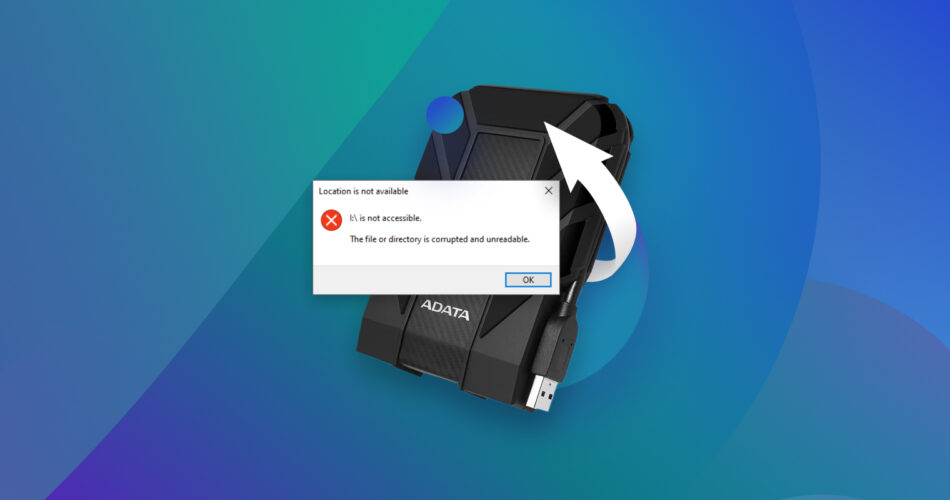
If your external drive slows down, files randomly disappear, or Windows keeps throwing errors when you try to access it, it may be corrupted. Even though the average life span of an external HDD is about three to five years, from what we’ve seen it doesn’t always mean the story ends there. Most of the time, you can repair a corrupted external hard drive and save your files, and today we’ll break down how to do it in plain language.
How External Drive Corruption Usually Shows Up
Before we jump into fixes, it’s worth pointing out how corruption usually shows up. A lot of people don’t realize the signs until the drive fully gives up, so spotting them early can make a difference. Sometimes the symptoms are obvious, other times they’re more subtle.
Here’s what you might see:
What happens on your external drive |
What it looks like in Windows |
It may throw errors like “You need to format the disk in drive” “parameter is incorrect” or not appear in File Explorer at all |
|
Certain folders go missing, or files vanish even though you never deleted them |
|
Disk Management displays the drive, but it has no file system or capacity reading |
|
Frequent freezes or slowdowns |
Opening folders takes forever, or copying files hangs indefinitely |
Strange noises or interruptions |
Clicking, buzzing, or the drive disconnecting randomly during use may indicate something more serious going on inside the disk. That usually points to mechanical trouble rather than a simple file system error. If you run into those noises, stop using the drive right away. |
We will start with data recovery from external drives. If the data matters to you, don’t skip this part – your files should come first. Many of the fixes you’ll try later may lead to some data loss. On the other hand, if the drive doesn’t hold anything important, you can go straight to the repair steps.
How to Recover Data From a Corrupted External Hard Disk
To recover files from a corrupted external hard drive, you’ll need to use third-party data recovery apps. But, you can only do this if the corrupted external hard drive is detected by your PC. To check this, press Windows Key + R, type diskmgmt.msc, and press Enter. In the Disk Management window, see if your external hard drive is visible.
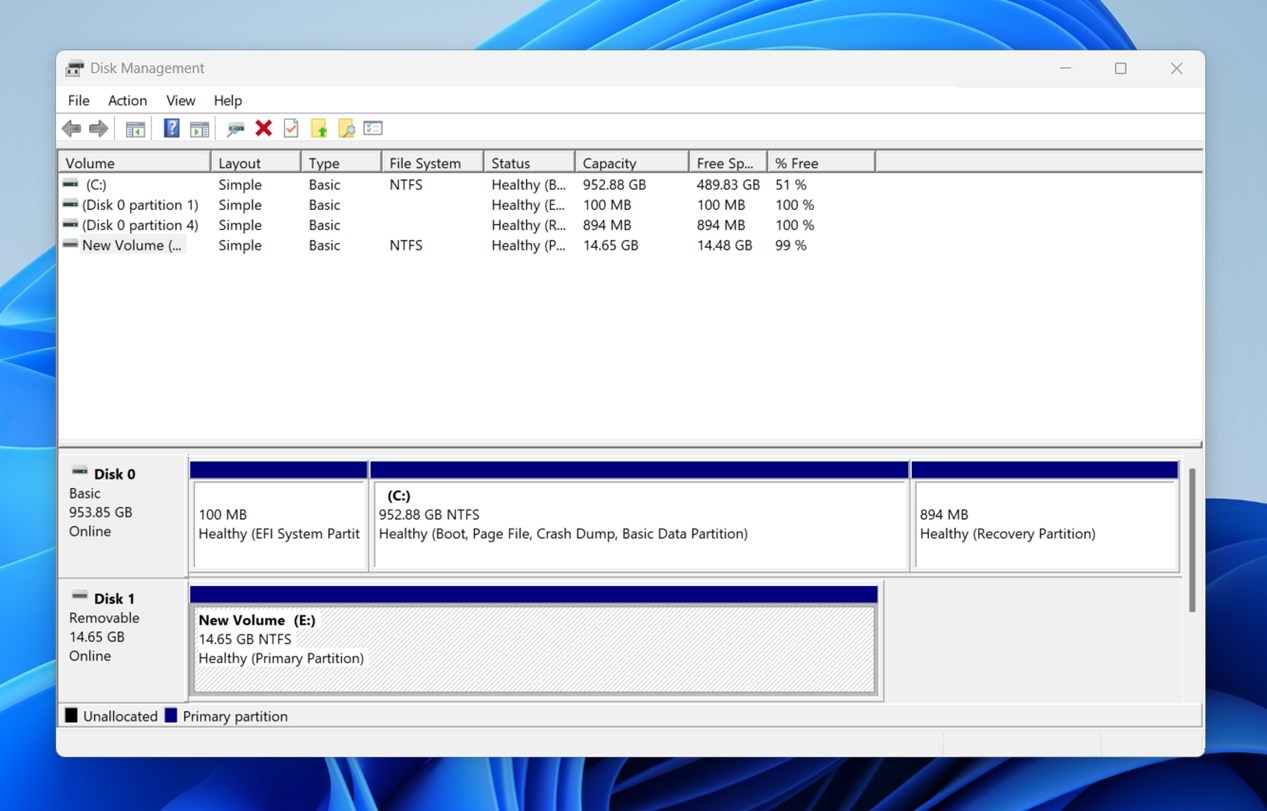
If it’s visible and doesn’t have the No Media label, you can proceed with the data recovery process. If not, it’s likely that your drive is physically damaged or has severe logical corruption to the extent that it needs to be examined by a professional data recovery service.
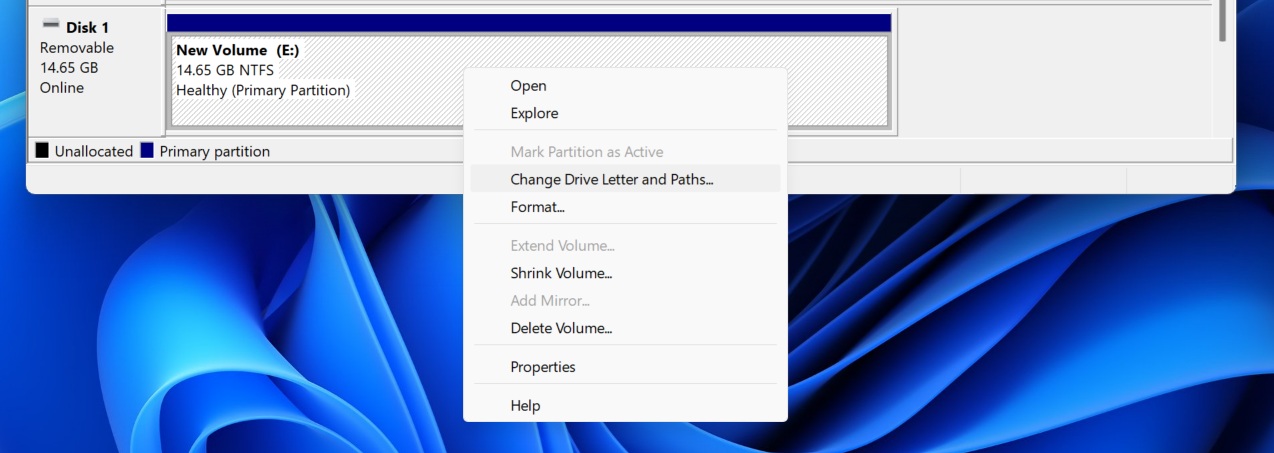
Note: Check if it has a drive letter assigned. Sometimes, that’s all it takes; no letter means Windows won’t show it. Right-click the partition and choose “Change Drive Letter and Paths” to assign one.
When we talk about corrupted external hard drive recovery, we mean a two-step process:
- First, you create a disk image of the corrupted external hard drive. This is important, as direct scans are stressful to the drive and may worsen the data loss. A disk image is essentially a virtual copy of your entire drive, and it can be scanned without risking your physical drive.
- Second, you scan that image with recovery software to pull your files back.
A quick Google search will reveal that numerous data recovery programs claim to recover your data. You’re spoiled for choice. Why recovery software in the first place? Because when a file system is damaged, there’s virtually no other practical way to extract your data. More importantly, these tools work. Based on our own data loss survey, nearly 80% of users who tried reputable recovery software were able to restore their data successfully.
Due to its proven safety and the added convenience of being able to create, mount, and scan disk images within one interface, we picked Disk Drill for this guide demo. It supports nearly all the major file systems you’re likely to encounter, including NTFS and exFAT, and has a reliable recovery record across all kinds of scenarios.
Disk Drill is compatible with all major portable hard drives from manufacturers such as Western Digital (WD), Seagate, Toshiba, LaCie, and more.
Let’s see how you can restore data from a corrupted external HDD:
Step 1: Create a Disk Image of the External Hard Drive
- Download Disk Drill and install it.
- Connect the corrupted external HDD to your PC.
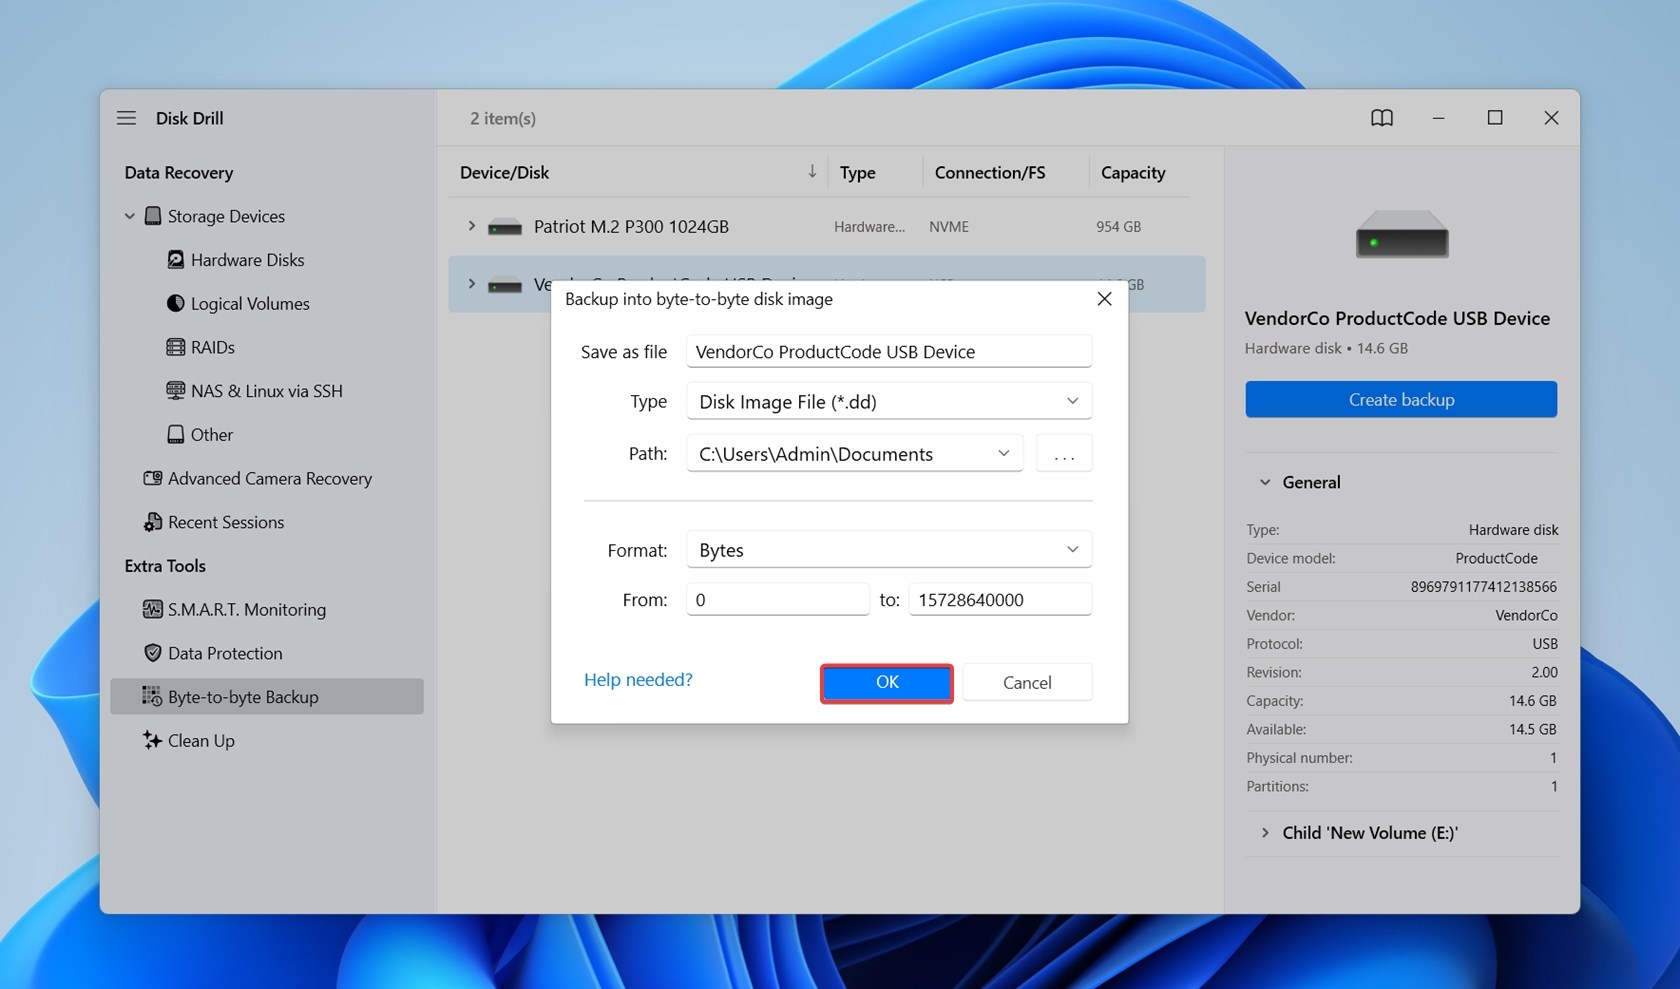
- Open Disk Drill and click on the Byte-to-byte Backup option under Extra Tools.
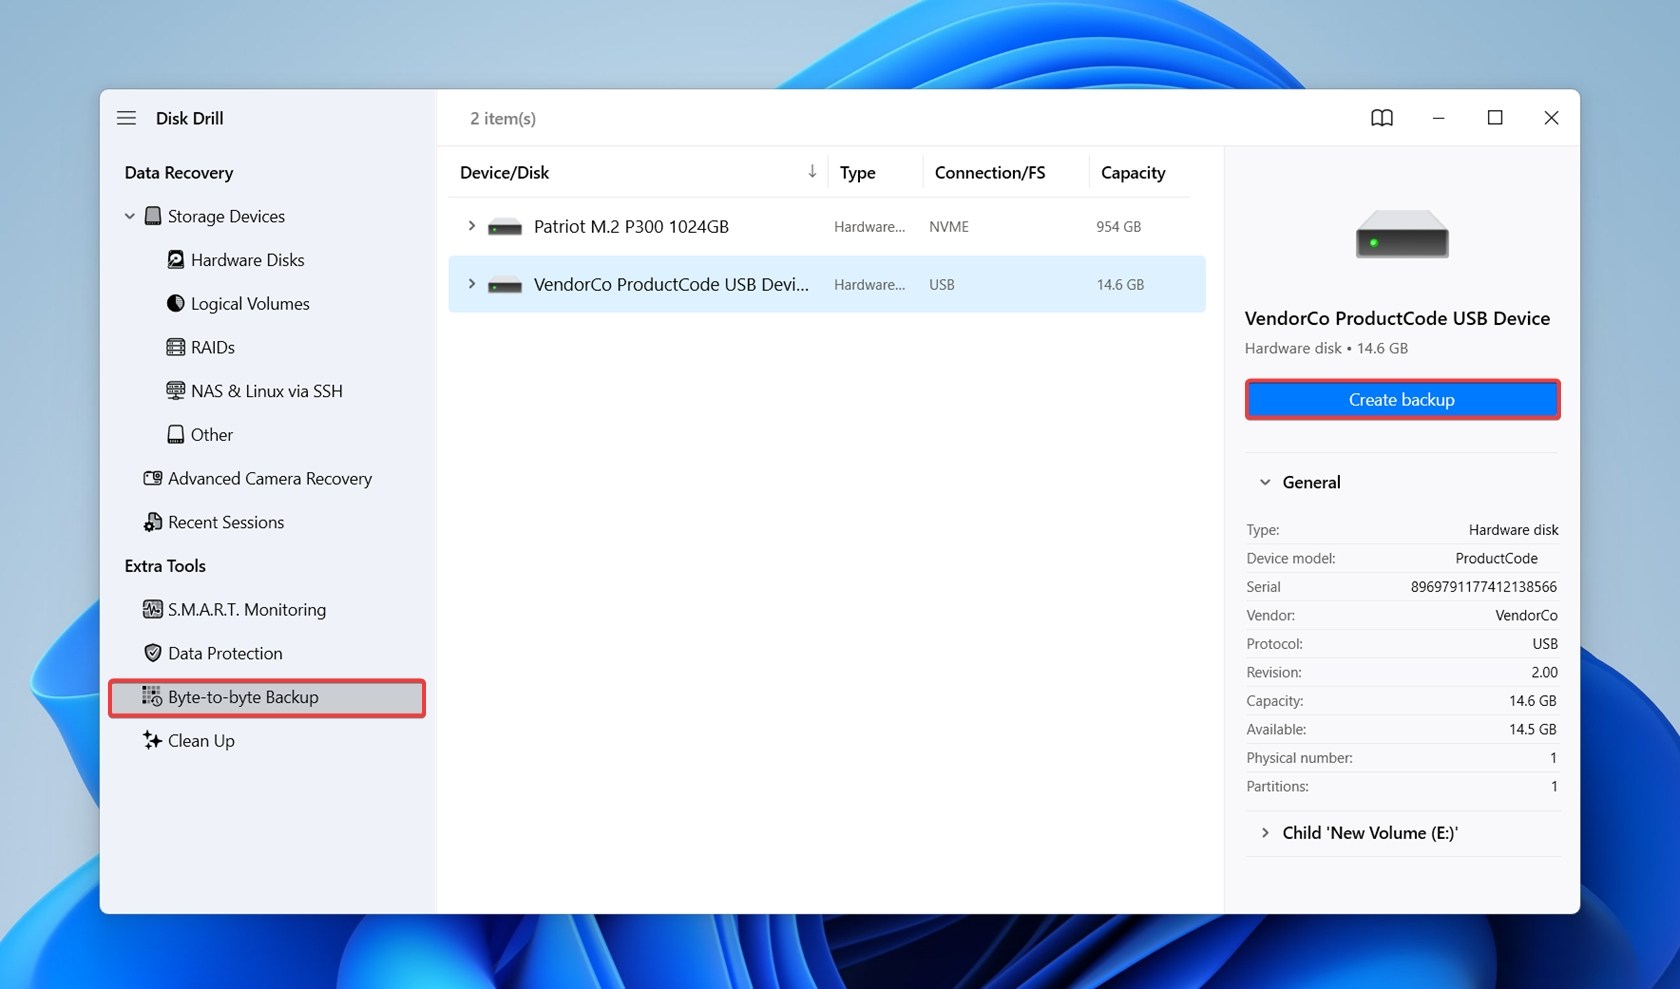
- Select the corrupted external HDD from the device list and click on Create backup.
- Choose a save destination for the disk image. Remember, it must have enough free space that is equal to or more than the entire storage size of your external HDD. Click OK.
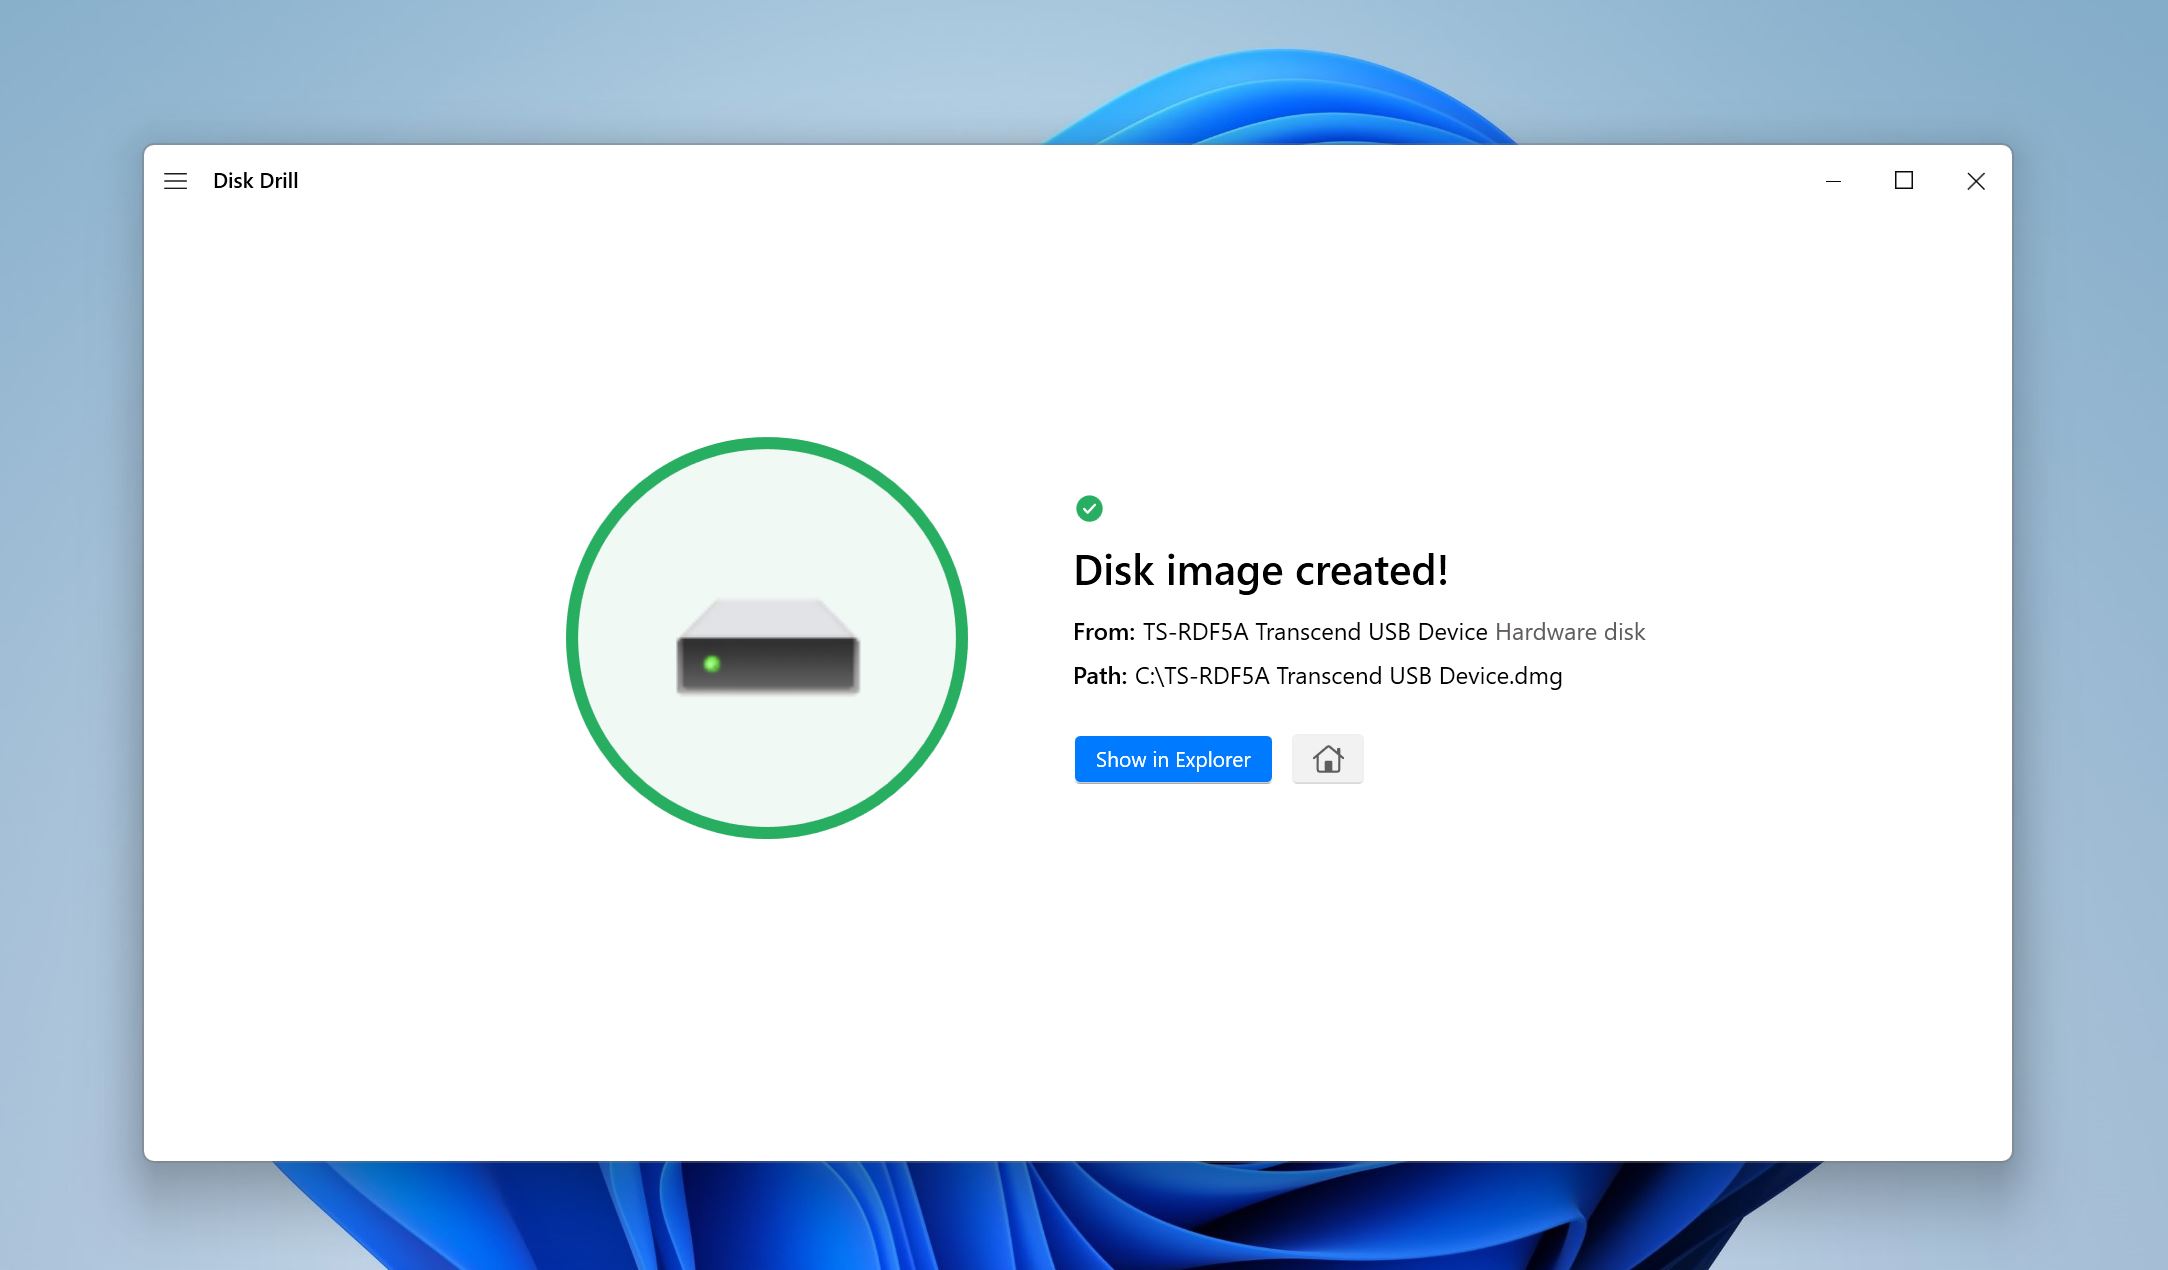
- Disk Drill will create the disk image. This may take a while, depending on your external drive’s storage size and your PC’s specs.
Step 2: Scan the Disk Image of the External Hard Drive
Now that your image file is ready, you can scan it the same way you would scan a regular disk.
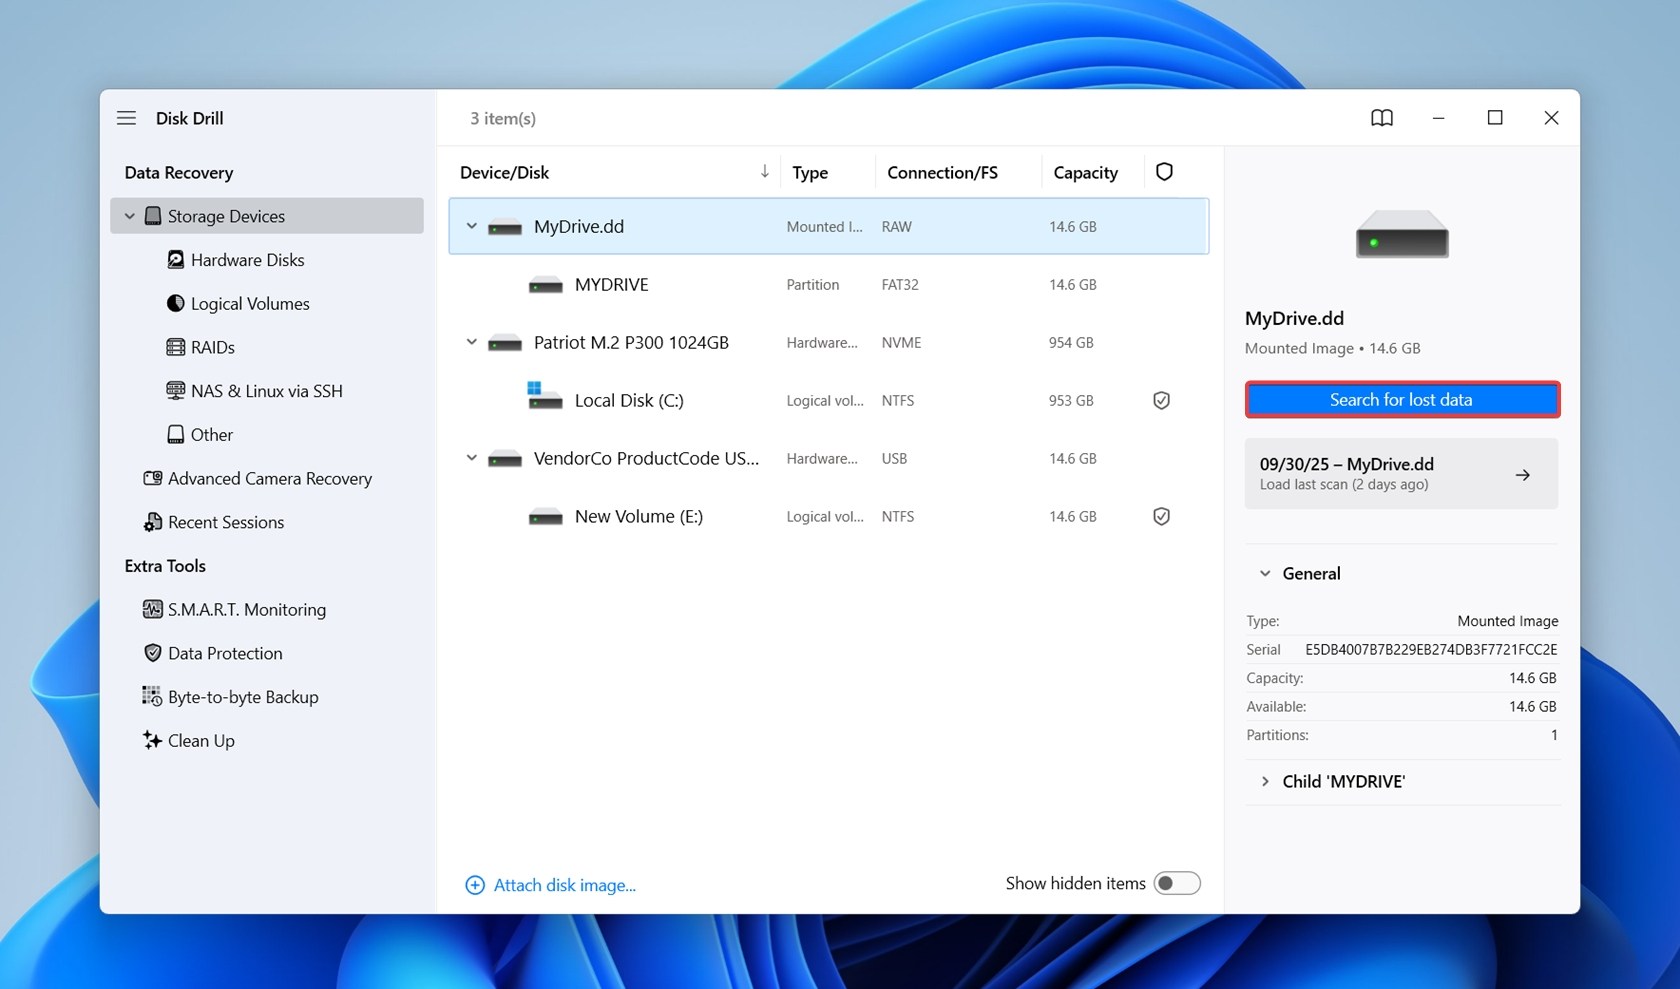
- Open Disk Drill, and make sure you’re on the Storage Devices screen.
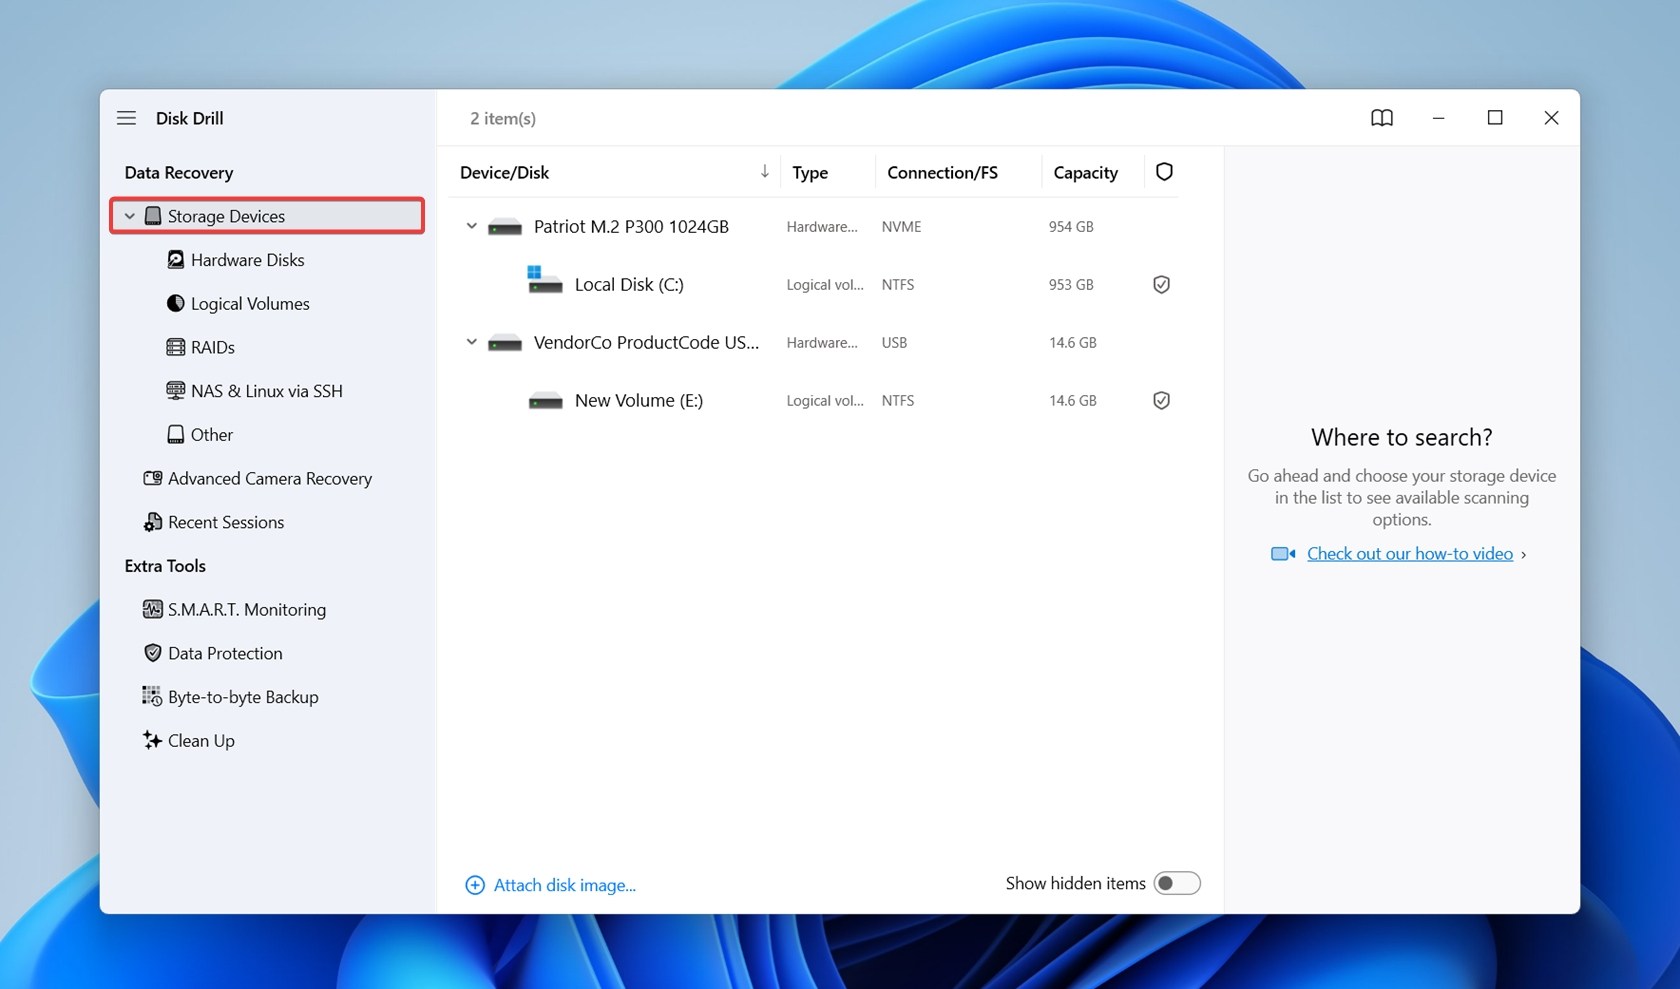
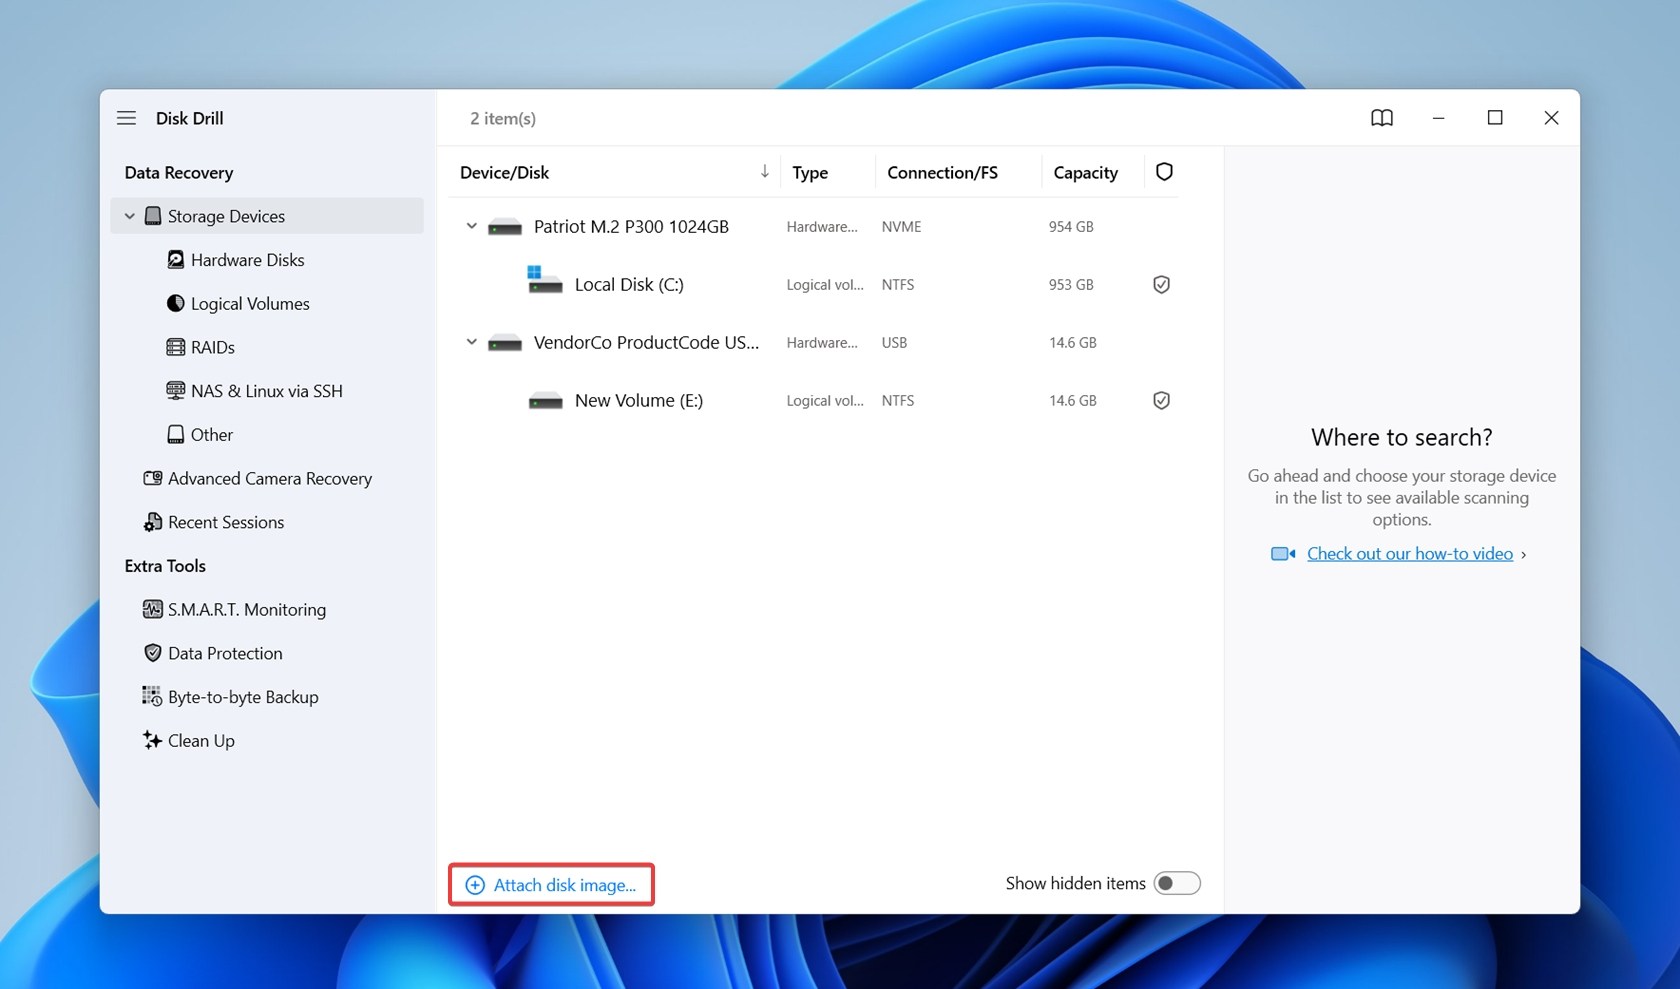
- Click on the Attach disk image option. Browse for the disk image you’d created earlier and double-click on it. It’ll be mounted to Disk Drill and show up as a storage drive.
- Select your external HDD’s disk image and click Search for lost data.
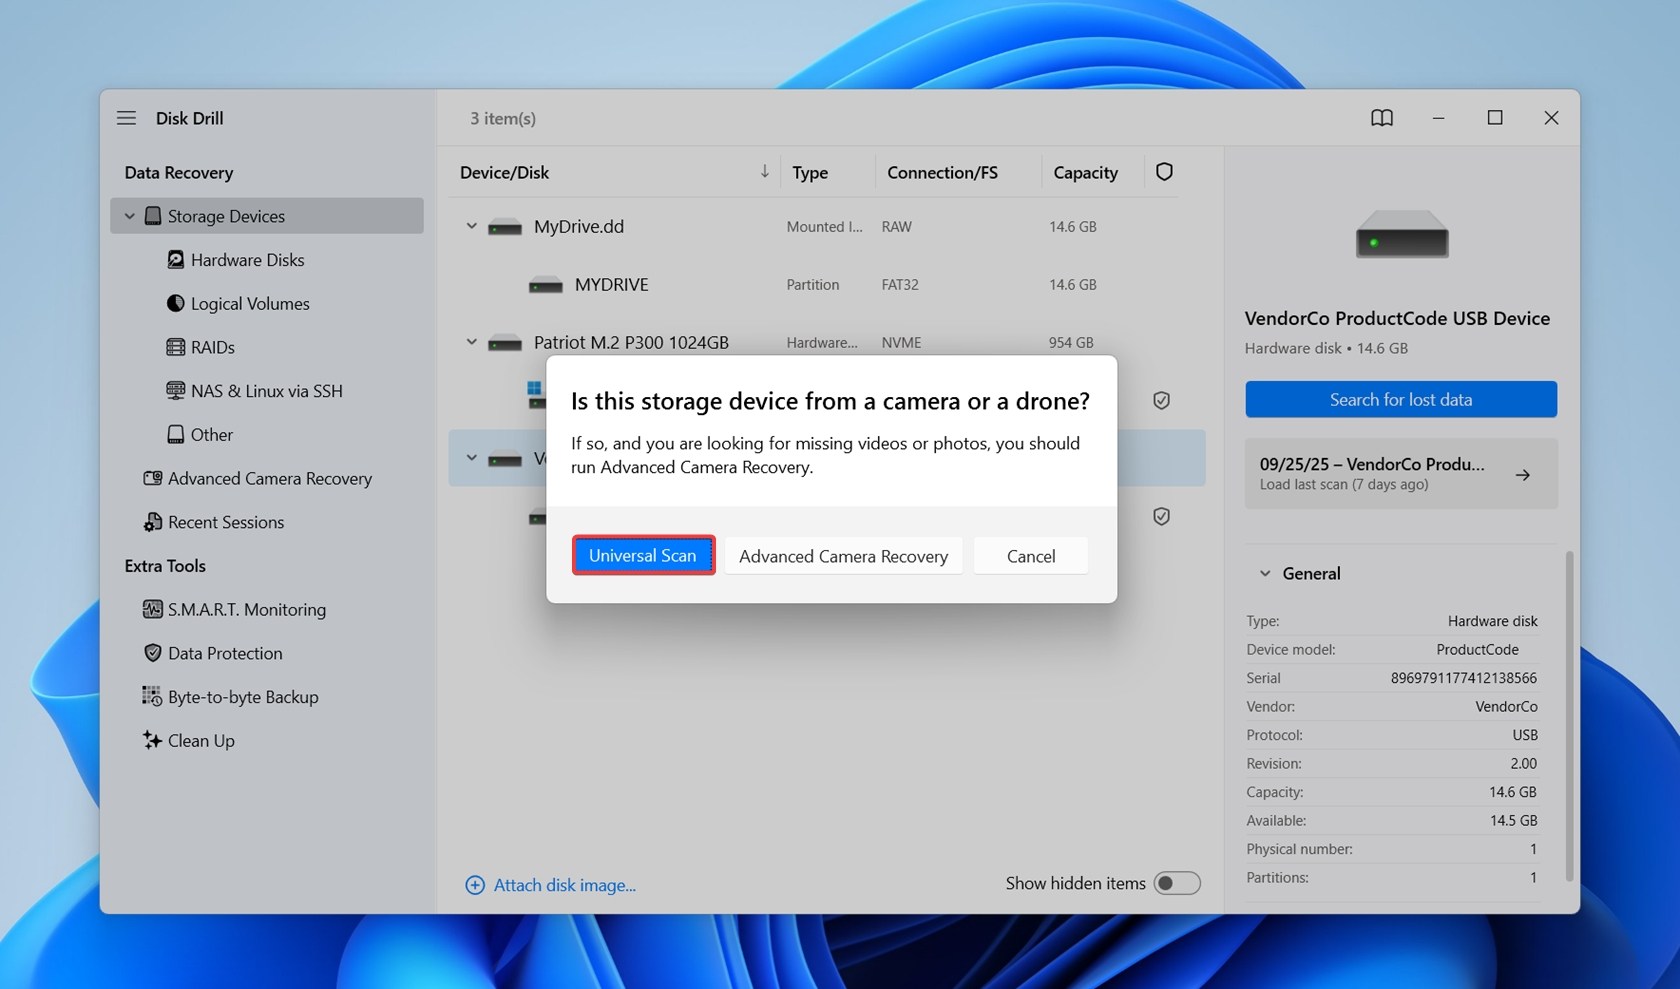
- If the app asks you to choose a scan mode, go with Universal Scan.
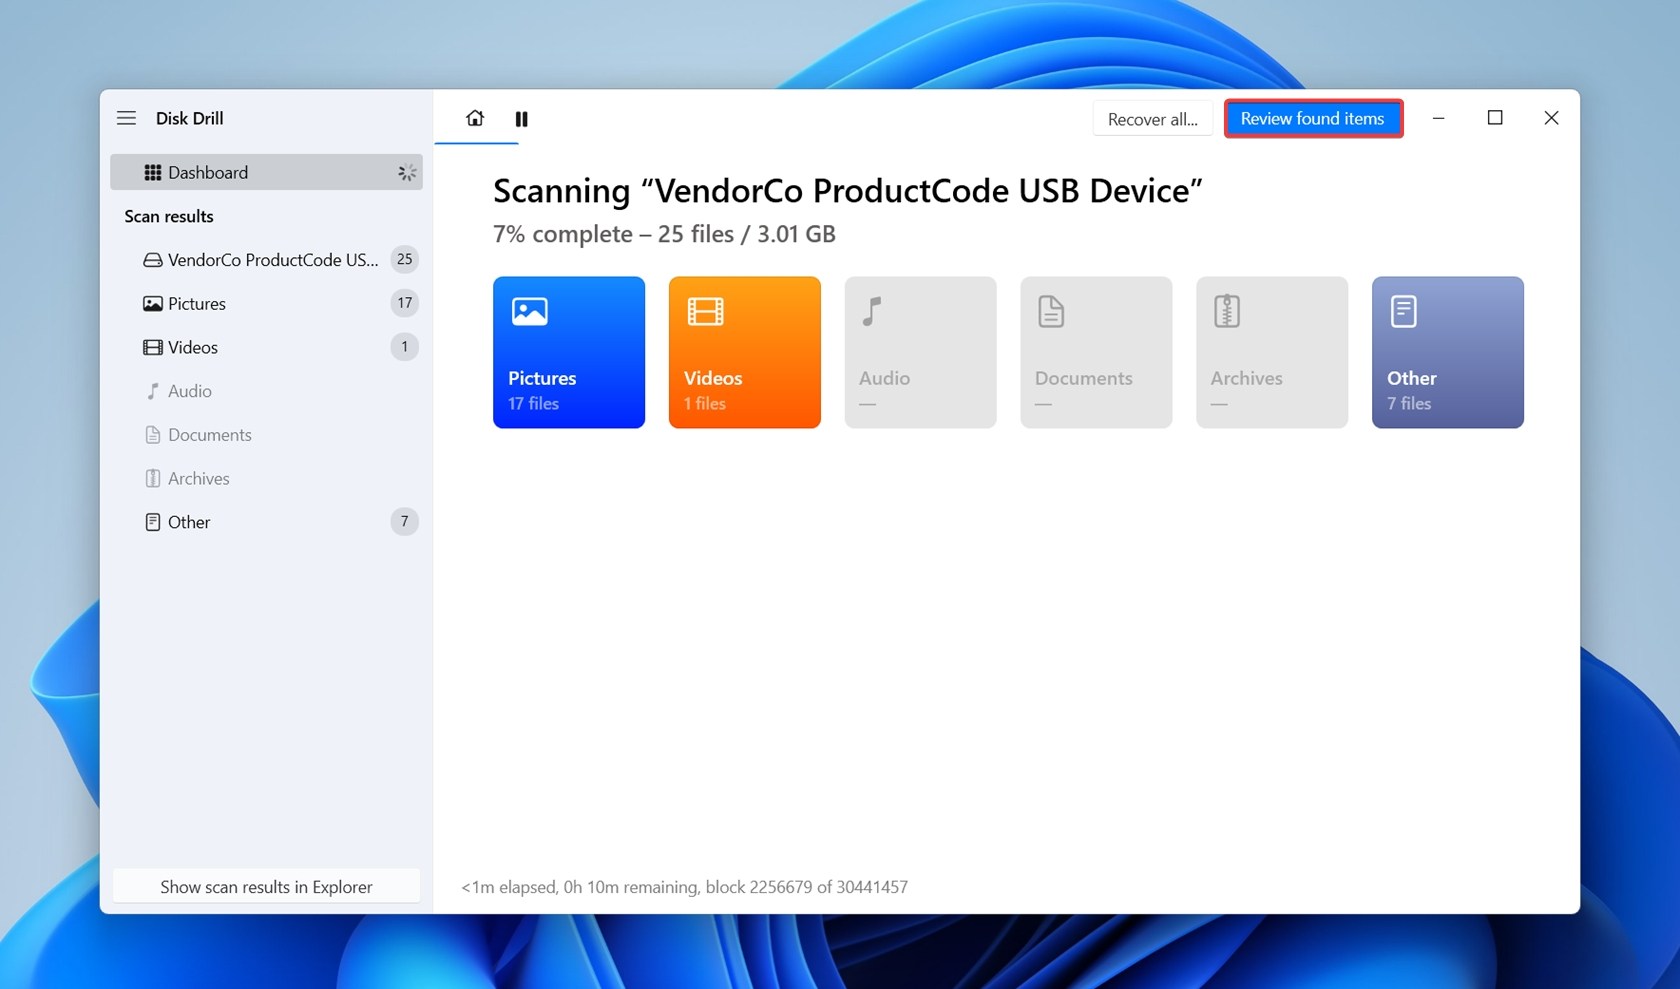
- Click Review found items to view the recoverable files on your drive. You can directly click on the file type you wish to restore, such as Pictures, Video, Audio, Documents, Archives, and Other.
- Expand the Existing tab to view files that are present on the external HDD. To view deleted files, expand the Deleted or lost, and Reconstructed sections. Then use the checkboxes to select the desired files and folders. Disk Drill will display a preview of the currently selected file.
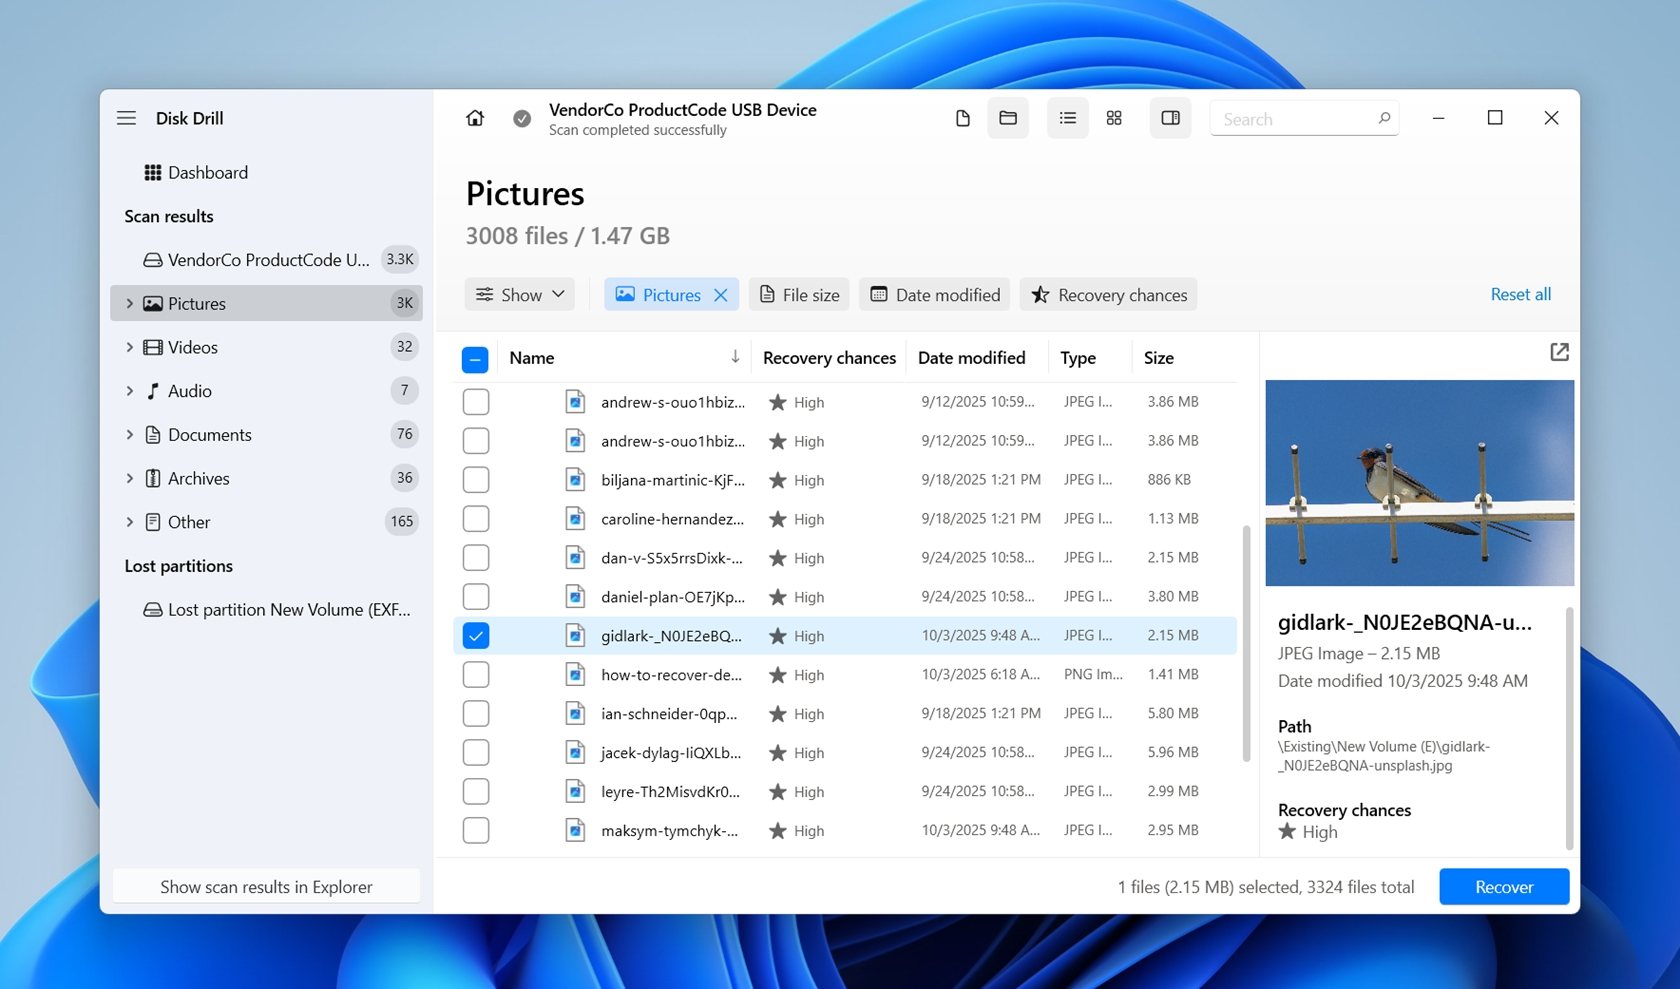 If you don’t see the preview on the right, click the little eye icon next to the file name – it’ll pop up instantly. Not only is this convenient for sorting through your results, but it also gives you 100% certainty that the file is fine and can be recovered fully intact. If it plays, opens, or looks right in preview, you’re good to go.
 - Click Recover once your selection is complete.
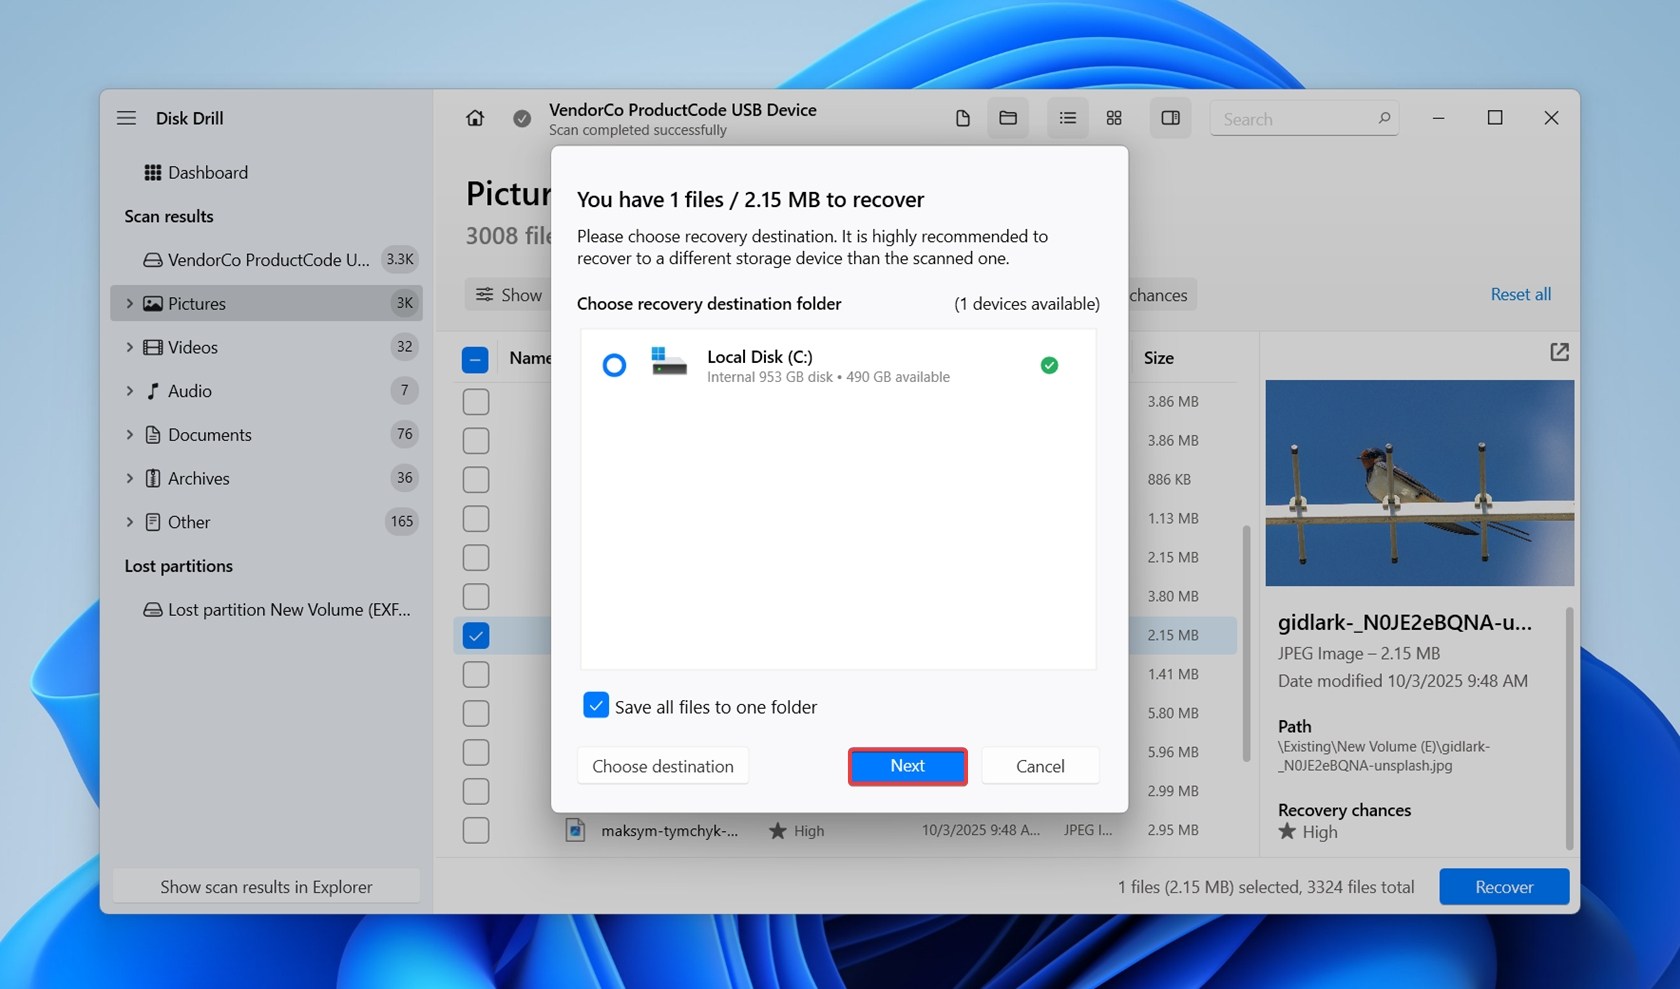
- Choose a recovery destination for your files (make sure it’s a different drive) and click Next.
- Disk Drill will recover your files. You can retrieve up to 100 MB of data for free with the trial version, which is usually enough to test how well it works, or even recover your most important files, like work documents, photos, or small videos without paying.
To know more about Disk Drill–its features, how it compares to other programs, and its pricing, read our in-depth review of the tool.
By the way, since you’re already in Disk Drill, take a second to check the S.M.A.R.T. monitoring feature. What it does is give you a real-time look at your drive’s health, things like temperature, error rates, bad sectors. It’s a quick way to catch warning signs before things get worse.
We’ll talk about S.M.A.R.T. in more detail a bit later, but it’s worth glancing at now while you have the app open.
How to Fix a Corrupted External Hard Drive
If your files still aren’t recovered and they matter to you, pause here and jump back to the recovery section. Once your data is safe, come back and continue with the repair steps.
In most cases, you can fix a corrupted hard drive without formatting. The only exception is extensive damage to the drive’s file system.
We’ll show you 4 methods to fix a corrupted external hard drive. Some of them are complex, so be sure to follow the instructions carefully.
By the way, if you’re curious about file system corruption and want to know more about it, we’ve got a great thread in our community where users talk about their own cases.
Method 1: Inspect the Drive
If you noticed the corruption on your drive after it was dropped or suffered any other form of physical impact, you need to perform a physical examination of the drive.
Here are two things you can do:
- 🔉 Check for any clicking, whirring, or beeping sounds from the drive. If you notice these sounds, your drive’s internal components are damaged. Stop using the drive and contact a professional data recovery service.
- 🔌 Check the cable and the connectors on your hard drive. If you see any sort of damage, such as a stretched wire or a broken port, you’ll need to dismantle the external hard drive and connect it to your PC using a SATA cable. Only do this, if you’re comfortable working with PC hardware. Otherwise, use a professional data recovery service. Remember, you can lose your data if you mishandle the drive physically and damage its platter in any way.
By the way, if you’re working with a PC, try to connect the external drive directly to one of the motherboard’s rear USB ports, not the front panel or a hub. Rear ports are built into the board itself, so they’re more stable and supply better power. We often see external drives that fail to mount, working just fine once they’re plugged into the back.
Method 2: Repair the Corrupted Partition on External Hard Drive
If you have trouble accessing your external hard disk’s partition, and you get errors such as the “access is denied” message, the partition could be corrupt. It may not show up in File Explorer as well. Additionally, a corrupt boot sector could be causing your drive or a specific partition to show up as RAW on your PC.
Fortunately, there’s a solid open-source tool you can use to fix this: TestDisk. It’s free, widely trusted, and we’ve used it more times than we can count. It’s not perfect, and it doesn’t work in every single case, but we’ve seen it recover partitions on external hard drives with a pretty high success rate.
The only drawback is that it doesn’t have a GUI, so navigating within the program is a little difficult for new users.
We’ll show you two ways you can use TestDisk to recover a corrupted external hard drive:
Option A: Use TestDisk to Repair a Corrupt Partition
First, you can try to restore the lost partition – it may have been removed or corrupted in a way that makes the drive unreadable but still recoverable. Here’s what to do:
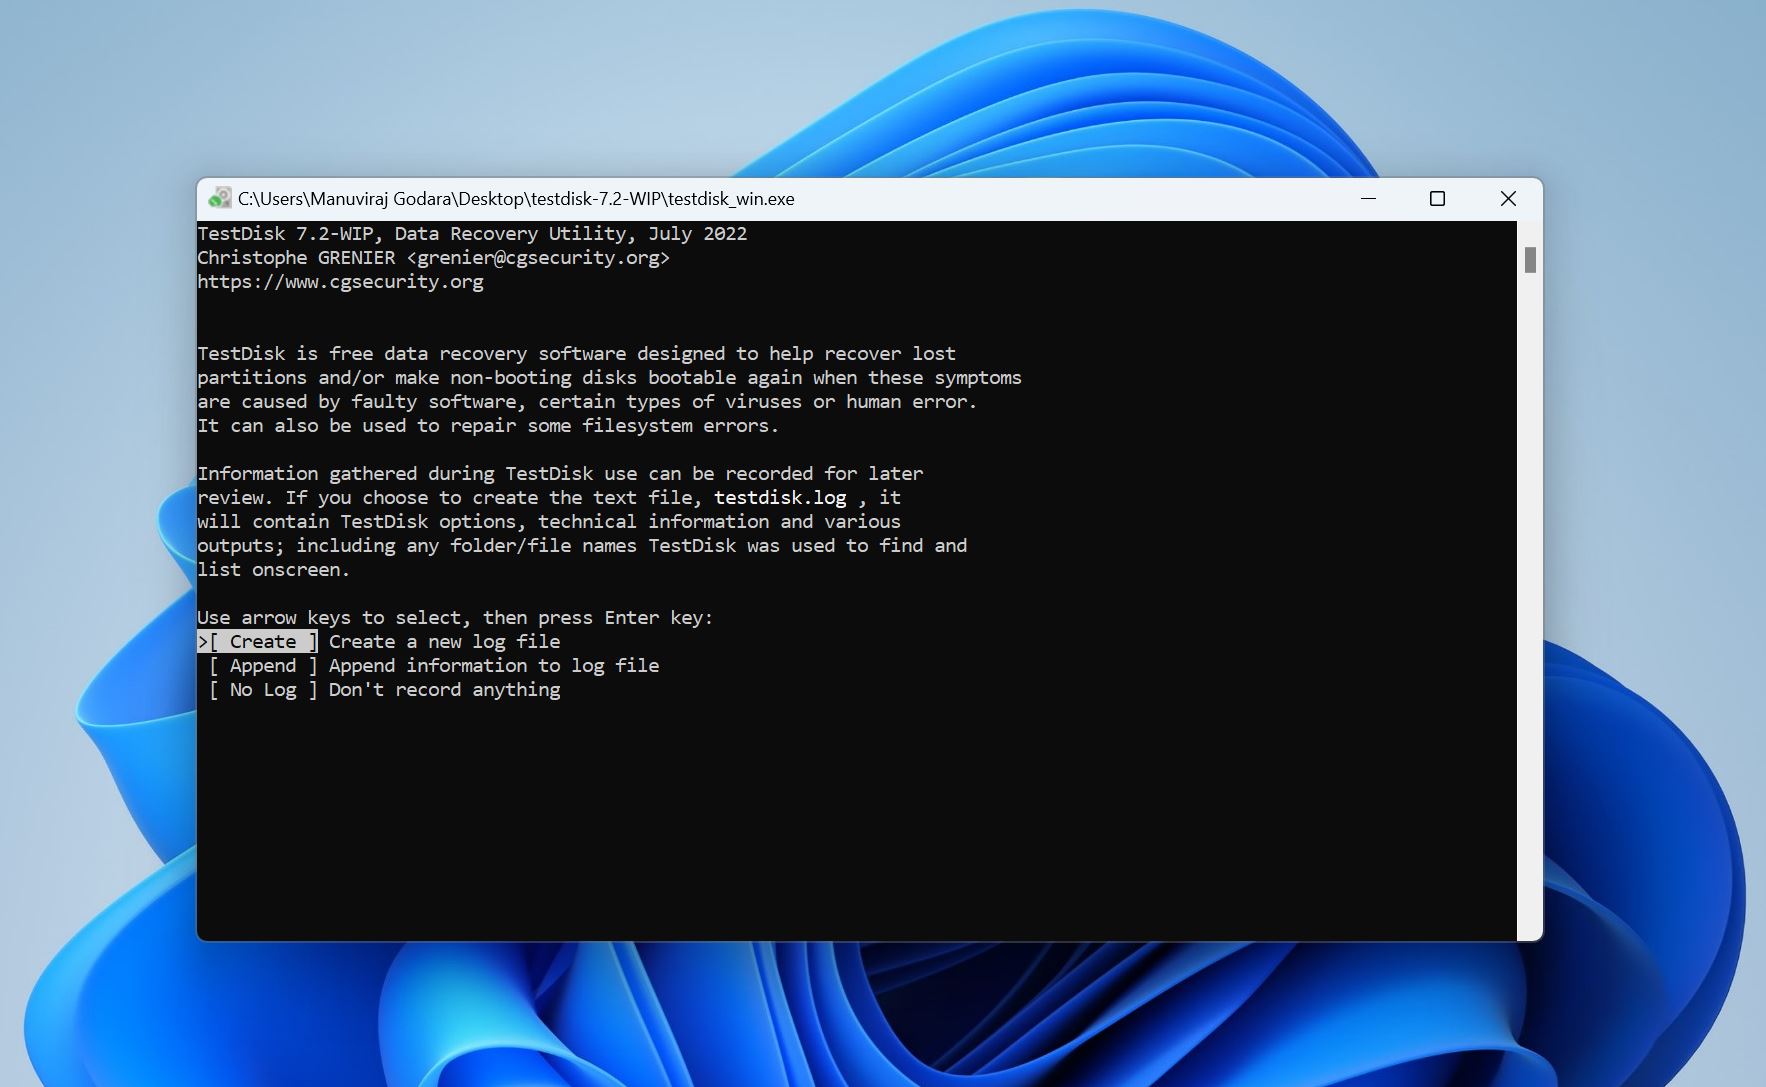
- Download TestDisk. Extract the contents of the archive and run the testdisk_win.exe file.
- Choose whether you want to create a log or not. Use the arrow keys to navigate and the Enter key to confirm.
- Select the corrupted external hard disk and press Enter to confirm.
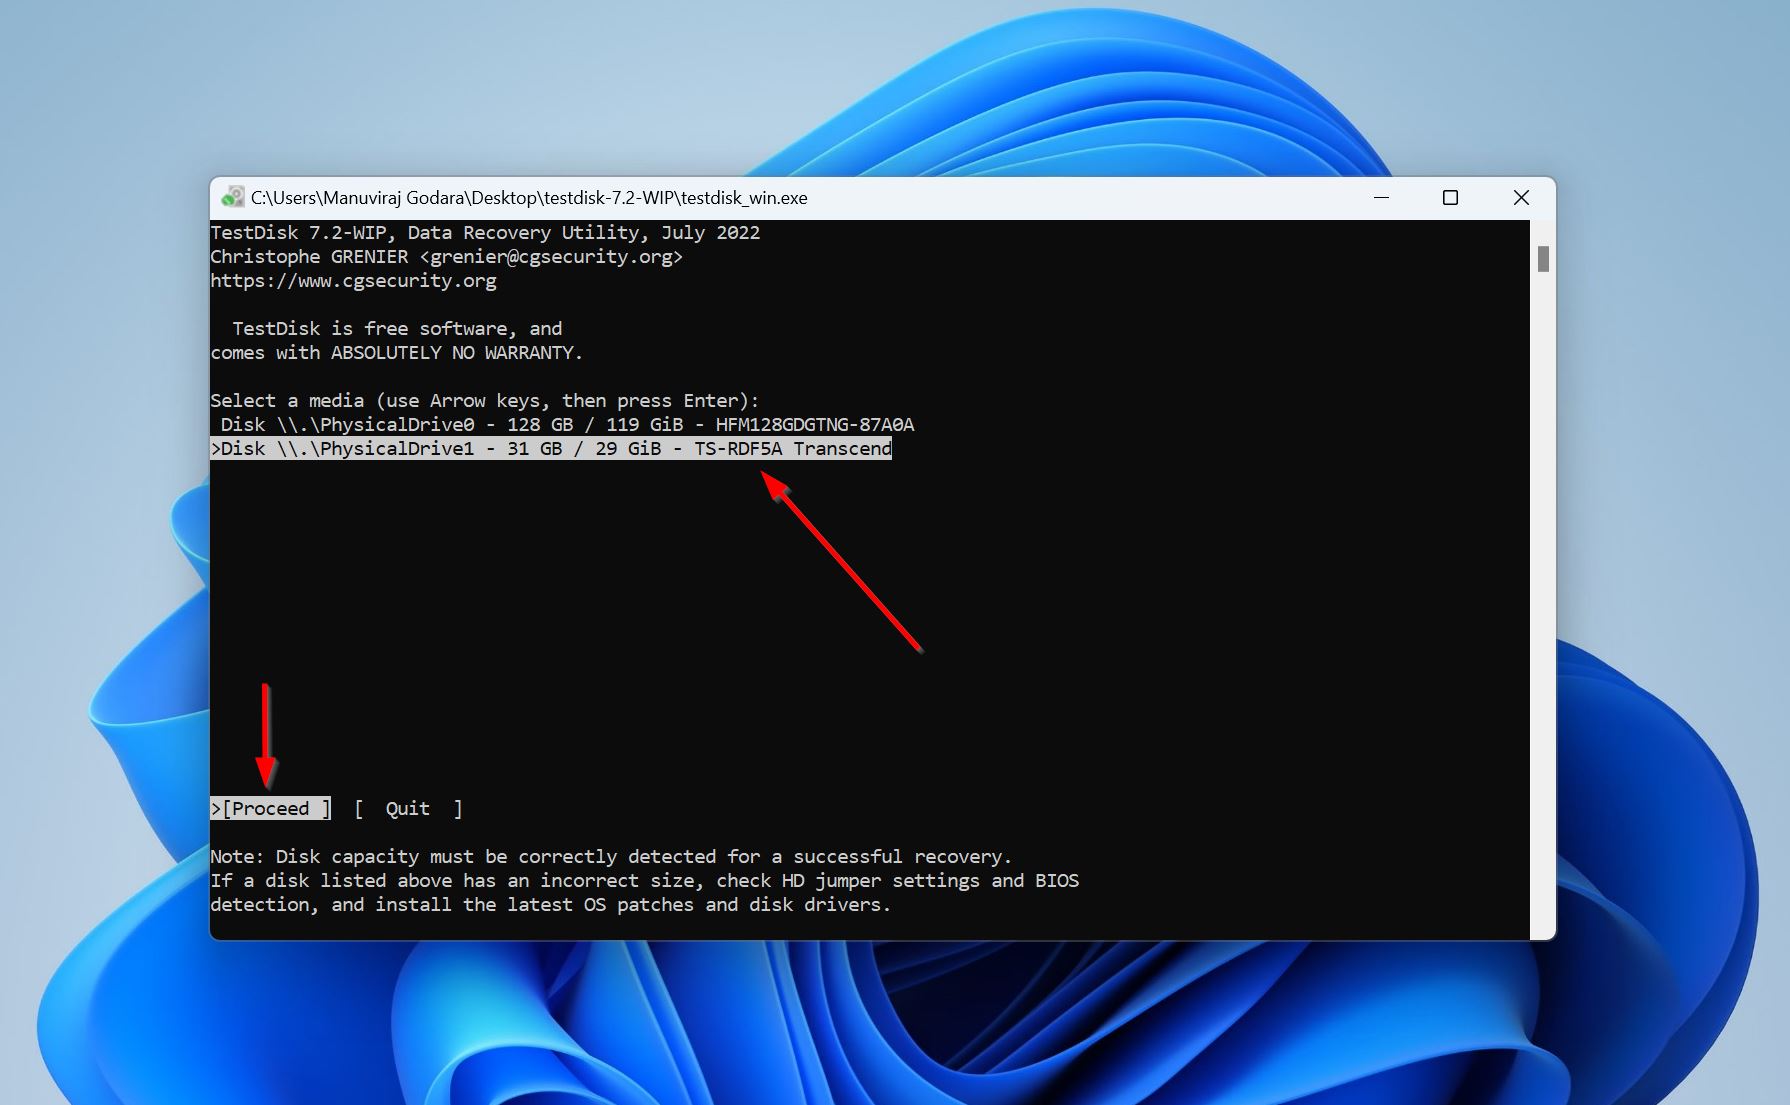
- Select the partition table type. It’s recommended you simply press Enter on this screen, because TestDisk automatically detects the partition table type.

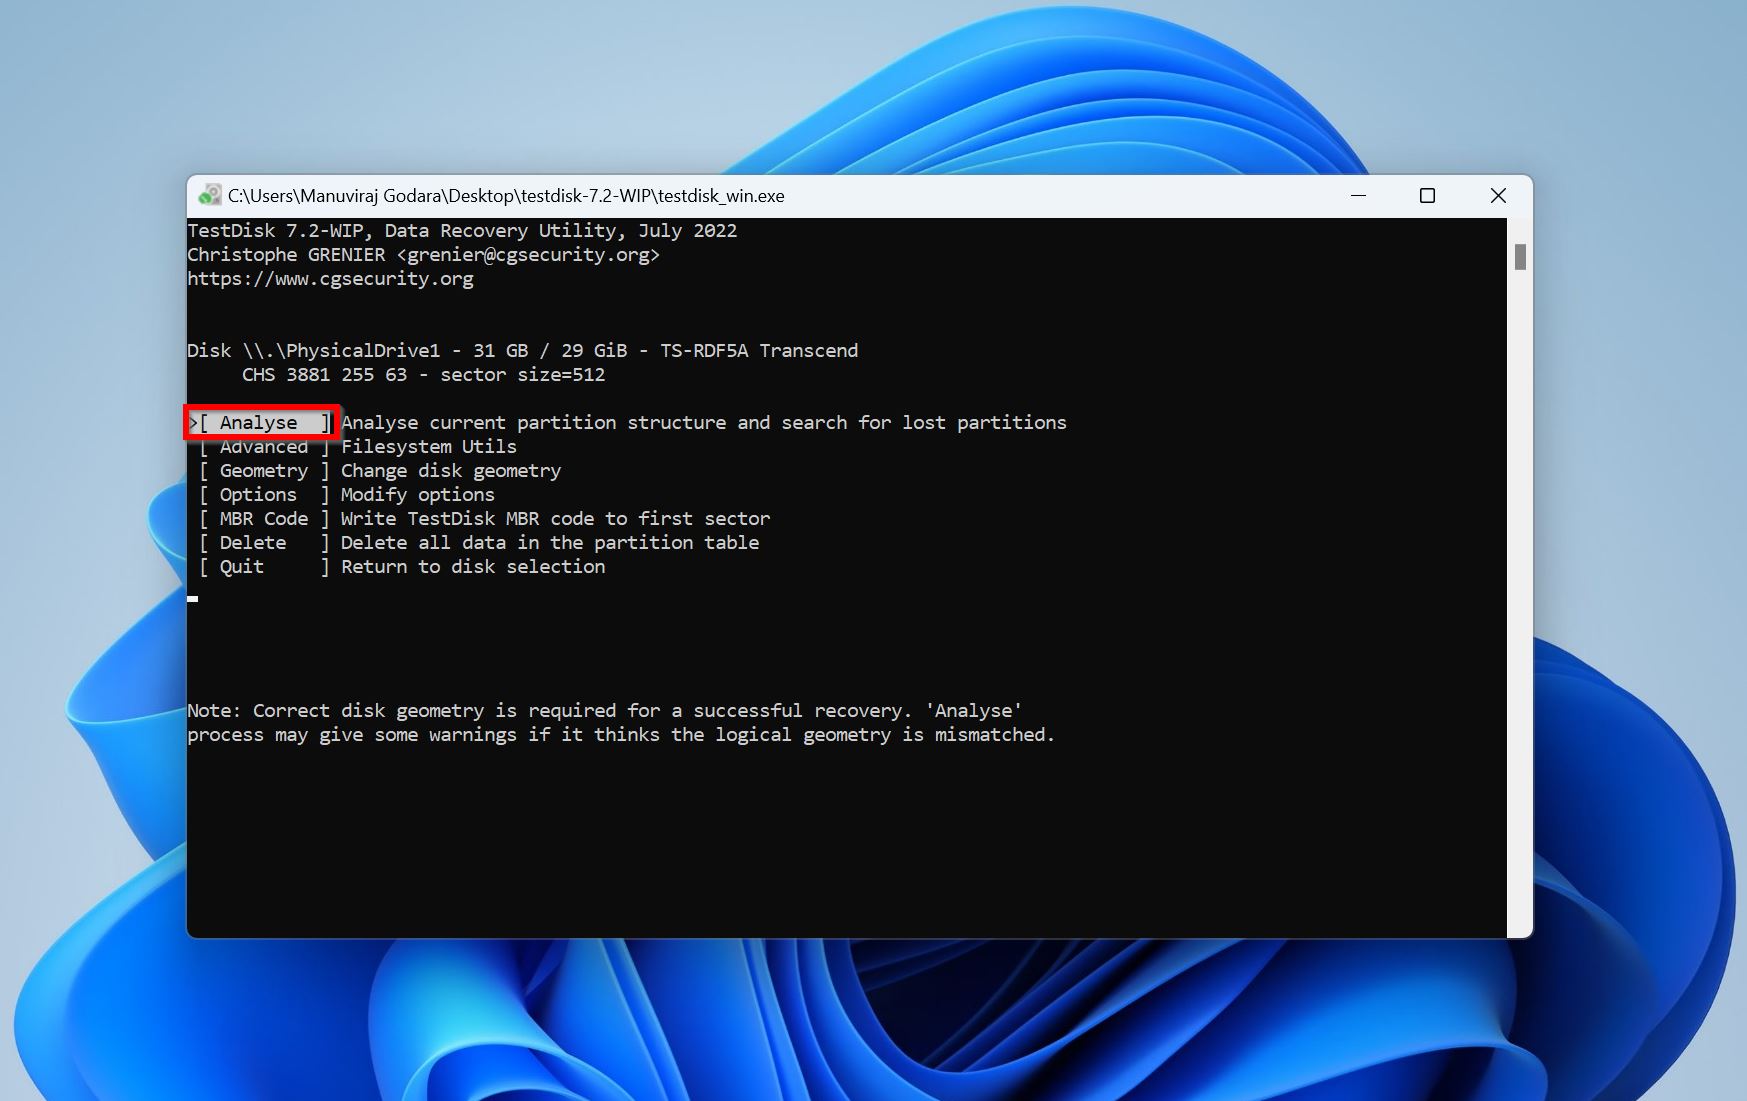
- Select Analyse and press Enter.
- Select Quick Search and press Enter.

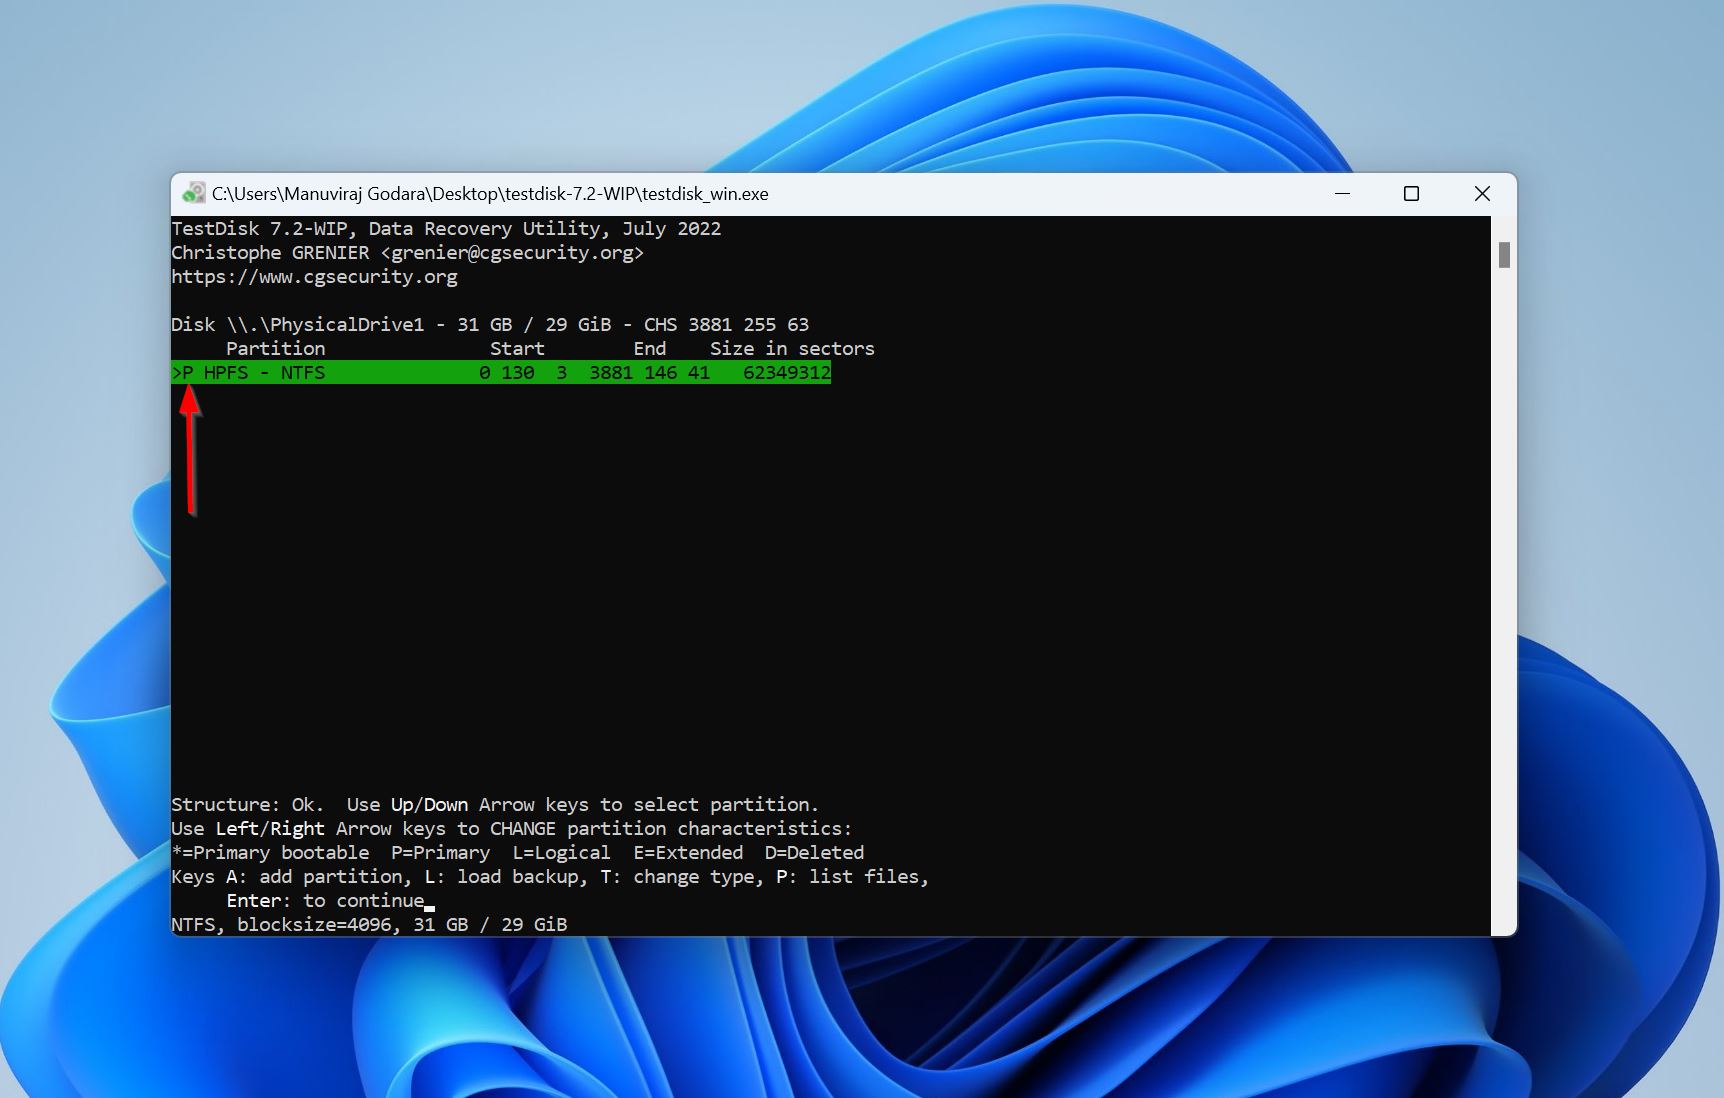
- Use the left and right arrow keys to cycle through the partition type. Make sure there is a P right at the beginning, as shown in the image below. Press Enter.
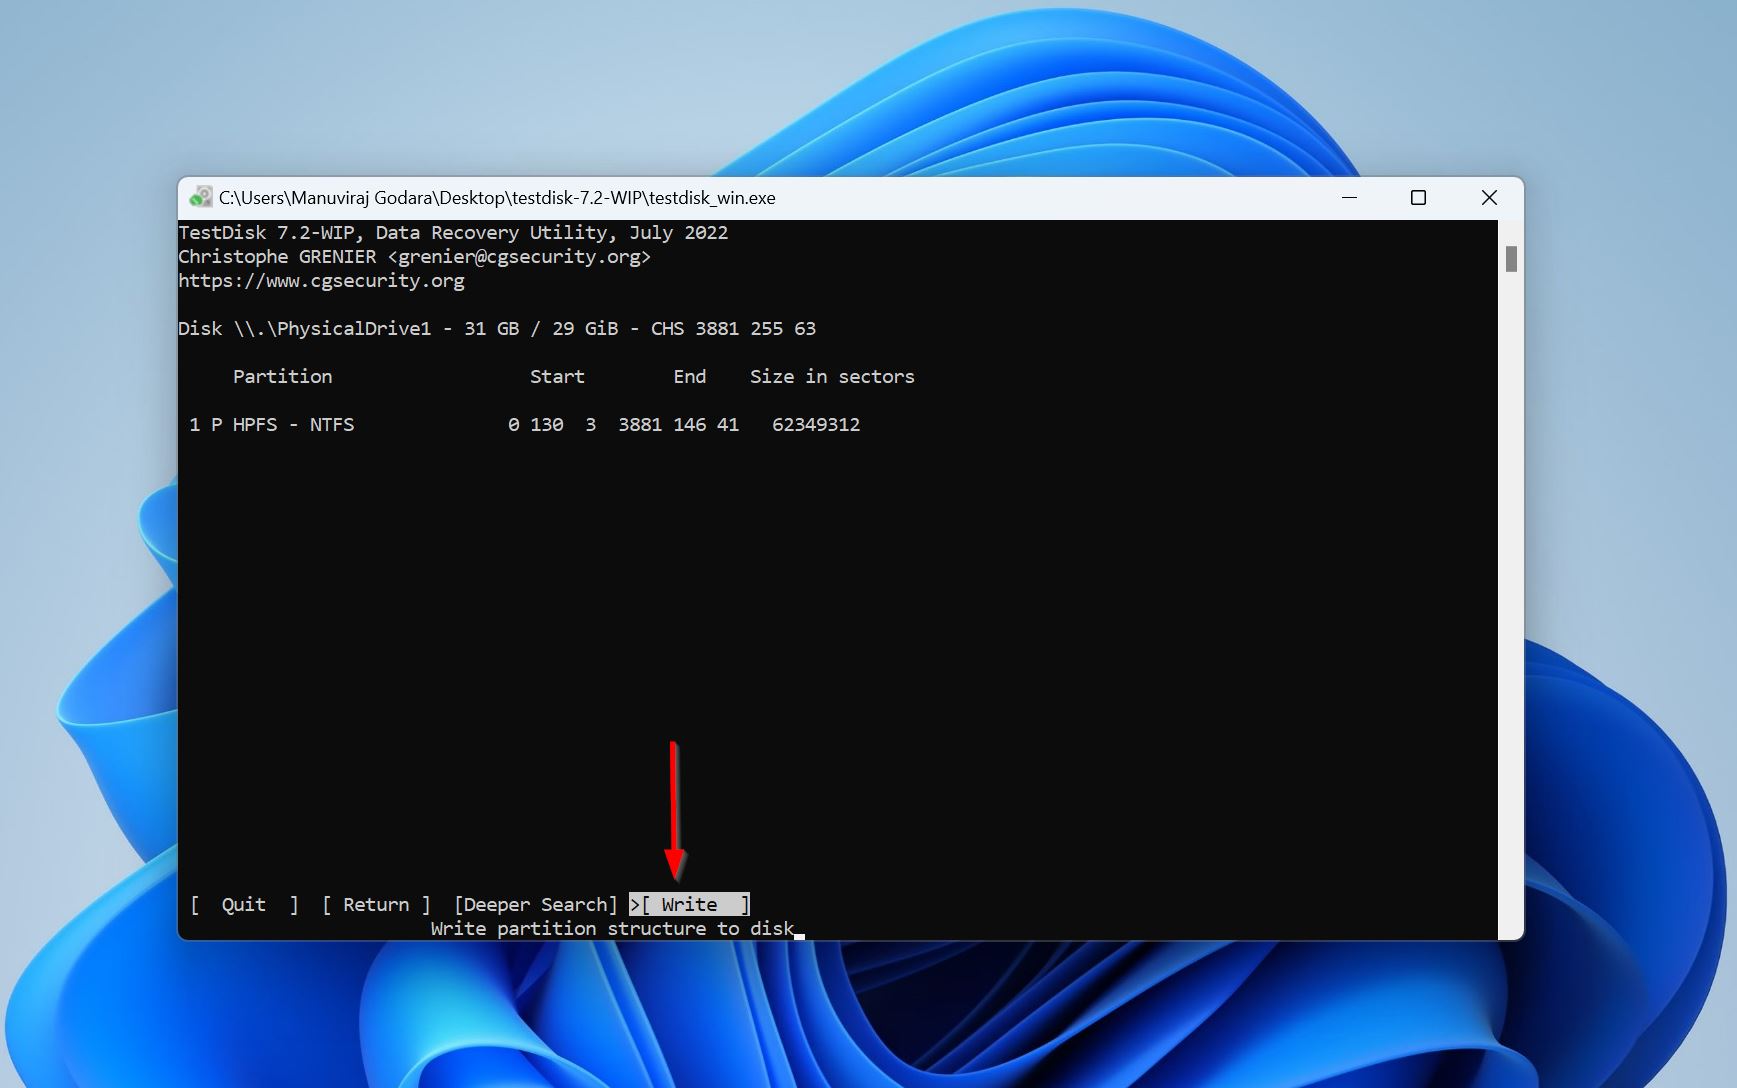
- Highlight the Write option, and press Enter.
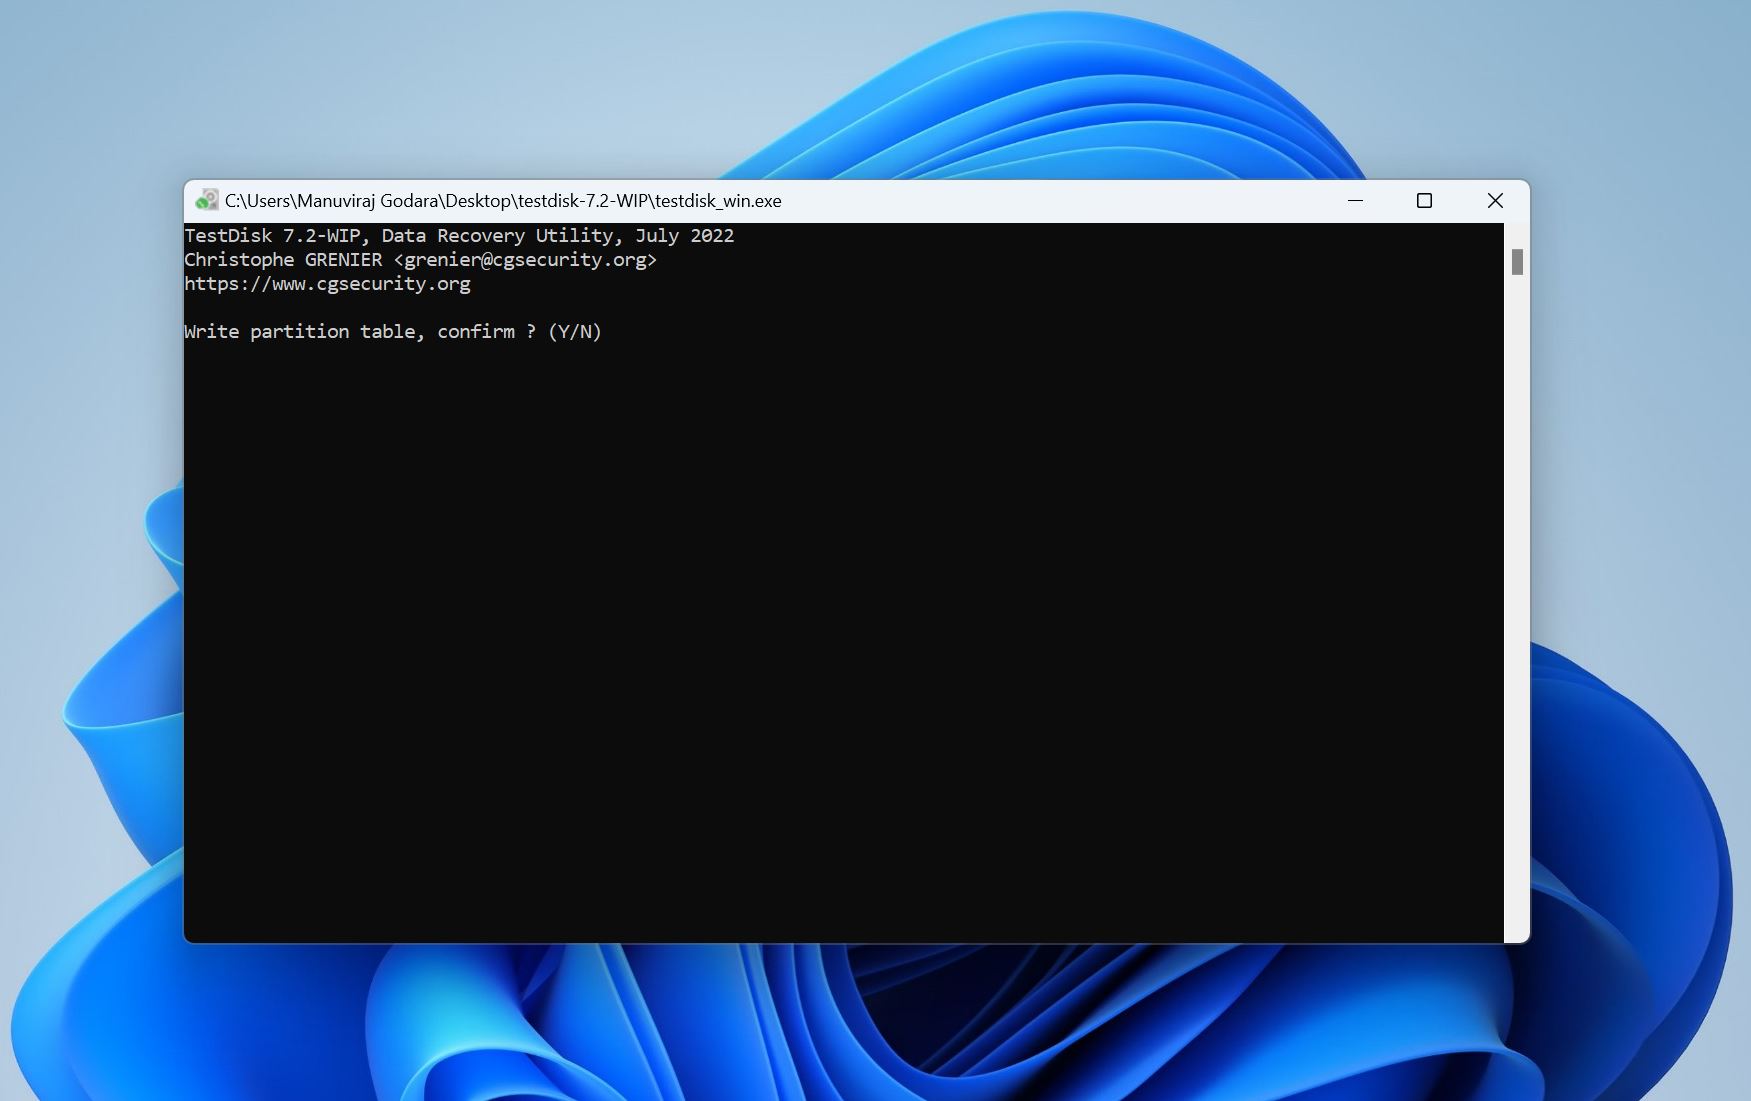
- Press Y on the confirmation prompt.
- TestDisk will recover the corrupted partition.
Option B: Repair the Corrupted Hard Drive’s Boot Sector Using TestDisk
Another way you can use TestDisk is to repair the boot sector on your external hard drive.
The boot sector is a tiny section at the very beginning of a partition that tells the system how to read the file system. If it gets corrupted, Windows can’t figure out what to do with the data. But the files are often still there; it’s just that the system doesn’t know how to access them. Here’s what to do:
- Open TestDisk and choose whether you want to create a log file or not.
- Select your drive and press Enter.
- Press Enter on the partition table selection screen.
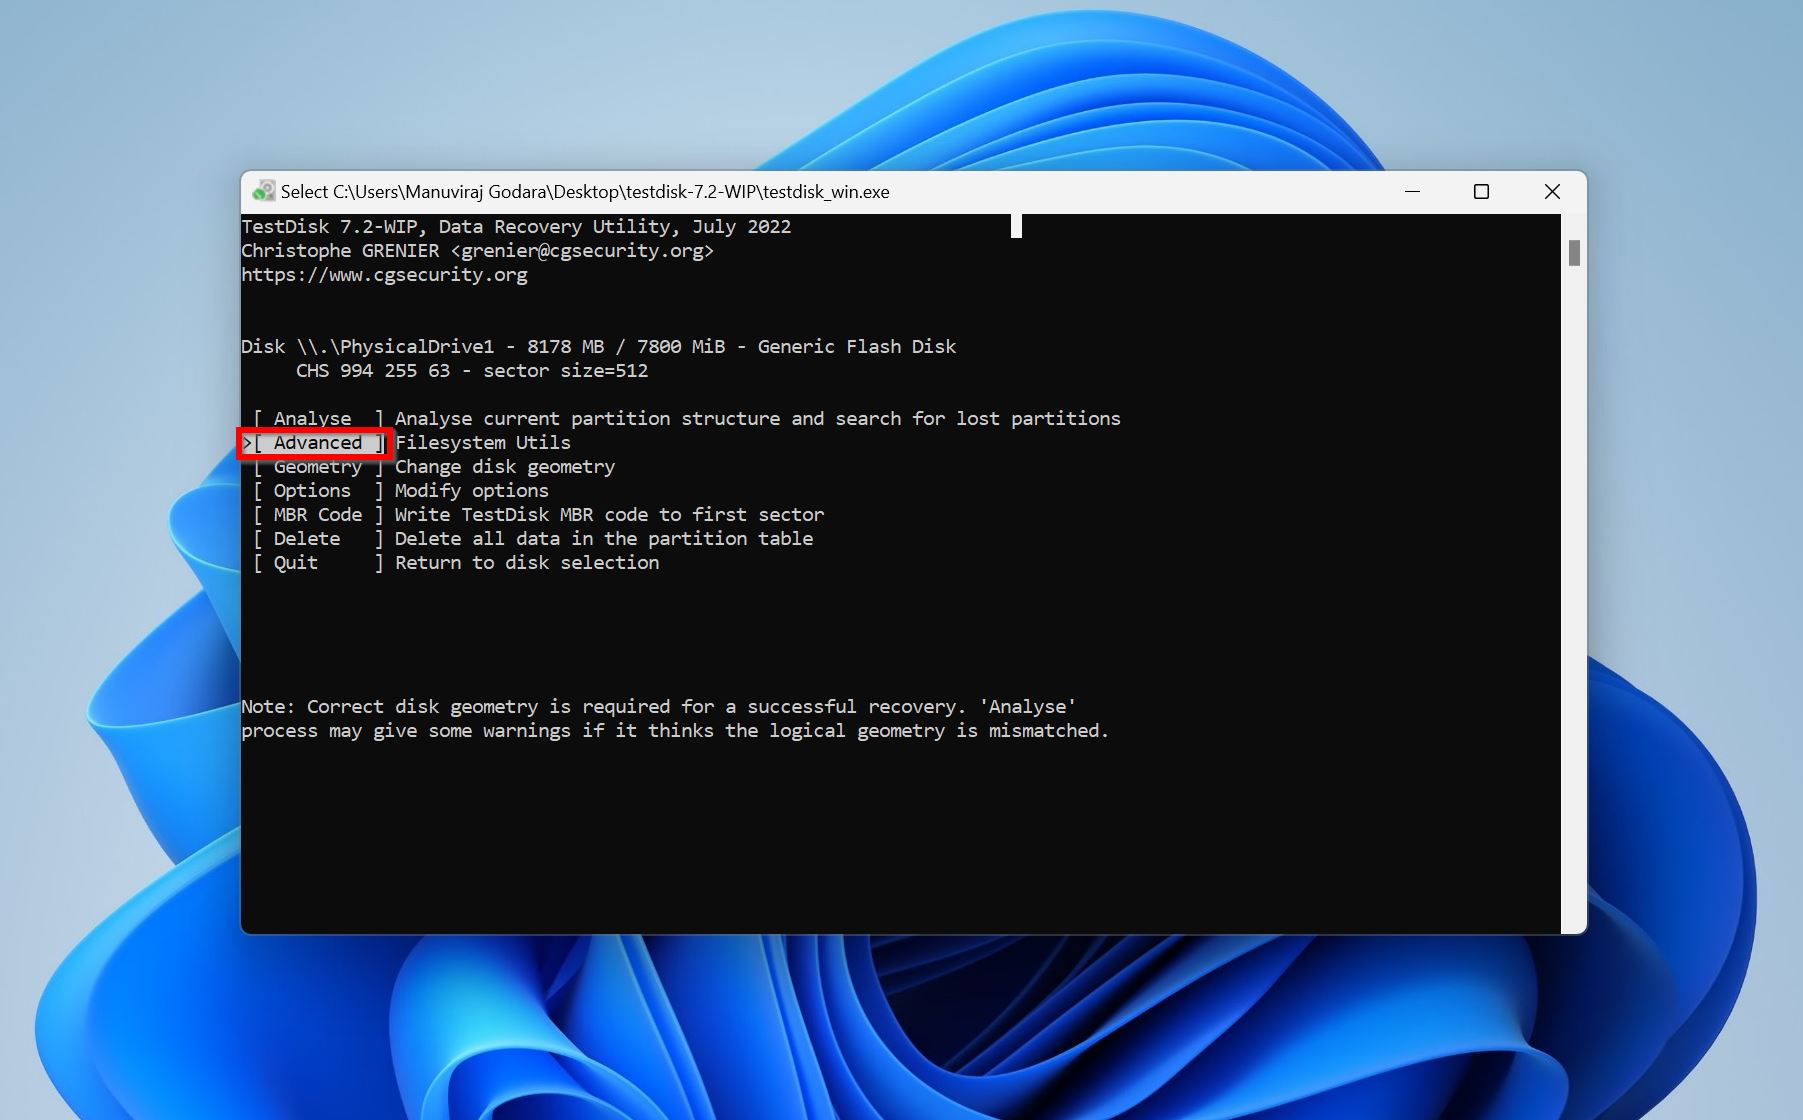
- Highlight Advanced and press Enter.
- Select the partition that’s showing up as RAW on your PC.
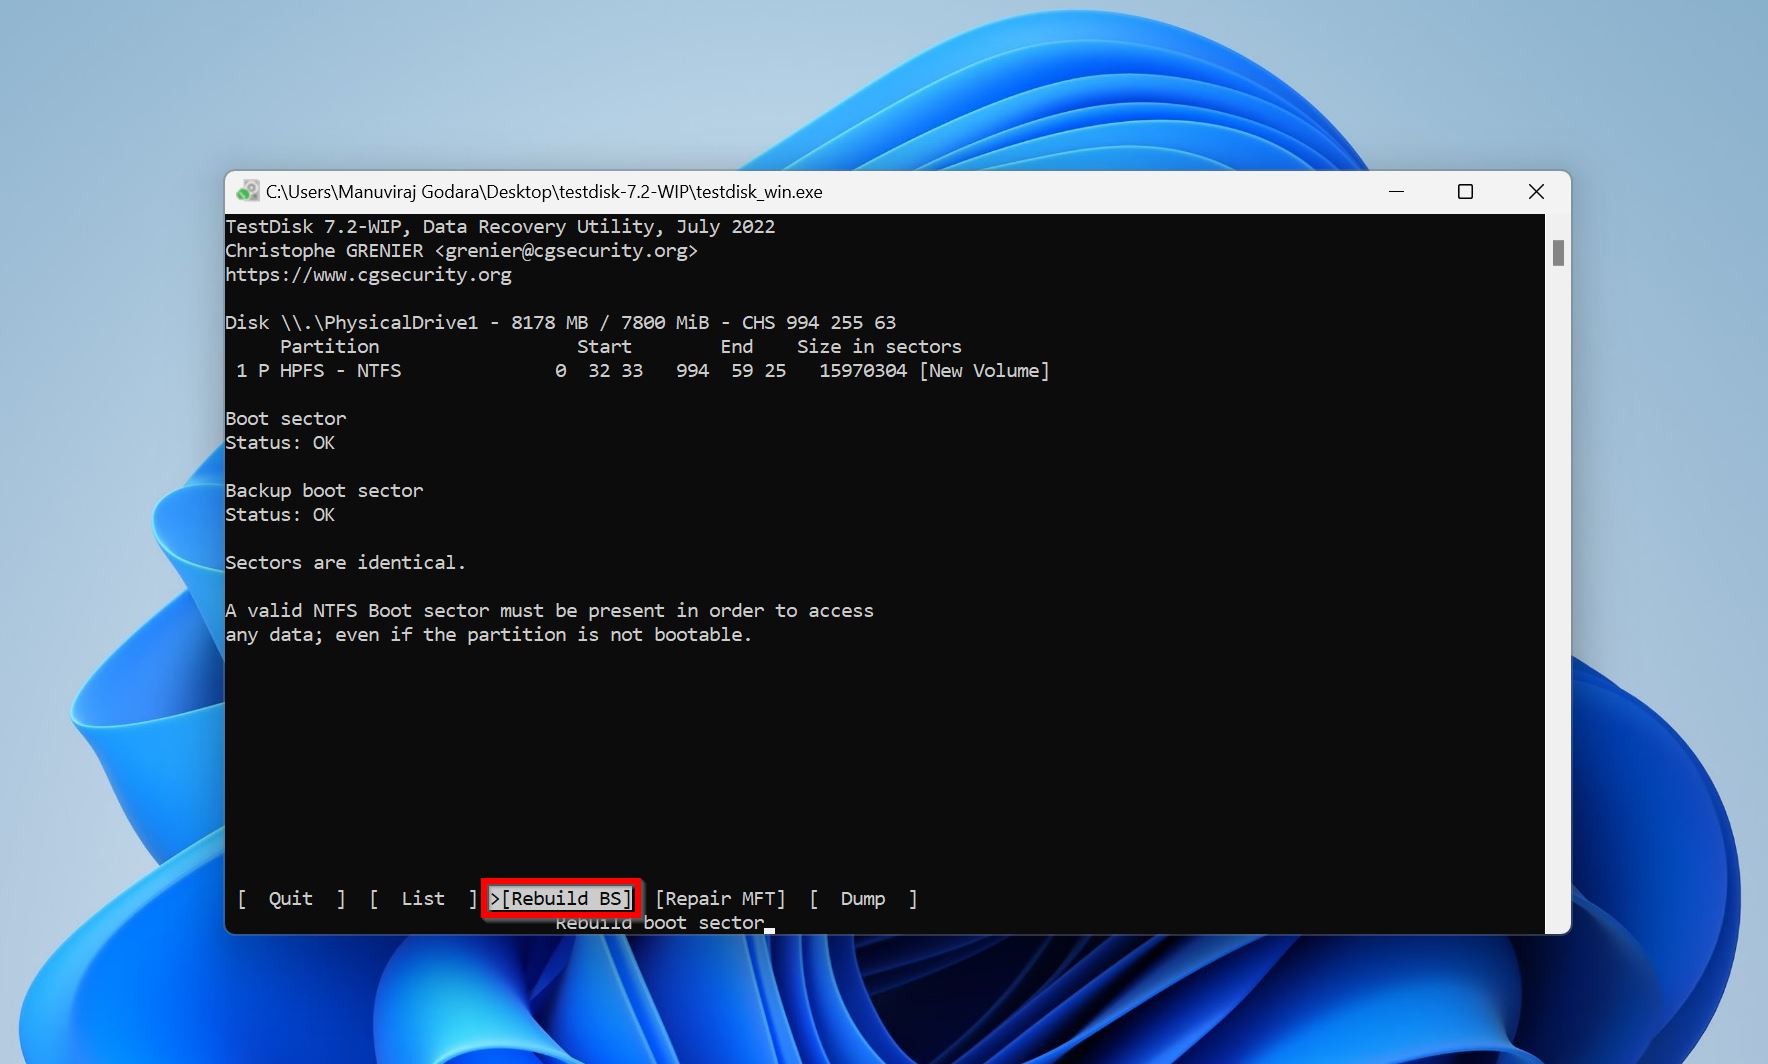
- Select Boot and press Enter.
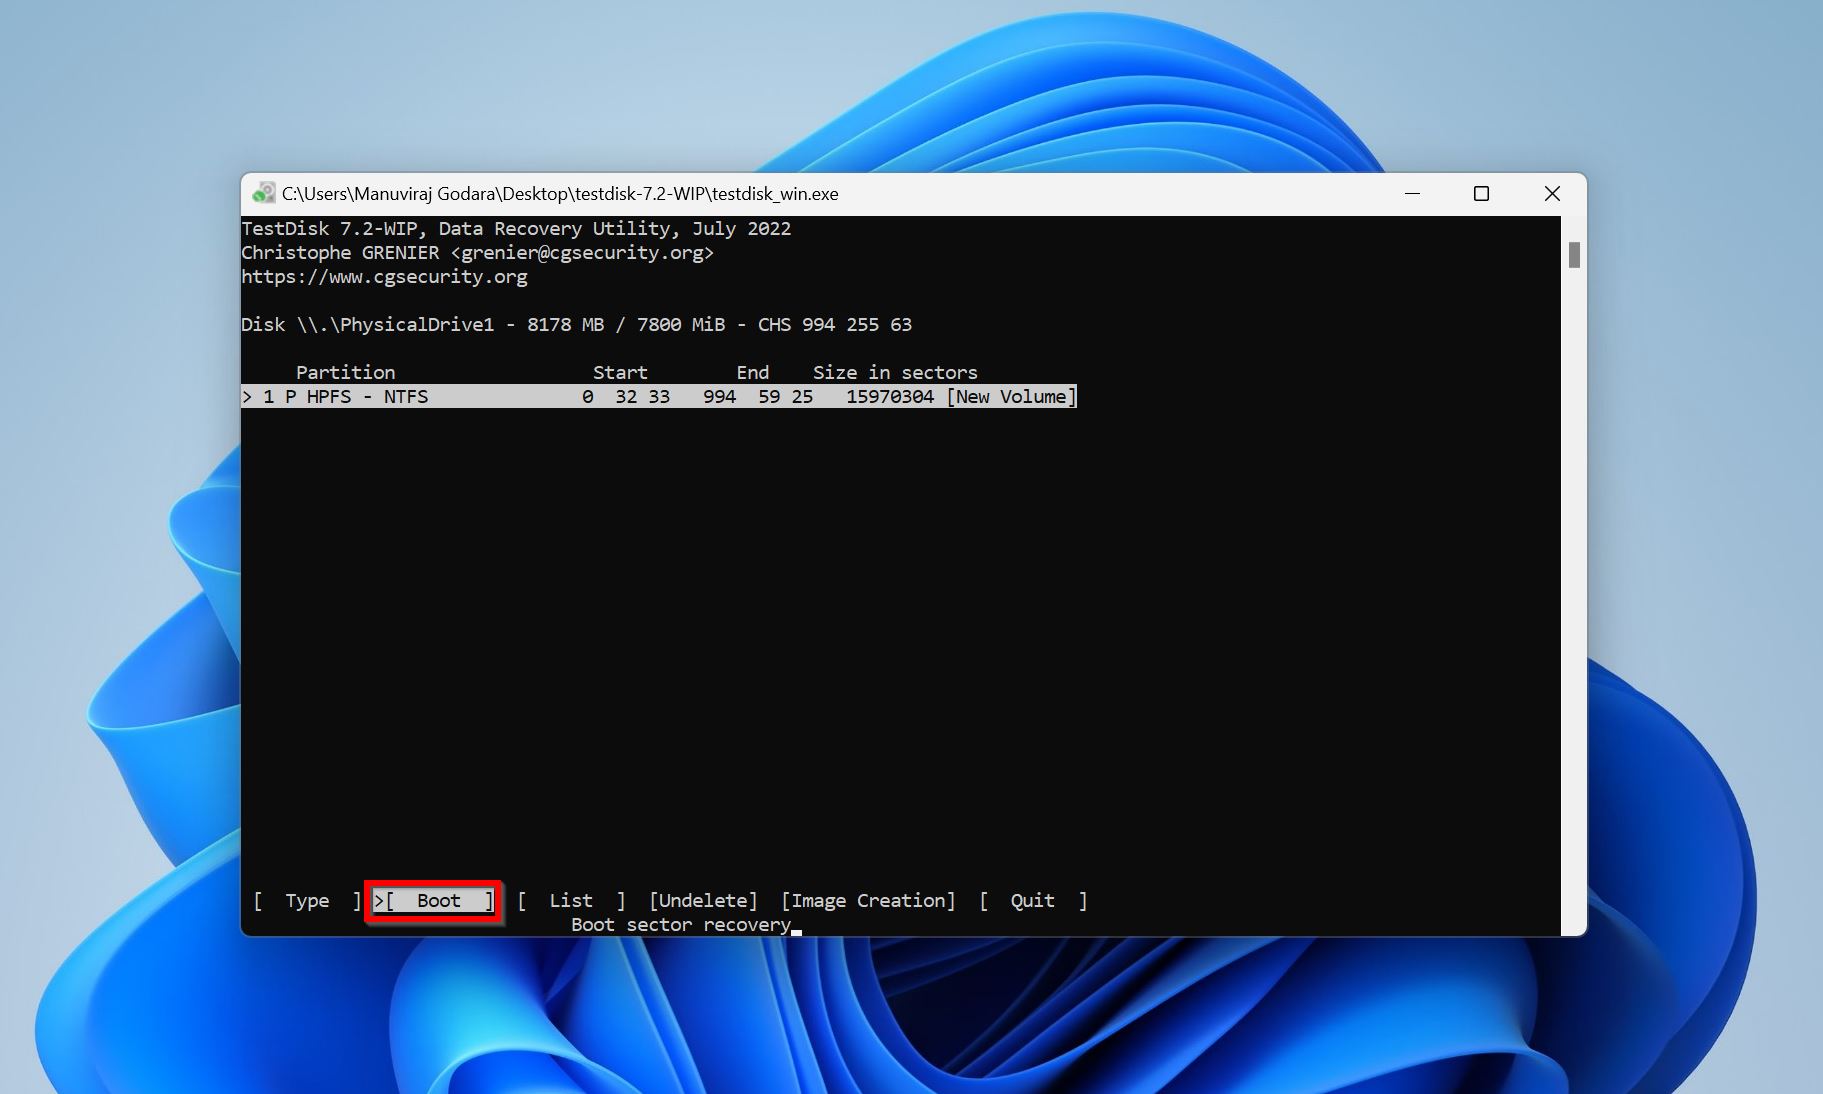
- Finally, select Rebuild BS and press Enter. On the next screen, pick Write and press Enter. Reboot your PC and you should be able to access the corrupted hard drive.
As we mentioned earlier, we use TestDisk often. It’s one of the few free tools that consistently gets results when it comes to lost/deleted partitions. If you want to learn more, we even have a full hands-on review covering all of its features, recovery performance, and everything you might want to know about it.
Method 3: Fix Corrupted Hard Drive Errors
Windows has an in-built utility that can detect and resolve file system errors on your external hard disk – CHKDSK. While CHKDSK is a command line utility, you can run a basic GUI version of it using File Explorer. It’s simply labeled as the Error Checking Tool.
Two things to keep in mind when using CHKDSK or the Error Checking Tool:
- CHKDSK only works if Windows can detect your drive and recognize its file system (it won’t work on RAW drives).
- Restore your data before you run these utilities. In some cases, they may delete files from your drive.
Let’s take a look at both ways to fix errors on your corrupted hard drive:
Option A: The Disk Error Checking Tool
Here’s how to use it:
- Connect your corrupt external hard disk to your PC.
- Open Windows Explorer (Windows Key + E).
- Right-click on the external hard drive and choose Properties.
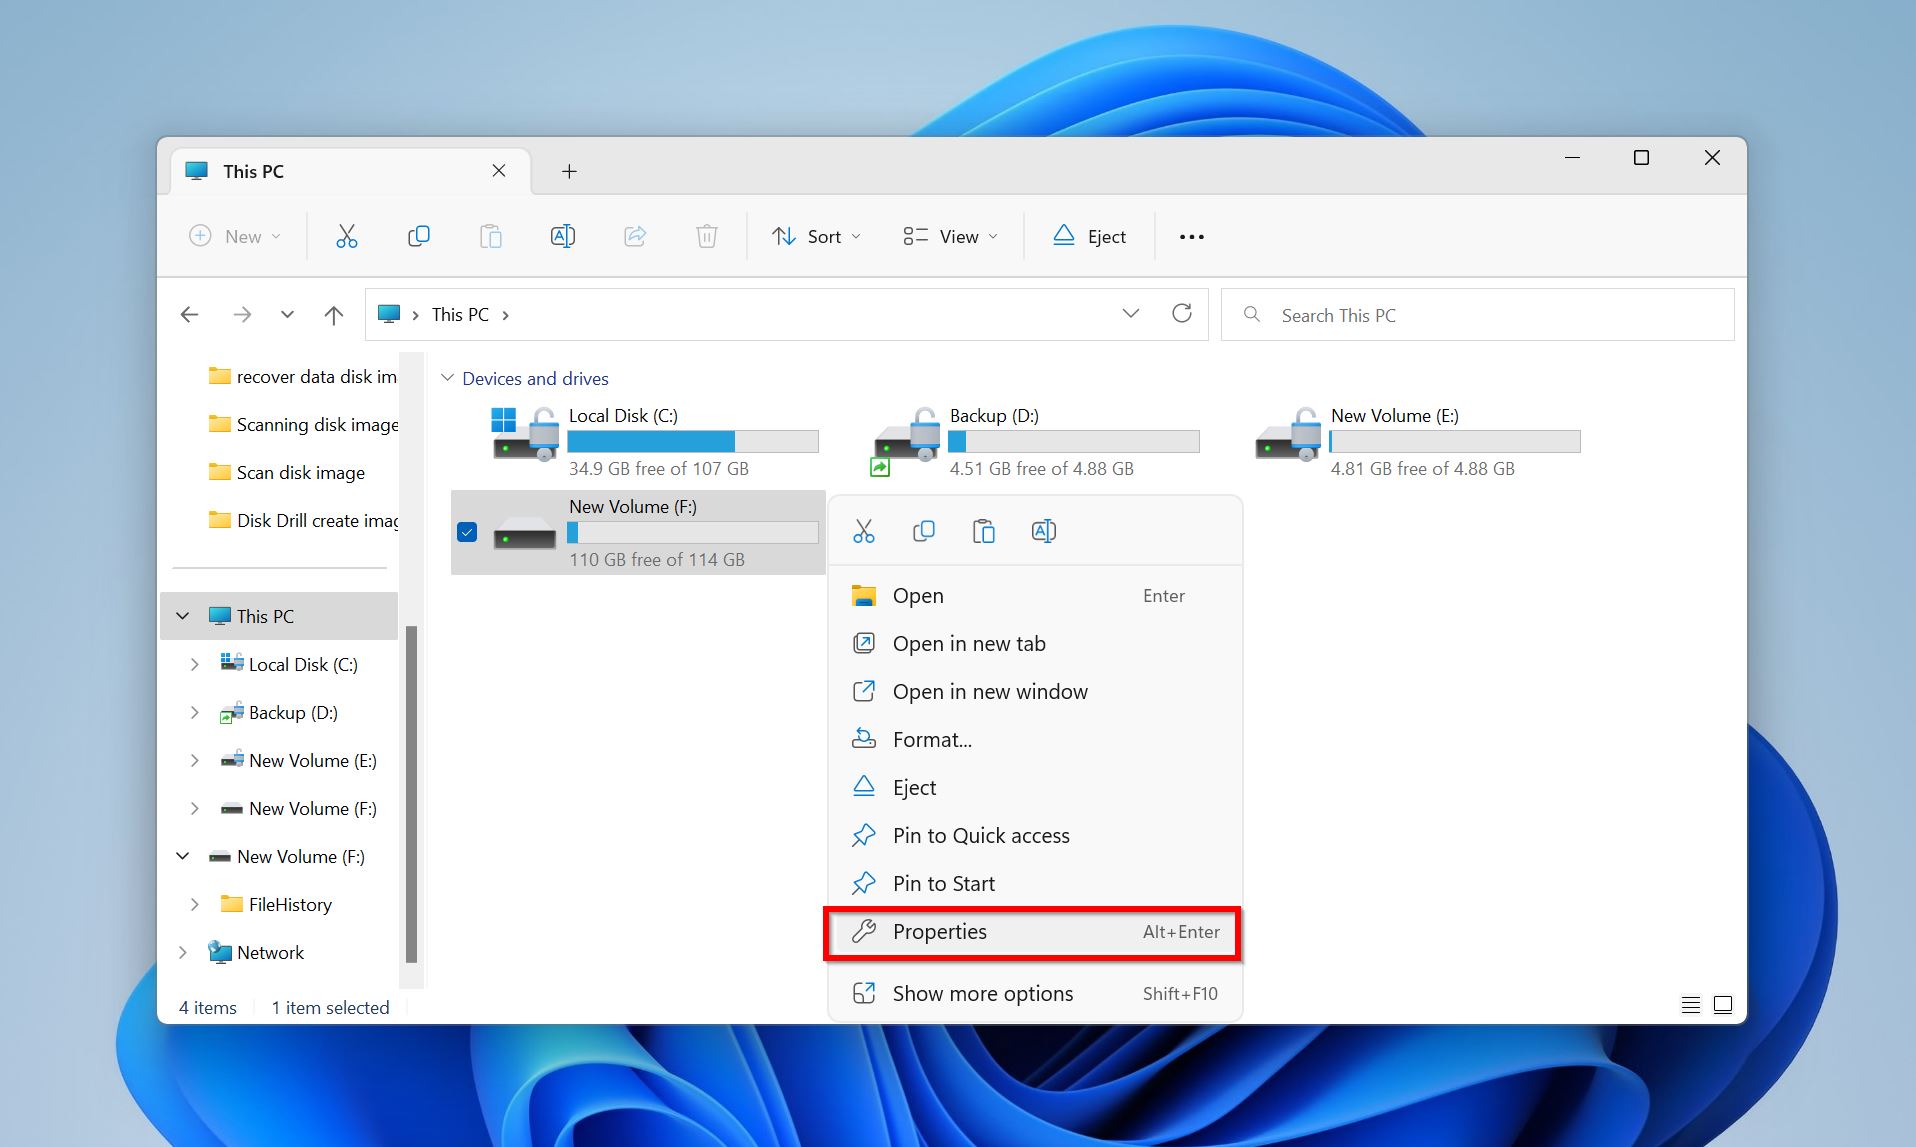
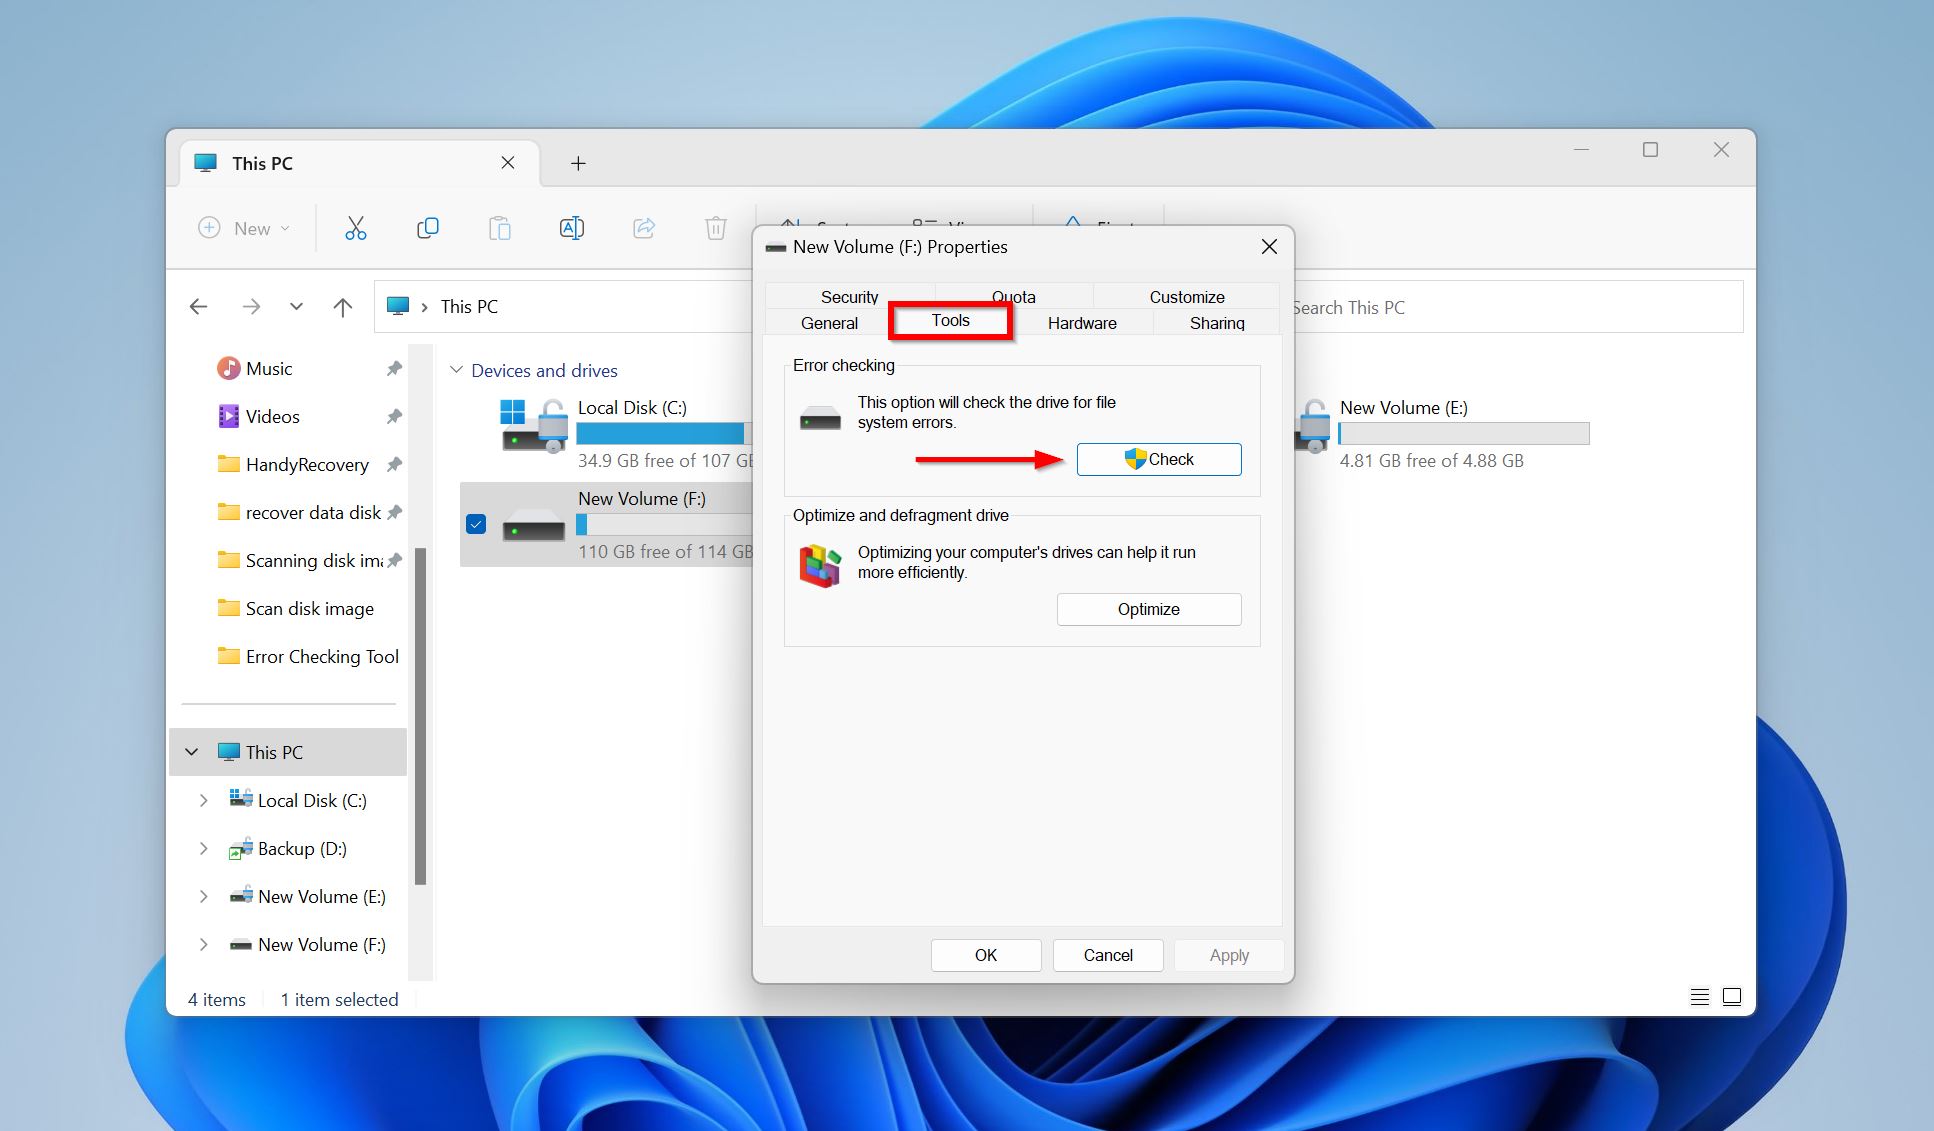
- Click on the Tools tab, and under Error checking, click Check.
Option B: CHKDSK
CHKDSK isn’t quite as straightforward as Error Checking, but it’s still nothing too complex. Here’s how to use it:
- Type “cmd” in Windows Search (Windows Key + S). Right-click on Command Prompt > Run as administrator in the search results.
- Type chkdsk X: /f and press Enter. Replace X with the drive letter of your external HDD.
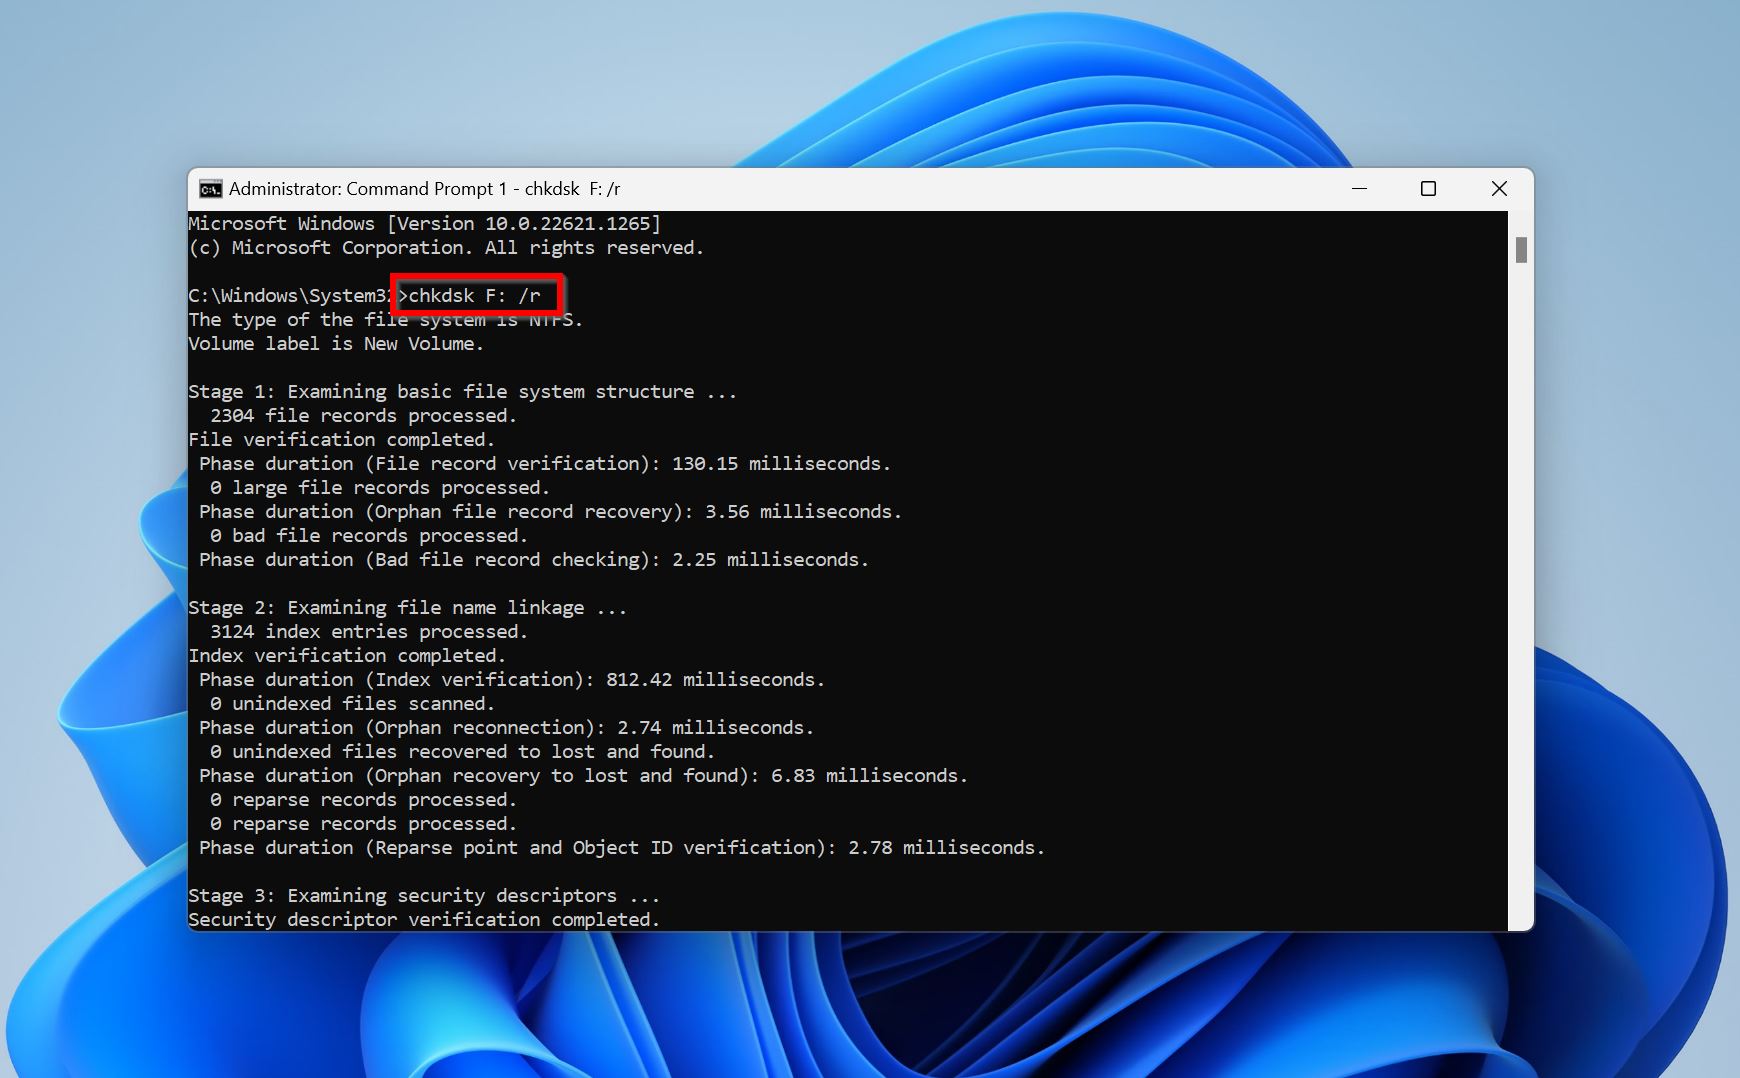
- The process may take some time, depending on the size of your HDD.
One thing to keep in mind: CHKDSK can take a long time, especially on larger or more damaged drives. We’ve seen cases where it stays stuck on stage 4 or 5 for hours. For example, someone in our community ran chkdsk on a 2TB external drive that had started slowing down. It stayed frozen at stage 4 for what felt like forever. They weren’t sure if it was safe to stop or if the tool had crashed.
The truth is that kind of delay isn’t uncommon when CHKDSK hits bad sectors. The process can appear stuck, even though it’s still working in the background. If the drive is important and you haven’t backed it up yet, it’s better to stop here, make a disk image, and recover files before trying CHKDSK again. Always play it safe when possible.
Method 4: Repair Bad Sectors on the External Hard Drive
Bad sectors are parts of your drive that have become unreadable. These can happen with age, wear, or after physical damage or power loss. When your drive hits one of these bad blocks, it may freeze, slow down, or fail to copy or open files. Some bad sectors are purely logical and fixable with software. Others are physical (permanent), but you can still mark them as unusable so the system skips them.
We’ll show you two ways you can try to repair bad sectors: one using a third-party tool called Victoria, and another using the good old full formatting method.
Option A: Victoria
Victoria has been around for a long time and is still one of the best free tools for bad sectors. It gives you a clear view of how your external hard drive is doing at the hardware level.
Here’s how to use Victoria:
- Download the app.
- Once you open it, make sure your external hard drive is selected in the list. You should see its model, capacity, and status info.
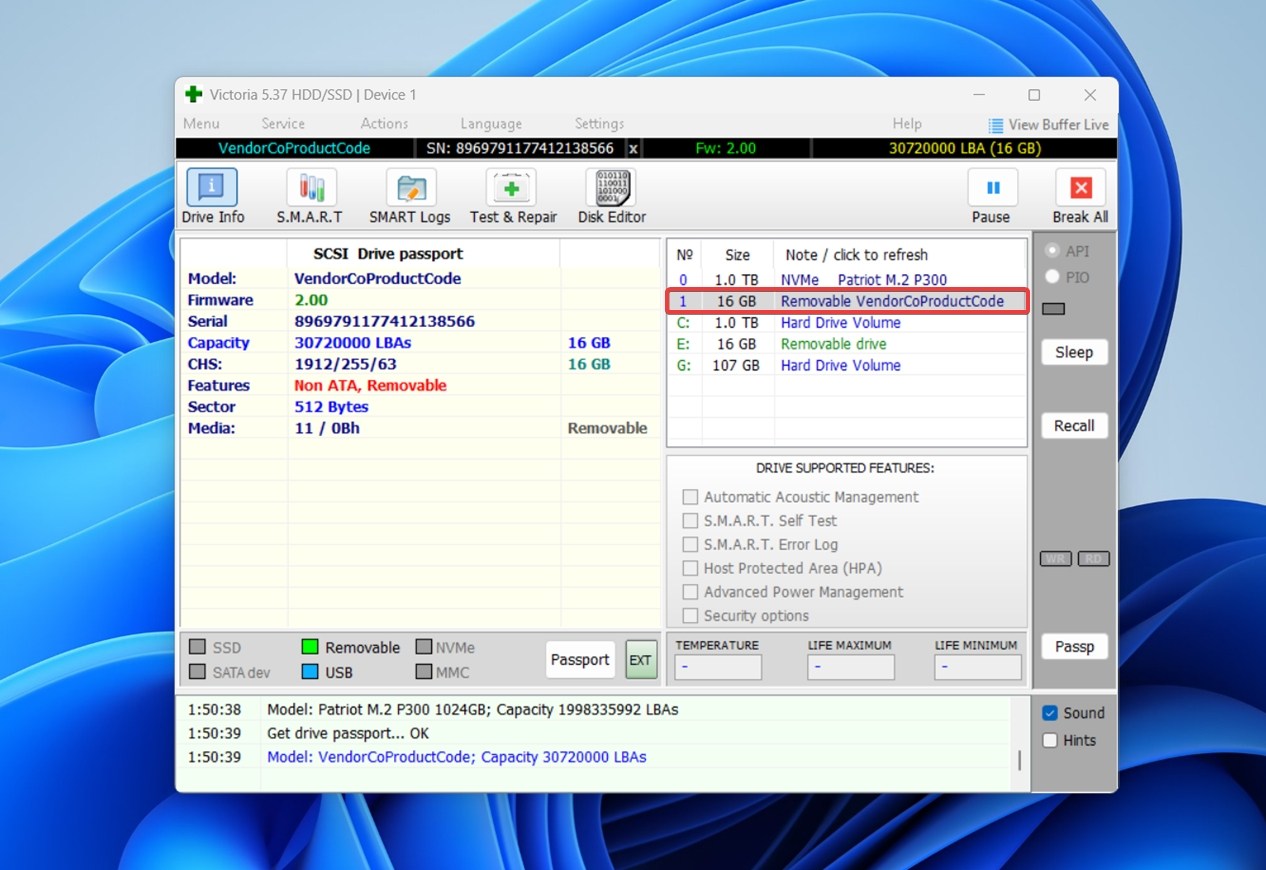
- Click on the Test & Repair tab at the top.
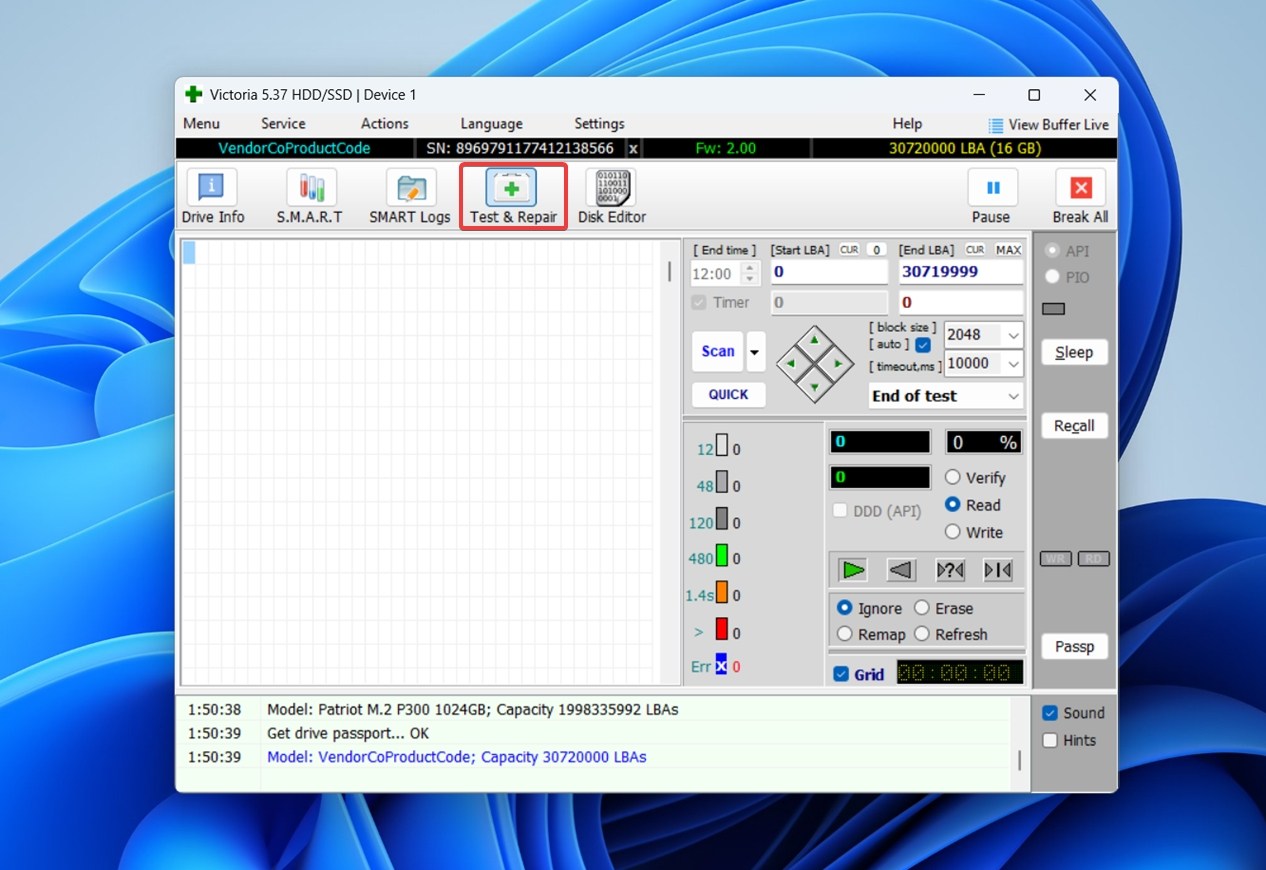 This is where all the sector-level scanning and repair options are. Make sure the drive isn’t being accessed by other programs.
 - Use the Scan button to begin scanning.
 You’ll start seeing colored blocks appear in the grid area – each color represents a response time: green is normal, yellow/orange means slow sectors, red means bad (unreadable) blocks.
After the scan, if you see mostly green and a few isolated yellow sectors, your drive is still usable (but it’s a sign of aging). It’s not perfect, but it should be okay for light use or as a second backup.
That said, if you start seeing a lot of red blocks, that’s a different story. You should seriously rethink using this drive for anything important. It’s not something you can trust for active storage anymore.
Option B: Full Formatting
If you don’t want to use third-party tools like Victoria, you can try a full format instead. Windows lets you do two kinds of formatting – a Quick Format (which is the default and recoverable) and a Full Format.
The full format takes longer, but it does a deeper scan of the drive. It checks each sector and marks any bad ones so they won’t be used again. This doesn’t actually repair the damaged sectors, but it helps prevent future crashes by isolating the problem areas.
As a last resort, you can Full Format your corrupt external HDD to repair all the bad sectors on it. Essentially, you get a clean slate. But keep in mind: as we explain in our guide on the difference between quick and full formatting – all data will be lost permanently. There’s no undo button once a full format is done, so only go this route if you’ve already recovered everything important.
Here’s how you can perform a Full Format in Windows:
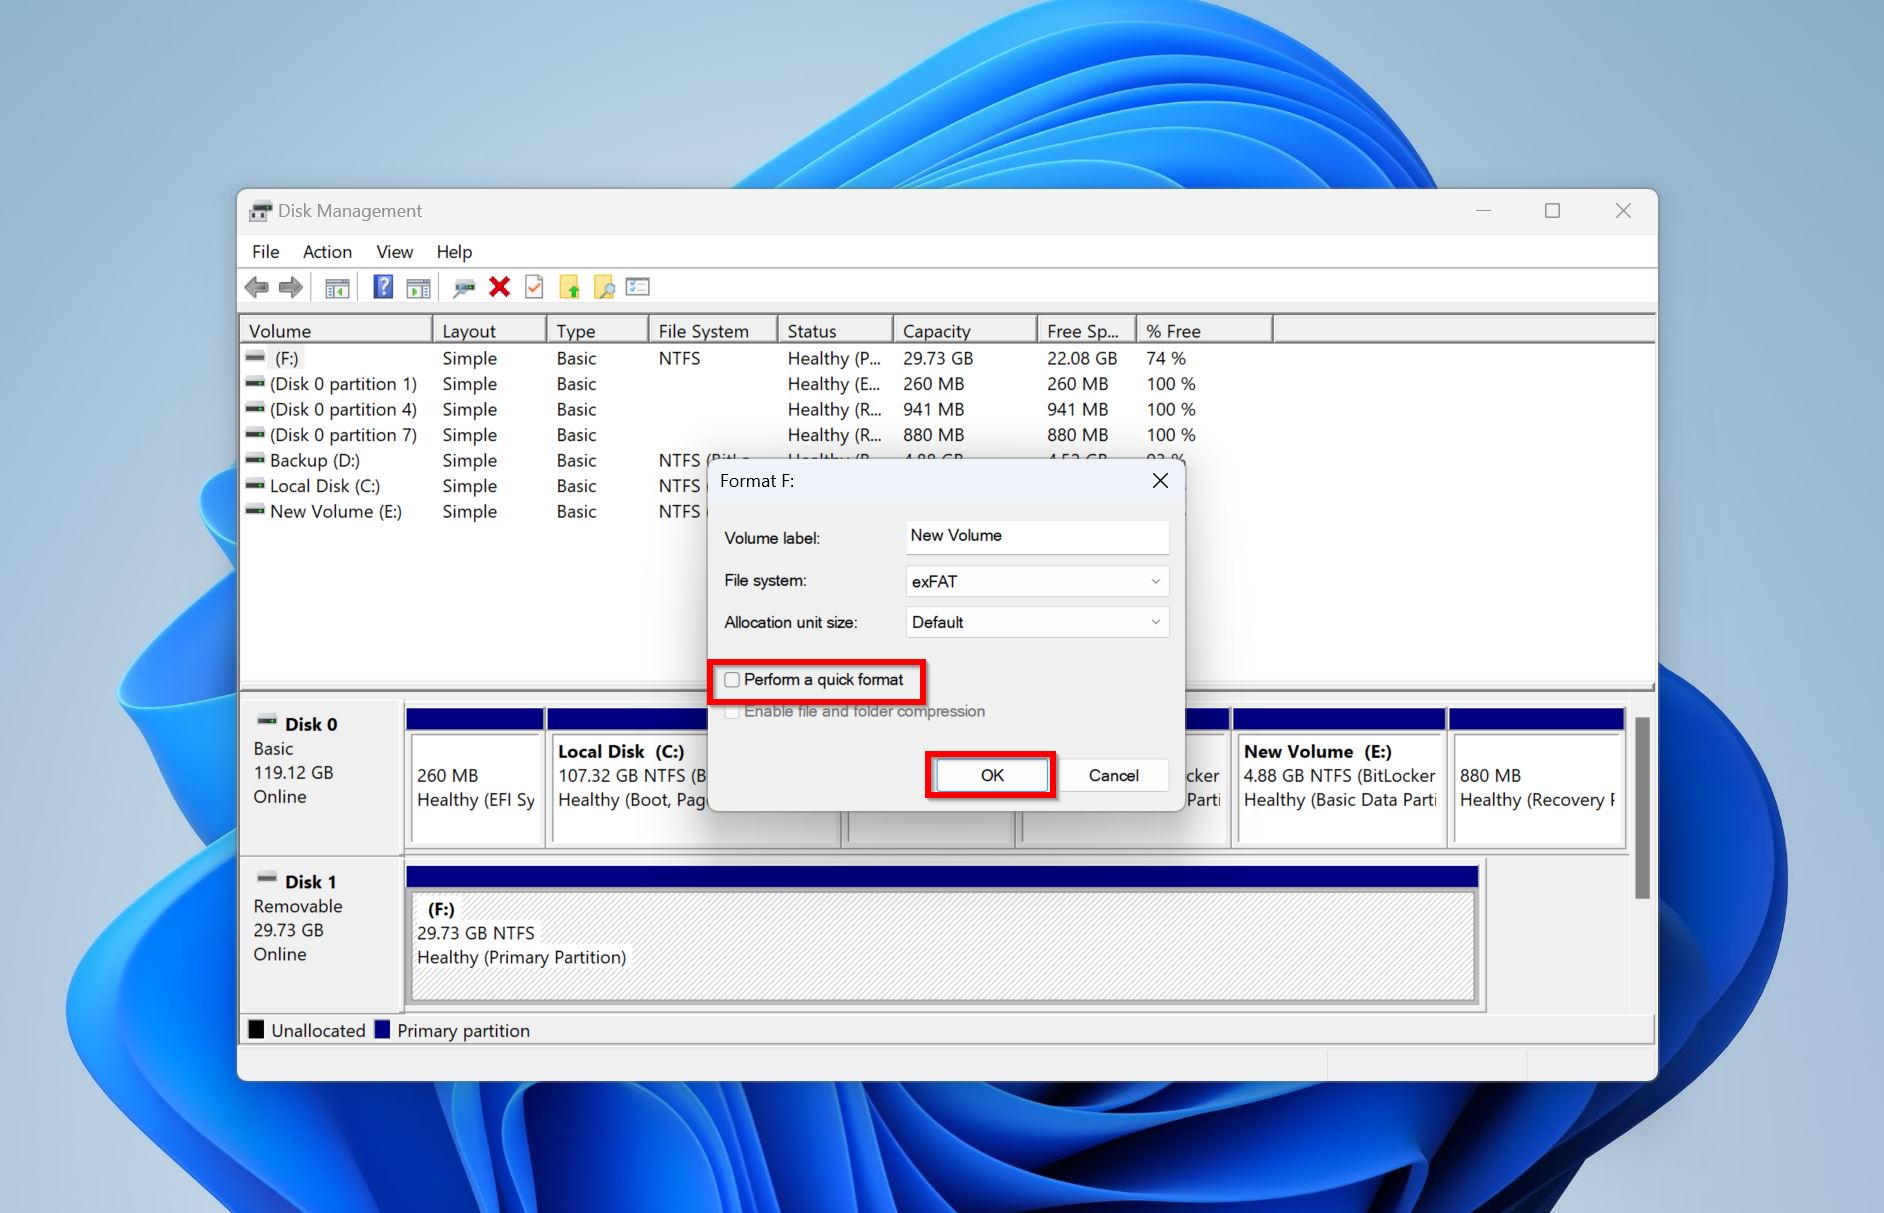
- Press Windows Key + R, and type diskmgmt.msc in the Run text box. Press Enter.
- In Windows Disk Management, right-click on your external hard drive and click Format.
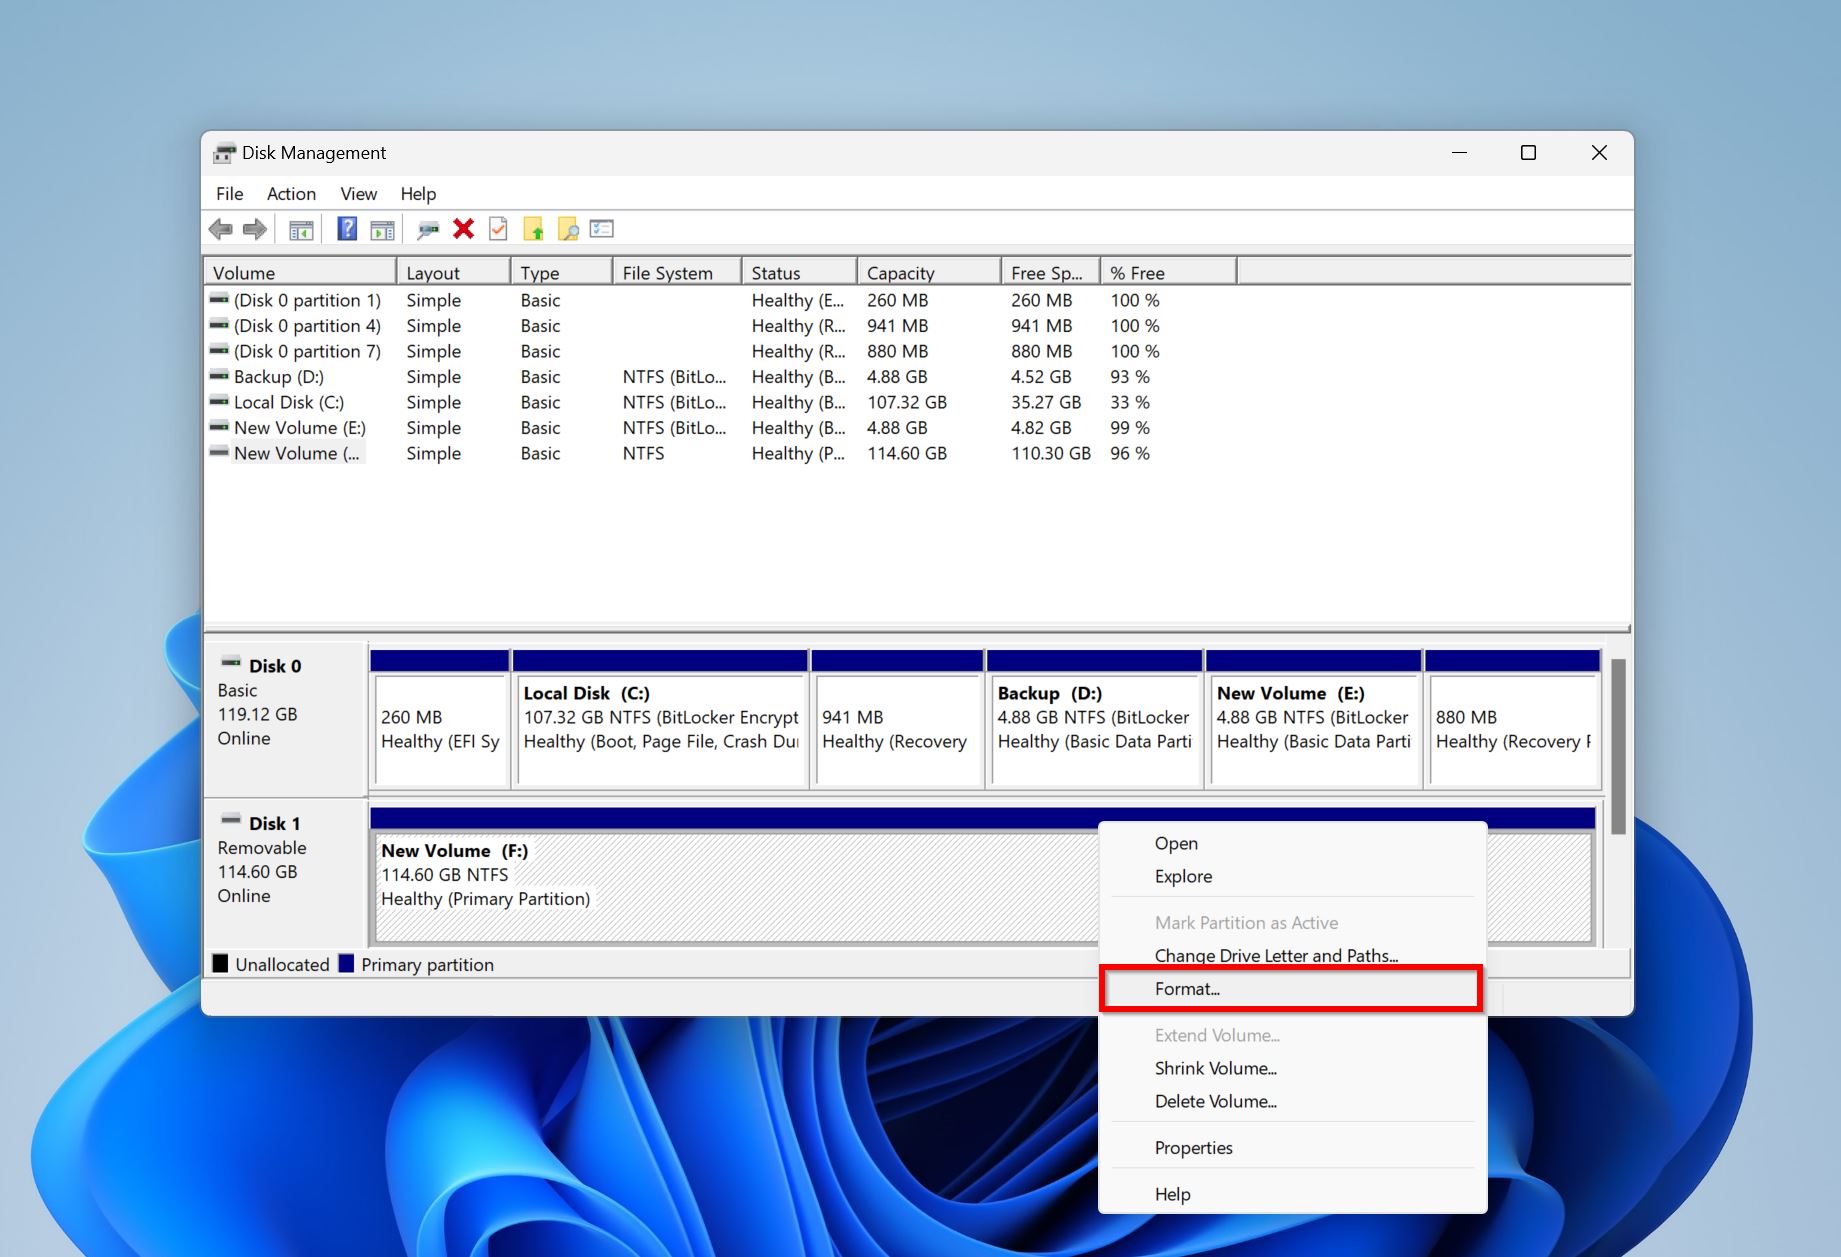
- In the Format options window, uncheck the Perform a quick format option. This is important. Click OK.
We usually recommend full formatting only as a last resort, after you’ve tried recovery and saved data. But if the drive has no hardware issues and the corruption was strictly logical, a full format is still the most reliable way to get your external hard drive back in working order. It’s a clean reset that clears all logical problems in one go.
Can I Trust This External Drive from Now On? (Let’s Talk S.M.A.R.T.)
We already mentioned S.M.A.R.T. earlier, but now let’s go into more detail. If you’re wondering whether you can keep using this drive long-term, this is where you look.
S.M.A.R.T. stands for Self-Monitoring, Analysis and Reporting Technology. It’s built into almost every modern hard drive, and it logs all sorts of internal stats while the drive is running: temperature, bad sector count, spin retries, start/stop cycles, and much more. The drive’s firmware watches these metrics and flags when something seems off.
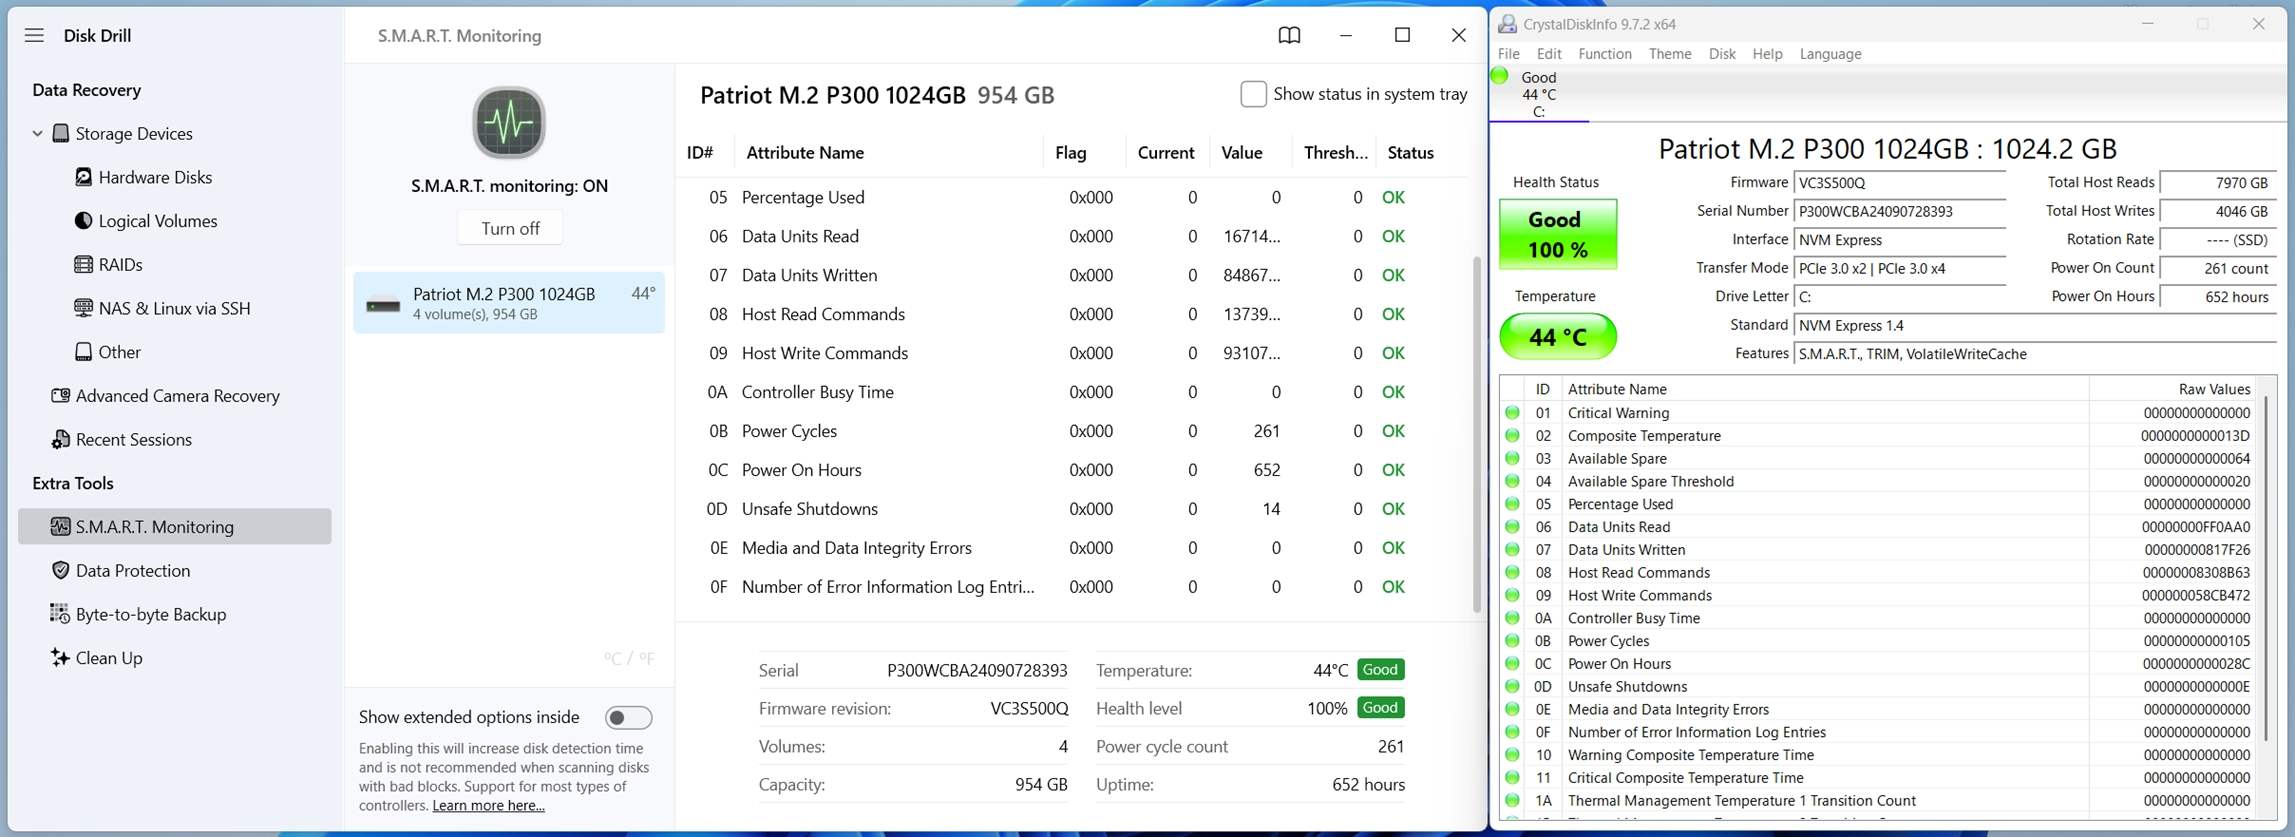
The good news is: you don’t need to be an engineer to check them. Most tools display S.M.A.R.T. data in a simple way: good or bad, often color-coded in green/yellow/red. You’ll also see values, thresholds, and sometimes “raw” numbers. Some popular tools for reading this on Windows include: CrystalDiskInfo, GSmartControl, SpeedFan. And like we already mentioned, some recovery apps, such as Disk Drill, include built-in S.M.A.R.T. as an extra.
What to Look For
One of the most important attributes is Reallocated Sector Count. That tells you how many sectors have gone bad and were replaced with spare ones. If this number is zero, you’re probably okay. If it’s above zero, it doesn’t mean the drive is dead – but it does mean the risk of failure is higher than average.
Google did a well-known study (you can find it here) showing that even a single reallocated sector can raise the chance of failure within a year by 30%. Drives with scan errors had up to a 50% failure rate. And in real-world use, we’ve seen that once those numbers start creeping up, they often accelerate fast.
Another flag to watch for is Reported Uncorrectable Errors. This means the drive ran out of ways to fix a bad block, even with spare sectors. If this number is greater than zero, it’s a strong sign the drive is wearing out.
But What Do Those Values Actually Mean?
S.M.A.R.T. uses values, thresholds, and raw numbers. It works like this:
- Value – ranges from 1 to 253. Higher is better.
- Threshold – the failure limit. If the Value drops below this, the drive is considered unhealthy.
- Raw value – this is usually the actual count (e.g. number of reallocated sectors), but manufacturers sometimes “code” it in a way only they can decode. So don’t rely on raw numbers alone.
For example, if you see Reallocated Sector Count:
- Value: 84
- Worst: 84
- Threshold: 64
- Raw: 38
In this case, the drive has 38 bad sectors and is still above the threshold, but it’s already lost some health (Value dropped to 84). It’s not failing yet, but it’s not perfect either. You’d want to monitor it closely or avoid putting anything important on it long-term.
Should You Keep Using the Drive?
If all values are in the green, no reallocated sectors, and no uncorrectable errors, it’s probably okay for casual use. But if any health-related values are dropping (or if you’ve seen growing numbers across a few boots) it’s a sign to stop trusting that drive for anything critical.
And here’s the unpleasant real-world part: some drives fail without any warning from S.M.A.R.T.. Sometimes everything looks fine, and the drive still dies overnight. That’s why the best answer to “can I trust this drive?” is: only if you have verified backups.
If you want a second opinion on your drive’s health, take a screenshot of your S.M.A.R.T. results and post it in our community or show it to someone who works with hardware. We’ve helped users do that more times than we can count.
FAQ
What are my chances of 100% data recovery from a corrupted external hard disk?
There’s no guaranteed answer; no one can predict 100% how successful you’ll be. Every case is different.
If the corruption is purely logical, like a damaged file system, missing partition, or RAW format issue, your chances of full recovery are actually pretty high. Tools like Disk Drill or R-Studio often recover 90-100% of your files, especially if the drive hasn’t been used since the problem started.
But if the drive has physical damage, the chances drop fast. It might not show up at all. In fact, a lot of the time, you won’t even be able to run recovery software on it, because the drive doesn’t get detected. And once that starts happening, software alone usually won’t help.
The main thing that affects your success is what you did after the corruption happened. If you avoided formatting, writing new data, or running risky repair tools, your odds of recovery go way up.
How to recover data from a corrupted external hard disk?
Here’s a quick guide on how to recover data from a corrupted external hard drive:
- Connect the drive to your computer and make sure it shows up in Disk Management.
- Create a disk image of the external drive, if possible. This keeps your original data safe during recovery.
- Use a data recovery tool that supports working with disk images. Mount the image file inside the app, if possible.
- Scan the disk image for recoverable files.
- Preview and recover the files you need.
- Always save them to a different drive, not back to the corrupted one.
Does repairing an external hard drive erase data?
It can. Some repair methods carry a real risk of data loss, even if the goal is to “fix” the drive.
For example, CHKDSK can cause data loss in some cases. If the file system is damaged, CHKDSK might remove or truncate files during the fix. Same goes for TestDisk; while powerful, if you select the wrong partition or write changes without checking, you can wipe out recoverable data by mistake.
And as you already know, full formatting is irreversible. It wipes everything on the drive and resets the file system from scratch. After that, recovery becomes impossible.
That’s why we always recommend thinking about data recovery first, then repairs.
How to repair an external hard drive without losing data?
To repair a corrupted external hard drive without losing data, the key is to focus on recovery first, repair second. Here’s how you can approach it safely:
- Connect the drive and check if it’s detected in Disk Management.
- Create a disk image of the external drive using recovery software. This protects your data in case anything goes wrong during repair.
- Scan the disk image using a recovery tool to extract and save your files to a separate drive.
- Once your data is safe, run safe repairs like: CHKDSK, TestDisk or Victoria.
- If needed, do a full format, but only when your data is already backed up.
Does the brand of my external hard drive matter for data recovery or reliability?
Yes and no. In terms of basic recovery steps, the brand doesn’t matter much, whether you’re using a Seagate, WD, Toshiba, or Hitachi, the same tools (like Disk Drill, TestDisk) will work the same way.
But when it comes to long-term reliability, some brands have different track records. Failure rates can vary between manufacturers and even between models within the same brand. Some external drives are also built with cheaper enclosures and low-end components, which can cause connection problems even when the internal drive is fine.
Do hard drives really only last 3 to 5 years?
That 3-5 year estimate is an average, not a fixed expiration date. It doesn’t mean your external hard drive will suddenly fail on its fifth birthday (but it does mean the chances of problems go up over time).
Some drives fail earlier. Others last way beyond 5 years. We’ve seen drives running fine after 8 or even 15 years. But those are outliers.
What the 3-5 year mark really means is: by that point, the odds of mechanical wear, bad sectors, or controller issues become more likely. So if your drive’s getting up there in age and still holds important stuff, it’s smart to back it up or replace it, even if it’s still working fine today. Better safe than stuck with a dead drive later.
Can I fix a corrupted external hard drive using CMD?
There are a few ways to repair a corrupted external hard drive using Command Prompt, but only if the drive still shows up on your system.
- The most common method is running CHKDSK, which checks for file system errors and bad sectors.
- You can also use TestDisk, an open-source recovery tool that runs in CMD and can repair partitions or boot sectors if the drive shows up as RAW or unallocated.
- And if you’re starting fresh, you can use the format command in CMD to fully wipe and reformat the external drive.
Just keep in mind: some of these can lead to data loss, so always try to recover your files first if the data is important.
This article was written by Manuviraj Godara, a Staff Writer at Handy Recovery Advisor. It was recently updated by Roman Demian. It was also verified for technical accuracy by Andrey Vasilyev, our editorial advisor.
Curious about our content creation process? Take a look at our Editor Guidelines.