The Intenso company is relatively lowkey and was founded in Germany at the tail-end of the 90s, developing products ranging from digital picture frames to power banks. Their specialty, however, lies in storage devices like external hard drives, memory cards, and USB sticks.
While Intenso products garnered decent reviews on account of their budget products and satisfactory workmanship, there’s still a very real chance that they’ll end up facing data loss.
In case you’re unfortunate enough to encounter such a scenario, we’ll teach you the best ways to recover data from Intenso USB sticks or other storage media.
Is It Possible to Restore an Intenso USB Device?
Being able to potentially recover data from Intenso external hard drives, memory cards, or USBs boils down to the main culprit behind the loss of data.
Below are a few of the most common data loss scenarios that can cause files to disappear from your drive and whether or not there’s a chance of recovering data from them:
😲 Accidental deletion |
Accidentally deleting files happens quite often. Fortunately, there’s a good chance you can recover deleted files from a flash drive by using one of the best data recovery apps, provided that you haven’t overwritten the data on your Intenso hard drive or USB just yet. |
🧹 Formatting |
You can format a USB using either a “Quick” or a “Full” method. The former erases all the files on your Intenso USB drive while creating an updated file system, though the data remains on the drive until it’s overwritten with new ones. This allows you to recover data from a formatted USB drive using a data retrieval program. On the other hand, the “Full” method wipes the USB’s data permanently and can no longer be recovered. |
⚠️ Logical Corruption |
Device corruption is another main reason for data loss and can also render your Intenso drive inaccessible by your OS. You can recover files from a corrupted USB using certain high-end data retrieval programs, even if they are not recognized by your OS. Otherwise, you can restore files from a logically corrupted device through a backup. |
💣 Physical Corruption |
Physical corruption stems from electrical or mechanical issues with your Intenso USB. This is often related to the connector of the USB stick and can lead to the inability to access the device, though the memory chip of the device is usually left intact. In these cases, you’ll likely need the help of a professional data recovery service if you want any hope of getting your files back. |
🦠 Viruses |
There are an overwhelming number of viruses out there that can have varying effects on your Intenso stick – one of which is data loss. Luckily enough, a competent data recovery program offers a solid chance of retrieving your lost files. |
🚫 File Transfer Errors |
Abruptly halting a file transform from or to your Intenso USB can lead to integrity issues in the data involved. This can happen because of an error or the removal of the device while the transfer process is ongoing. You can attempt to recover data from Intenso USB sticks in these scenarios, but it’s likely that the rescued files will be damaged. You’re better off copying the lost files from a backup if one is available. |
Intenso Data Recovery Tips: Dos and Don’ts
Before you attempt Intenso data recovery, there are a few important tips that you should keep in mind.
- ⛔ Stop using the device. The first thing you should do when you encounter data loss on your Intenso USB stick or any other Intenso device is to immediately stop using the drive. Continuing to utilize the device increases the chance of your lost data being overwritten or further data loss to occur.
- 🚫 Do not format the USB drive. Formatting your Intenso USB drive will cause all the data on the device to get wiped. This makes it more difficult to recover lost data. Furthermore, if you perform a “full” format on the drive, the files will be gone for good.
- 🔎 Look for a reliable recovery tool. Not all recovery programs are created equally. That being said, make sure you choose one with the right features, excellent recovery rates, and a superb reputation.
How to Perform an Intenso Drive Recovery
Intenso has quite a few storage devices under its belt, including the Ultra, Green, Twist, and cMobile lines of USB drives, as well as a range of Intenso premium line hard drives and SSDs. But no matter which kind of storage device you have, there are a few ways you can go about USB, SSD, or external hard drive data recovery, depending on the situation.
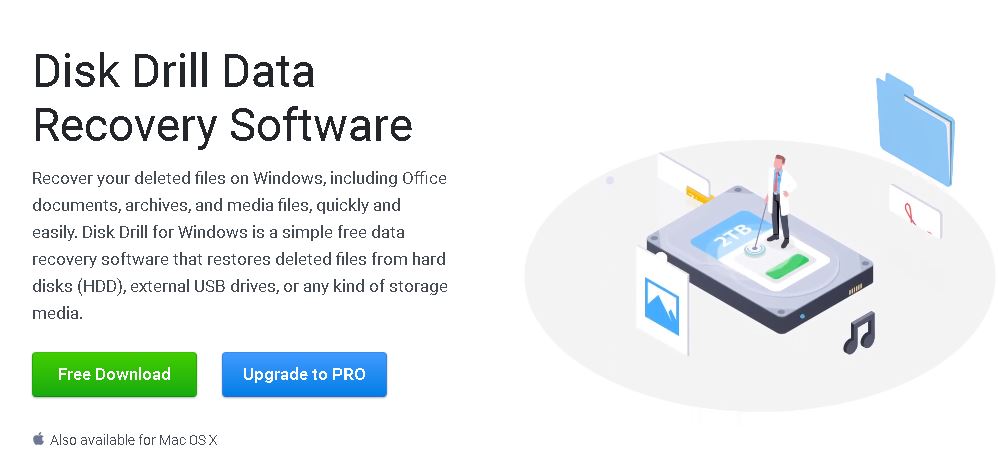
Option A: Recover Data from the Intenso USB Stick/Drive Using Disk Drill
The first DIY method to consider when trying to recover data from Intenso USB sticks or hard drives is using a data recovery program.
Disk Drill reviews show that it’s an Intenso data recovery software that manages to set itself apart from the competition by combining superior scanning speeds, first-rate recovery rates, and an expertly designed user interface.
Add to that a host of useful features, including:
- 💾 Support for a wide range of storage devices ranging from USBs and memory cards to hard drives and SSDs. Keep in mind, however, that SSDs that have the TRIM feature enabled can make it impossible to recover data since this causes deleted files to be overwritten right away.
- 🗃️ High compatibility with pretty much any storage device file system, such as NTFS, FAT32, exFAT, HFS, APFS, and a whole lot more.
- 📄 Ability to recover the majority of file types, whether it’s for photos, audio, video, documents, archives, etc.
And if you happen to own both Windows and Mac machines, Disk Drill has a Cross-Platform Scanning feature that lets you start a scan on one OS and continue it on another.
Still hesitant to give it a go? The program has a pretty comprehensive trial version that lets you try out all of its tools and features as long as you stay within the 500 MB recovery limit.
Simply follow the steps outlined below to perform Intenso data recovery using Disk Drill:
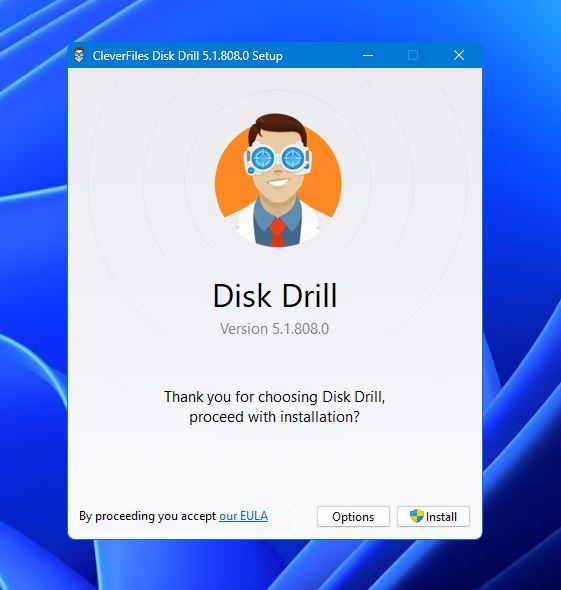
- First, head over to the Cleverfiles official website and download the installation file for the latest version of Disk Drill.
- Next, open the downloaded file and follow the instructions until the software is installed on your computer.
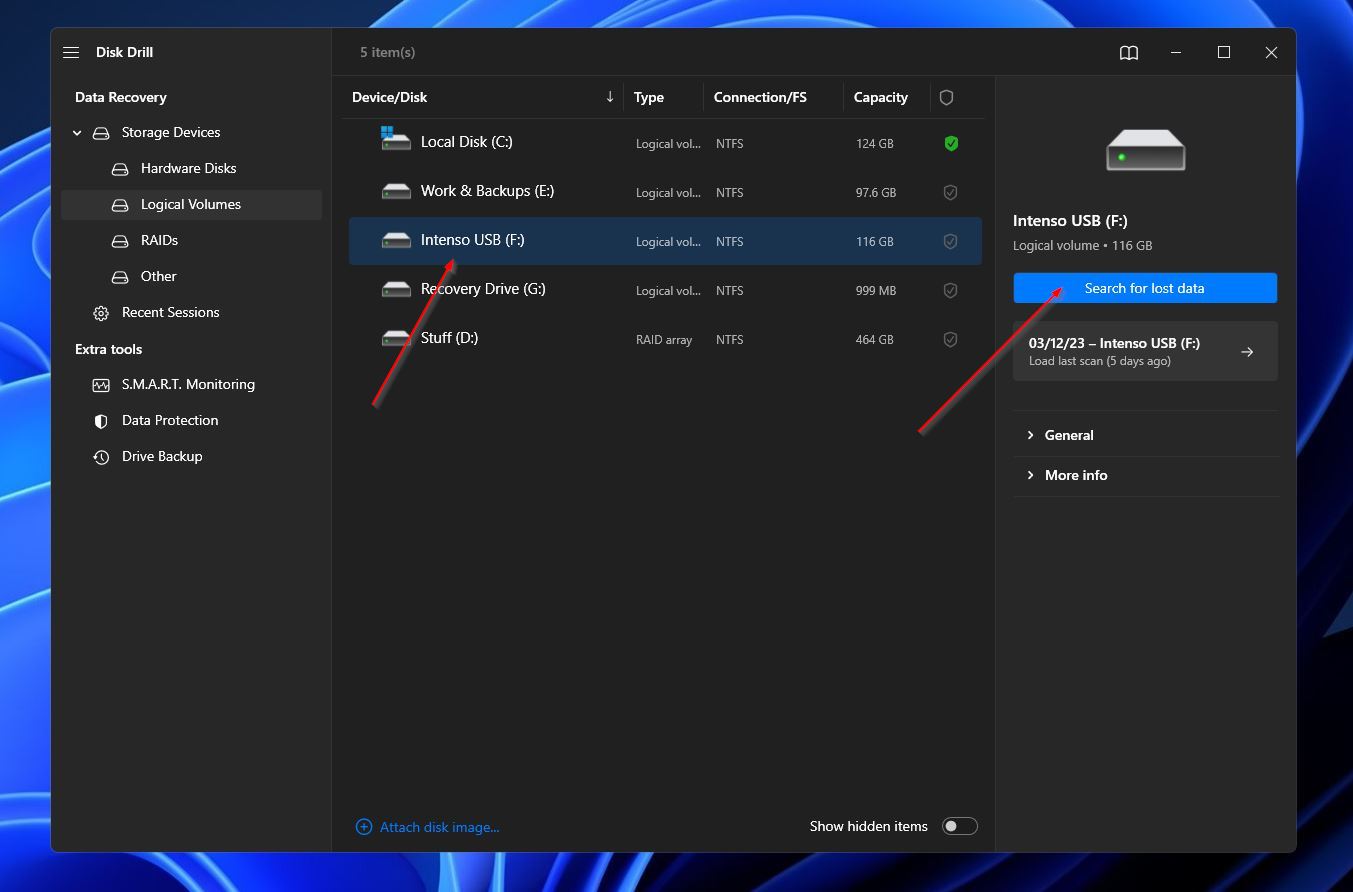
- Make sure your Intenso USB is properly connected to your computer, then run Disk Drill and select the device from the list. To proceed, click the Search for lost data button.
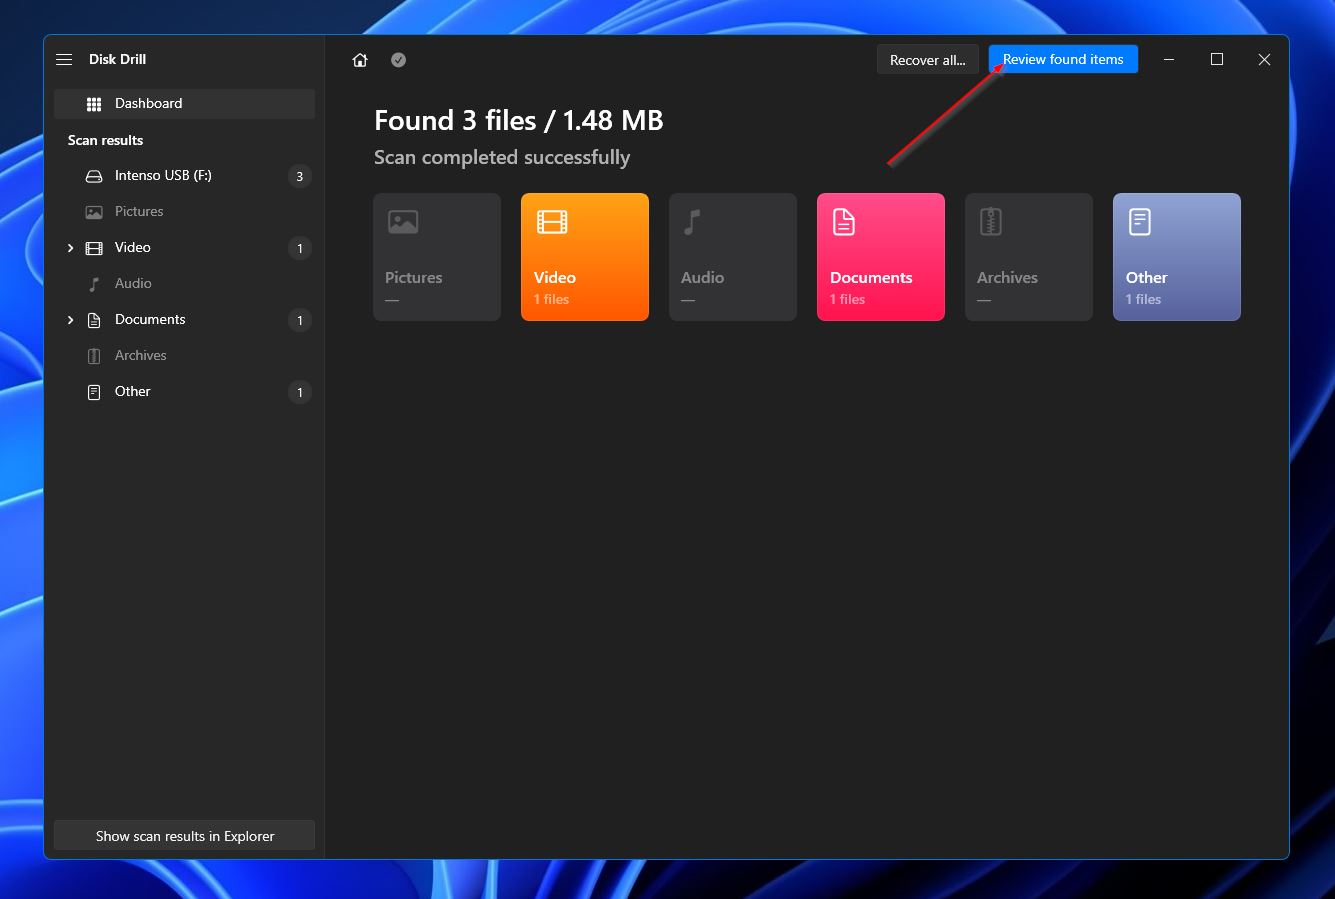
- After that, the app will now start searching through your USB for any files it might be able to retrieve. The bigger the capacity of your drive, the longer this process is likely to take. As the scan continues, you can click the Review found items button at the top-right corner to check the files that have been unearthed so far. Another option is to just wait for the scan to finish before clicking the same button to head to the results section.
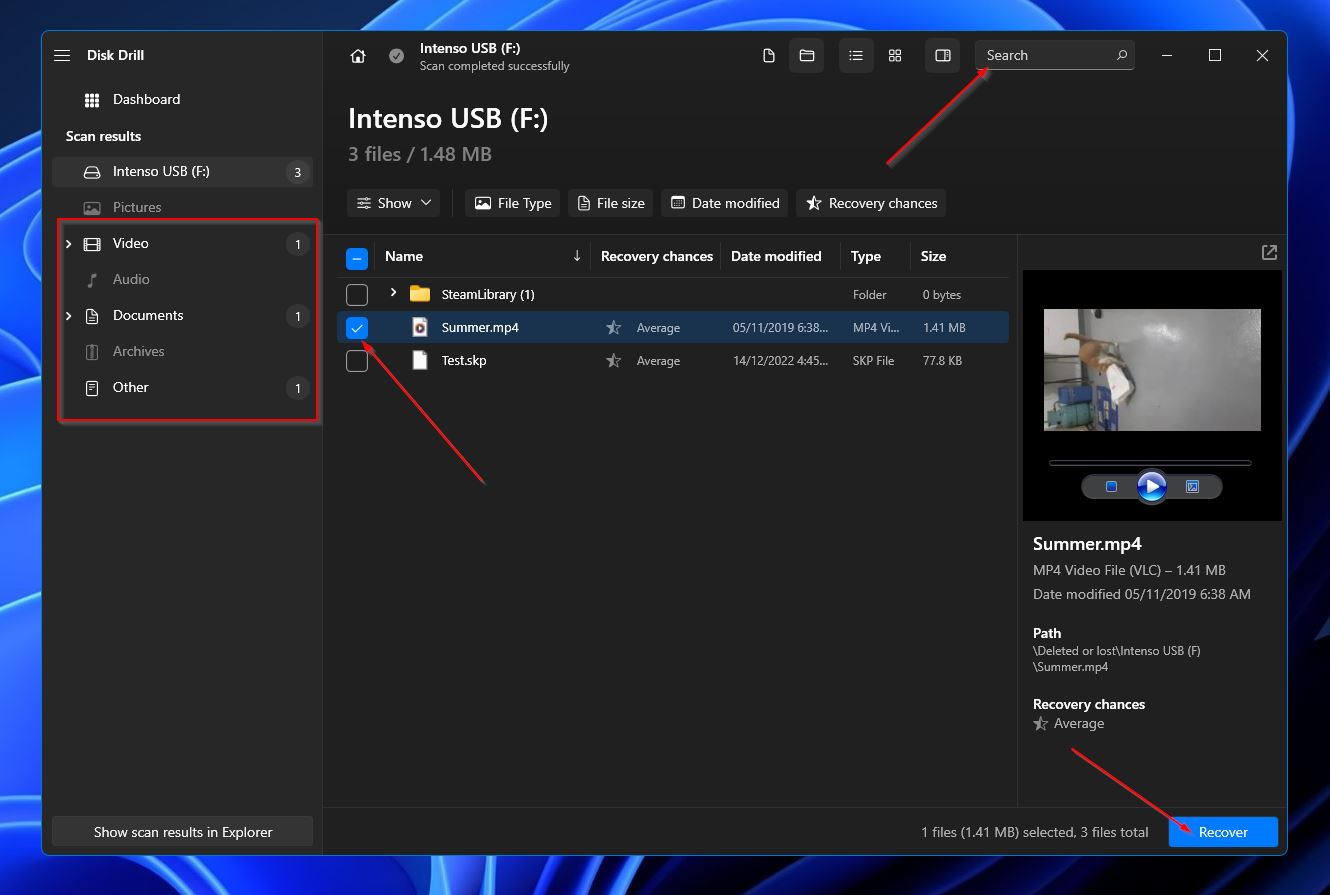
- Browse the results section to find the files you want to rescue. You can make the search easier by using the categories on the left or the search bar at the top-right corner. The latter allows you to search both file names and file extensions. Select the files you want to recover by clicking the checkboxes next to the file names, then hit Recover to move on to the next step.
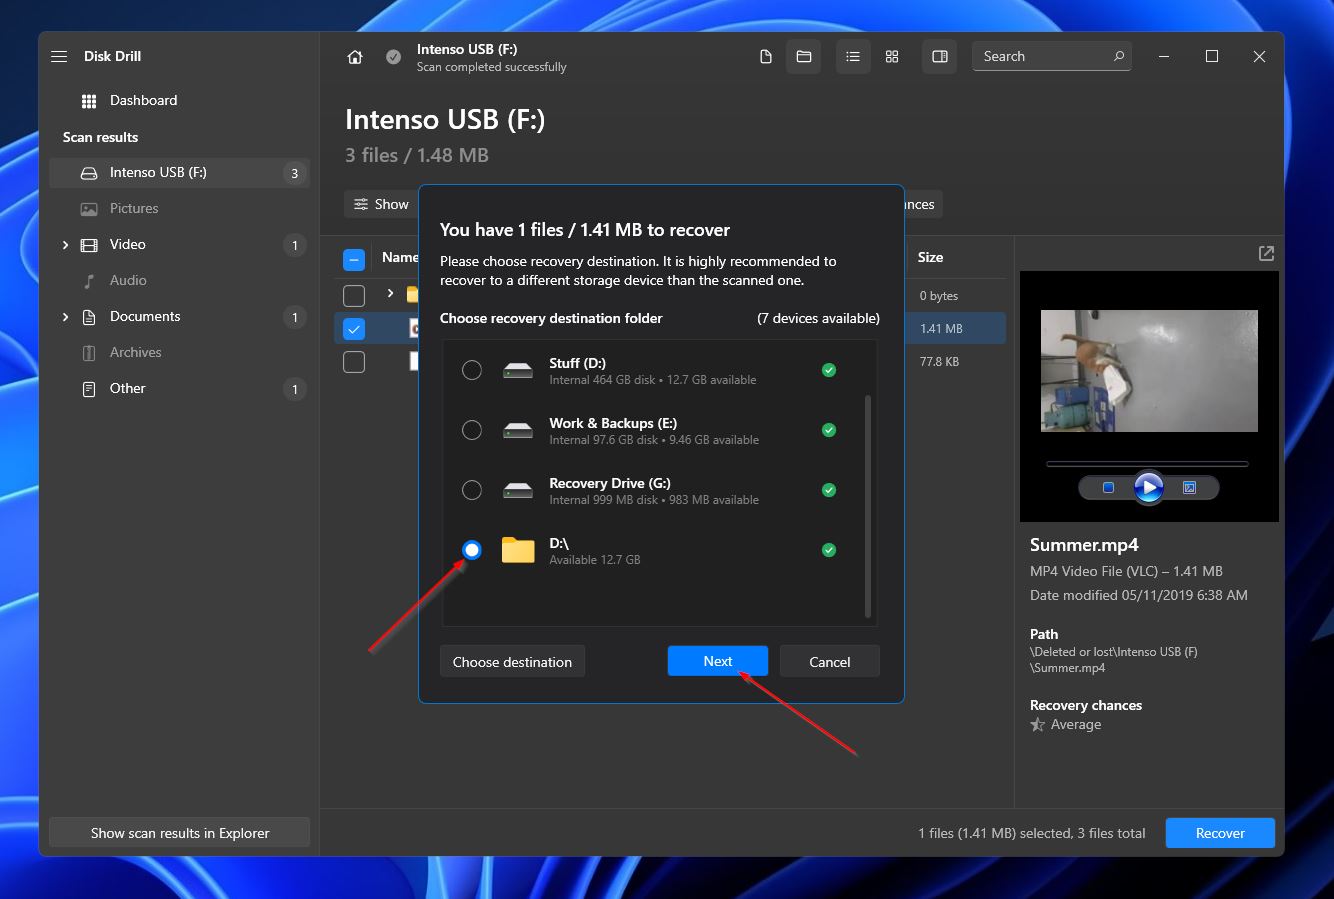
- Upon clicking, a small pop-up should appear on-screen, where you need to select the storage location for the retrieved files. This has to be different from the Intenso drive you’re trying to restore. Click OK to start the final part of the process.
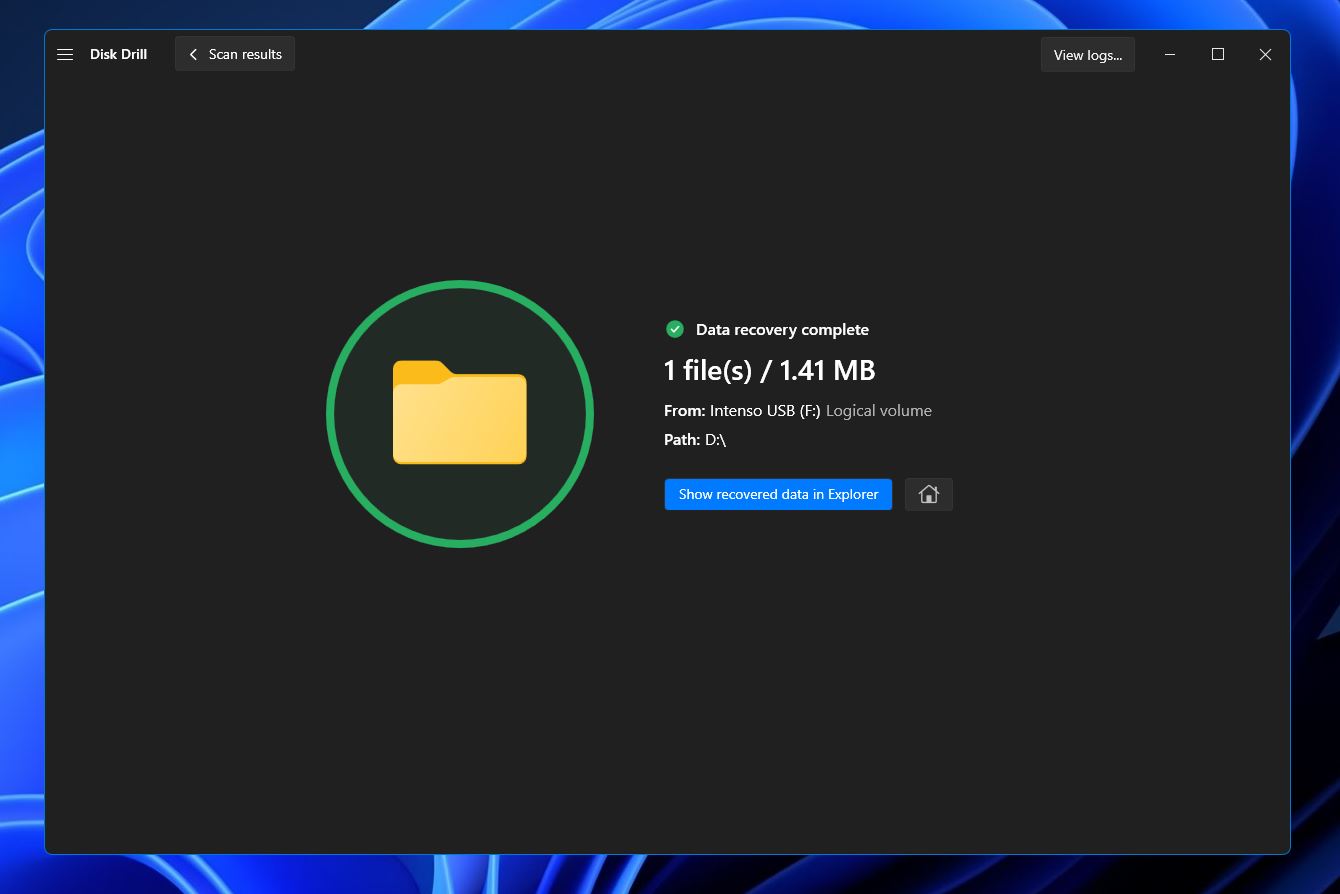
- This is the part where Disk Drill tries to get your files back. Once completed, you’ll have the option to click the Show recovered data in Explorer button to go right to the files.
Option B: Repair the Intenso Flash Drive/External Disk Using CHKDSK
CHKDSK is a built-in Windows tool that checks the integrity of your storage media and tries to fix any file system errors that it can. If you have a corrupted Intenso drive, it’s worth giving this tool a shot.
Here’s what you can do:
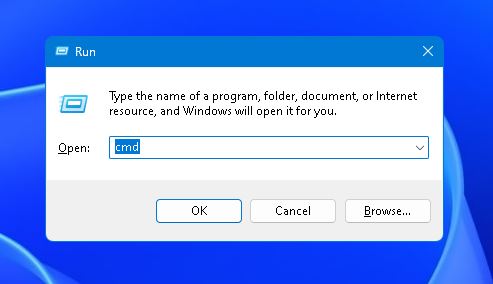
- To get started, press Windows + R simultaneously to launch the Run command box, then type “cmd” followed by pressing Ctrl + Shift + Enter to run as admin.
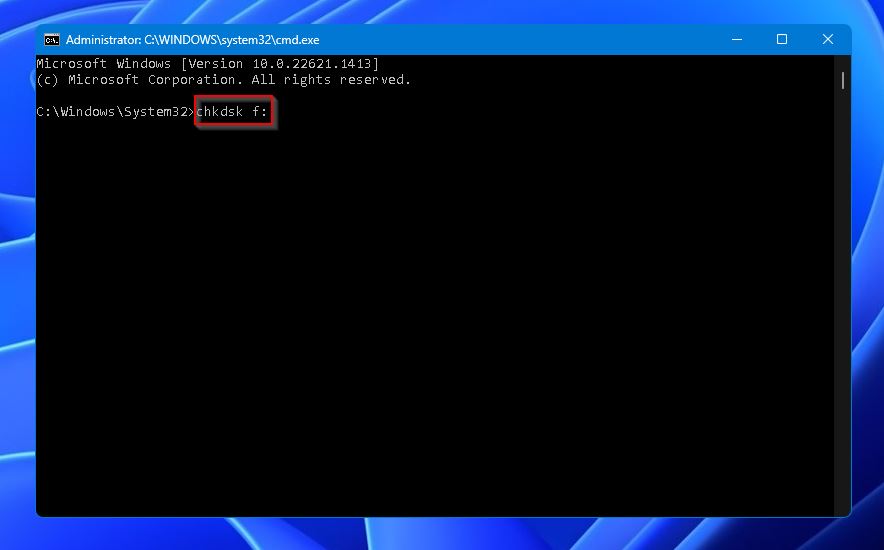
- In the Command Prompt that launches, type “chkdsk” followed by the drive letter of your Intenso drive. Next, press the Enter key to execute.
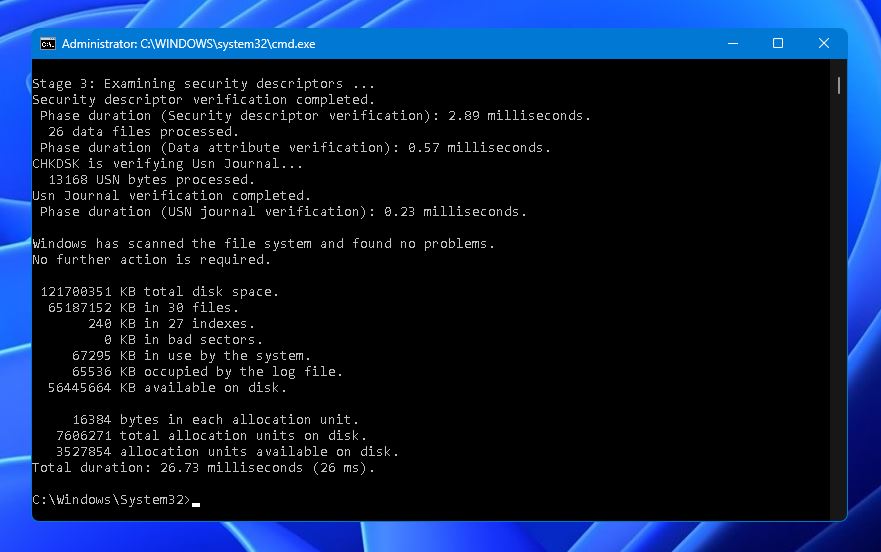
- CHKDSK will take care of the rest, scanning your drive and repairing errors.
Option C: Fix the Intenso USB/Drive Partition Using TestDisk
TestDisk is a pretty straightforward recovery program that’s both free and open-source. It’s used primarily to retrieve lost files and compromised partitions, and potentially repair drives that no longer boot as they should.
Here’s how to use it to fix partition issues:
- First, head over to the TestDisk download page and select the version that fits your OS. Keep in mind that you need archiving software like WinRAR or WinZIP to open the downloaded file.
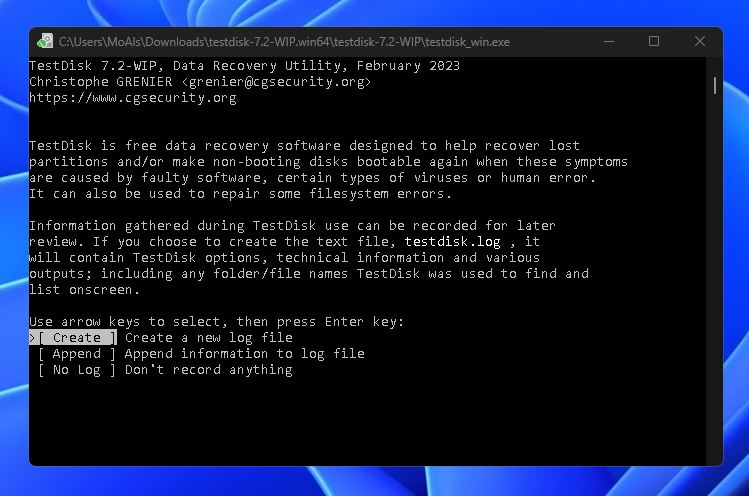
- Unpack the downloaded file and run testdisk_win.exe.
- The first choice you need to make is pertaining to the log file. Select whichever and press Enter to continue.
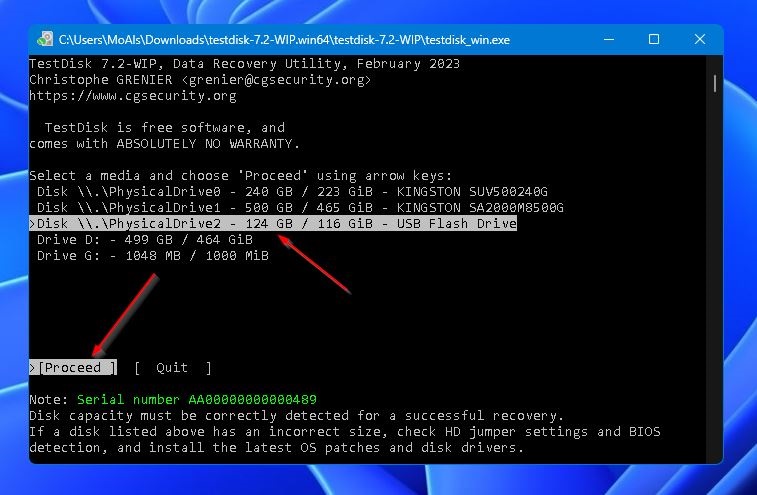
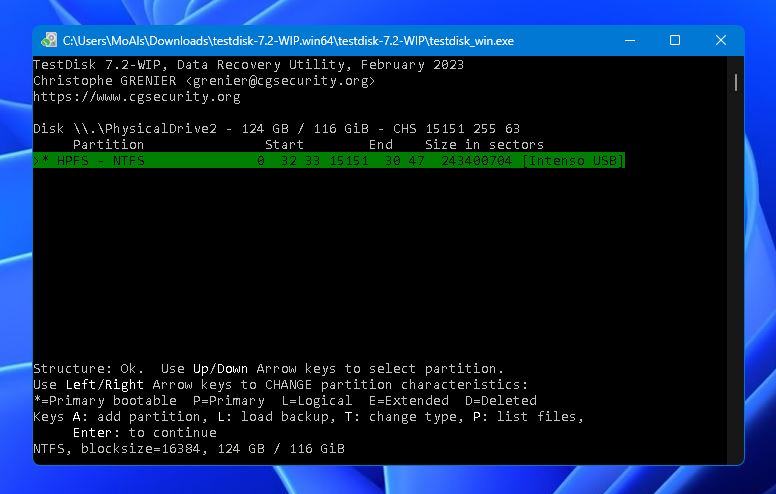
- Next, select your Inteso drive from the list and hit Enter.
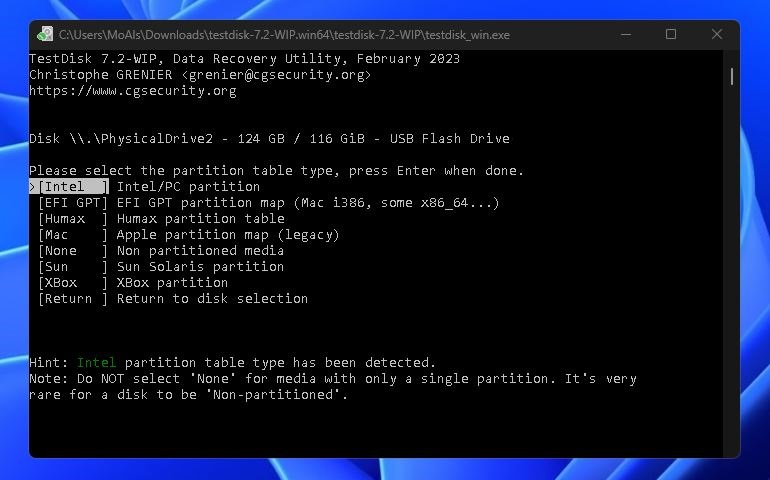
- After that, you need to choose a partition table. It’s best to leave it as the default highlighted choice and hit Enter.
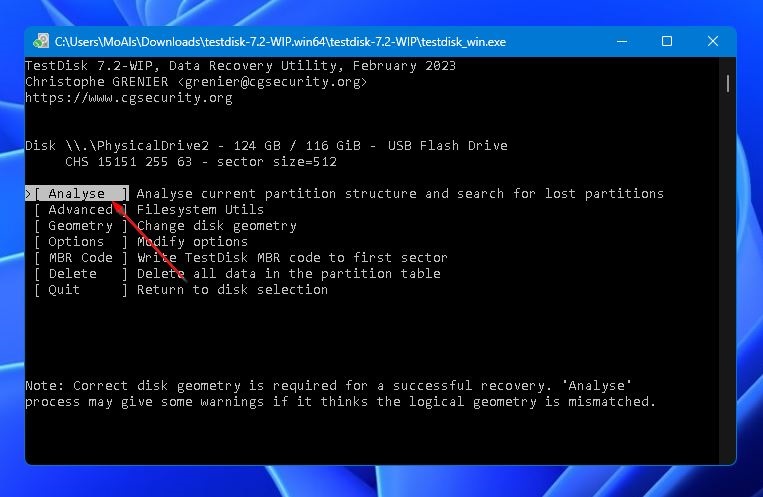
- Select Analyse, followed by the Enter key.
- Then, choose Quick Search and hit Enter.
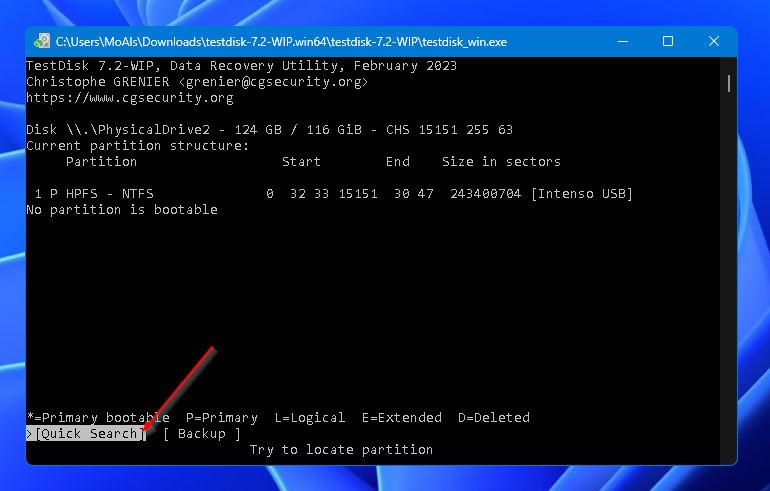
- Here, you can see a list of the available partitions. Select the one you want to repair and hit Enter.
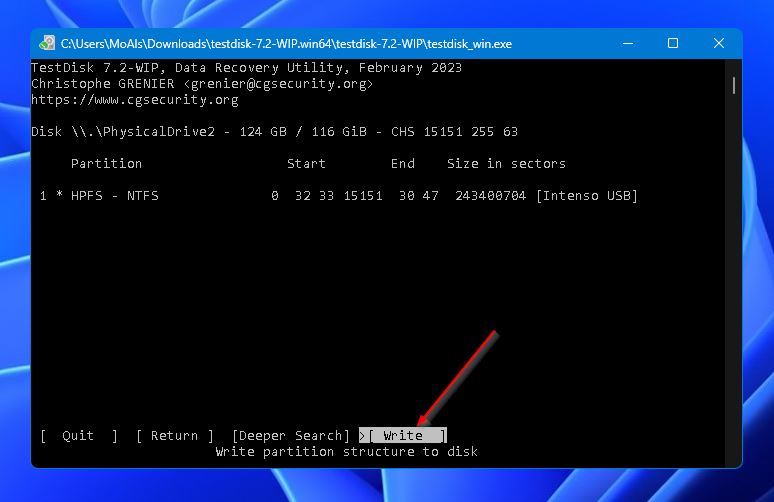
- If all the partitions are showing up in this section, select the Write option and hit Enter. Your missing partition should appear after that. If the partition didn’t appear on the list, select Deeper Search to perform a more meticulous scan.
FAQ
How to recover deleted files from Intenso USB stick?
For Intenso data recovery, go for one of the best USB recovery apps, like Disk Drill. Here’s how to use it:
- Download and install Disk Drill.
- Launch it and scan your Intenso drive.
- Evaluate the scan results and preview recoverable files.
- Mark the files you want to rescue.
- Pick a storage location and click OK.
Does Intenso have a proprietary USB stick repair tool?
Intenso doesn’t have its own brand of data USB repair tool, but there’s no shortage of programs out there that can help you recover files or restore your drive.
What is the best Intenso USB repair tool?
It really depends on what you’re trying to accomplish. For repairing file system problems, CHKDSK is a great tool to go with. As for partition issues, it’s definitely worth giving TestDisk a try.
Conclusion
Whether it’s to retrieve lost files, fix integrity issues, or repair partition problems, you can go about Intenso data recovery in various ways. There are some excellent USB repair tools available, after all. Hopefully, this guide will help arm you with the best tools for the job and walk you through the processes one step at a time.
This article was written by Princess Lescan, a Staff Writer at Handy Recovery Advisor. It was also verified for technical accuracy by Andrey Vasilyev, our editorial advisor.
Curious about our content creation process? Take a look at our Editor Guidelines.