Have you tried connecting a USB flash drive to your Mac but realized it’s not showing up? This can happen because of numerous issues: malware, hardware damage, file system corruption, driver failure, and the list goes on. But the good news is that in most cases, it’s possible to solve this problem.
Read on to learn how to fix a USB not showing up on your Mac using these easy and effective solutions.
How to Recover Data From USB Drive that Won’t Show Up on Mac
If you have any valuable data stored on the USB drive that isn’t showing up on your Mac, it is a good idea to try to recover the files from the flash drive before moving forward with any repair procedures since some of them may damage the data stored on such a device. However, keep in mind that it’s possible to retrieve the files from a flash drive with this issue only if Disk Utility recognizes it when you plug it into your Mac and if the size of the drive is correctly displayed.
When it comes to choosing a data recovery software for USB drives, we recommend giving Disk Drill a try. This tool is regarded as one of the best data recovery software for Mac thanks to its powerful scanning algorithms and astonishing file recovery results. Another reason why Disk Drill is our top choice is that it is compatible with all USB drive brands (Kingston, SanDisk, Samsung, Verbatim, and others) and file systems (FAT32, exFAT, APFS, HFS+, etc.).
For more information about this data recovery tool, check out this in-depth Disk Drill review.
Follow these steps to recover data from a USB flash drive on your Mac using Disk Drill:
- Download Disk Drill and follow the onscreen instructions to install it on your Mac.
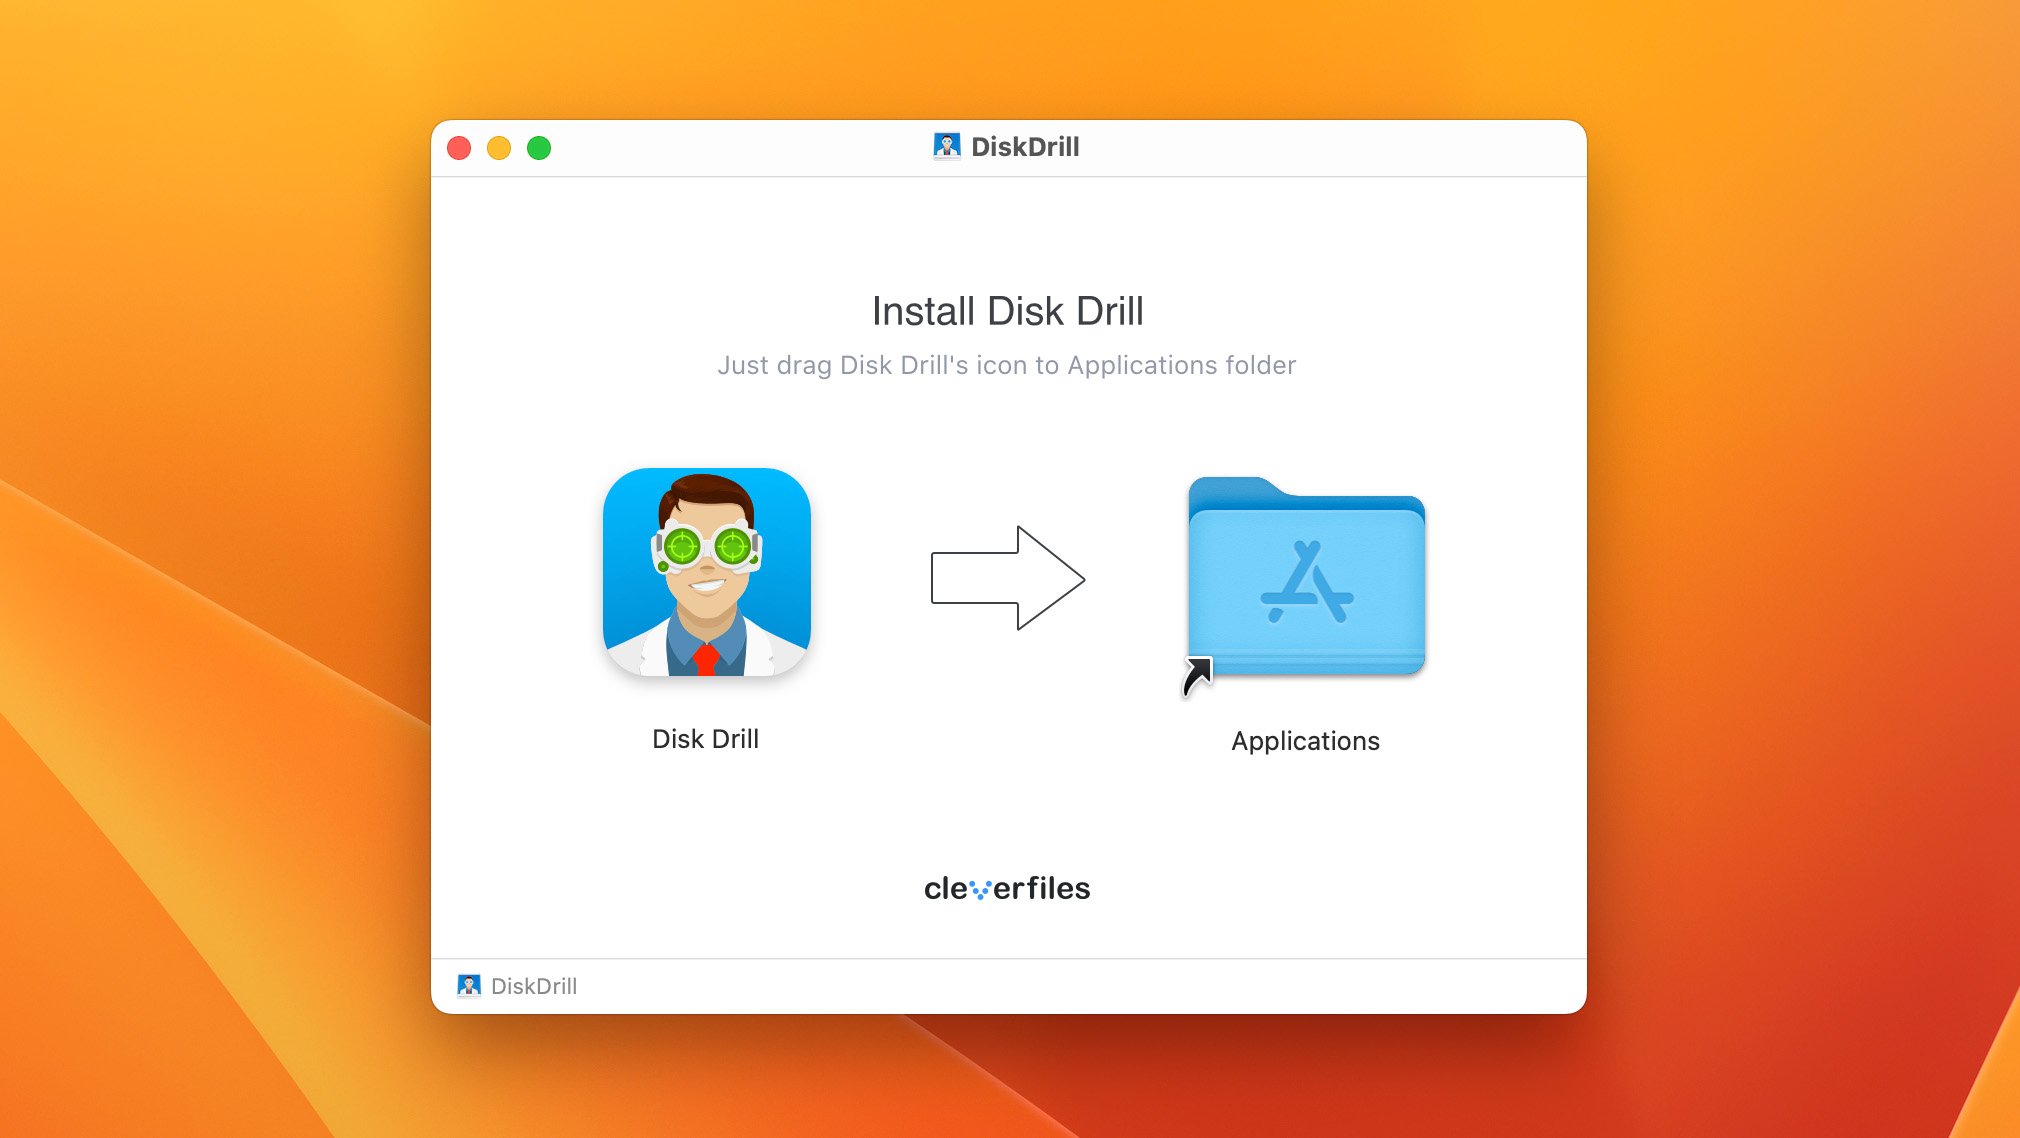
- Connect the USB flash drive that is not showing up on your Mac.
- Launch Disk Drill.
- Choose Storage devices from the sidebar on the left.
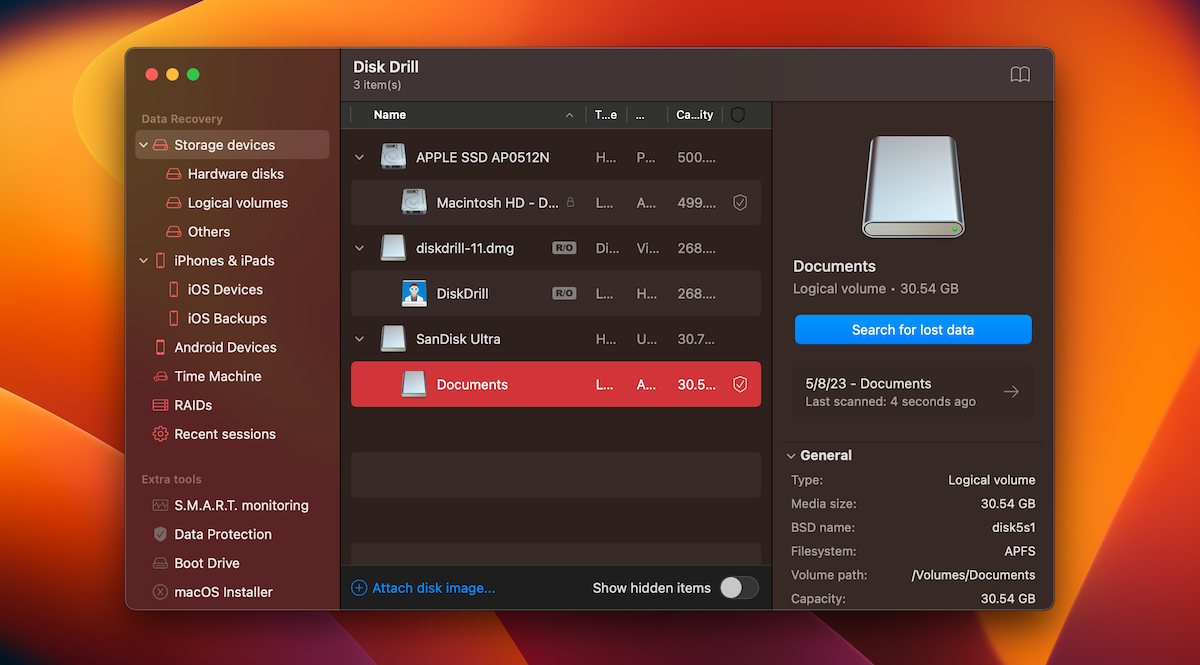
- Click the USB flash drive on the list to select it and click Search for lost data to start the scan.
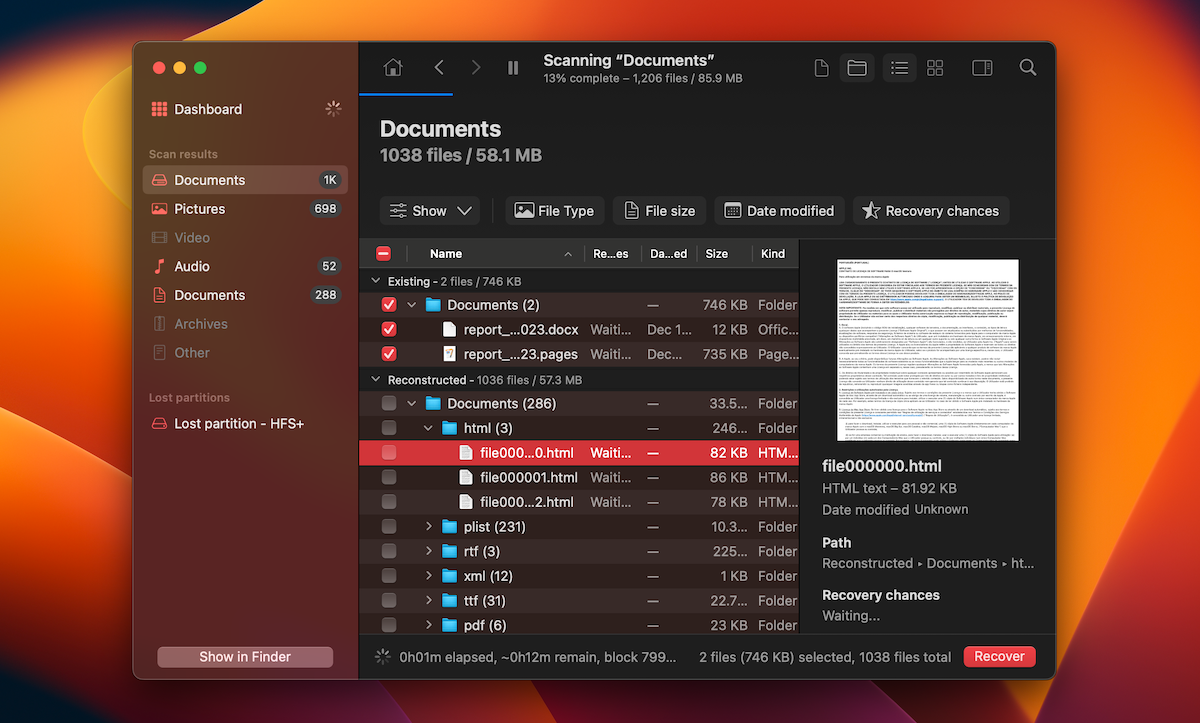
- Wait for the scan to finish or click Review found items to start previewing the files as soon as they get discovered by the tool.
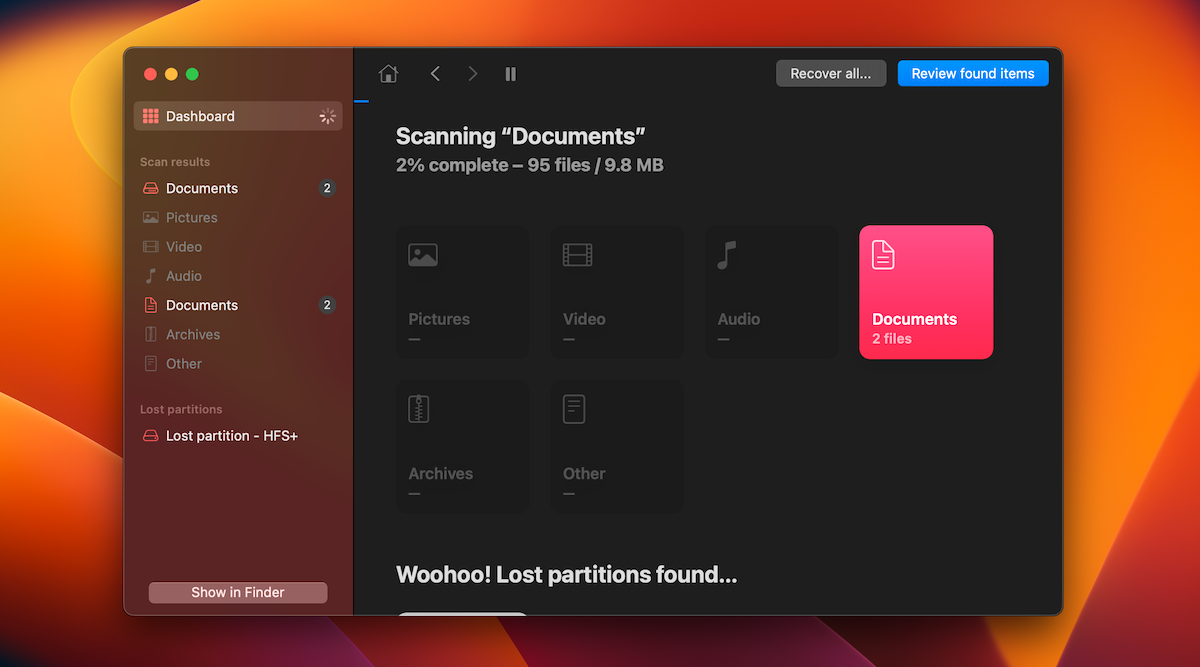
- Click the eye icon near a file to preview it.
- Choose the files you wish to retrieve and click the Recover button.
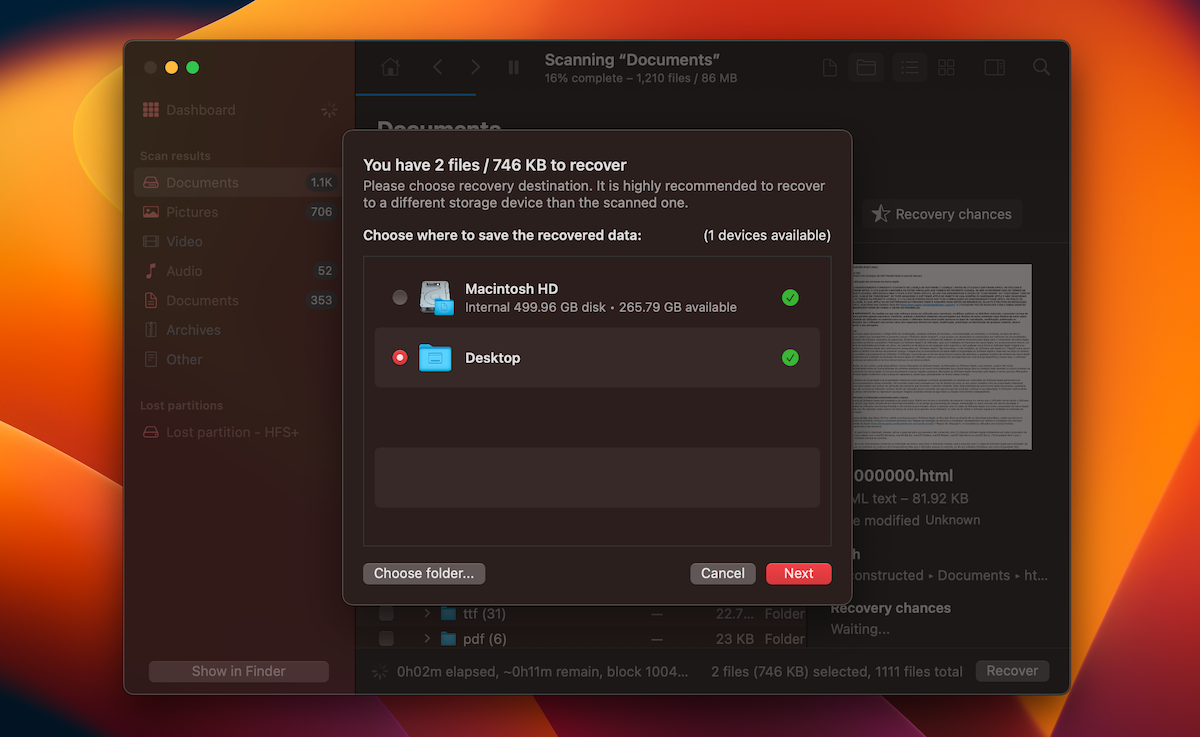
- Select a preferred destination for the recovered data and click Next (make sure to choose a folder located on a drive different from the one you’re trying to recover from).
The free Disk Drill version allows you to scan a device and even preview the potentially recoverable files so that you’ll be sure the lost data can actually be restored. If you’re satisfied with these results, only then you’ll be asked to upgrade to the paid Pro version to complete the recovery process.
How to Fix a USB Flash Drive Not Showing Up on Mac
Not sure where to start with the repair process of your USB drive? In this section, we’ve gathered the top 10 most effective methods that can help you make your flash drive show up on your Mac. For the best outcome, you should try these solutions one after the other.
Method 1: Fix USB Drive Issues Caused by Hardware Defects
When trying to fix a USB stick not showing up on your iMac, MacBook Air or MacBook Pro, it’s best to start with the basics. Since hardware defects are usually the most common reason for the appearance of such an issue, here’s what you should do to make an attempt at repairing it.
🔨 Check for Physical Damage on the USB Stick
If your USB drive is not recognized by your Mac, it’s possible that it has suffered from physical damage. When checking your USB drive for physical damage, pay close attention to the USB connection point. Moreover, if any of the internal components of the drive become visible to you, it also means that the drive is damaged.
Unfortunately, there is not much that you can do to fix a damaged USB drive. In such a case, your best option would be to send the drive over to a data recovery service to retrieve the files from it and transfer them to a different storage device.
🔗 Check the USB Hub
If you’re using a USB drive hub to connect a flash drive to your Mac and your computer stops recognizing it, it’s possible that there might be something wrong with the hub. In that case, try using a different USB hub or connect the USB drive directly to your Mac (without the hub).
Or, if you have too many USB drives attached to a USB hub, that also might be the reason why your Mac won’t display a specific USB flash drive.
🔌 Identify USB Port Problems
Another thing that you should double-check when having issues with connecting a USB drive to your Mac is your computer’s USB port. There is a chance that the port you’re trying to use for your drive is not working. So just to rule out this issue, you should plug the USB drive into another port on your Mac.
Method 2: Restart the System to Fix USB Issues
Have you tried restarting your Mac? Sometimes a flash drive might not show up on a Mac because of a simple glitch in the USB ports functionality. Usually, you can fix this issue by rebooting your computer.
Here’s the easiest way to restart the system on your MacBook:
- Click the Apple icon on the menu at the top of the screen.
- Choose Restart from the drop-down menu.
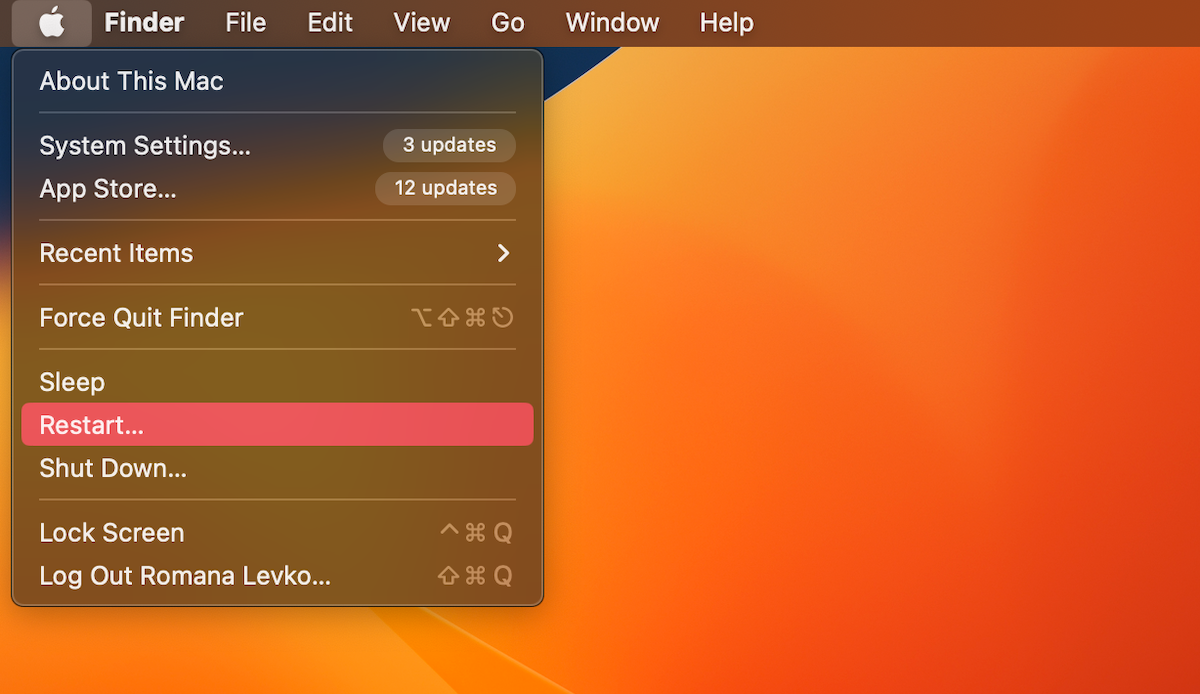
- Wait for your Mac to turn back on, and try connecting the USB drive again.
Method 3: Adjust Finder Settings to Show USB Drives
There is a possibility that the reason why you don’t see your USB drive listed in Finder is because of the settings. Therefore, it’s a good idea to check whether you’ve allowed your Mac to show connected USB drives (or other external disks) in the sidebar.
Follow these steps to check and, if needed, change the sidebar settings in Finder on your Mac to view your USB drive on the list of connected devices:
- Open the Finder application on your MacBook.

- From the menu at the top of the screen, click Finder > Settings.
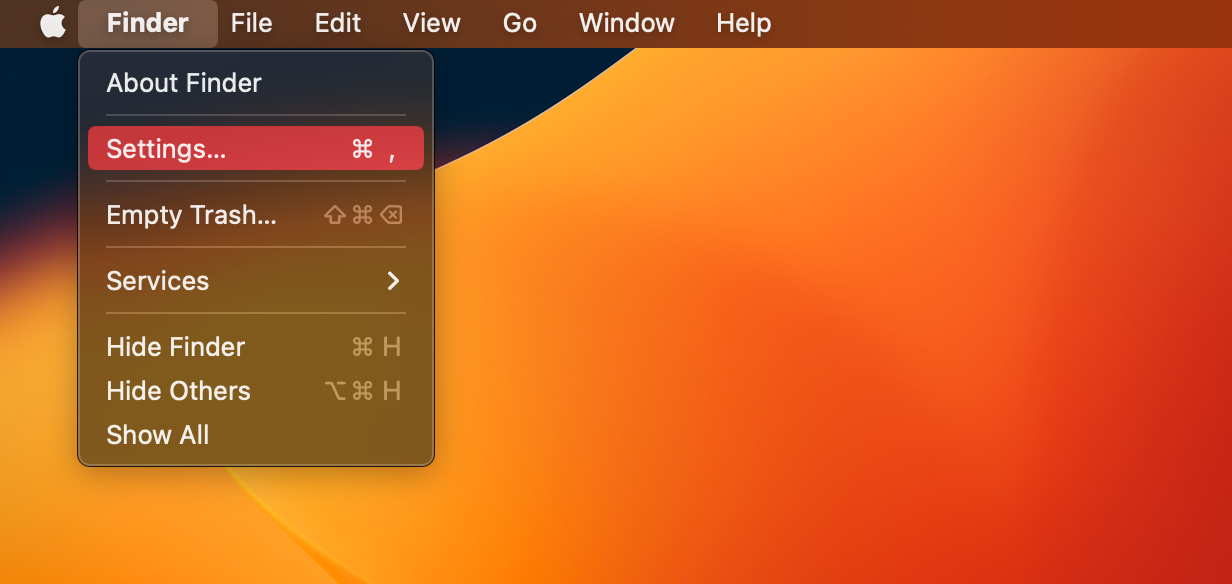
- Choose the Sidebar tab.
- Under the Locations section, check if there is a tick in the box near External disks. If it’s not there, simply click the box to select it.

Method 4: Verify Flash Drive File System Compatibility
Another potential reason why your Mac won’t read a USB flash drive when you connect it is that it might be using a file system that’s not compatible with macOS. For example, if your drive is formatted as ext4, there is a chance that it’s not showing up on your Mac because of that since this file system format is a Linux-based one.
Follow these steps to check which file system format is used by your USB drive:
- Connect the USB drive to your Mac.
- Go to Applications > Utilities and double-click System Information to open the tool.
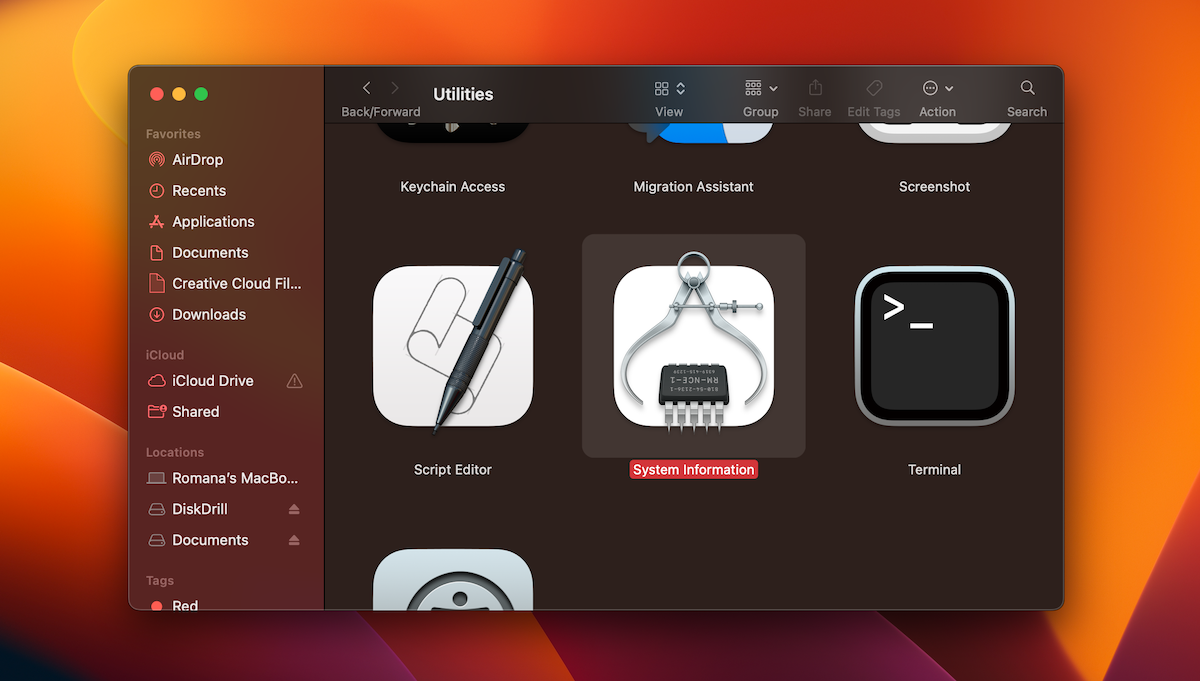
- Click USB on the sidebar on the left.
- You’ll see what format your drive is using near File System.
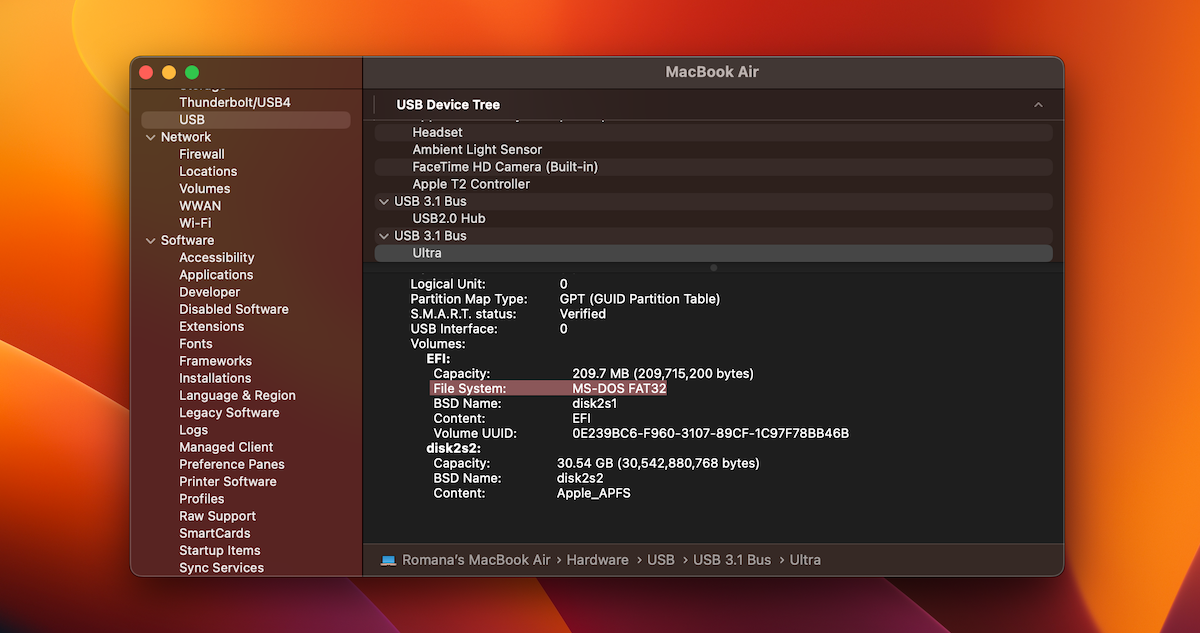
If you’ve confirmed that the drive you’re trying to access is formatted as NTFS, then you can use a tool like Disk Drill to scan such a flash drive and recover the data from it.
Method 5: Repair Flash Drive Errors with First Aid Utility
If the file system on your USB drive is corrupted or has directory structure issues, it’s possible that it might be the reason for your problems. In that case, you can use a tool called Disk Utility on your Mac to scan the drive and repair the issues, if there are any.
Before proceeding with the repair process, it’s a good idea to try to recover the data stored on that drive to avoid any potential data loss.
Follow these steps to repair your USB drive using this feature on your Mac:
- Connect the faulty USB drive to your Mac.
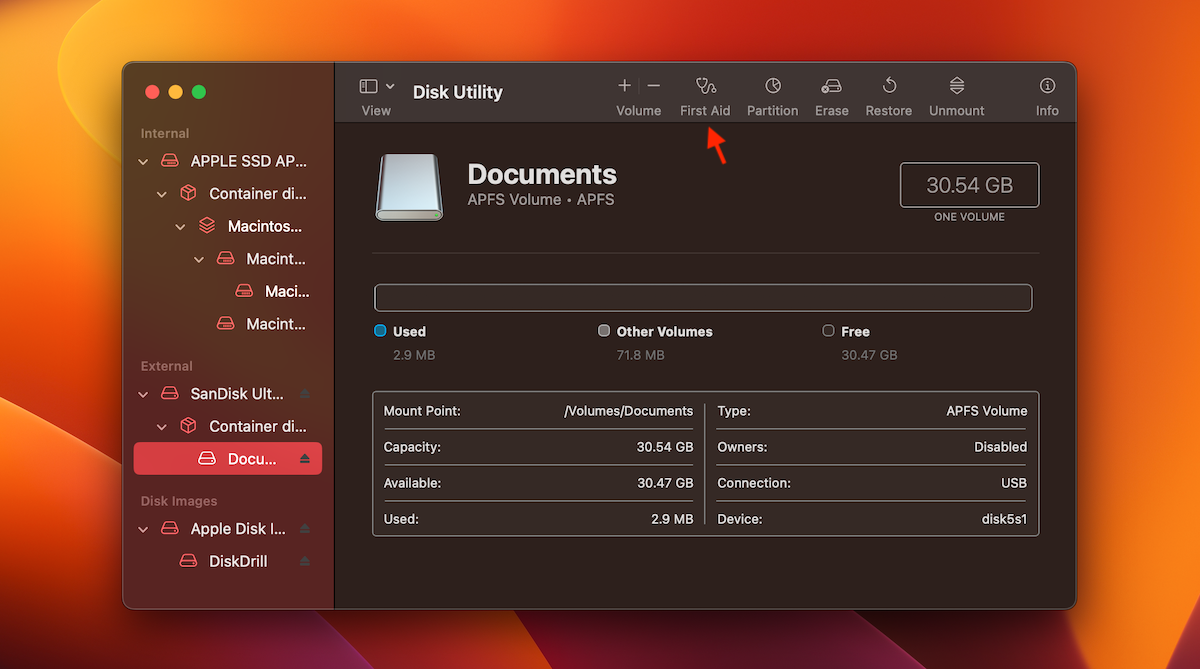
- Open the Disk Utility application (go to Finder > Applications > Utilities and double-click Disk Utility).
- Click your USB drive on the list on the sidebar.
- Click the First Aid button at the top.
- Click Run.
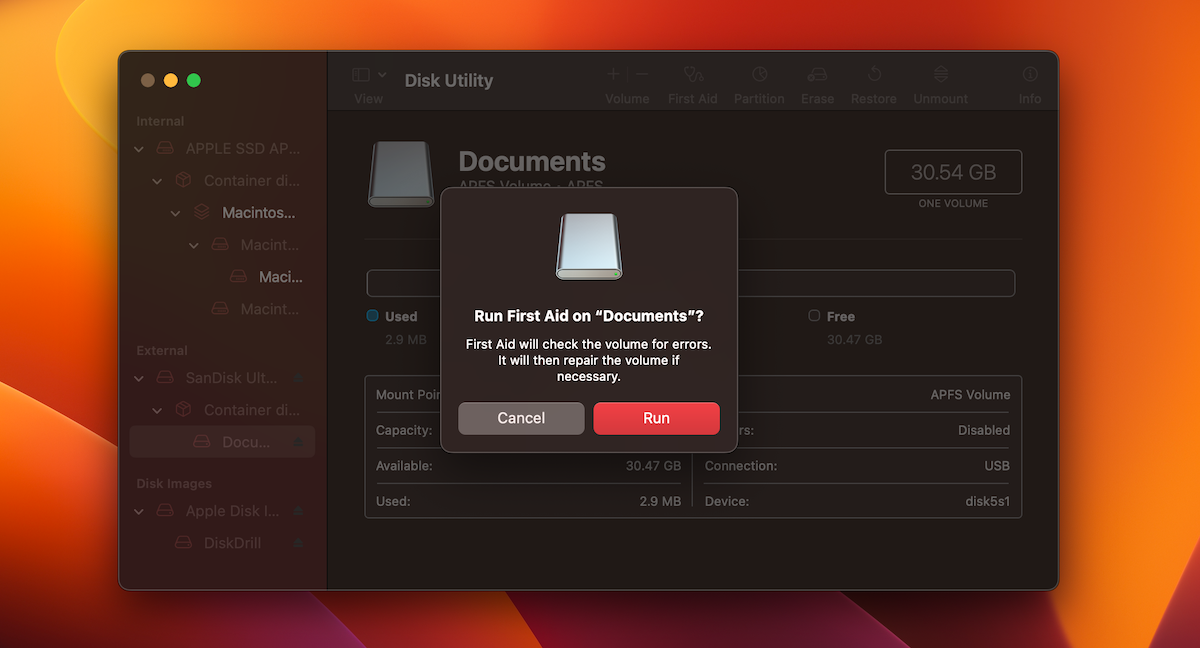
Once the tool has finished the repair process, eject your USB flash drive from the computer and then plug it back in to check if the tool has fixed the issue and has made your drive visible again on your Mac.
Method 6: Reset the SMC and PRAM/NVRAM
If your Mac is not recognizing your USB drive, sometimes resetting the SMC and PRAM/NVRAM might help to fix the issue.
The SMC (System Management Controller) is directly responsible for making sure that your Mac correctly distributes the power to the USB ports. So it’s a good idea to reset the SMC on your computer to see whether this was the issue that was preventing your Mac from displaying your USB drive. Depending on what type of Mac you’re using, the instructions for resetting the SMC will vary.
If resetting the SMC didn’t help, you should try to reset the PRAM/NVRAM (Parameter Random Access Memory/Non-Volatile Random Access Memory) on your Mac. This is the type of memory used by your computer to access certain system settings. If it is not working properly, it might keep your Mac from properly showing a connected USB drive.
Follow these steps to reset PRAM/NVRAM on your Mac:
- Turn off your Mac.
- Turn it back on by pressing the power button and then pressing and holding Command + Option + P + R
- Hold the keys until the Apple logo appears (around 20 seconds).

- Wait for the computer to power back on, and try to connect your USB flash drive again.
Method 7: Troubleshoot USB Drive Mounting Issues via Terminal
This method is more suitable for more experienced Mac users since it entails using a tool called Terminal. It is a text-based interface application, meaning that there is no actual graphical interface, and to use this tool, you’re going to be using commands. But if you’re comfortable with using such a tool, go ahead and try to fix your faulty USB drive with this method.
Fix File System Errors with FSCK
First, you should try to fix the file system errors on your flash drive (if there are any). Sometimes this issue can keep your Mac from recognizing a USB drive, which is why it’s best to scan your drive to see if that’s the problem.
Follow these steps to fix file system errors on your USB drive using Terminal on your Mac:
- Connect the USB drive to your MacBook.
- Open the Terminal application (go to Launchpad and type in Terminal in the search field).

- Type in the following command and hit Return: diskutil list
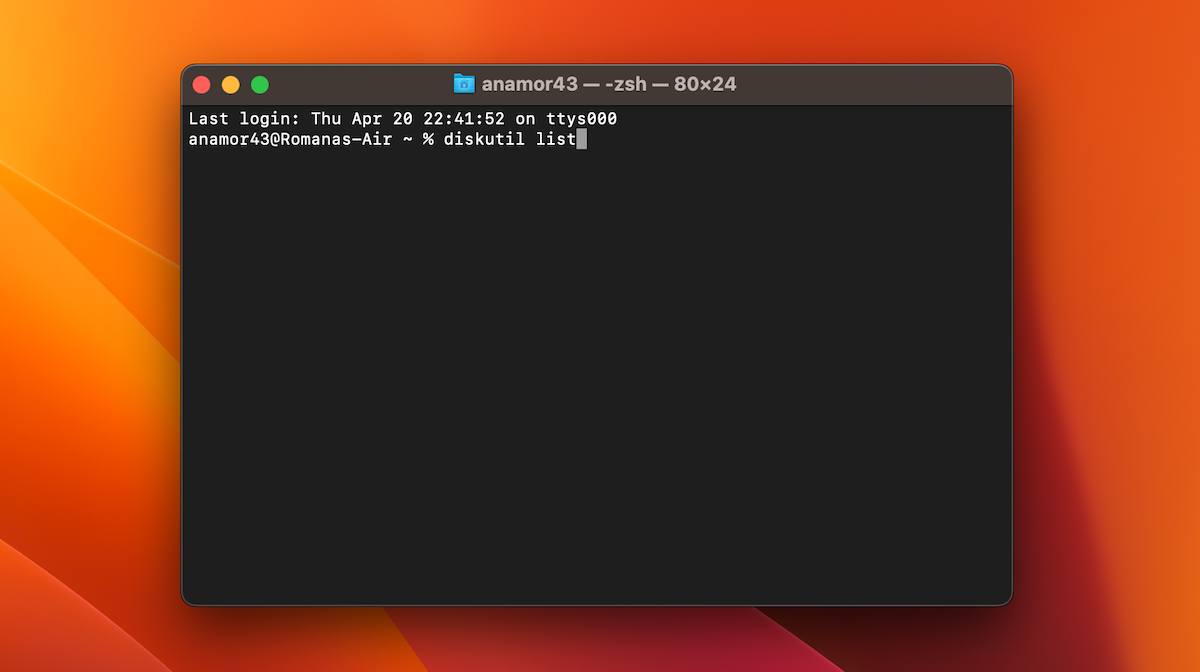
- Locate the name for your USB drive (it should be similar to /dev/disk3).
- Boot your Mac in Single User mode (restart your computer and immediately press and hold Command + S).
- Type in the following command (replace /device_name with the corresponding one) and hit Return: sudo fsck -fy/device_name
- Type in this command (replace apfs with the file system used on your drive) and hit the Return key: -fsck_apfs
- Type in this command (replace apfs with the file system used on your drive) and hit the Return key: fsck_apfs
- Type reboot and hit Return.
- Restart your Mac.
Mount Your USB Drive Manually
Another option that you can try is to force-mount the USB drive to your Mac.
Follow these steps to do it with the help of Terminal:
- Connect the USB drive to your MacBook.
- Open the Terminal application (go to Launchpad and type in Terminal in the search field).

- Type in the following command and hit Return: diskutil list

- Find the name for the internal representation of your USB drive.
- Type in this command and hit return to mount the flash drive: diskutil mount /device_name (replace /device_name with the corresponding one).
- Hit Return.
Method 8: Update MacOS and Firmware to Resolve USB Problems
There are numerous benefits to keeping your Mac operating system and firmware up to date. But the main reason for doing that is to protect your computer from potential hardware or functionality issues like outdated system drivers. So if you’re still using macOS Monterey, it’s a good idea to upgrade to macOS Ventura or the newest operating system version available.
So if you’re not sure if your Mac is up to date and you’re experiencing a problem when trying to connect a USB drive, it’s a good idea to check for any macOS updates:
- Click the Apple icon at the top menu.
- Choose System Settings from the drop-down menu.
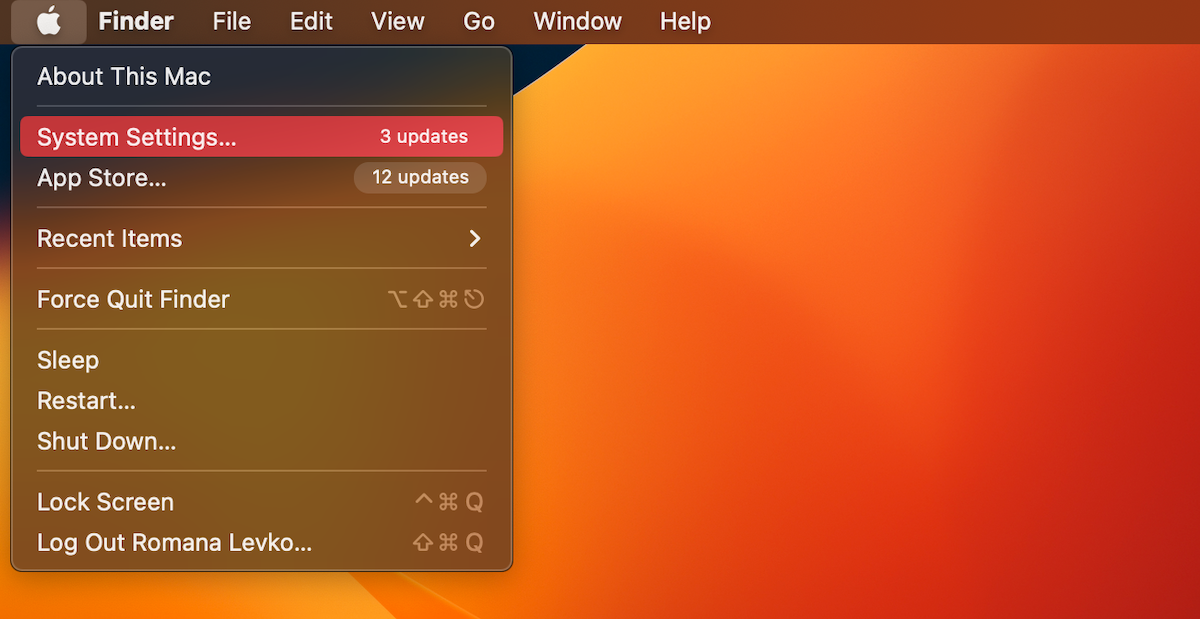
- Go to General > Software Update.
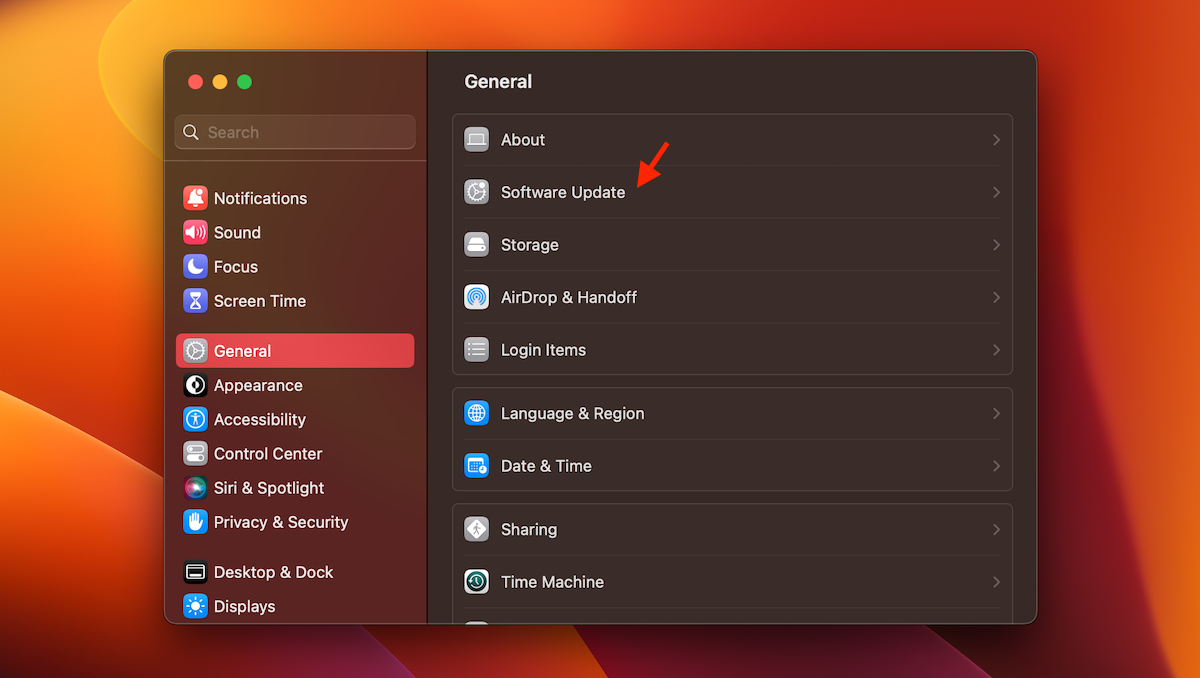
- Click Update Now if there is an update available.
Method 9: Format Your USB Drive
Another thing that you can try to make your USB drive show up on your Mac is to format it. This is a rather invasive option, but if you’ve already tried everything from the above, this method is the next one. But keep in mind that once you format the drive, all of the files located there will be permanently erased from it.
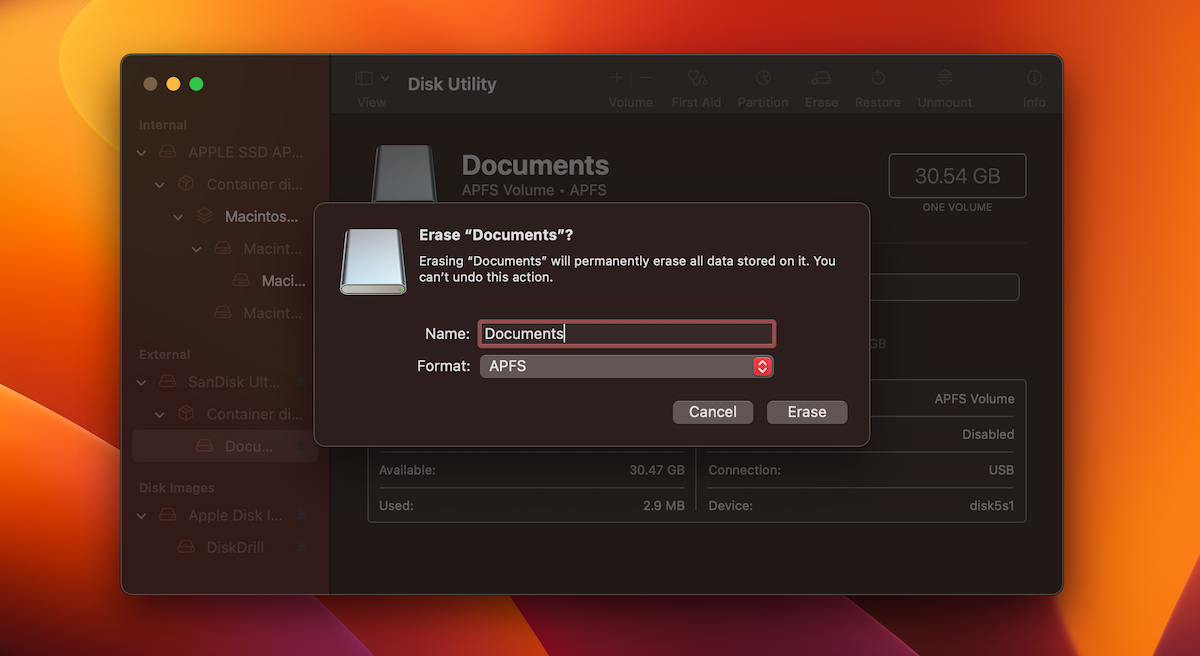
Follow these steps to format your USB drive on your Mac:
- Connect the faulty USB drive to your Mac.
- Open the Disk Utility application (go to Finder > Applications > Utilities and double-click Disk Utility).
- Choose your USB drive from the list of devices on the left.
- Click the Erase button.
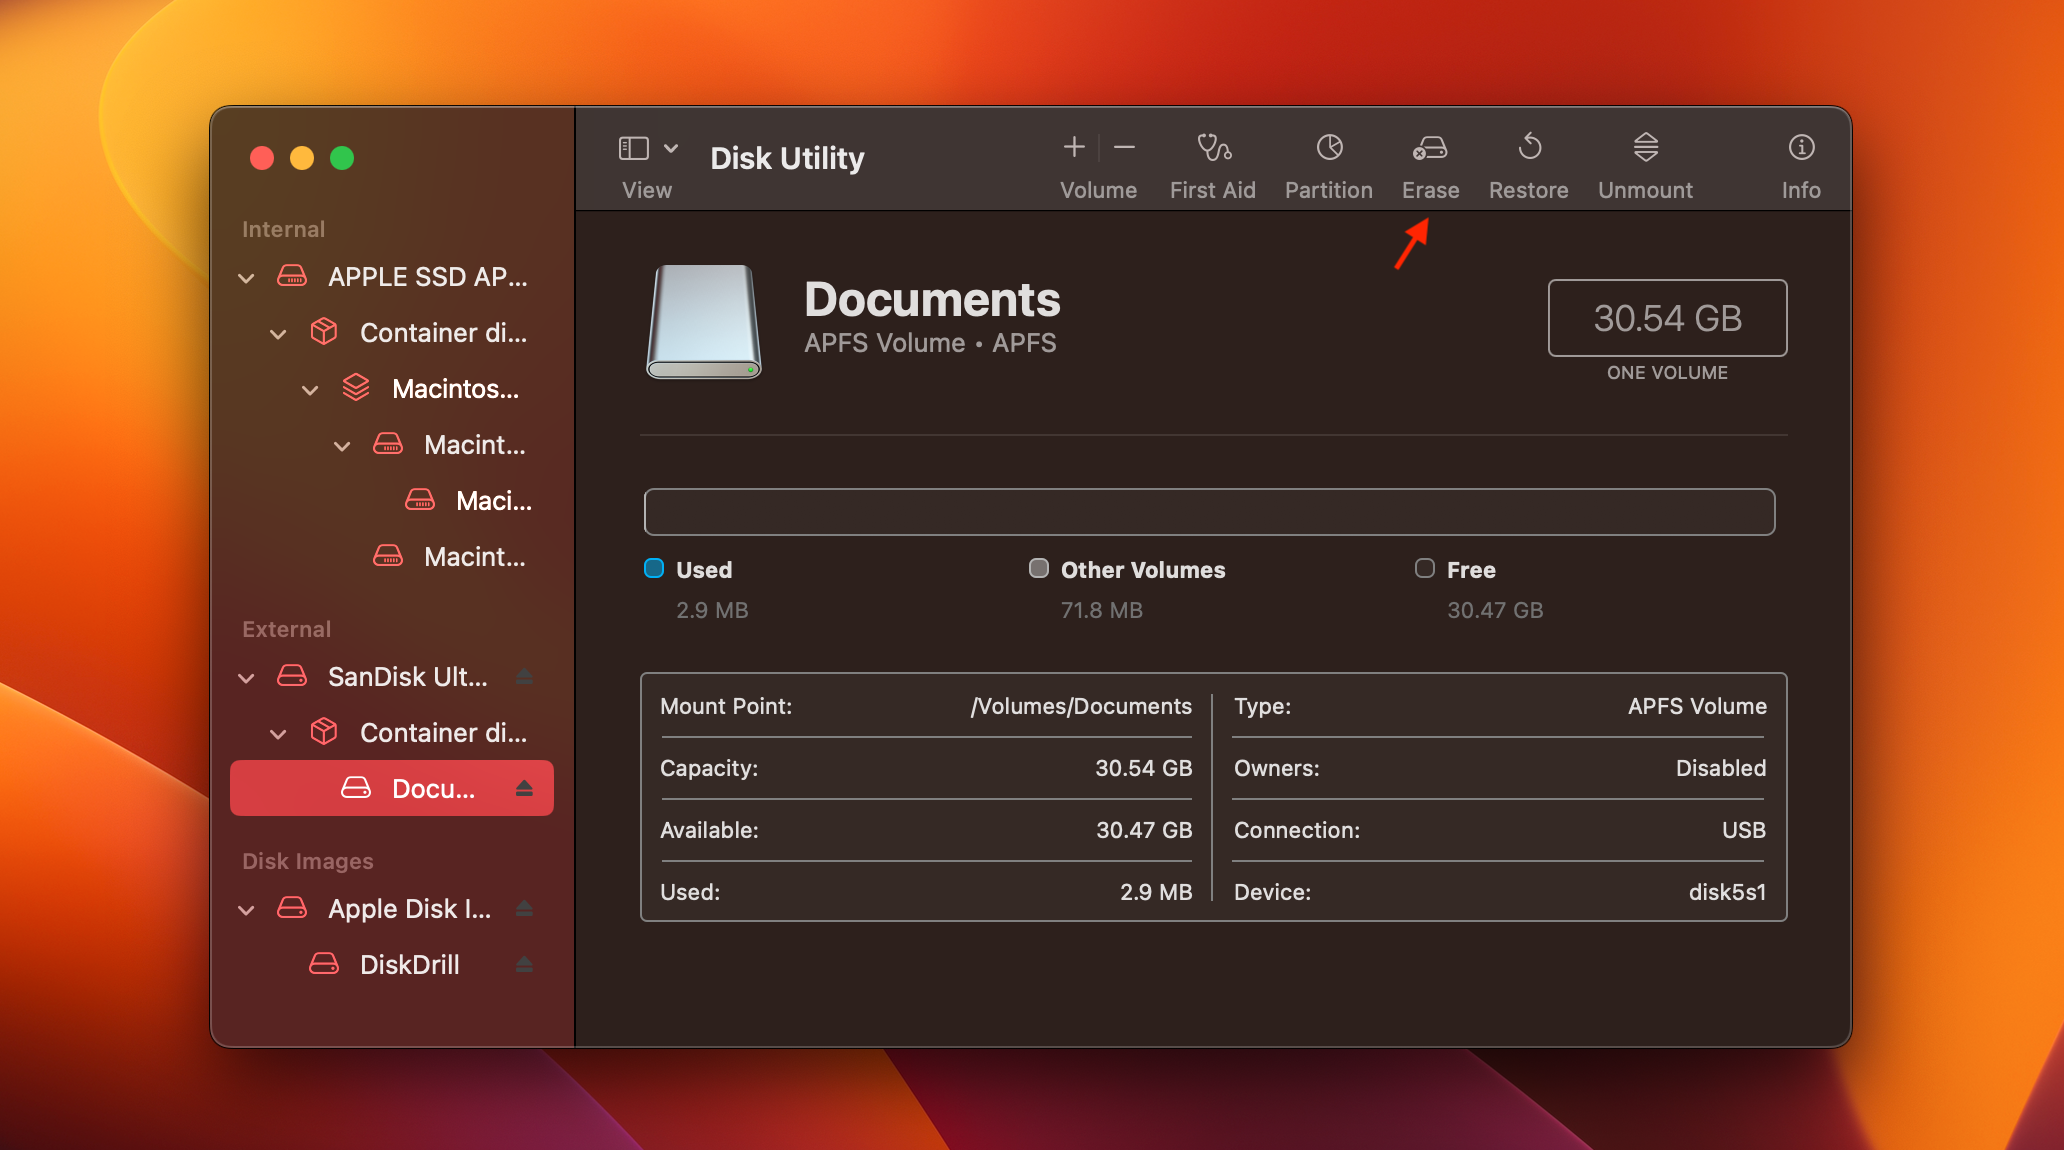
- Type in a name for your flash drive and select a file system format you wish it to be formatted to.
- Click Erase to confirm your choice.
It should be possible to recover some of the files from a USB drive even after formatting it. However, to retrieve the most data, it is recommended to make an attempt at recovering the device before proceeding with the formatting process.
Method 10: Contact Data Recovery Service
If the above-mentioned methods failed to fix your thumb drive not showing up on your Mac, and you need to save the data located there, you should try getting help from a professional data recovery service. They should be able to retrieve the files from the faulty USB drive and transfer them to a new storage device. Some services will also make an attempt at fixing the USB drive and making it bootable again.
FAQ
Why is my USB not showing up on my Mac?
Here are the potential reasons why your pendrive is not detected on a Mac:
- Physical damage
- Outdated drivers on your computer
- Malware infection
- File system corruption
- Faulty USB hub or port
How do I get my Mac to recognize my USB flash drive?
Follow these steps to fix your USB device using the First Aid feature on your Mac to make it recognizable by your computer:
- Connect the USB drive to your Mac.
- Open the Disk Utility application (go to Finder > Applications > Utilities and double-click Disk Utility).
- Click your USB drive on the list on the sidebar.
- Click the First Aid button at the top.
- Click Run.
How to open a USB drive on Mac?
When you connect a USB flash drive to your Mac, you can open it directly from the desktop of your Mac. After attaching the drive, an icon with the name of the drive should appear on the desktop. So all you need to do is double-click the icon to open the drive.
Another way to access the data on your flash drive on a Mac is with the help of Finder. Whenever you connect an external storage device to your computer, it appears on the sidebar of the Finder. To open the drive, just click its name on the sidebar.
Conclusion
Now you should be able to troubleshoot a faulty USB drive all on your own. We hope the solutions in this article helped you fix a USB flash drive not showing up on your Mac and access the files located there. If not, you can always let professionals take care of your issue.
This article was written by Romana Levko, a Staff Writer at Handy Recovery Advisor. It was also verified for technical accuracy by Andrey Vasilyev, our editorial advisor.
Curious about our content creation process? Take a look at our Editor Guidelines.
