Plugging your trusty USB drive into your Mac without seeing it show up properly because it has become corrupted can be a heart-sinking experience, especially if the drive contains a large quantity of important data. But don’t panic just yet! In this article, we explain how to fix a corrupted USB drive on Mac so that you can access your precious data again.
Note: To successfully complete this data rescue mission, you don’t need any special skills—just our step-by-step instructions and some free time.
Can a Corrupted USB Drive Be Fixed?
Yes, USB drive corruption can often be fixed, but you need to use the right solution for the specific problem you’re dealing with.
The table below provides an overview of common causes of USB drive corruption, the average data recovery chances associated with them, and the recommended solutions.
Problem |
Data recovery chances |
Solution |
My files have disappeared from the flash drive. |
High |
Use Mac/MacBook data recovery software to recover your lost files. In this situation, it’s usually not possible to recover deleted files without software. |
My files are randomly renamed or have unrecognized file extensions. |
High |
The good news is that your files are present on the flash drive and can be manually recovered. Just make sure to scan the USB drive using the First Aid tool to repair file system errors to prevent further corruption. |
The USB drive is not showing up in Finder/Disk Utility/System Information. |
Low |
You should consider sending the USB drive to a data recovery service center because it has likely suffered physical damage. |
My files become corrupted when I transfer them from/to the USB drive. |
High |
Check the USB drive for file system corruption and verify that the USB port the drive is plugged into isn’t damaged. |
Steps to Fix a Corrupted USB Drive on Mac
Now that you’re familiar with some of the most common problems associated with USB drive corruption, it’s time for us to take a look at a tried-and-tested approach that can be used to recover files from a flash drive on Mac and fix any corruption in just five steps.
Step 1. Retrieve Important Data From Corrupted USB Drive
Important: It’s critically important that you act as quickly as possible and minimize the usage of the corrupted USB card until you’ve completed this step.
The first thing you should do when fixing a corrupted USB flash drive on Mac is to create its byte-to-byte copy. That way, your files will be safe and recoverable even if your repair attempt fails to deliver the desired results.
We recommend you create the byte-to-byte backup using a data recovery software application called Disk Drill. Because Disk Drill combines data backup and recovery capabilities into one user-friendly package, you can get things done fasters and with less effort.
What’s more, Disk Drill supports a wide range of file types and file systems, including FAT16/FAT32/exFAT, NTFS, NTFS5, HFS, HFS+, APFS, and EXT2/EXT3/EXT4. The application can also read RAW storage devices and many popular disk image file formats, and you can even use it to restore from a Time Machine backup. These and other capabilities make it one of the best data recovery software applications for Mac.
Here’s what you need to do to create a byte-to-byte copy of your corrupted USB drive:
- Download and install Disk Drill.
- Launch the application and select the Byte-to-byte Backup tool from the list of extra tools located in the left pane.
- Choose your corrupted USB drive.
- Click the Create backup button.
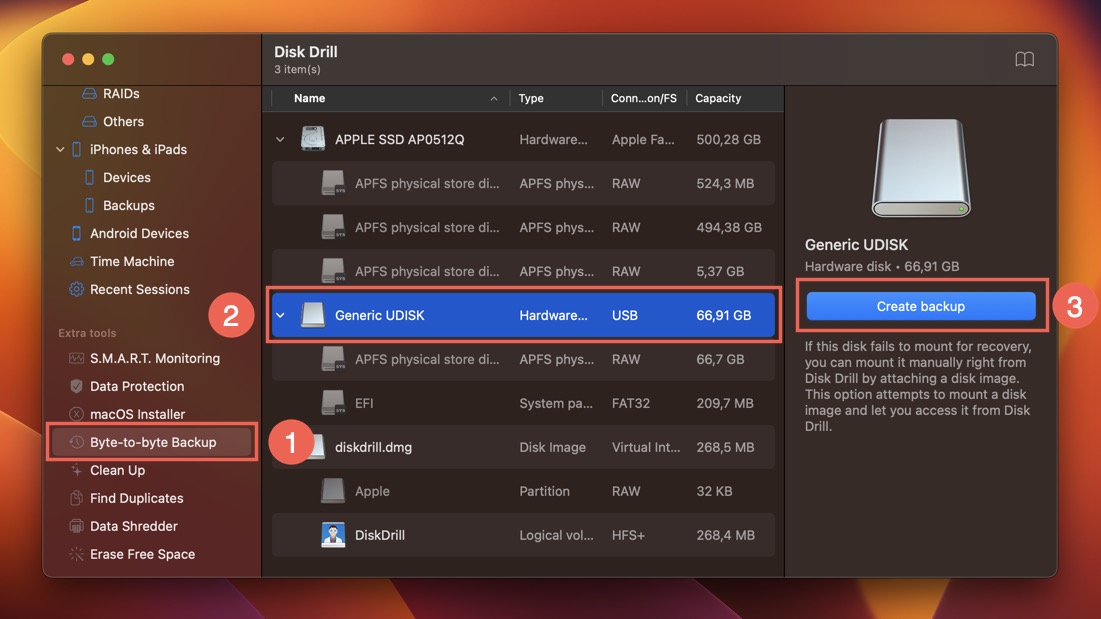
- Name the backup image and tell Disk Drill where you can to save it. Confirm by clicking the Save button.
Once Disk Drill has finished backing up your USB flash drive, you can attach the created image and recover missing files from it. This approach is preferable to direct USB flash drive recovery because it won’t make the corruption worse.
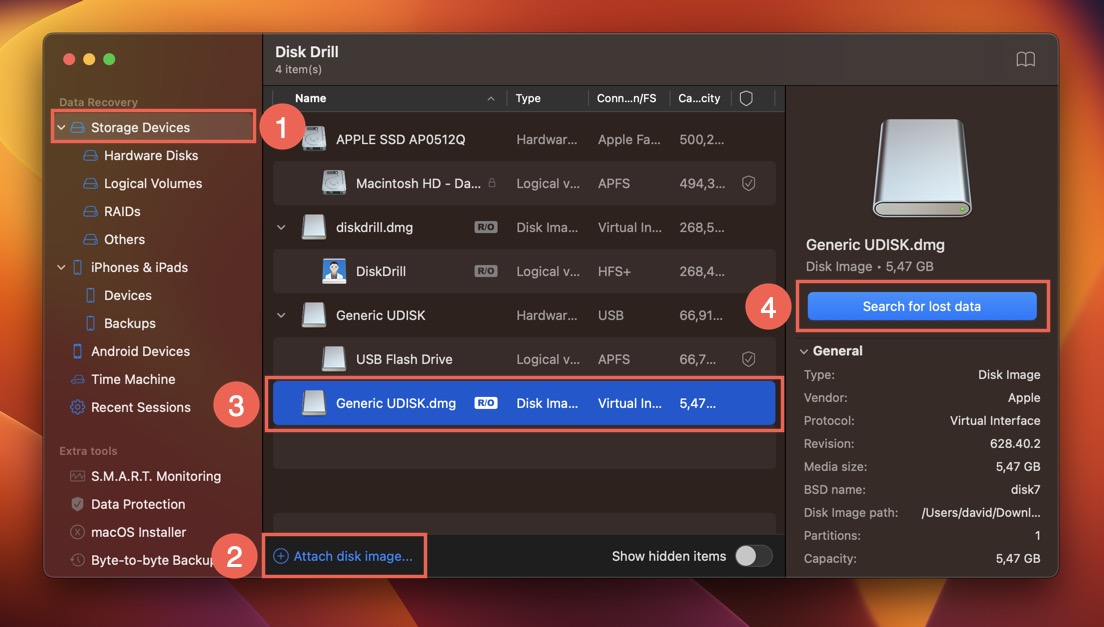
To attach the byte-to-byte copy of your corrupted USB drive and recover data from it:
- Select the Storage Devices option under Data Recovery in the left pane.
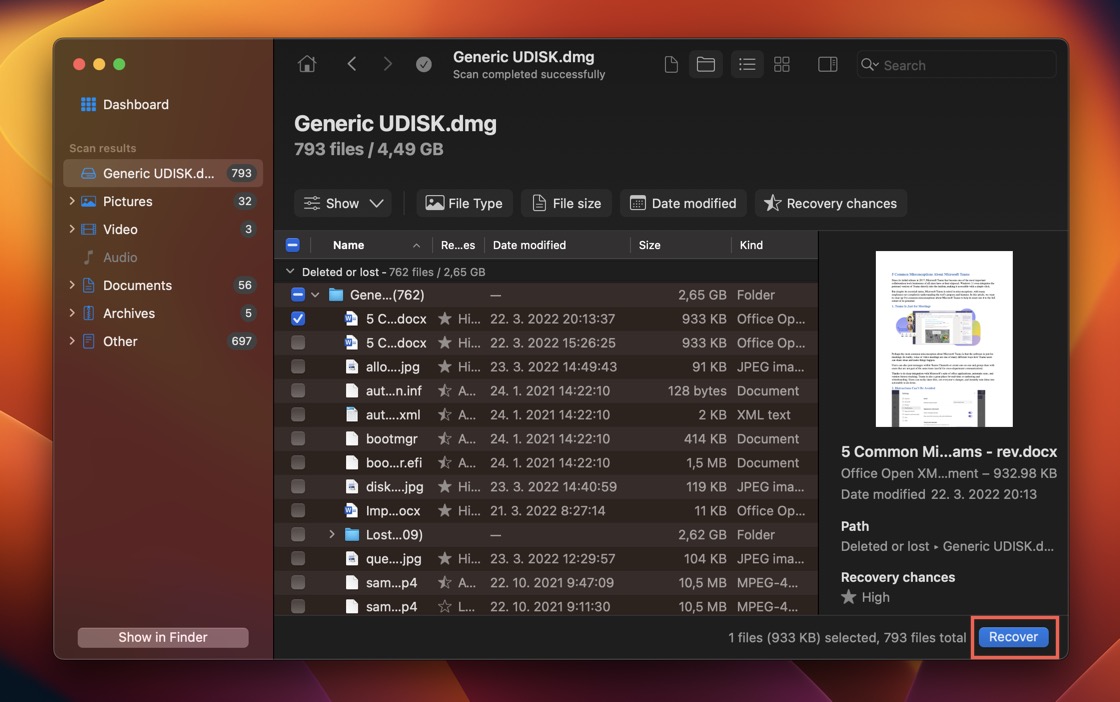
- Click Attach disk image in the bottom-left corner of the central pane and select the byte-to-byte copy of your corrupted USB drive. We’ve backed up only a small portion of our USB flash drive for the purposes of this tutorial (something Disk Drill makes easy to do), which is why the image is smaller than the USB drive itself.
- Choose the byte-to-byte copy from the list of available storage devices.
- Click the Search for lost data button.
- Wait for Disk Drill to scan the byte-to-byte copy and analyze the results.
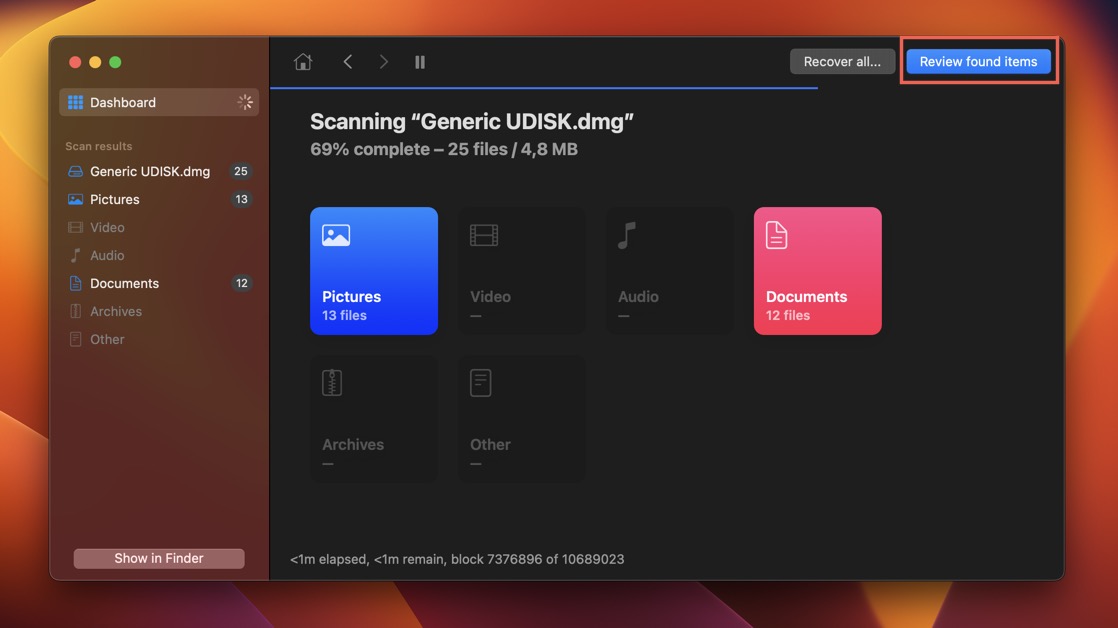
- Add all data you want to recover to your recovery queue by clicking the checkboxes next to them. You can use Disk Drill’s scan results filters, search bar, and preview feature to easily find what you’re looking for.
- Click the Recover button and tell Disk Drill where you want to save your data.
That’s all it takes to perform data recovery with Disk Drill. The same process can be used to recover data from a hard drive on a Mac. With your USB flash drive backed up and your data recovered, you can now safely fix the corrupted USB stick and make it usable again with your Mac, and we will explain how in the next step.
Step 2. Fix a Corrupted USB Stick With First Aid
Now that you have a byte-to-byte copy of your corrupted flash drive, you can safely proceed with its repair. Fortunately, your Mac comes with an easy-to-use flash drive repair software tool called First Aid. This tool is included in the Disk Utility app, and here’s how you can use it:
- Connect the flash drive you want to format to your computer.
- Launch Disk Utility.
- Select the flash drive you want to fix.
- Click the First Aid button.
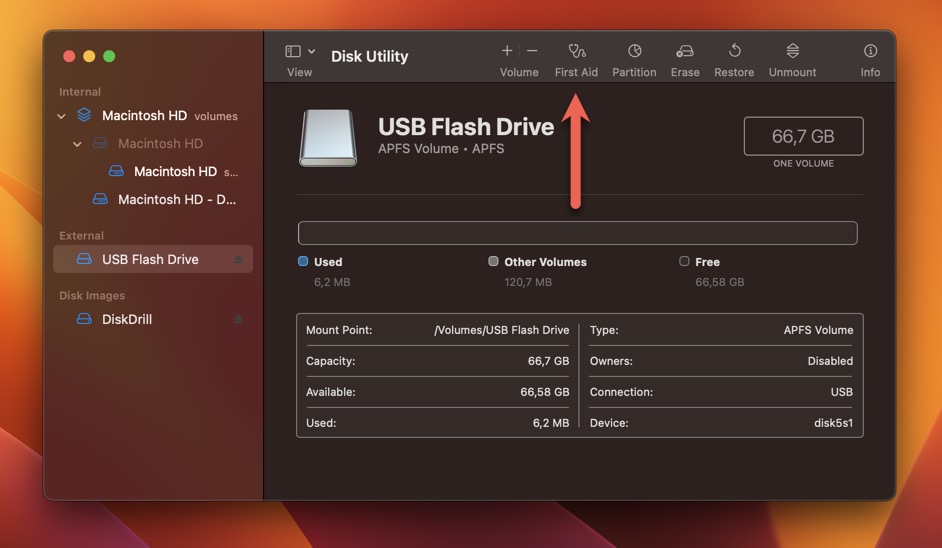
- Confirm your decision to fix the corrupted USB stick by clicking the Run button.
Now you just need to wait a short while for the First Aid tool to finish doing its job. If it finds any errors, it will automatically attempt to repair them.
Step 3. Repair a Corrupted USB Partition Via TestDisk
The First Aid tool in macOS can deliver great results when it comes to fixing USB flash drive corruption, but it’s no match for dedicated flash drive repair software like TestDisk.
This free and open-source tool is especially useful if you need to repair a flash drive partition that has become inaccessible due to file system corruption.
Here are the steps you need to follow to use it:
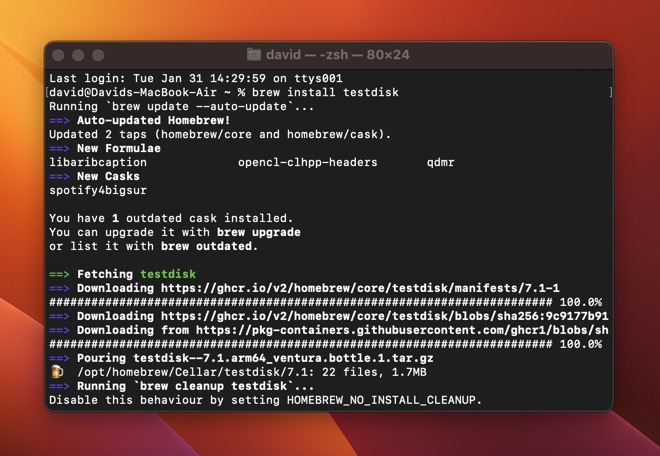
- Install TestDisk using Homebrew.
- Connect the corrupted USB drive to your computer.
- Launch Terminal, type “sudo testdisk” and press Enter. You will be asked to enter your admin password.
- Choose if you want to create a log file (this choice isn’t important).
- Select the corrupted USB flash drive.
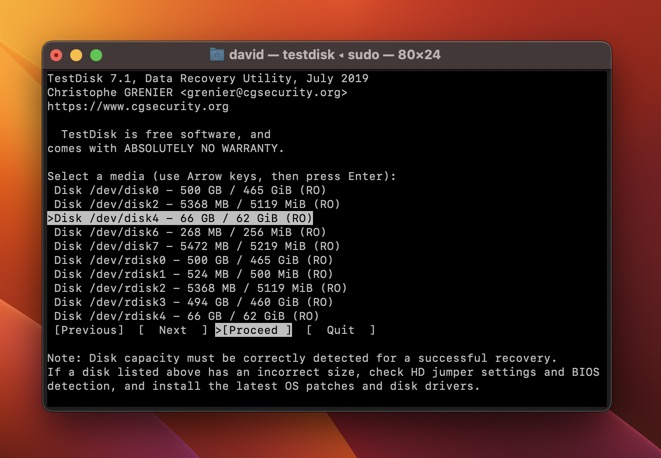
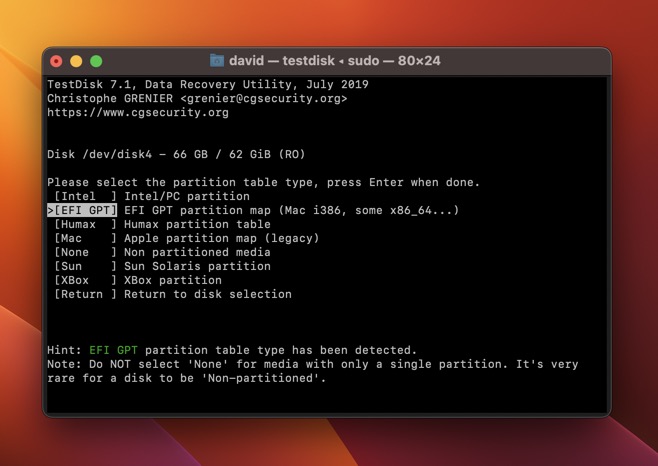
- Select the partition table type. TestDisk will automatically attempt to detect the correct one.
- Use the Analyse option to search for lost partitions.
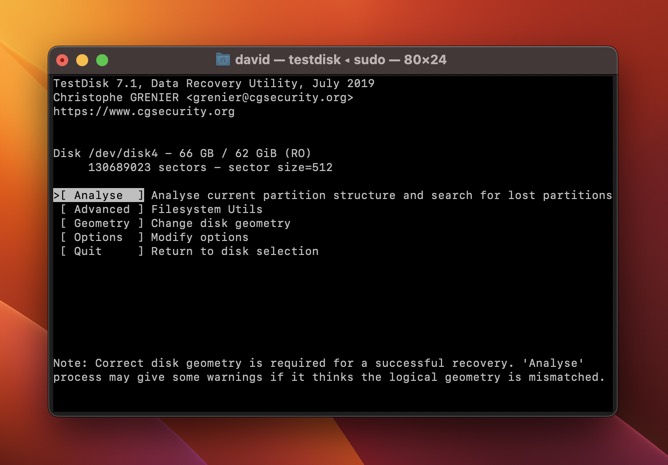
- Select the Quick Search method to find lost partitions.
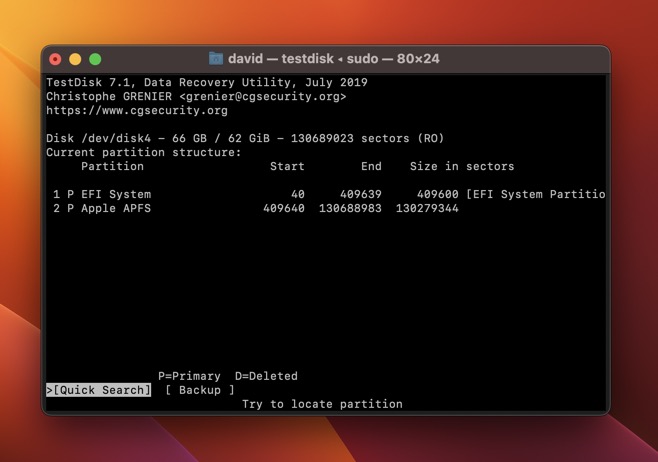
- Write the new partition structure to the disk.
- Use the Deeper Search method to look for additional partitions if they’re still missing.
Step 4. Format the Corrupted Flash Drive
Is your USB flash drive still corrupted and not readable? Then it’s time for the nuclear option: formatting, which is a quick and easy way to restore your USB drive to its original state.
Hopefully, you’ve been following our articles step by step. If so, then you’ve already recovered important files with the help of Disk Drill from a byte-to-byte copy of your corrupted flash drive. As such, it doesn’t really matter that formatting will wipe the entire flash drive clean.
To fix an unreadable USB flash drive on Mac by formatting it:
- Connect the flash drive you want to format to your computer.
- Launch Disk Utility.
- Select the flash drive you want to format.
- Click the Erase button.
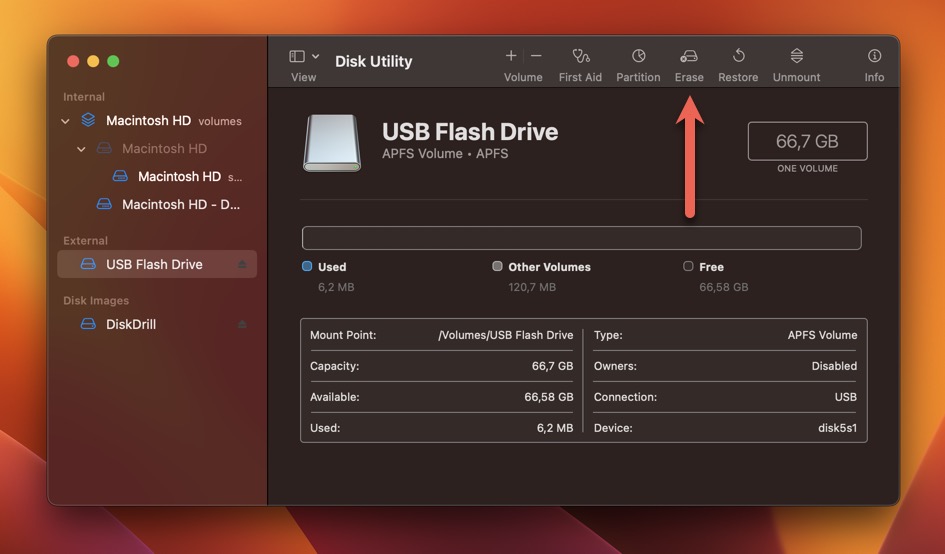
- Choose the desired file system (we recommend FAT or exFAT) and click Erase again.
Step 5. Contact Data Recovery Services
If you still haven’t achieved your goal of recovering lost data and/or repairing your flash drive, then there’s still one trick you can pull out of your sleeve: you can contact data recovery services and pay highly experienced data recovery professionals with the most advanced data recovery and repair tools at their disposal to fix your flash drive for you.
The prices charged by data recovery services depend on many different factors (the complexity of the job, the type of storage device, or the number of days you’re willing to wait to get your data back), but they tend to lean on the expensive side. But if your data is worth a lot to you, then spending a few hundred or even a few thousand dollars to get it back might just be worth every single cent.
FAQ
How to fix a corrupted flash drive without losing data on Mac?
To fix a corrupted USB stick on Mac without losing data:
- Download and install Disk Drill for Mac.
- Connect the corrupted flash drive to your Mac.
- Launch Disk Drill and scan your flash drive.
- Select your data.
- Recover them to a safe location.
How to fix an unreadable USB flash drive on Mac?
If your USB flash drive has become unreliable, then we recommend you format it:
- Connect the flash drive to your Mac.
- Launch Disk Utility.
- Select your unreadable flash drive.
- Click the Erase button.
- Confirm your decision to erase the flash drive.
How to fix a corrupted flash drive without formatting on a Mac?
You can attempt to fix a corrupted USB flash drive on Mac using the First Aid tool:
- Connect the flash drive to your Mac.
- Launch Disk Utility.
- Select your corrupted flash drive.
- Click the First Aid button.
- Click Run to check the flash drive.
How to repair a USB drive using Mac Terminal?
Follow these steps to repair a USB drive using Mac Terminal:
- Connect the flash drive to your Mac.
- Launch the Terminal app.
- Type “diskutil list” in the Terminal and press enter. Remember the identifier associated with your USB drive.
- Unmount the USB drive by typing “diskutil unmountDisk /dev/diskX” (where X is the identifier for your USB drive).
- Repair the USB drive by typing “sudo diskutil repairVolume /dev/diskX”.
- Mount the USB drive again by typing “diskutil mount /dev/diskX”.
How to reset USB ports on Mac?
You can reset your MacBook Air, MacBook Pro, iMac, Mac mini, Mac Studio, or Mac Pro USB ports by restarting your computer:
- Click the Apple logo in the menu bar.
- Select the Restart option.
Conclusion
Dealing with a flash drive that’s not showing up on Mac because it has become corrupted can be a frustrating experience, but don’t let it get you down. If you follow our step-by-step instructions, you should be able to fix your corrupted USB drive and save all of your important files in no time. And who knows, maybe your new data rescue skills will come in handy again in the future.
This article was written by David Morelo, a Staff Writer at Handy Recovery Advisor. It was also verified for technical accuracy by Andrey Vasilyev, our editorial advisor.
Curious about our content creation process? Take a look at our Editor Guidelines.