
A write-protected USB drive won’t be able to store new files until the feature is disabled. This can be especially frustrating if you don’t own multiple USB drives. If the issue pops up suddenly, it can also signal other problems on your USB drive, including drive failure. So, how do you effectively diagnose and remove write protection from the USB drive? It’s simple, use our detailed guide below.
Why Can’t I Remove Write-Protection on USB
You can’t disable the write protection on your USB drive for several reasons. Some of these include:
- 🧰 Physical damage: The write protection switch on your USB drive is especially susceptible to physical damage as it is a moving part. In case of a damaged write-protect switch, the pen drive could appear write-protected, even though its internal circuitry may be fine otherwise.
- 🔛 Write-Protection switch is ON: If the physical write-protect switch on your pen drive is set to ON, your PC will not be able to write to the drive.
- 💽 Logical damage: Over time, your USB drive is bound to develop bad sectors, i.e., areas that can’t be read or written to. While a few bad sectors are nothing to fret about, numerous bad sectors can cause the write protection issue on the drive. Additionally, a pen drive has a limited life span; if the drive is ancient, it may have simply reached the end of its life.
- ❌ Permission issues: It’s possible that some users on your PC don’t have Write permissions to the USB drive. It’s especially likely if you’re using a non-administrator account. This can be fixed by changing the permission settings in Device Properties, using an administrator account.
- ⚙️ Firmware: The firmware of your pen drive is what enables it to communicate with your computer’s software. Corrupted firmware prevents the pen drive from communicating smoothly with your PC, causing read/write issues.
- 🦠 Viruses and Malware: Computer viruses can cause widespread data corruption on your USB drive and damage its file system. They’re also a common reason why pen drives develop a huge number of bad sectors. It’s best to scan your drive for viruses each time you connect it to your PC.
How to Recover Data from a Write-Protected USB Drive
It’s recommended that you recover all important data from the affected USB drive, before attempting to repair it. Why? That’s because many of the reasons that could cause the write-protection issue to crop up (such as bad sectors, malware, and corrupt file systems) are also common culprits for data loss. Furthermore, common fixes for the issue – CHKDSK, and formatting – also delete your files. Both these reasons make prior data recovery crucial.
A convenient and approachable way to recover data from a write-protected USB drive is to use a data recovery app. The only problem? The sheer number of low-quality data recovery apps available on the web can make choosing the right one, difficult. To make your life easier, we already sorted through the fluff and compiled a list of the best USB data recovery apps.
Note: It’s necessary to ensure that the USB flash drive doesn’t have the “No media” label in Windows Disk Management. If it does, data recovery software will not be able to help you. You’re better off contacting a professional data recovery service.
For this data recovery tutorial, we picked Disk Drill. Its clean interface, advanced data recovery algorithm, and wide compatibility make it an excellent choice for users looking to recover data from corrupted, broken, or dead USB drives. Disk Drill excels at USB drive data recovery, and supports data recovery from all popular file systems (FAT32, NTFS, exFAT, and more). It’ll even recover data from a drive that has no file system at all, i.e., it is RAW. If you’re on Windows, you can take advantage of Disk Drill’s free trial that lets you recover up to 500 MB of data at no cost.
Let’s take a look at how to recover data from a write-protected USB drive using Disk Drill:
- Download Disk Drill and install it. Connect the problematic USB drive to your PC.
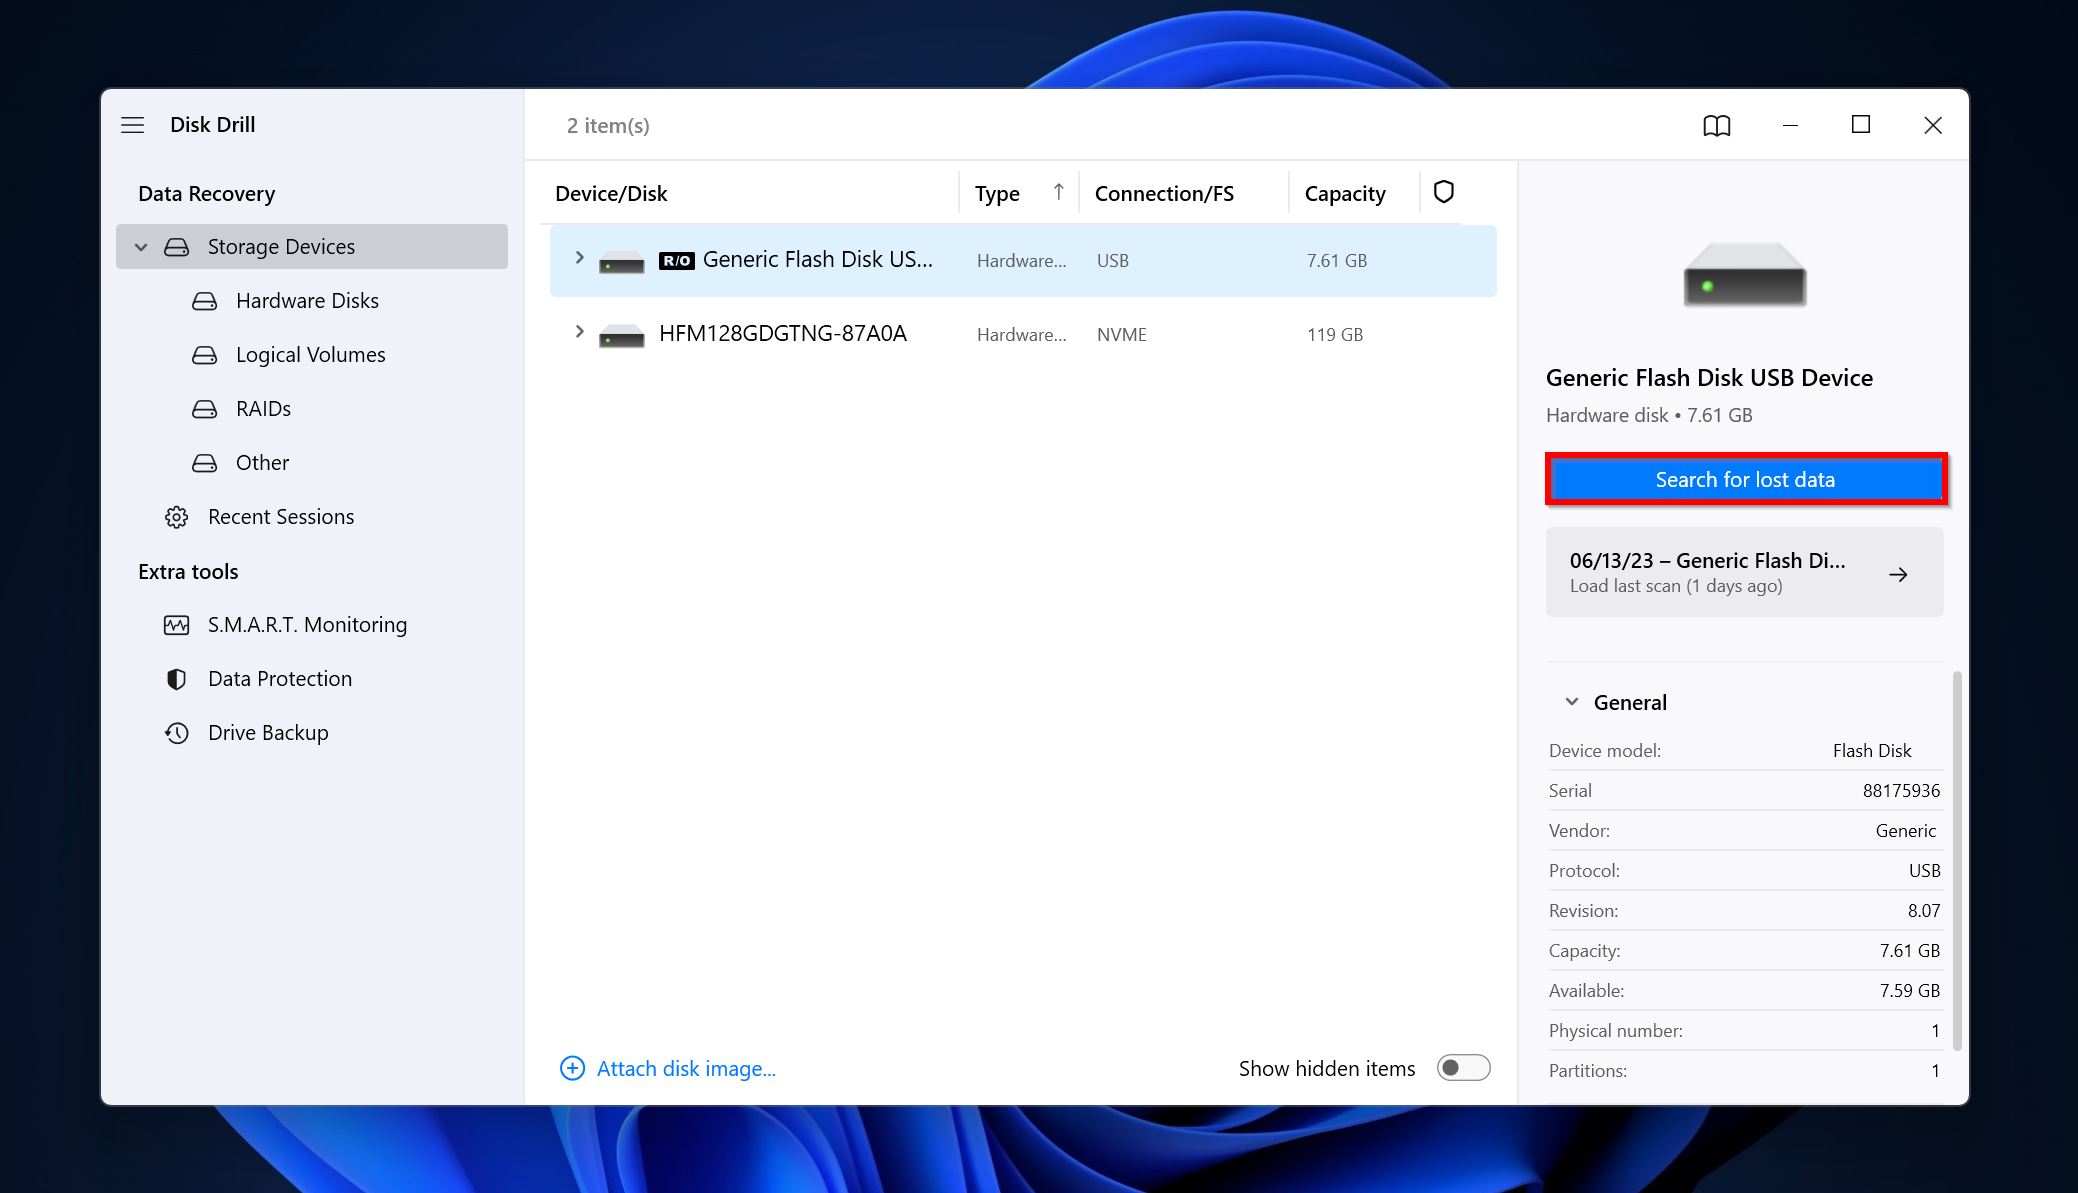
- Open Disk Drill, select the write-protected USB drive, and click on Search for lost data.
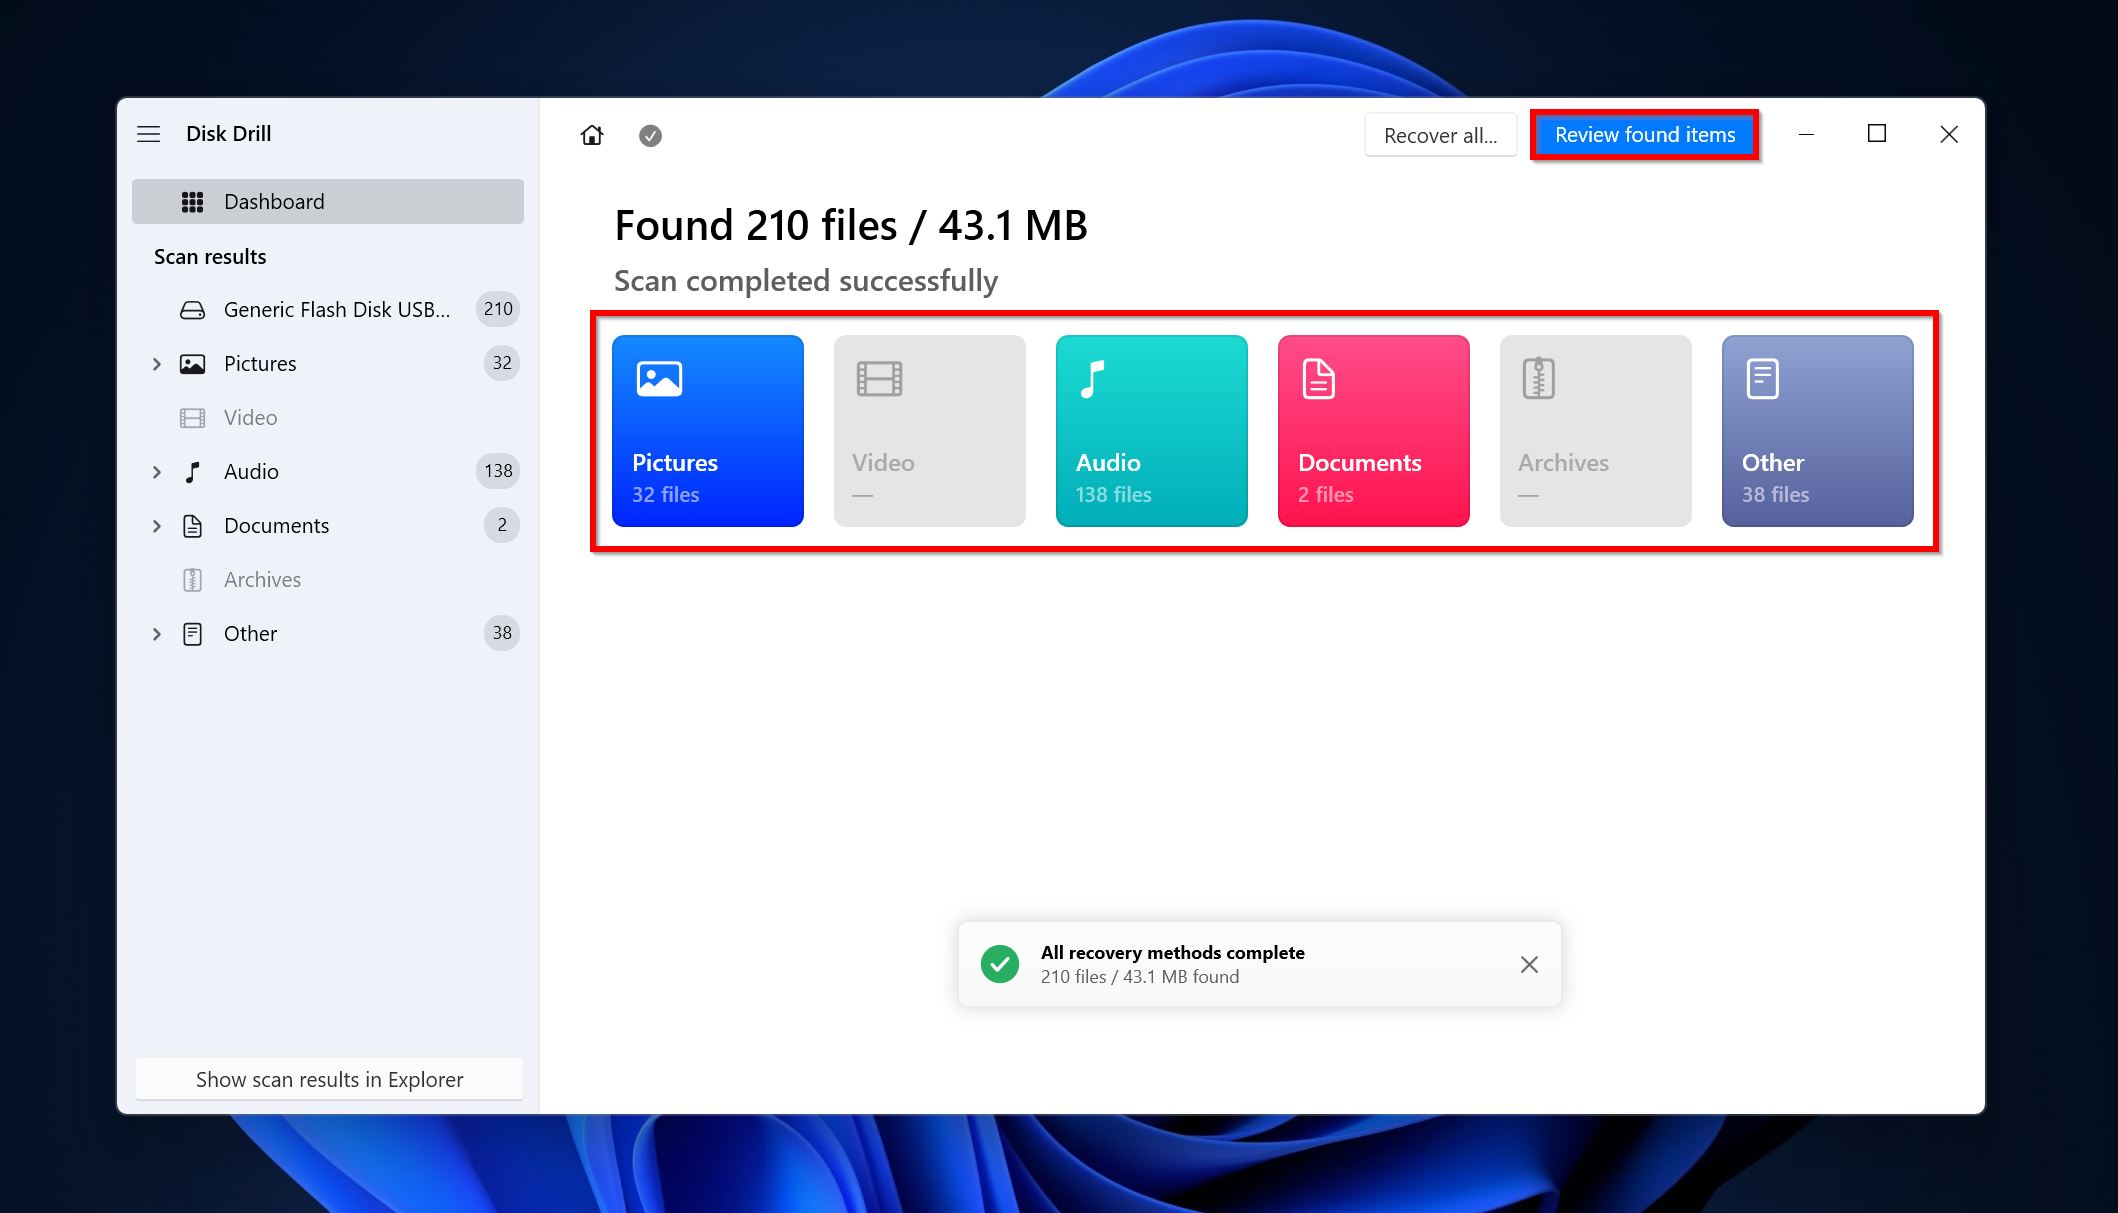
- Click on Review found items to view all the recoverable files that Disk Drill discovered. You can also filter out the results by clicking on the relevant file type (Pictures, Video, Audio, Documents, Archives, and Other).
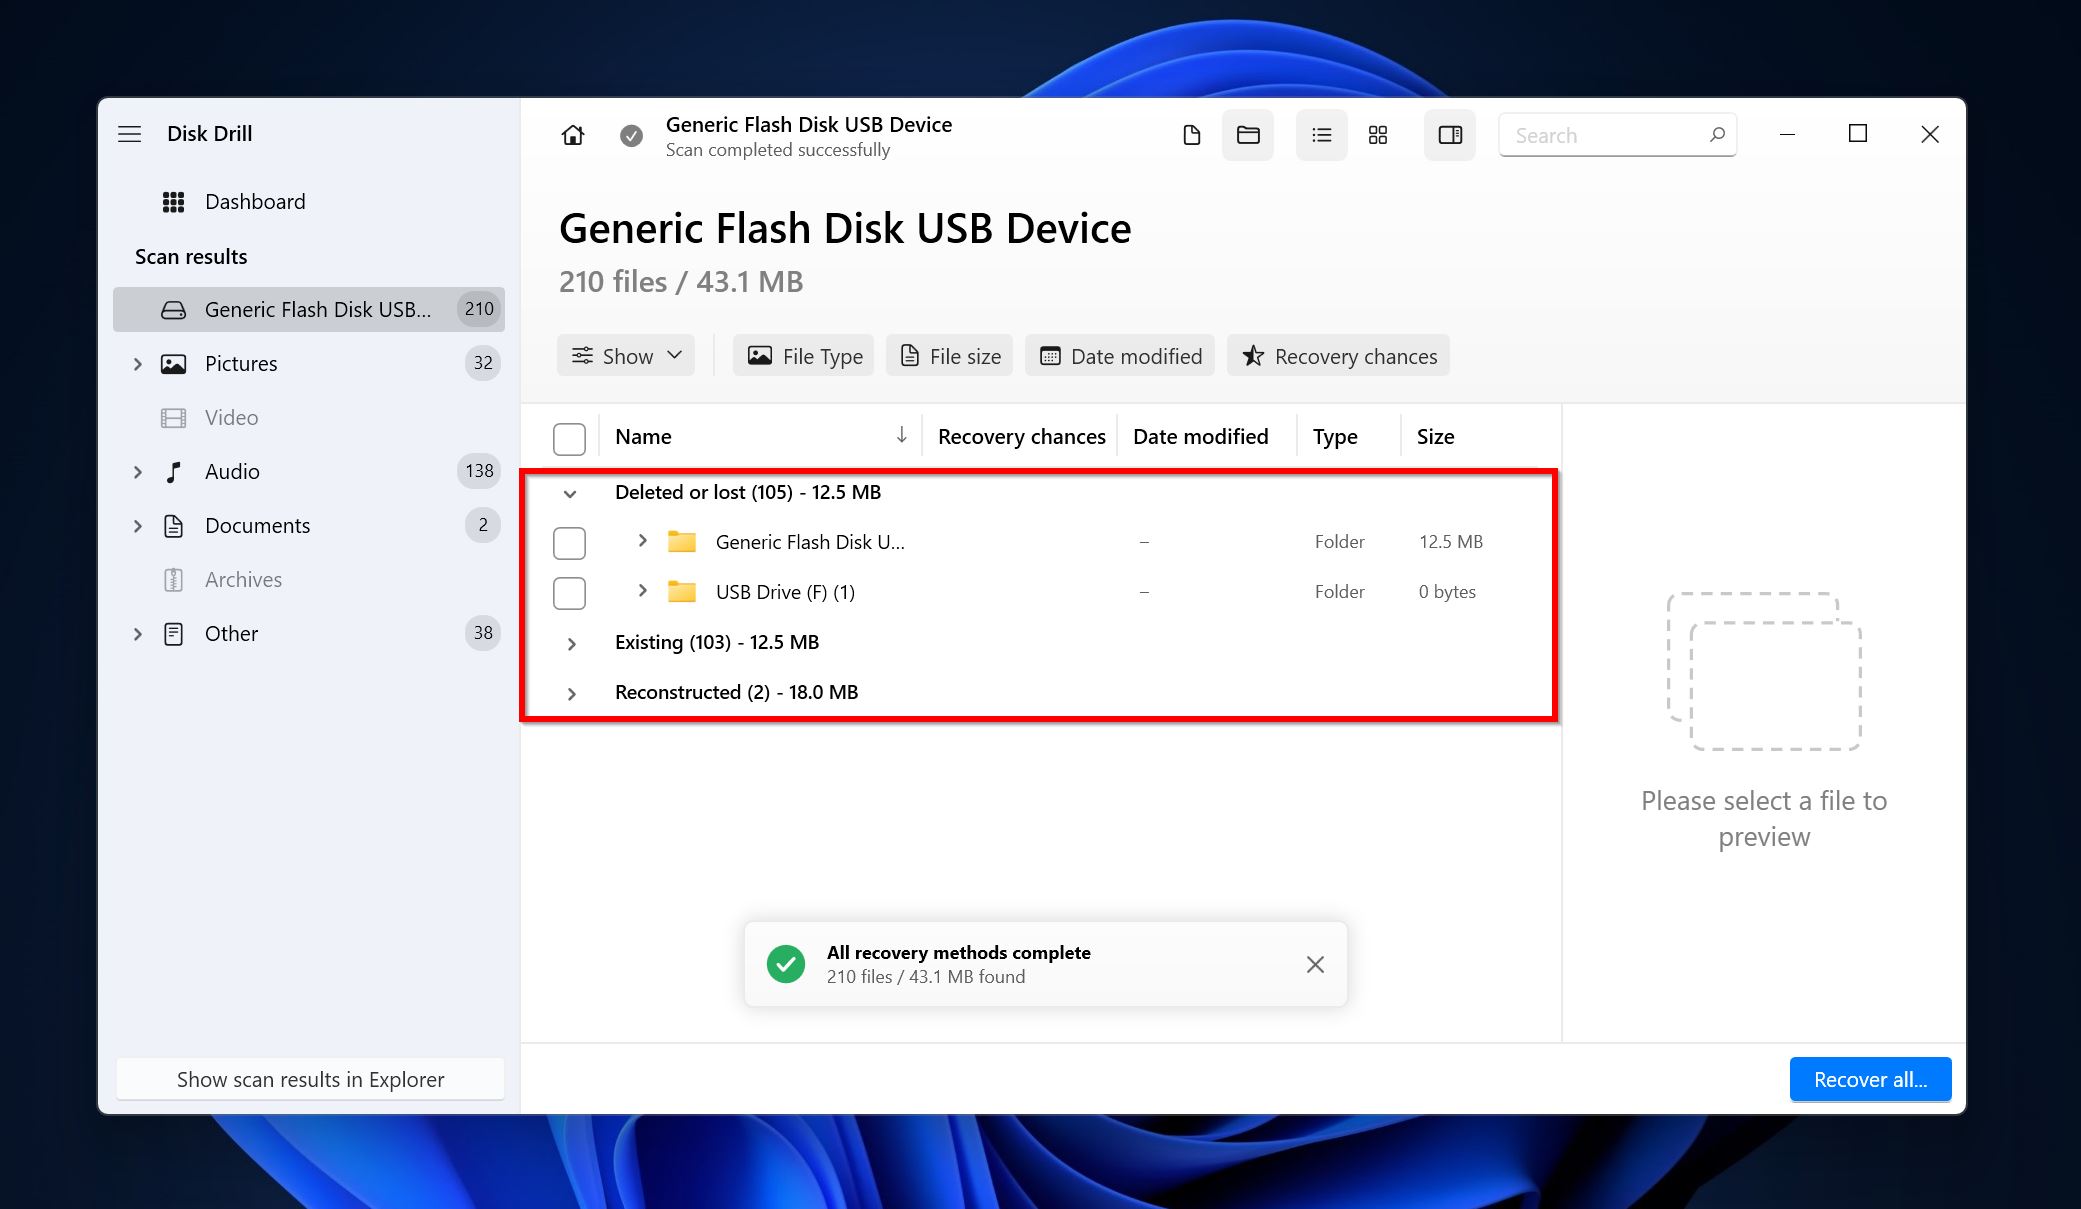
- Expand the Existing section to view files that are intact and exist on the USB drive. To view files that were deleted due to any reason, expand the Deleted or lost, and Reconstructed sections.
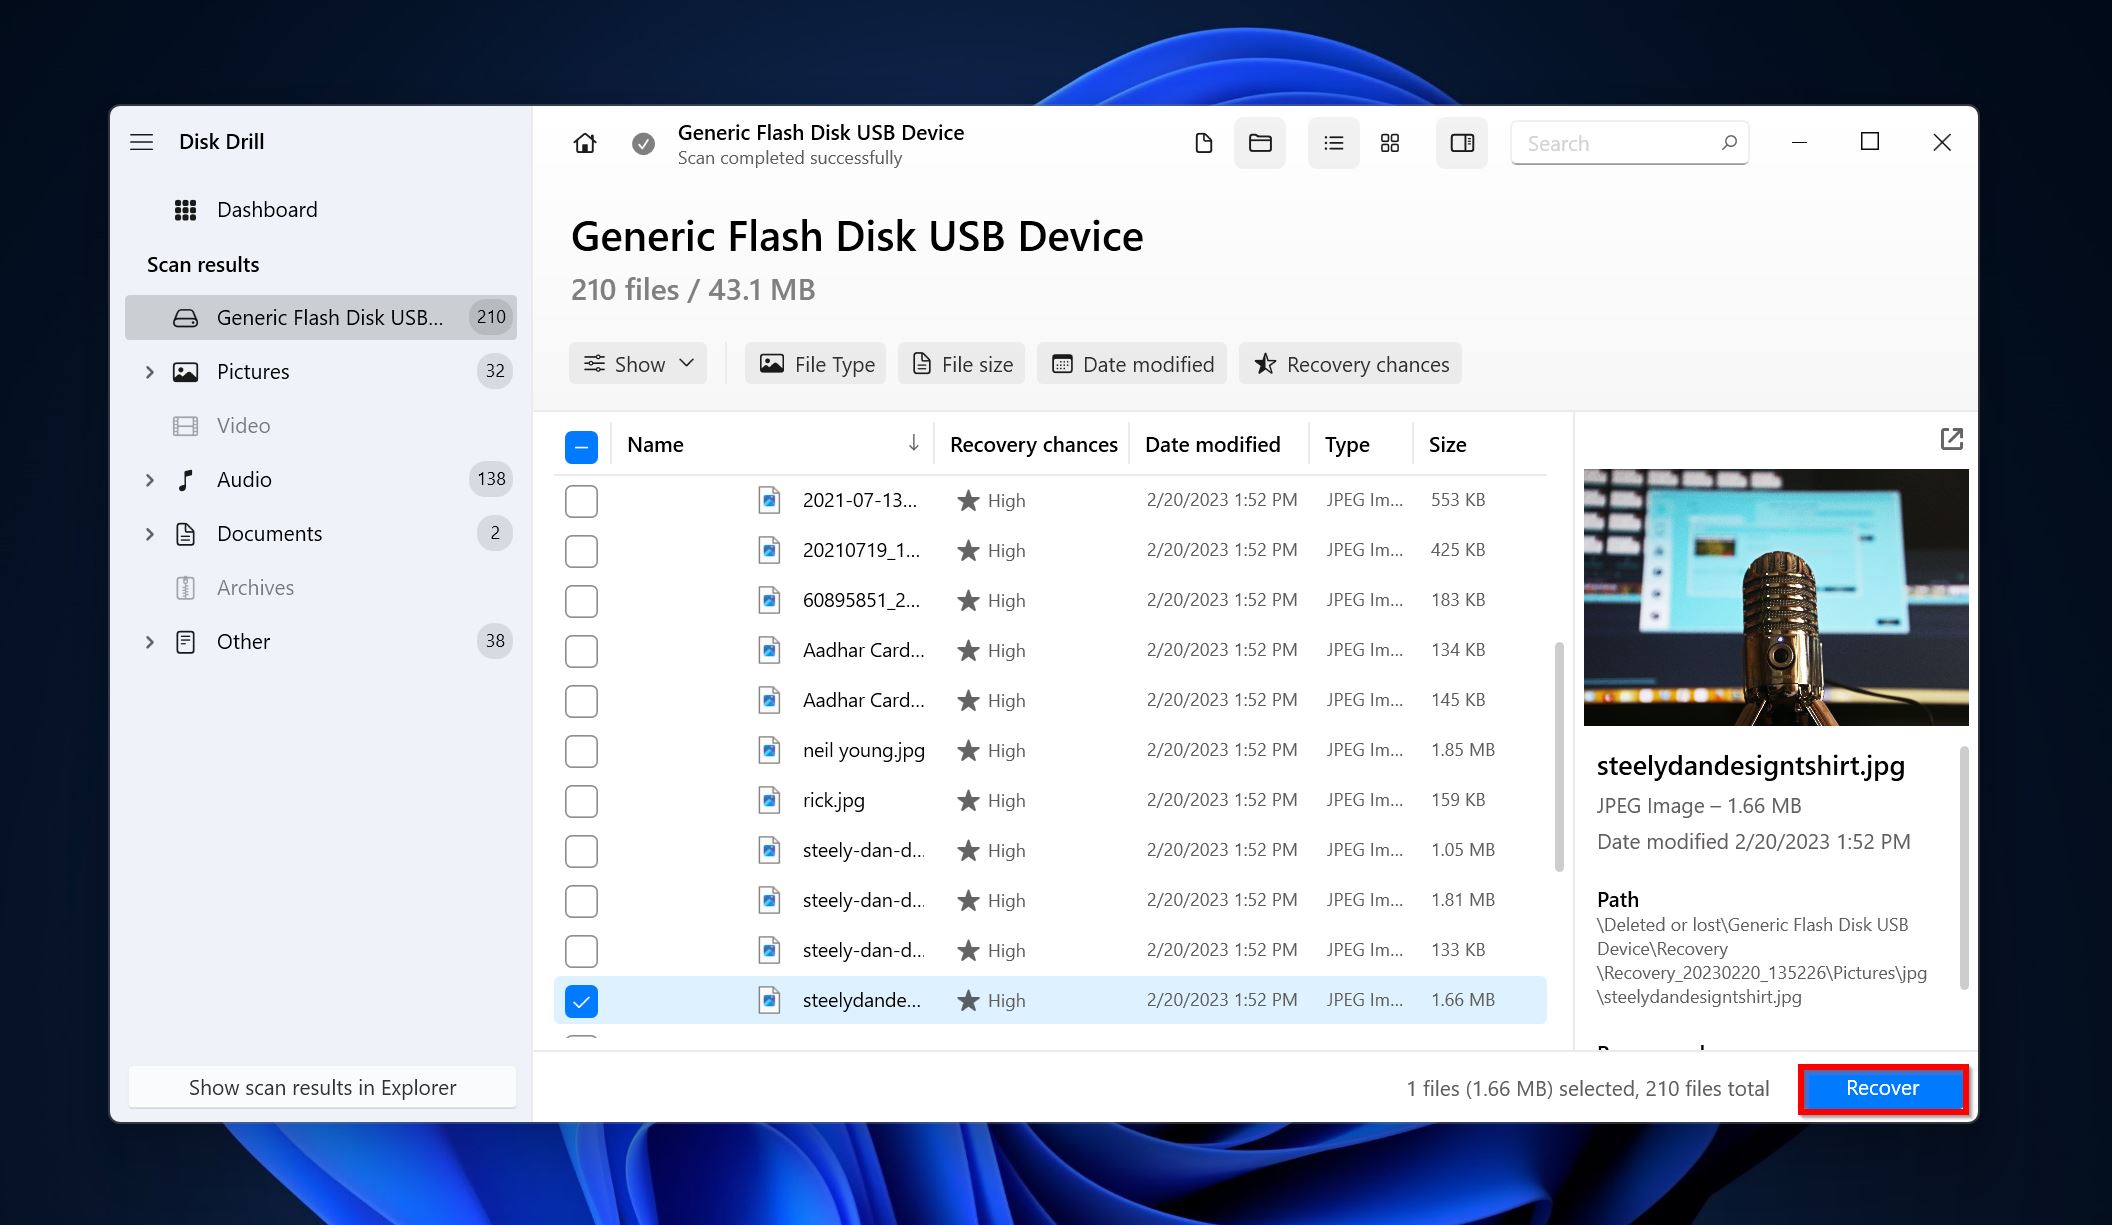
- Use the checkboxes to select the files you wish to recover. You will see a preview of the currently selected files. A fully previewable file has high recovery chances. Once you’ve confirmed your selection, click on Recover.
- Choose a recovery destination for the files and click Next.
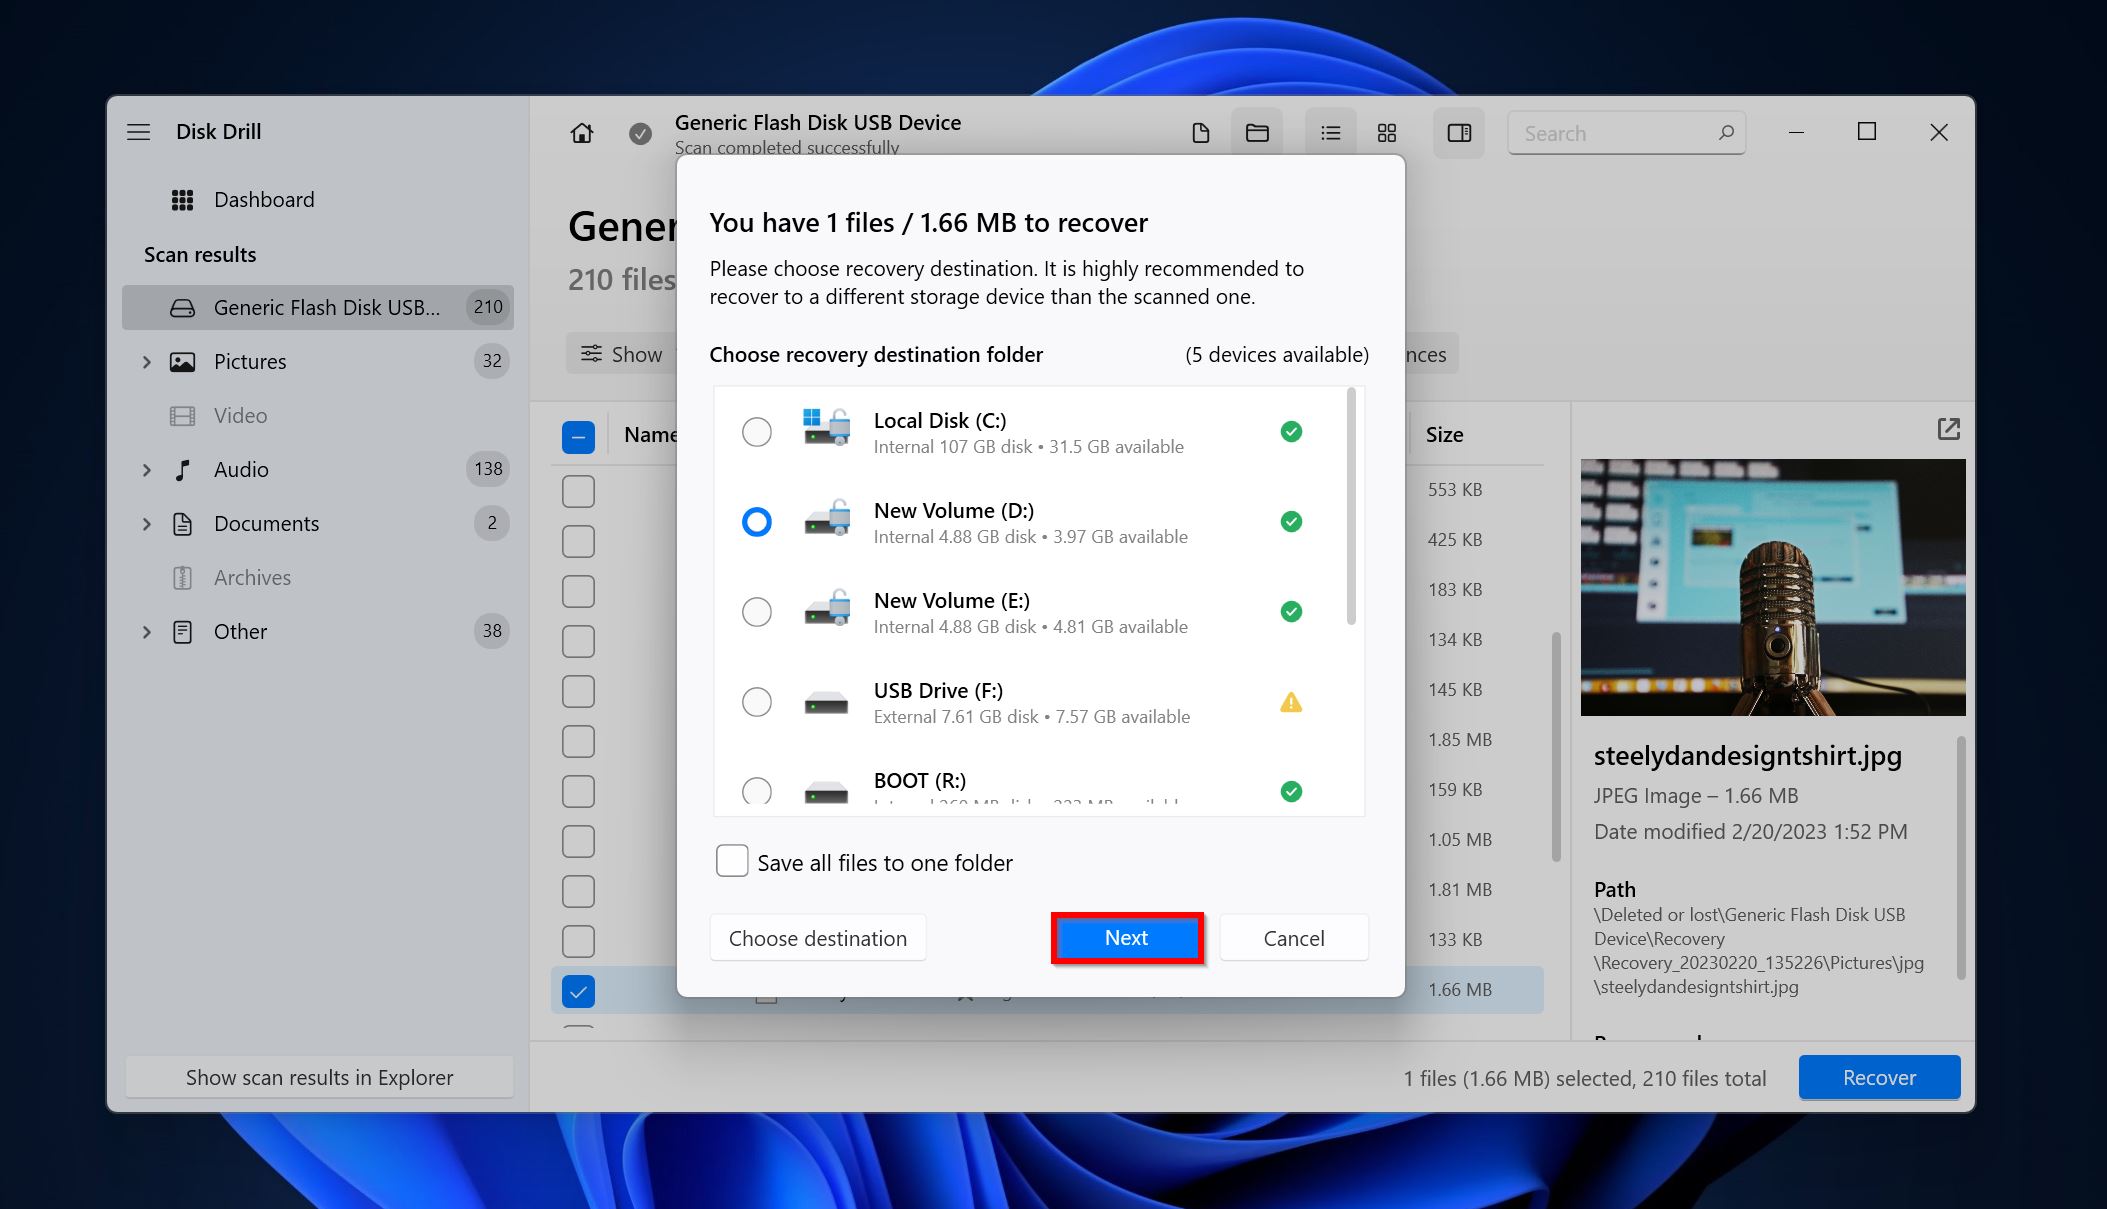
- Disk Drill will recover the selected files.
For a complete look at Disk Drill, its features, safety, shortcomings, and more, browse through our in-depth review of the tool.
How to Remove Write-Protection from a USB Drive
Removing write-protection from your USB drive could be a simple case of flipping the write-protect switch or more complex – like changing the Windows Registry settings. Regardless, all the methods below have been designed so that they are easy to follow.
Method 1: Check the Position of the Write-Protect Switch
Many popular thumb drive manufacturers like SanDisk, Kingston, and Transcend have models that come with a physical write-protect switch. Before proceeding to any other fix, check if your pen drive has such a switch. It usually has a sliding mechanism.
If yes, ensure that it is set to the OFF position. The OFF position could vary depending on the manufacturer, so be sure to check the manufacturer’s website or do a simple Google search on what the off position for your USB is. Typically, there’ll be a click sound when the switch slides into position. If the switch seems loose or free, it could be a sign that it is physically damaged.
Method 2: Remove Write-Protection from the USB Drive Using CMD
If your drive remains write-protected after ensuring that the write-protection switch is working and set to the OFF position, it’s time to remove the read-only attribute from it. To achieve this, you can use the Diskpart utility, which comes bundled with Windows. It’s a command-line utility, so you’ll need to use Command Prompt to execute it.
Here’s how you can clear the read-only attribute and effectively disable write protection on your USB drive:
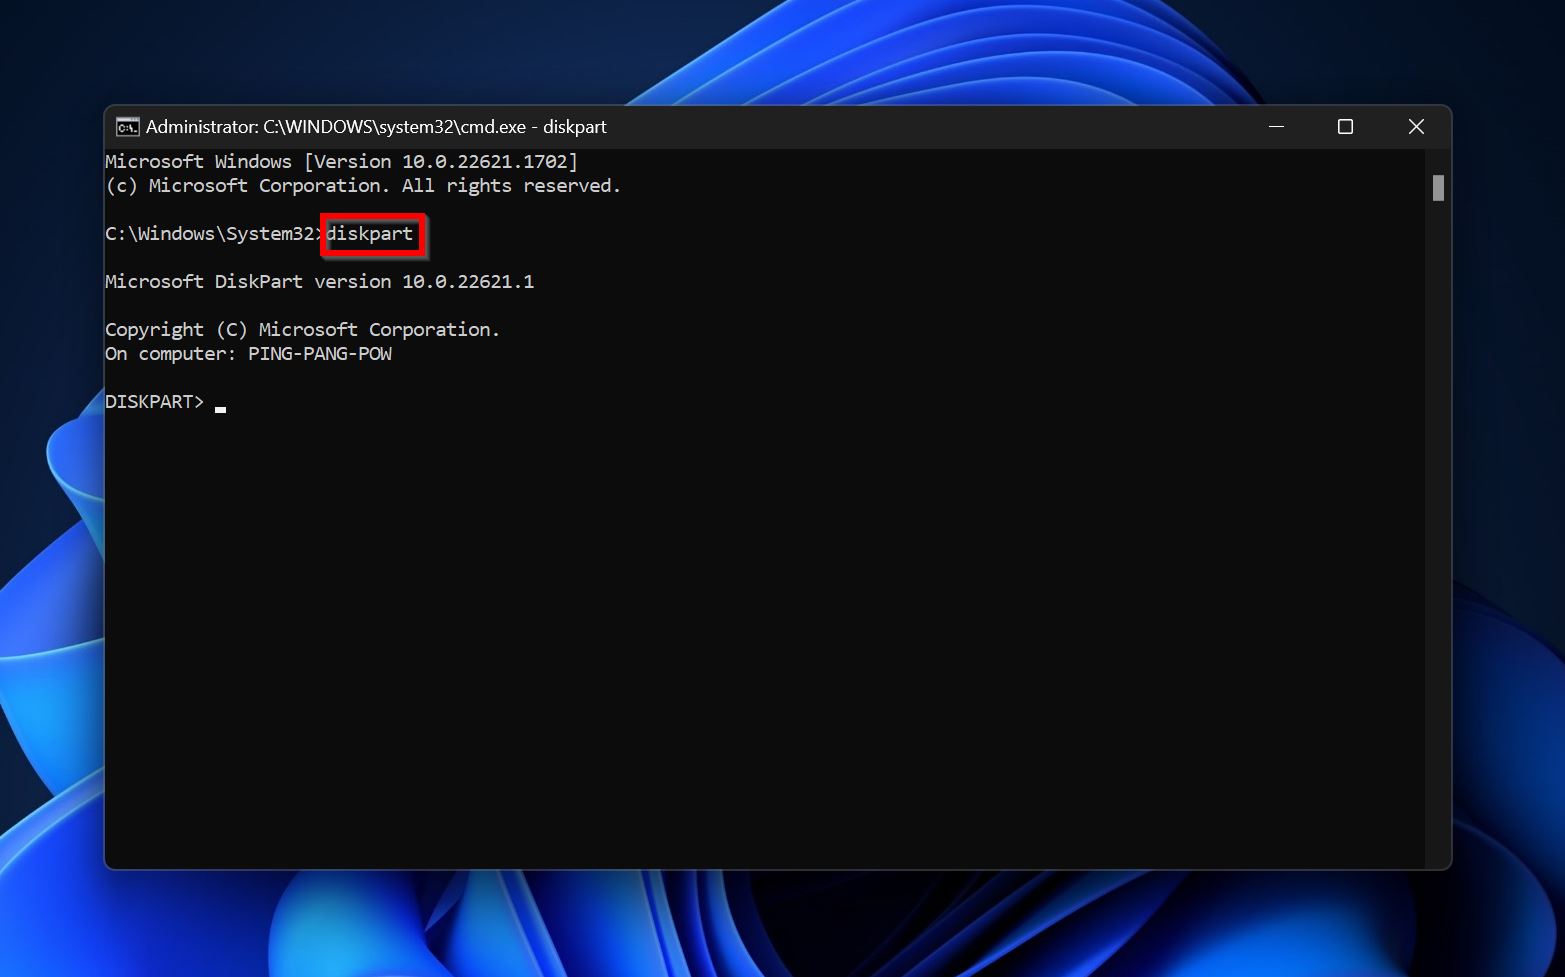
- Search for “cmd” in Windows Search (Windows Key + S). Right-click on Command Prompt > Run as administrator.
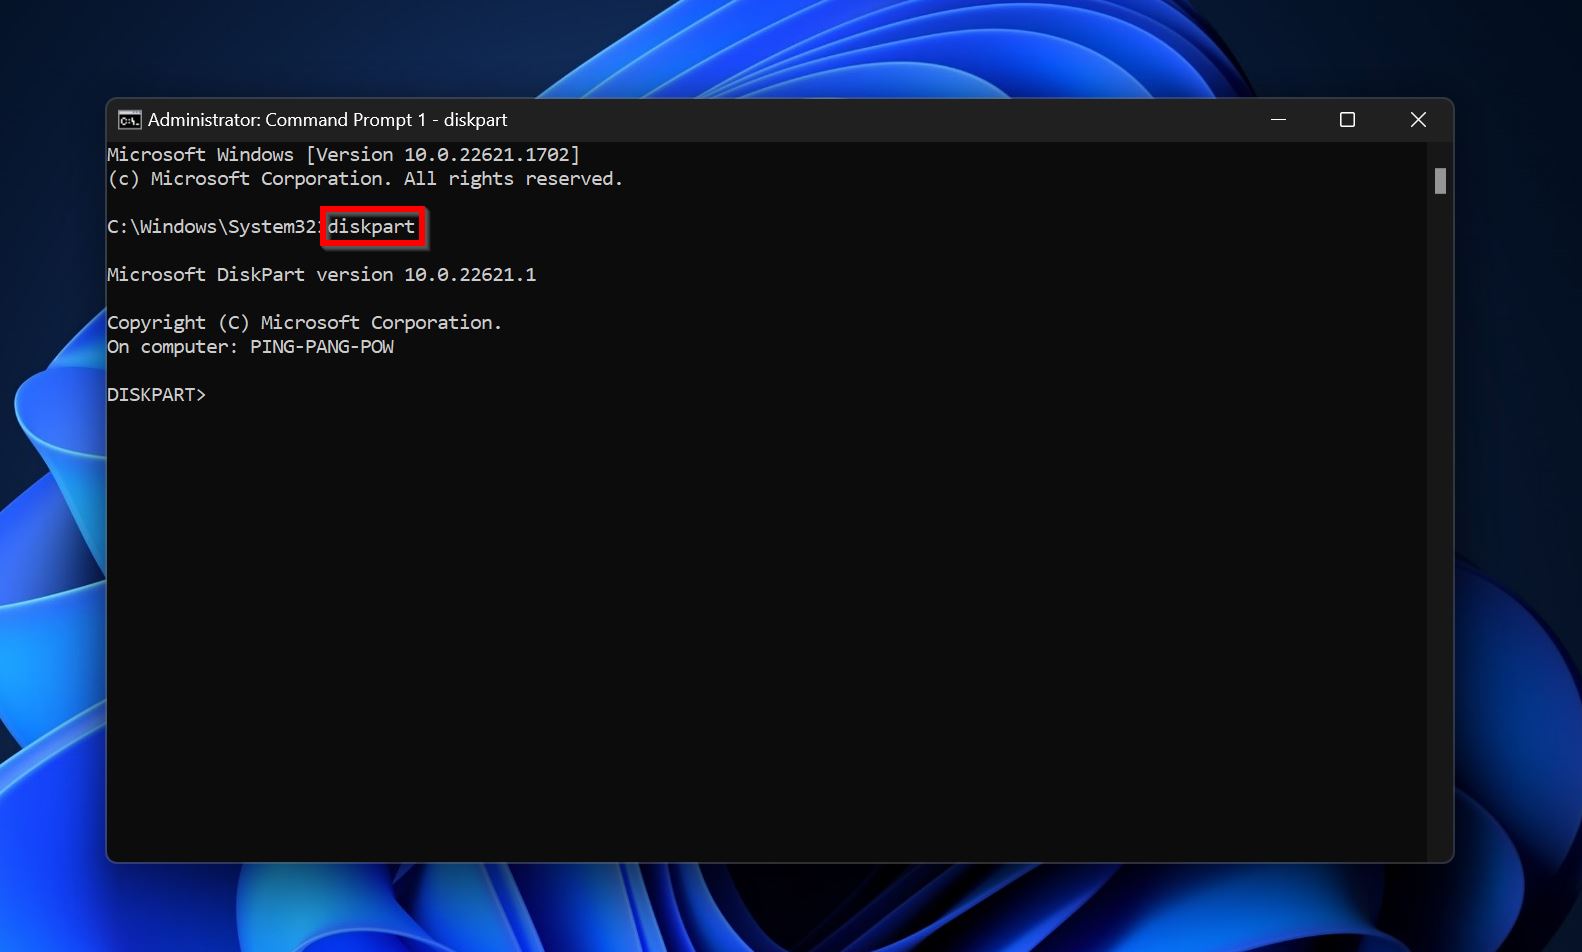
- Type diskpart in the console and press Enter.
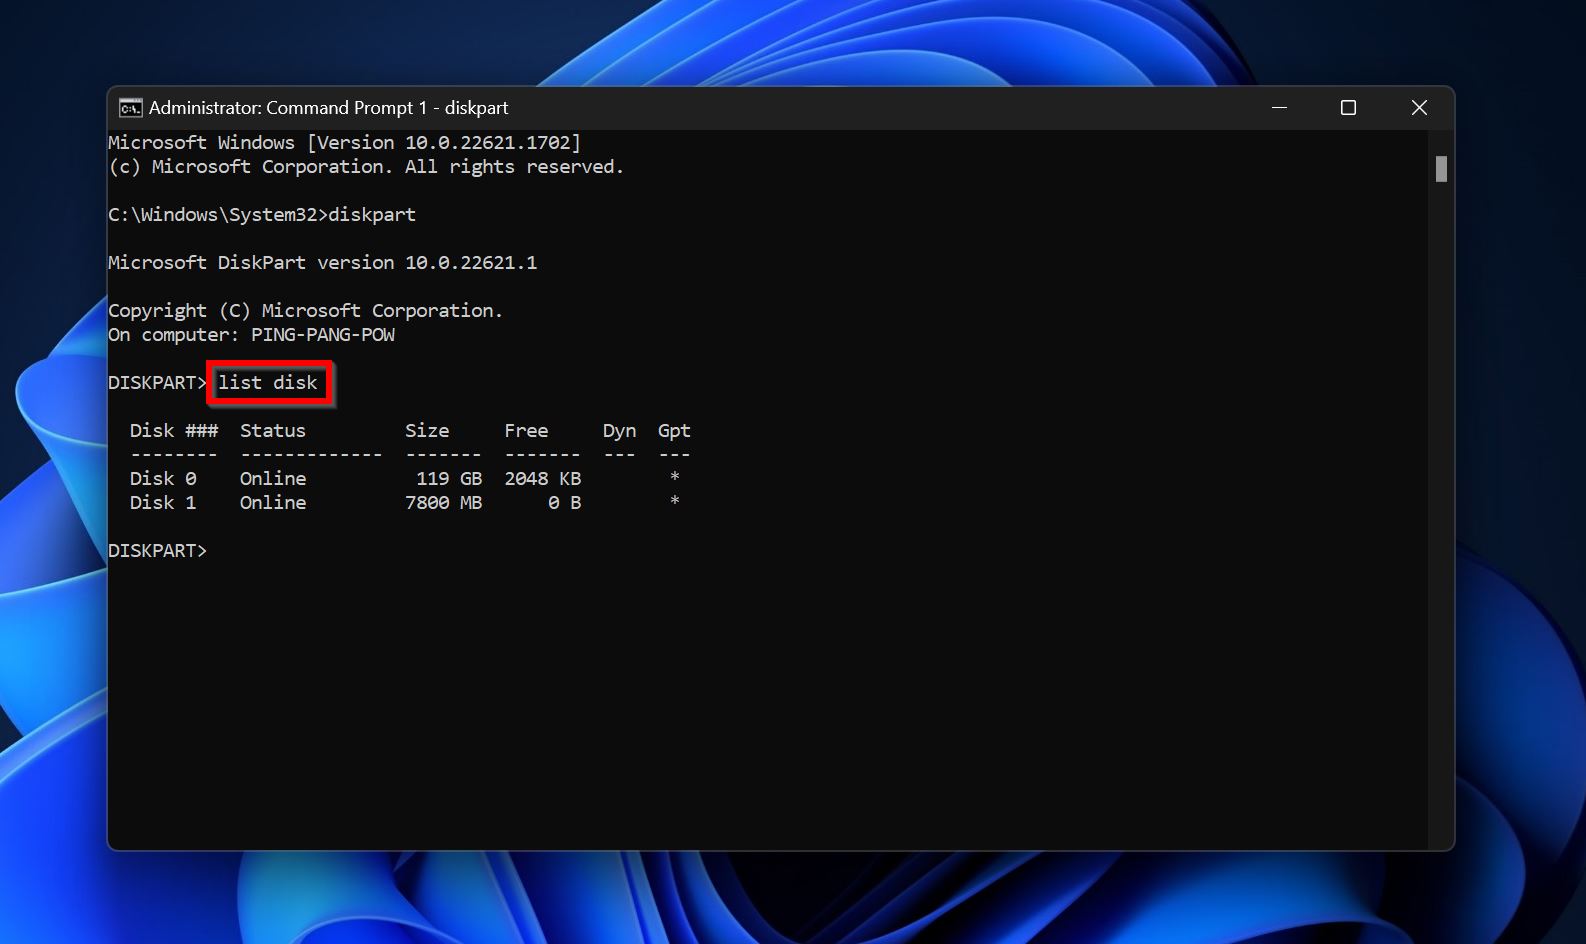
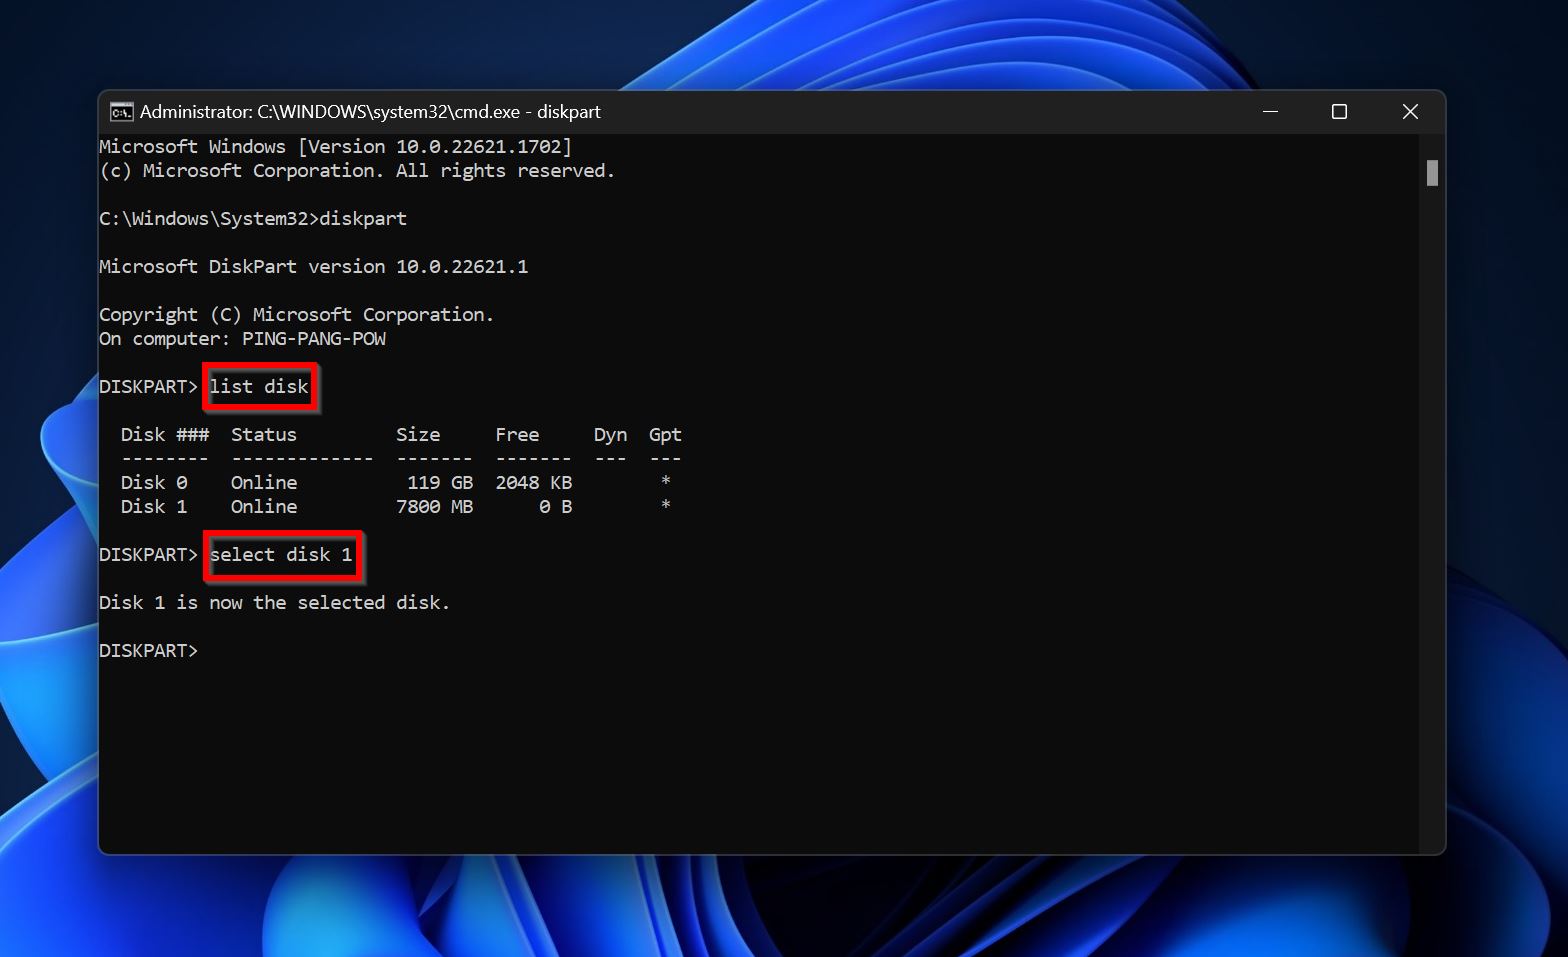
- Type list disk to view all the storage drives attached to your PC.
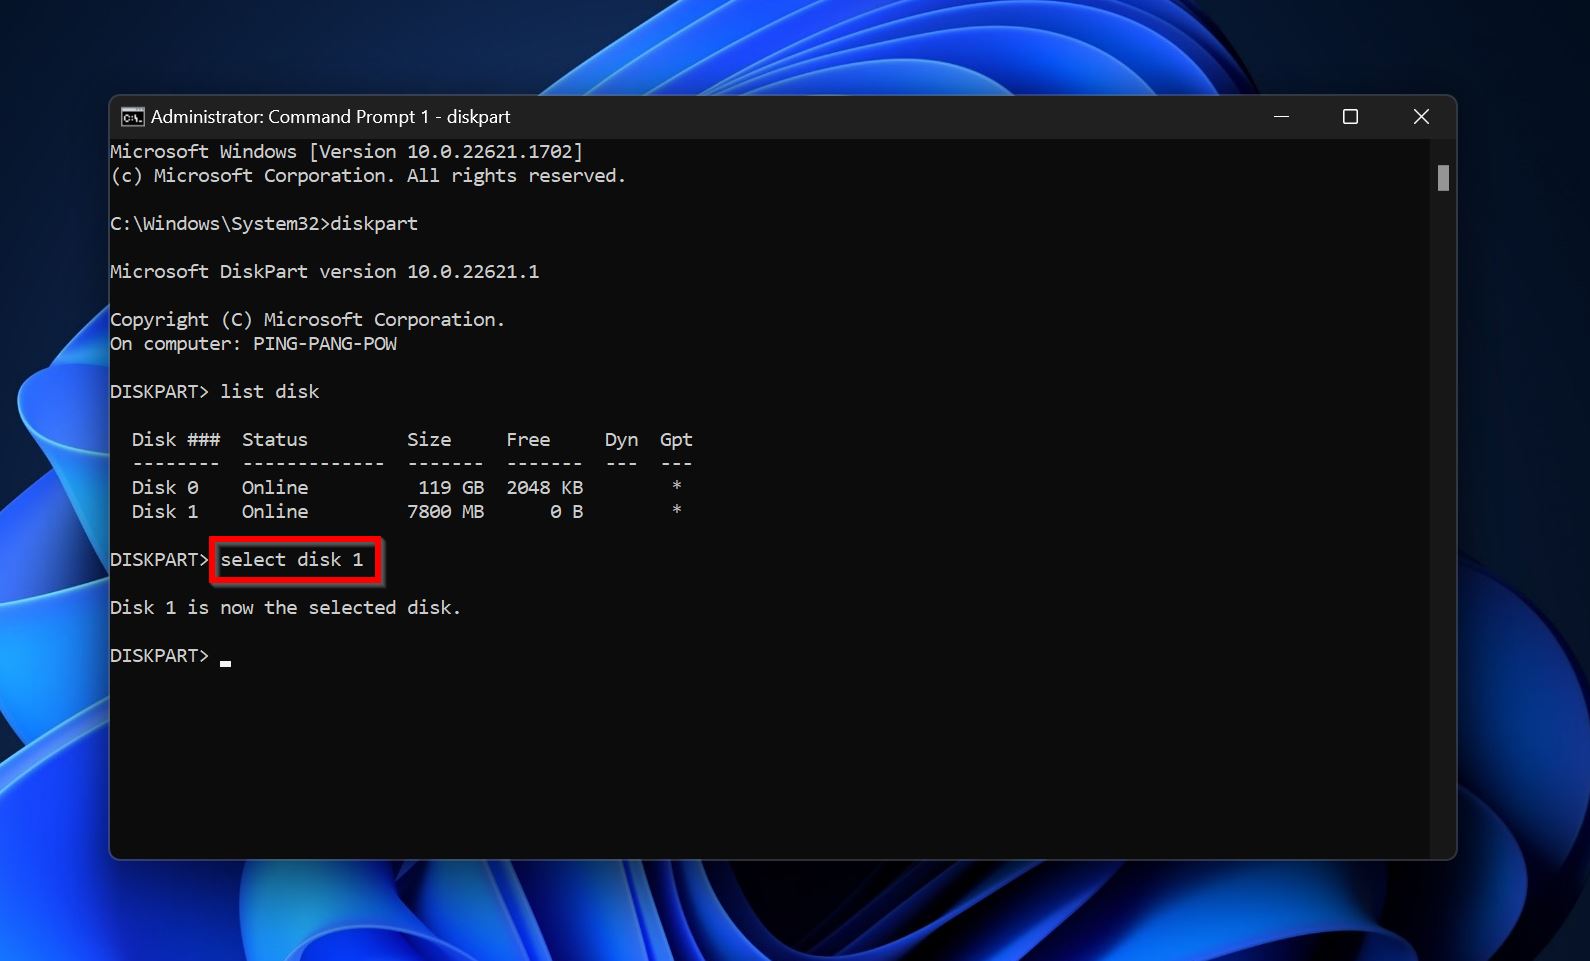
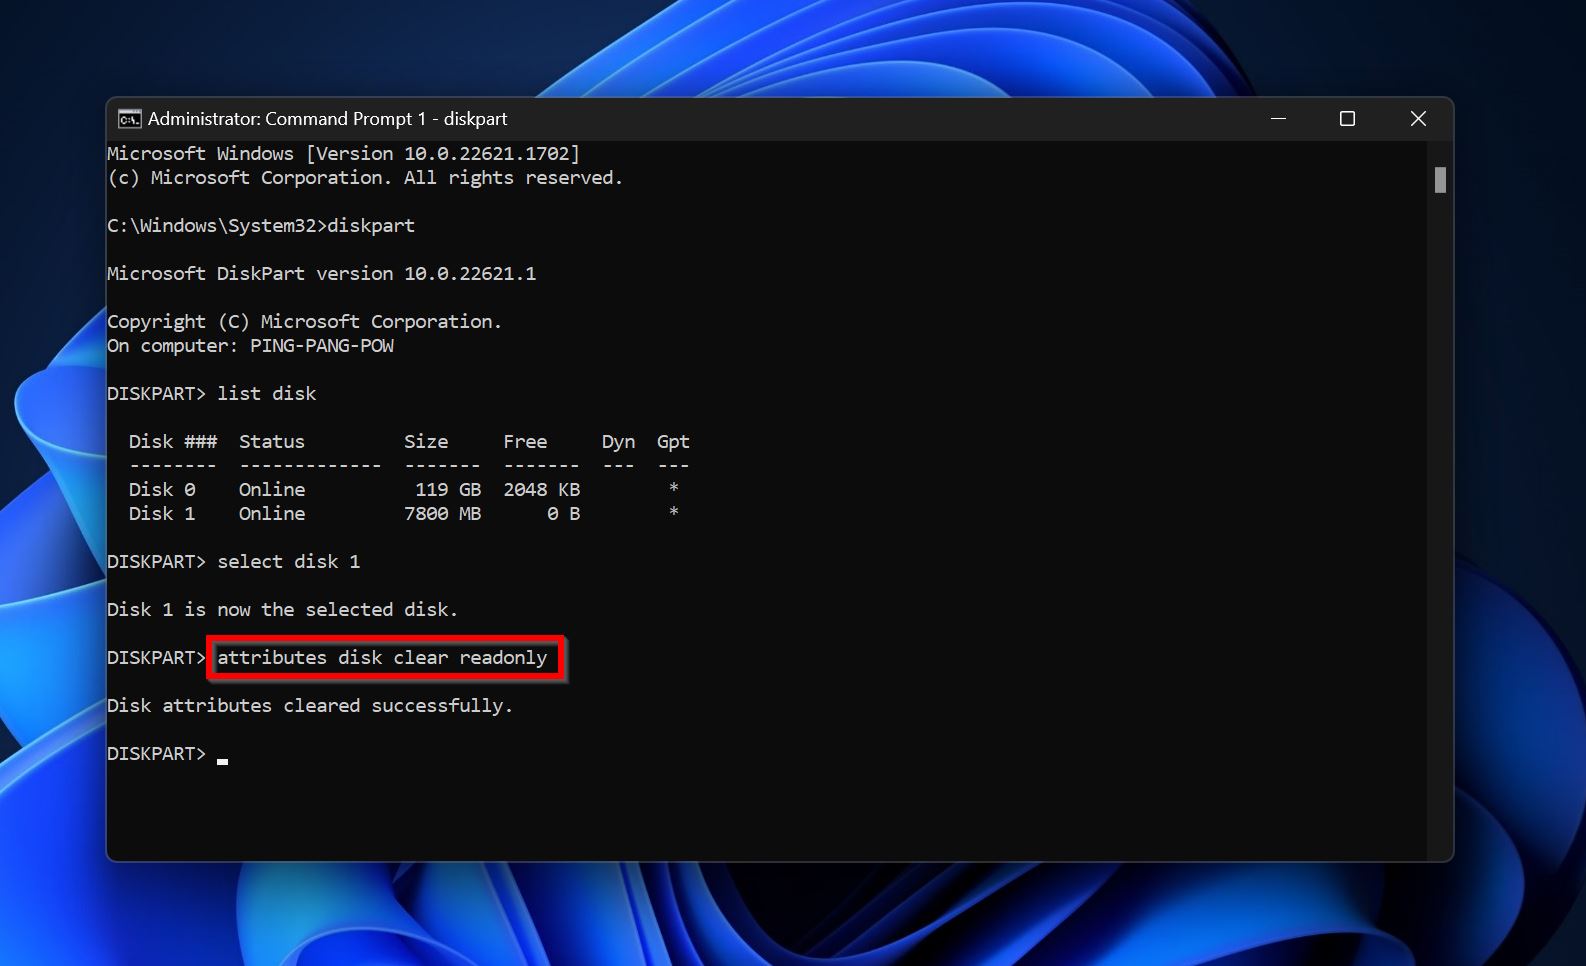
- Look for your USB drive in the list. You can determine which one it is by looking at the storage size as well as the other drives attached to your PC. Type select disk x and press Enter. Replace “x” with the disk number of the write-protected USB drive. In our case, it was Disk 1, so the resulting syntax was select disk 1.
- Finally, type attributes disk clear readonly and press Enter. This will remove write protection from the USB drive.
Method 3: Disable Write Protection in the Registry Editor
Unfortunately, there’s no magic write protection removal software, so we’ll need to stick to slightly complex native Windows methods to unlock your USB drive and make it work as it should. In this method, we’ll tackle the write-protection issue by editing an entry in the Windows Registry.
Here are the exact steps:
- Press Windows Key + R to open the Run application. Type regedit in the text box and press Enter.
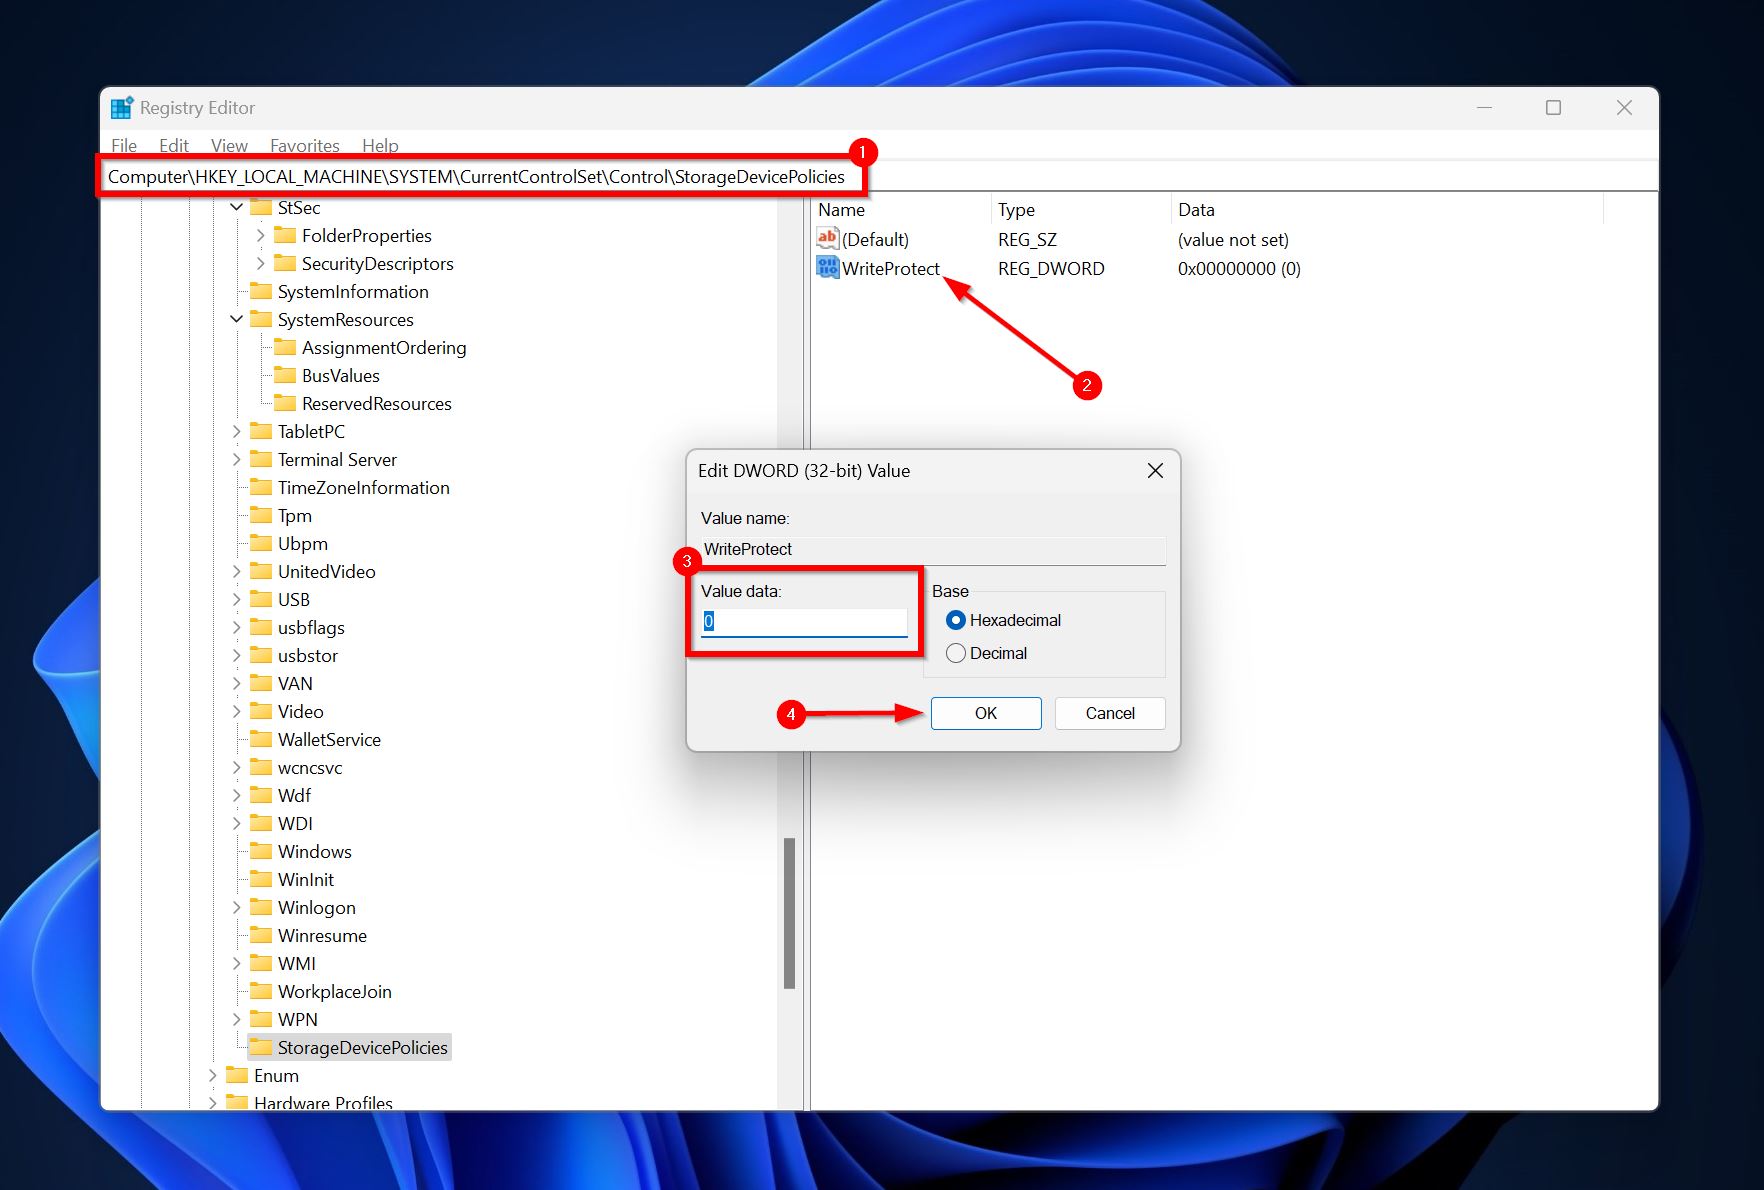
- Navigate to HKEY_LOCAL_MACHINE\SYSTEM\CurrentControlSet\Control\StorageDevicePolicies in the Registry Editor. Use the folder tree on the left to navigate to it. If the StorageDevicePolicies folder doesn’t exist, right-click on the Control folder and choose New > Key. Name it StorageDevicePolicies.
- Here, there’ll be an entry named WriteProtect. Double-click on it and change Value data to 0. Click on OK. Again, if the WriteProtect entry doesn’t exist at all, right-click on the whitespace on the right pane, and select New > DWORD (32-bit) Value. Change the name of the newly created entry to WriteProtect and follow the first part of this step.
Here is a useful YouTube video on how to create the StorageDevicePolicies key and the WriteProtect entry in the Registry Editor.
Method 4: Ensure that BitLocker Is Disabled
Sometimes, BitLocker can interfere with Windows’ ability to remove write protection from the drive. If none of the methods above worked for you, it could be because BitLocker is enabled on your drive.
The BitLocker feature only exists on the Pro version of Windows 10 and Windows 11, so this method may not be applicable in all cases.
Here’s how to turn off BitLocker:
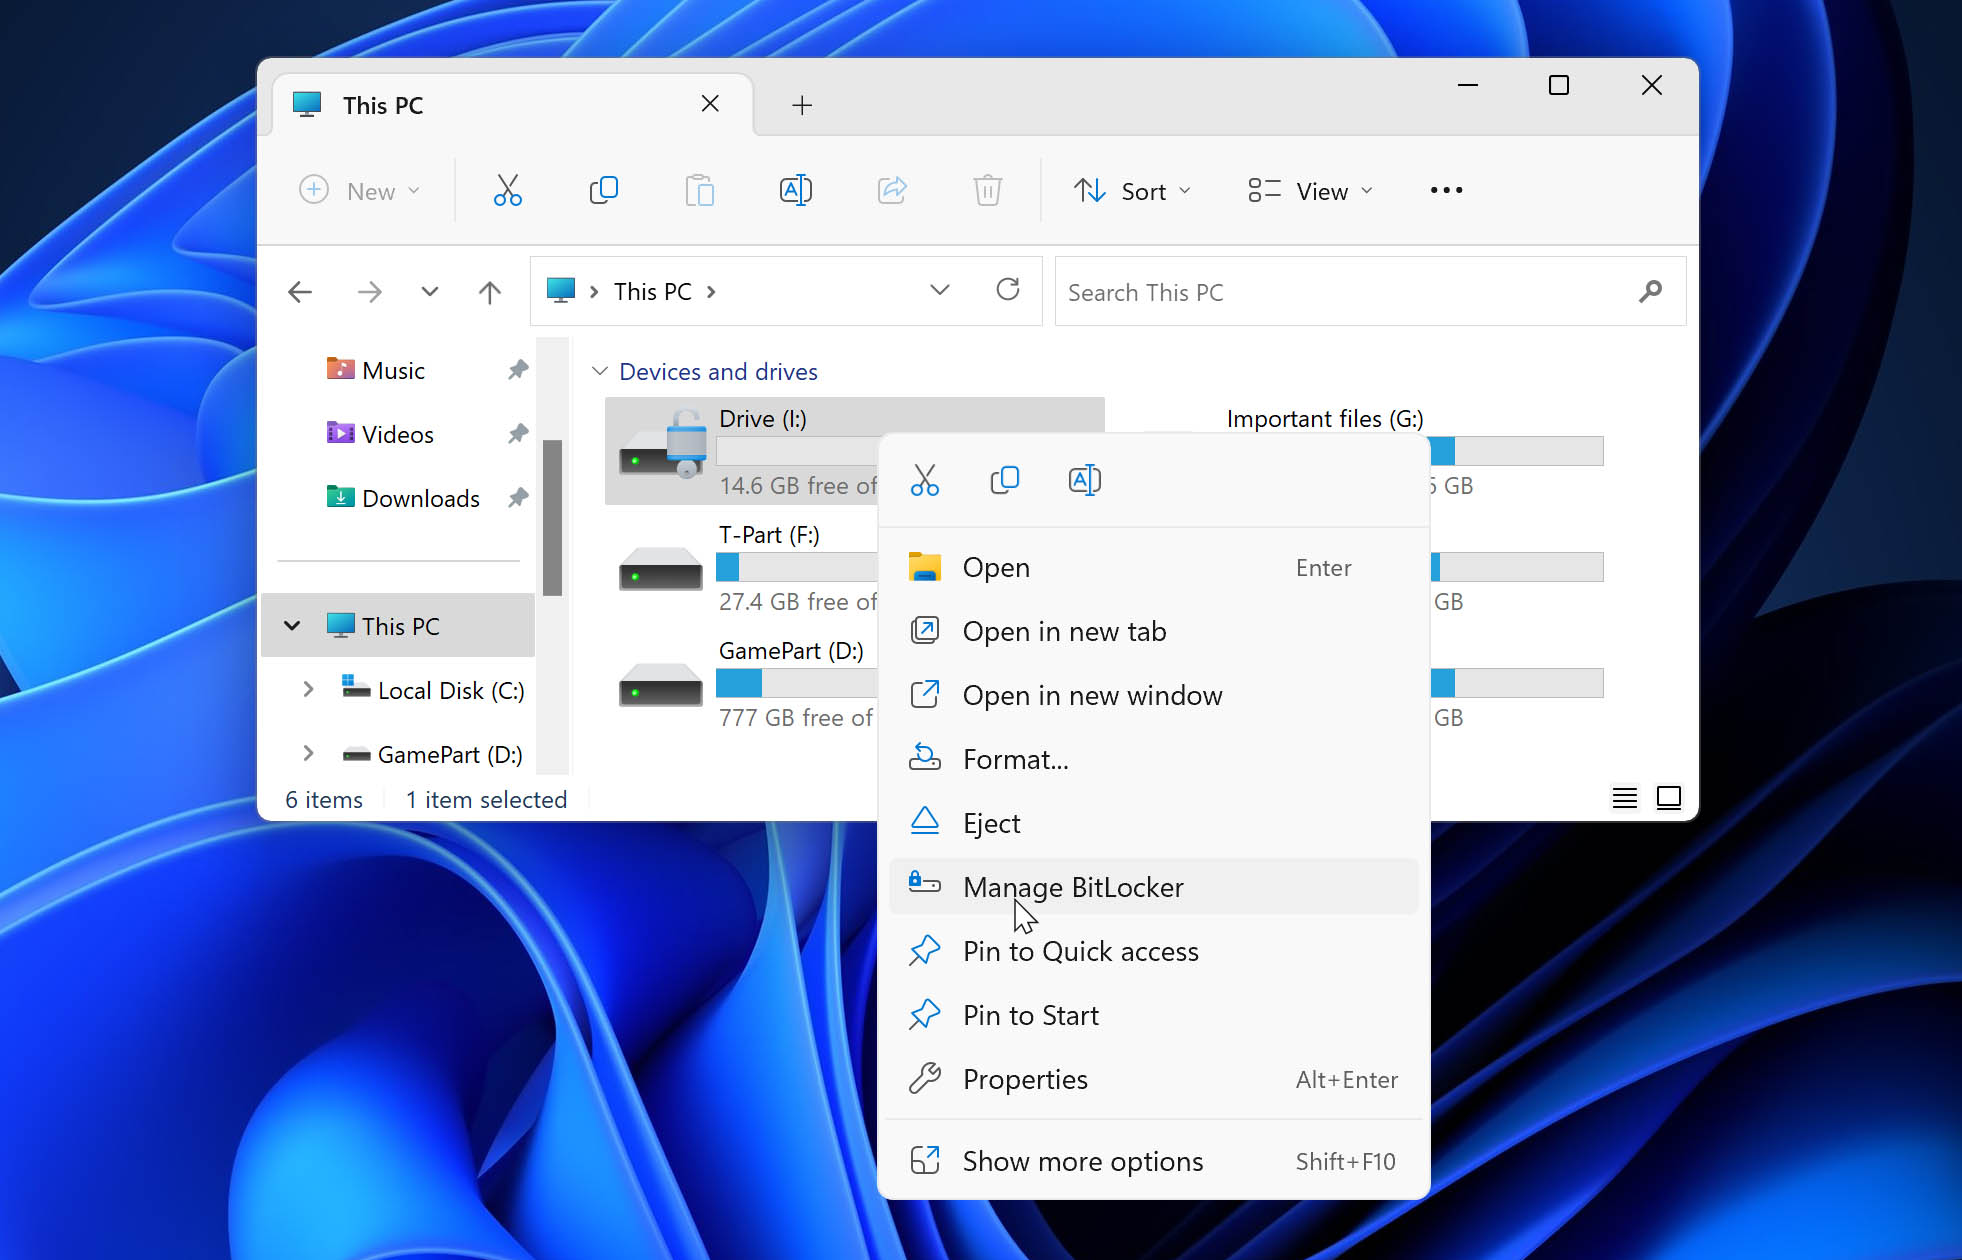
- Open File Explorer (Windows Key + E).
- Right-click on the write-protected USB drive and choose Manage BitLocker.
- In the next window, click on Turn Off BitLocker.
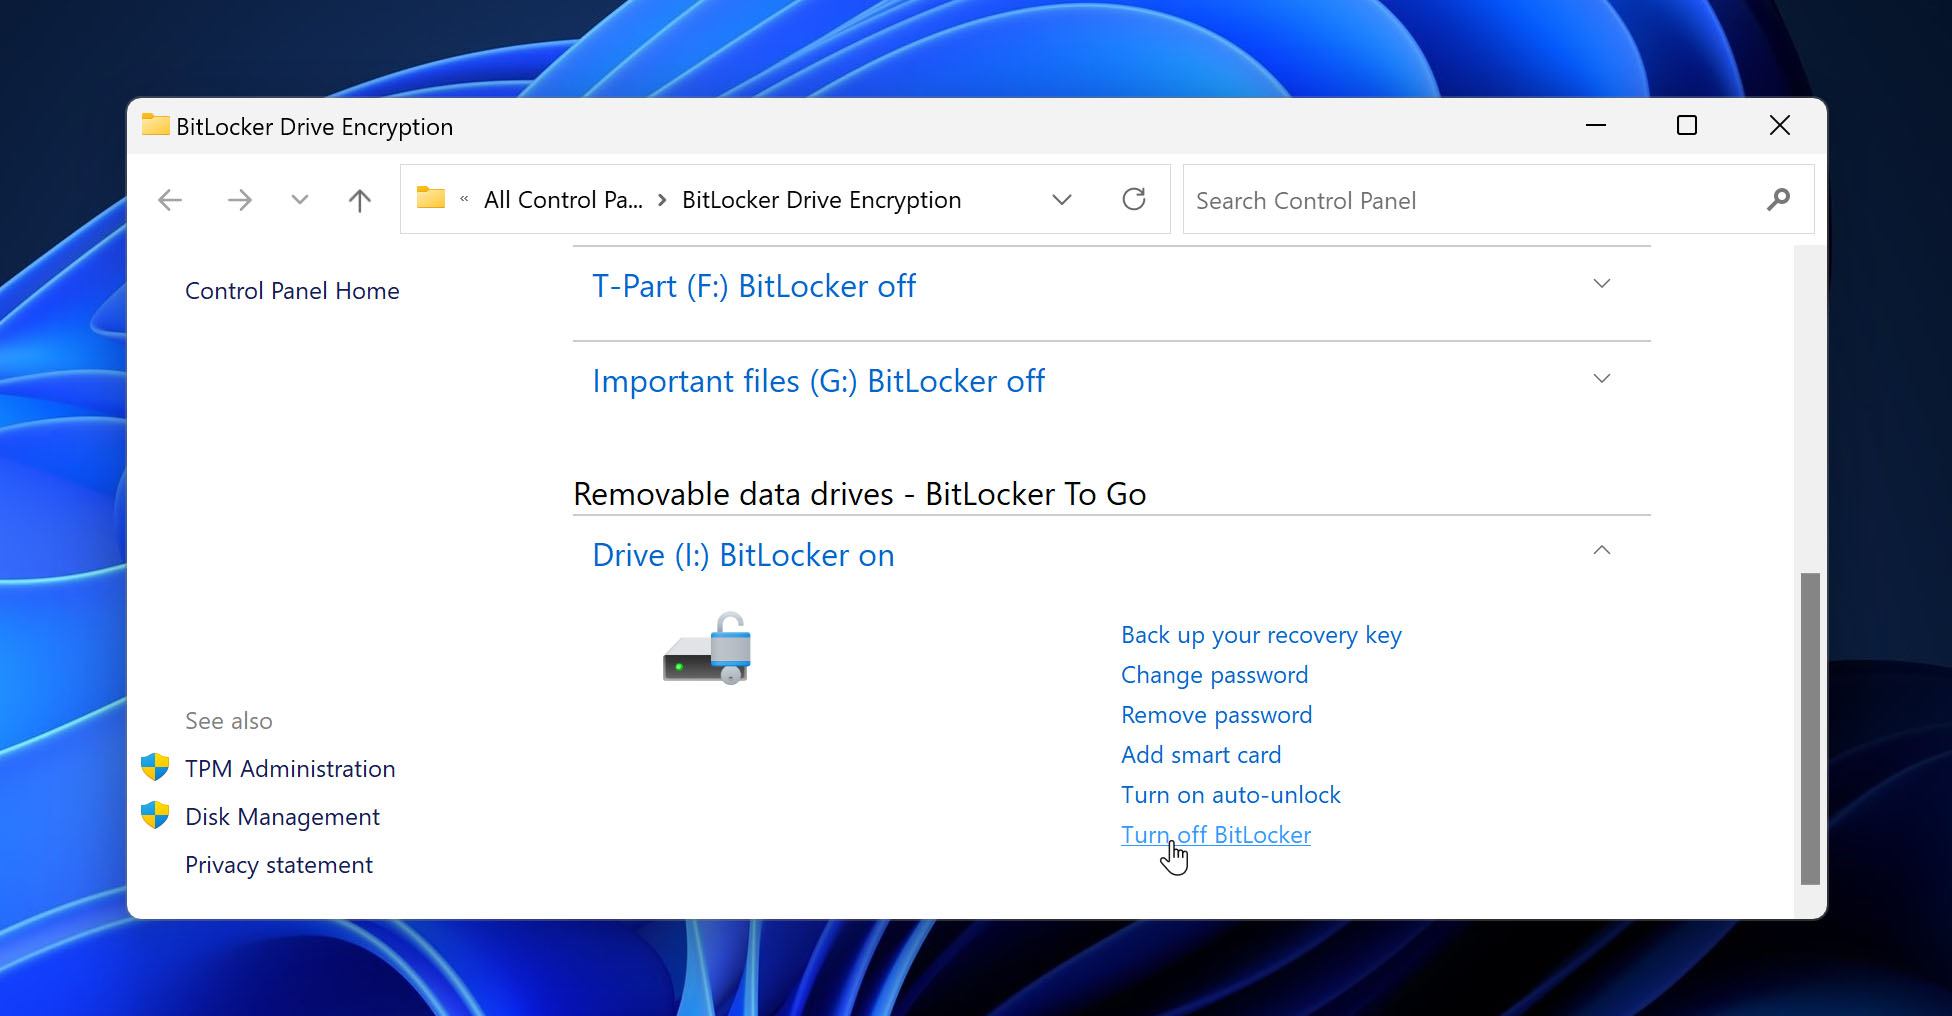
- The BitLocker decryption process will begin.
Method 5: Format Your USB Drive
Typically, if you were unable to remove write protection from the USB drive. It’ll be impossible to format it as well. But, if the previous methods worked for you, it’s a good idea to format the USB drive anyway. This is because formatting will give you a clean slate to work with, and it also fixes logical errors along the way, ensuring that the drive performs smoothly.
Before you proceed to format the drive, it’s important to know that formatting deletes all the data from your pen drive, and in some cases, this is irreversible.
Here’s how you can format the USB drive after removing write-protection from it:
- Search for “cmd” in Windows Search (Windows Key + S). Right-click on the Command Prompt and choose Run as administrator.
- Type diskpart and press Enter.
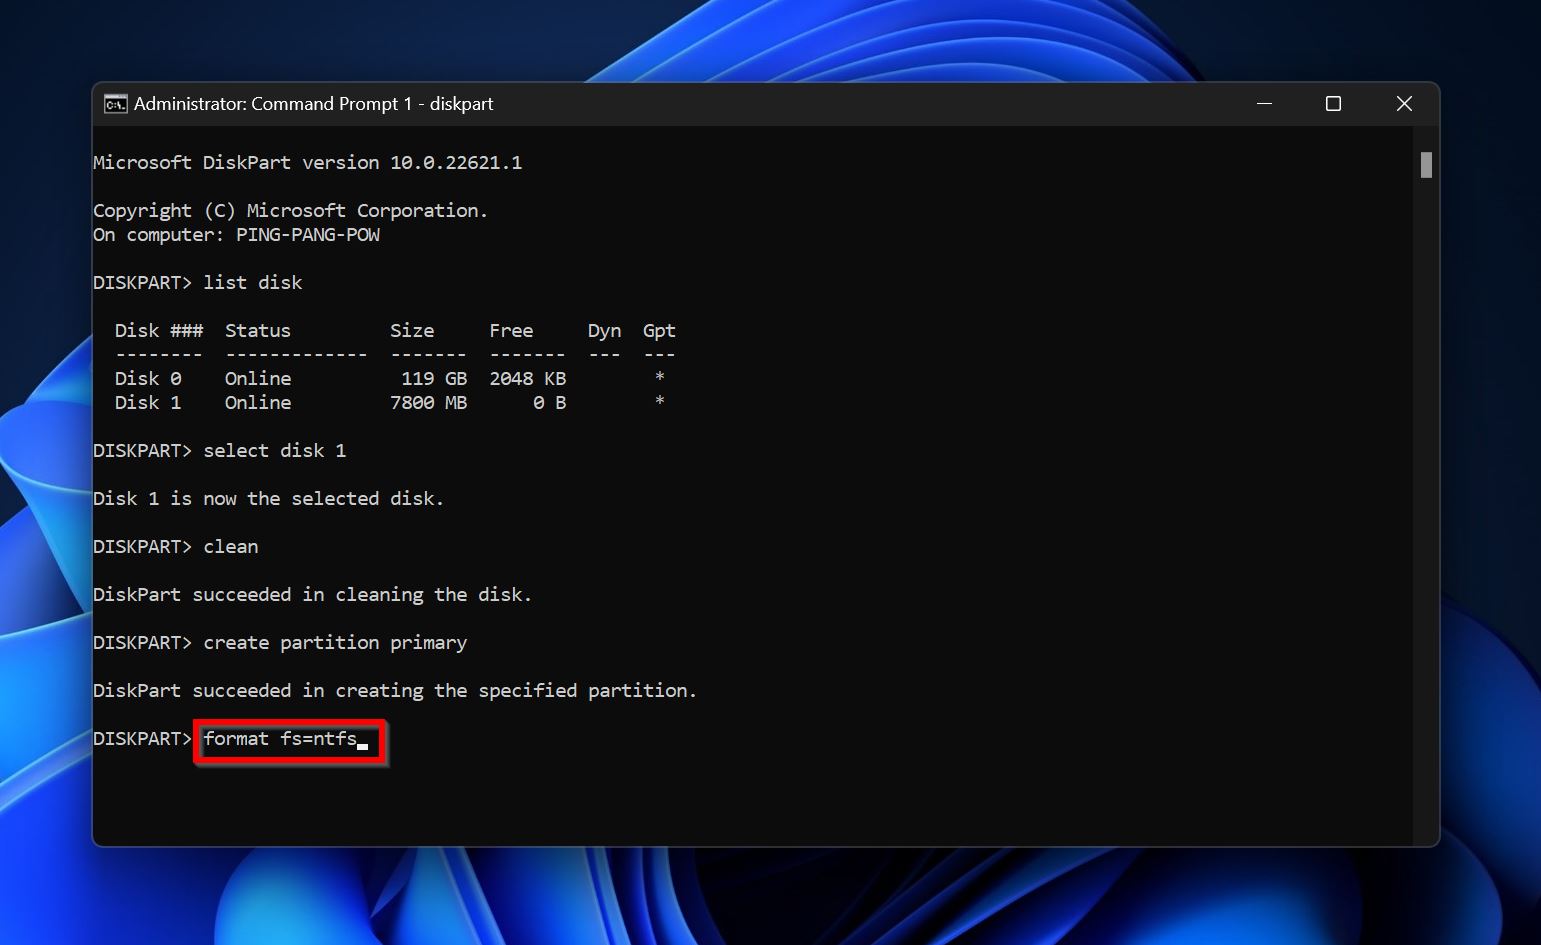
- Type the following commands in the console and press Enter after each one:
- list disk
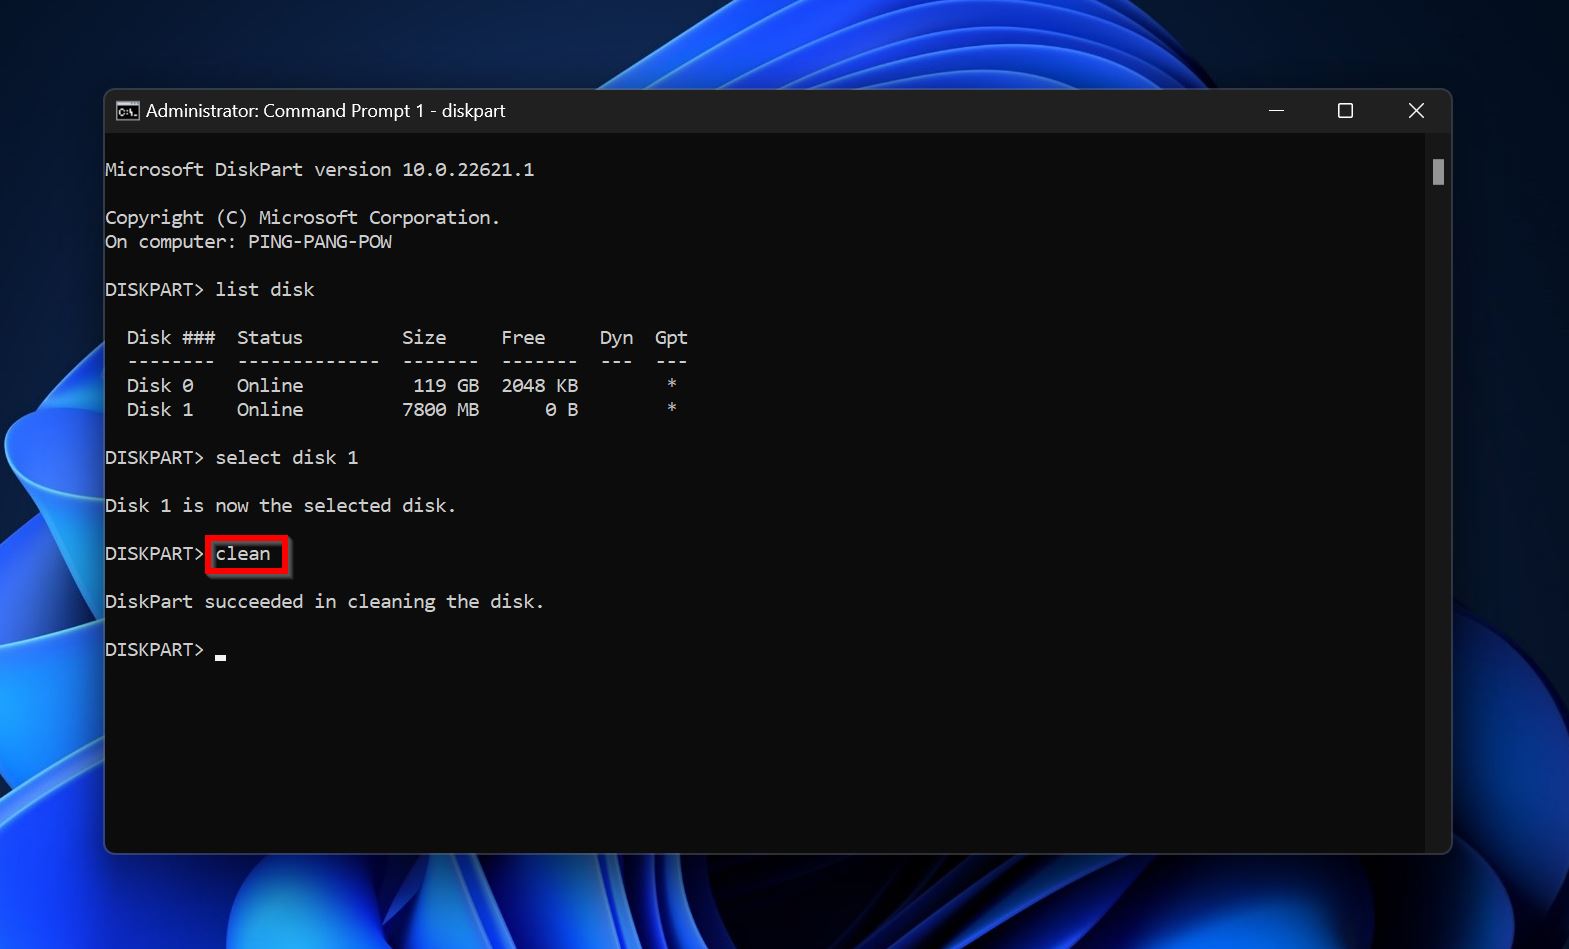
- select disk x (Replace “x” with the disk number of your USB drive).
- Type clean and press Enter.
- Type create partition primary and hit Enter.
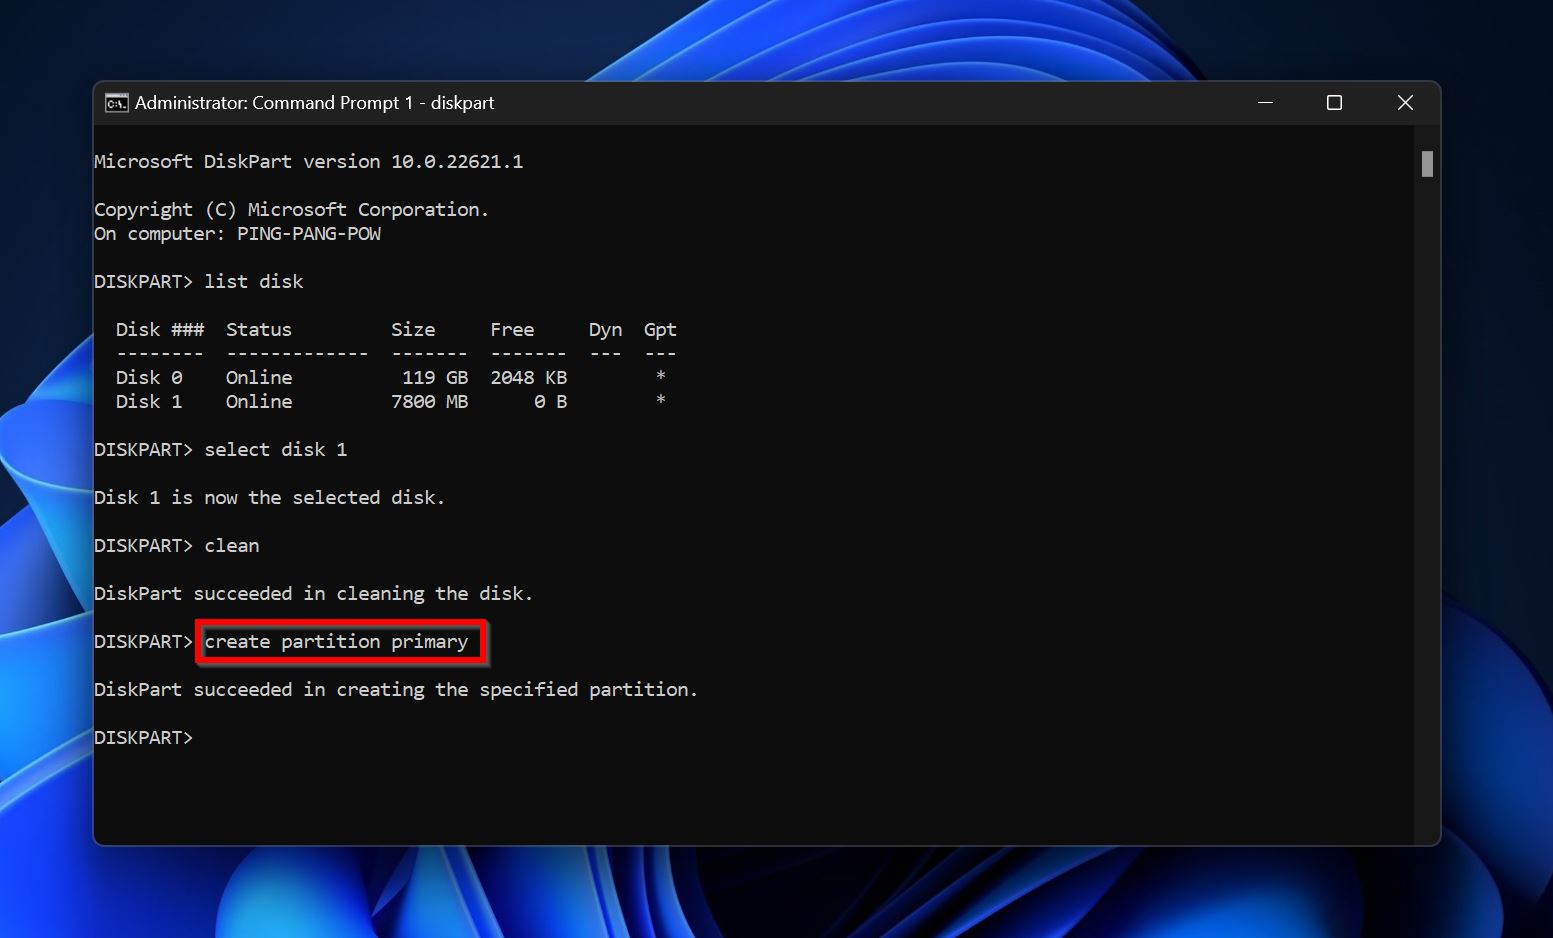
- Type format fs=NTFS and press Enter. NTFS is the file system and you replace it with the file system of your choice. For example, format fs=fat32.
- Wait for Windows to format the drive.
How to Check the Integrity of Your Write-Protected USB Drive
There are ways to check whether your write-protected USB drive is working properly and there aren’t any underlying signs of imminent failure. The points below are a mix of ways to help you detect as well as fix integrity issues on your drive:
- 🔎 Visually examine the drive: Although rare, USB drives can be physically damaged. This could happen because of physical drops, water damage, and heat (or if you’re like me – by accidentally sitting on the drive). Ensure the write-protect switch doesn’t have free play, and the USB’s connector is not bent or cracked. If the drive shows signs of physical damage, it’s best to contact an expert or simply replace it.
- 📡 Run S.M.A.R.T.diagnostics: The Self-Monitoring, Analysis and Reporting Technology (S.M.A.R.T.) status of your USB drive can help you predict whether the drive is going to fail as well as its current condition. To view the S.M.A.R.T. status of your drive, you can use Disk Drill or another third-party tool like Crystaldiskinfo. Some USB drives don’t support the S.M.A.R.T. feature. In this case, you’ll have to use the vendor-specified health monitoring tool to determine the state of your USB drive.
- 🩺 Use CHKDSK or the Disk Error Checking utility: Windows has two primary disk monitoring and repair tools – CHKDSK and the Disk Error Checking Utility – that can detect and fix bad sectors on your drive. It’s a good idea to run these tools if your USB drive is showing signs of data corruption and slow performance. You can also use one of these USB repair tools to diagnose a wide array of problems on your pen drive.
- 🦠 Scan the PC and USB drive for viruses: Malware can wreak serious havoc on your computer. It’s advisable to perform a full antivirus scan at regular intervals, as well as scan your USB drive for viruses each time you connect it to your computer. When it comes to data recovery, you must first scan and remove the virus, before attempting to recover data from the infected USB drive.
FAQ
Are there any USB write protection removal tools?
There aren’t any specific USB write-protection removal tools. While some partition managers claim to remove the write protection, it’s unlikely that they’ll be of any more help than the in-built utilities on Windows.
Can you format write protected USB stick?
No. It’s highly unlikely you’ll be able to format a write-protected USB drive. However, if you still want to give it a try, you can use tools like the USB Low-Level Format tool and see if it bears any fruit.
How to remove write protection from a USB drive on Mac?
You can use the Repair Disk Permissions feature to remove write protection from a USB drive on macOS:
- Type “Disk Utility” in Spotlight (Command + Space) and press Enter.
- Select the USB drive and click on First Aid.
- Click on Verify Disk Permissions.
- Click on Repair Disk Permissions.
Conclusions
Write-protection problems can crop up on your USB drive at any time. The best way to protect your data is to keep multiple backups of it on local storage drives as well as the cloud. Additionally, avoid storing important data on old USB drives, as they can fail at any time. It’s also a good idea to practice proper ejecting etiquette, i.e., use the Safely eject media option in Windows before physically removing the drive.
This article was written by Manuviraj Godara, a Staff Writer at Handy Recovery Advisor. It was also verified for technical accuracy by Andrey Vasilyev, our editorial advisor.
Curious about our content creation process? Take a look at our Editor Guidelines.