Simple mistakes such as improperly ejecting your Kingston USB drive can lead to data corruption and other forms of logical damage. This is only one example. There are numerous other reasons that lead to data loss and logical corruption on a Kingston flash drive. So, how do you recover the Kingston USB drive? It’s simple, follow our guide.
Is It Possible to Recover a Kingston USB Flash Drive?
Yes. And in most cases, it’s pretty straightforward. However, there are numerous reasons for data loss, and the Kingston USB data recovery process will differ accordingly.
Here are some common data loss scenarios in Kingston USB drives and the corresponding solutions:
Reason |
Description |
Solution |
😲 Accidental deletion |
Deleting your files or folders accidentally. Files deleted from a USB drive do not go to the Recycle Bin. |
Scan the Kingston USB drive using data recovery software. |
🧹 Formatting |
Formatting the wrong flash drive. This could be a Quick Format or a Full Format. |
Use data recovery software to recover data from a Quick formatted USB drive. For a Full formatted flash disk, contact a professional data recovery service. |
📛 Logical corruption |
Renders your files unreadable because of partition corruption, deletion, a damaged file system and partition table, or malware. |
Use a USB repair tool to fix the logical damage on your Kingston USB drive. If the USB drive is visible in Windows Disk Management, you can use data recovery programs to scan it for recoverable data. |
⚡ Physical corruption |
Data loss due to reasons such as improper physical handling, power surges, or water. |
Do not attempt DIY data recovery. Instead, contact a professional data recovery service. |
👾 Viruses |
Computer viruses can delete or corrupt your files, making them inaccessible. |
Scan your computer for malware and then perform a data recovery scan using data recovery software. |
🔃 File transfer errors |
Inability to copy files to and from the Kingston USB drive. Typically happens when the flash disk is write-protected. |
Disable write-protection on the USB drive. In some cases, you may have to convert the USB drive to NTFS (here’s a guide on how to format the USB drive without losing data) or extend the volume. |
Kingston USB Recovery Dos and Don’ts
To effectively recover your Kingston USB drive, there are some pointers you should keep in mind.
Following these tips will ensure you’re able to recover most if not all of your data safely and quickly:
- 🛑 Stop using your Kingston flash drive as soon as you discover the data loss. This eliminates the chances of data being written to the drive, which can overwrite the deleted files and make recovery impossible.
- ❌ Most articles on the web will list formatting as a quick fix to repairing a corrupt USB drive. Don’t. Instead, try to get back your data from the USB drive, first.
- ✅ Use a reliable data recovery tool. Data recovery scans stress your storage drive and the first scan is most likely to yield success. We recommend you use only the best data recovery programs to scan your Kingston USB drive (the list includes some free options as well).
- 👩🏽🔧 Physical damage should be dealt with by experts. Trying to recover data from a physically damaged Kingston USB drive at home, can further the data loss.
How to Perform a Kingston USB Recovery
Kingston offers two major model series in their USB drive lineup–the DataTraveler (with the DTSE9 being the most popular consumer model), and the IronKey. While Kingston DataTraveler USB drives can be scanned and repaired using the methods listed below, the IronKey series are encrypted drives and some models contain a crypto chip for preventing unauthorized access.
If you want to recover data from a Kingston IronKey USB drive, it’s best to seek expert assistance.
Now, depending on the physical state, and the reason for data loss in your Kingston USB drive, there are three ways to repair it and recover your data. Refer to the table in the first section of this article to know which method you should choose. Here are the options:
Option A: Recover Data from the Kingston Flash Drive Using Disk Drill
Barring professional data recovery services, data recovery programs are the only way you can get back deleted files from your Kingston USB drive. These apps are much cheaper than dedicated data recovery services. There are plenty of USB data recovery programs available on the internet, but the importance of choosing a reliable and user-friendly option cannot be overstated.
In this Kingston flash drive recovery tutorial, I decided to go with Disk Drill. The high data recovery rate coupled with an elementary UI that makes even new PC users right at home, it’s an easy choice. Disk Drill’s compatibility with all major file systems including the ones commonly used in USB drives (FAT32, exFAT, and NTFS) ensures that you don’t have to waste time double-checking for compatibility.
In my case, the USB drive had become RAW and Disk Drill was still able to scan and recover all my data from it.
Let’s see what the data recovery process looks like in Disk Drill:
- Download Disk Drill and install it.
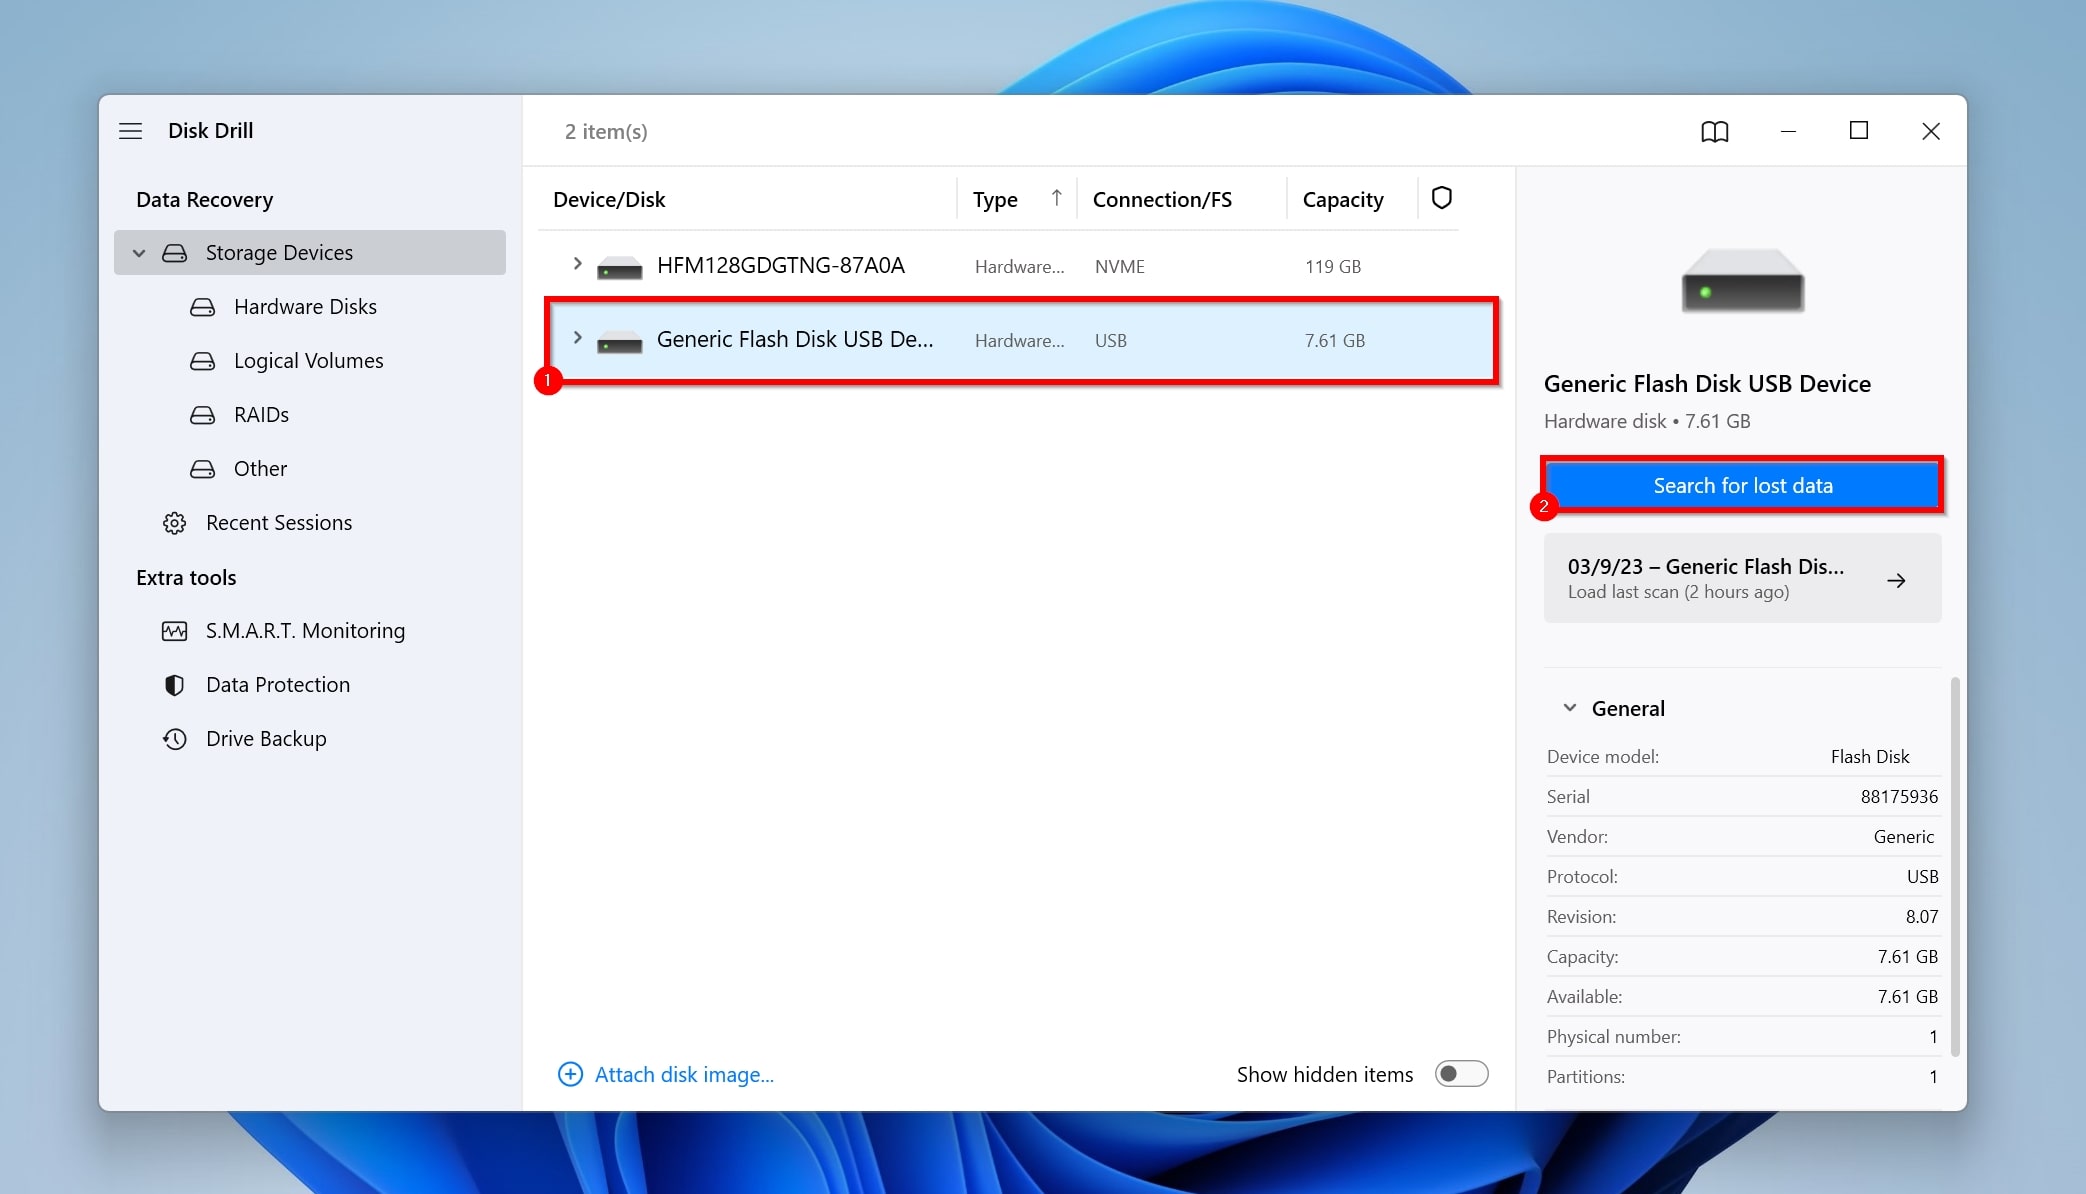
- Connect the Kingston USB drive to your PC.
- Open Disk Drill, select the USB drive, and click Search for lost data.
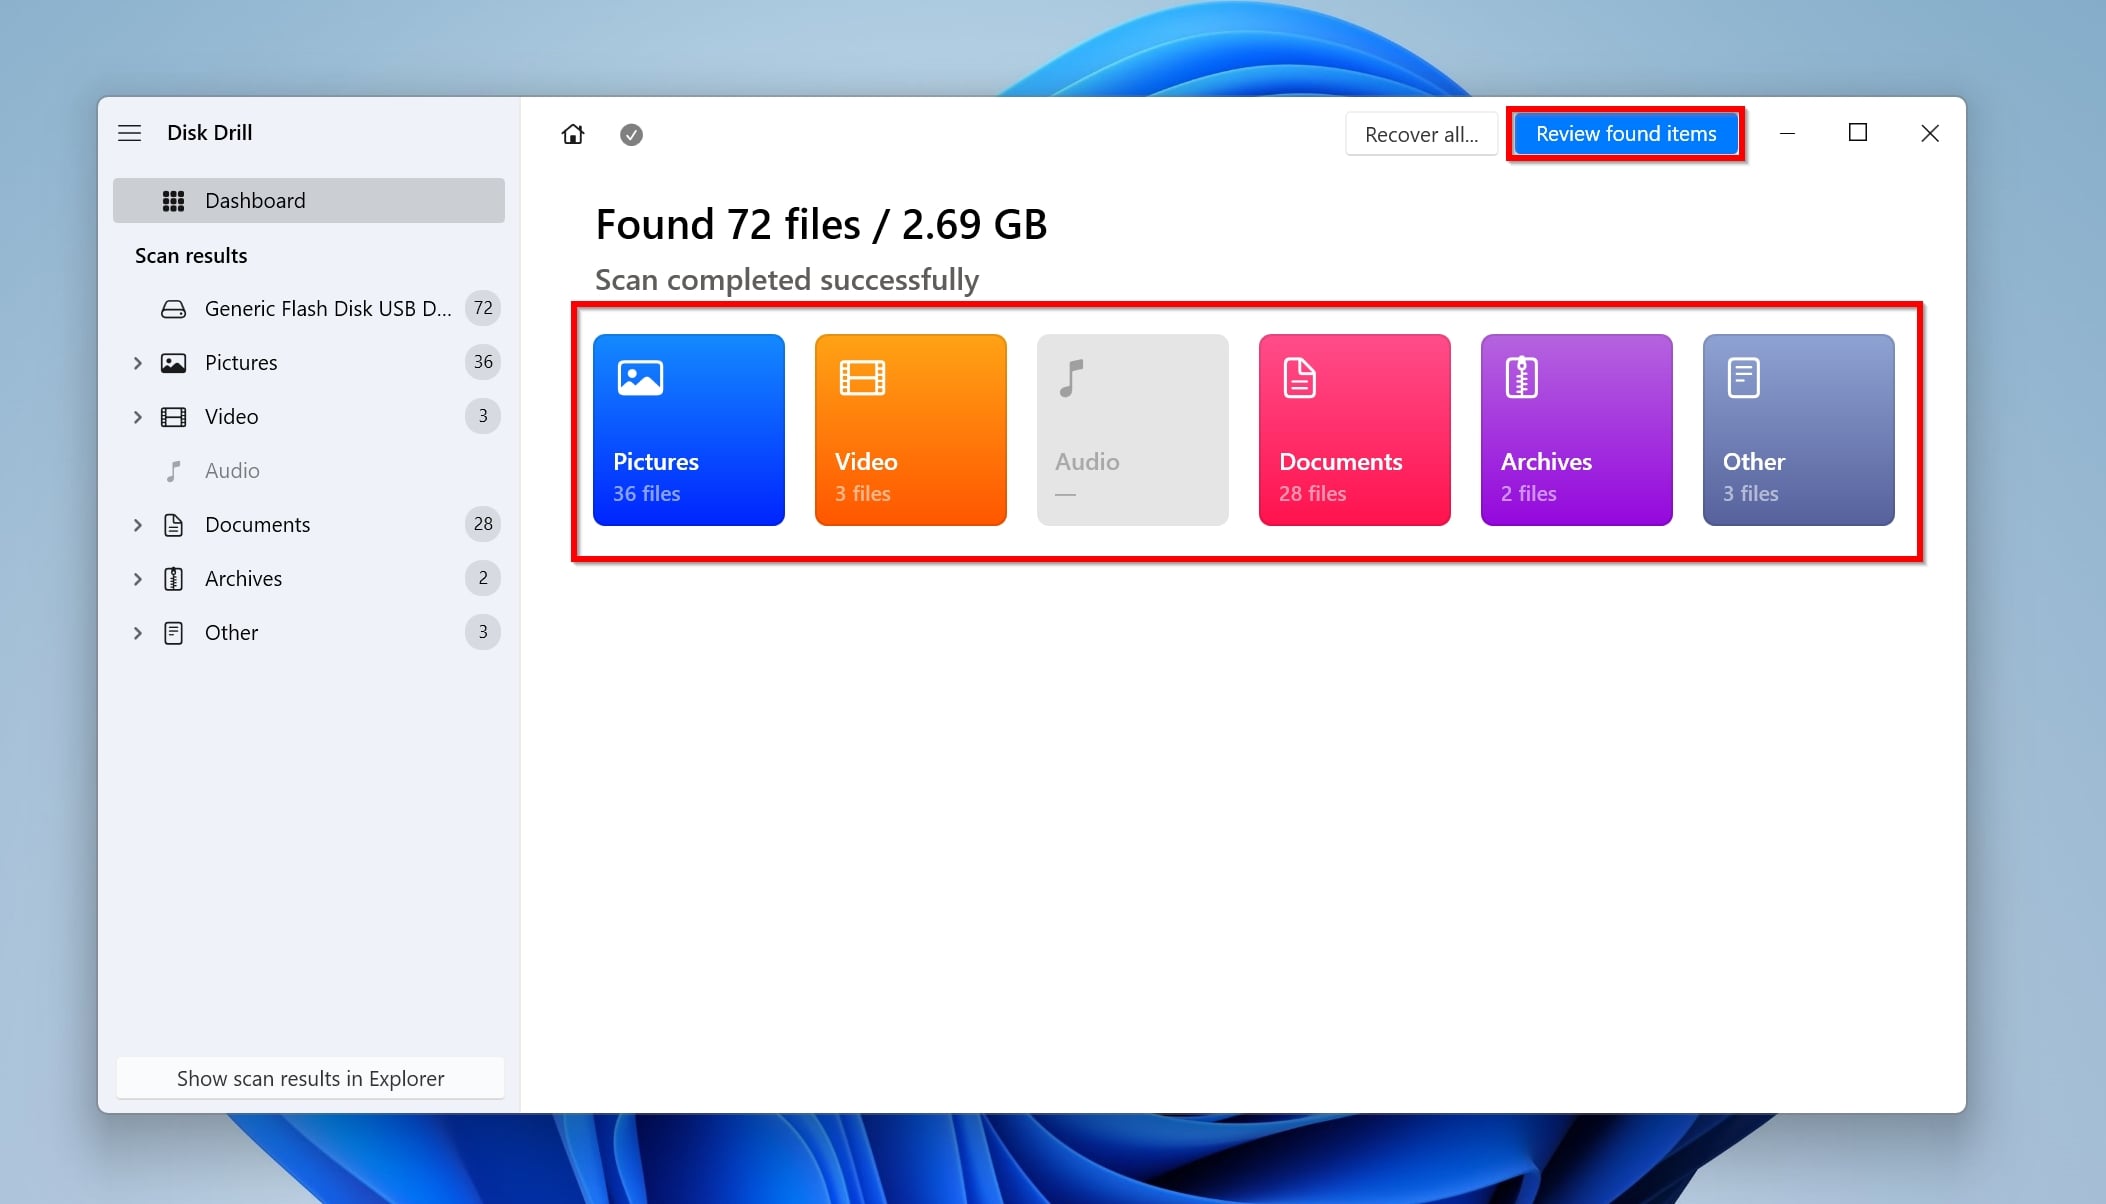
- Click Review found items to view the recoverable data. If you want to recover a specific file type, click on the relevant option on this screen (Pictures, Videos, Audio, Documents, Archives, and Other).
- Select the desired files using the checkboxes. You can take advantage of Disk Drill’s preview feature to ensure you’re selecting the correct files. Click Recover after you’re done selecting.
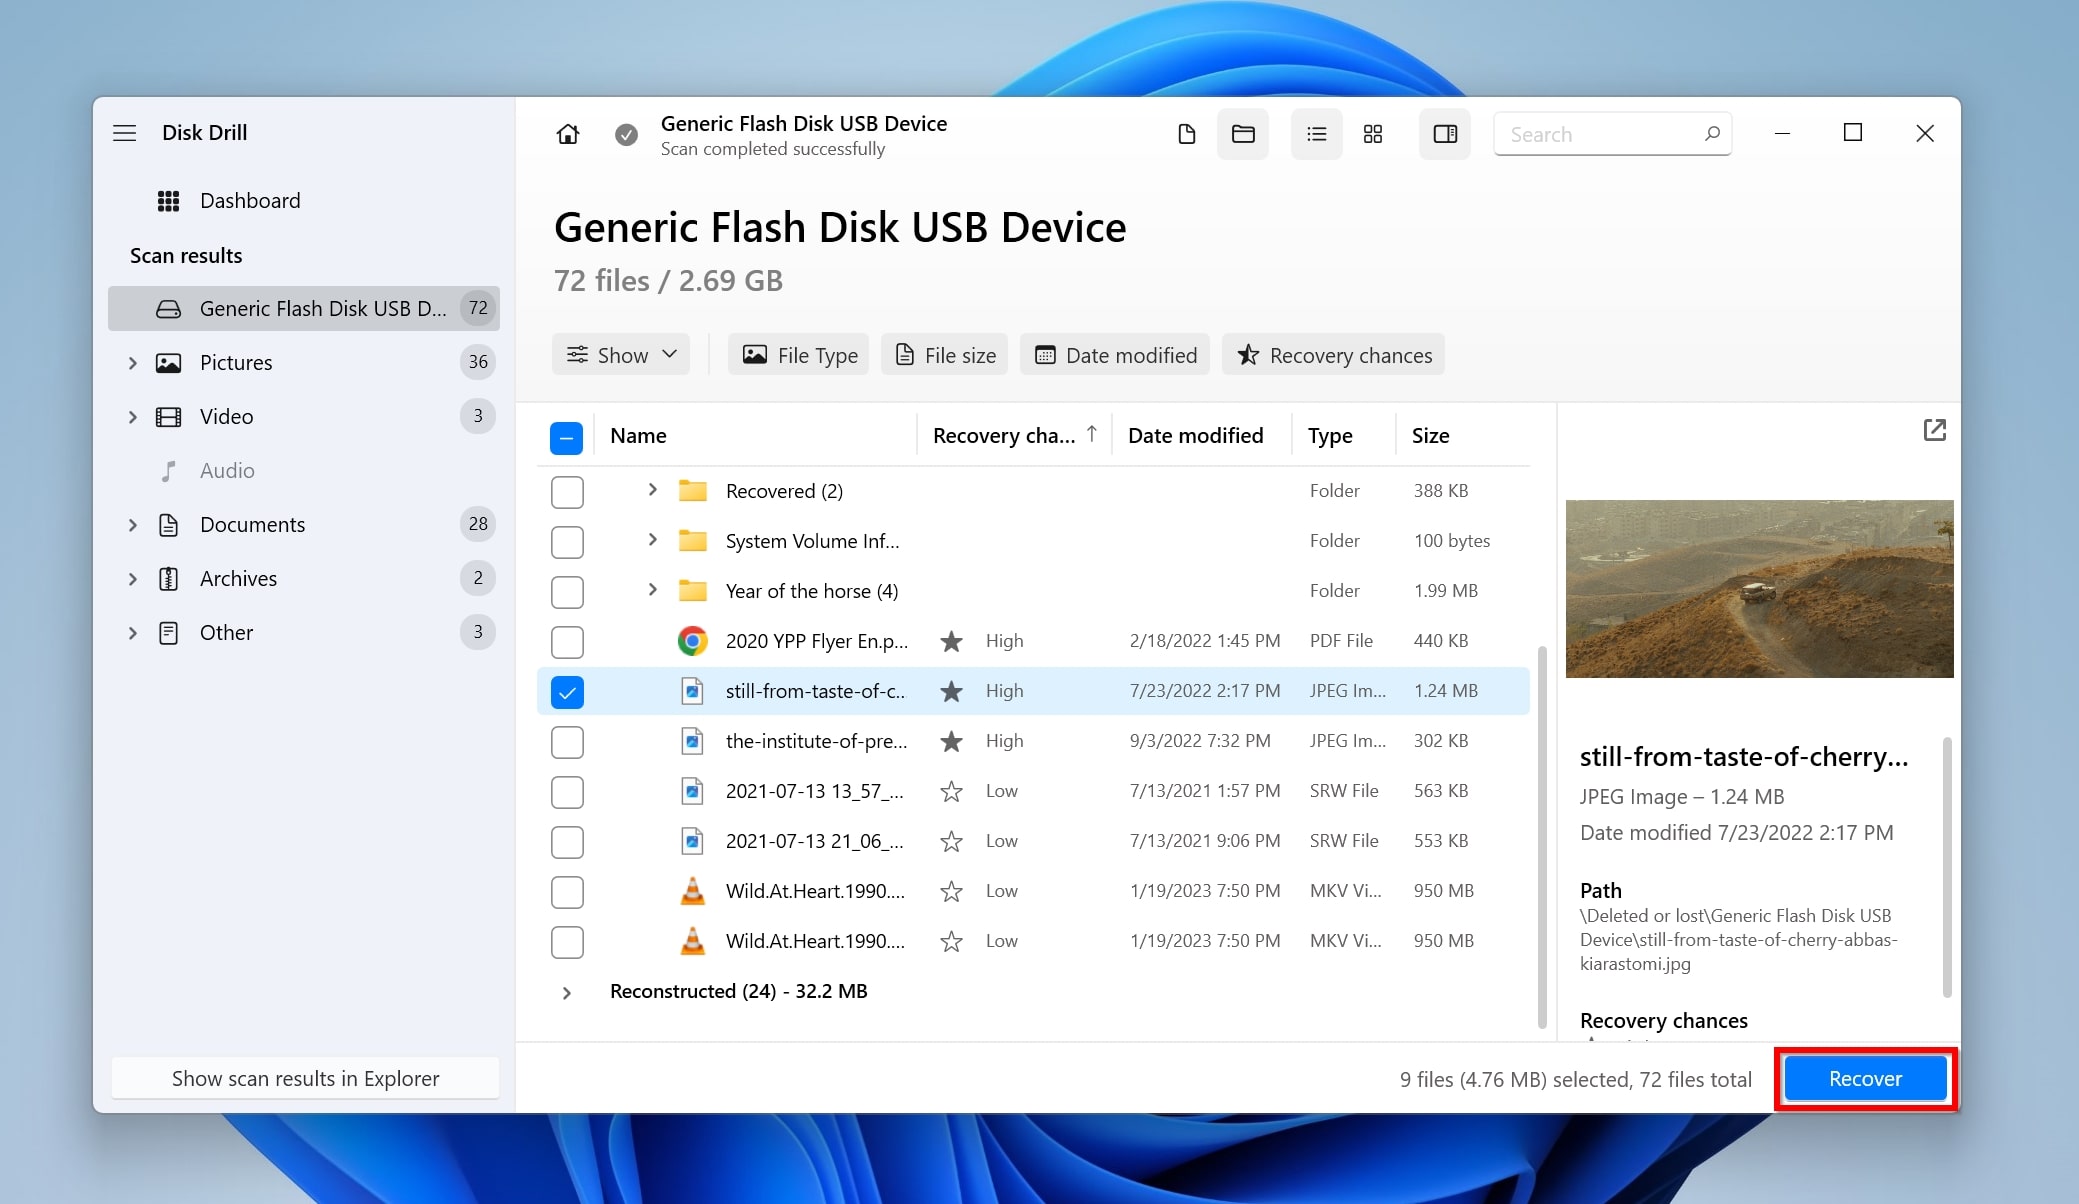
- Choose a recovery destination and click Next. Don’t recover the files to the Kingston USB drive itself.
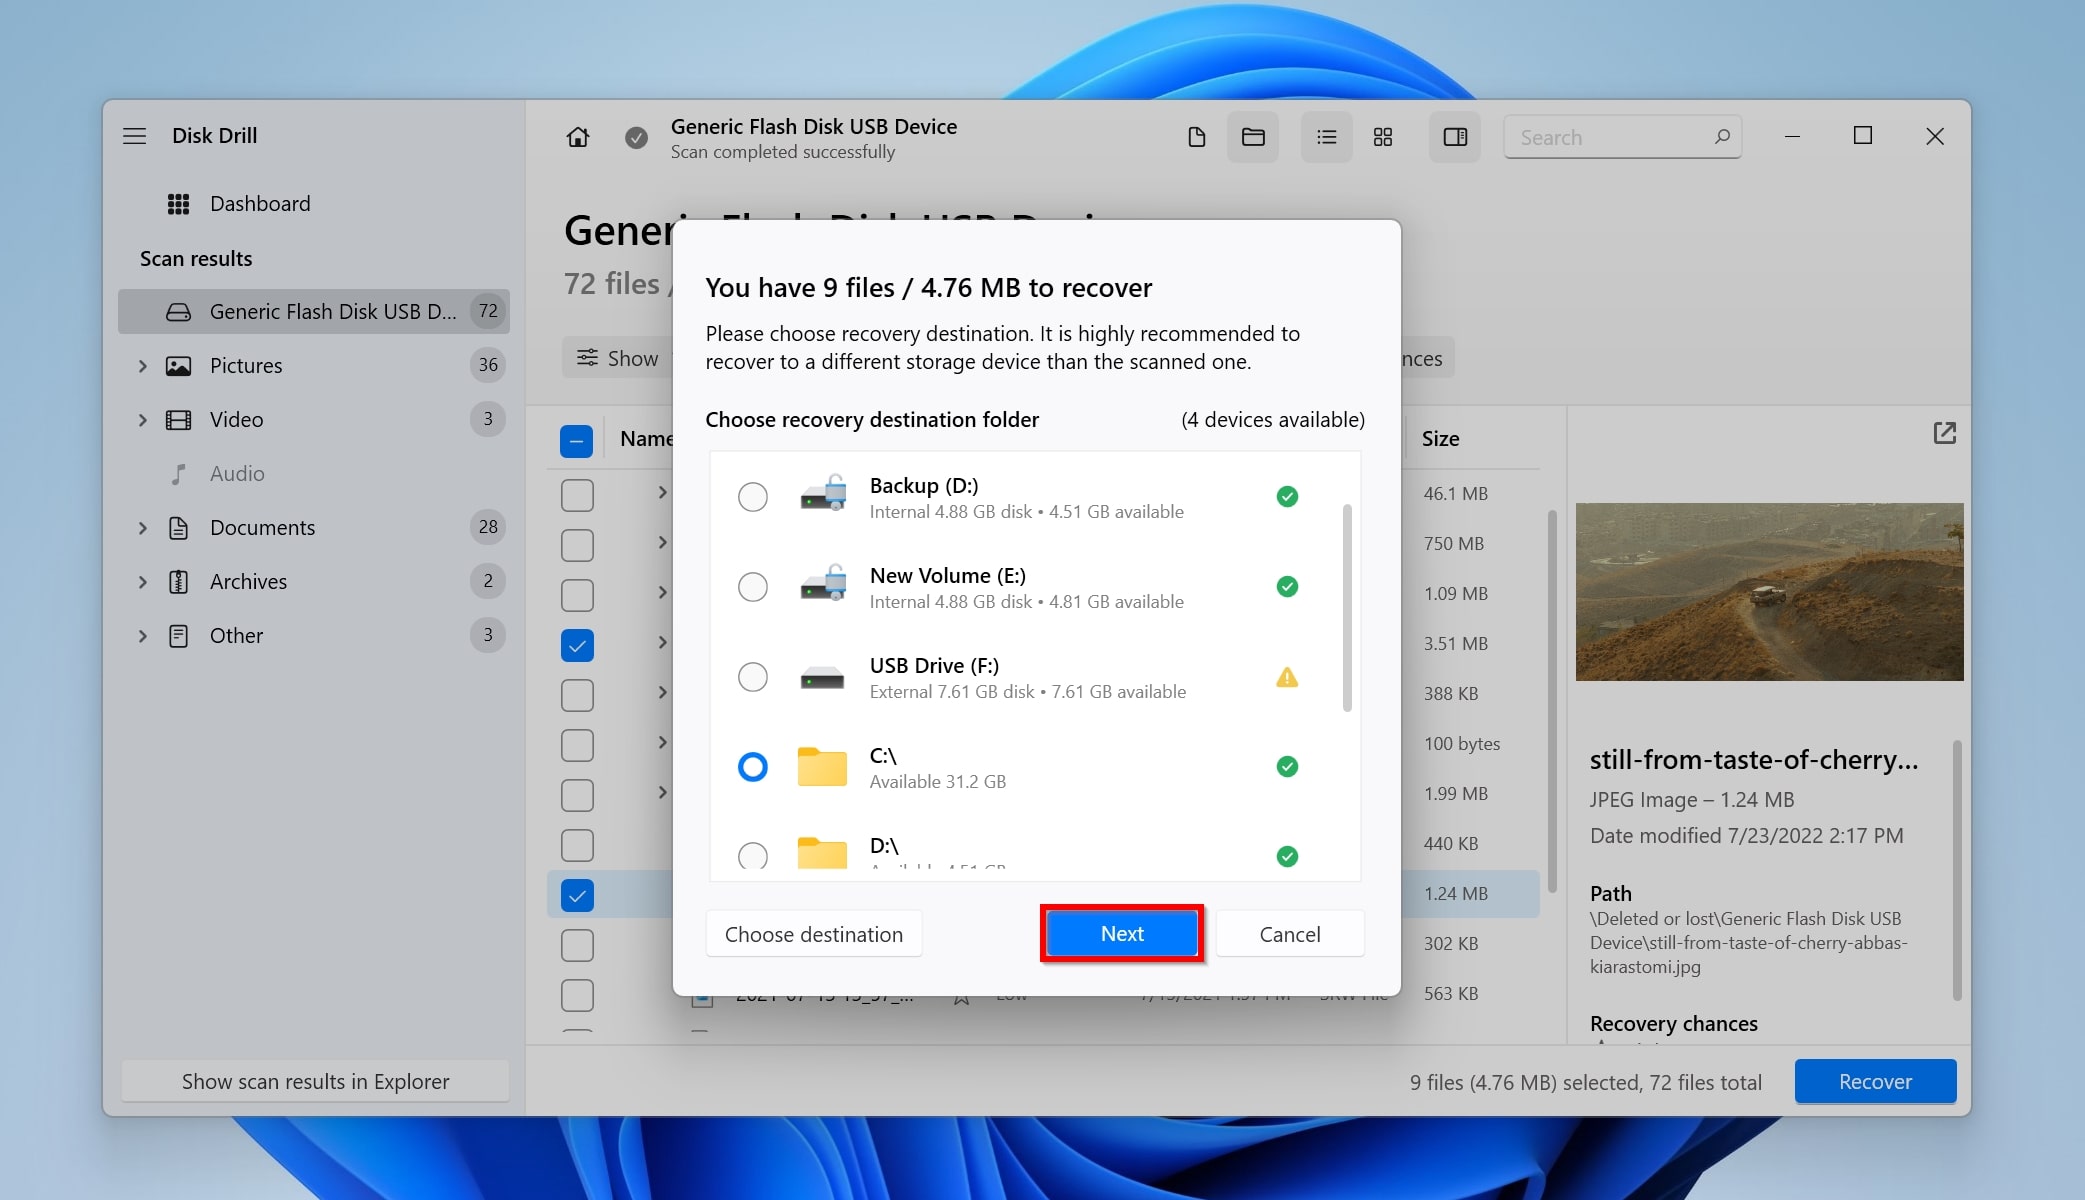
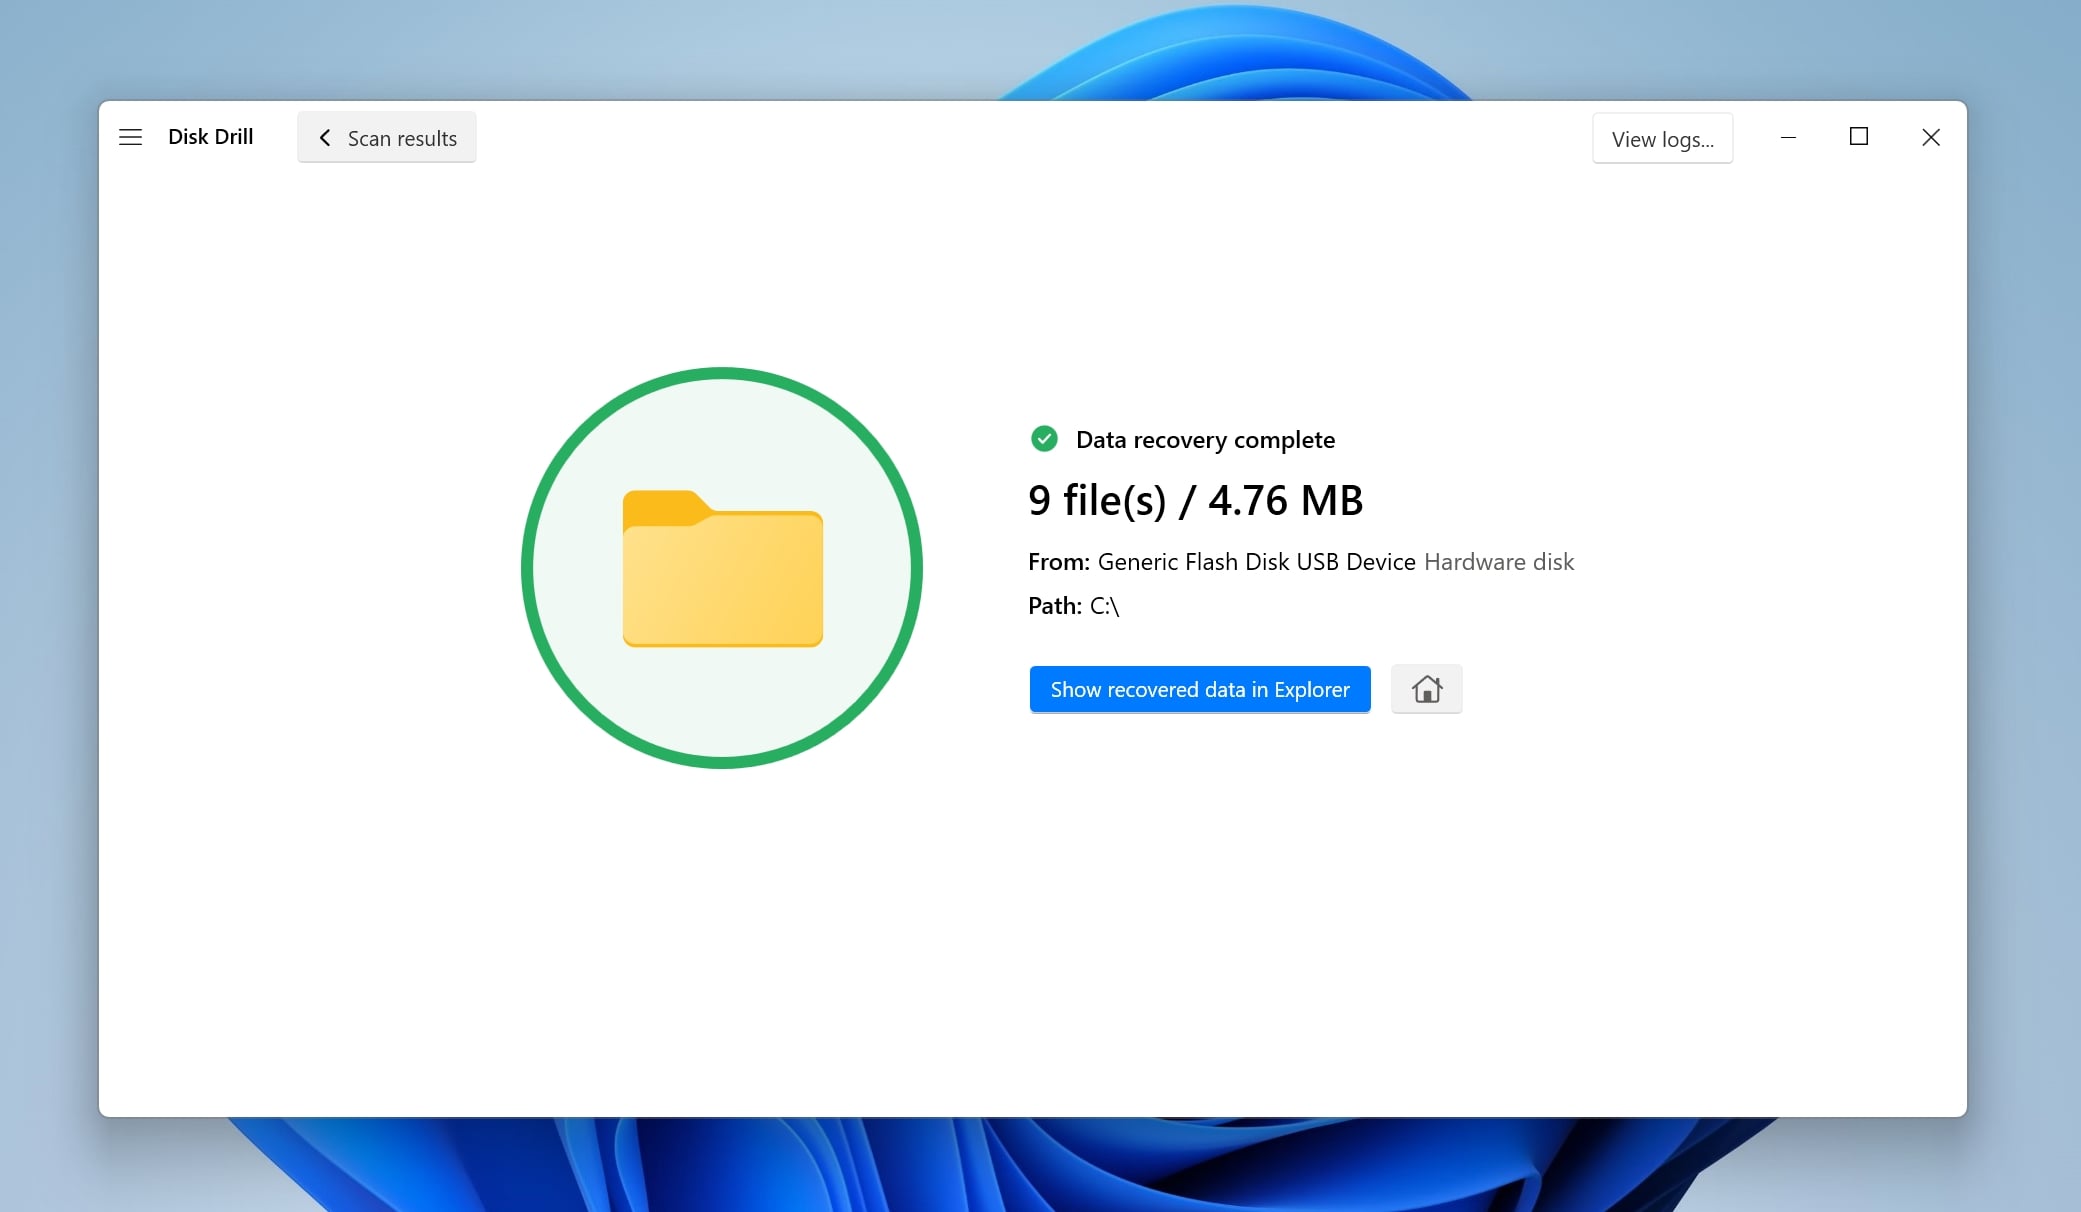
- Disk Drill will recover the selected files from your Kingston flash drive.
Our Disk Drill review describes the program and its various features in detail so you can make a more informed choice.
Option B: Repair the Kingston Pen Drive Using CHKDSK
CHKDSK is an in-built command line utility on Windows that detects and fixes logical issues with your storage devices. It’s quite versatile, and we recommend you use it to fix your Kingston USB drive. Keep in mind that CHKDSK won’t work on RAW storage drives.
Here’s how to use CHKDSK to repair a Kingston USB drive:
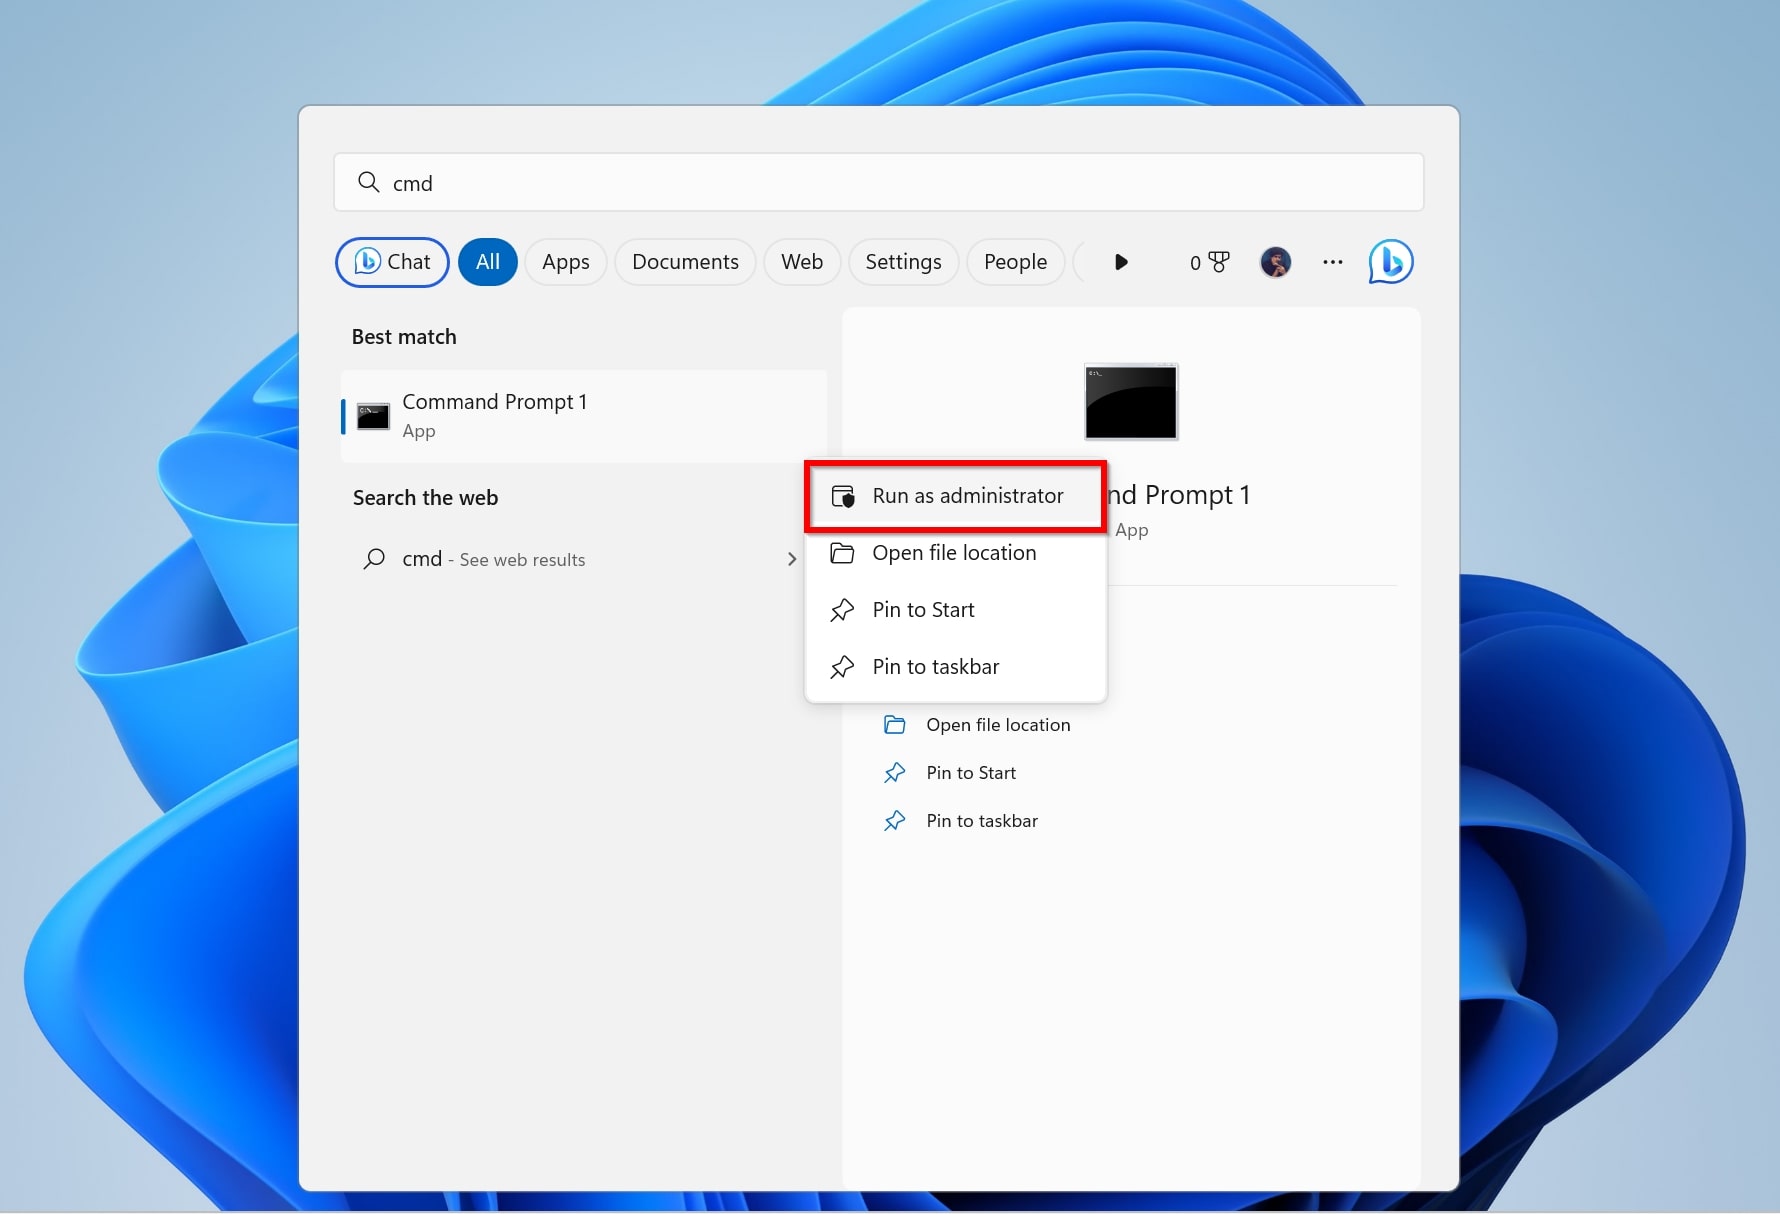
- Type “cmd” in Windows Search (Windows Key + S). Right-click on Command Prompt > Run as administrator.
- In the CMD console, type chkdsk X: /r and press Enter. Replace “X” with the drive letter of your Kingston USB drive.
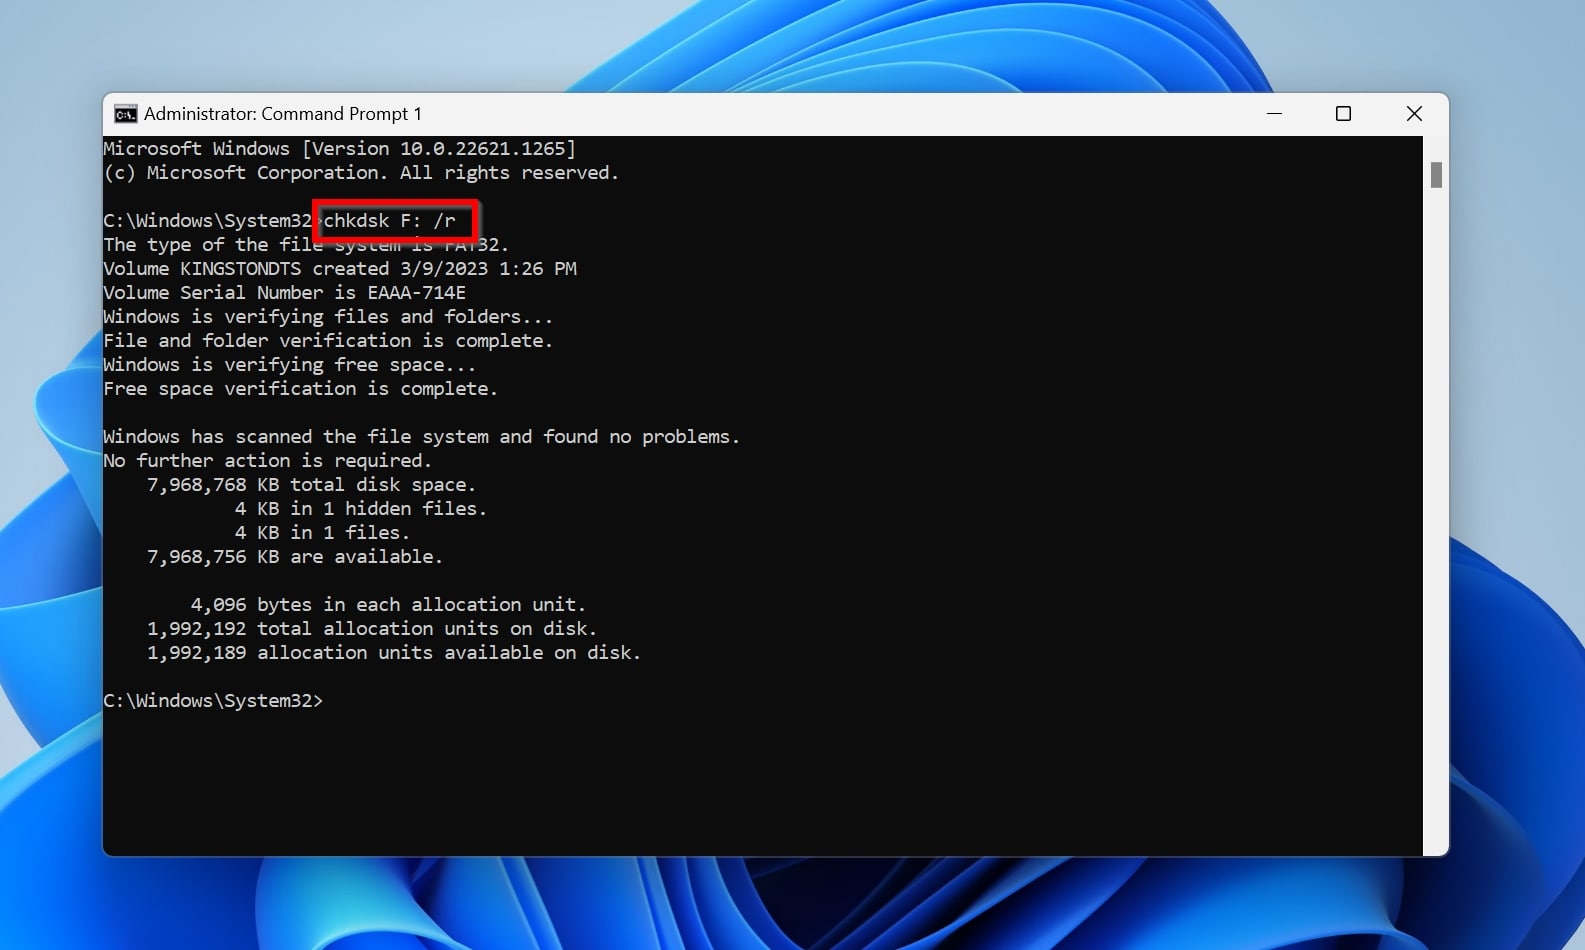
- Wait for CHKDSK to scan and repair the pen drive.
Option C: Fix the Kingston USB Partition Using TestDisk
If a deleted partition or damaged partition table caused data loss on your Kingston USB drive, TestDisk is your best friend. It’s open-source and runs on Windows, Linux, and macOS. However, it lacks a GUI which means that it’s a little difficult to get around the program. To navigate in TestDisk, use the arrow keys, and press Enter to select an option.
Be sure to carefully follow the steps listed below:
- Download TestDisk and extract the contents of the ZIP file.
- Connect the Kingston USB drive to your PC.
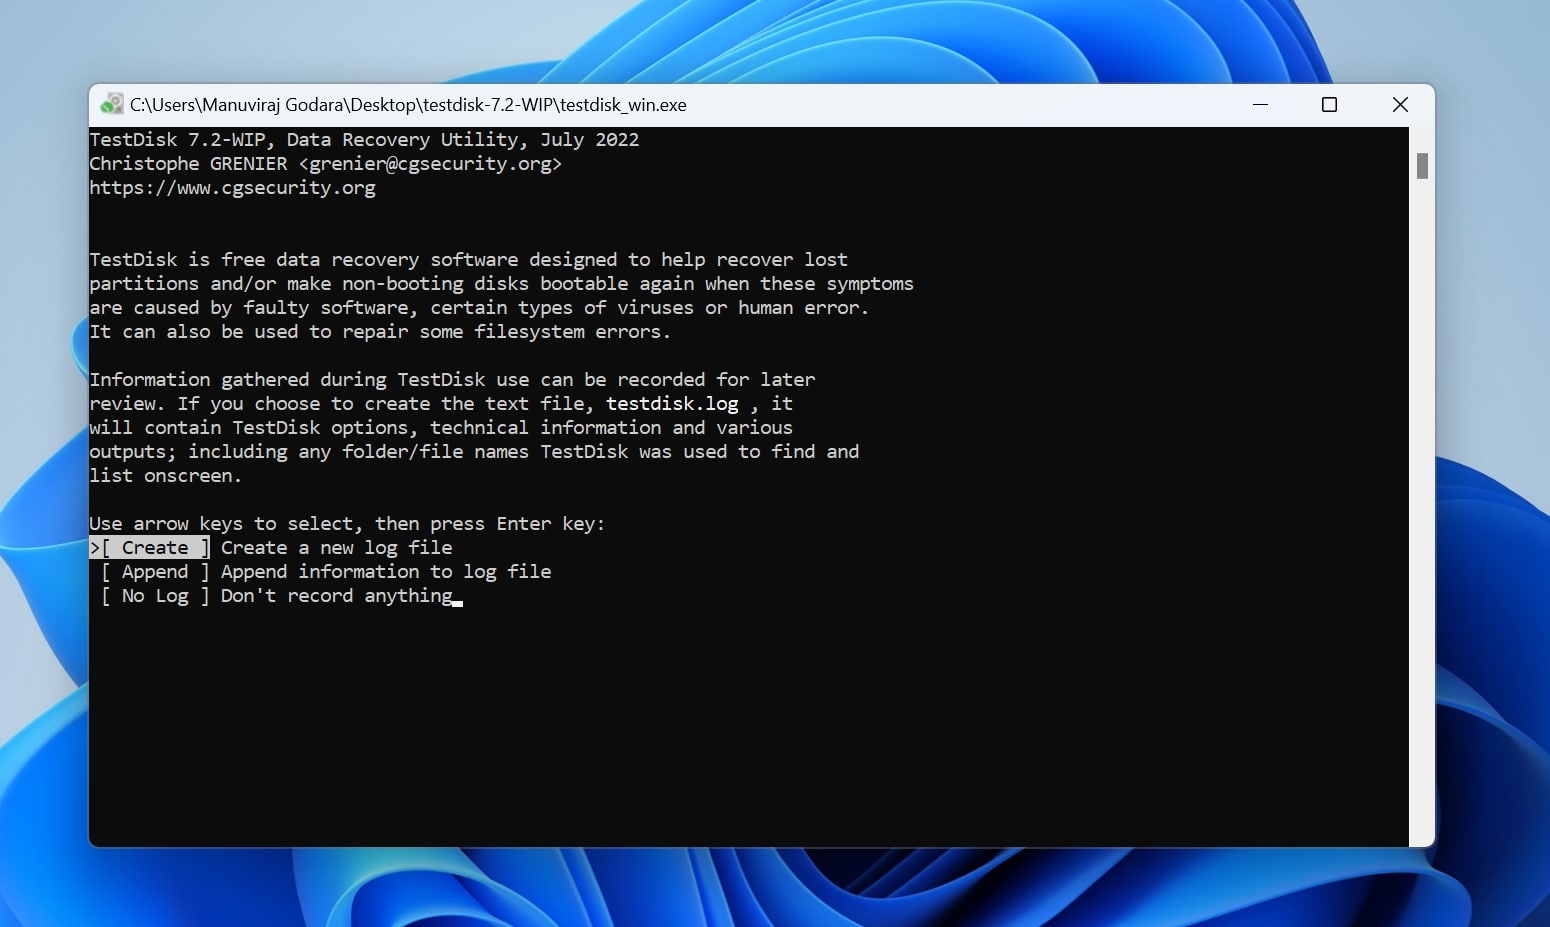
- Run TestDisk. Use the arrow keys to choose whether you want to create a log file or not, and press Enter to confirm.
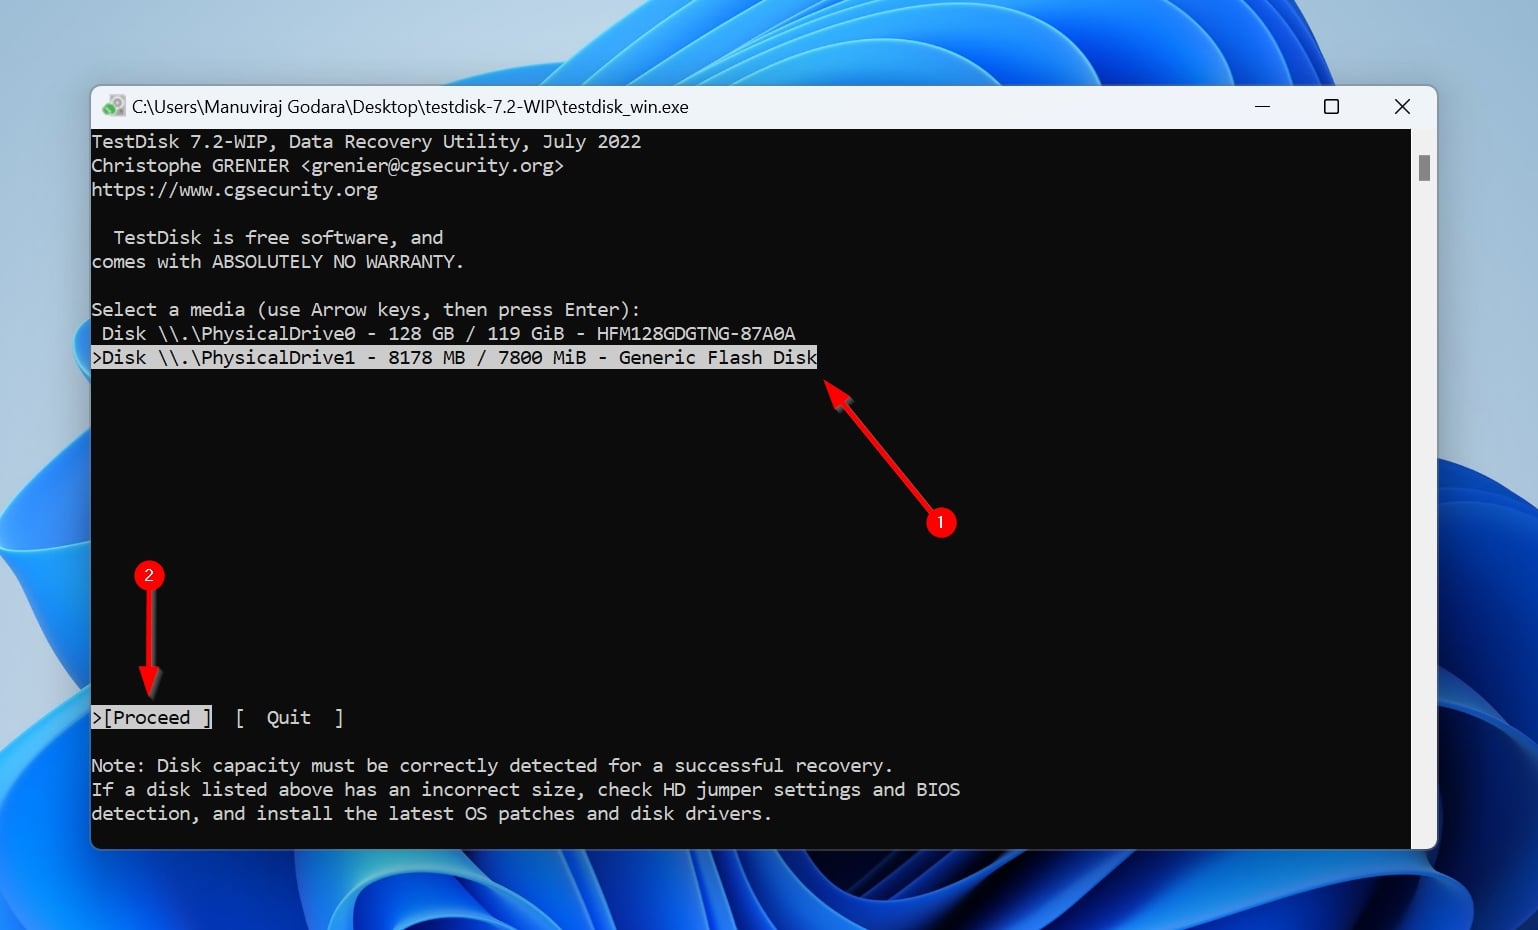
- Choose the Kingston USB drive from the device list and press Enter.
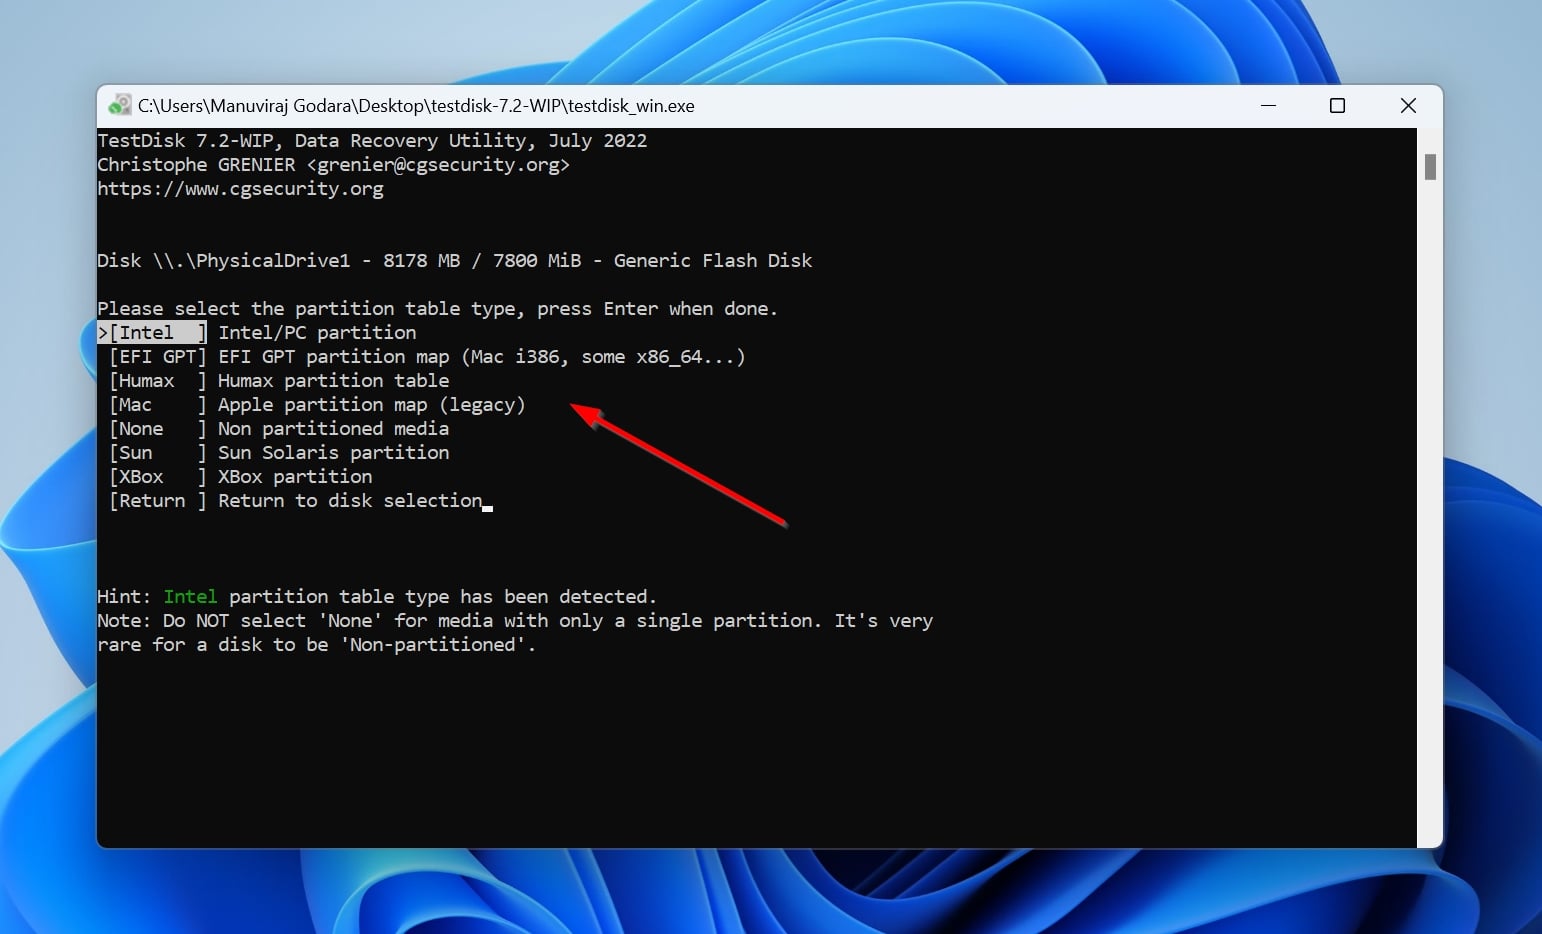
- Select a partition table type on the next screen. Since TestDisk automatically detects this, just press Enter on this screen.
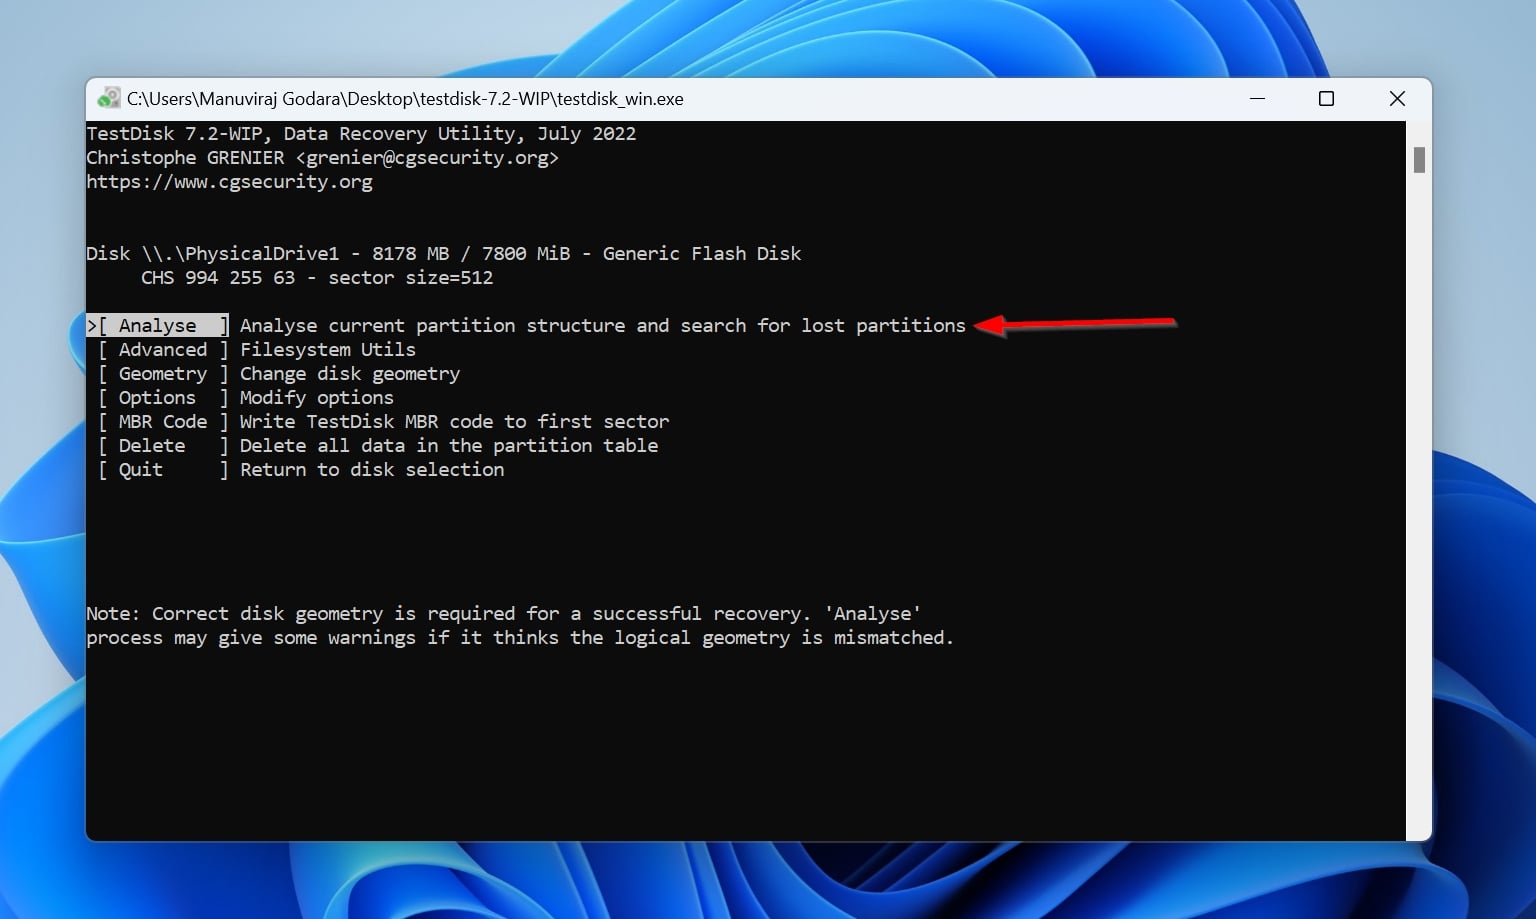
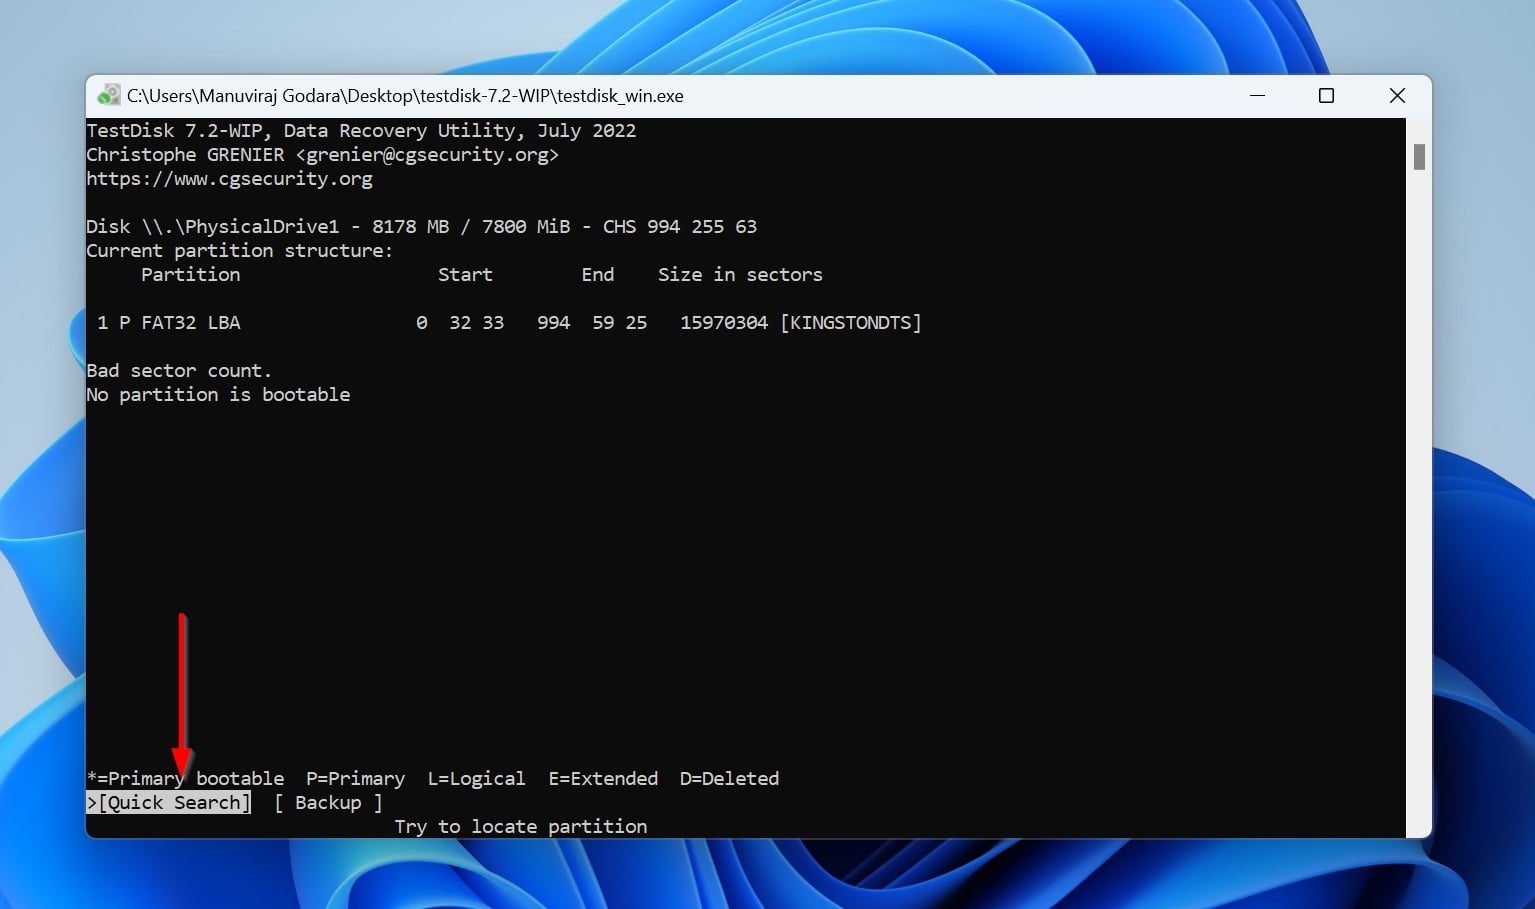
- Ensure the Analyze option is selected, and press Enter.
- Select the Quick Search option using the left or right arrow keys and press Enter.
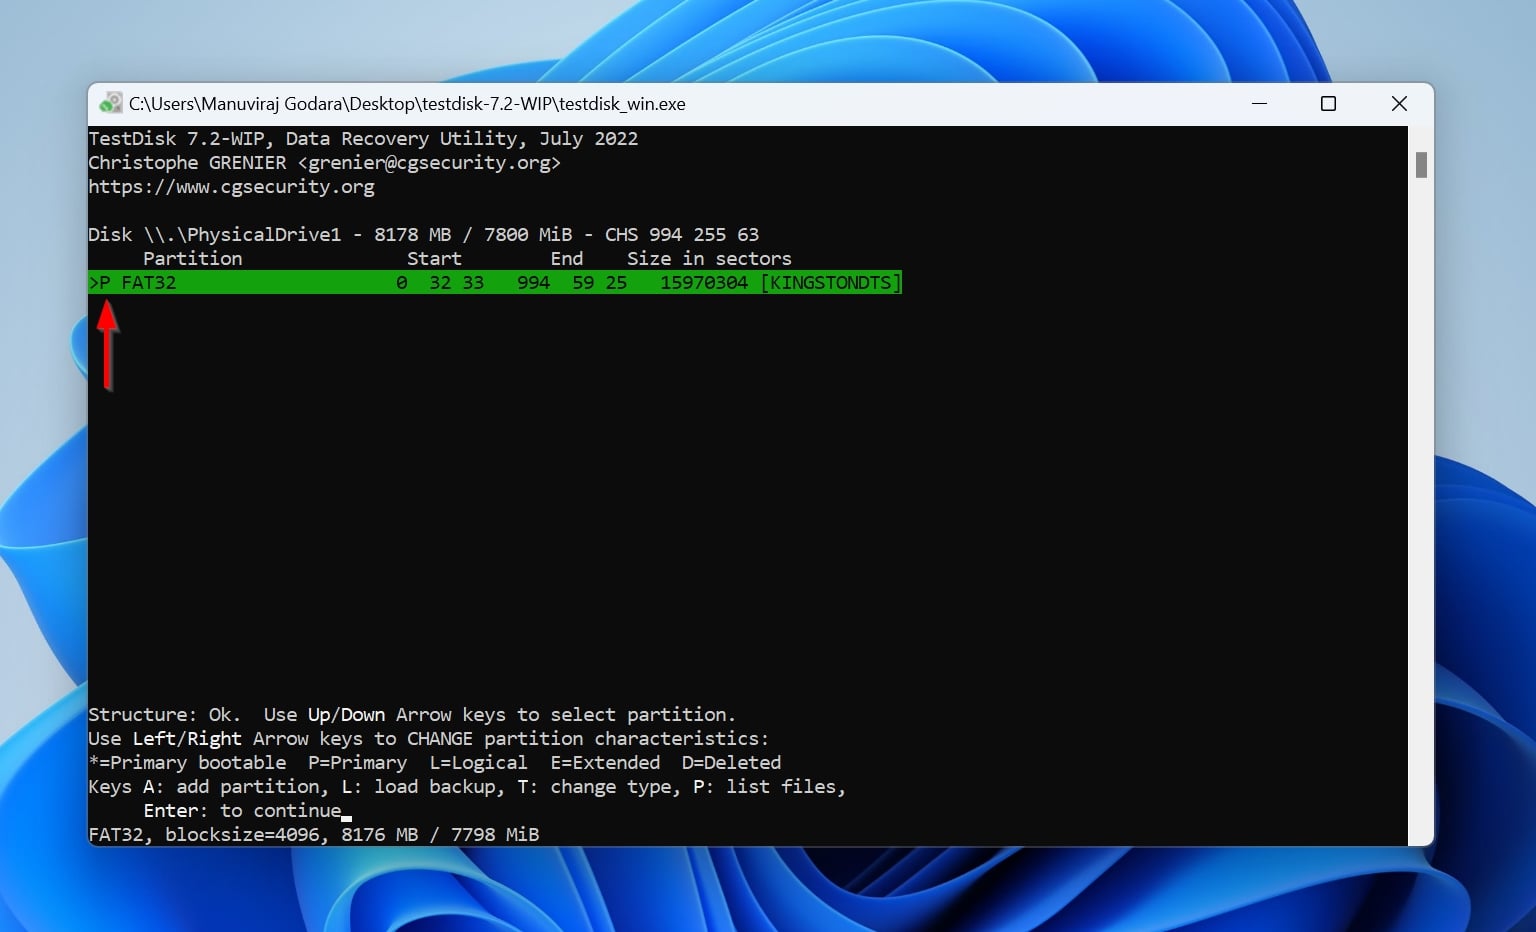
- Use the left and right arrow keys to cycle between the partition types. Ensure there is a P before the file system name, as shown in the image below. Press Enter.
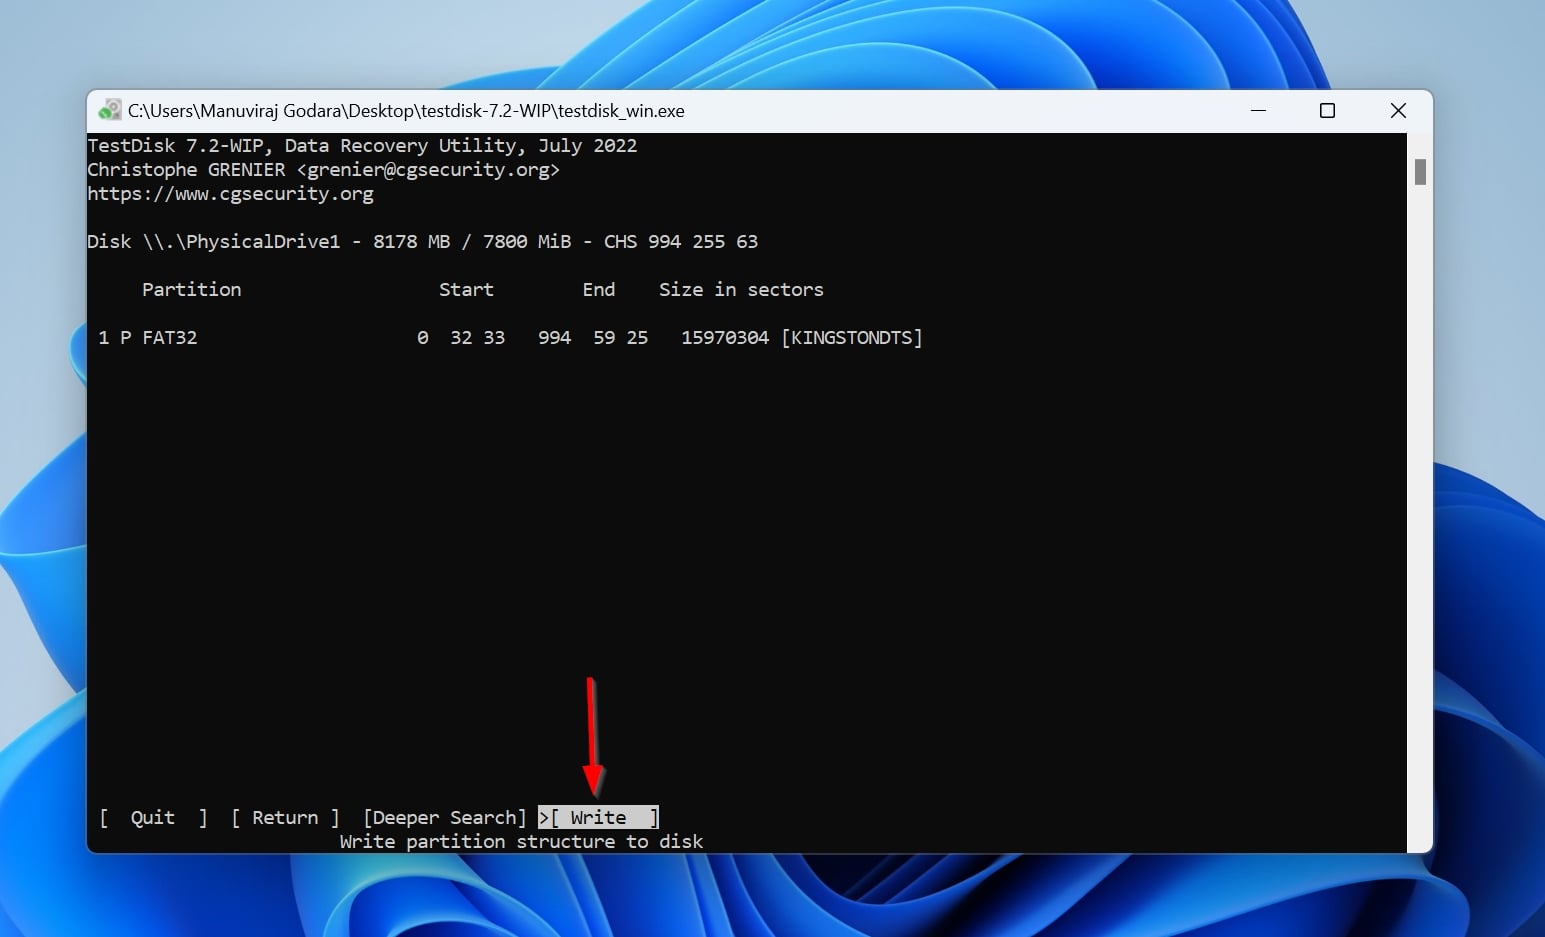
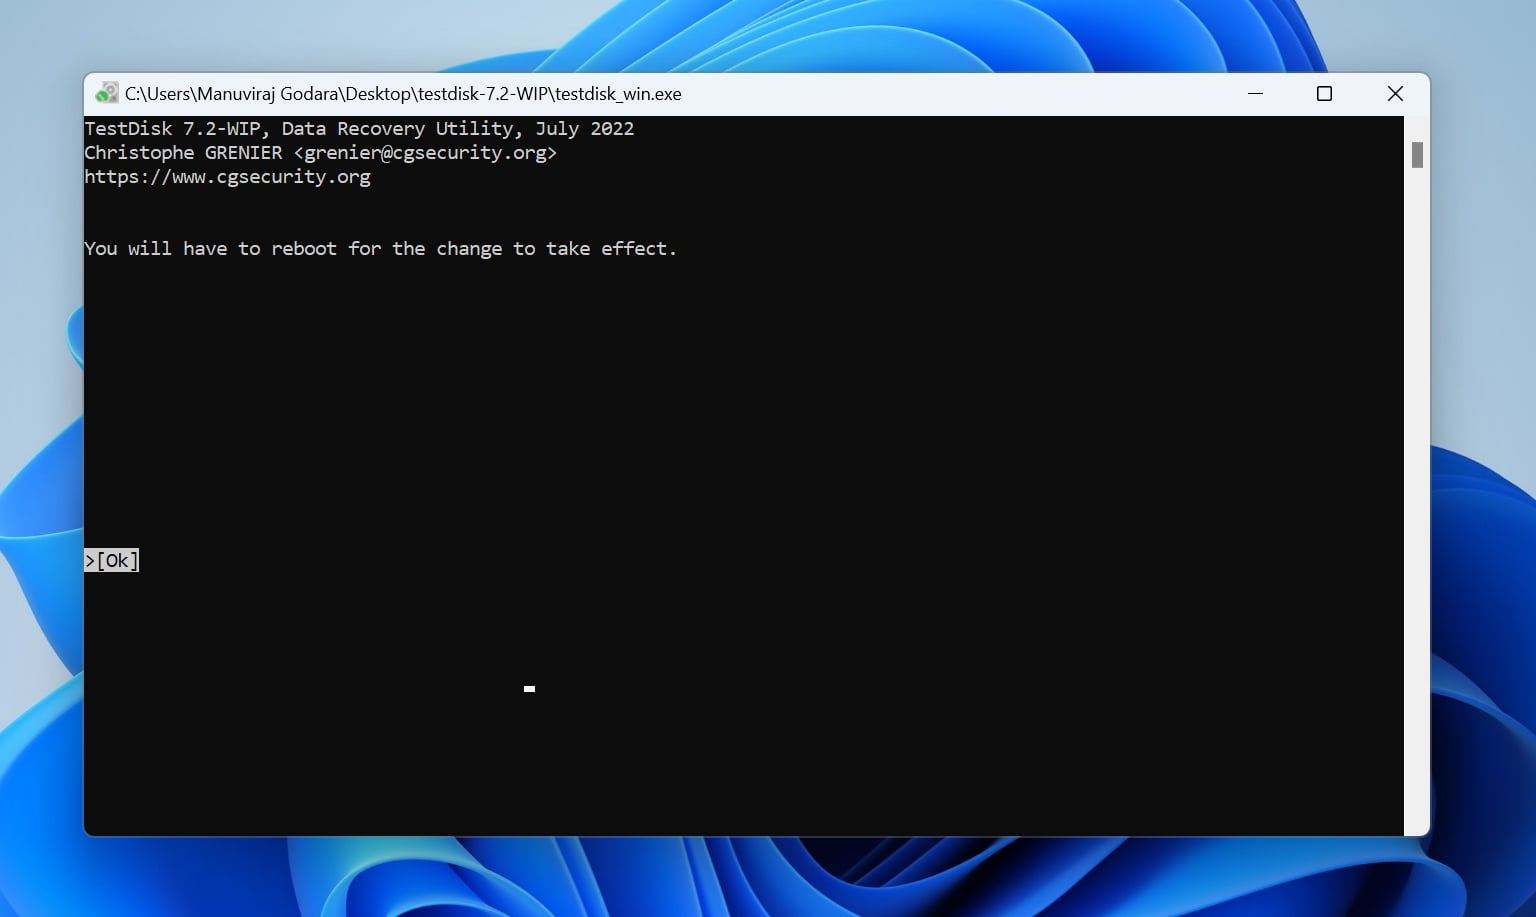
- Highlight the Write option using the left/right arrow keys and press Enter. Press Y on the confirmation prompt.
- TestDisk will fix your Kingston USB drive’s partition.
To familiarize yourself with TestDisk and know how it fares in comparison to other programs, browse through our review of the tool.
FAQ
How to recover a Kingston USB drive?
To recover a Kingston USB drive, follow these steps:
- Download Disk Drill and install it.
- Connect the Kingston pen drive to your PC.
- Open Disk Drill, select the USB, and click Search for lost data.
- Click Review found items.
- Select the files and click Recover.
- Pick a recovery destination and click Next.
What is the best Kingston USB recovery tool?
I recommend you use Disk Drill to recover data from your Kingston USB drive and TestDisk to repair the drive. However, there are numerous other offerings in the market. Some of them include:
Does Kingston have a proprietary USB repair tool?
While it’s not strictly a USB repair tool, the Kingston Format Utility can be used to restore your Kingston pen drive to its original state.
Conclusion
Data recovery programs can undo file deletion in multiple data loss scenarios. However, they cannot replace a regular backup schedule. Mishaps happen, and if your Kingston USB drive is lost, a backup is the only way to restore your data. You can use Kingston’s very own Acronis software to create backups.
This article was written by Manuviraj Godara, a Staff Writer at Handy Recovery Advisor. It was also verified for technical accuracy by Andrey Vasilyev, our editorial advisor.
Curious about our content creation process? Take a look at our Editor Guidelines.