You open File Explorer and don’t see your drive there. Or, it appears as a USB Drive (N:) and you can’t access its data. Keep reading to learn how to fix either of these issues AND save your data.
In this article, we’ll cover the potential causes of the error, how to repair the error depending on the exact scenario, and how to restore data from the drive with the best chances of success using a popular freemium tool.
As a bonus, we’ll also briefly bust the internet myths surrounding alleged “solutions” that don’t really work. Read on!
This error can happen to external or internal (non-system) disks. This article mainly focuses on external disks, but we’ll note any differences in the processes for internal disks, if applicable.
Why is My Hard Drive Not Showing Up in File Explorer?
As we’ll cover in the Dishonorable Mentions section, there’s a lot of misinformation about this error amok on the internet. This includes the potential root causes of this error; knowing the real causes would go a long way toward resolving this issue quickly.
We strongly dislike misinformation, so first on the agenda is a reliable and up-to-date list of real reasons why your hard drive is not showing up in File Explorer. You need to identify which cause applies to your situation in order to use the appropriate fix.
If the hard drive doesn’t show up in File Explorer:
- Poor connection – The connection is being disrupted due to mechanical problems with the disk’s ports, your computer’s ports, or the cable connecting the two.
- Unallocated space – Unallocated space on a disk has no file system or even any sort of formatting, which makes it unusable for Windows in its current state.
- Uninitialized disk – An uninitialized disk is also unallocated space (no formatting) and lacks a defined partition scheme. This state may be due to logical damage, connection issues, or drive letter conflicts. It may also be a brand-new drive that was shipped in an uninitialized state.
- No drive letter – If your external hard drive has no letter assigned to it, it may prompt the error. This is the case whether its letter was accidentally deleted or modified or if it had no letter in the first place.
- Missing drivers – While unlikely on modern systems (where drivers are automatically downloaded from the internet), it’s possible that your drivers had accidentally been deleted or modified, or conflicts are occurring.
- Severe damage – Your drive may be logically or physically damaged, severe enough to prevent it from appearing in File Explorer and even Disk Management. If physically damaged, skip this article and send your drive to a professional data recovery service to avoid making things worse.
If the hard drive appears as a USB and can’t be accessed:
- Incorrect file system – Windows can only read and write on disks with the following file systems: NTFS, FAT32, and exFat. If your drive is using any other file system, it won’t appear on your system properly (bar special cases like UDF/ReFS formats or using third-party software like HFSExplorer).
- RAW file system – A hard drive with a RAW file system indicates malfunction due to logical damage (e.g. malware, corruption). This causes the drive error.
- Damaged file system – The file system is important for how the hard drive functions as a storage device and is responsible for communicating with your PC. If it’s damaged, your drive won’t behave as expected.
The next sections are dedicated to fixing your hard drive. However, note that repair processes usually cause data loss. If you have important data on the drive, we strongly advise you to read and follow the recovery section first.
How to Fix the ‘Hard Disk Not Showing in File Explorer’ Error
This section is dedicated to the different methods you can use to fix your hard drive. It consists of two parts, each dedicated to either of the two scenarios: (a) hard drive is not showing up or (b) hard drive is displayed as USB drive without access.
For each method, we wrote in-depth instructions and included screenshots to make it easier for you to follow along. Just make sure you’re in the right section!
Scenario A: Disk Does Not Appear in File Explorer at All
This error is typically caused by software conflicts and mechanical issues. There are 3 methods to fix an external hard drive that is not showing up. Choose one appropriate for your situation.
Method 1: Check the Connection
A proper connection between the hard drive and your PC is critical for both devices to communicate with each other and execute tasks. If your disk is not showing in File Explorer, there’s a strong possibility that a connection hasn’t been established in the first place.
Mechanical issues are a common and likely culprit. Try the following:
- Connect your hard drive to other ports on your PC (ideally, ports that have recently worked with other storage devices).
- Use a different cable to connect your hard drive to your PC.
- Connect your hard drive to a different PC – this way, you can check if the ports or the drivers are the problem.
Method 2: Assign a Letter to the Volume
Having a drive letter is critical for storage devices because it allows your computer to:
- Identify the drive
- Access the contents of the drive
- Navigate the drive’s file system
- Integrate the drive into Windows’ file management and storage management systems
A missing drive letter commonly manifests in severe communication issues with other devices (like your PC), such as the hard disk not showing in File Explorer.
Manually assigning it a drive letter may resolve the error. Here’s what to do:
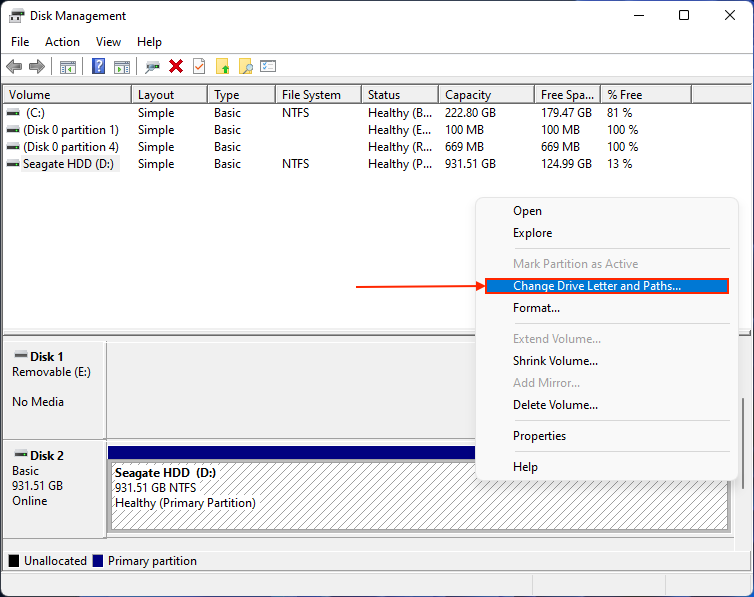
- Securely connect your drive to your PC. Then, open Disk Management.
- Right-click letter-less volume on your hard drive and click Change Drive Letter and Paths…
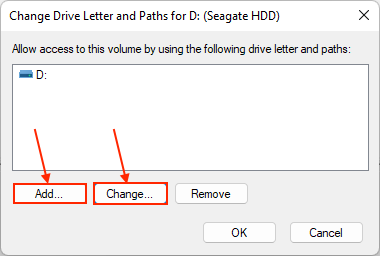
- If the volume has no drive letter at all, click Add… If it has an existing letter (which may be causing conflicts), click Change…
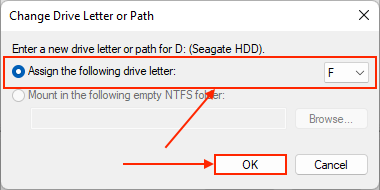
- Beside Assign the following drive letter, use the dropdown menu to select a letter to assign. Make sure to choose one you’re not using for another device. Then, click OK.
Method 3: Use TestDisk to Restore the Partition
This method resolves the variation of this error caused by logical damage to your hard drive’s partition/s. Using a free and open-source recovery tool called TestDisk, we’ll show you how to recover damaged or lost partitions, which may restore access to the drive.
If you want to learn more about TestDisk before installing it on your PC, check out our in-depth TestDisk review.
- Download and install TestDisk.
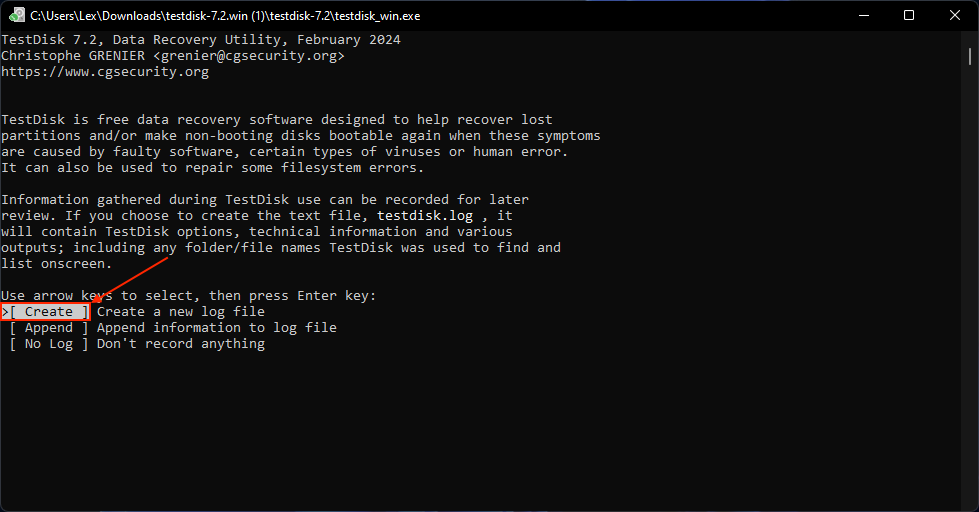
- Open TestDisk. Using the arrow keys, select Create and press Enter.
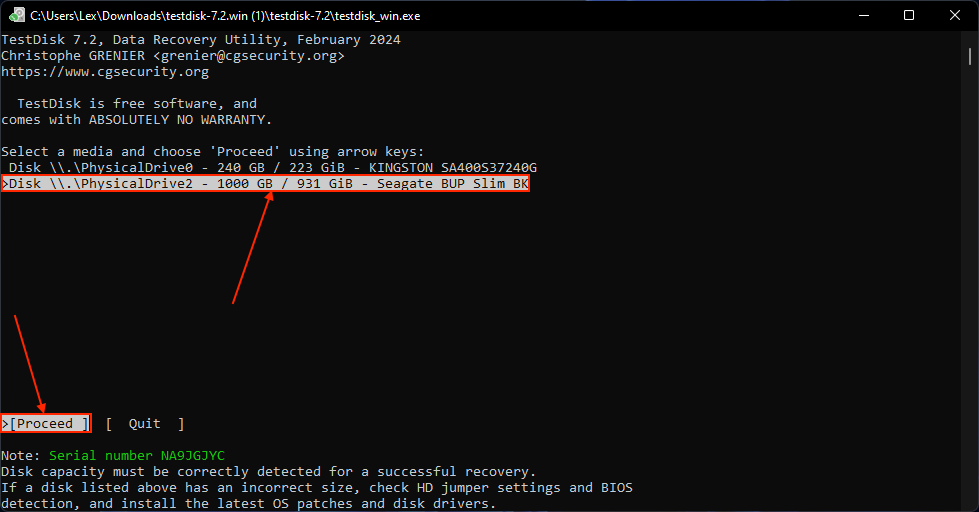
- Select your external hard drive. On Proceed, press Enter.
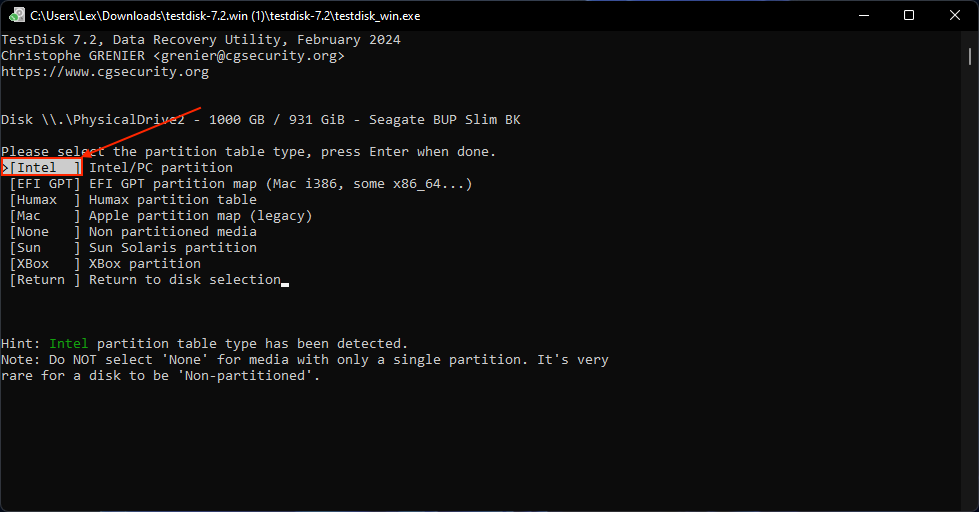
- Leave TestDisk’s default selection and press Enter.
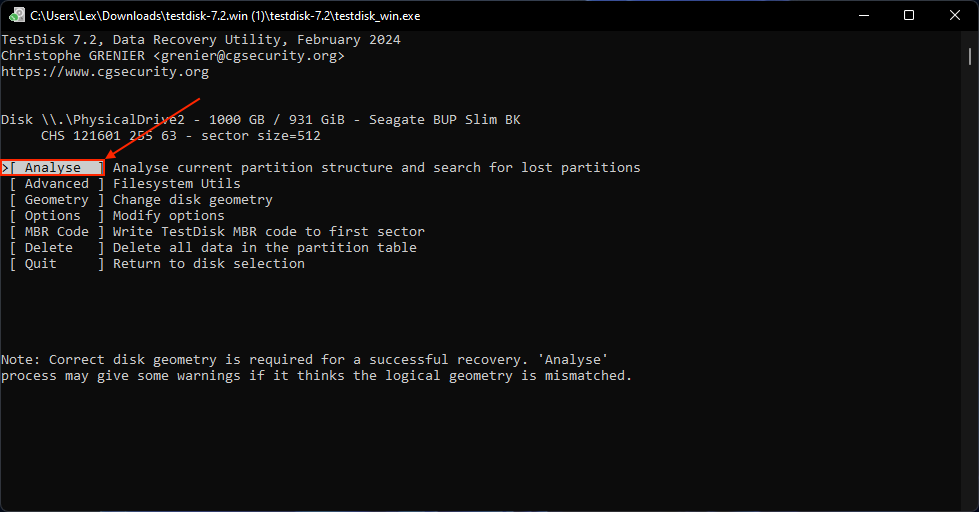
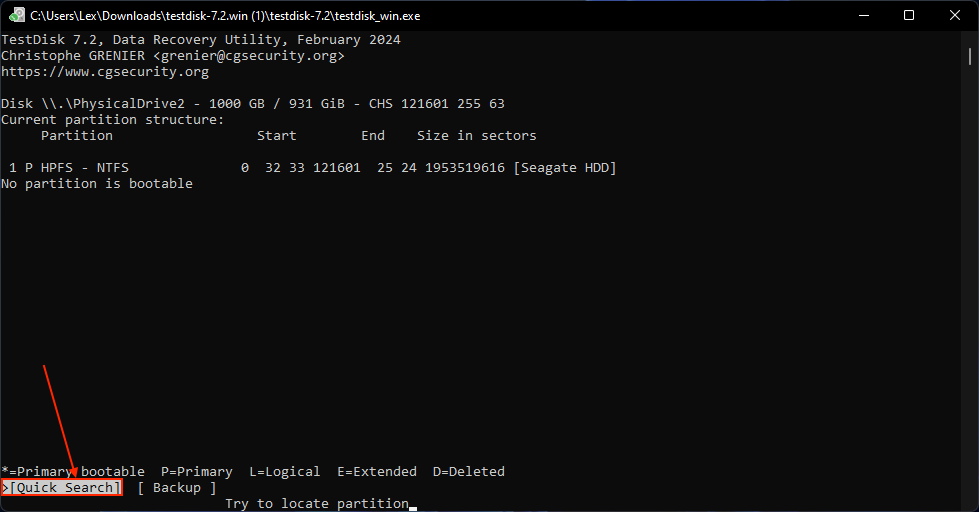
- Select Analyse and press Enter.
- Select Quick Search and press Enter.
- Select the partition you want to review and press Enter.
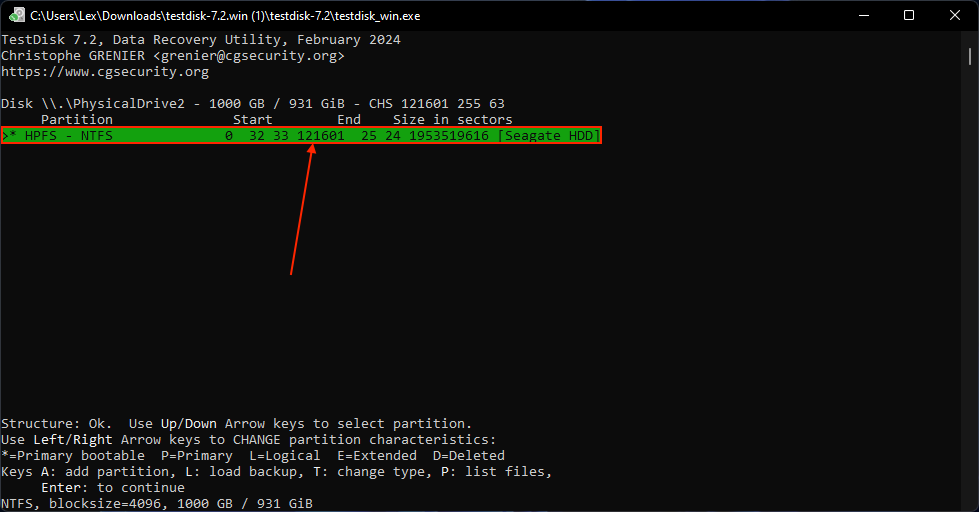
- If TestDisk found the missing partition, select Write and press Enter. Otherwise, select Deeper Search instead (make sure to Write the partition structure if Deeper Search finds what you’re looking for.

Method 4: Initialize Your Drive
If you see “Unknown” or “Not Initialized” beside your drive in Disk Management, your drive is likely uninitialized (which is causing the error). Fortunately, you can use Disk Management to initialize the drive yourself, which automatically lets you format it as well.
Out of all methods, this one ensures total data loss. If it contains important data, we strongly recommend that you recover your external hard drive without formatting it first.
To initialize a disk:
- Open Disk Management as Administrator.
- Right-click the disk and click Initialize Disk.
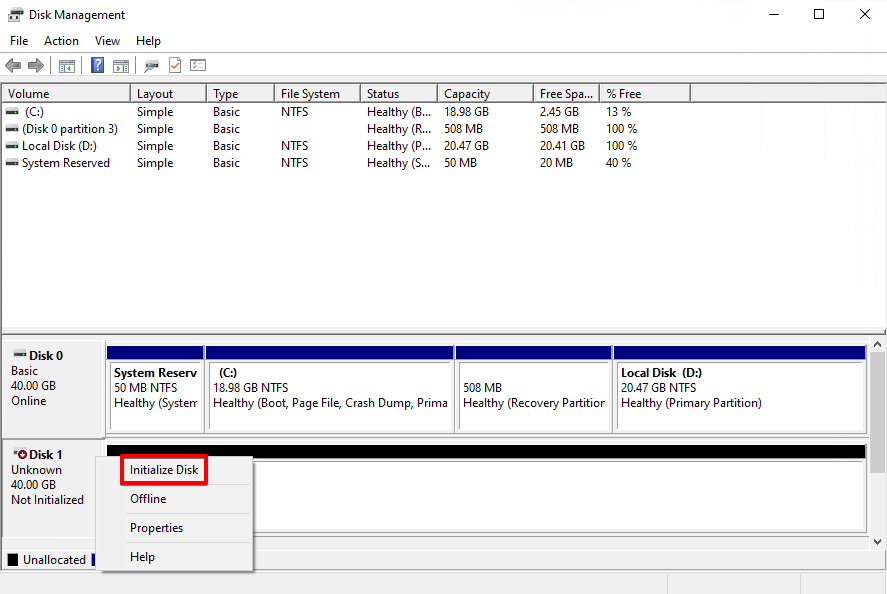
- In the dialogue box, ensure that your disk is selected. Then, you can either leave Disk Management’s default selection for partition style or choose one yourself. Click OK to confirm.
- Right-click the area on your disk that indicates unallocated space. Then, click New Simple Volume.
- Follow the wizard to choose the new volume’s size, drive letter, and file system (for external hard drives, we recommend ExFAT). At the end of the wizard, click Finish.
If your drive came like this, we recommend contacting the manufacturer and having it replaced. It’s simple enough to initialize a drive – even without much tech knowledge – but it’s better to ensure that the drive you’re paying for works as advertised.
Scenario B: Drive Appears as a USB Drive Without Access
This section attempts to resolve hard drive errors where a connected external hard drive appears as a USB drive in File Explorer. This type of bug usually manifests due to Windows struggling to interpret the drive’s file system (usually as a result of software errors).
There are 2 potential fixes for this error, which we’ll cover for you below.
Method 1: Format Your Drive
If Windows can’t identify a supported file system installed on the drive disk, it can’t display the drive in File Explorer correctly. It’s possible that your drive is using an unsupported file system or its file system has been corrupted
To remedy this, you can use Disk Management to format your drive with a file system that Windows supports.
For hard drives, you generally want to be using the ExFAT or NTFS file systems.
To reformat a disk:
- Open Disk Management.
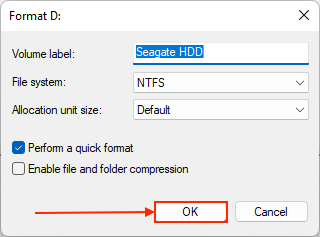
- Right-click the volume you want and select Format.
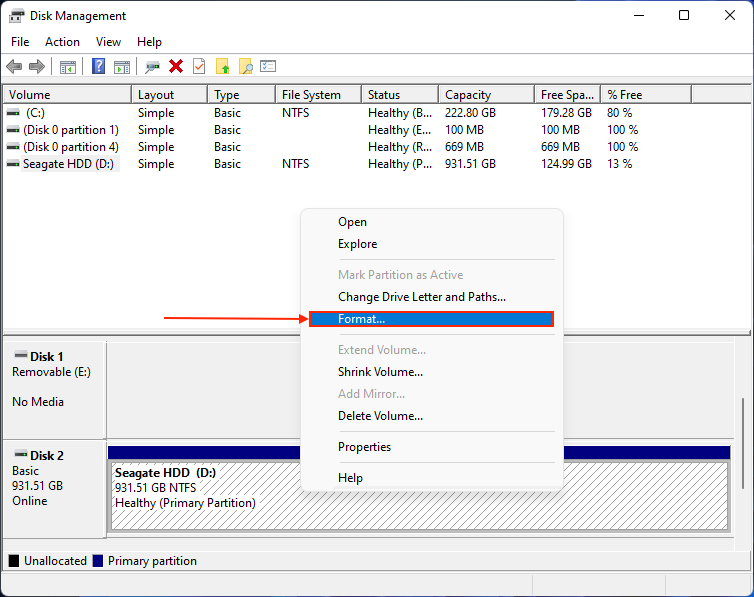
- Choose the volume’s new label, file system, and size (you can leave it as default). If you plan on attempting data recovery after formatting, make sure Perform a quick format is selected. Once you’re satisfied with the parameters, click OK.
Method 2: Use TestDisk in Case of a Damaged System
One common issue that causes file system damage is a malfunctioning boot sector. The boot sector contains critical information that the system needs to start up the disk, such as file system type.
If a drive’s boot sector is damaged, the file system may become unreadable or appear as RAW.
To fix it, we can use a disk recovery tool called TestDisk, which we already featured in an earlier section related to partition recovery. It’s a free and open-source app that can repair damaged boot sectors. Follow our instructions closely:
- Download and install TestDisk.
- Open TestDisk. Use the arrow keys to select Create, and press Enter.
- Use the arrow keys to select your drive. With Proceed selected, press Enter.
- Leave TestDisk’s default selection and press Enter.
- Select Advanced and press Enter.
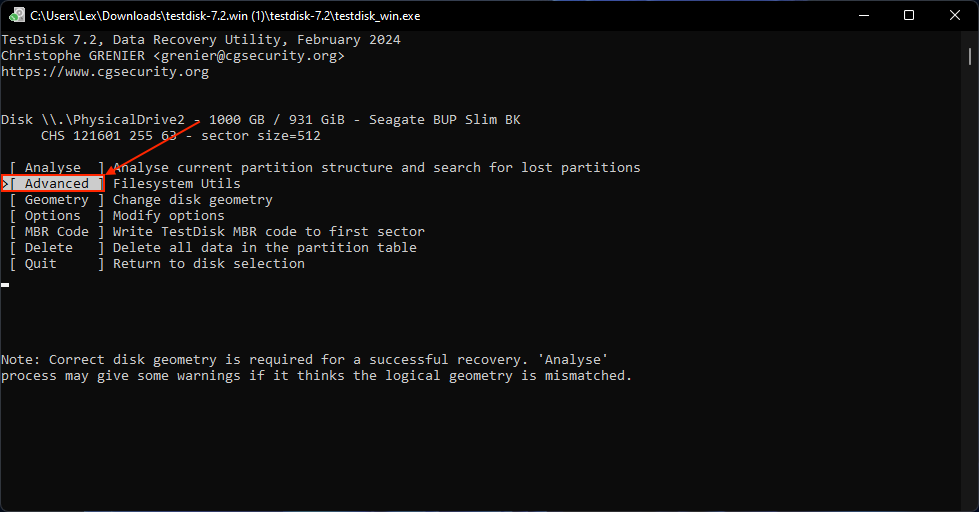
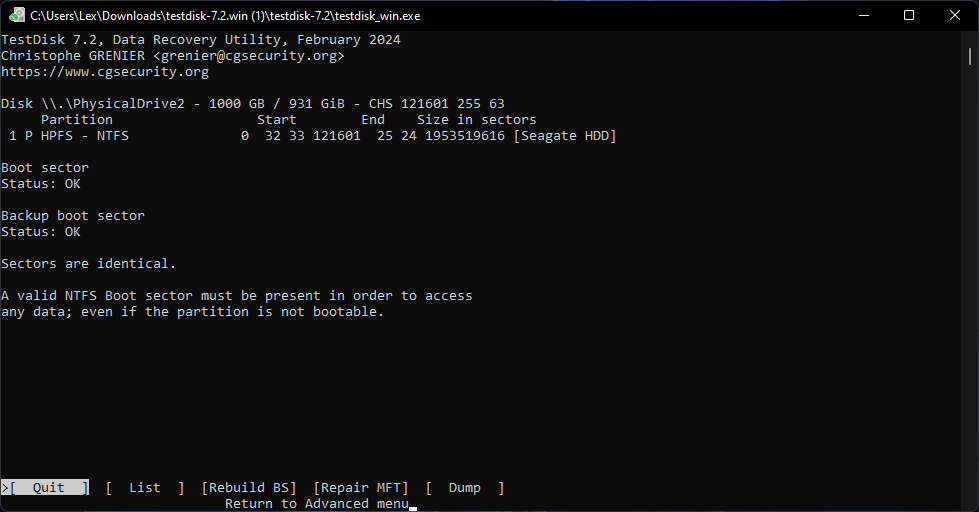
- Select the partition you want to repair. Choose the Boot option and press Enter.

- If TestDisk outputs Boot sector: Bad, select BackupBS, press Enter, and confirm the action.
- Quit TestDisk and restart your computer.
How to Recover Data From Disk Not Showing in File Explorer
It’s possible to recover data from a hard disk that isn’t detected but it needs to show up in Disk Management, not as No Media. As long as these conditions are met, you can proceed with recovery. This guide covers the following scenarios:
- Scenario 1: Repair was unsuccessful and you still have no access to your data
- Scenario 2: Repair was successful, but the process caused data loss (e.g. reformatting)
- Scenario 3: You haven’t attempted repair yet
For the purposes of this guide, we’ll be using a data recovery app called Disk Drill. It’s one of the best data recovery apps for beginners who need to restore logically damaged drives without much tech knowledge.It also recognizes most major file types (including RAW photos and videos) and file systems (ExFAT, FAT32, NTFS).
Most importantly, it has image backup and recovery tools, which will allow you to maximize your recovery chances in case of Scenario 3.
Proceed as follows:
- If Scenario 1 or 2 applies to you, skip the backup guide and proceed directly to Recover your data.
- If Scenario 3 applies to you, consider if you noticed signs of bad blocks or other malfunctions: read/write errors, unstable connections, louder-than-usual noises from your drive, etc. In this case, proceed with the Create a backup guide first.
- If Scenario 3 applies to you but you don’t experience the symptoms above (e.g. file system corruption), proceed directly to Recover your data.
To start the backup or recovery process, download and install Disk Drill to your PC (ideally, on a different disk than the one you’re trying to recover).
Disk Drill Basic for Windows offers 500 MB of free data recovery. To restore more data, you’ll need to purchase a license. However, you can scan and preview your data for free, which helps you at least confirm if your files are recoverable.
Create a backup:
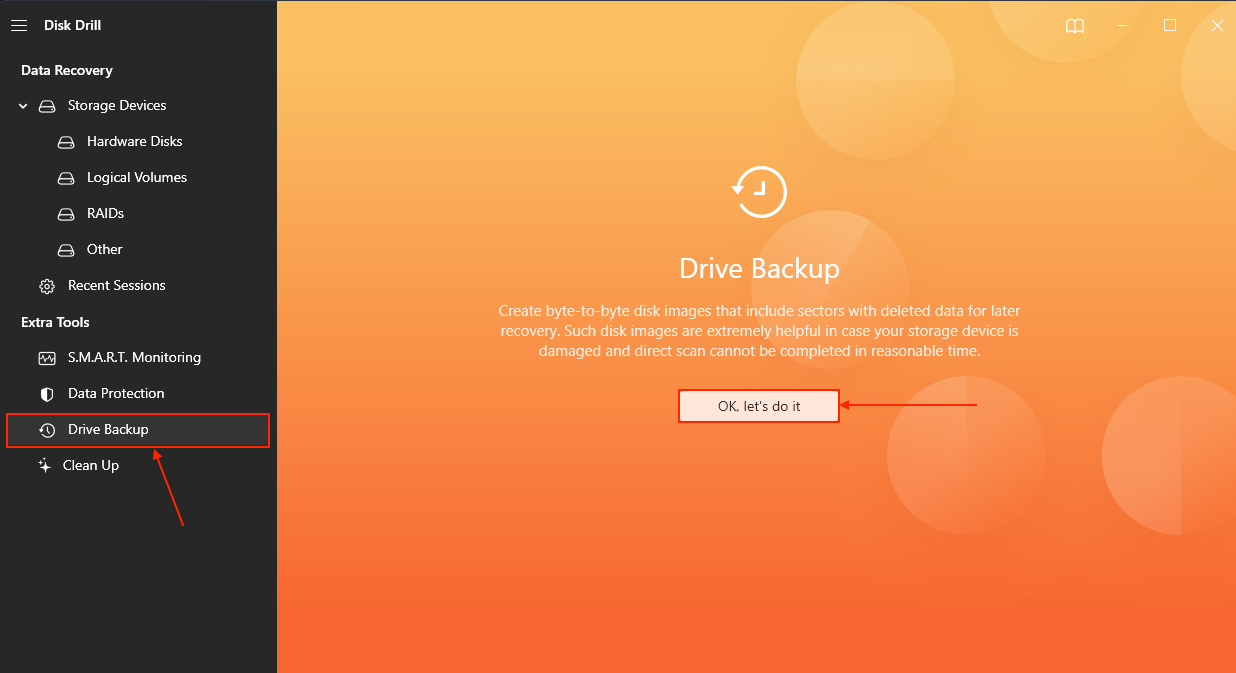
- On the left sidebar, click Drive Backup If it’s your first time launching this tool, click OK, let’s do it.
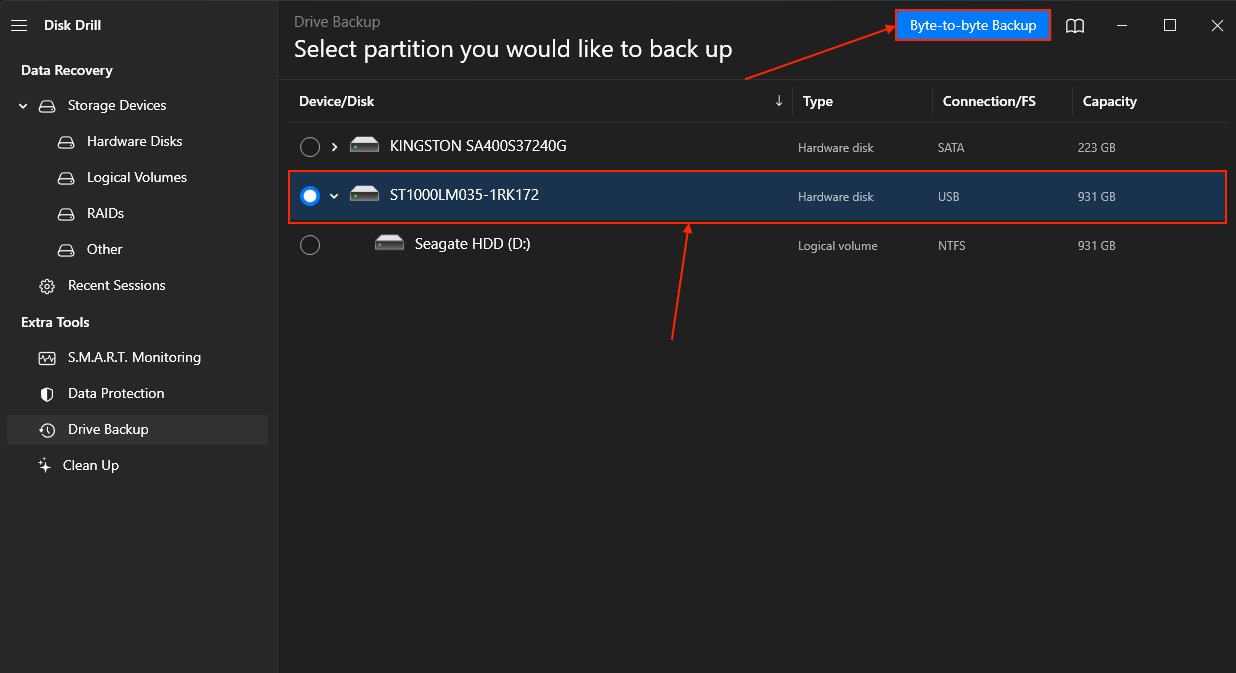
- Select your drive and click Byte-to-byte Backup.
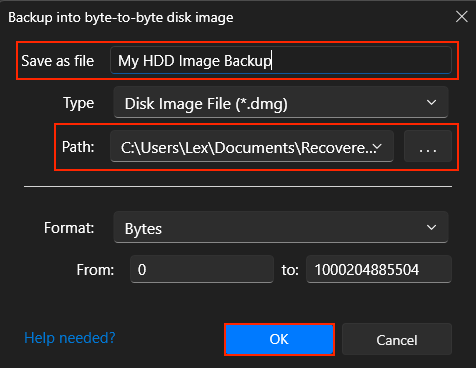
- Input a name for the backup file and choose a location where you want to save it. Then, click Create.
Once the backup has been saved to your PC, you can safely eject your hard drive and set it aside for the rest of the task. You can also safely attempt to fix your corrupted hard drive at this point because you no longer need it for the recovery stage.
Recover your data:
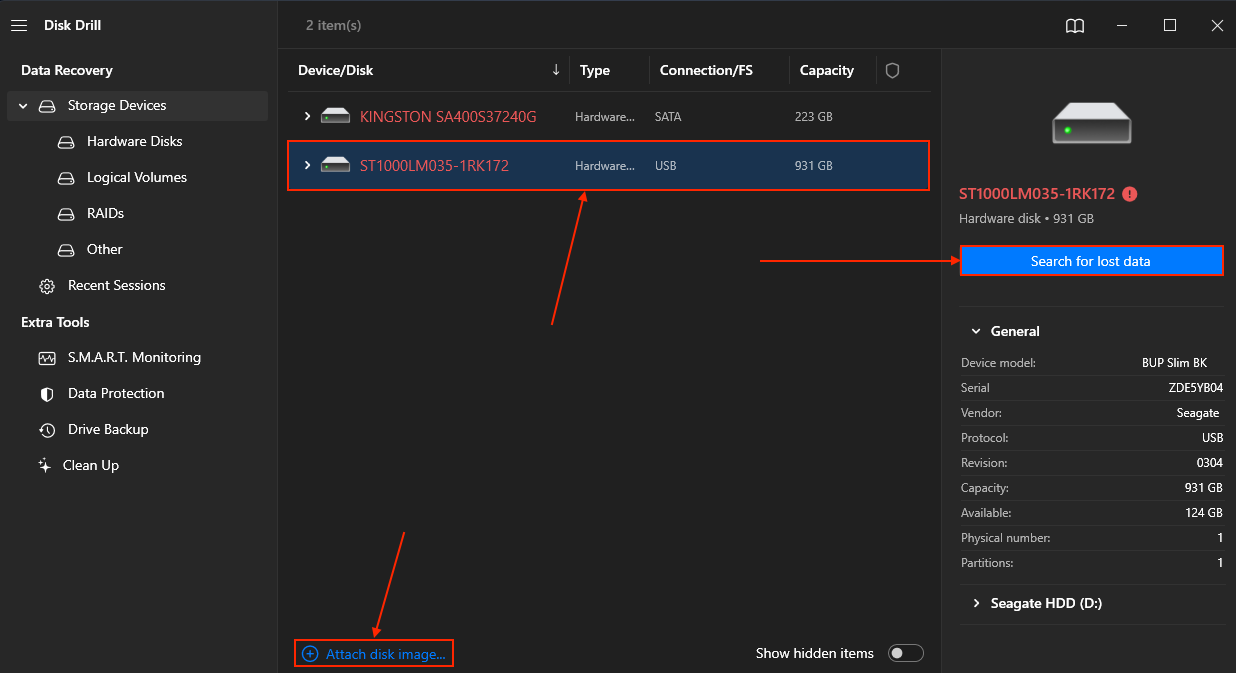
- On the left sidebar, click Storage Devices. If you want to recover a backup file, click Attach disk image… at the bottom of the window to import the backup into the drive list. Then, select the attached backup image OR select your drive and click Search for lost data.
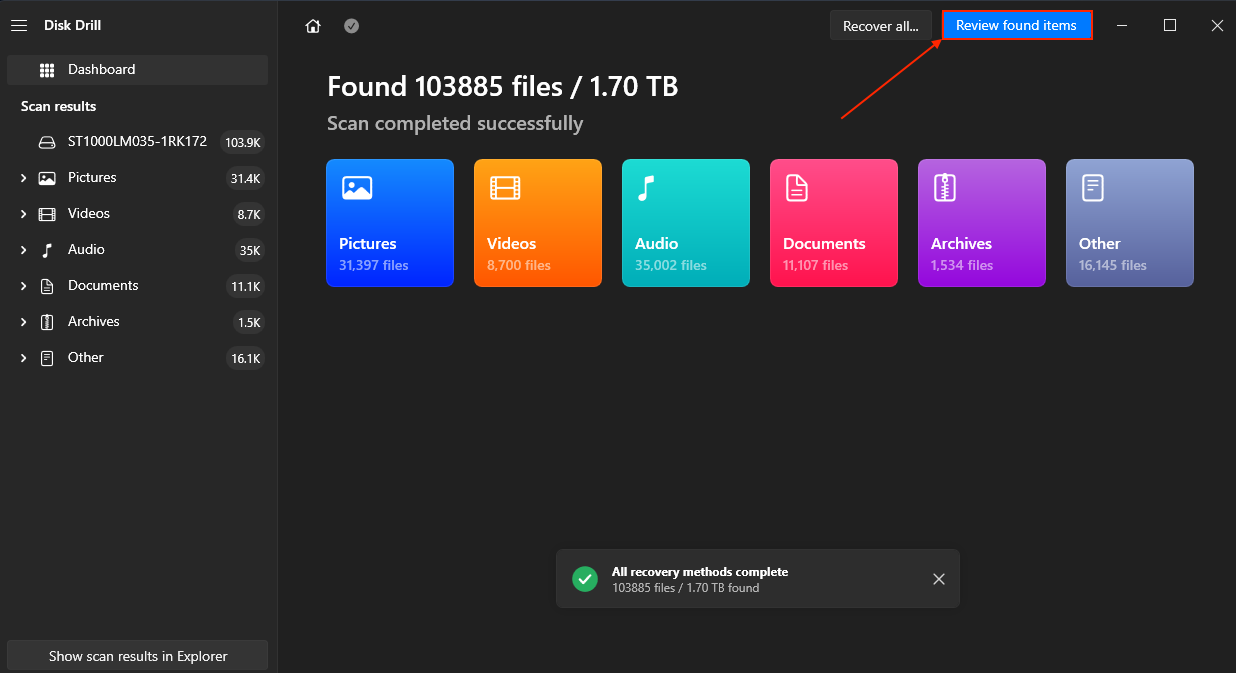
- Once the scan is done, click Review found items.
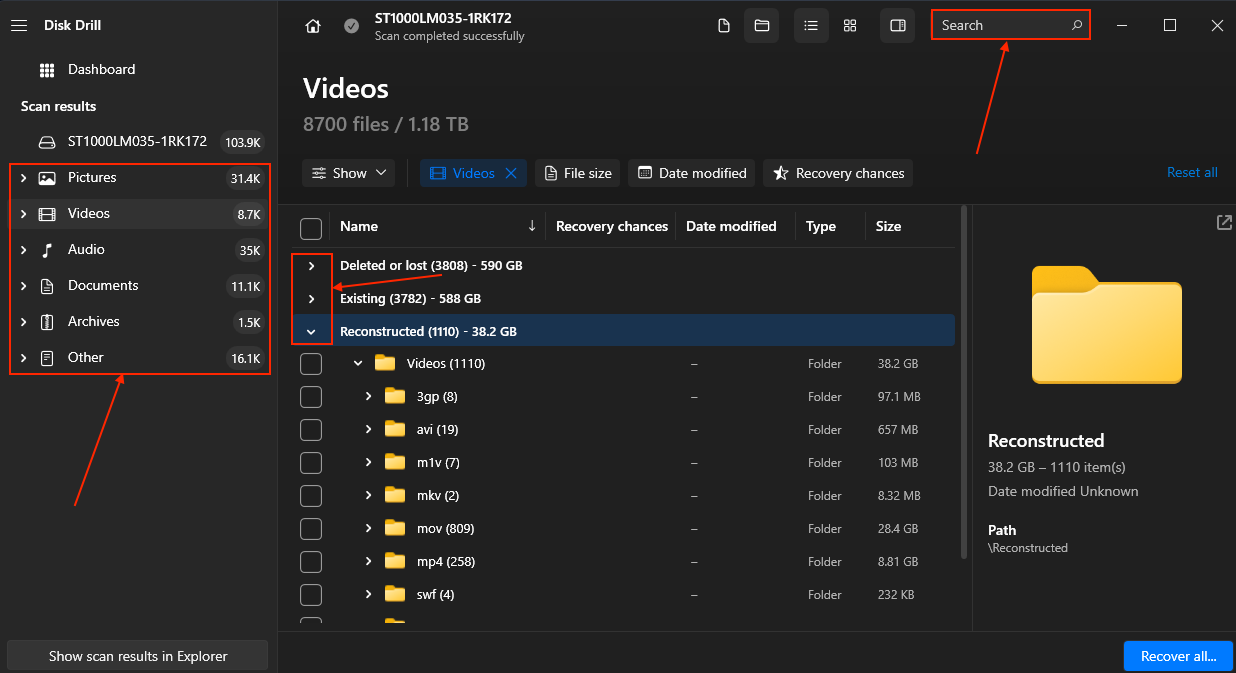
- Browse the recovered files for what you need. The Existing tab may have most of your data, but you can check the Deleted or lost and Reconstructed tabs as well. Use the search bar in the top-right corner and the filters in the sidebar if you want to look for specific files.
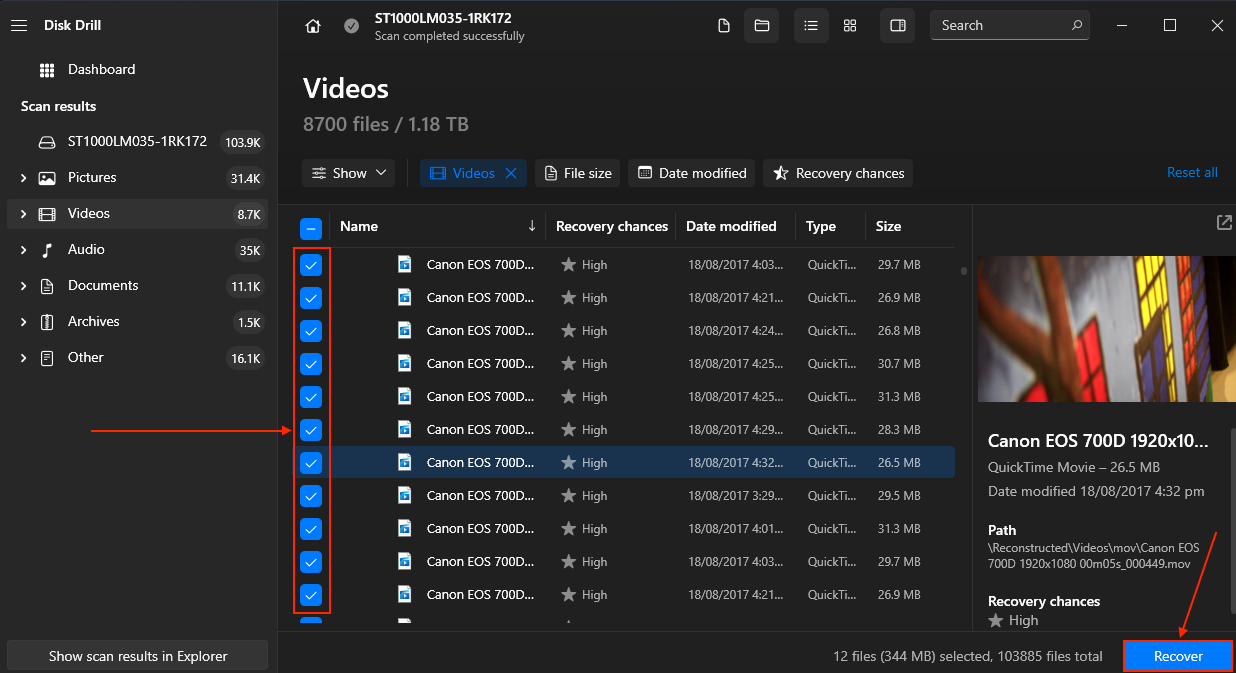
- If you want to confirm recoverability, click any file once to display its preview. Mark the boxes beside the files and folders you want to restore and click Recover.
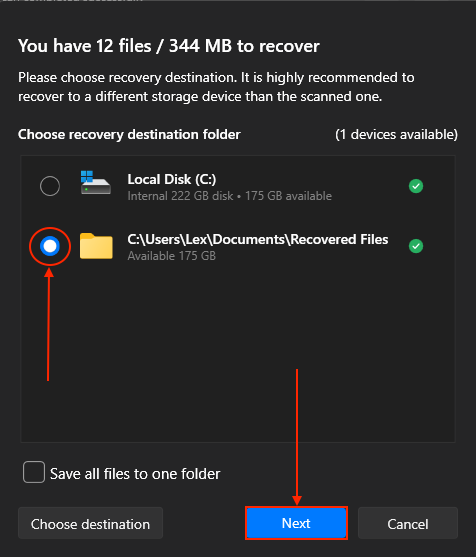
- Select a location on your PC where you want Disk Drill to save the recovered files. Then, click Next to proceed.
Is Disk Drill safe? Yes – we tested it using VirusTotal and Microsoft Defender, and we made sure we could opt out of data collection. It also uses non-destructive algorithms so your data stays intact during the recovery process. If you want to learn more about this app before installing it on your PC, check out our in-depth Disk Drill review.
File Explorer Doesn’t Show Drive: Dishonorable Mentions
There are many articles online that straight up give faulty advice on how to fix (and recover data from) hard drives that don’t show up in File Explorer or appear as USB drives.
Not only does faulty advice waste your time, but it may also cause further damage and/or data loss. So, we collected commonly published “fixes” from other sources online so we can debunk them for you and get you started on the right foot.
- Using chkdsk on a missing disk – If the drive doesn’t show up in File Explorer at all, the chkdsk command (as executed in Command Prompt) won’t work. It needs a volume letter.
- Using chkdsk on a misinterpreted disk – If the drive shows up as a USB, it likely has a RAW or incompatible file system. Chkdsk is not available for RAW drives or drives with incompatible file systems.
- Updating drivers or controllers – While we briefly mentioned updating drivers earlier, it’s not a major fix. Modern systems should be able to take care of it autonomously.
- Updating BIOS/UEFI – Updating firmware does help with overall system stability, but it’s unlikely to resolve any issues with the file system directly. And if you’re using Windows 11, it requires the GPT scheme for installation – so BIOS settings won’t interfere with reading a disk using the GPT scheme.
Conclusion
Useful advice: if your hard drive (a) doesn’t show in File Explorer at all or (b) appears as a USB drive, act immediately to preserve your files. Recover your data first – using one of the many data recovery tools available online – before attempting to fix the drive. The opposite still works but it’s not as effective.
Also, note that hard drives that have been previously damaged or corrupted are more likely to fail again in the future. Even if you successfully repair your hard drive, avoid using it for super-important data. Alternatively, regularly back up your files so you can continue using the drive without worry.
This article was written by Alejandro Santos, a Staff Writer at Handy Recovery Advisor. It was also verified for technical accuracy by Andrey Vasilyev, our editorial advisor.
Curious about our content creation process? Take a look at our Editor Guidelines.