Is your computer not recognizing your SSD? You’re not alone. Many Windows users have encountered the same frustrating problem. Here’s the good news: in most cases, there are simple solutions to get your SSD recognized and back in action, and this guide will walk you through those that have successfully helped us and countless others before.
Note: Based on user search queries, the primary concern is that the SSD is not showing up in File Explorer, indicating a logical issue rather than a physical one. That’s why this guide focuses exclusively on scenarios involving logical issues, including problems that prevent the disk from being shown in Disk Management or even in the computer’s BIOS/UEFI. Know that the solutions provided apply to both internal and external SSDs.
Common Reasons Why Your Computer May Not Recognize an SSD
There are several reasons why your SSD may not be showing up in Windows. In most cases, the issue lies with how Windows recognizes the drive logically, rather than a physical malfunction with the SSD itself:
- The disk is not initialized: New SSDs are often not initialized and those that are already in use can become uninitialized due to partition table corruption. When that happens, the SSD in question becomes inaccessible by the operating system. Luckily, this can be easily fixed by performing the SSD initialization process in the Disk Management tool, which comes with Windows.
- Partition letter is not assigned: In some cases, the SSD may not have a drive letter assigned to it, making it invisible in File Explorer. This can be fixed by assigning a drive letter in Disk Management.
- The disk is not connected correctly: If the SSD is not properly connected to your computer, Windows may not detect it. Make sure the SSD is securely connected to your motherboard (if dealing with an internal SSD) and that all cables (SATA and power cables for internal drives and USB cables for external drives) are properly seated.
- The device is disabled at the BIOS/UEFI level: In some cases, the SSD may be disabled in the BIOS/UEFI settings, preventing it from being detected by Windows. Check your BIOS/UEFI settings to ensure that the SSD is enabled.
- Legacy BIOS mode with GPT disk: If your computer is using Legacy BIOS mode and you’re attempting to boot from a GPT-formatted SSD, or if the SSD is disabled in BIOS settings, then the SSD may not be recognized. Check your BIOS settings to make sure the SSD is enabled and the system is set to UEFI mode, as Legacy mode is incompatible with GPT disks.
- Problems with the disk: If none of the above solutions work, there may be a problem with the SSD itself, such as a hardware failure or corrupt firmware. In these cases, it may be necessary to seek professional help or replace the disk.
The key takeaway is that logical causes of SSD not showing up in Windows 11, 10, 8, 7, or any previous version have software-based solutions that you can implement at home by following our step-by-step instructions.
Less serious physical causes (such as a poorly seated cable) can also be easily addressed at home, so it’s only hardware failure or severe firmware corruption that might necessitate a visit to a professional technician or possibly replacing the SSD.
How to Fix a PC Not Detecting an SSD in File Explorer
When most people type “my SSD is not showing up” into Google, what they really mean is that the SSD is not visible in the File Explorer app, and that’s exactly what the three methods described in this section aim to address.
If you find out that you can’t put the three methods below to good use because your new SSD is not showing up in Disk Management or even BIOS/UEFI, then we recommend you skip to the “How to Fix a PC Not Recognizing SSD in BIOS/UEFI or Disk Management” section for a different set of solutions.
Method 1: Initialize Your SSD
Initializing an SSD is the process of preparing it for use by Windows. If your SSD is new, it may not have been initialized yet, which is guaranteed to prevent it from showing up in File Explorer.
During SSD initialization in Windows, you are required to select a partition style, which affects how the data is managed on the SSD. MBR is typically used for older systems and supports disks up to 2TB with up to four primary partitions, while GPT is suitable for newer systems and larger disks, supporting more than 2TB of storage and allowing for a virtually unlimited number of partitions.
Warning: All data stored on the SSD that’s not detected will be deleted during the initialization process. However, that shouldn’t be an issue if the SSD is new.
Here are the steps to initialize your SSD:
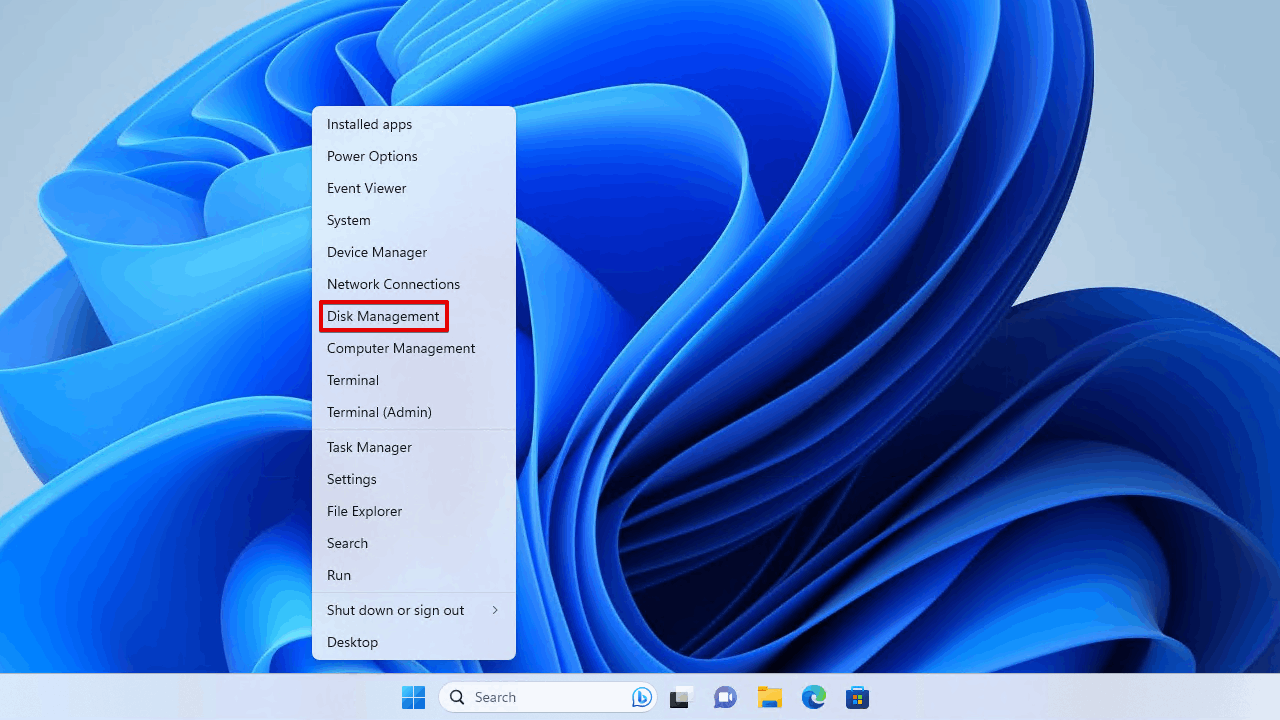
- Press the Windows key + X and select Disk Management from the menu.
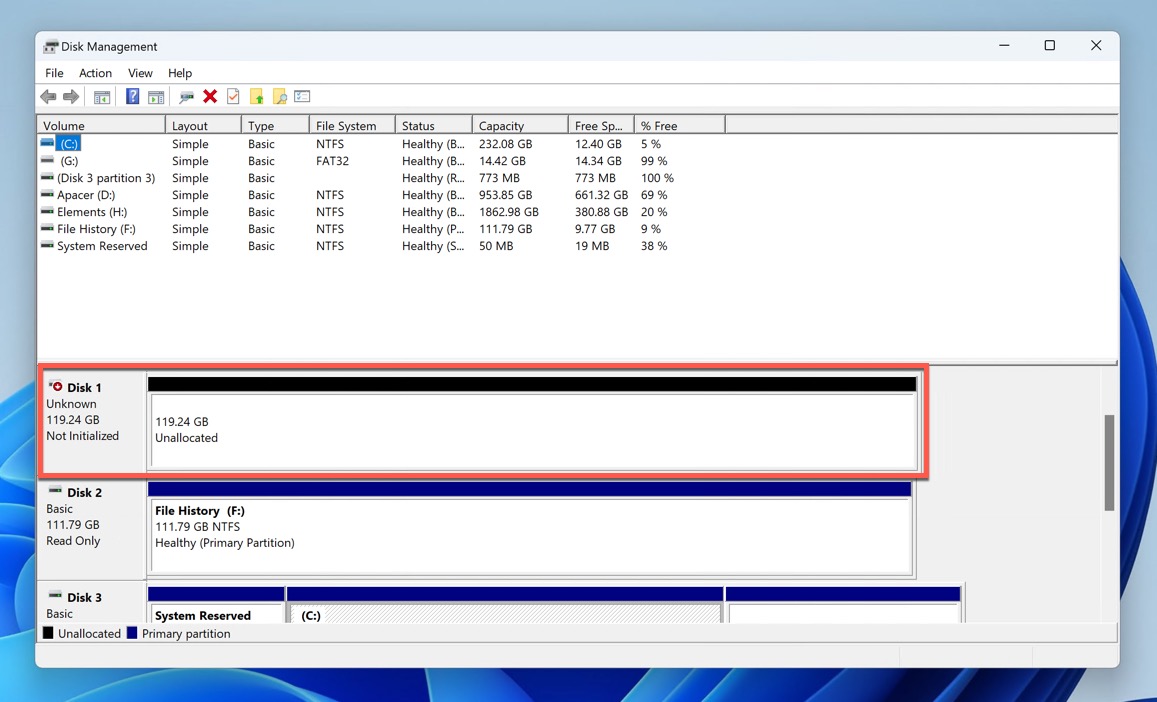
- In the Disk Management window, look for your SSD in the list of disks. It will be marked as “Unknown” or “Not Initialized.” If the disk is marked “Online” or “Read Only,” then it’s already initialized, and the cause of your PC not detecting the SSD is something else.
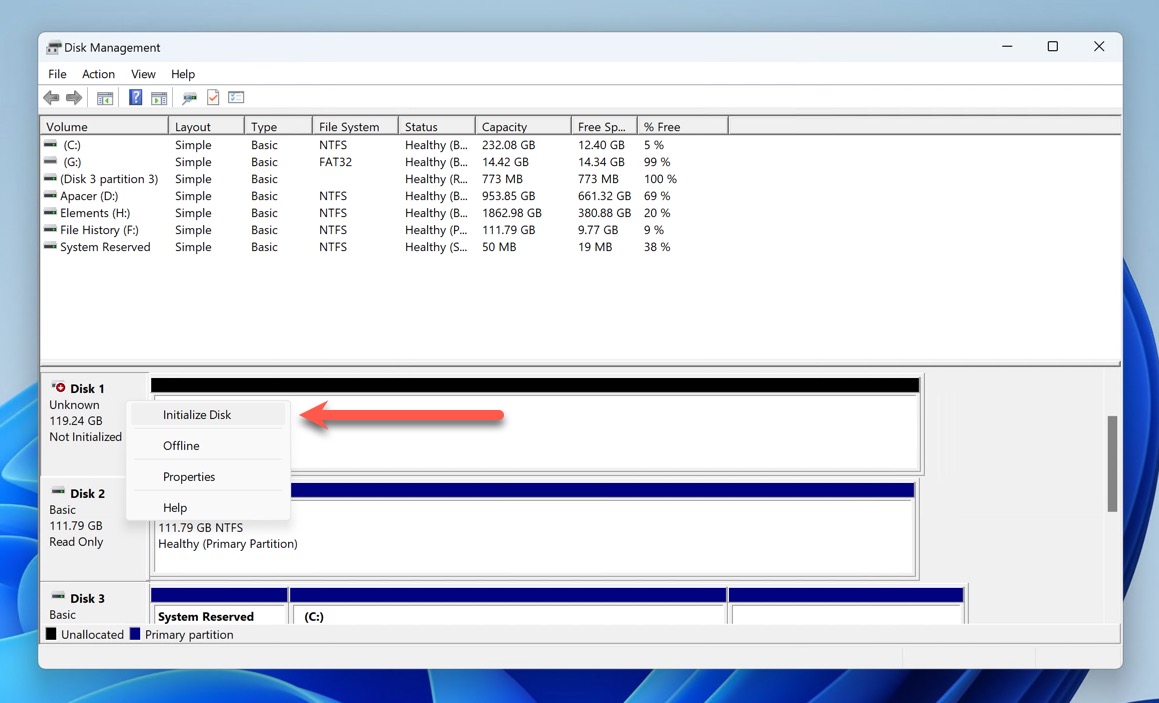
- If you’ve decided to proceed with initialization, then you can right-click on the SSD and select “Initialize Disk.” Note that you might need to select the Online option first if the current status is “Offline.”
- In the Initialize Disk window, select the correct disk to initialize (if there are multiple disks listed), choose the partition style (usually GPT), and click OK.
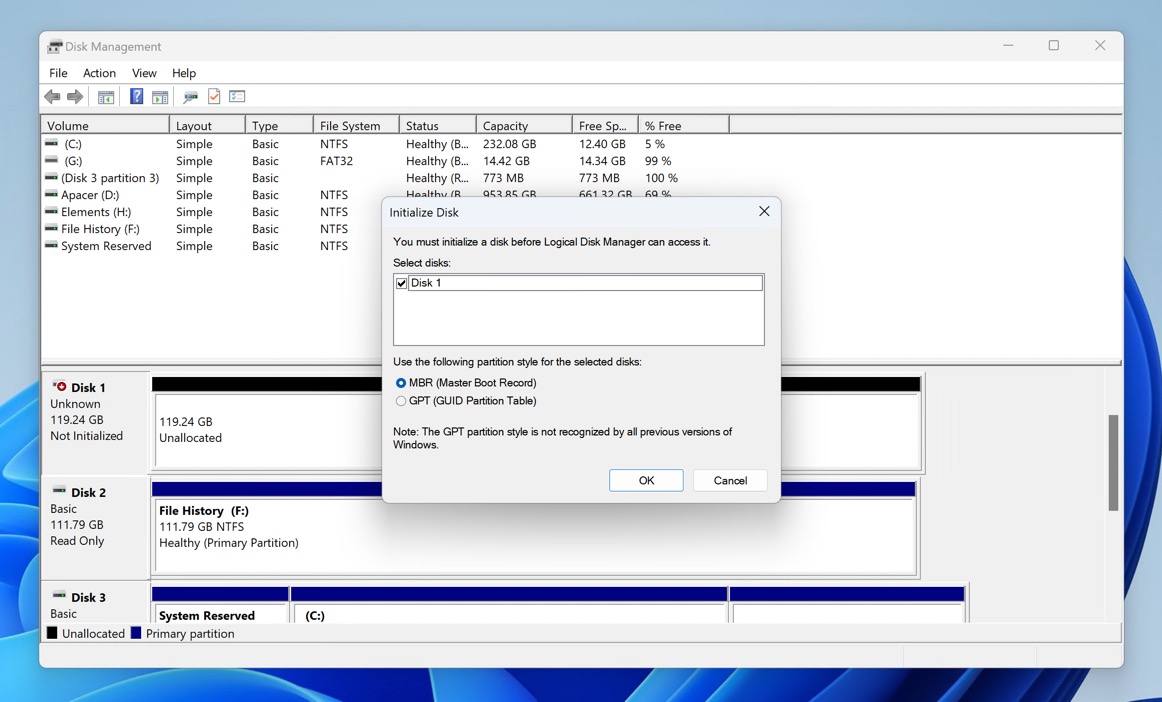
- Wait for the initialization process to complete.
Your SSD should now be successfully initialized using the GPT partition scheme, but you still won’t see it in File Explorer. That’s because it doesn’t have a partition (volume) with a file system on it, which is exactly what the next method covers.
Method 2: Format Your SSD
Formatting prepares your SSD for storing data. It creates a file system, which is essentially the digital filing system that the operating system uses to organize and manage files on the drive. Think of formatting like building shelves and folders in a storage room.
This method applies in the following scenarios:
- For a freshly initialized SSD: If your SSD was new or wiped clean and you just initialized it in Method 1, it will show up in Disk Management as unallocated space. You’ll need to create a partition and then format that partition to make it usable.
- For an already initialized SSD with an existing partition: If your SSD was previously initialized but isn’t showing up in File Explorer, formatting might be necessary if the partition is RAW (doesn’t have a file system) or uses an unsupported file system by Windows (such as EXT4 used by Linux).
Warning: Formatting will erase all data on the SSD. If there is any data that you need to recover, use SSD data recovery software before proceeding.
Follow these steps to format your SSD:
- Press the Windows Key + X key combination and open the Disk Management tool.
- Within the Disk Management window, look for your SSD. If it’s freshly initialized, it will show unallocated space. If it’s already partitioned, you’ll see the existing partition(s).
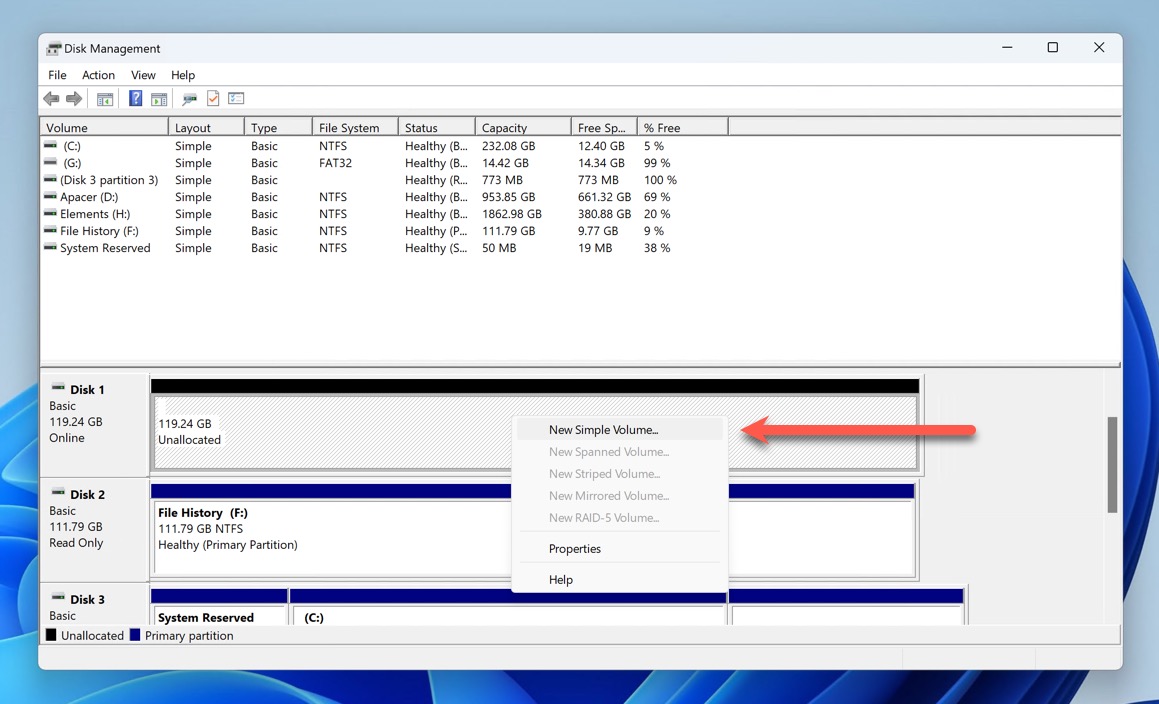
- (For freshly initialized SSDs) Right-click on the unallocated space representing your SSD and select New Simple Volume. A wizard will appear to guide you through creating a new simple volume.
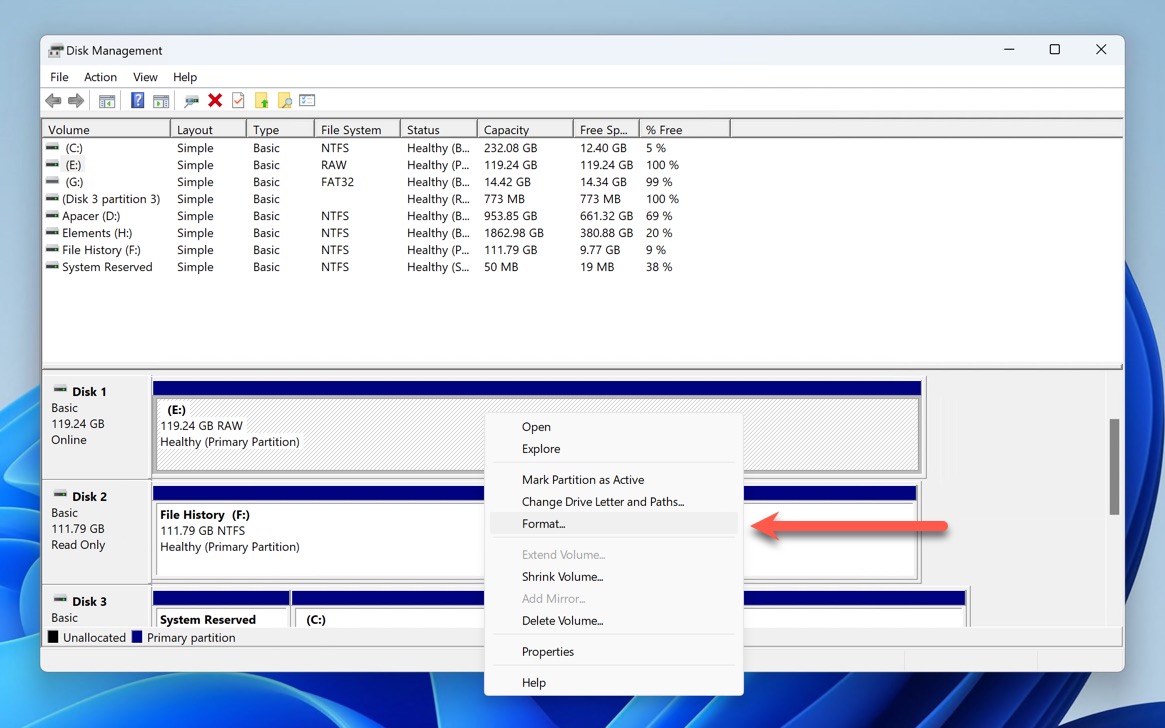
- Right-click the SSD partition and select the Format option.
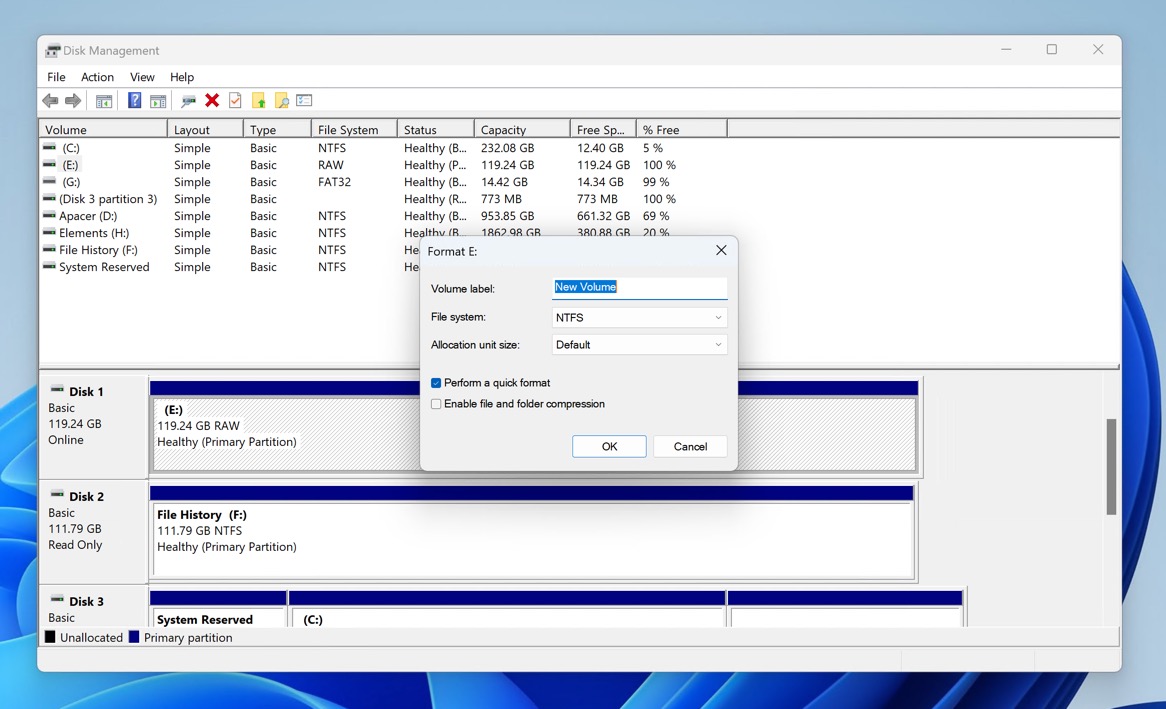
- Choose the file system for your SSD partition. The recommended file system for Windows drives is NTFS. If it’s an external SSD that you would like to access from macOS and Linux computers, then use exFAT or FAT32 instead. In most cases, it’s okay to use the Quick Format option to save time. Without it, the partition would be overwritten with zeroes, which can take ages.
Once formatting is complete, your SSD partition should now be visible in File Explorer and ready to use! If it still isn’t, then it’s almost certain that it’s missing a drive letter. Fortunately for you, the following method explains how to assign it.
Method 3: Assign a Drive Letter to Your SSD Partition
Even though you’ve formatted your SSD and created a usable partition, it might still be invisible in File Explorer because Windows hasn’t assigned it a drive letter, which acts as a label that allows Windows to easily identify and access the associated partition. In some cases, the drive letter may disappear from a previously working SSD due to software glitches or other issues. Therefore, assigning a new drive letter can sometimes restore the SSD to a working state and make it visible in File Explorer again.
Thankfully, assigning a drive letter is a very simple process using Disk Management:
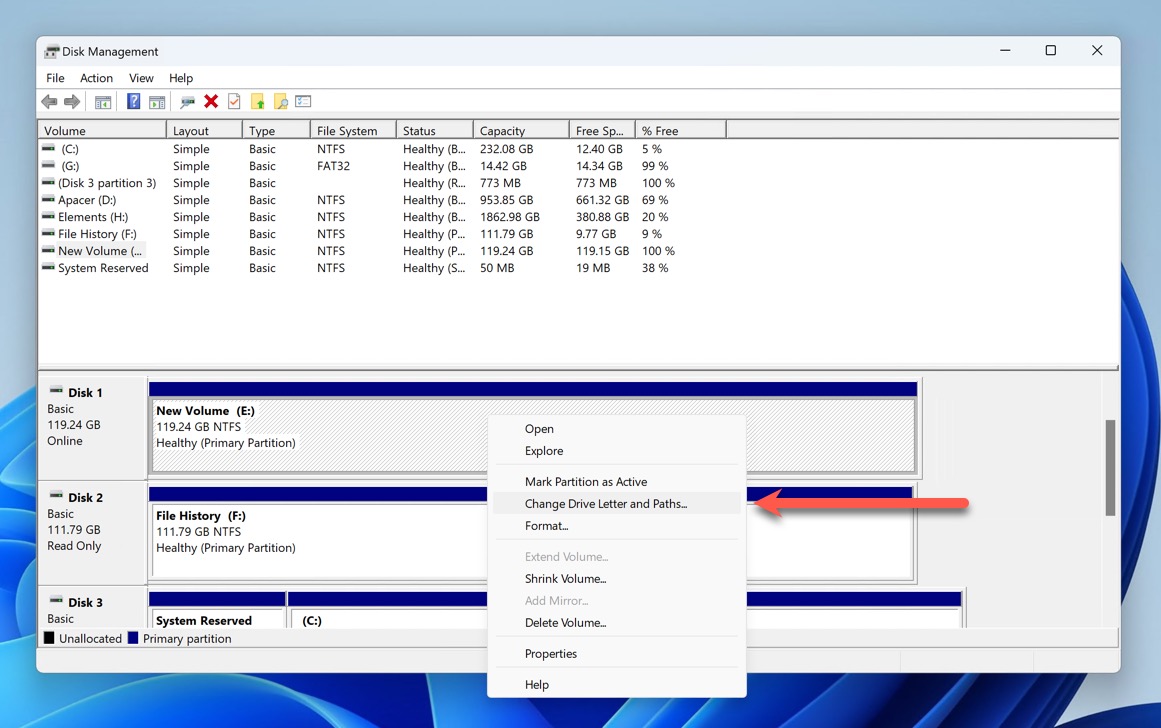
- Press the Windows Key + X key combination and select Disk Management from the menu.
- Find your SSD partition in the bottom pane of the Disk Management window and right-click it.
- Select the Change Drive Letter and Paths option.
- You’ll see options to either Change an existing drive letter or Add a new one (if there’s currently no letter assigned). Click the appropriate button depending on your situation. Choose a letter that isn’t currently in use by another drive (typically letters C and D are reserved for your primary and secondary storage drives).
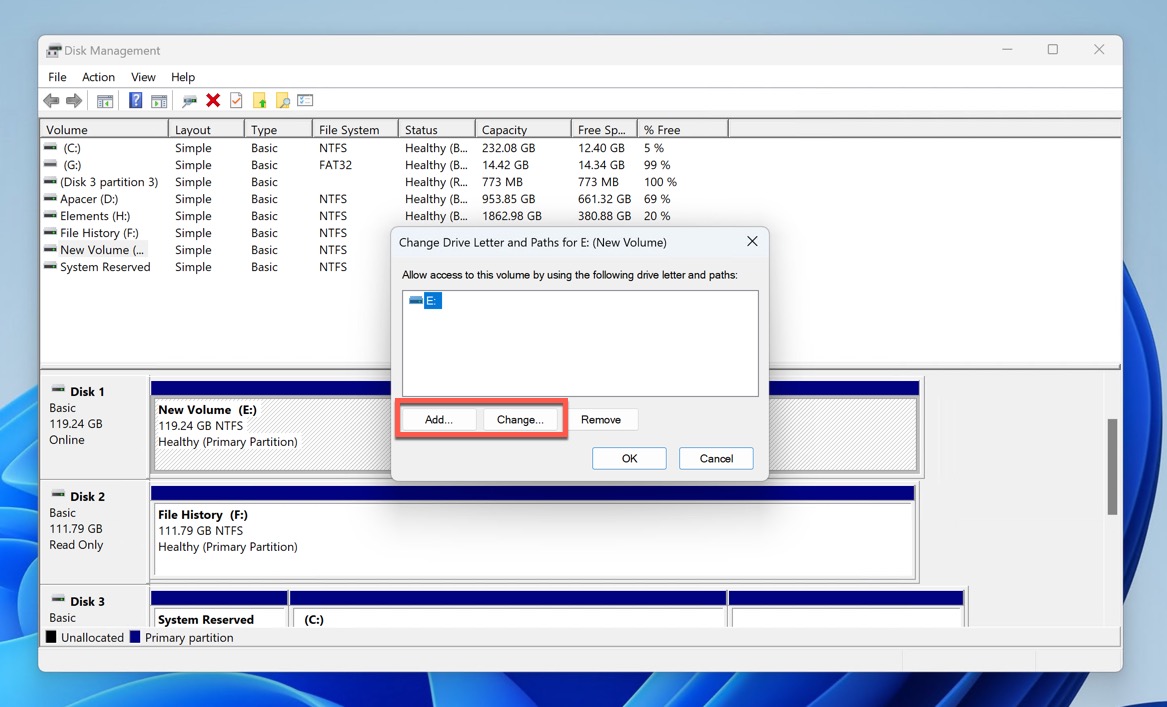
- Click OK to confirm your selection. Windows may prompt you with a warning message about programs that might rely on the drive letter. If you’ve just formatted the partition and haven’t installed any programs on it, you can safely click Yes.
Your SSD partition should now be visible in File Explorer with the assigned drive letter. You can now access your SSD and start using it to store your files and programs.
How to Fix a PC Not Recognizing SSD in BIOS/UEFI or Disk Management
The methods covered in the previous section addressed scenarios where the SSD isn’t showing up in File Explorer, but it was still detectable by Windows through Disk Management. However, in some cases, the SSD might be entirely invisible—not showing up in File Explorer, Disk Management, or even your computer’s BIOS/UEFI.
When your PC is not reading your SSD, it typically indicates a more serious issue, potentially with the connection, BIOS/UEFI settings, or the SSD itself. The solutions described in this section will help you troubleshoot and fix these issues so that your PC can recognize your SSD.
Warning: If you’re uncomfortable opening your computer case or tampering with hardware, it’s advisable to seek help from a technician.
Option A: Ensure Proper Connection
We recommend you start by ruling out a simple physical connection issue by going through the following steps:
- Power off your computer and unplug it from the power source.
- (Internal SSDs only) Open your computer case and locate the SSD.
- Check for any visible damage on the SATA data and power cables or the USB cable (for external SSDs).
- Make sure all connectors are properly seated. If you have spare cables, try swapping them to rule out invisible cable-related issues.

Credit: Samsung Memory
- Once you’ve verified the connections, close the case (if checking an internal SSD) and power on your computer.
If, after reseating the connections and checking the cables, your SSD is still not recognized, then the problem likely lies elsewhere, such as your BIOS/UEFI configuration.
Option B: Configure BIOS or UEFI Settings
Your computer’s Basic Input/Output System (BIOS) or UEFI (Unified Extensible Firmware Interface) governs the communication between various hardware components, including storage devices like your SSD. Incorrect BIOS/UEFI settings can entirely prevent your SSD from being recognized by the operating system. This can happen for a number of reasons, but a common culprit is a reset BIOS/UEFI configuration.
For instance, if your computer experienced a sudden power outage or an extended period without power, the BIOS/UEFI settings might have reverted to defaults, potentially disabling the SATA controller or changing other settings that are responsible for your SSD suddenly not being detected.
Accessing the BIOS/UEFI setup varies slightly depending on the manufacturer of your motherboard or pre-built computer. Below are general steps that should work in most cases:
- Begin by restarting your computer. You’ll need to enter the BIOS/UEFI before your operating system starts.
- During the initial boot phase, press the key that opens the BIOS/UEFI settings. Common keys include Delete, F2, F10, F12, or Esc.
- Once in the BIOS/UEFI, you can use your keyboard (mouse support is available in some versions of UEFI but not in BIOS) to check if the SSD is enabled and properly configured.
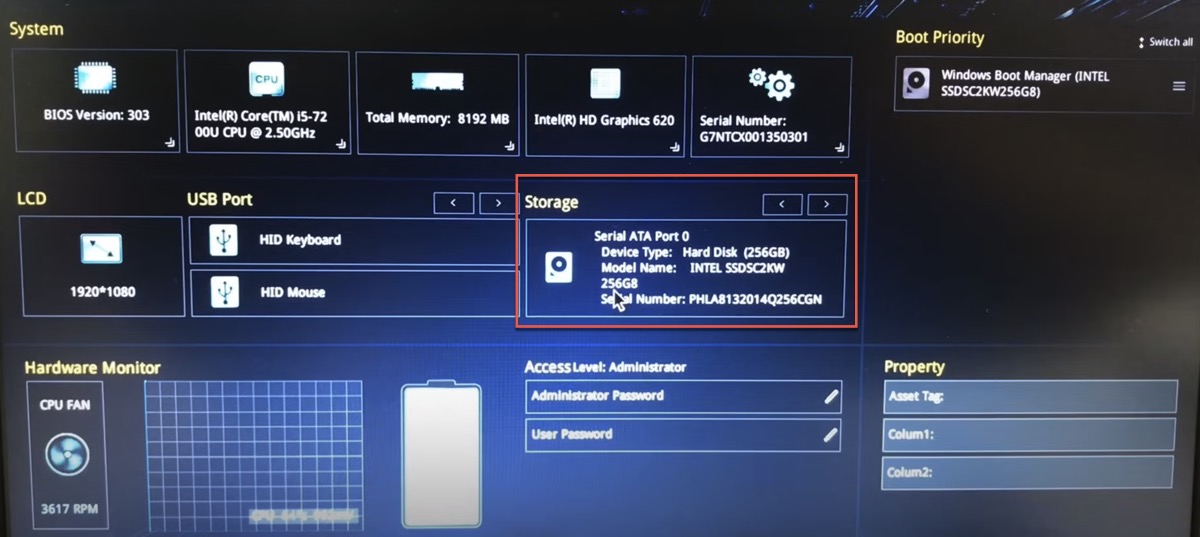
As BIOS menus can be complex and vary significantly between manufacturers, we recommend consulting your motherboard or computer manufacturer’s documentation for specific guidance on how to configure your SSD settings. Here are some helpful resources to get you started:
ASRock | ASUS | Dell | HP | Lenovo | MSI
Option C: Send the SSD to Data Recovery Professionals
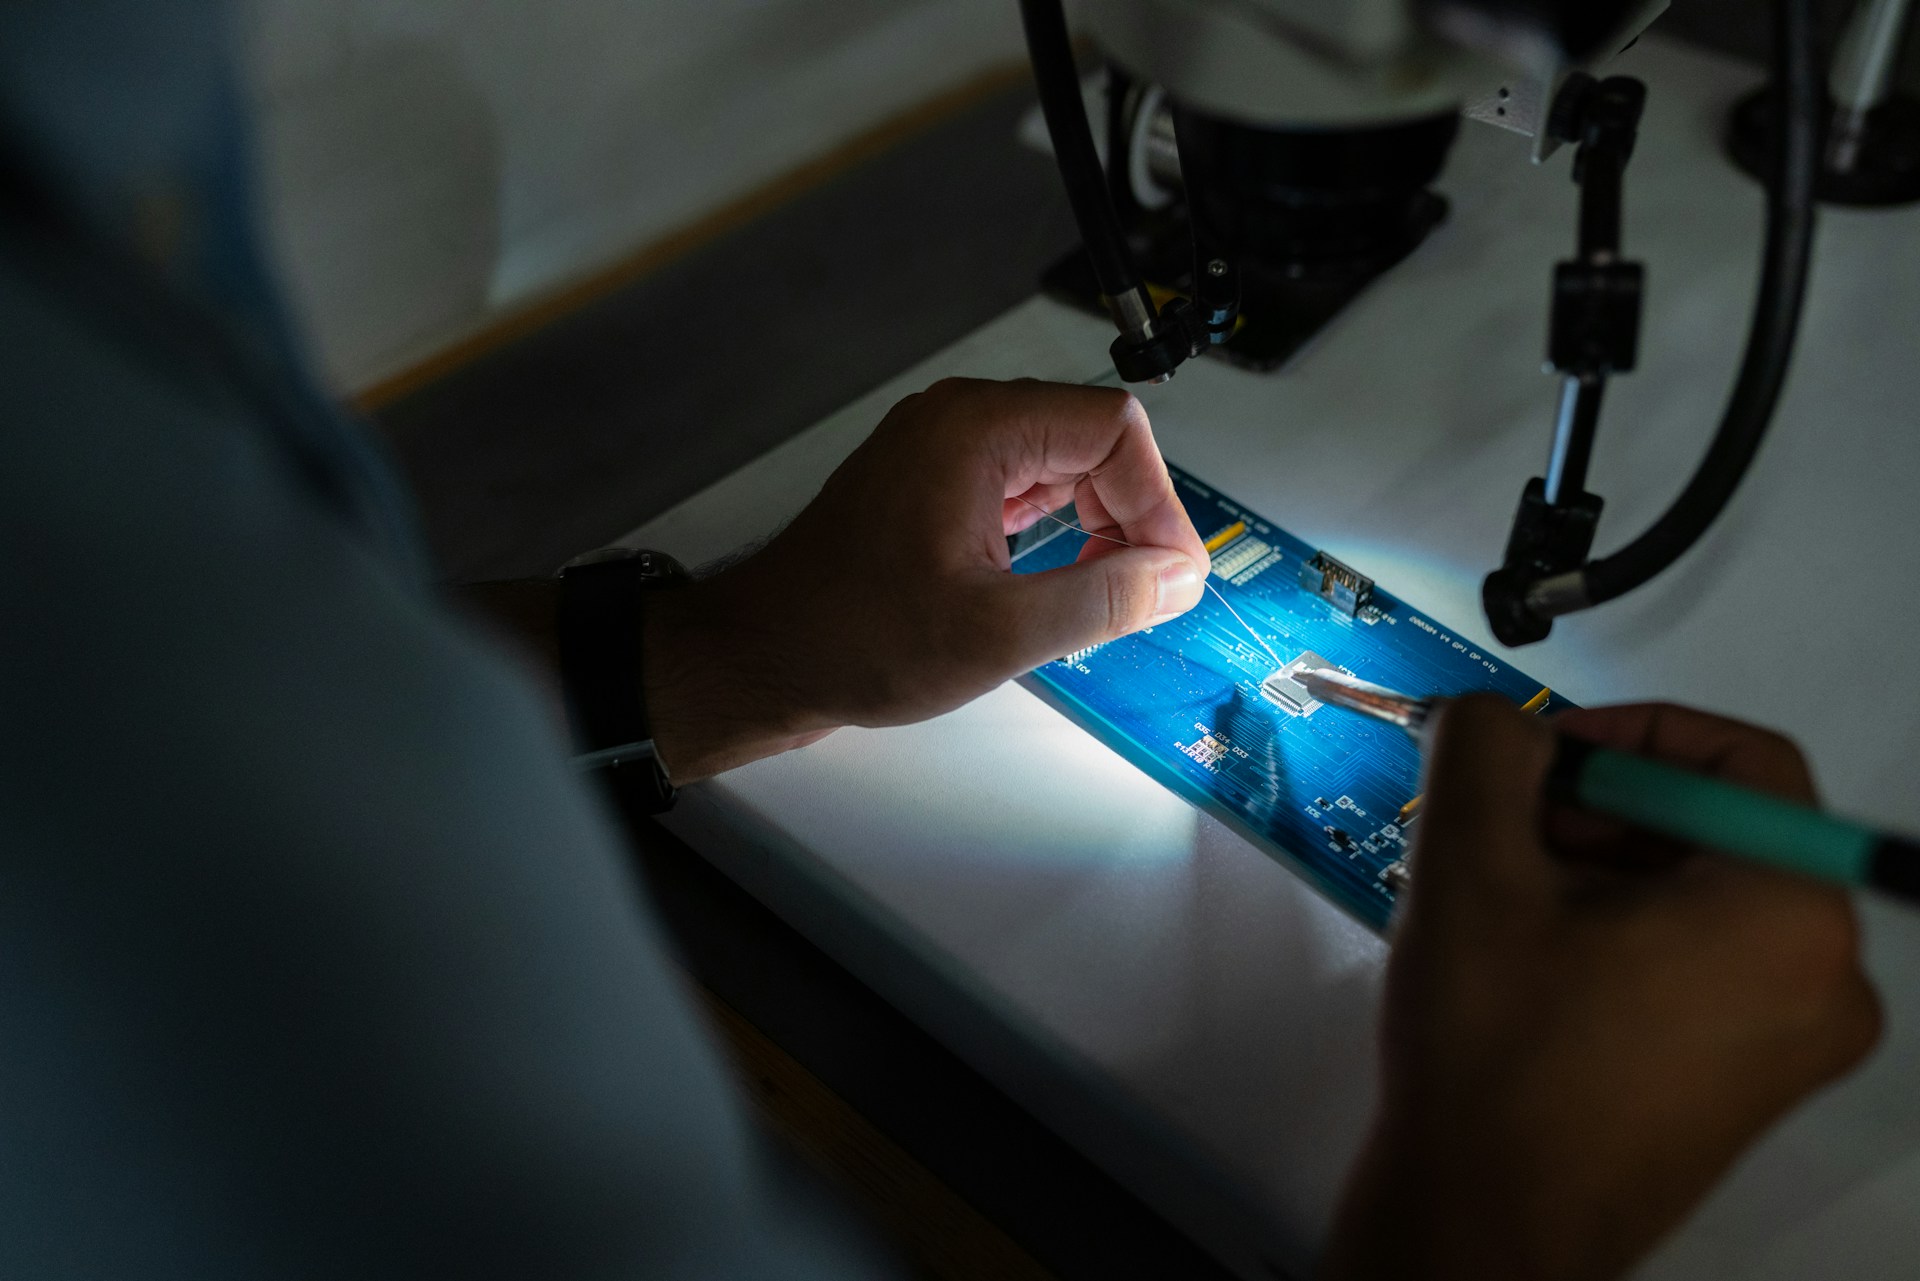
Credit: ThisisEngineering
If you suspect mechanical damage to your SSD, have tried all the methods described in this guide without success, or just don’t know how to approach SSD data recovery, it might be time to seek professional help.
Data recovery professionals have specialized tools and expertise to handle complex SSD issues that might be causing it not to show up in Windows. Of course, professional data recovery services can be expensive, so they’re worth paying for only if your SSD contains important data. If not, then you can just get a new one.
How to Recover Data from an SSD Not Showing Up in Windows File Explorer
There are situations where an SSD might not be entirely invisible, but its accessibility is limited. For instance, the disk might be visible in Disk Management but not in File Explorer, or it appears as a “Local Disk (H:)” with no storage space showing. In such scenarios, the best SSD data recovery software can be your best bet to get your valuable files back.
We have published a detailed Disk Drill review where you can learn more about its features and capabilities. However, for the purpose of this guide, just know that Disk Drill is excellent for recovering data from SSDs in Windows because:
- It supports all Windows file systems (NTFS, FAT, FAT32, exFAT), allowing it to recover files with metadata (their names and locations);
- can also recognize the signatures of recoverable files on drives that don’t have a file system (because they are corrupted or have become RAW);
- and is completely safe and privacy-respecting as it operates read-only during its scans and doesn’t collect any data about its users without permission.
To recover data from an SSD that’s not showing up in Windows File Explorer:
- Download and install Disk Drill for Windows from the official website. Install it on a different drive than the affected SSD to avoid overwriting potentially recoverable data.
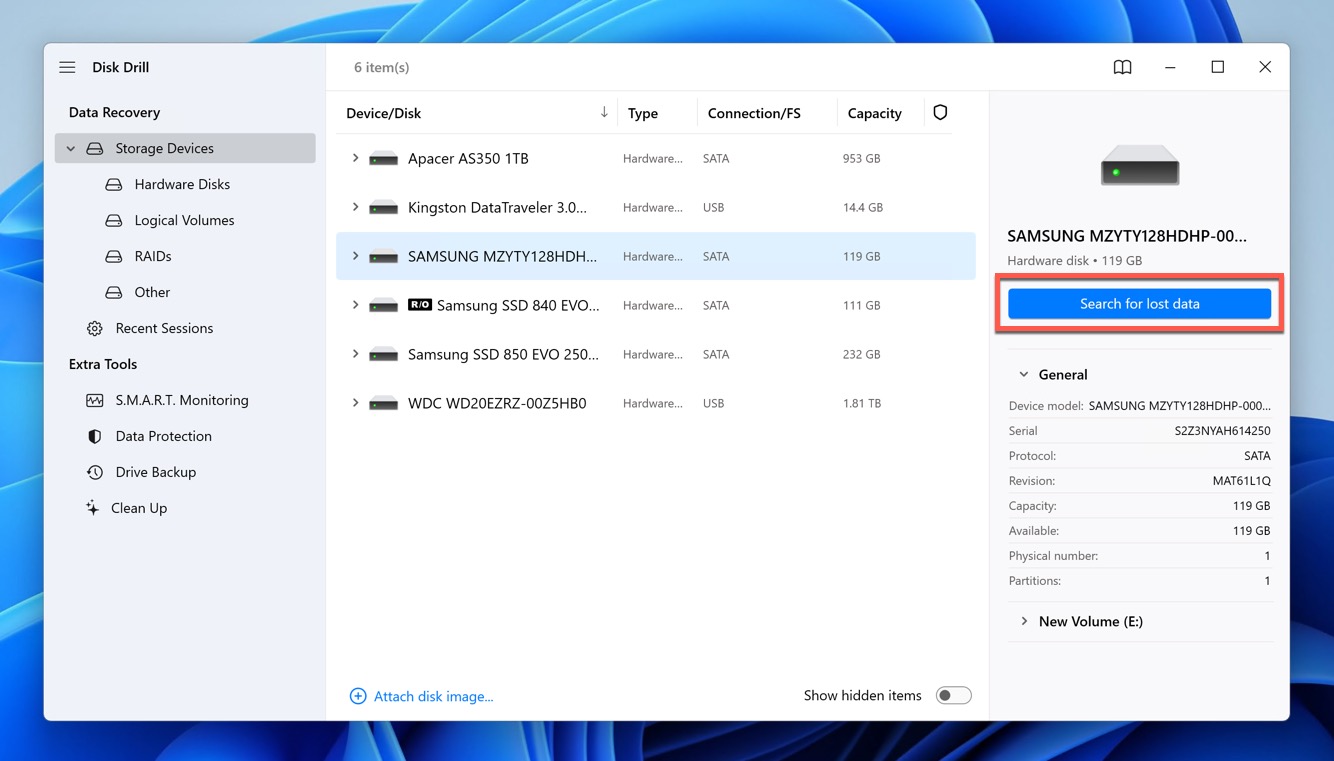
- Launch Disk Drill and locate your SSD in the list of connected drives.
- With your SSD selected, click the “Search for lost data” button to begin scanning. Disk Drill will employ multiple scanning algorithms to locate recoverable files on your SSD.
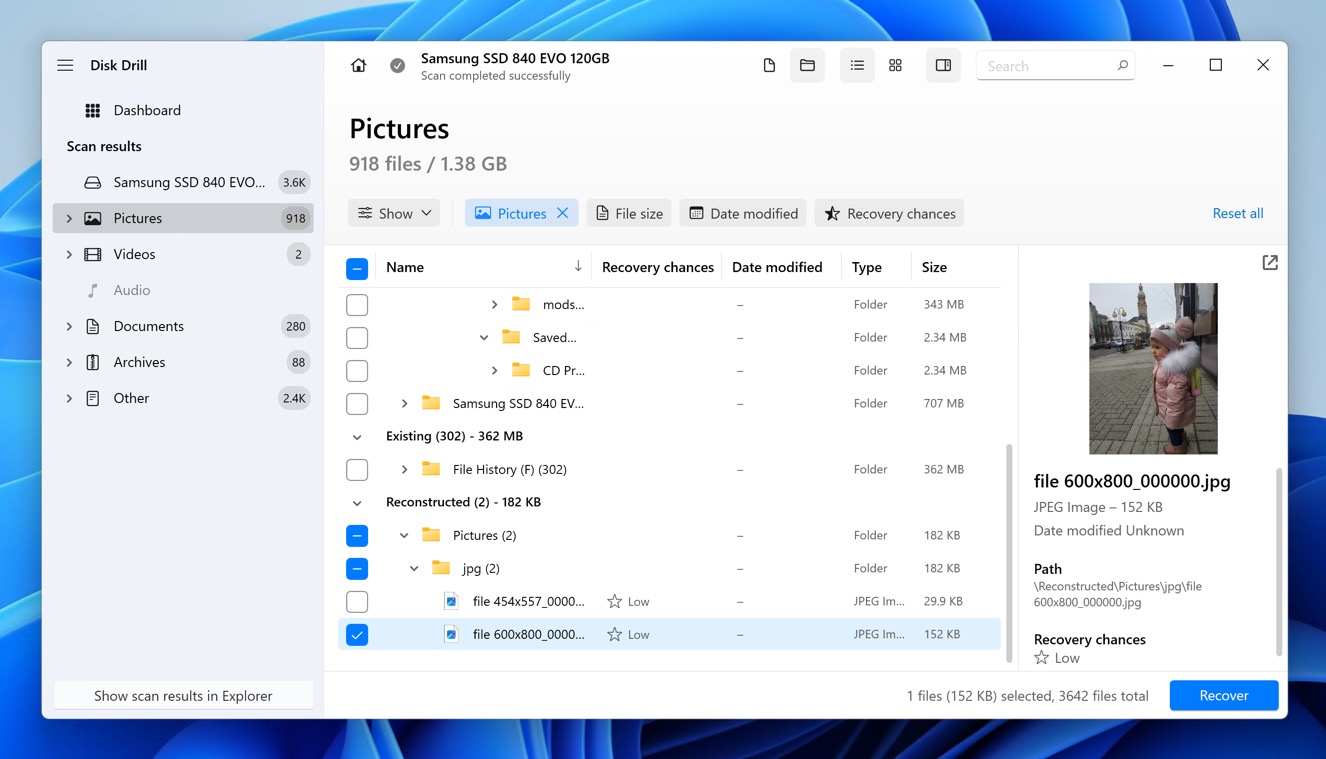
- Once the scan is complete, Disk Drill will present you with a list of recoverable files. You can preview them to verify their integrity and select the ones you want to recover.
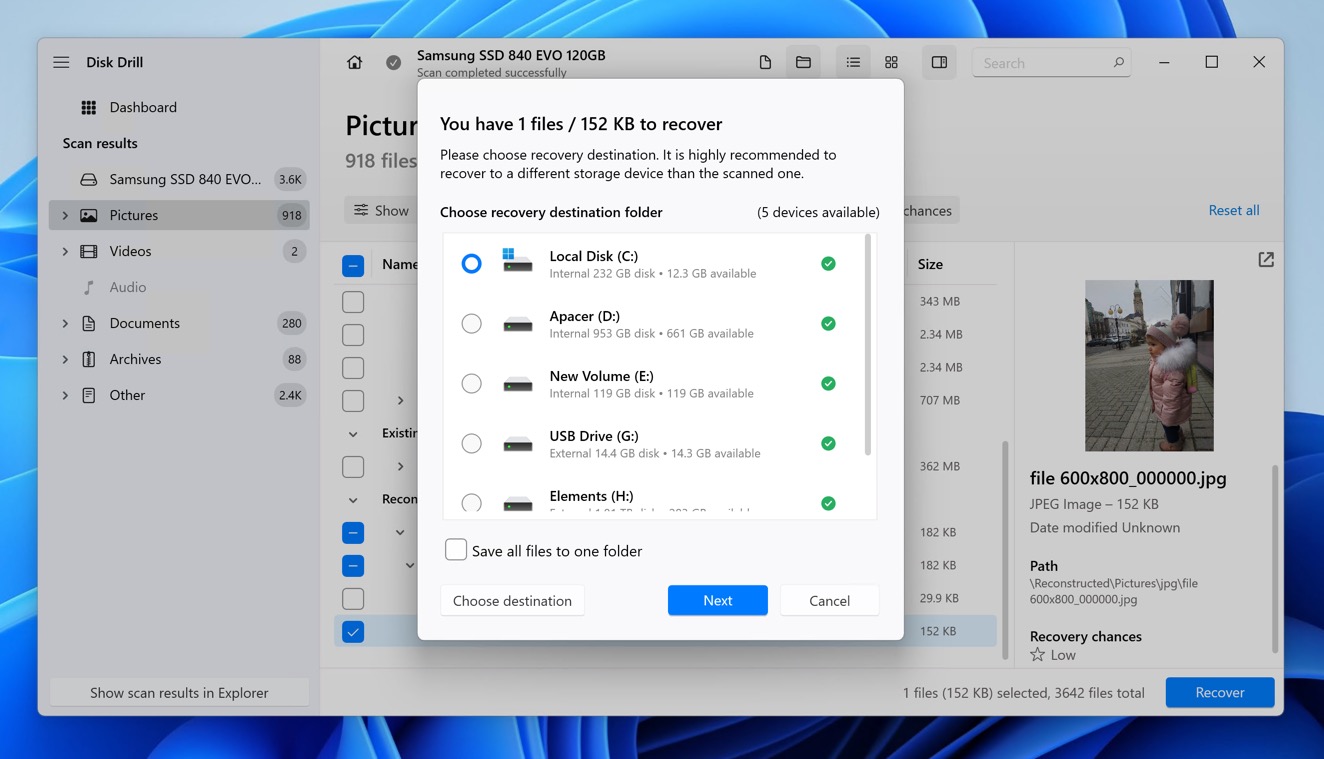
- Click the “Recover” button and choose a safe location to save the recovered files. Do not save them to the affected SSD to avoid overwriting other potentially recoverable data.
The free version of Disk Drill allows you to recover up to 500 MB of data for free. If you have more data to recover, a one-time payment upgrade is available to unlock unlimited recovery.
Conclusion
This guide has provided solutions to address the most common causes of SSDs not showing up in Windows, such as unassigned drive letters or BIOS/UEFI configuration issues. We have also demonstrated how free data recovery software like Disk Drill can recover data from a problematic SSD in preparation for its initialization, formatting, or other troubleshooting steps. Hopefully, you’ve been able to regain access to your valuable data.
This article was written by David Morelo, a Staff Writer at Handy Recovery Advisor. It was also verified for technical accuracy by Andrey Vasilyev, our editorial advisor.
Curious about our content creation process? Take a look at our Editor Guidelines.