Having some trouble with your M2 SSD not showing up correctly? There are various reasons why this can happen; some minor, others more severe. Before you can harness the superior performance of the M.2 drive, you’ll need to figure out how the problem started.
In this guide, we’ll discuss why this problem happens and go over several solutions for making your M.2 drive visible and accessible again. Each of the methods we cover has been proven to address the issues that cause this problem, so we’re confident that you’ll find at least one that works for you.
Based on our research, we’ve found that most users who look into this topic are experiencing hardware-based problems rather than logical ones. This leads the disk to be unrecognizable in the BIOS or Disk Management due to an issue with the device or its physical connection. Therefore, we will focus primarily on these cases, but we will also provide solutions for addressing logical-based errors.
Common Reasons Why an M.2 Drive May Not Be Showing Up
To determine what sort of problem this is (physical or logical), it helps to determine where the drive isn’t appearing. For example, an M.2 drive that’s not showing up in File Explorer may only be experiencing a software-related problem that’s easily fixable. However, if an NVMe drive is not showing up in BIOS or Disk Management, it could indicate more troublesome damage.
While this isn’t an exhaustive list, we’ve included some common reasons why an M.2 drive may not be showing up.
NVMe Not Showing Up in BIOS or Disk Management
- The device is disabled in BIOS. When a drive is disabled in BIOS, it prevents the operating system from detecting or accessing the drive. This can be fixed by enabling it.
- Legacy BIOS mode is enabled, and the disk is formatted in GPT. Legacy BIOS cannot recognize disks using the GPT scheme. To fix this, you will need to back up the data and change the partition style of the SSD.
- The disk isn’t properly connected. If the disk isn’t installed correctly, it results in the BIOS not detecting the M.2 SSD.
- A physical component on the M.2 or motherboard is faulty. In this case, it’s unlikely that you will be able to fix it yourself. Inspection by an expert is required and the M.2 SSD or motherboard may need to be repaired or replaced.
M.2 Not Showing Up in File Explorer
- The disk is not initialized. Before any storage device can be recognized, it needs a partition style, volume, and file system. Sometimes disks may become uninitialized due to an error. Initializing the disk will fix this.
- Unallocated space on the drive. Unallocated space refers to parts of the drive that don’t contain a file system. Formatting the unallocated space with a compatible file system will cause it to appear.
- No volume letter has been assigned. The M.2 drive may not be showing up as it hasn’t been assigned a drive letter. In this case, simply assigning a drive letter will rectify the issue.
How to Fix an M.2 SSD Not Showing Up in BIOS/Disk Management
When an NVMe drive is not showing up in Disk management or BIOS, it could point towards a very simple mistake like an installation error, or something catastrophic like a faulty hardware component. Either way, one of these methods may prove useful in helping get the M.2 SSD up and running.
Option A: Ensure Proper Connection
If the M.2 drive is not installed properly, your motherboard will not recognize it and it will not show up in BIOS or Disk Management. If it’s your first time installing an M.2 drive, consult the instructions below for a brief walkthrough on how to do it properly:
- Remove the heatsink covering the M.2 slot (if your motherboard has one).
- Remove any protective covers and labels on the M.2 drive connector. Also, remove the screw that will be used to hold the M.2 drive in place (if necessary).
- Position the M.2 drive at a 30-45 degree angle and align the notches with the slot. Gently insert the SSD until it’s fully seated in the slot.
- Use the screw (or mounting system, like a locking pin) to fasten the M.2 drive so it’s no longer sitting at an angle.
- Reattach the heatsink if you have one. Be sure to remove the plastic film covering the thermal pad to ensure it makes contact with the NVMe SSD.
It’s also worth checking the documentation of your motherboard to ensure you’re connecting the M.2 drive to the correct slot, as connecting it to the wrong slot can cause performance issues like bottlenecking.
Option B: Configure BIOS
Nowadays, your BIOS/UEFI generally picks up on newly installed hardware automatically. However, if it doesn’t, you may need to change some settings so it’s able to read the M.2 SSD.
The key(s) you need to press to enter the BIOS varies from manufacturer to manufacturer. If unsure, check your motherboard’s documentation or consult this guide.
Here are a few things you can do to make sure everything is as it should be:
- Enable the M.2 slot. You may have inadvertently disabled the M.2 slot in the past. Be sure to check your M.2 slot configuration to confirm the slot is enabled and ready to read the drive.
- Configure SATA as AHCI. If you’re using a SATA M.2 SSD (as opposed to an NVMe M.2 SSD that uses PCIe), ensure that SATA is set to AHCI (Advanced Host Controller Interface) in your BIOS, as it’s optimized to work with M.2 SATA drives.
- If it’s a system drive, adjust your boot settings. The M.2 drive may be readable, but it’s not launching properly as another drive has a higher boot priority. Check your boot order and make sure the M.2 drive is at the top of the list.
- Reset BIOS to defaults. If in doubt, resetting your BIOS to default settings is a good opportunity to start from scratch (so long as you remember any important settings needed for other hardware components).
- Check your BIOS mode. Make sure that your BIOS is in UEFI mode if you’re using a GPT-based drive. Legacy BIOS is unable to read drives that use the GPT partition scheme.
How to Fix NVMe Not Showing Up in File Explorer
When an M.2 drive is showing up in Disk Management but not File Explorer, it typically points towards a logical issue that you can fix on your own, one way or another.
Method 1: Initialize the Disk
An M.2 drive that hasn’t been initialized will not show in File Explorer as it doesn’t have a readable file system. Before it can be read or accessed, you will need to initialize the disk, choose a partition style, create a partition, and then format it with a file system.
If the drive is already initialized but only recently became unrecognizable in File Explorer, you may need to perform NVMe data recovery before taking any further action.
Follow these steps to initialize an M.2 drive:
- Right-click Start and click Disk Management.
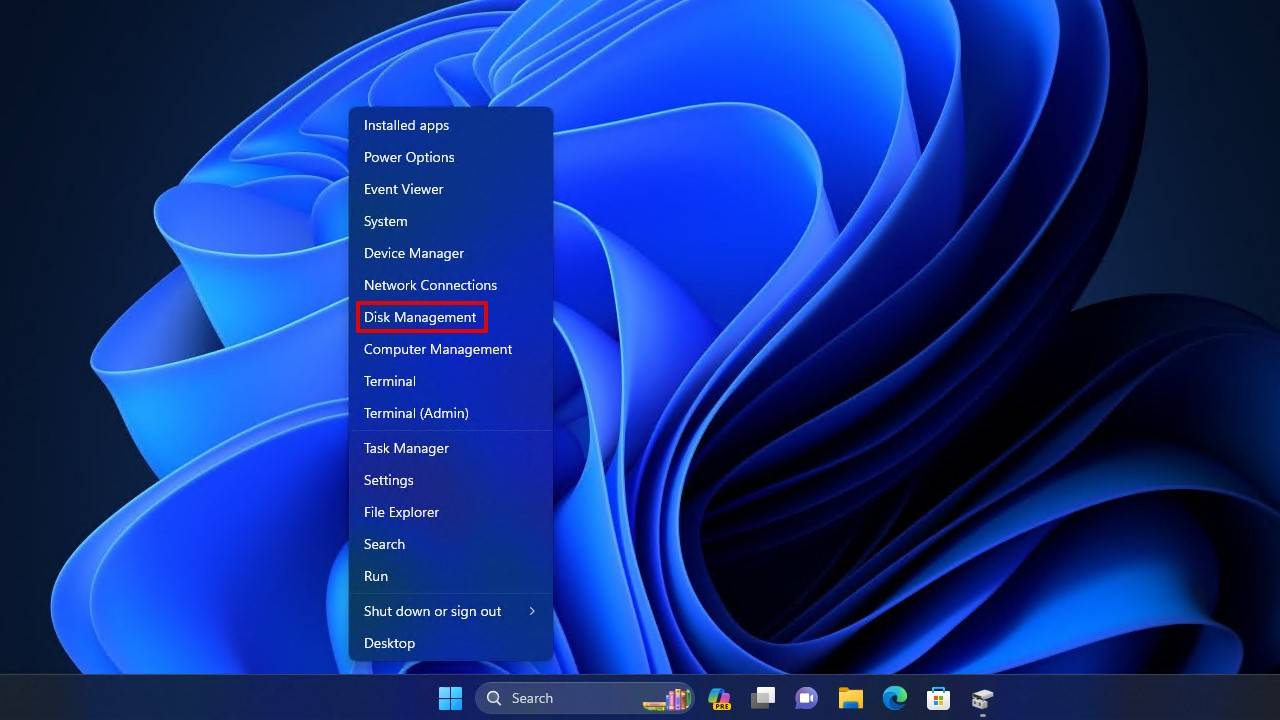
- Right-click the M.2 drive and click Initialize Disk.
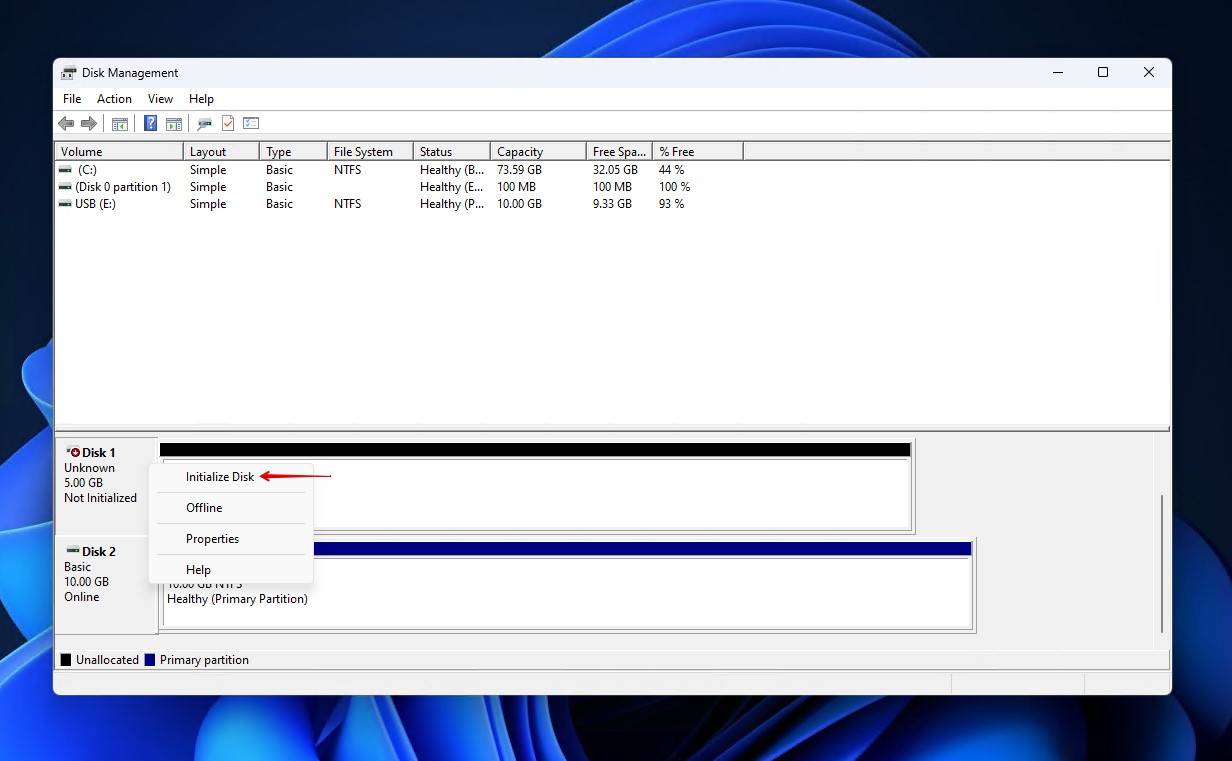
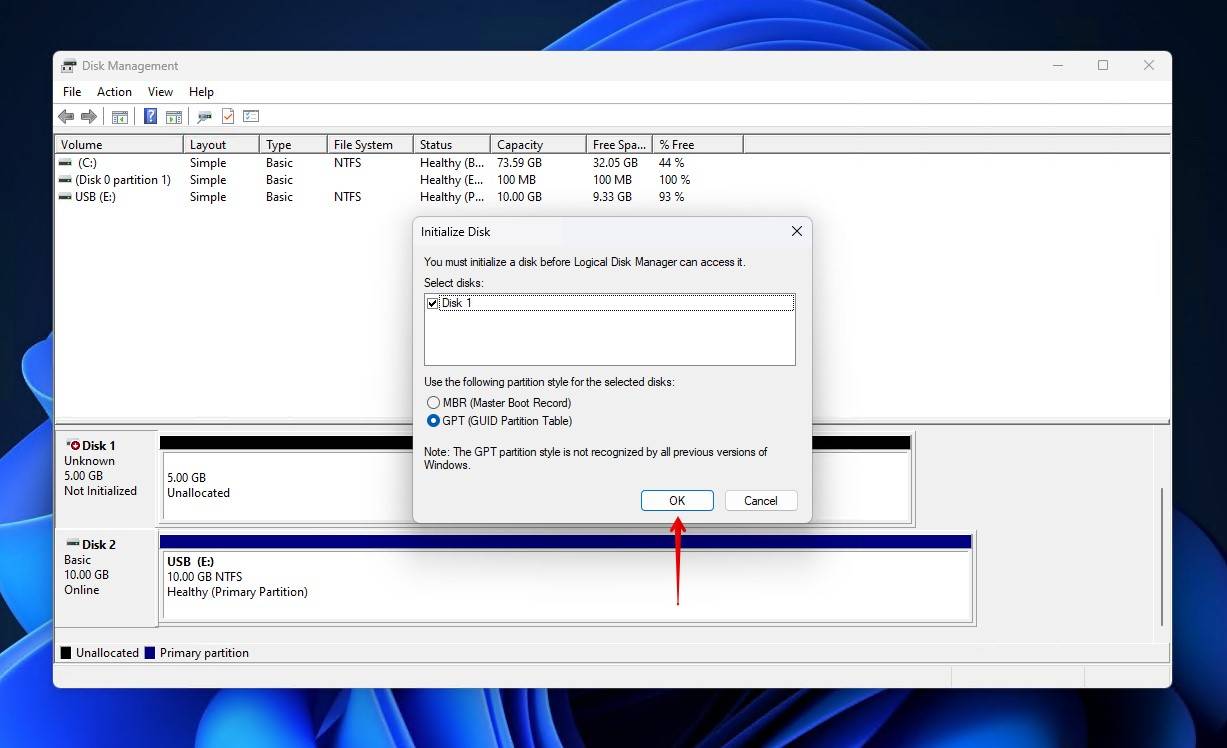
- Select a partition style and click OK.
Now the drive is initialized. But, before you can see it in File Explorer, you’ll also need to create a volume. These next steps will guide you through setting up a new volume with a working file system:
- Right-click the unallocated space and click New Simple Volume.
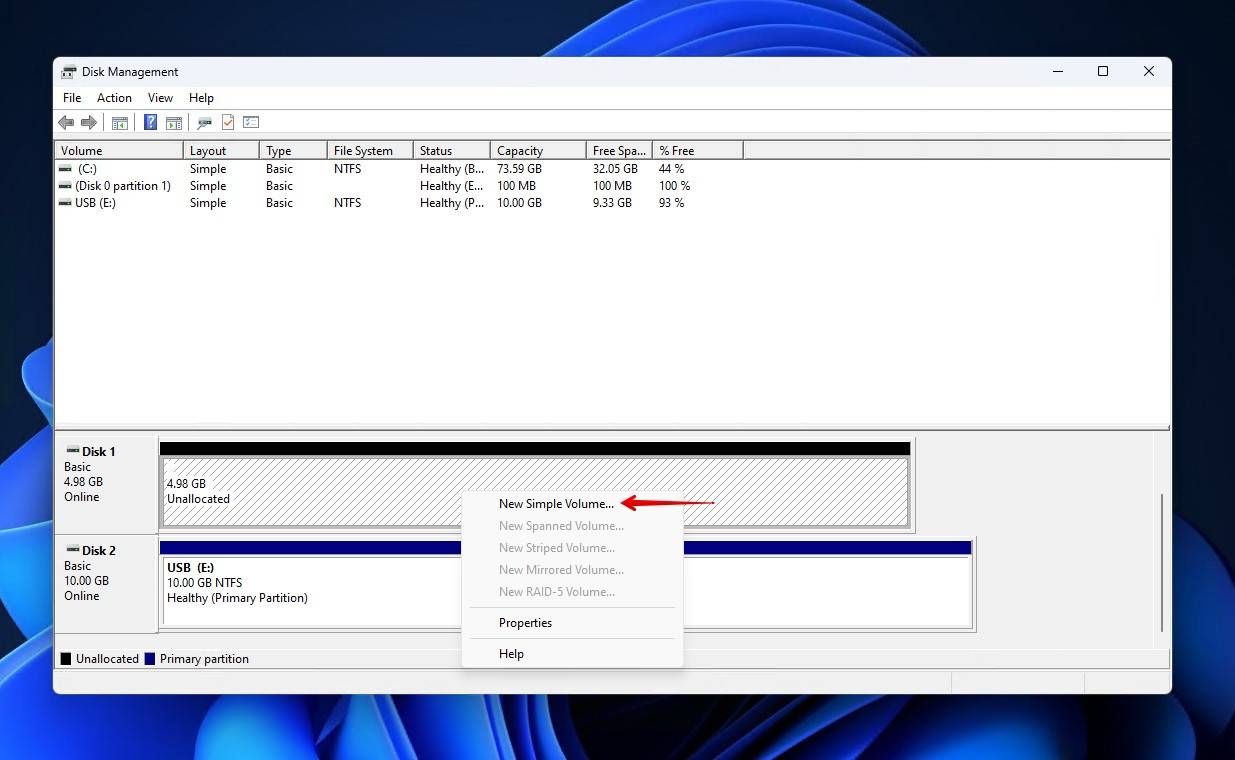
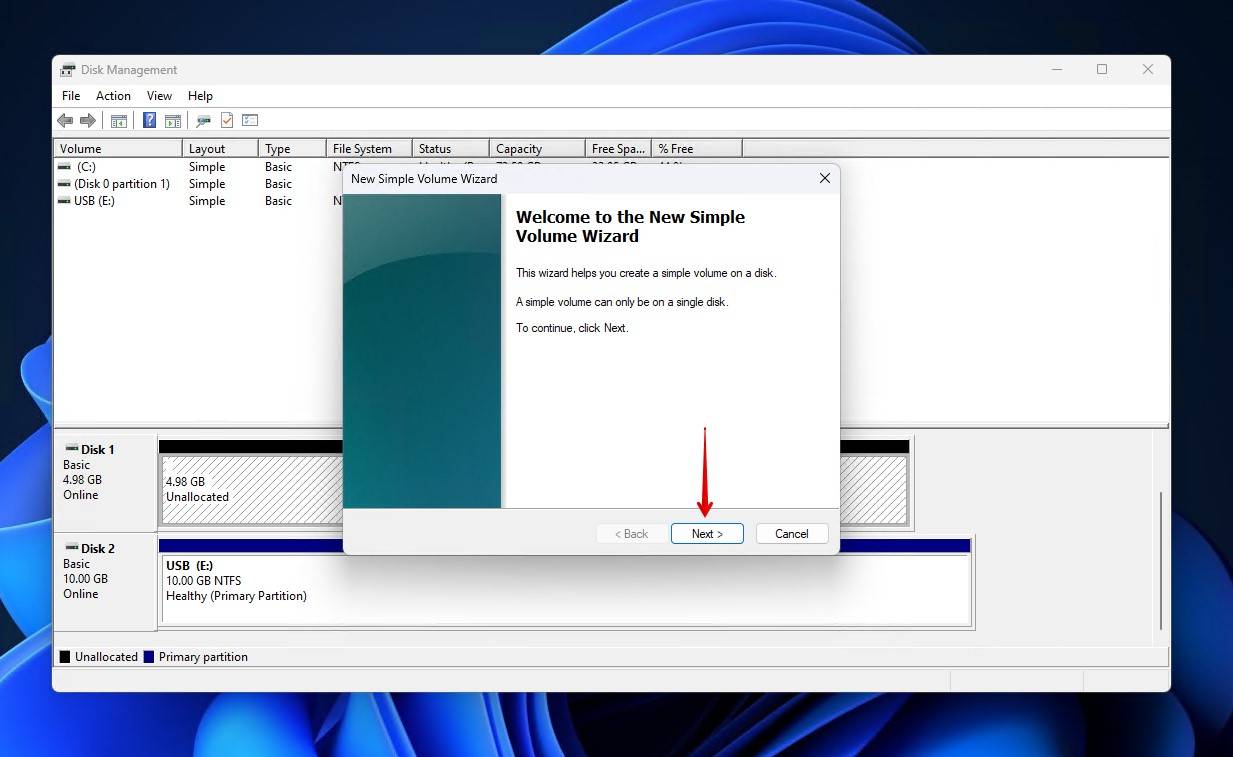
- Click Next.
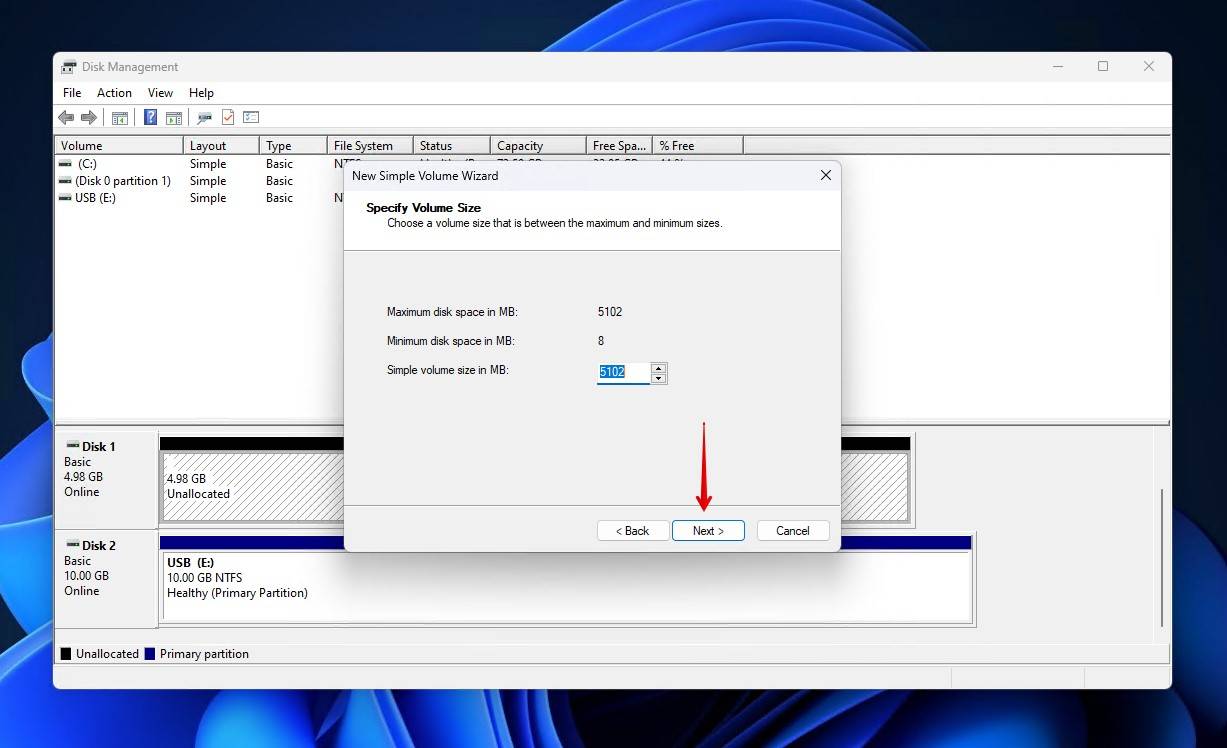
- Specify how large you want the volume to be. Click Next.
- Choose a drive letter, then click Next.

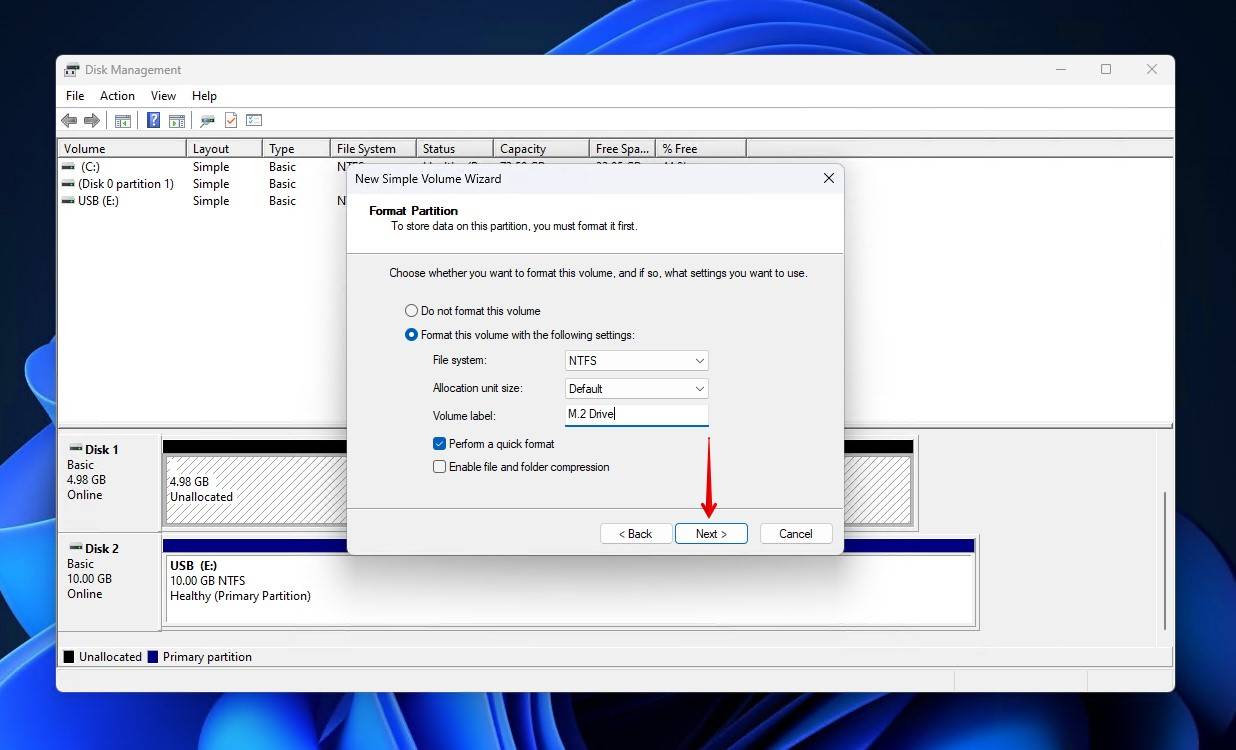
- Specify the file system you want to use and give the volume a label. Make sure that Perform a quick format is ticked. Click Next.
- Click Finish.
Method 2: Assign a Drive Letter to the Volume
It may be that your volume still exists, just that it has either lost its drive letter or hasn’t been assigned one. Without a drive letter, Windows does not display storage devices in File Explorer, even if they contain data. This, however, is relatively easy to fix.
- Right-click Start and click Disk Management.
- Right-click on the volume of your M.2 drive, then click Change Drive Letter and Paths.
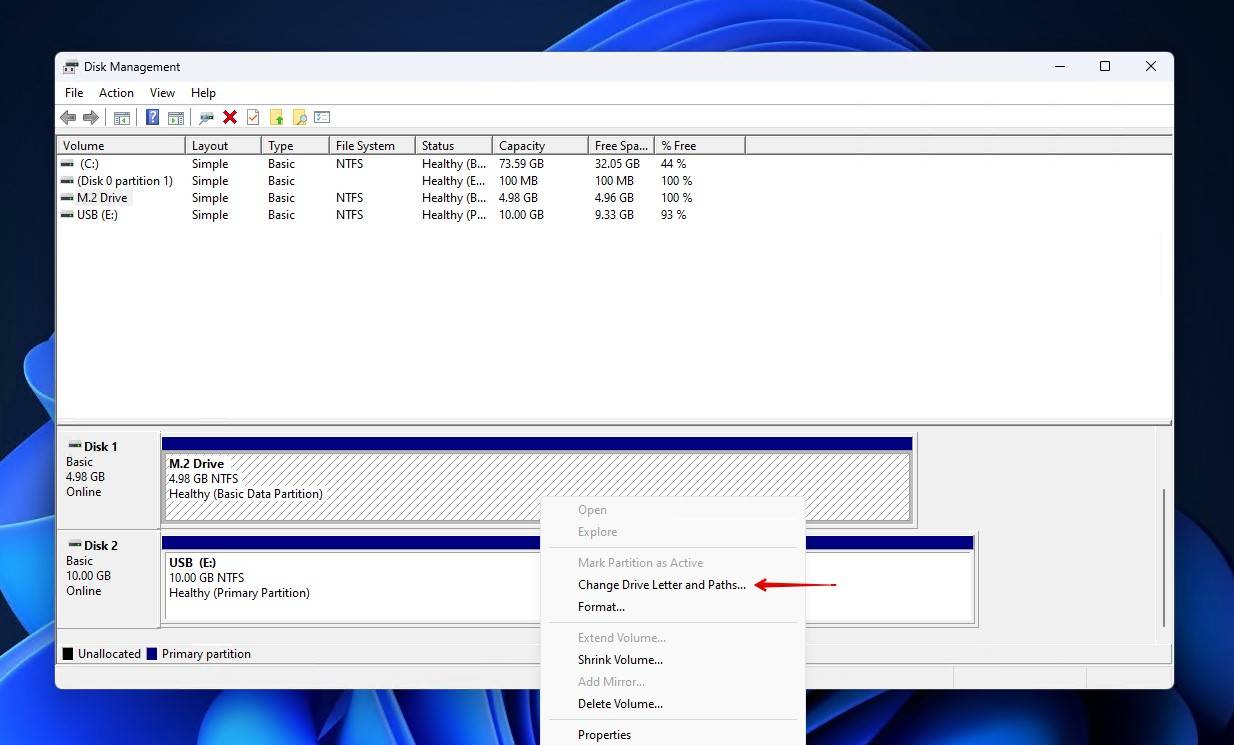
- Click Add.
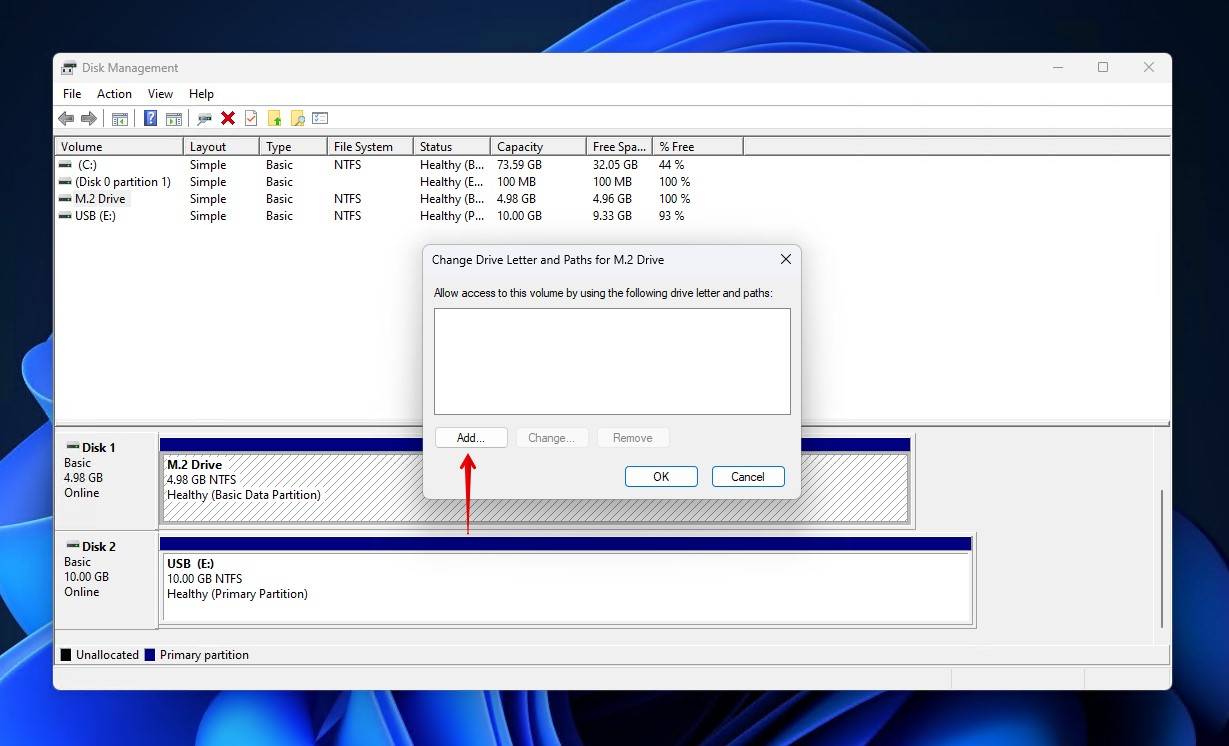
- Choose a drive letter from the dropdown, then click OK.

How to Recover Data from an M.2 SSD That Doesn’t Appear in File Explorer
In instances where your M.2 SSD appears in Disk Management but not File Explorer, or it appears as a Local Disk (H:) with no storage space, you may have a chance of recovering the data if you want to secure it before attempting any of the aforementioned fixes, or if you simply want to retrieve it because none of them were successful. Using data recovery software, you can scan the drive for existing, lost, or deleted files and restore them to a working storage device.
Bear in mind that data recovery software shouldn’t be used in cases of physical damage. You should refer to a data recovery service instead.
There are a number of recovery options available, but we prefer to use Disk Drill. Disk Drill is a professional data recovery tool that’s user-intuitive, safe to use, and packed with advanced recovery algorithms that excel in recovering data in situations just like this (including those where your disk has become raw).
Follow these steps to recover data from an M.2 SSD that appears in Disk Management but not File Explorer:
- Download and install Disk Drill.
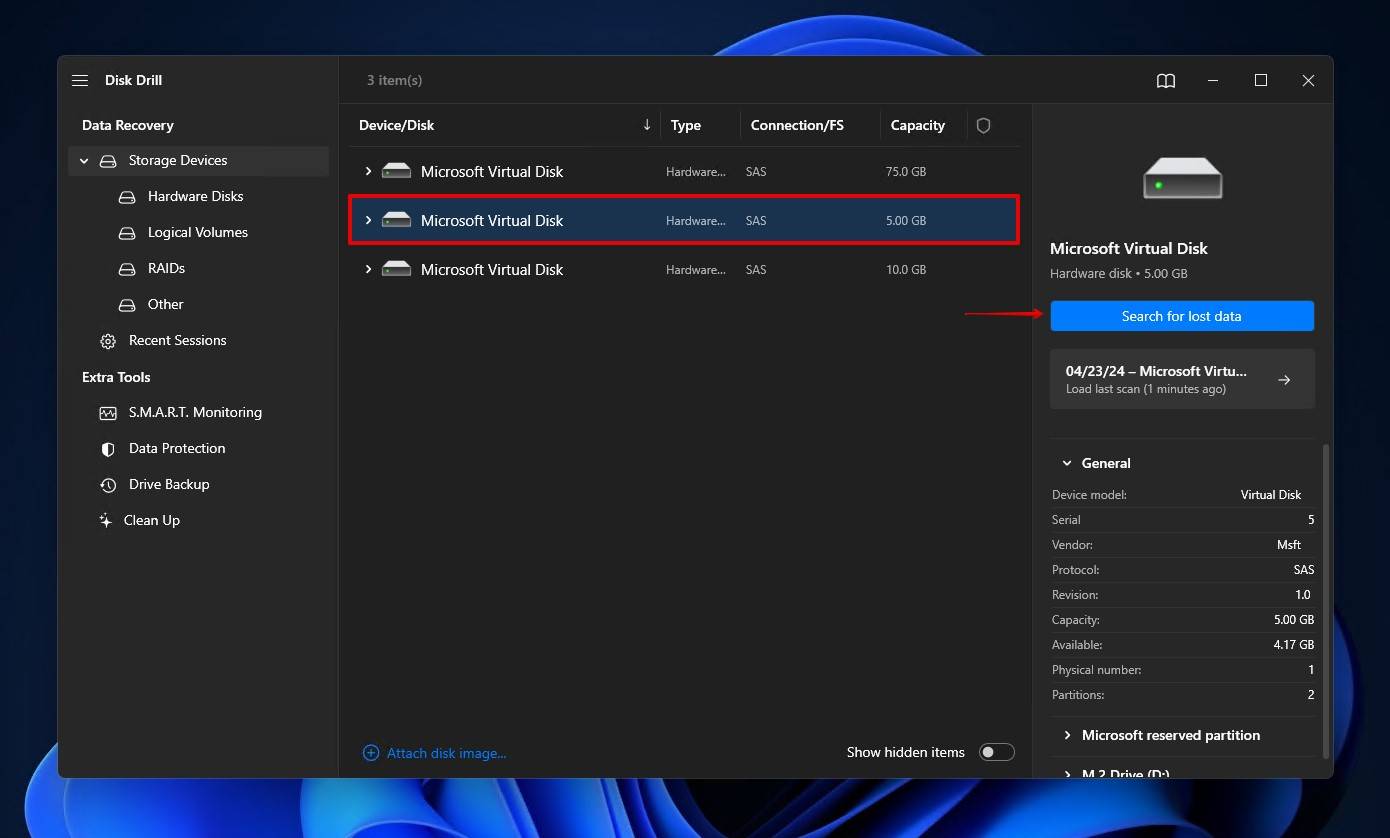
- Select the M.2 from the list of devices then click Search for lost data.
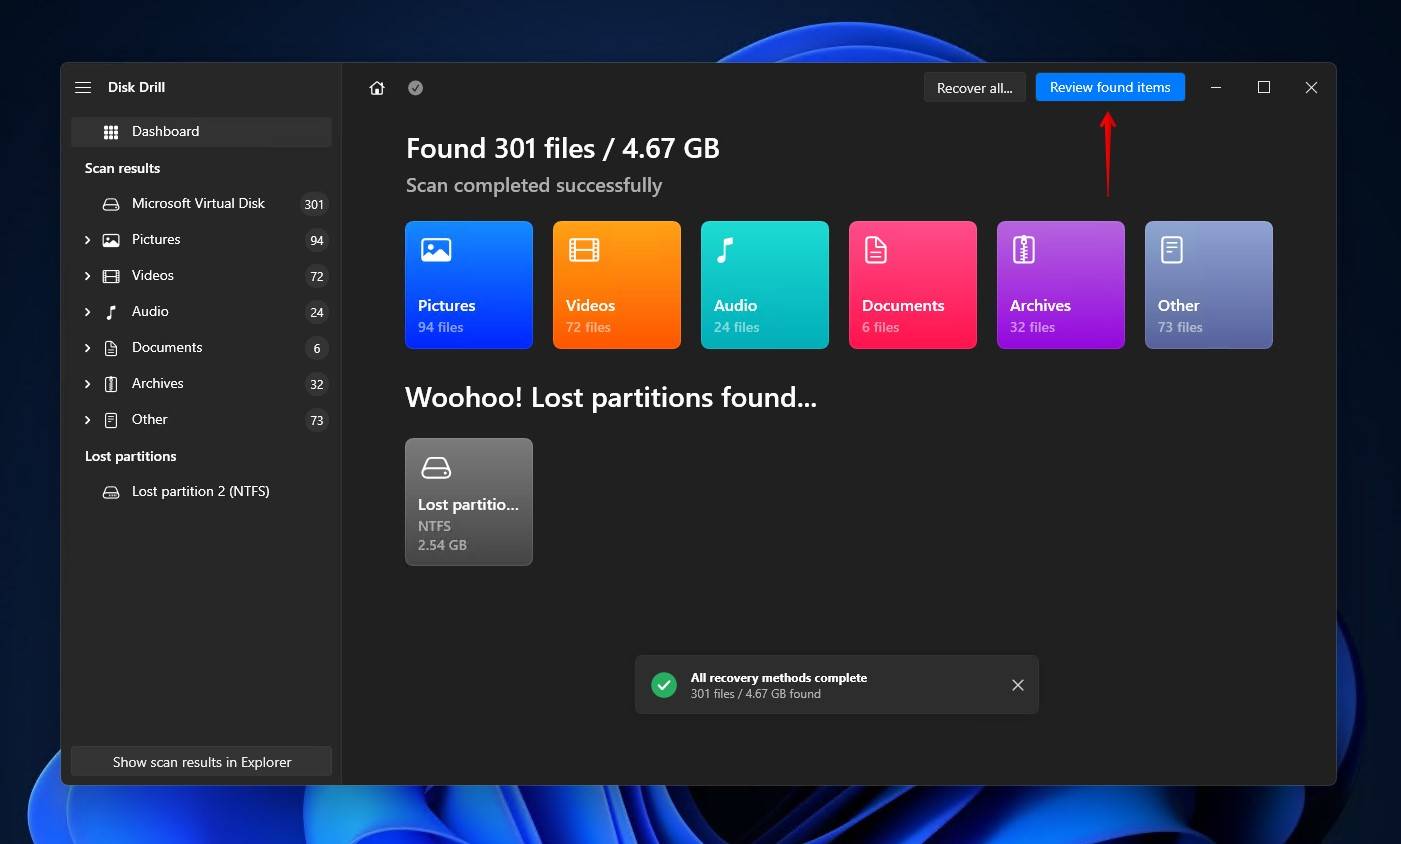
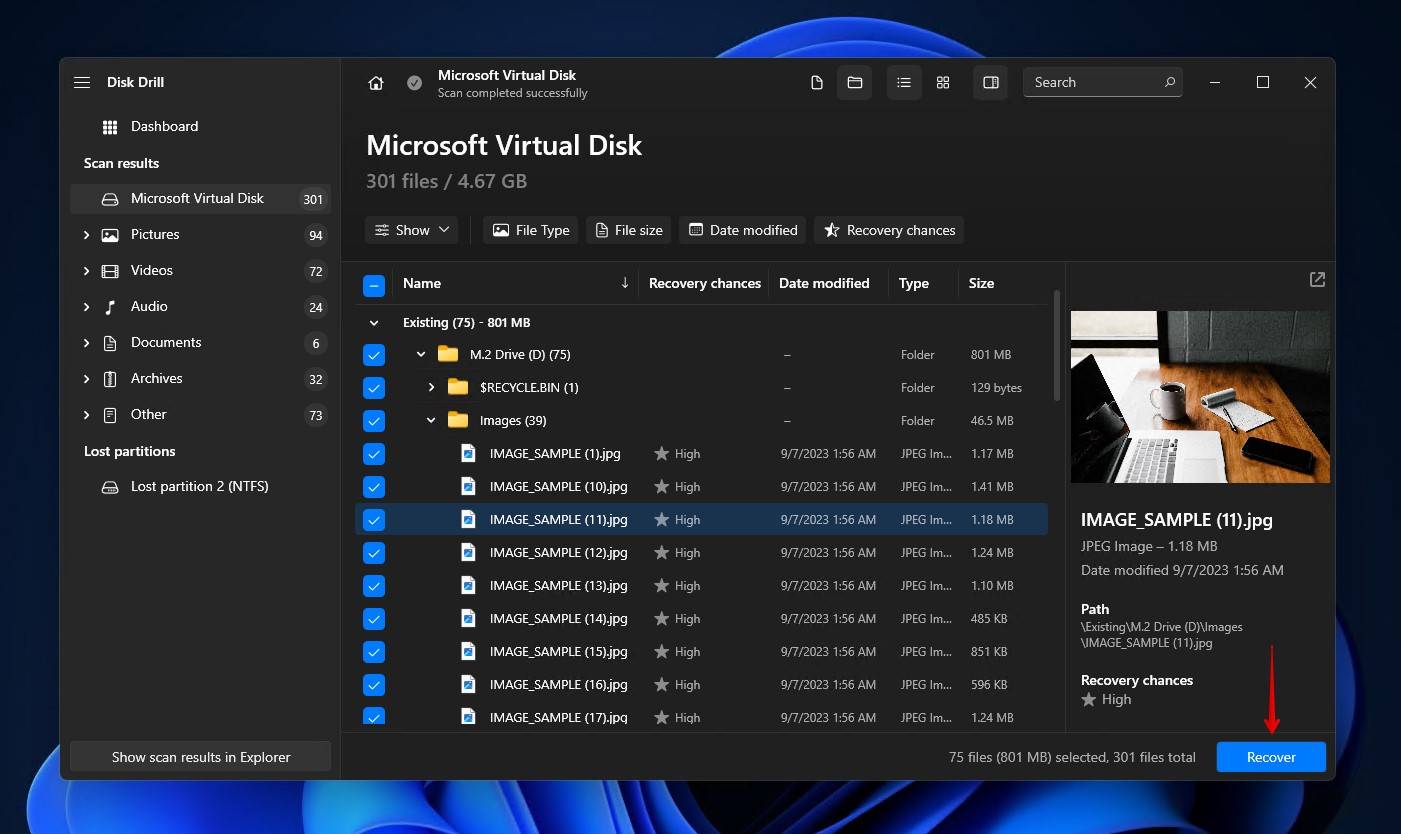
- Click Review found items once the scan is complete. You can also click Recover all if you want to recover everything instead.
- Select the files that you want to restore from the M.2 SSD. All existing data will be found in the Existing dropdown menu. Deleted items that have been recovered will be located under Deleted or lost and Reconstructed. Click Recover.
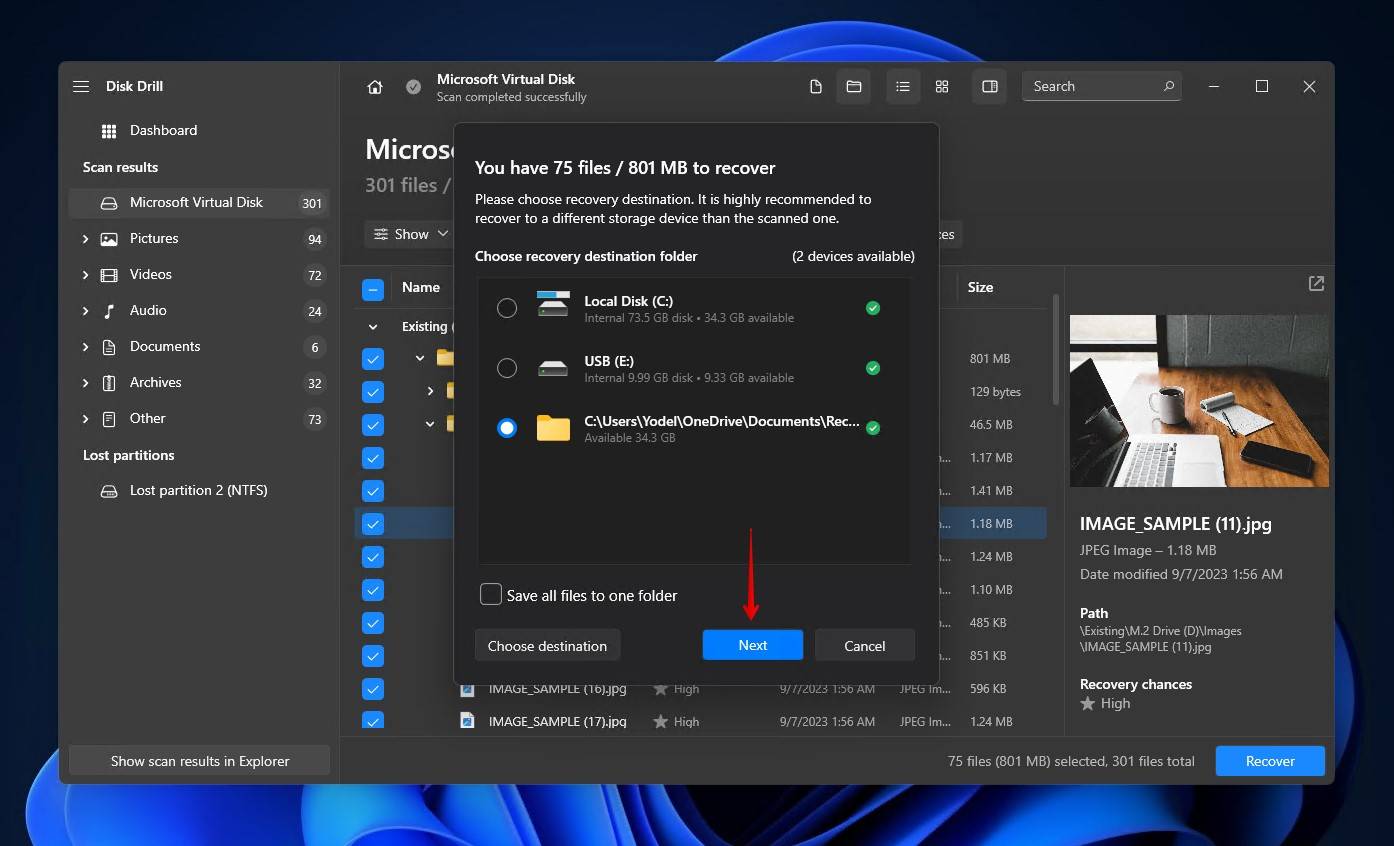
- Choose a recovery location on a separate storage device. Click Next.
Which Methods Are Unlikely to Fix the ‘M.2 SSD Not Showing Up’ Error?
The topic of an M.2 drive not showing up is widely covered on many parts of the web. The problem is that not every solution you find will be a viable option in fixing the issue. Below are some commonly recommended “solutions” that you’ll find. We’ve explained why they won’t be particularly useful in this case.
- Running CHKDSK – CHKDSK is a useful utility for troubleshooting, but only when it comes to file system-related issues. Seeing as it requires a drive letter, it’s not much use here. For example, if your M.2 drive is not showing up in BIOS, it’s not going to have a drive letter you can use to start a scan with CHKDSK, rendering it useless.
- Updating drivers – Updating your drivers is useful in many cases, but not this one. Your M.2 drive should be visible using standard, non-proprietary drivers. Therefore, there should be no drivers you need to install for the drive to become visible.
Although these solutions can be useful in troubleshooting specific issues, they are unlikely to help restore access to your M.2 drive, which is why we have decided not to include them in this article.
Conclusion
As frustrating as it is when an M.2 is not showing up in Disk Management, BIOS, or File Explorer, there are some possible solutions that can get it back up and running. When the M.2 SSD isn’t showing in Disk Management or BIOS, it could be an issue with the physical connection or BIOS configuration, in which case you can reconnect the SSD and review your BIOS settings. Otherwise, if the M.2 drive is displaying in Disk Management and BIOS but not File Explorer, it may be that you need to initialize the disk or assign a drive letter.
In cases of logical damage that has caused the M.2 SSD to vanish, you can use SSD data recovery software to restore your data before troubleshooting the SSD further. Otherwise, in the case of physical damage, you should seek the advice of a data recovery specialist, as attempting recovery on your own can worsen the problem and lead to irreversible data loss.
This article was written by Jordan Jamieson-Mane, a Staff Writer at Handy Recovery Advisor. It was also verified for technical accuracy by Andrey Vasilyev, our editorial advisor.
Curious about our content creation process? Take a look at our Editor Guidelines.