
When you plug in your hard disk, you don’t see any action in the system tray. The computer doesn’t know you plugged in a drive. Frustrated, you remove the disk and reinsert it — no luck. You’re confused, but we’ve got solutions. The first order of business? Learn how to recover data from an external hard disk which is not detecting.
Directly jumping to fixing the hard drive might lead to losing your data altogether in case you end up damaging the drive further. Once you’ve recovered the data, you can try fixing the hard drive using the methods we’ve explained in this guide.
Possible Causes of External Hard Drive Not Being Detected
Determining the cause for your HDD not showing up can help you fix the problem faster. Here are the possible causes you should consider:
Cause |
Explanation |
🔌 Improper connection |
Your computer won’t recognize the hard drive if the connecting cable is damaged, or you’ve connected it using a USB port that’s not working. The drive not recognized problem might also occur when you’ve connected a USB 3.0 drive to a USB 2.0 port because of the mismatch in power requirements. |
❌ Faulty hard drive |
The hard drive may have logical errors, or it may have suffered physical damage, leading to the hard disk not showing up. |
📁 Unsupported or corrupted file system |
Windows can’t recognize file systems like HFS+ or APFS. Sometimes, your hard disk might be RAW (which means it doesn’t have any filesystem), which also prevents Windows from recognizing the drive. Another potential cause could be file system corruption. This happens when even though the filesystem is supported by Windows, it can’t be recognized because of inconsistent internal structures. |
⚠️ Corrupted or outdated system drivers or OS |
A driver is a software solution that allows the operating system (OS) to communicate with a hardware device. Your computer uses system drivers to communicate with devices like a hard drive, and when this driver is outdated or corrupted, Windows won’t be able to recognize the hard drive. A similar problem can occur if your OS needs to be updated. For example, if you’re still using Windows XP, your PC won’t recognize hard drives with up to 2TB of storage. |
How to Recover External Hard Disk Data When It Is Not Detected: A Step-by-Step Guide
The first step you should take when your computer doesn’t recognize a hard disk is to recover data from the undetected hard drive. Now, this might seem tricky given you don’t have access to the hard disk data, but that’s where Disk Drill can help.
Note: Disk Drill can recover data from a hard drive that doesn’t show up in File Explorer but does show up in the Disk Management console with the correct size.
Disk Drill is one of the best data recovery solution on the market with various built-in functionalities that allow you to quickly recover files from all types of hard drives, including SSDs, portable drives, flash drives, and all external drives that are not detected.
Read our Disk Drill review to learn more about Disk Drill, and don’t miss our dedicated safety analysis of this tool.
Here’s the four-step process to recover data from a hard disk that’s not detected using Disk Drill:
Step 1: Install Disk Drill
Start by downloading Disk Drill and installing it on your computer. The free version allows recovering up to 500 MB of data.
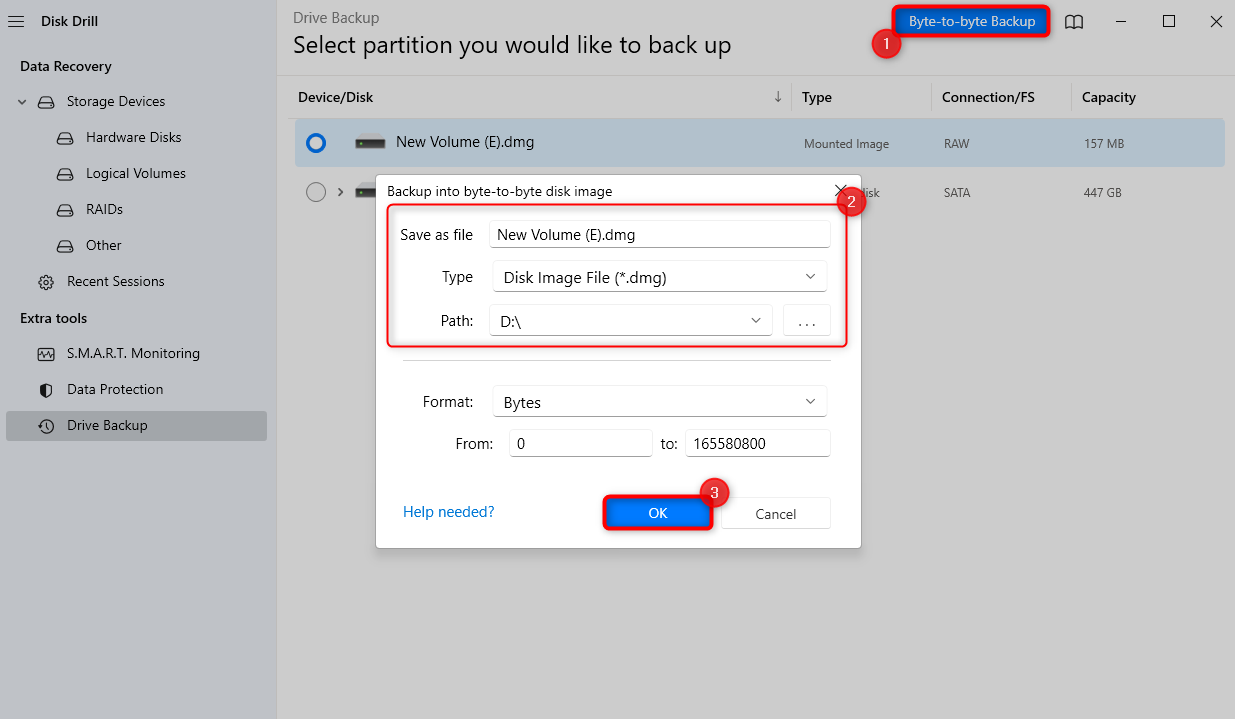
Step 2: Create a Byte-to-Byte Back of the Drive That Windows Isn’t Detecting
Physical damage can be a potential cause leading to the external drive not being recognized. In such cases, it’s best to not put the drive through any intense activity like scanning.
Instead, you should create a virtual image of the drive and scan the image to recover your files using Disk Drill.
Launch Disk Drill after it’s installed and switch to the Data Backup section using the left sidebar.
You’ll notice that even though Windows doesn’t recognize your external hard drive, Disk Drill does in most cases.
Select the external hard drive that Windows isn’t detecting from the home screen in Disk Drill and click on the Byte-to-Byte backup option at the top right.
Name the image file, select the path where you want to save it and click OK.
Step 3: Scan the Backup Image
Switch to the Storage Devices section using the left sidebar. Click on the Attach disk image from the bottom of the app screen. Navigate to the location where you saved the image file in the previous step and select it.
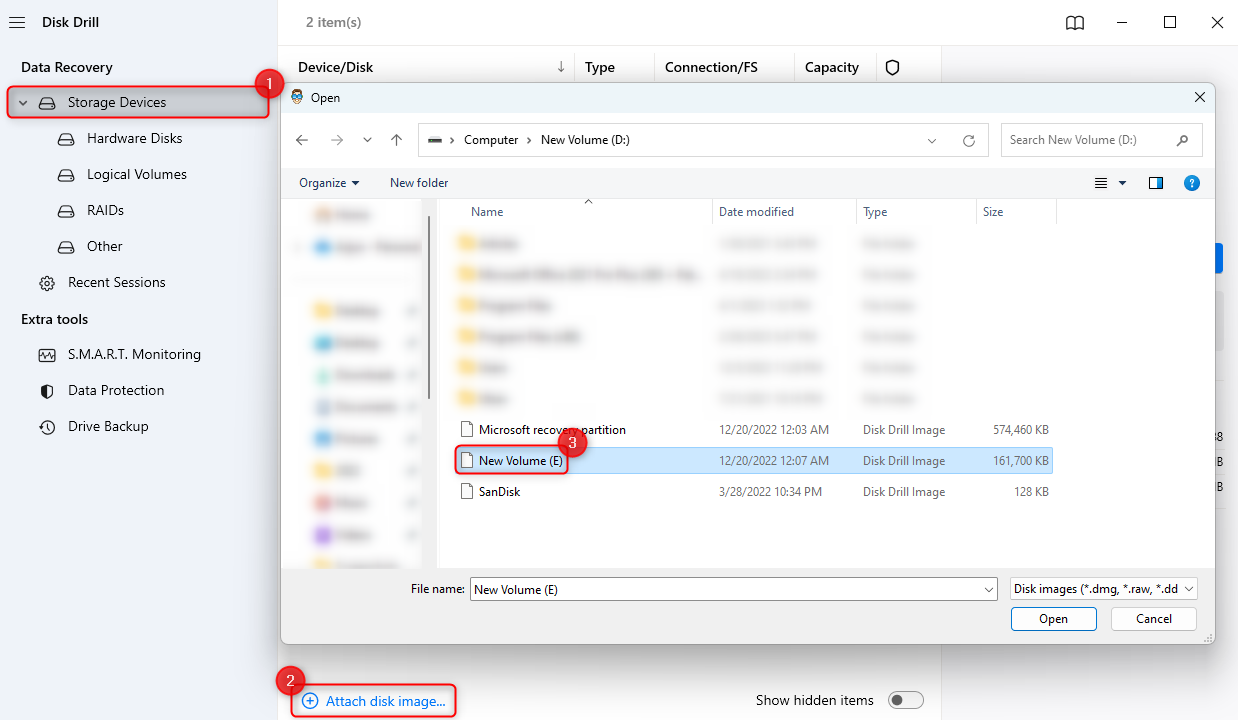
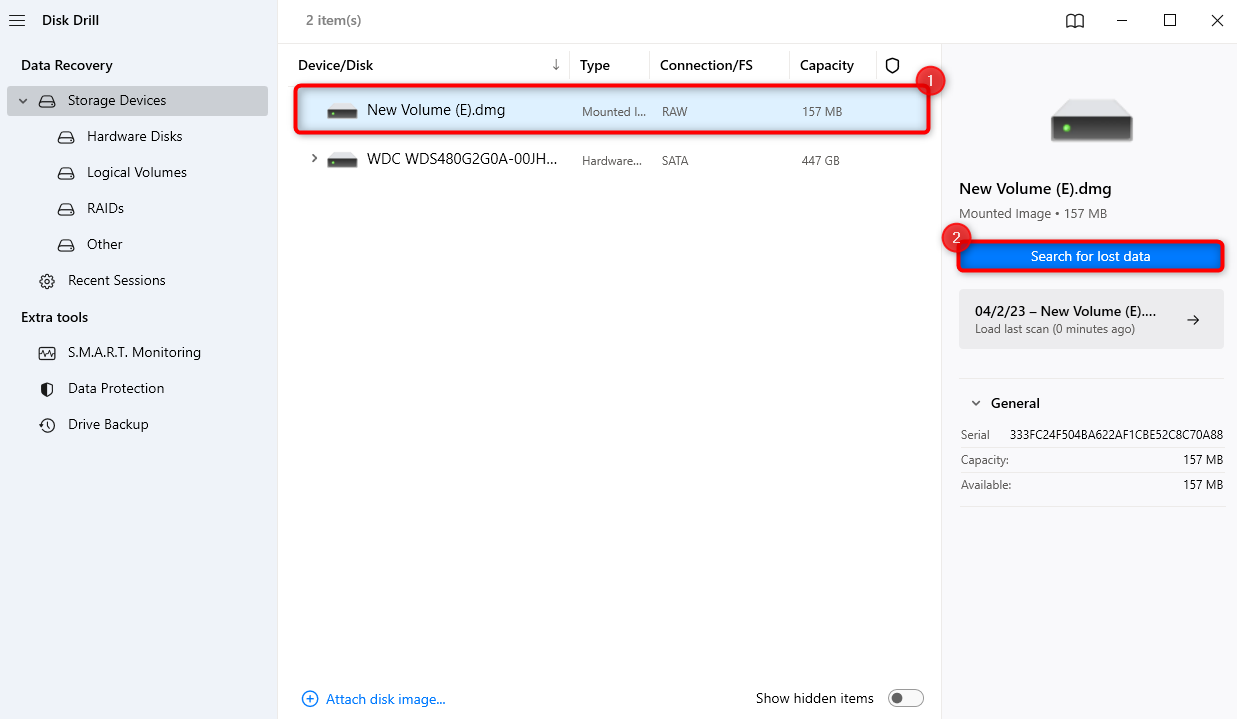
You should see the image listed as a disk now. Select it and click the Search for lost data button to start the scan.
Step 4: Recover the Files
Once the scan completes, you’ll see the scan results. Select all files by clicking the checkbox at the top to the left of the Name label. Note that this includes all files present on the physical disk, including previously deleted files. To recover files that were present on the disk before the problem occurred, select the files in the Existing category.
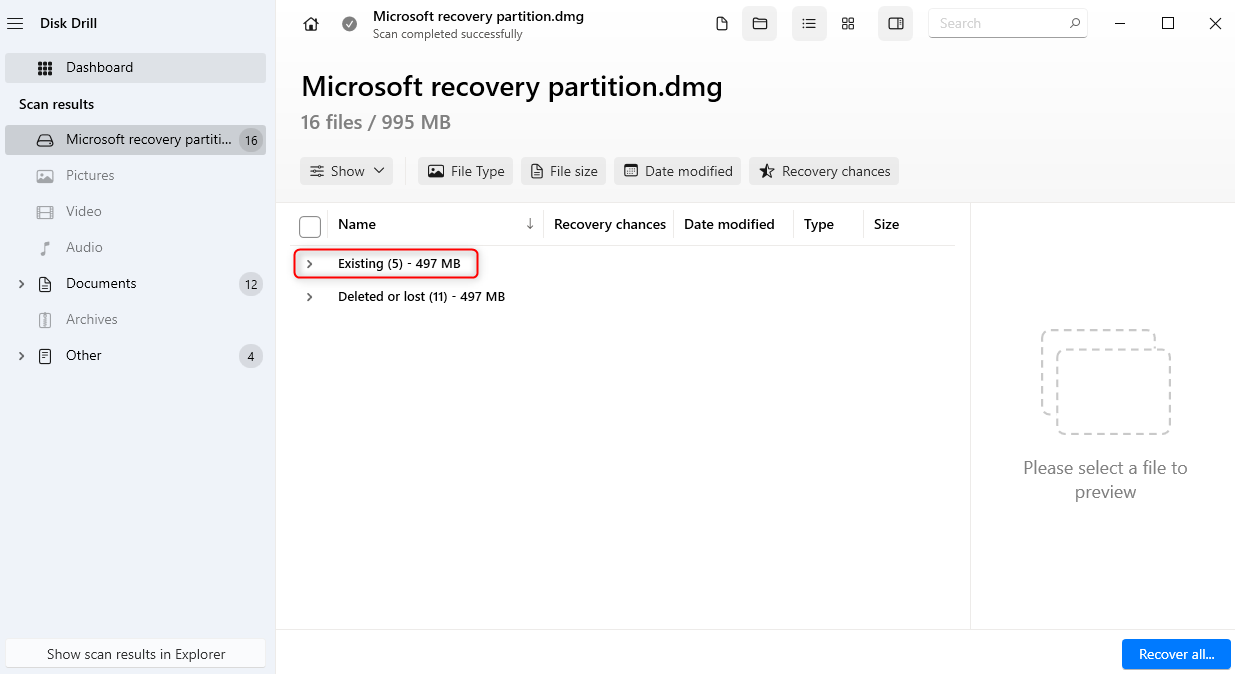
Once you’ve found the files you want to recover, select them by checking the box to the file’s left. After selecting the files, click the Recover button and select a location to save the recovered files.
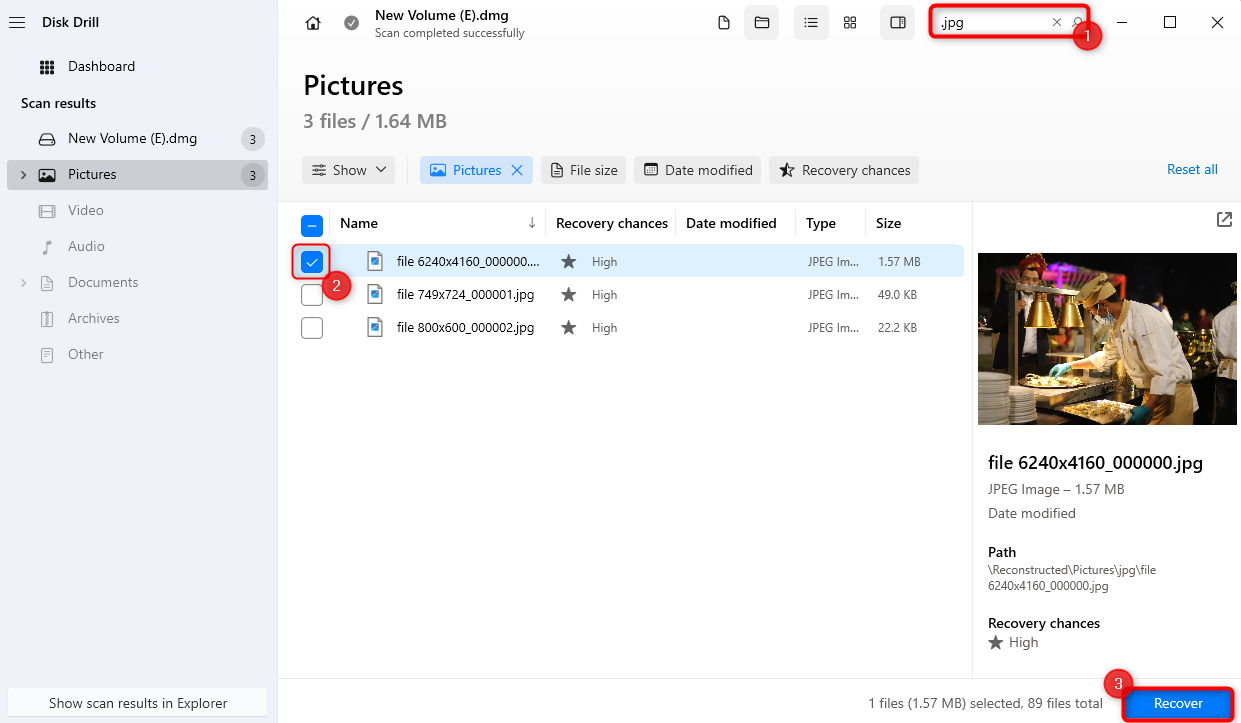
Select the location where you want to save the files and click Next.
Note: Save the files to a location not on the external hard drive to avoid overwriting the data, which can lead to permanent data loss.
Troubleshooting Tips for Recovering an External Hard Drive that is Not Being Detected
Once you recover data from the external hard drive, you can start trying to repair the drive that’s now showing up. Below are the solutions you might consider trying based on the cause. If you don’t know the cause, just try them in the sequence they’re listed.
Method 1: Ensure Your External Hard Drive is Connected and Functioning
Start by checking the external hard drive’s cables and the computer’s ports. Are they both functioning properly? You can try another hard drive or use a different port to confirm if they’re functioning properly. If a cable is damaged, you’ll need to replace it.
If the cable and ports are working, check the external hard drive’s power requirements. USB 3.0 requires more power than USB 2.0, so a USB 3.0 hard drive won’t work when plugged into a USB 2.0 port.
Method 2: Test Your External Drive on Another Computer
Try connecting the external hard drive to another computer to make sure the problem isn’t with the current computer. For example, all ports on an old computer might be USB 2.0 ports. Connecting the drive with a USB 3.0 port on a new computer can help zero in on the problem.
Method 3: Reassign External Hard Drive Letter
Reassigning a drive letter is a simple fix that can often solve the issue within seconds.
- To reassign an external drive’s letter, launch the Disk Management console by searching for “diskmgmt.msc” in the Start Menu and pressing Enter.
- Find the external disk that isn’t detected in the File Explorer. Right-click on the drive and select Change Drive Letter and Paths.
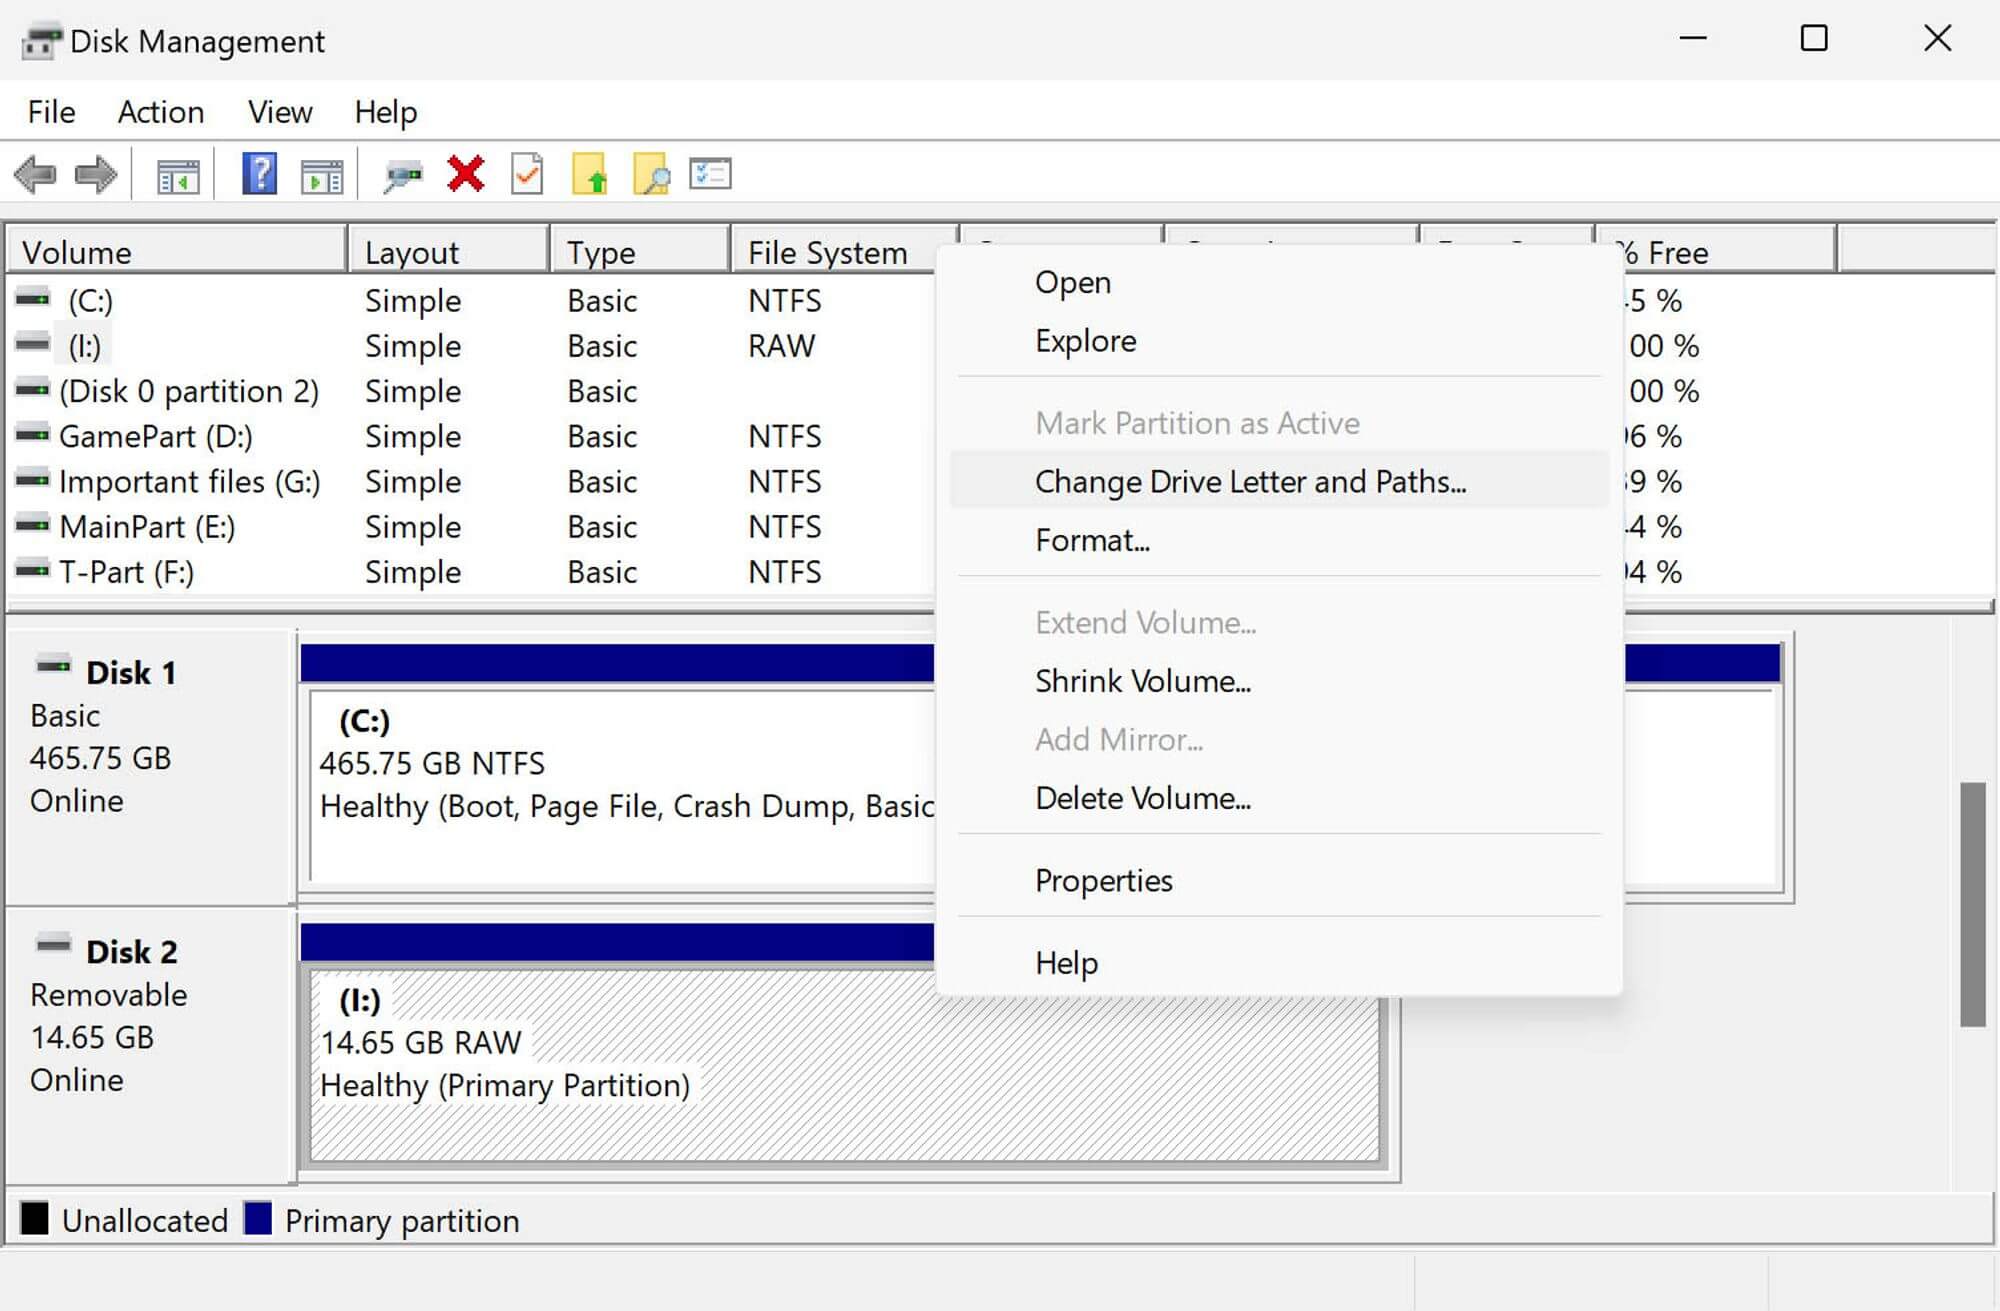 Note: If the Change Drive Letter and Paths option is unavailable or grayed out, the reason could be that the drive is not ready to receive a drive letter, or the disk needs to be initialized first.
 - Select Change or Add if the drive doesn’t already have a letter assigned.
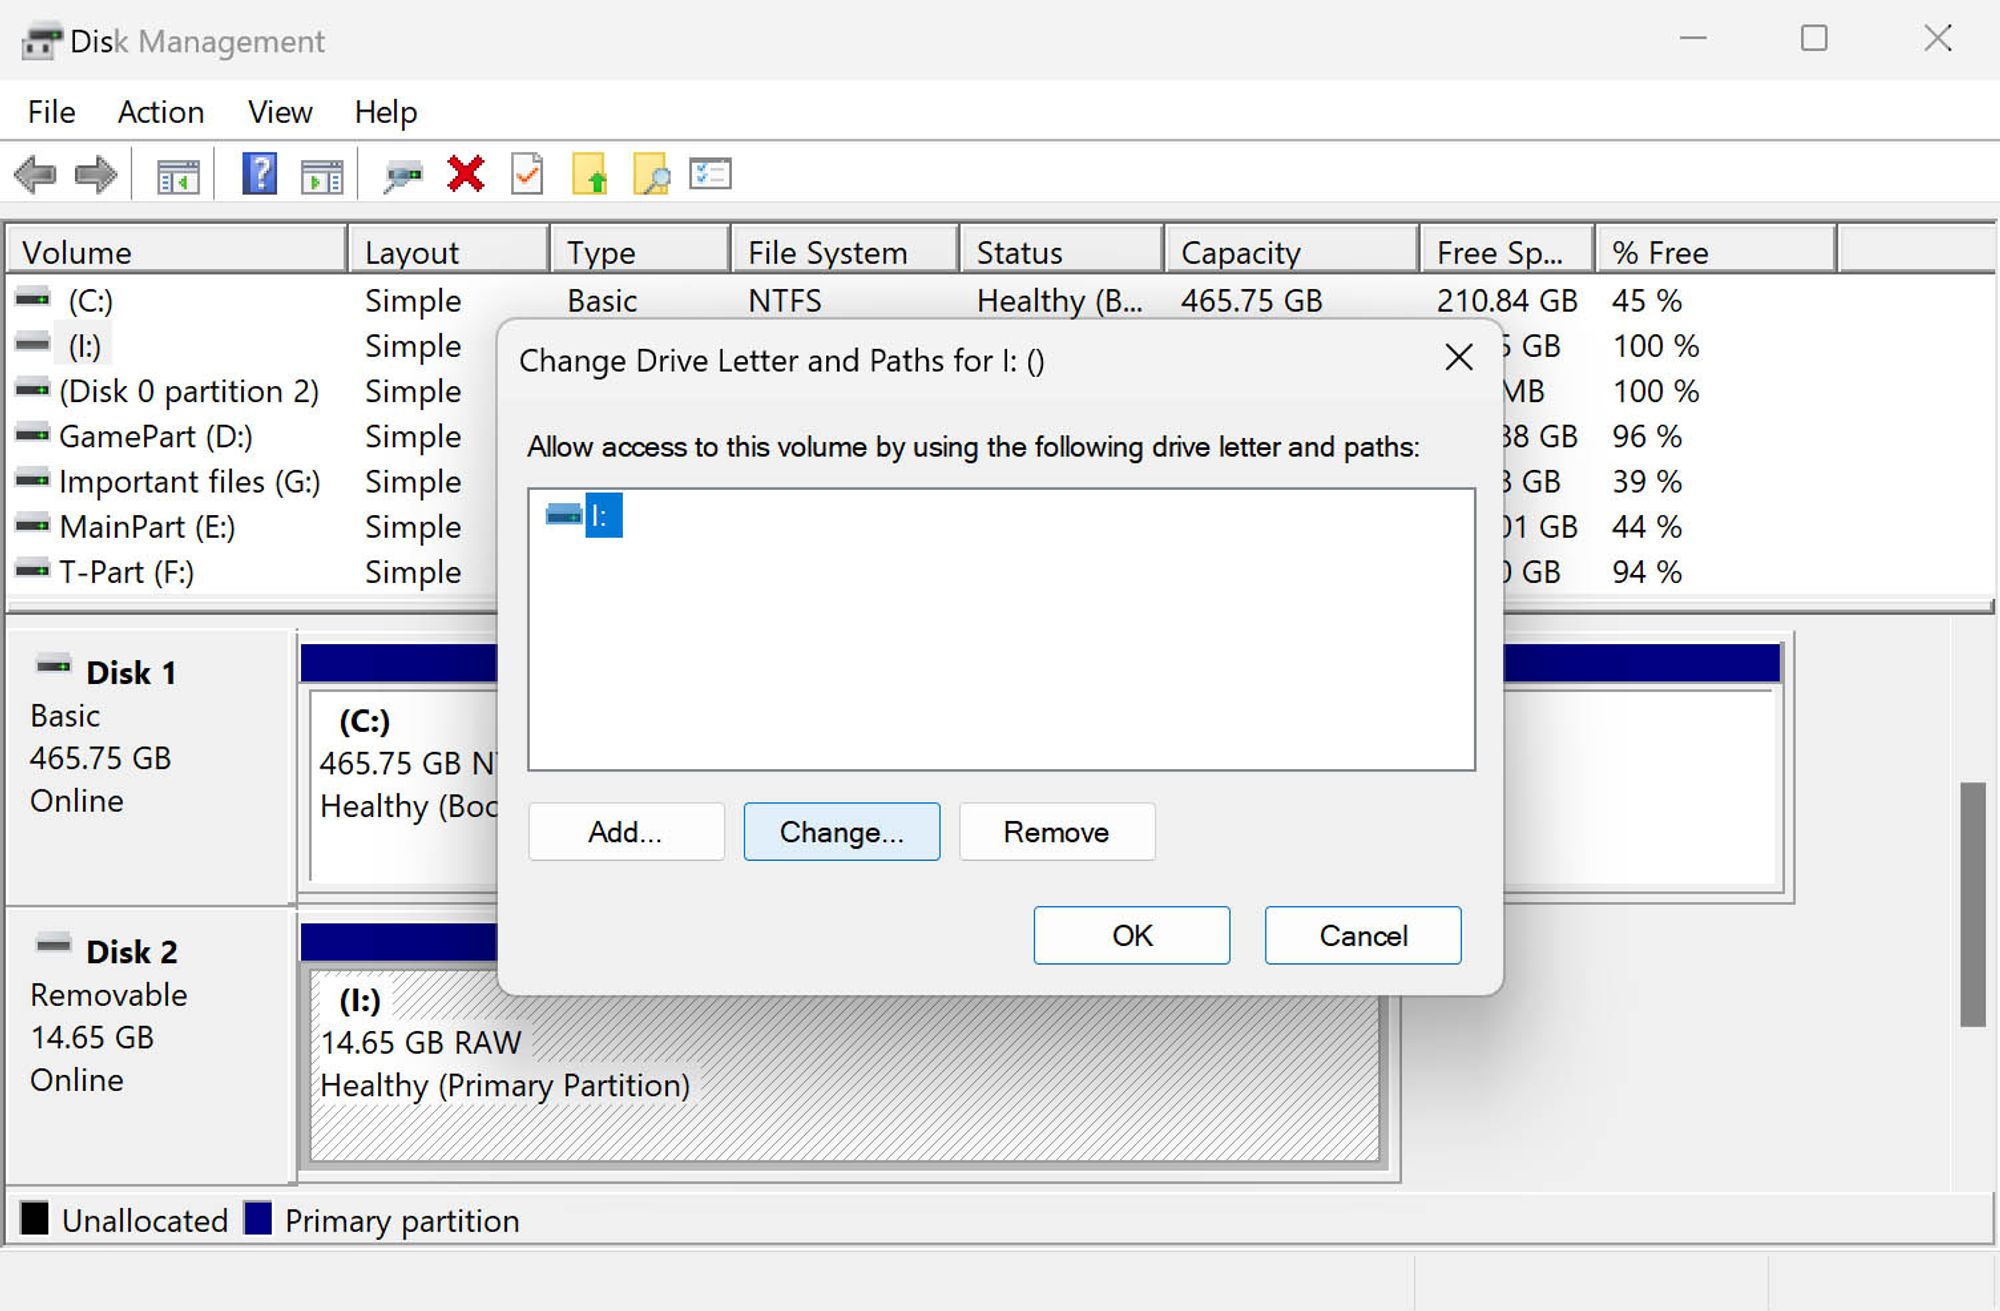
- Select another drive letter from the drop-down menu next to the option called Assign the following drive letter.
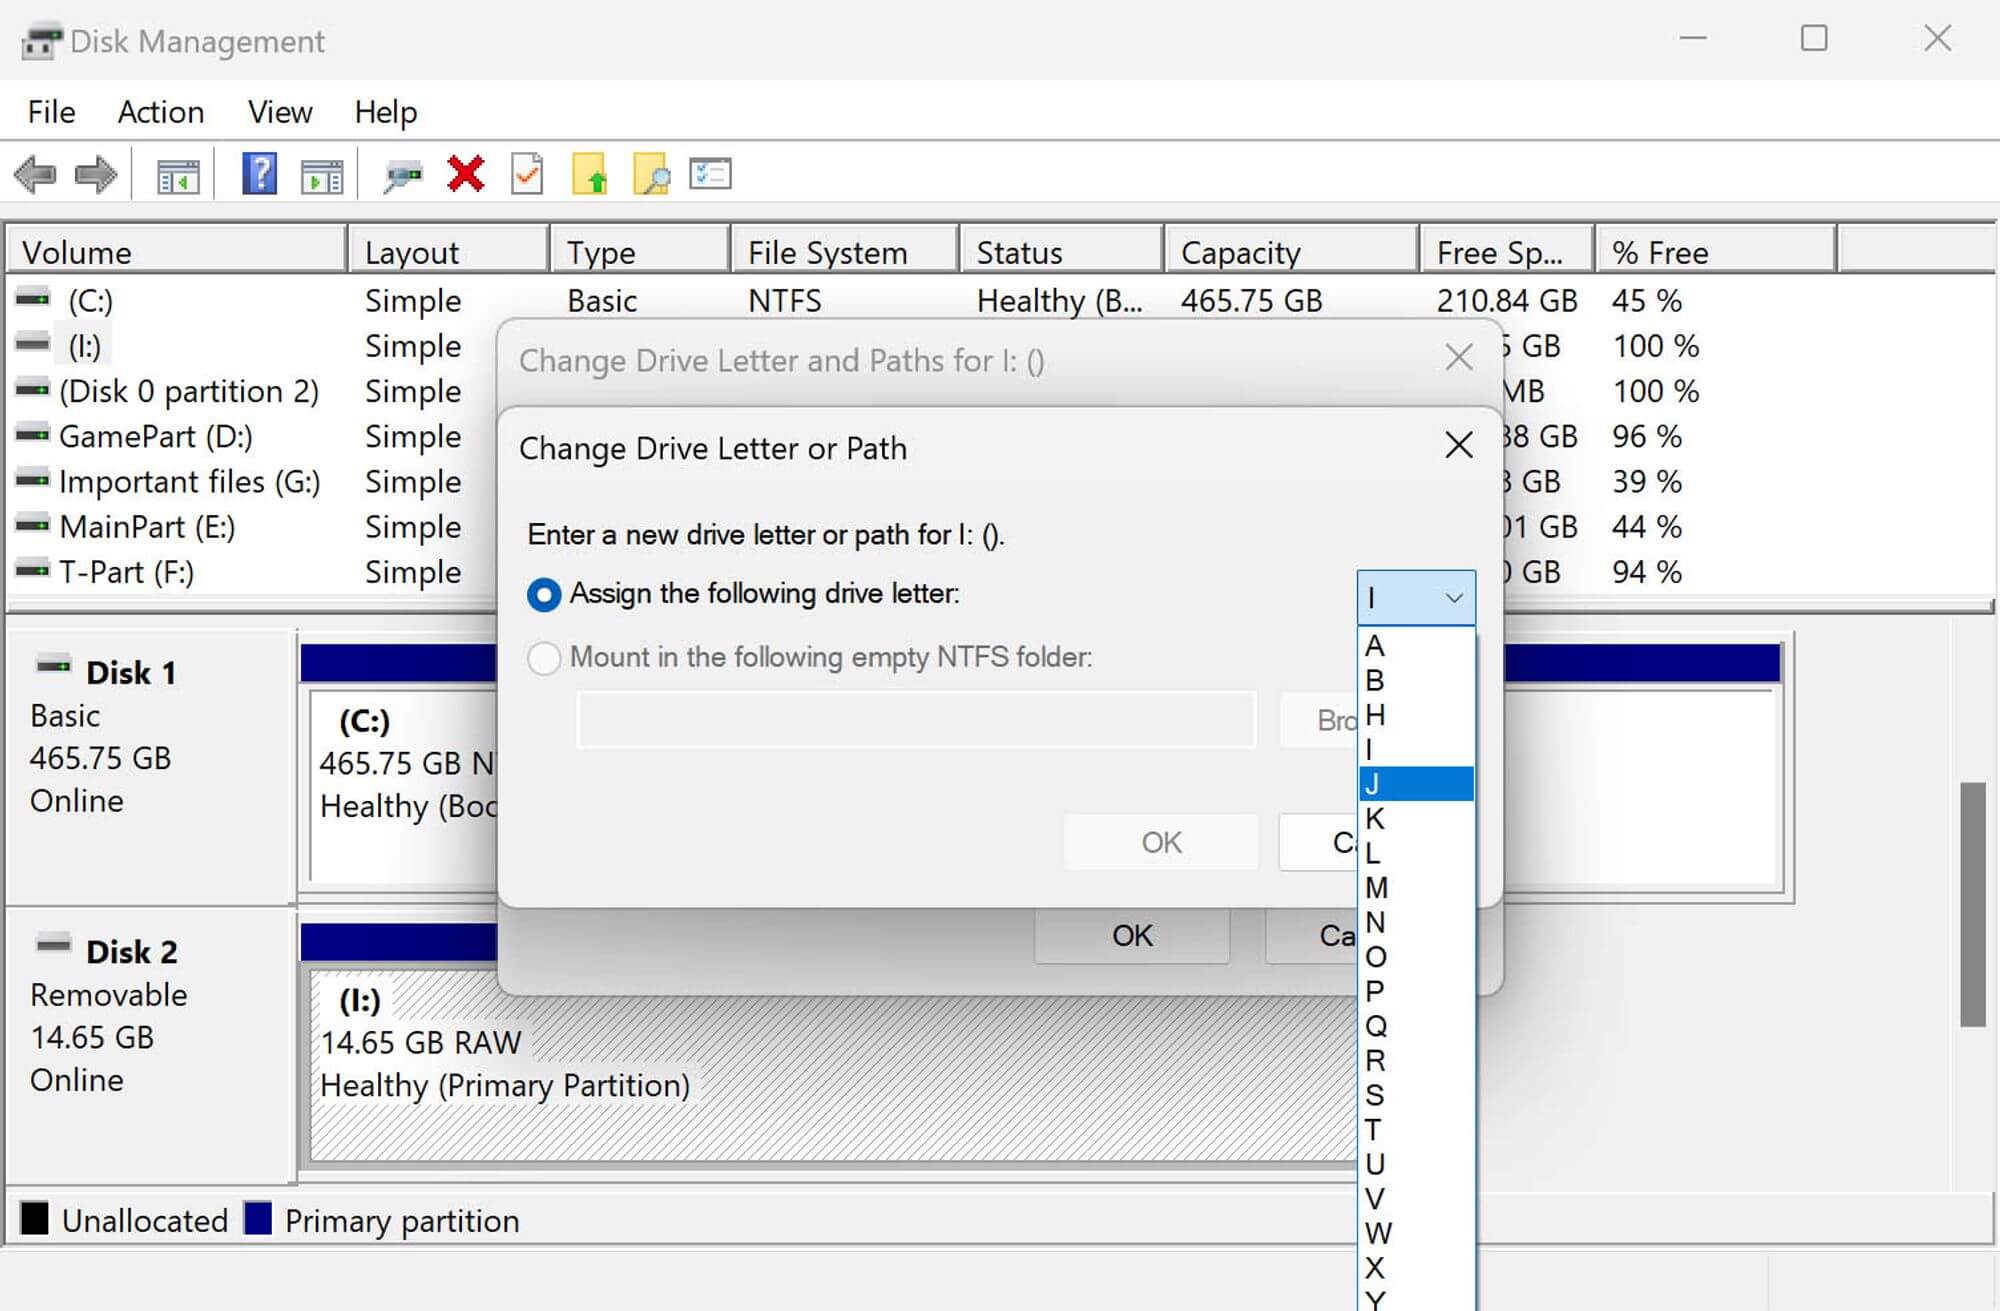
- Click Yes when you see a confirmation prompt.
Method 4: Update System Drivers and OS
Outdated or corrupt drivers can prevent the PC from recognizing the hard drive. Fortunately, Windows automatically installs the best drivers for an external hard drive when you insert it. This is true for almost any major brand you can think of, including Seagate, WD My Passport, LaCie, and Toshiba. However, in some cases, you might need to update drivers yourself.
Updating system drivers is pretty straightforward:
- Search for “updates” in the Start Menu and select the Best Match option called Check for Updates.
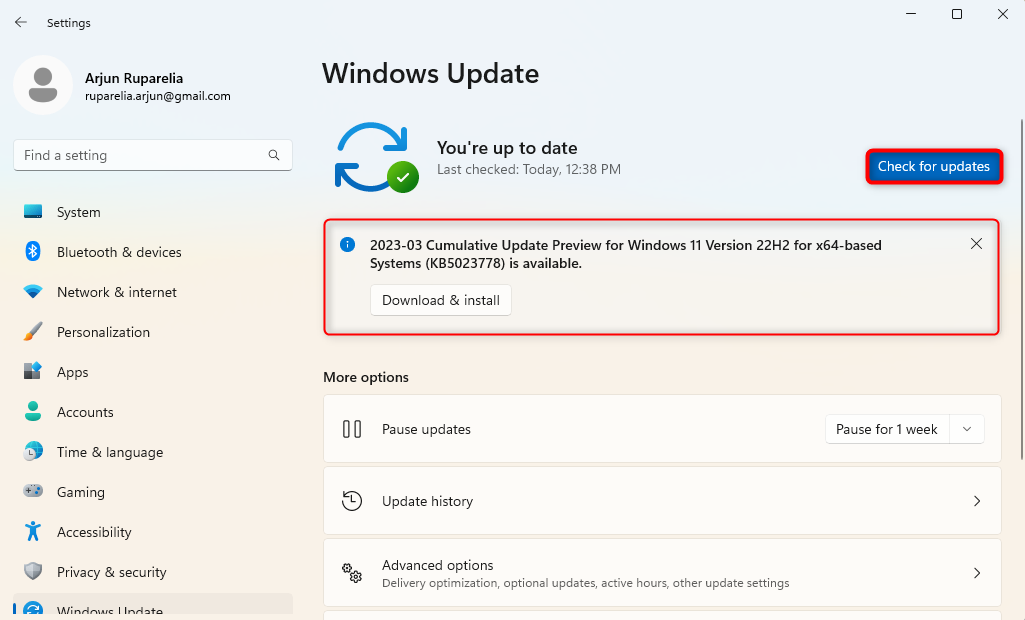
- In most cases, Windows will auto-detect updates and encourage you to install them. If you don’t see any updates, try clicking on the Check for Updates button and installing the updates Windows finds.
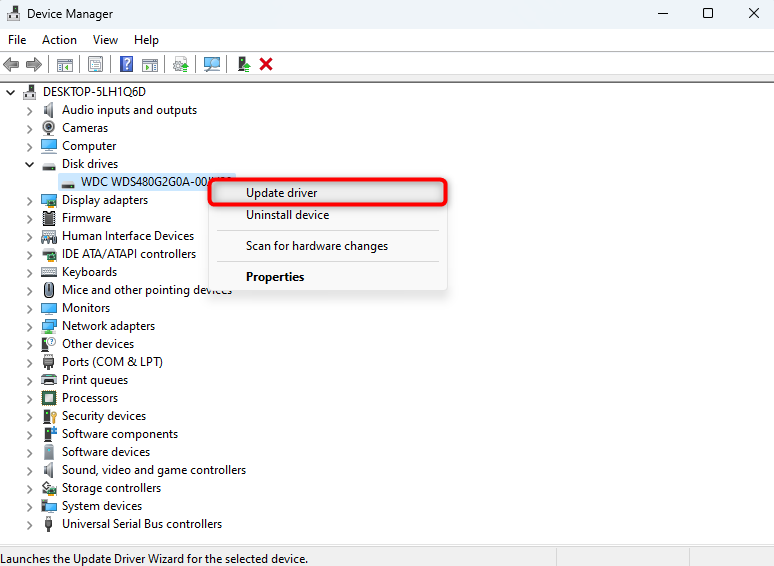
Another way to update specific drivers is through the Device Manager:
- Search for the device manager in the Start Menu and press Enter.
- Find the external drive in the list of devices. Right-click on it and select Update driver.
In some cases, you might need to upgrade your operating system. Windows XP might not recognize newer hard drives, and to resolve the issue, consider upgrading to Windows 10 or 11.
Method 5: Initialize Your External Hard Drive When It Won’t Show Up
When a hard drive doesn’t have a valid disk signature, it appears as uninitialized. Reasons could include various things like corruption or hardware problems.
Initializing a disk is easy. Remember, though, that initializing a disk erases all the data on the disk. Once you initialize a disk, you’ll need to format it and then store files on it.
Here’s the process:
- Search for “diskmgmt.msc” in the Start Menu and press Enter.
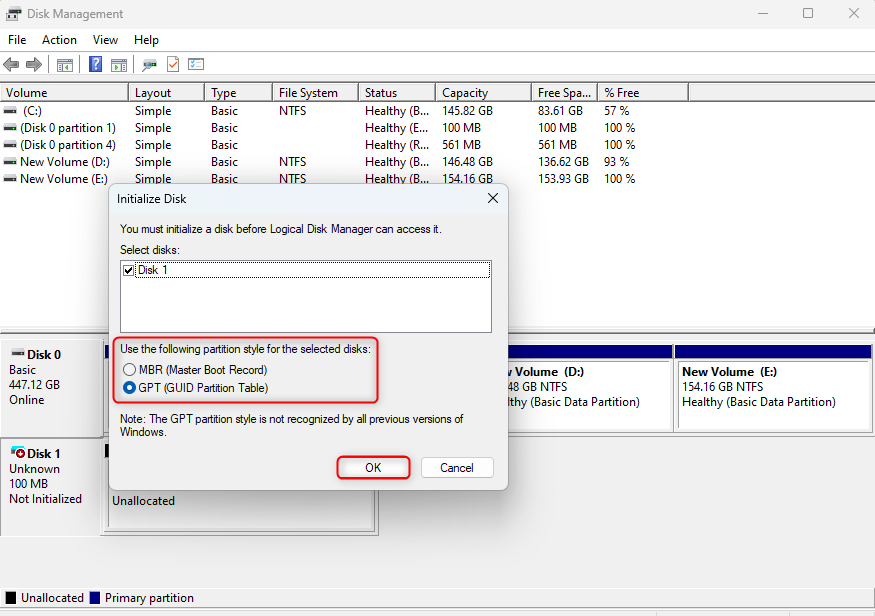
- When the Disk Management console launches, you’ll see a prompt telling you there’s an uninitialized disk and you should initialize it. If you don’t, right-click on the uninitialized disk and select Initialize disk.
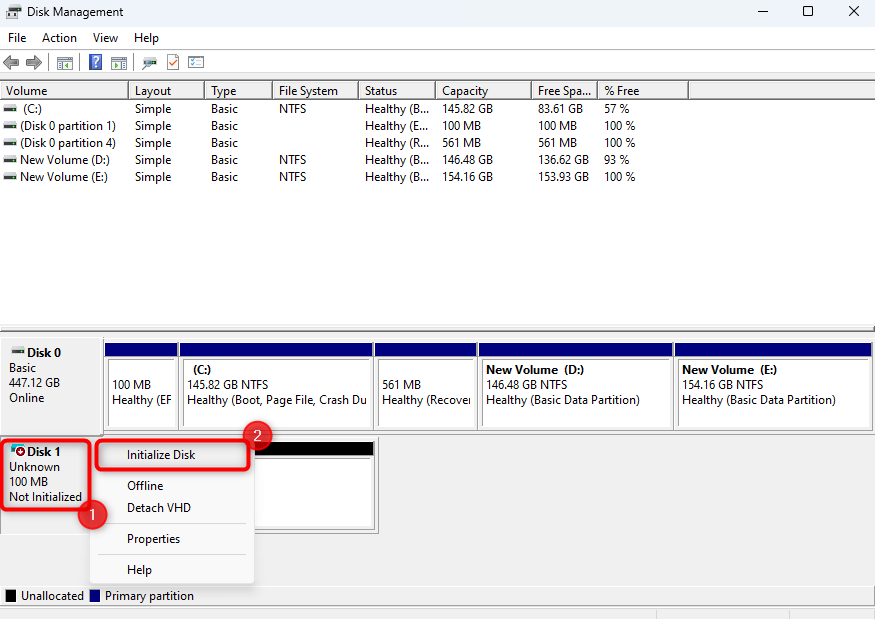
- Leave the partition style that’s selected by default. Click OK to initialize.
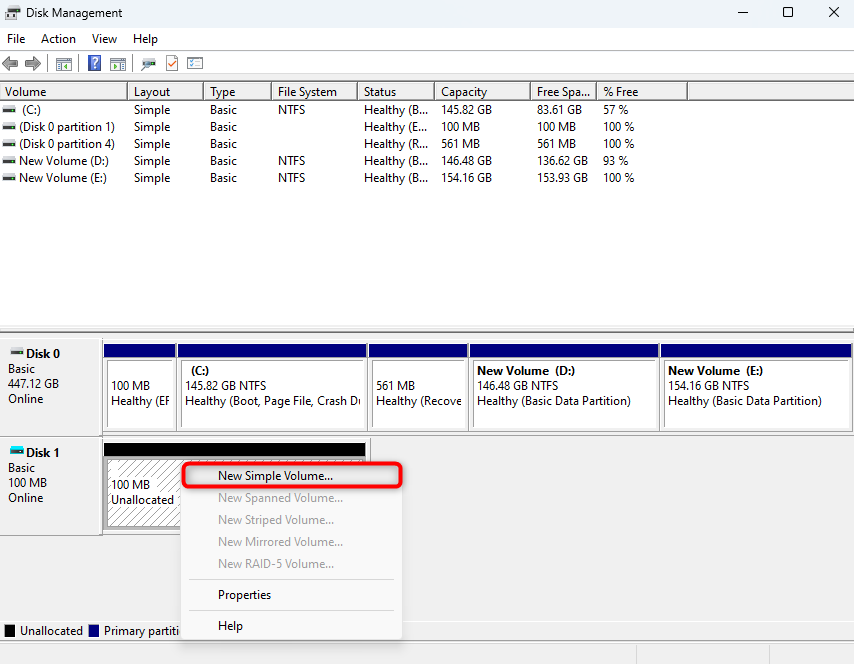
- You’ll see the disk space categorized as Unallocated after it’s initialized. You need to create a new volume to allocate this disk space. Right-click on the unallocated disk space and select New Simple Volume.
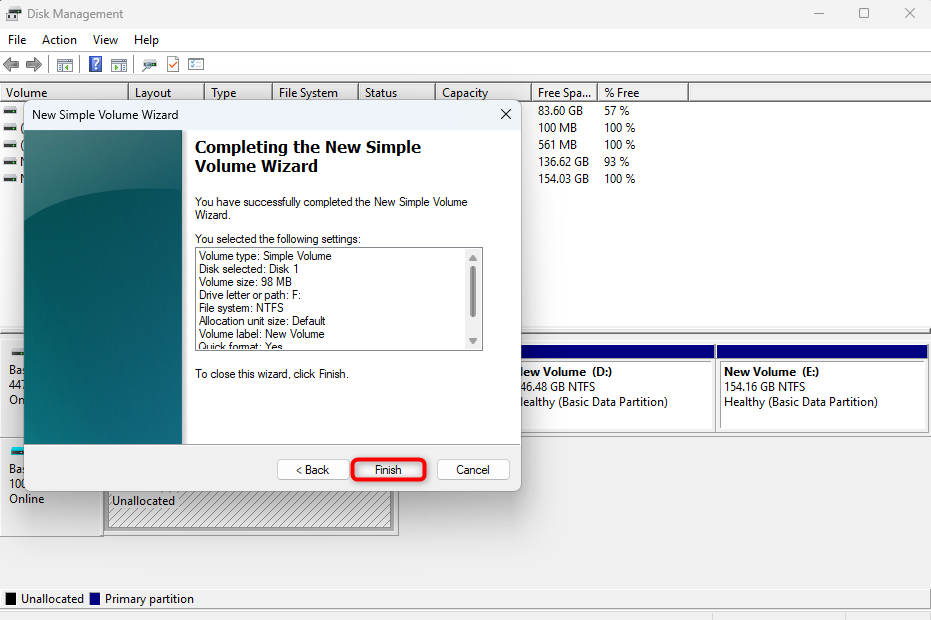
- Follow the wizard’s prompt for creating a new volume. During the wizard, you’ll need to select volume size, assign a drive letter, and format the drive to a compatible file system like NTFS, FAT32, or exFAT. Also, make sure the Perform a quick format option is enabled in this step. Click Finish to format and create the new volume.
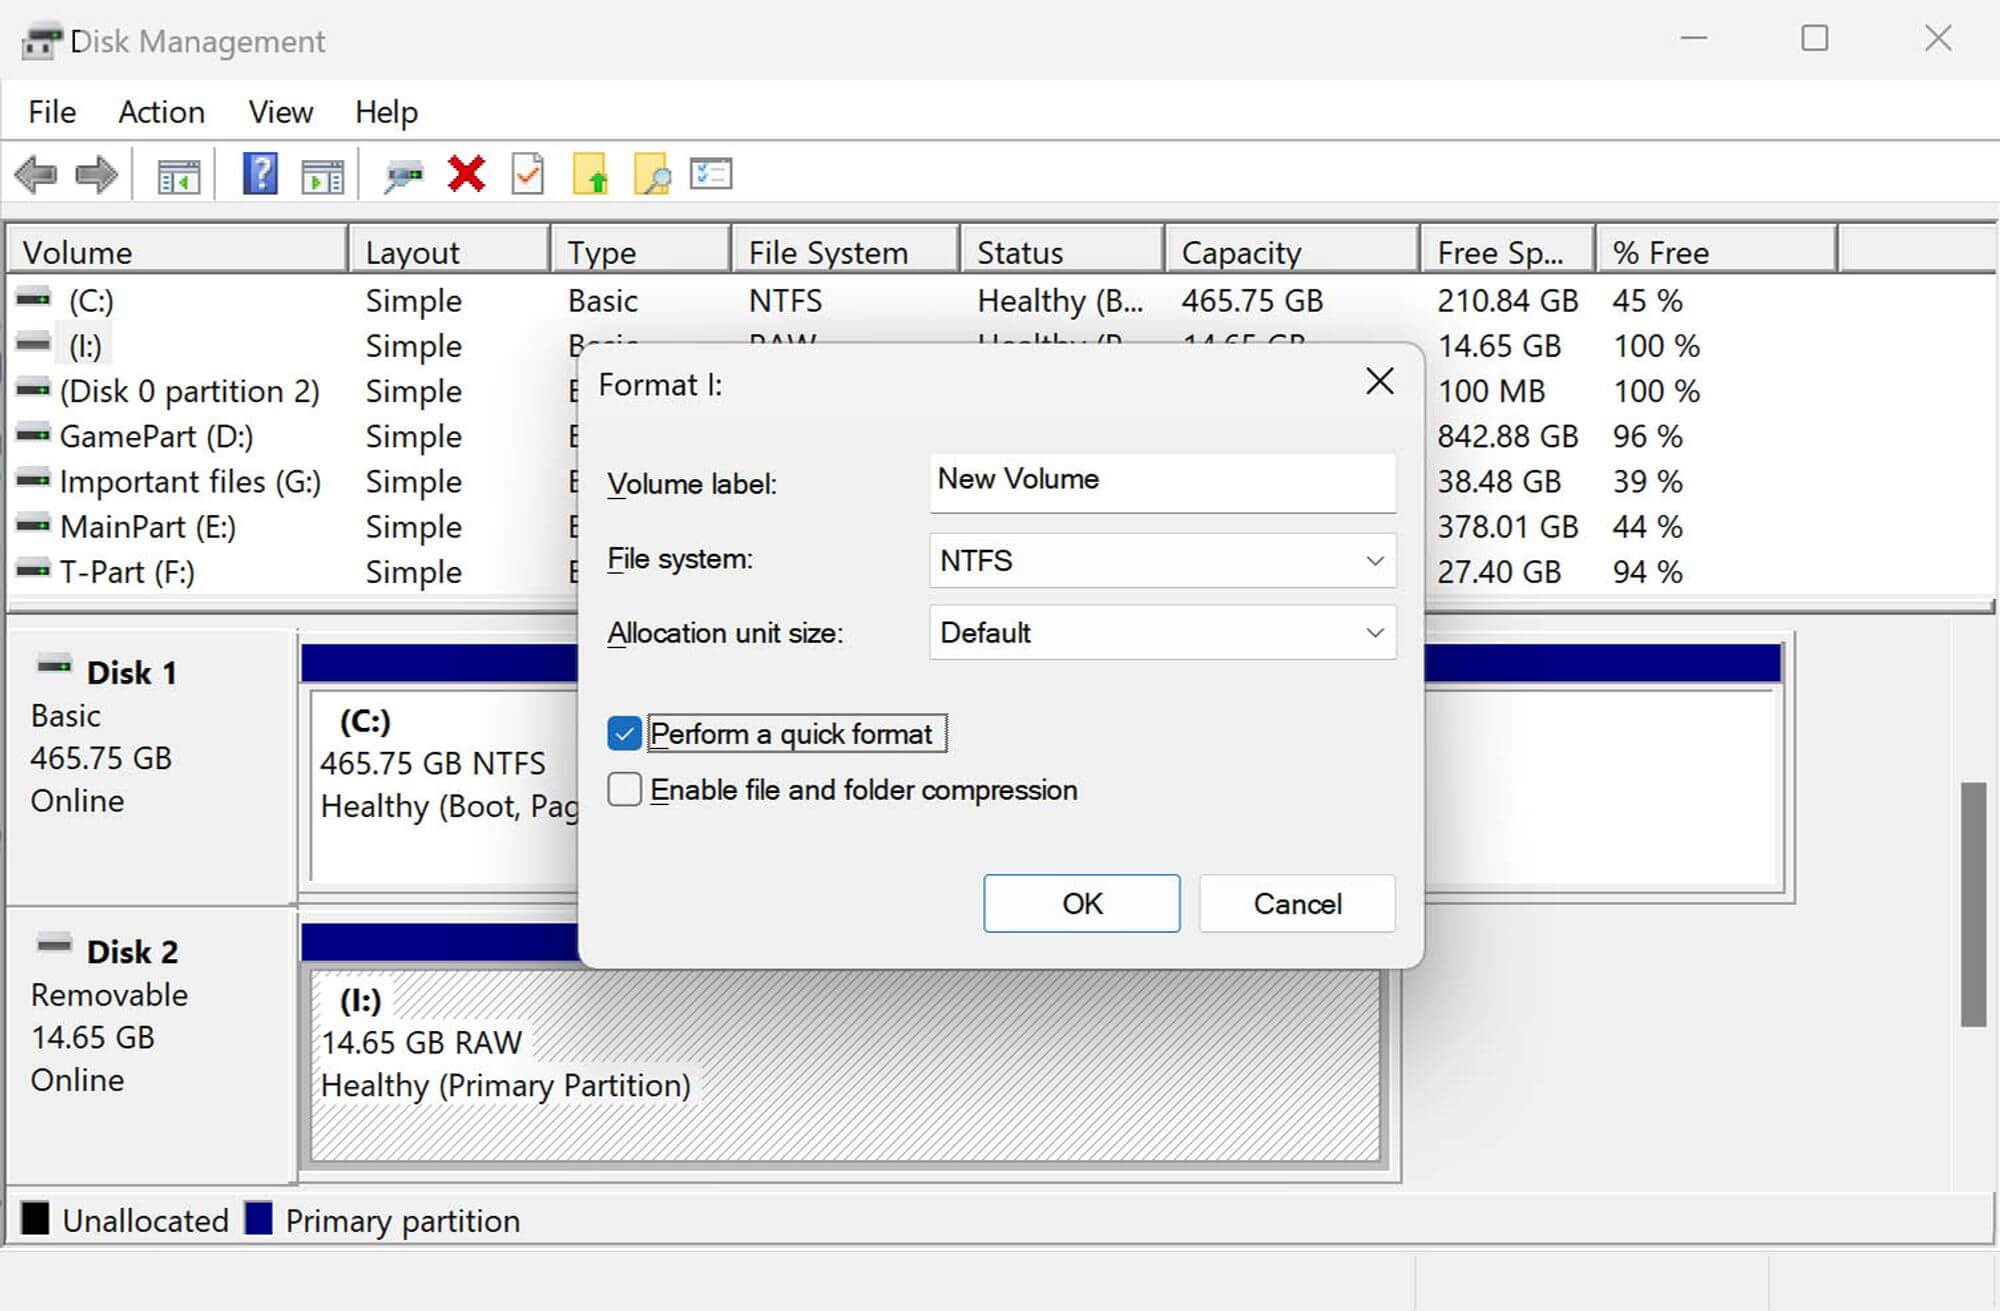
Method 6: Format Your External Drive
Your external hard drive may have a filesystem that Windows doesn’t support. If your hard drive works on a Mac, for example, the hard drive might be formatted as HFS+ or APFS. Alternatively, the filesystem may have become corrupt. Corruption can occur because of various reasons, such as abrupt removal during the previous formatting process. Formatting the hard drive can fix the issue.
Pro tip: Did you know you can format a hard drive without losing data? However, it’s still best to attempt data recovery before formatting whenever possible.
Here’s the process for formatting:
- Search for diskmgmt.msc in the Start Menu and press Enter to launch the Disk Management console.
- Right-click on the drive that your computer isn’t detecting and select Format.
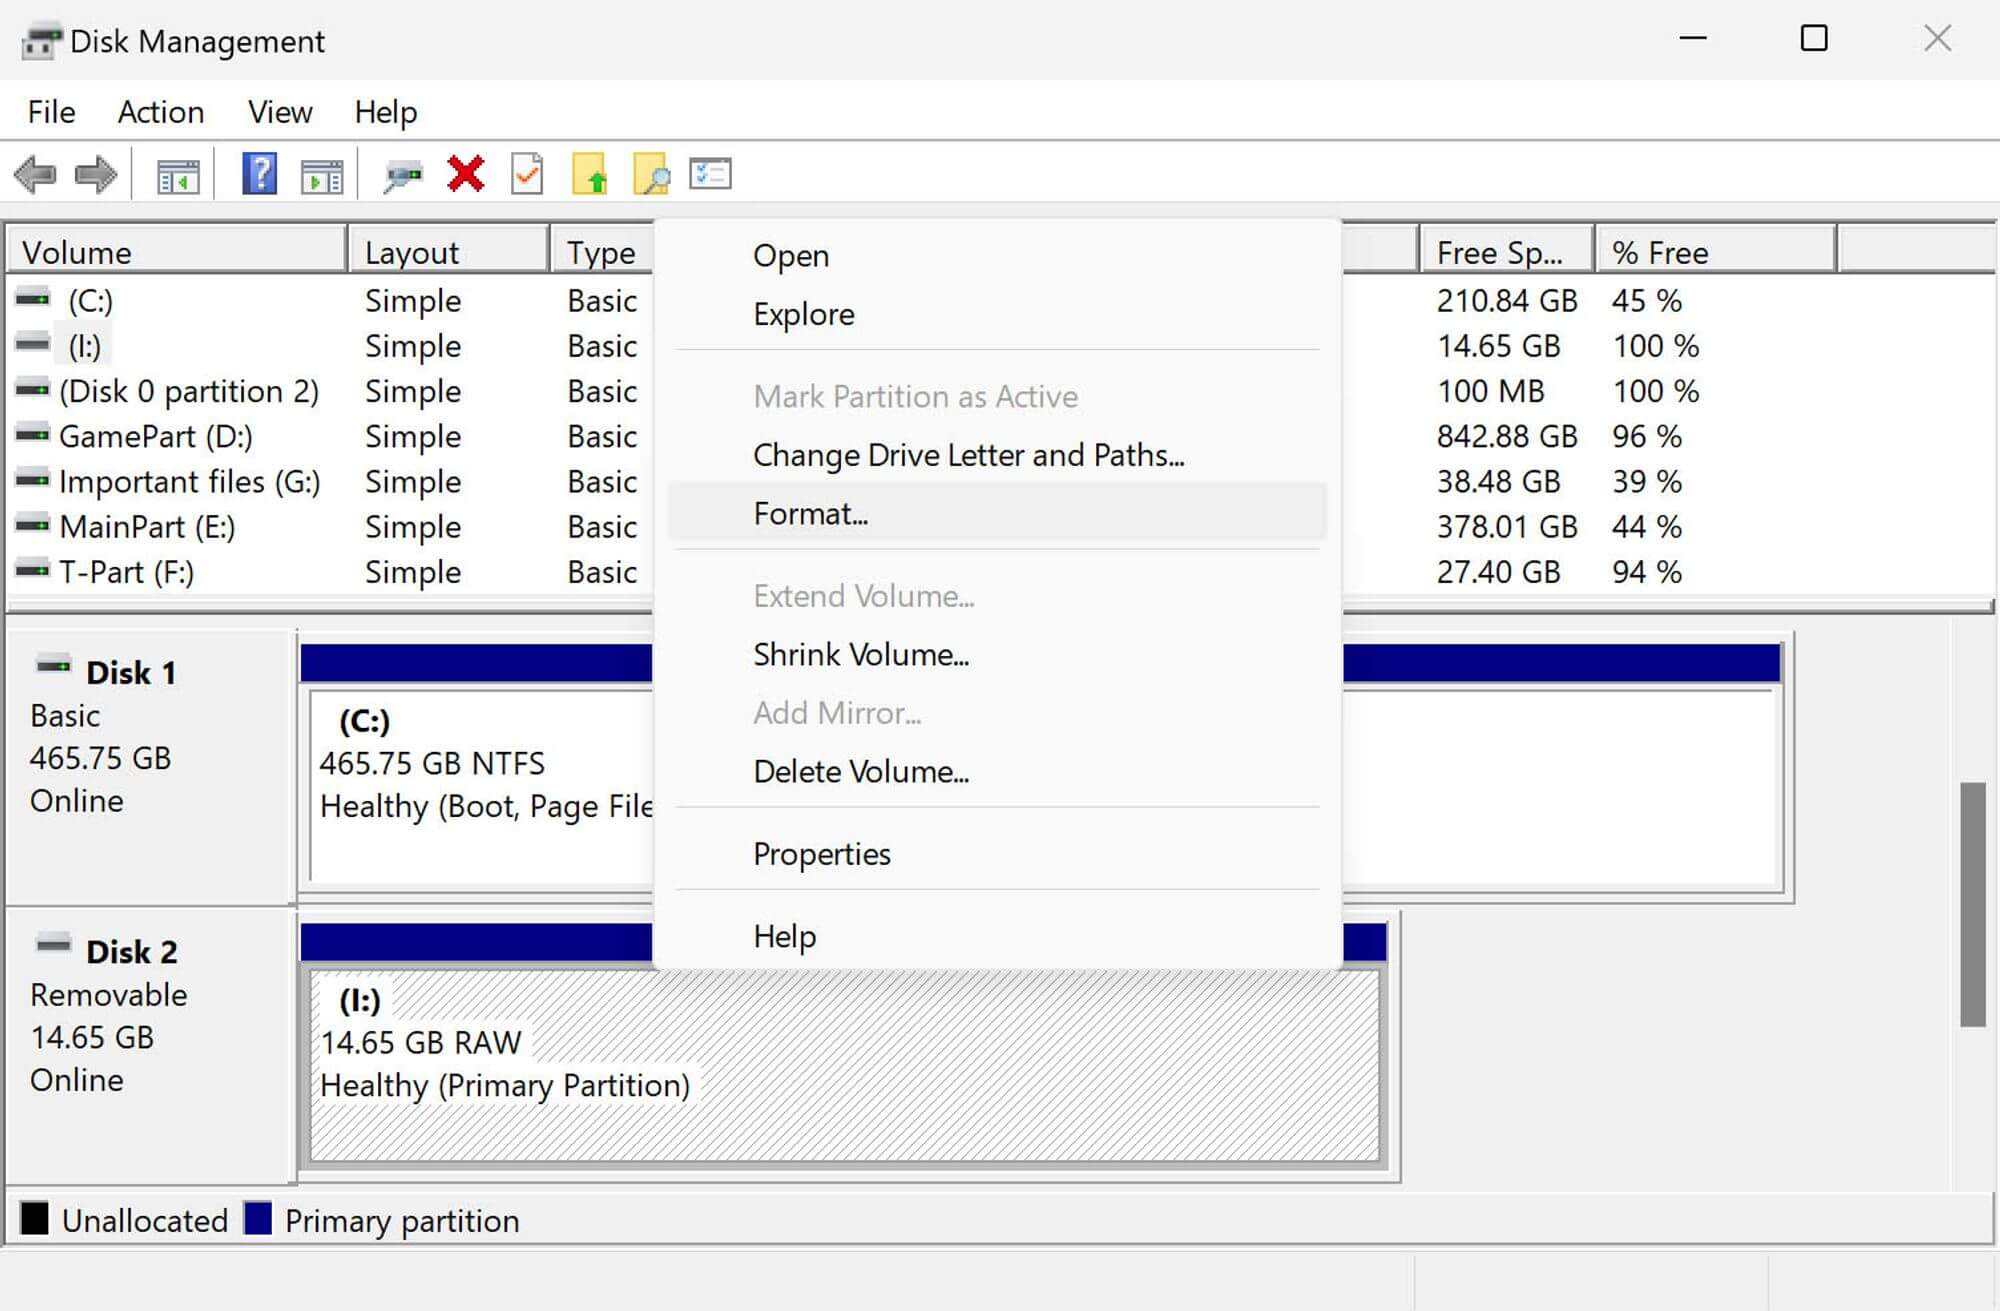
- Select a filesystem. You may select NTFS, FAT32, exFAT, or any other file system supported by Windows.
- Check the box to the left of the Perform a quick format option and click OK to start the process.
FAQ
How to recover data from external hard disk which is not detecting on Mac?
A hard disk might not be detected on a Mac if it’s damaged, has a bad cable, or is because of a software glitch. You can recover data from an external hard disk which is not detecting on Mac the same way as on a Windows PC, i.e., using a data recovery solution like Disk Drill. Here are the steps:
- Install Disk Drill.
- Scan the disk using Disk Drill.
- Select the files you want to recover.
- Recover the files to a destination different from the external drive that’s not detecting.
How to recover data from a hard disk not detected in BIOS?
If the BIOS doesn’t recognize your hard drive, there’s a chance it might be physically damaged. In such cases, it’s best to contact a professional data recovery service. They’ll try to recover data from the drive using advanced equipment and return the drive once the data is recovered.
Is It possible to recover data from an external hard drive that won't boot?
You can recover data from an external hard drive that won’t boot using a data recovery solution like Disk Drill. Once you’ve recovered the data, you can try fixing it by going into the BIOS and making sure the hard drive is enabled in System Setup.
How can I fix the issue of my external hard drive not showing up on my PC?
The method to fix the issue of the external hard drive not showing up on my PC depends on the cause. Here are some fixes you can try:
- Check the hard drive’s cable and if the USB port in your PC is working properly.
- Reassign the drive letter.
- Update system drivers and OS.
- Initialize the hard drive when it’s uninitialized.
- Format the external drive.
Conclusion
It’s easy to panic when an external hard drive with important data stops showing up when you plug it into a USB port. While there are a few quick fixes you can try, you should start by recovering the data. This ensures the data doesn’t get written over as you try to fix the hard drive or lose the data altogether in case the drive fails altogether.
The easiest way to recover data on a hard drive that’s not showing up is using a data recovery solution like Disk Drill. Just create a disk image using Disk Drill, scan it, and recover the files. Once you’re done, you can use one of the fixes in this guide to repair your external hard drive.
This article was written by Arjun Ruparelia, a Contributing Writer at Handy Recovery Advisor. It was also verified for technical accuracy by Andrey Vasilyev, our editorial advisor.
Curious about our content creation process? Take a look at our Editor Guidelines.