The cyclic redundancy error, often presented as a Cyclic Redundancy Check (CRC) error, may show up unexpectedly and typically signals that the drive is on the brink of failure. The error can render your files inaccessible and can cause data corruption too. In the sections below, we’ll walk you through how to recover your data and fix the CRC error.
Why Does the CRC Error Occur?
Cyclic Redundancy Check (CRC) is an error-checking mechanism whose job is to check the integrity of data blocks while they’re being transferred or accessed. It does this by calculating a checksum and attaching it to the data blocks being transferred. If there are any discrepancies between the data that was transferred and the one which was received, you’ll encounter a CRC error. For a detailed look at the mathematics involved in the CRC error-checking mechanism, read through this Cardinal Peak article.
The CRC error usually pops up when you’re extracting files, copying/moving them, or attempting to read data. When the CRC check fails, Windows will typically display one of the following messages:
- Data error (Cyclic Redundancy Check).
- Error: Data error (Cyclic Redundancy Check).
- X:\ is not accessible. Data error (Cyclic Redundancy Check).
The CRC error shows up because of the following reasons:
- ⛔ Damaged Computer Hardware: Physically damaged SATA cables and ports, hard drives, and motherboards can directly cause data corruption, or prevent your OS and the hard drive from communicating properly. This can cause a range of problems on your PC, including the redundancy error, more formally known as the Cyclic Redundancy Check (CRC) error.
- ❌ Data Corruption: At its core, a failed CRC check indicates that your data is corrupt, or your OS is facing trouble reading the data. Viruses, abrupt power cuts while reading/writing data, improper ejection, and accumulation of bad sectors can all cause data corruption on your drive, resulting in CRC error.
- 💻 Software or Firmware Issues: Outdated or corrupted HDD firmware and interrupted software installations can also damage the integrity of your data, resulting in the Cyclic Redundancy Check error. Rarely, corrupted entries in the Windows Registry could lead to a CRC error as well.
How to Retrieve Data from a Drive with a CRC Error
A CRC error can be a sign of a failing drive, so it’s best to recover your data as soon as possible. Thereafter, you can proceed to fix the issue.
Before attempting hard drive data recovery, you need to ensure that the drive is detected by your PC. To do this, open Disk Management and see if the drive with the CRC error is visible and its storage size is listed correctly. If there’s a size mismatch, or the drive is not showing up in Disk Management, it’s best to disconnect the drive and contact a professional data recovery service.
If the drive is visible in Disk Management with its correct storage size (even if it shows up as “unallocated”) you can recover data from your drive, even if it’s facing the Cyclic Redundancy Check error. How? Well, using third-party data recovery programs. There are numerous data recovery programs available on the web, but we recommend you pick an option only from the best ones. These programs have a proven track record and will provide you with unparalleled peace of mind.
In our tutorial, we decided to use Disk Drill – mainly because of its safety, cutting-edge data recovery algorithm, and ease of use. The program works with all types of storage drives (corrupt or not) across a wide range of file systems, including cases where the drive may have no file system at all (RAW).
Note: If the CRC error prevents you from booting into Windows, you can either use a live Windows USB to boot into Windows 10 and Windows 11, or use a disk enclosure to connect the drive to another working PC.
Here’s how you can use Disk Drill to recover data from a drive with the CRC error:
- Download Disk Drill and install it.
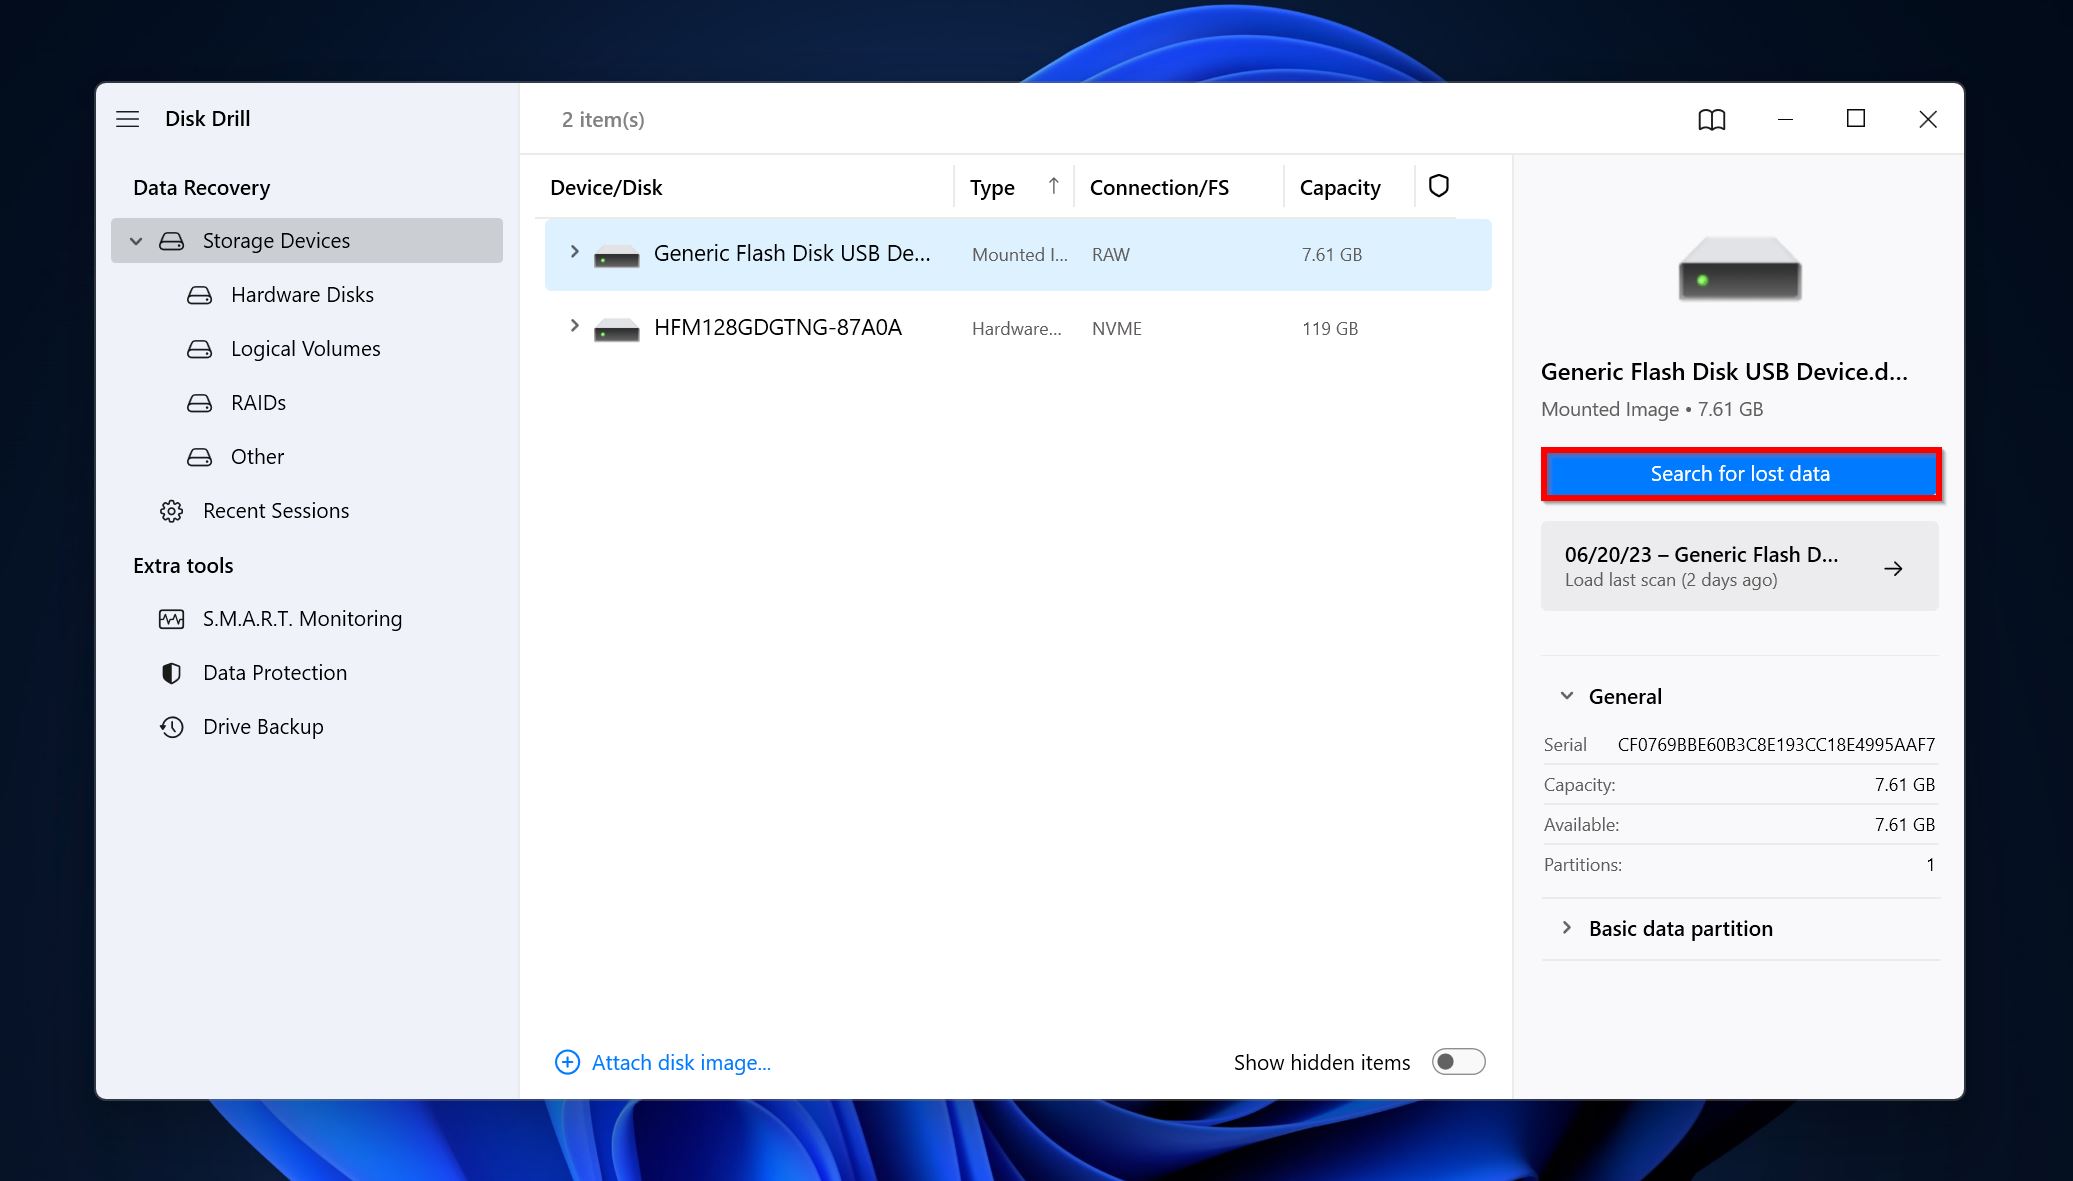
- Open Disk Drill, select the drive with the CRC error, and click Search for lost data.
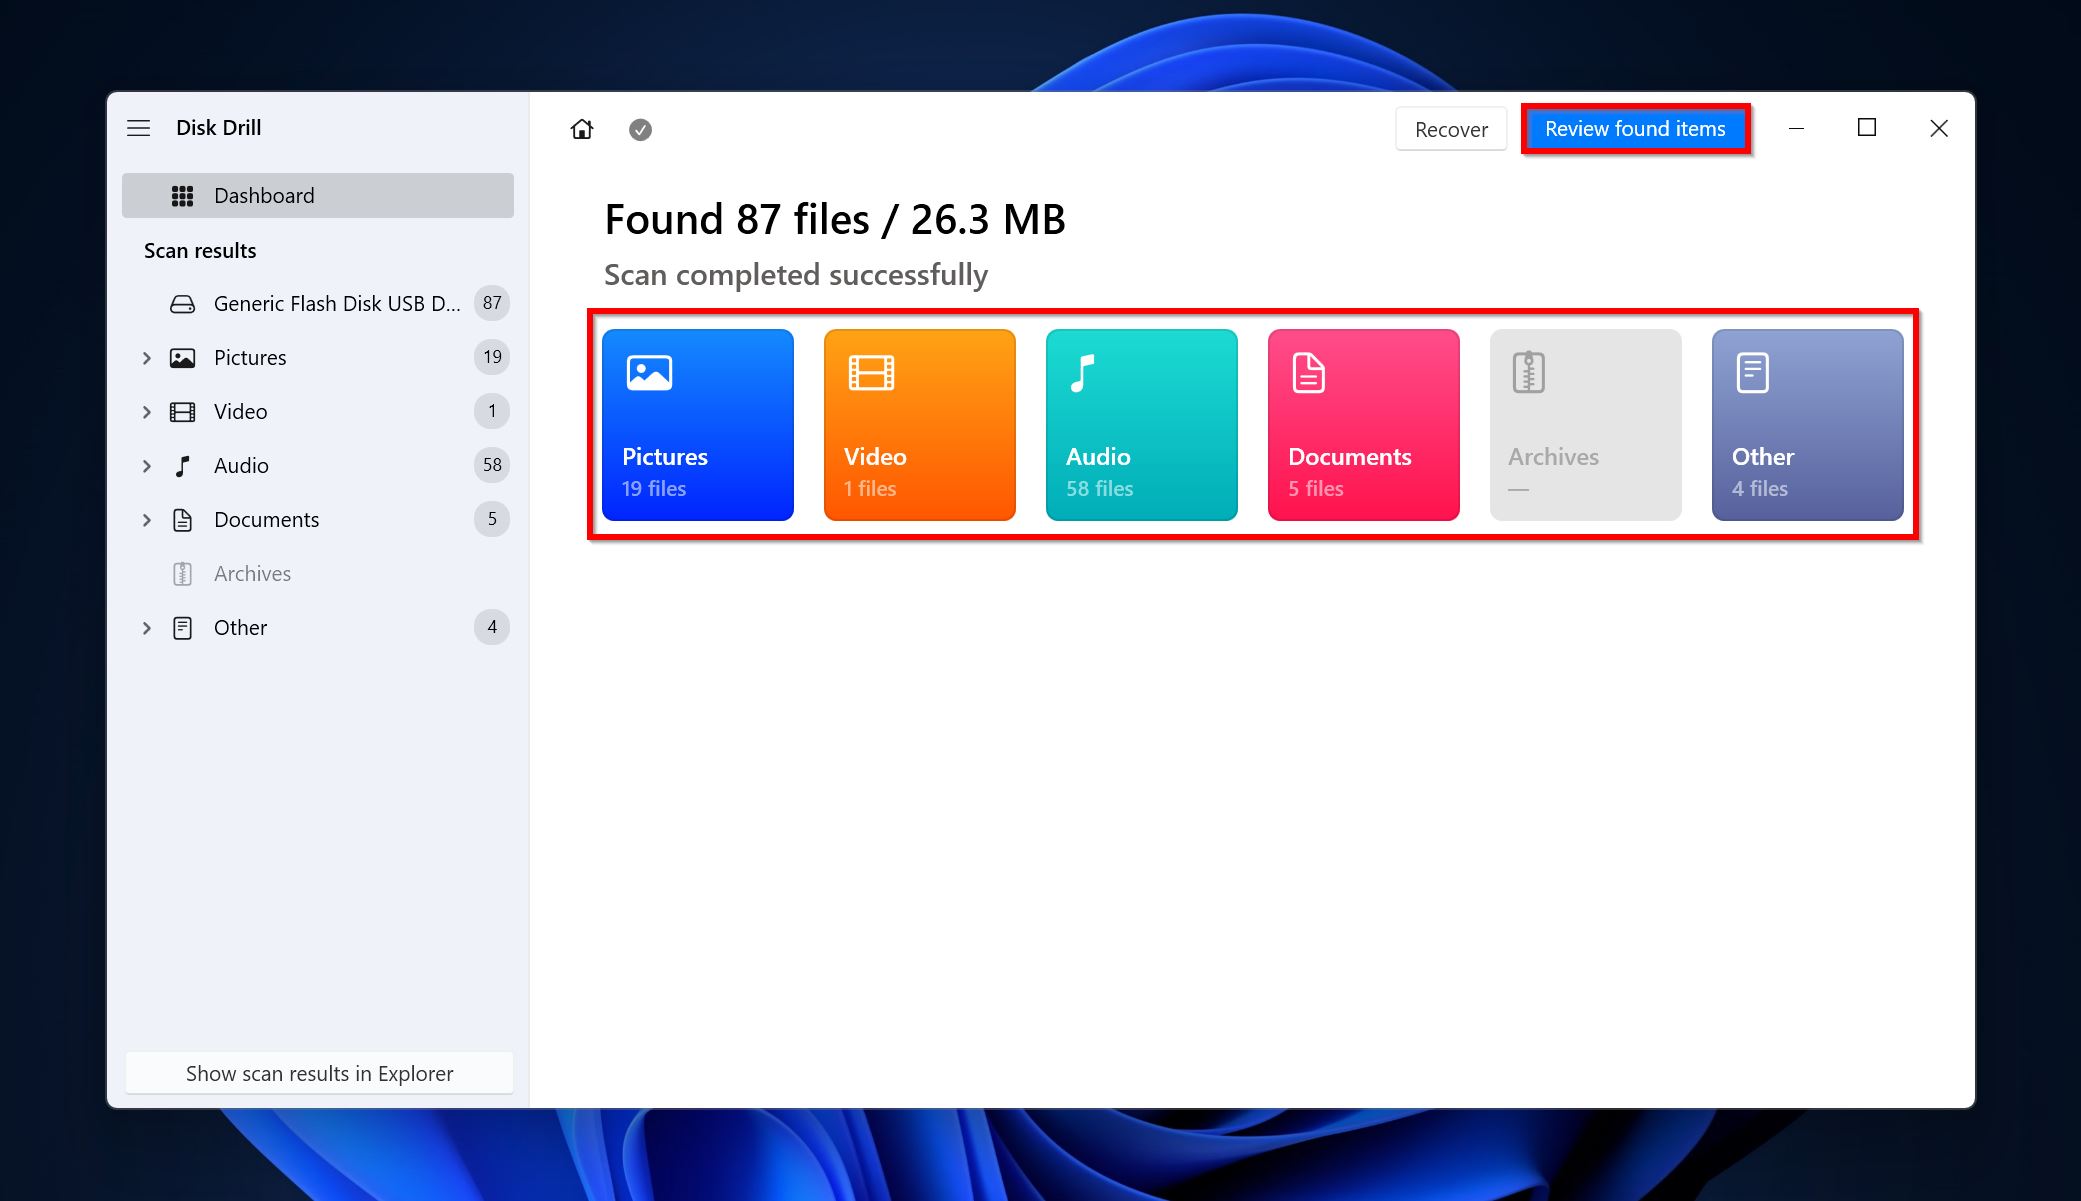
- Click on Review found items to view the recoverable files. You can opt to filter out the results by simply clicking on the file type you wish to recover (Pictures, Video, Documents, Archives, and Other).
- If you wish to recover files that are already there on the drive, but are inaccessible due to the CRC error, expand the Existing section. To view files that were deleted or corrupted, expand the Deleted or lost and Reconstructed sections.
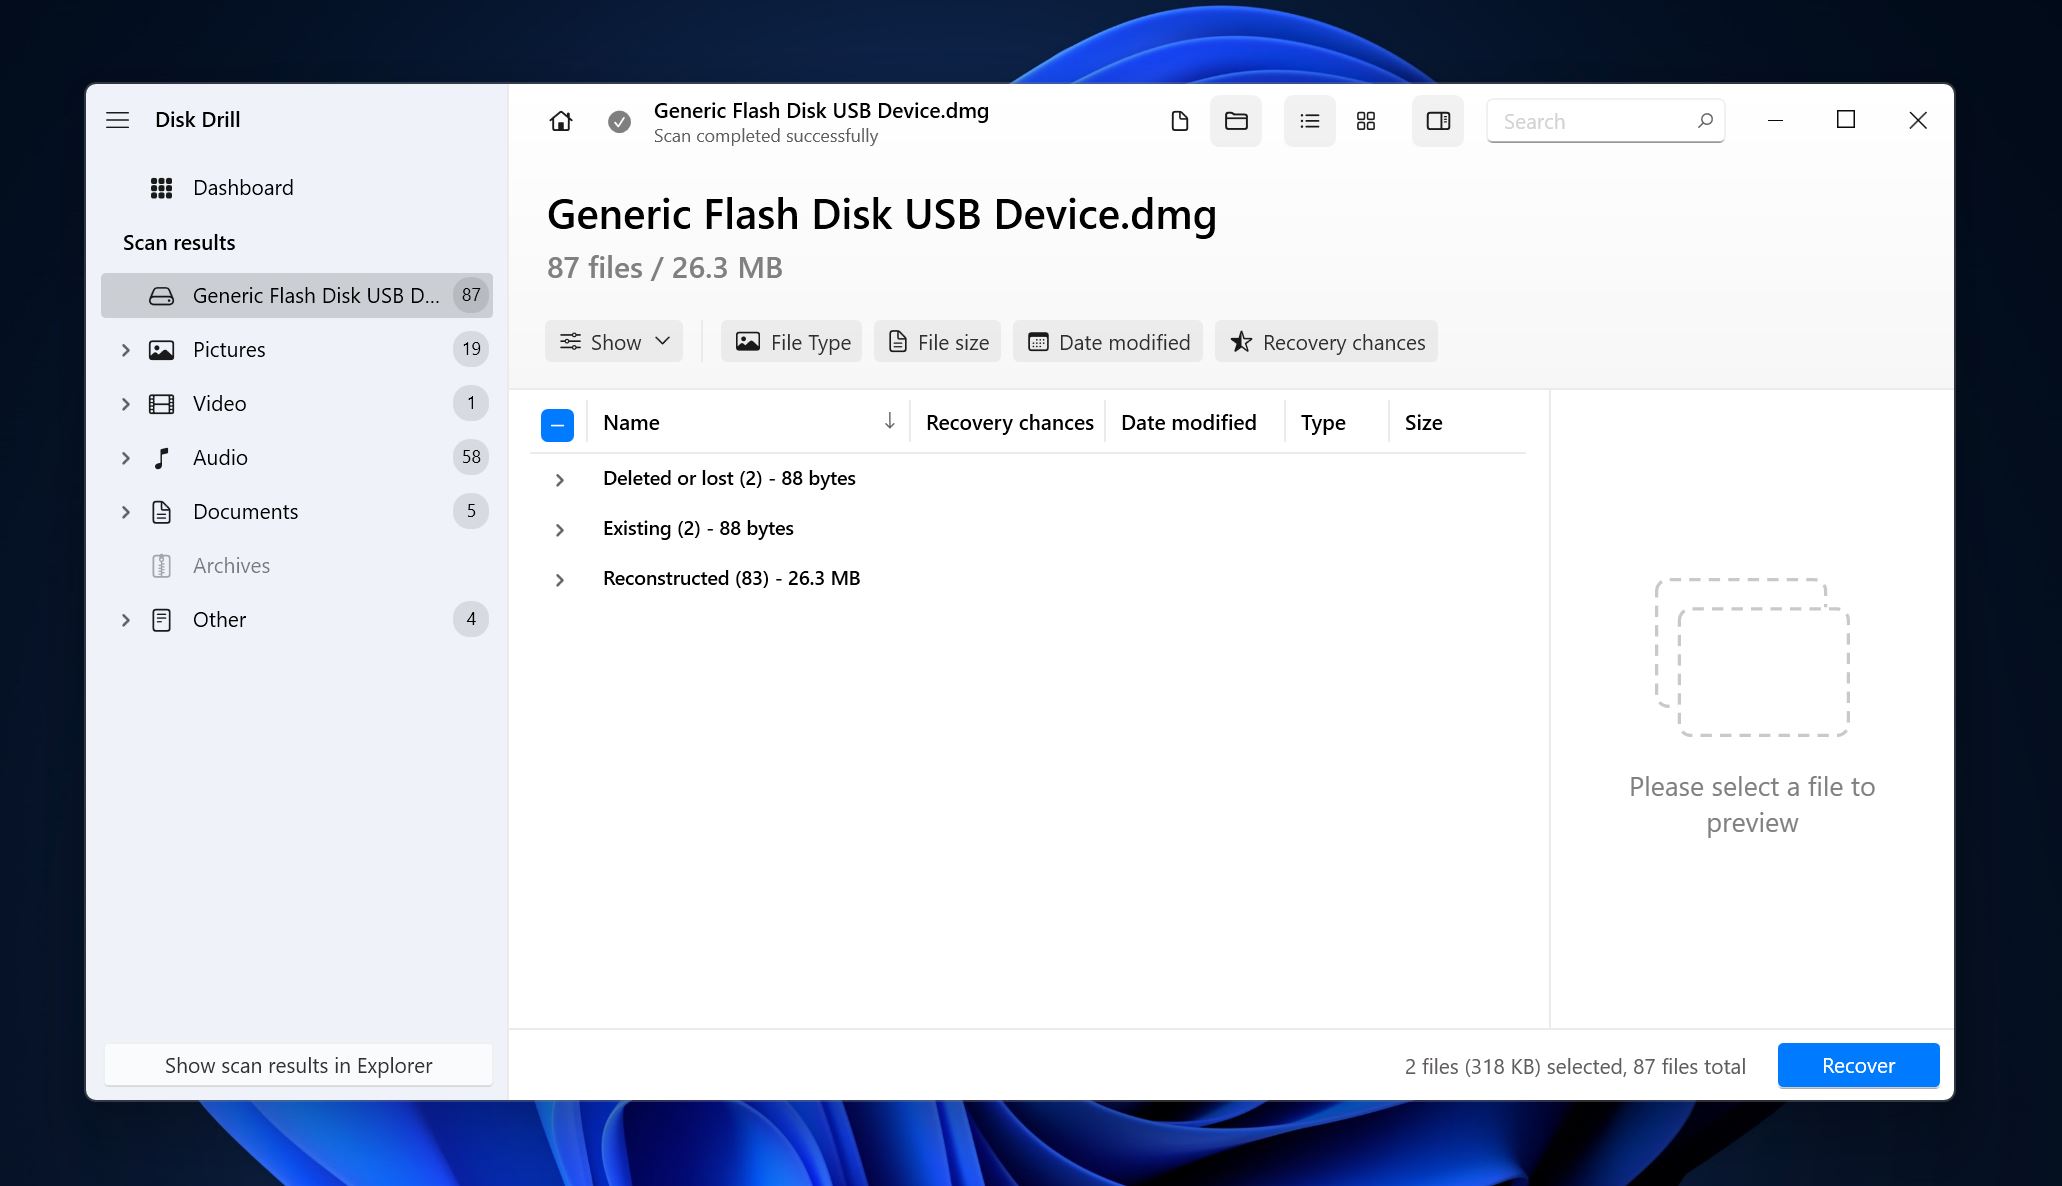
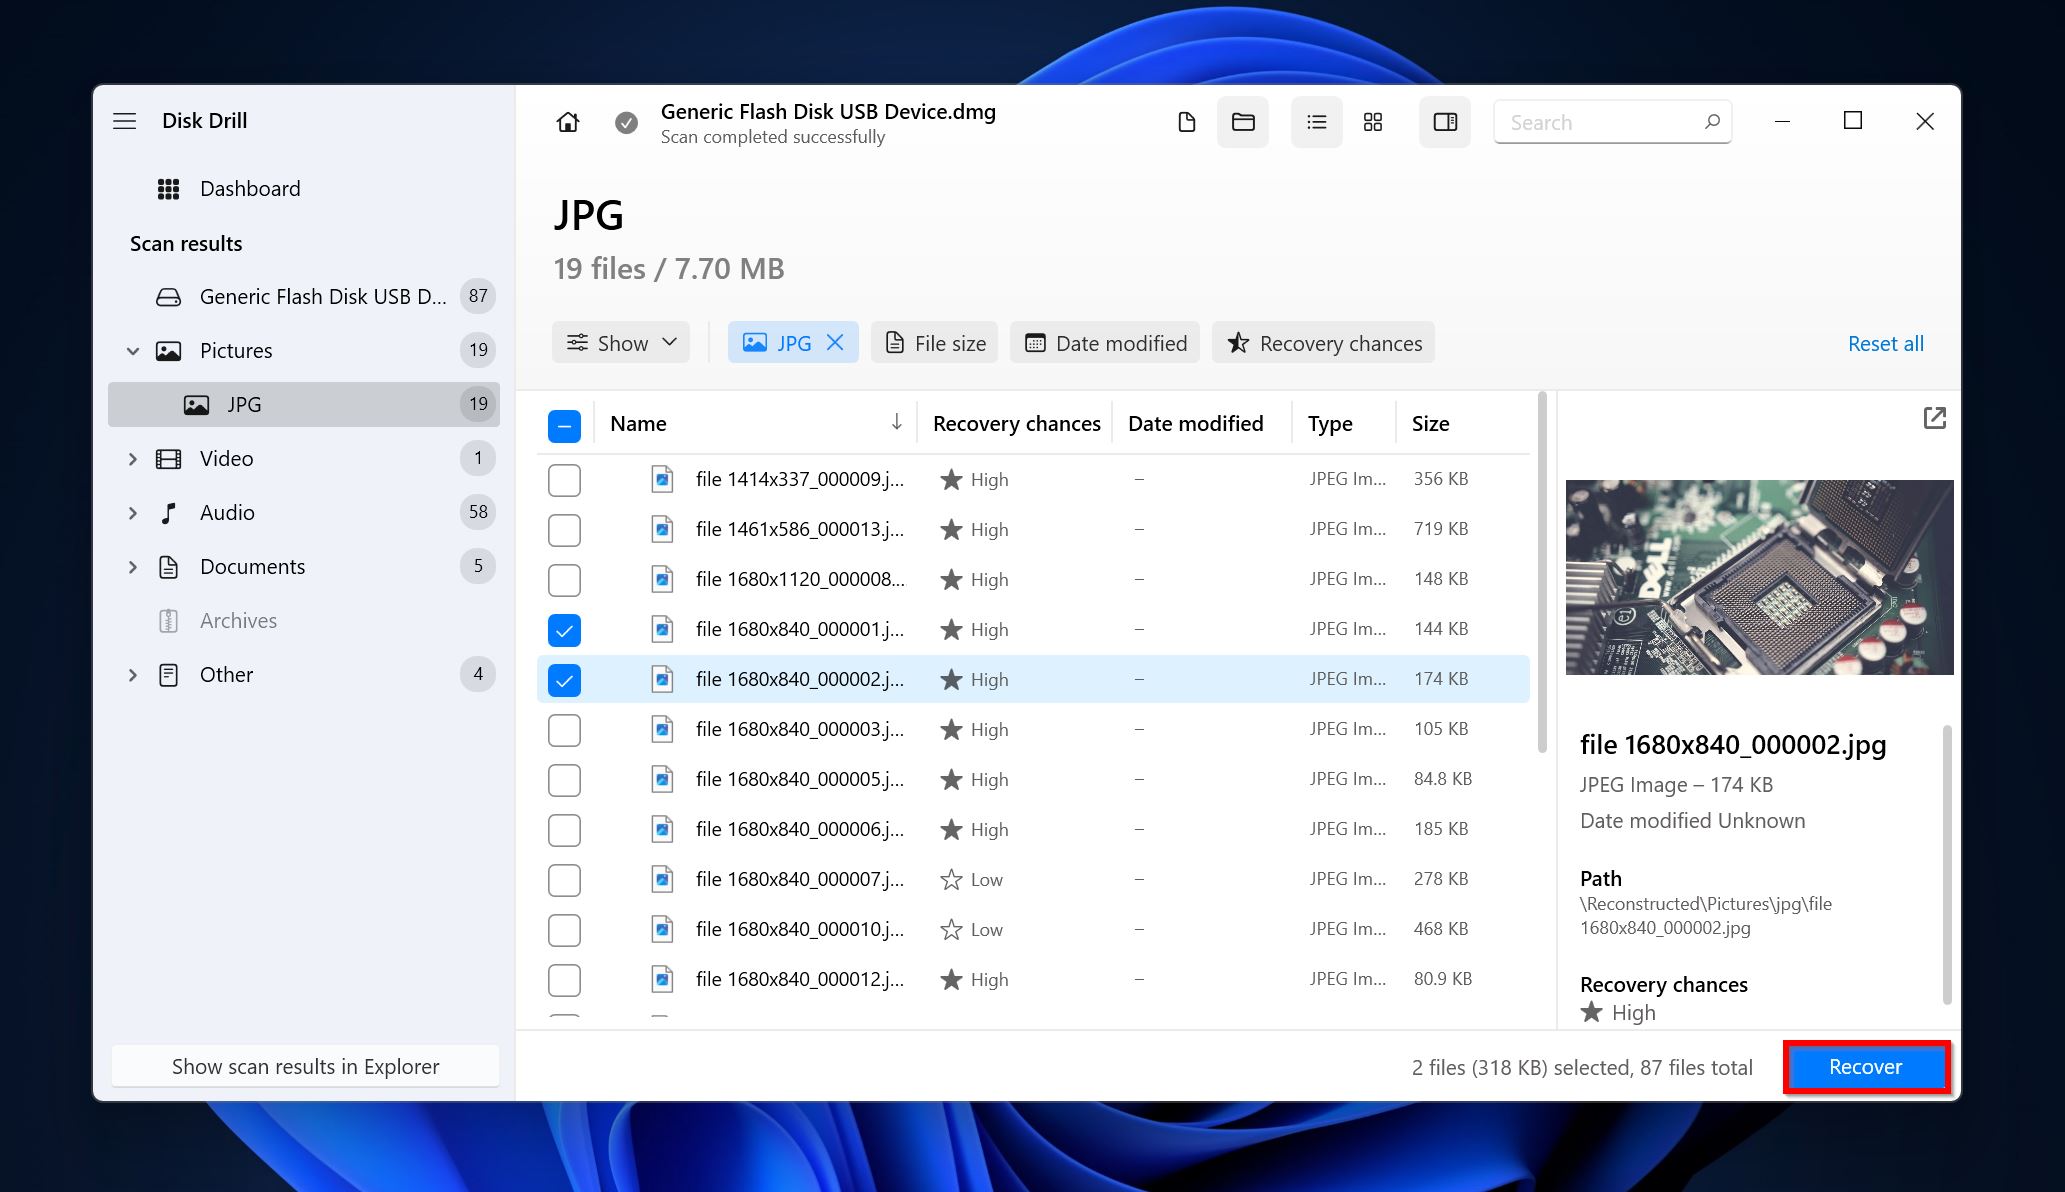
- Select the files you wish to recover. Disk Drill displays a preview of the currently selected file. You can also click the eye icon next to the filename to manually preview it. Click on Recover after confirming your selection.
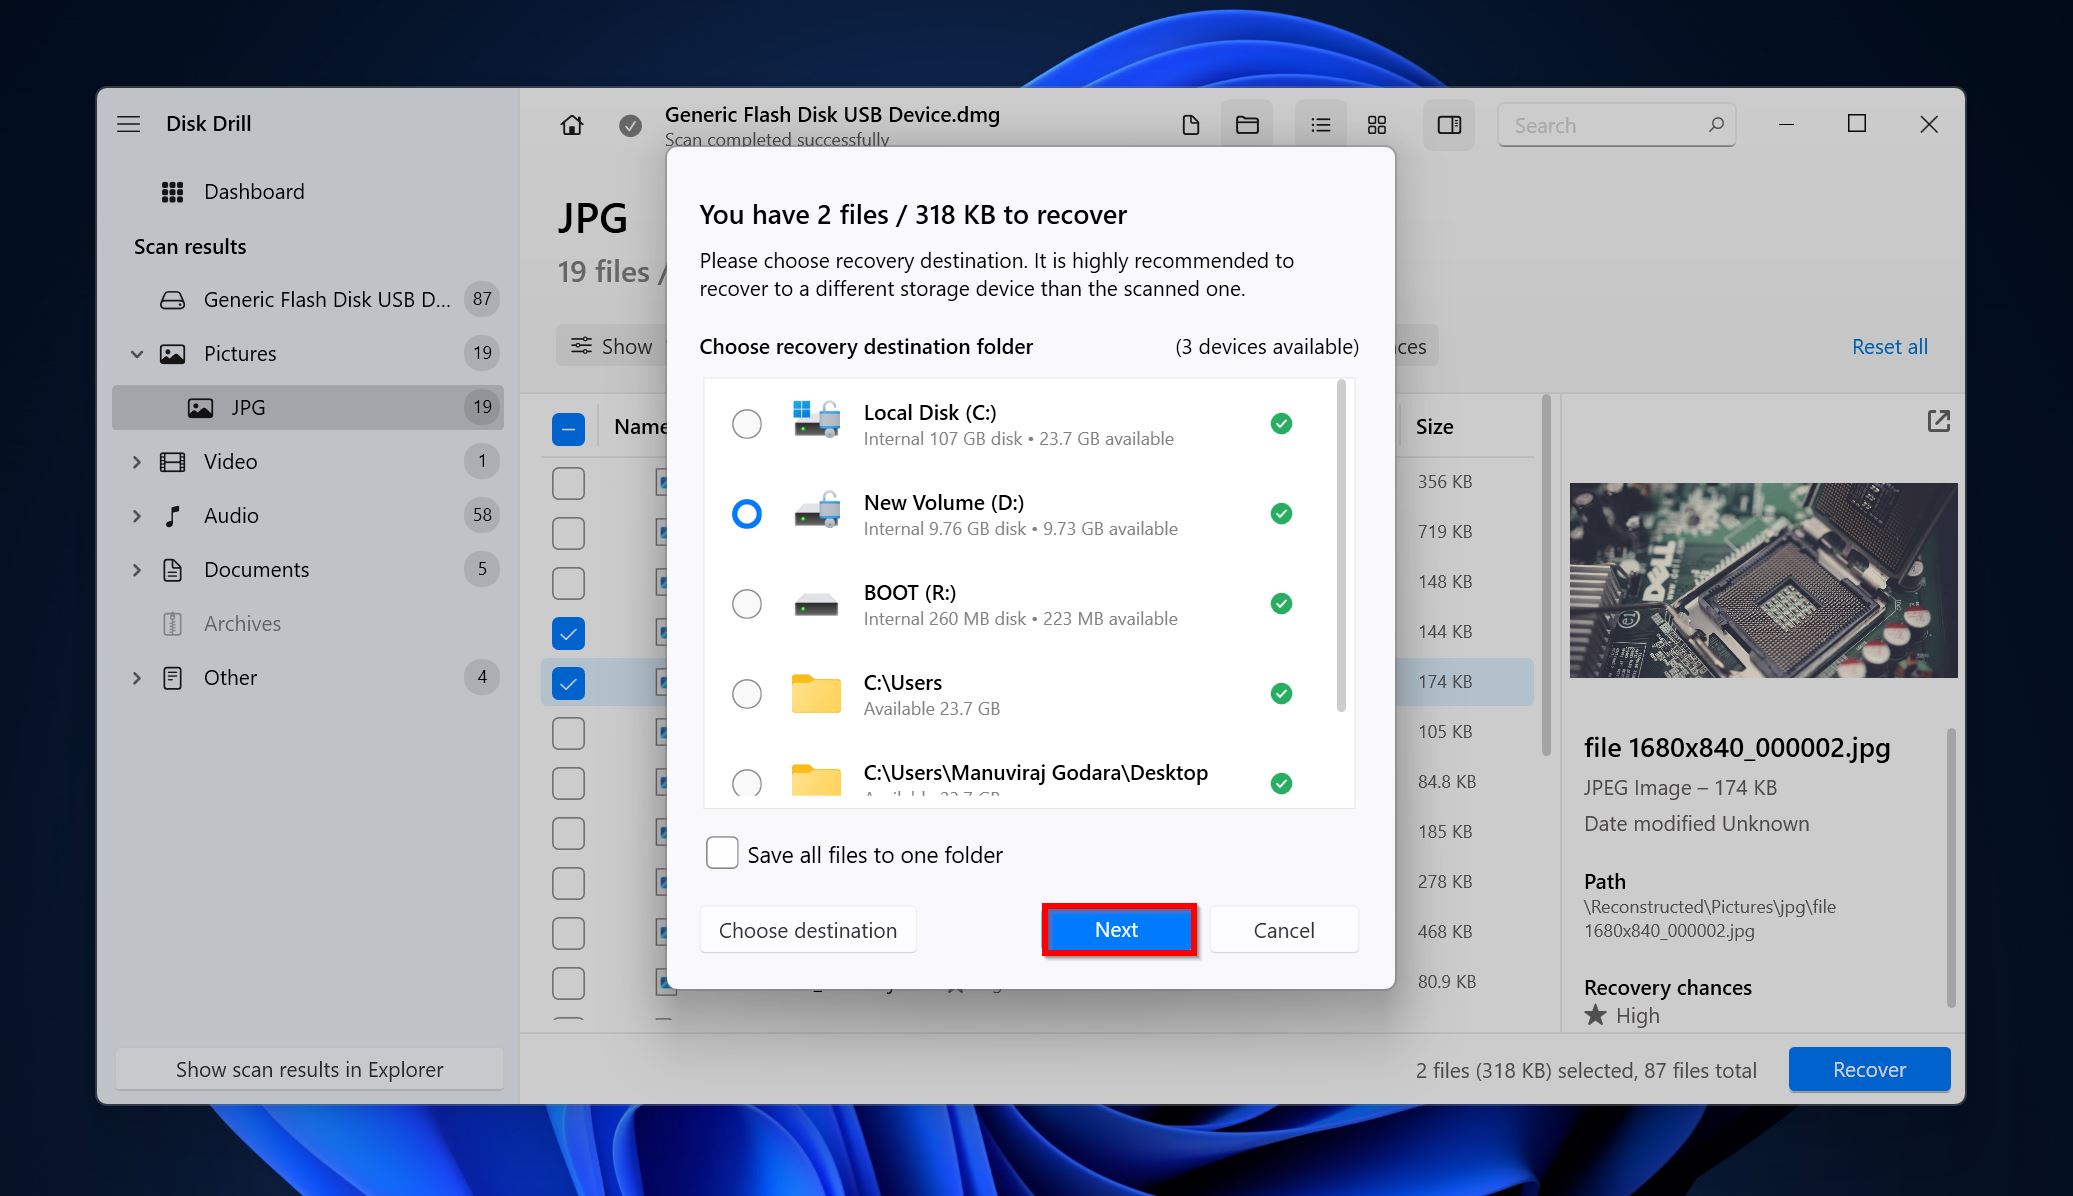
- Choose a recovery destination for the files and click Next. Disk Drill lets you recover up to 500 MB of data on a Windows PC as part of its free trial.
- Disk Drill will recover the selected files.
How to Fix the Cyclic Redundancy Check Error
In most cases, a CRC error is a glaring sign that your drive is about to fail. That’s why we emphasize that you perform data recovery as soon as possible, and then attempt to fix the drive. Depending on what caused the CRC error to crop up, the fixes listed below may only serve as a band-aid, before the drive fails completely.
To implement a crc error fix, here are some ways you can diagnose and address the Cyclic Redundancy Check (CRC) error:
Method 1: Check the Drive’s Physical Connection
Start by checking the drive’s physical connection. A damaged or loose cable and a broken connector port can prevent your PC from reading the drive properly. The first thing you should do when facing a CRC error, is double-check the drive’s connection to your PC.
Disconnect the SATA or USB cable and check for signs of damage – see if it’s unnaturally bent or if the cable is cracked or peeling. Check the USB and SATA ports on your PC and ensure they are not damaged. If you encountered an external hard drive cyclic redundancy error, manifested as a Cyclic Redundancy Check data error, the first step is to try connecting the drive to the USB ports situated directly on the motherboard.
Insufficient power supply to the drive can also cause CRC errors. Double-check the HDD’s power cable and ensure it’s not loose or damaged in any way. It’s a good idea to connect the drive to another PC and see if the error persists. If it does, a damaged cable or connector could be the culprit.
Method 2: Diagnose the State of the Drive
Many popular storage drive manufacturers like Seagate and Western Digital (WD) have their own diagnostic utilities that can check your drive’s health, and often, resolve any issues it encounters. Using these utilities, you can get a Self Monitoring Analysis and Reporting Technology (S.M.A.R.T.) report of the drive – which can be used to determine the health of the drive.
If your drive manufacturer doesn’t have a dedicated diagnostic utility, you can use third-party tools like Crystaldiskinfo.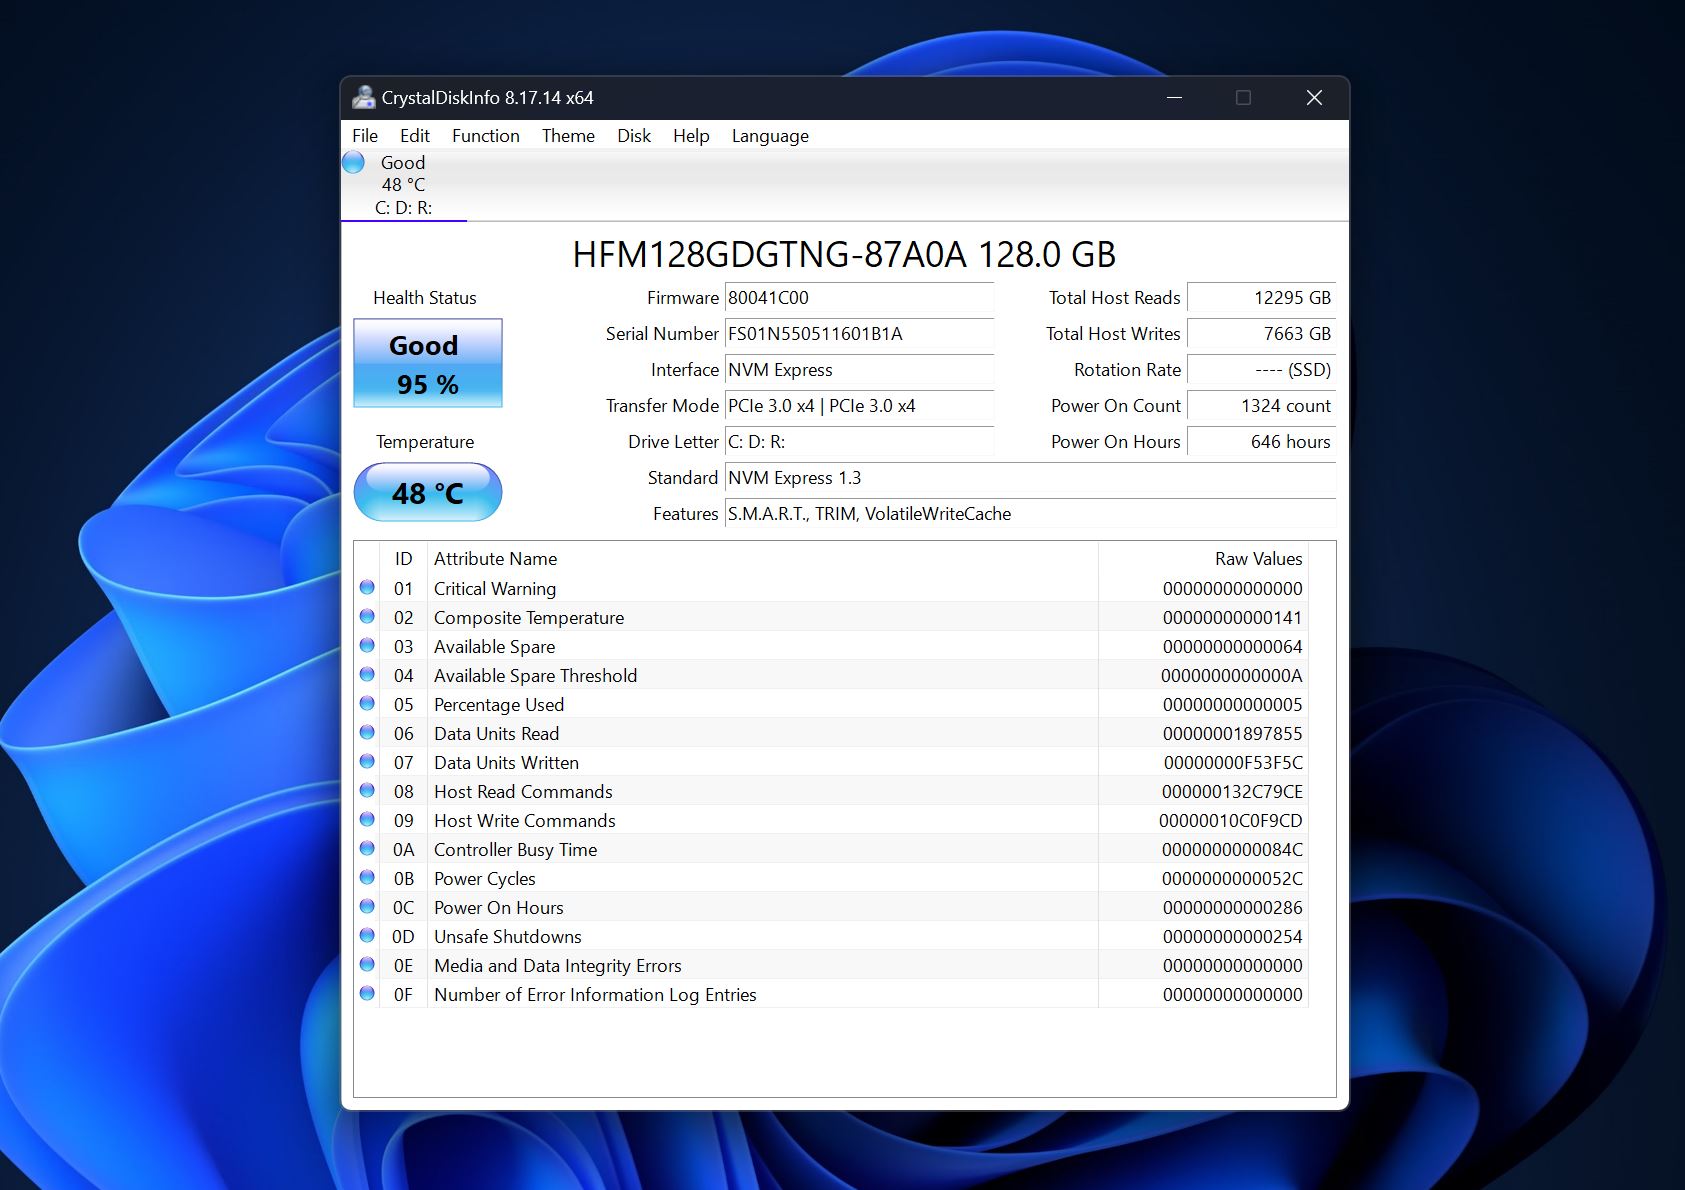
In your drive’s S.M.A.R.T. report, look for fields like Reallocated Sector Counts, Current Pending Sector Count, Reported Uncorrectable Errors and check their Raw values. Higher Raw values indicate drive wear and an accumulation of bad sectors. Here is a detailed guide to the various S.M.A.R.T. values and what they mean.
Method 3: Update the Drivers and Disk Firmware
A simple driver update could fix the Cyclic Redundancy Check error on your drive. Regardless, it’s always a good idea to regularly update a disk’s software drivers and firmware. Usually, the drivers are automatically updated when you update Windows. However, if you haven’t updated Windows in a while, it’s a good idea to manually update your drive’s software drivers and firmware.
You can do so using the Device Manager:
- Search for “device manager” in Windows Search and click on Device Manager from the search results.
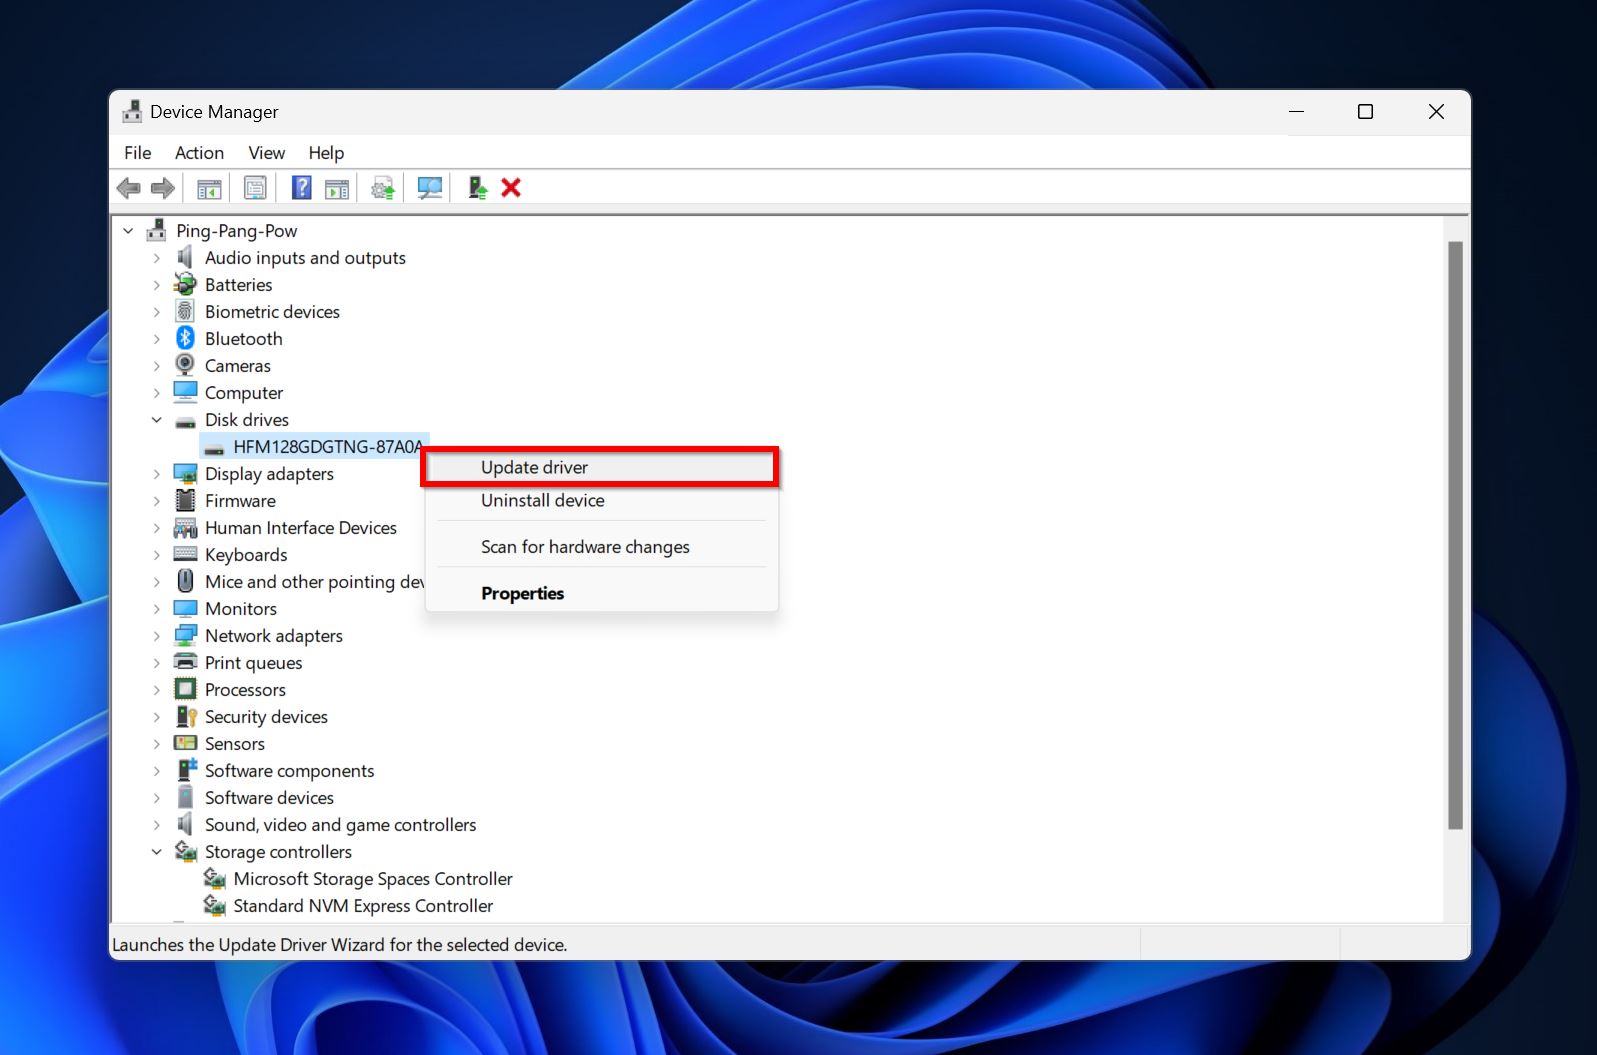
- Expand the Disk drives section, right-click on the drive with the CRC error, and choose Update driver.
- Click on Search automatically for drivers.
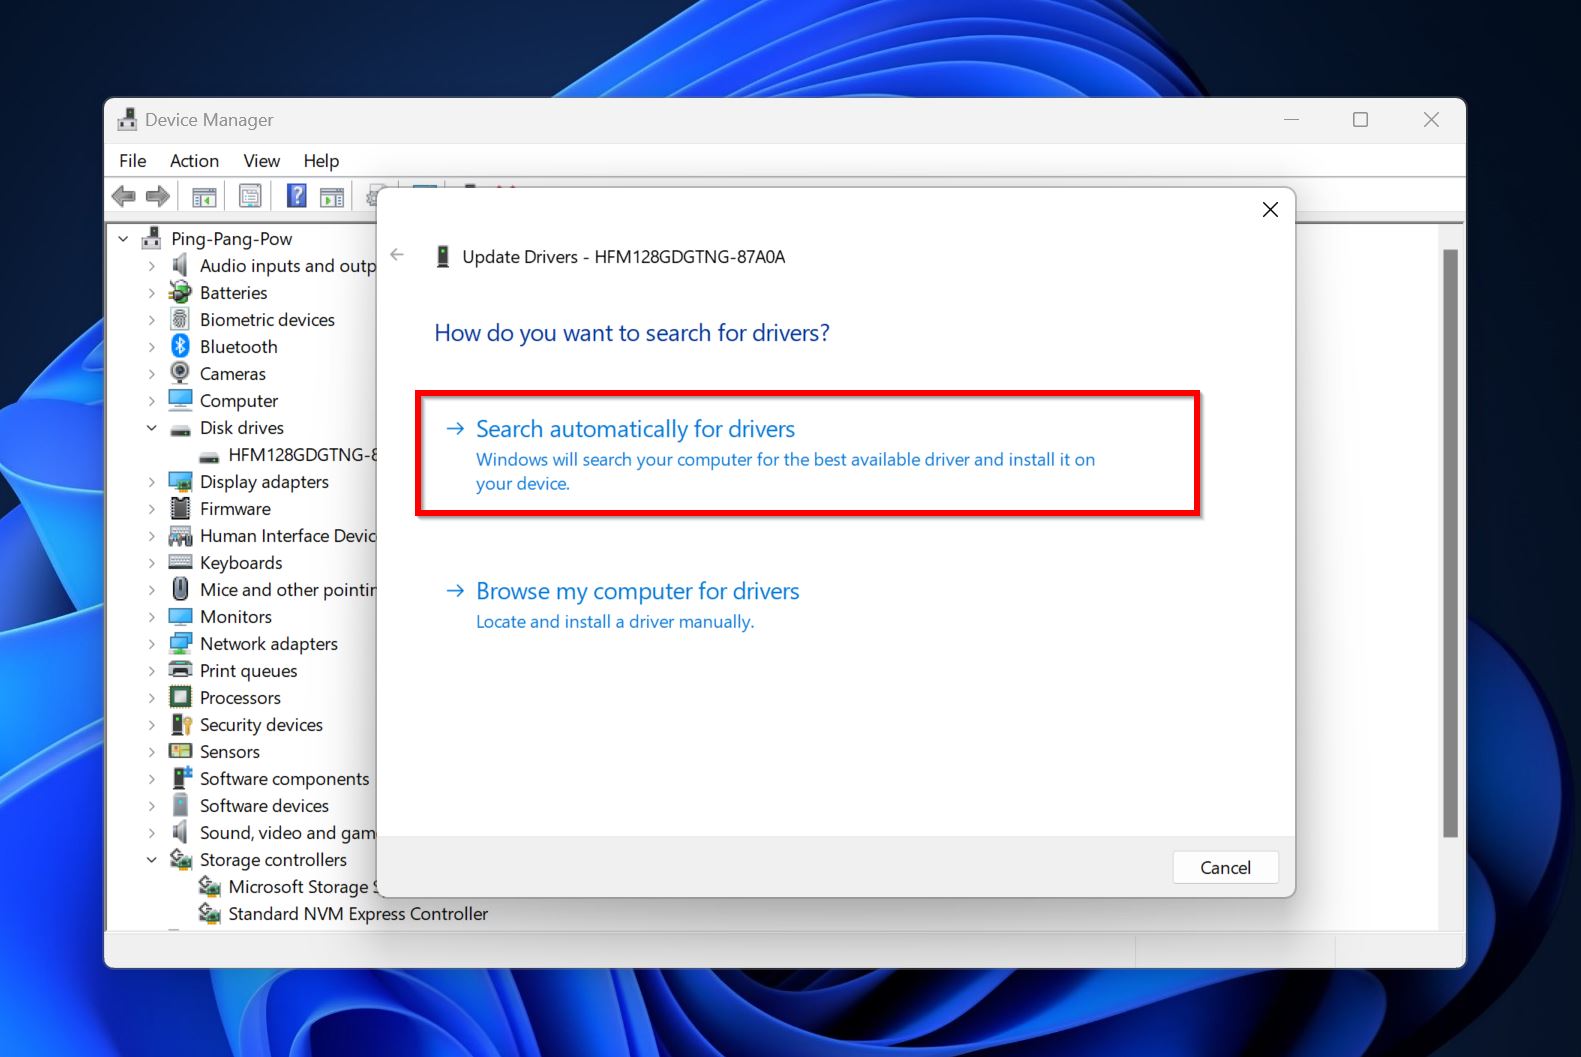
- Windows will automatically look for the latest drivers and install them.
Method 4: Repair Disk Errors
Windows has an in-built error-checking utility – aptly called the Error Checking Tool – that can scan your drive for errors and fix them. Before proceeding to more complex, command-line-based fixes, it’s a good idea to run this simple utility and see if it fixes the CRC error on your hard drive.
To understand how to fix cyclic redundancy check errors, let’s start with running the Error Checking tool on Windows:
- Press Windows Key + E to launch Windows Explorer.
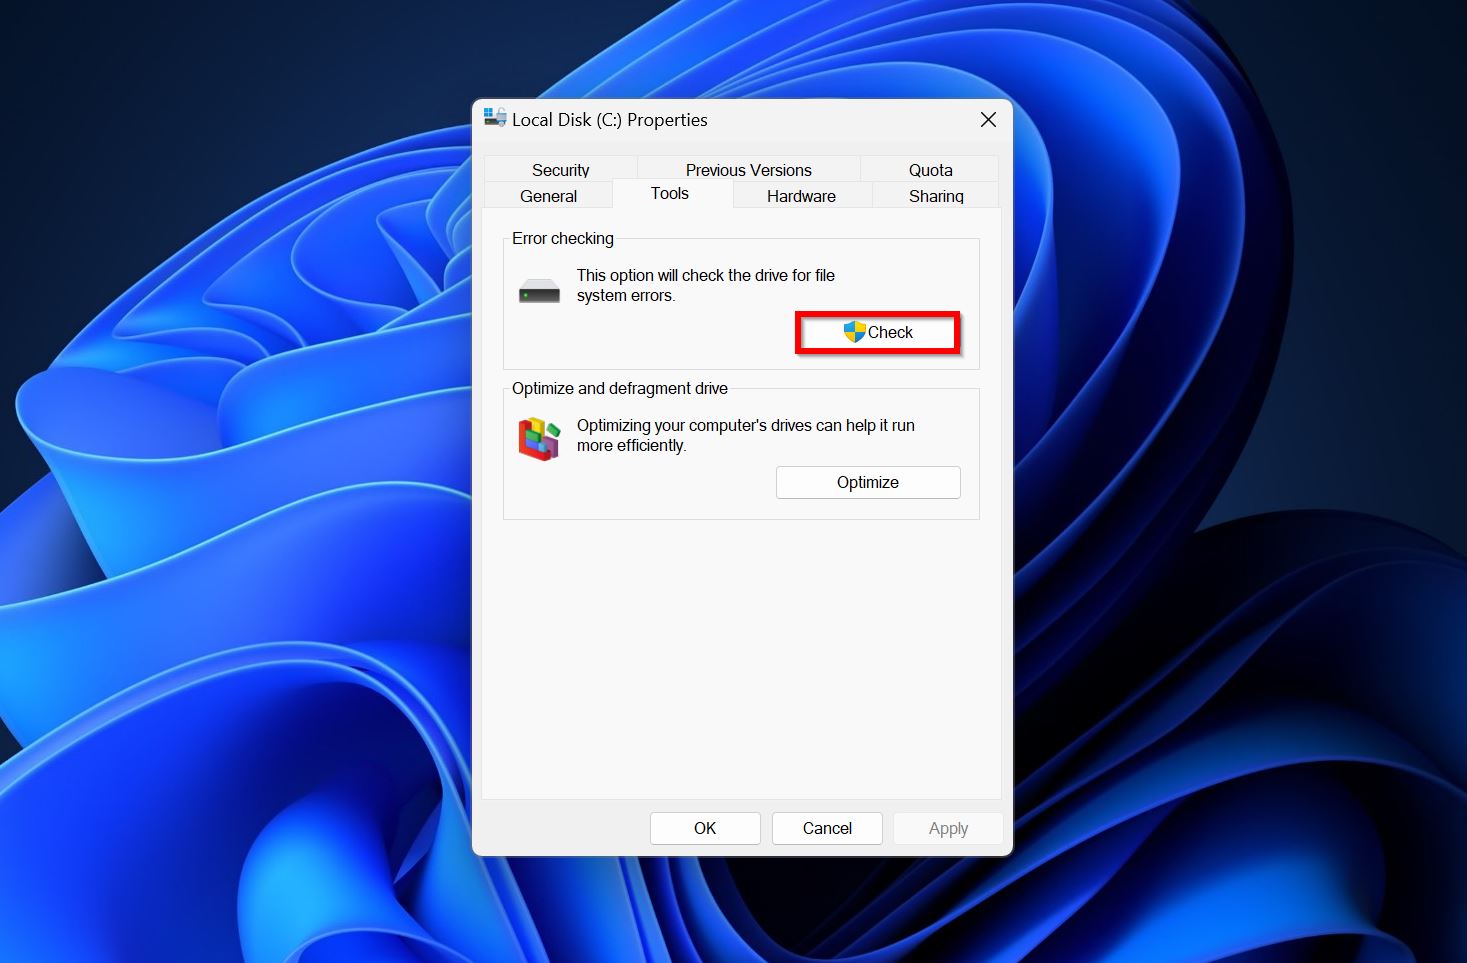
- Right-click on the problematic partition or drive that’s displaying the CRC error and choose Properties.
- Go to the Tools tab and click on Check, under Error-checking.
Method 5: Verify the Integrity of System Files
Corrupted system files can adversely affect the functioning of your PC, and even lead to the CRC error on your drive. Fortunately, Windows has two capable utilities – DISM (Deployment Image Servicing and Management) and SFC (System File Checker) – that can automatically find and repair corrupt system files.
DISM finds and fixes corrupt files in the Windows system image. We recommend that you run DISM before SFC, as the latter relies on the system image to work properly.
To run DISM and SFC, you need to use the Command Prompt:
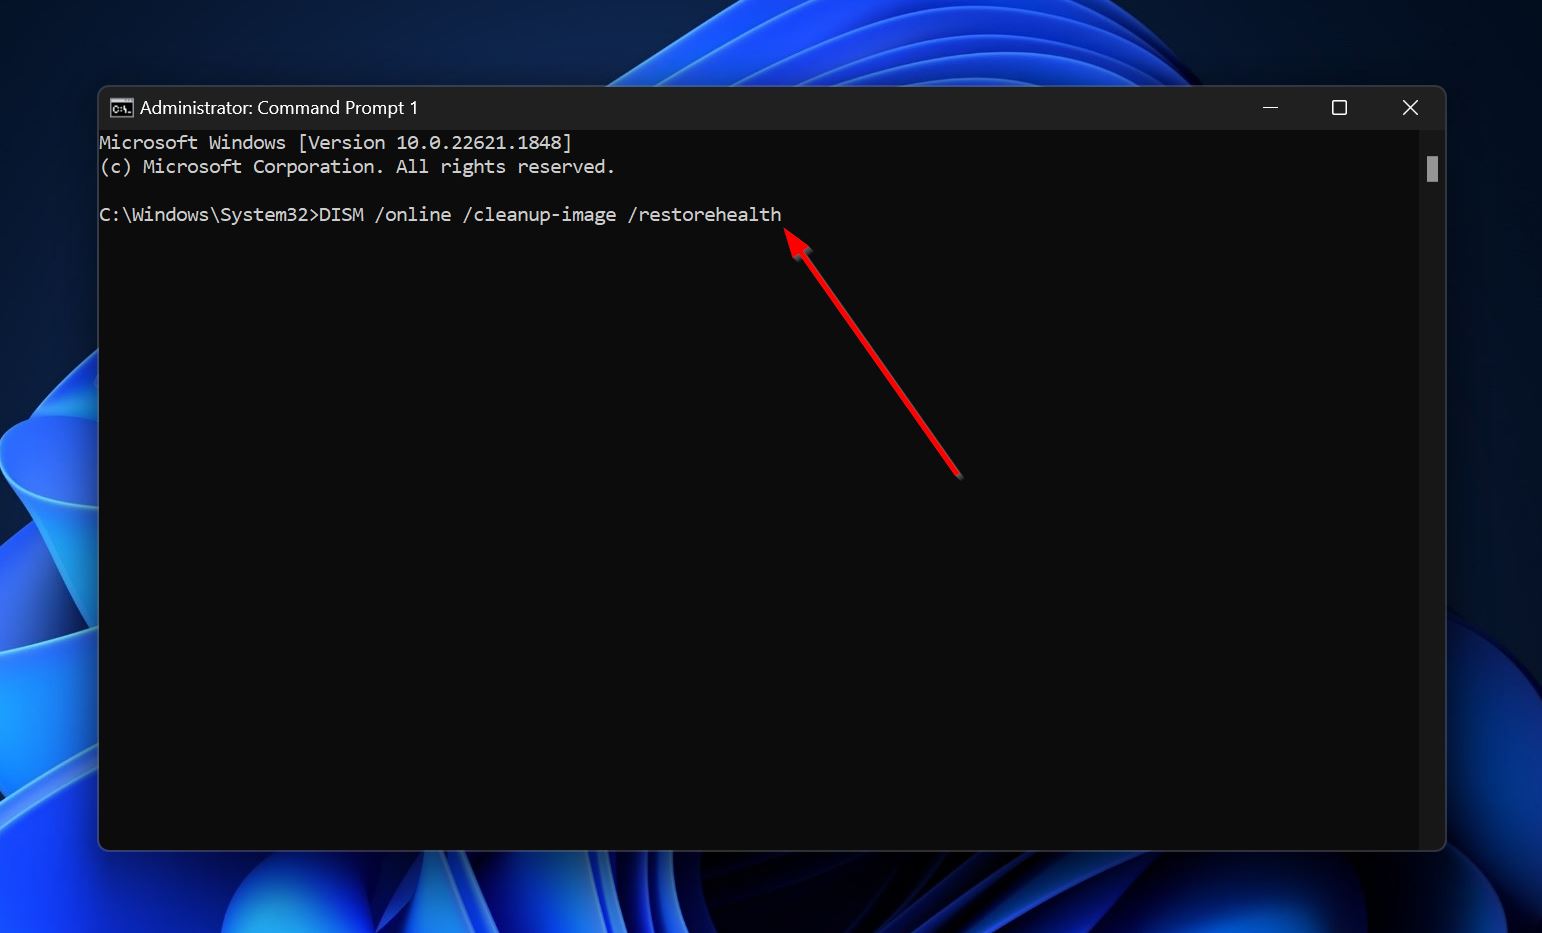
- Type “cmd” in Windows Search (Windows key + S). Right-click on Command Prompt > Run as administrator.
- Type DISM /Online /Cleanup-image /Restorehealth and press Enter. The DISM scan may take some time.
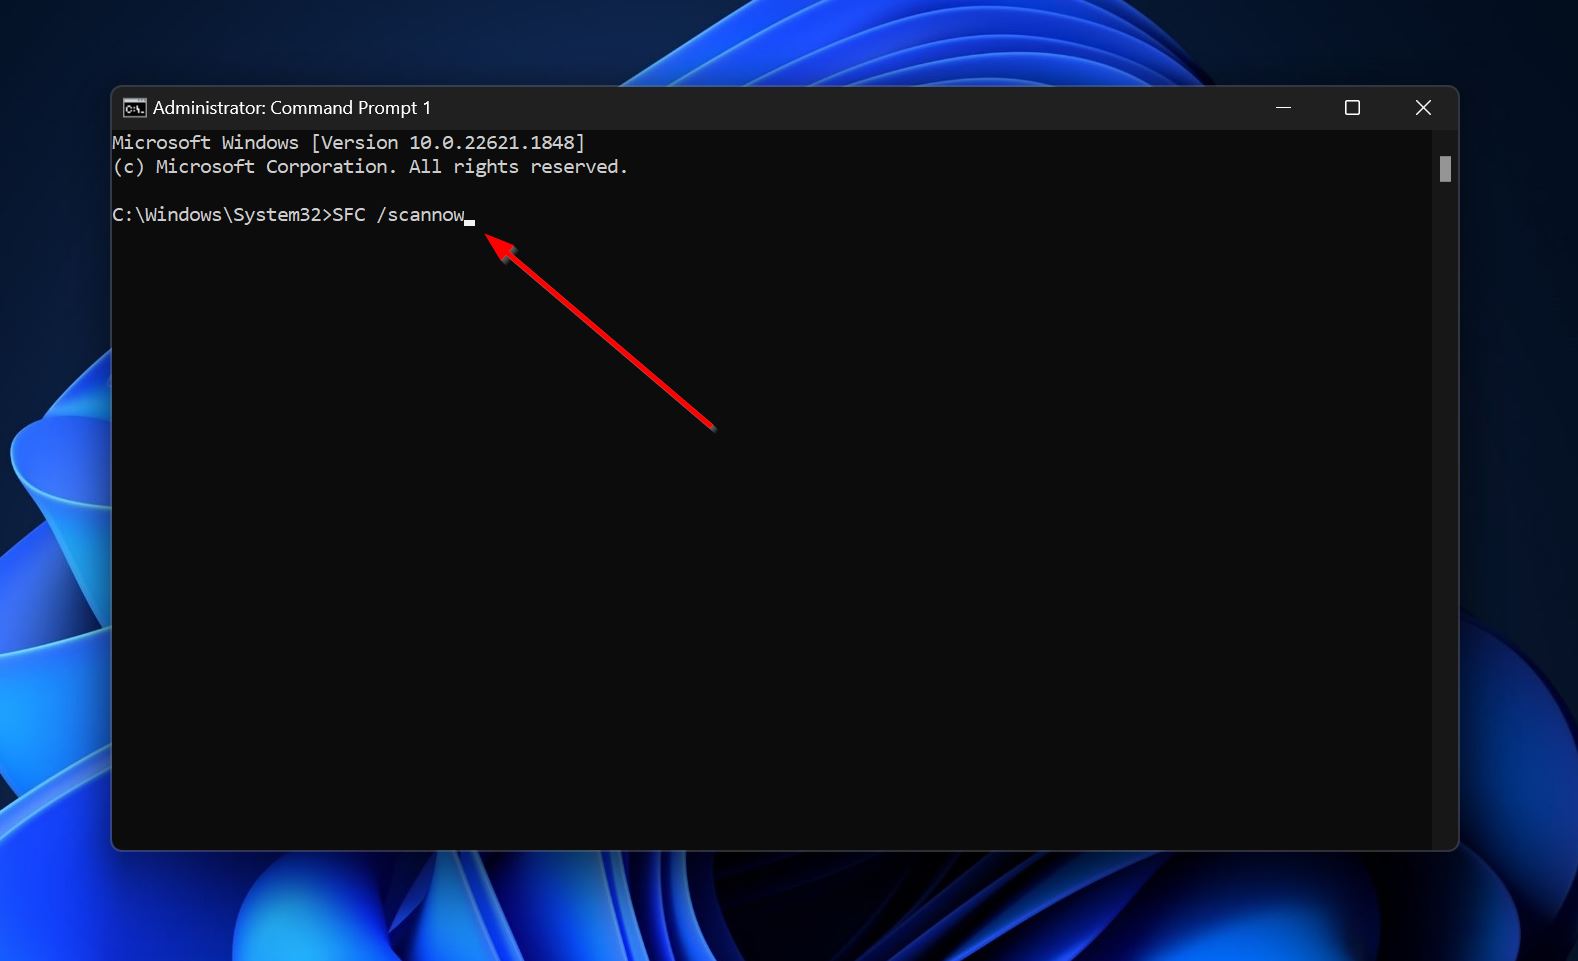
- Type SFC /scannow and press Enter once the DISM scan is over.
Method 6: Format the Drive
Shy of replacing your drive, formatting is the only remaining way, if none of the methods above fixed the CRC error on your drive. While data recovery after a Quick Format is possible, a full format erases all the data on your drive. It’s best to recover your data before you format the drive.
To format your drive, follow these steps:
- Search for “disk management” in Windows Search (Windows Key + S). Click on Create and format hard disk partitions from the search results.
- Right-click on the drive you wish to format and click on Format.
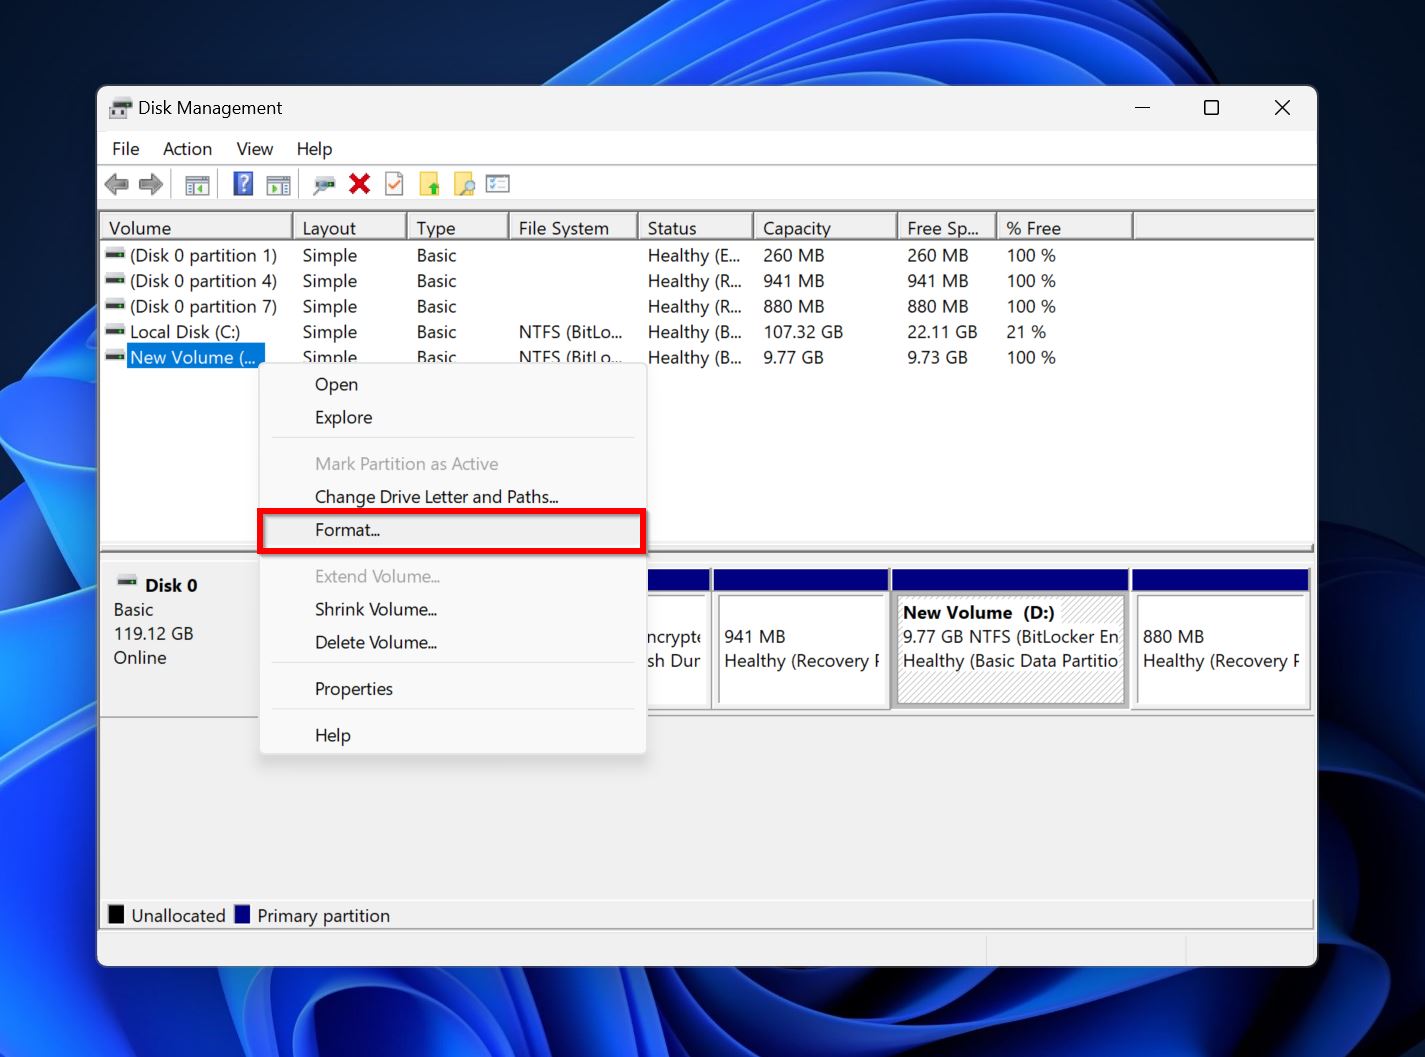
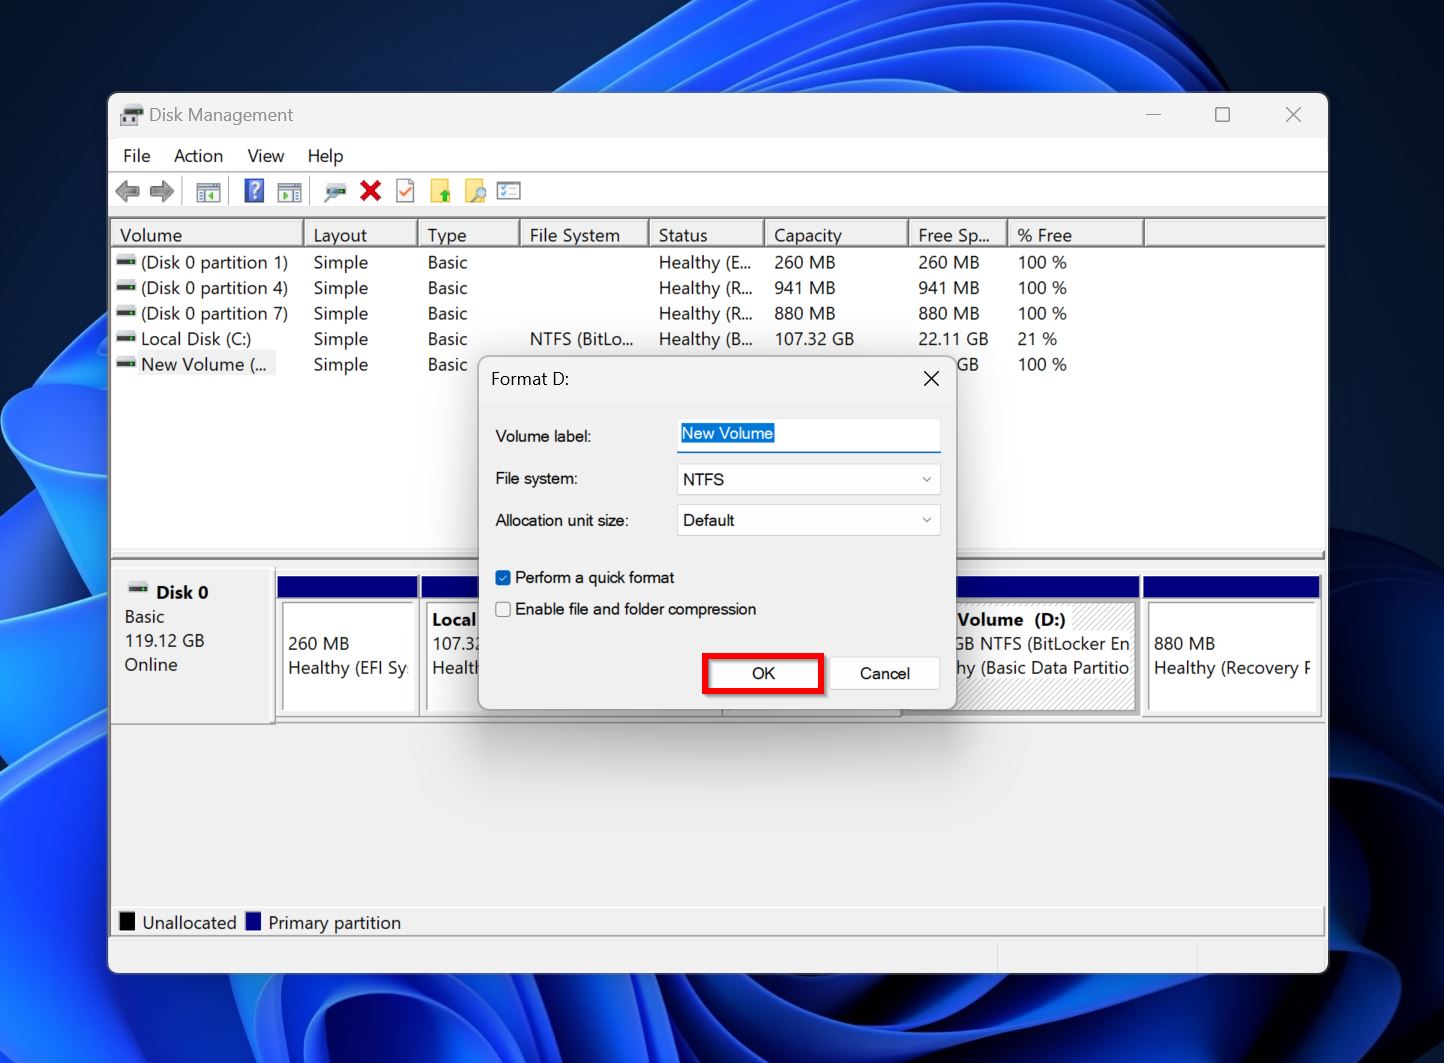
- Pick the format parameters, such as the File System and Volume label. Click on OK.
FAQ
What are the reasons for the Cyclic Redundancy Check error on an external hard drive?
There are several reasons why an external hard drive cyclic redundancy check, or CRC error, may occur on your external HDD:
- The USB or power cable is loose or damaged.
- The drive is physically damaged.
- File system corruption and bad sectors.
- Improper system configuration.
Why do I get a Cyclic Redundancy Check error when initializing the disk?
A CRC error during disk initialization usually indicates drive failure. It’s best to get the drive replaced under warranty if it’s new or use some other drive.
How to fix the Cyclic Redundancy Check error using CMD?
You can use the Command Prompt (CMD) to run the DISM and SFC commands, which can fix the CRC error. The syntax for these commands is DISM /online /Cleanup-image /Restorehealth and SFC /scannow respectively. Remember to run the DISM command first.
Conclusion
Cyclic redundancy check (CRC) errors should be taken seriously. Back up your data as soon as you can, and only then attempt to repair the drive. It’s advisable to create regular backups of all your important data, so you’re protected against such errors. Ideally, store these backups on an external storage drive as well as a cloud storage service. If you suspect physical damage was the culprit behind the CRC error, contact a professional data recovery service, instead of using DIY recovery methods.
This article was written by Manuviraj Godara, a Staff Writer at Handy Recovery Advisor. It was also verified for technical accuracy by Andrey Vasilyev, our editorial advisor.
Curious about our content creation process? Take a look at our Editor Guidelines.