Are you on the verge of punching your computer screen because of a secondary hard drive that doesn’t show up?
Keep reading for a troubleshooting guide aimed at fixing your secondary hard drive that refuses to show up. This article also features some research behind why secondary hard drives don’t show up. Click here to skip straight to the troubleshooting steps.
Exploring the Reasons Why a Secondary Hard Drive Doesn’t Show Up
Here are some common problems and corresponding solutions for a secondary hard drive not showing up:
Problem | Reason | Solution |
📁 The secondary hard drive is not showing up in File Explorer | File system corruption and unsupported file systems can prevent File Explorer from detecting your secondary hard drive. | Use data recovery software to scan and retrieve data from your secondary hard drive. |
💻The secondary hard drive is not showing up in Disk Management | This happens when the OS fails to detect your secondary hard drive as a storage device. | Try to reconnect the secondary hard drive. |
🛑 The secondary hard drive is not showing up in BIOS | Physical damage to your secondary hard drive can prevent your PC from detecting it. | Consult a data recovery service to repair the secondary hard drive. |
How to Recover Data from Secondary Hard Drive That Is Not Showing Up
It’s possible that your undetected secondary hard drive has significant logical damage, and even physical impact. In such cases, attempts to fix the hard drive could lead to data loss. Consequently, it’s critical to create a backup ASAP.
The good news is that data recovery software can access your secondary hard drive, even when File Explorer fails to do so.
While there are several data recovery applications, our editors vouch for Disk Drill because of its simplicity and versatility. Disk Drill ships an effective backup mechanism called the byte-to-byte feature that creates a disk image of your secondary hard drive. You can scan this disk image like a regular storage disk, to view existing files and recover deleted data.
Having secured data from the secondary hard drive, you can then explore methods to fix your hard drive without having the anxiety of potential data loss.
Disk Drill helps you access the secondary hard drive, even if File Explorer doesn’t display your storage device. The only prerequisite is that Disk Management must detect your secondary hard disk with its correct drive size.
Here’s how you can use Disk Drill to recover data from a secondary hard drive that’s not showing up:
- Download, install and launch Disk Drill.
- Navigate to Drive Backup under Extra Tools. Click on your secondary hard disk, and initiate the Byte-to-byte backup.
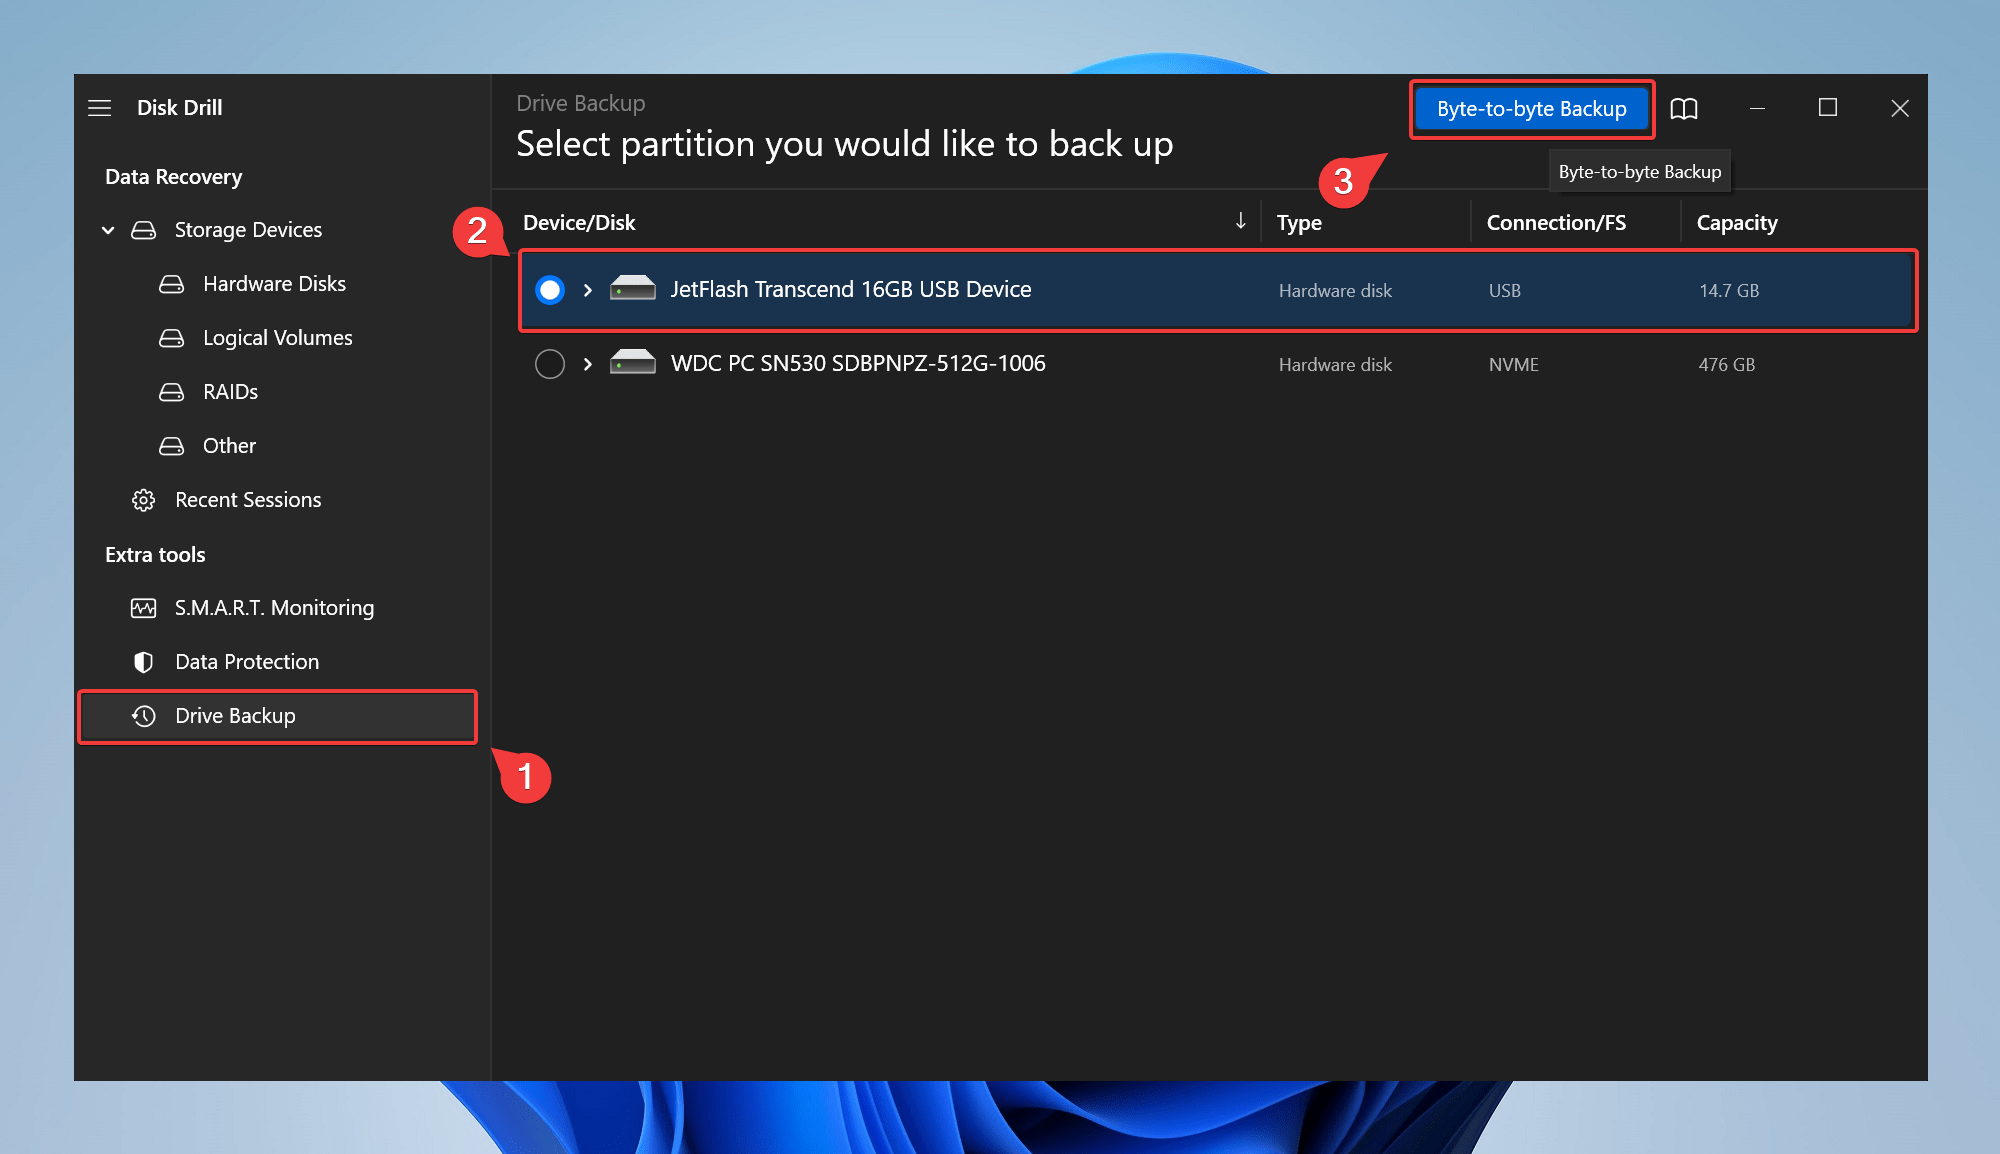
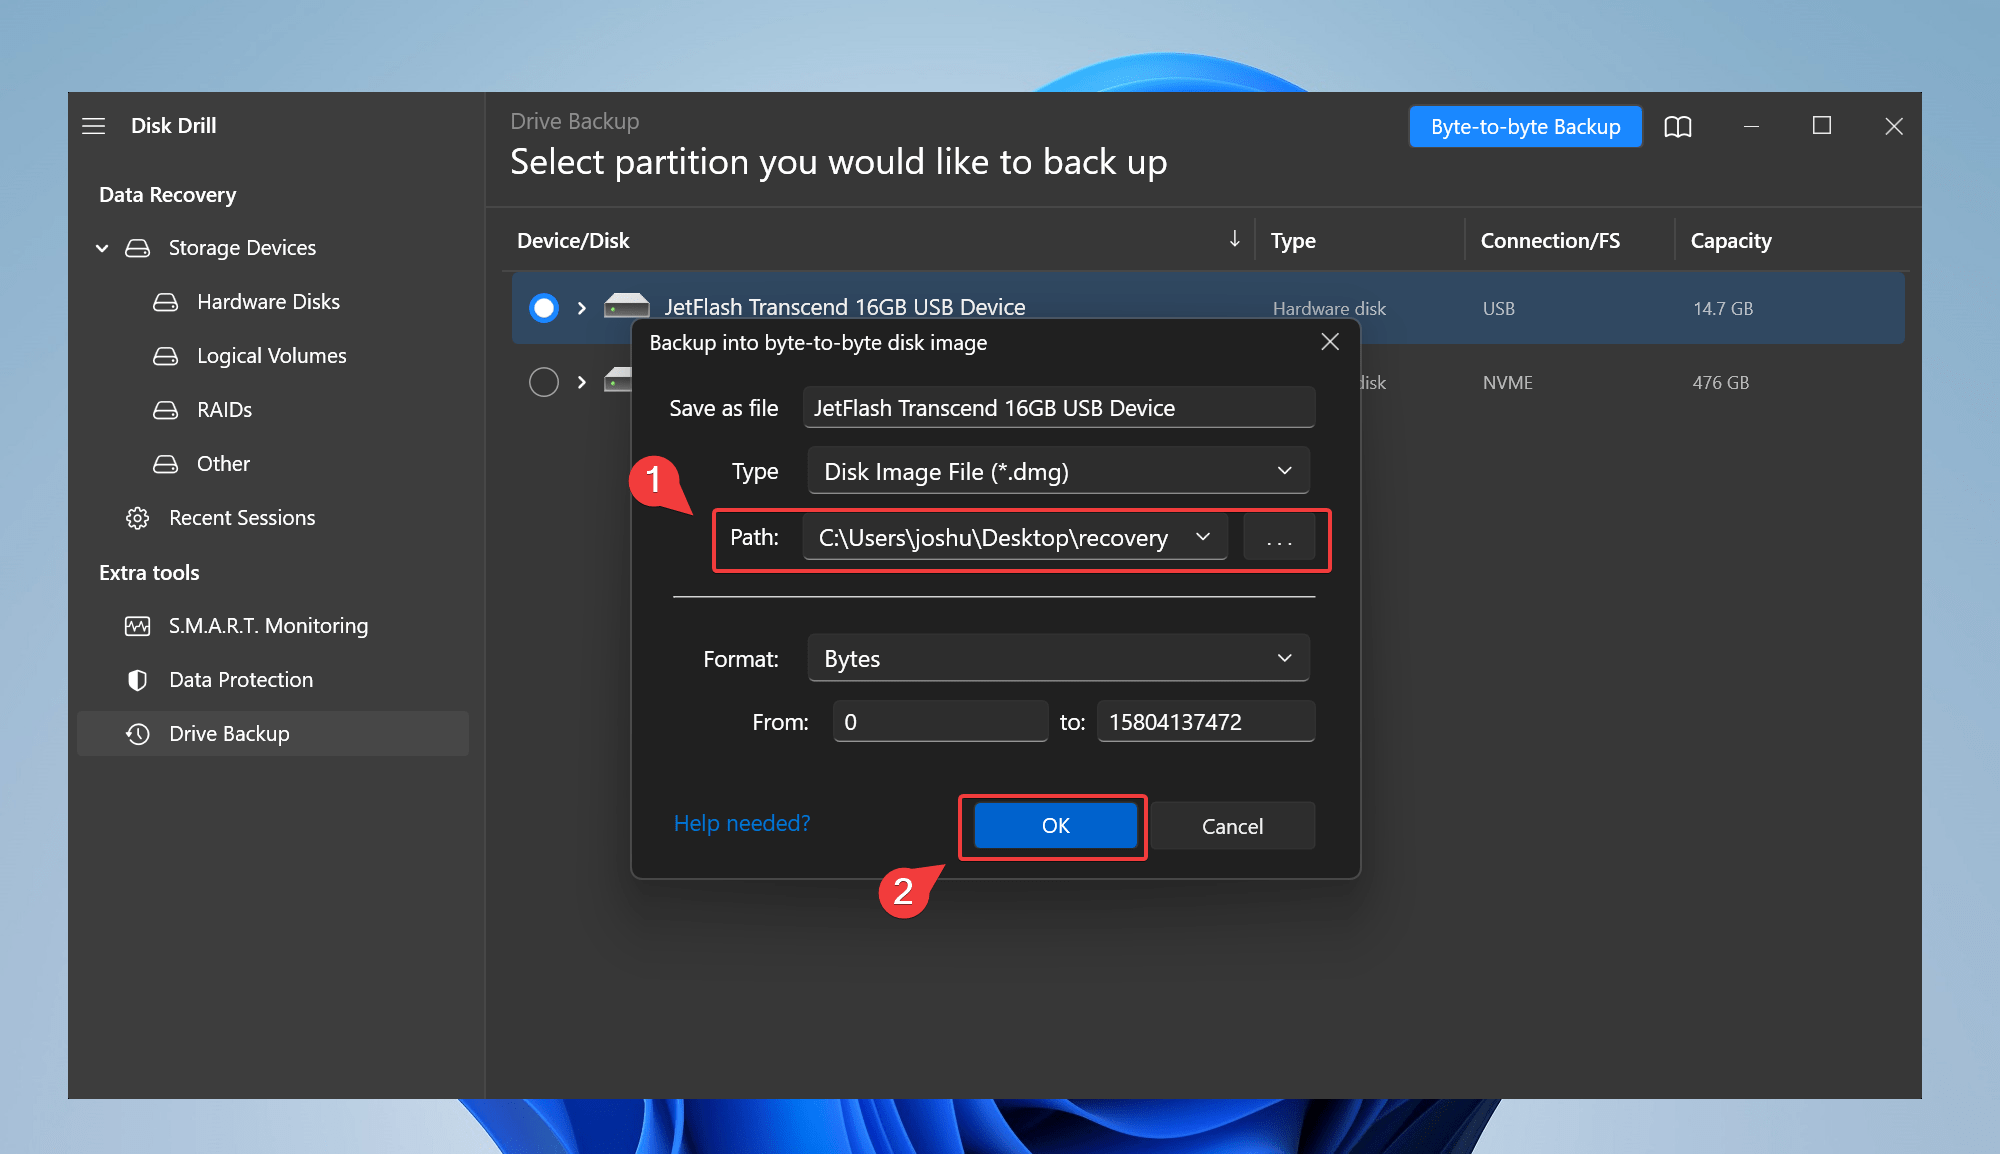
- Select your target destination, and click Ok.
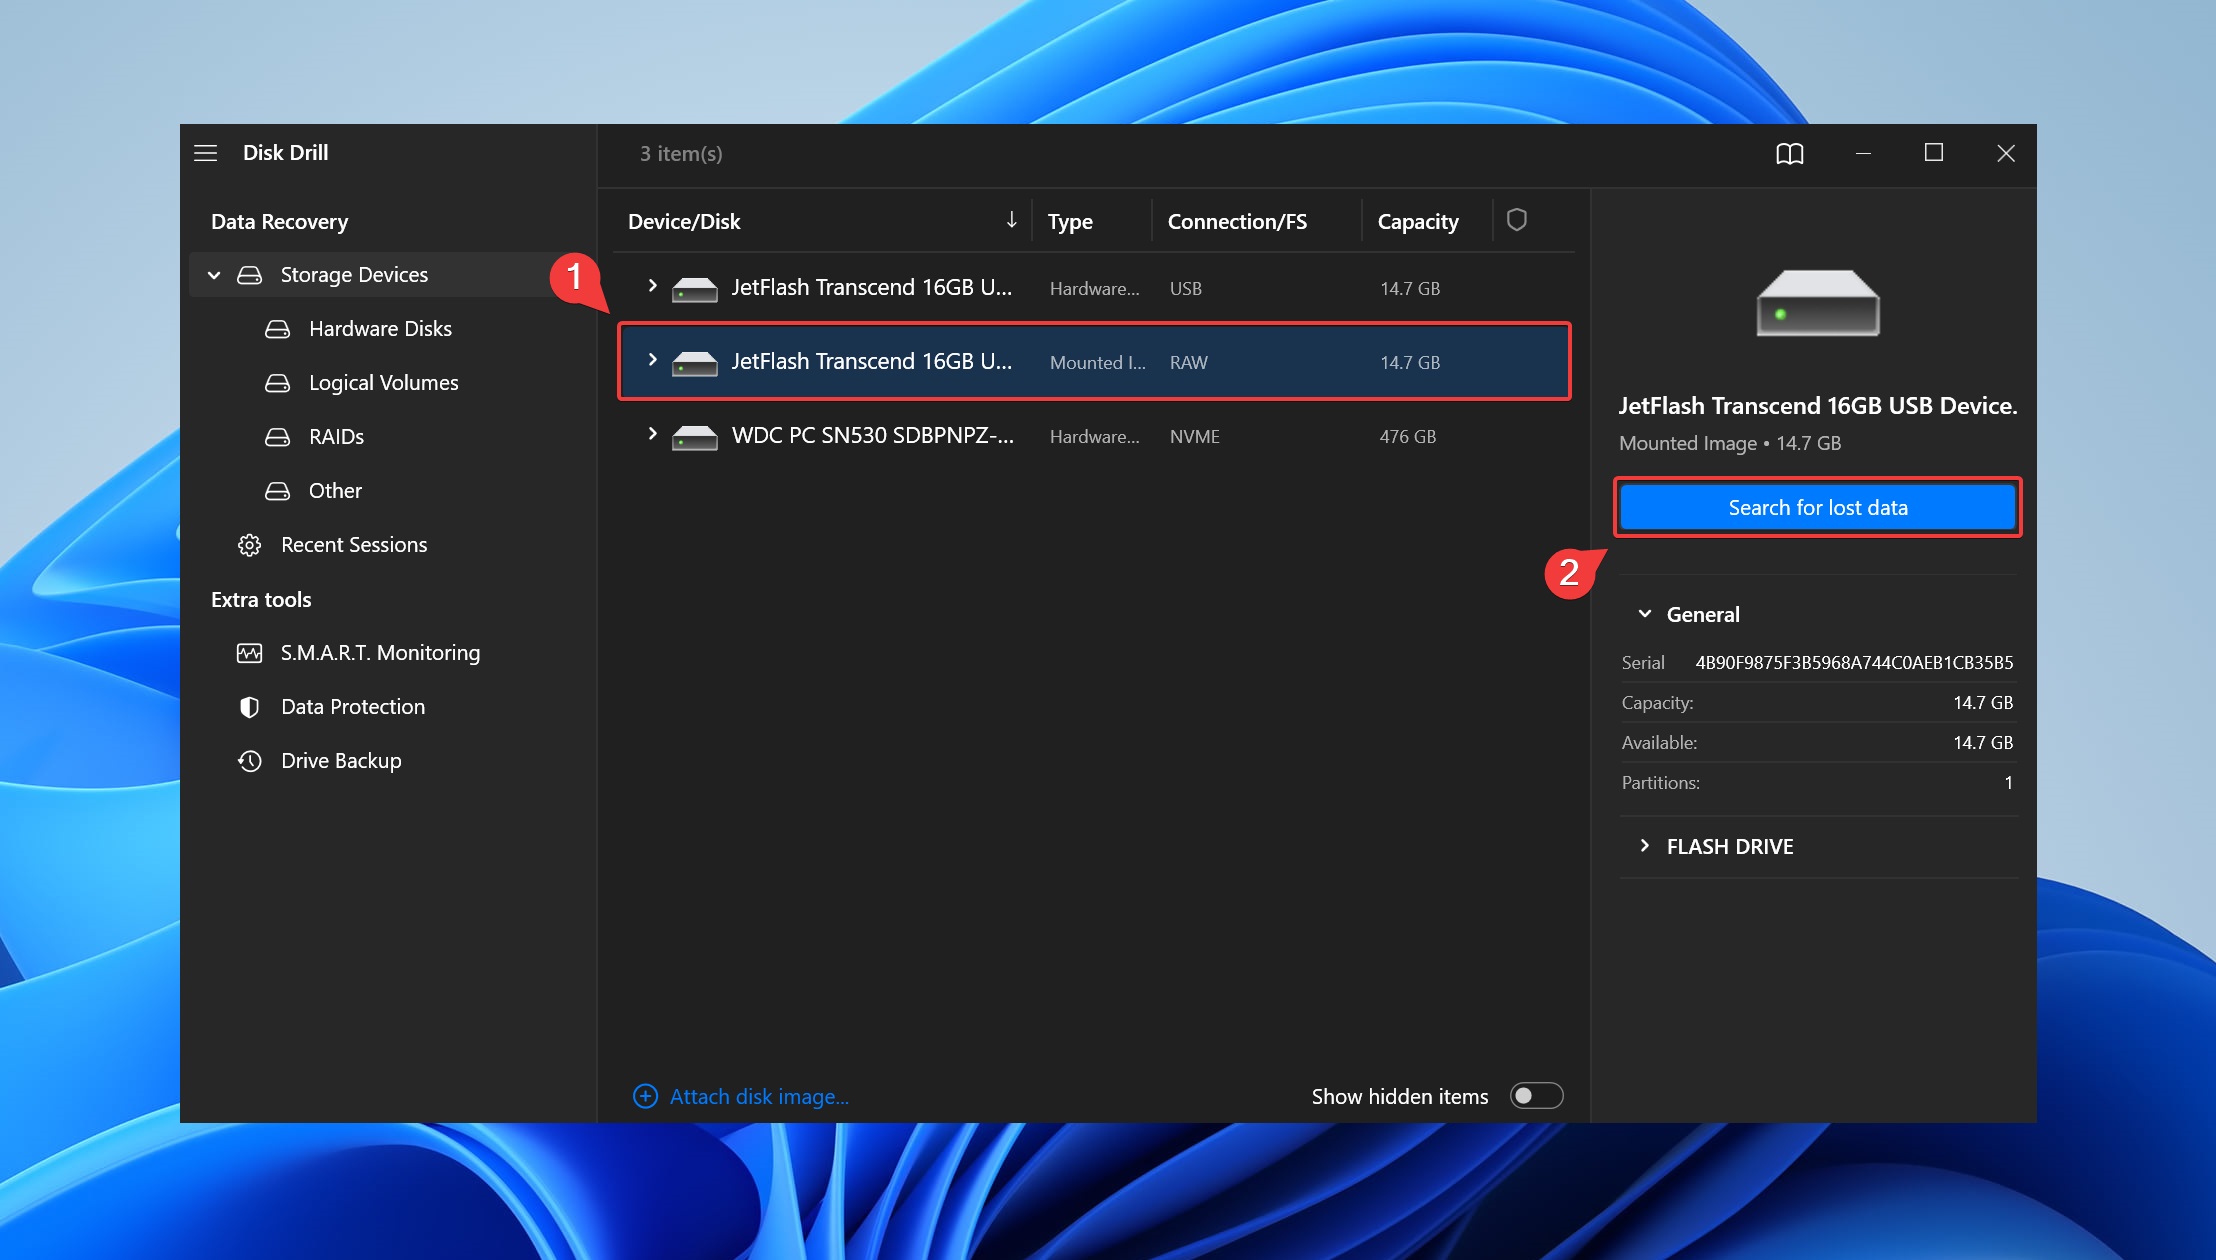
- Click the home button to return to the main page, and click on Storage Devices > Attach disk image. Now, select the newly created disk image of your secondary hard drive.
- Select the disk image, and click on Search for Lost Data.
- Wait for the scan to terminate, and click on Review Found items to browse through recoverable files on your secondary hard disk.
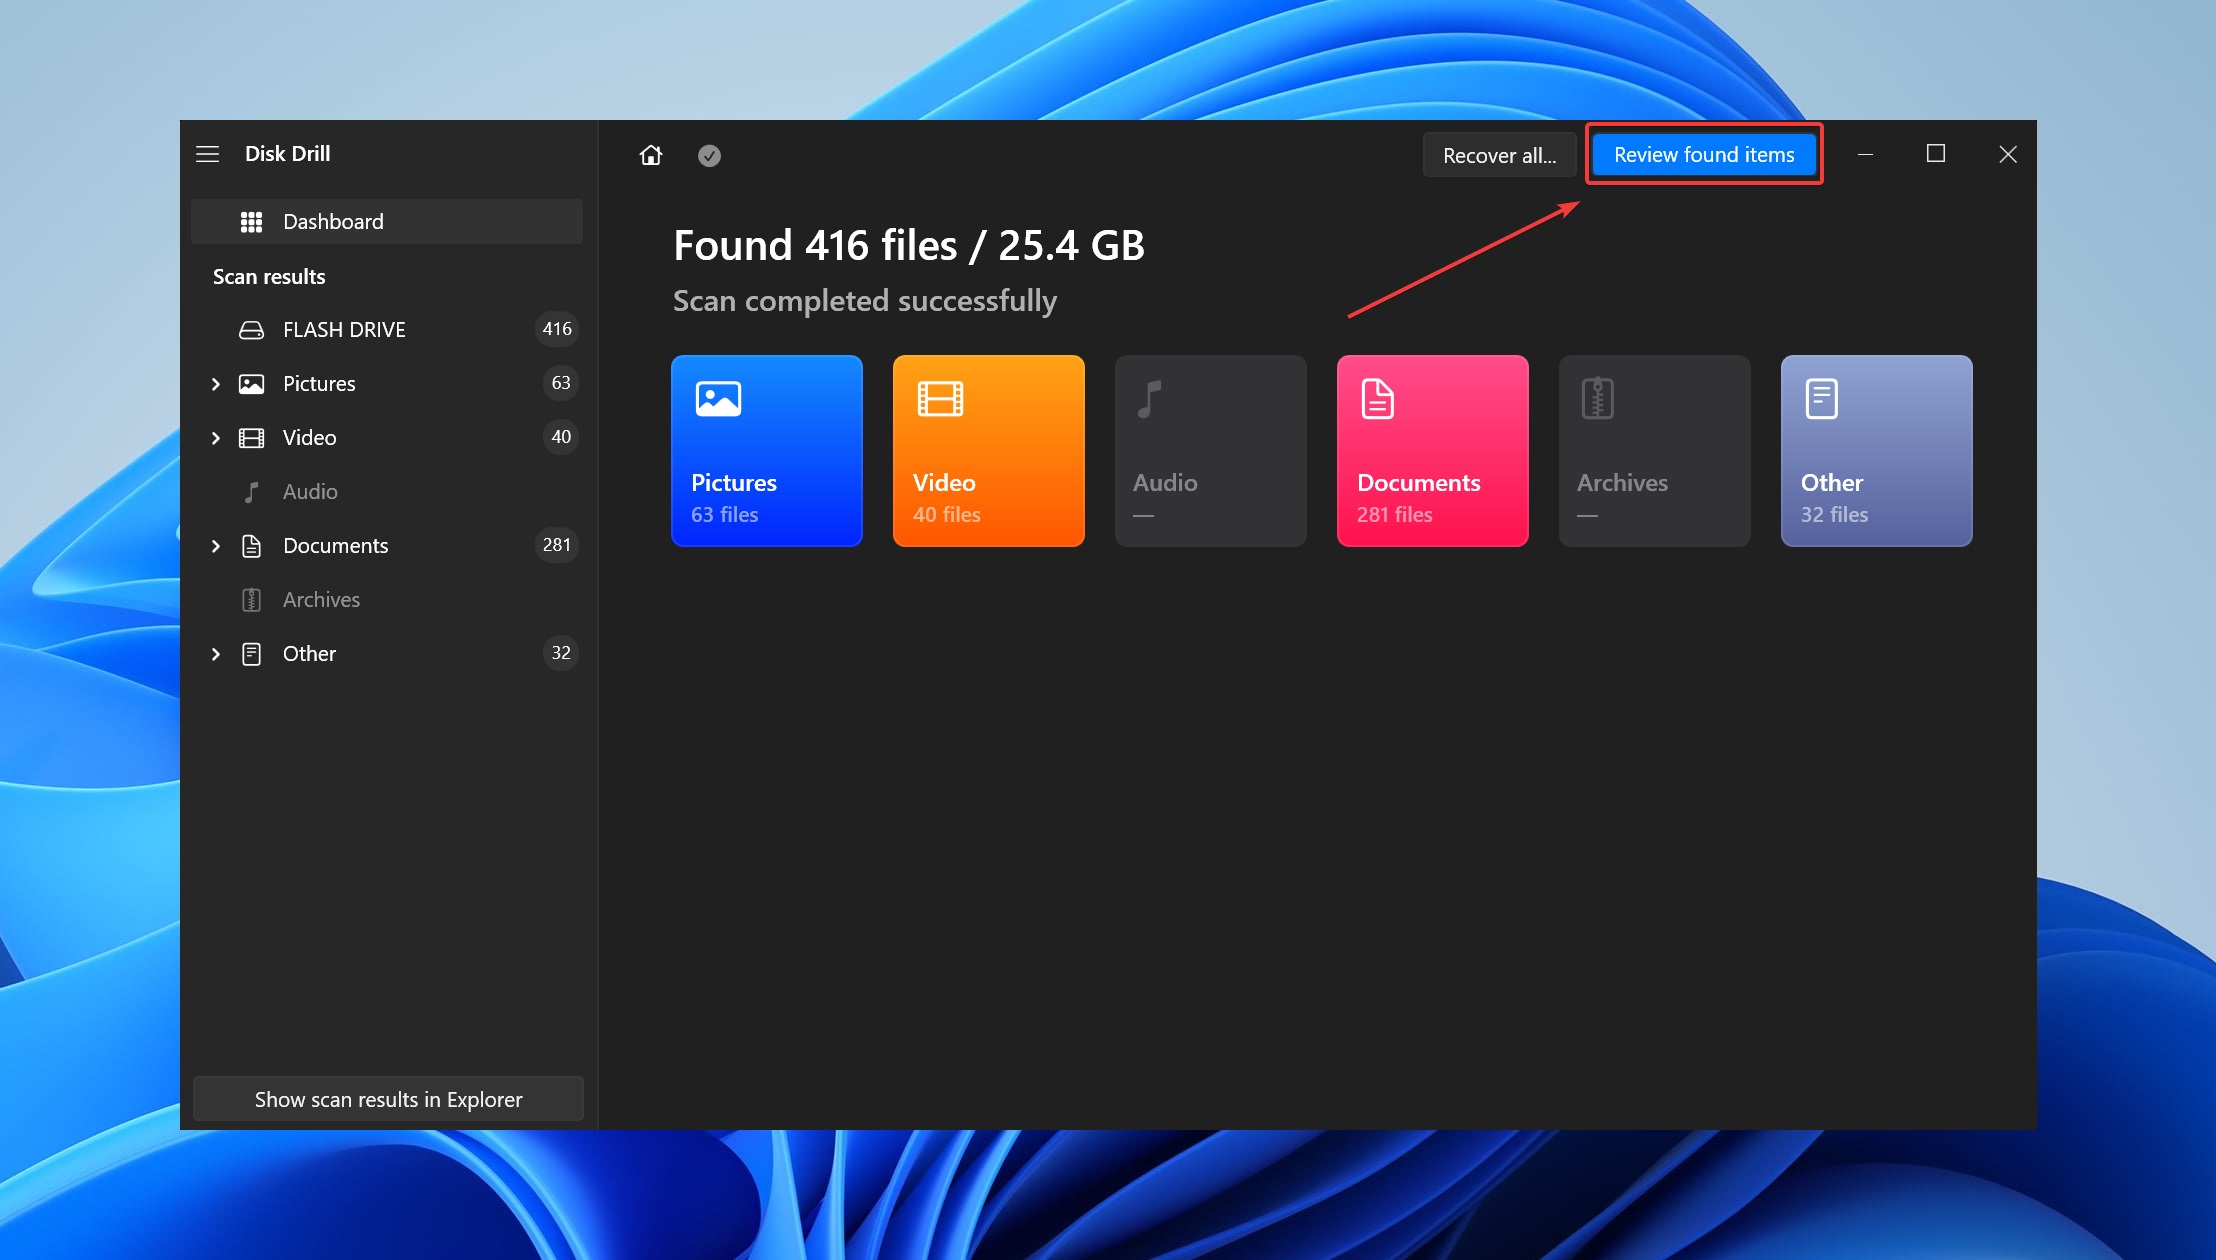 👀
👀Note: Disk Drill will now scan the disk image of your secondary hard drive. This way, you don’t inflict any stress on the secondary hard disk by scanning. Now, you can eject the secondary hard disk to prevent any read/write operations on it.
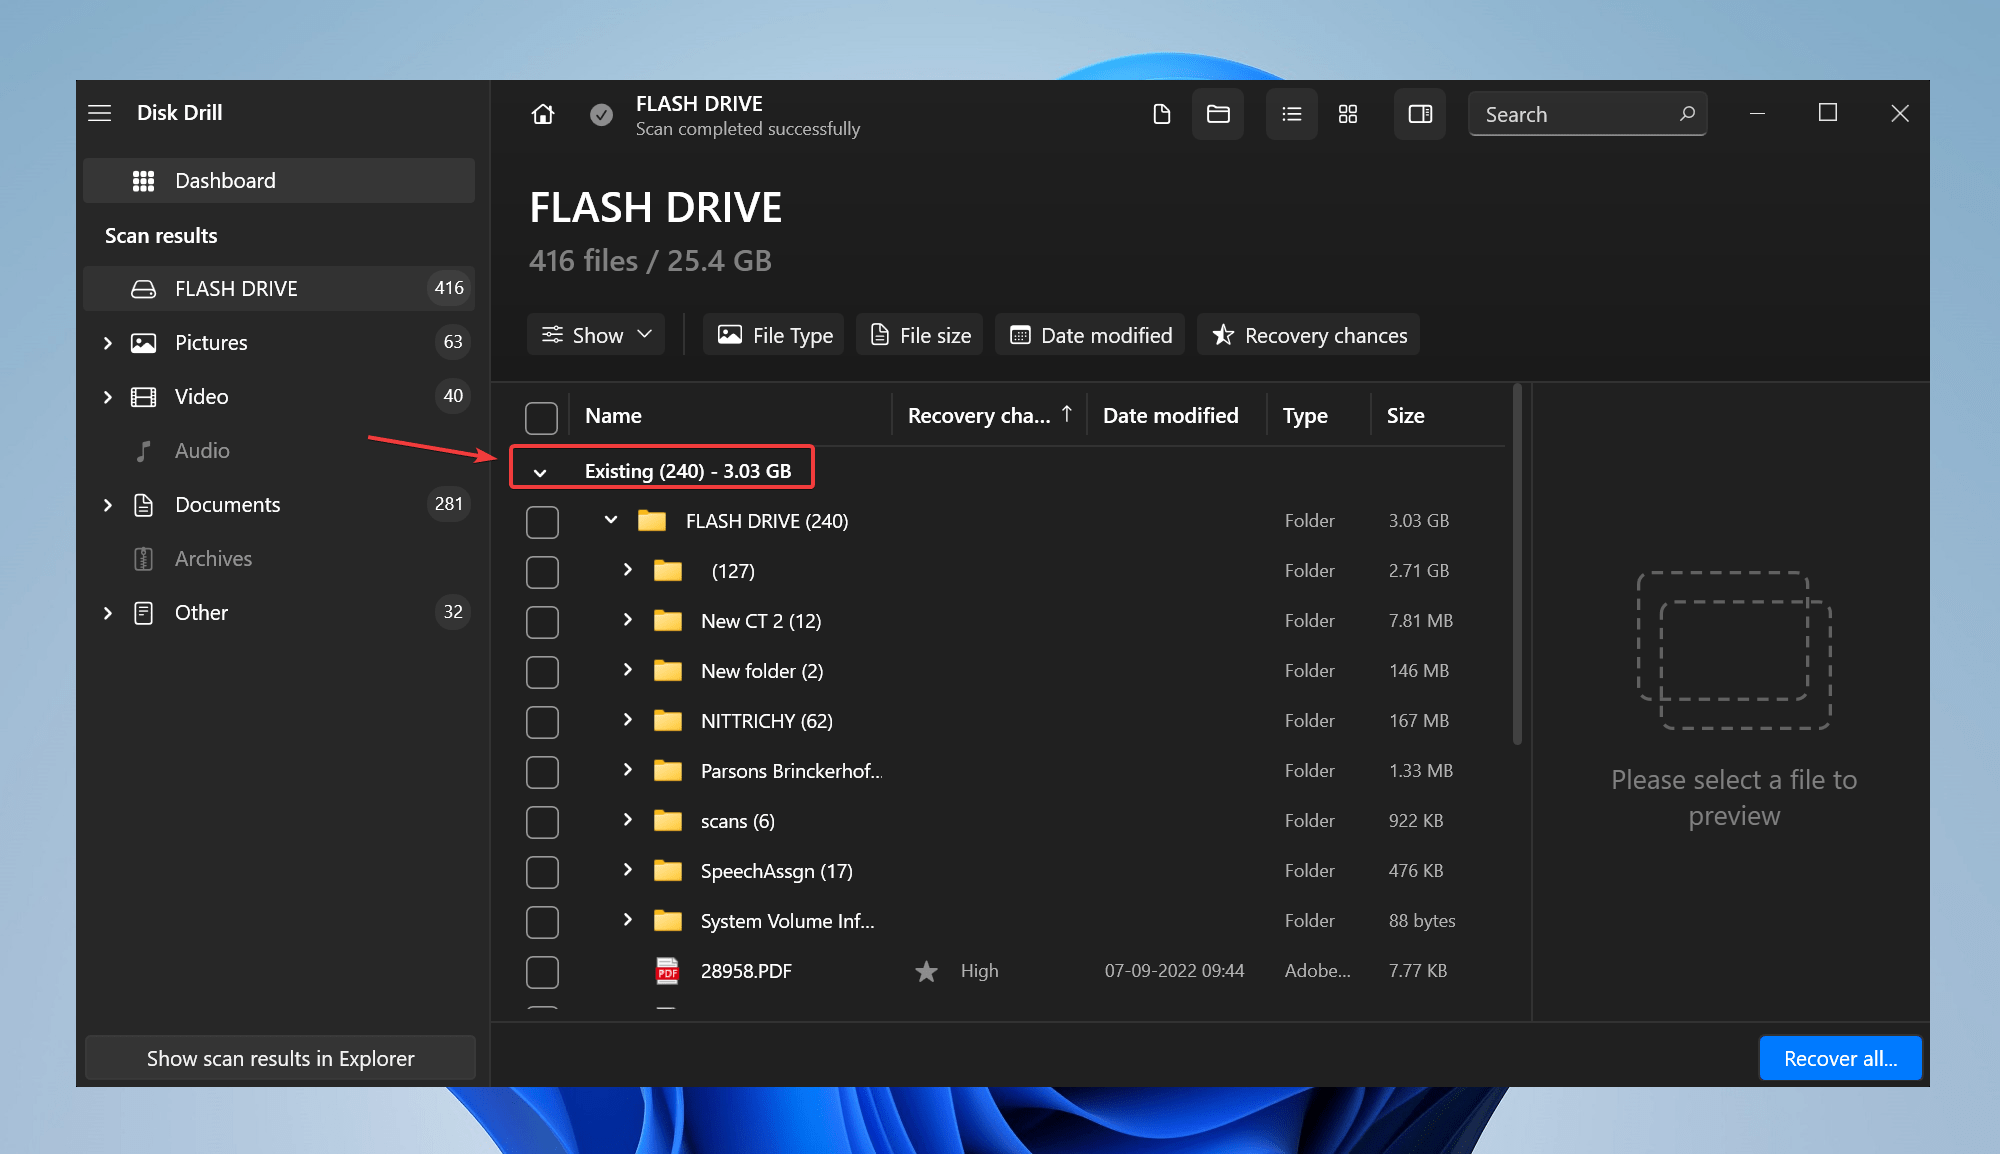
- Click Existing to reveal the contents of your secondary hard drive.
- If you want to recover deleted files, click the “deleted or lost” or “Reconstructed” section, and preview your files by clicking on the eye icon to discover attributes like the last modified date and file size. Leverage the filter feature to refine search results. For instance, I typed in jpg in the top right corner to view only jpg images for recovery.
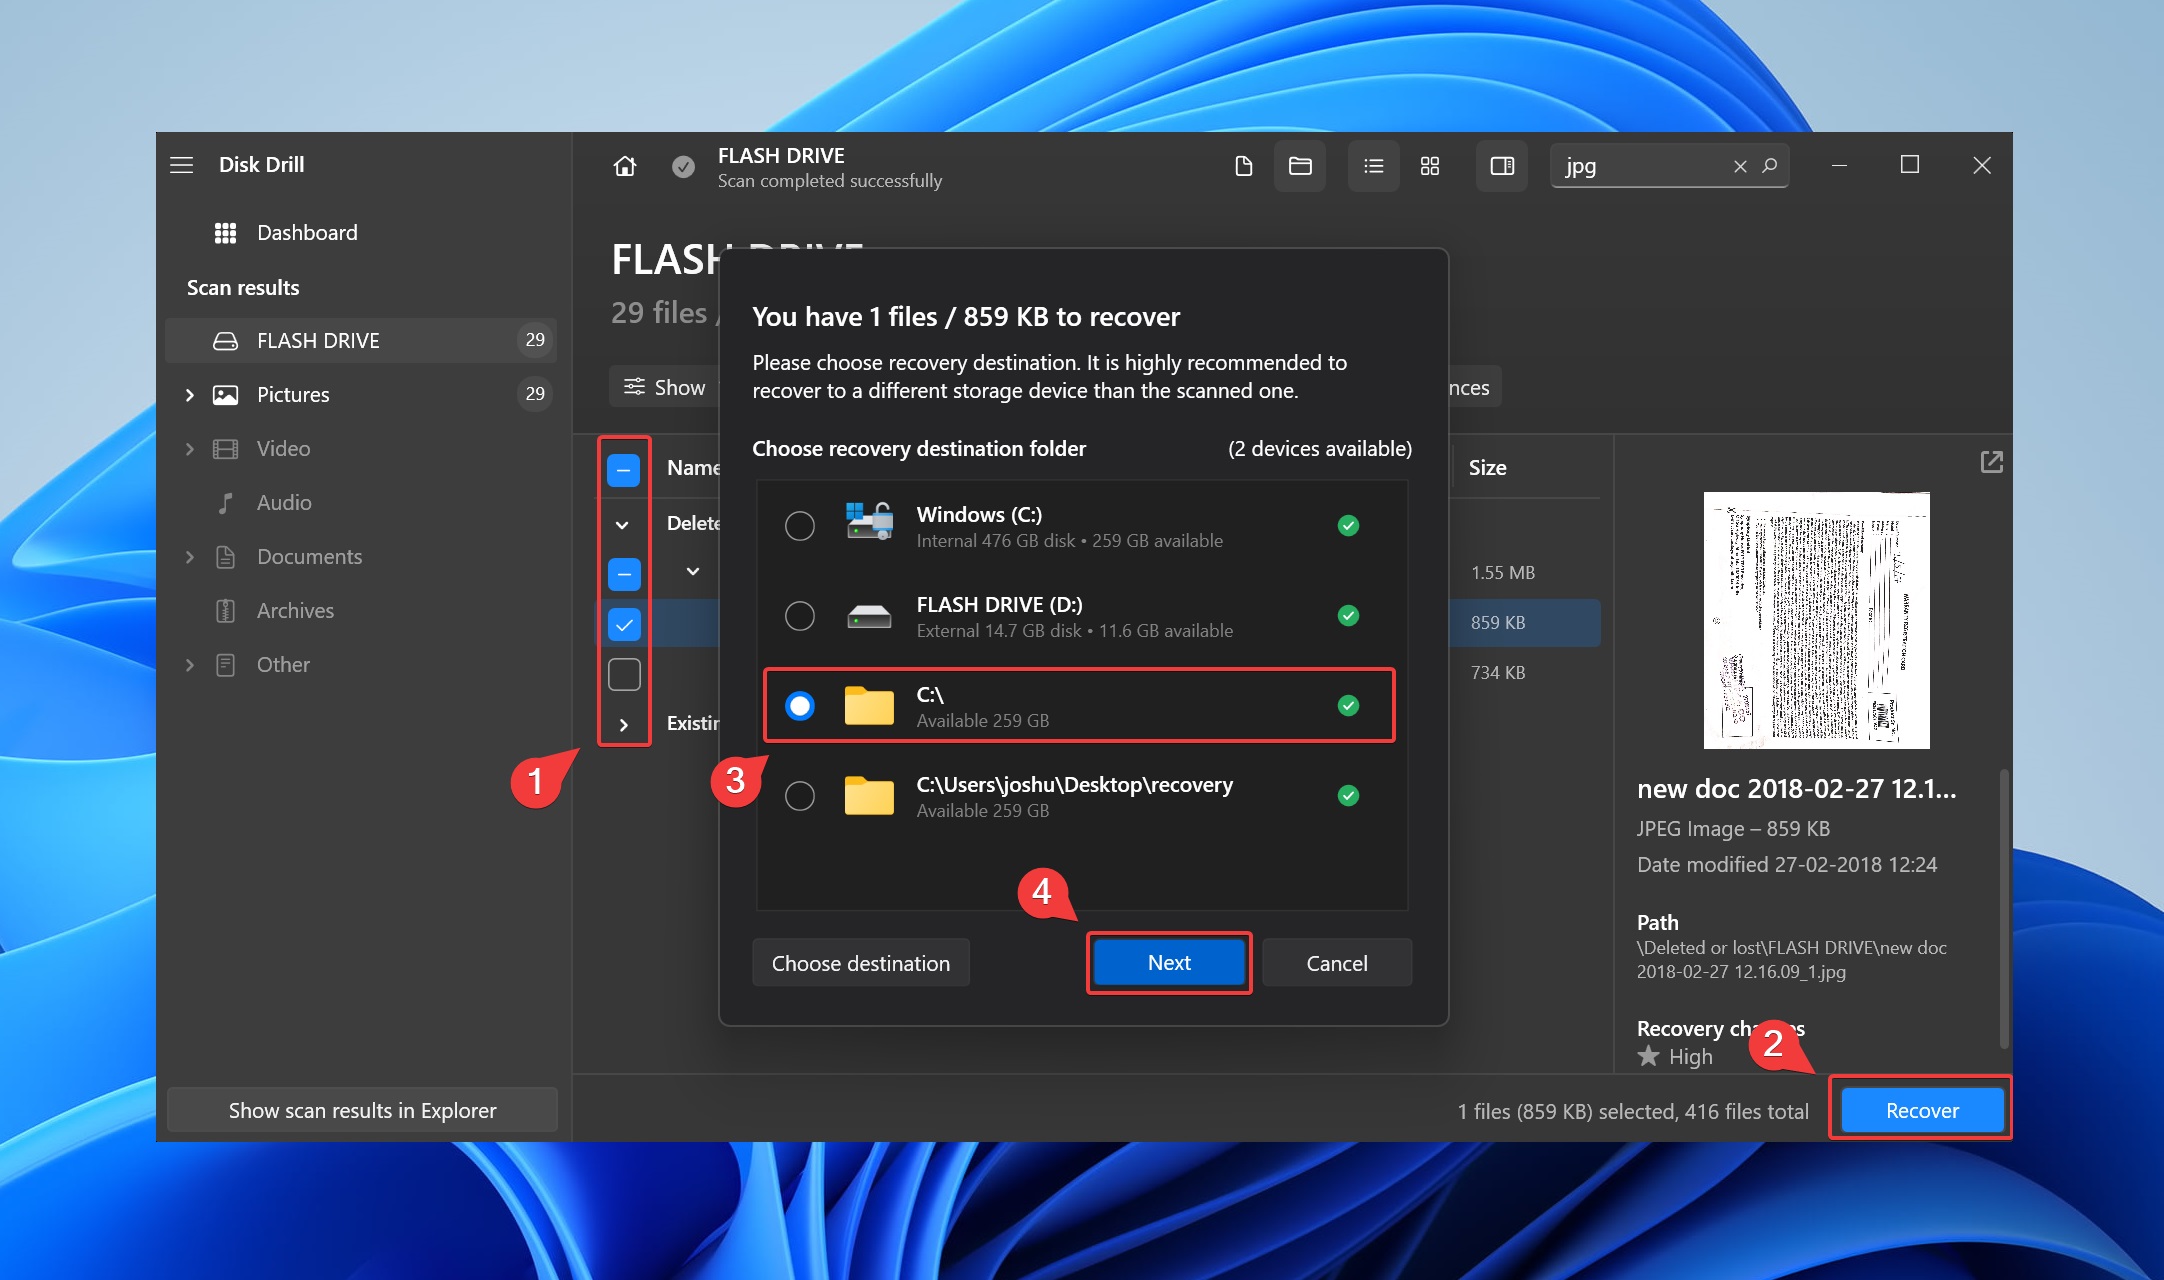
- Select the files you want to retrieve and click Recover.

- Specify the destination for saving your recovered data. Do not select the affected secondary hard drive as your destination.
- Click on Show recovered data in Explorer to view your retrieved files.
Note: While the byte-to-byte feature is free, you would need to upgrade to Disk Drill PRO to extract files from the disk image.
Explore our complete Disk Drill review to unravel the other hard drive data recovery features that the tool offers. Also, check out our expert opinion on whether Disk Drill is safe for your computer.
How to Fix Secondary Hard Drive Not Showing Up
Now that you have secured the secondary hard drive’s data, you can try to fix the hard drive not showing up issue. Here are six methods to fix your secondary HDD that’s not showing up:
Method 1: Reconnect Secondary Hard Drive to the PC
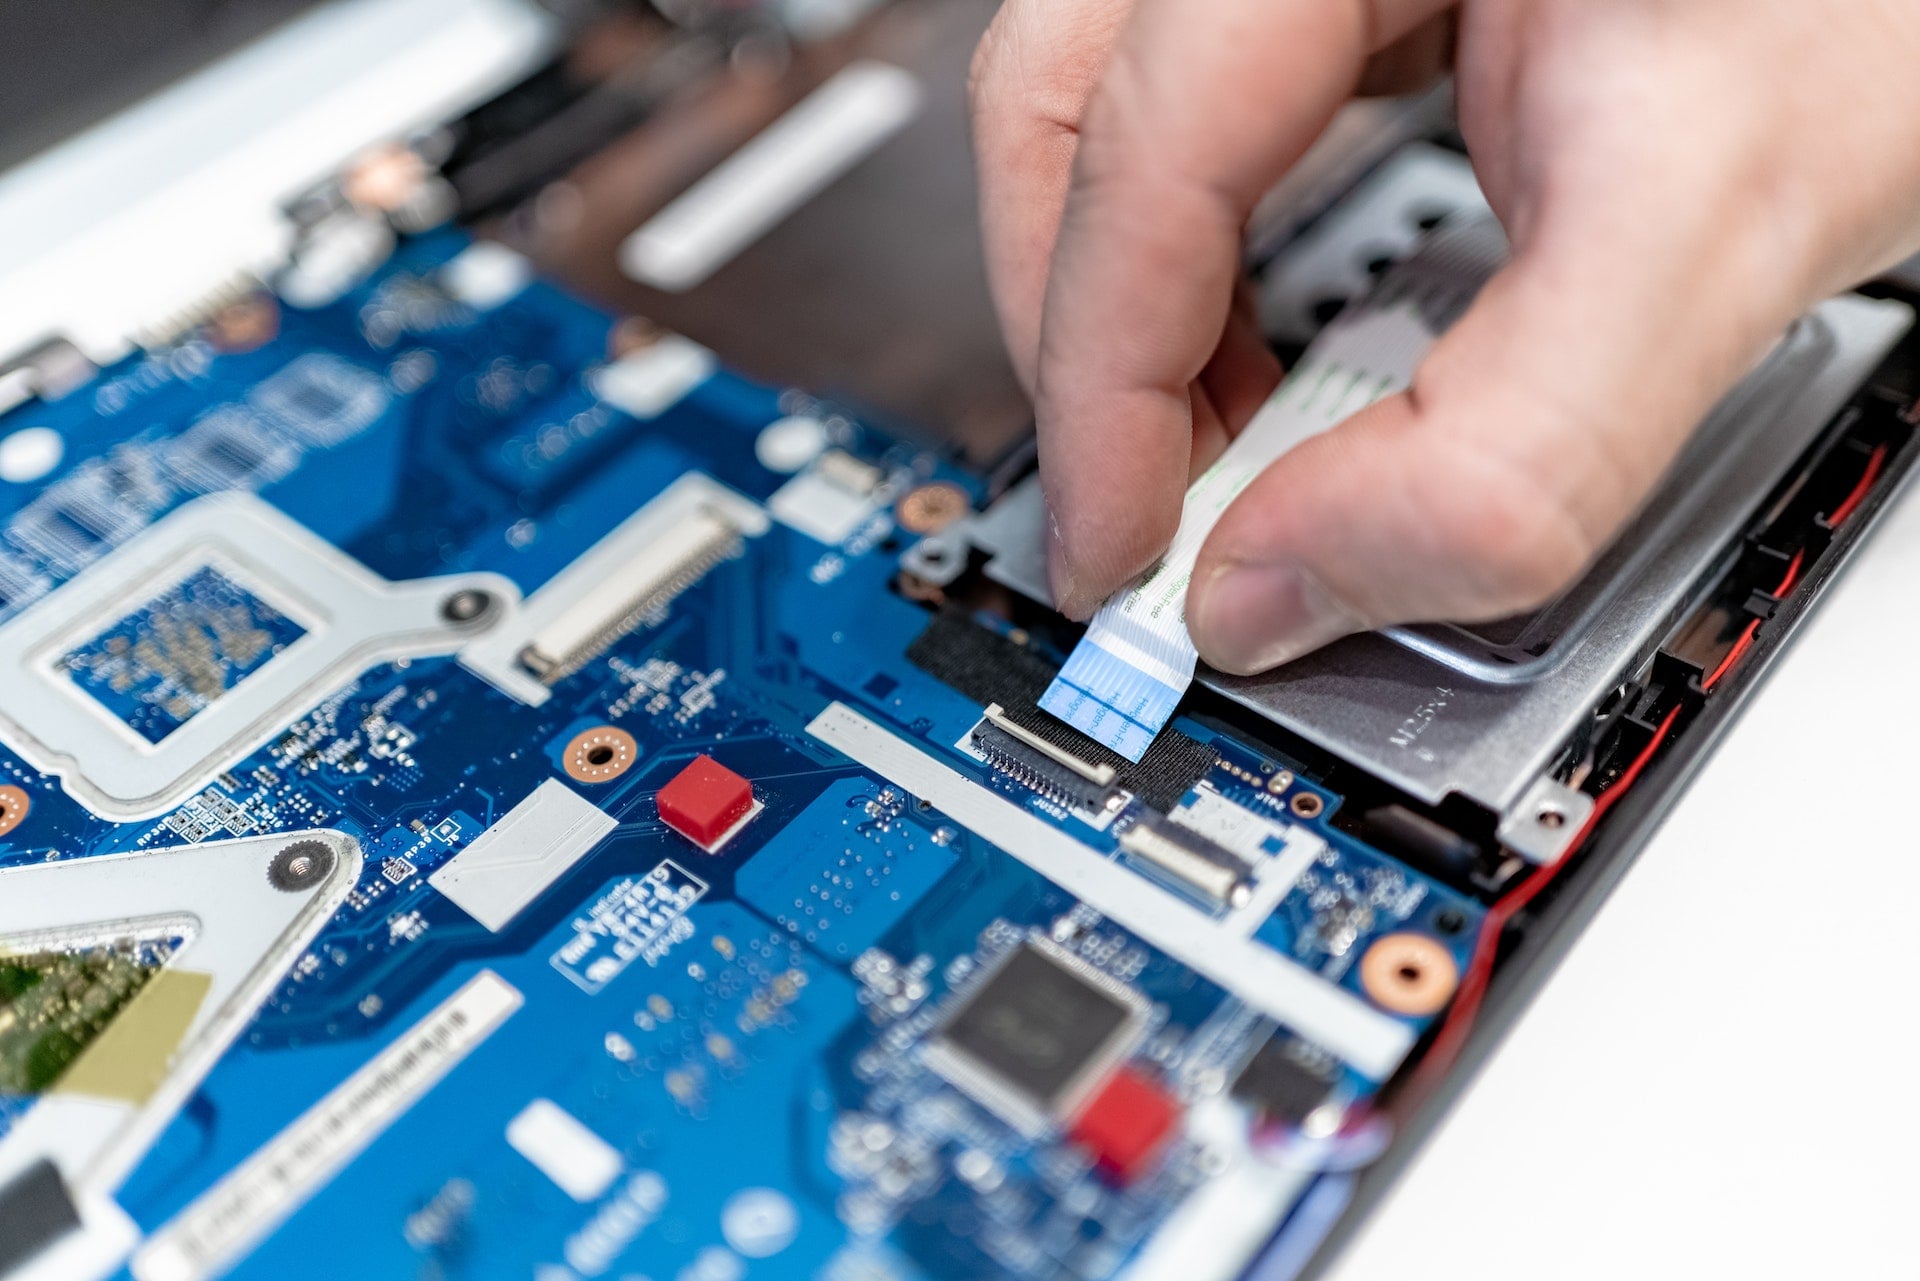
If you’re dealing with a problematic internal secondary hard drive that doesn’t show up on Disk Management or BIOS, attempt a physical reconnection:
- Turn off and unplug your PC. Wait for your computer’s fans to completely stop before proceeding.
- Using a screwdriver, carefully open your CPU’s case.
- Locate your secondary hard drive, and unscrew it off the drive slot. Some modern PCs feature toolless cases – which would require you to push a lever to eject the secondary hard drive.

- Disconnect the cables from your secondary hard drive to the motherboard. Ensure you remove the SATA cables and power connectors.
- Slide and wiggle the secondary hard drive outwards.
- Now, try reconnecting the secondary hard drive. If you still encounter the undetected issue, try using different SATA cables and power connectors. Ensure you establish an intact connection by plugging in the cables correctly.
For Windows 7 users: How to Recover Deleted Files on Windows 7.
Method 2: Check Secondary Hard Drive Visibility In BIOS
To rule out the possibility of a malfunctioning secondary hard drive, check its visibility in BIOS:
- Reboot your computer, and press F1 during the OEM screen to enter the BIOS terminal. The hotkey for BIOS varies. Check your OEM’s guide for more instructions. The shortcuts could be F2, F10 or F12.
- Navigate to Startup > boot. Use arrow keys to navigate, Enter to confirm, and Esc to go backwards.
- Now, check if your secondary hard drive is visible in this list of devices. If your secondary hard drive isn’t visible in BIOS, skip to method 6.
Brief explanation on BIOS: Basic Input/Output System (BIOS) performs essential functions during start-up. BIOS coordinates between the hardware and software components of your PC.
Method 3: Reassign the Drive Letter
Changing the drive letter of your secondary hard drive can help avoid drive conflict, and improve your computer’s chances of detecting the storage device.
Here’s how you can reconfigure a new drive letter for your secondary hard drive:
- Use the shortcut Win + X to open the power user menu. Now click Disk Management.
- Right-click on your secondary hard drive, and click on Change Drive Letter and Paths.

- Click Change, and select a new drive letter > Ok.
- Head over to File Explorer, and check if you’re able to access the secondary hard drive.
Method 4: Update Drivers
Updating your secondary hard disk’s drivers can help fix potential bugs and improve the chances of detection. Here’s how you can update the secondary hard disk’s driver:
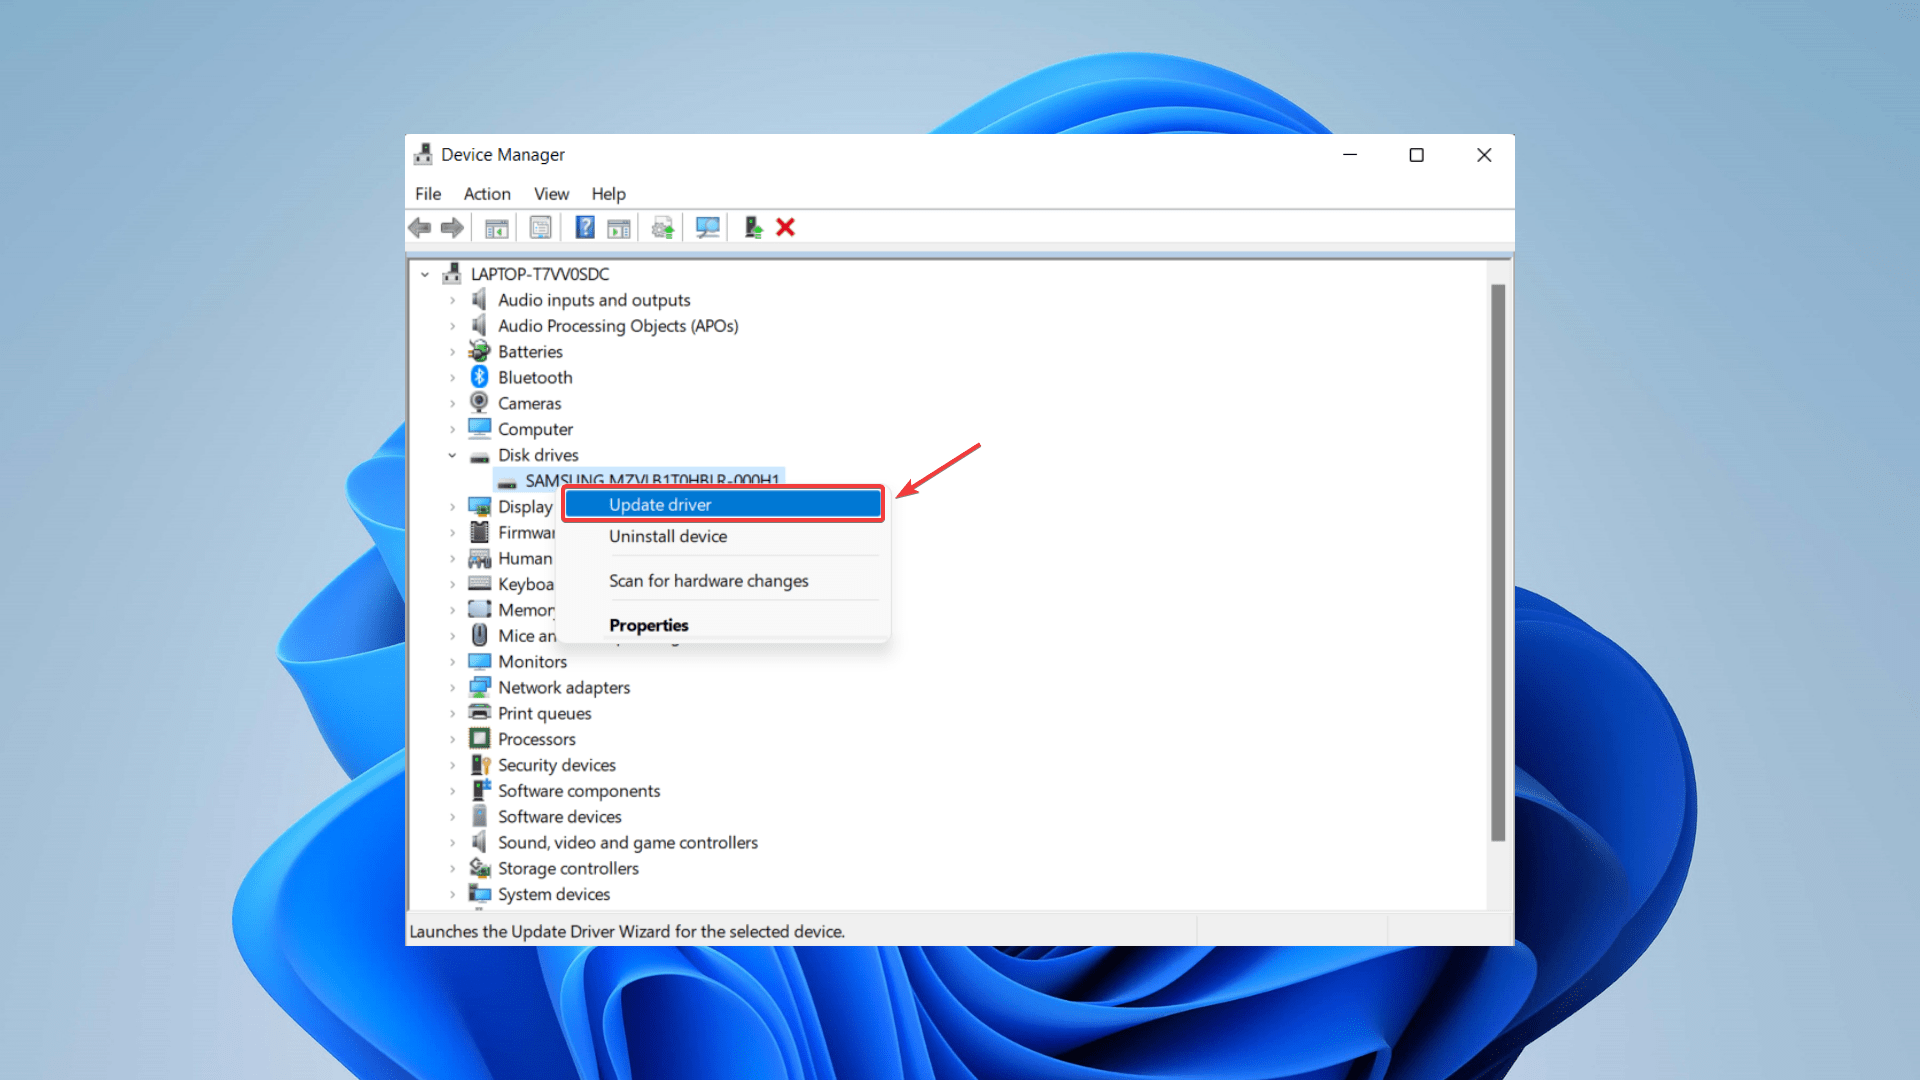
- Use the shortcut Win + X to open the power user menu. Now click Disk Management.
- Expand disk drives, and right-click on your secondary hard drive, and click Update Driver.
- Select Search automatically for updated driver software.
- Click on Update Driver, and finish the installation process.
Method 5: Initialize Secondary Hard Drive Manually
A fresh disk initialization prepares your secondary hard drive by formatting and creating compatible disk structures. Additionally, disk initialization helps with proper disk partitioning, thus improving disk accessibility to the operating system.
Note: Initializing your secondary hard drive revokes your access to the data. Consequently, you will need to use data recovery software to retrieve the data.
Here’s how you can manually initialize your secondary hard drive:
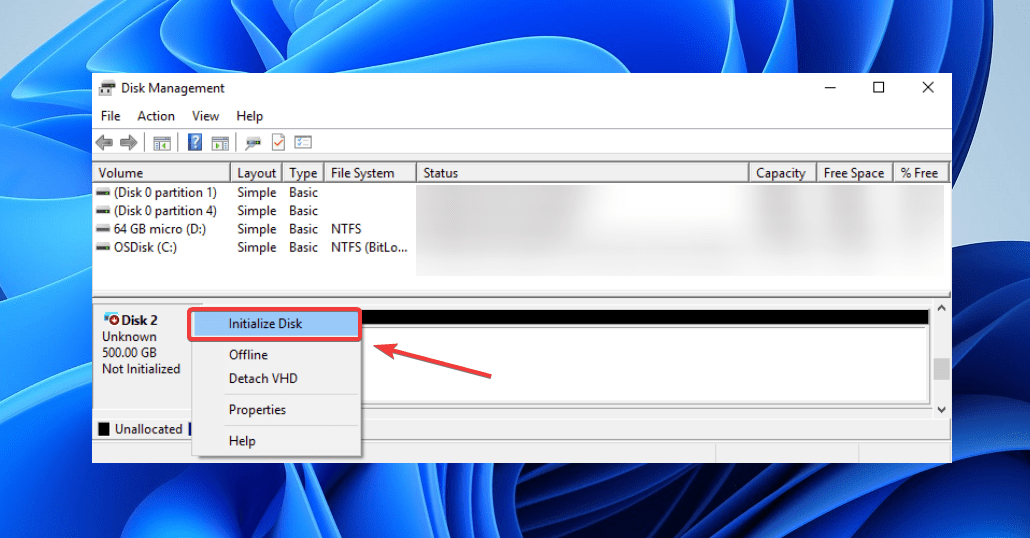
- Use the shortcut Win + X to open the power user menu. Now click Disk Management.
- Right-click on your secondary hard drive, and click on Initialize Disk.
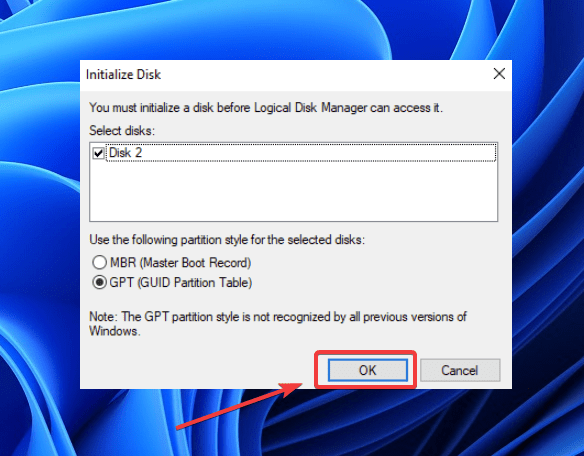
- By default, the partition style is GPT (GUID Partition Table). Click Ok to continue.
- Now, right-click on your drive’s unallocated space > New Simple Volume.
- Click Next, and specify the volume size, and click Next again.
- Specify a drive letter, and click Next.
- Finally, select the file system > Next > Finish.
Unlike the popular misconception, it’s very much possible to initialize a disk without losing any data. Additionally, here’s how you can recover data from an uninitialized disk.
Method 6: Contact Data Recovery Service
If none of the above methods worked, your final resort is consulting a data recovery service. Reputable data recovery service centers can help you nail the root cause behind your secondary hard drive not showing up.
Moreover, Data recovery professionals use specialized tools to repair your secondary hard drive in dust-free and static-free clean room environments.
Some important criteria to consider while choosing a data recovery center include:
- 💯 Industry expertise
- 🛠️ Data Recovery capabilities
- ✅ Clean Room Facilities
- 🔒 Security Policies
- 💰 Pricing
Always do your homework before selecting a data recovery center. Here’s a breakdown of the best data recovery services.
FAQ
How to repair a hard disk not detected by Windows?
Here are some methods to fix a hard disk not detected by Windows 10/11:
- Reconnect the hard drive to the PC
- Reassign drive letter
- Update hard disk drivers
- Initialize hard drive manually
- Fix the corrupted hard drive
Why isn't my second SSD not showing up?
Some possible reasons why your secondary SSD isn’t showing up include:
- SATA port & cable issues
- Incorrect BIOS settings
- Uninitialized partitions
- Outdated drivers
- Compatibility issues
How do I enable a second hard drive in BIOS?
Here’s how you can enable a secondary hard drive in BIOS:
- Reboot your computer, and press F5 to enter the BIOS screen.
- Under Setup, navigate to the System Setup section.
- Corresponding to your secondary hard drive, toggle the switch to ON.
- Save and exit the BIOS setup.
Conclusion
Encountering a secondary hard drive that isn’t showing up can be extremely frustrating. By employing the techniques outlined in this article, you can fix the undetected error on your secondary hard drive.
With a little perseverance and patience, you can turn the odds in your favor and bring that secondary hard drive back to life. Always ensure to recover data from the problematic hard drive first before attempting any fixes.
This article was written by Joshua Solomon, a Contributing Writer at Handy Recovery Advisor. It was also verified for technical accuracy by Andrey Vasilyev, our editorial advisor.
Curious about our content creation process? Take a look at our Editor Guidelines.