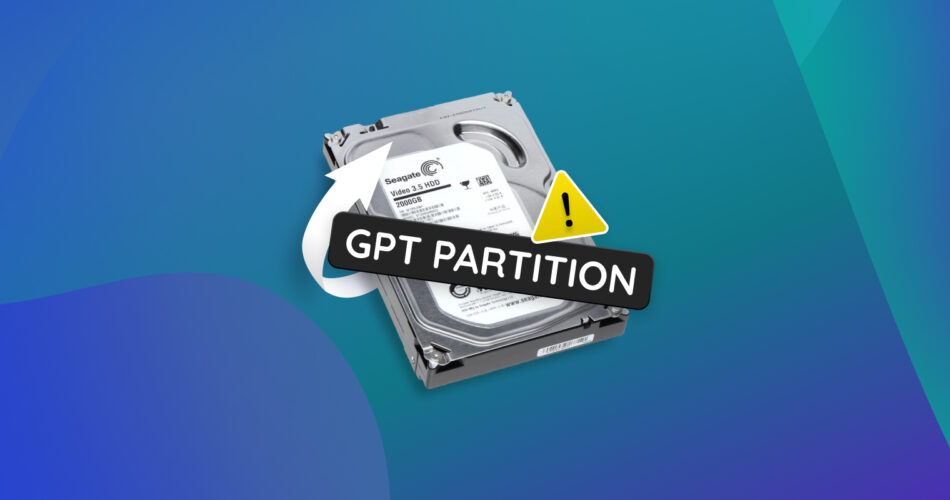
One day your drive is working fine, and the next time you connect it, you notice there’s a corrupt GPT partition on the drive. It denies you access to your data, and you’re unable to move or copy files from it. Panic ensues, but we are here to allay your fears. How? By showing you how you can perform GPT partition recovery and regain access to your data. Simply follow the guide below.
What Are the Reasons for GPT Partition Corruption?
There are several reasons why a GPT partition becomes corrupt. It could be a simple case of using the wrong adapter or enclosure to connect the disk to your PC, or something more sinister, like a drive with numerous bad sectors that is on the verge of failure.
Typically, one or more of the following is what caused GPT partition corruption on your drive:
- 🔨 Physical Damage: Hard drives have numerous moving parts that will wear out over time. The drive will develop bad sectors and soon become unfit for storing data. If the drive is older than 7–8 years, it’s quite likely that the disk has developed physical bad sectors, resulting in data corruption. Additionally, careless handling, physical shock, etc. can physically damage the drive as well.
- ⏏️ Improper Ejection: In the case of external storage drives, it’s crucial to first eject them using the Windows System Tray, before physically removing the drive. Repeated failure to do this can cause corruption, especially if the disk is in use at the time of removal.
- 💽 Accidental Partition Formatting or Deletion: It’s easy to accidentally format the wrong partition, or delete it entirely and lose access to all your data in the process. There may also be other issues related to where the drive was initially formatted. According to a Seagate troubleshooting guide, 32-bit systems may list a disk as an inaccessible GPT Protective Partition, if it was prepared and formatted with a GPT partition on newer 64-bit Mac or Windows 10 and Windows 11 systems. A corrupt partition table can also lead to issues like a GPT Protective Partition.
- 💻 Driver and Software Conflicts: Outdated, problematic drivers can prevent your OS from reading a drive properly and, in rare cases, even cause logical damage to it. They can also result in drive showing up as a GPT Protective Partition. Often, this can also be a result of using a different adapter or using a disk enclosure, instead of directly connecting the drive to your motherboard via a SATA cable.
The good news is, barring physical damage and an undetectable drive, it’s possible to recover data from a GPT partition, regardless of what caused it. We’ll show you how, in the next section.
How to Restore a Deleted GPT Partition Using Disk Drill
There is a buffet of data recovery programs available on the internet, but it’s important to choose one that is safe, has a proven track record, and is suitable for GPT partition recovery. The first data recovery scan is typically the most successful, so we recommend you pick an option from our list of the best data recovery apps, all of which have been thoroughly tested.
To demonstrate how to recover a GPT partition, we’ll use Disk Drill–a leading data recovery program. We specifically picked Disk Drill because it makes data recovery extremely simple. In addition to supporting all popular file systems (FAT32, exFAT, NTFS, and more), Disk Drill can also recover data from corrupted drives that have no file system at all, i.e., they are RAW.
Let’s take a look at what the actual GPT partition data recovery process looks like:
- Download Disk Drill and install it.
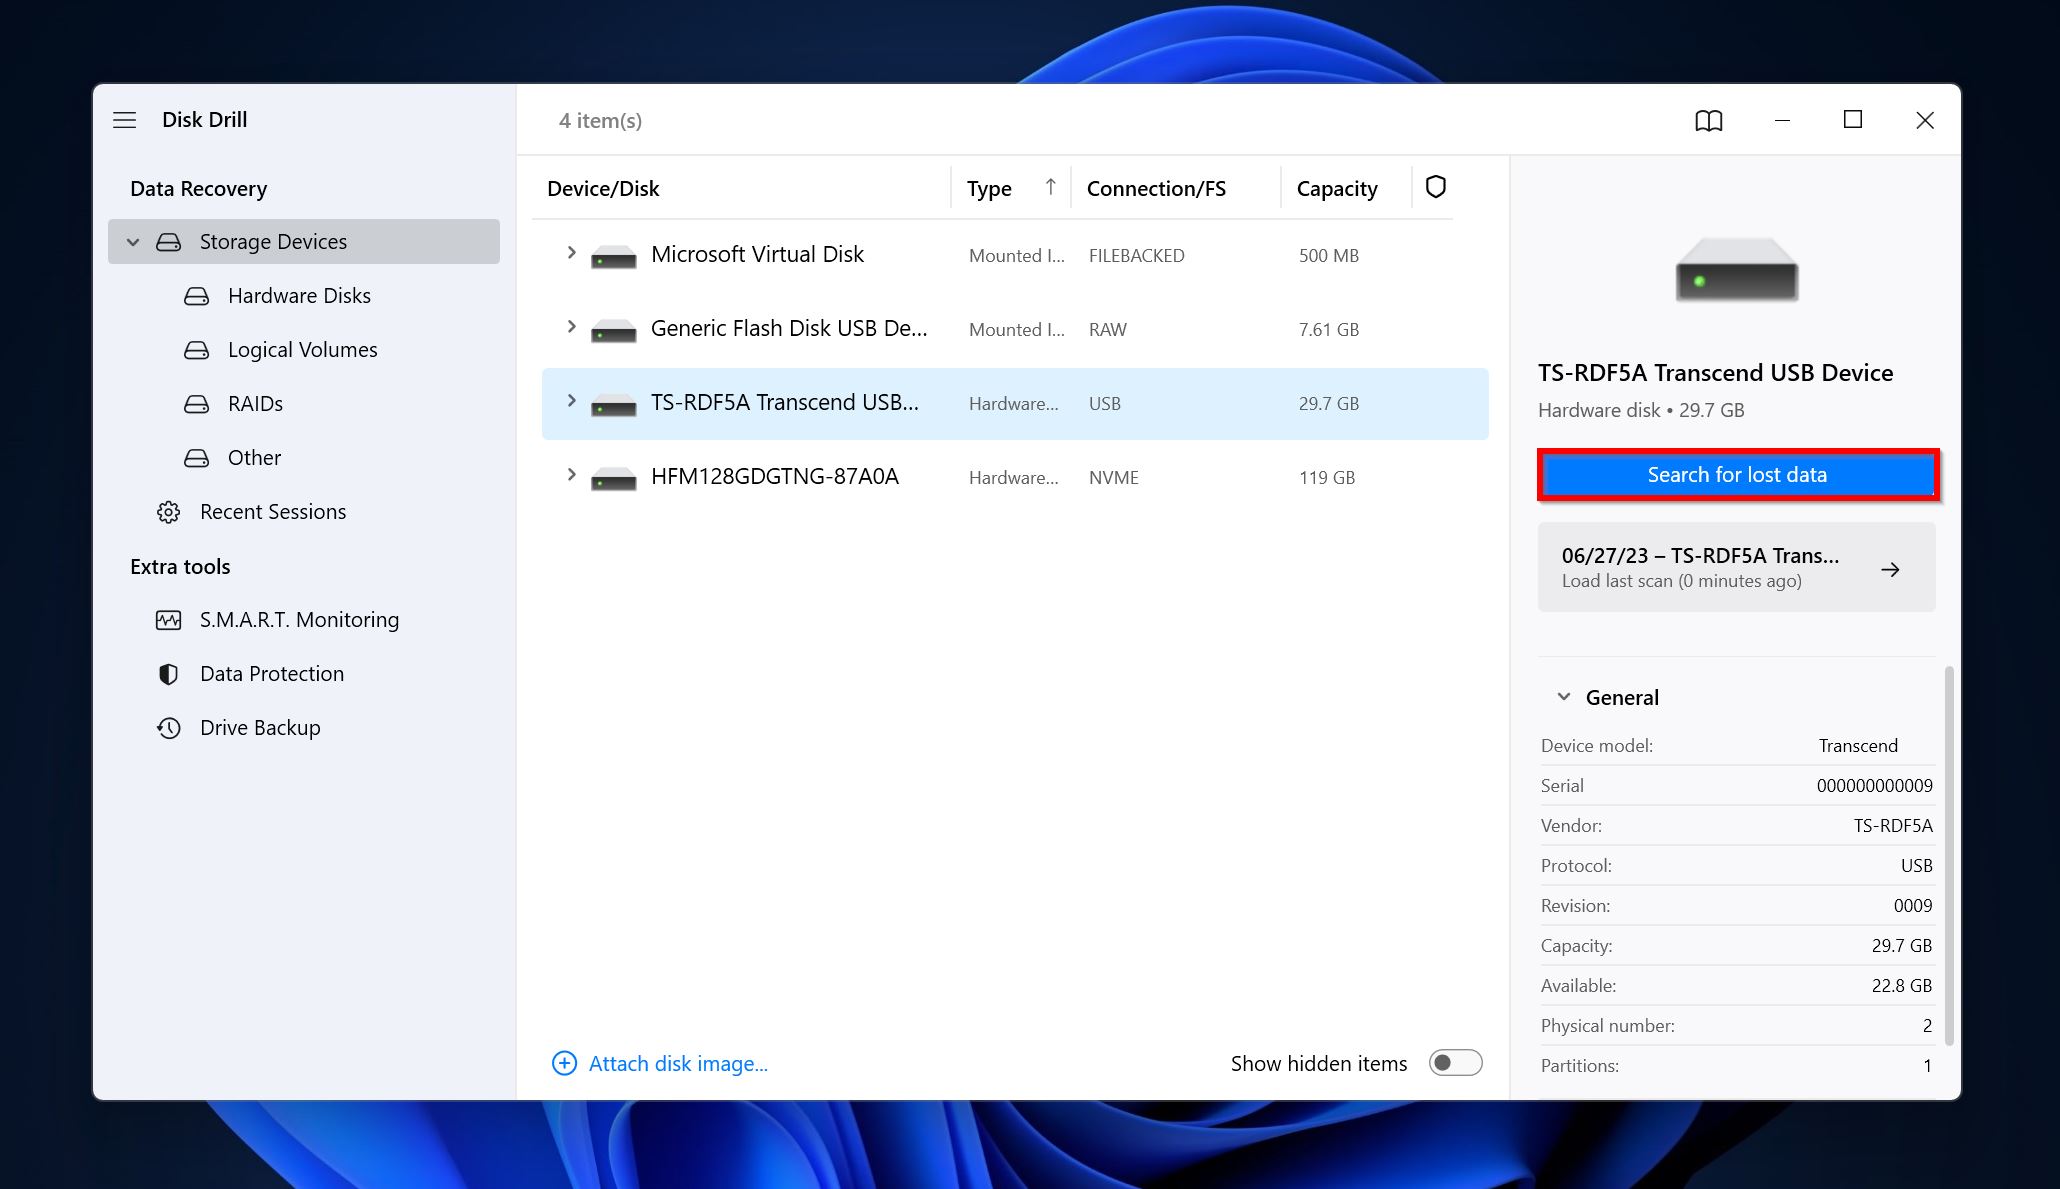
- Open Disk Drill, select the disk with the corrupt GPT partition, and click Search for lost data.
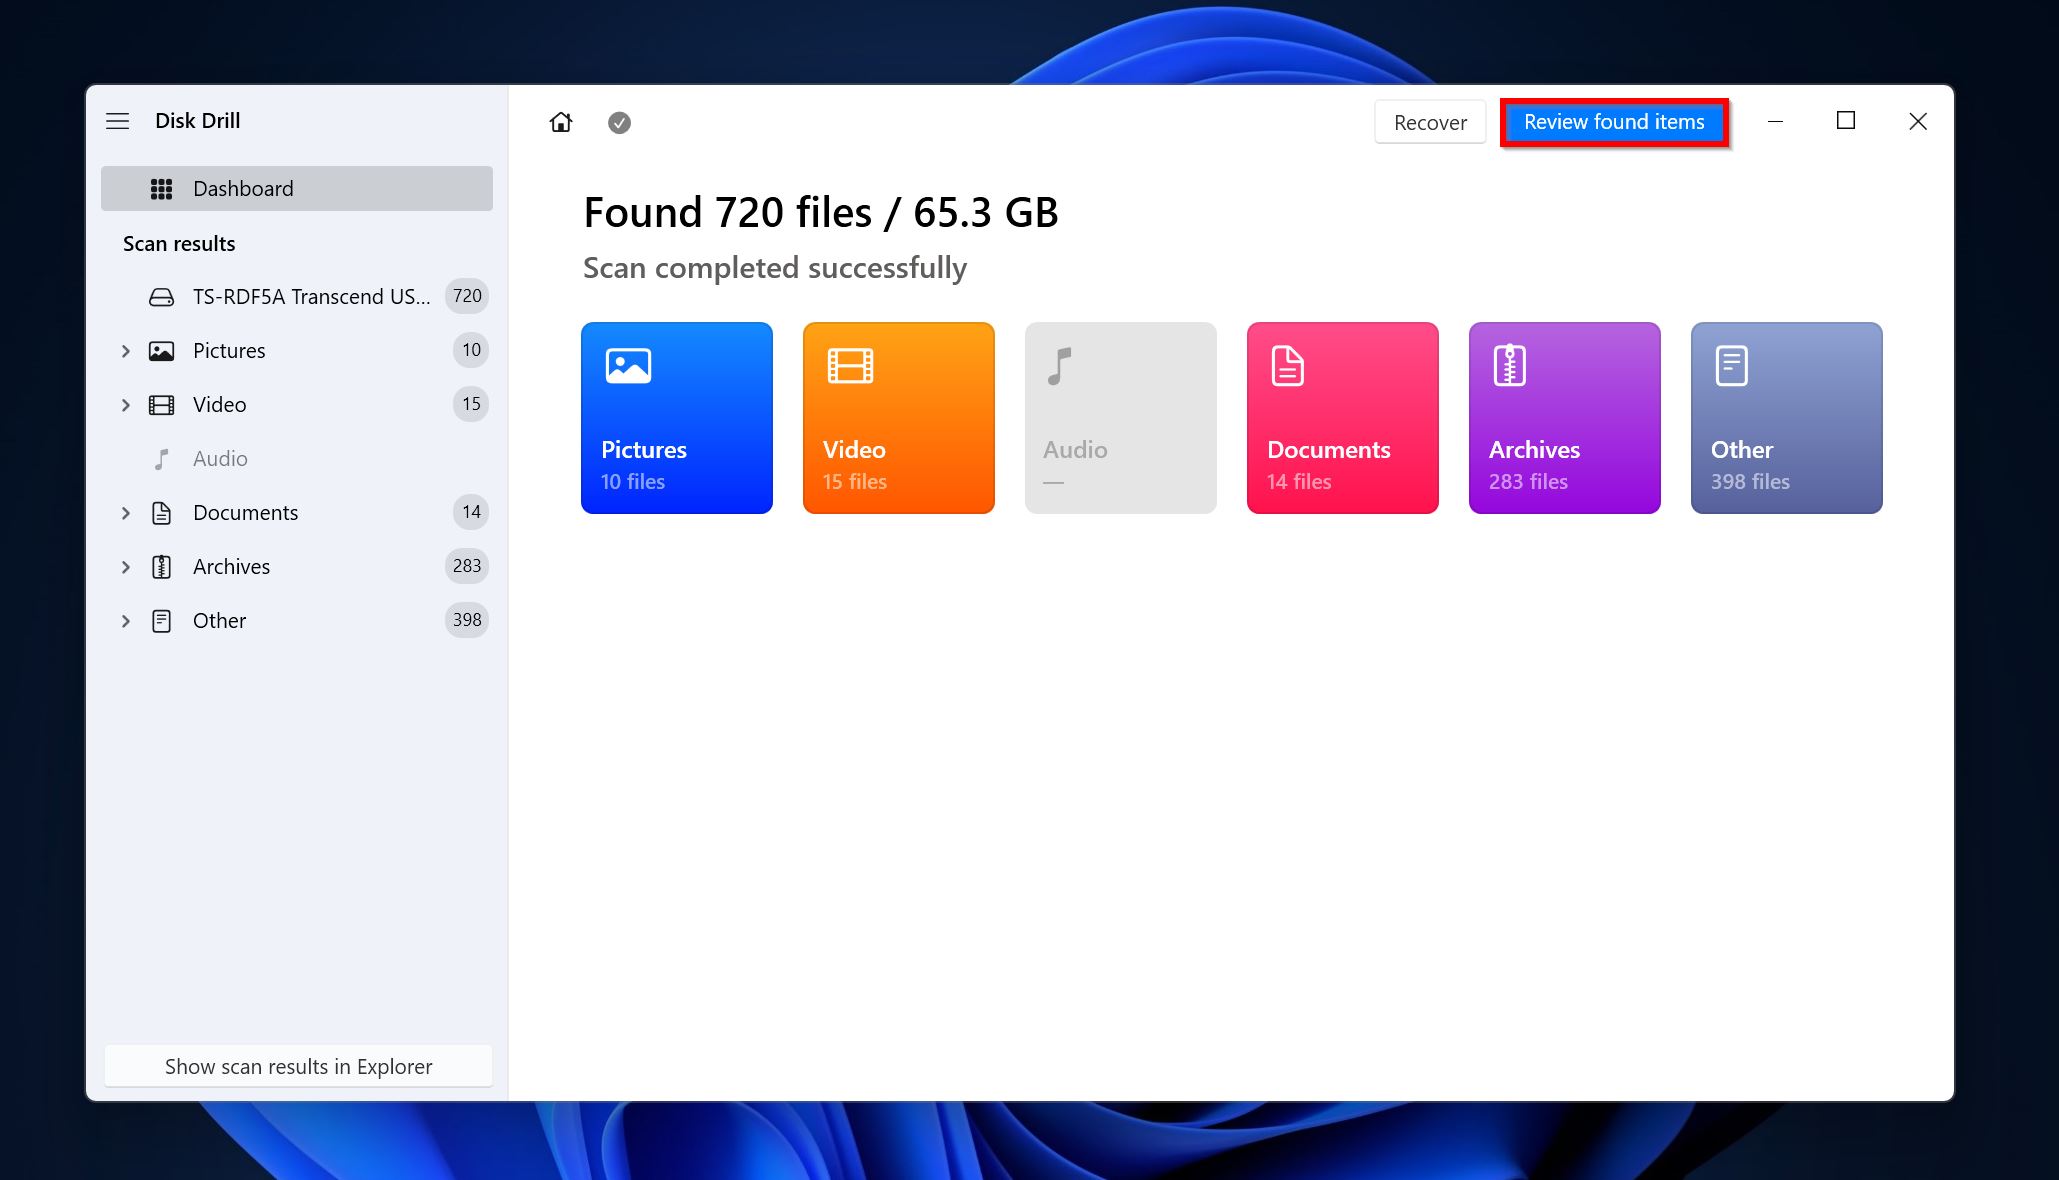
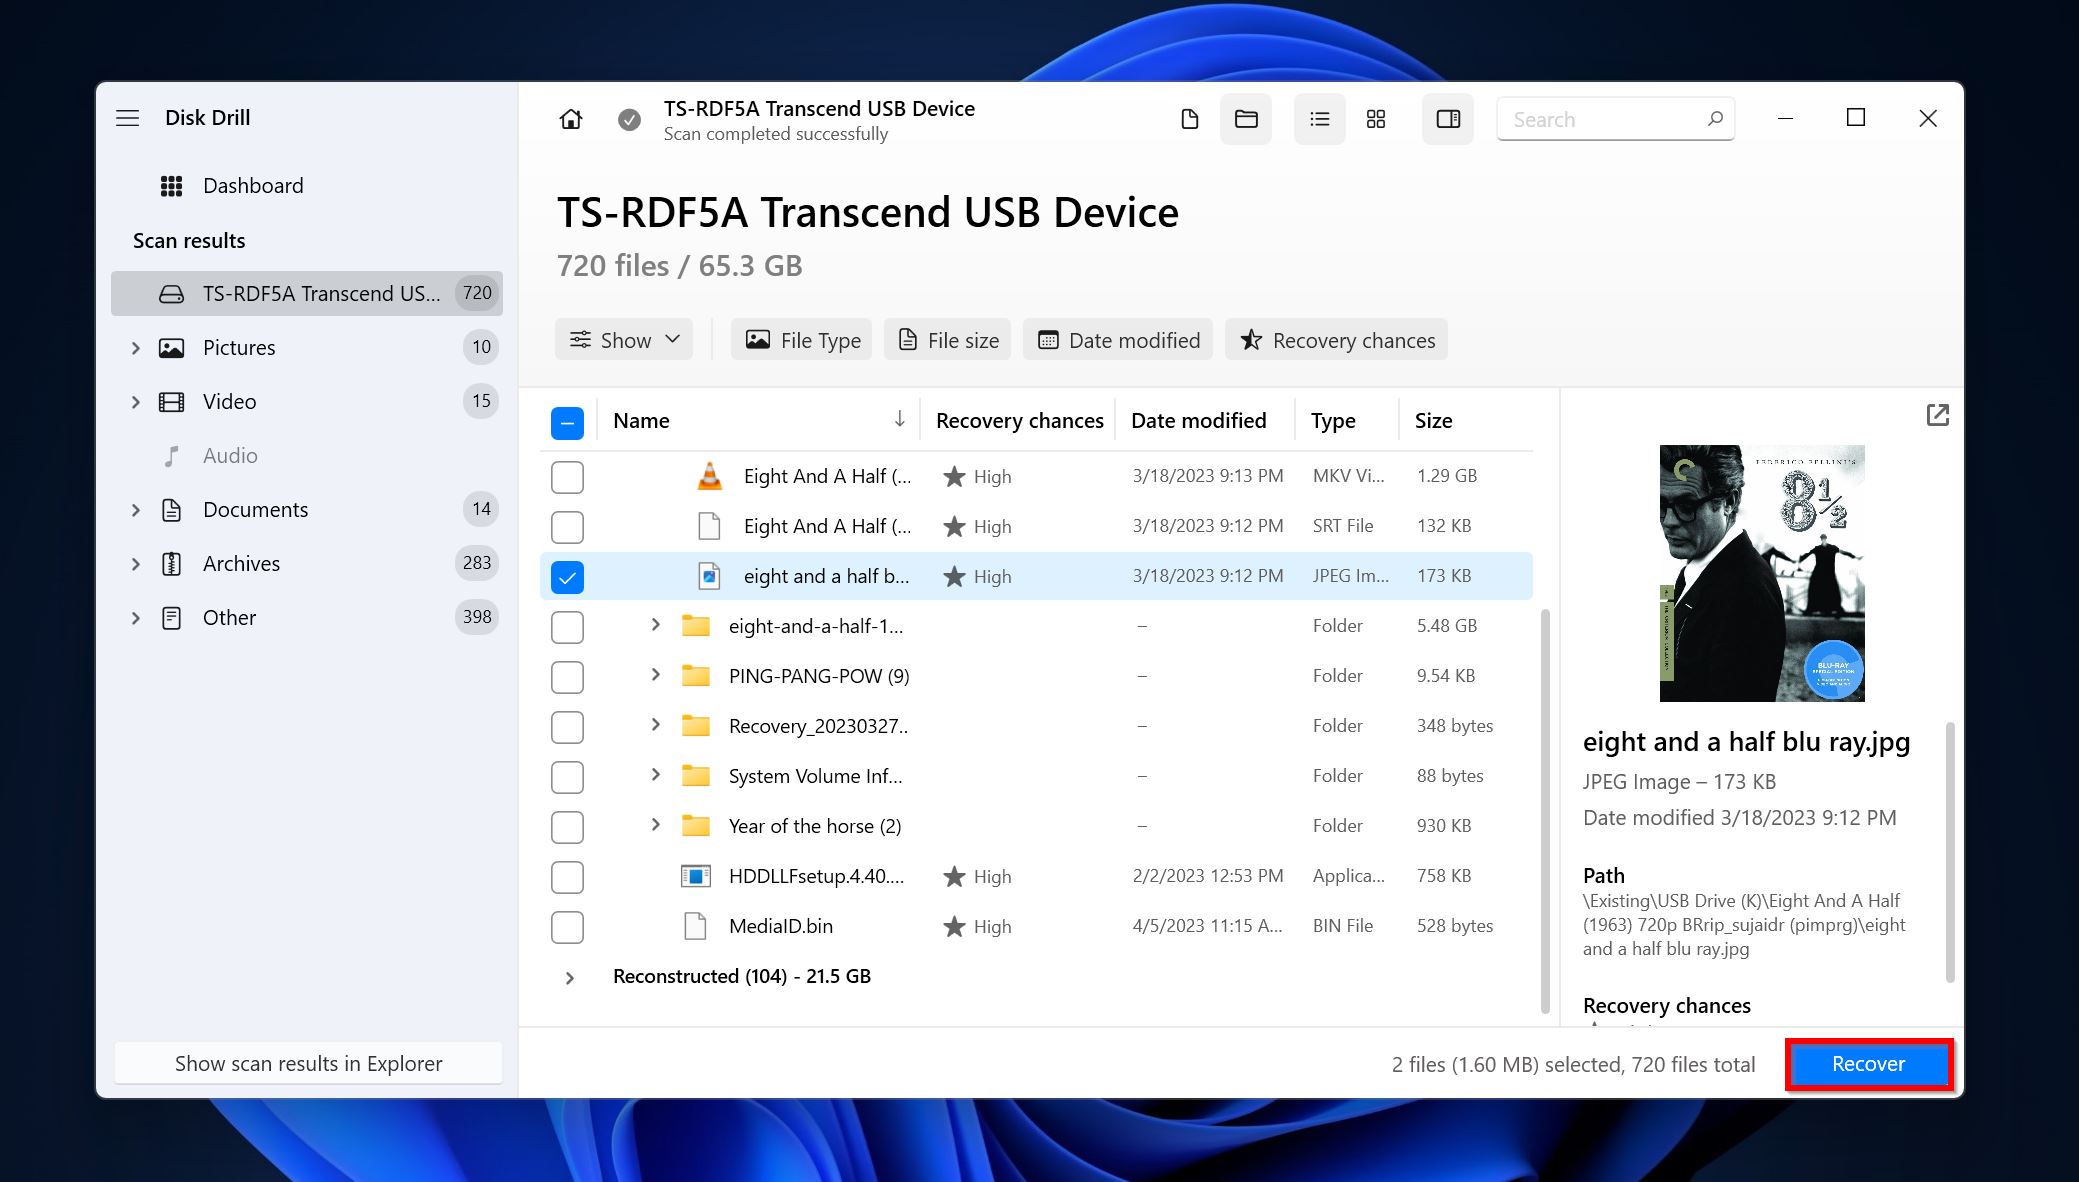
- Click on Review found items to view the files Disk Drill discovered. You can directly filter out the results by clicking on the relevant filetype tile (Pictures, Video, Audio, Documents, Archives, and Other).
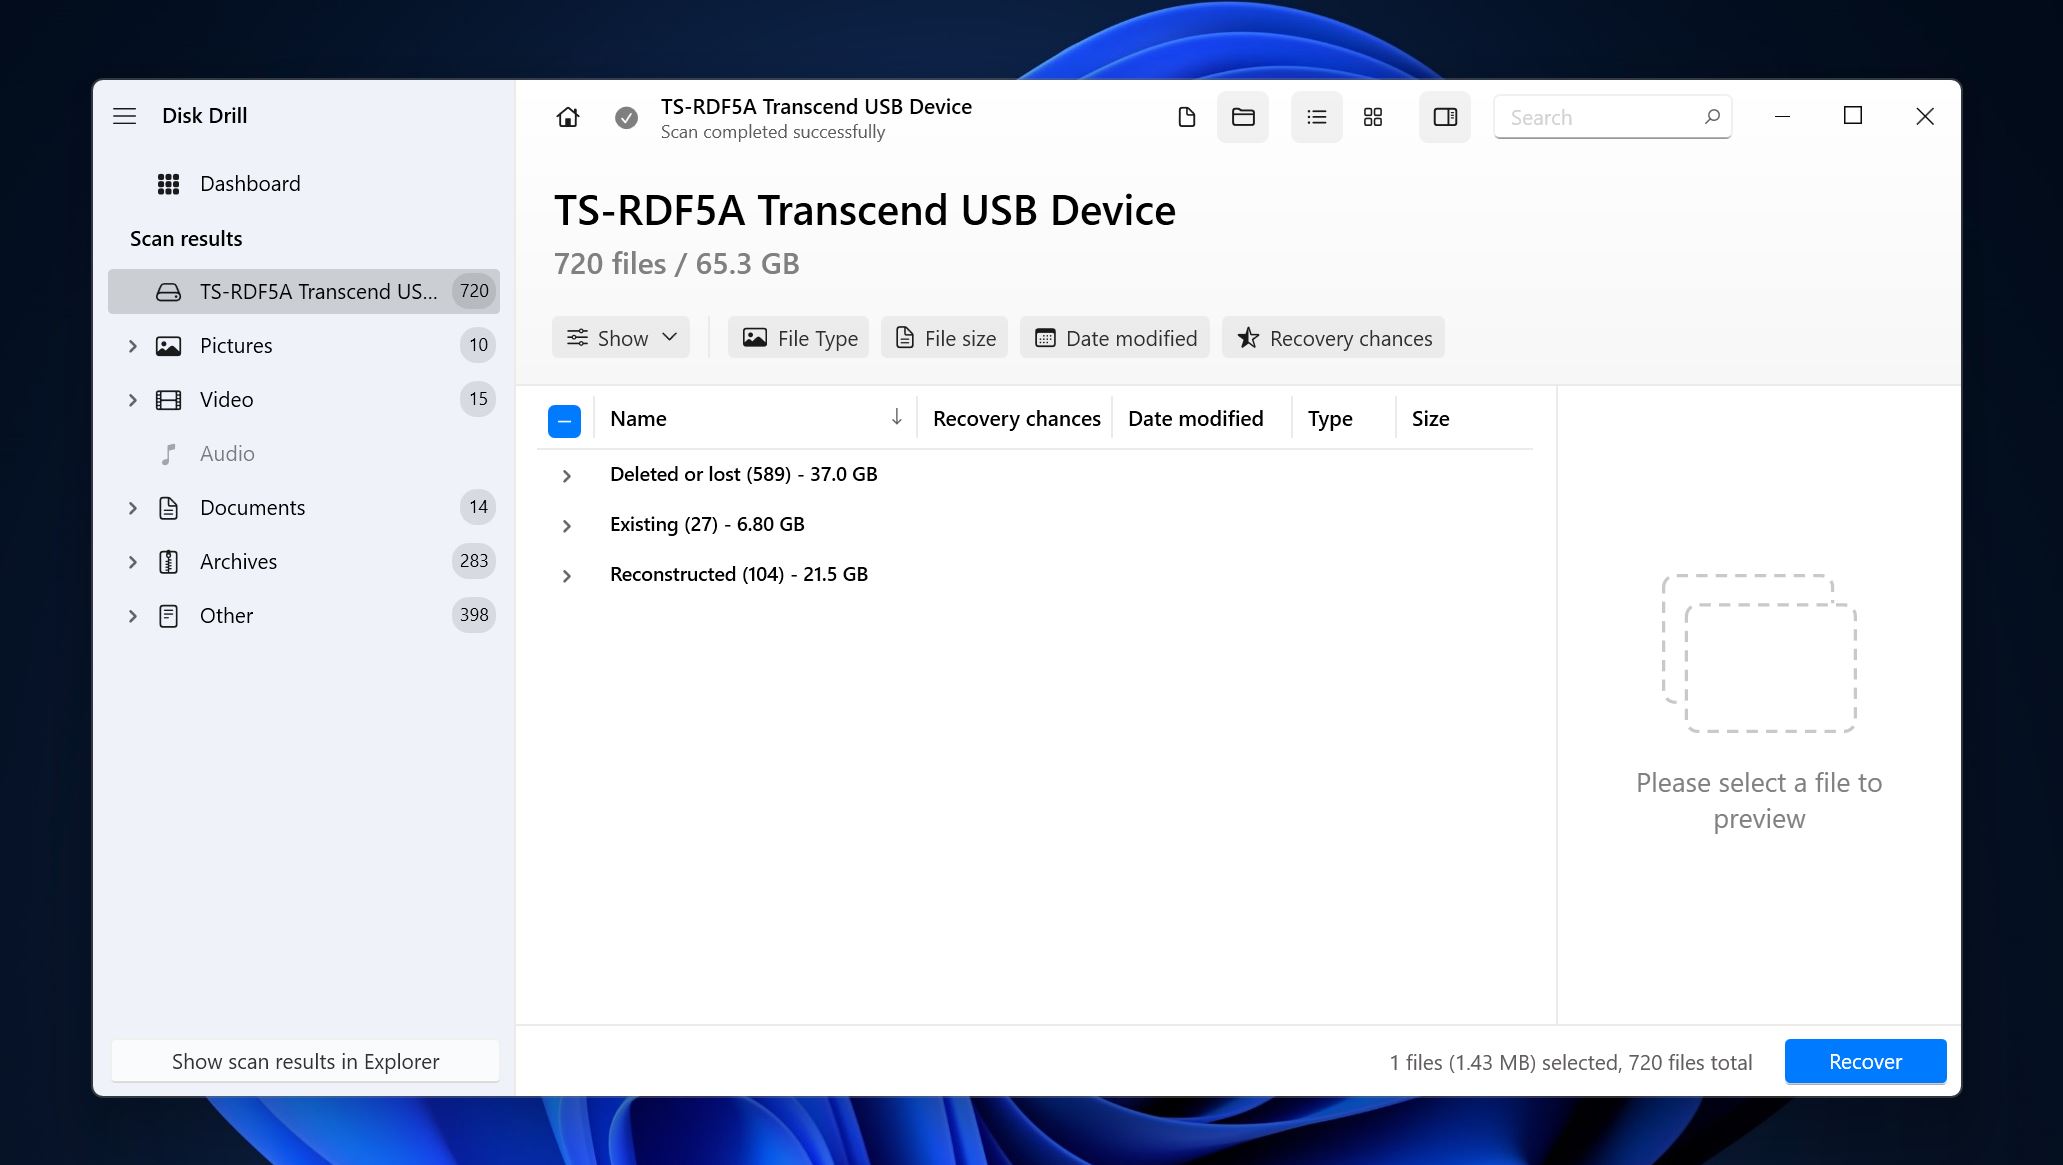
- Expand the Existing section to view the currently stored files on the GPT Partition. To view files that were deleted earlier, but can still be recovered, expand the Deleted or lost and Reconstructed sections.
- Select the files you wish to recover. Disk Drill will display a preview of the currently selected file. To preview a file manually, click on the eye icon next to its filename. Click on Recover once you’ve selected all the files you wish to recover.
- Select a recovery destination for the files and click Next.
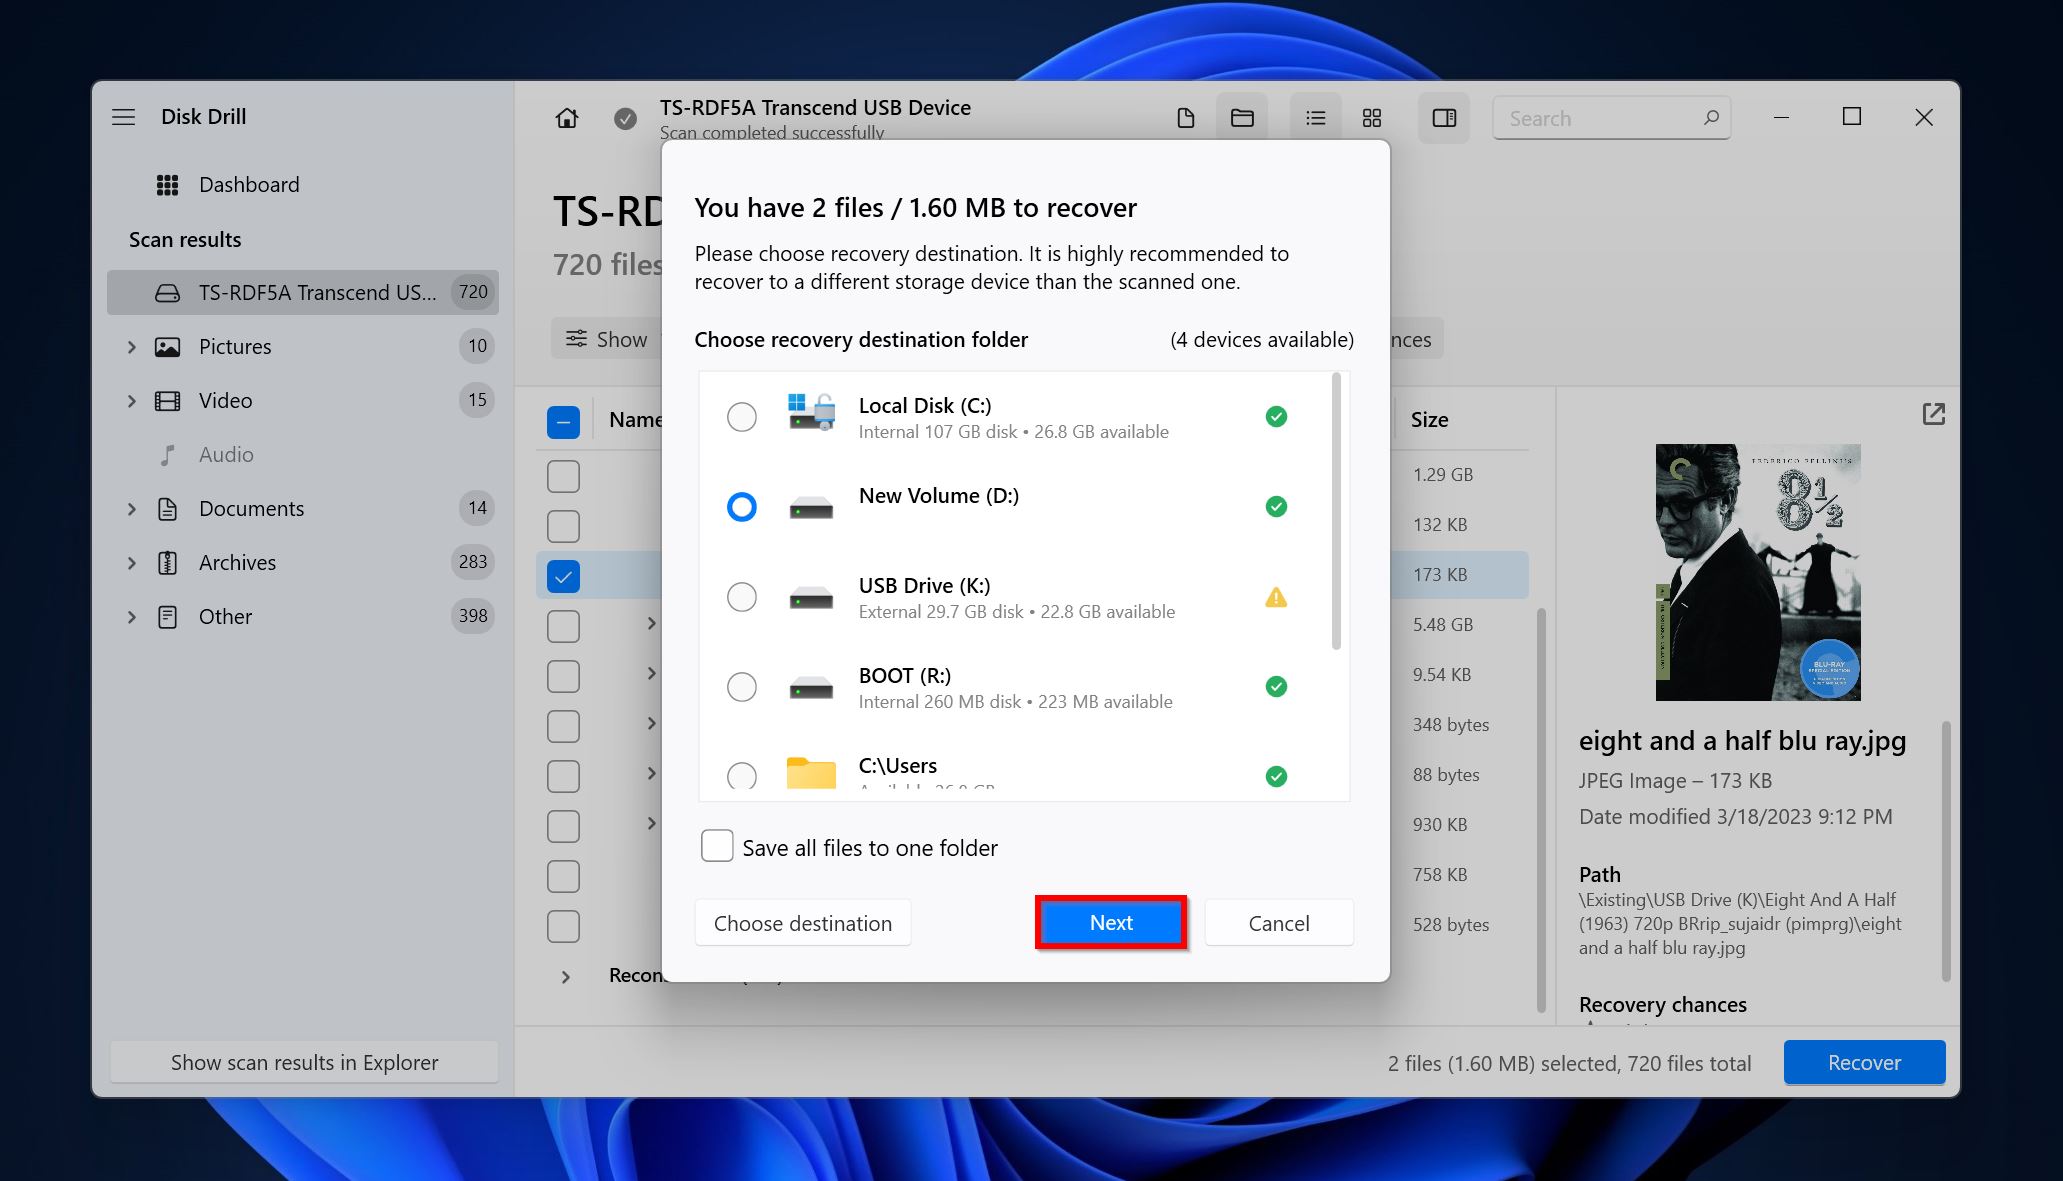
- Disk Drill will recover your files. You can recover up to 500 MB of data as part of the free trial.
We also have an in-depth Disk Drill review, that dives into the various features of the program, its safety, and how it compares to other offerings in the market.
How to Repair a Corrupted GPT Partition Table Using TestDisk
A corrupt partition table can be a possible reason behind a corrupt GPT partition. Rewriting the partition table using the Diskpart utility in Windows entails removing the partition table and formatting the drive.
An alternative to this is to use TestDisk. It’s a great GPT partition recovery software, that fixes the corrupt partition table, without wiping out your data. You can also use TestDisk to try to recover a GPT Protective Partition. The tool doesn’t have a GUI, so it will take some time to get used to navigating around it. But, follow the steps below carefully, and you should be good to go.
Here’s how to recover a GPT partition table, using TestDisk:
- Download TestDisk and extract its contents.
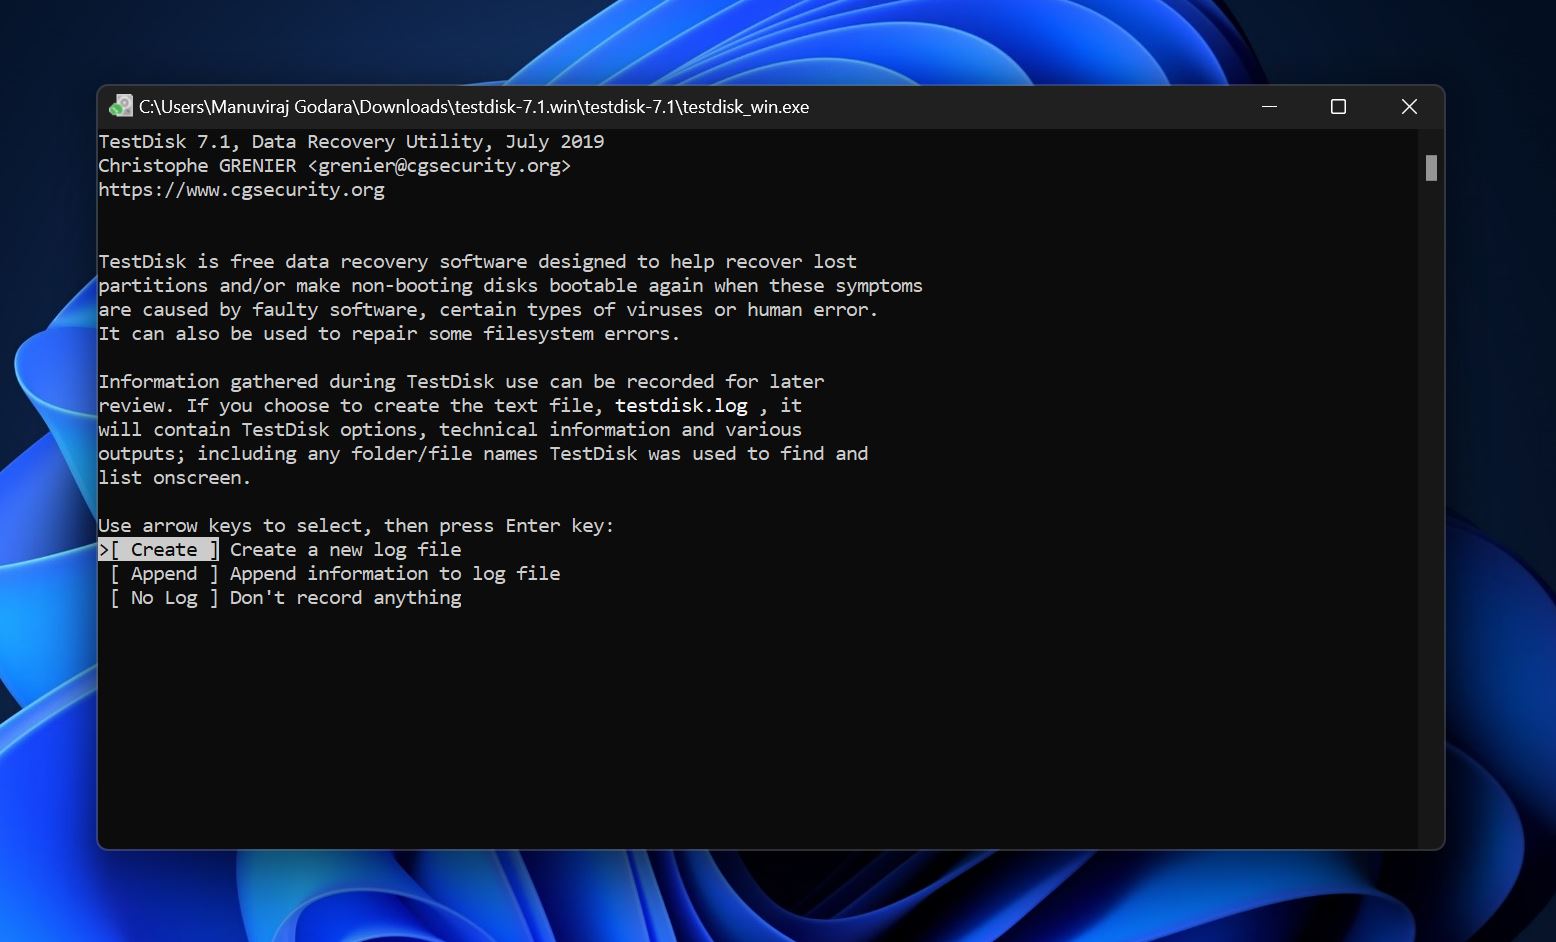
- Run the testdisk_win.exe file from the place where you installed TestDisk.
- Choose whether you wish to create a log file or not. Use the arrow keys to highlight the desired option and Enter to confirm.
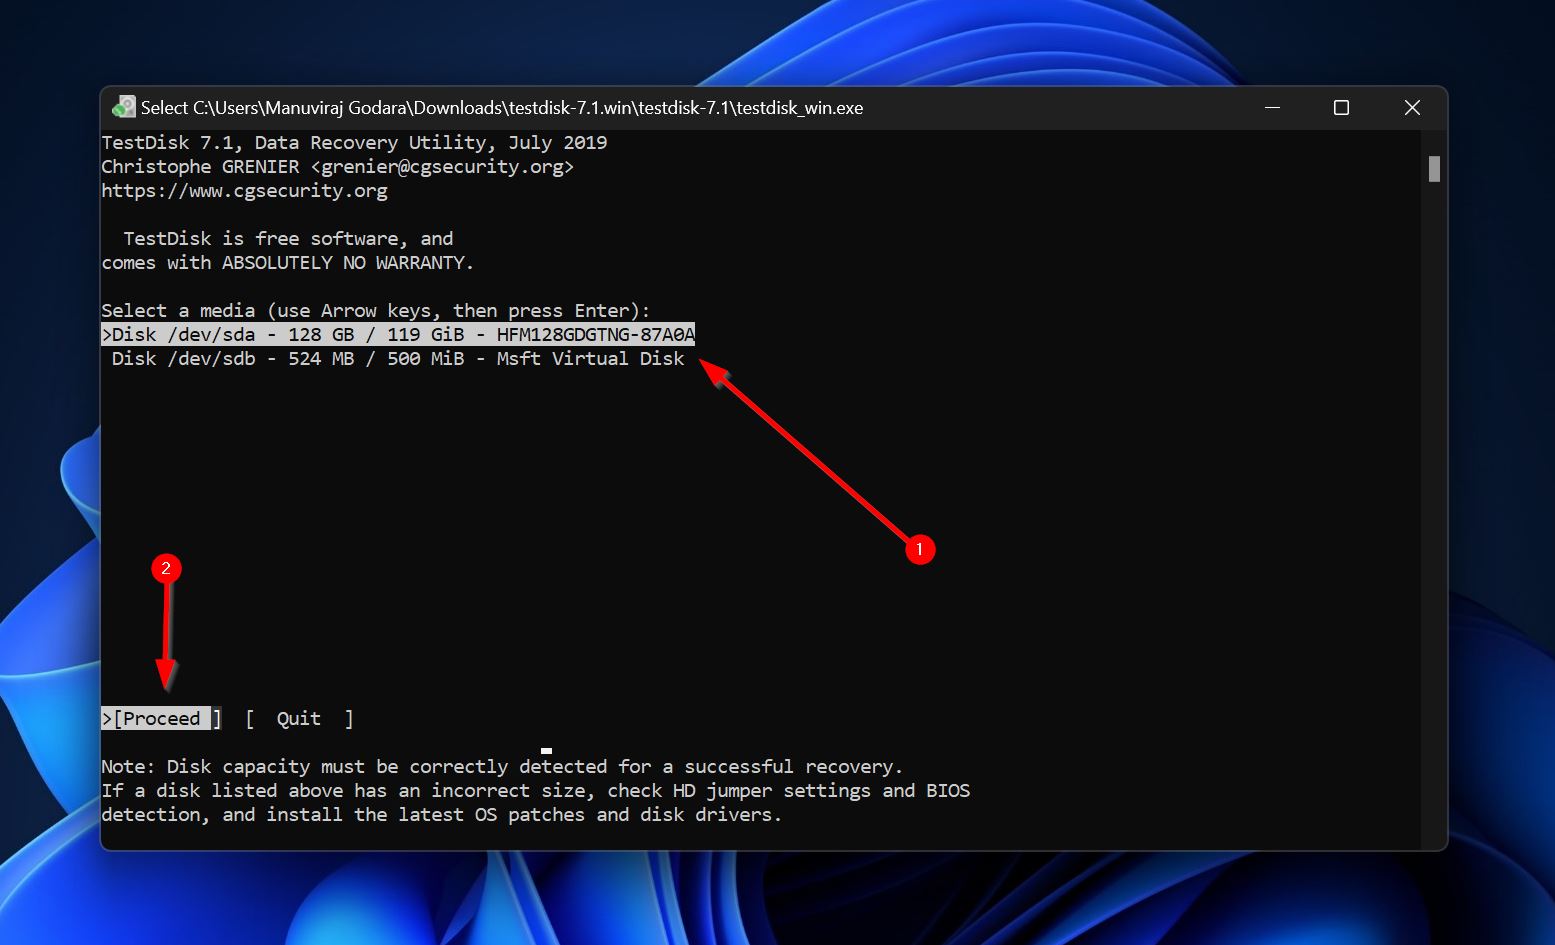
- Now, select the disk with the corrupt GPT partition and press Enter.
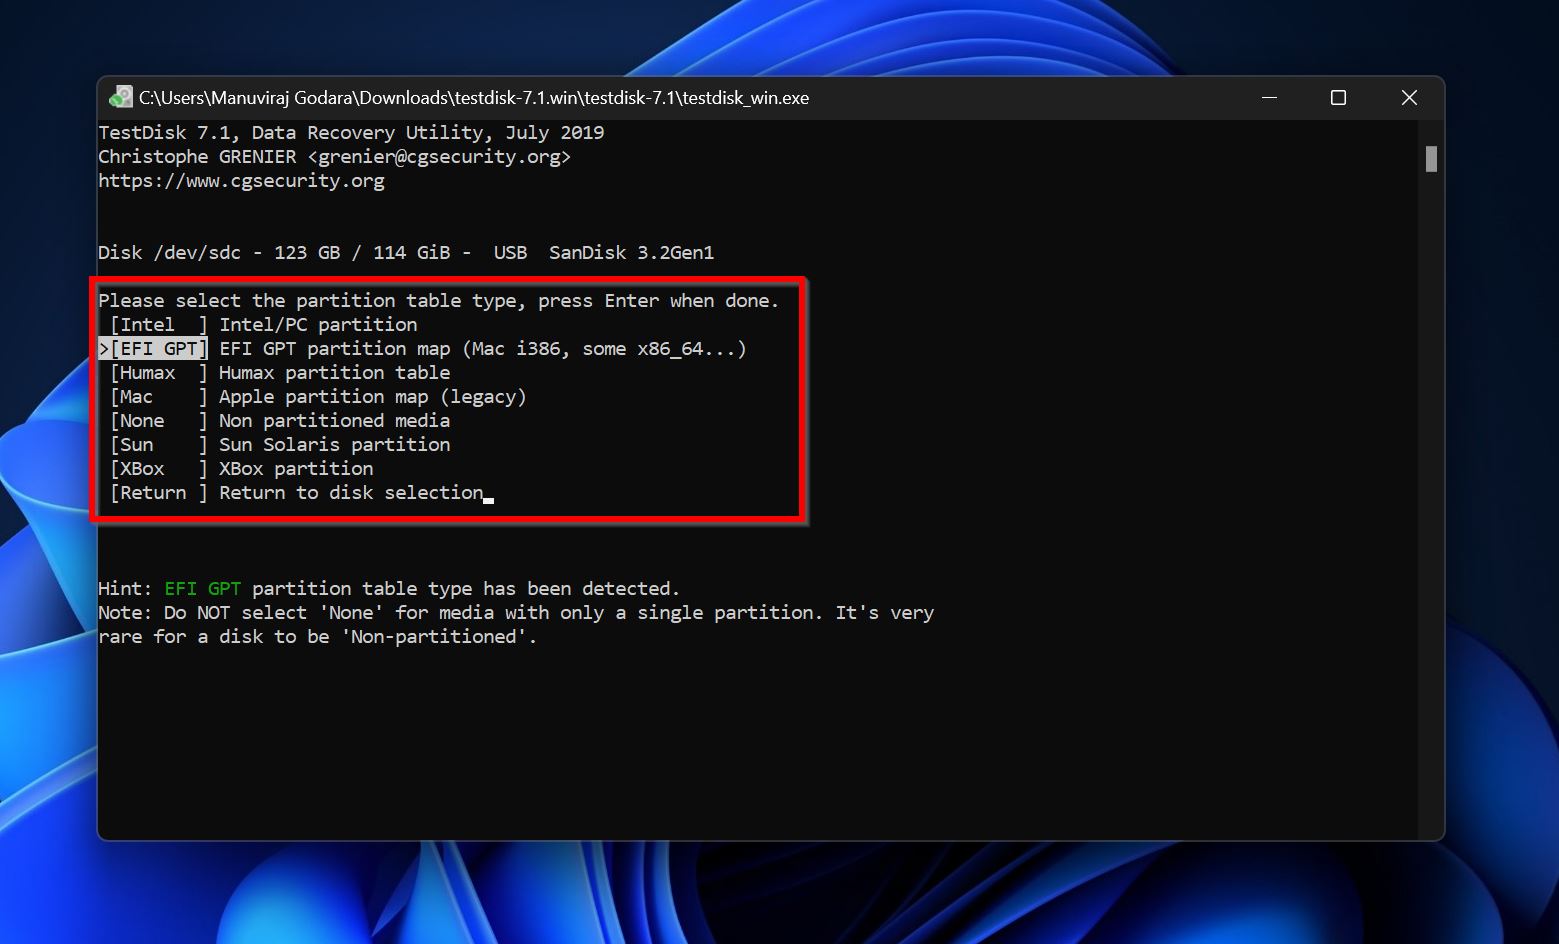
- Select the partition table type. It’s best to simply press Enter on this screen, since TestDisk detects the partition table type automatically.
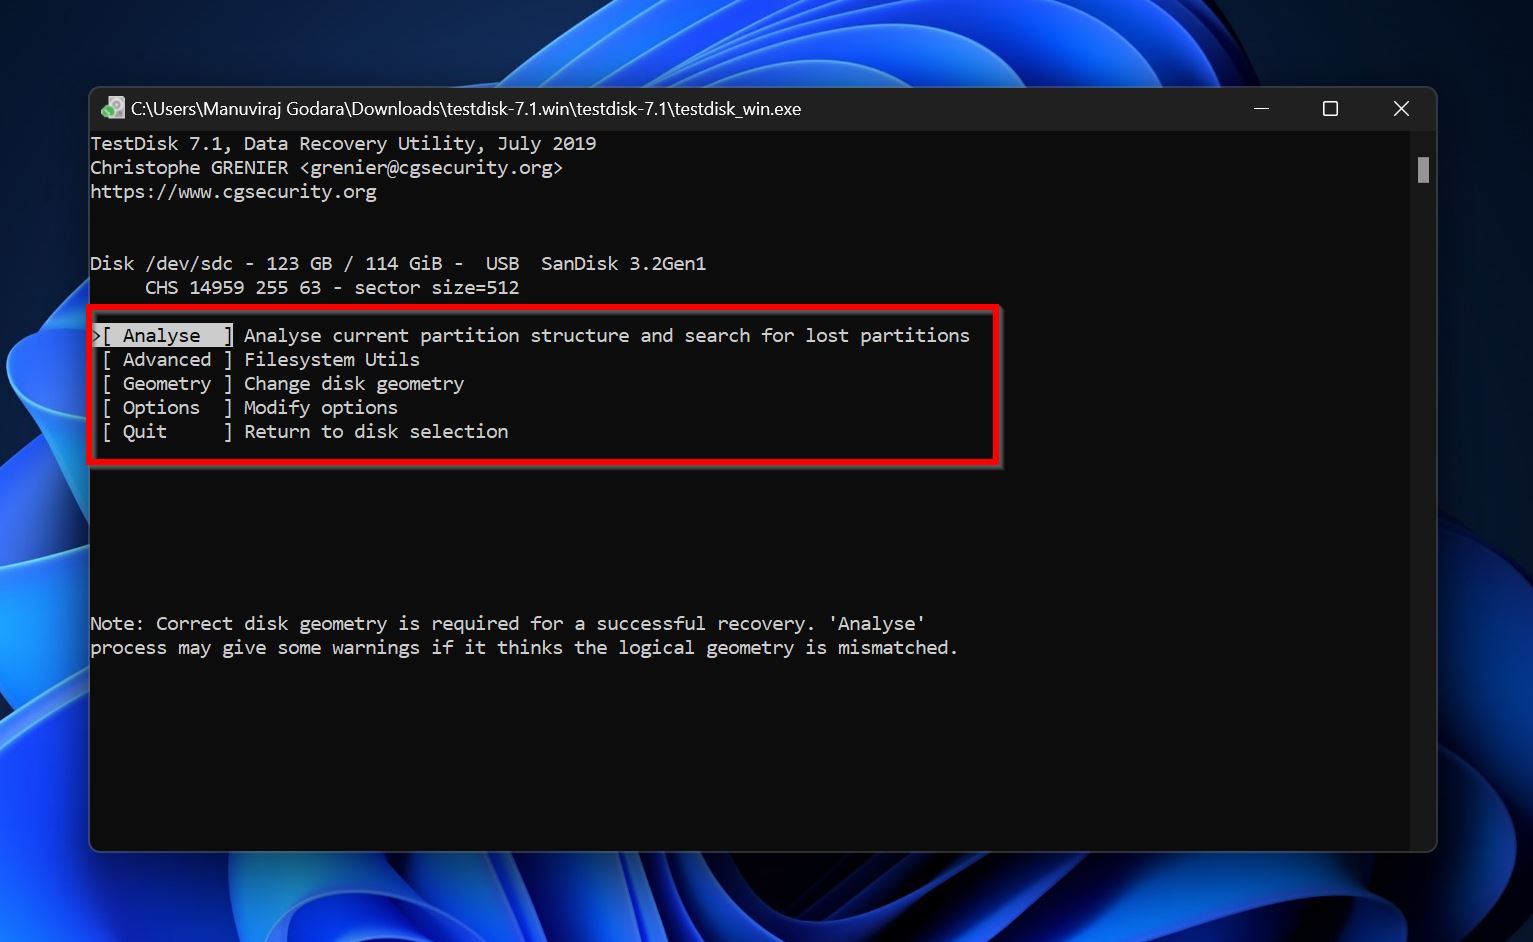
- Select the Analyse option and press Enter.
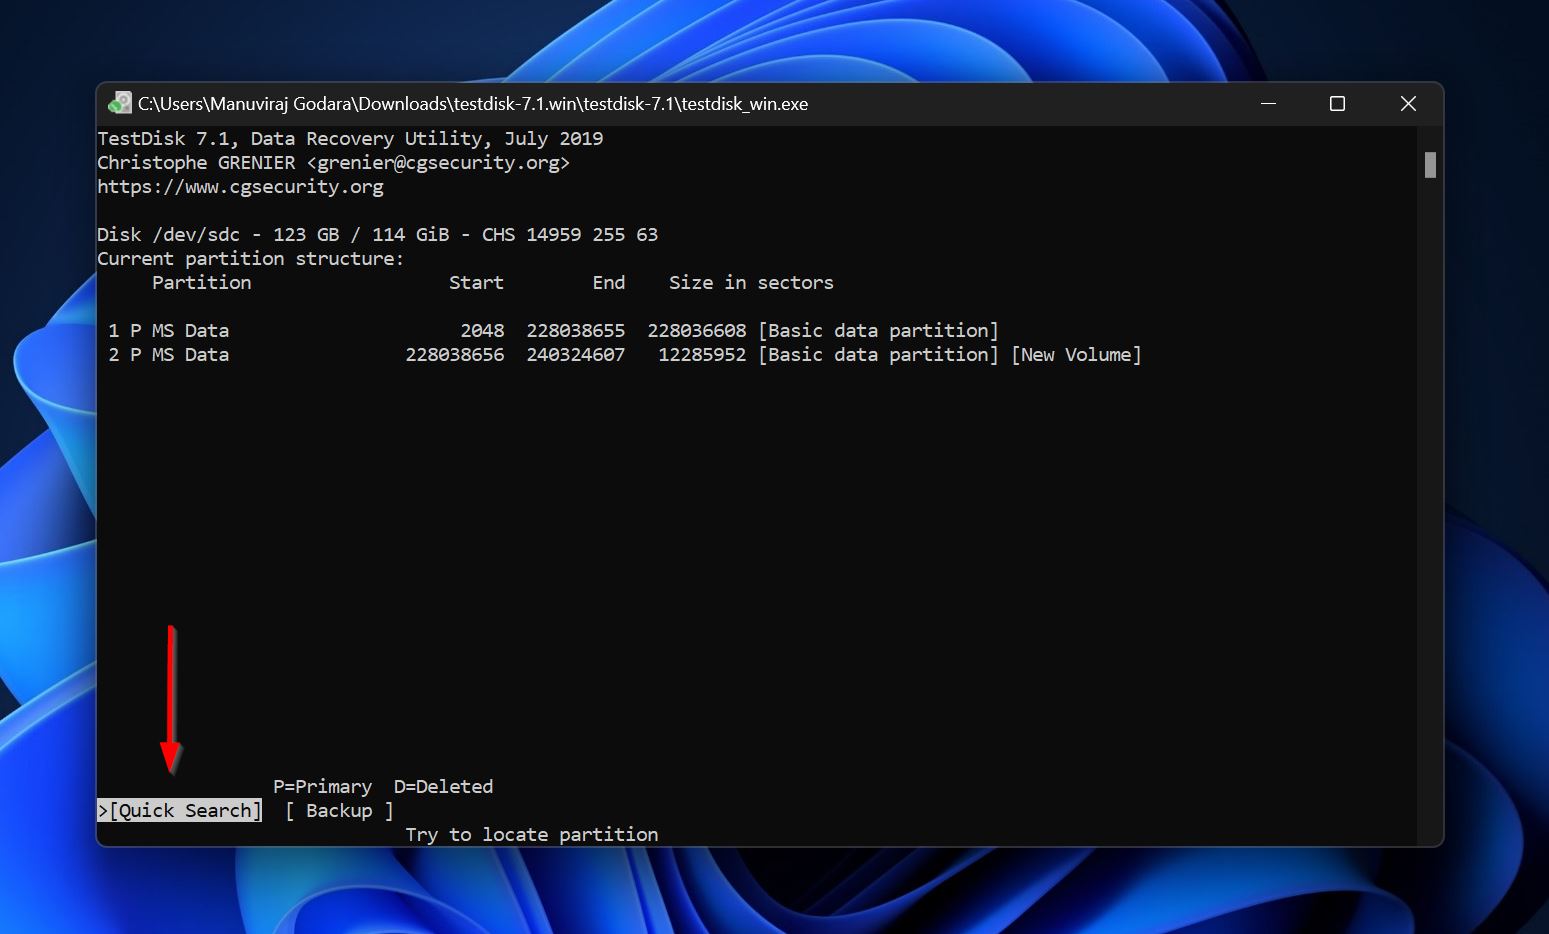
- Ensure that Quick Search is highlighted and press Enter.
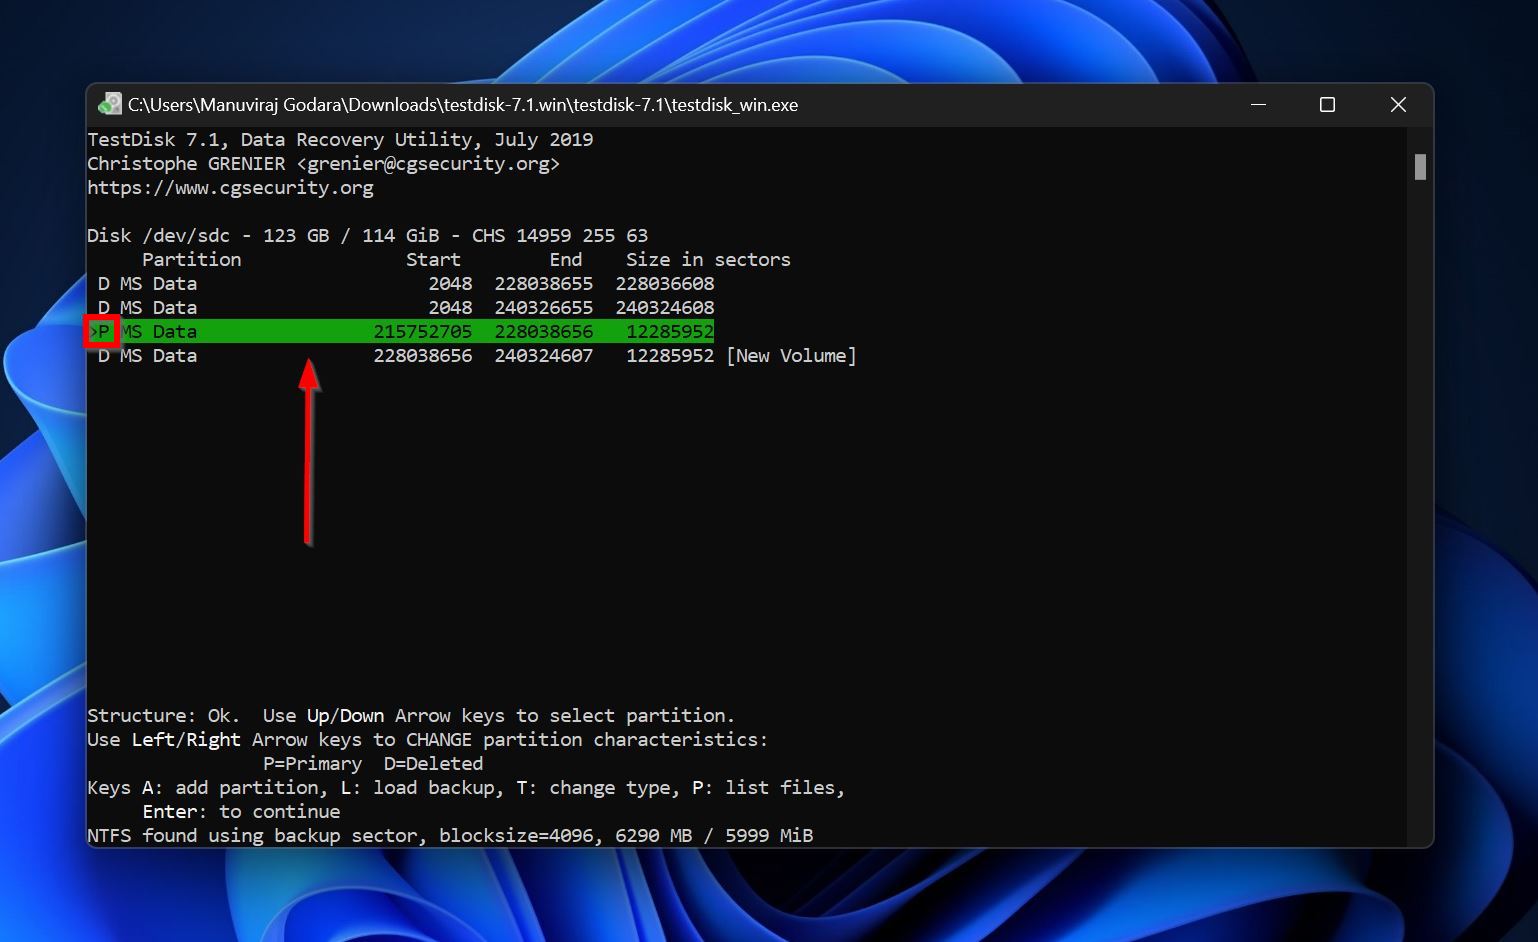
- Look for the GPT partition. To find out which one it is, highlight the partitions one at a time and press P to list their files. Use the files to find out which one is the GPT Partition. Press Q to back from the list files screen. Ensure there is a P or L before the partition name (use the left/right arrow keys to cycle between them), and press Enter.
- Select the Write option and press Enter.

- Press Y on the next screen.
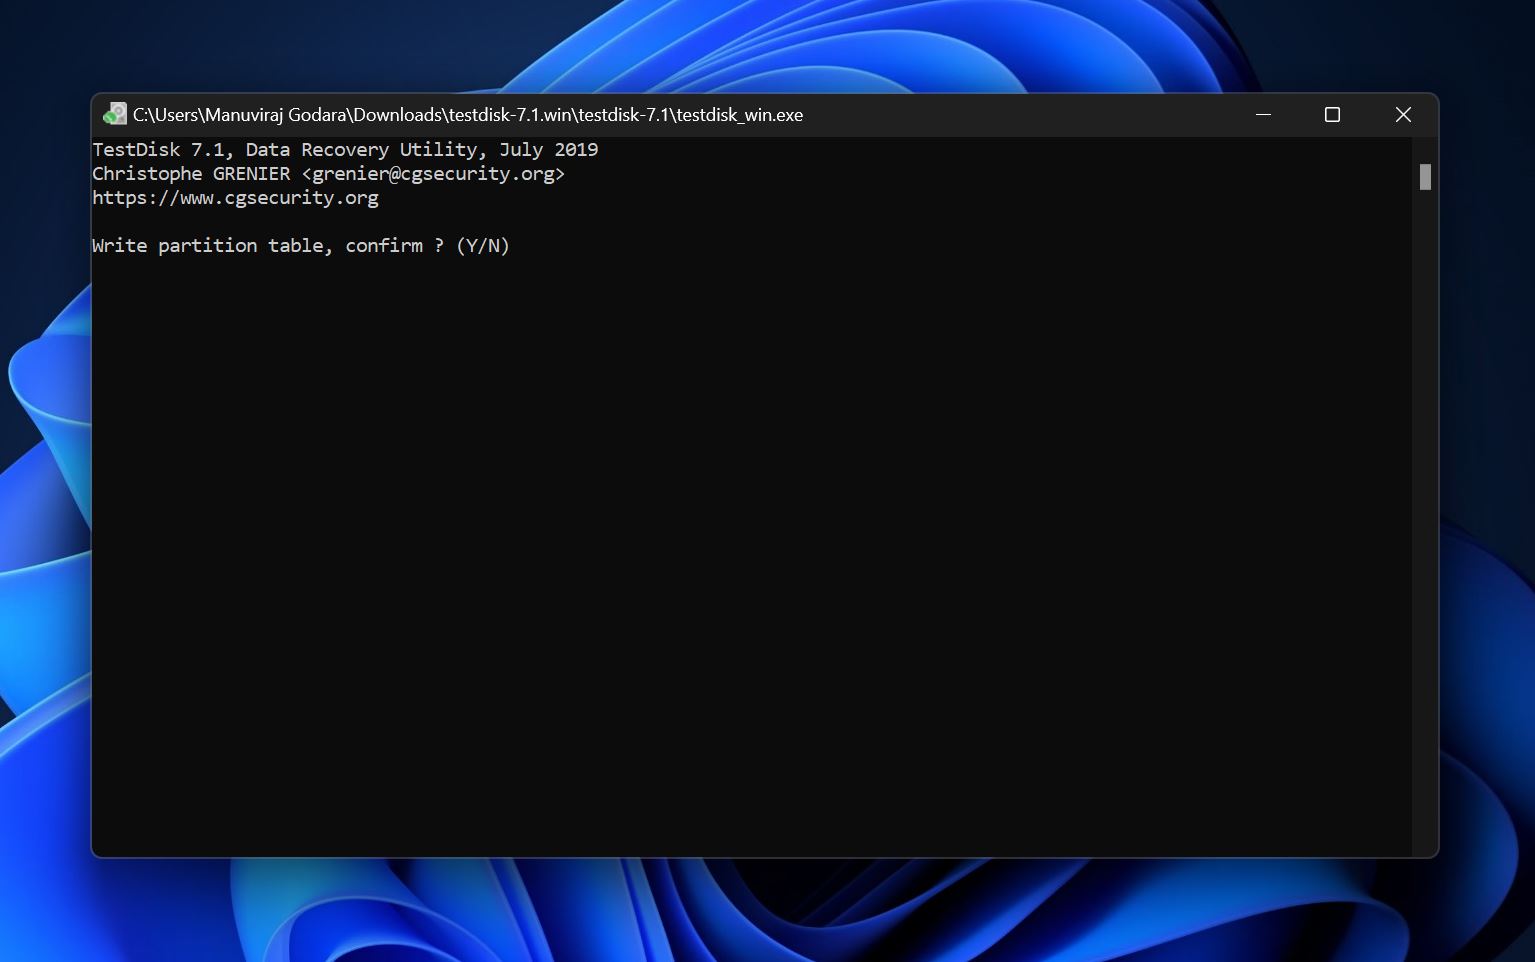
- TestDisk will recover the GPT partition table, and you should be able to access the drive.
To know more about TestDisk and its features, be sure to check out our detailed review of the tool. If you’re not comfortable using the tool’s command-line UI, we have a list of TestDisk alternatives, and other partition recovery programs that will get the job done as well.
Is It Possible to Recover Data from a GPT Protective Partition?
Essentially, the GPT Protective Partition is a preventative measure. All GPT formatted disks have an MBR header that displays the disk as a single MBR partition, called “GPT Protective Partition”, on older systems that do not recognize the GPT partitioning style. This prevents the older systems from thinking that the drive is uninitialized and needs to be formatted.
Usually, the GPT Protective Partition issue occurs on newer systems because of wrong software drivers or physical adapters like a disk enclosure. However, a corrupt partition table, often caused by malware, physical damage, and improper usage, can also result in the problem.
GPT Protective Partitions are inaccessible, and you can’t repartition or format them using Windows Disk Management, or the Windows File Explorer. If you wish to modify the drive in any way, you’ll need to use the Diskpart command-line utility.
However, as long as the disk is not encrypted, a good data recovery program like Disk Drill will be able to access the drive and recover data from it. But, you do need to act quickly because the problem could be a sign of a failing drive.
To recover a GPT Protective Partition and make it usable again, you’ll need to use the clean command in Diskpart, then convert the drive to an MBR disk by either using the convert mbr command or a third-party program. This is a destructive process, as the clean command wipes out the partition table from your drive, so we recommend you first recover your data.
FAQ
How to recover data from GPT Protective Partition?
Here’s a quick and easy guide on recovering data from a GPT Protective Partition:
- Download and install Disk Drill.
- Launch the tool, select the GPT Protective Partition, and click Search for lost data.
- Click on Review found items.
- Select the files and click Recover.
- Choose a recovery destination for the files and click Next.
How to remove a GPT Protective Partition?
To remove a GPT Protective Partition, follow these steps (be warned that you will lose all your data from the disk):
- Run Command Prompt as Administrator.
- Type diskpart and press Enter.
- Type list disk and press Enter.
- Type select disk X, replacing X with the disk number of the GPT Protective Partition drive. Press Enter.
- Type clean and press Enter.
- Type convert mbr and press Enter.
- You can then proceed to format the drive as you normally would.
How to make the GPT Protective Partition readable?
To read data from a GPT Protective Partition, you’ll need to use a third-party tool like Disk Drill. But, to make the partition itself readable again, you’ll need to use Diskpart to remove the drive’s partition table, convert the disk to MBR, and then format it. This is a destructive process, so ensure you recover your data beforehand.
How to back up the GPT partition table?
There’s no way to natively back up the GPT partition table on Windows. But, third-party backup and recovery tools should be able to help you out.
Conclusion
Data recovery is a delicate process and while third-party data recovery programs can make it look easy, it’s important to know when and when not to use them. If your drive suffered physical damage, never attempt to perform DIY data recovery on it. Instead, contact a professional data recovery service. It’s also important that you regularly back up all important files to the cloud as well as a local storage disk.
This article was written by Manuviraj Godara, a Staff Writer at Handy Recovery Advisor. It was also verified for technical accuracy by Andrey Vasilyev, our editorial advisor.
Curious about our content creation process? Take a look at our Editor Guidelines.