Most of us are unfamiliar with the term “hard drive initialization” until we need to perform such a task for the first time. Thus, it’s normal to wonder, will initializing a disk erase data or affect existing files?
Read on to find the answer to that question and learn everything you need about initializing your drives while keeping all the valuable data on them.
Disk Initialization In a Nutshell
Since you’re reading this, you’re probably wondering what initializing a disk actually does. Doesn’t storage “just work”?
Most external storage devices come partitioned, formatted, and ready to use. However, you must initialize new hard drives, SSDs, or NVMe internal storage devices to use them. Similarly, if a storage device somehow gets damaged or corrupted, you might need to re-initialize it to keep using it.
Your PC can “see” a storage device connected to it, but without the necessary “structures” on it, it won’t know how to use it for data storage.
Those “structures” are known as partitions, and a storage device’s “initialization” is the process of creating them. A brand new storage device might lack those “structures”, or they might become corrupted (for various reasons) on one you were already using.
The old standard for creating partitions on such storage devices was Master Boot Record (MBR). It allows only up to four primary partitions and only supports storage devices up to 2TBs.
The more versatile GUID Partition Table (GPT) is the new partitioning standard. All drives over 2TBs in size use it by default – as noted by Seagate for their external storage solutions. However, it expects the PC to come equipped with the newer UEFI instead of the old BIOS system for the partitions to be correctly “recognized”.
If you need to recover data from a storage device that lacks any type of partition table, and shows up as uninitialized, make sure to check our guide on the proven methods to recover data from an uninitialized disk.
Will Initializing a Drive Erase Data?
We’ve established you need to initialize a new hard drive to use it. Still, it’s rational to wonder, “what happens if I initialize a disk with data on it? Does initializing a disk erase it?”.
Strangely, the answer is both positive and negative:
- ❌ Initializing a disk does erase the partitions on it, creating a new partition table, but…
- 🗃️ Initialization doesn’t remove data from a device. It only “redefines” the partition “structures”.
Thus, taking a backup beforehand is best to ensure you can re-initialize a hard drive without losing data. But it’s also possible to get (at least some of) your files back if you initialized a disk you were using but forgot to copy your data off it using a data recovery app. For that, check our guide on the best data recovery apps.
Reasons Why You’re Forced to Initialize a Disk
Even if you’d prefer to skip initializing a disk, sometimes it’s unavoidable if you want to use your storage gear. For example:
- 👶 You have to do it if a hard drive is new and not yet initialized and formatted.
- 🐛 You’re troubleshooting a hard drive malfunction.
- ⚒️ You want to fix partition table corruption by fully resetting the partitioning scheme on a storage device like a misbehaving external hard drive.
Although for this article we’ll be using Windows 11, you can initialize a disk the same way in Windows 10, Windows 7, or even older versions of Microsoft’s OS.
How to Initialize a Hard Drive Without Data Loss
There are many ways you can (re-)initialize a hard drive without losing data (while keeping the data you may already have on it). Still, for simplicity’s sake, we’ll present a specific series of steps in this guide.
Follow them as presented to ensure that after you initialize a new hard drive, it will work as expected, or that you’ll be able to safely initialize a disk that already contains data without losing any of your precious files on it.
Step 1. Create a Copy of an Uninitialized Hard Drive
Do you want to initialize a disk containing data to troubleshoot or reset it to its original condition? Then, you ought to back up its contents, for after a hard drive initialization, they’ll be gone.
For that, you can use Disk Drill. Although the app specializes in data recovery, it also includes many more useful tools. Among them, you’ll find a powerful byte-to-byte backup solution. Learn more about it by checking our thorough review of the app.
The process is as simple as this:
- Download Disk Drill from its official site, install and launch it.

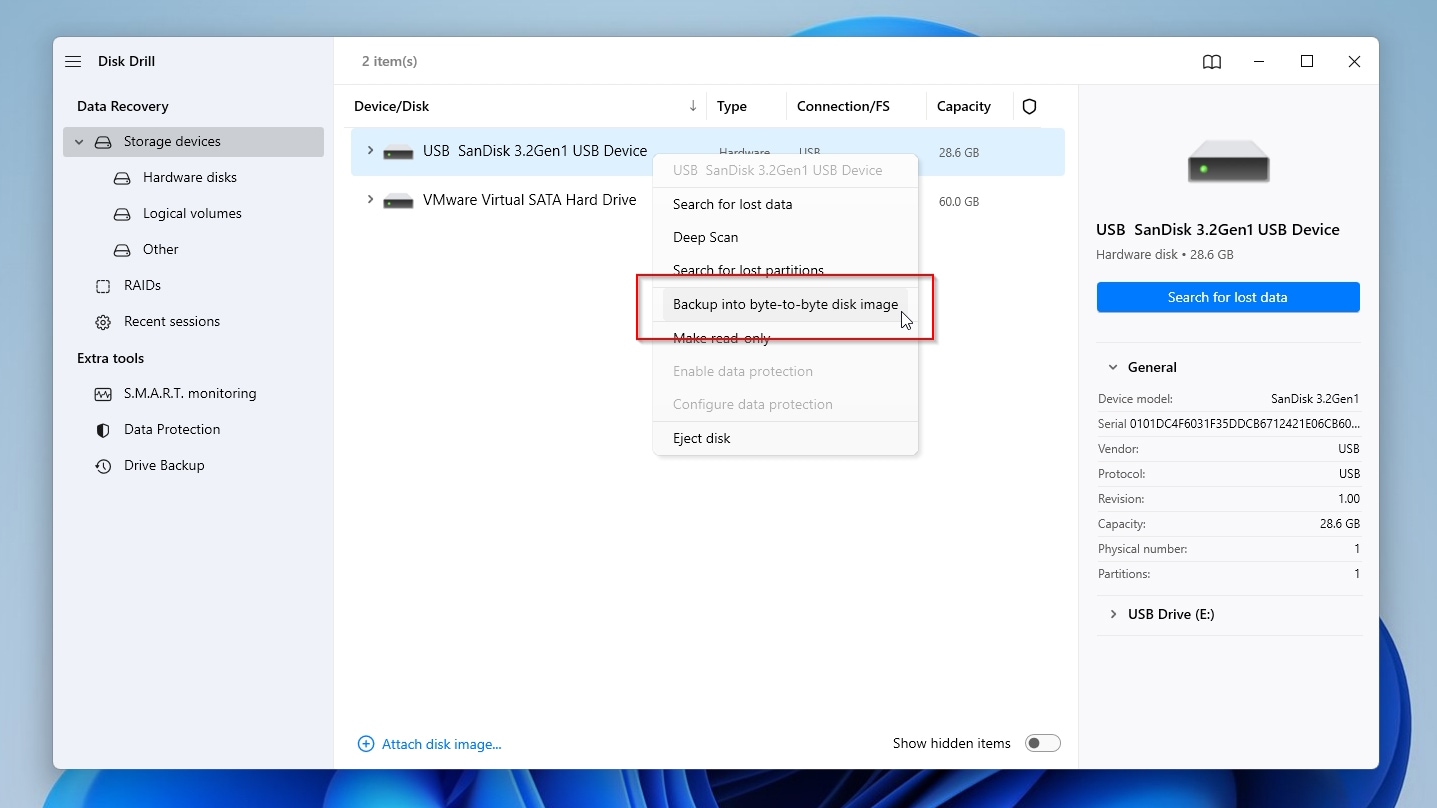
- Right-click on the storage device you want to back up from the Device/Disk list on the center of Disk Drill’s window, and choose Backup into byte-to-byte disk image from the menu. You can also directly select Drive Backup under Extra tools from Disk Drill’s menu on the left of its window.
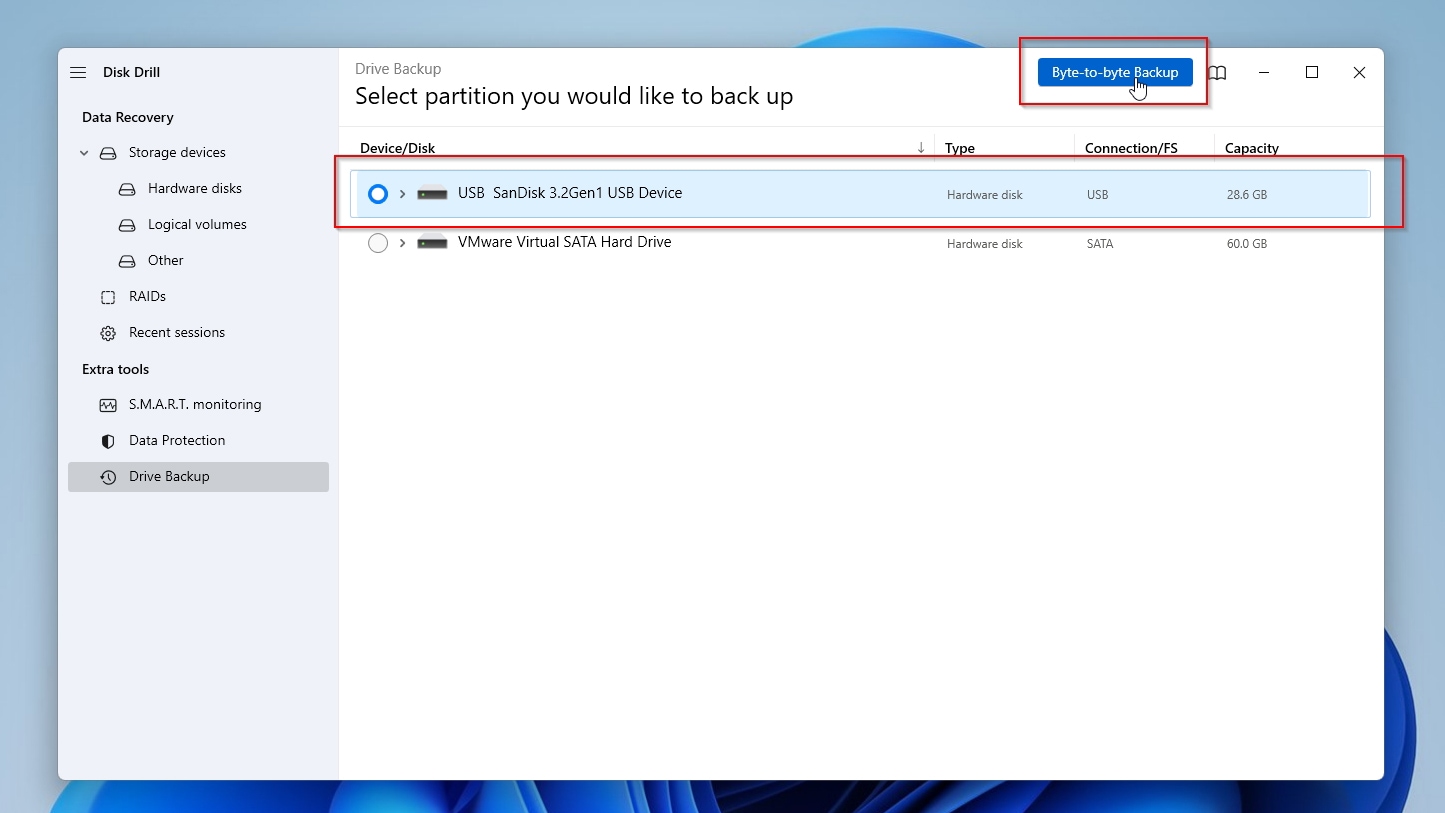
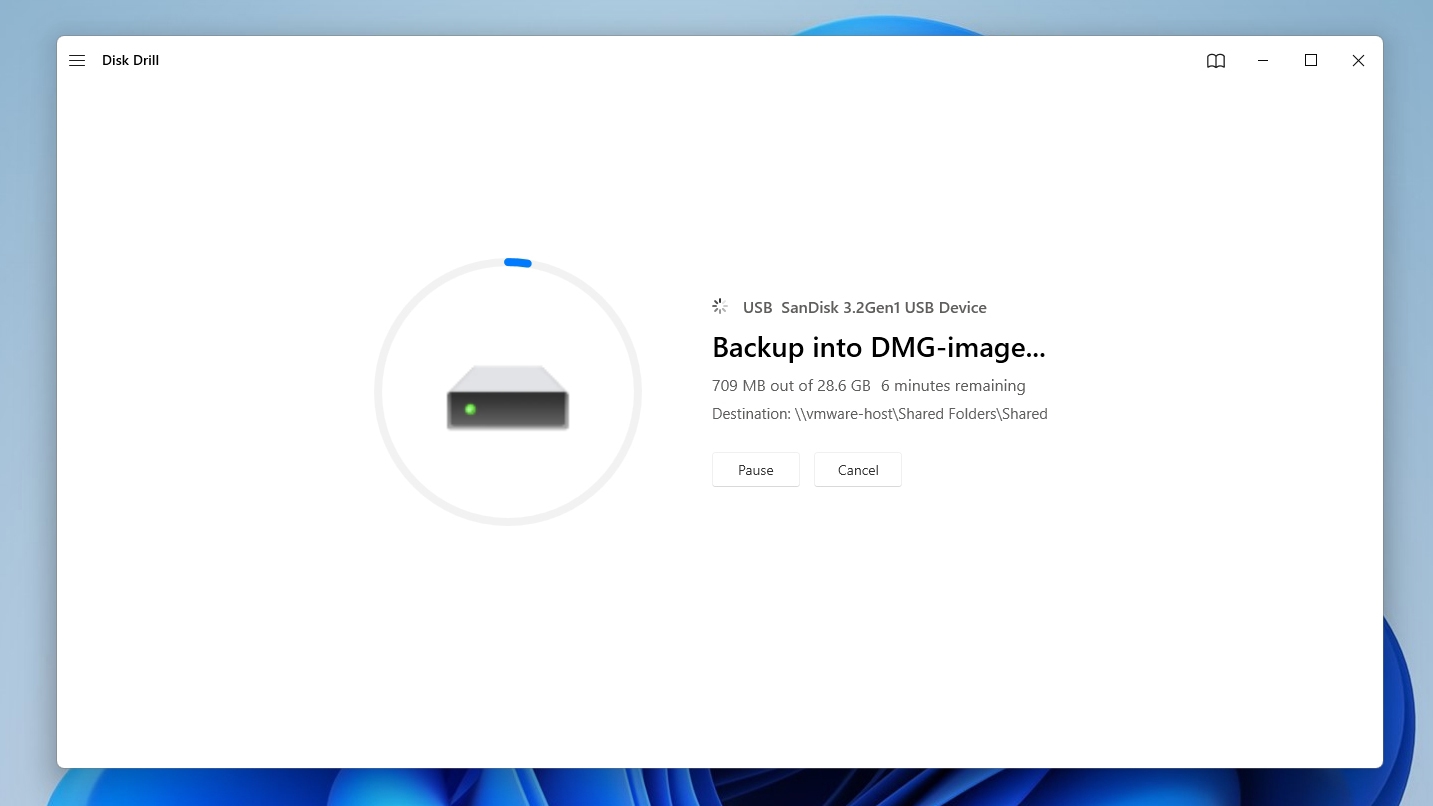
- Click the OK, let’s do it button to launch Disk Drill’s backup tool. Then, select the device you want to back up from Disk Drill’s Device/Disk list, and click on Byte-to-byte Backup on the top right.
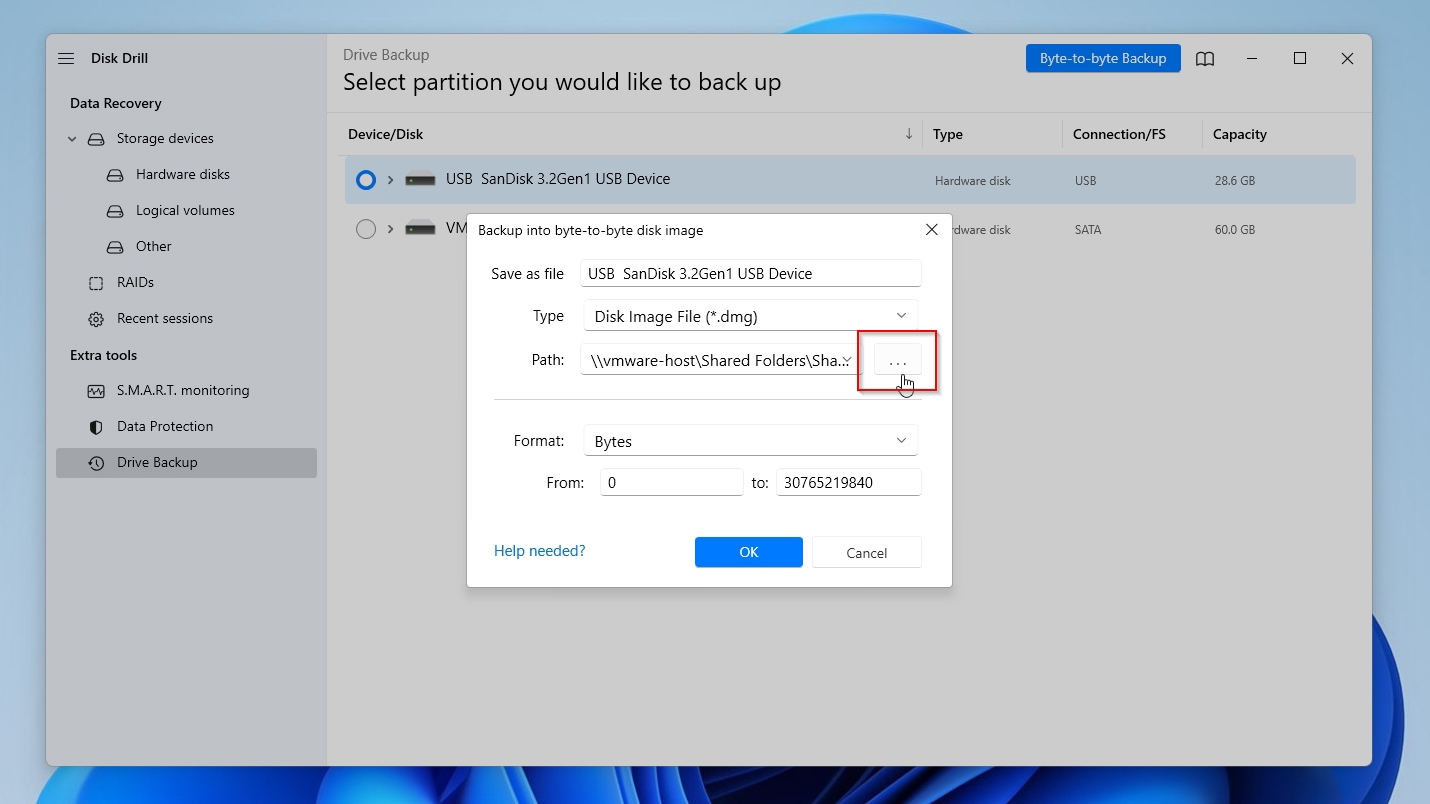
- Click on the button with the three dots and choose where you want to store the backup image Disk Drill will create. You can leave everything else as is. Click on OK to start the backup process.
- Allow Disk Drill some time to create your backup. Avoid interrupting the process, or the backup will end up incomplete. Depending on the size and speed of the device you’re backing up, this can even take up hours (on multi-Terabyte HDDs).
When the process completes, you can terminate Disk Drill and move to the next steps.
If you’re dealing with a problematic storage device, the following steps might not help you make it work again, nor save your data from it. Instead, you need to perform data recovery, and try to “fix” the drive afterward. Thankfully, we’ve got you covered. If it’s an internal HDD, check our guide on how to recover data from an internal hard drive. External hard drives require somewhat different steps, but we’ve got an article for them, too. And when you finally manage to get your data off them, see how you can try to fix a corrupted hard drive to render it working again.
If no matter what you try, you can’t get your data out of your HDD, and it keeps showing up as corrupted, empty, or RAW, unfortunately, there’s not much more you can do yourself. In such a scenario, sending it to an expert data recovery service is best since they have the proper equipment and, more importantly, know how to save your data. Thankfully, we’ve already covered the best data recovery services worth checking out.
Step 2. Initialize Your Hard Drive
If you backed up the data on your disk, or if it didn’t contain any data (that you care about), you can safely initialize your HDD (or other storage device). Let’s see the two main paths you can take to do that.
Method 1: Initialize Hard Drive Using Disk Management
The easiest way for initializing a disk in all modern versions of Windows is through the Disk Management app.
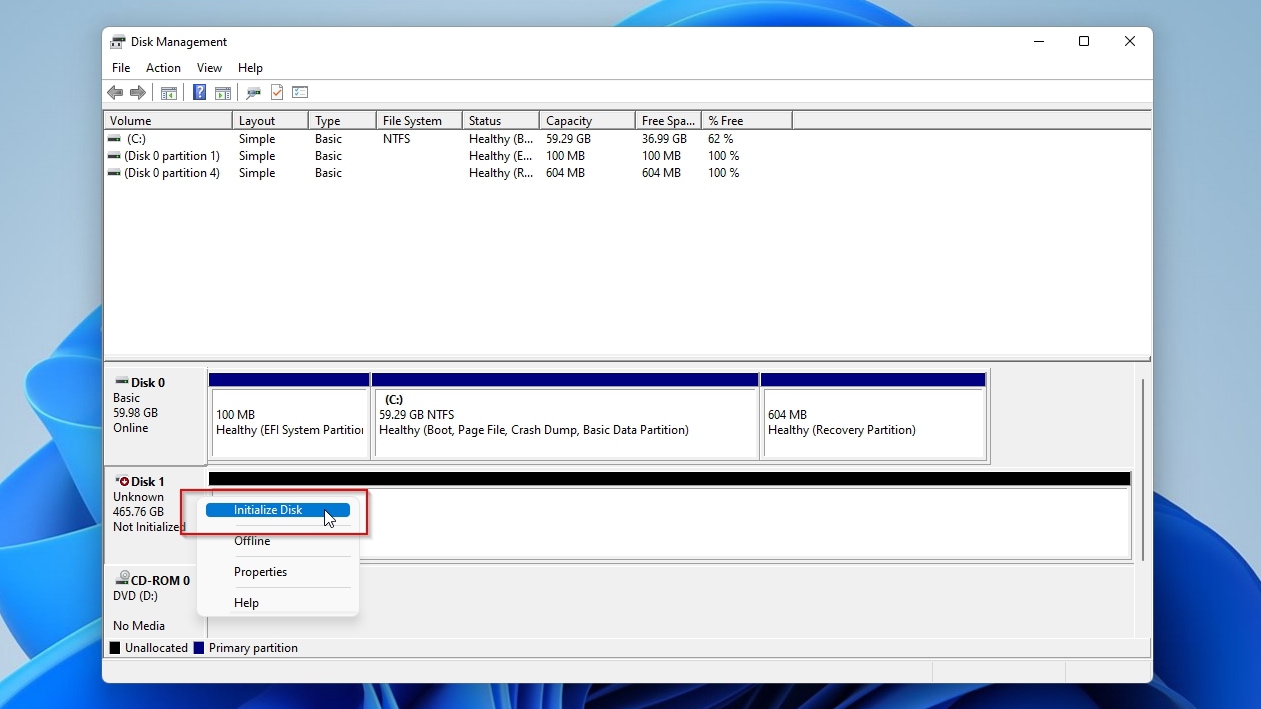
- Press Windows Key + X and choose Disk Management. If the disk is brand-new, the app will prompt you to initialize it. If it’s not, you don’t have to fully re-initialize the disk. You can remove and recreate partitions at will, using its existing partition table. But you can also switch between partition tables by right-clicking on every volume and Deleting it. Then, right-clicking on the disk itself (on the left of its representation on Disk Management’s window) and choosing Convert to MBR Disk or Convert to GPT Disk to re-initialize it with the desired partition table.
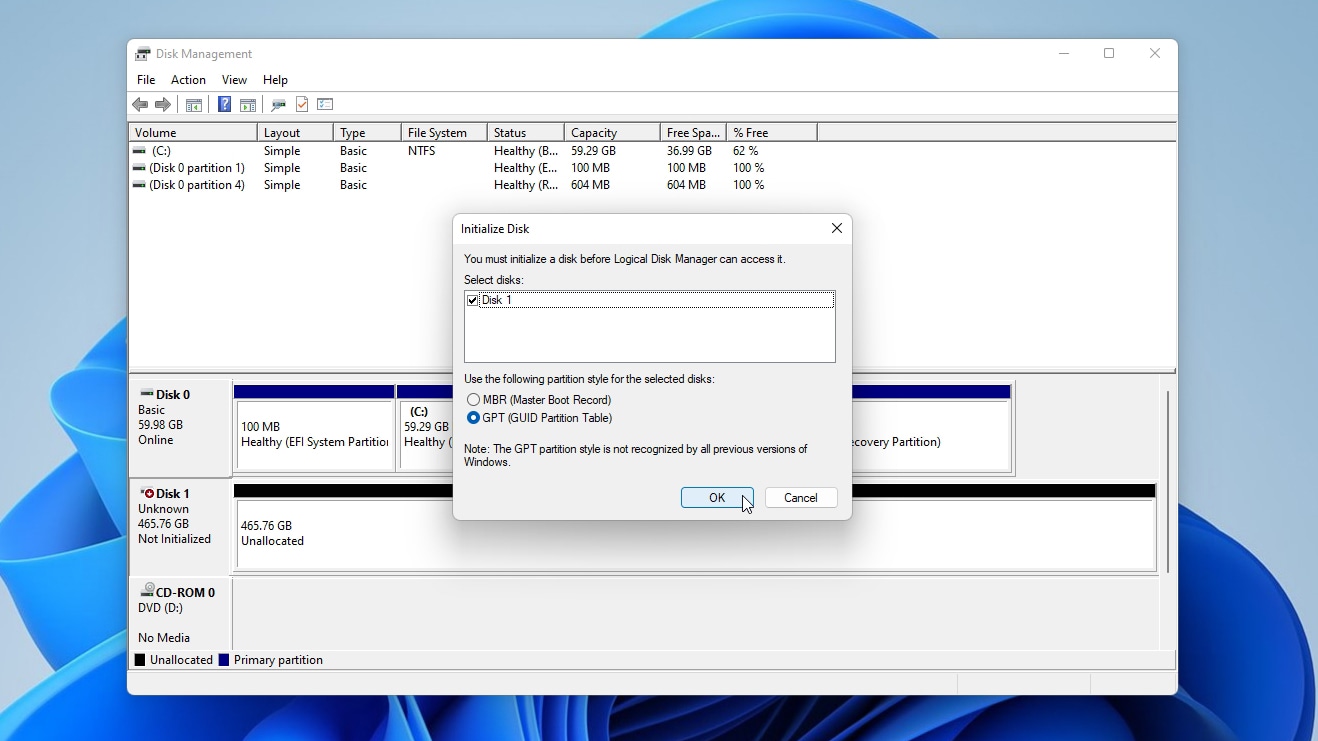
- Make sure to choose the correct partition table type for your hardware and OS. MBR for older hardware with BIOS and disks smaller than 2TB, GPT for the rest.
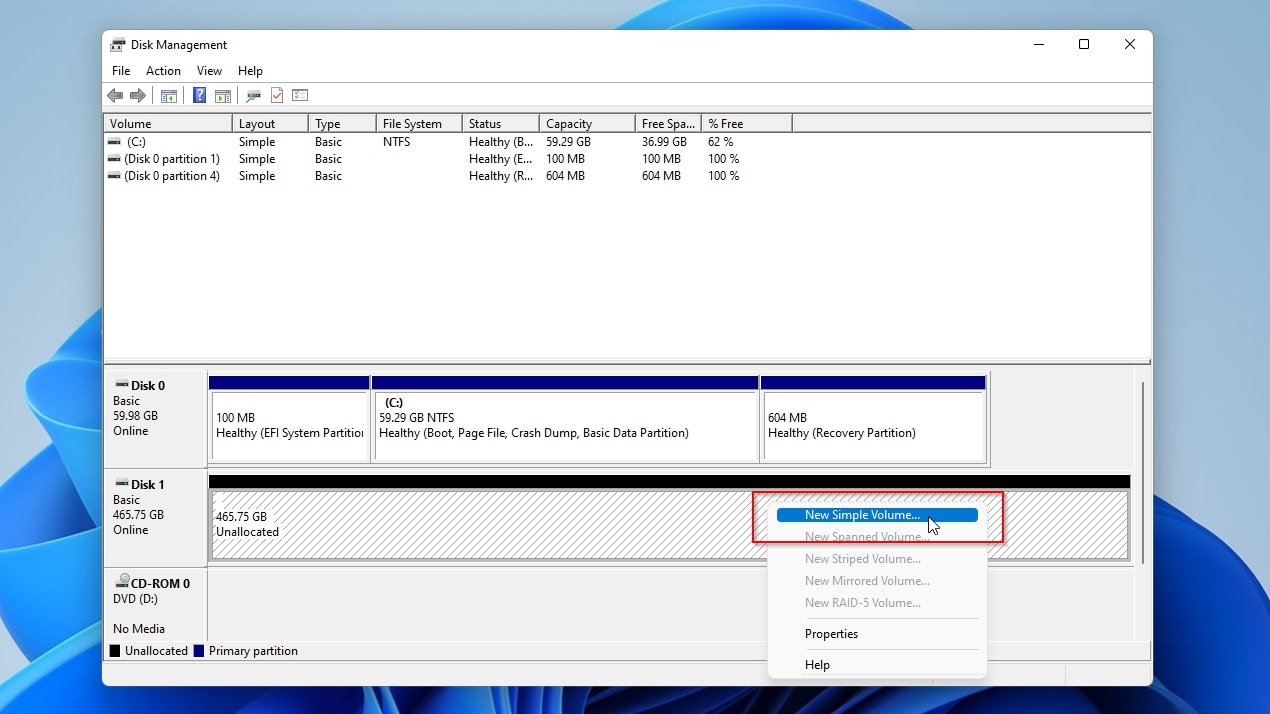
- Right-click on your newly initialized disk, and choose New Simple Volume to create a primary partition.
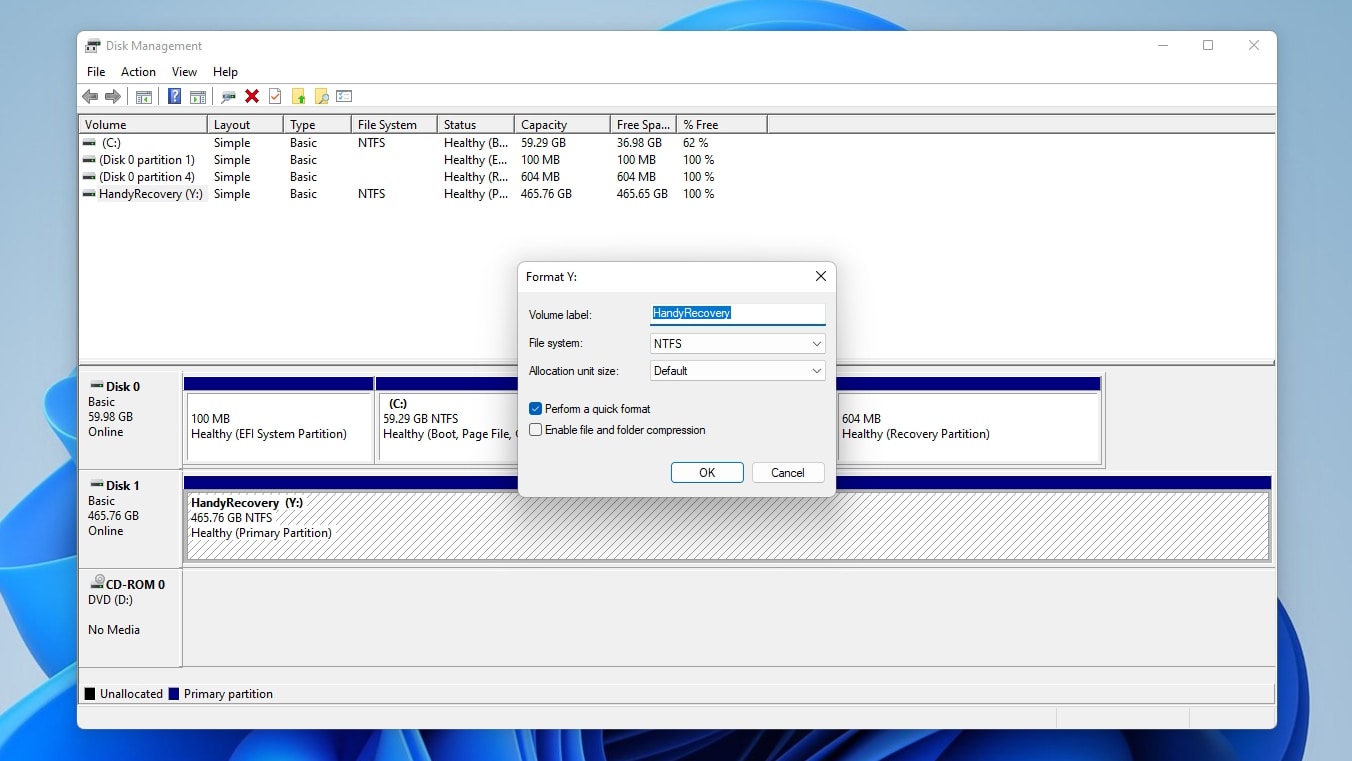
- Disk Management will also prompt you to format the new partition. Follow the presented guide, choose a drive letter, give it a name, and choose the desired file system (most people should go for NTFS). Leave Perform a quick format enabled if you’re doing all this to “reset” your storage. Disable it for new devices or, if troubleshooting, have the format go over the whole disk’s storage area and check it for problems.
Your disk should be fully accessible afterward from the letter you chose for the newly created partition.
Method 2: Initialize Hard Drive Using CMD & Diskpart
Diskpart is a command line tool in Windows for manipulating disks and partitions. It’s somewhat complex to use for newcomers, and you can use it to perform many storage-related tasks. Learn more about it, and all you can do with it, at Microsoft’s official documentation page for the tool. Among the actions you can perform with it, you can follow the following steps to (re-)initialize a hard drive using Diskpart.
Note: Remember that in the terminal, you must press Enter after every command to execute it.
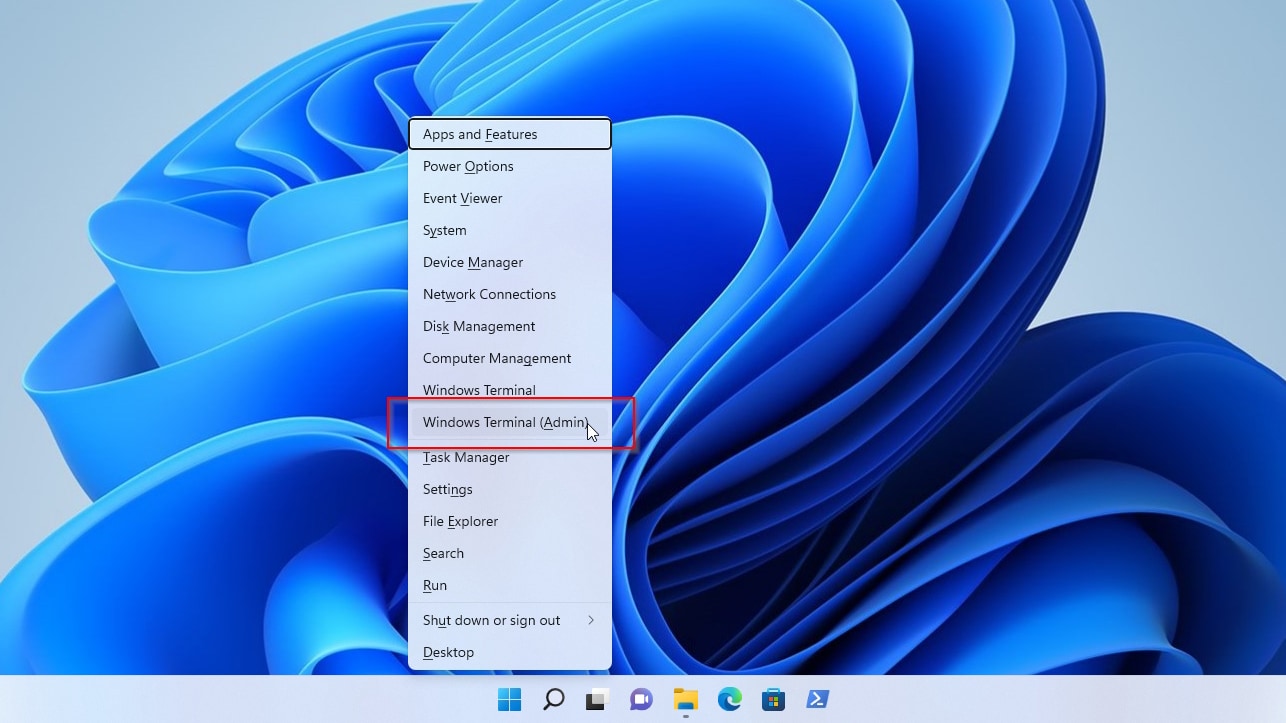
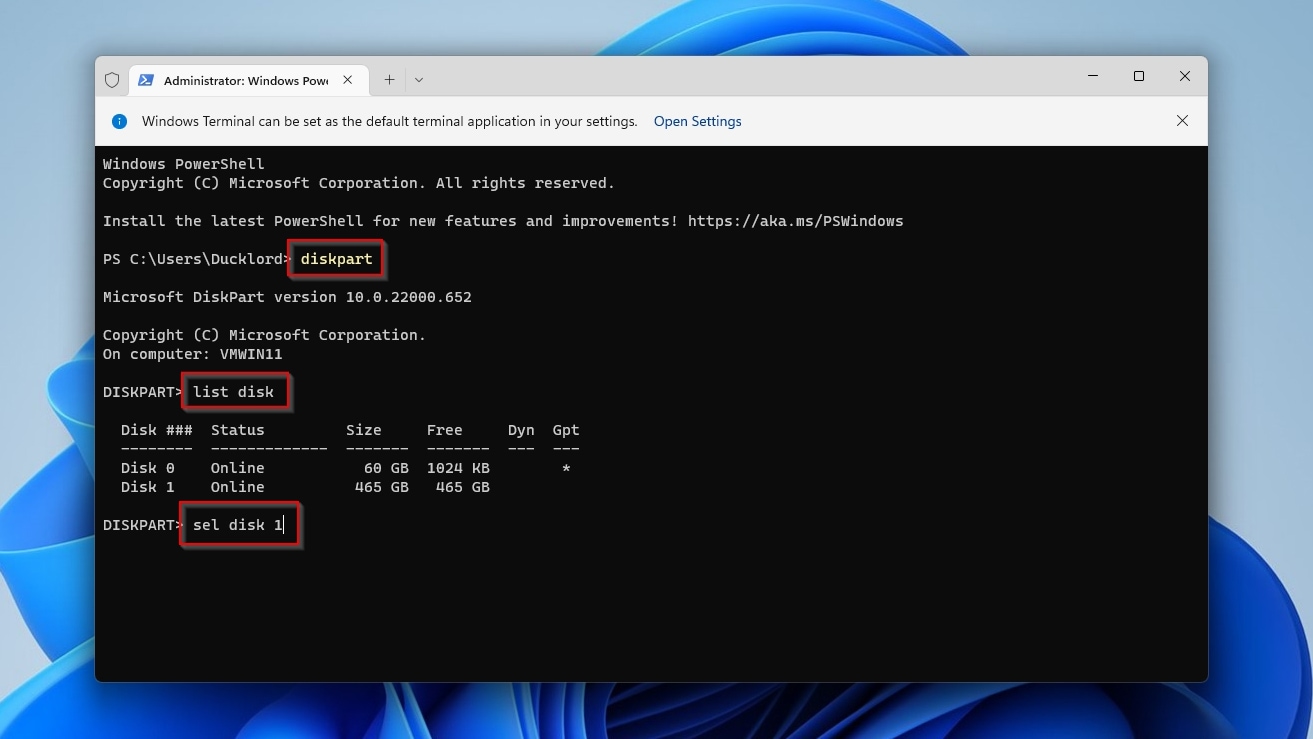
- Press Windows Key + X and choose Windows Terminal (Admin).
- Type:
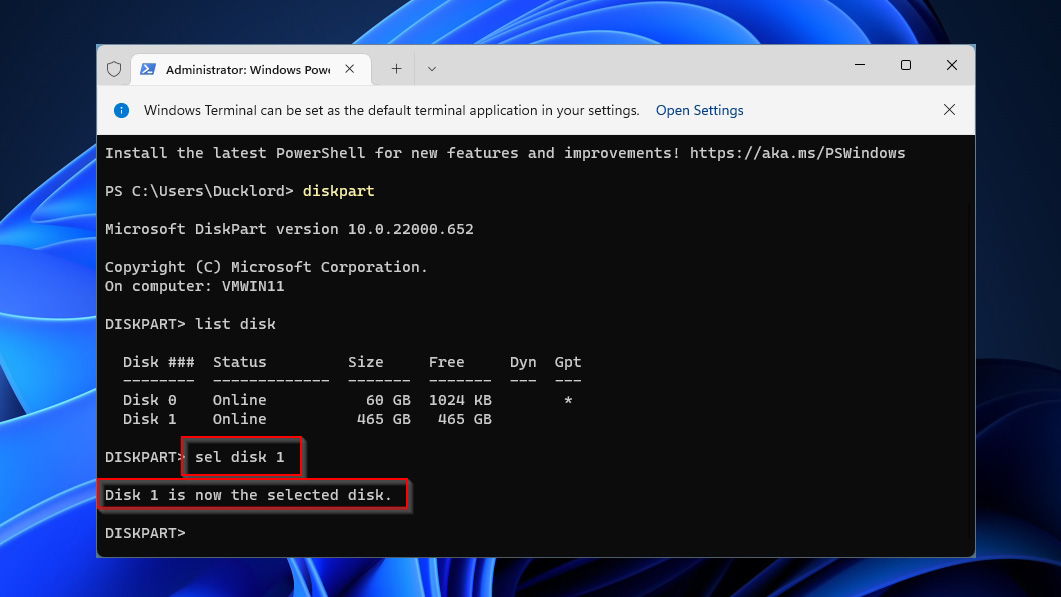
diskpart
…in the terminal window that will show up. Follow it with:
list disk
…to see all the disks diskpart can detect, and then:
sel DISK NUMBER
…(for example, sel disk 1) to select the one you want to initialize.
- Use the command:
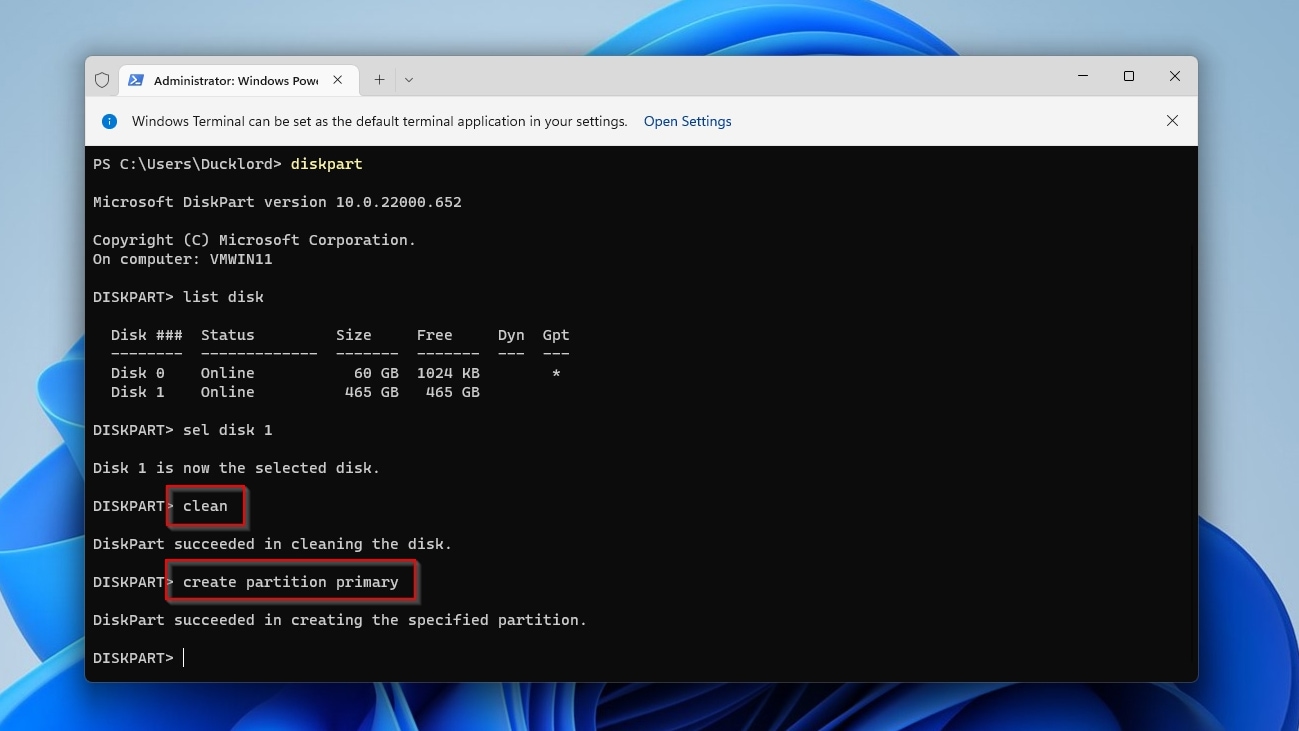
clean
…to remove the disk’s existing partition table and “reset” its data structures. If you want to fully erase everything on the disk, you can use the command:
clean all
…instead. However, note that this action will remove any data on the disk. If you go for that route, you should first make a complete byte-by-byte backup of your disk. With your disk now “reset”, create a new “storage room” on it with:
create partition primary
You can now exit Diskpart and use friendlier GUI tools for the rest of the process. If, however, you don’t mind sticking with Diskpart, you can also format your new partition and assign it a letter from your terminal with the following steps:
- Type:
format fs=ntfs label=NAME_YOU_WANT quick
…to quickly format the partition as NTFS with the name NAME_YOU_WANT.

- Find the active volume with:
detail disk
Then select it with:
sel VOLUME NUMBER
…(for example sel volume 4).
- Assign it a letter with:
assign letter=LETTER
…(like assign letter=y).
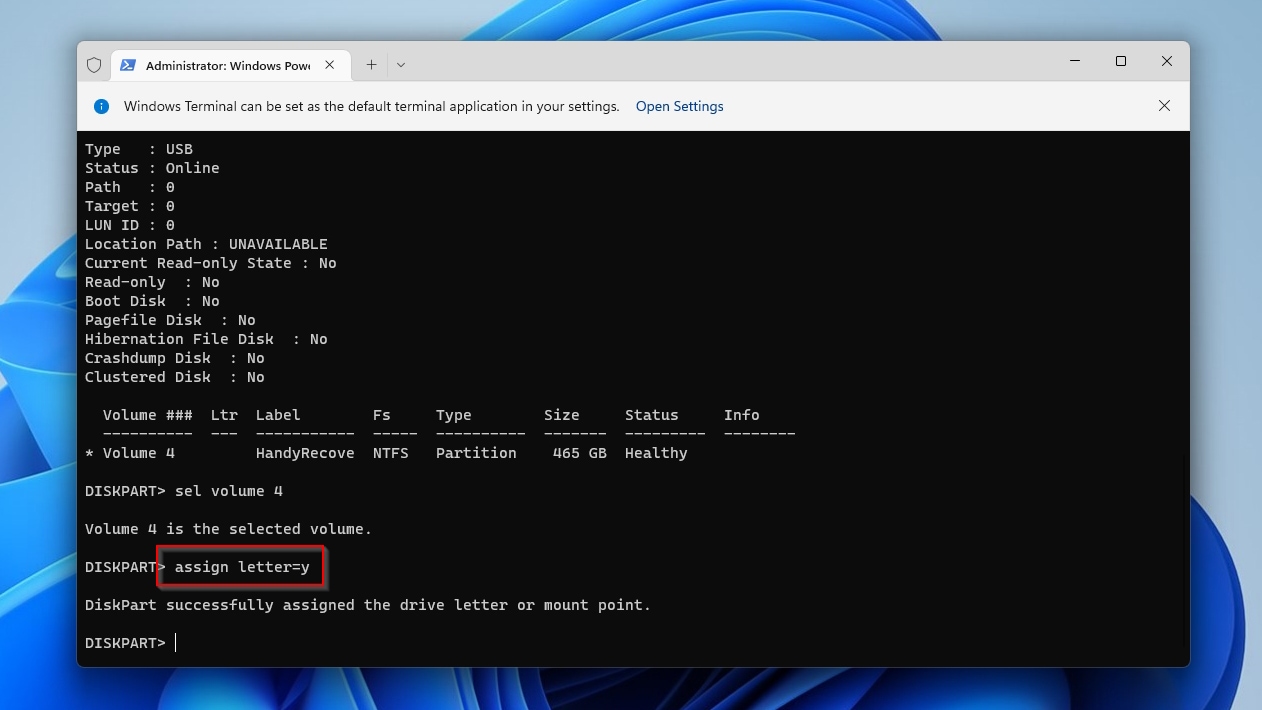
Your disk should be initialized and accessible from the letter you assigned its active volume.
Step 3. Retrieve Data From the Backup
If you have re-initialized a storage device that already contained data, now’s the time to bring that data back.
We saw how you can take a complete backup from a storage device using Disk Drill by creating a byte-to-byte image. Bringing that data back to the same storage device is a matter of reversing that process as we’ll see next.
However, it’s also worth noting that Disk Drill’s powerful data recovery engine can help you even if you didn’t keep a complete backup of your drive. That was one of the main reasons it achieved an average score over 9 when we reviewed the app. If you didn’t also perform a full format after initializing your drive, you can have Disk Drill scan it directly, instead of using its image. Then, have it recover your data on a secondary drive.
- Run Disk Drill and click on the Attach disk image option at the bottom left of the Device/Disk list at the center of its window.
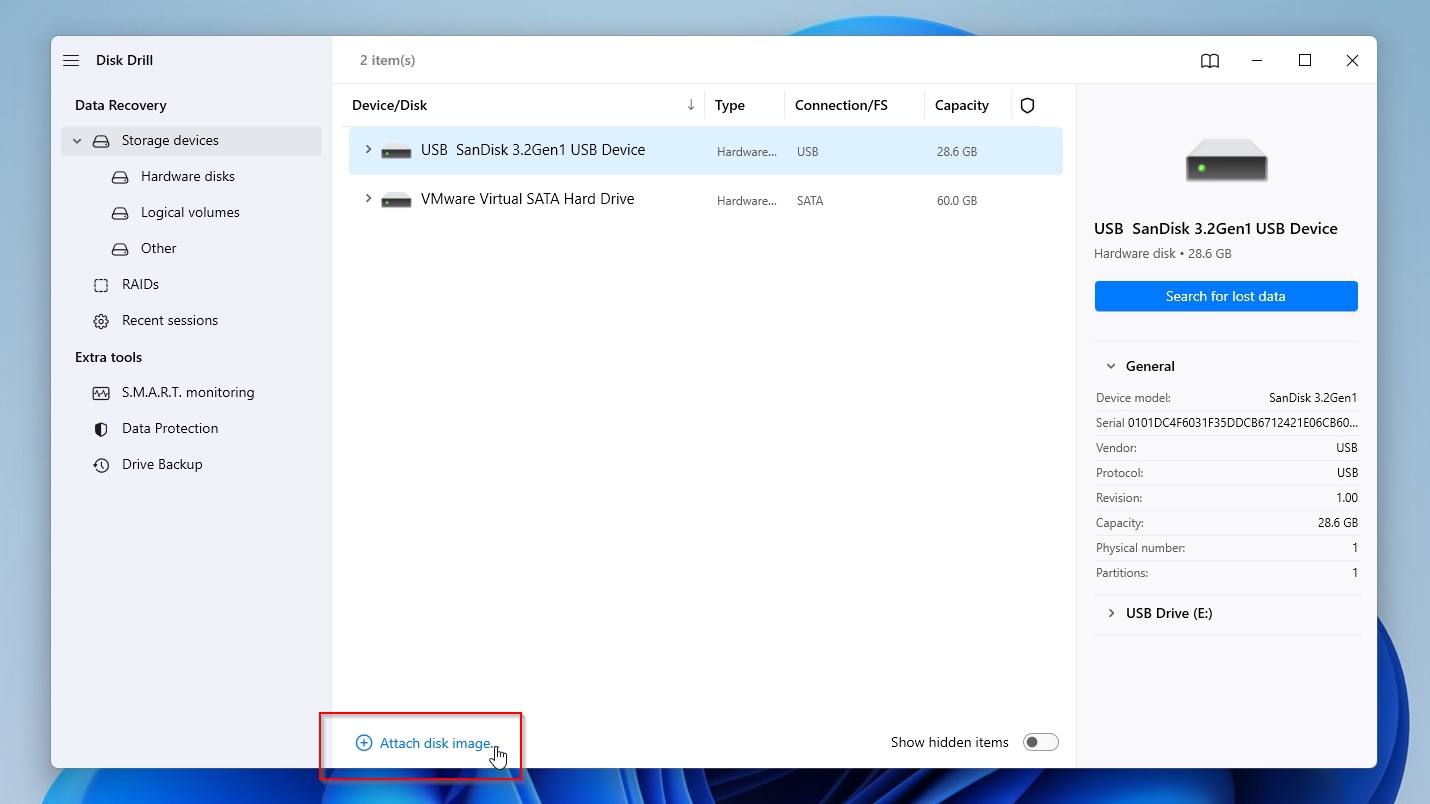
- Almost immediately, you’ll see your Mounted Image show up as a new device. You can click on it and then on Search for lost data, but there’s an even quicker way to get your data back.

- Instead of scanning the virtual device with Disk Drill’s default mode, which is “tuned” for storage devices from which you want to recover lost data, right-click on the image and choose Allocate existing data.
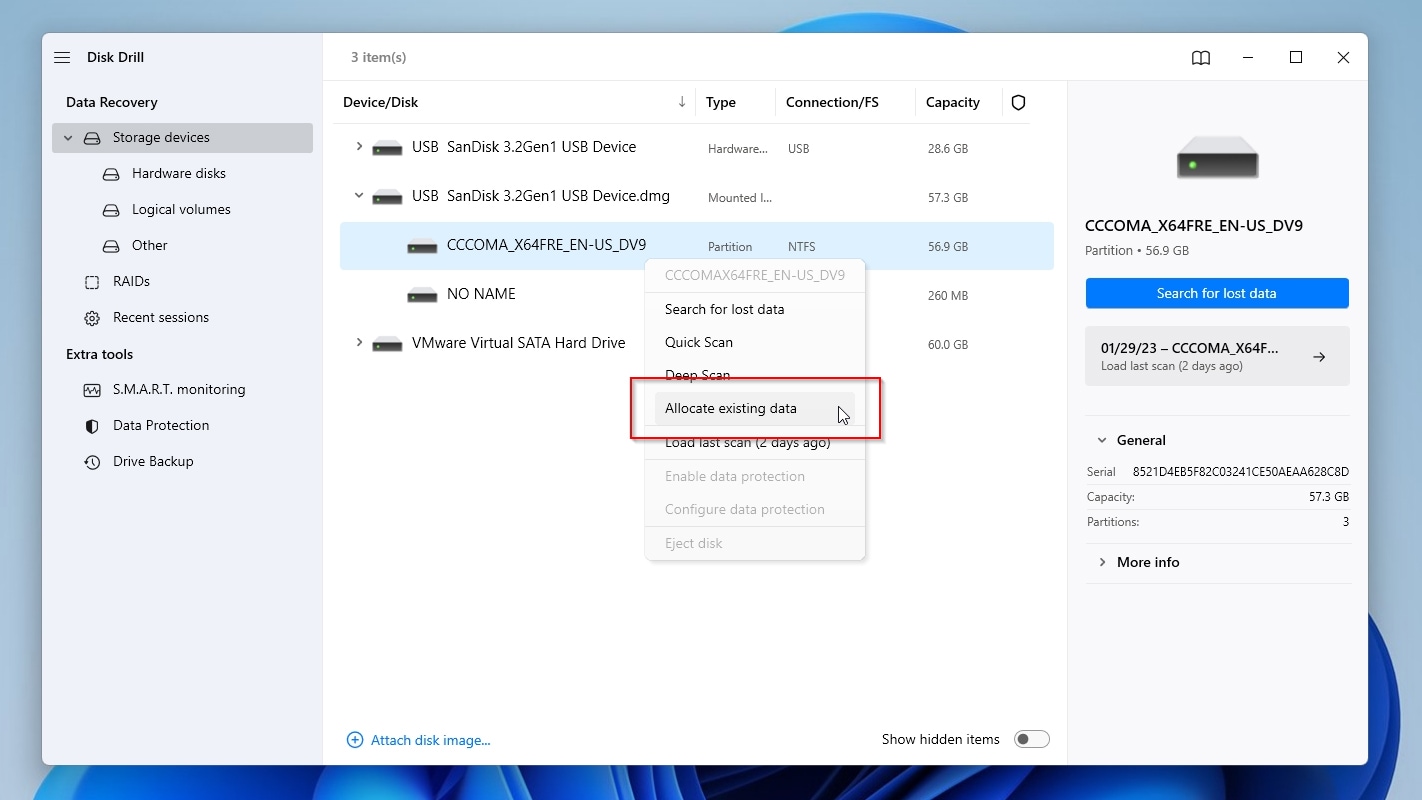
- Give Disk Drill some time to re-index all data in the image. When it’s done, click on Review found items, and select the files you want to bring back. Alternatively, you can click on Recover all to bring back everything. Choose your initialized disk to restore your files to their original “home”. Then, click Next and follow along to bring your files back.
FAQ
What does 'initialize disk' mean?
To store data on a storage device, it needs a “scaffolding” that will define how it will be stored and organized. This “structure” is made out of two things. First, partitions, outlined by a partition table, which “compartmentalize” the disk in one or more “storage rooms”. Second, their file systems, established during their formatting, that state how folders and files will be arranged in those partitions.
Will I lose my data if I initialize a disk?
If you only “initialized a disk”, the process wrote a new partition table on it, making it appear empty, but it didn’t affect the data on it. On the contrary, having a usable partition table can make it possible to pull your files out of your storage device by using the right tool for the job (like Disk Drill, PhotoRec, or any other trustworthy recovery app you choose). If you also performed a full format on those partitions, all data on them will be gone and only recoverable from a backup.
Will initializing a disk format it?
The answer can be both yes and no, depending on your choices during the initialization process. Although “initializing a disk” doesn’t format it, if you follow through with all steps of an automated wizard that performs that initialization, you may also end up formatting the device after creating a new partition table.
Should I initialize MBR or GPT?
The choice depends on your hardware. MBR is compatible with older and newer PCs but only supports storage devices up to 2TBs in size. GPT is newer, more versatile, and can work with multi-terabyte storage devices, but it is best only for newer PCs equipped with a UEFI system instead of the older BIOS.
How do I recover data from an initialized disk?
Suppose you only initialized a disk or initialized it and performed a quick format. In that case, you can restore (most of) the data within it with a tool like Disk Drill, like so:
- Run Disk Drill.
- Choose your initialized disk from Disk Drill’s Disk/Devices list.
- Click on Search for lost data to scan it for files.
- Choose the ones you want to bring back.
- Click on Recover and choose where to save them.
For a more detailed version of the above, check our guide on recovering data from a storage device after a quick format.
If you initialized a disk and performed a full format, it’s impossible to recover data from it. However, you can restore your data if you had previously backed it up, for example, by using Disk Drill’s byte-to-byte imaging capabilities.
This article was written by Odysseas Kourafalos, a Editor-in-Chief at Handy Recovery Advisor. It was also verified for technical accuracy by Andrey Vasilyev, our editorial advisor.
Curious about our content creation process? Take a look at our Editor Guidelines.