
Photos are magical records that capture and freeze moments of time. Unfortunately, photos are prone to data loss like other digital files, regardless of the device storing the photos, including internal and external hard drives.
This article explains the various methods you can use to recover deleted photos from a hard drive.
How to Recover Photos From Hard Drive Using a Recovery Tool
The best way to recover pictures from your computer hard drive is to use third-party data recovery software. These professional tools are efficient, easy to use, and can help recover deleted photos from any device in a few easy steps.
Amongst the best photo recovery apps, our editorial team vouches for Disk Drill as the ultimate go-to option. Disk Drill facilitates the recovery of specific file types, including 90+ different image types like BMP, JPEG, PNG, GIF, TIFF, PSP, and others. Disk Drill also allows you to recover RAW file formats from the most popular camera brands such as Nikon, Canon, Sony, FujiFilm, etc.
Disk Drill is reliable, affordable, and features a straightforward user interface. Moreover, the recovery tool can help you retrieve deleted photos from your hard disk formatted to all major file systems, including FAT32, exFAT, NTFS, etc. You can learn more about all of Disk Drill’s advanced features in our in-depth review.
Step 1. Find All Existing Photos on Hard Drive
Interestingly, you don’t always have to recover the deleted photos. For instance, if you have an unused hard drive from an old computer – you can use Disk Drill to scan the hard drive and safely backup the pictures.
Data recovery software such as Disk Drill helps you not only with photo recovery but also with accessing photos on old or logically corrupt drives, including those not showing up on File Explorer. The only prerequisite is that your disk must get displayed in Disk Management, and have a definite size (not appearing as “No Media”).
If you have an unused hard drive from an old computer, you can use Disk Drill to scan your hard drive and safely pull up your photos.
Here’s how you can use Disk Drill to find and filter all existing photos on an external hard drive:
- Download and Install Disk Drill on your computer.
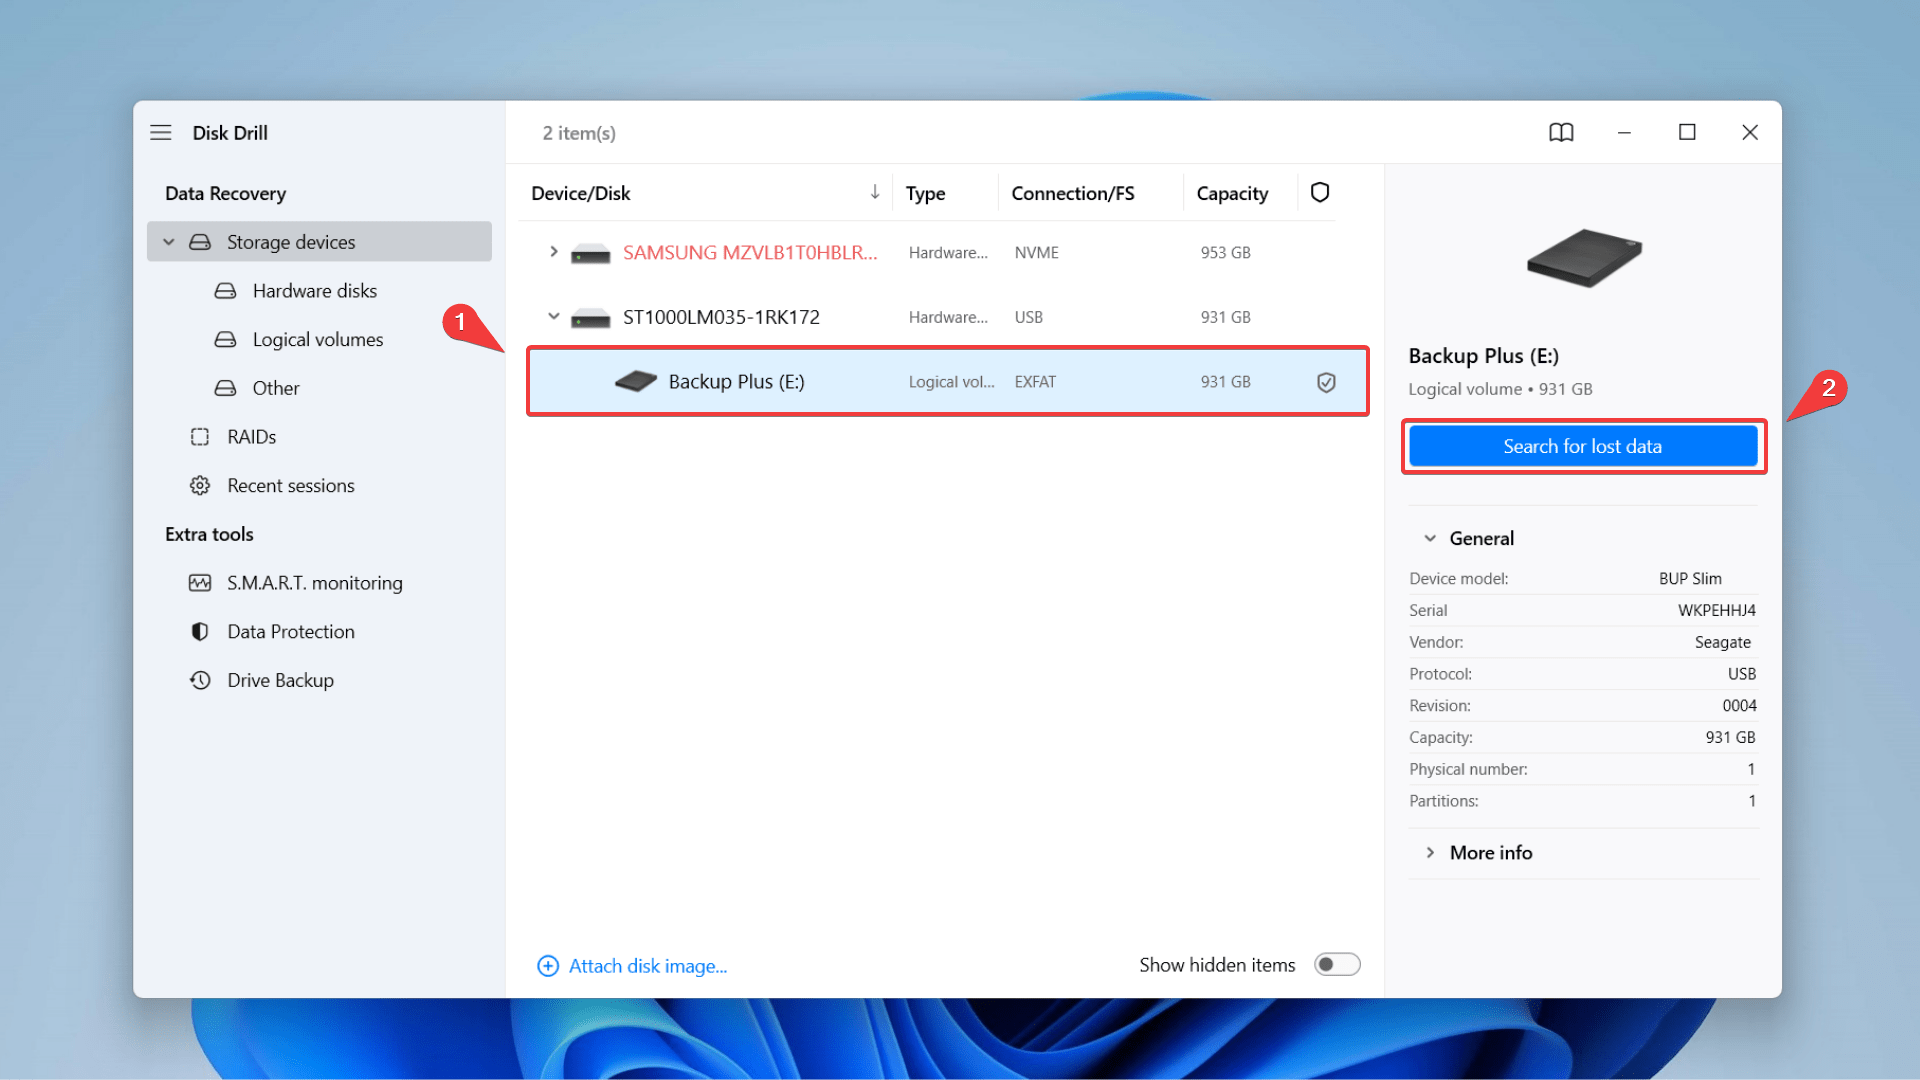
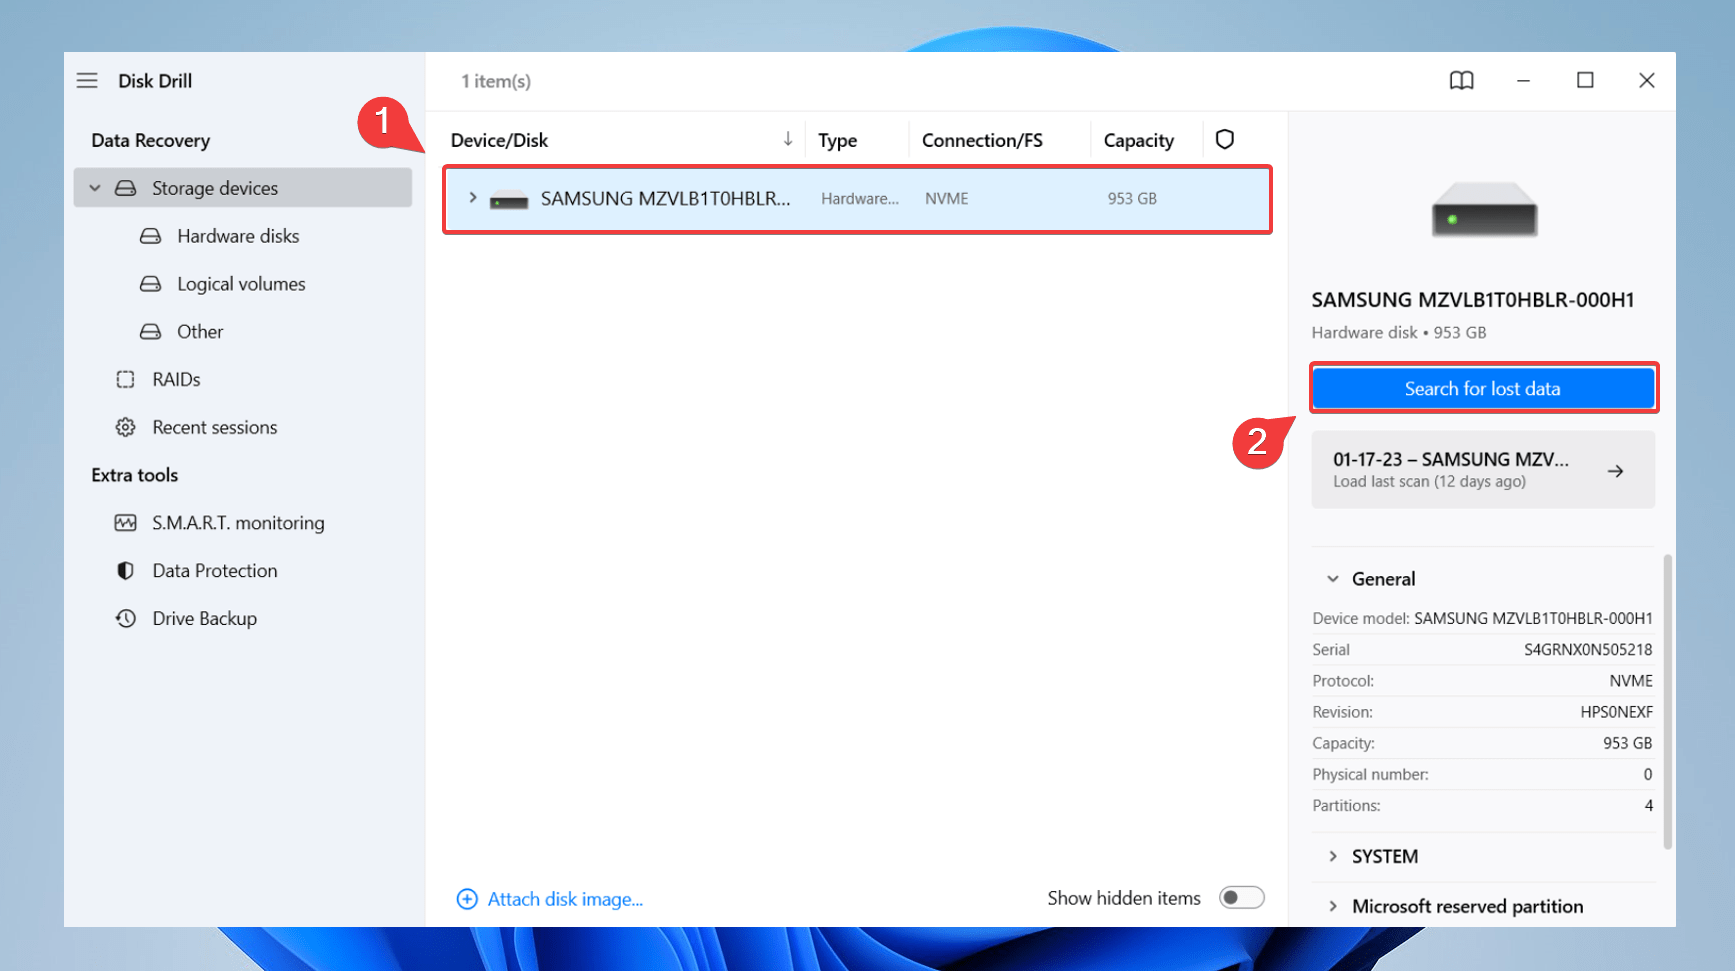
- Scan Your Hard Drive: Launch Disk Drill and select the hard drive with the lost or deleted photos. To begin the scan, click the Search for lost data button.
- Allocate and Find Files: Disk Drill’s advanced algorithm will now begin scanning the hard drive. The entire scan may take some time, depending on the hard drive size.
👀
While scanning, Disk Drill allocates all existing files into specific categories – Pictures, Video, Audio, Documents, Archives, and other files. In this case, when you click on Pictures, you’ll find three categories – Deleted or Lost, Existing, and Reconstructed.
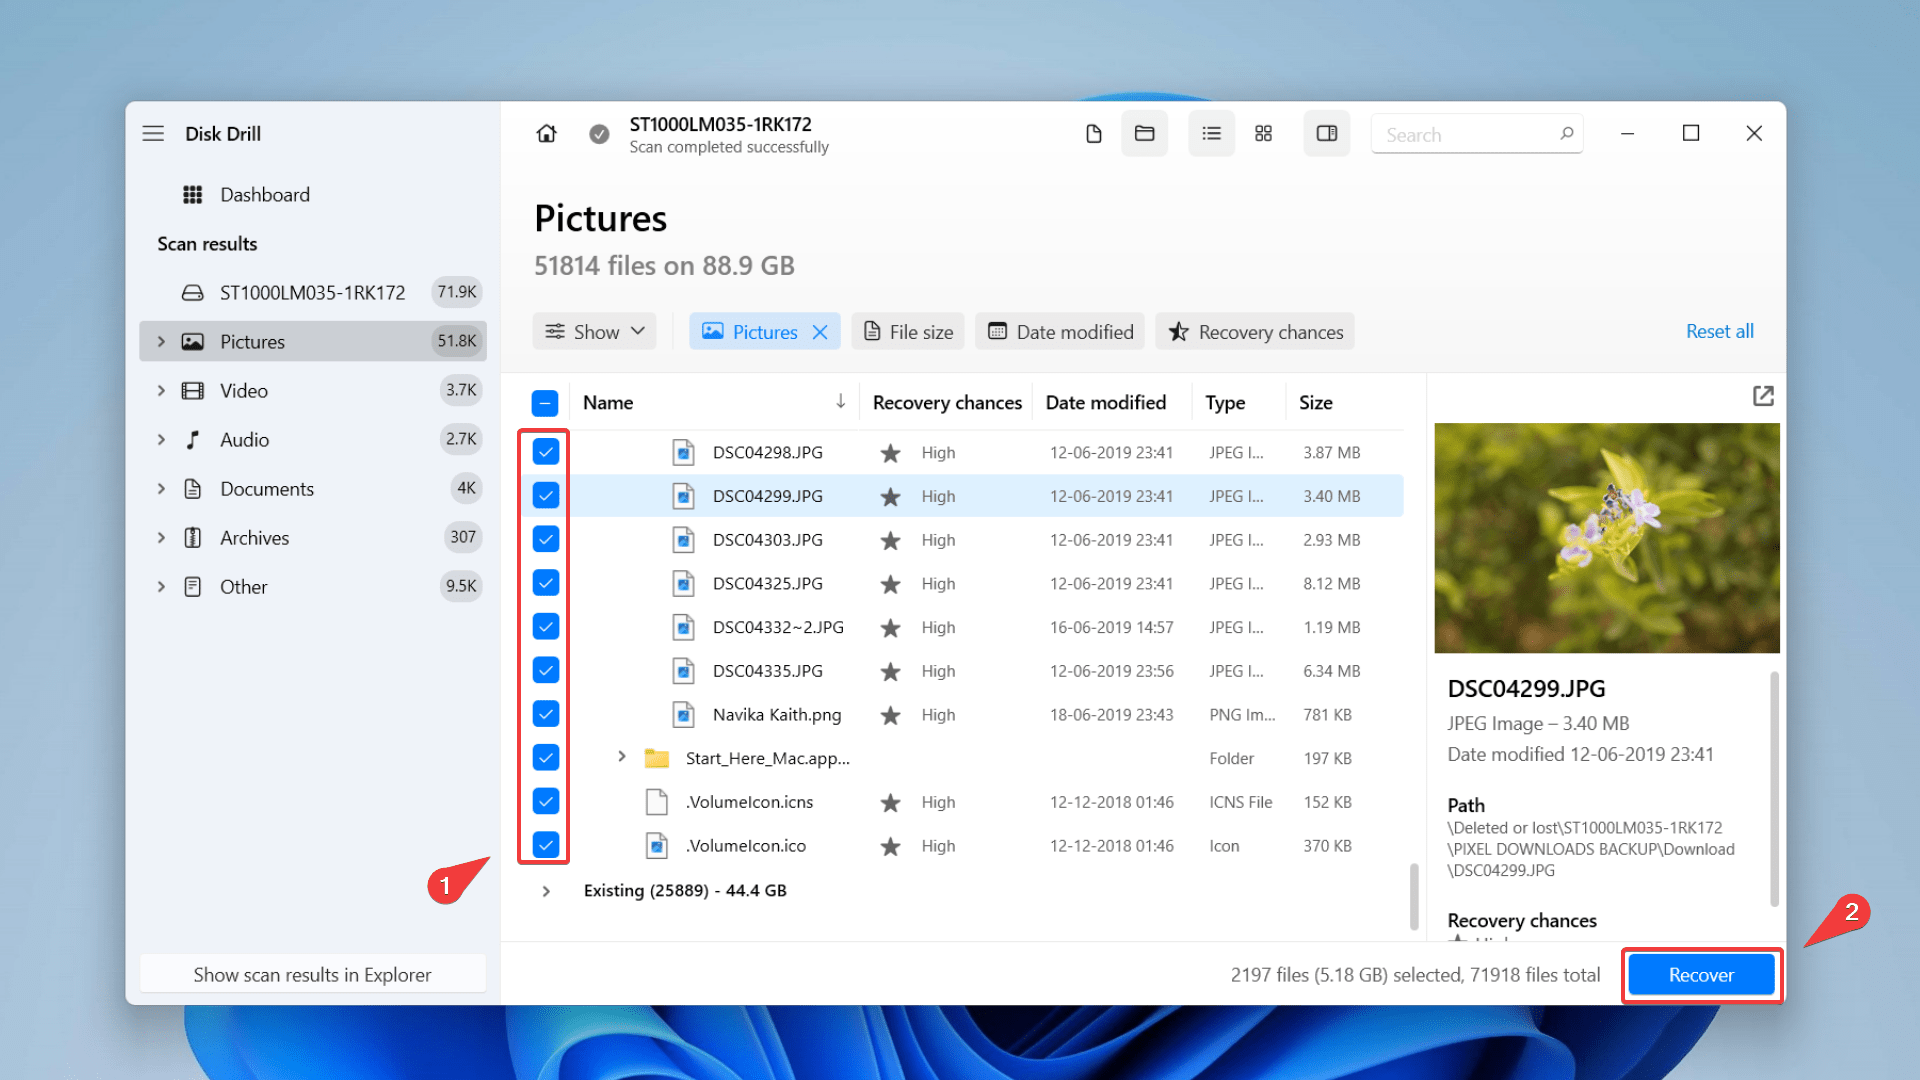
- Preview Existing Files: Go through the ‘Existing Files’ category to find the photos you want to retrieve. You can also expand the picture category and check out the sub-categories grouped by file type to further filter the files. Preview your photos by clicking on the ‘eye’ button next to the file name.
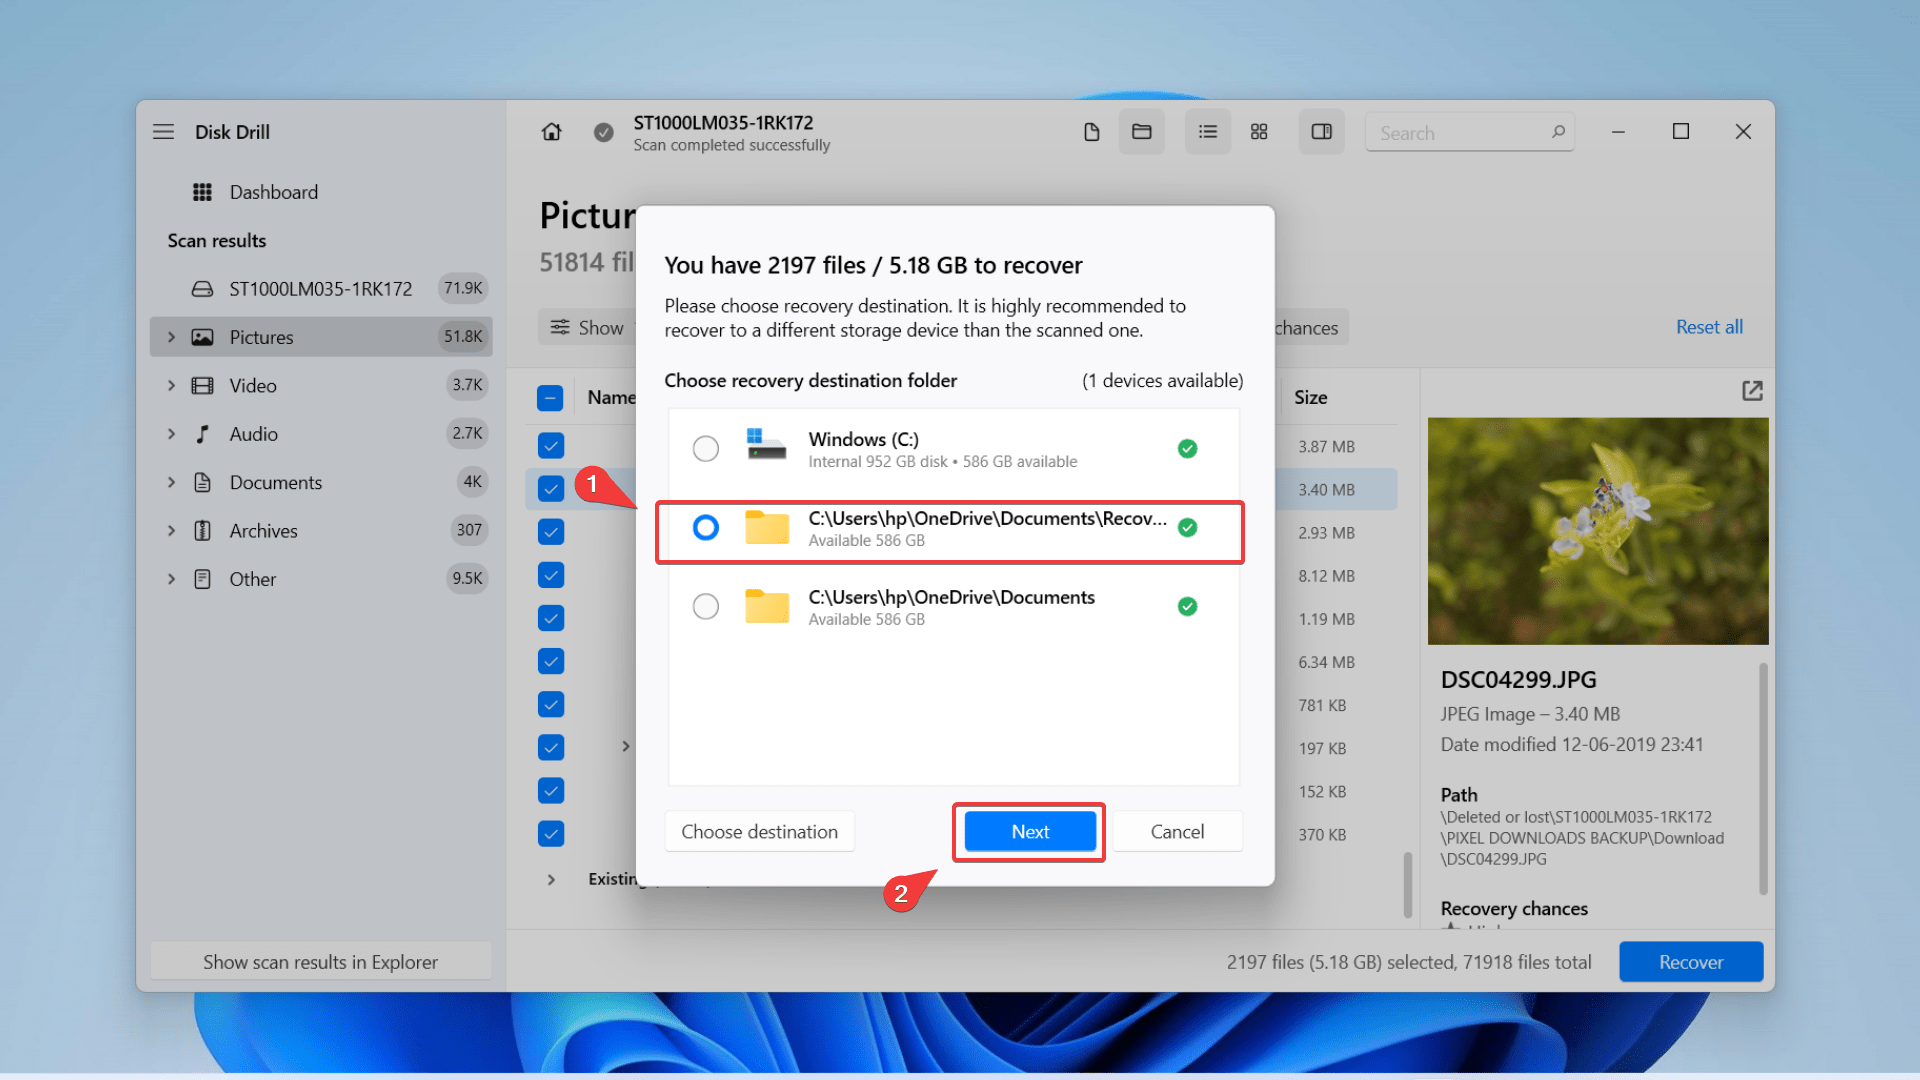
- Retrieve your Photos: Now, select the photos from the list of existing files and click Recover. Disk Drill will ask you to specify the folder for the image recovery. Ensure you select a separate partition on the hard drive as the target destination to avoid overwriting—Press Next to complete data recovery.
Step 2. Recover Permanently Deleted Photos From Hard Drive
Now that we’ve gone through the steps to retrieve existing photos, here’s how you can recover deleted photos from your hard drive. You can also follow these steps if you want to perform external hard drive recovery.
- Download and Install Disk Drill.
- Launch Disk Drill, select the hard drive from the list of devices, and click Search for lost data.
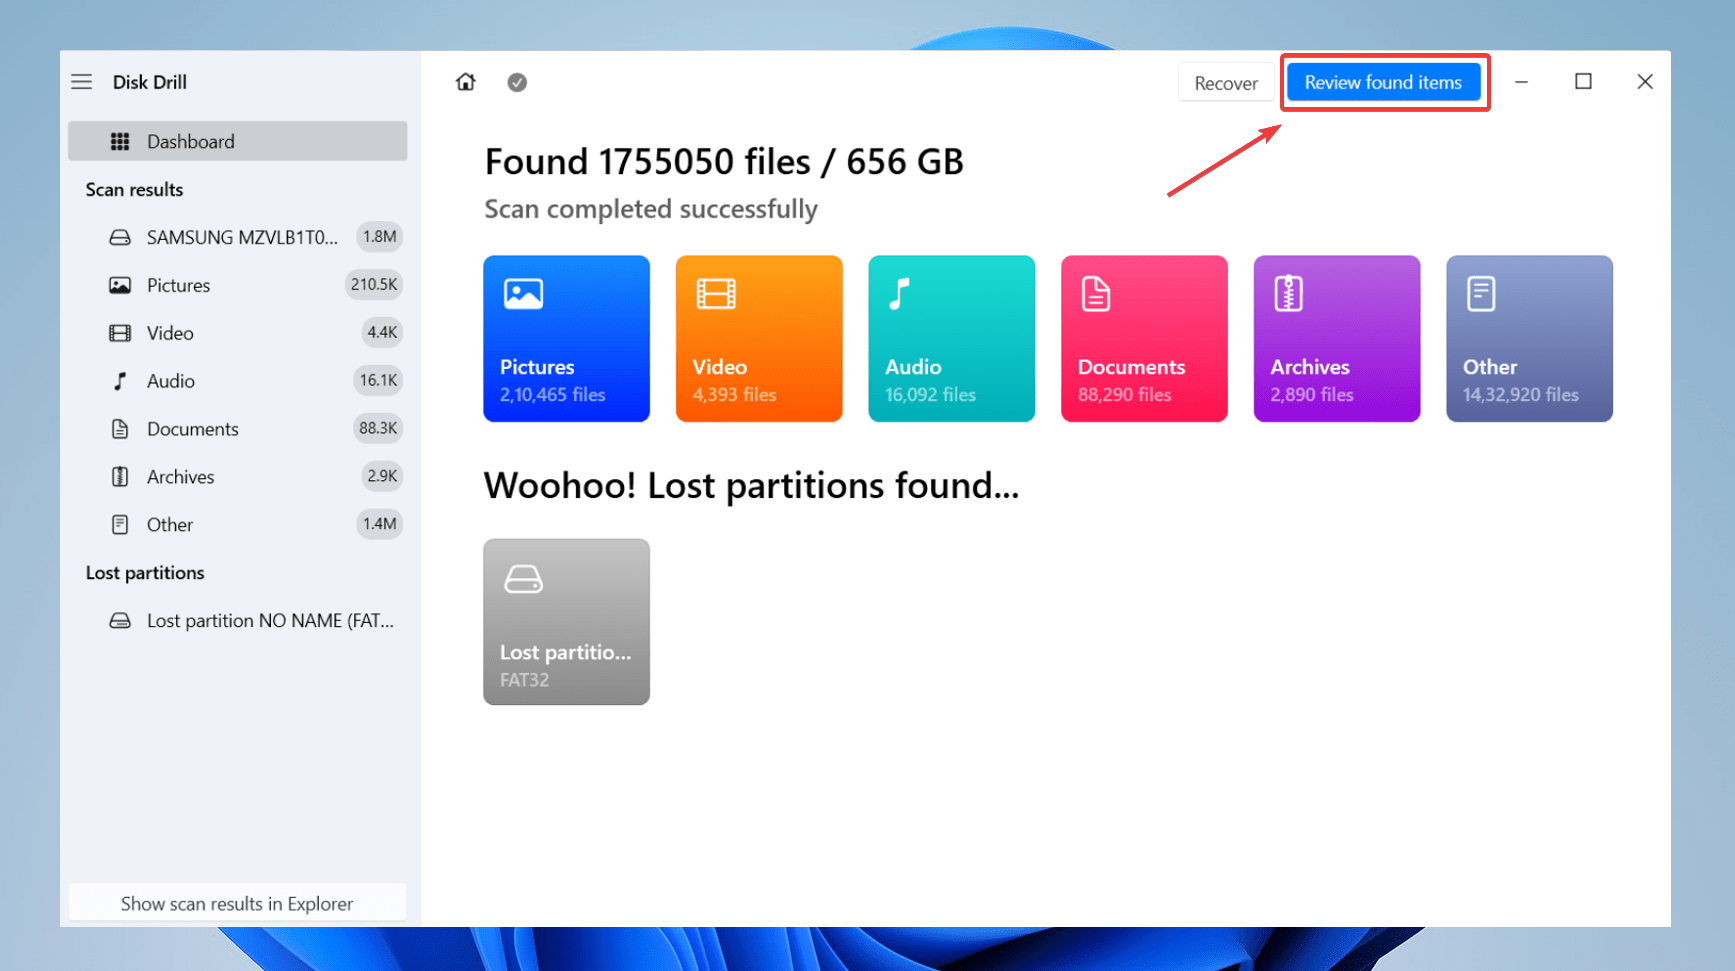
- Disk Drill’s algorithm will now scan the drive for recoverable data. Once the scan is complete, you can either select the Pictures category or click Review found items.
- Filter through the search results using specific file extensions and Preview the photos you want to recover. You can hover over the eye button to preview files and use this feature to decide which pictures you wish to retrieve.
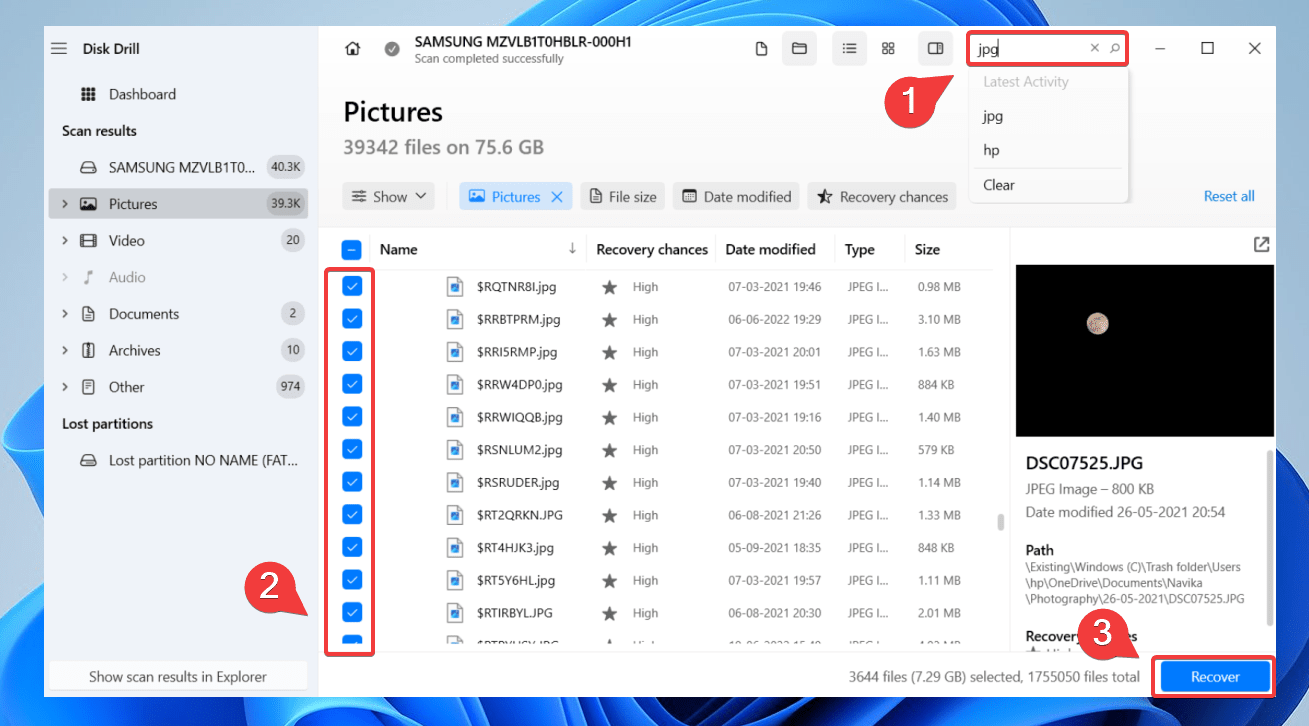 🗨️
🗨️Here, we’ve typed in the .JPG extension, and all the photos that support this file type appear as a list.
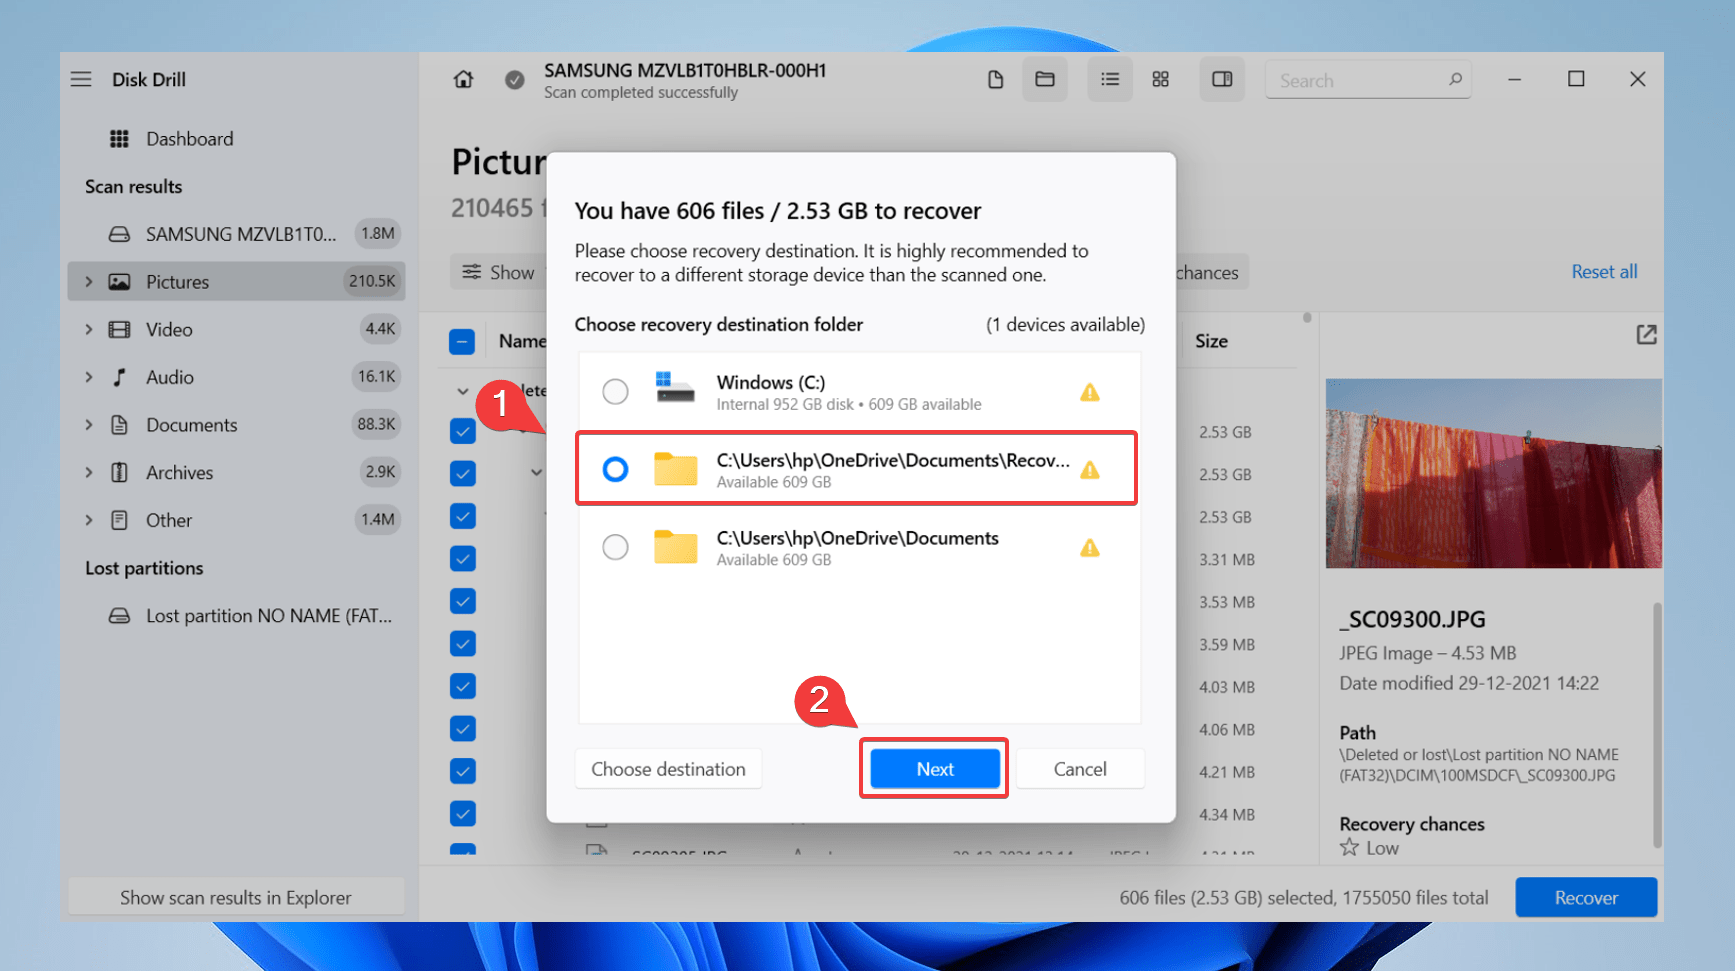
- Finally, select the files by ticking the checkboxes next to them and then click Recover. Choose the recovery destination for the pictures, and ensure you don’t select the same hard drive. Press Next to recover deleted photos from the hard drive.
If your photos are on a seriously damaged or undetectable hard drive, it may not be possible to retrieve them via data recovery software. In such cases, you can approach reliable data recovery services to help you recover lost or deleted photos. Our team has compiled a list of the best data recovery services to help make your choice easier.
How to Recover Photos from Hard Disk With Windows Native Features
Besides professional data recovery software, you can also use Windows Native Functions to retrieve lost photos from your hard disk.
Method 1: Find Pictures on the Hard Drive Using File Explorer
There can be situations where your photos aren’t deleted, but you’ve misplaced and saved them in an unknown location. In such cases, you can try and find the disappeared photos through Windows File Explorer.
Follow these steps to find pictures on the hard drive using File Explorer:
- Go to the Start menu and type File Explorer.
- Open File Explorer.
- Type
ext:.fileformatin the search bar and replace “fileformat” with the image file format. For example, if you wish to retrieve JPG files, typeext:*.JPG, and press Enter.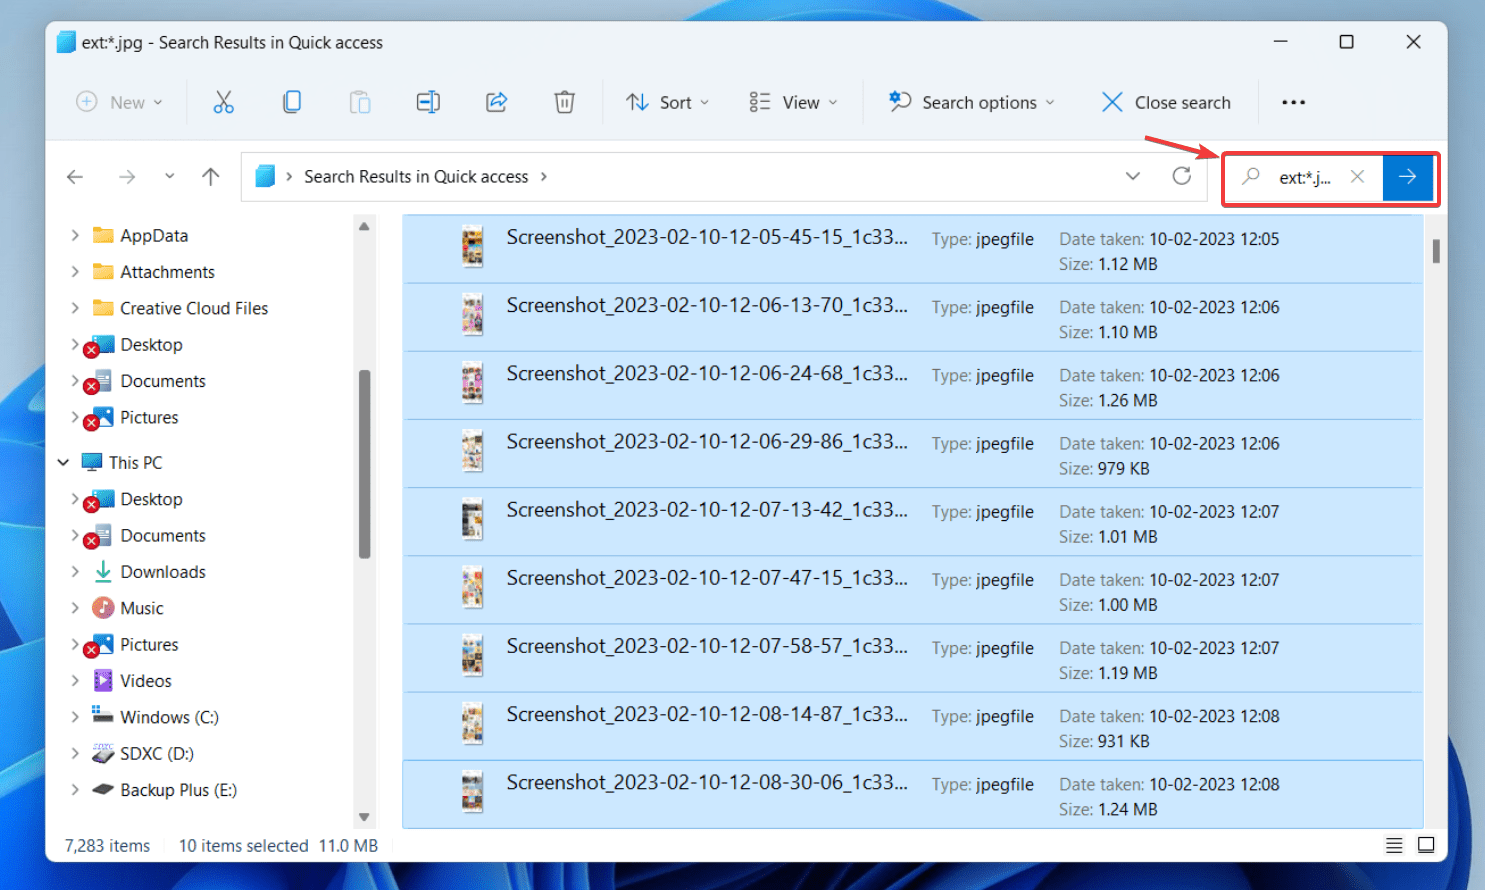
- Finally, scroll down and locate the photo you’re looking for.
Method 2: Recover Pictures from Hard Drive Recycle Bin
The easiest way to recover photos from the hard drive is to check the Recycle Bin. While it may seem like the first and the most common step users would take, many often forget to check this folder. Recycle Bin recovery is also the most convenient method of recovering data. However, it is only useful until you’ve emptied the Bin.
Follow these steps to recover deleted photos on Windows 10/11 via Recycle Bin:
- Navigate to the Recycle Bin icon on your desktop and double-click.
- Once you’ve opened the folder, locate the photos you want to recover.
- Check the box next to the selected images.
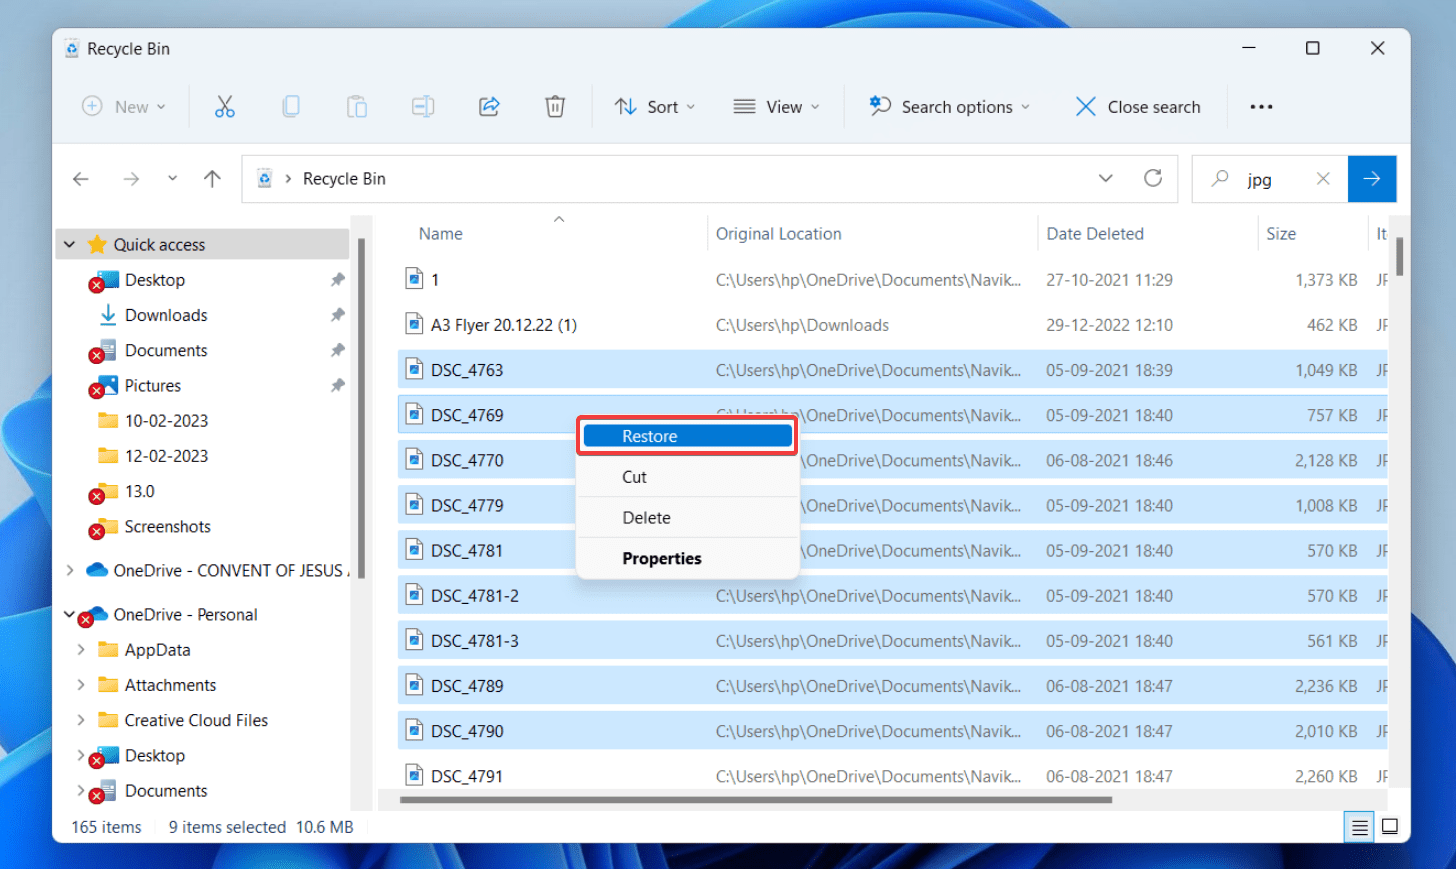
- Right-click and select Restore to recover deleted photos from the hard disk.
If you wish to recover deleted photos from your external hard drive Recycle Bin, follow these steps:
- Open File Explorer and select your external hard drive.
- Click on the three dots > Options.
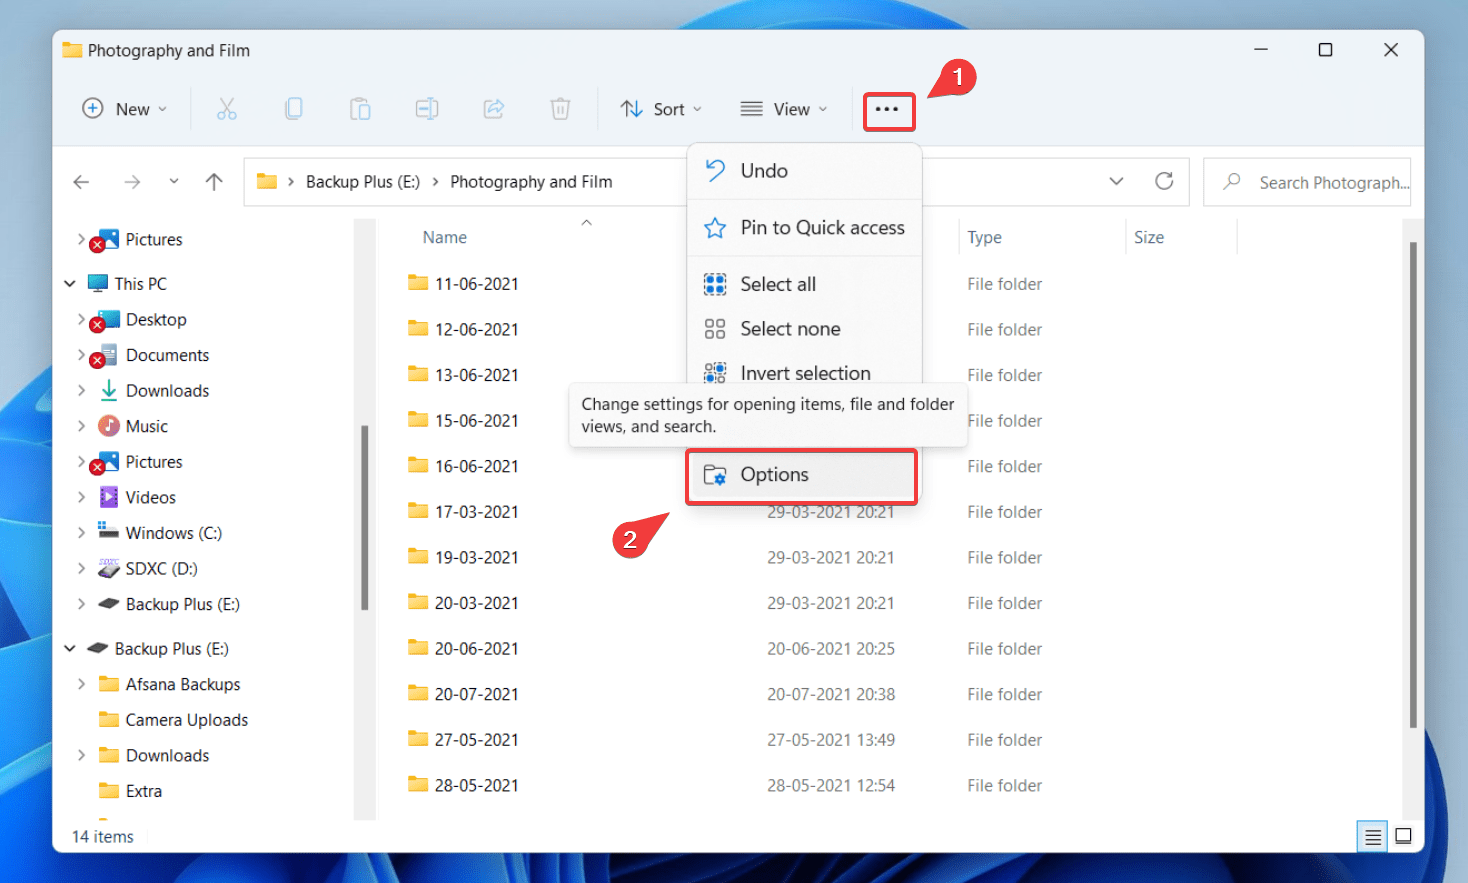
- Navigate to the View tab.
- Enable Show hidden files, folders and drives.
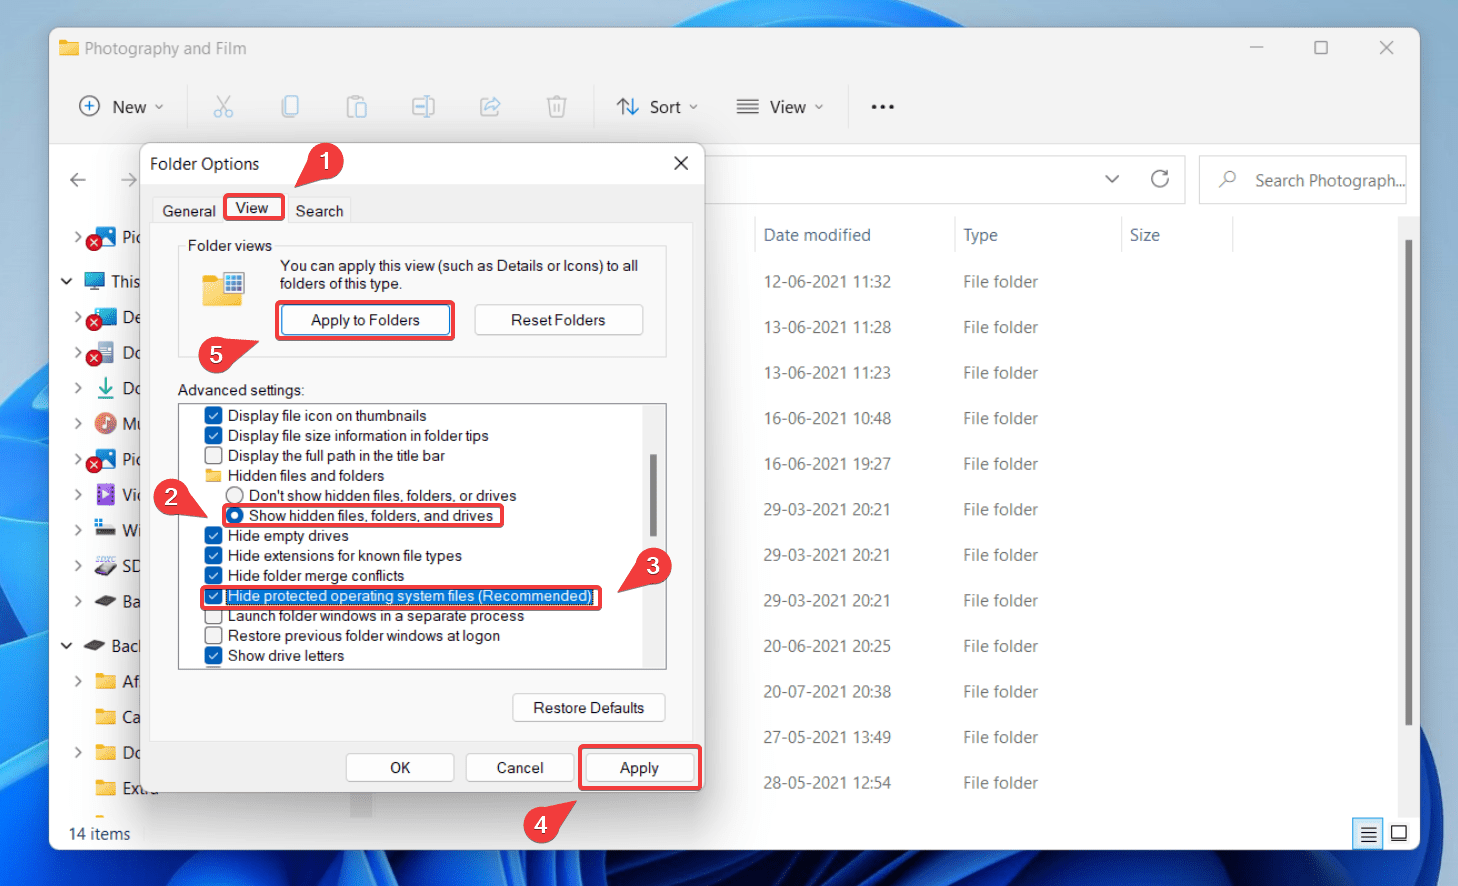
- Disable Hide protected operating system files.
- Click Apply, then click Apply to Folders.
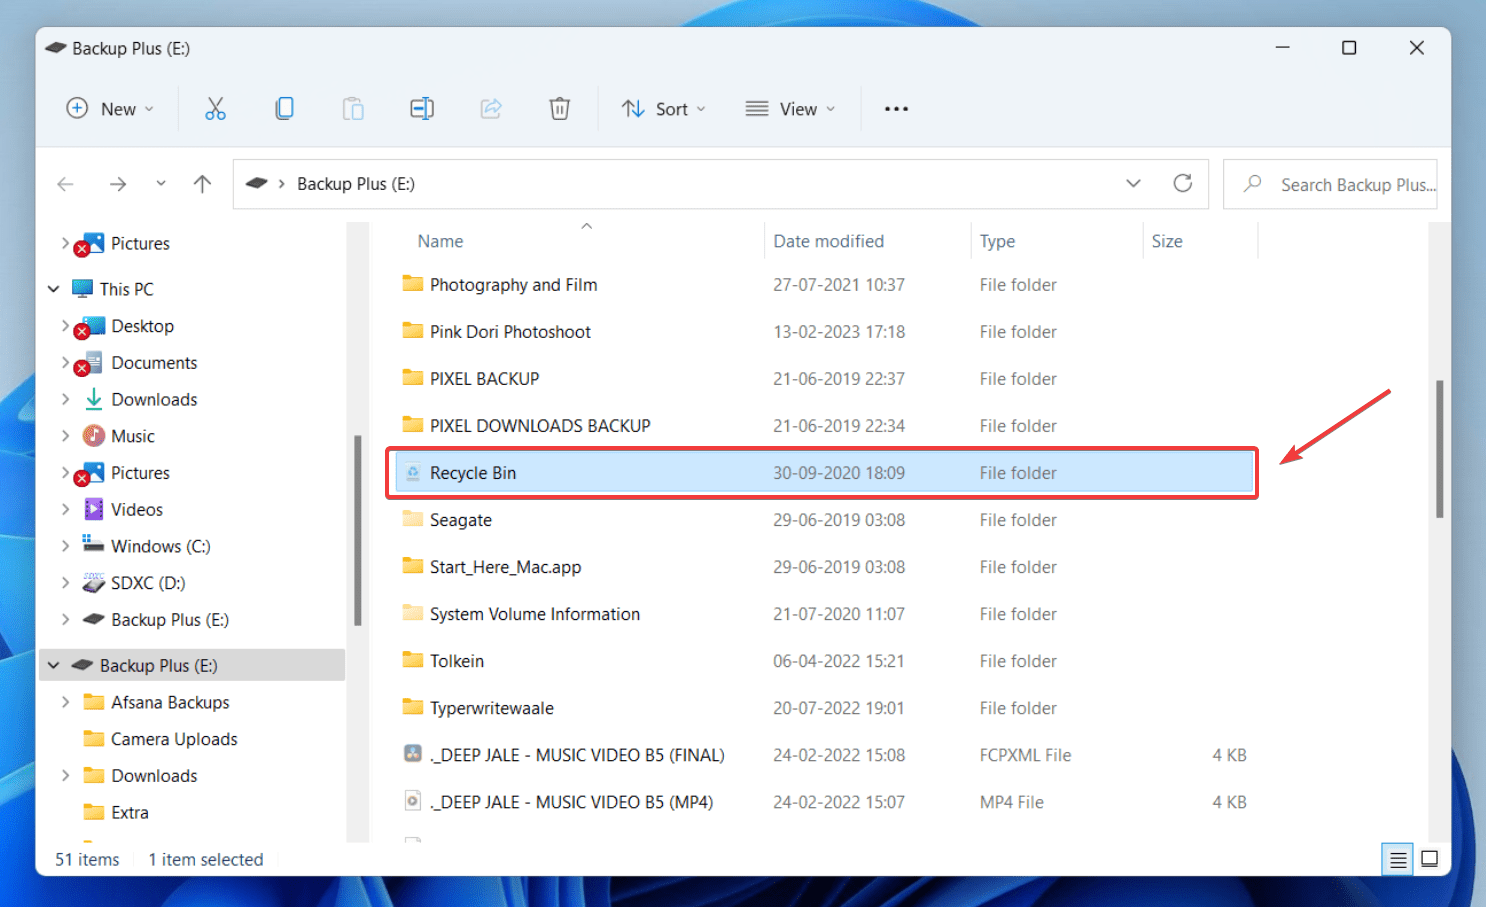
- The Recycle Bin folder will now be visible. Select deleted photos and click Restore to retrieve deleted photos from your hard drive.
Method 3: Restore Deleted Photos from Hard Drive Backup
Windows also has a native backup feature that you can use to restore deleted photos when you experience unexpected data loss. The only prerequisite is that you have already turned on the File History option.
Follow these steps to restore files with File History on Windows 11:
- Connect the external hard drive or storage device that contains your backup files.
- Open the Start menu and type Control Panel, then select it from the results.
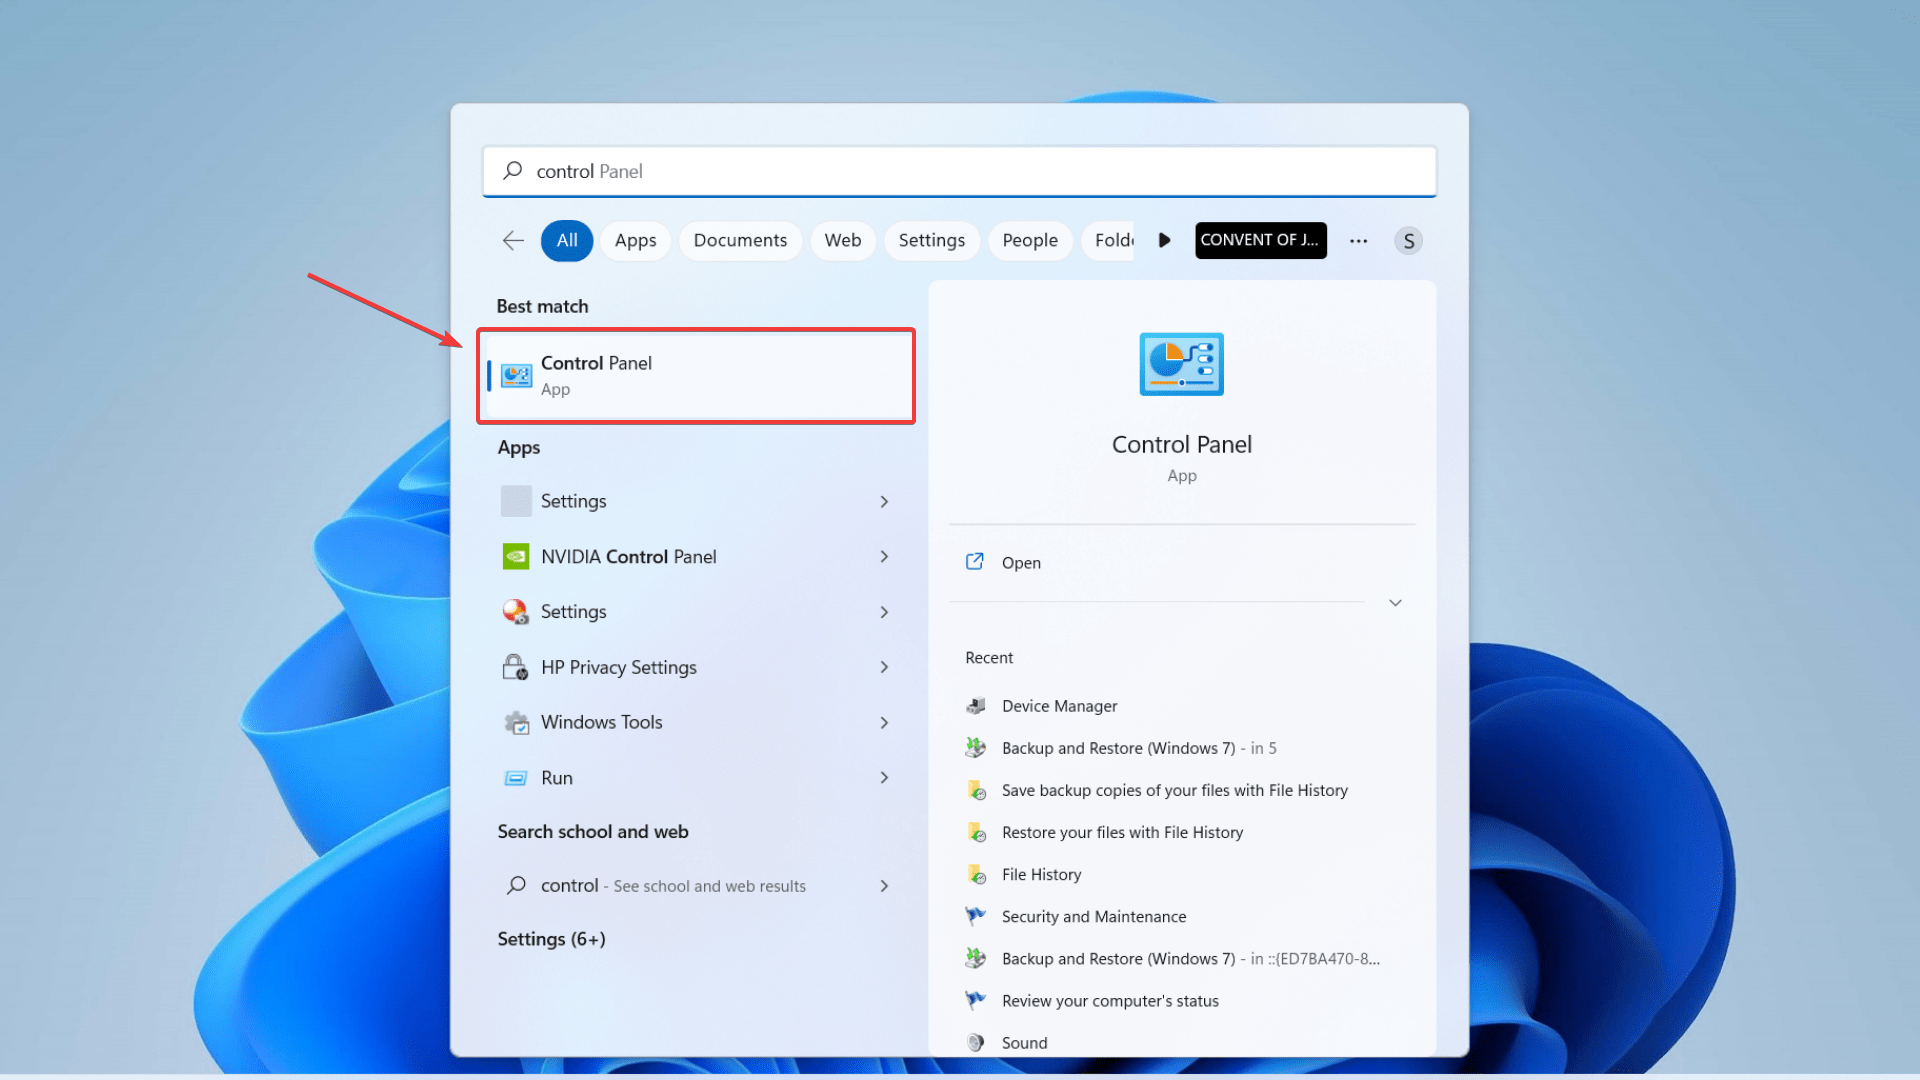
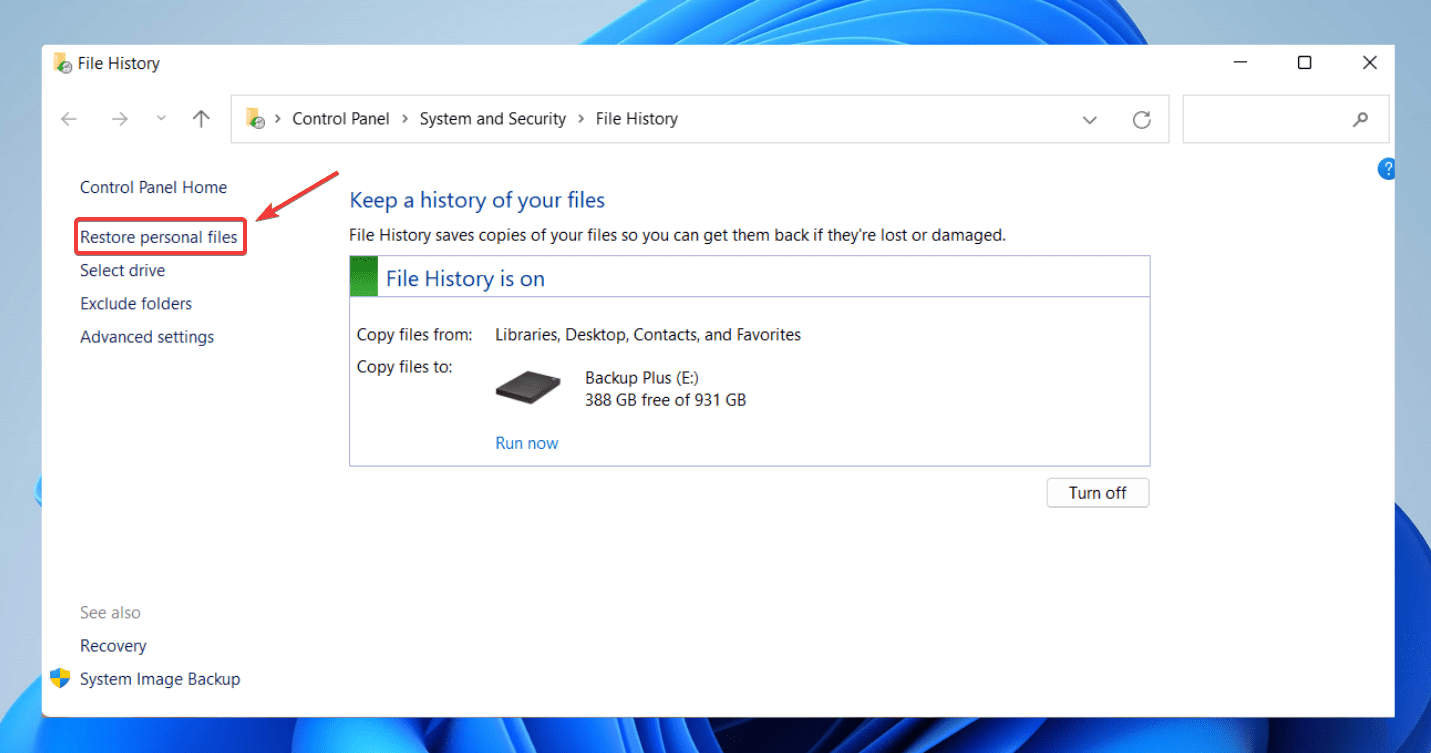
- In the Control Panel’s search bar, type File History, then select the Restore personal files option.
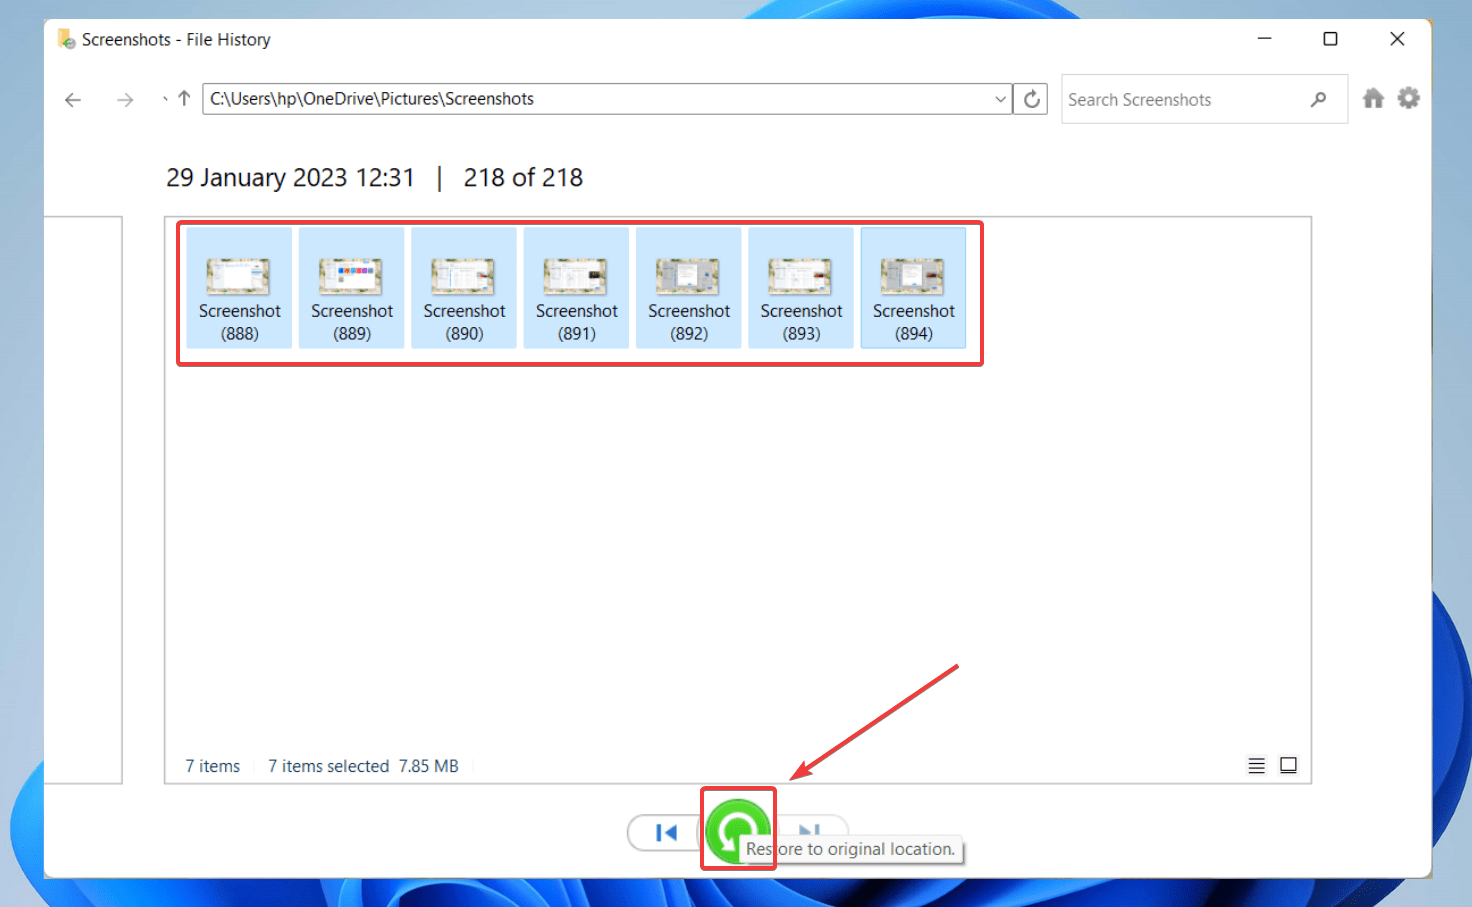
- Look through the available backups and locate the photos you want to recover.
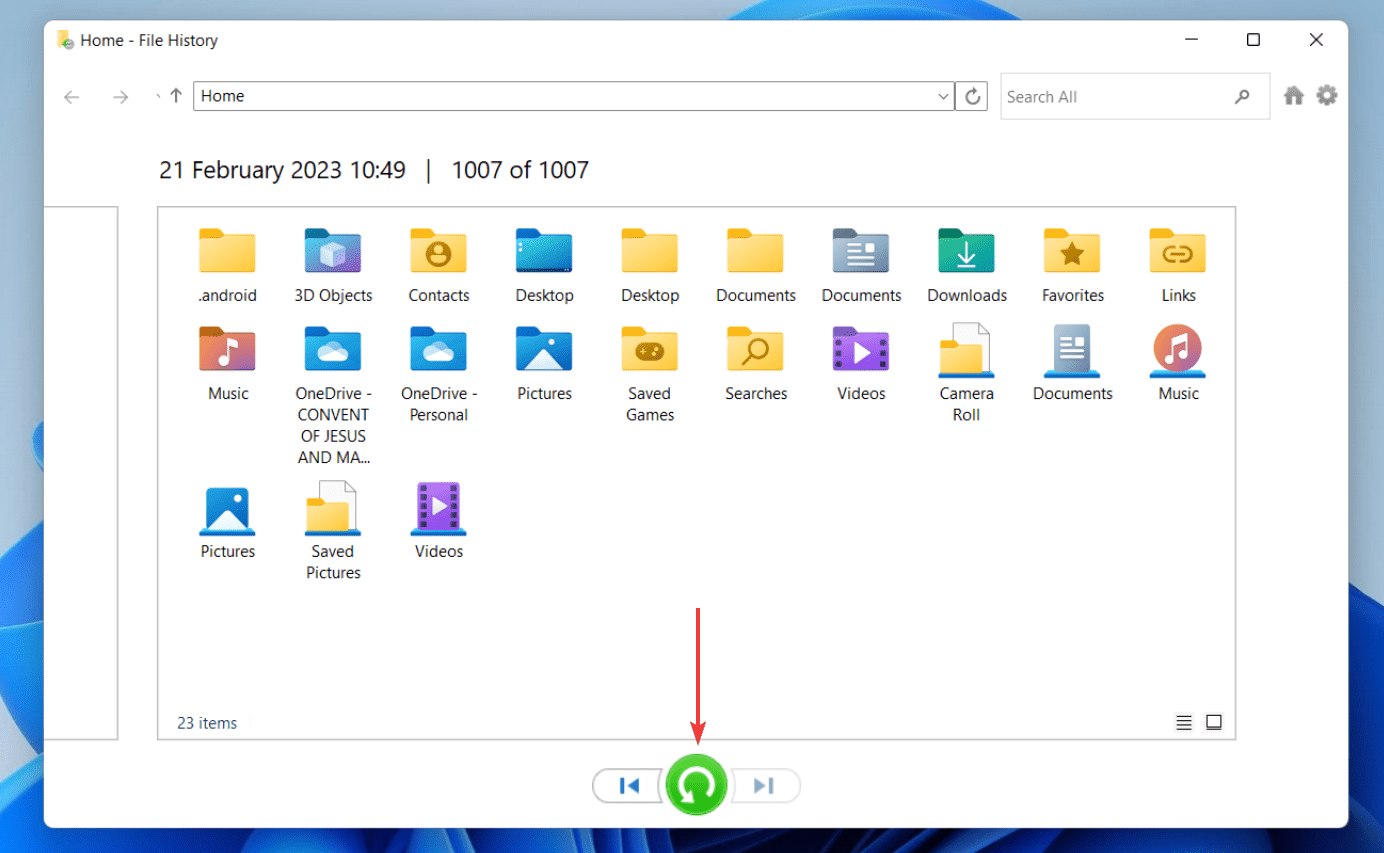
- Once you’ve found the desired file, click the green Recover button. Your files will then be restored to their original location.
FAQ
How to find all pictures on an external hard drive on Mac?
Follow these steps to find all pictures on an external hard drive on Mac:
- If Photos is open on your Mac, first Quit the app.
- Now, go to Finder, and open the folder that contains the Photos Library. By default, Photos Library is stored in the Pictures folder.
- Drag Photos Library to your external storage device.
- Now, double-click the Photos Library in its new location to open it.
How to recover deleted photos from an external hard drive?
Follow these steps to recover deleted photos from an external hard drive via Disk Drill:
- Download and Install Disk Drill on your PC.
- Connect the external hard drive and click Search for Lost Data.
- Filter and Preview the photos you want to recover.
- Select files for recovery.
- Click Recover and select a destination to restore deleted photos.
How to get photos off a broken laptop?
If you wish to recover photos from a broken laptop, your best bet is to approach data recovery services with trained professionals experienced in recovering data from physically damaged hardware.
How to get pictures off an old computer hard drive?
You can perform hard drive recovery to recover pictures from an old computer hard drive using professional data recovery software like Disk Drill. You can also attempt to repair it using the Command Prompt by utilizing the CHKDSK functionality.
How to find all photos on a hard drive on Windows 7/10/11?
Follow these steps to find all photos on a hard drive on Windows 7/10/11:
- Open File Explorer.
- Type
ext:.fileformatin the search bar and replace “fileformat” with the image file format. For example, typeext:.JPGto retrieve JPG files and then press Enter. - Locate all your images from the search results.
Conclusion
While our photos are very valuable, they aren’t immune to data loss. Fortunately, it’s possible to recover lost or deleted photos. You can leverage data recovery tools like Disk Drill to retrieve deleted photos from a hard drive. Alternatively, you can also try Windows native functions like the file explorer filter function, hard drive recycle bin, or backups.
This article was written by Joshua Solomon, a Contributing Writer at Handy Recovery Advisor. It was also verified for technical accuracy by Andrey Vasilyev, our editorial advisor.
Curious about our content creation process? Take a look at our Editor Guidelines.