So, you connected your external drive, ready to access your files, but instead, you see the “Access Denied” message. Yeah, it’s not that uncommon of an issue. What now? Now we will show you several different ways to fix this error (since there can be different problems that cause it). The methods here are battle-tested and reliable, as this problem is as old as Windows itself, and we’ve helped many people resolve the external hard drive access denied issue in the past.
We’ll also explain how to protect the data on your drive while troubleshooting, so you don’t lose anything important. Let’s start.
Quick Solutions to External Hard Disk Access Denied Problem
As we mentioned, this error can happen for a variety of reasons, so it makes sense that different problems require different fixes. Based on our previous battles, we would list possible underlying issues and what can be done about them like this:
Possible Cause |
Explanation |
What to Do |
Insufficient Permissions |
Your user account may not have the necessary rights to access the drive. |
Check and modify permissions in the Security tab of the drive’s Properties window. |
File System Errors |
Corruption in the file system is preventing access to the drive. |
1. First, retrieve your files with data recovery software. 2. Then run CHKDSK or format the drive. |
Drive Ownership Issues |
The current user account isn’t recognized as the owner of the drive. |
Change the ownership of the drive in the Security tab under Advanced settings. |
Drive BitLocker Encryption |
The drive is encrypted, and the correct password or key isn’t provided. |
Unlock the drive using the BitLocker password or recovery key. |
Conflicting Drive Letter Assignment |
The drive letter might conflict with another drive or be missing. |
Assign a new drive letter via Disk Management. If the issue persists, consider formatting the drive (but recover data beforehand if it is important to you). |
You should know that fixes to some problems that cause your external hard disk to throw an “access denied” error might lead to data loss on the drive. That’s why we recommend thinking about the safety of your files first. For most people, this is the top priority, so that’s what we’ll cover first. But if you don’t care about the data on this drive, feel free to skip ahead to the fixes.
How to Retrieve Data When Access Is Denied to an External Hard Drive
If access is denied to your external hard drive, it means you can’t reach your files through normal methods like File Explorer or any other file manager. So, what do you do? In this situation, you can use data recovery software. These tools are typically used to recover deleted or lost data, retrieve files from formatted drives, and so on. But they can also help you access your existing data when the system denies access. As long as your computer detects the drive, that’s all we need.
There are plenty of data recovery tools available on the market, and you can check out our list of top data recovery apps to find the best ones. We personally tested each tool on that list, so you can’t go wrong with any of them. For this demonstration, we chose Disk Drill. It’s one of the best tools for this purpose because of its reliable results and ease of use. In fact, it’s the one we use most often for demonstrations. Disk Drill also comes with a variety of handy stuff, which we’ll showcase as we go through the process.
Here is a tutorial on how to use Disk Drill to bypass access denied for the external hard disk:
- Download Disk Drill and install the program.
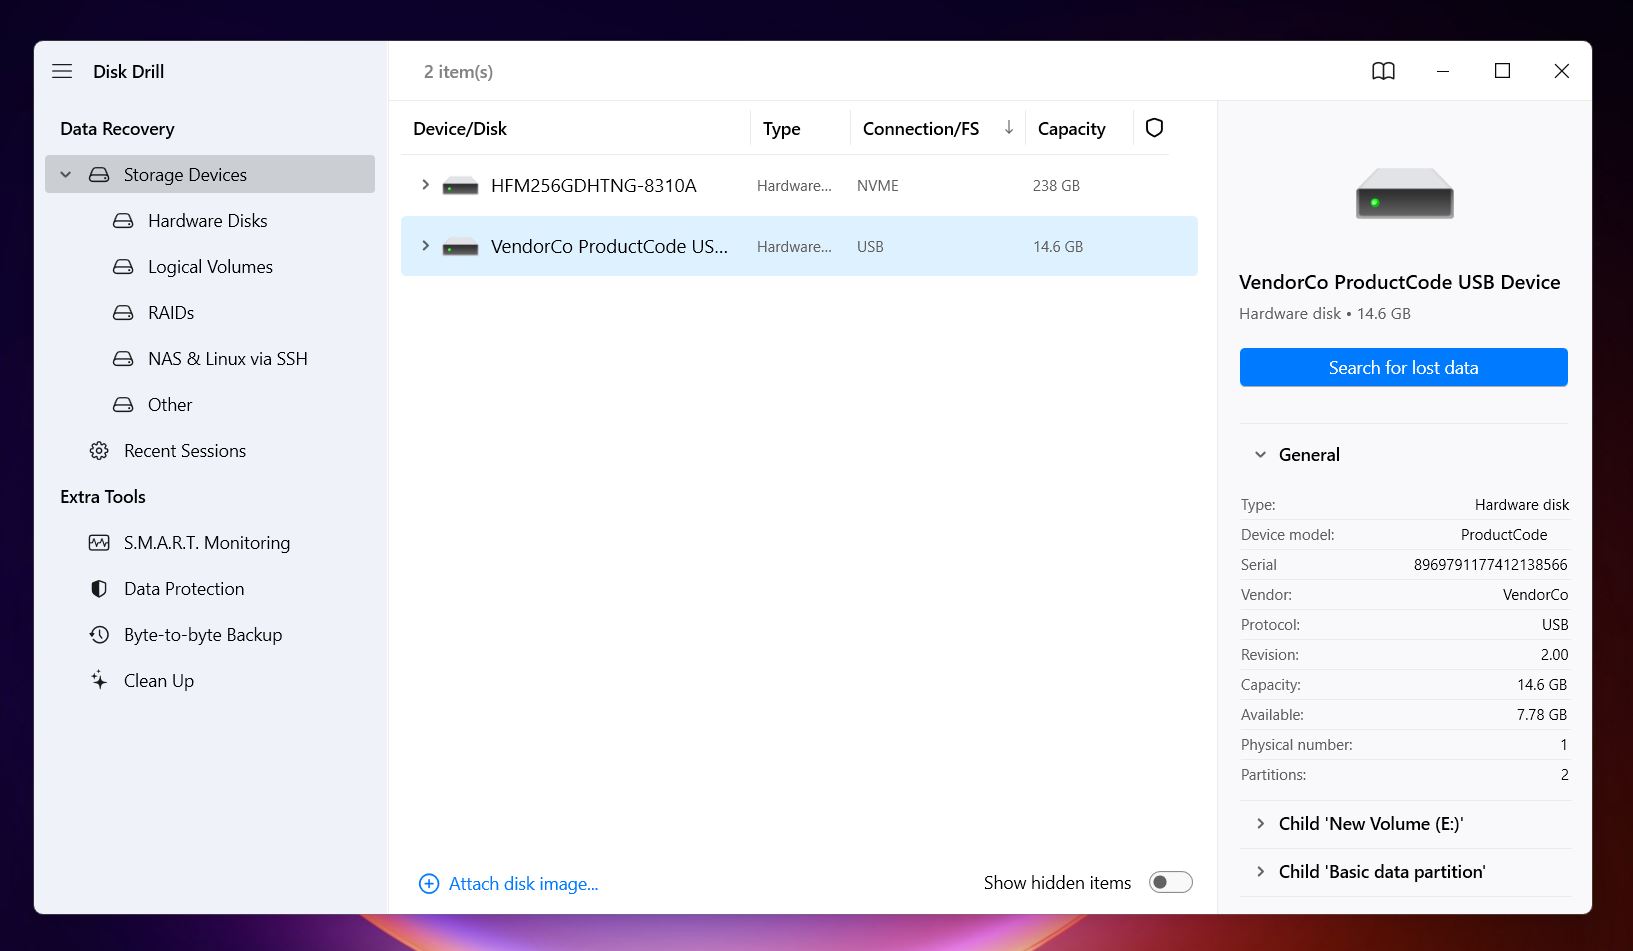
- Connect the external hard drive to your computer. Whether it’s a Western Digital, Seagate, or a lesser-known brand, it should show up in the list of storage devices. Disk Drill displays all connected storage, including internal drives, external drives, USB flash drives, and so on.
- Select the external hard drive from the list of devices and click the Search for lost data button.
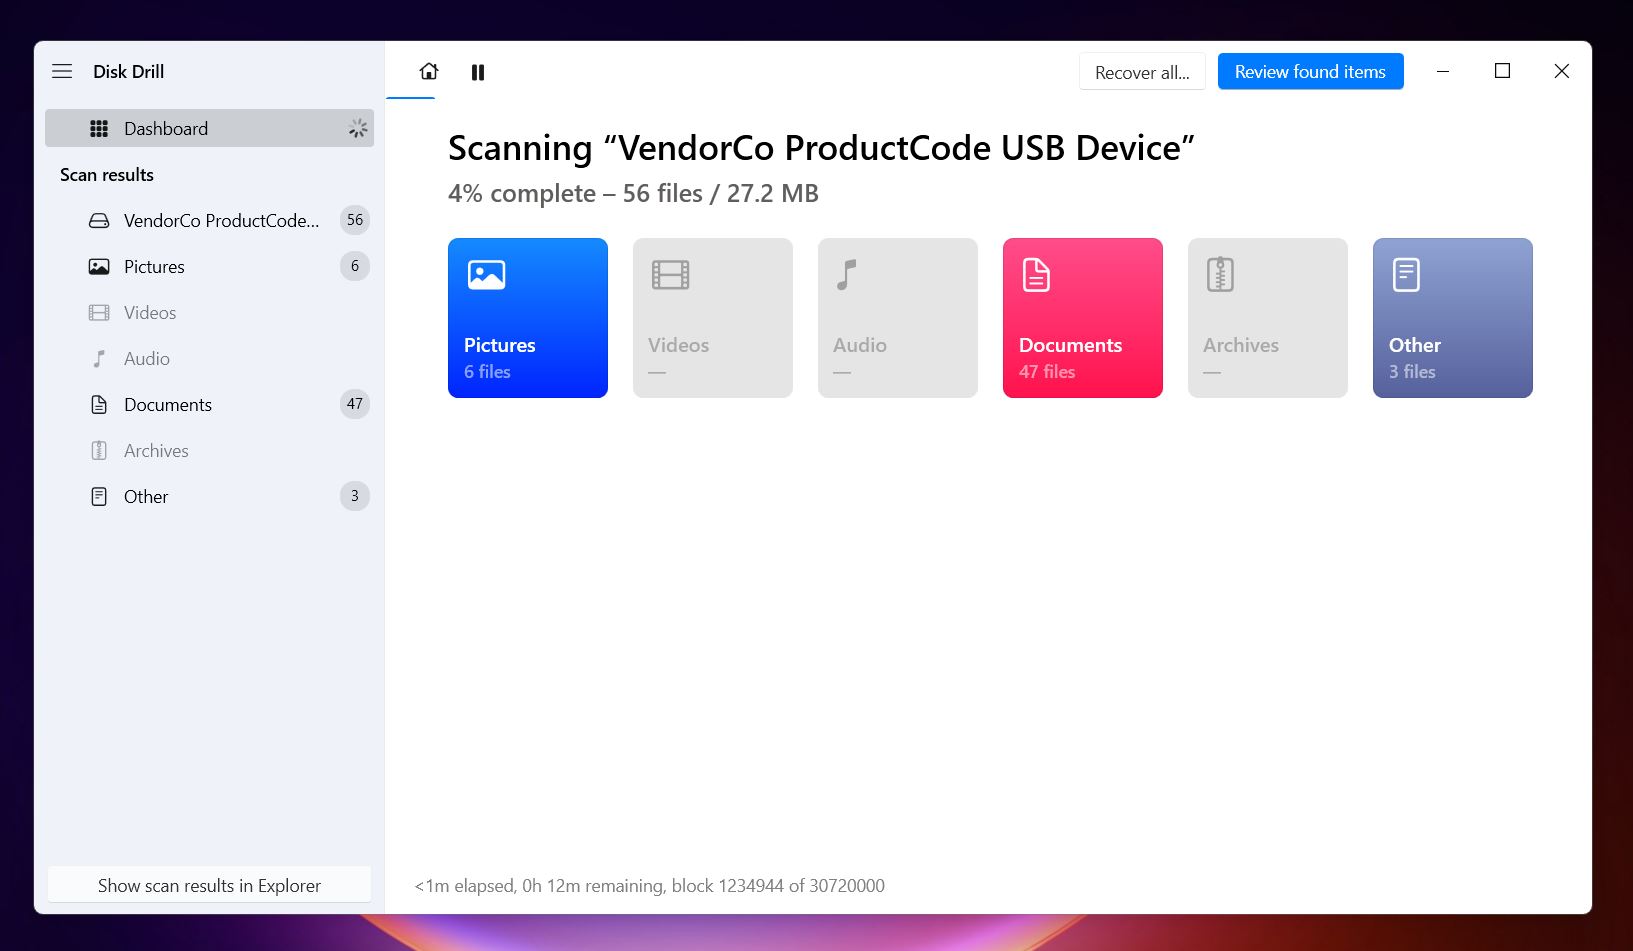
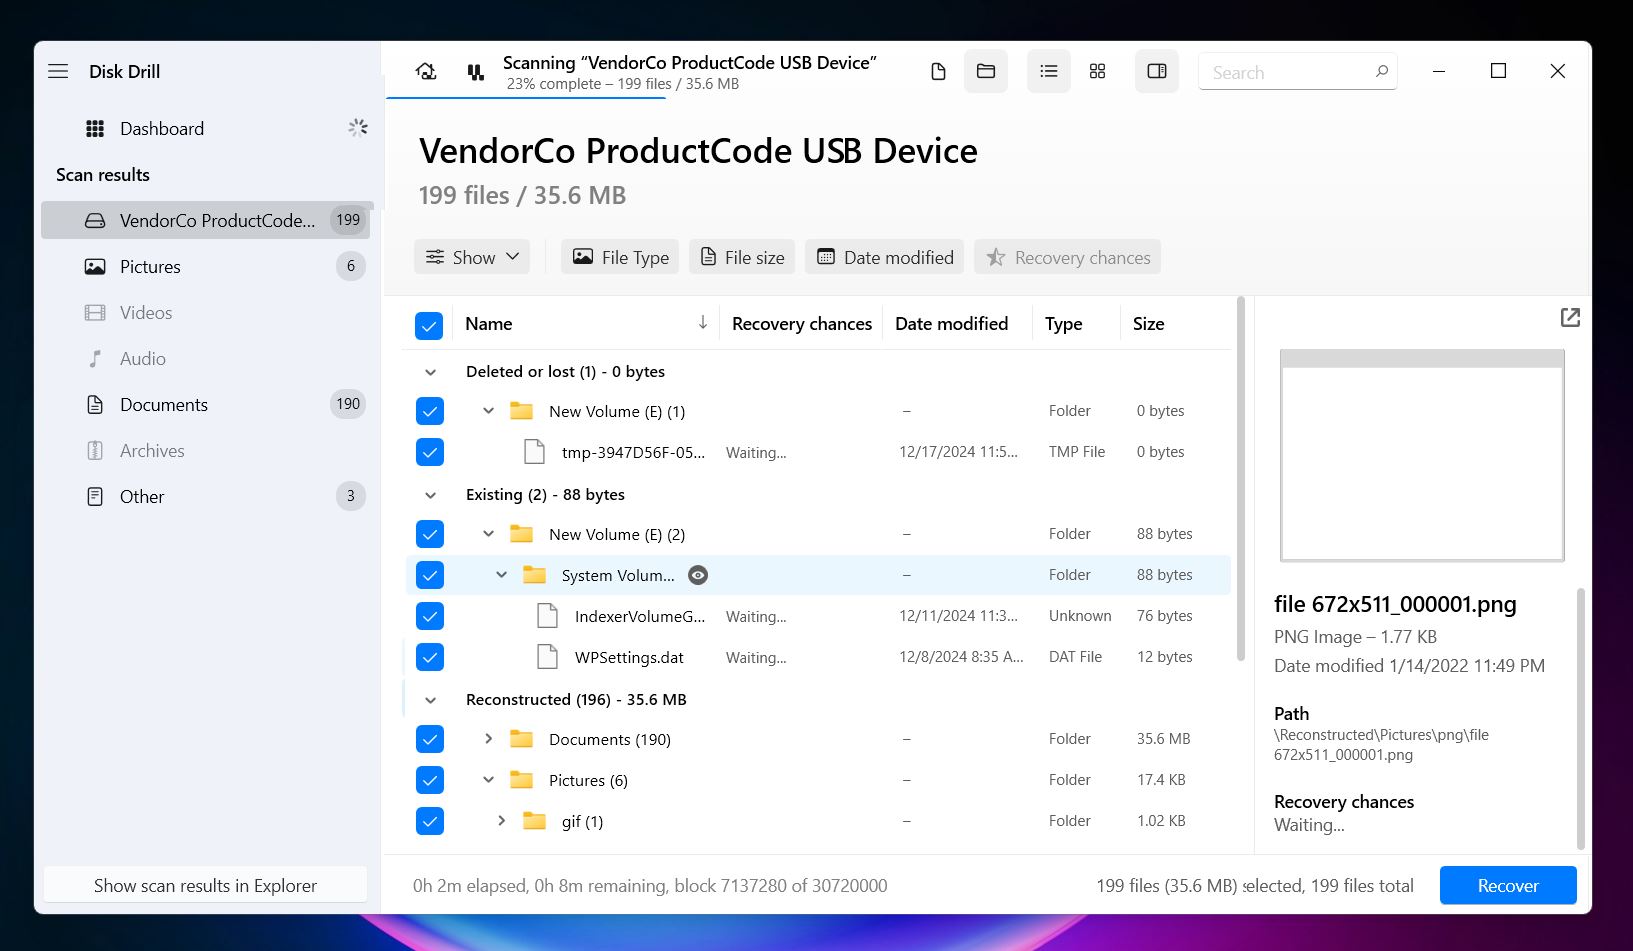
- As the scan progresses, you can wait for the scan to complete and click the Recover All… button to retrieve everything Disk Drill finds. Or, you can click on Review Found Items during the scan to browse the files in real-time and pick and choose which ones you want to recover.
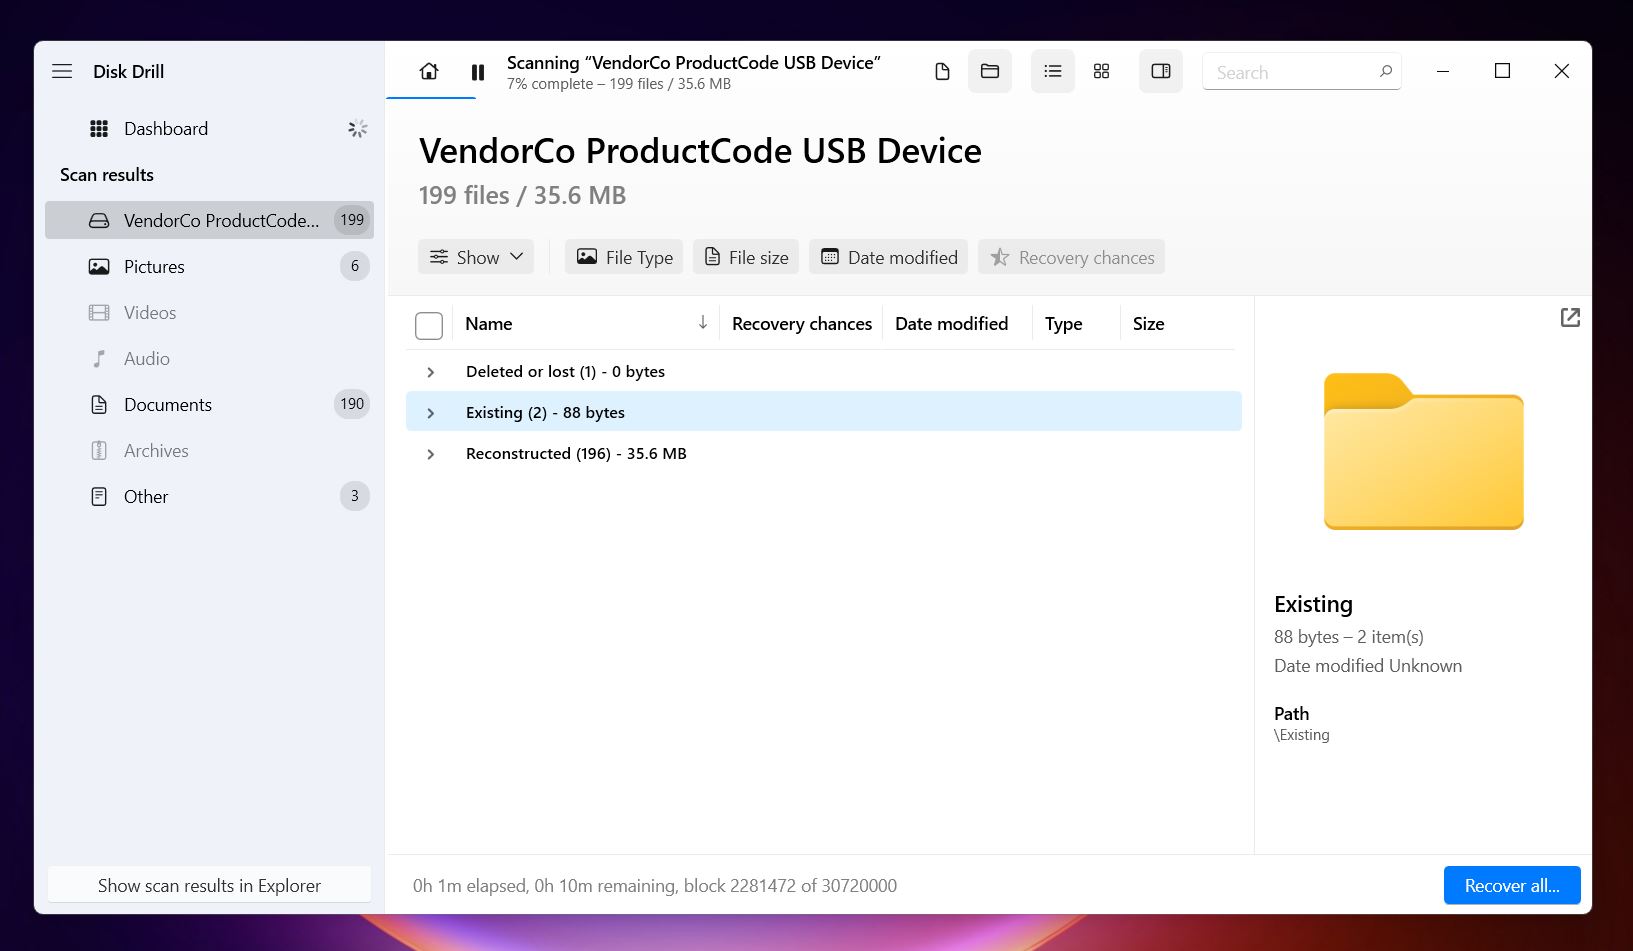
- Once the scan completes (or as you browse in real-time), you’ll see a list of files organized into subcategories like Deleted or Lost, Reconstructed, and Existing. As you might’ve guessed, your files will likely appear under Existing, since they’re still on the drive but inaccessible due to the error. If you spot files in Deleted or Lost that you previously deleted, great—Disk Drill might recover those too.
 🗨️
🗨️If you don’t recognize a file name, hover over it, and you’ll see a small eye icon, click on it to preview the file.
- Select the files you want to recover.
- Click Recover and select a location to save your files.
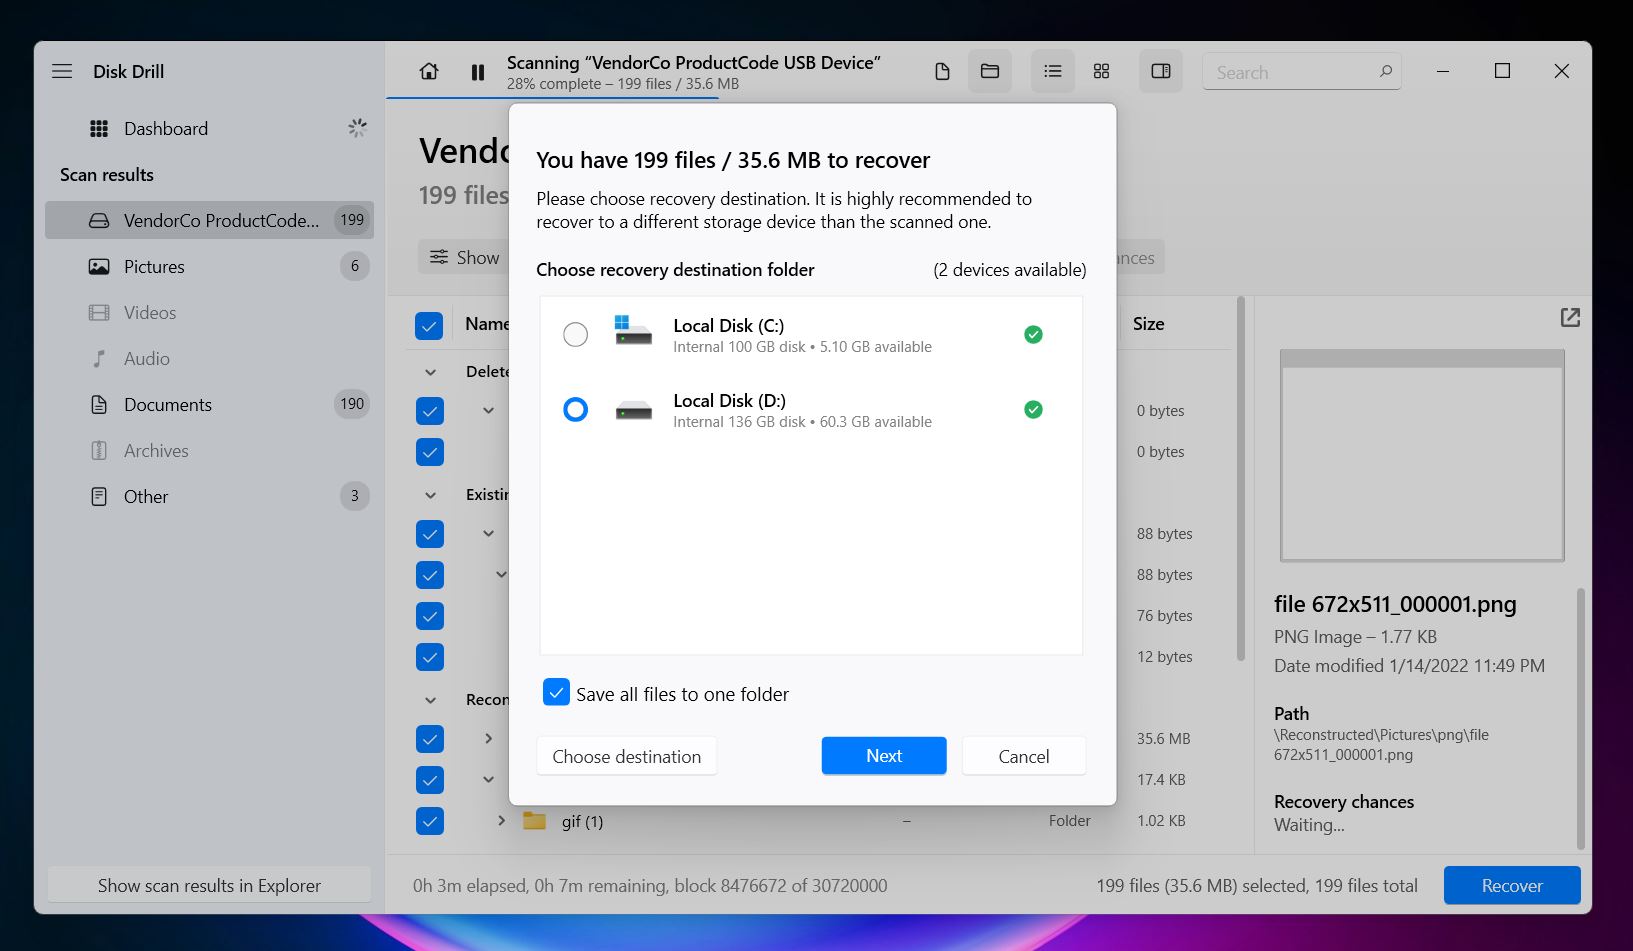
With Disk Drill’s Basic version, which is free, you can scan and preview files as many times as you want. However, the free version limits data recovery to 500 MB. If you need to recover more files without restrictions, consider the PRO version, which offers unlimited recovery. That’s it! Disk Drill makes this process pretty straightforward. Not only is it capable—it’s also one of the safest data recovery options available. However, if Disk Drill doesn’t feel like the right fit for you, there are other alternatives worth checking out.
Now that your files are safely stored elsewhere, you can move on to fixes. The simplest option, if you don’t want to mess with Windows permission settings or other detailed methods, is to format your drive. Since your data is secure, you can give your external hard drive a clean slate and avoid dealing with complex troubleshooting. For steps on how to do this, check out the Method 4: Format External Hard Drive section.
However, you might get lucky, and one of the fixes could be easier than expected. So, if you have a little time, give all the methods a read.
How to Fix “External Hard Drive Access Denied” Error
Now, let’s look at various fixes for the external HDD access denied issue. These methods tackle the most common causes of the problem, from permission errors to file system corruption. Some fixes might seem obvious to you, while others might feel like a lot of effort. There’s no way to know exactly which one will work in your case, so take your time, go through each method, and read carefully.
Method 1: Fix the Access Using Windows Security Tab
If the connection isn’t the issue, the most common reason for an external hard drive access denied problem is permission settings in Windows. So, that’s what we’ll check next. Sometimes, the OS doesn’t recognize your user account as the owner of the drive, or the permissions aren’t set correctly.
Note: this method will only work for NTFS file systems, as FAT and exFAT will not have the Security tab we are showing below.
Essentially, you need to take ownership of your external hard drive to regain access. Here is how you can do this on Windows 10/11:
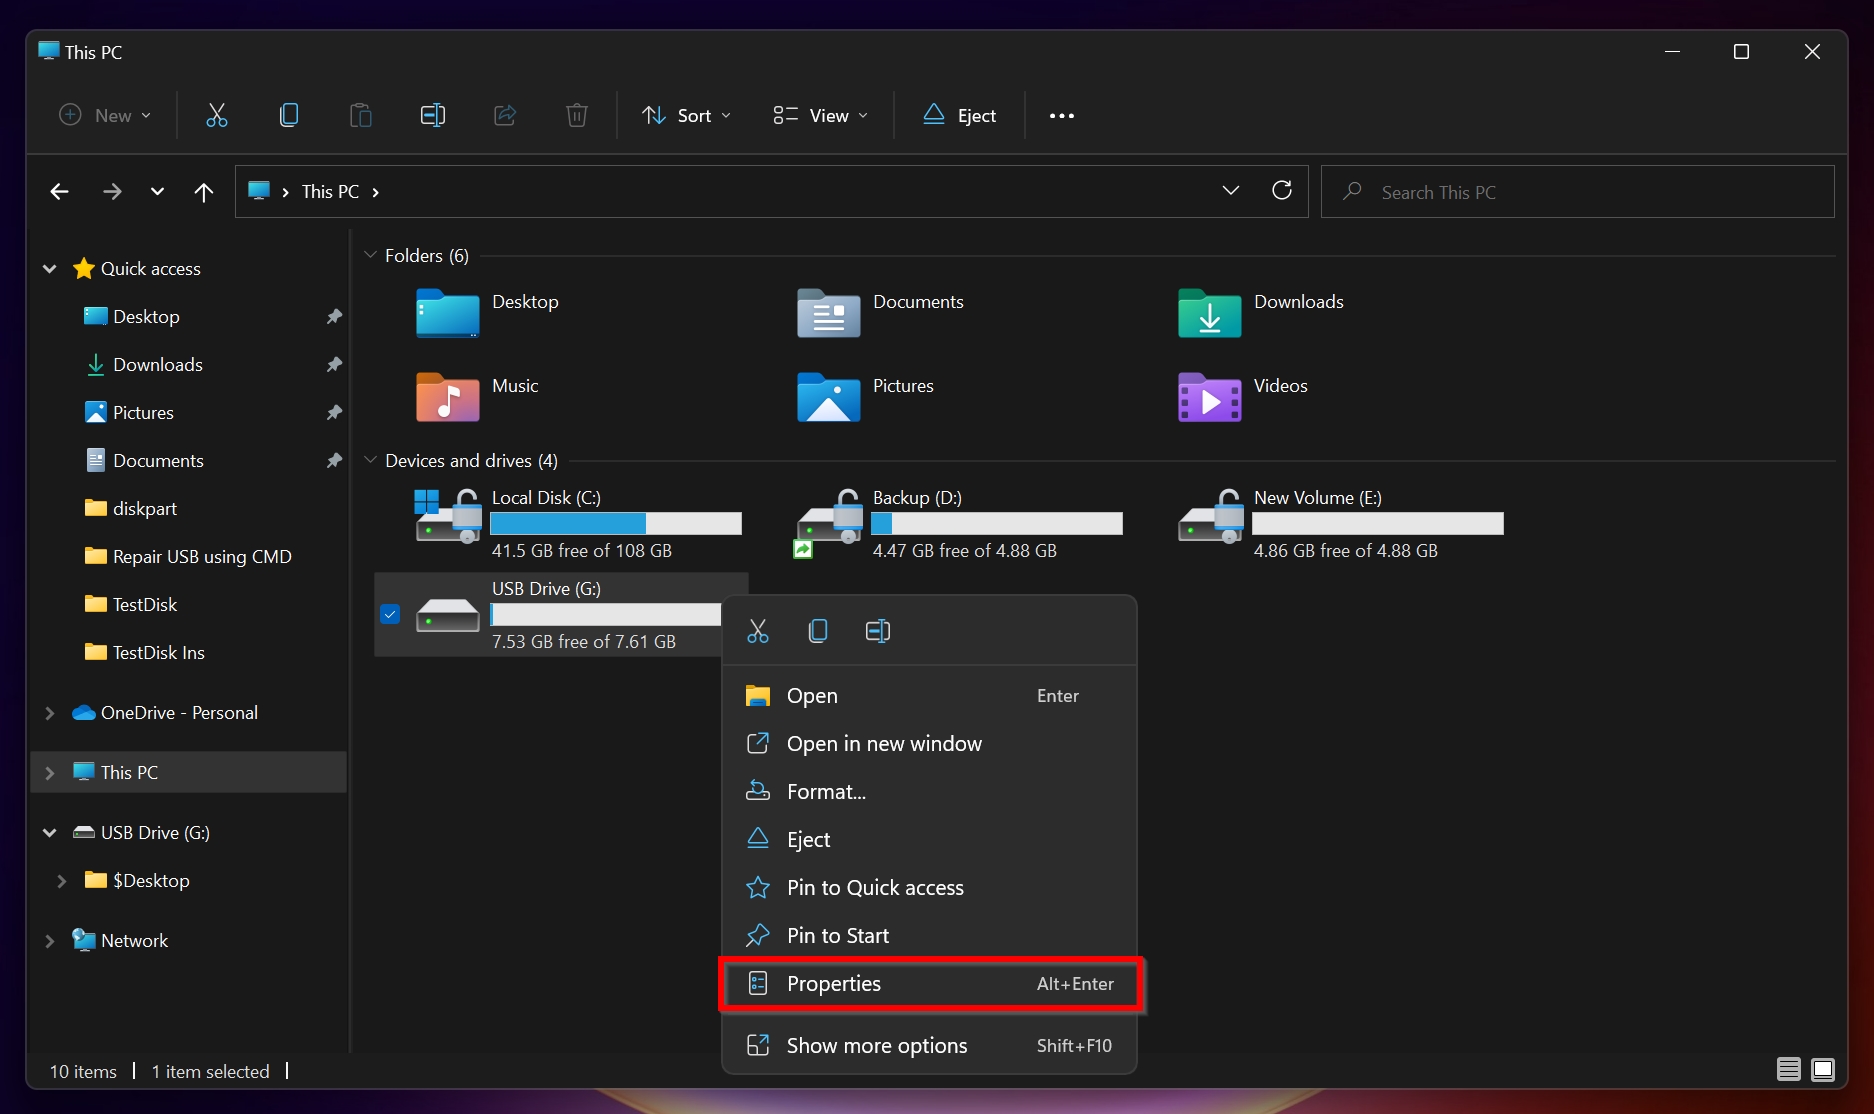
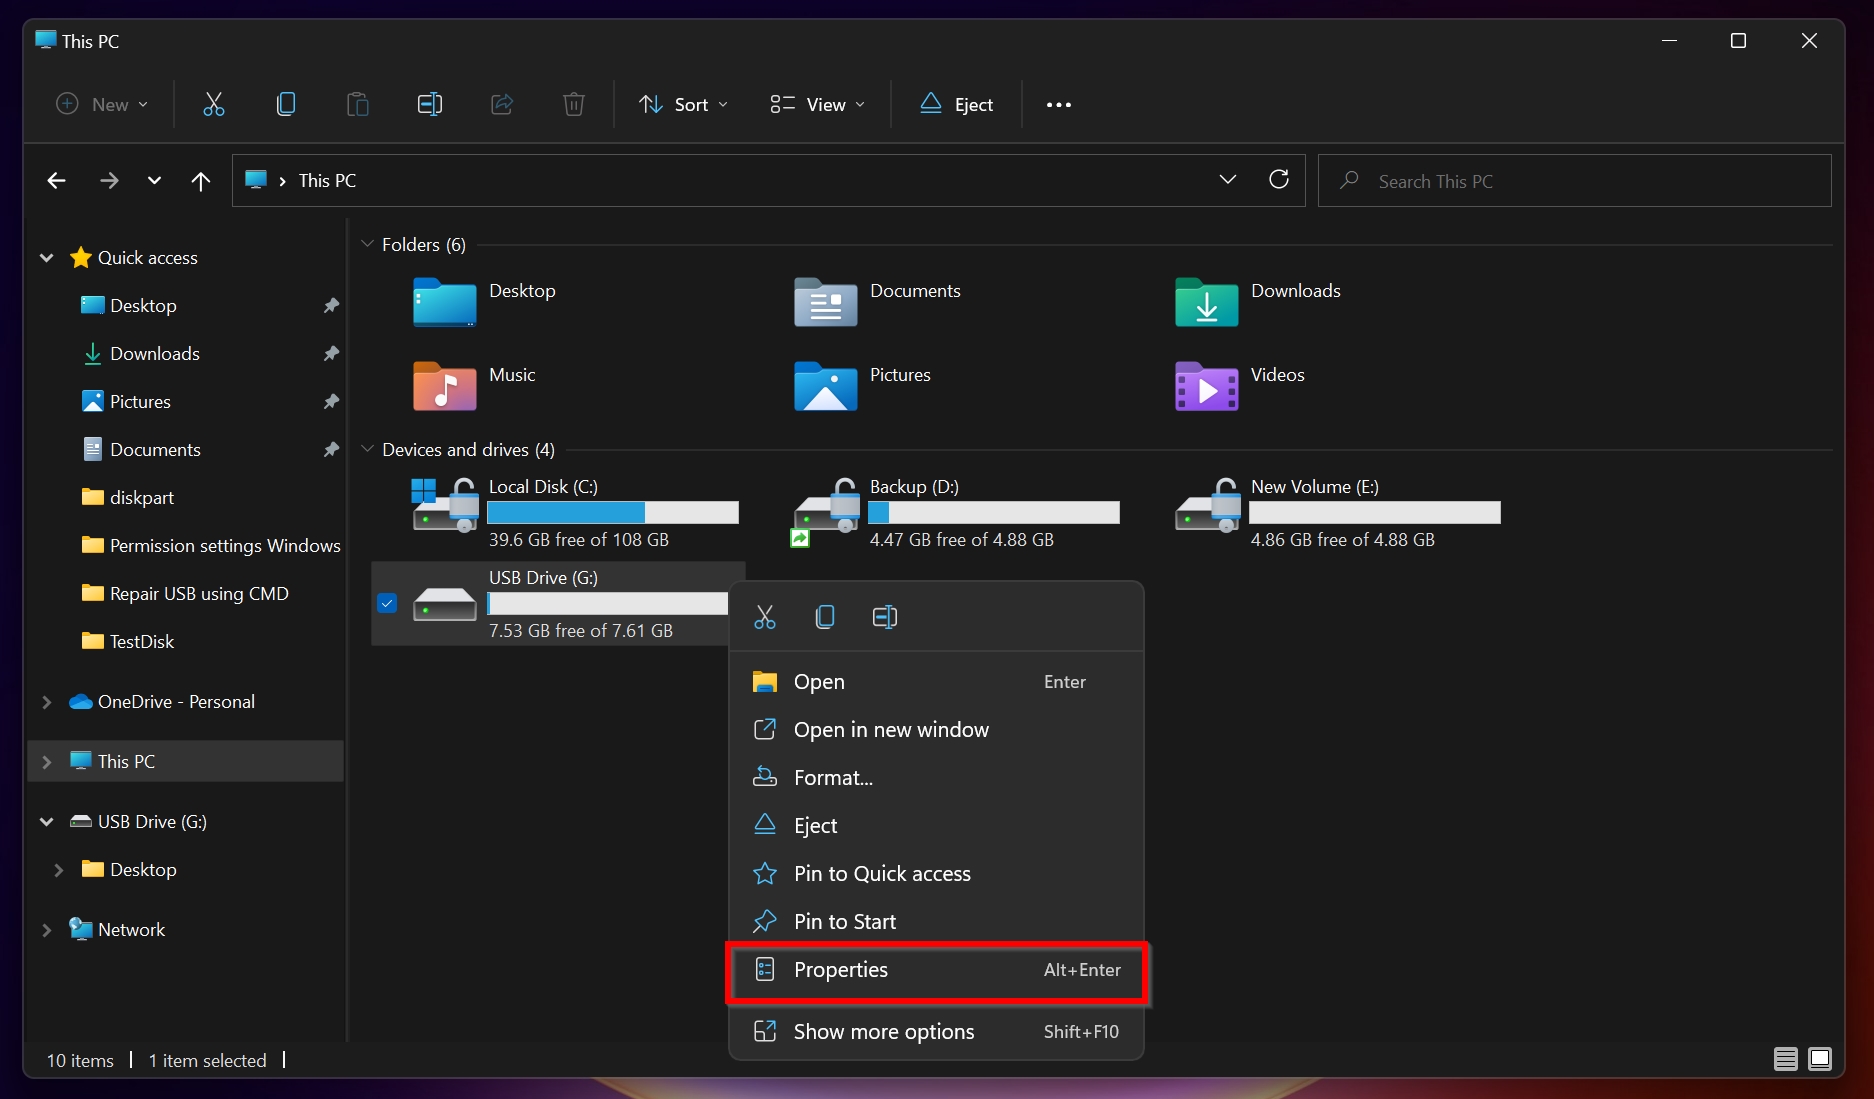
- Open File Explorer, right-click on the external hard drive and click Properties.
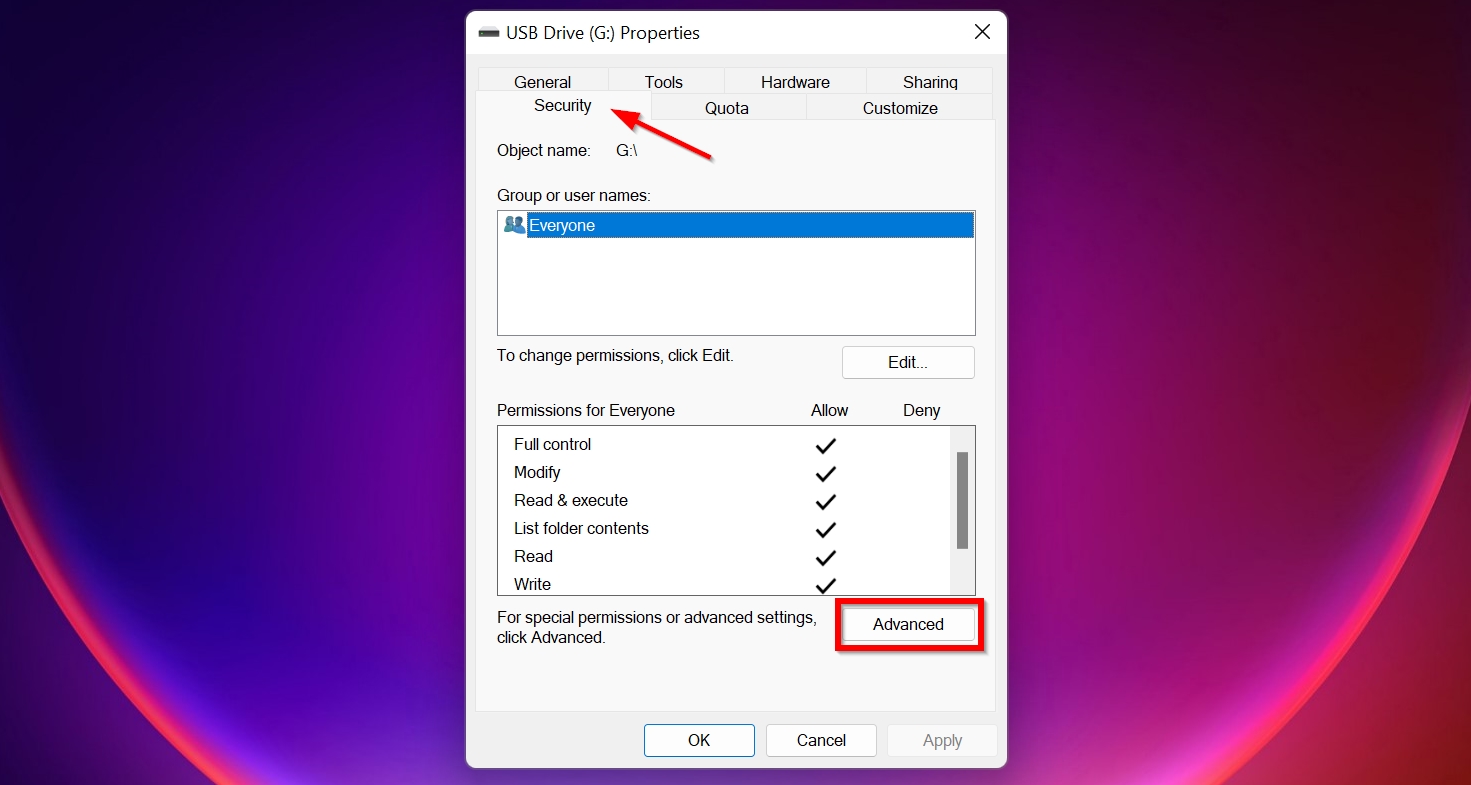
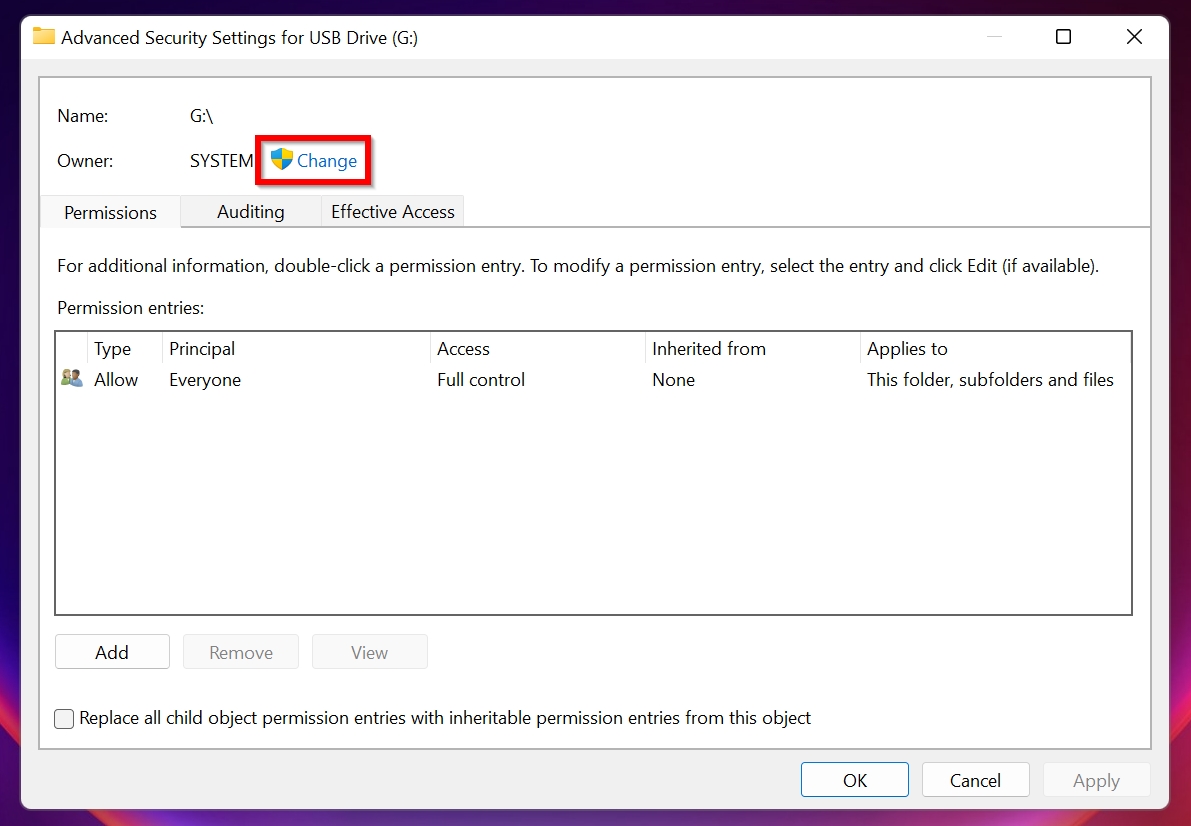
- In Properties, click on the Security tab. Here, click on Advanced, towards the bottom of the window. This will open the Advanced Security Settings window.
- Click on Change. Make sure you have administrative rights.
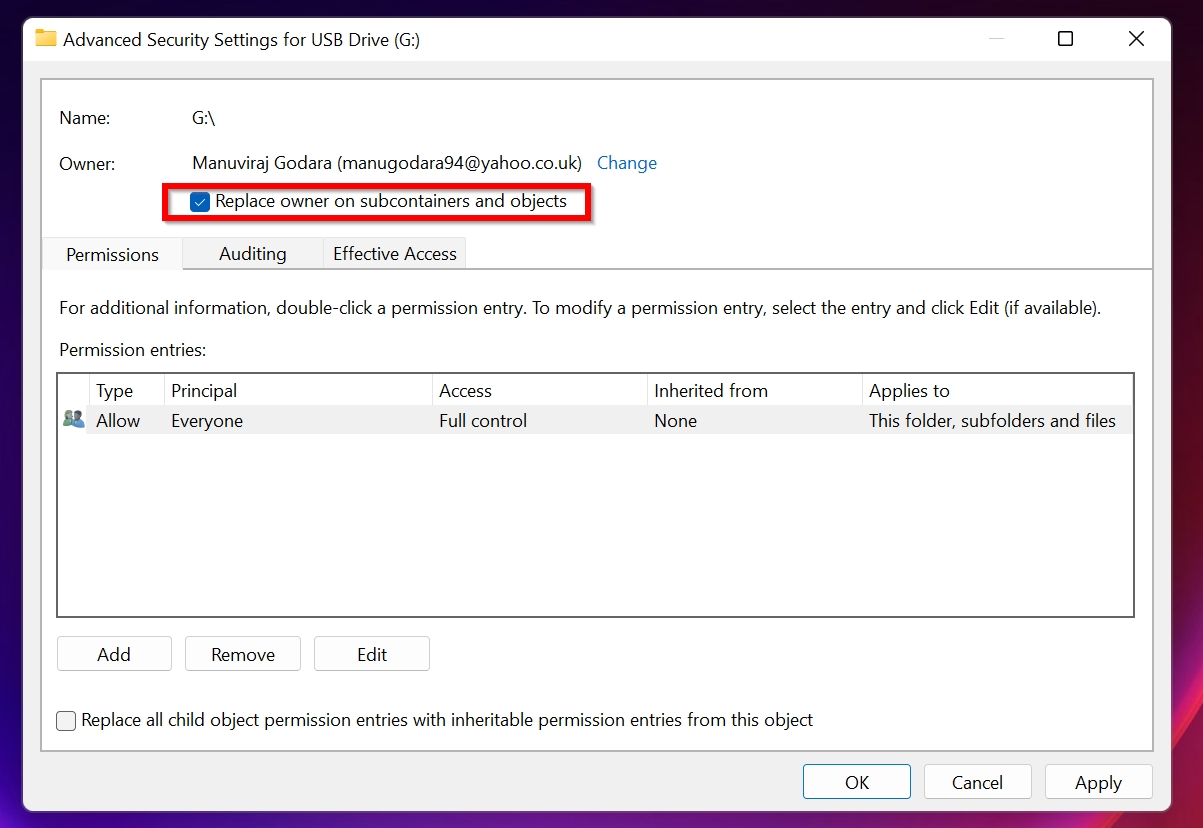
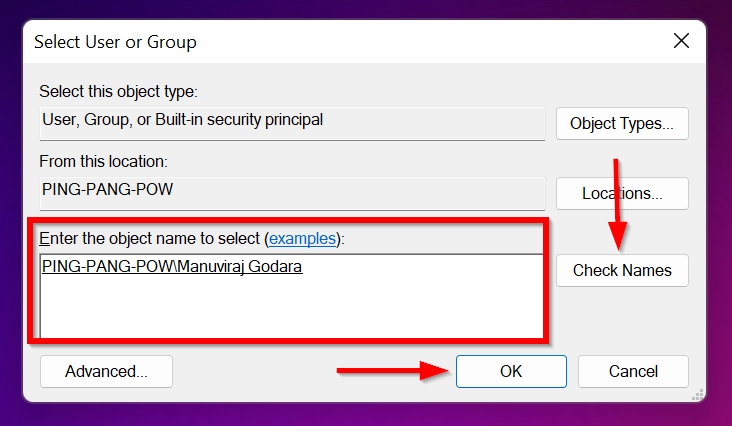
- In the Object Name text box, type in the name of your user account, then click Check Names. Click OK.

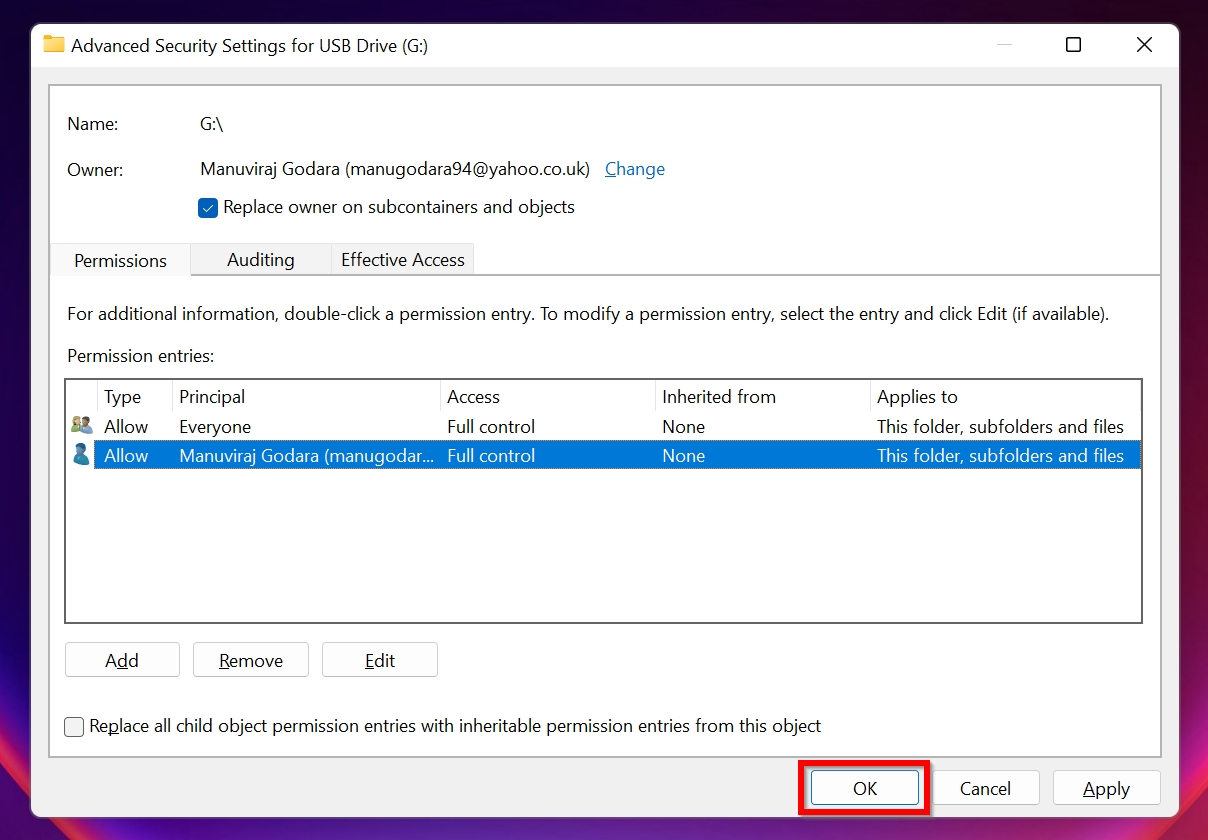
- Tick the Replace owner on subcontainers and objects checkbox.
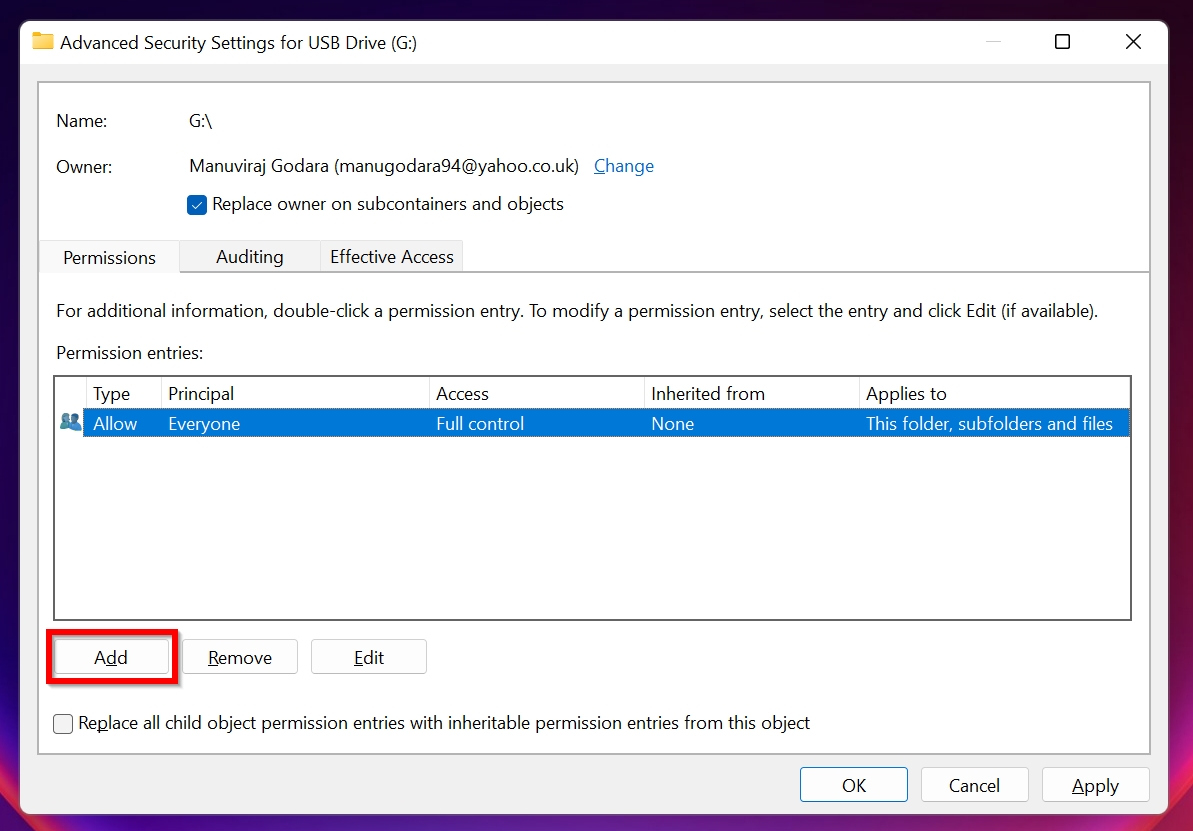
- Click on Add in the Advanced Security Settings window.
- Click on Select a principal.
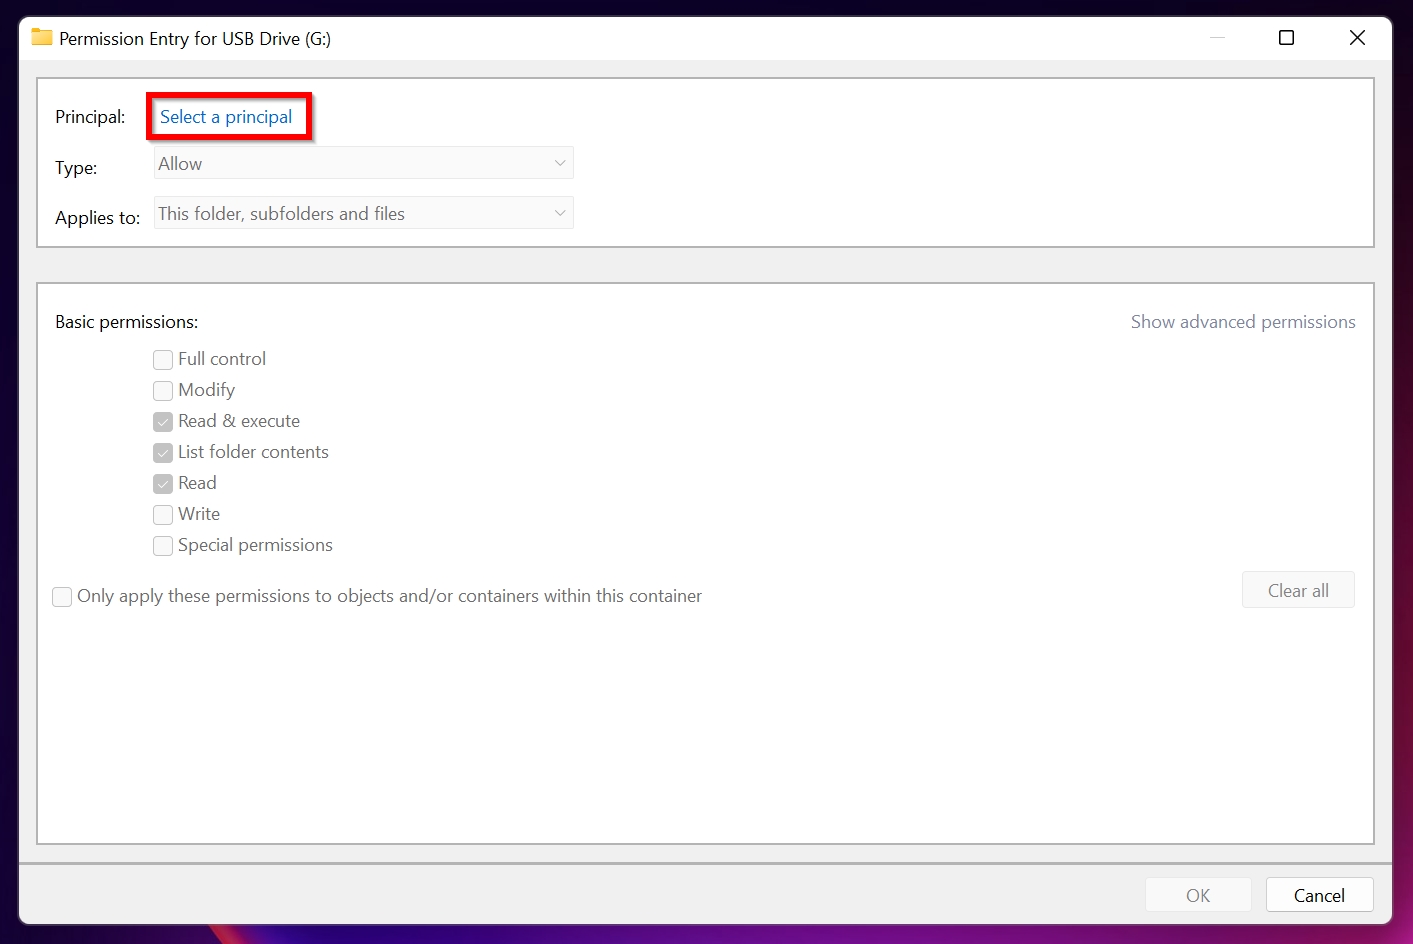
- Similar to step 4 above, type in your user account in the Object Name text box. Click on Check Names and then click OK.
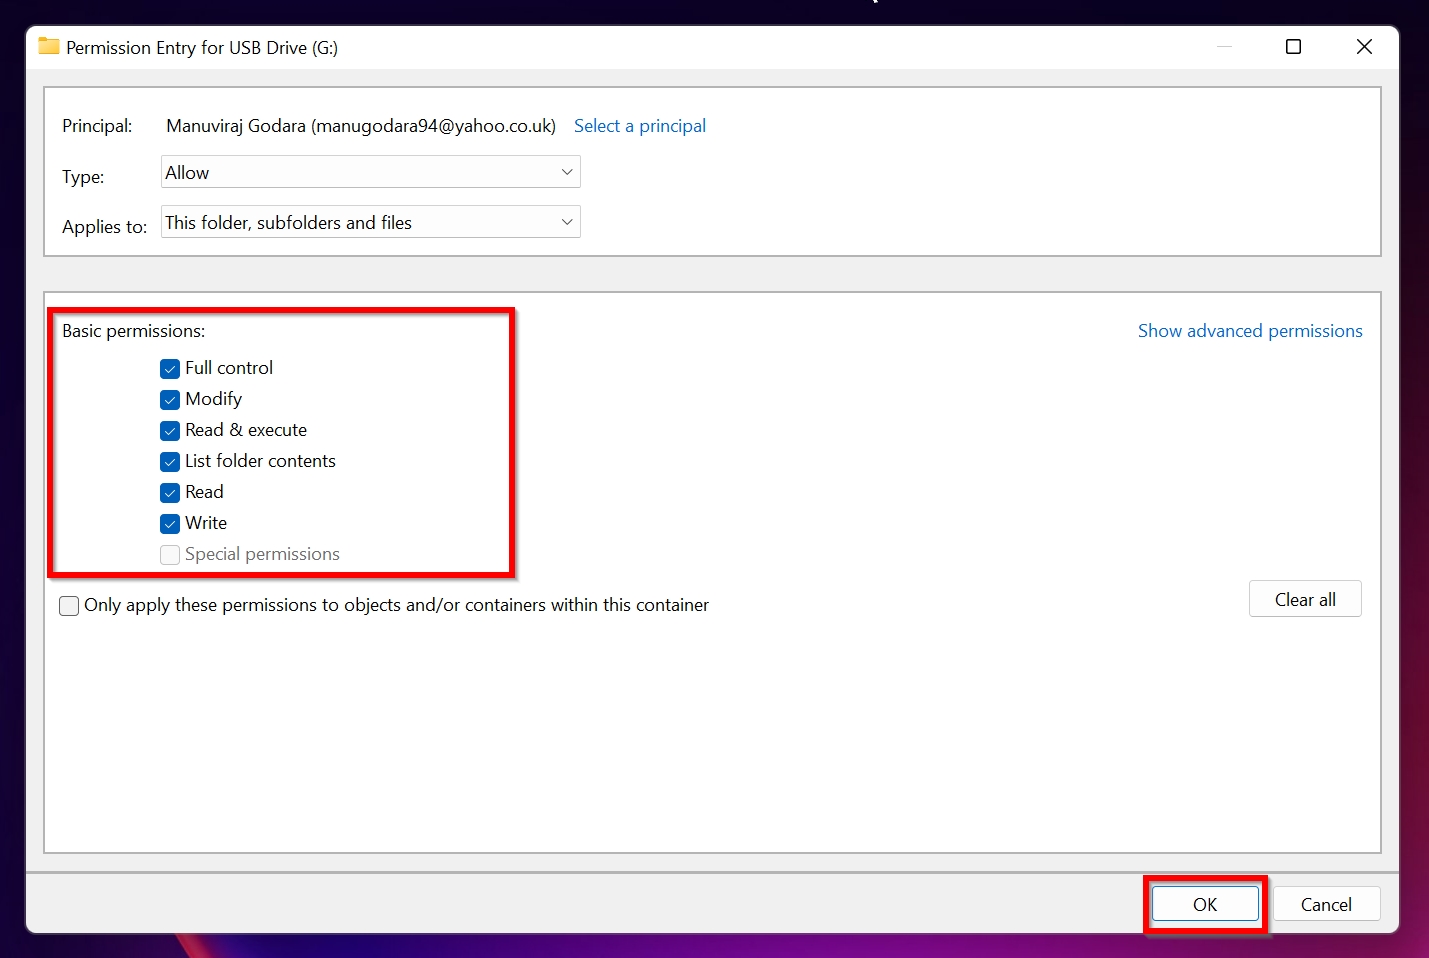
- Check the Full Control option and click OK.
- Click OK on the next screen, then close Properties.
It’s quite possible that your drive is encrypted by BitLocker. In this case, you need to enter the password to access and change user permissions. To check if a drive is encrypted by BitLocker open File Explorer, right-click the drive, select Properties, and check under the General tab for a note about BitLocker encryption.
(Alternatively) Take the Ownership With CMD command (takeown)
If you’re comfortable using Windows Command Prompt, you can use the takeown command to take ownership of the external hard drive. It could be that there is access denied to a folder on the external hard drive, instead of the entire drive. The takeown command can be used to resolve this, as well as take ownership of the entire drive:
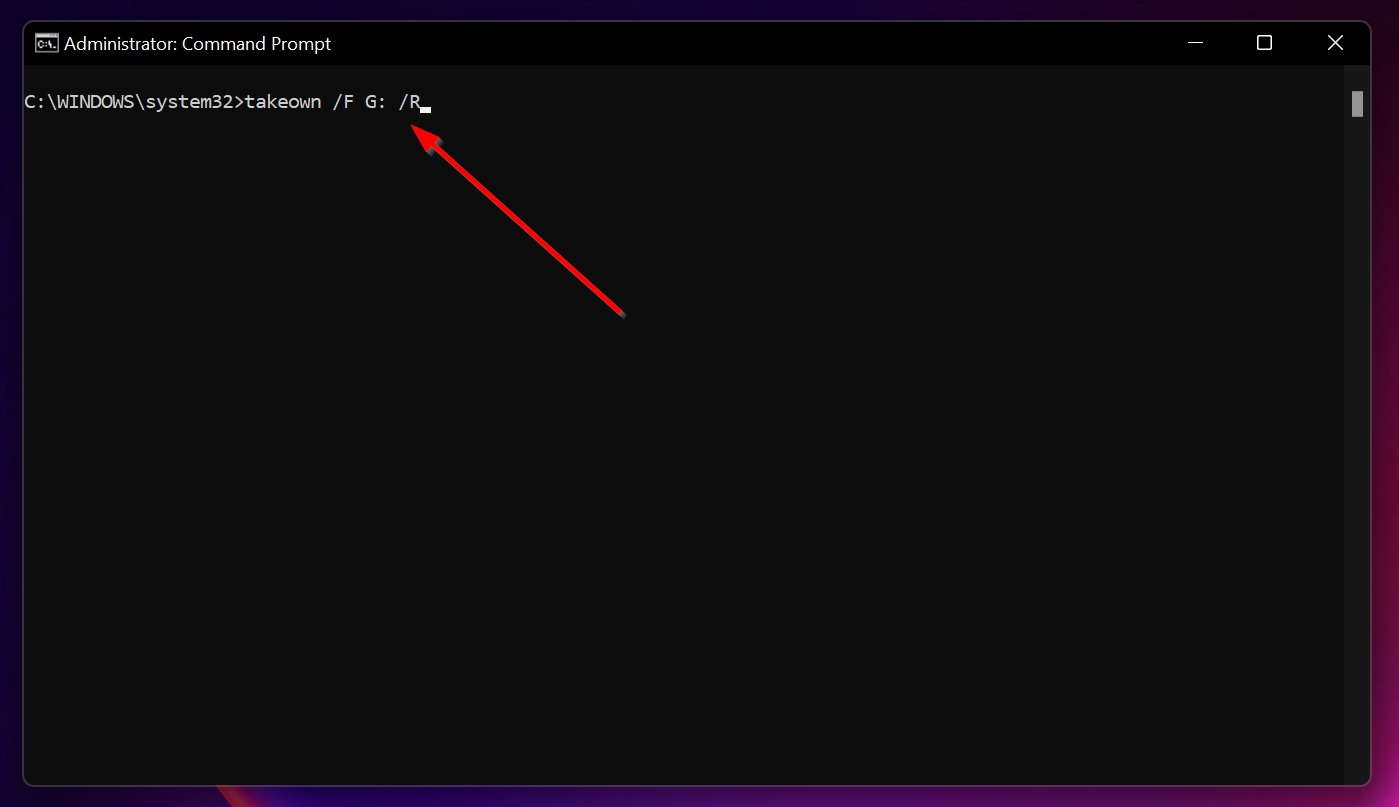
- Type “cmd” in Windows Search (Windows Key + S) and right-click on Command Prompt > Run as administrator.
- Now, type the following command and press Enter: takeown /F X:\ /r. Replace X: with the drive letter of the external hard disk drive. ⚠️
Be careful with the takeown command, especially when choosing the drive. You don’t want to accidentally use it on your system drive (C:), since that can cause all sorts of problems with your OS or even prevent your computer from booting, and nobody wants that.
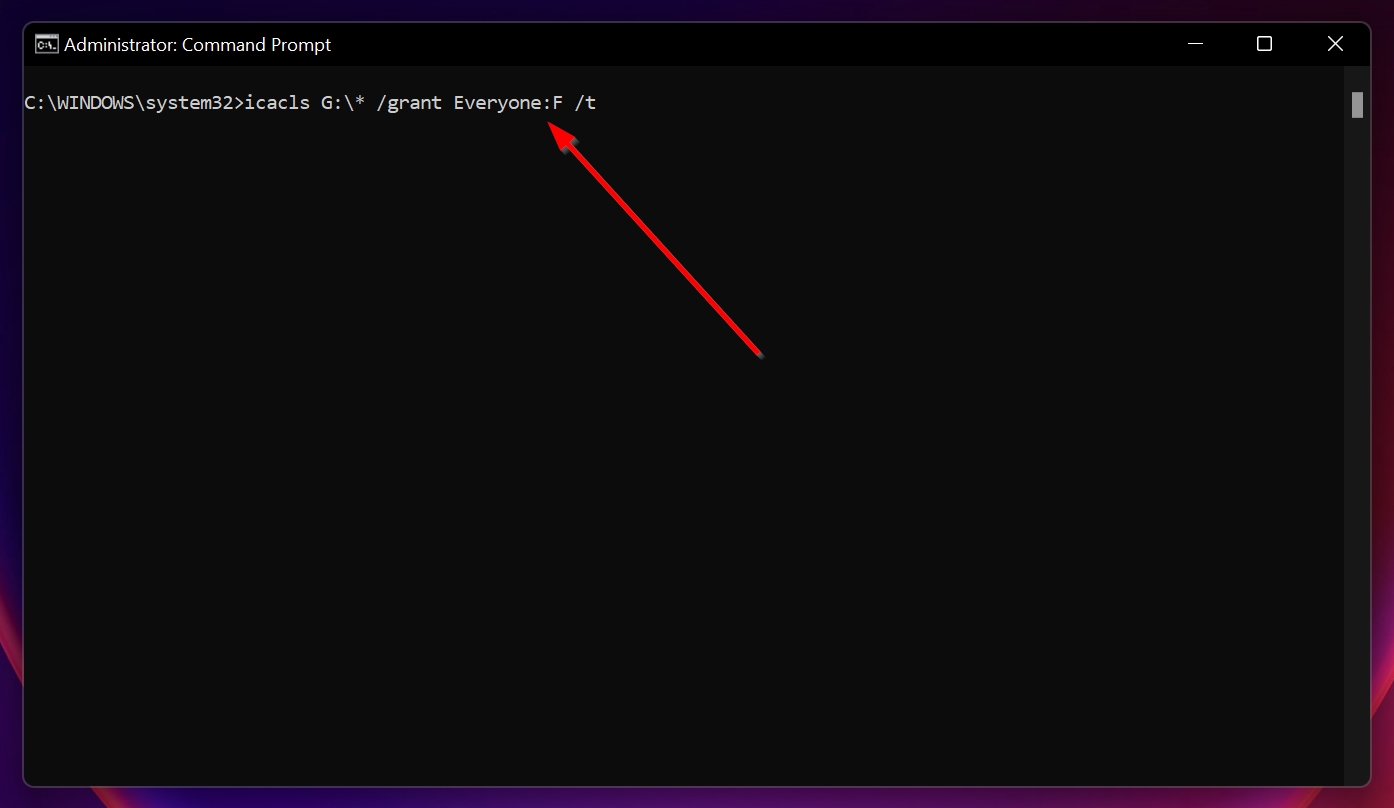
- Finally, to change ownership of the drive, type icacls X:\* /grant Everyone:F /t and press Enter. Again, X needs to be replaced with the drive letter.
Method 2: Change the Drive Letter
When you connect an external hard drive, Windows assigns it a drive letter, like D, E, or F, to identify it. But sometimes, things can go wrong. When there’s a conflict with another device trying to use the same letter, your hard disk might throw an “access denied” error. To fix this, all you need to do is assign the drive a different letter that’s not already being used by another device.
Assign a letter far down the alphabet, like X, Y, or Z. These are less likely to conflict with other devices, even if you connect new ones later.
Here’s how to do it:
- Press Windows Key + R to launch the Run application.
- Type diskmgmt.msc in the text box and press Enter to launch Disk Management.

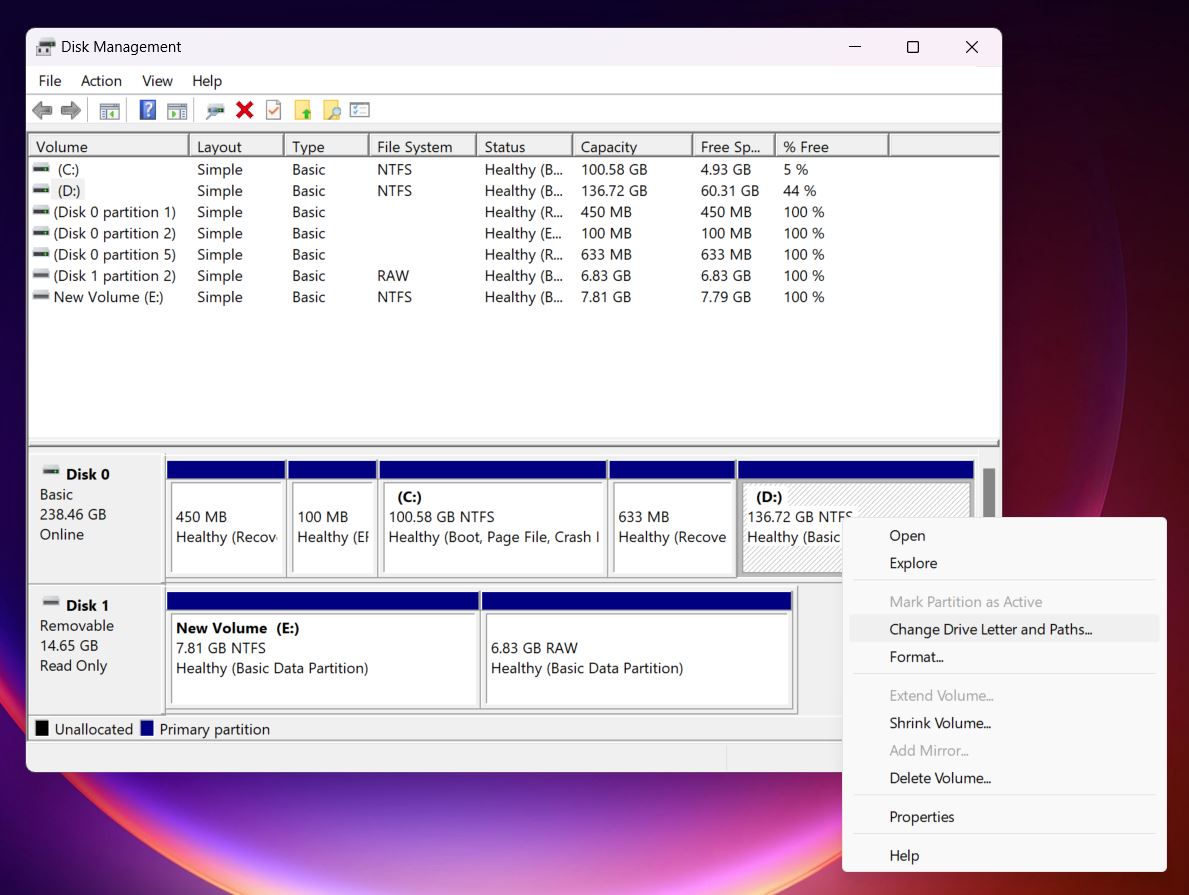
- Look for your external hard drive in the list. It might be labeled with the brand name (like WD or Seagate) or appear as “Disk X.” If it doesn’t have a letter or isn’t visible in File Explorer, that’s likely the problem.
- Right-click on your external drive and choose Change Drive Letter and Paths. This lets you assign a new letter or fix any conflicts.
- Click Change, then choose a different letter that isn’t already in use.

- Click OK to save the new settings. Windows will update the drive letter, and your external drive should now appear in File Explorer.
If the letter change doesn’t immediately fix the problem, restart your computer. Windows sometimes needs a quick reboot to fully catch on to the new letter.
Method 3: Check the Drive for Corruption With Error Checking Tool
Another common reason for the external HDD access denied error is file system corruption. The file system is the framework that organizes and manages how your data is stored, accessed, and retrieved on a drive. It’s what allows your OS to communicate with the drive and keep track of all your files.
When the file system gets corrupted—whether from sudden power outages, improper ejection, malware, or bad sectors—your OS can’t read the drive properly. That’s why you get errors like access denied. Tools like Windows’ Error Checking or CHKDSK can scan for and often repair these issues.
Keep in mind that the CHKDSK command can sometimes cause data loss. That’s why we always recommend using data recovery software to retrieve your files first.
Here is how to run the error checking utility to fix access denied to external hard drive error:
- Open File Explorer.
- Right-click on the external HDD and click Properties.
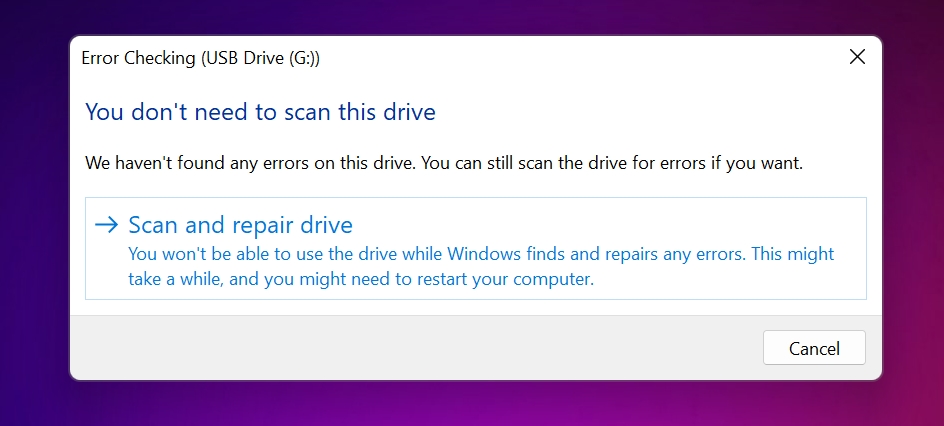
- In Properties, click on the Tools tab and then click Check. You will need administrative privileges.
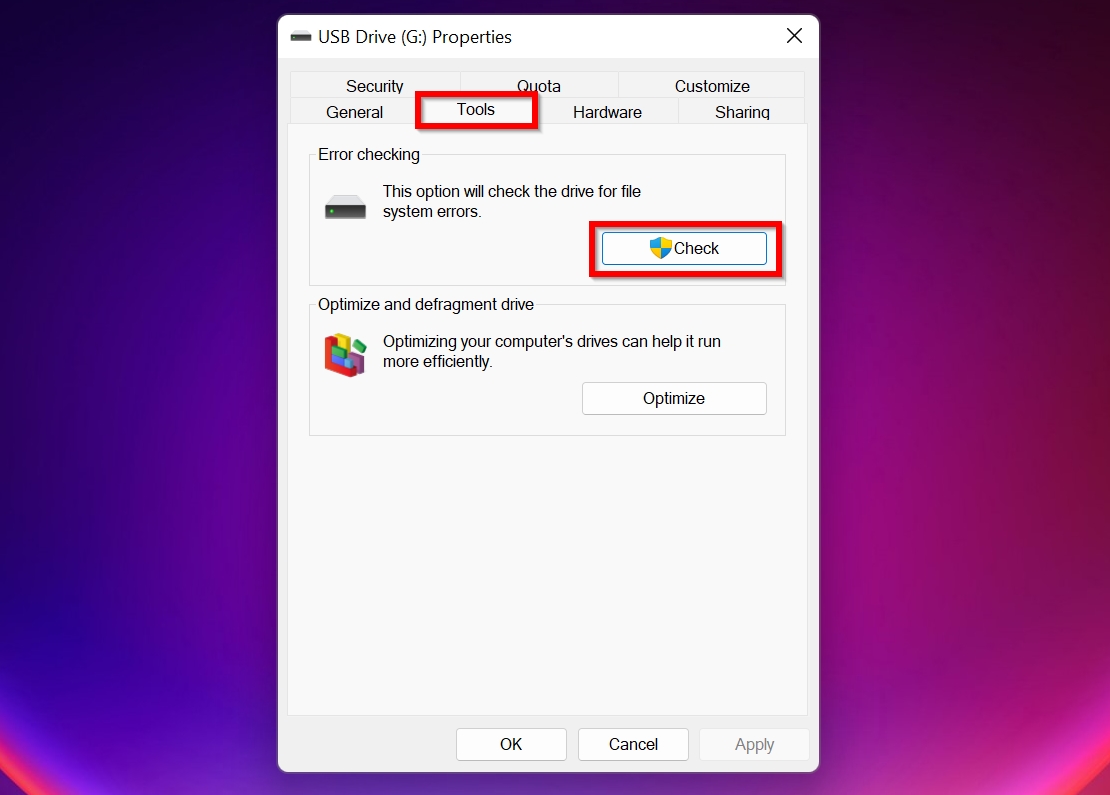
- On the next prompt, click Scan and Repair. Wait for the scan to be over and then click Close.
Alternatively, you can run CHKDSK directly in Command Prompt. It performs the same function as the Error Checking tool. Just press Windows Key + R, type cmd, and press Enter. In the Command Prompt window, type: “chkdsk X: /f /r” (replace X: with the drive letter of your external hard drive).
You can find more about it in our CHKDSK guide.
Method 4: Format External Hard Drive
And our final fix for the external hard drive access denied error is formatting the drive. If all other methods fail and you’ve already recovered your data, formatting the drive will reset it to a clean state.
The reason we say to format your external drive only after recovering your data is that formatting will erase all files from the drive. Only proceed if you’ve already saved everything you need.
But if you were in a rush and formatted the drive without thinking about your files, it’s often still possible to retrieve data from formatted drives (but only if it was a quick format). Just go to the How to Retrieve Data When Access Is Denied to an External Hard Drive section of this article. The steps outlined there will work for a formatted drive too.
Here is how to format a drive:
- Press Windows Key + R to launch the Run application.
- Type diskmgmt.msc in the text box and press Enter to launch Disk Management.
- Right-click on the external drive and click Format. Click yes on the confirmation prompt.

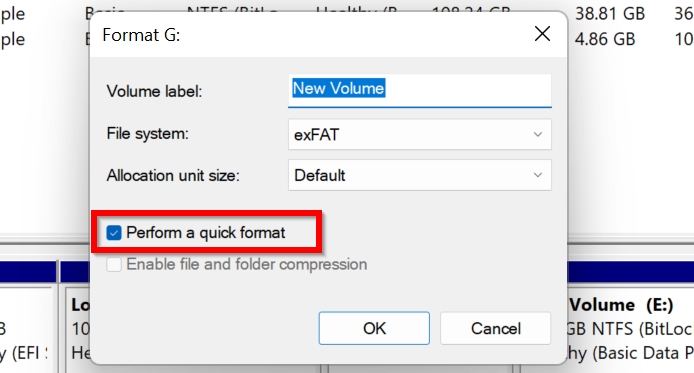
- In the Format options menu, tick Perform a Quick Format and press OK. Click Yes on the next prompt as well.🗨️
The “Perform a Quick Format” checkbox lets you choose between a faster or more thorough formatting process. With Quick Format enabled, the drive skips bad sectors scan, only clears the file system, and leaves the data technically recoverable until overwritten. If you leave the box unchecked, Windows performs a full format, which scans for bad sectors and removes data more thoroughly. Choose Quick Format for speed or a full format if you suspect issues with the drive or need a secure wipe.
- Windows will format the external hard drive.
If you’re not sure which file system you need, here’s a quick guide to help you decide:
- NTFS: Best for Windows systems, supports large files, and modern features like encryption and permissions.
- FAT32: Works on both Windows and macOS but has a 4GB file size limit. It’s great for devices that need compatibility across multiple systems. These days, FAT32 is not usually used for external hard drives.
- exFAT: A modern version of FAT32 without the file size limit. It’s perfect for external drives used on both Windows and macOS.
Stuck? Have Questions? Get Help from Online Communities
We’ve covered pretty much everything you need to know to fix the hard disk showing the “access denied” error. However, you might still run into additional questions or unexpected obstacles—these types of problems can be unpredictable. If that happens, feel free to start a discussion in our Handy Recovery Advisor Community, where our team and readers can offer guidance and share tips.
It’s also worth checking out some Reddit communities, like r/DataRecoveryHelp or r/techsupport, which has over 2 million members. Don’t hesitate to reach out for help, but be ready to provide as many details as possible, such as your drive’s info, the error messages you’ve encountered, and what you’ve already tried. The more information you share, the easier it will be for others to assist you.
FAQ
Why is my external hard drive not accessible?
There can be many reasons behind an inaccessible external hard drive. Some common ones are:
- A corrupted hard drive. This could be due to improper usage, power cuts, damaged firmware, or virus attacks.
- Permission settings. Some user accounts may not have privileges to access or modify the data on the hard drive.
- A damaged file system.
Can I fix Access Denied error without formatting?
Yes, you can often fix the “Access Denied” error without formatting. Formatting should be your last option since it erases all data from the drive. It’s also recommended to retrieve your data beforehand using data recovery software, just in case something goes wrong during fixes.
Here are some solutions to try:
- Change the drive’s permissions in the Windows Security tab to give your account full control.
- Use the takeown command in Command Prompt to assign ownership of the drive to your account.
- Assign a new drive letter in Disk Management to resolve conflicts or missing drive letters.
- Use the built-in Error Checking tool or the CHKDSK command to repair file system errors.
How to get files from a Seagate external hard drive that shows 'Access Denied'?
If your Seagate external hard drive shows an “Access Denied” error, you can still retrieve your files using data recovery apps. These programs require your drive to be detected in Disk Management to scan it for data. Since your drive is recognized (you wouldn’t get this error otherwise), data recovery tools like Disk Drill can help. They scan the drive and let you recover both existing files and files you may have deleted earlier. While these tools are primarily designed for deleted or lost data, they work just as well for existing files.
Does fixing the External Hard Drive Access Denied error differ between Windows 10 and Windows 11?
No, fixing the “External Hard Drive Access Denied” error is mostly the same on both Windows 10 and Windows 11. Both operating systems provide similar tools and processes for troubleshooting. The main difference lies in the user interface. Windows 11 has a slightly updated design, so menus and options might look different, and that’s it.
This article was written by Manuviraj Godara, a Staff Writer at Handy Recovery Advisor. It was recently updated by Roman Demian. It was also verified for technical accuracy by Andrey Vasilyev, our editorial advisor.
Curious about our content creation process? Take a look at our Editor Guidelines.