When you face data loss, selecting the appropriate recovery software becomes crucial. Active@ File Recovery claims to be an “efficient and easy to use recovery tool” that works for deleted or lost files and damaged or re-formatted volumes, even if your PC doesn’t boot! But how does it measure up when compared to other leading data recovery software options?
In this comprehensive review of Active@ File Recovery, we’ll explain its features and functionalities through comprehensive tests and check its capabilities for recovering deleted files.
TL;DR: Whether you’ve accidentally deleted important files, lost data due to a system crash, or encountered corruption issues with your hard drive, Active@ File Recovery provides a user-friendly and effective means of recovering your valuable information.
While evaluating its capabilities and user interface, we found it to be a useful tool for recovering deleted files from damaged, formatted, or deleted partitions. It supports the recovery of a wide range of file systems and has clear-cut buttons that don’t complicate the recovery process. The pricing of the software license is modest, too, and while the UI could use an upgrade, overall, it is a good choice for data recovery.
You can also check out our other software tests to find data recovery tools that better fit your recovery needs.
How to Use Active@ File Recovery
Active@ offers several tools to help with data recovery, and their website goes in-depth into how their data recovery software works. The two main recovery features we used were the QuickScan and SuperScan tools.
The QuickScan option is a simple disc scan, revealing recently deleted files along with existing files and folders that are missing. It also attempts to recover data while preserving the original file names and original folder structure.
The SuperScan is a more advanced scan that detects deleted files and recognizes files by their signatures. The SuperScan is a more powerful but time-consuming tool (our drive took more than 4 hours to fully scan! Keep in mind that this time depends on the method of connection and the storage size of your device).
We decided to run a simple test to recover deleted files from a test folder on our system’s internal drive to demonstrate how the SuperScan tool works. For the test, we added and deleted a few JPG and PNG files from our test folder, which is a common scenario of data loss. Here’s what we did to perform a quick scan on our drive to recover the deleted files:
Run the SuperScan
- Download and launch Active@ File Recovery.
- In the Local System Devices list on the left, select a physical device or a volume that contains your data. You can use HDDs, USB devices, and even Floppy disks. We chose the Local Disk (D:) drive for our test, where we created and subsequently deleted a folder named “Test_Folder.”
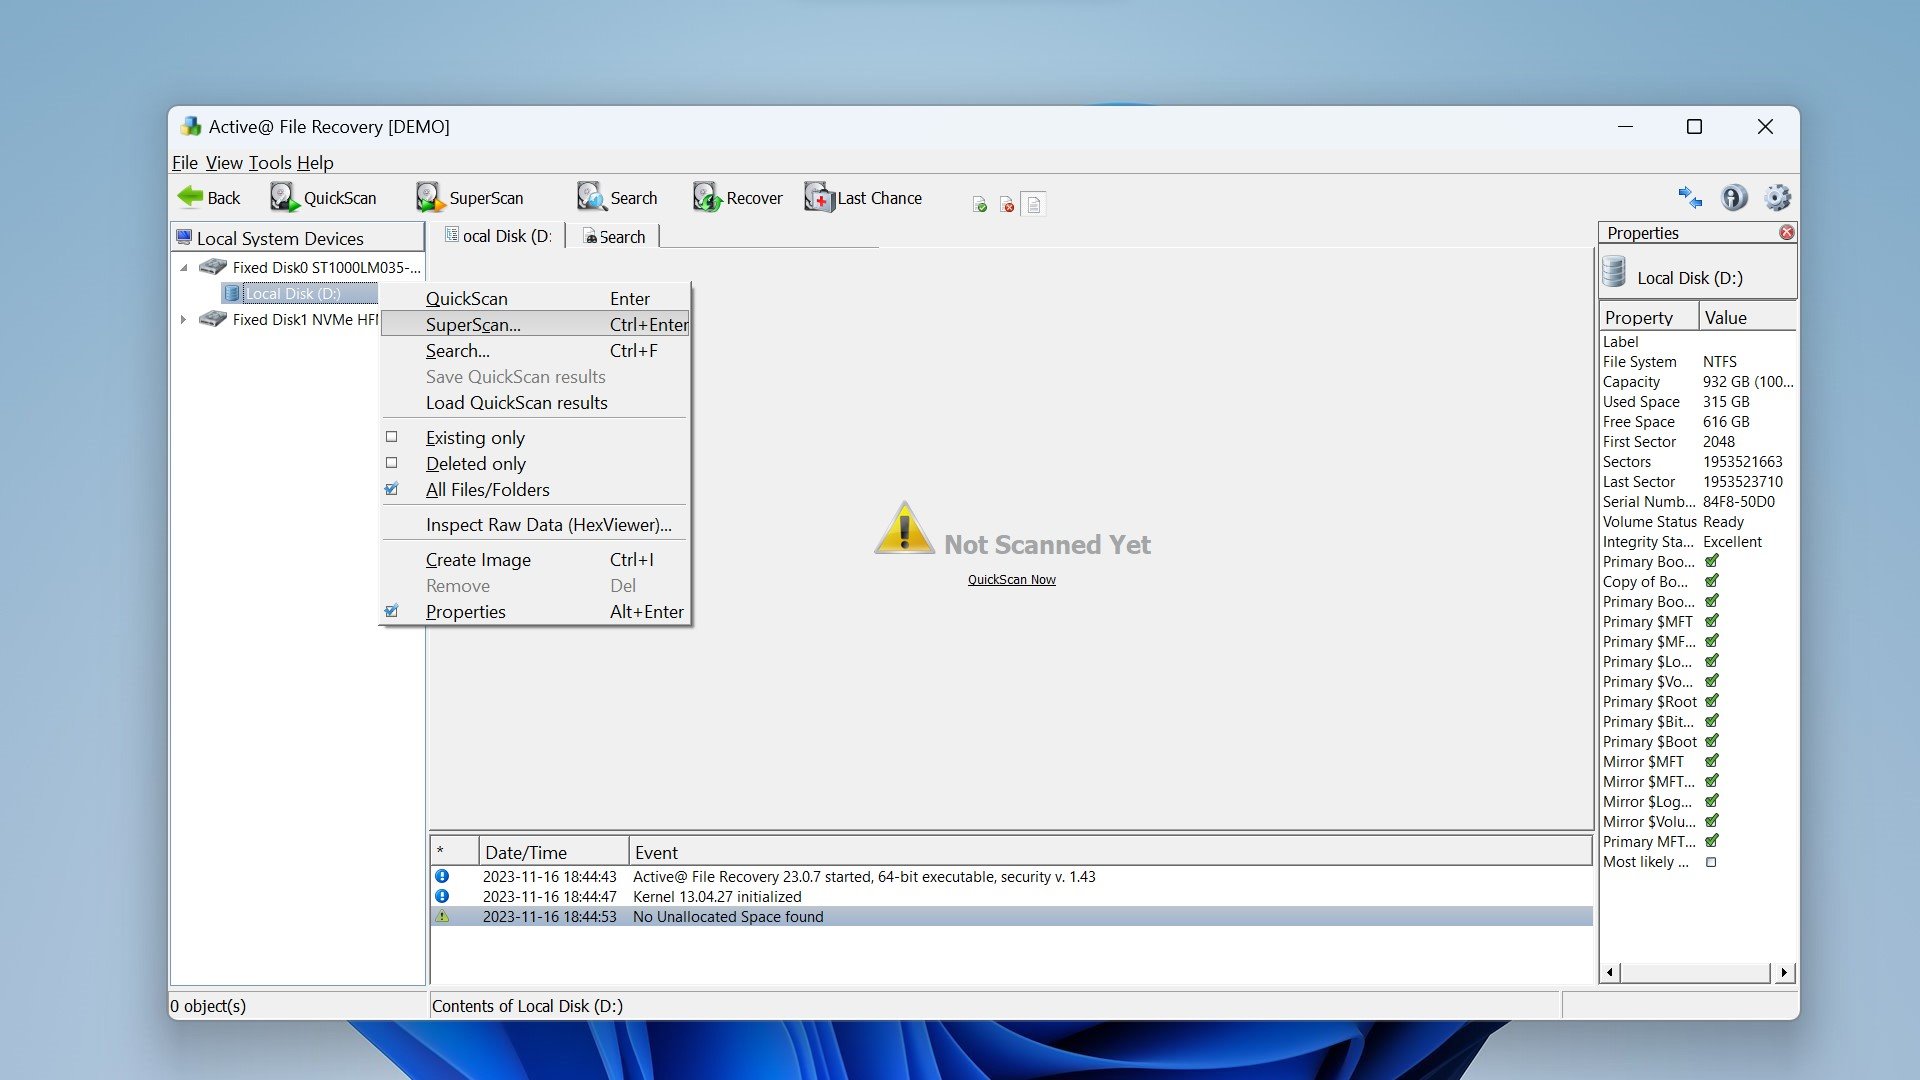
- Next, open the SuperScan Options dialog by clicking the SuperScan toolbar button. Alternatively, you can right-click the disk and choose SuperScan from the context menu.
- You can now customize the SuperScan. You can select the disk’s area manually by typing the starting sector number in the From field and the number of sectors in the Size field. If you need several areas to be scanned, define area parameters and click the Add button, then type other area parameters and click Add again.
- Select the checkboxes next to the partition types that you want to look for. Clear the check boxes next to the partitions that you do not want to skip. We decided to search the entire disk, which turned out to be a longer process.
- If a disk has been severely damaged and partitions and files are not found, you may turn on the File types to be recognized based on the signatures option. Provided that the files are not fragmented, Active@ can detect the file signatures and will try to reconstruct files of certain types.
- The None option means that no signature recognition will be applied and will speed up the SuperScan process, and less memory (RAM) will be consumed. We selected this option for a faster scan. You can also choose the All option, which instructs SuperScan to recognize all possible supported signatures.
- Now click Scan or press Enter to start the SuperScan process. The statistics and progress bar appear underneath the scanning area.
- For each SuperScan process, a new virtual folder named SuperScan [YYYY-MM-DD HH:MM:SS] will be added to the Local System Devices list. The contents of this folder get displayed in the tree as well as in the Volumes tab as they’re found.
- Scanning the entire disk took about 4 hours, but since our folder was recently deleted, we were able to find it in the recovered folder’s tree after a few minutes of scanning.
Recover deleted Folders after SuperScan
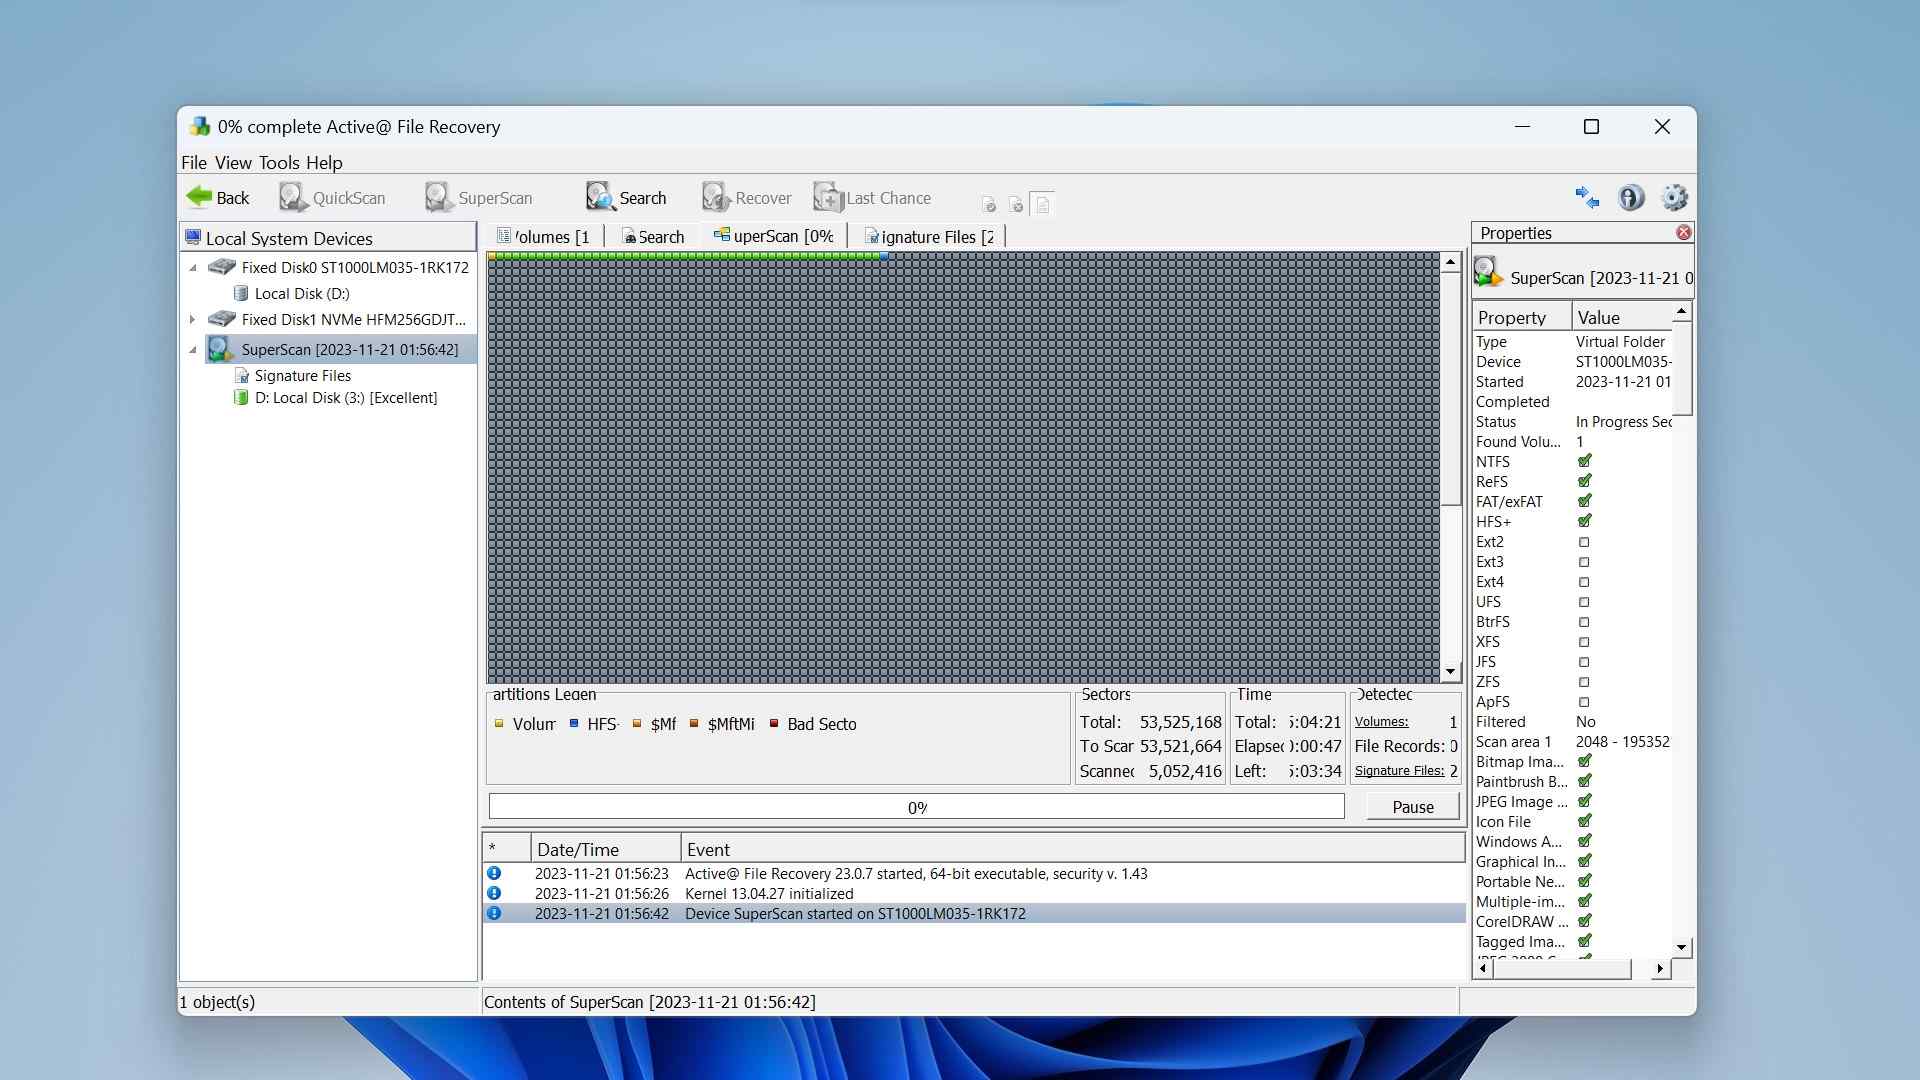
- You can now search for deleted files and select the file or group of files to be recovered. We found the deleted folder, although it did not have its original name and was simply named “New Folder.” We selected it, but you can further customize your files for recovery.
- Launch the Recovery Options dialog by either clicking the Recover button on the toolbar or by right-clicking the file and then choosing Recover from the context menu.
- To recover the file to a specified location, in the Recover to field, type a different path or click the ellipsis button (…) and browse to a recovery folder location of your choice. Make sure to avoid copying the files to the same location you lost them from!
- If you select several files, you can try filtering them for the recovery process by choosing to recover All selected files, Deleted only, or Existing only files. We were also able to select our drive and find the images in the “Deleted” folder section.
- Click Recover. The output folder will open after recovery and display the recovered files after the process is complete.
Although it took a long time to scan, the SuperScan tool worked well and was able to recover our lost image files. However, we were not able to recover the folder with its original name.
How Active@ File Recovery Stands Out
Active@ File Recovery stands out with a range of features that contribute to its effectiveness in data recovery. Here are some key aspects that we liked:
- 🚀 Comprehensive Compatibility: Active@ File Recovery is compatible with all Windows operating systems. Notably, it supports older systems like Windows 98, offering a solution that extends to running from a flash drive or CD for portability.
- 🛠️ RAID Tools: Active@ File Recovery offers RAID recovery with its RAID constructor tool. It virtually rebuilds damaged RAID0, RAID1, RAID5, and Span disk arrays. You can also recover data from damaged RAID arrays.
- 📁 File System Compatibility: Active@ File Recovery offers support for various file systems and is compatible with NTFS, FAT12/16, FAT32, exFAT, Ext2/3/4, HFS+/HFSX, ReFS, APFS, and more.
- 📑 File Organizer: It features a file organizer for files detected by signatures. This allows users to reorganize files in a tree structure, rename files based on internal attributes, and preview reorganized data before actual recovery.
- 💾 Integrated Disk Editor: The Active@ Disk Editor (Hex Viewer) lets users inspect raw disk sectors, including MBR, Boot Sectors, and MFT records. This functionality makes the tool useful for advanced users and forensic purposes.
- 💽 Raw Disk Image Capabilities: Active@ File Recovery allows users to create Raw Disk Images for both logical and physical drives. This feature proves handy for future data recovery in case of hard disk failures.
Pros and Cons of Active@ File Recovery
Every software has some good features and some things that can be improved. Let’s explore the pros and cons to gain insights into how Active@ File Recovery competes against other software:
Pros:
- 🔍 Deep Scan Capabilities: With features like QuickScan and SuperScan, the software can perform in-depth scans, detecting deleted or damaged partitions, logical drives, and disks with damaged MBR.
- 🚄 Fast Scan and Recovery Speed: The software boasts fast scanning speeds and swiftly displays the file structure of recoverable files across supported file systems. This feature enhances the efficiency of data recovery, providing users with a quick and streamlined process.
- 🖥️ Support for Various Disk Types: From traditional HDDs to modern SSDs, USB drives to complex RAID disk arrays, Active@ File Recovery supports an extensive range of disk types and configurations. This versatility ensures users can apply the tool across diverse storage setups.
- 📖Custom File Signature Filters: Active@ gives the user the ability to define custom file signatures using simple syntax with regular expression (RegExp) support. Users can also create specific filters for unique file types not covered by standard filters.
Cons:
- 🌐 Learning Curve: The software may have a steeper learning curve for users who are not familiar with advanced data recovery tools and low-level disk editing. Beginners might find some features more complex to use.
- ⚖️ Cost: While Active@ File Recovery is a powerful tool, it isn’t free to use. Depending on your needs and budget, the variable pricing may be a considerable downside to this software, as some features are only available in the Ultimate (more expensive) package.
- ⏳ SuperScan can be Slow: The SuperScan feature, while thorough, is a rather slow process. Users should be prepared for longer scan times, as much as several hours, when opting for the in-depth SuperScan option.
Price and Value for Money
The cost of data recovery software varies greatly, where some are free, and others require purchasing a premium version to access all features.
Active@ File Recovery for Windows offers a free demo version that can be downloaded from their website. Note that this version is just for trial, with a tiny 64kb recovery file size limit, as well as just the basic tools for scanning. There are also various premium licenses of the Active@ recovery software available, shown here:
Plan Type |
Description |
Personal License Price |
Corporate License Price |
Active@ File Recovery Standard |
The Standard version allows you to recover deleted files or to recover files from deleted or damaged partitions. |
$29.95 |
$39.95 |
Active@ File Recovery Professional |
The Professional package comes with the integrated Active@ Disk Editor (or HexViewer) for low-level data inspection, supports recovery from damaged RAIDs, enables custom signature definitions, and includes an Organizer for files detected by signatures. |
$44.95 |
$64.95 |
Active@ File Recovery Ultimate |
The Ultimate package includes Active@ Boot Disk Lite, a WinPE-based ISO Image for CD/DVD/USB. Windows PE boots from this, allowing recovery of partitions and files in unbootable systems. It also features the Linux-based Active@ LiveCD, compatible with the latest x86 & x64 UEFI secure boot systems. |
$69.95 |
$89.95 |
FAQ
Does Active@ File Recovery support macOS or Linux?
No, Active@ File Recovery does not support macOS or Linux. It is a file recovery tool compatible with only Windows operating systems, including Windows 11, Windows Vista, Windows 7, and all versions of Windows based on x64 platform.
How can I recover my files using Active@ File Recovery software?
Here’s how you can recover deleted files using Active@ File Recovery software:
- Launch the Active@ File Recovery software on your computer.
- Choose the volume or drive where the files were originally stored.
- In the Search dialog box, enter the file name or choose a file type. Click “Find” to start the search process.
- Examine the Search virtual folder for matching items.
- Sort the search results based on filters like name, size, date, etc.
- Select the files and folders you want to recover. You can now restore the selected items to your desired location.
Is Active File Recovery free?
While Active@ File Recovery offers a free demo, its full version is not free and requires the purchase of a premium license to use.
How long does it typically take for Active@ File Recovery to super scan a damaged hard drive?
Depending on the size of the drive that you are scanning, it can take a significant amount of time to scan partitions. Large or damaged drives can take multiple hours.
If you exit Active@ File Recovery in between a scan for any reason, it will take a long time to scan the partition again. To avoid losing the information that you have already scanned, you can save the SuperScan results to a file. When you open Active@ File Recovery again, opening the saved results file will ensure your SuperScan takes much less time.
What is the process for searching for a specific file by its name in Active@ File Recovery?
If you’re not sure where the deleted file or folder was, select a drive or folder and click “Search” on the toolbar. In the Search dialog box, to find a file by name, type the file name in the “Find what” field. You can use an asterisk (*) for part of the name. Now click “Find” to start the search process.
After the search is done, check the Search virtual folder, which lists all items that meet your criteria. You can sort the recovered results by name, size, date, etc.
How can I identify what files are contained within a particular sector using Active@ File Recovery?
Active@ File Recovery provides a hex viewer feature where you can inspect the contents of specific sectors. Navigate to a particular sector of interest to view its data.
How do I change the language settings in Active@ File Recovery?
We could not find settings to change the language in Active@ File Recovery Software.
What are the steps to remove duplicate files in Active@ File Recovery?
You cannot remove duplicate files using the Active@ software. However, you can prevent duplicate files from getting displayed twice by going to Settings>General>Recovery and selecting the “Skip Existing Files” checkbox.
How do I recover files by their signatures using Active@ File Recovery?
You can use the SuperScan and Last Chance recovery options to recover files by their signatures when QuickScan fails to detect your files or if numerous volumes are detected.
These methods identify un-fragmented files based on standard signatures, allowing recovery in most cases. While file system attributes like original filename and creation date may not be detected. Recovered files are grouped by extension, and the File Organizing feature can help you categorize them based on extended attributes, such as artist or album for songs and camera/date for photos.
What measures can I take with Active@ File Recovery to save data from a dying HDD?
If your hard drive is failing, prioritize copying essential data first. You can then use Active@ File Recovery to recover files as a precautionary measure, but make sure to have a backup in a different location. Depending on the criticality of your files, you should also consider going to a professional data recovery service.
Is Active File Recovery good?
Yes, Active@ File Recovery is a good recovery tool that performs as advertised and can be used to recover lost files and folders.
Verdict
Active@ File Recovery stands out as an affordable data recovery solution that offers various features.
Through our hands-on test scenario, we were able to recover deleted images from a test folder, although it took a very long time to scan and did not preserve the folder name.
While the Ultimate package offers a complete set of features, the Professional package still provides a wide array of tools for users with specific requirements. Overall, the software can be a valuable ally in your quest for data recovery.
This article was written by Vihaan Jain, a Staff Writer at Handy Recovery Advisor. It was also verified for technical accuracy by Andrey Vasilyev, our editorial advisor.
Curious about our content creation process? Take a look at our Editor Guidelines.