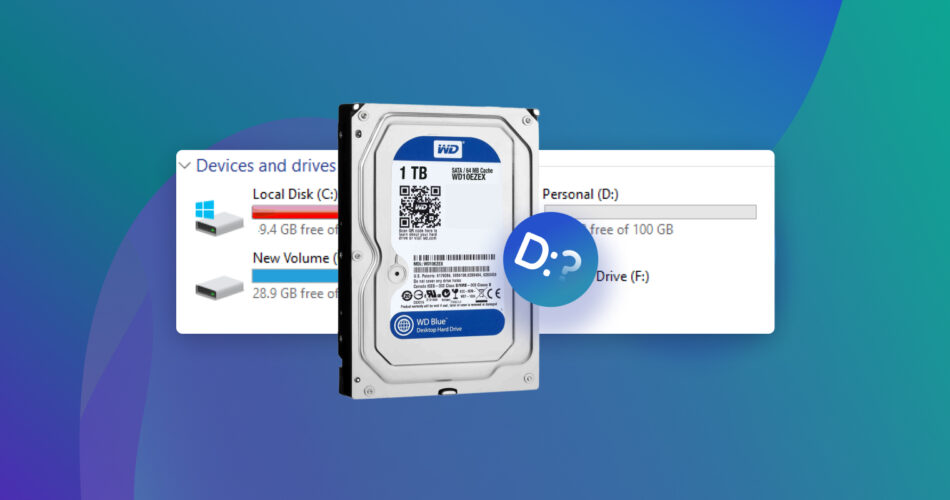
Has your D drive suddenly become invisible? Are you unable to locate it on File Explorer?
Windows users often find that the D drive on their OS can suddenly go missing. In most cases, the D drive is a partition of your primary hard drive and can become invisible due to system updates, accidental deletion, hard drive problems, etc. If you find yourself in this situation, know that it’s possible to solve the problem and that you’ve come to the right place.
Why is My D Drive Not Showing Up?
In our experience, 95% of the cases where people try to fix a missing D drive involve situations where the D drive is a partition on an internal hard drive. The C drive usually runs Windows, and the D drive stores files or programs. The other 5% involves the D drive being a separate disk (either internal or external), usually assigned the next letter in line.
We’ll walk you through different situations and show you what’s going on and how to fix it. Here’s a quick breakdown to help you figure out where your situation fits:
Your Situation |
What Might Cause It |
What You Can Do About It |
My internal drive’s D partition disappeared from File Explorer |
The partition is hidden, unallocated, or corrupted. |
– Open Disk Management and check if the partition exists. – If it’s unallocated, assign a drive letter. – Use data recovery software to get data off of the D partition. – Use TestDisk to recover lost partitions or repair corruption. |
My external drive (that was labeled D:) doesn’t show up in File Explorer when I connect it |
The drive is not initialized (e.g., it’s a brand-new drive), has a damaged file system, or isn’t properly connected. |
– Verify connections and try a different USB port or cable. – Check if the drive appears in Disk Management. – Initialize the drive in Disk Management. – Rescan the disks to refresh the list of connected drives. – If formatted in an unsupported file system (e.g., Linux EXT4) use data recovery software to get data off of it and reformat it in a compatible file system. – Use data recovery software to retrieve files (if you need them) and then reformat the drive. |
My D drive doesn’t show up in Disk Management at all |
Physical drive failure, faulty connection, or disabled drive in BIOS. |
– Check BIOS/UEFI settings to make sure the drive is detected. – Verify all physical connections, including power and data cables. – Test the drive on another computer to rule out hardware issues. – If undetectable, consider professional recovery services. |
I want to get files from my D drive, but it doesn’t show up in File Explorer |
There’s a drive letter conflict, the file system is corrupted. |
– Check if the drive appears in Disk Management. – If visible, use data recovery software to retrieve files. – If unallocated, assign a drive letter. – Use TestDisk to repair the file system or recover lost partitions. |
My D drive is visible but inaccessible (e.g., asks to format when opened) |
Corrupted file system, damaged partition, or malware infection. |
– Use file recovery software to retrieve data before formatting. – Try TestDisk to repair the file system or recover partitions. – Run chkdsk to attempt a repair. – Scan for malware if the issue followed suspicious activity. |
How To Check If Your Computer Detects Your D Drive
If your D drive is a partition on your system’s main disk and Windows boots without a hitch, your computer is detecting it. The issue probably lies in how Windows handles that partition. But if your D drive is a separate internal or external disk, the first thing you want to do is check Disk Management. Think of Disk Management as the control center for all your connected drives.
It lists all drives and partitions, whether they are visible in File Explorer or not. Here’s how to check:
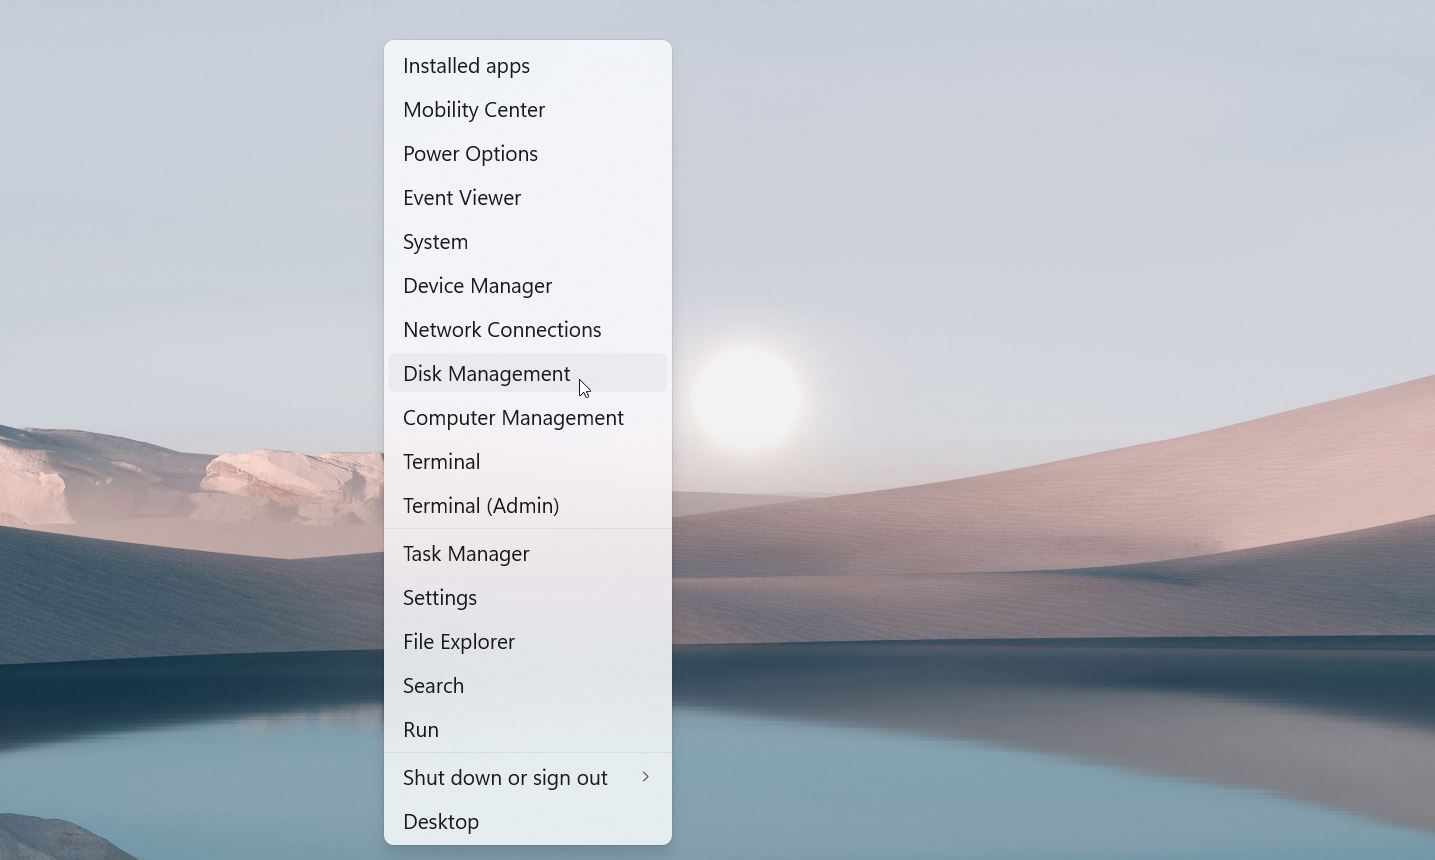
- Hit Win + X on your keyboard and pick Disk Management from the menu. It’ll pop up a window showing all the drives connected to your computer.
- Scroll through the list of drives and look for your D drive. If it’s labeled Unallocated or has no drive letter, the drive is there, but Windows isn’t treating it like a usable drive. If it’s totally missing, we’re likely dealing with hardware issues.
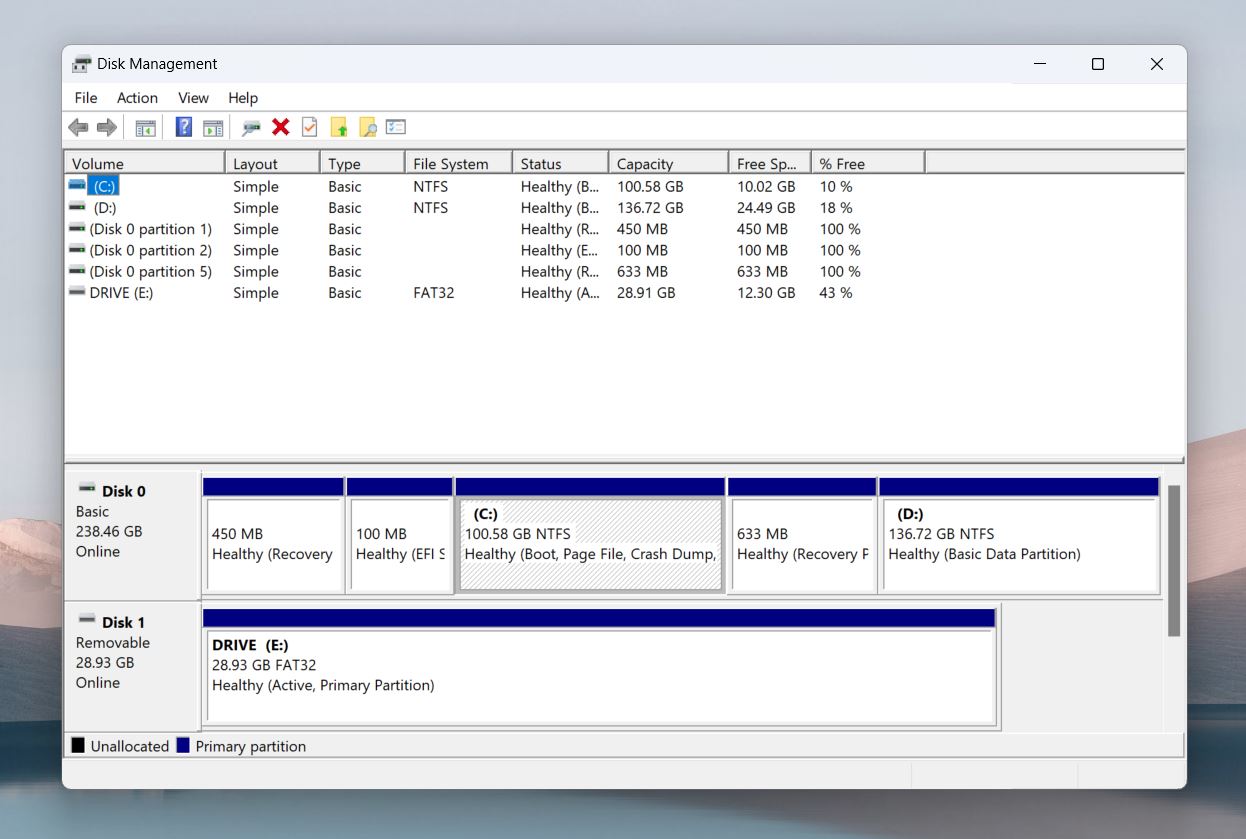
- Pay attention to the labels next to each drive. Not Initialized or Offline means the drive is recognized but has problems that need fixing. If the drive is listed and looks fine but still doesn’t show up in File Explorer, it could just need a drive letter assigned.
If your disk D is not showing up anywhere—not even in Disk Management—you should Check BIOS/UEFI Settings to make sure your system hasn’t sidelined it, and Check Connections to see if a loose cable is to blame. Sometimes, it’s as simple as tightening things up!
How to Recover Data From Disk Drive D That Not Showing Up
If you don’t need to recover the files that were on your D drive, you can skip straight to the fixes.
As long as your drive appears in Disk Management, data recovery software is your best bet to retrieve files from the invisible drive safely.
These tools don’t care if File Explorer can’t see your drive. As long as the disk shows up in Disk Management, these tools can get to work. They scan the drive directly, bypassing any issues with partitions or unassigned drive letters, to pull out everything: deleted files, existing files, hidden ones, and even stuff you forgot about.
We have a list of the best data recovery apps for our readers. But for this article, we’ll demonstrate D drive recovery with two efficient data recovery software – Disk Drill and R-Studio. Why these? Because both software have very powerful backup and data recovery algorithms and are leaders in their fields: Disk Drill is a solid all-rounder with a simple flow, while R-Studio is more professional software with some extra features.
Option A: Disk Drill
Disk Drill is one of the best recovery app we’ve ever tested. It works seamlessly with all kinds of partitions, from the usual suspects like NTFS, FAT32, and exFAT to formats that Windows doesn’t natively recognize, like EXT4. Plus, it packs a byte-for-byte backup feature that can be a lifesaver with problematic drives. This tool lets you create an exact copy of your drive, so you can work on the backup instead of risking more damage to the original D drive.
![]()
You can download Disk Drill for free from its official CleverFiles site. The free version lets you scan your drive and preview everything that’s recoverable. It even allows you to recover up to 500 MB of data at no cost, so you can test its features before upgrading to the paid version.
Here’s how you can create a drive backup of your missing D drive and recover data from it using Disk Drill:
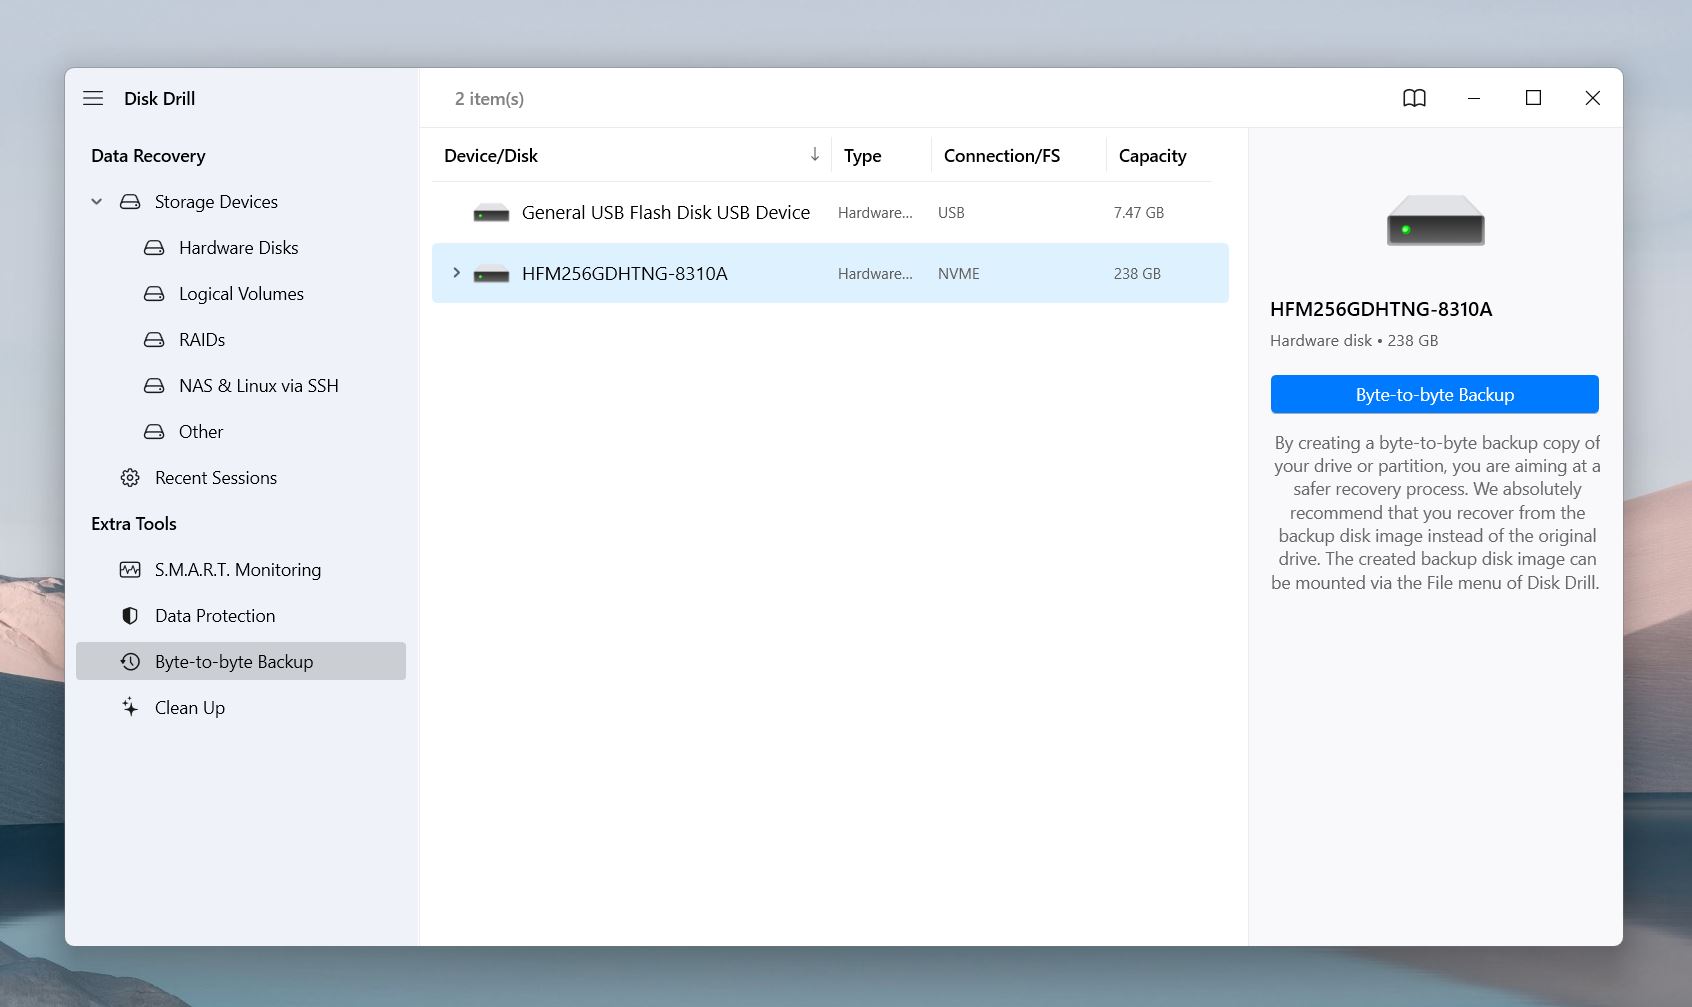
- After installing Disk Drill on your computer, launch it from the desktop icon or the Start menu. The program will automatically display all the drives your system detects—even the ones hiding from File Explorer.
- Navigate to the Extra Tools menu and select Byte-to-Byte Backup from the list of available options.
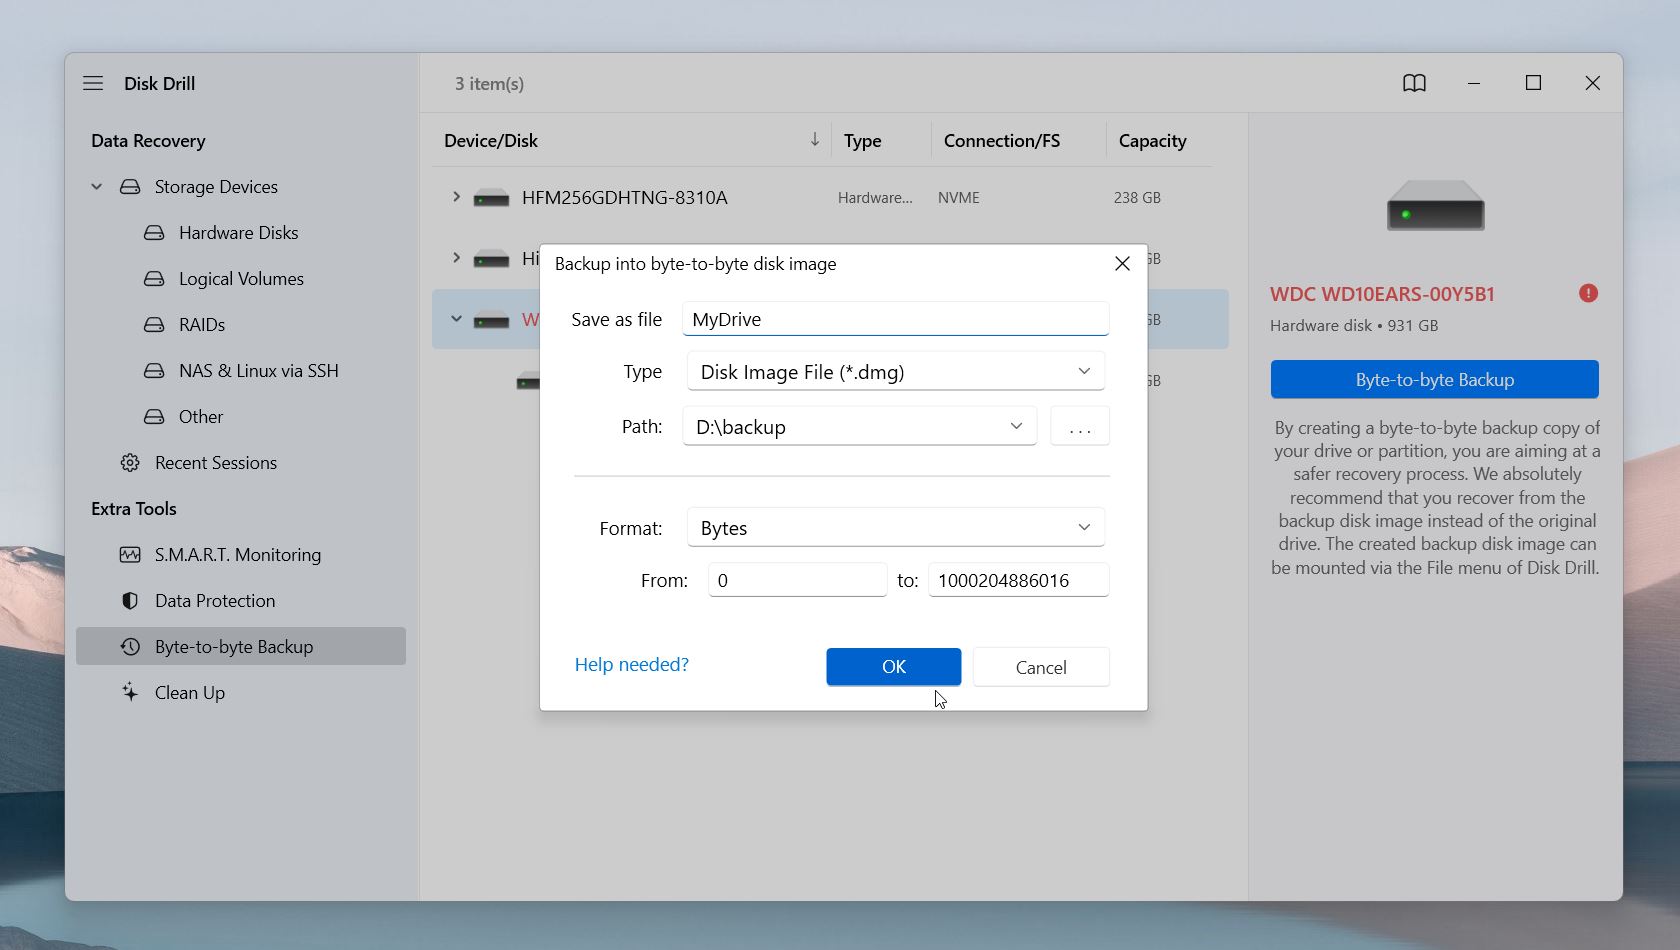
- Select your D drive/partition from the list of drives and click Byte-to-Byte Backup.
- Choose a location where Disk Drill will save the DMG backup file and click OK to start the backup process.
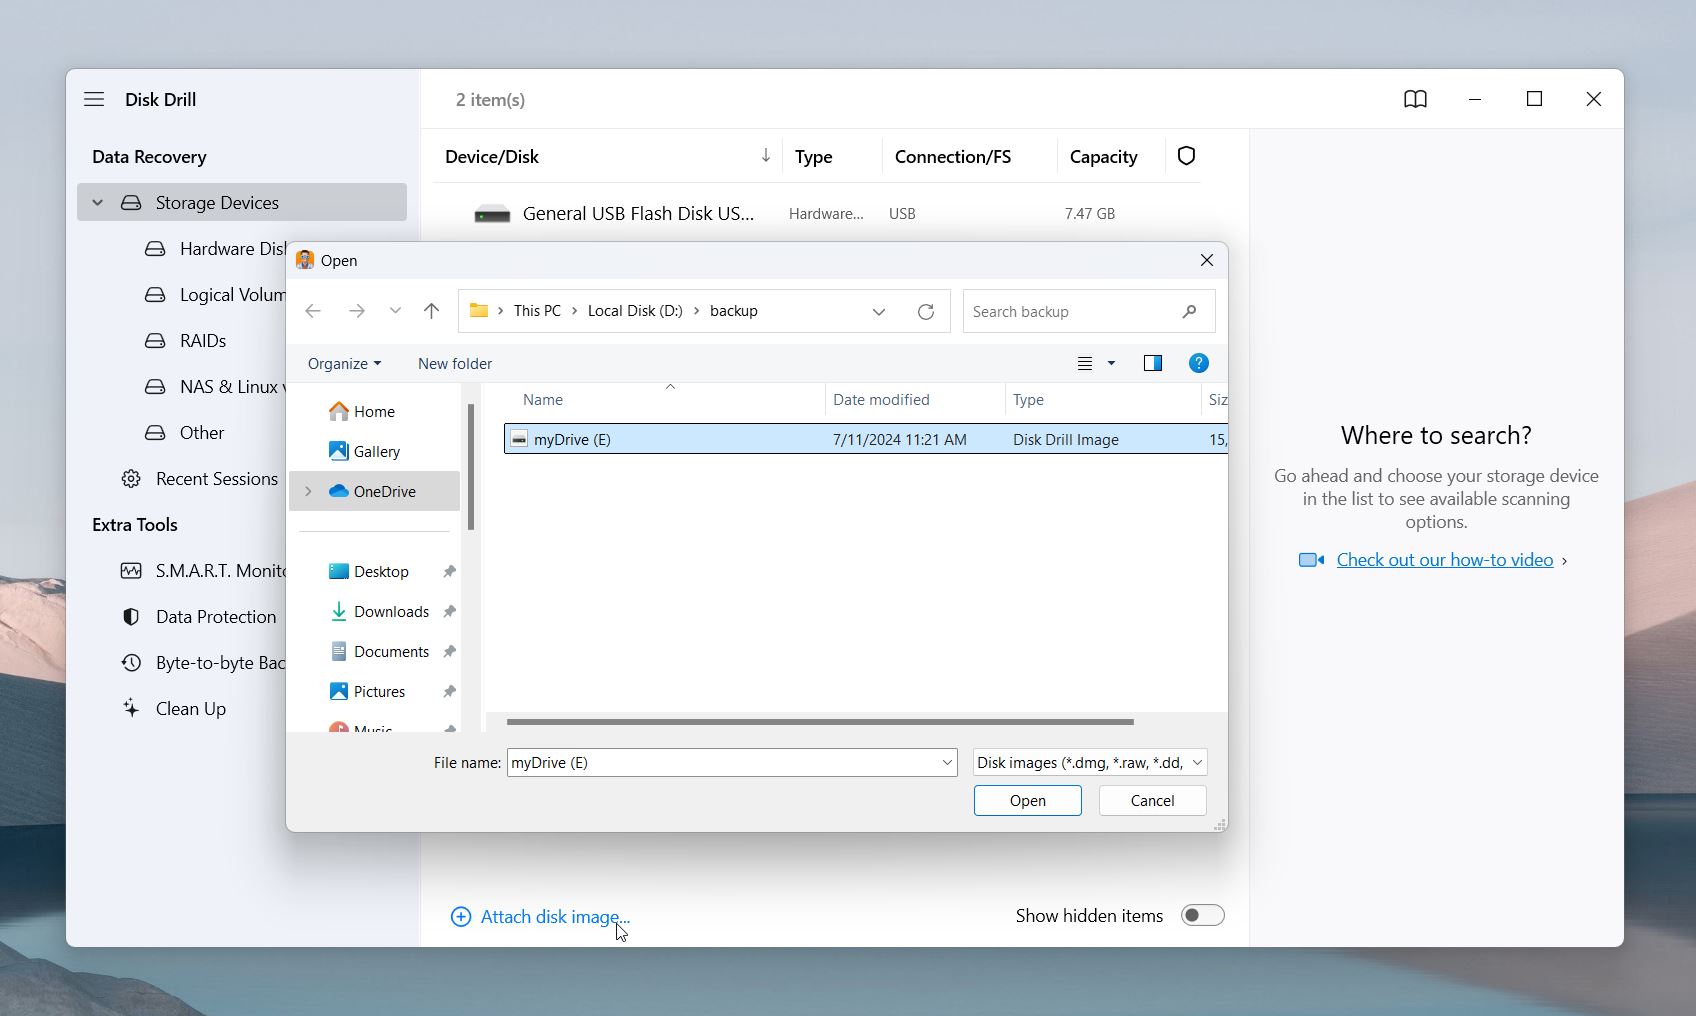
- Once the backup is complete, return to the Data Recovery section, and click on Attach disk image.
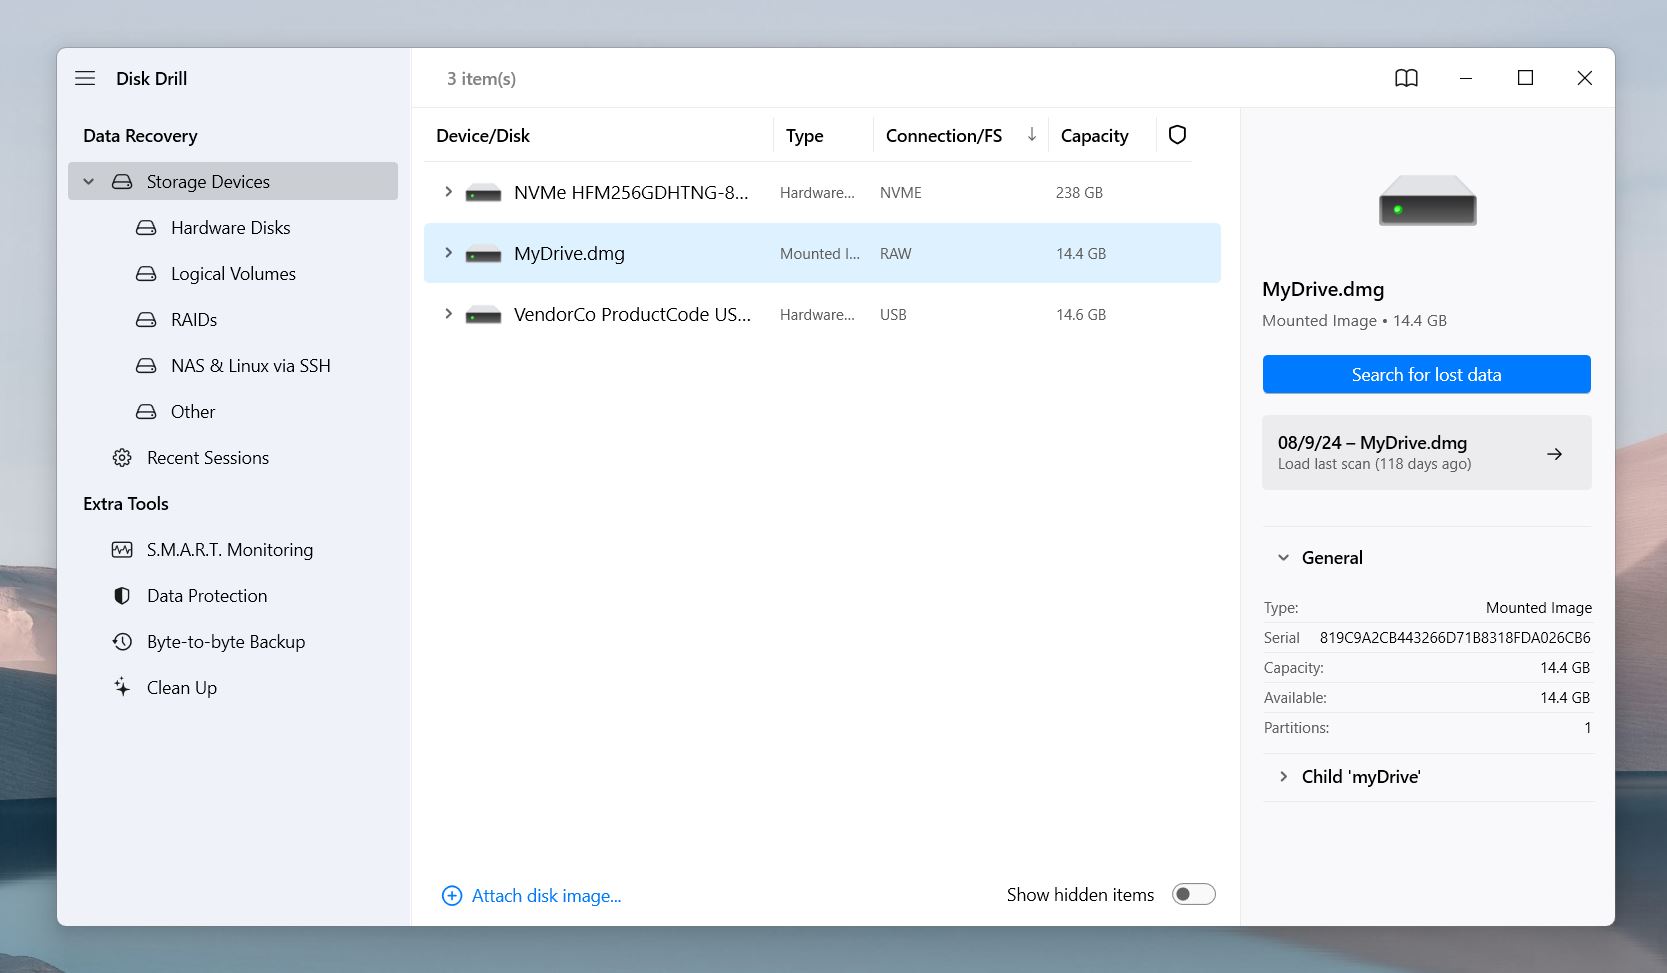
- Look for the disk image (created from step #3). Select the file, and Disk Drill will load it and display the attached disk image alongside all other drives in the list, as though it’s a physical drive.
- Then click Search for lost data to begin data recovery.
- Disk Drill’s algorithm will run its scan to find recoverable items. You can pause, save or resume the scan whenever you want. You can select a specific category, like Pictures or Videos, or click Review Found Items to see all file types at once.

- Disk Drill shows a thumbnail preview of the selected file. As you hover over a file in the results, click the small eye icon next to it to open a full preview.
- You can also use filters to locate the files. You can filter by file type, file size, date modified, or recovery chances.
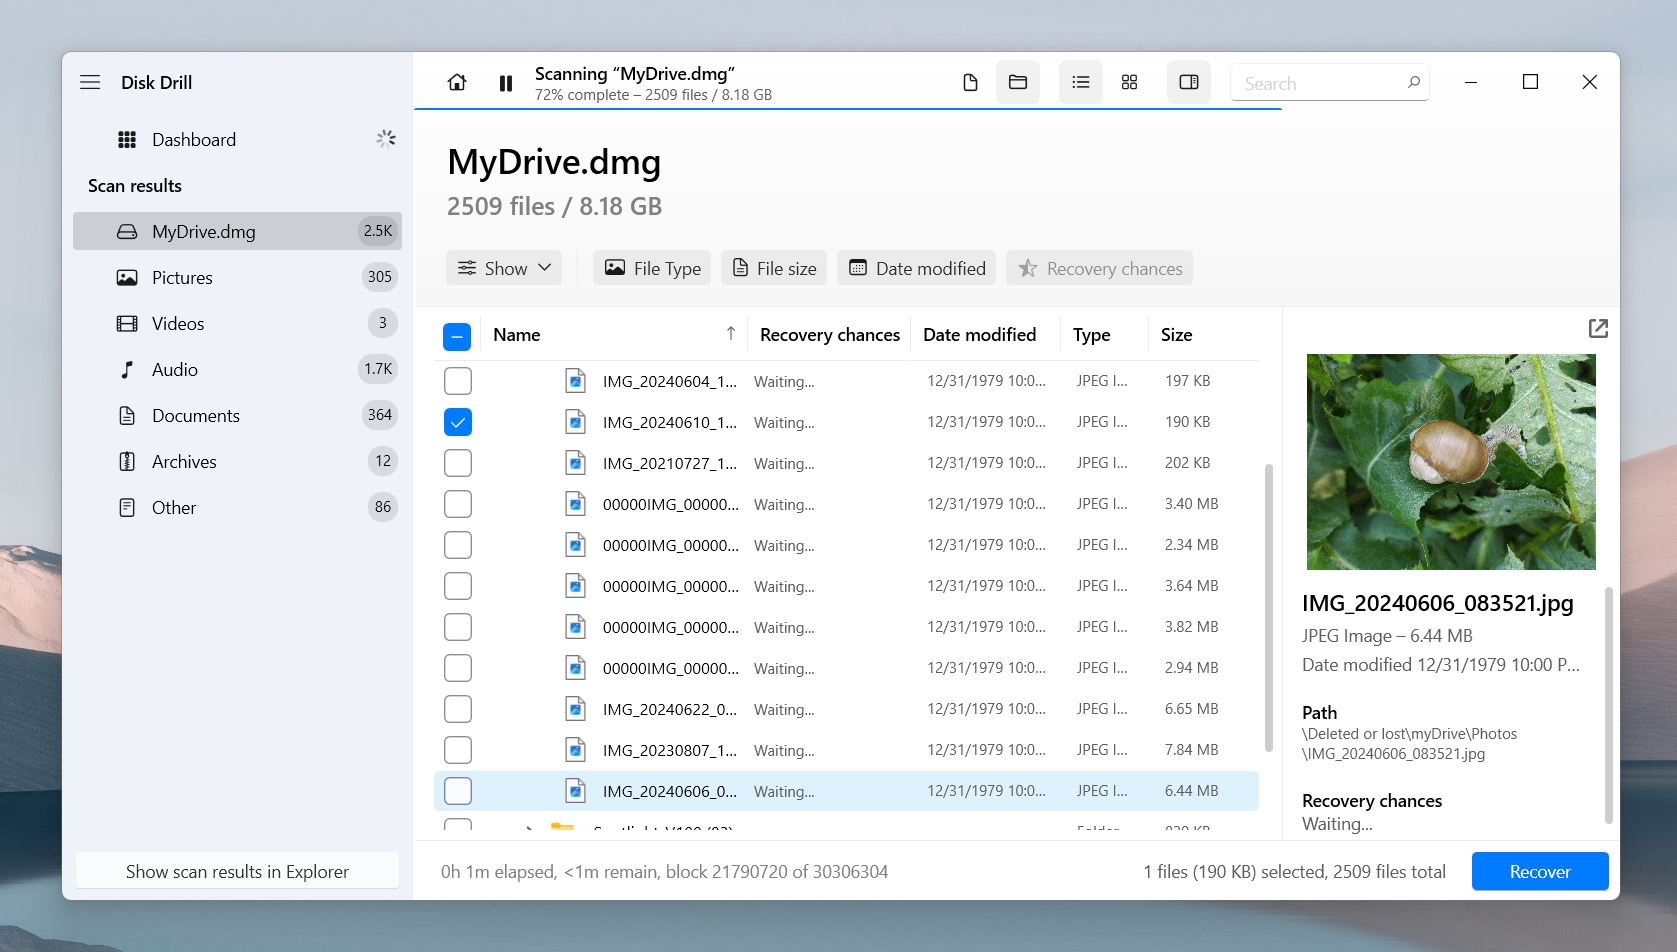
- You’ll also see Recovery Chances listed next to each file, which is super handy for deleted or lost data. It tells you how likely it is to get the file back in good shape. If you’re only after existing files that are already on the drive but just inaccessible, you’re in the clear.
- After selecting the required files, click the Recover button, enter the recovery location, and click OK.
Despite its easy navigation and user-friendly design, Disk Drill is a powerhouse when it comes to data recovery and drive management. It doesn’t just help recover data from a missing D drive—it can also scan RAW disks/partitions and recover data from formatted hard drives.
Beyond its byte-for-byte backup feature, Disk Drill offers a variety of other useful tools. One standout is S.M.A.R.T. Monitoring, which lets you check the health of your drives. To use it:
- Navigate to the Extra Tools menu.
- Enable S.M.A.R.T. Monitoring for the drive you want to assess.
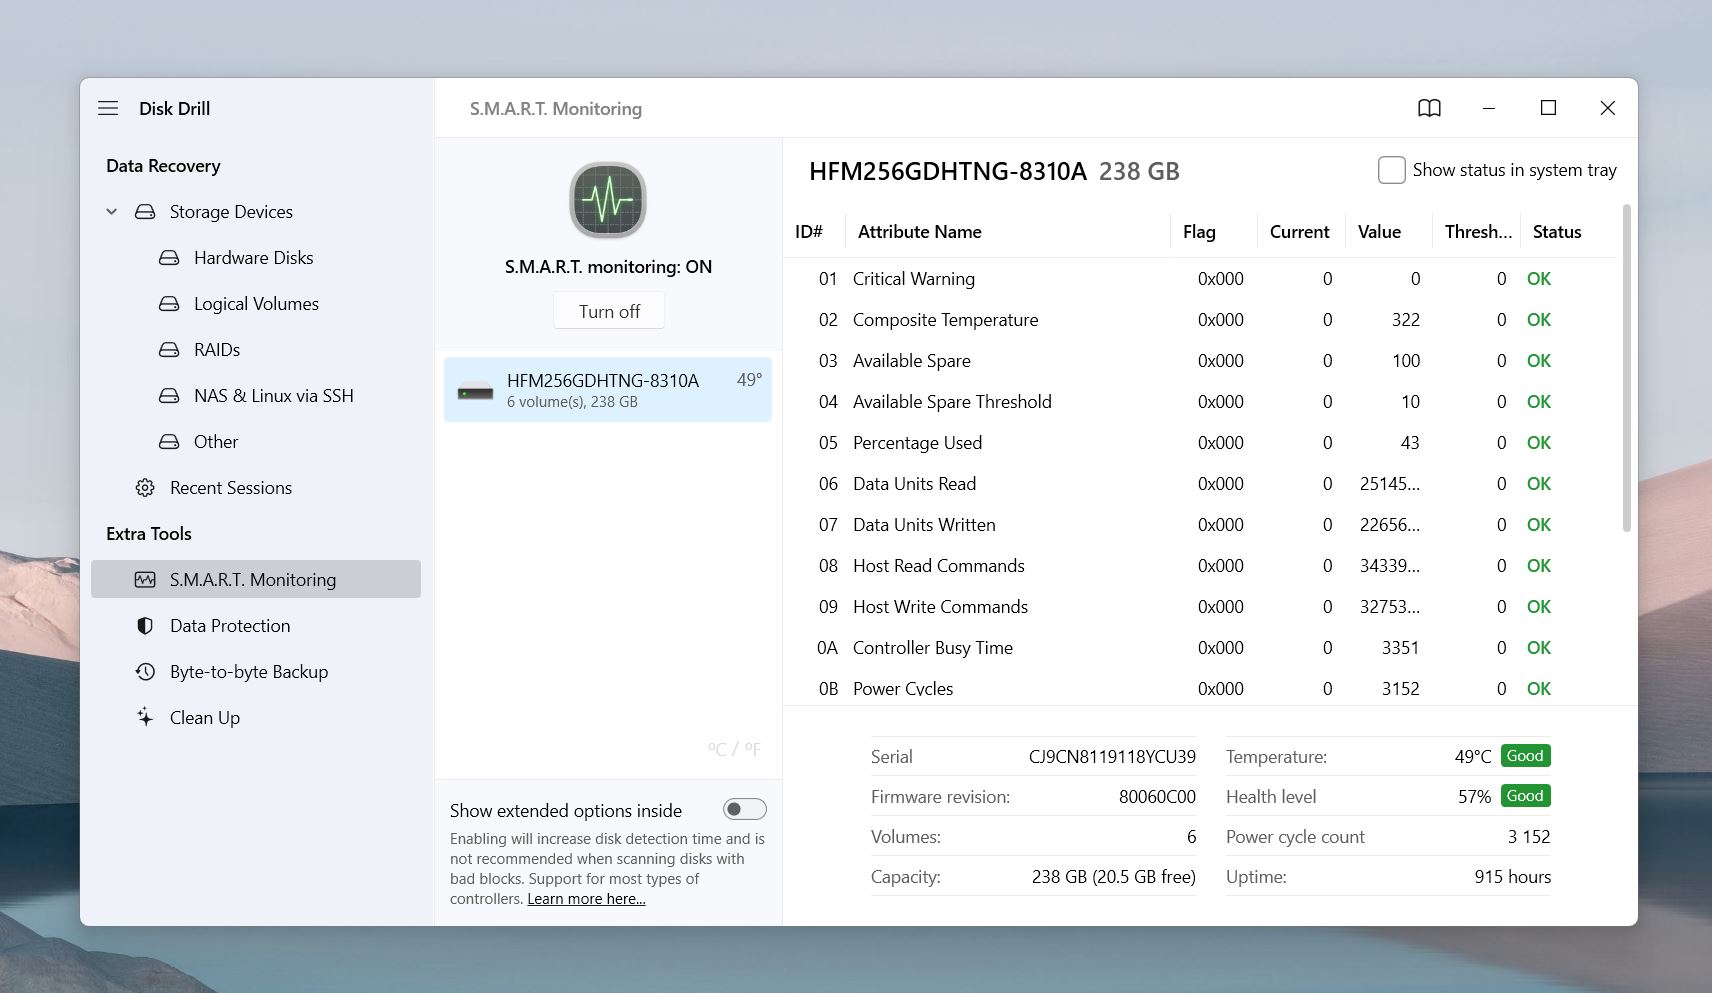
Once enabled, you’ll see the status of your drives. If the drive is in good condition, it will display “Good” in green. If there’s an issue, Disk Drill will pinpoint the exact problem.
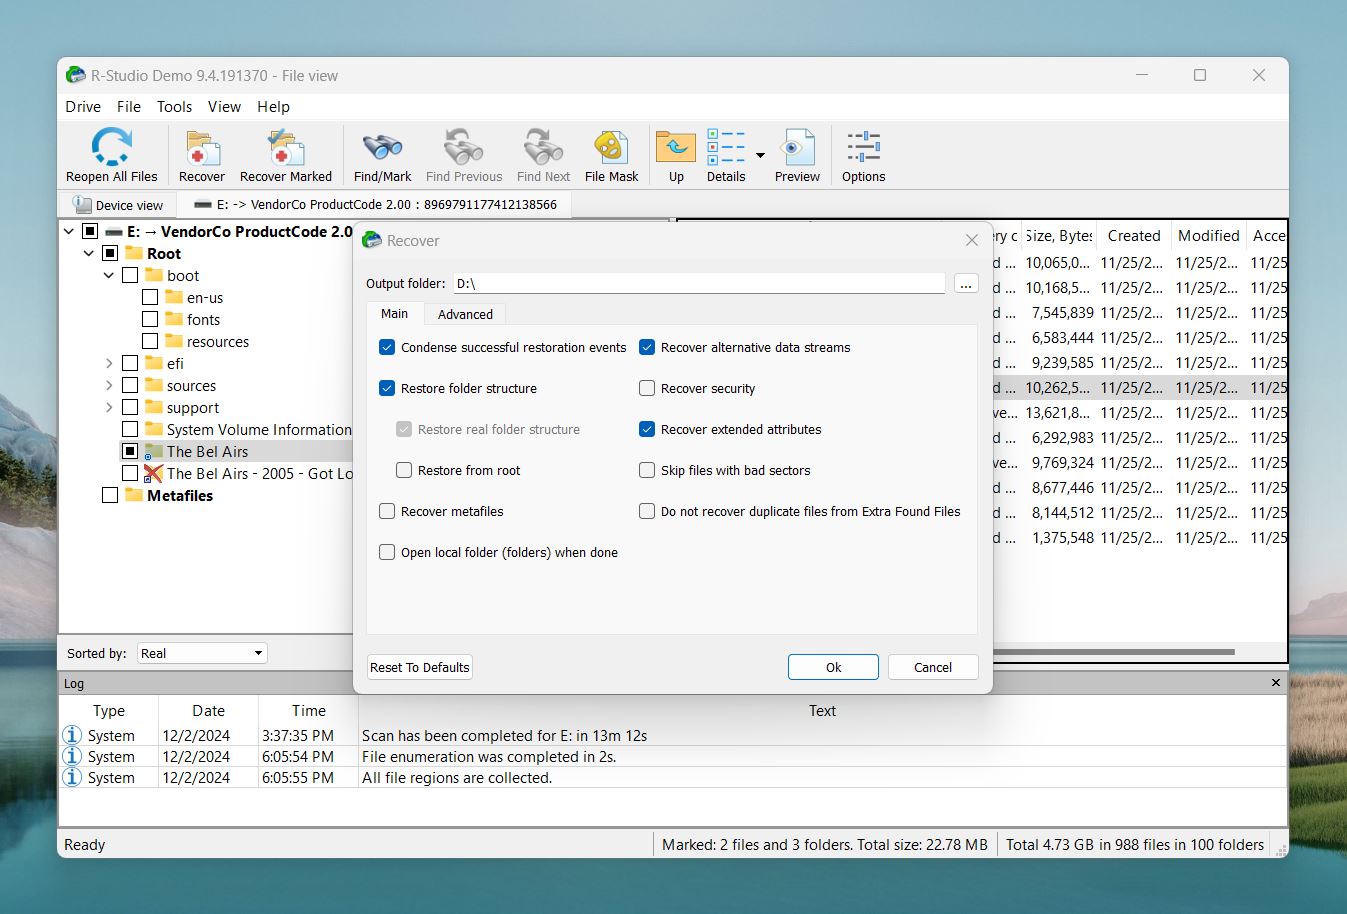
Option B: R-Studio
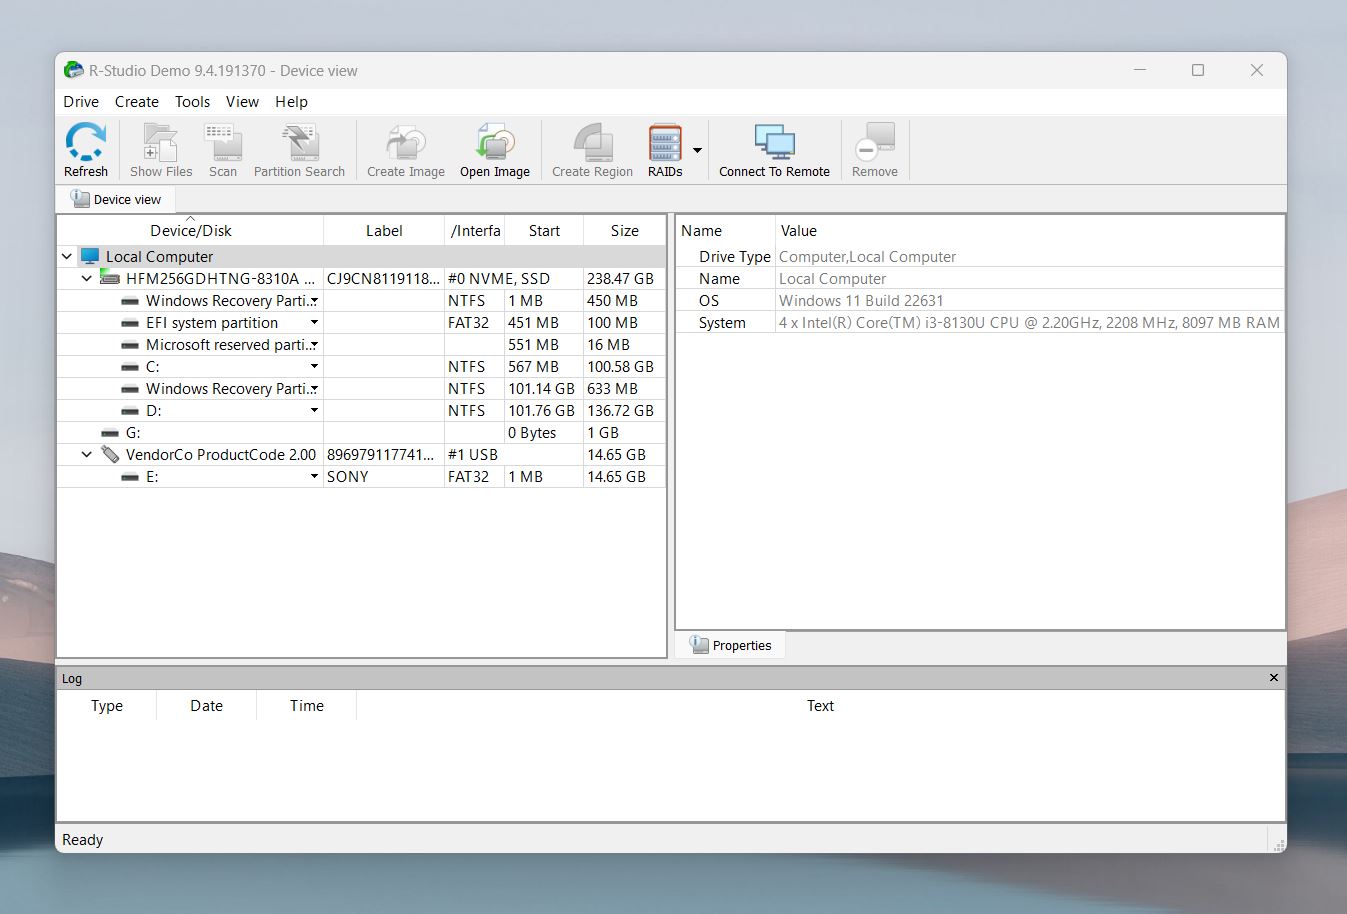
Another capable tool is R-Studio by R-Tools Technology Inc. It’s a sophisticated data recovery tool targeted at professionals and experts. Much like Disk Drill, R-Studio supports the recovery of damaged or corrupted partitions, formatted hard disks, and your missing D drive. Moreover, it supports all major operating systems – Windows, Mac, and Linux.
![]()
However, while R-Studio has several advanced features, it has a learning curve and isn’t easily accessible for beginners. Its user interface is quite different from its other alternatives and offers advanced options. The software’s demo mode is available for free download on the website and allows up to 256 KB of free file recovery.
Here’s how you can recover data from your missing D drive using R-Studio:
- Download and Install R-Studio on your system. Make sure you download the software from the official website to prevent viruses or malware from attacking your device.
- Now, run the application. Select the D drive from the list of available devices/partitions from the main panel.
- Select the partition from which you intend to retrieve data and click the Scan button. Next you’ll see viewing options and some other advanced preferences. For most users, the default settings are perfectly fine.
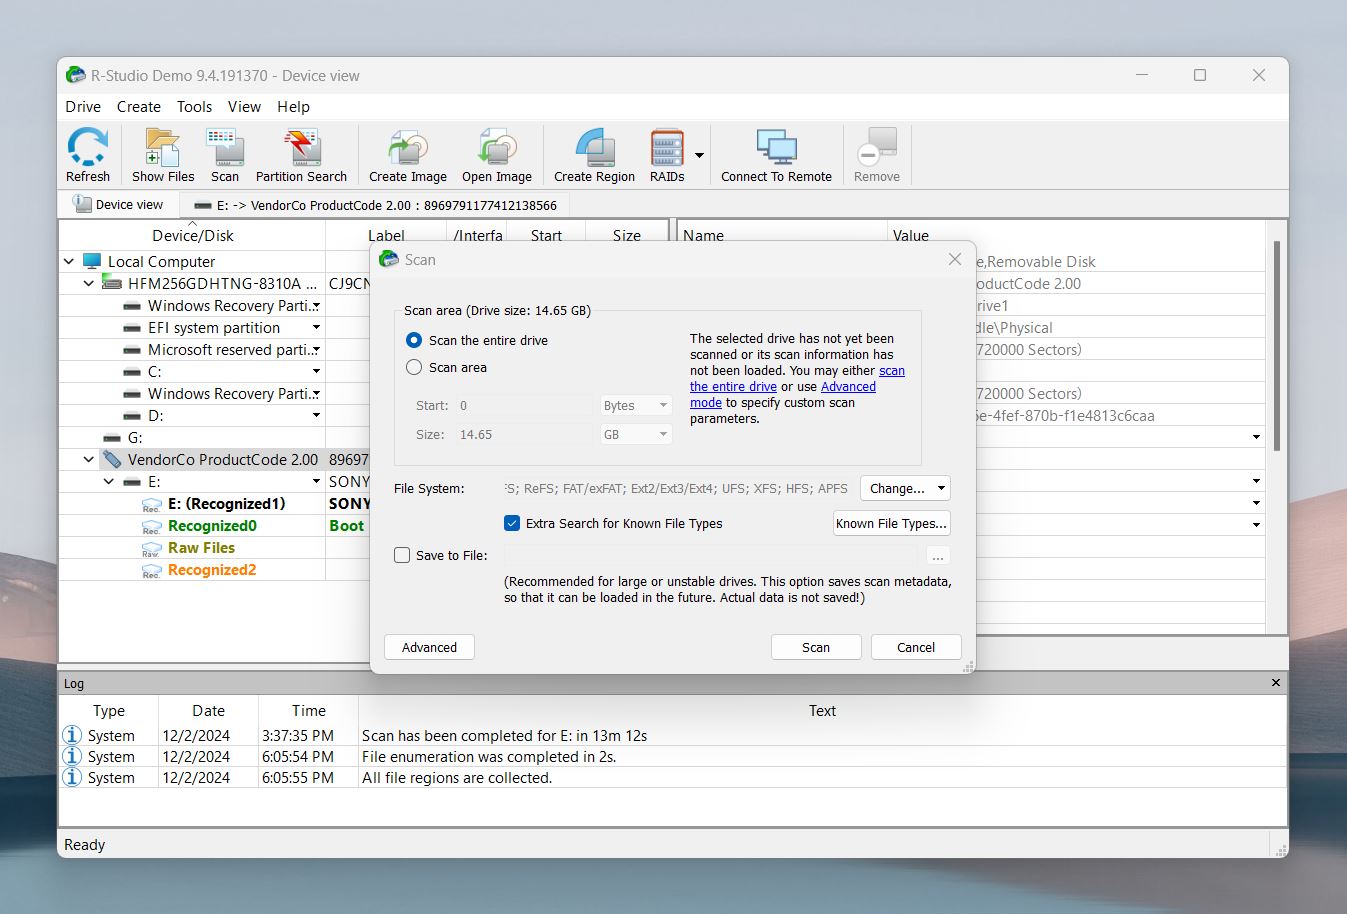
- Click Scan again to begin the recovery process. After the scan is complete, R-Studio creates a default subfolder with the recovered files under the scan location. Select this folder and click the Recover button to retrieve files.
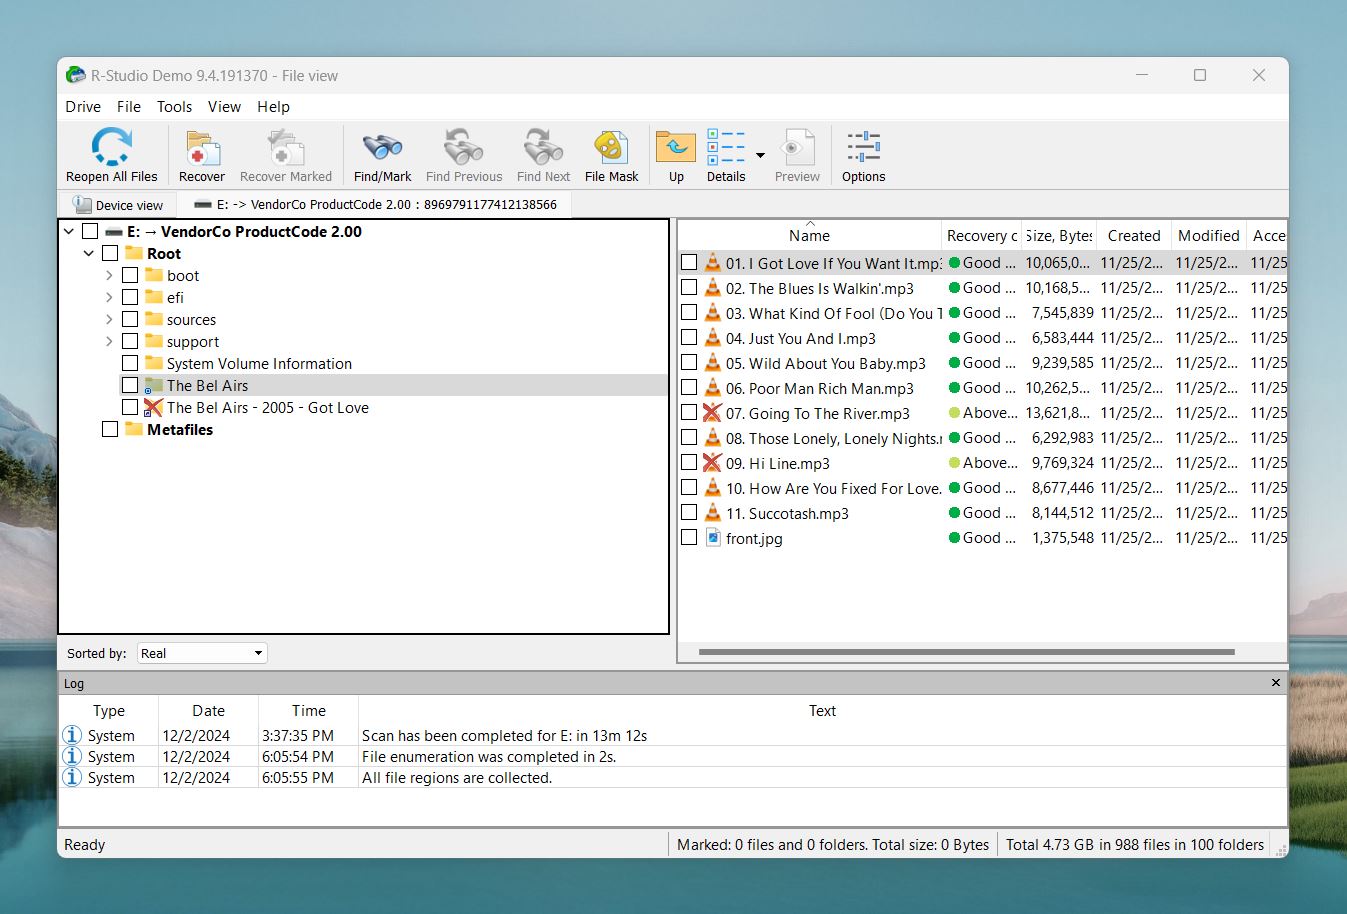
- Finally, select a location to save the files recovered from the missing D drive.
R-Studio may not boast the most intuitive or easy-to-navigate design, but it more than makes up for it with its powerful recovery capabilities. It offers advanced features like damaged RAID recovery, Recovery Over Network, and S.M.A.R.T. Monitoring. For experts, it also includes tools like a hex viewer for inspecting raw data and other professional-grade options.
How to Fix “D Drive Not Showing Up” in Windows
Now that your data from the missing D drive is safe somewhere else, you can attempt to fix the problem of ‘D drive not showing up’ or enable the D drive in Windows. Listed below are some methods that can assist you in resolving the issue.
Method 1: Check BIOS/UEFI Settings
This method is applicable if your D drive is a separate internal drive that isn’t showing up in Disk Management.
Think of BIOS (Basic Input/Output System) and UEFI (Unified Extensible Firmware Interface) as the “brains” behind your computer’s startup process. These system-level controls manage how your computer interacts with its hardware, including your hard drive. If the BIOS/UEFI doesn’t detect your D drive, Windows won’t either, no matter how functional the drive is.
Here’s how to check and adjust your BIOS/UEFI settings to address the issue:
- Start your computer and, during the initial boot screen, press the key to enter BIOS/UEFI. Common keys include F2, F10, or Del—you’ll usually see a message like “Press F2 to enter Setup.” If you miss the window, restart your computer and try again. Timing is key here!
- Once you’re in the BIOS/UEFI menu, look for a section labeled Storage, Drives, or Boot Options.
- Check the list of connected devices. If your drive isn’t listed, your system isn’t detecting it. This could point to a physical connection issue or, worst-case scenario, drive failure.
- Some systems support both UEFI and Legacy (CSM) boot modes. If your D drive isn’t detected in one mode, try switching to the other.
- If you suspect an incorrect configuration, look for an option like Restore Factory Defaults or Load Optimized Defaults in the BIOS/UEFI menu. This resets everything to the manufacturer’s default settings, which can often resolve issues caused by accidental changes.
- After making adjustments, save your changes (usually by pressing F10) and exit the BIOS/UEFI menu.
- Restart your computer and check if your D drive appears in Disk Management or File Explorer.
Method 2: Check Connections
This method is applicable if your D drive is a separate internal drive (or external drive) that isn’t showing up in Disk Management.
A loose connection or bad cable might be the reason your D drive has gone MIA. Checking the physical connections is a quick and simple way to rule out hardware hiccups.
For separate internal drives:
- Shut down your computer and unplug it from the wall.
- Open your computer case by removing the side panel. If screws hold it in place, grab a screwdriver.
- Find your D drive and check the cables. The SATA data cable and the power cable should be firmly connected to both the drive and the motherboard.
- Unplug and replug the cables to make sure everything’s snug. If the cables look damaged or worn, replace them with new ones.
- Close up the case, plug your computer back in, and power it on. Open Disk Management (press Win + X and select Disk Management) to see if your D drive has reappeared.
For external drives:
- Take a good look at the USB cable connecting your external drive to the computer. If it’s frayed or damaged, swap it out for a new one.
- Plug the drive into a different USB port. If your computer has USB 3.0 ports (the ones with the blue inserts), try one of those for faster detection.
- Test your external drive on another computer. If it works there, the problem might be with your computer’s USB ports or drivers.
- If your drive uses an external power adapter, make sure it’s plugged in and working properly.
- Restart your computer and check Disk Management to see if the drive shows up.
What If It still doesn’t work? If your D drive still not showing in Disk Management, it’s likely has serious physical issues that you won’t be able to fix at home. If the data on the drive is important, consider reaching out to a local service center or a professional data recovery company. Just keep in mind, these services don’t come cheap.
Method 3: Rescan Disks in Disk Management
This method is applicable if your D drive is temporarily undetected by Windows due to a minor system glitch.
Sometimes, Windows simply needs a little wake-up call to recognize your drive. If your local disk D is not showing in File Explorer or Disk Management, you can force your system to rescan the disks with the Rescan Disks command in Disk Management.
What this does? The system sends a request to the hardware layer to identify any new, removed, or previously unresponsive drives. This process updates the disk and partition table stored in the Windows registry and refreshes the volume mount points. If a drive wasn’t showing up due to a temporary communication glitch, a rescan often resolves the issue.
Here’s how to do it:
- Press Win + X on your keyboard and select Disk Management from the menu.
- Once the Disk Management window is open, look for the menu at the top. Click on Action, then select Rescan Disks from the dropdown menu.
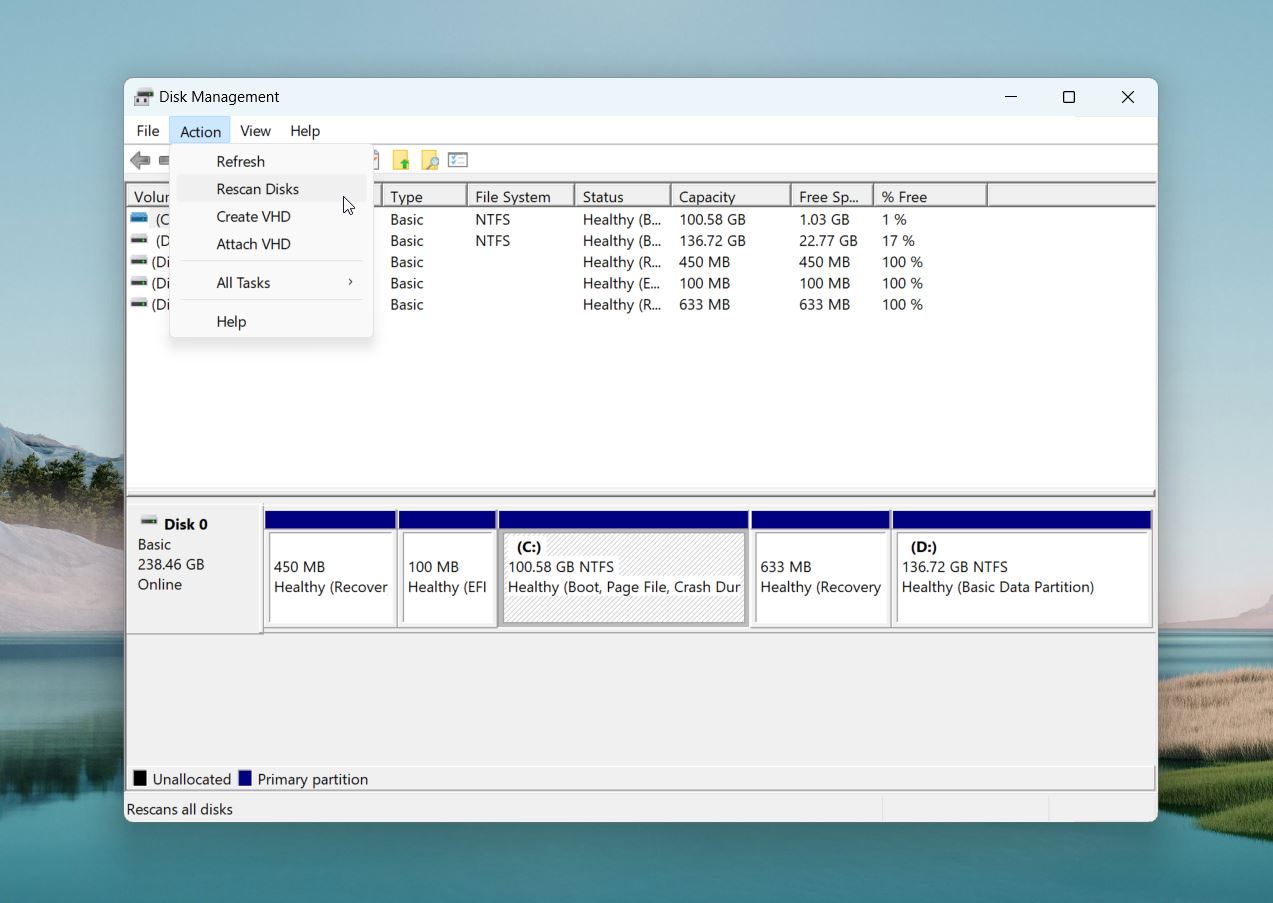
- Windows will now refresh its list of connected drives. This process may take a few seconds as it searches for hardware changes and updates the drive list.
- After the scan, check if your D drive appears in the list. If it does, you should see it displayed with its status (e.g., allocated, unallocated, or RAW).
- If the drive is visible but not accessible, you might need to assign a drive letter (see Method 4) or recover lost partitions (see Method 5).
Method 4: Assign/Change a Drive Letter
This method is applicable if your D drive is missing its letter, or its letter has been assigned to another device.
In some cases, the D drive becomes invisible because the letter D is already assigned to another device, like a DVD/CD drive or a USB flash drive. Other times, the D partition might not have a drive letter at all, for whatever reason. In these cases, you can manually reassign the drive letter D (or any other available letter) to your original partition through Disk Management. Here’s how:
Follow these steps to reassign the drive letter:
- Press Win + X, and select Disk Management.
- In Disk Management, locate the DVD/CD drive or the USB drive and check if the drive letter assigned to it is D.
- If the assigned letter is indeed D, right-click the DVD/CD drive, then select Change Drive Letter and Paths.
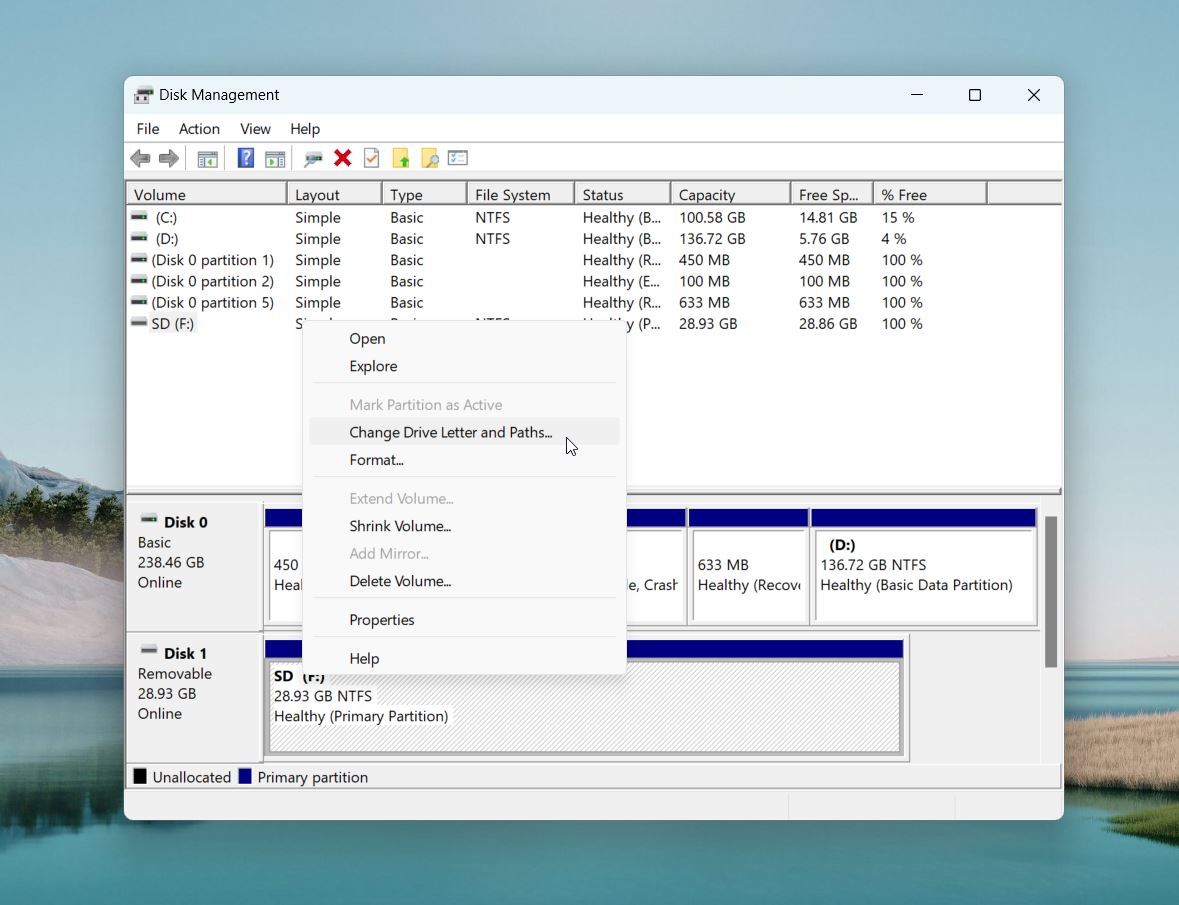
- Click Add if no letter is assigned, or Change if the D drive has another letter. From the drop-down list, select D and click OK.
- Click Yes to confirm this change. You can now reassign the drive letter D to the original D drive.
Method 5: Recover Lost Partitions with TestDisk
This method is applicable if your D drive appears as unallocated space in Disk Management (or showing as RAW), it could mean the partition has been lost or corrupted.
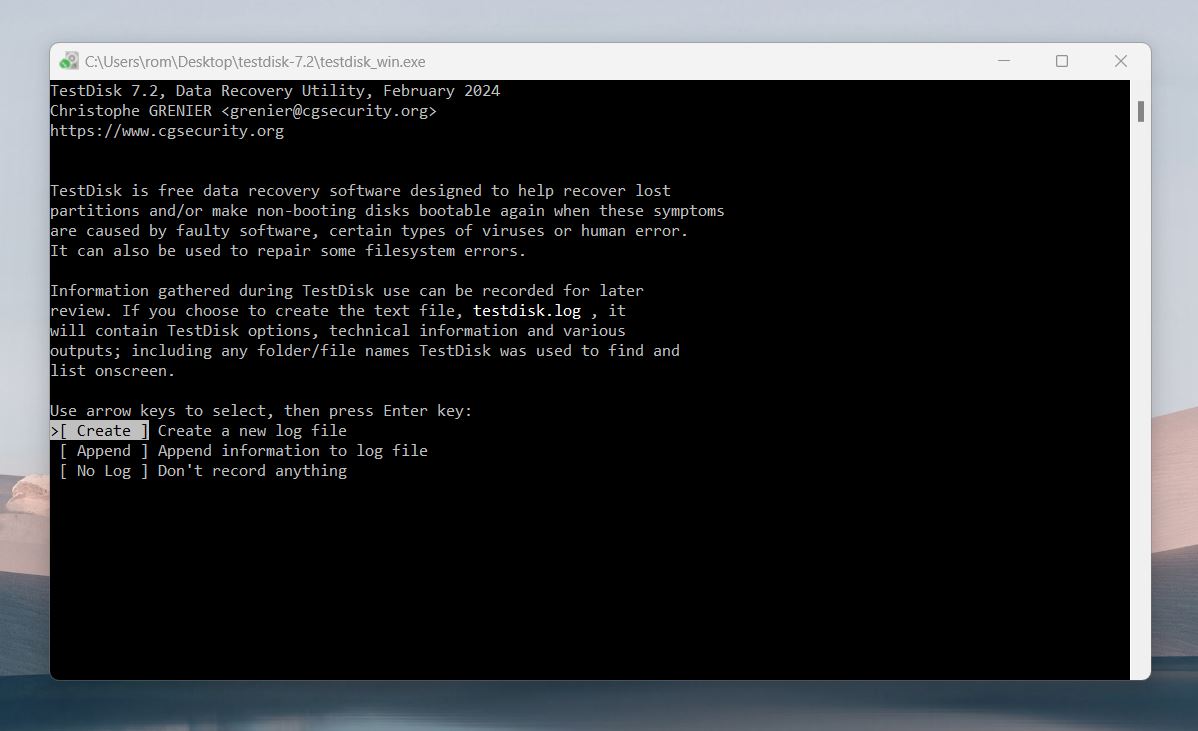
It’s often possible to fix this with a specialized tool called TestDisk. The best part? It’s open-source and completely free. The catch? TestDisk works entirely through the command line, so you won’t get an intuitive interface holding your hand through the process. But that’s why we’re here.
Follow these steps to recover your lost partition:
- Visit TestDisk’s official site and download the latest version. Once downloaded, extract the contents to a folder on your computer.
- Open the folder where you extracted TestDisk and run the executable file (usually named testdisk_win.exe). This will open a Command Prompt-style window.
- On the TestDisk main menu, select Create to generate a new log file. This helps keep track of the recovery process, though it’s optional for most users.
- TestDisk will display a list of connected drives. Use the arrow keys to highlight the drive containing the lost D partition. Double-check your selection to be sure you’ve picked the right drive.
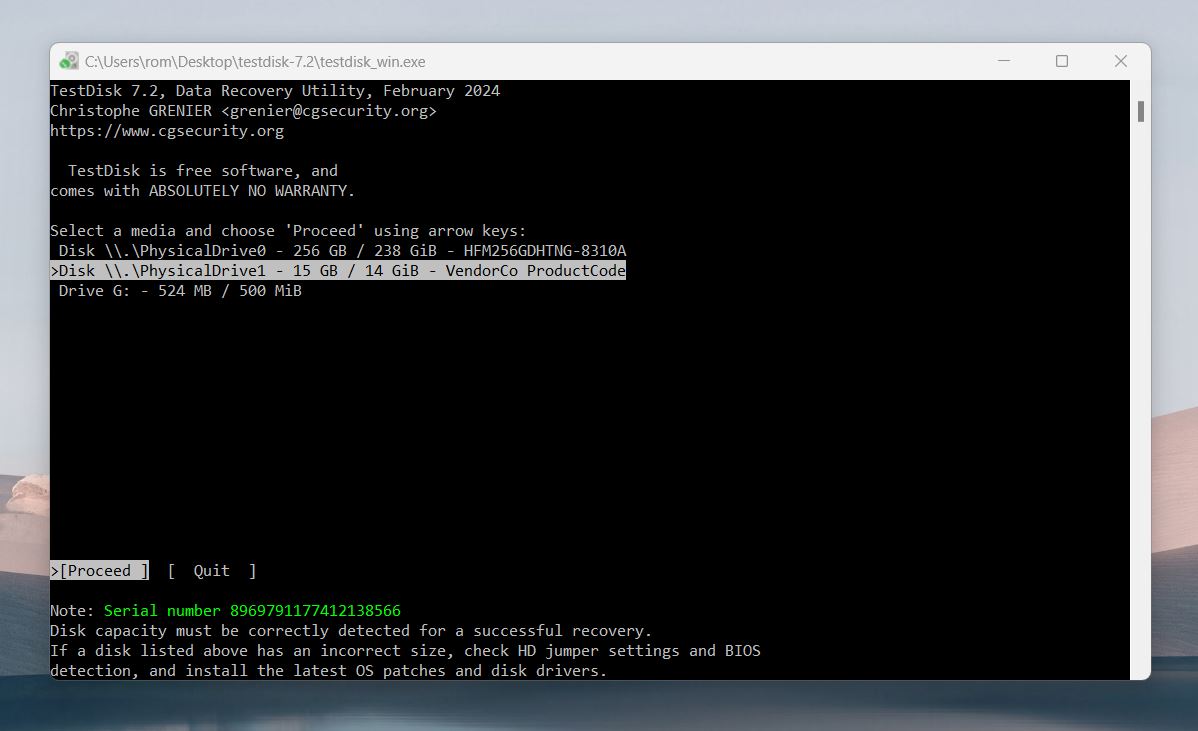
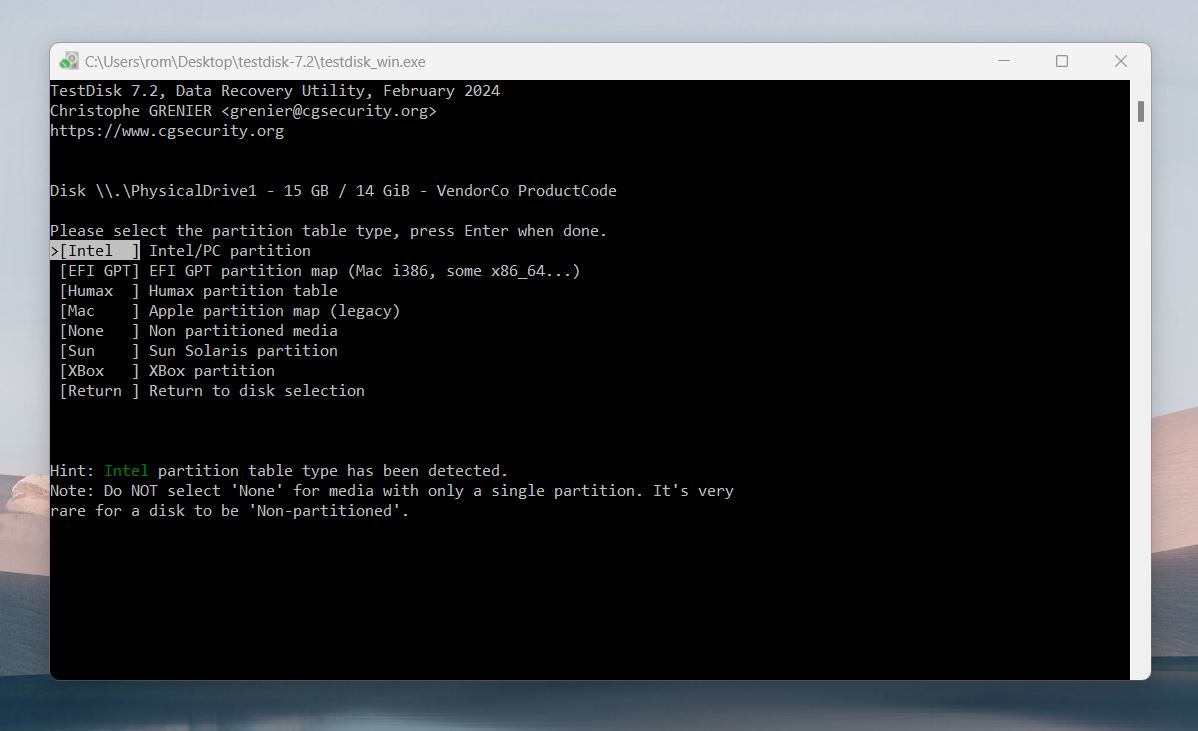
- TestDisk will attempt to detect your drive’s partition table type automatically (e.g., Intel, EFI GPT). In most cases, stick with the default option and press Enter to proceed.
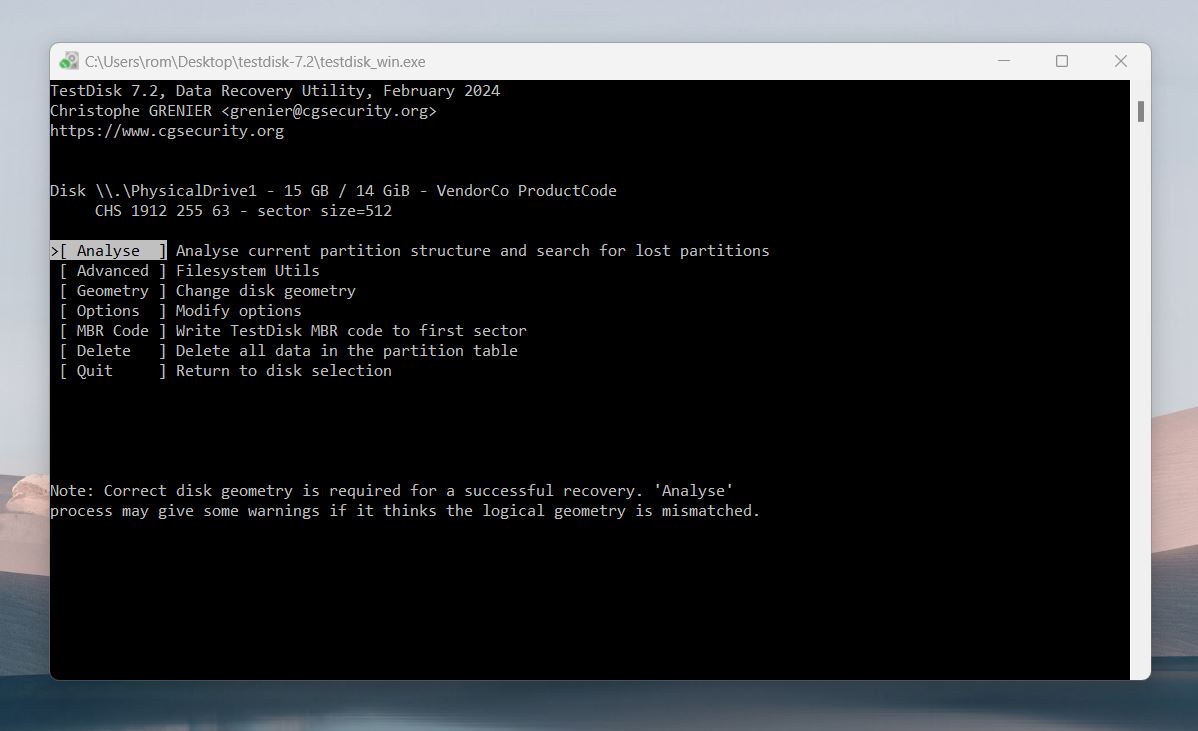
- Select Analyze from the menu to scan your drive for partitions.
- When the scan completes, TestDisk will display a list of detected partitions. Look for the one you’re trying to recover or repair. Highlight it and press Enter to select it.
- If the partition appears correct, choose the option to Write the new partition structure back to the drive. TestDisk will prompt you to confirm before any changes.
- After writing the partition, restart your computer to finalize the changes.
TestDisk is an incredibly useful tool to have for partition issues. If you’re looking for alternatives that address similar problems and situations, be sure to check out our curated list of TestDisk alternatives.
Method 6: Repair the File System with CHKDSK
This method is applicable if your D drive is visible but inaccessible and throws all kinds of errors when you try to open it (which indicates file system corruption).
File system corruption can happen due to sudden power loss, improper disconnections, or even malware. Luckily, Windows includes a built-in tool called CHKDSK (Check Disk) that scans the drive for errors and fixes them.
Here’s how to use it:
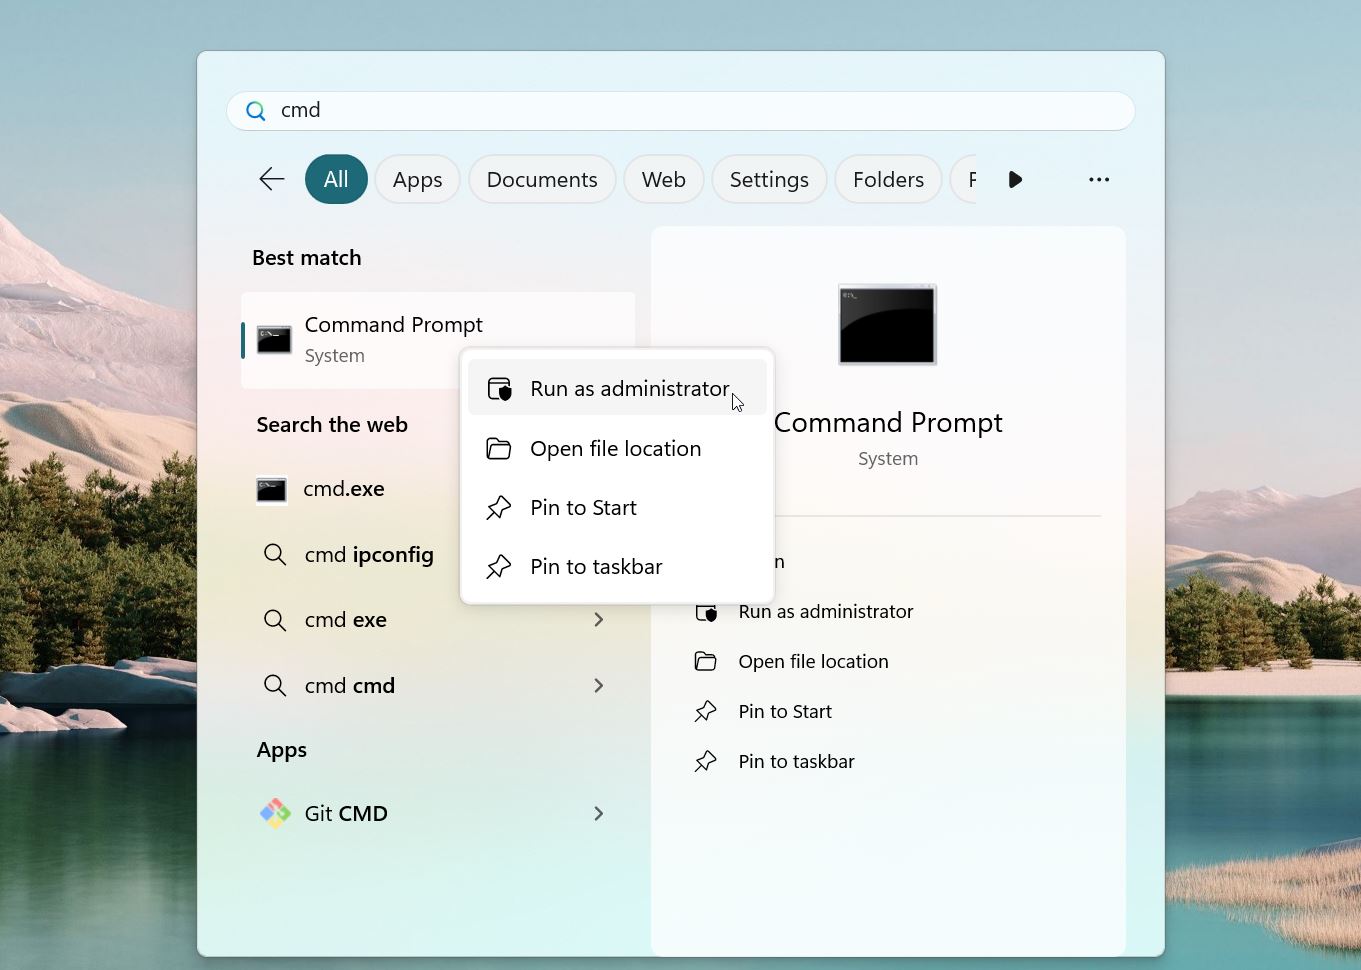
- Press Win + S, type Command Prompt, and right-click it. Select Run as Administrator to open it with the necessary permissions.
- Type this command and press Enter:
chkdsk D: /r
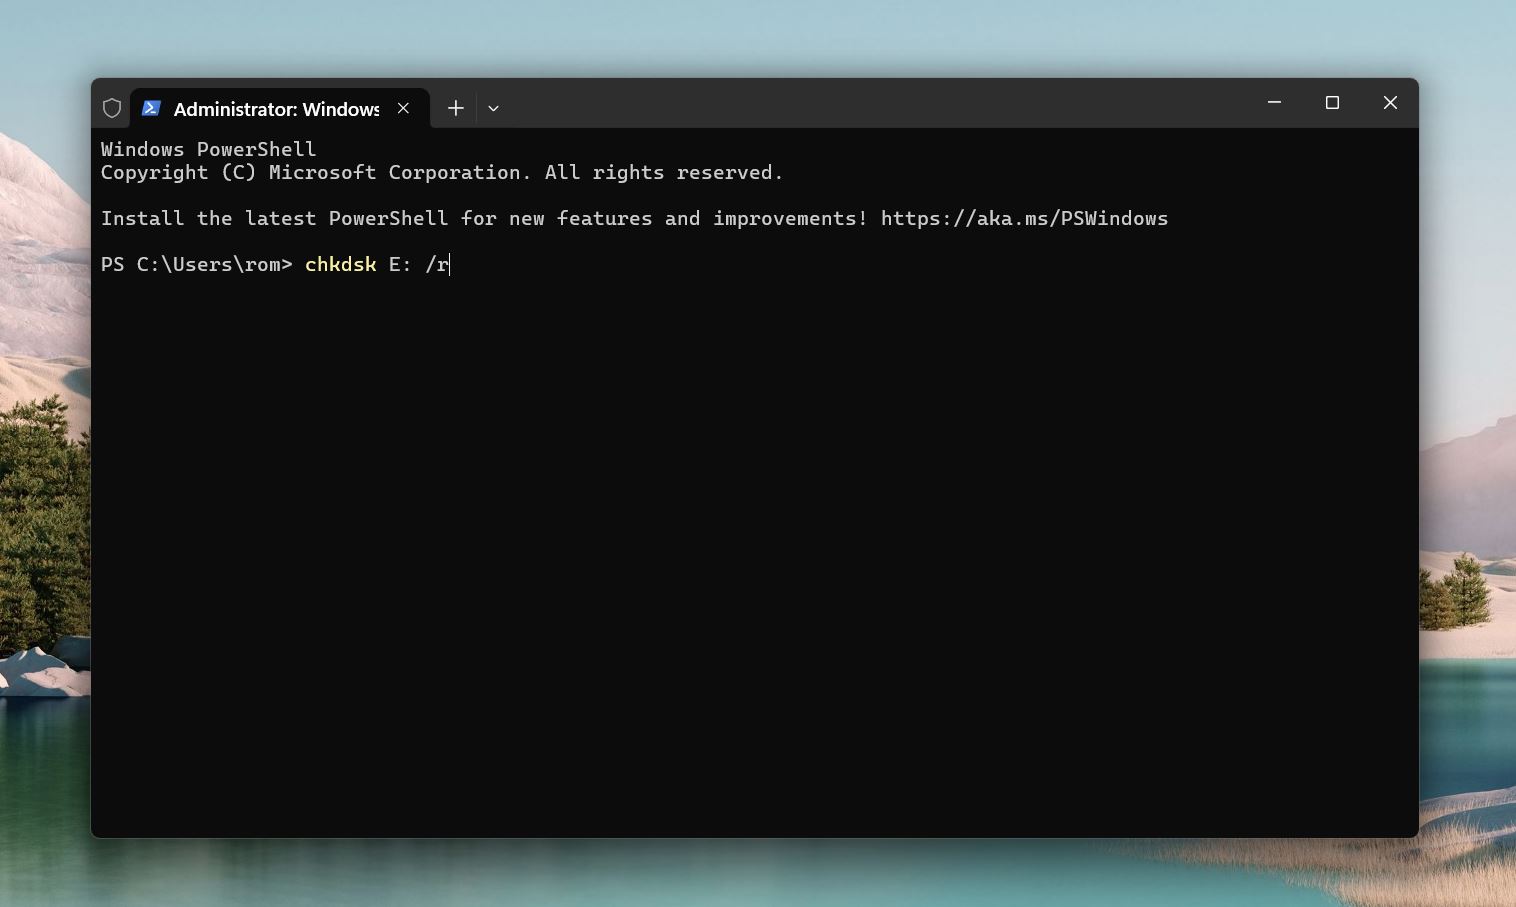
- CHKDSK will scan the drive and repair any errors it finds.
- Once CHKDSK finishes, it will show a summary of the fixes. Check File Explorer to see if your D drive is back to normal.
The CHKDSK command can be a lifesaver, but it’s not without its pitfalls, as many users have discovered. In fact, this very topic has been brought up on our community forum, where users have shared their experiences with CHKDSK getting stuck mid-process.
It is also known for the CHKDSK command to lead to data loss in some cases, so it should be used with caution.
Method 7: Reformat the Partition
This method is applicable if:
- You’ve already backed up or recovered your data (or decided you don’t need it).
- The drive is visible but still inaccessible in File Explorer.
- Other repair methods have failed to resolve the issue.
If none of the previous methods work and your D drive is still inaccessible or unusable, reformatting the partition can give it a fresh start. This process will erase all data on it, but since we’ve already gone through data recovery, your files should be safely stored elsewhere. With that, we can go ahead and reformat the drive to get it back in working condition.
On a technical level, reformatting a partition sets up a brand-new file system (like NTFS or exFAT), which acts as the framework for organizing and storing data. It also rebuilds the file table, which tracks where files are located on the drive. In a Quick Format, the process clears references to existing data but doesn’t actually erase the data itself. A Full Format takes it further, it scans for bad sectors (damaged areas on the disk) and marks them so they won’t be used. A Full Format erases data completely, with no trace behind. Reformatting fixes logical issues like file system corruption but won’t solve physical hardware problems.
How to reformat the partition:
- Open Disk Management.
- Find your D drive in the list. It may show as unallocated, RAW, or still have its existing file system listed.
- Right-click on the D drive and select Format from the menu. A new window will open with formatting options.
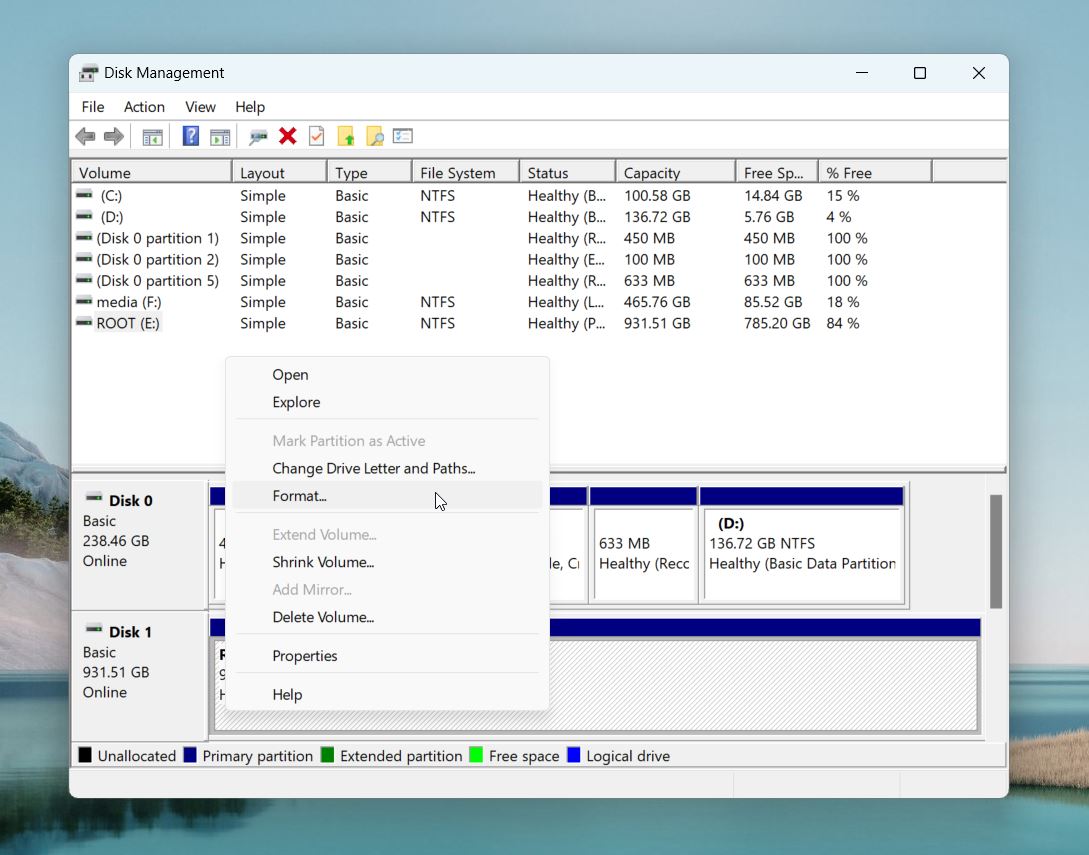
- Set Volume Label and File System. Choose NTFS for Windows-only use or exFAT if you want cross-platform compatibility.

- If you uncheck Perform a Quick Format, Windows will perform a Full Format instead.
- Click OK to begin. Windows will warn you that all data on the drive will be erased—confirm to proceed.
- The process may take a few seconds (Quick Format) or longer (Full Format), depending on the size of the drive. Once it’s done, the D drive will be ready for use again.
If after formatting you realized that you DO need those files, it might still be possible to recover them after formatting (quick formatting, to be precise—since, as you now know, a full format erases data without a trace).
FAQ
Why is D drive not showing up on my Windows?
If your D drive is not appearing on File Explorer, (although depending on whether the D drive was a drive partition or a separate drive), chances are your system reads it as an unallocated partition. There are several reasons why this could be happening.
Let’s look at some common reasons explaining the absence of the D drive:
- 💻 Issues with the OS update: Sometimes, an OS upgrade changes certain computer configurations and permissions. Such updates can cause file deletion or result in your computer not recognizing the D drive.
- 🗑️ Formatting or accidental deletion: It’s likely that your D drive is not showing up due to accidental deletion. It’s also possible that you formatted the drive while cleaning or resizing partitions.
- ❌ Wrong/unassigned drive letter: Your computer may misinterpret the D drive with the DVD/CD drive. In other cases, your D drive could appear as unallocated. The simple fix here is to access Disk Management and rename the DVD drive or assign a letter to the D drive.
- 💾 Outdated drivers: When device drivers are outdated, your device can start becoming slow with performance issues, and it can cause the D drive not to show up on your Windows computer.
- 📂 The D drive is hidden: In some cases, the D drive may be hidden by your system due to security updates or changes in the configuration or settings of the computer.
- 🔧 Physical damage: Another reason for the D drive not appearing in File Explorer is physical damage caused to it due to power surges, liquid infiltration, etc.
How to show D drive in My Computer?
If your D drive is not visible in My Computer (File Explorer), follow these steps:
- Press Win + X and select Disk Management. Look for your D drive in the list of connected drives. If it’s listed without a drive letter, assign one by right-clicking the drive, selecting Change Drive Letter and Paths, and clicking Add or Change.
- In Disk Management, click Action in the top menu and choose Rescan Disks. This refreshes Windows’ detection of drives.
How do I get my D drive to show up?
You can try the following methods to get your D drive to show up:
- Reassign the drive letter.
- Unhide Partition in Disk Management
- Update Drivers
- Change Drive Letter of the Missing Partition
How do I rescan my hard drive?
You can rescan your drive by following these steps:
- Press Win + X and click Disk Management.
- Select the drive you want to rescan. Then, click Action > Rescan Disks.
- Now, wait for the rescanning to be complete.
How do I fix an unallocated hard drive?
You can fix an unallocated hard drive by following these steps:
- Press Win + X, and select Disk Management.
- Right-click the unallocated volume, then click New Simple Volume.
- When the New Simple Volume Wizard opens, click Next.
- Specify a size for the new partition, then click Next.
- Choose a drive letter, then click Next.
- Specify a volume label, and leave everything else as default. Click Next again.
- Finally, click Finish.
How do I get my external hard drive to show up on my computer?
You can try the following methods to get your external hard drive to show up on your computer:
- Connect to a Different Port
- Initialize the Drive
- Run a Troubleshooter
- Update or Reinstall Your Drivers
- Disable USB Selective Suspend
- Add or Change the Drive Letter
- Format the Drive
If you own a Mac, you can go through our article on the external hard drive not showing up on Mac.
Why is the D drive missing after the Windows 10/11 update?
Sometimes, when you update your operating system, it can modify certain computer configurations and change permissions. If you’ve recently updated your Windows 10/11, the update may be causing your computer not to recognize the D drive.
This article was written by Joshua Solomon, a Contributing Writer at Handy Recovery Advisor. It was recently updated by Roman Demian. It was also verified for technical accuracy by Andrey Vasilyev, our editorial advisor.
Curious about our content creation process? Take a look at our Editor Guidelines.