
This article comprehensively addresses the issue of files missing after a Windows 10 update. As a result, it is quite detailed and lengthy. If you are looking for quick and effective solutions, please click on one of the links below to proceed directly to data recovery methods.
Windows 10 was released on July 29, 2015, and it wasn’t until October 2024 that Windows 11 surpassed half of Windows 10’s market share. Despite the rise of Windows 11, Windows 10 will continue to receive updates until October 14, 2025. However, these updates can sometimes result in files being lost or irretrievably deleted.
In this article, we’ll detail various methods to recover deleted files after a Windows 10 update. You might be wondering why we’re focusing on Windows 10, especially with Windows 11 being more popular. The reason is we haven’t yet decided whether to create a separate article for Windows 11 or update this one. However, this shouldn’t be a major issue, as most of the methods in this article also work for recovering data after a Windows 11 update.
The Real Reasons Why Windows 10 Updates Delete Files
Windows updates are essential for security patches and new features, but occasionally, they can lead to unexpected file loss. Here are the primary reasons why this happens:
🕵️♂️ Temporary user profiles after update: Sometimes, after installing a Windows 10 update, the system might sign you into a temporary user profile. In this scenario, your original files and settings seem to disappear because you’re not logged into your usual account.
- Why it happens: The update process might encounter issues loading your user profile, so Windows creates a temporary one.
- Signs to look for: A notification stating you’re logged into a temporary profile, missing desktop icons, or default settings restored.
📂 Files moved to a different location: Windows updates can sometimes relocate your personal files to a different folder, such as the Windows.old folder.
- Why it happens: During major updates or upgrades, Windows backs up your data to Windows.old in case you need to revert to a previous version.
- What to do: Check the C:\Windows.old\Users\YourUsername directory for your missing files.
☁️ Synchronization issues with OneDrive: If you use OneDrive for file synchronization, an update might disrupt the syncing process.
- Why it happens: Updates can reset OneDrive settings or cause sign-out issues, leading to files not syncing correctly.
- Solution: Make sure you’re signed into OneDrive and that syncing is functioning properly. Check the OneDrive Recycle Bin for missing files.
🛑 Corrupted user profile: A corrupted user profile during the update process can lead to data inaccessibility.
- Why it happens: File system errors or interrupted updates can corrupt the profile.
- Indicators: Error messages when logging in, or Windows loading default settings.
🔄 Software incompatibilities: Incompatibilities between the new update and existing software can cause files associated with those programs to become inaccessible or deleted.
- Why it happens: Outdated software may not be fully compatible with the latest Windows updates.
- Recommendation: Update all third-party software before initiating a Windows update.
💽 Disk errors and bad sectors: Physical issues with your hard drive can cause data loss during an update.
- Why it happens: If Windows encounters bad sectors while writing update data, it can result in corrupted or lost files.
- Preventative measures: Regularly check your disk health using S.M.A.R.T. monitoring tools or consider replacing failing drives.
⚡ Unexpected shutdowns during update: Power outages or forced shutdowns can interrupt the update process, leading to file loss.
- Why it happens: An incomplete update can corrupt system files and personal data.
- Tip: Verify that your device has continuous power, if it is a laptop, put it on a charger. Wait for the update process to complete.
🐞 Known update bugs: Occasionally, specific Windows updates have bugs that lead to file deletion.
- Example: The Windows 10 October 2018 Update (version 1809) had a known issue where user files were deleted.
- Microsoft’s response: Such updates are usually pulled, and patches are released promptly.
How to Recover Permanently Deleted Files After Windows 10 Update
There are several ways to recover deleted files, and we’ll cover all of them. However, many users don’t use built-in backup features, or Windows wasn’t able to create a backup in time. In such scenarios, the most reliable way to recover data is using data recovery software.
Caution: As soon as you encounter any file loss, you must minimize the usage of your device to prevent any overwriting. Continued use of the drive or device drastically reduces the chance of successful file restoration. Moreover, we strongly recommend immediately disconnecting the affected drive from your PC and scanning it as an external storage device connected to another PC.
Usually, recovery of the deleted files using data recovery software is straightforward, as long as you follow a simple rule: do not write new data to the disk. It’s important to note that recovering deleted data after an update is a sensitive process, as there’s a risk of overwriting deleted data with new information written during the update process. Therefore, it’s difficult to predict the chances of successful recovery in such cases.
Either way, it’s always worth a try. This time, our choice is Disk Drill. This program has long proven itself in the field of data recovery. It has efficient scanning algorithms and supports about 400 different types of files, which comes in handy when you’ve lost a large number of files of different formats after an upgrade. In addition, Disk Drill is extremely simple and easy to use and allows you to scan your disk for free to make sure that the files you need can be recovered before upgrading to the Pro version of the program.
So here is how to recover permanently deleted files after a Windows 10 update using data recovery software:
- Download, install, and run Disk Drill from the official website. We highly advise you to download and install it on a separate drive so you don’t overwrite the deleted data.
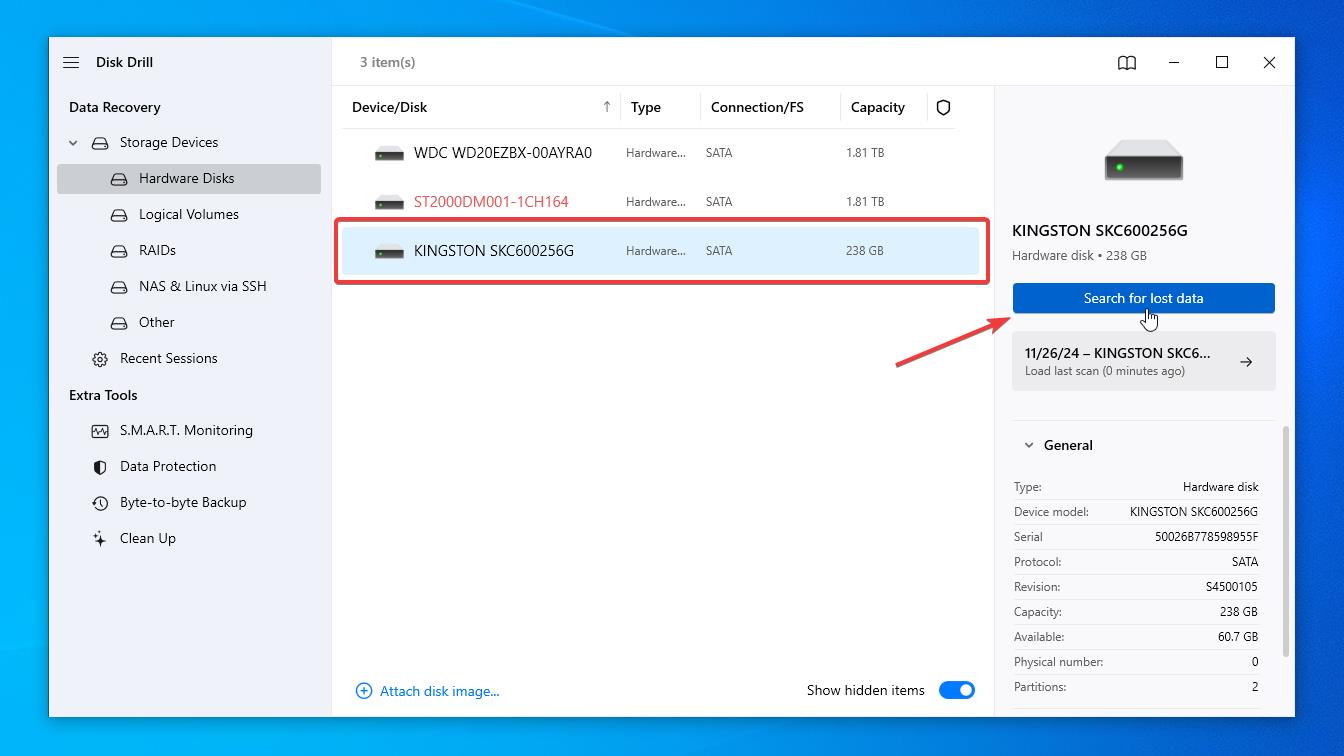
- Select the partition or an entire drive containing the lost files from the list. Then click the ‘Search for lost data‘ button on the right.
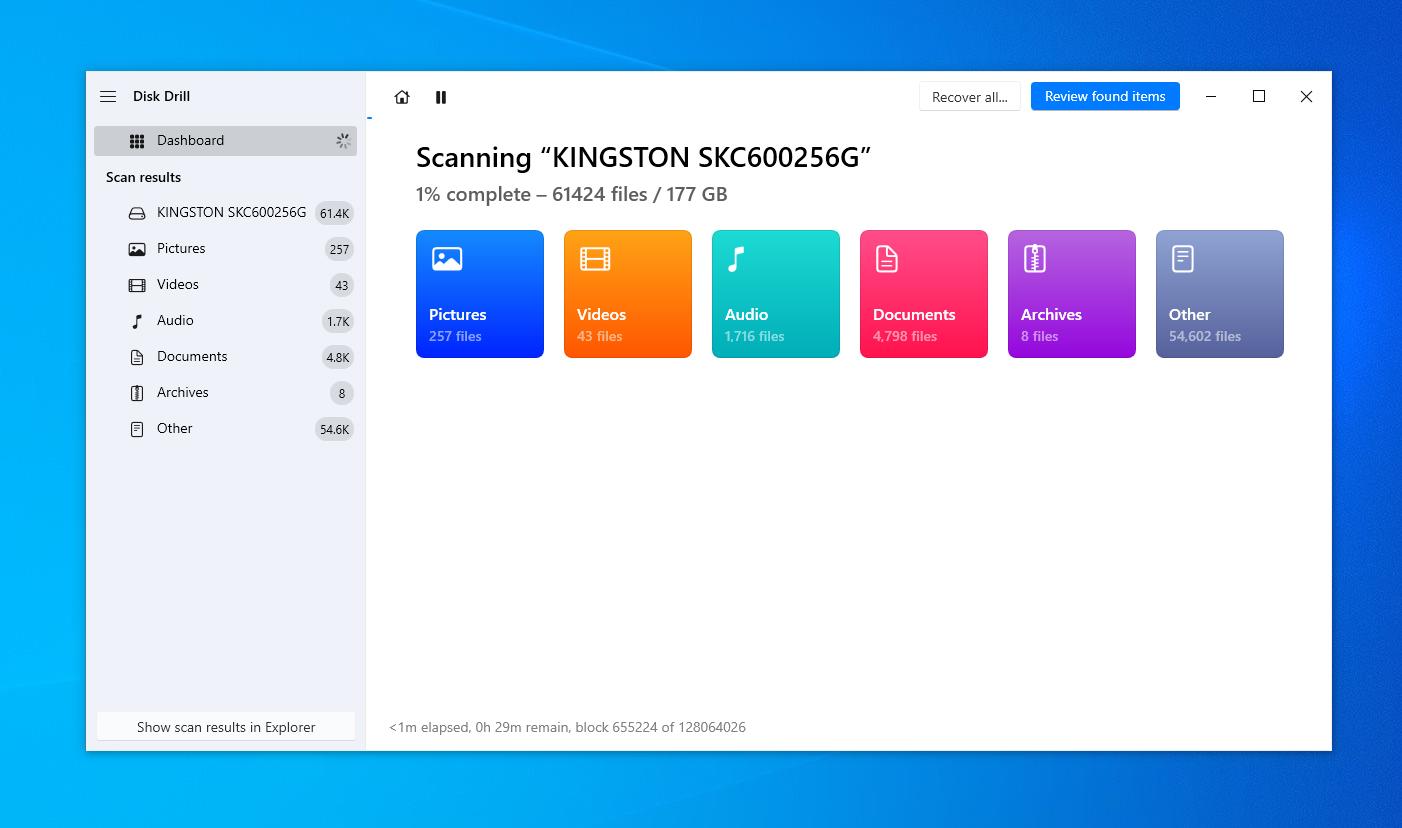
- Disk Drill will begin the scanning process. It can take some time depending on the size of the drive, but you are actually able to review recovered files in real-time as they begin to populate in the different categories.
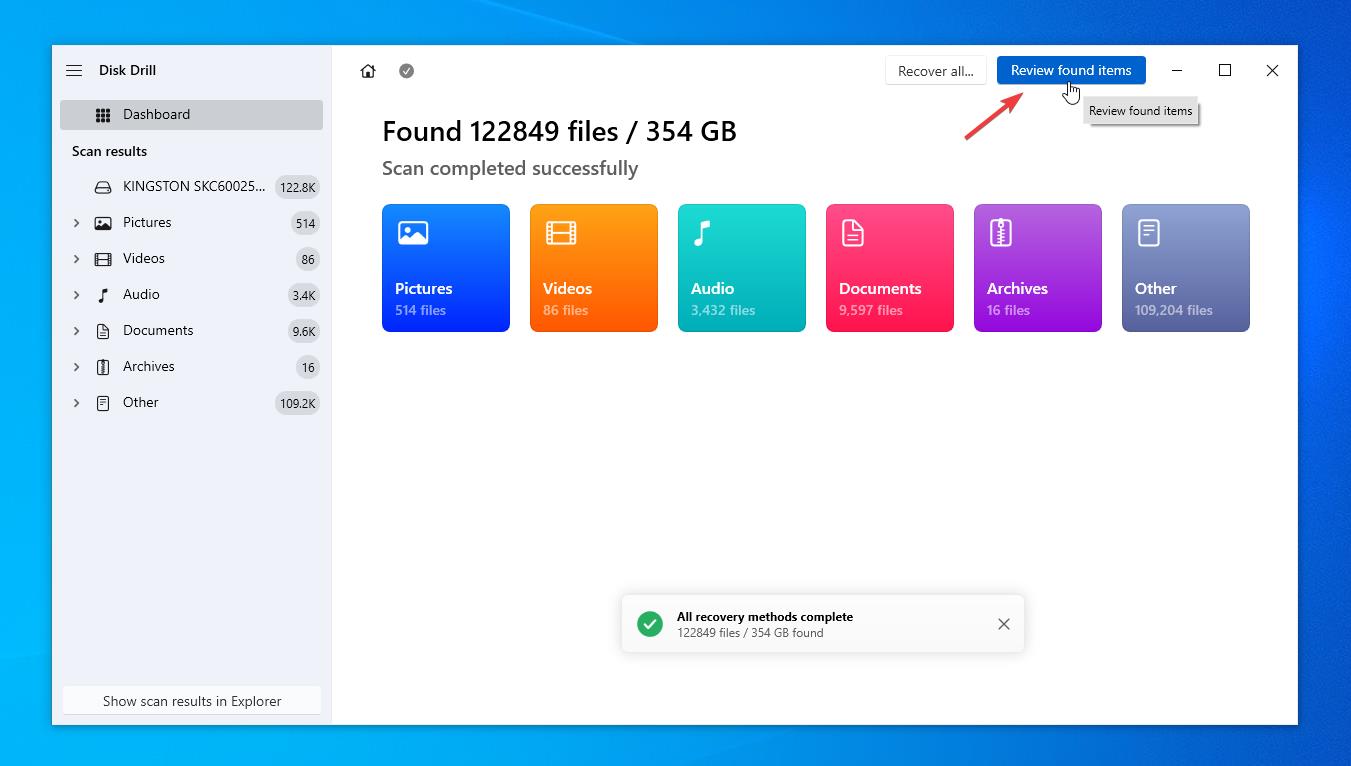
- Although you can pause the scan at any point, we recommend letting the scanning procedure terminate by itself. As a result, you get a complete picture of which files are recoverable. Once the scan is complete, click on ‘Review found items‘ on the top to check the items you would like to recover.
- Now that you can see all the files Disk Drill was able to find, you can sort them and filter by date, size, and file type or find particular ones using the search bar.
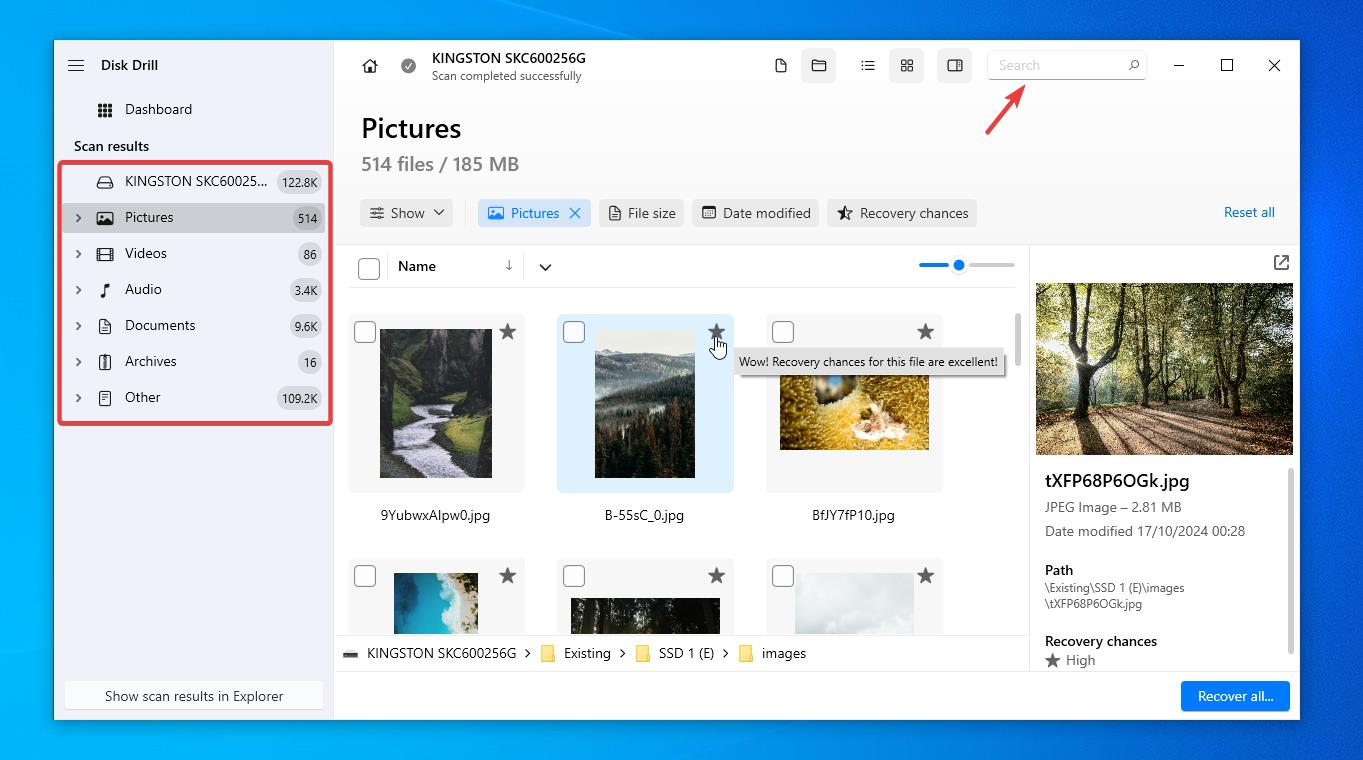
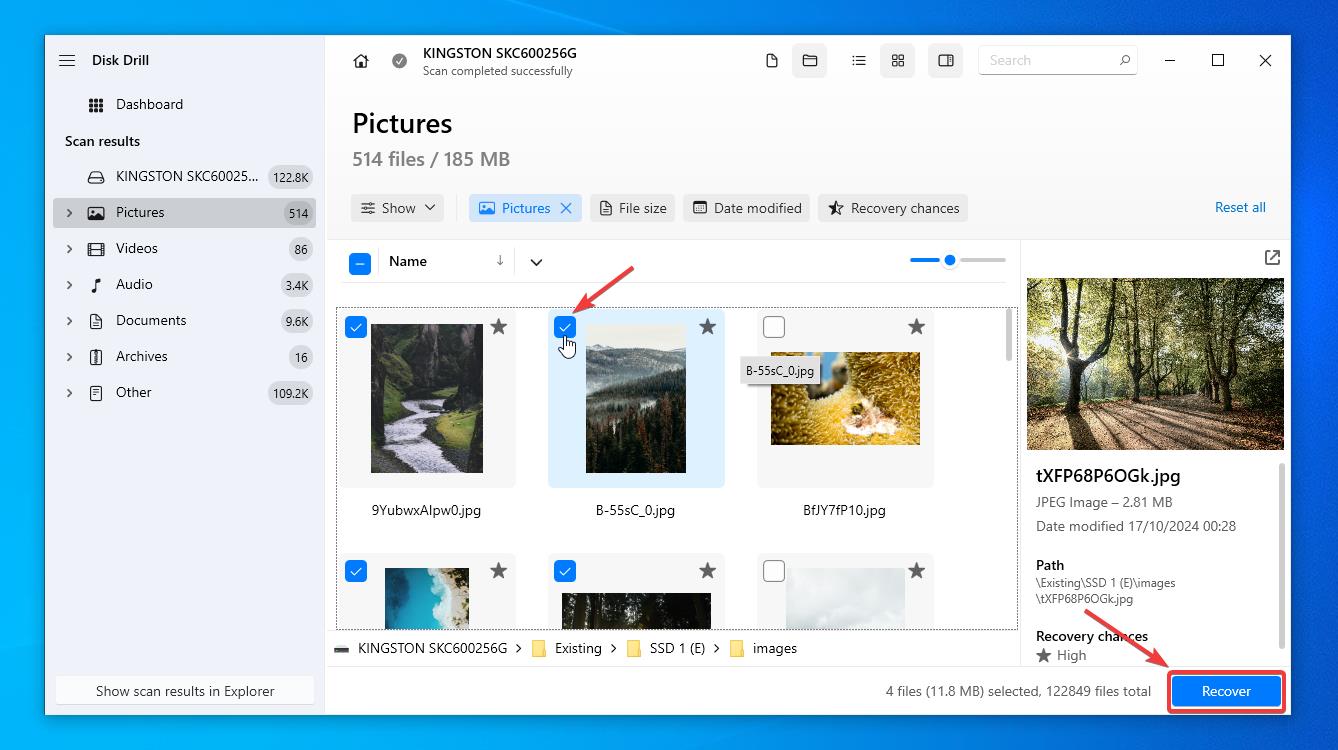
- At this point, you can click on the ‘Recover all‘ button on the bottom-right, or select specific files you need by putting a checkmark next to them. Once you decide the appropriate way, click on the ‘Recover‘ button.
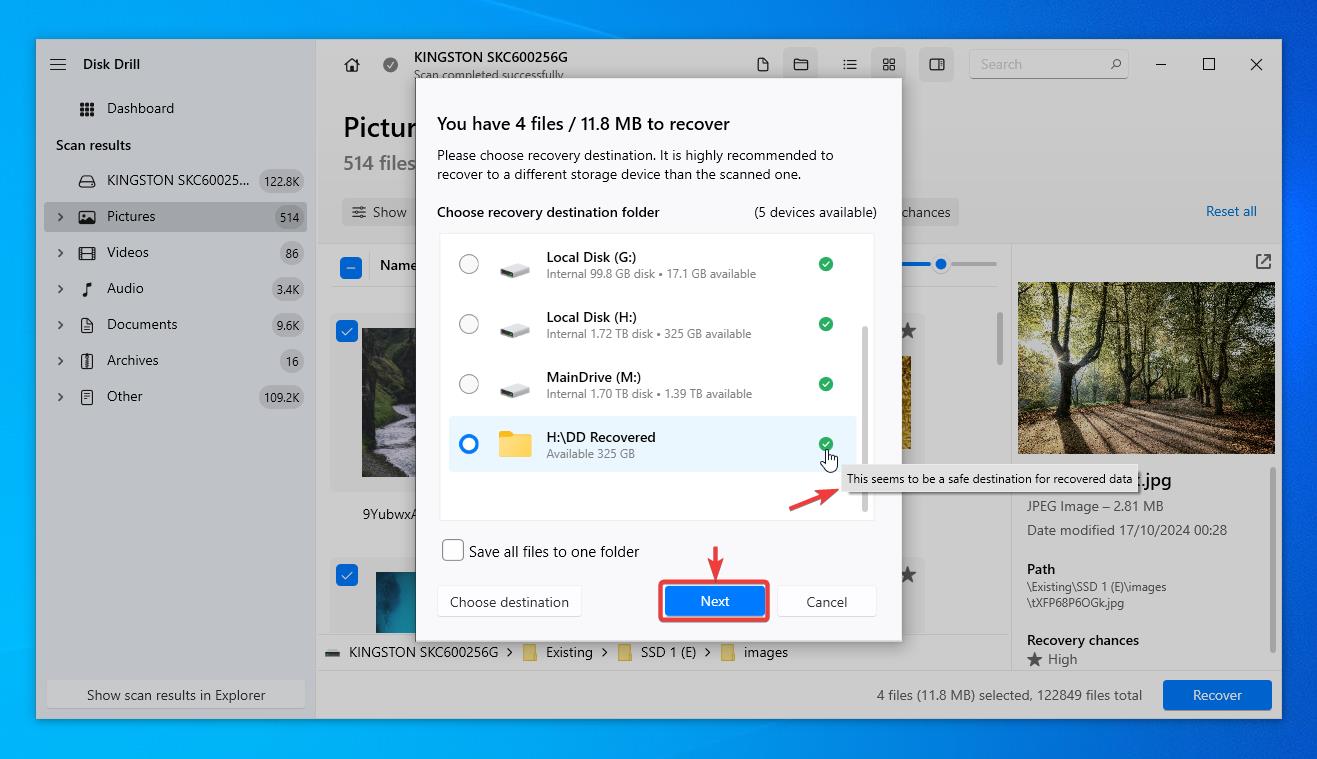
- While you select a destination for the recovered data, please make sure that you do not select the affected device (your main hard drive in this case) You will see the notification icon on the right side. Then click ‘Next’ to complete the recovery procedure.
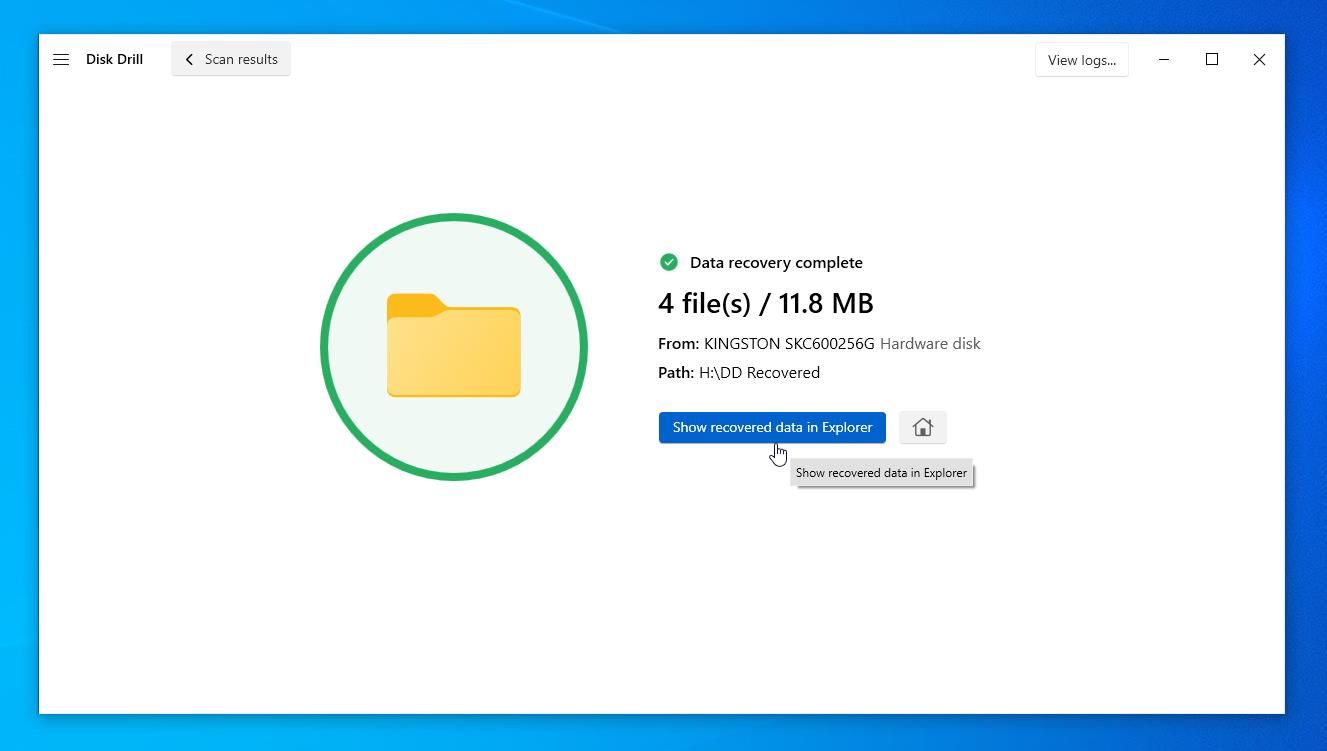
- Once you complete the recovery you can review recovered files.
Note: Disk Drill is just one of the many data recovery tools out there. What we liked about Disk Drill was the risk-free data recovery offering. You can download the application for free and recover 500 MB of data for the low, low cost of zero.
Check out this comprehensive review of Disk Drill – which covers everything you need to know about this tool.
How to Recover Deleted files Files After Windows 10 Update Using Native Windows Options
We have some more methods for you to recover your deleted files. These methods might be a bit obvious, albeit worth a shot! It is common for users to forget, or even not know that they have activated backups at some point in time, and they have a backup option in the form of built-in backups. Also, Windows offers alternate data recovery options in the form of system rollback or backup folders. Let’s take a look at all the possible options.
1. Use File History to Restore Files
On the off chance that you backed up files before upgrading your OS, the backup restore would get your data back.
Note: We highly recommend taking system backups before any OS update. Even the most minor upgrades can effect unexpected consequences. As a result, it’s a great idea to schedule automatic backups.
Here’s how it works:
- To restore a backup, go to Settings > Update & Security > Backup > More Options. Scroll down and click the Restore files from a current backup button.
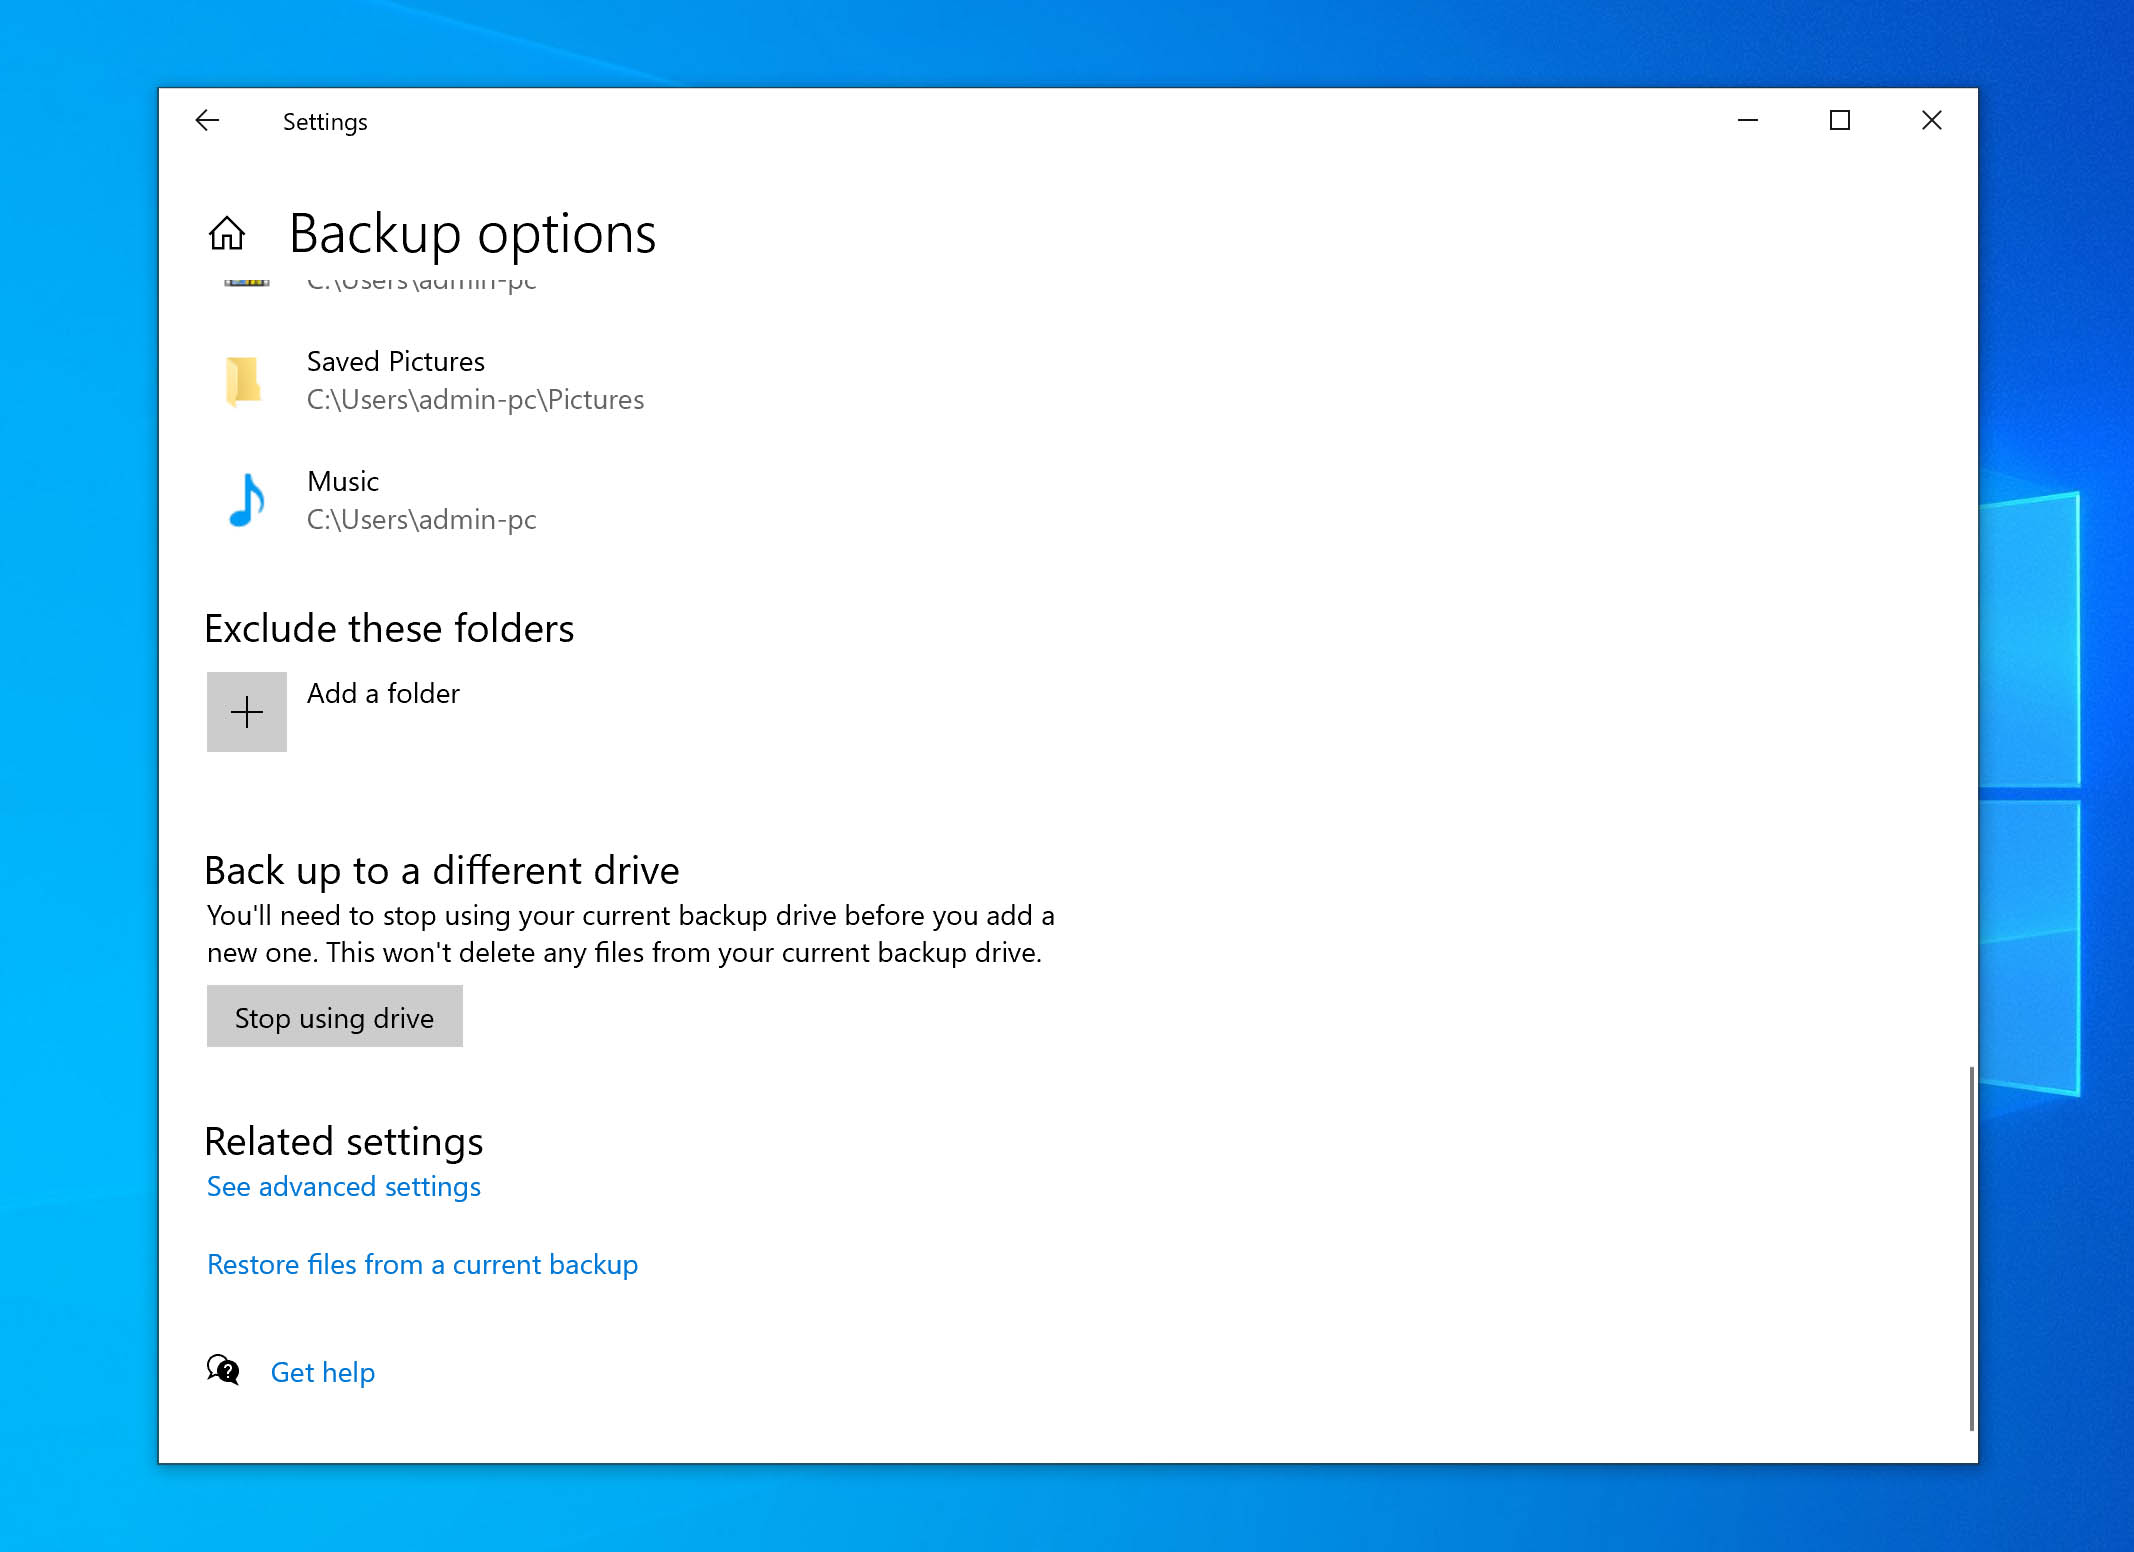
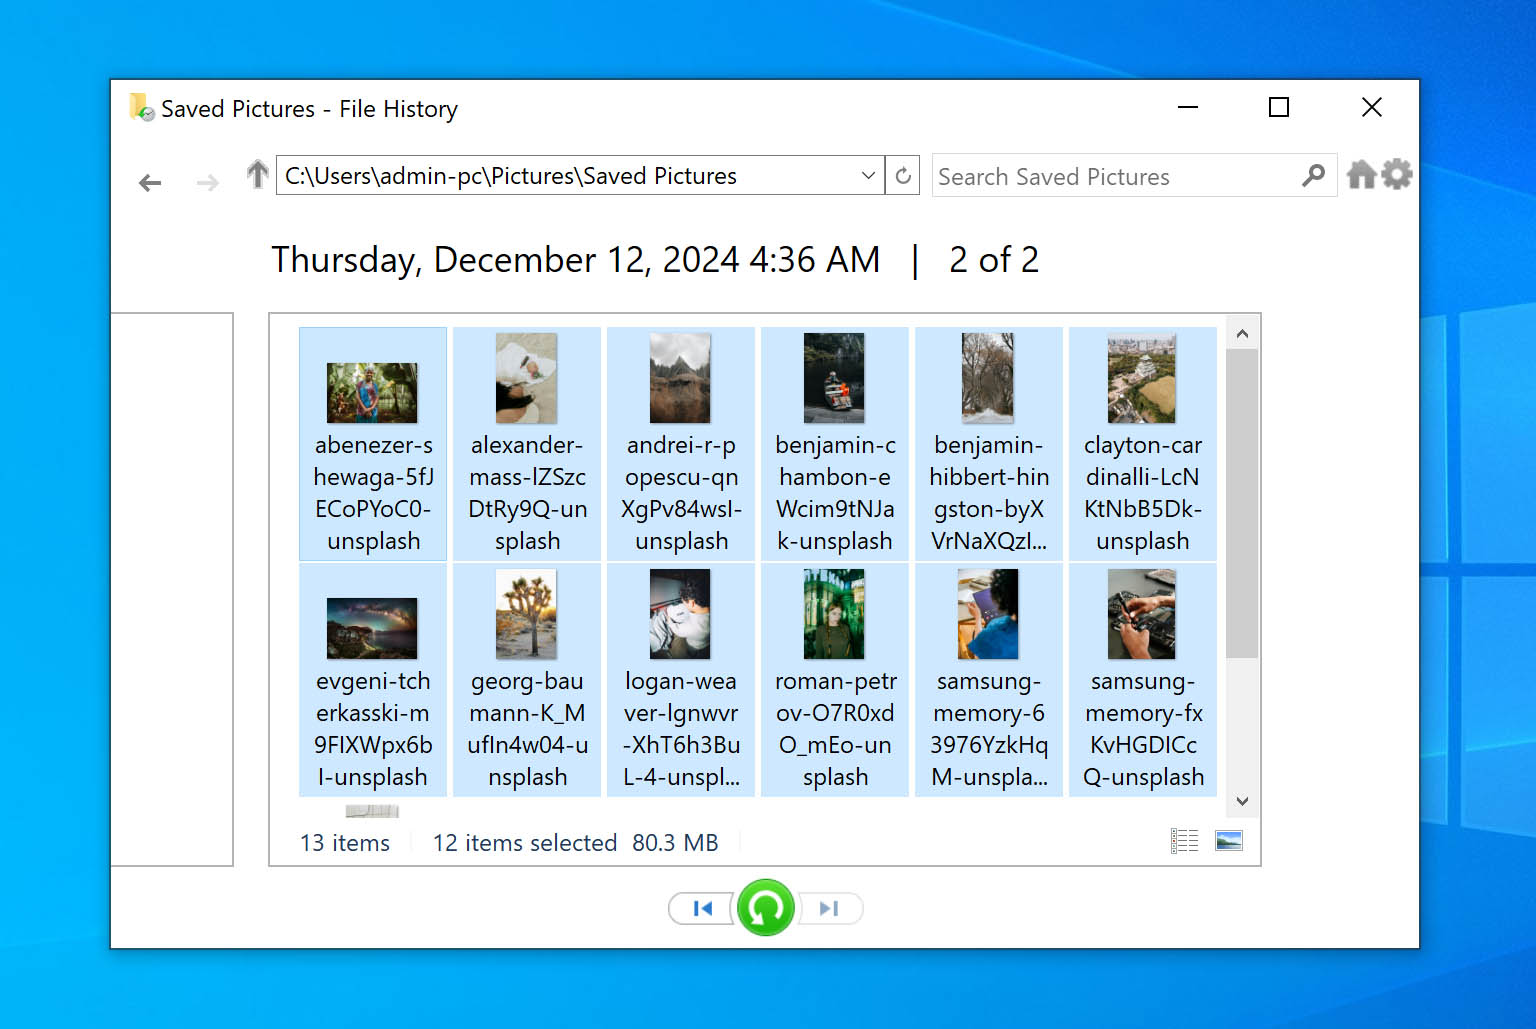
- Windows shows the backed-up folders. Sift through the results to locate the files you need. Then, click the green button at the bottom to restore the files.
2. Utilize Backup and Restore Feature on Windows 10
This is a more conventional approach to restoring your stored backups.
Here’s how you can get started:
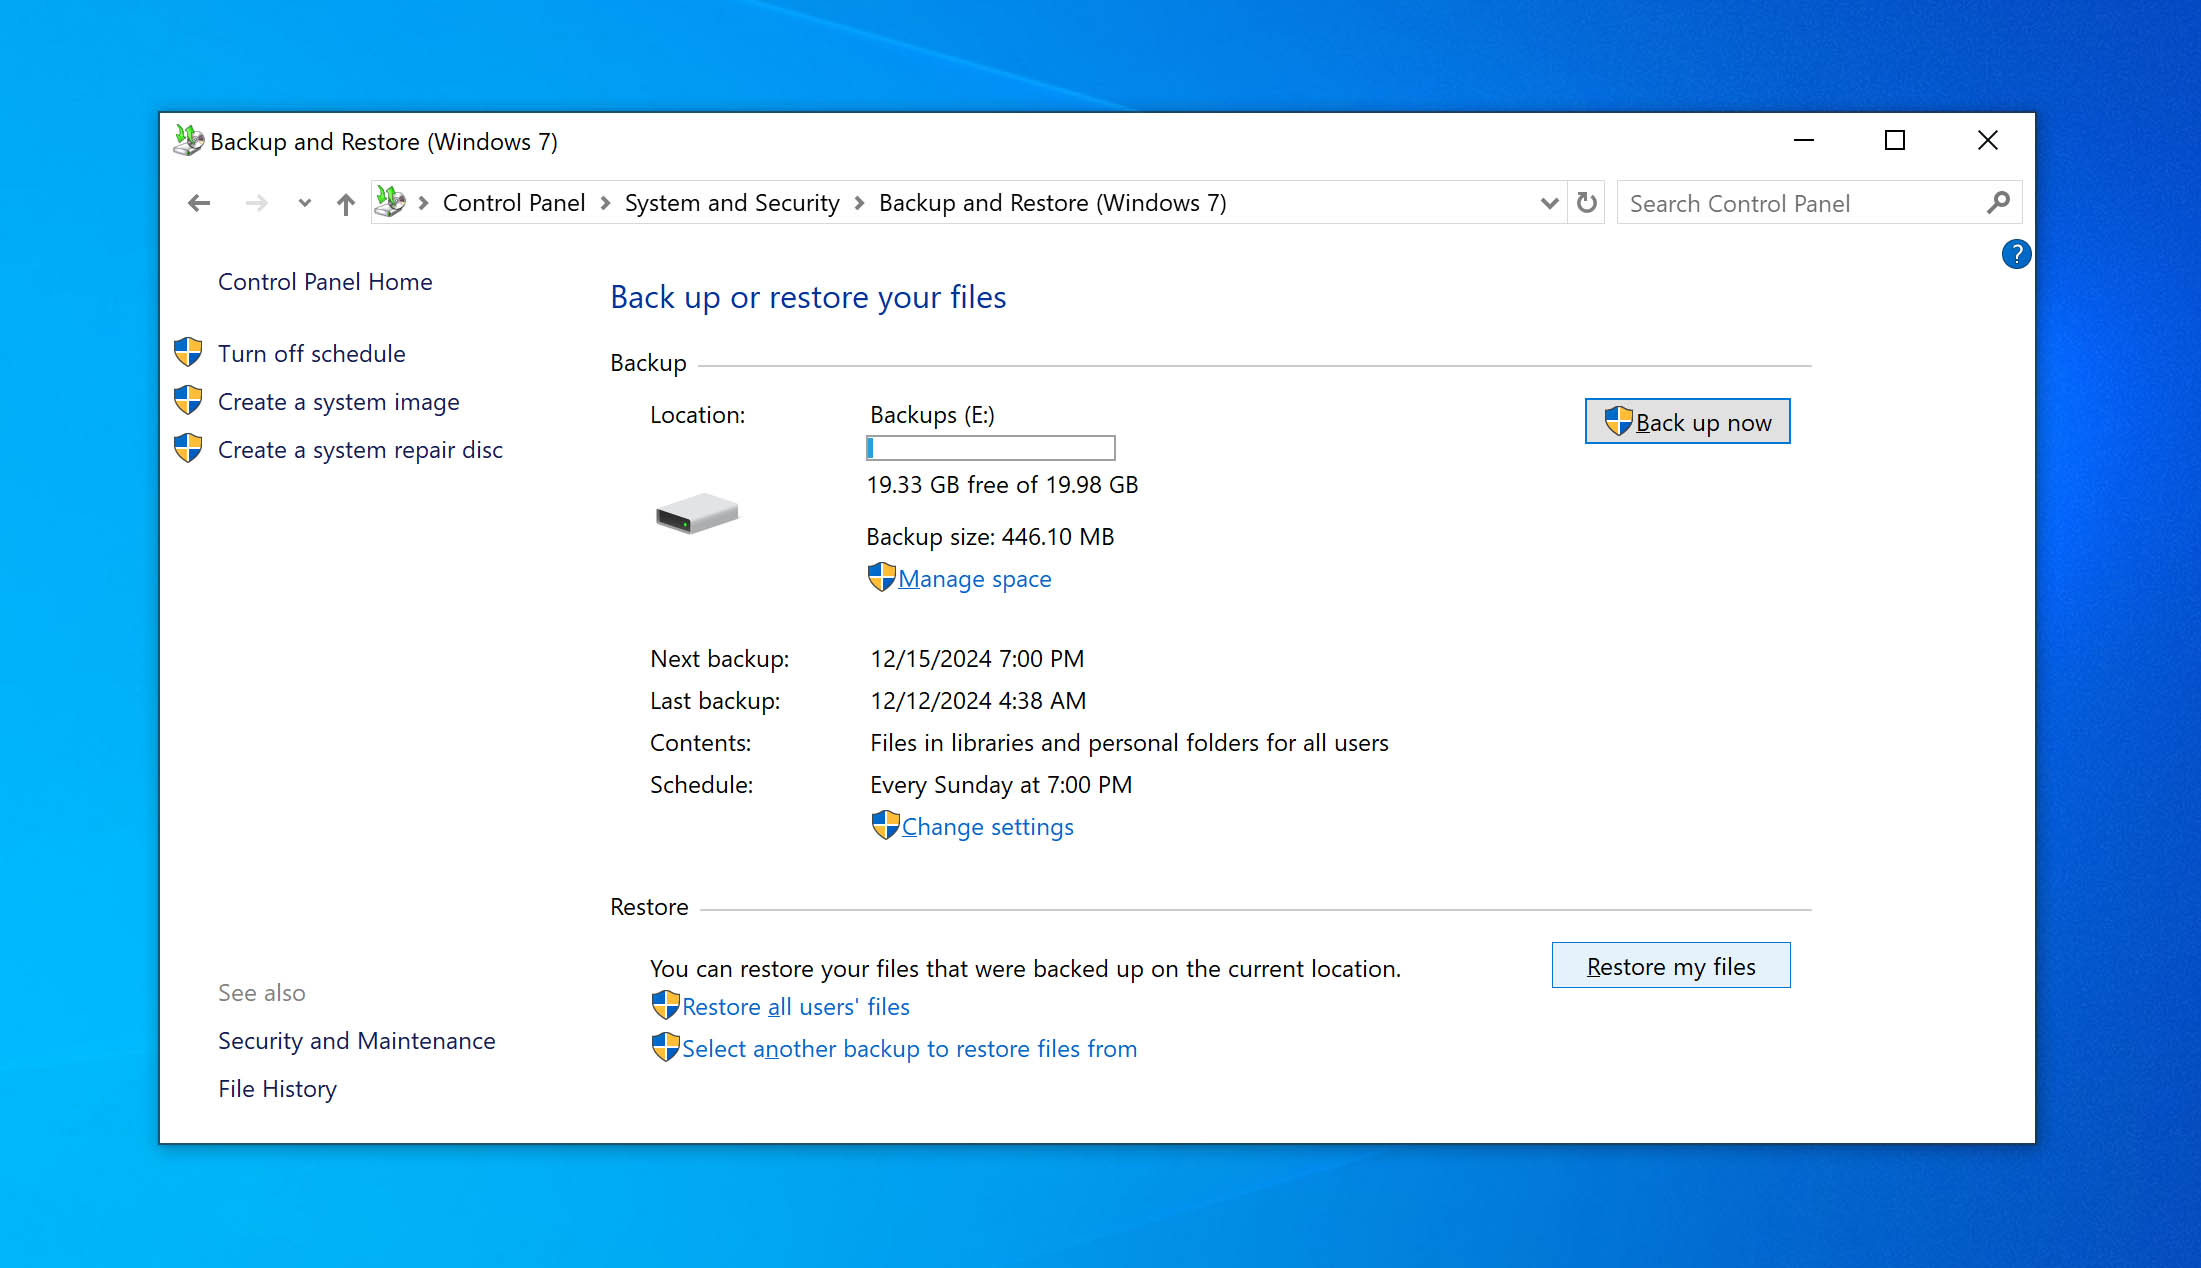
- Open Control Panel.
- Go to System and Security > Backup and Restore (Windows 7).
- Under the Restore section, click on the Restore my files button.
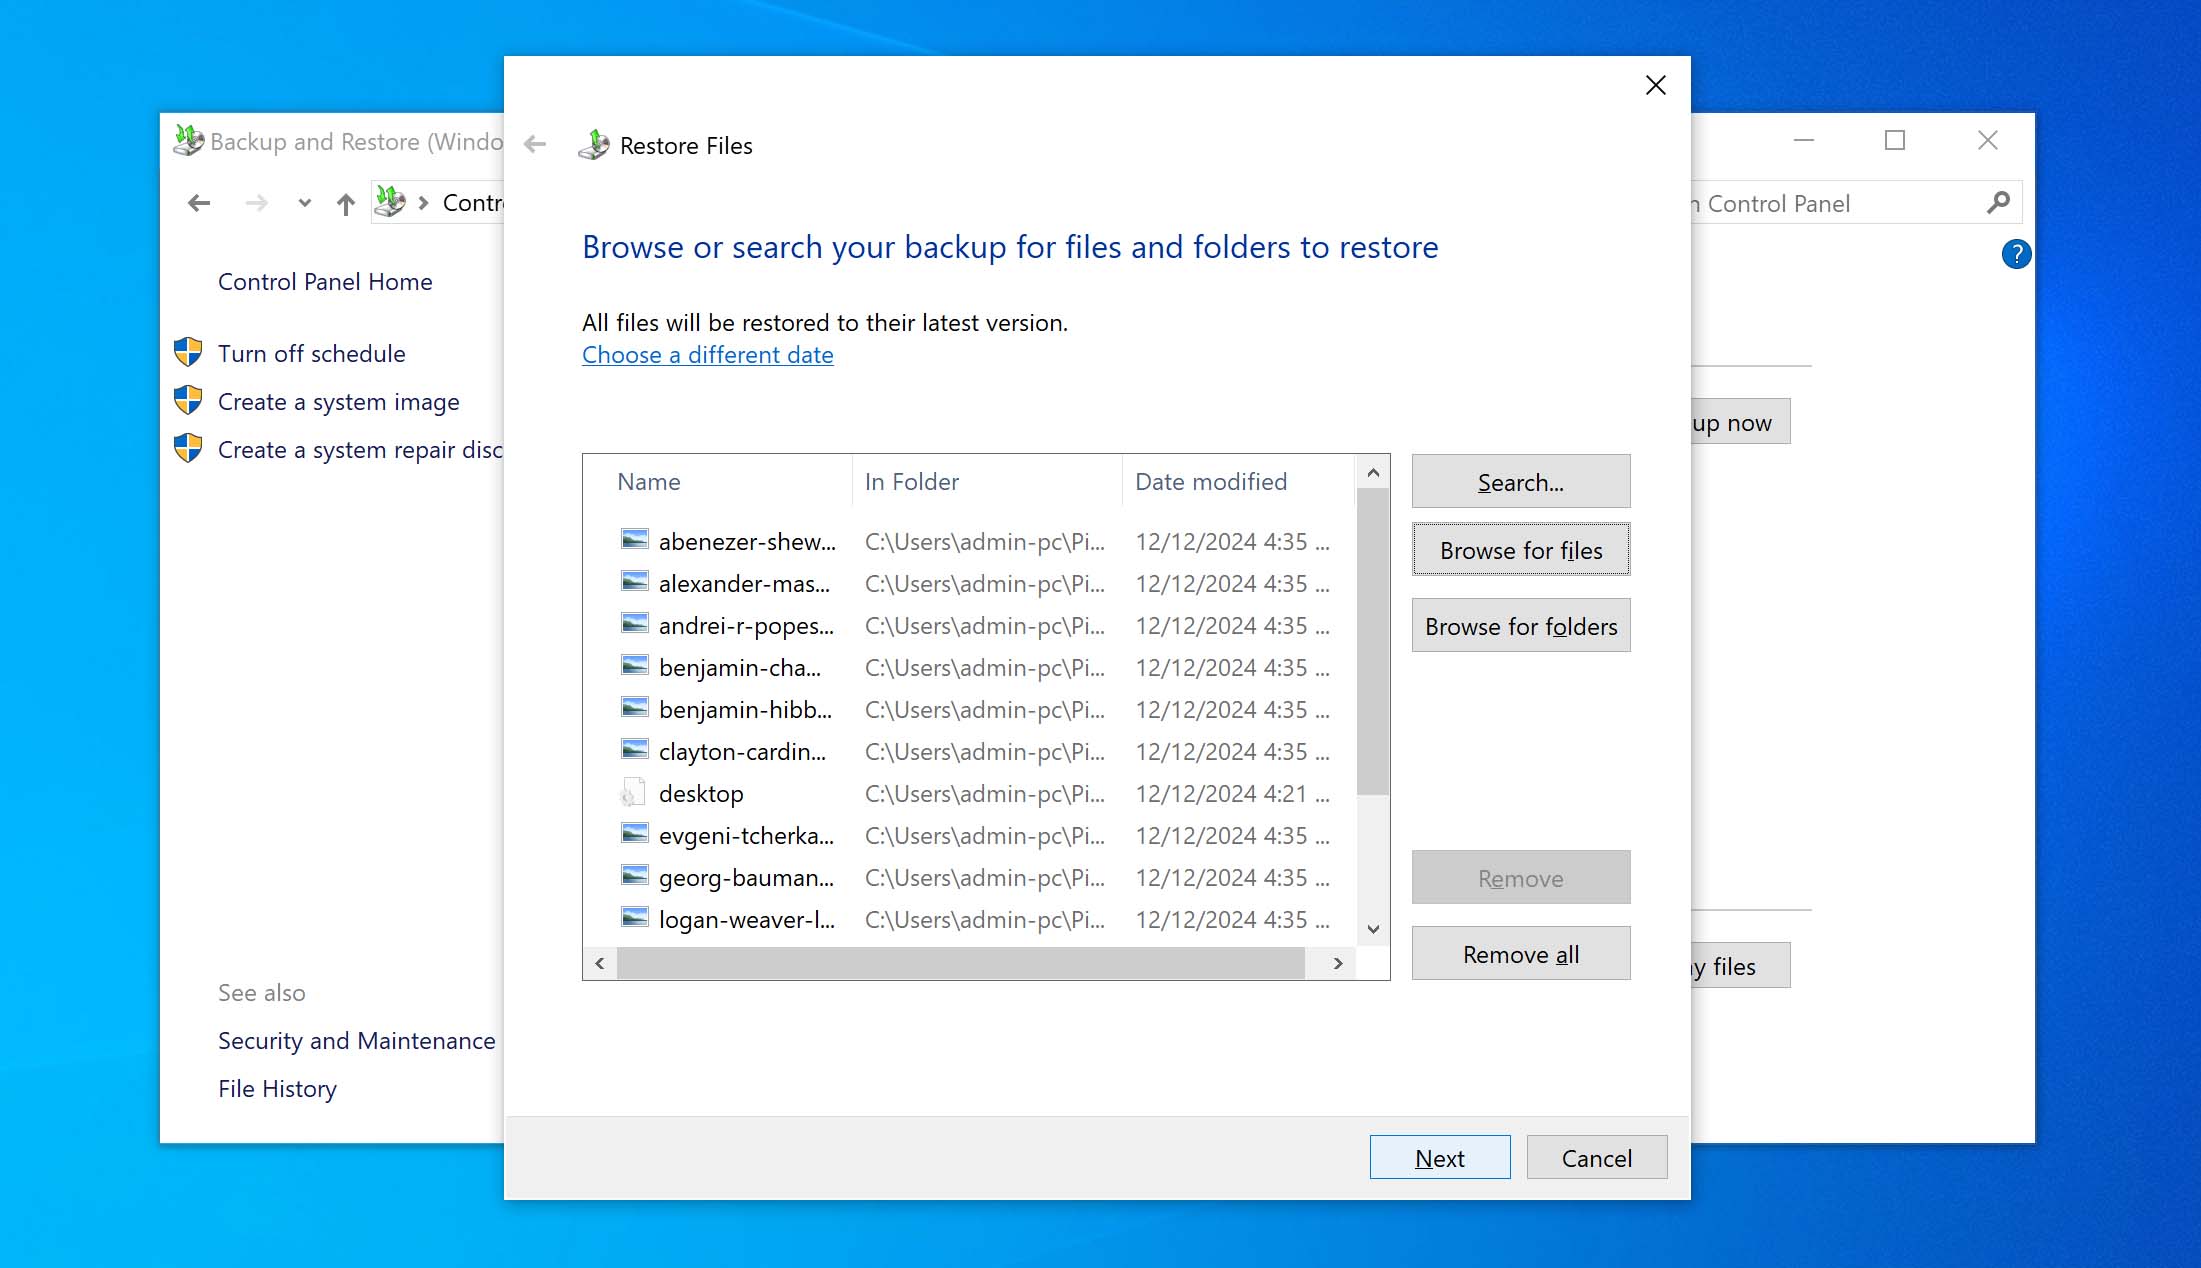
- Click on the Browse for files button.
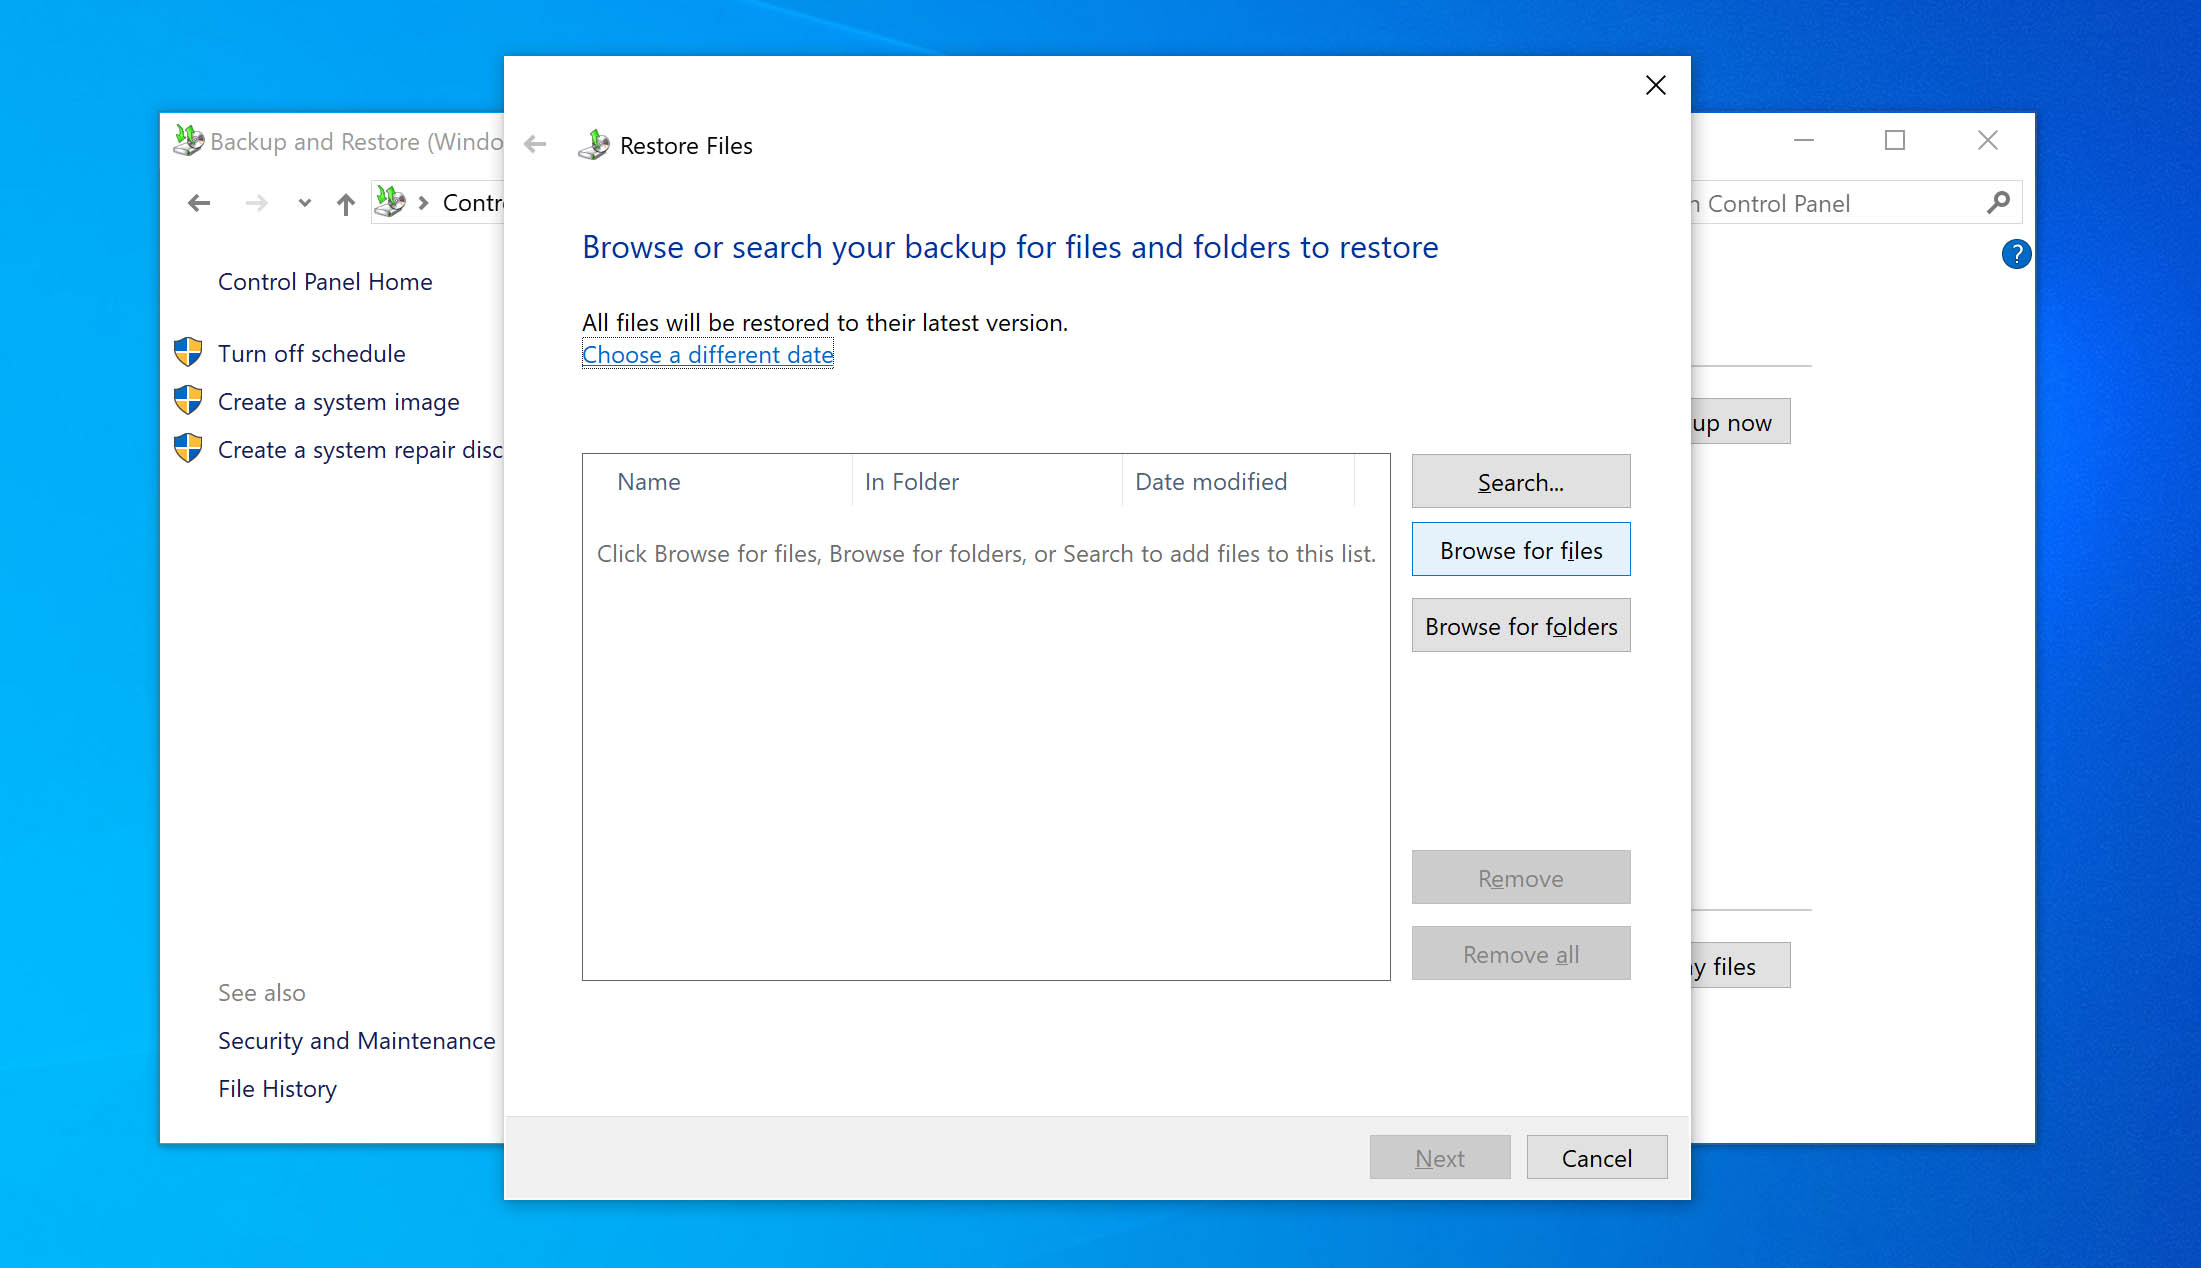
- Browse through the backup and mark the files you would like to recover. Click on the Add files button.

- If you want to recover an entire folder, click on the browse for folders button; Mark the folders for recovery and click on Next.
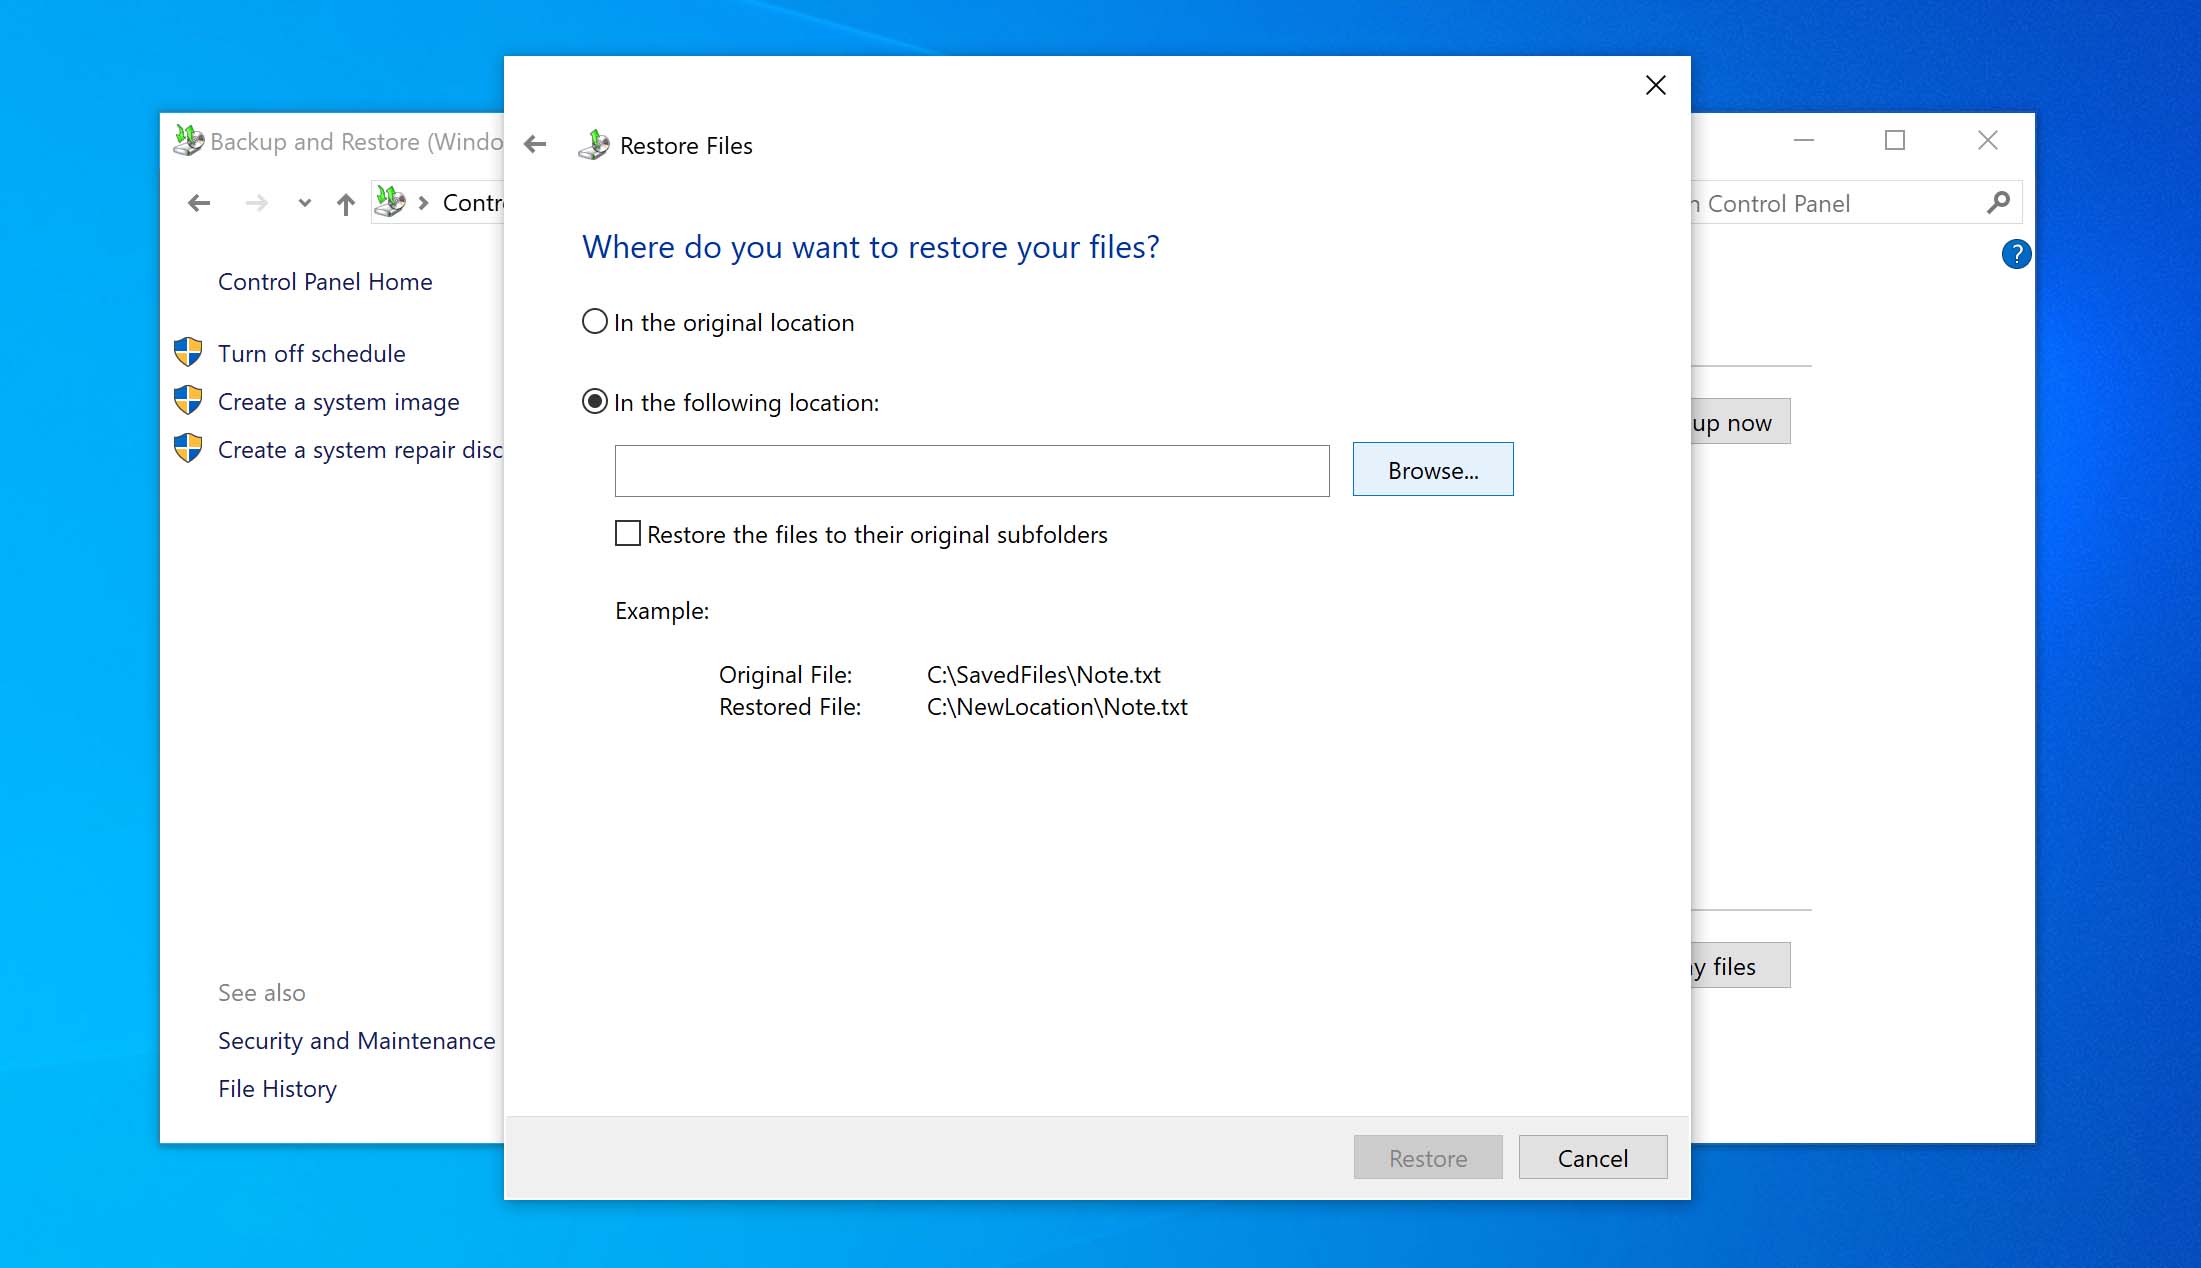
- Specify the destination for saving the restored files. Click on restore> Finish.
Note: It’s worth checking your One Drive backup settings. You could have subconsciously scheduled an automatic cloud backup, and that might get you off the hook.
3. Check the Windows.old folder
When you opt for a Windows 10 upgrade, the OS creates a folder named “Windows.old” which copies the previous version’s data – for recovery.
Here’s how you can recover data from the Windows.old folder:
- Head to the File Explorer.
- Click on the This PC option.
- Enter the Local Disk (C:) drive.
- Open the Windows.old folder.
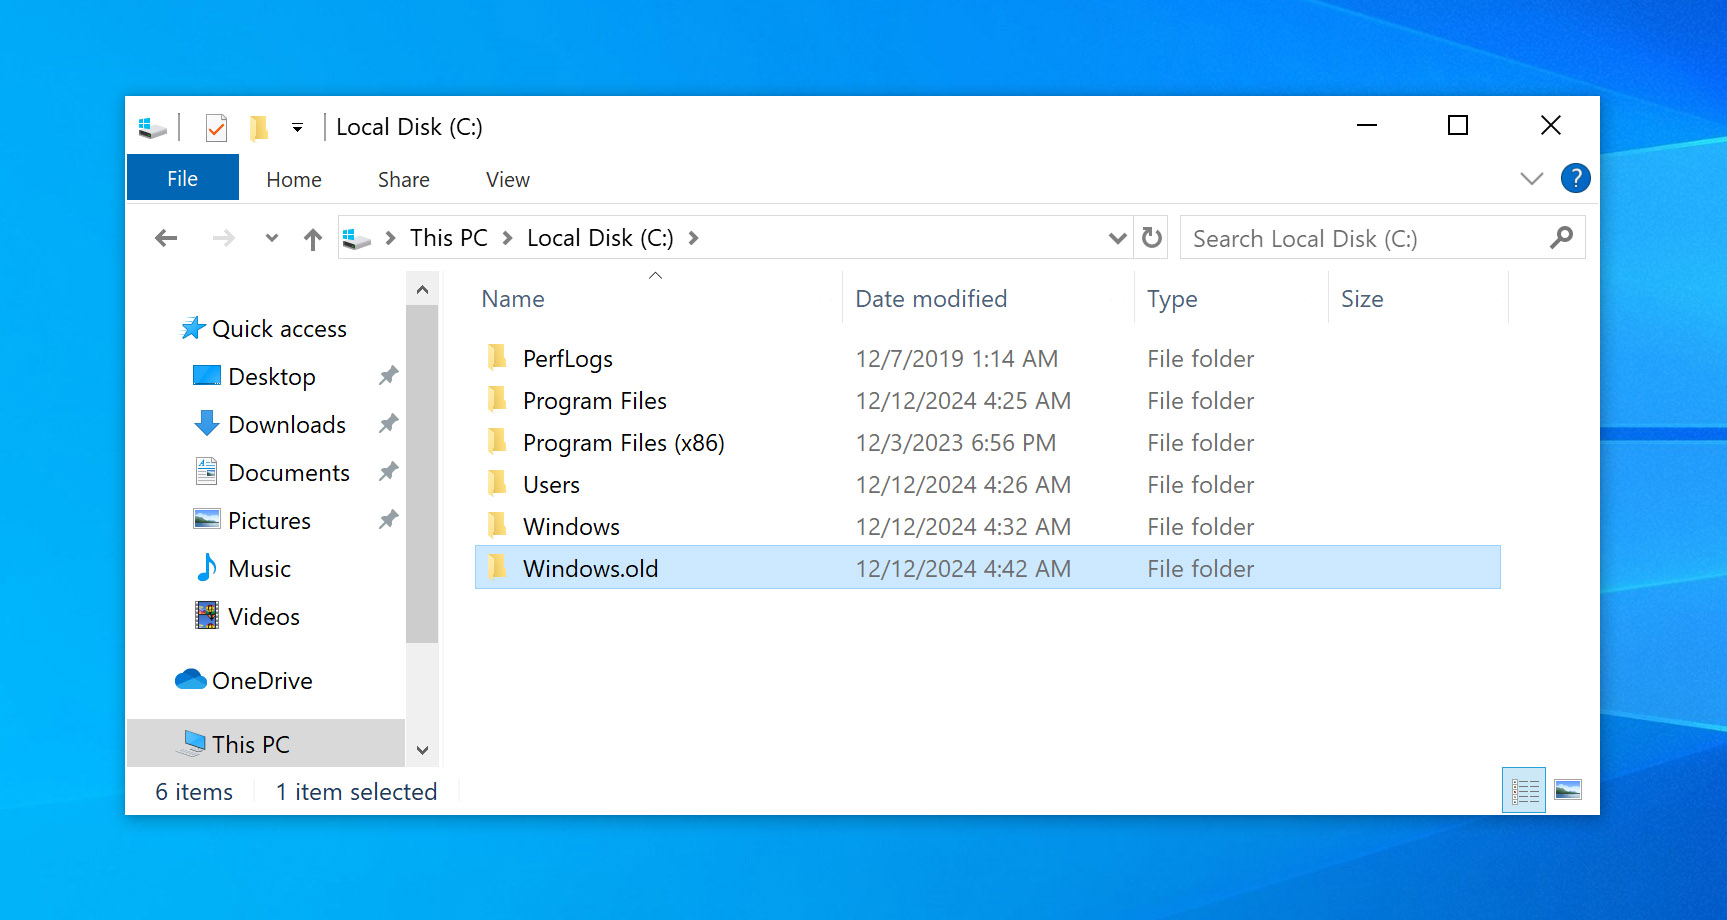
This folder would contain your personal files and data. Now, you can move these files to a desirable location.
Note: if you can’t find the Windows.old folder, the chances are that you implemented a clean installation process that erases all data on your PC. Moreover, something unexpected probably happened during the installation, which hindered the backup.
4. Use The Administrator Account to Recover Data after Windows Update
If you upgraded from Windows 7 to 10, there are chances you created a Microsoft account in the process. As a result, your data could reside within the Administrator account – which is initially disabled.
Here’s how you can gain access to your missing files:
- Open the Start Menu.
- Key in Computer Management and click on it.
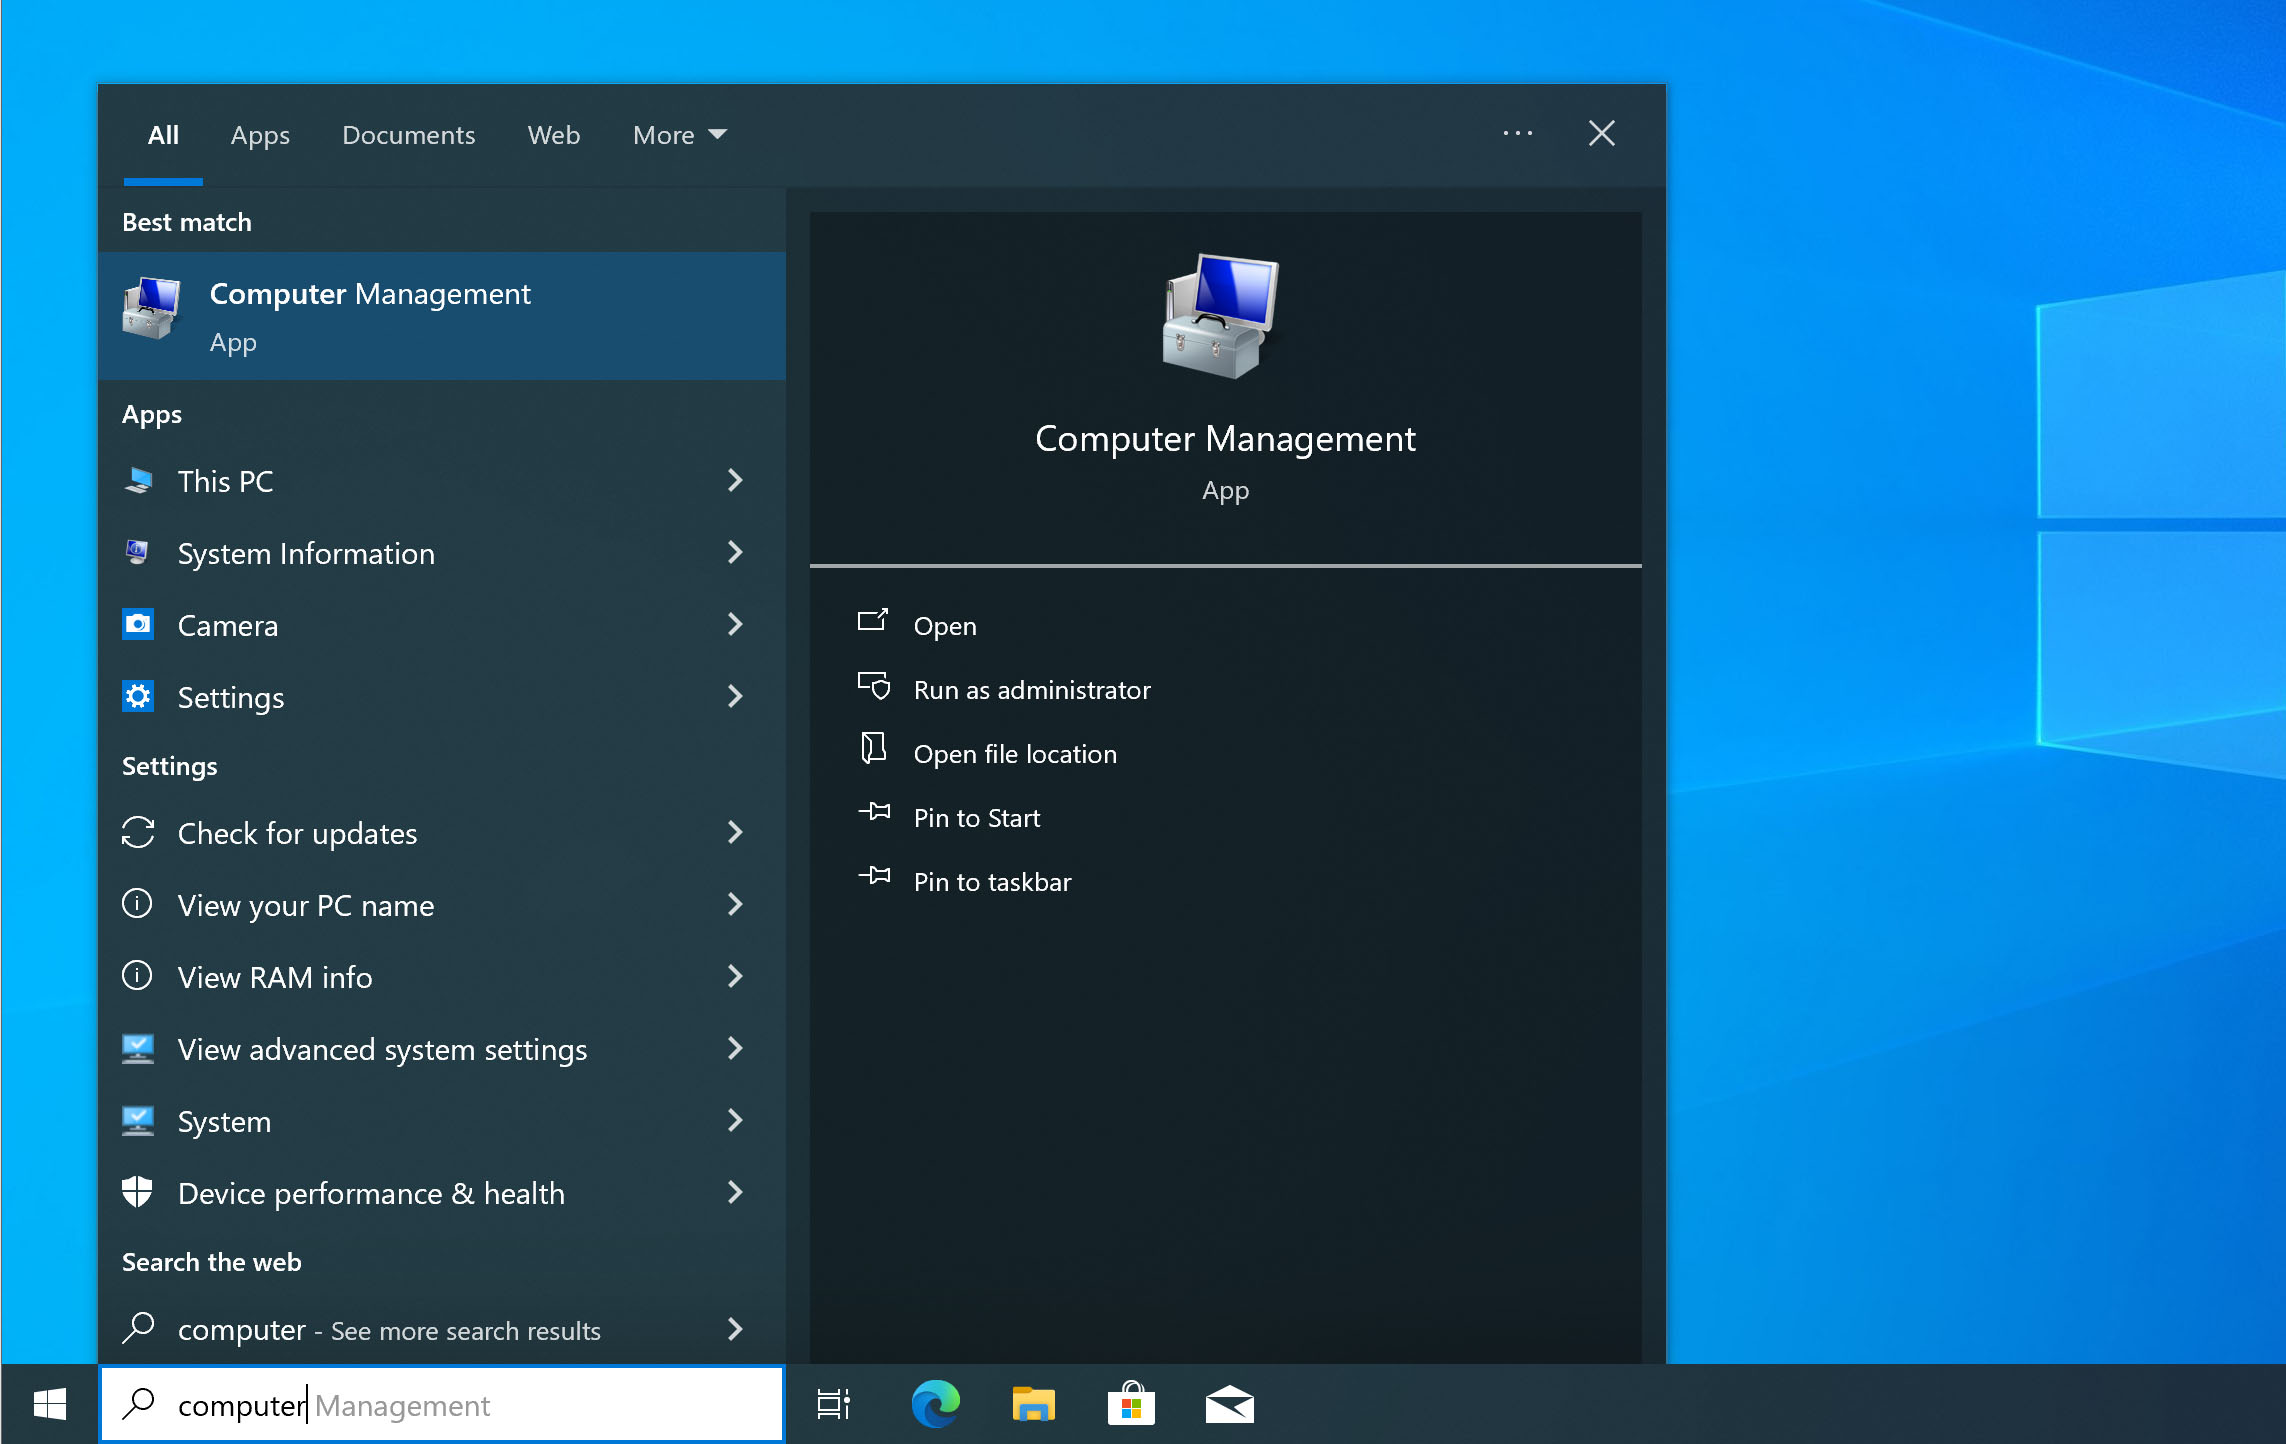
- Navigate as per this path: Computer Management > Local Users and Groups > Users.
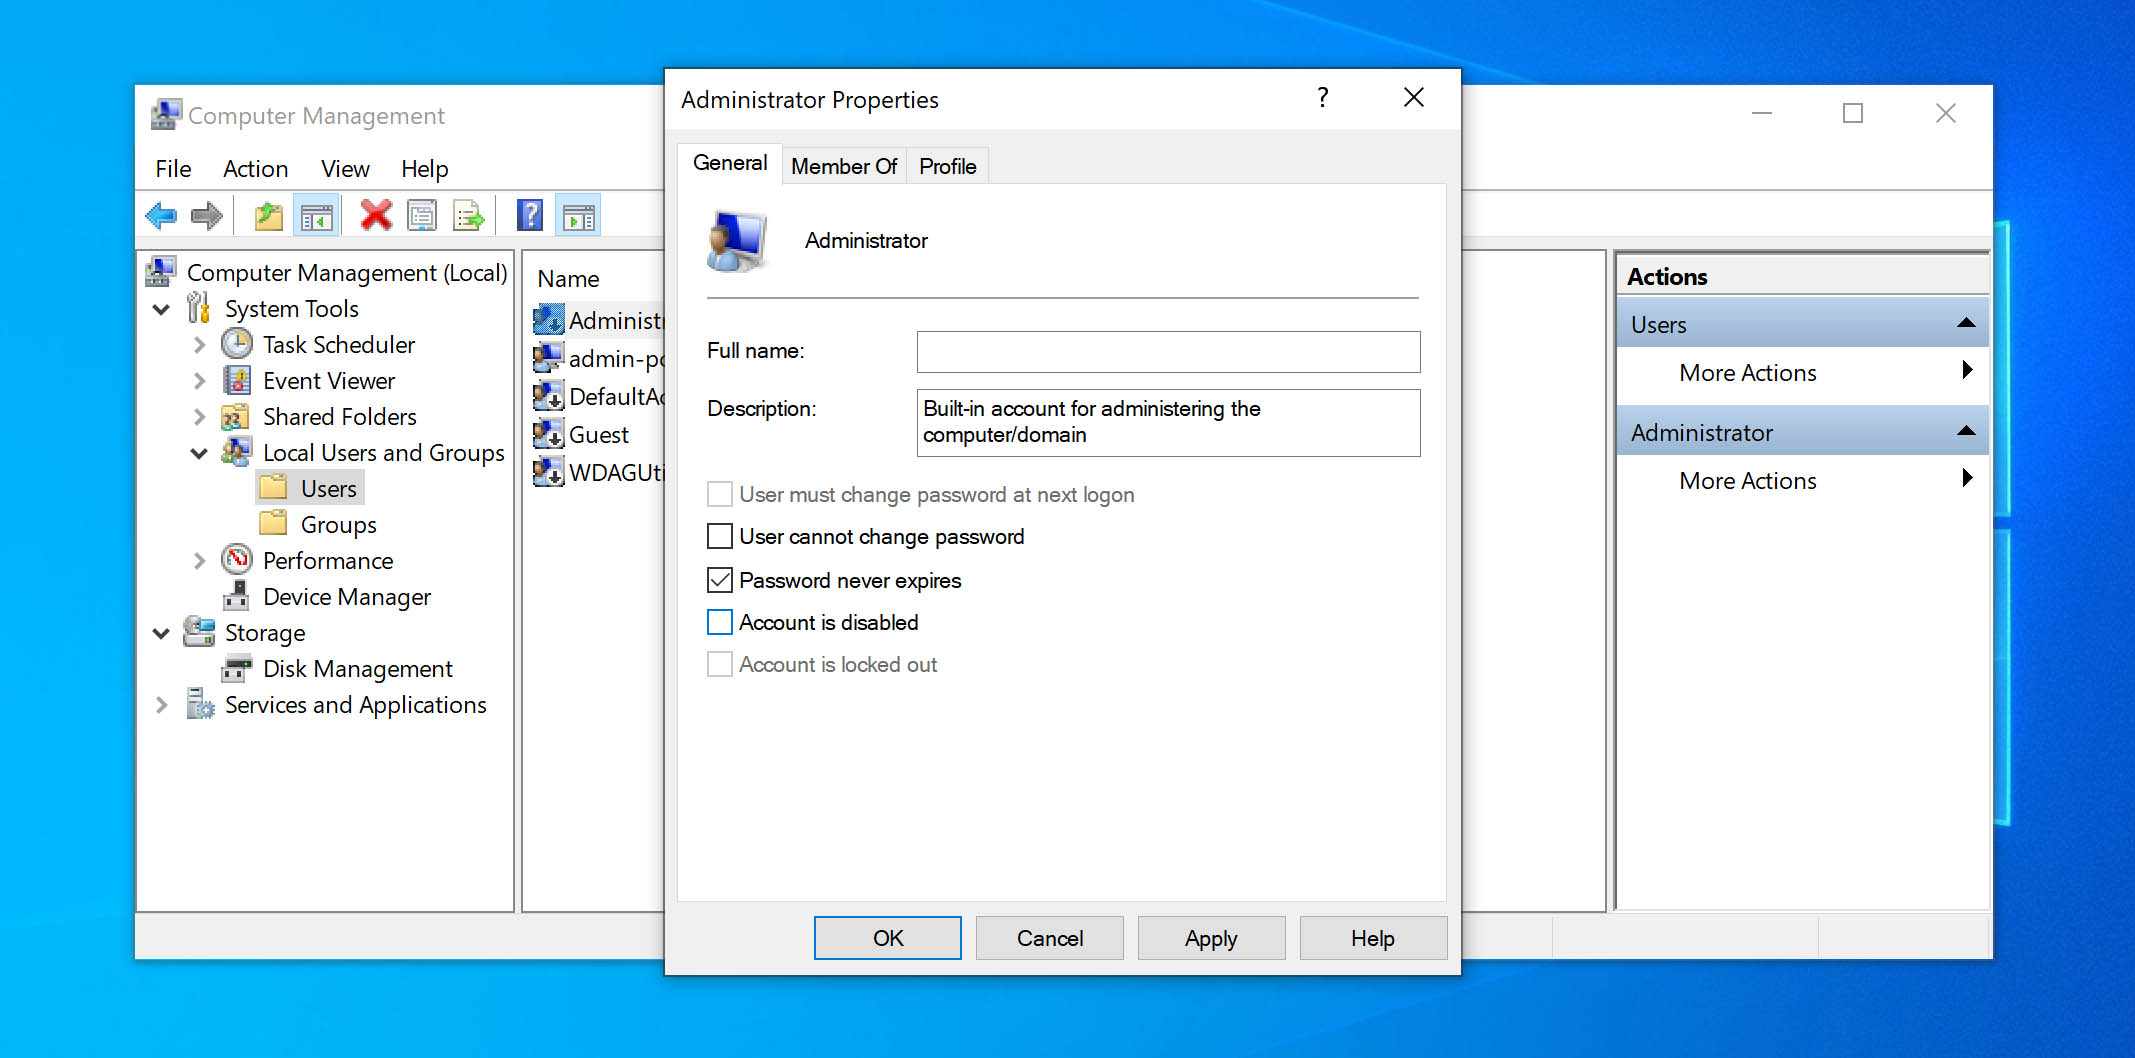
- Double click on the Administrator account (first row in the image).
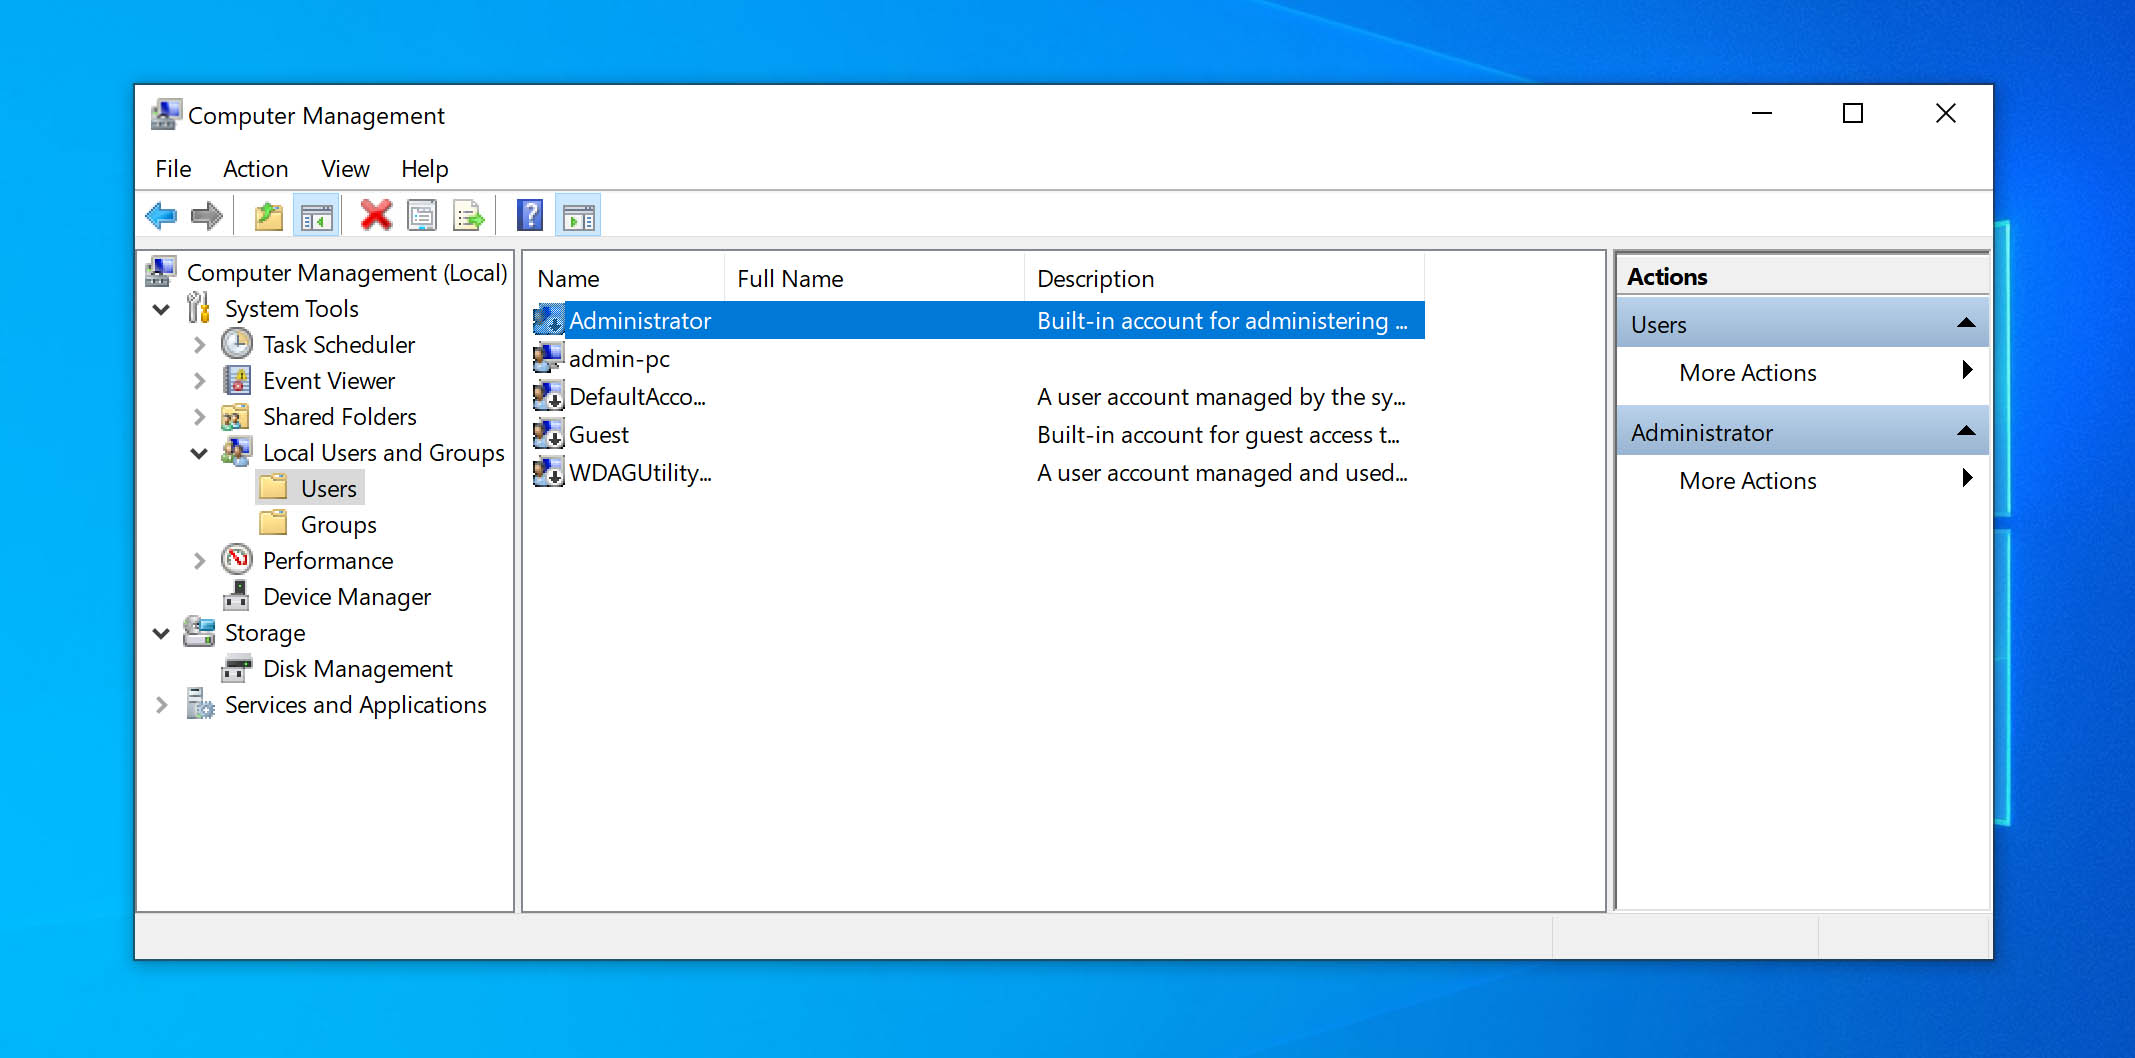
- Uncheck the Account is disabled box.
- Click on Apply > OK.
- Next, sign out of the current account.
- Sign in with your admin account.
If you followed the above steps correctly, your files will be available in the local Admin account.
What if your admin account was never disabled in the first place? We got a few other methods for you: Stay tuned!
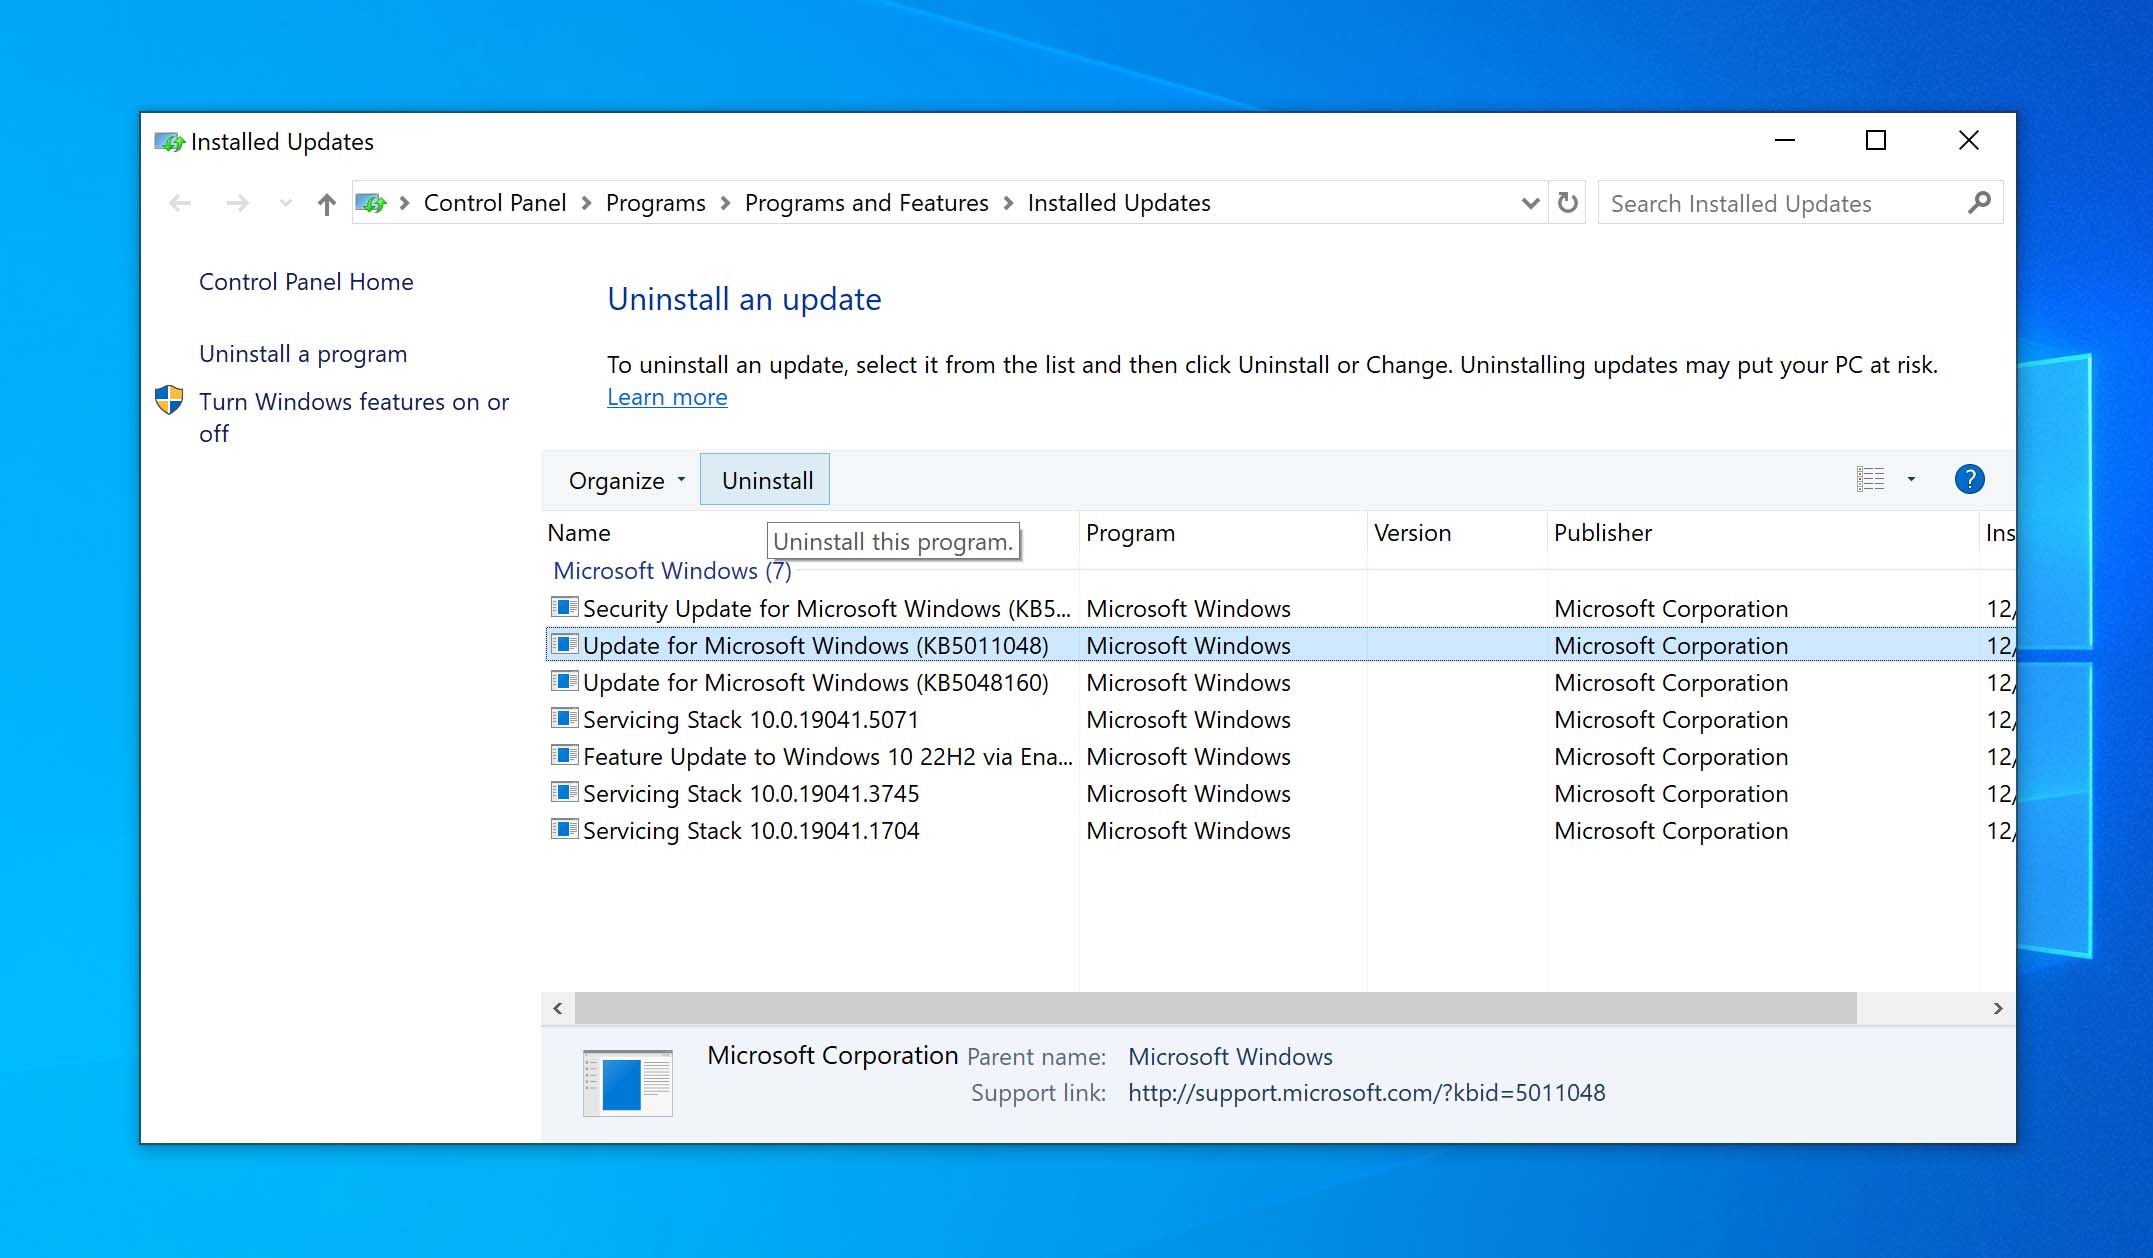
5. Uninstall the Update and Retrieve Your Files
What if you could roll back the update and get back to basking in the good old days?
Well, here’s how you can do that:
- Open Settings.
- Head over to Update & Security and click on Windows Update.
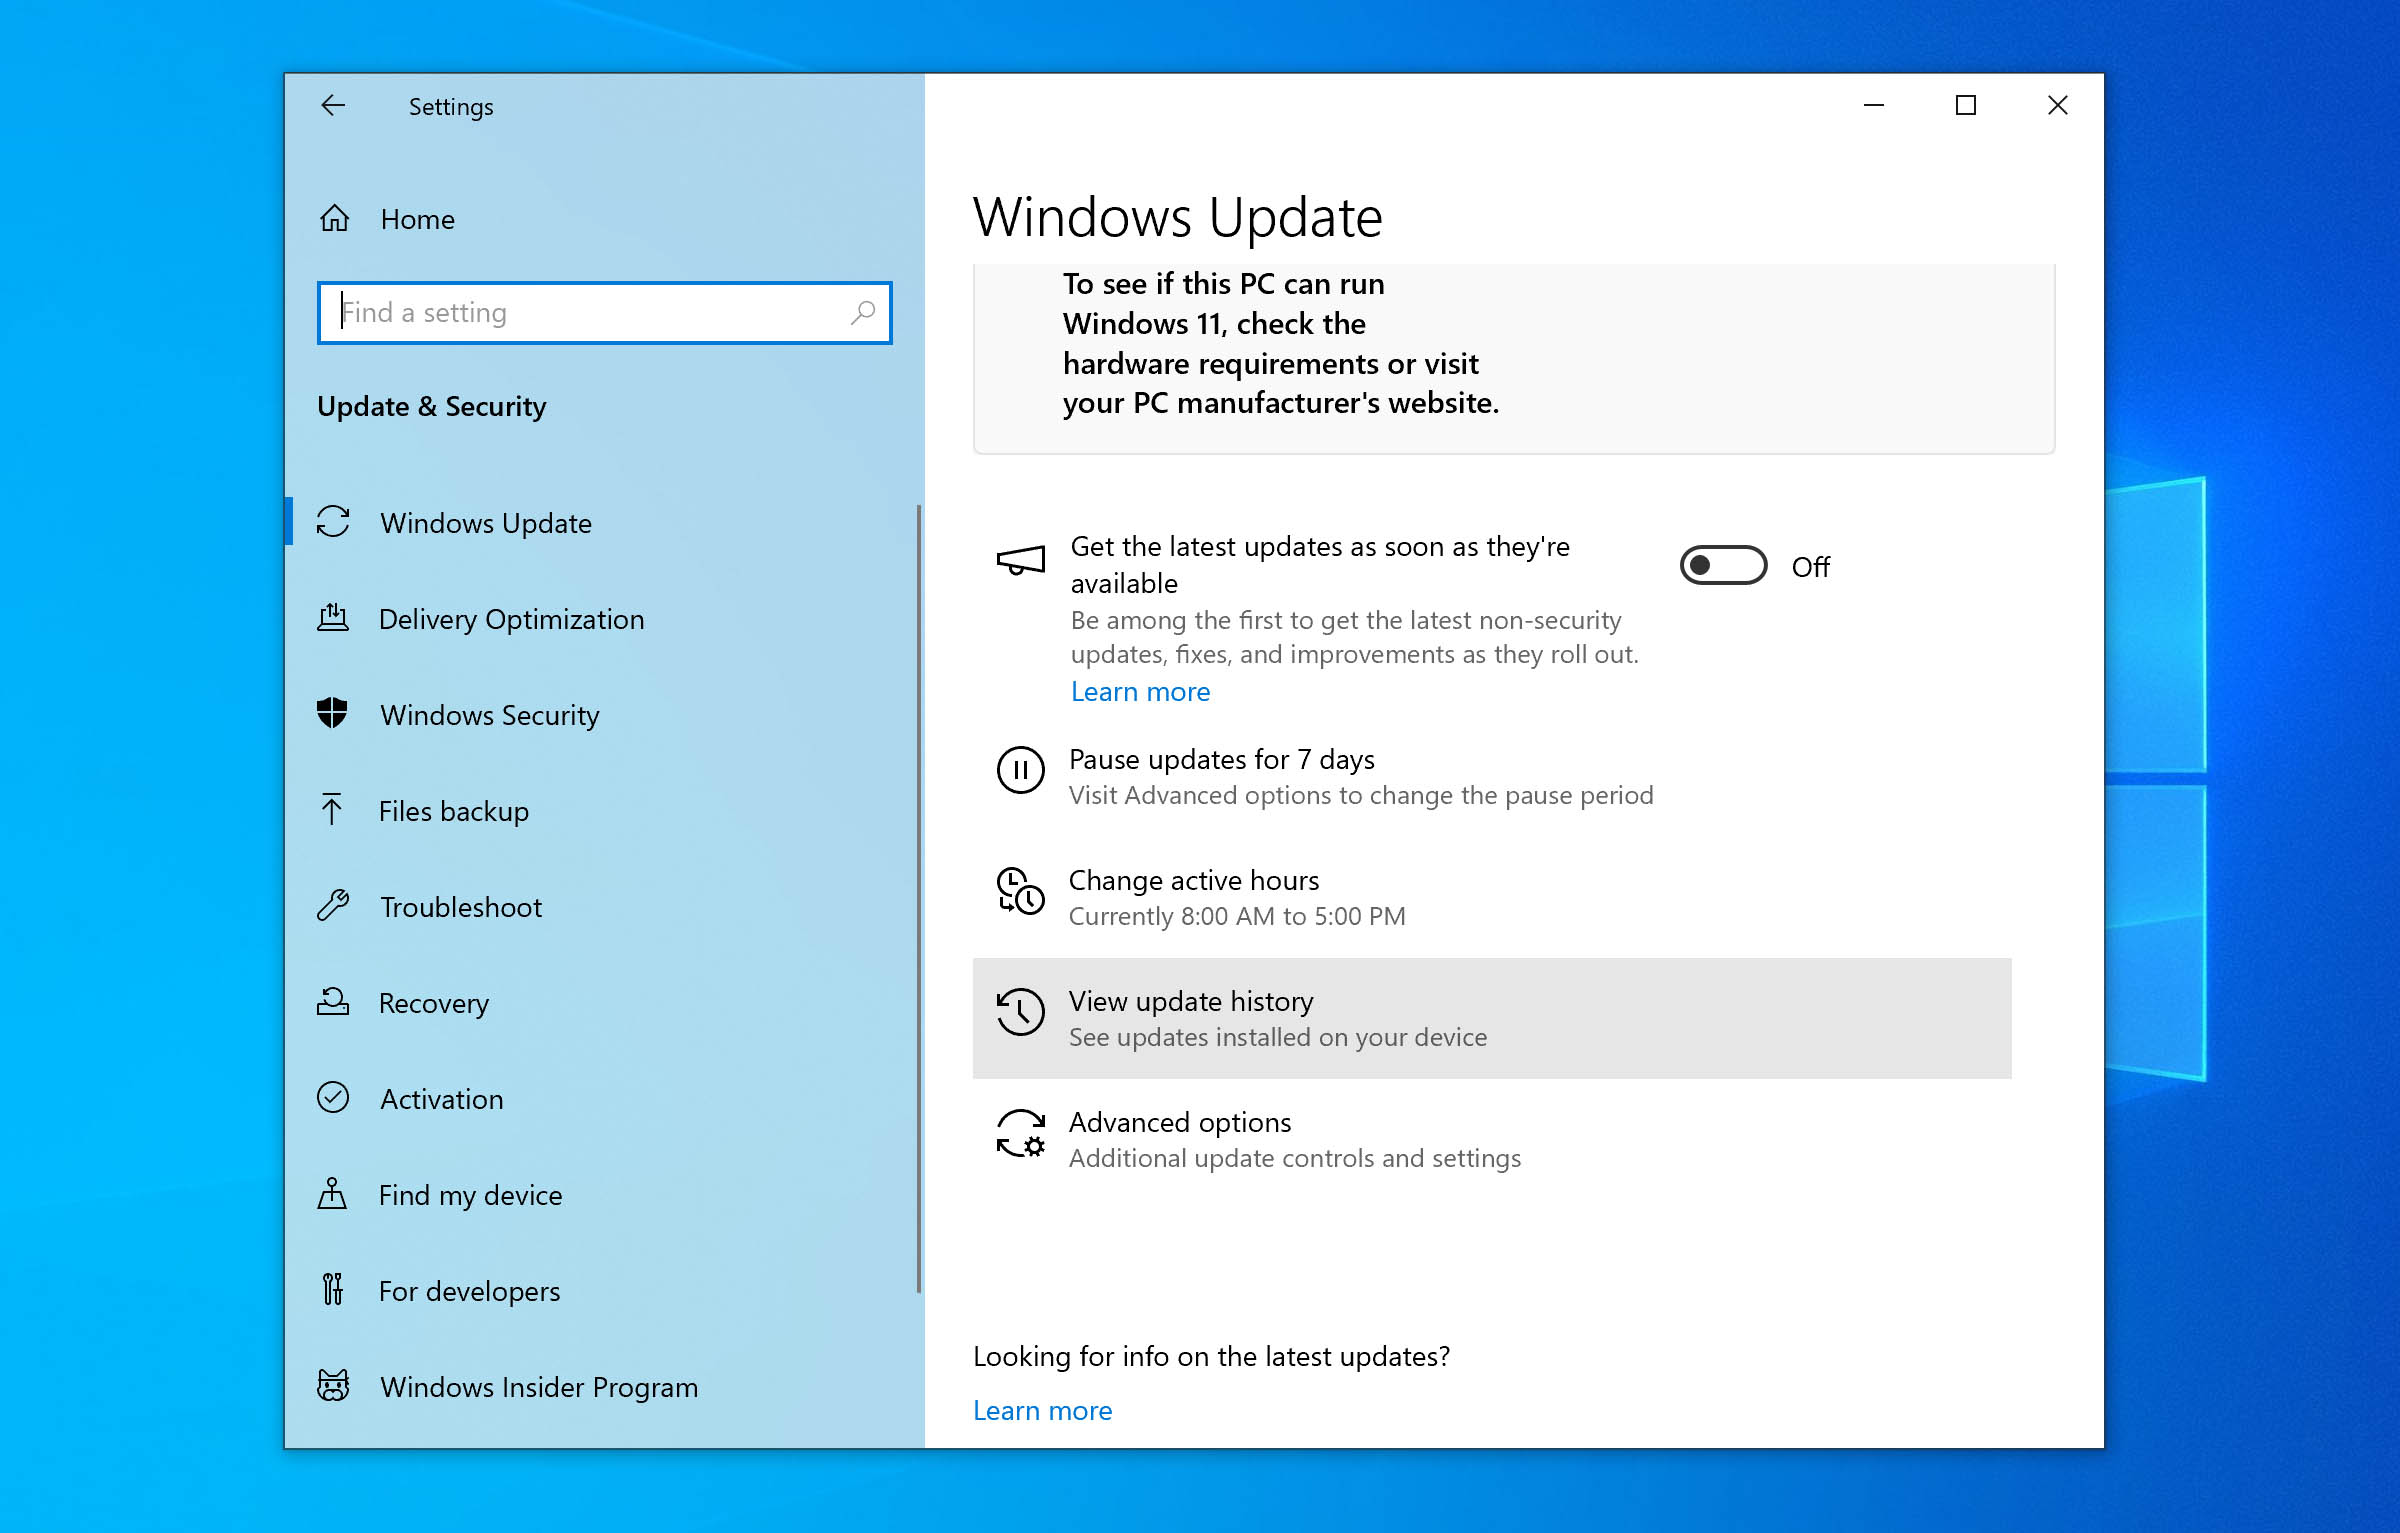
- Now, click on View Update History > Uninstall Updates.
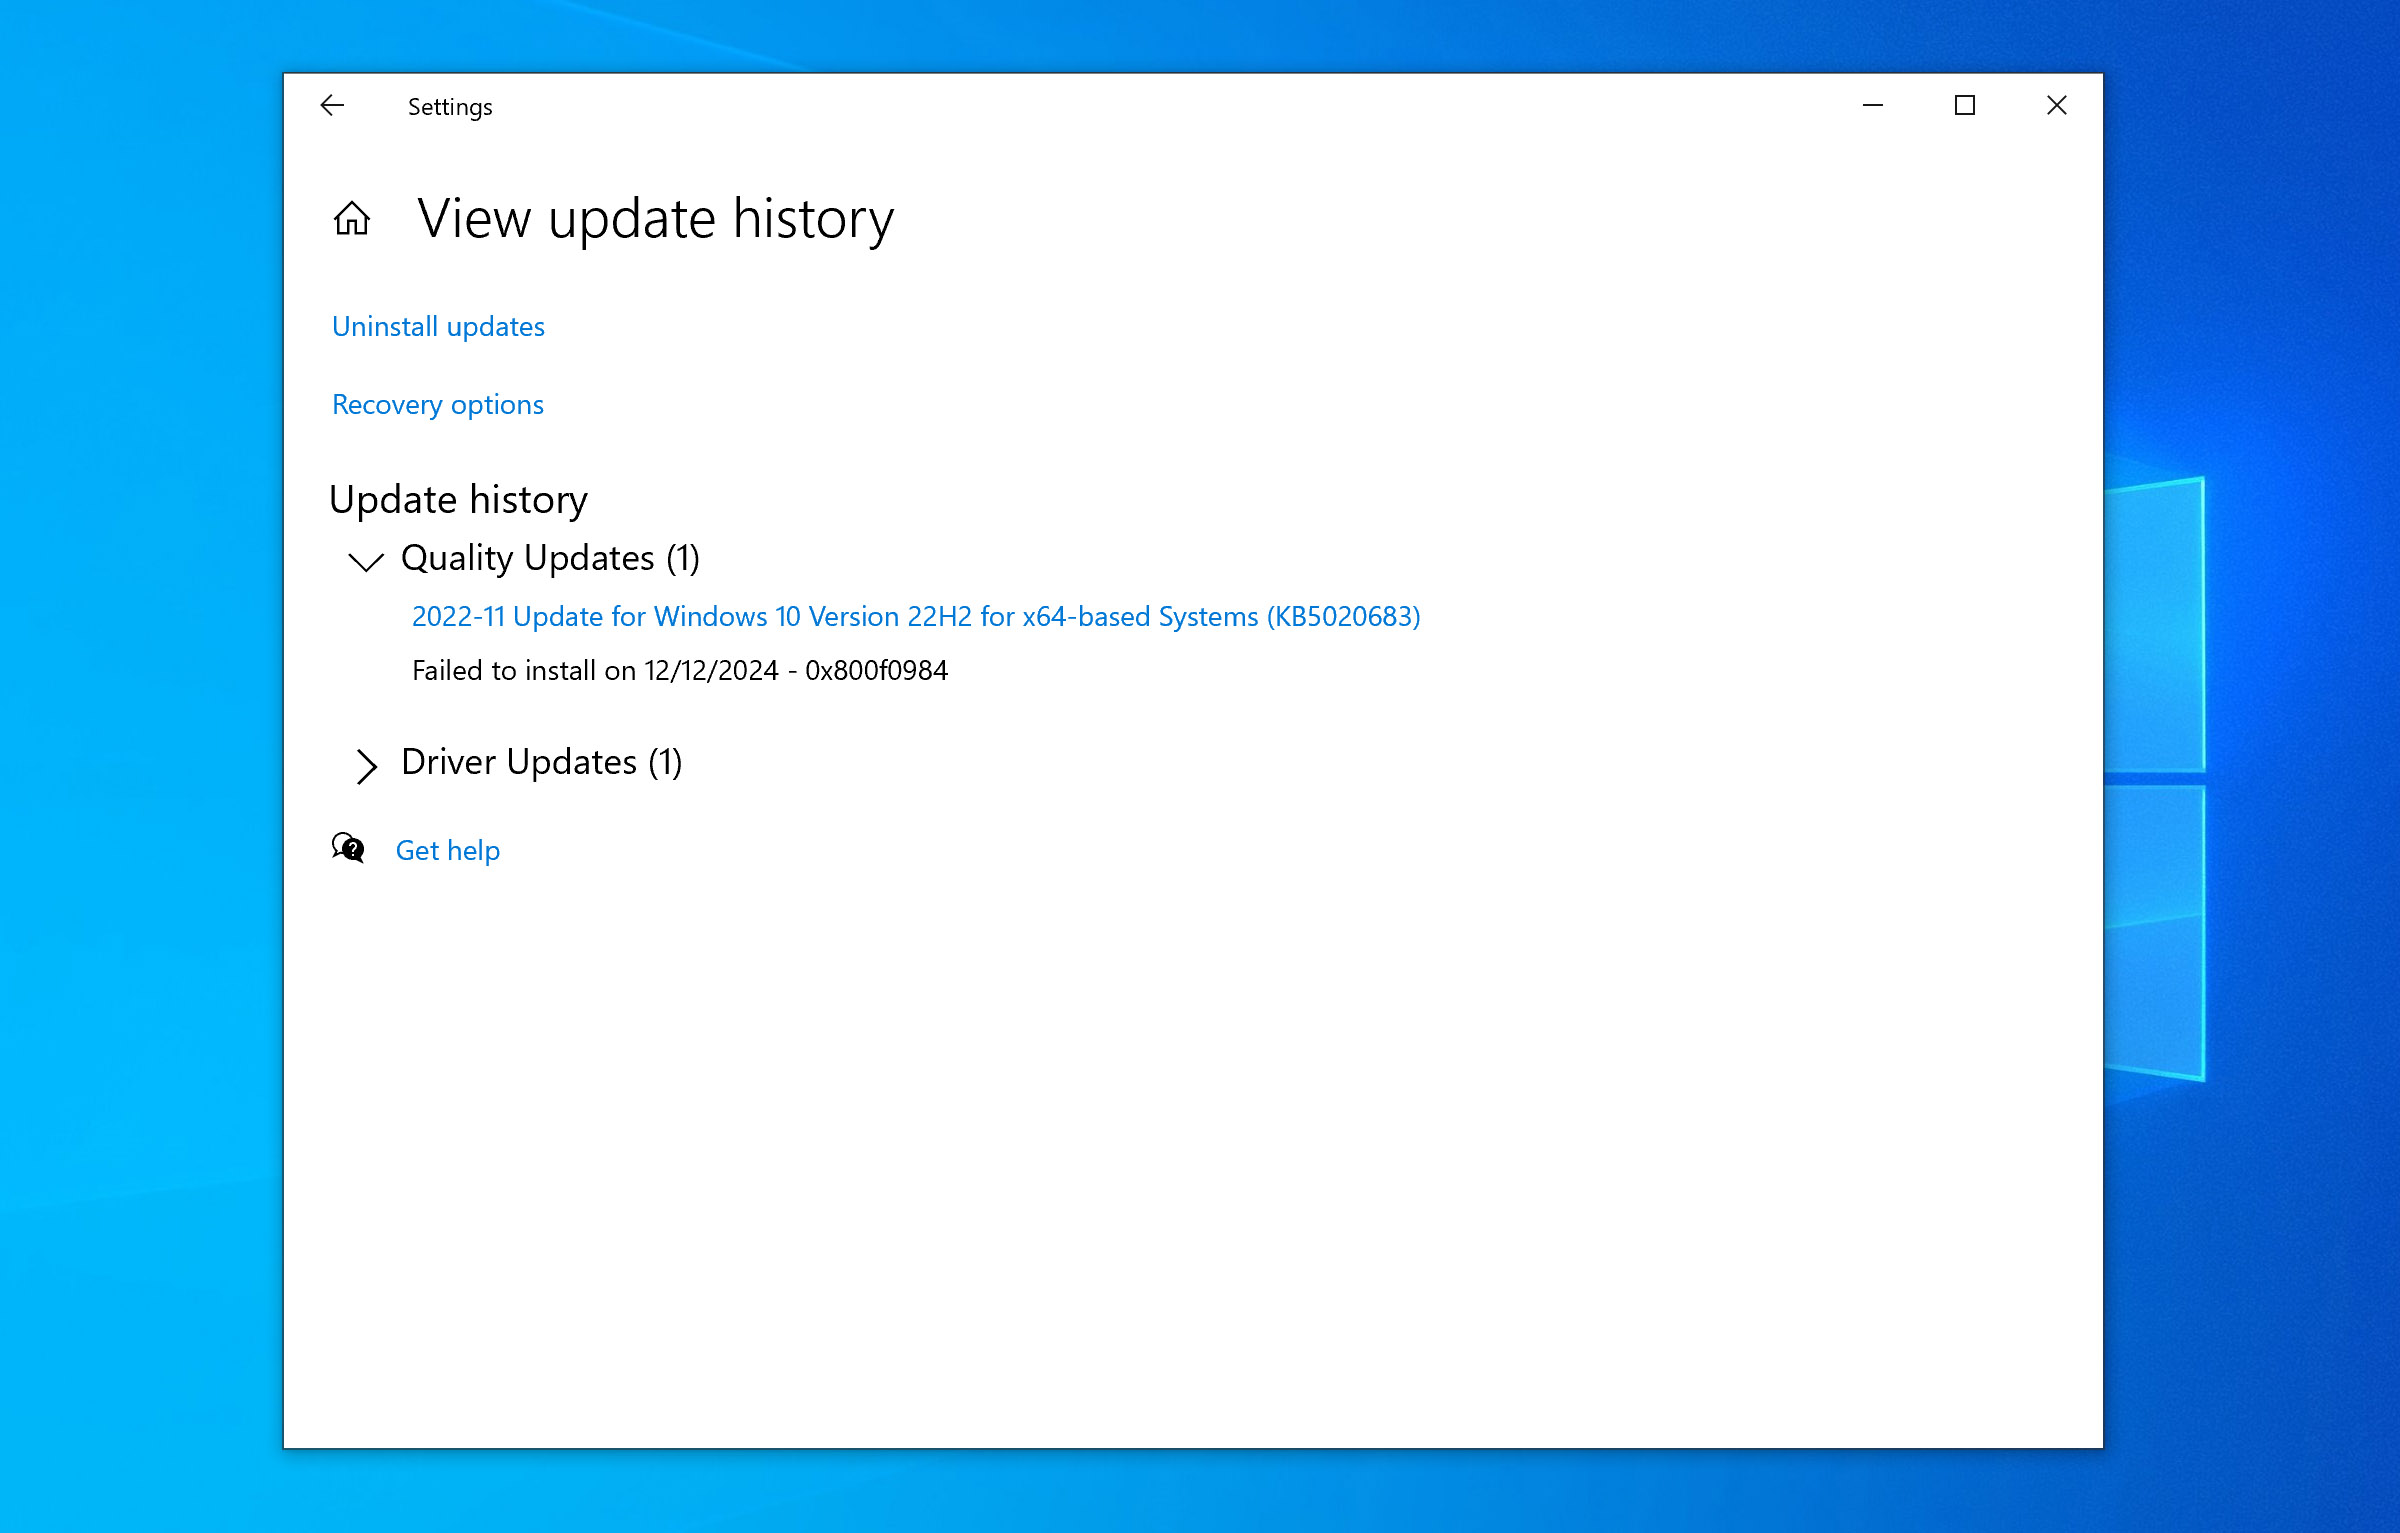
- Type in the buggy update ID into the search box, and press Enter.
⚠️
Note: To quickly check out what version of Windows you’re on, use the shortcut Windows key + R and key in Winver and then select OK.
- Restart your PC after the update gets uninstalled. Your files should be accessible now.
If the above steps didn’t work, you could also head over to File Explorer and then C:\Users\ . There are chances that the main user folder is renamed. For instance, if the user profile folder is C:\Users\Joshua there might be a C:\Users\Joshua.bak or C:\Users\Joshua.000 folder. This renamed folder will have your files.
6. Recover from a Previous System Restore Point
The restore point is a nifty feature in Windows. In a nutshell, if you run into a critical error upon installing a new application, or update – the system restore essentially rolls back the settings and configurations to an earlier point in time.
Here’s how you can recover data after Windows Update using System Restore:
- Open Start.
- Key in Create a restore point.
- Click the first result and enter the System Properties page.
- Click on the System Restore button.
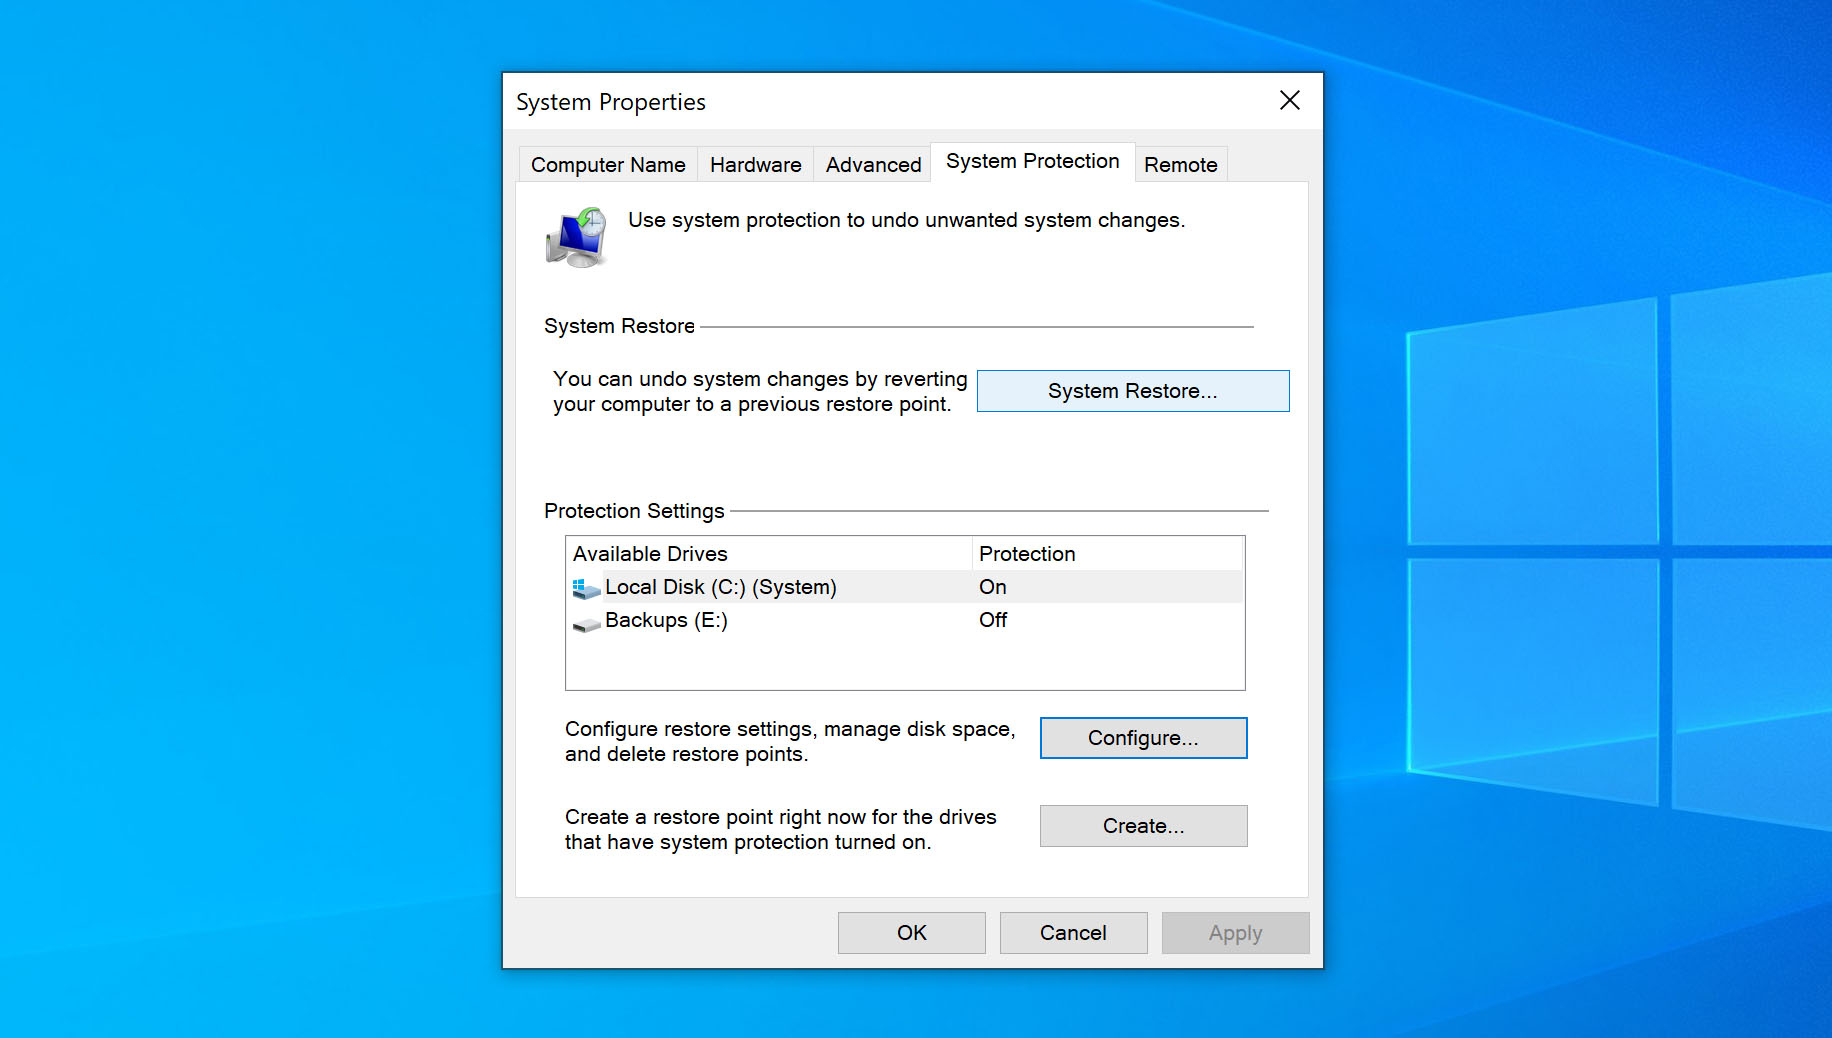 If you can’t click on the button, it means there is no available restore point.
 - Click on Next.
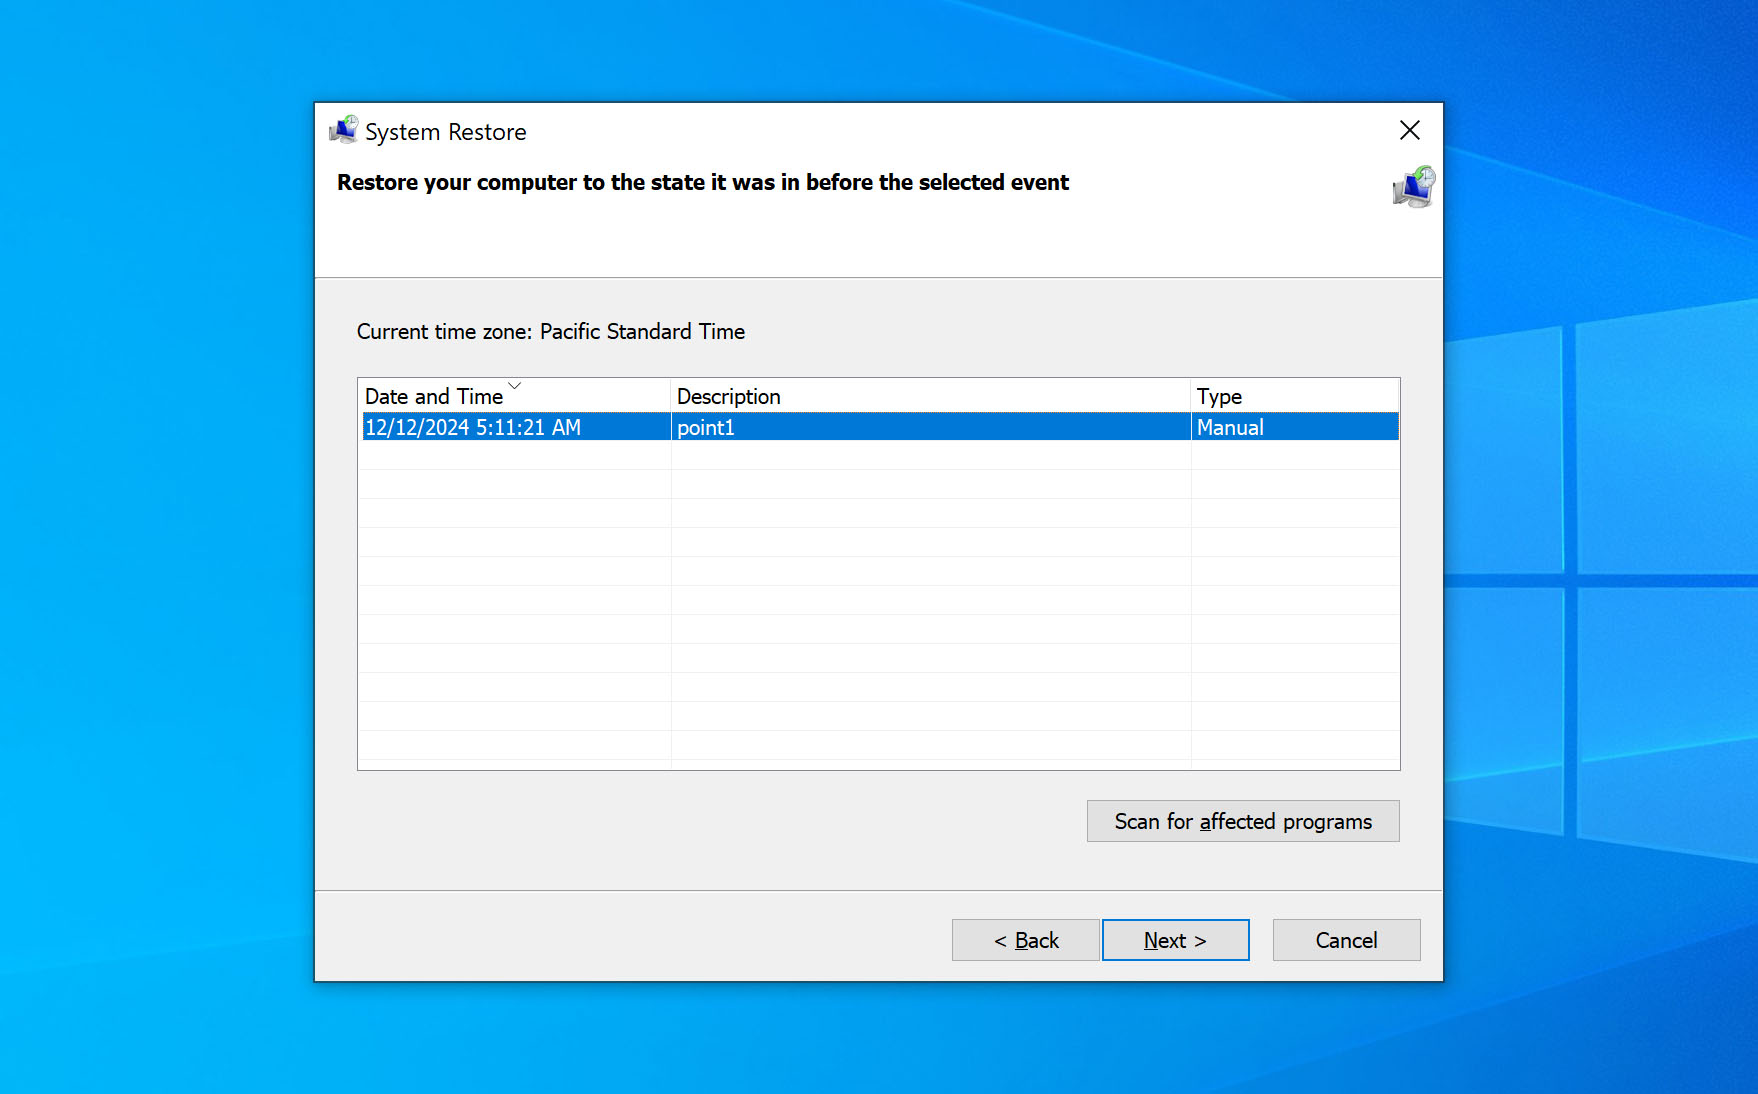
- Select the desired restore point.
- Click on Close > Next > Finish.
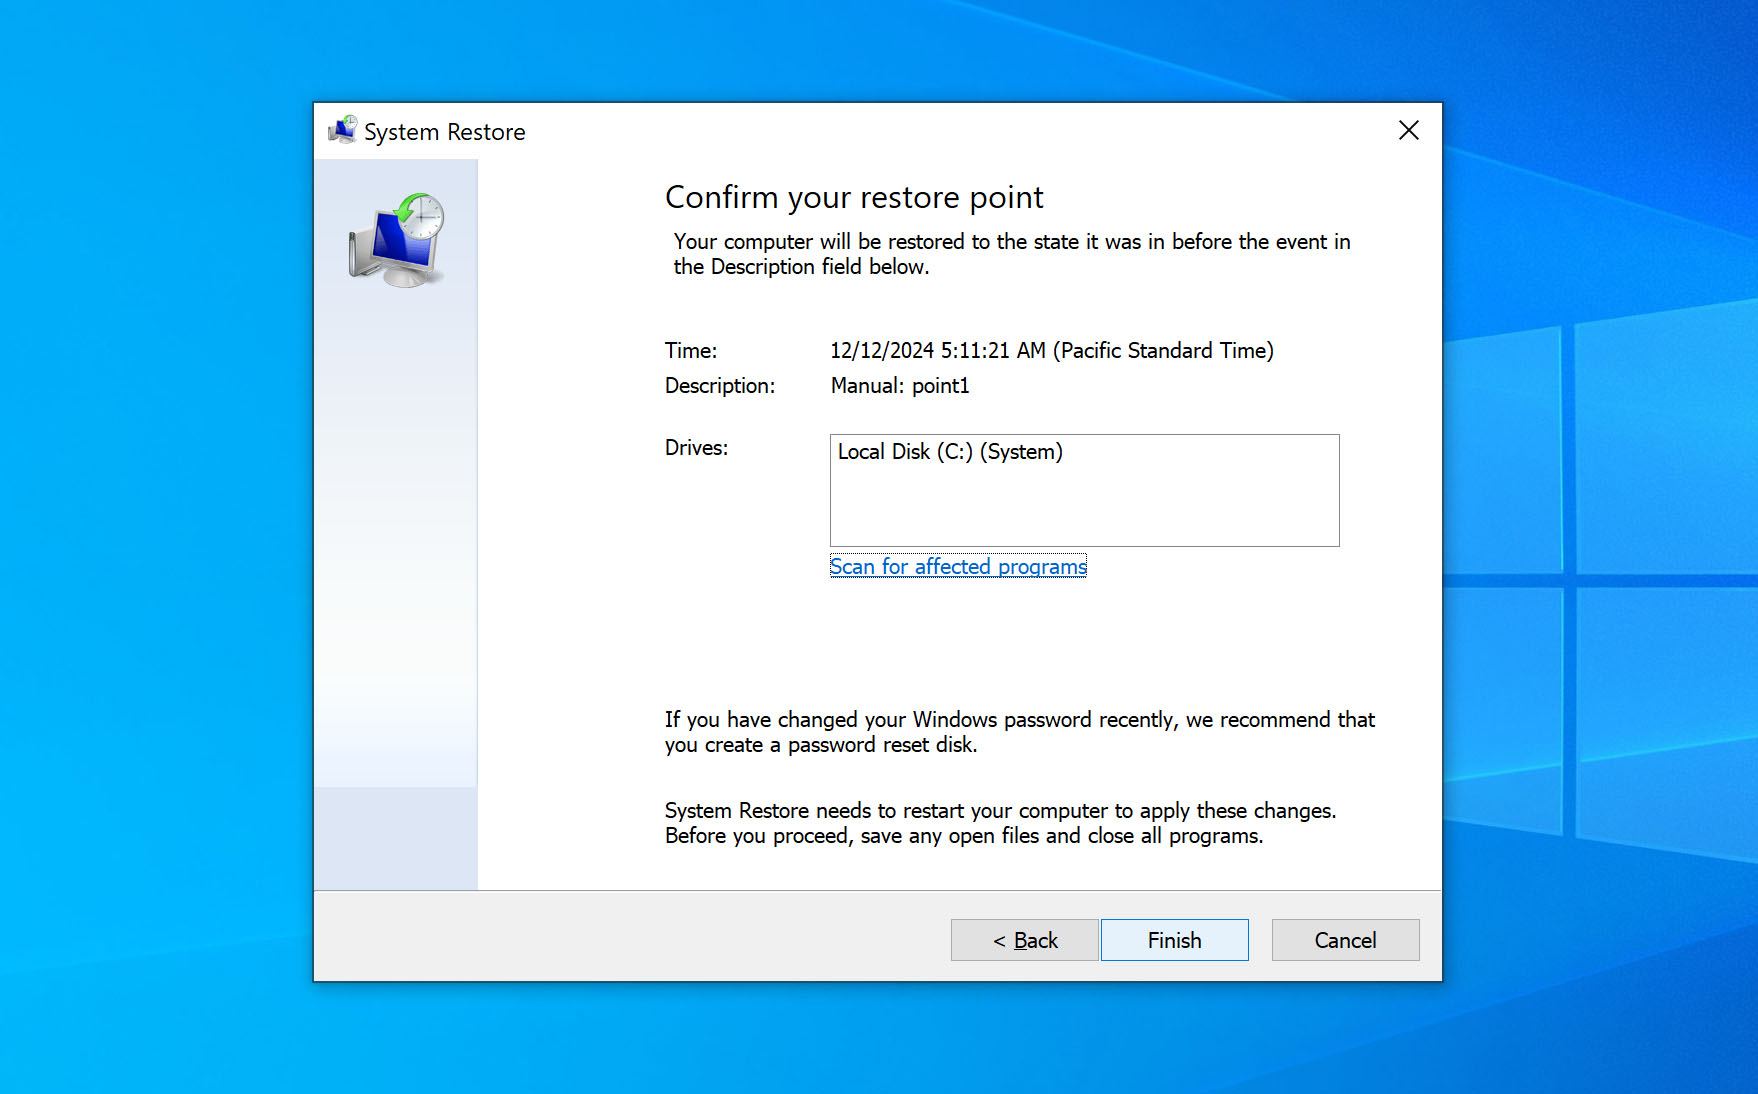
Now, your PC would have teleported back in time to undo the buggy update.
System Restore is disabled by default. Here’s how you can enable it.
7. Sign Out from the Temporary Windows Profile
After a Windows update, there are chances you encounter the “You have been logged in with a temporary profile” alert. Consequently, your desktop would be lifeless with your profile files gone and Windows settings back to default.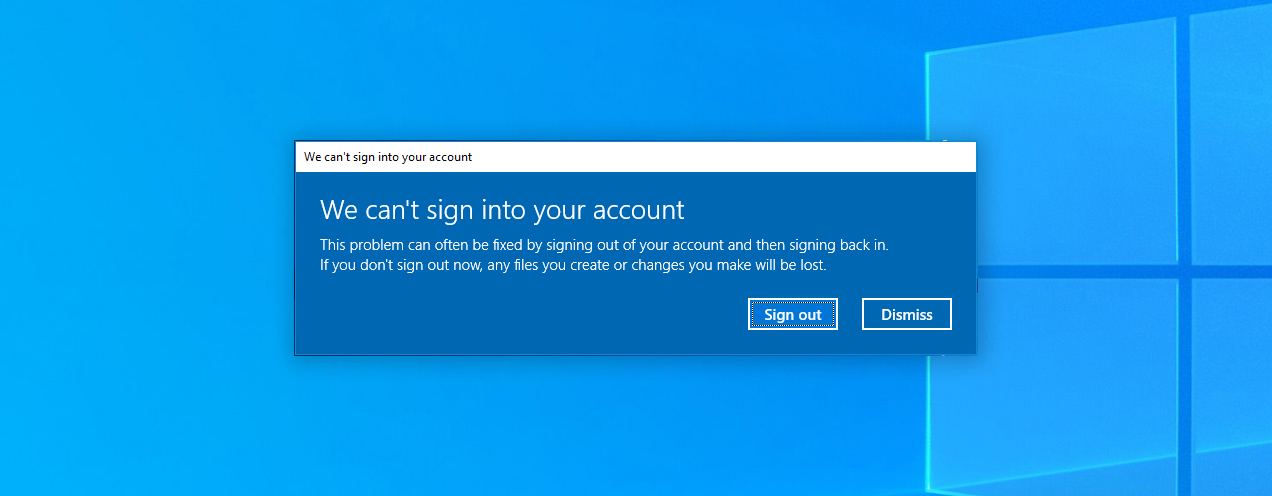
Here’s how you can check if you’re on a temporary profile:
- Open Settings.
- Head over to Accounts.
- Click on Sync your settings.
- If you encounter the “You are logged on with a temporary profile. Roaming options are currently unavailable.” message, – you’re on a temporary profile.
- Reboot your computer.
- Sign in with your account.
Now, you should be able to access all your original files and folders.
Caution: Before restarting your PC, back up your data (from the temporary profile).
There’s another workaround solution to this problem as well:
- Restart your computer while holding down on the Shift key – this boots your computer into safe mode.
- Now, reboot out of safe mode. Your PC should restart normally and bring back your default user profile.
Note: The real reason why this temporary profile issue arises is that Windows tends to create a temporary user profile while applying its updates. In some cases, the temporary profile doesn’t get removed even after the installation ends. As a result, you end up logging into this empty – temporary profile.
8. Thoroughly Search for Your Files
While upgrading Windows, sometimes your data moves to a different location or folder. As a result, conducting a manual file search could help you locate that data:
- Open up File Explorer (Windows key + E).
- Click on This PC on the left panel.
- Key your file name into the top right search box.
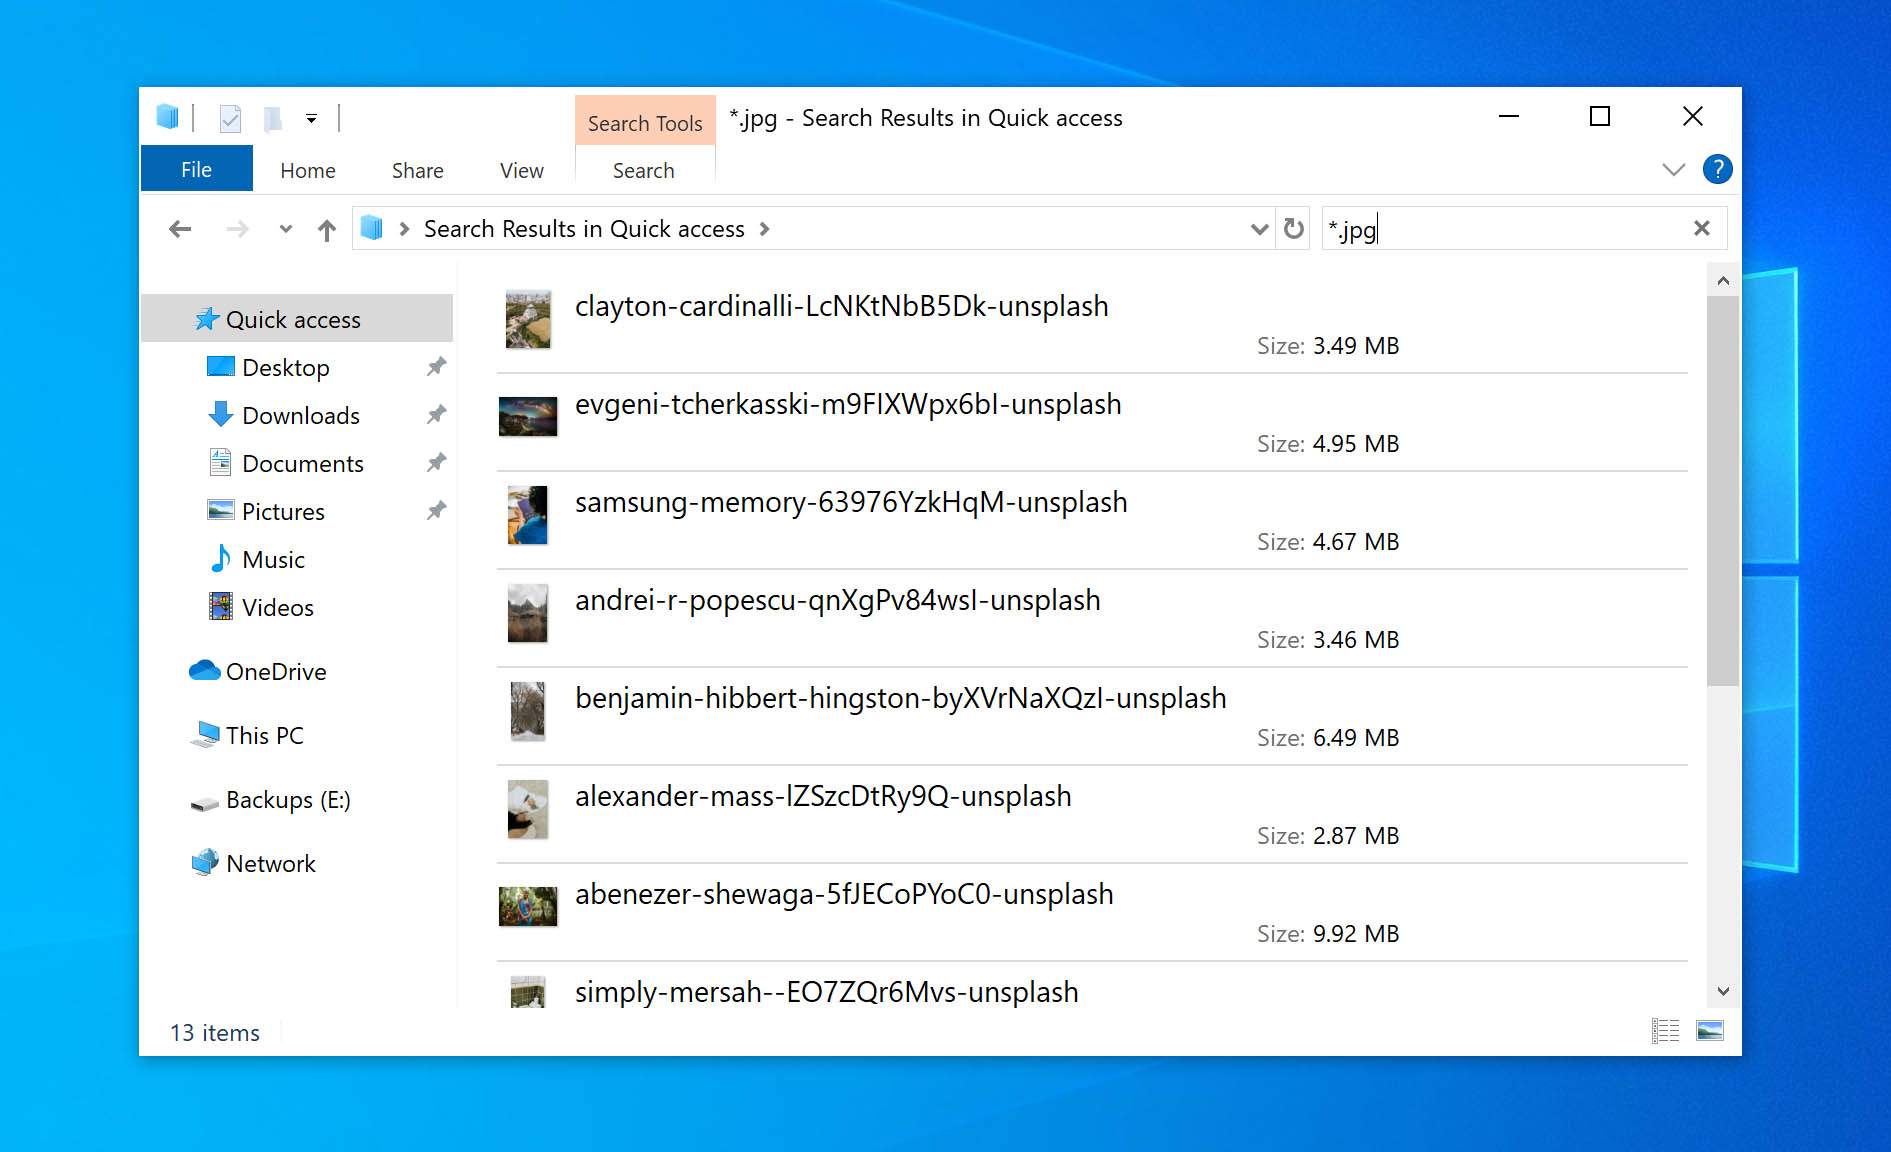
You can also use the * (asterisk) for a wildcard search. For instance, you can use the *.PDF search query to pull up all your PDF documents.
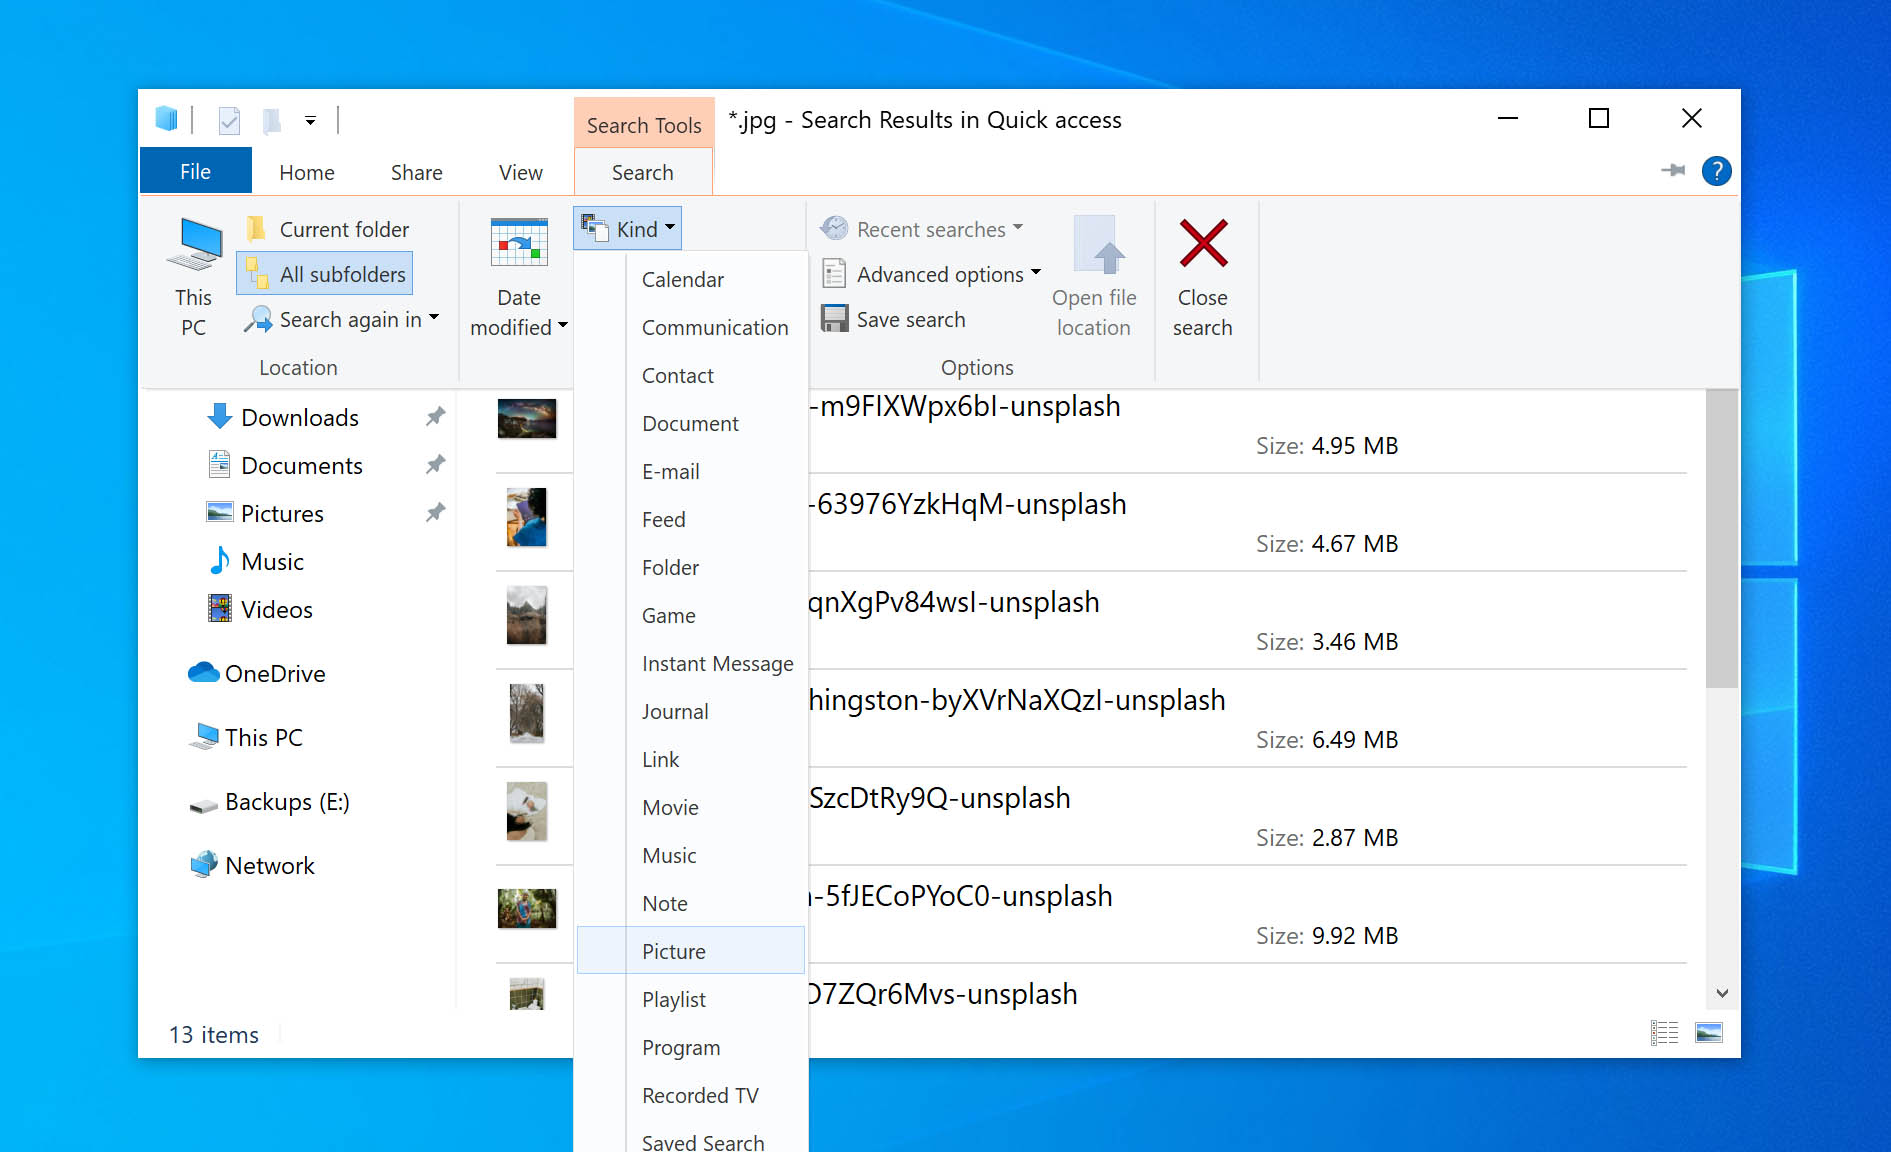
Additionally, File Explorer has a nifty feature that helps filter out your search results. You can drop down the kind tab and select a file type for a more refined search.
Furthermore, you can conduct a more comprehensive search by unraveling your hidden files/folders. Here’s how you can unhide files:
- Go to File Explorer.
- Under the View Tab, click on Options > Folder Options.
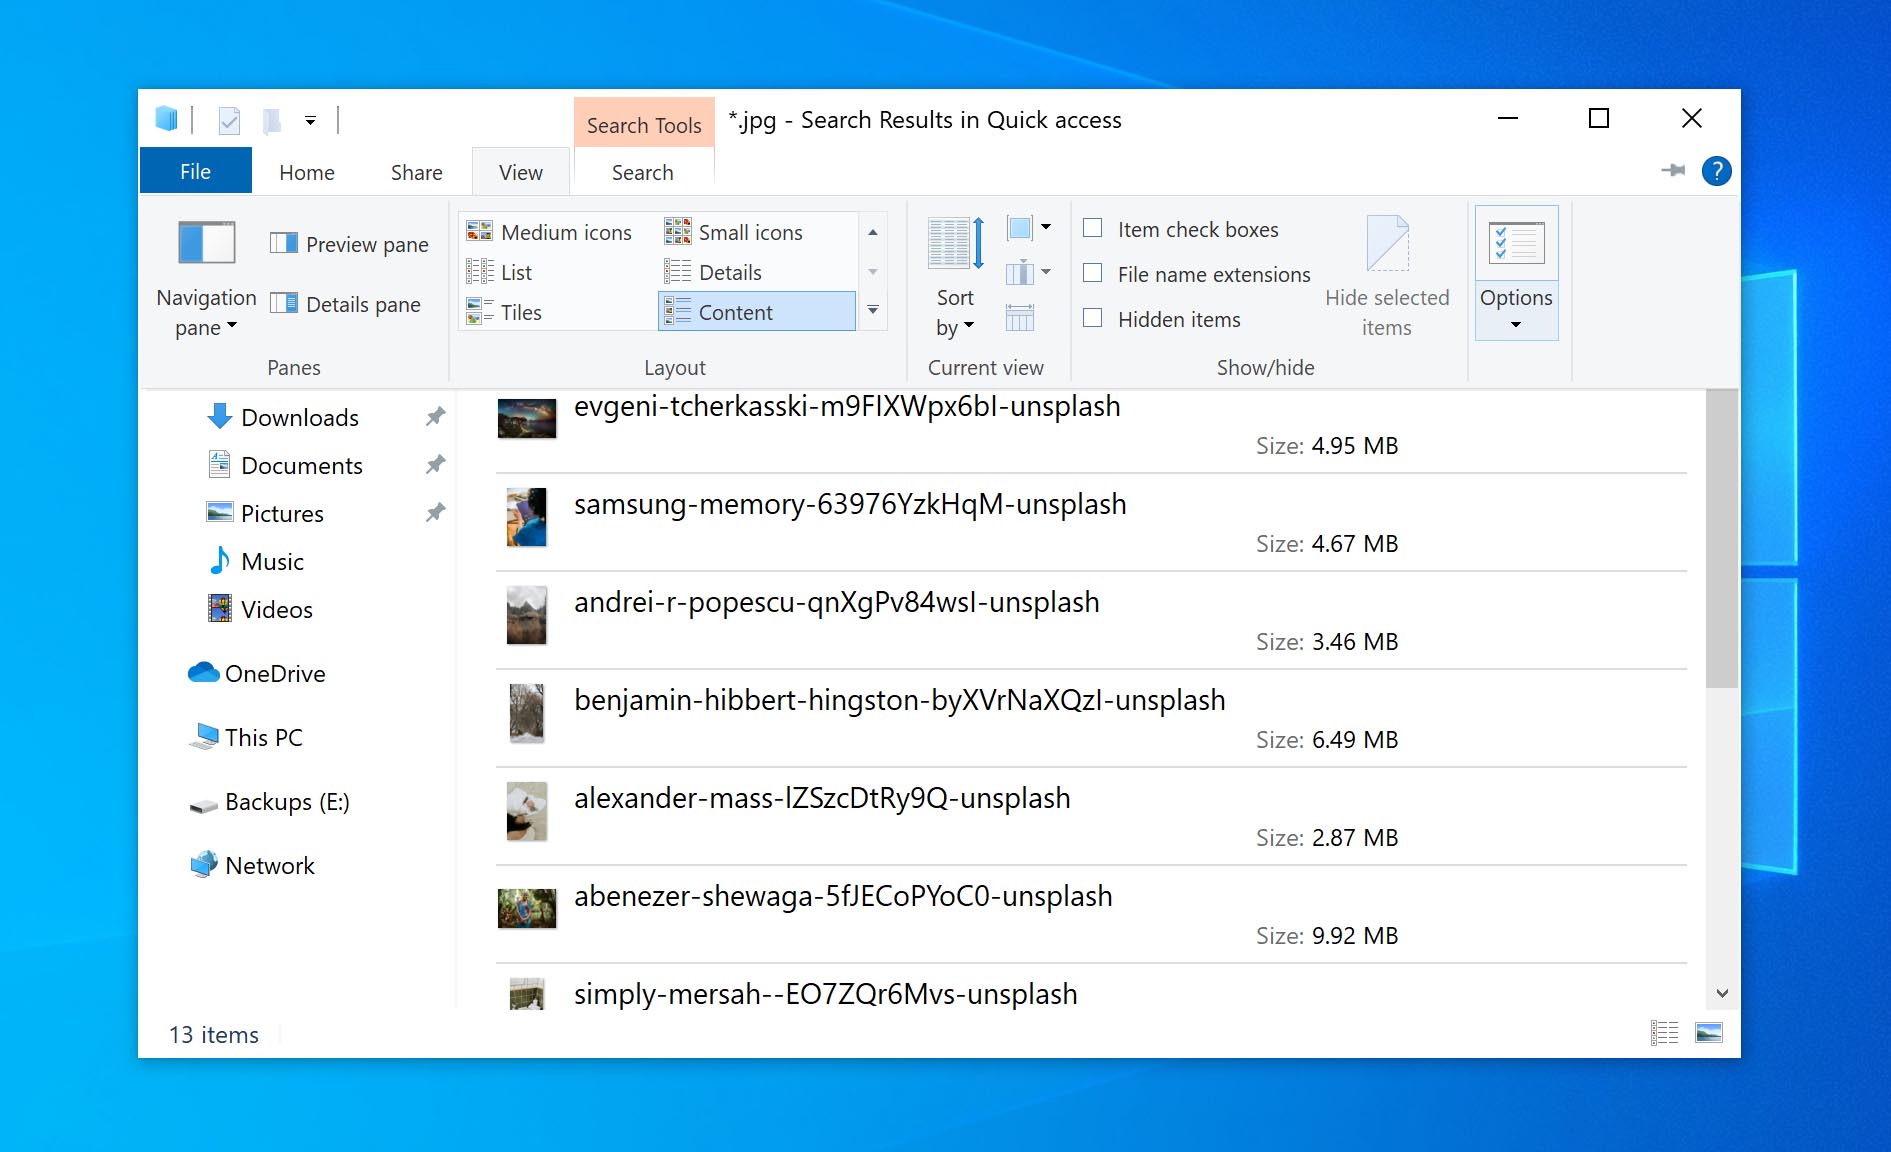
- Under the Advanced Settings section of the View tab, check the option for showing hidden files.
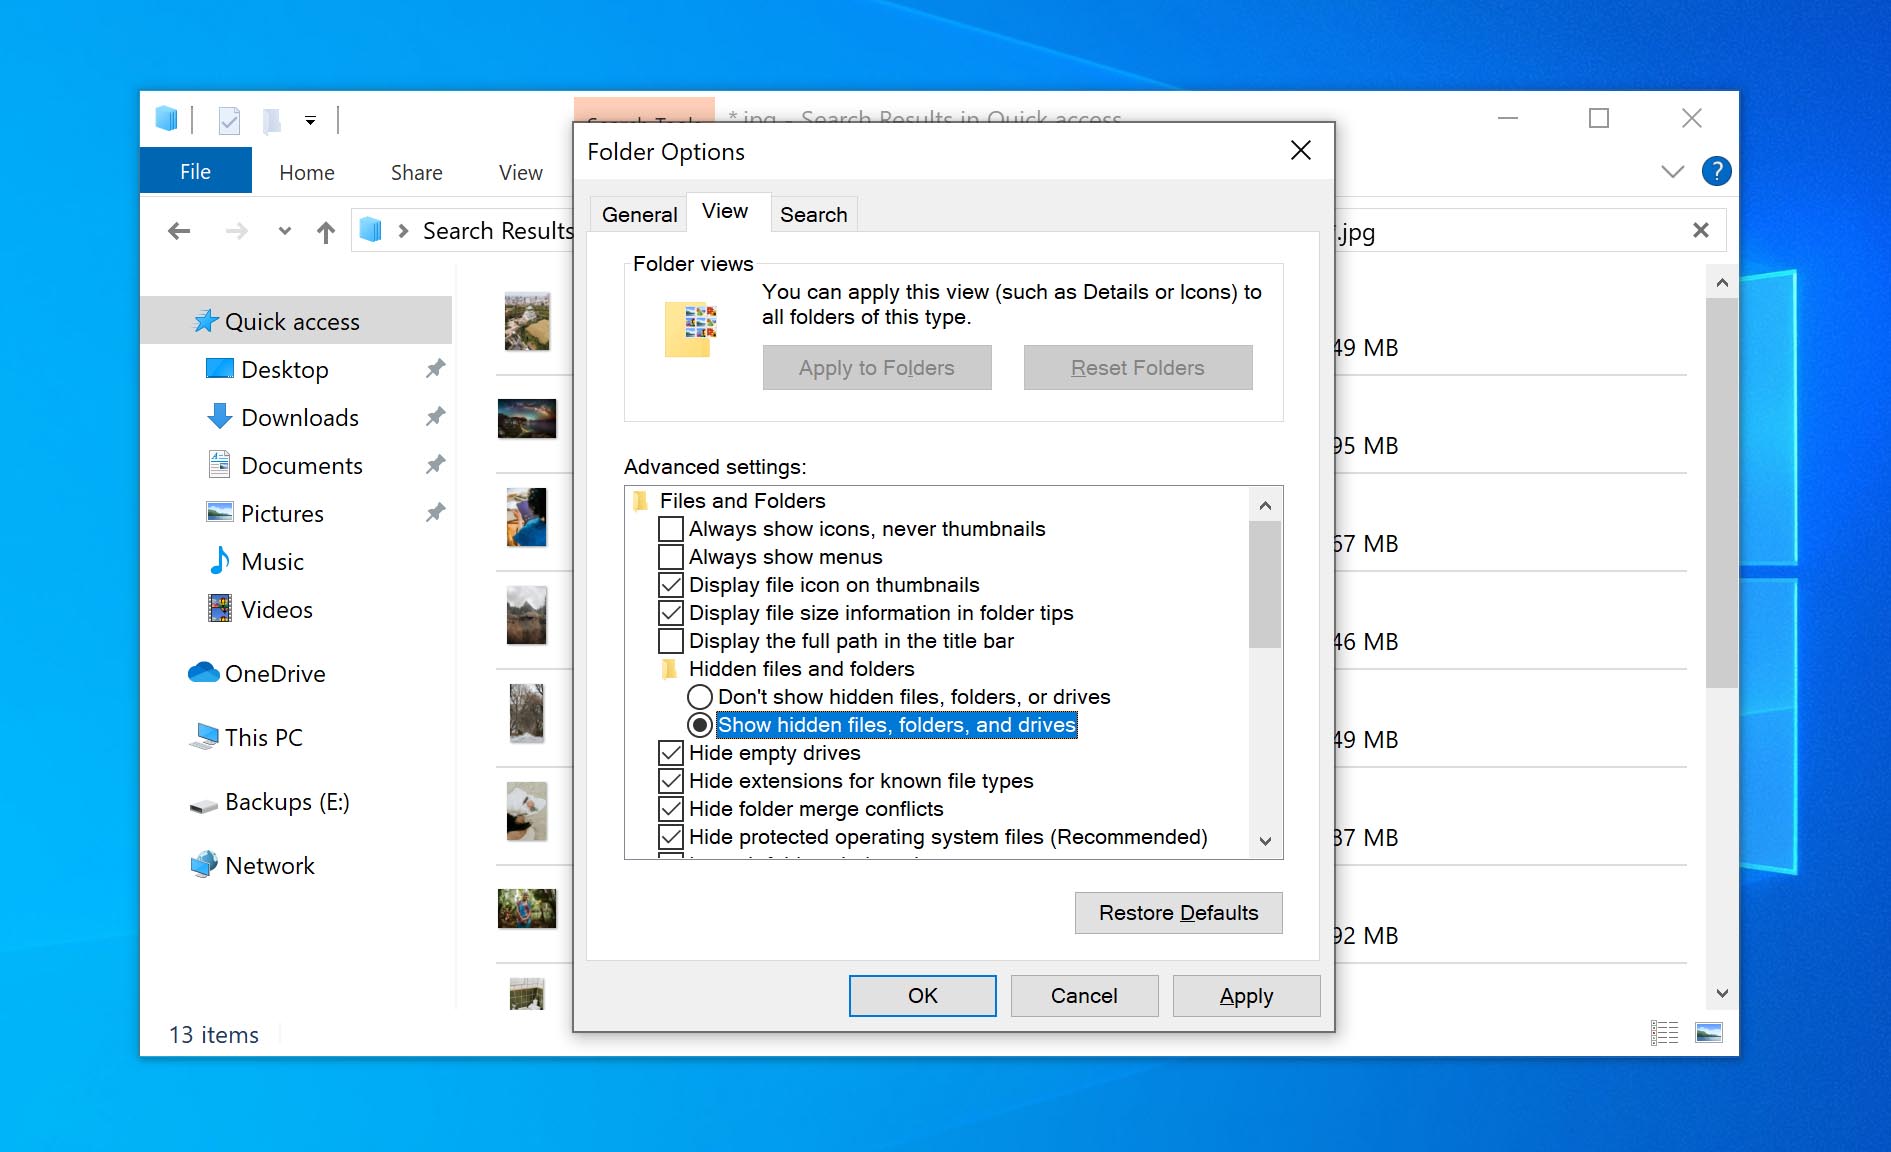
Now, you can initiate your file searches. You never know: You were probably fretting over a file that was accidentally hidden!
FAQ
Can Windows Update delete everything on my computer?
It’s unlikely that a Windows Update would delete everything on your computer. Our team’s experience and the sources we consulted when preparing this article primarily discuss missing files after an update, rather than completely deleted files. This usually happens when Windows creates a temporary user profile during the update process. However, a clean install of Windows will erase all data on your PC. Additionally, if an update is interrupted by something like a power outage, it could cause file corruption and data loss. Windows updates should not delete personal files, but it can happen under certain circumstances.
Why did Windows Update delete my desktop files, and how can I recover them?
Several reasons could explain why your desktop files appear to be deleted after a Windows update. The most likely culprit is that Windows created a temporary user profile during the update, making your usual files inaccessible. You can try rebooting your computer and signing back into your regular account. The update might have also moved your files to a different location, like the Windows.old folder. This folder contains data from your previous Windows installation and is automatically deleted after 10 days. If you were syncing your desktop with OneDrive, check the OneDrive Recycle Bin. If these methods fail, try using data recovery software like Disk Drill (or its alternatives) or explore options like System Restore or checking for a disabled administrator account.
My laptop updated and deleted everything. What should I do?
Our experience doesn’t include this specific scenario of a Windows update deleting “everything” on a laptop. However, if your files are missing after an update, you should first try restarting your computer and signing in with your regular user account. Then, check the Windows.old folder, your OneDrive Recycle Bin, and consider enabling the disabled Administrator account. If these initial steps fail to recover your files, consider using data recovery software. As a last resort, you can consult a professional data recovery service.
Key Takeaways
Did your files get deleted after a Windows update? Fret not because there’s a handful of techniques to get your data back.
We covered certain methods like conducting a refined search and signing out of the temporary profile. Moreover, try to use a data recovery tool – which simplifies the data recovery process.
Additionally, if you have backups, restore the saved backup, and you’re good to go.
We want to leave you with one bit of advice: Backup, backup & backup. It merely takes a few minutes to schedule automated backups. Let us know in the comments which technique you found the most helpful.
This article was written by Joshua Solomon, a Contributing Writer at Handy Recovery Advisor. It was recently updated by Oleksandr Medvediev. It was also verified for technical accuracy by Andrey Vasilyev, our editorial advisor.
Curious about our content creation process? Take a look at our Editor Guidelines.