If you’ve lost some (or even all) files from a CFexpress card, don’t be too quick to assume they’re gone for good. We’ve worked with every kind of memory card out there and seen just about every data loss case you can imagine, and yes, plenty involving CFexpress cards.
Today, we will lay out everything we’ve learned from real-world recovery work. You’ll see when CFexpress card data recovery is actually possible, which tools can get the job done, and how to recover your files step by step.
Want to skip the basics and go straight to the recovery part? Click here.
What Is a CFexpress Card and Where Is It Used
CFexpress cards are storage devices designed to store high-resolution photos and videos. These memory cards have PCIe 3.0 interface and NVMe 1.3 protocols that deliver faster speeds and enable you to take advantage of the latest features on your camera.
Is CFexpress better than an SD card?
Though more expensive than SD cards, CFexpress memory cards are the better choice for professionals and those who shoot videos. This is because they are primarily used for high-end cameras and are better equipped to handle videos in 4K to 8K resolution. They are also more durable and boast super-fast speeds over other media storage devices like SD cards.
Is there a difference between CF and CFexpress?
A CompactFlash (CF) card is a memory card format that stores data using flash memory technology. CFexpress cards are the latest generation of these CF cards that operate efficiently at higher speeds while working with high-resolution photos and videos on the latest cameras.
CF cards reach a maximum speed of 167 MB/s whereas the base speed of a CFexpress card is 1000 MB/s. The CFexpress cards also have a bigger form factor than CF cards.
Check out our article on recovering files from a CF card.
What is the difference between CFexpress Type A and Type B?
The CFexpress Type A card measures 20mm (width) by 28mm (length) by 2.8mm (thickness), while the Type B card measures 38.55mm by 29.6mm by 3.8mm respectively. The difference in size is mainly due to the PCIe lanes. Type A cards have one PCIe lane, whereas Type B cards have two.
Speed is also a differentiating factor between these two cards. Type A cards have a maximum theoretical transfer speed of 1000 MB/s, while Type B cards can reach a maximum theoretical transfer speed of 2000 MB/s.
When Can You Recover Files From a CFexpress Card?
Not every data loss situation is the same, and not every one is fixable. But in most cases, you can recover files from a CFexpress card, especially if you act quickly and follow the right process.
Here’s a breakdown of common scenarios where recovery is possible:
Data Loss Scenario |
Recovery Chances & What to Do |
Accidentally deleted files |
🟢 High. This is probably the most common data loss scenario we see (and usually the easiest to fix). As long as you haven’t saved too many new files to the card, there’s a strong chance recovery software can bring your deleted files back. That’s because when you delete something, the card doesn’t actually erase the data; it just marks that space as available for reuse. Until something overwrites it, your deleted files are still sitting there. Even if you’ve taken another photo or copied a small file, that doesn’t necessarily mean your deleted data is gone. But the more you use the card, the greater the risk. Best move: stop using the card immediately and run recovery software from a computer. |
Quick format (in camera or PC) |
🟢 High. Quick formats usually erase the file system, not the actual data. So, just like with accidental deletion, recovery is often possible if you act fast. If you formatted the CFexpress card by mistake, stop using it immediately. Don’t try to reformat again, and definitely don’t save anything new to it. Run a scan with CFexpress data recovery software. It can work even if the memory card has already been formatted. |
Full format |
🔴 Low (basically zero). A full format is a different story. Unlike a quick format, it actively overwrites the entire card with zeros or a new structure, depending on the system used. Once that happens, your original files are gone for good. In most cases, even professionals can’t recover anything after a full format. If you’re unsure what type of format was used, it’s worth running a scan just in case (but don’t get your hopes up). |
File system corruption / unreadable |
🟡 Moderate to high. If your CFexpress card throws an error, refuses to mount, or doesn’t show up in your file manager, it doesn’t automatically mean the data is gone. In many cases, the file system is just damaged, while the actual files are still intact underneath. The key thing to check is whether your computer detects the card at all. Open Disk Management (right-click the Start button and choose Disk Management) and look for the card, if it appears with the correct size, that’s a good sign. You can use data recovery software to scan it. |
Physically damaged CFexpress card |
🟠 Very low. DIY recovery won’t work. You’ll need a professional data recovery service with hardware tools. |
While data recovery from CFexpress cards is possible, you should manage your expectations. These cards use the NVMe protocol and often support Data Set Management (DSM) commands, similar to TRIM. For example, Swissbit’s CFexpress datasheet explicitly lists TRIM as a feature. That means when files are deleted or the card is formatted, the data may be wiped immediately. Whether that command has already been executed or not depends on the card’s firmware and how the host device handled the deletion. If it hasn’t been triggered yet, recovery is still very possible.
The most important rule is simple: the moment you realize something’s missing, stop using your CFexpress card. If it’s still in your camera, stop shooting and remove the card safely. Don’t try to view, rename, or transfer anything.
From there, plug the card into your computer using a reliable CFexpress card reader. Then, install appropriate express data recovery software (we’ll go over it below), and scan the card. The less you do between the moment of loss and the recovery attempt, the higher your chances to restore files from CFexpress intact.
The exact type or brand of your card doesn’t really matter, whether it’s a Sony CF express card Type A, Type B, or something else entirely. As long as your system can detect the card, the recovery process is the same. And if you need some encouragement, know this: our recent survey found that nearly 79% of people who tried a DIY recovery tool were able to get their files back.
How to Recover Data Using CFexpress Recovery Software
Now let’s get to the practical part. We’ll show you exactly how to recover lost files from your CFexpress card using our go-to recovery tool: Disk Drill.
We’ve tested a lot of memory card recovery software, and Disk Drill fits CFexpress recovery really well, and here’s why:
- It handles file systems commonly used with CFexpress cards, like exFAT, FAT32, and even NTFS (for cards formatted on PCs).
- If the file system is too damaged to be of any use, it falls back on a powerful signature-based scan. Disk Drill supports nearly 400 file types, including raw photo and video formats.
- It can restore deleted photos and videos from Canon (.CR2, .CR3), Sony (.ARW), Nikon (.NEF), and many others, including popular video formats like .MP4, .MOV, and .MXF.
- It also includes on-the-fly previews for a wide range of media types, so you can see what’s recoverable before you commit to recovery.
- And if your CFexpress card is starting to act unstable, Disk Drill includes a byte-for-byte backup feature. You can create a full image of the card and scan that instead, which is the safest way to recover data from a fragile CFexpress card without putting it under more stress.
Disk Drill has a bunch of other useful features, like session saving, file type filters, and smart scan modes. You can check them all in our full Disk Drill review, but for now, let’s see how to use it to recover data from CFexpress cards:
- Plug your card into your computer using a compatible CFexpress card reader.
- Download and install Disk Drill from the official website.
- Open Disk Drill. You’ll see a list of available drives. Look for your CFexpress card, it might be labeled with the brand (like Sony, Lexar, or ProGrade), or just show as a removable device. If you see multiple partitions, select the full physical device.

- (option step) If you see that your CFexpress card behaves oddly, we recommend one extra step before scanning: create a disk image and scan that instead. Head to the “Extras” section in Disk Drill, choose the Byte-to-byte backup option, select your CFexpress card, and pick a safe location on your computer to save the file.
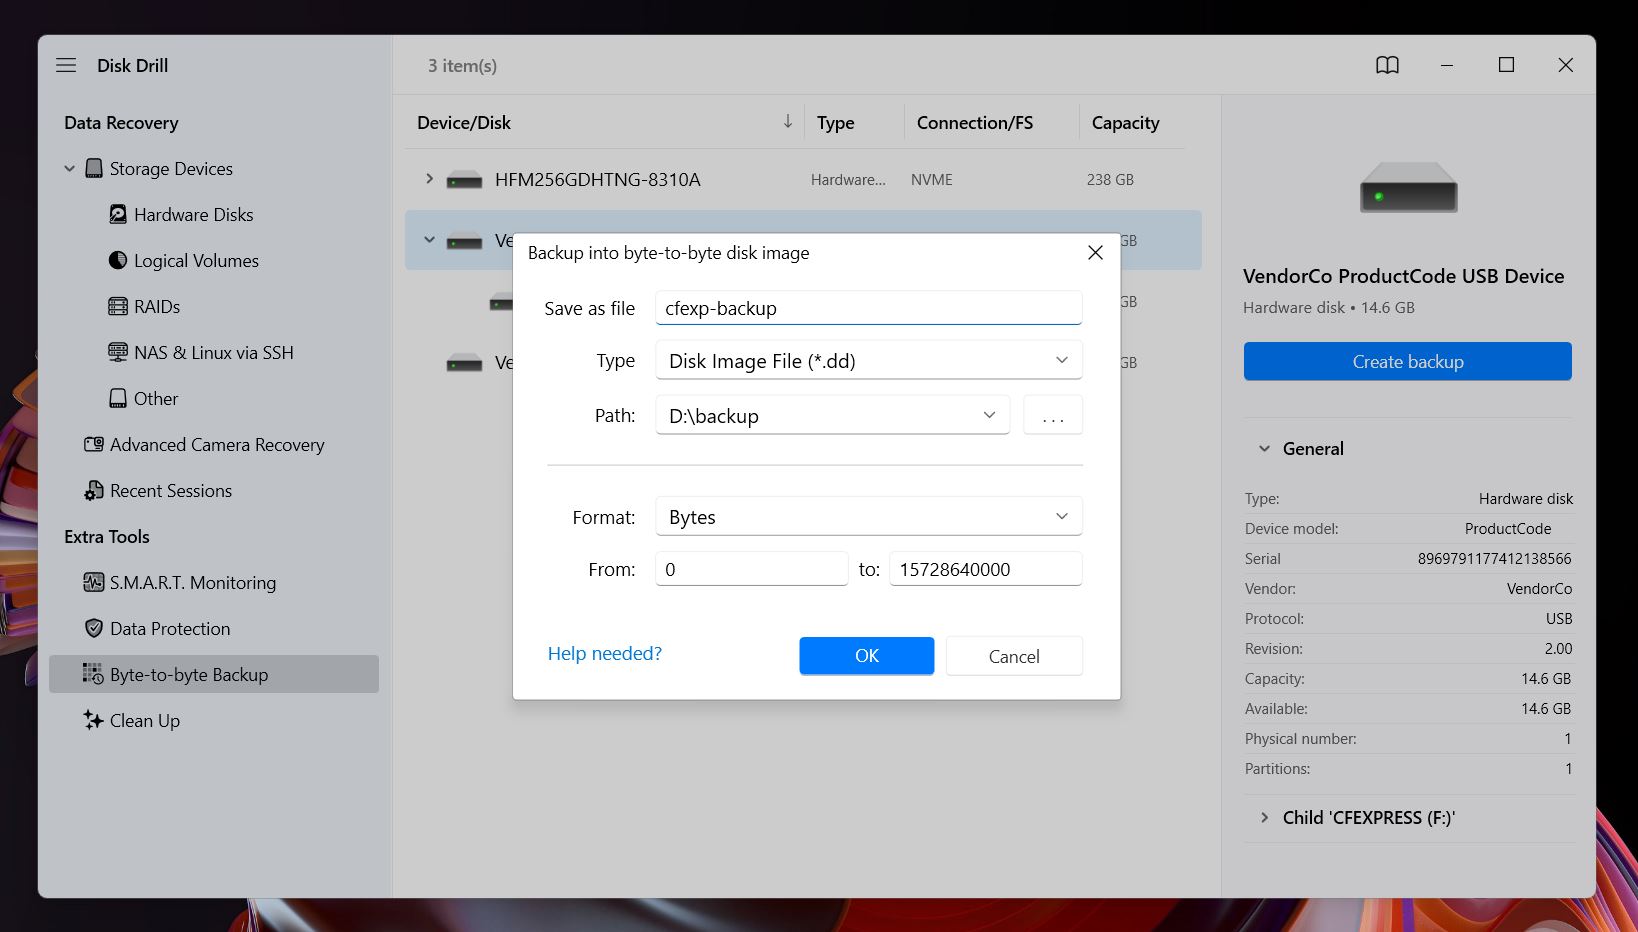 Make sure to store the image on a separate drive (not on the card itself). You’ll need a little more free space than the total size of the card.
Once the backup is complete, you can mount the image in Disk Drill and scan it just like a normal device. To do that, click Attach disk image at the bottom of the main screen. This approach protects your original media and gives you a stable copy to work with.
Make sure to store the image on a separate drive (not on the card itself). You’ll need a little more free space than the total size of the card.
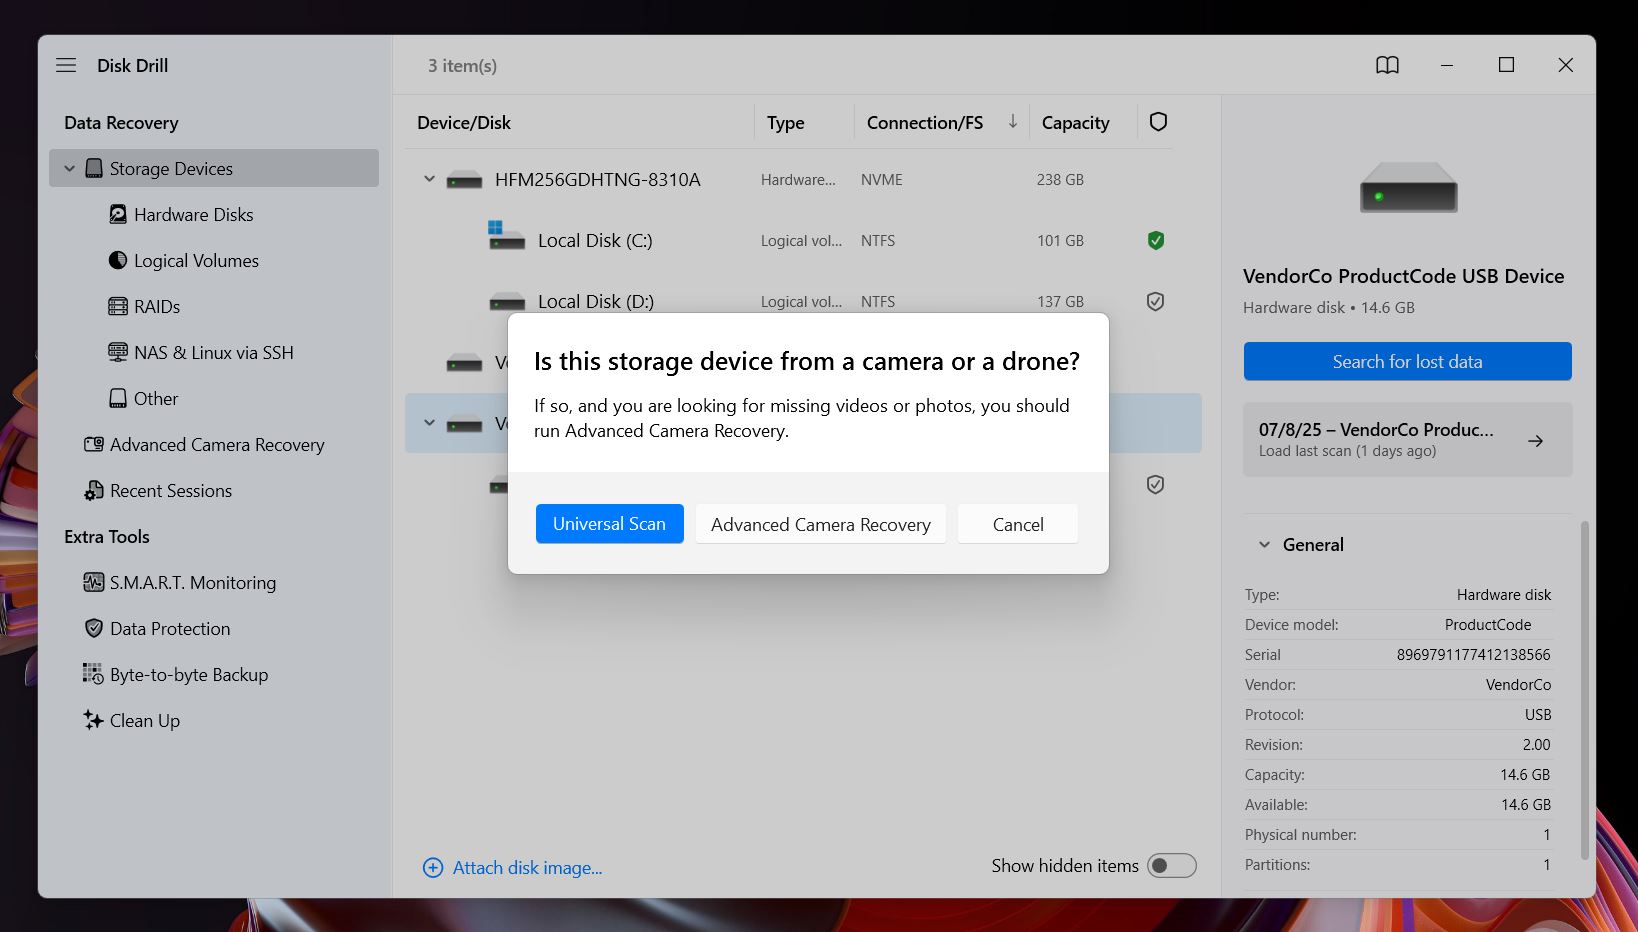
Once the backup is complete, you can mount the image in Disk Drill and scan it just like a normal device. To do that, click Attach disk image at the bottom of the main screen. This approach protects your original media and gives you a stable copy to work with. - Click Search for lost data next. Disk Drill will offer two scanning modes: Universal Scan (best for cards that were connected to a computer when files were deleted or formatted) and Advanced Camera Recovery (better for footage lost in-camera, like if a recording stopped suddenly, or files never appeared after a shoot). If you’re not sure, start with Universal Scan. You can always run another scan after.
- As Disk Drill scans, it starts sorting files by type: Pictures, Video, Audio, Documents, and more. You don’t have to wait for the scan to finish, you can browse results in real time.
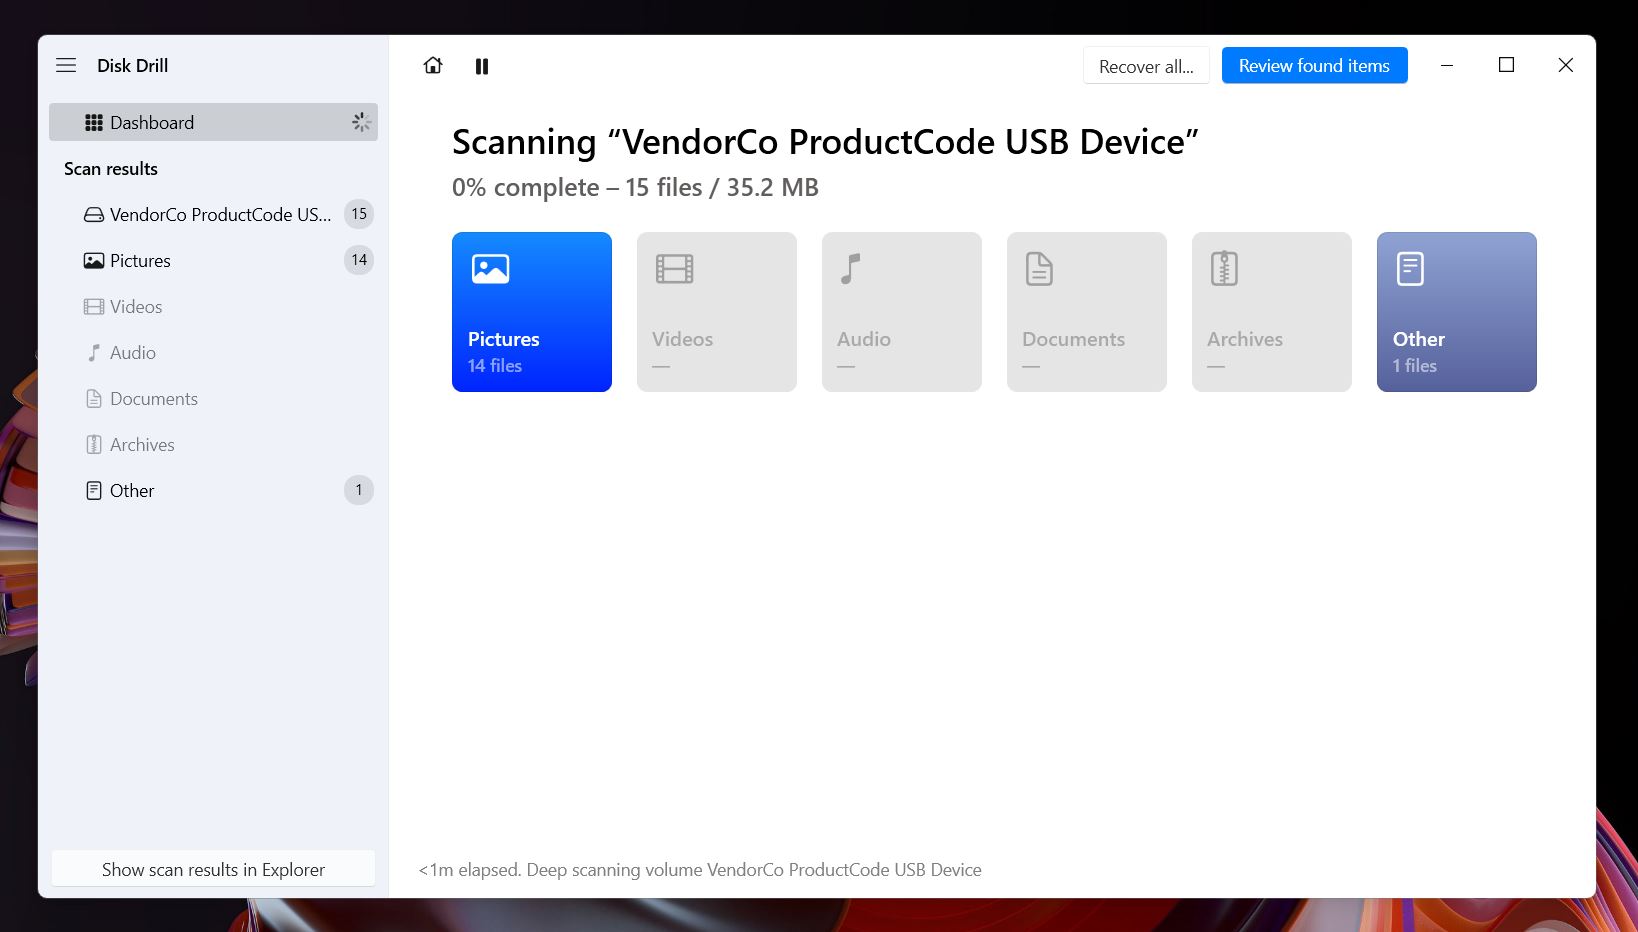
- Disk Drill organizes results into a few main categories: Deleted or Lost (the ones you probably want), Reconstructed (for files found via signature scan) and Existing (files still on the card). If your file system is damaged or gone, Reconstructed can still pull usable media files based on type alone.
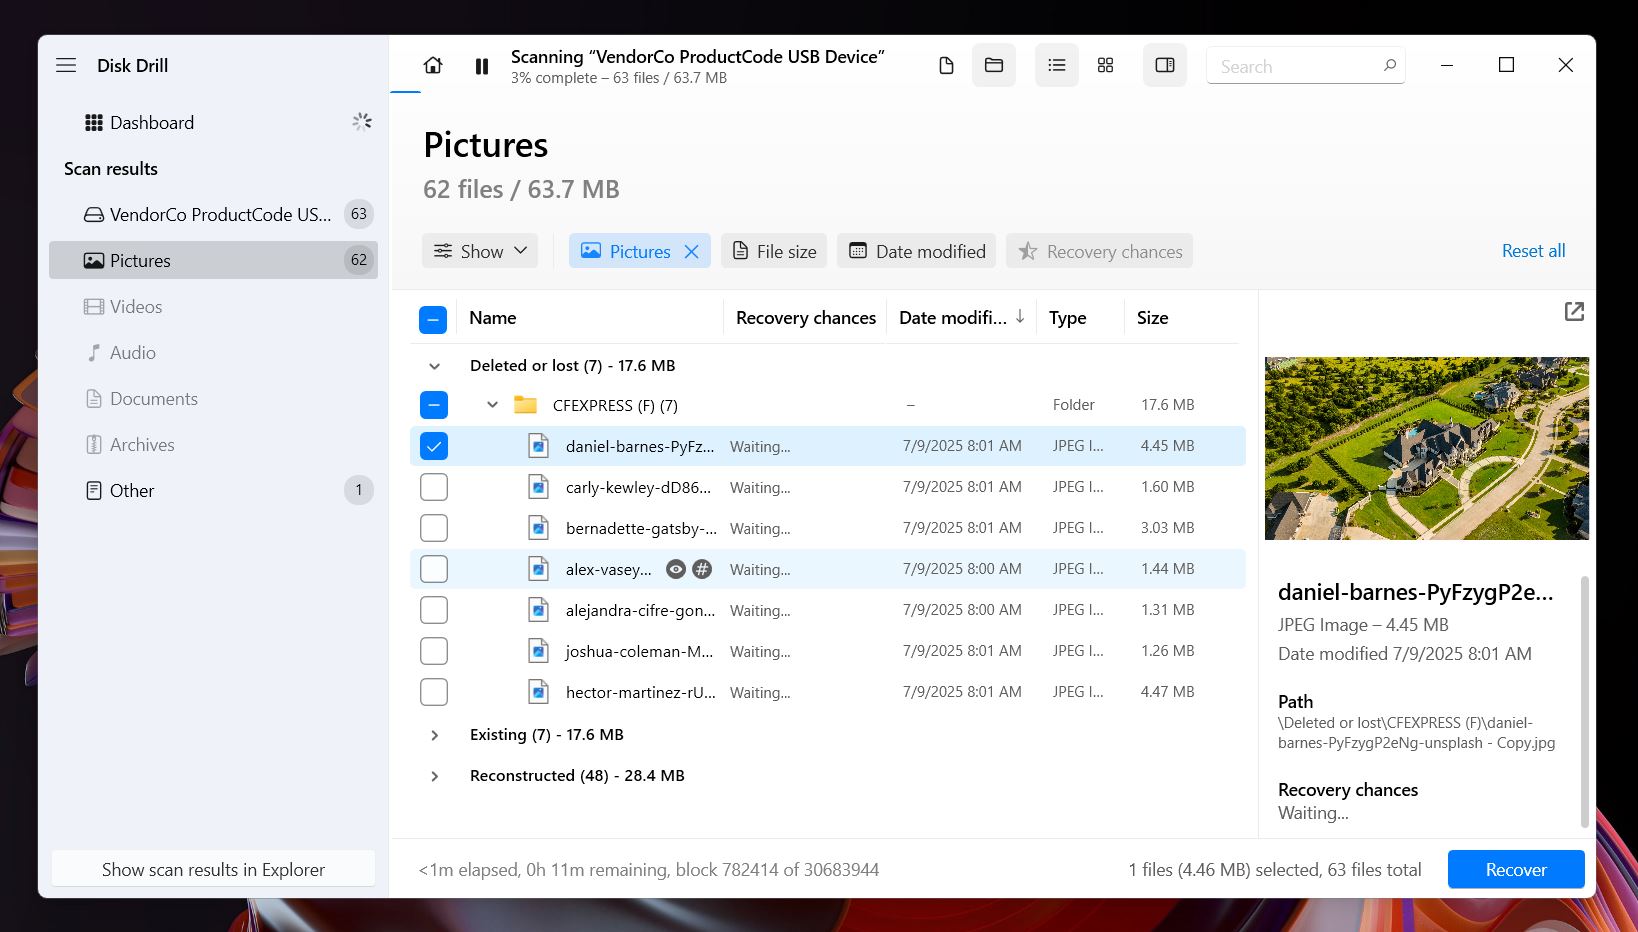
- Use the left sidebar to filter by file type, like JPG or MP4. Or type into the search bar. You can search by name, extension, or just keywords.
- You’ll notice preview thumbnails showing up on the right side of the window. Disk Drill can preview any file your OS can open natively or with a third-party viewer you already have installed. It also gives each file a recovery rating: High, Average, or Low. But honestly, the best predictor is the preview itself. If you can see a working preview, that means your file is 100% recoverable.
- Check the boxes next to the files you want to recover, then hit Recover.
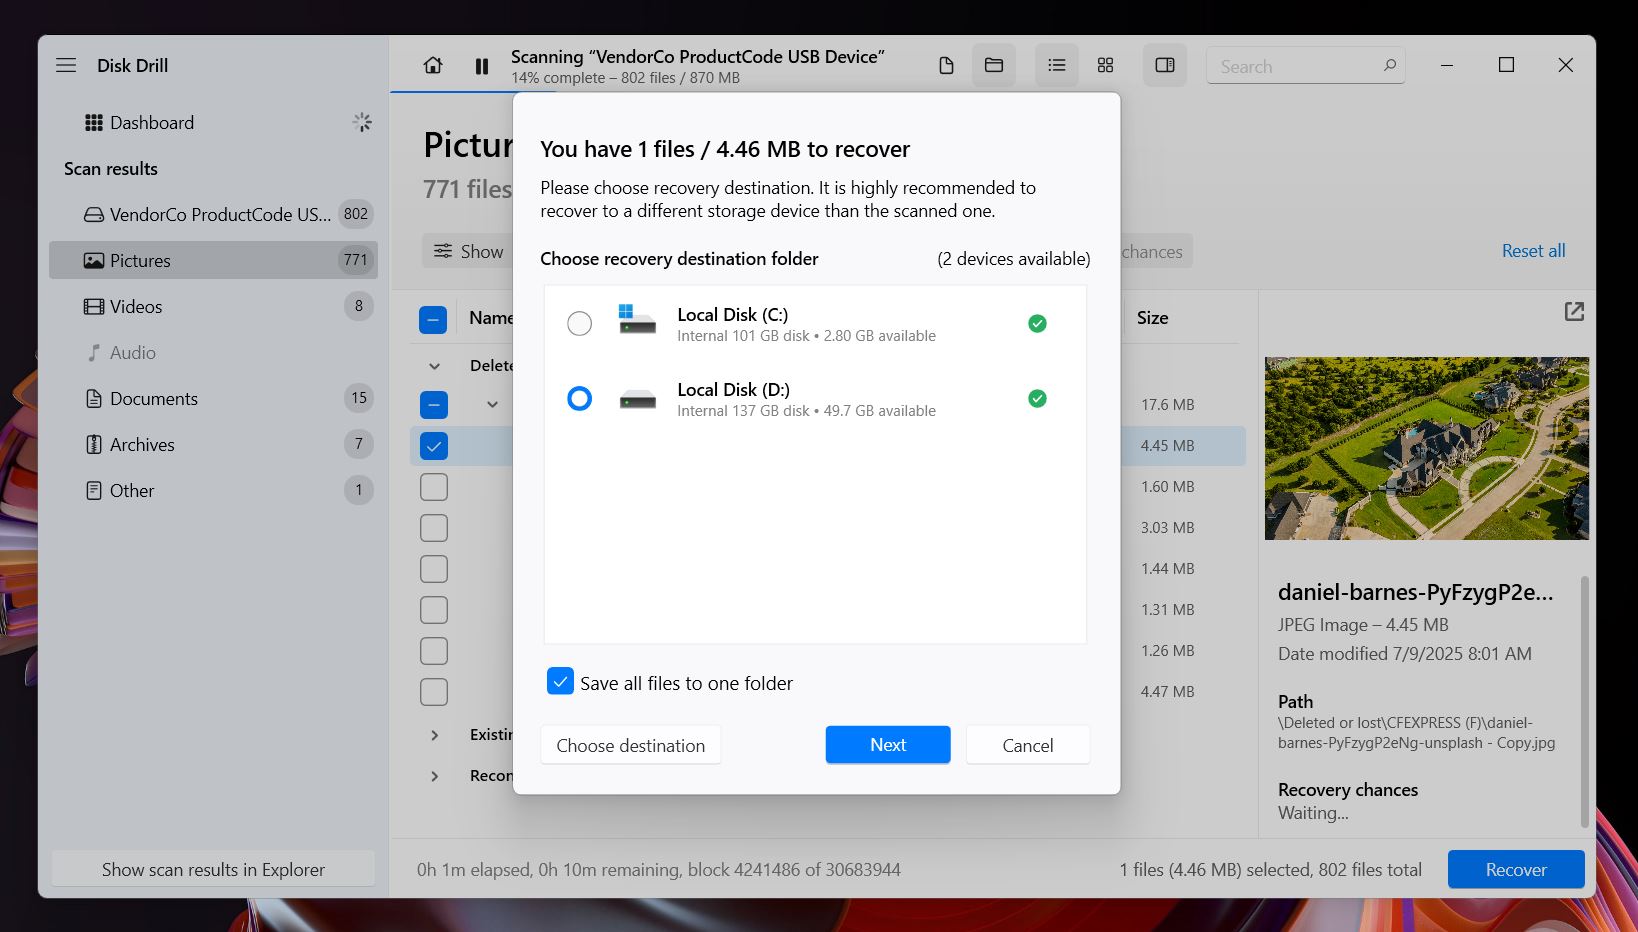 Important: Always recover to a different drive, never back to the CFexpress card itself. Disk Drill will warn you, but it’s good to avoid corrupting anything that hasn’t been recovered yet.
On Windows, Disk Drill’s free version lets you recover up to 500MB of data. That’s plenty for a photo batch or a few short clips. If you’re dealing with 4K/8K video or full raw sessions, you’ll hit that limit quickly, but scans and previews are fully unlocked, so you can see exactly what’s recoverable before deciding to upgrade.
When to Use Professional CFexpress Data Recovery Services
As we said earlier, DIY recovery might not be on the table if your CFexpress card is in rough shape. Software works great for accidental deletion, quick formats, and light corruption, but it can’t fix physical damage or hardware failure.
If your CFexpress card isn’t showing up at all in Disk Management, it’s bent out of shape, has a broken connector, water damage, or any other serious issue, you’ll likely need to turn to a professional data recovery lab.
We actually have a guide on the best memory card recovery services, where you can learn about top options, cleanroom standards, recovery success rates, pricing policies, and what to expect.
Just a heads-up: it’s definitely more expensive than the DIY route, but when there’s no other option and the data matters, it’s often the only move that makes sense.
Additional Methods and Tools That Might Help With CFexpress Card Recovery
While the method we showed above will help you restore files from a CFexpress card in most situations, we also want to highlight a few additional tools and utilities that might come in handy in more complicated cases, like severe file system corruption or cards that need extra help just to become “visible” again.
These tools aren’t always necessary. In fact, you probably won’t need them unless you’re dealing with a specific problem. But since CFexpress issues can come in all shapes and sizes, we’ll include a quick note for each tool explaining when it might be worth trying.
Method 1: Run CHKDSK
This tool can help if your CFexpress card is detected by the system, but you get errors like “The file or directory is corrupted and unreadable”. CHKDSK checks the card for file system problems and attempts to fix them, sometimes allowing you to access the data again.
CHKDSK can lead to data loss if it tries to “fix” damaged structures. So don’t run it unless you’ve already recovered your files. It’s more of a repair tool than a recovery one. In fact, we’ve seen cases, like the one shared in our community post, where CHKDSK got stuck mid-process and made the situation worse. Use it wisely.
Here’s how to use it:
If you’re sure your files are safe, open Command Prompt as Administrator, and type:
chkdsk E: /f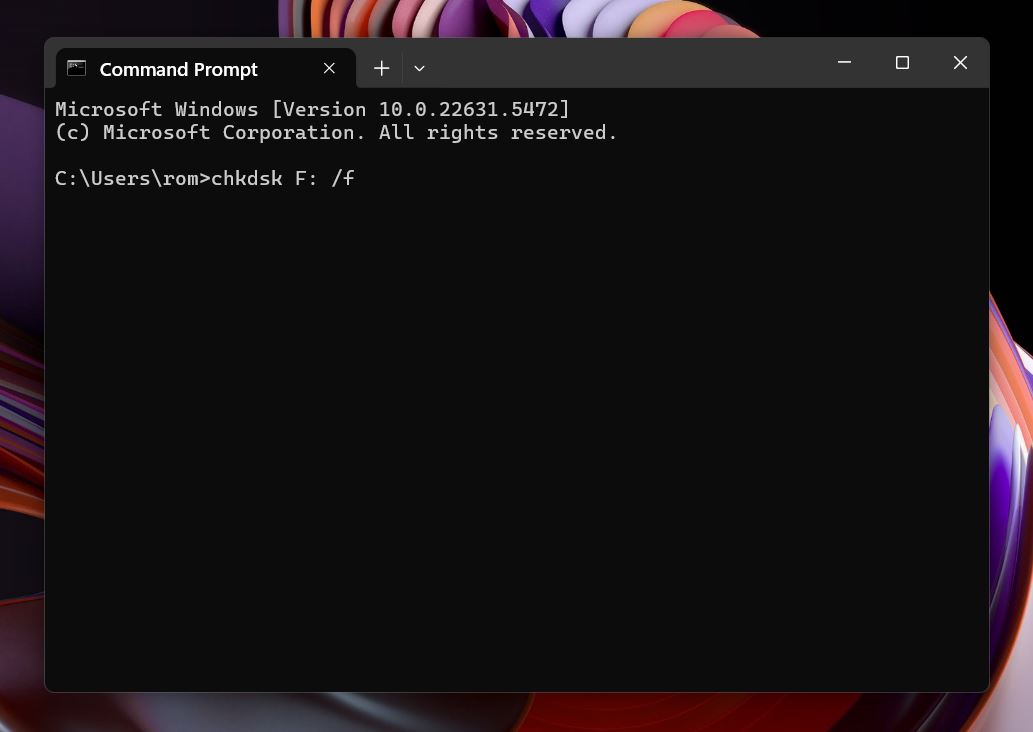 (Replace E: with the actual drive letter of your CFexpress card.)
This tells Windows to scan the file system and fix any errors it finds.
(Replace E: with the actual drive letter of your CFexpress card.)
This tells Windows to scan the file system and fix any errors it finds.
If it works, your card might become readable again, and your files may show up normally, no CF recovery software needed. You can also run CHKDSK directly from File Explorer: just right-click your CFexpress card, go to Properties > Tools, and click Check under the Error checking section. 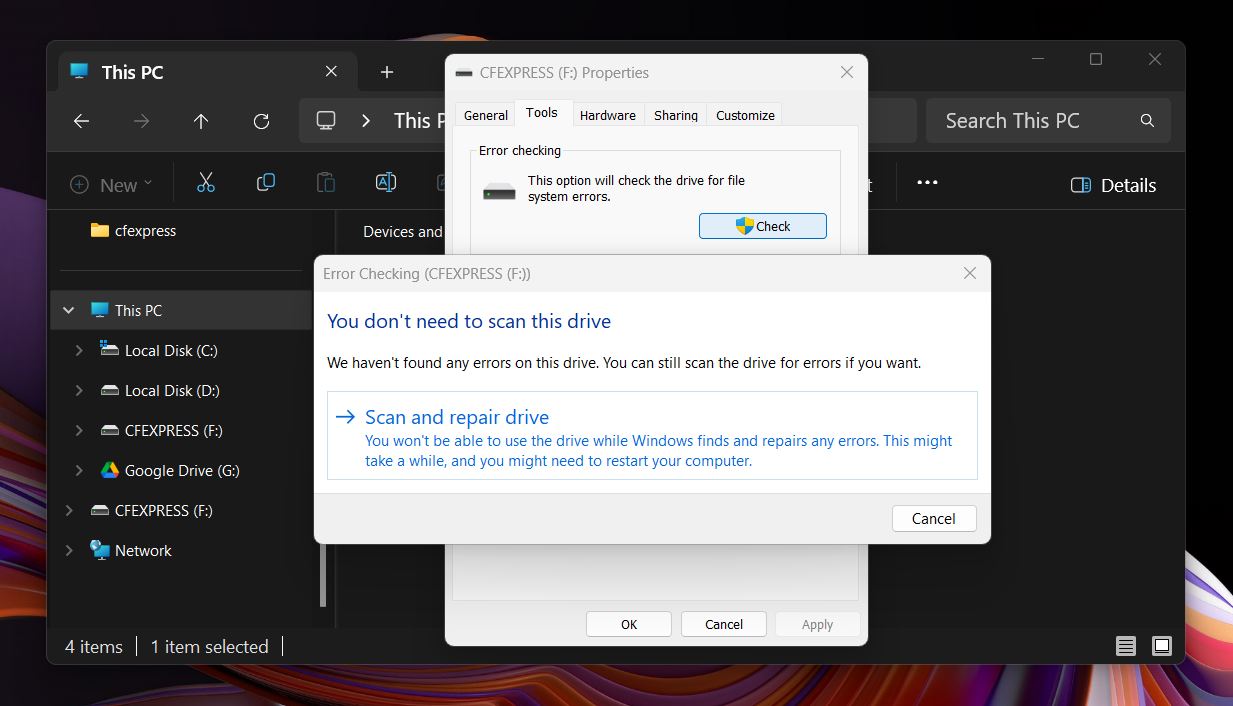 Windows will scan the card for file system issues and offer to fix them automatically. Again, only do this if you’ve already backed up your data.
Method 2: Use TestDisk
Sometimes you’re not just missing files, you’re missing the entire partition. If your CFexpress card shows up as “unallocated” or doesn’t mount at all, TestDisk can help recover deleted partitions, fix corrupted partition tables, and make the card accessible again. Just like with CHKDSK, TestDisk may lead to data loss. One wrong choice and you could overwrite the partition table or damage what’s left. Only use it if you’re comfortable with a text-based interface and you’ve already made a backup of the card.
TestDisk is a free and open-source project that works across Windows, macOS, and Linux. It can scan your CFexpress card for lost or deleted partitions and give you the option to restore them manually. If it finds a valid partition structure, it can rebuild it, which will make the card mountable again without even touching individual files.
Here’s how to do it:
- Download TestDisk from the official website. Once it’s downloaded, unzip the archive anywhere you like.
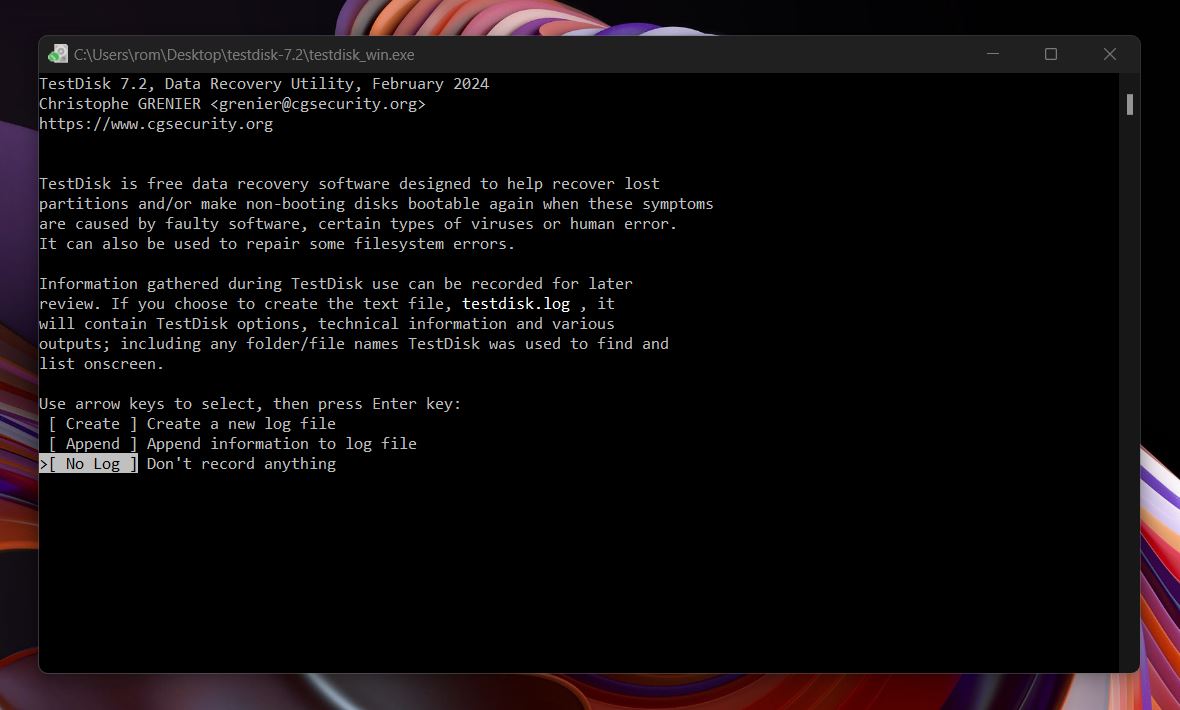
- On Windows, right-click testdisk_win.exe and select Run as administrator. The program will open in a command-line window with a simple text-based menu.
- Choose Create to start a new log (or No Log if you’d rather skip it), then select your CFexpress card from the list using the arrow keys and hit Enter.
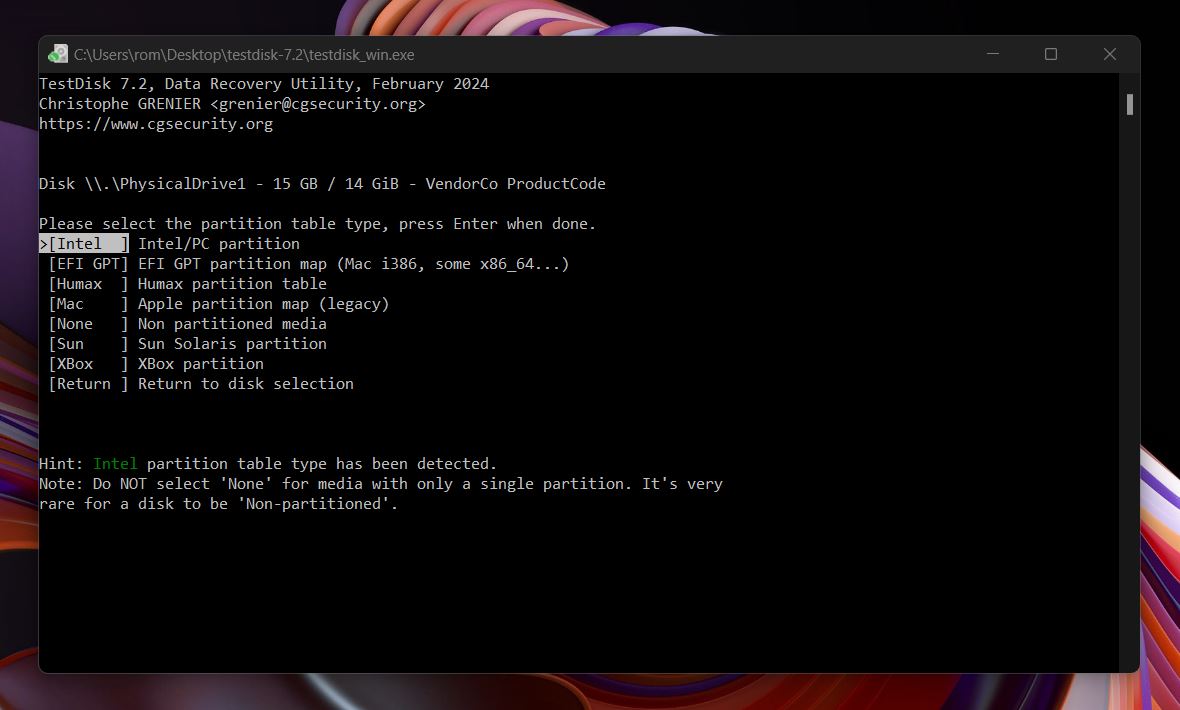
- Next, select the partition table type. TestDisk usually detects this automatically, but for most CFexpress cards, you’ll want to stick with [Intel] for MBR or [EFI GPT] for newer setups.
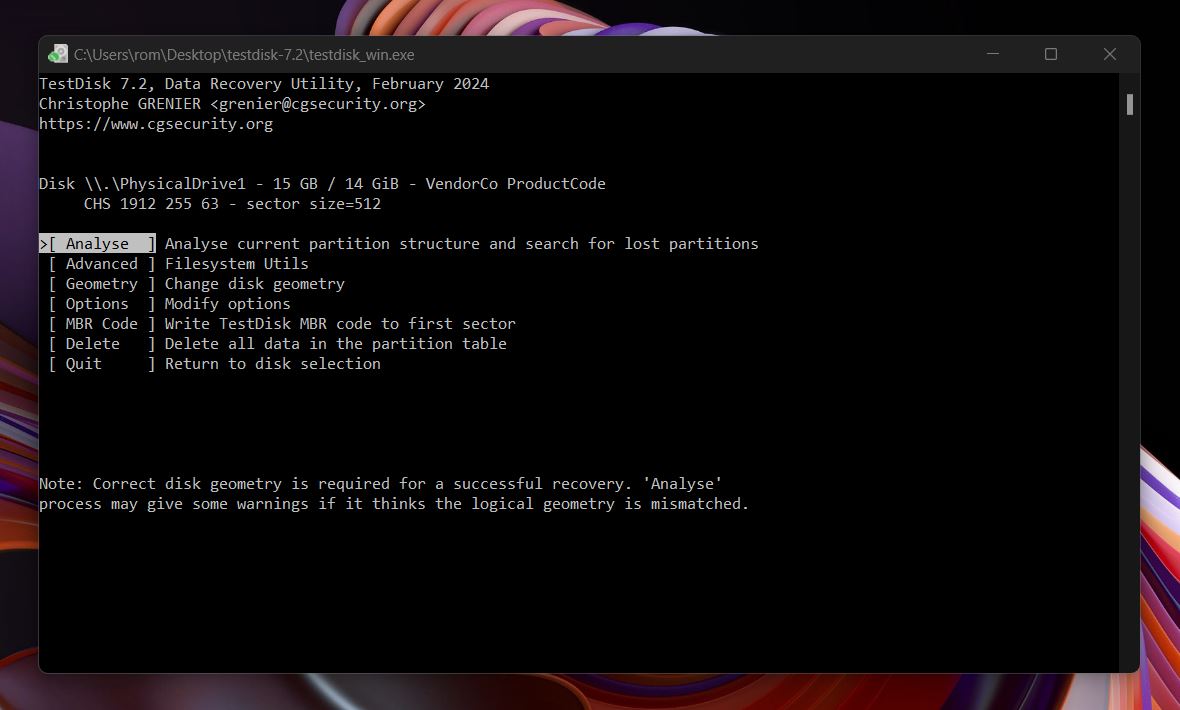
- Choose Analyse to scan the card for partition structures. It will show any current entries it finds. Press Enter to proceed.
- Now select Quick Search and press Enter again. If the lost partition appears (you’ll often see something like exFAT, FAT32, or NTFS), highlight it using the arrow keys.
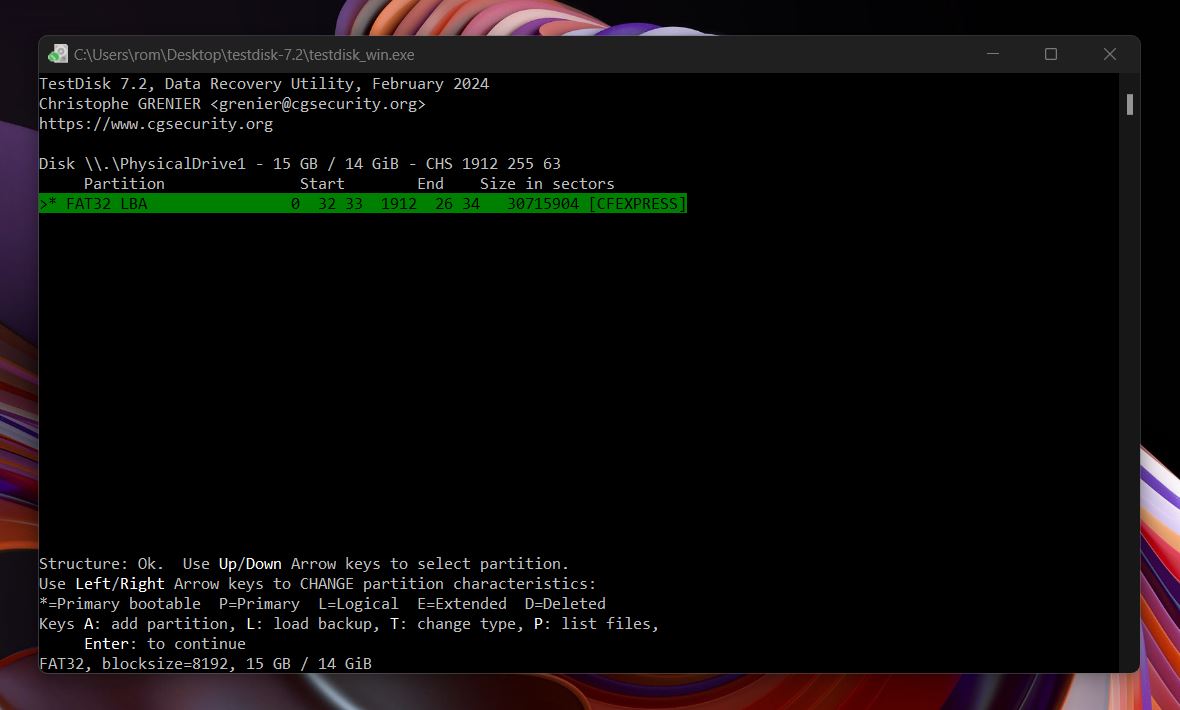
- Press P to list files inside the partition. If your folders and files show up here, that’s a good sign.
- If everything looks correct, press Enter again, then choose Write to restore the partition to the card.
- Confirm the write when prompted, then exit TestDisk. Safely eject and reconnect the CFexpress card; it should now mount normally, with your data accessible again.
We have a detailed TestDisk review if you’re interested. It gets into all its capabilities. Also, just so you know, TestDisk comes bundled with another tool called PhotoRec. Unlike TestDisk, PhotoRec can be used to recover individual deleted or lost files from a CFexpress card, not entire partitions. It’s powerful, but keep in mind: because it uses signature-based scanning only, you won’t get original file names, folder structure, or previews.
Method 3: Format the CFexpress Card
Only go this route if you’ve already recovered your files, or there’s nothing left to recover. If your CFexpress card still shows up but throws errors, won’t open, or just refuses to behave, a reformat can often bring it back to working condition.
And this is probably the surest way to get your CFexpress card back to a usable state, as long as you’re done with recovery. Formatting will erase everything, so double-check that your files are recovered and saved elsewhere. If the card isn’t physically damaged but the file system is beyond repair, a clean format can give it a fresh start and restore normal function.
How to format on Windows:
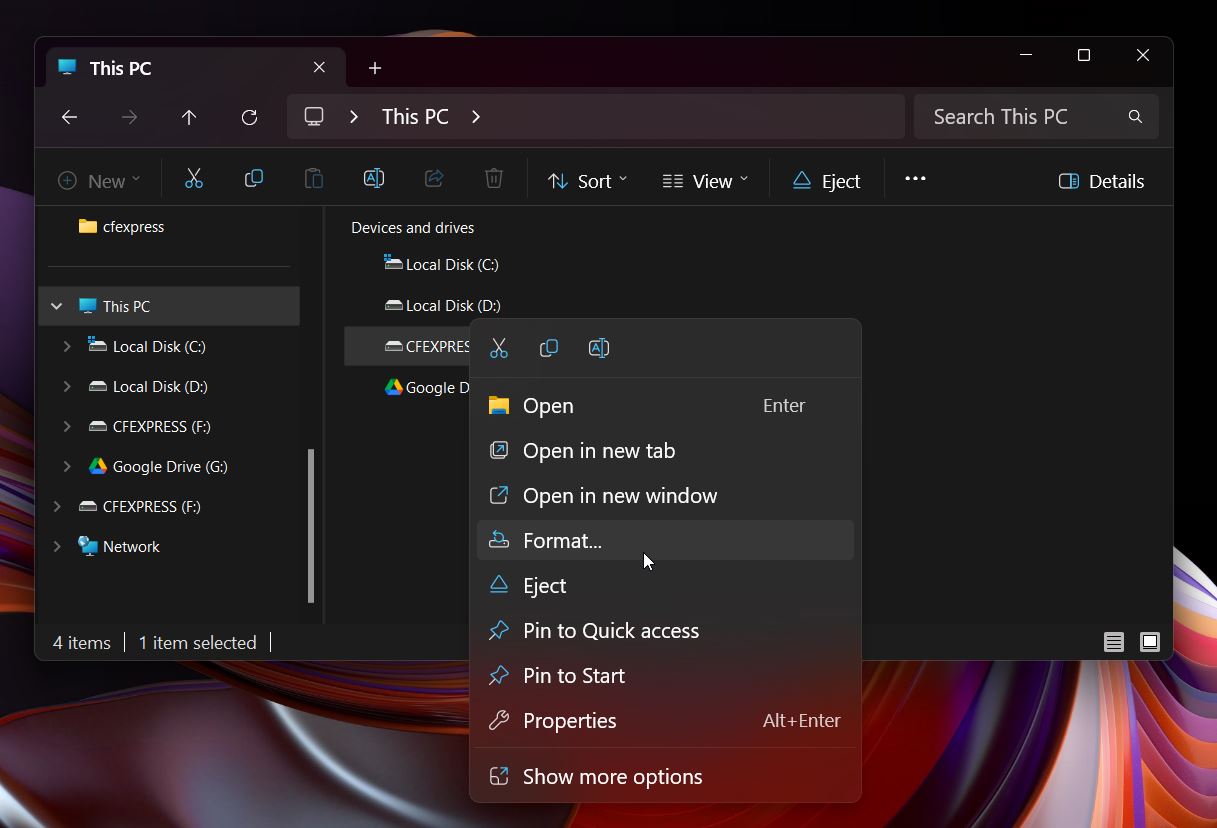
- Right-click the CFexpress card under “This PC” or “Devices and drives,” then select Format from the menu.
- In the Format window, set the file system to exFAT. That’s the recommended format for CFexpress cards, especially if you’re using large media files.
- Leave the allocation unit size set to Default unless you know you need something specific.
- You can enter a volume label if you want to rename the card, but it’s optional.
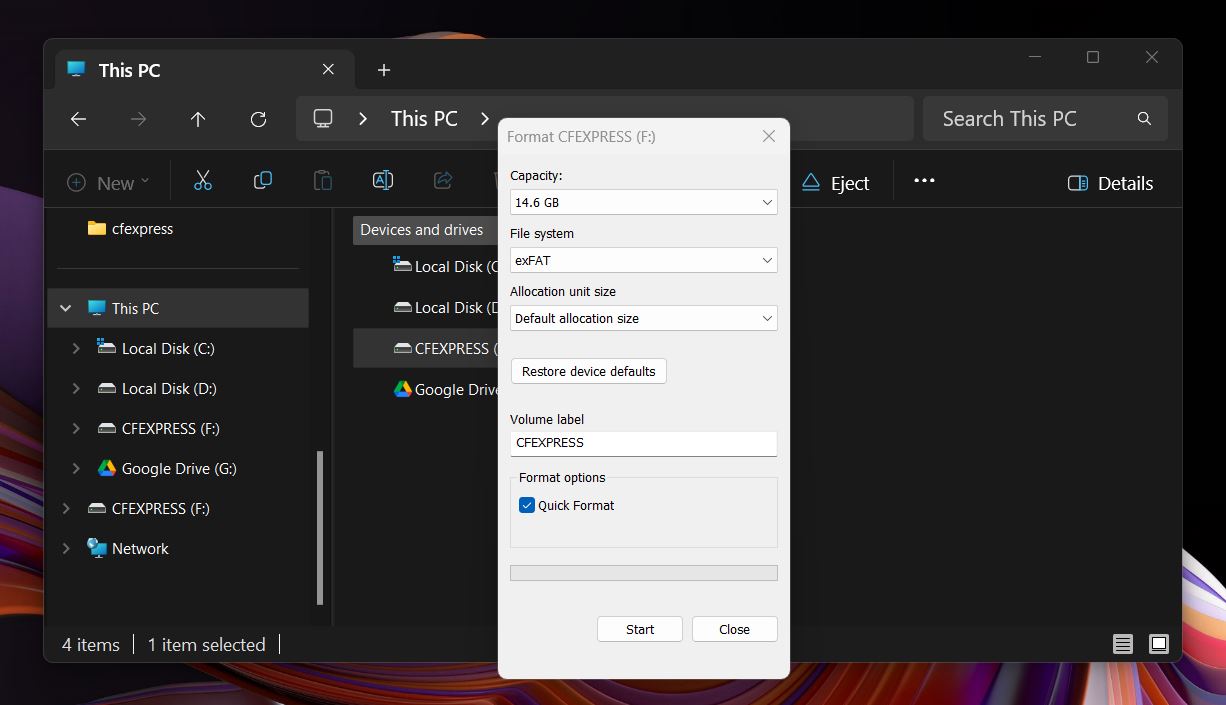
- Decide whether to keep Quick Format checked. For most cases, Quick Format is fine and much faster. If the card’s been unstable, uncheck it for a full format.
- Click Start. You’ll get a warning that all data will be erased. Click OK to continue.
- Once the format finishes, you’ll see a confirmation message. Click OK and close the window.
This is how you format a CFexpress card on Windows, but if you plan to use the card with your digital camera, it’s actually better to format it in-camera. Most camera manufacturers recommend doing this, and some even write camera-specific metadata during the format process. It helps avoid compatibility issues and makes sure the card is ready for recording right away.
FAQ
How to recover data from a CFexpress card?
You can seamlessly recover data from a CFexpress card using data recovery software:
- Connect the CFexpress card to your computer using a compatible card reader.
- Download and install a trusted data recovery program.
- Launch the tool and select your CFexpress card from the list of available drives.
- Start a scan to search for lost or deleted data.
- Review the scan results and choose the files you want to restore.
- Click the recovery option and select a safe location on your computer to retrieve files from the CFexpress card.
Is it possible to perform CFexpress card recovery on a Mac?
CFexpress card recovery is possible on a Mac.
- Detach your CFexpress card from the camera and connect it to your Mac.
- Next, download a data recovery software like Disk Drill onto your Mac.
- Scan for the recoverable items in your CFexpress card.
- Select the files you want to retrieve and recover them to any folder.
Can I recover data from a corrupted CFexpress card?
Yes, you can recover data from a corrupted CFexpress card if the damage is logical. Remove the card from your camera and connect it to your computer. If your system detects the card, open Disk Management (not just File Explorer) to confirm it appears with the correct size, even if it looks unformatted or unreadable. Once the card shows up, run data recovery software to scan it and restore your files. Avoid saving anything to the card in the meantime, as that could overwrite recoverable data.
If your computer doesn’t recognize the card at all, stop there. Reach out to a professional data recovery service right away and keep the card disconnected until they examine it.
Can I recover data from a formatted CFexpress card?
Yes, you can recover data from a formatted CFexpress card, as long as it was a quick format and you haven’t saved new files to it yet. Quick formatting only clears the file system and directory structure, but the actual data usually remains on the card until it’s overwritten.
If that’s the case, you can scan the card with data recovery software and restore the files. Just avoid using the card any further until recovery is complete.
If the card was fully (or low-level) formatted, recovery is not likely, since the process has overwritten the data completely.
Final Tips
Before you go, we want to leave you with this.
CFexpress cards are built for speed and performance. With PCIe 3.0 and NVMe under the hood, they’re ideal for handling massive 8K RAW video and high-burst photo sequences. That’s why they’re the go-to choice for professionals. But they’re not just for the pros anymore; plenty of serious hobbyists use CFexpress too, especially with newer Sony, Nikon, and Canon cameras that support Type A or Type B cards.
The difference is that professionals usually know how to protect their work. They back up their data after every session, sometimes in two or three places. But beginners? According to our own survey, over 50% don’t back up at all. No offload, just hoping the card doesn’t fail.
If that’s you, here’s the advice we give to everyone starting out:
- Always keep two copies of your work: one on your computer, one on a separate drive.
- Use cloud storage for anything important. It doesn’t have to be fancy; even free options work.
- Format your card in-camera once you’ve backed everything up. It helps keep the file system healthy.
Follow those three rules, and you’ll avoid most data loss scenarios entirely. But if something still goes wrong, now you know exactly what to do.
This article was written by Mako Young, a Contributing Writer at Handy Recovery Advisor. It was recently updated by Roman Demian. It was also verified for technical accuracy by Andrey Vasilyev, our editorial advisor.
Curious about our content creation process? Take a look at our Editor Guidelines.