
SD cards are common storage devices we use with cameras, phones, and other mobile devices. They’re useful because they’re small and can hold a lot of data, but they’re made of plastic and prone to corruption and damage.
Many users don’t routinely back them up and most even forget that they have one – until they find that something went wrong and files disappeared from the SD card. This article guides you through the possible reasons for data loss on SD cards and all the ways to solve them.
Reasons Behind Files Disappearing From SD Card
Files disappearing from SD cards without user intervention or permission is a tell-tale sign that the device is damaged, compromising any saved data. There are a couple of reasons behind this, some of which are the following.
- 🤦♂️ Accidental deletion – A common reason for data loss is accidental deletion of files or formatting an SD card without backing up data first. It happens to everyone, at least once.
- 🔄 Transferring bulk files – Users report that files tend to get lost or overwritten when transferring bulks of data.
- ⏹️ Process interruptions – Data loss can occur inevitably when interrupting a save, transfer, or formatting process.
- 👾 Malware and other virus infections – Data becomes lost or unreadable because of malware infecting SD cards.
- 🔨 Physical damage – SD cards are vulnerable electronics whose data storing capabilities may be affected by liquid contamination, fire damage, or electrostatic discharge, regardless of how minimal the damage may be.
- ⚠️ Improper ejection – This refers to the abrupt removal of the SD card from the host device while the card is still in its write-state. User errors like this result in data not being properly saved SD cards continue to write data to their memory for a period even after usage.
- ⛔ Corrupted file system – When the host device crashes or the power is suddenly cut off, the operating system may malfunction, rendering the file system corrupted and compromising the data stored in the SD card. The navigation path to the data becomes effectively lost and cannot be accessed even though the data may appear to exist.
- 🚫 Counterfeit SD cards – Using SD cards with lower capacity than advertised. Note that all data exceeding that capacity will get corrupted or result in data loss.
How to Recover Files Disappeared From SD Card
When your files disappeared from an SD card, they weren’t immediately deleted forever – that data is still stored (as a whole or fragmented) within the card’s file system. Using SD card data recovery tools, you can piece together those fragments or restore entire files from the file system. The right software can even recover files from dead SD cards.
Fortunately, most of these apps are super easy-to-use even for non-tech-savvy users. In this section, we walk you through using 2 of our favorite data recovery software to restore files from a problematic SD card.
Option A: Disk Drill
![]()
Disk Drill is an advanced and well-known data recovery tool with a good-looking and user-friendly GUI (graphical user interface). On its own, Disk Drill is a formidable data recovery solution, but it also comes with other useful utilities like a file shredder, an image backup tool, and more.
Disk Drill can reliably recover data from SD cards and other storage devices such as hard drives and SSDs, mobile phones, and more – all with one app. It can even recover a wiped SD card. Disk Drill is available for both Mac and Windows machines, and has free and premium versions.
Main Features
- Advanced Data Recovery – Recover deleted files from corrupted, reformatted disks, partitions, and raw disks on a wide range of devices, including SD cards, external and internal drives, Android and iOS mobile devices, and more. Restore deleted videos from SD cards, as well as documents, images, audio files, and more.
- Easy-to-Use GUI – Disk Drill has a modern and sleek GUI that’s intuitive and beginner-friendly.
- Smart Disk Scan – When users don’t have a set scanning method, Disk Drill will suggest an efficient sequence of scanning algorithms for the user’s particular storage device.
- Free Unlimited File Preview – Preview as many files as you want with the free version, so you can determine whether it’s safe to continue attempting recovery. If you can’t preview your files, your SD card might be physically damaged and should be sent to a professional data recovery center to avoid permanent data loss.
- S.M.A.R.T. Monitoring – S.M.A.R.T. (Self-Monitoring Analysis Reporting Technology) is a feature built into many modern drives. Its job is to check hard drive health by identifying problems that may eventually lead to drive failure. Unfortunately, it doesn’t do a good job of warning users. Disk Drill lets you view S.M.A.R.T. attributes so you can backup your data before it’s too late.
- Byte-to-Byte Backup – “Clone” your SD card into an image backup that’s not only more convenient but also more thorough than traditional file backups.
How to Recover Disappeared Data Using Disk Drill
Disk Drill is very easy-to-use, even for non-tech-savvy users. Still, it can be stressful to go it alone if your data is on the line. Below is a step-by-step guide with screenshots that you can follow along with:
- Download and install Disk Drill.
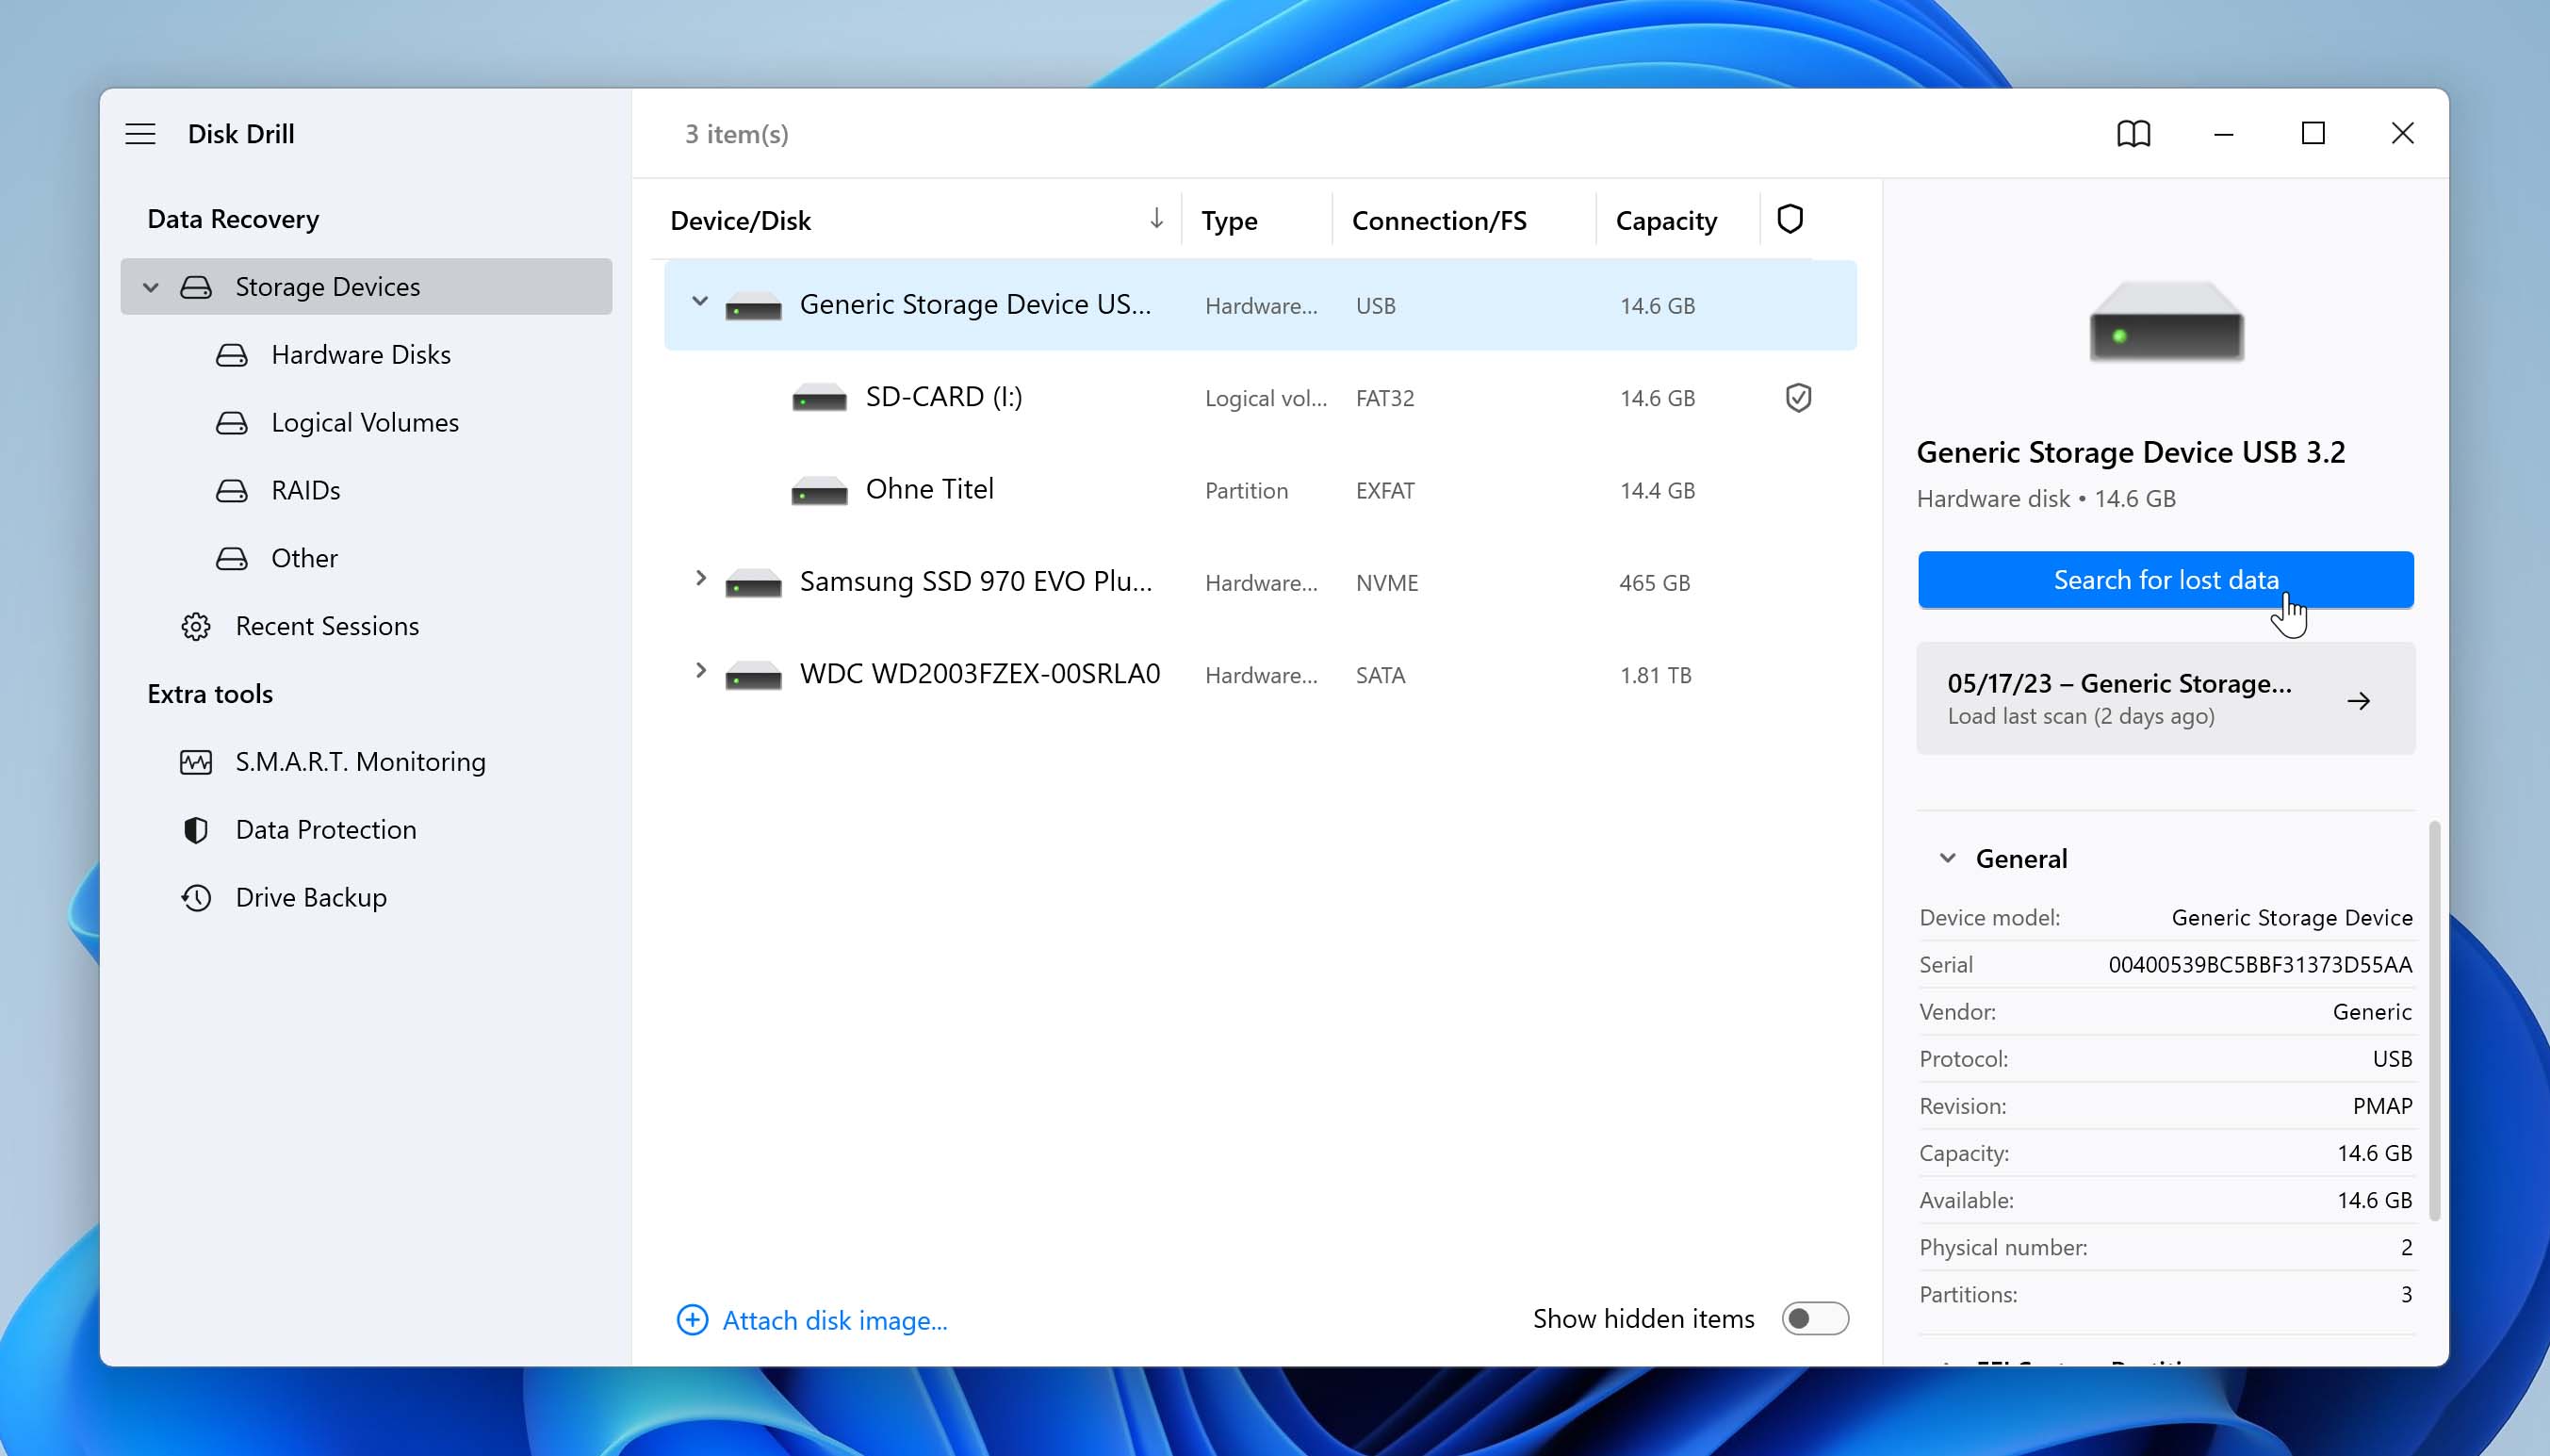
- Launch Disk Drill by double-clicking its icon on your desktop. Then, select the target SD card from the list of available disks and devices, leave all settings to default, and click “Search for lost data.”If you’re using a card reader like I did with my SanDisk SD card, your card will appear as “Generic Storage Device”.
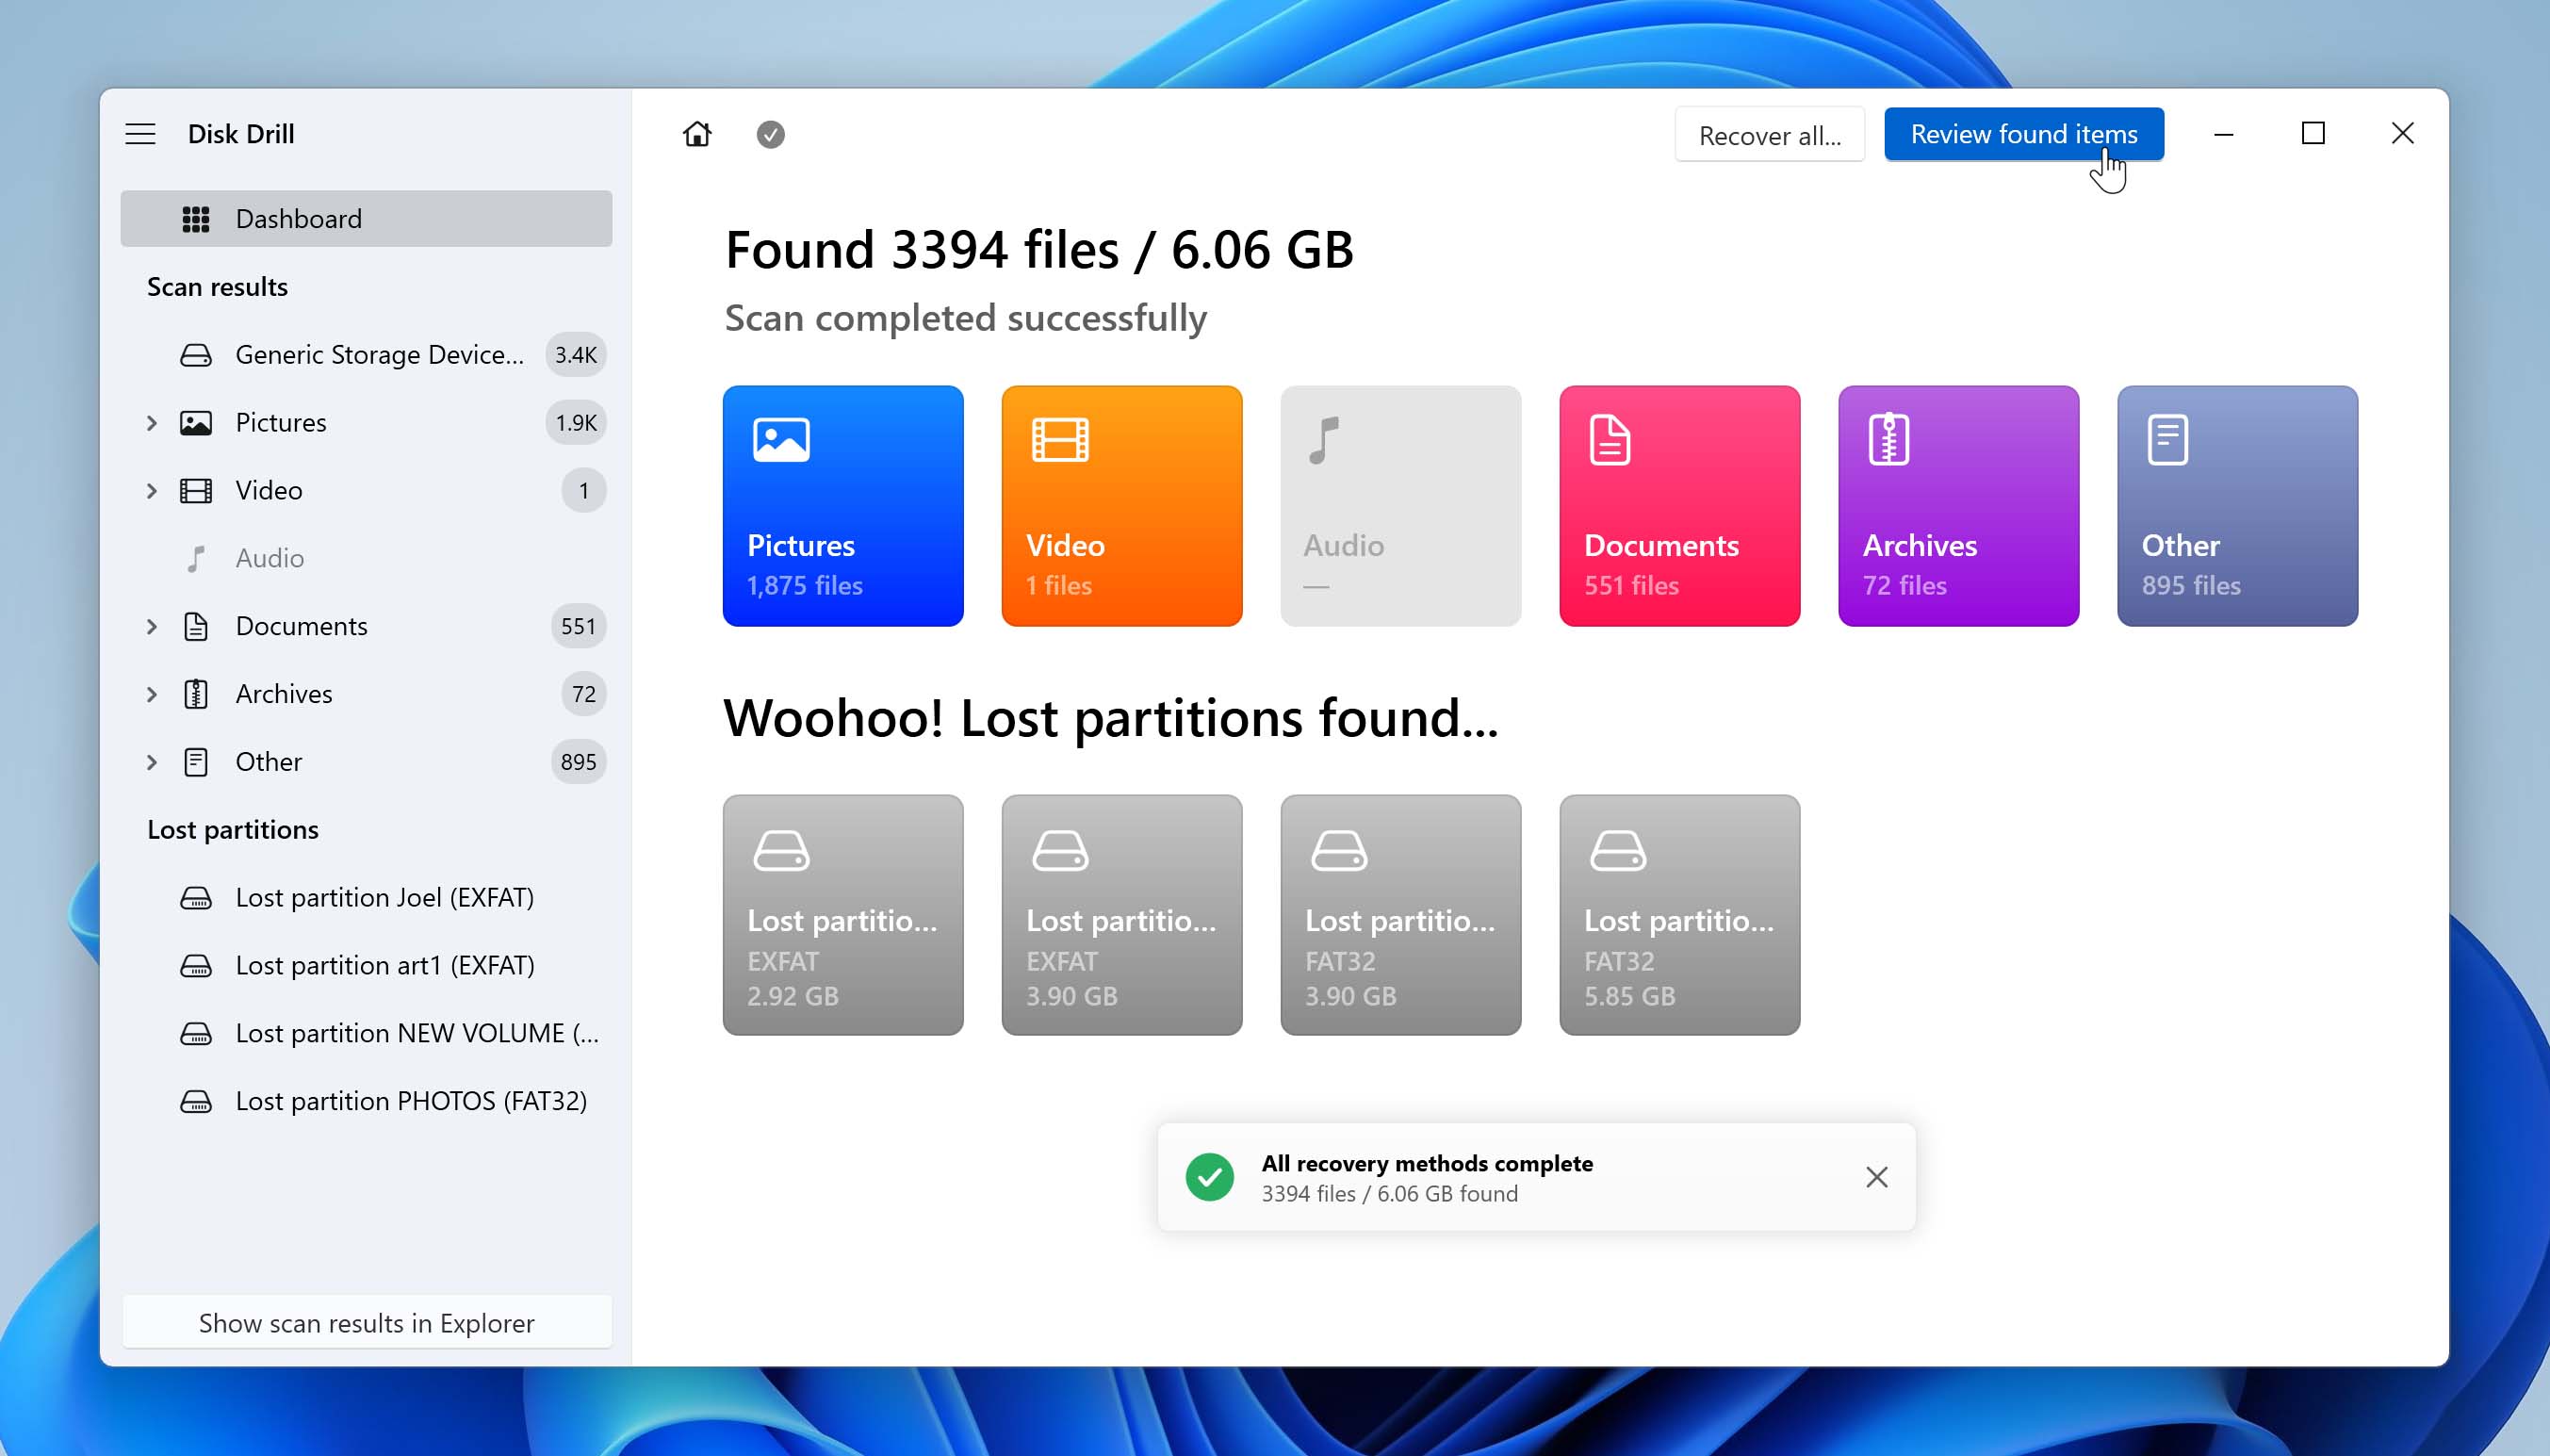
- Let Disk Drill complete its scan for the best results, then, click “Review found items”.
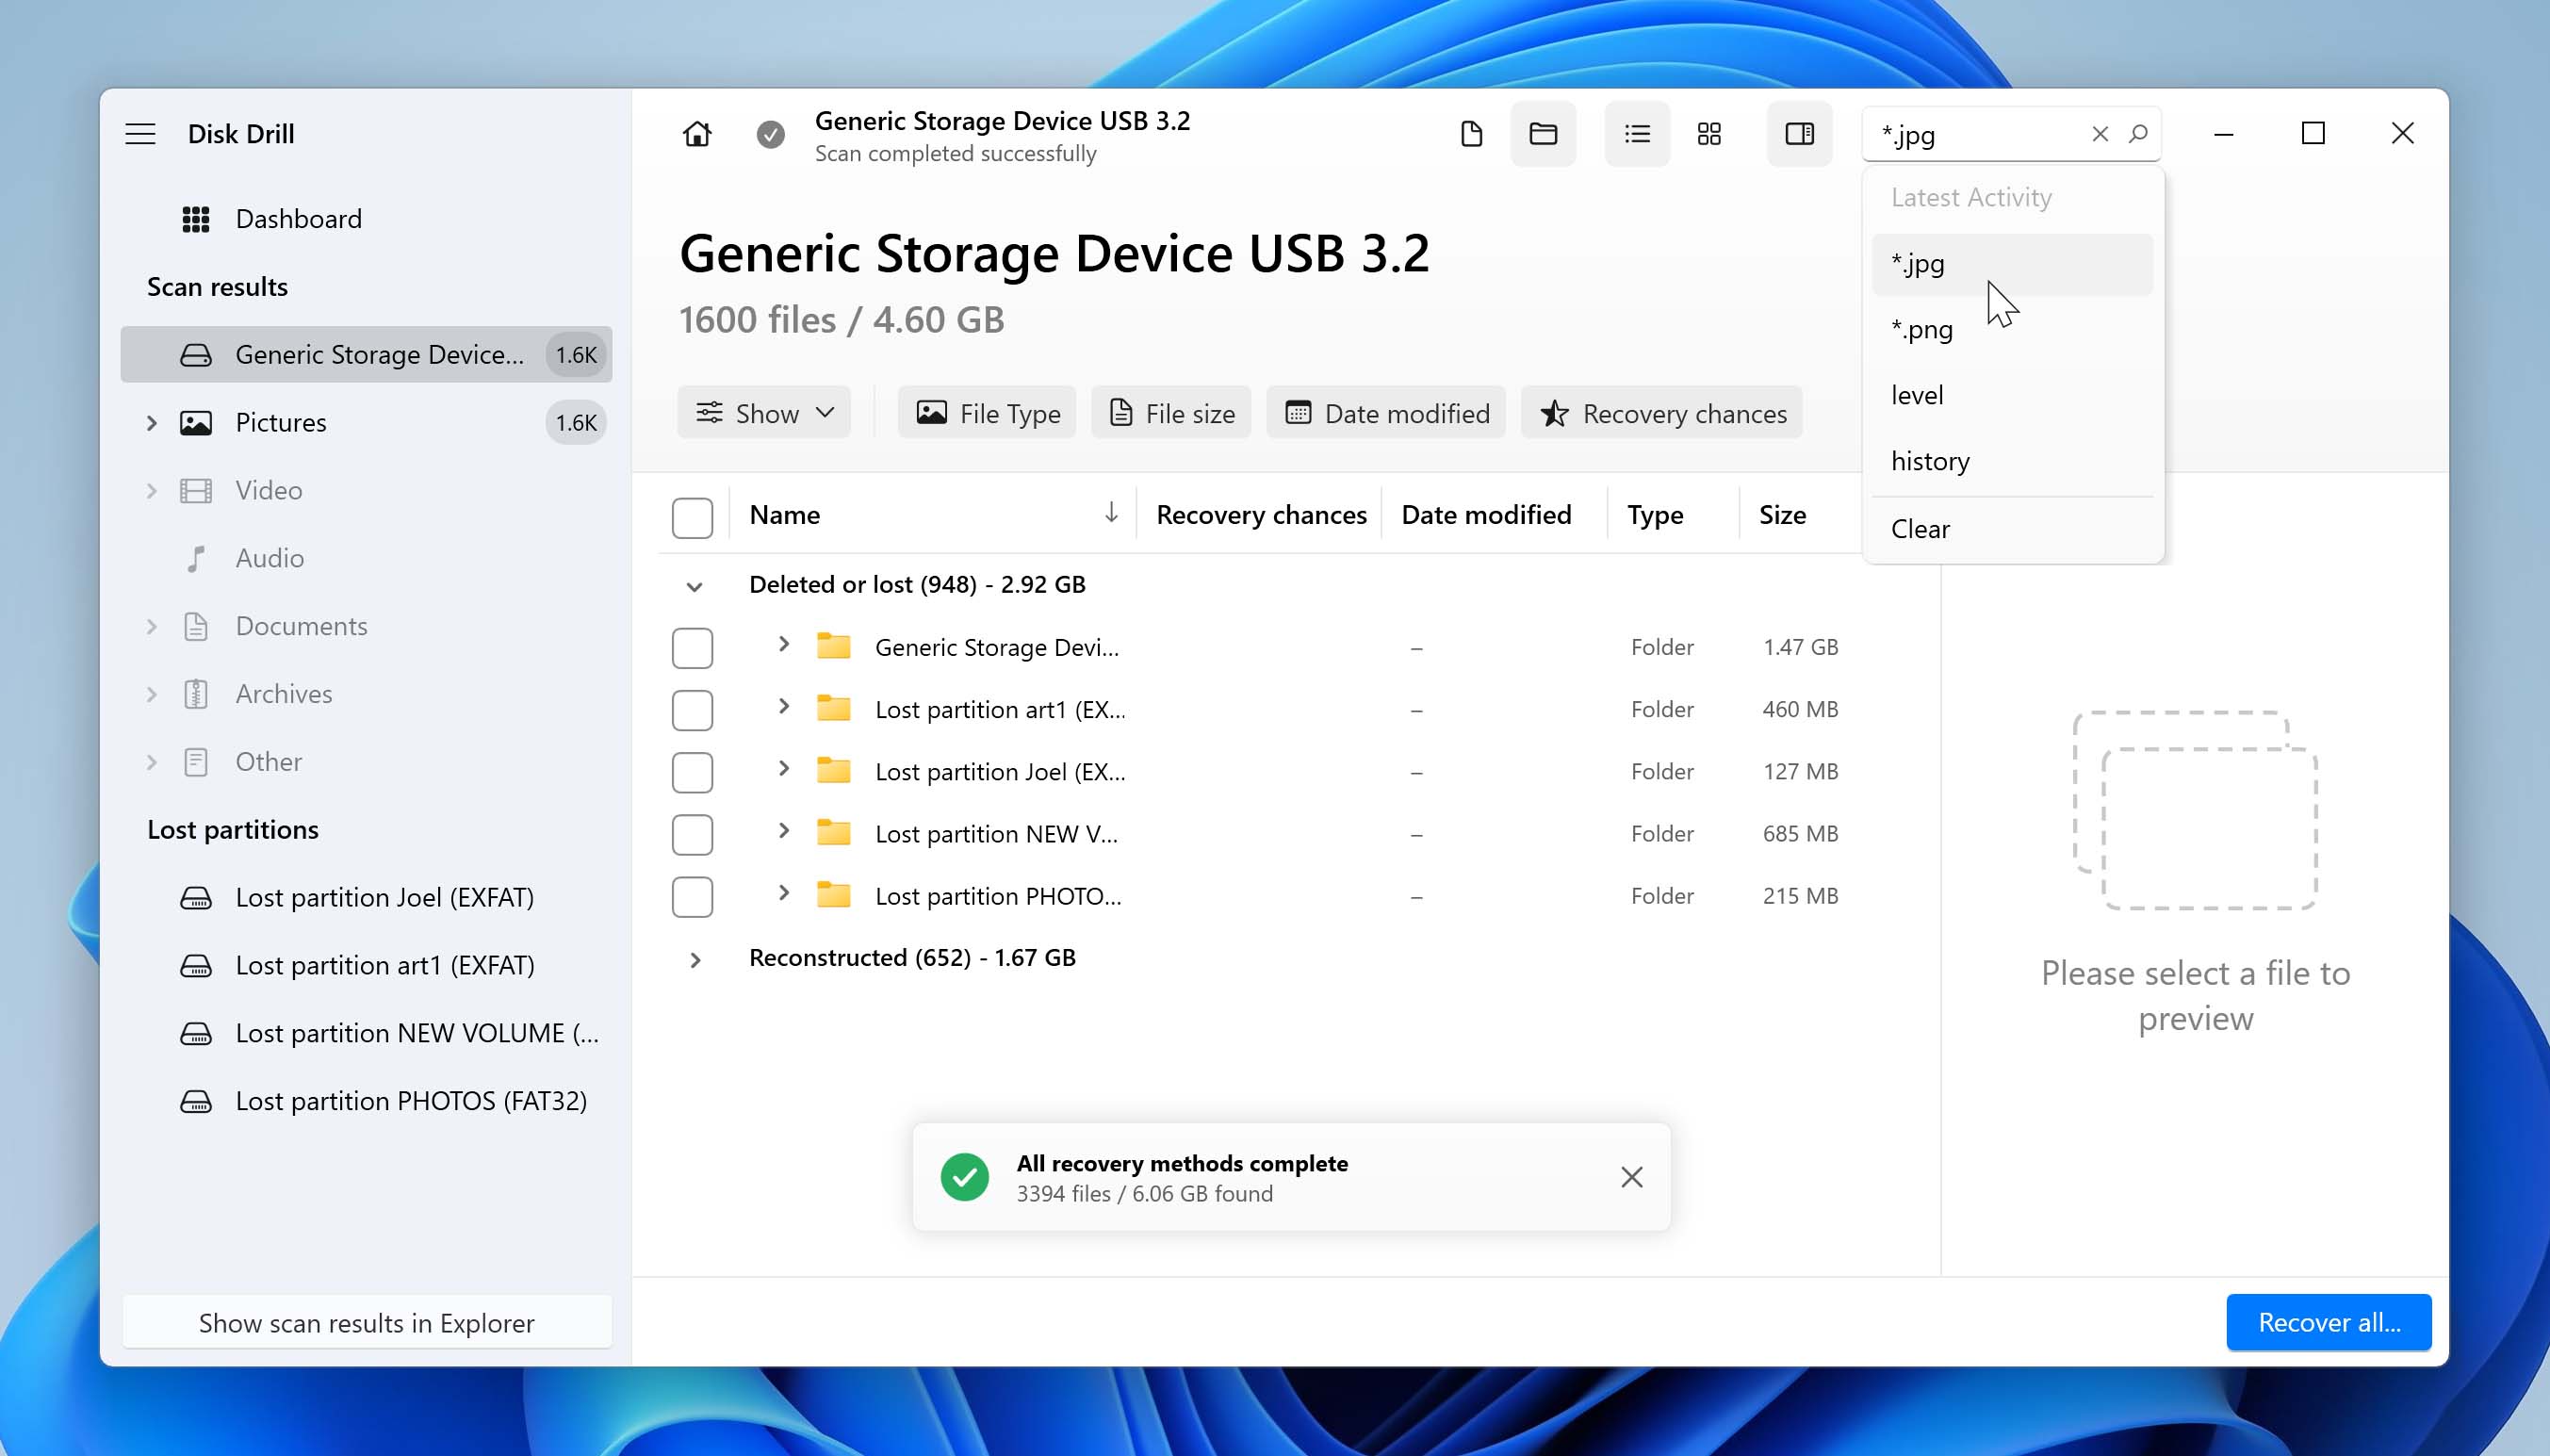
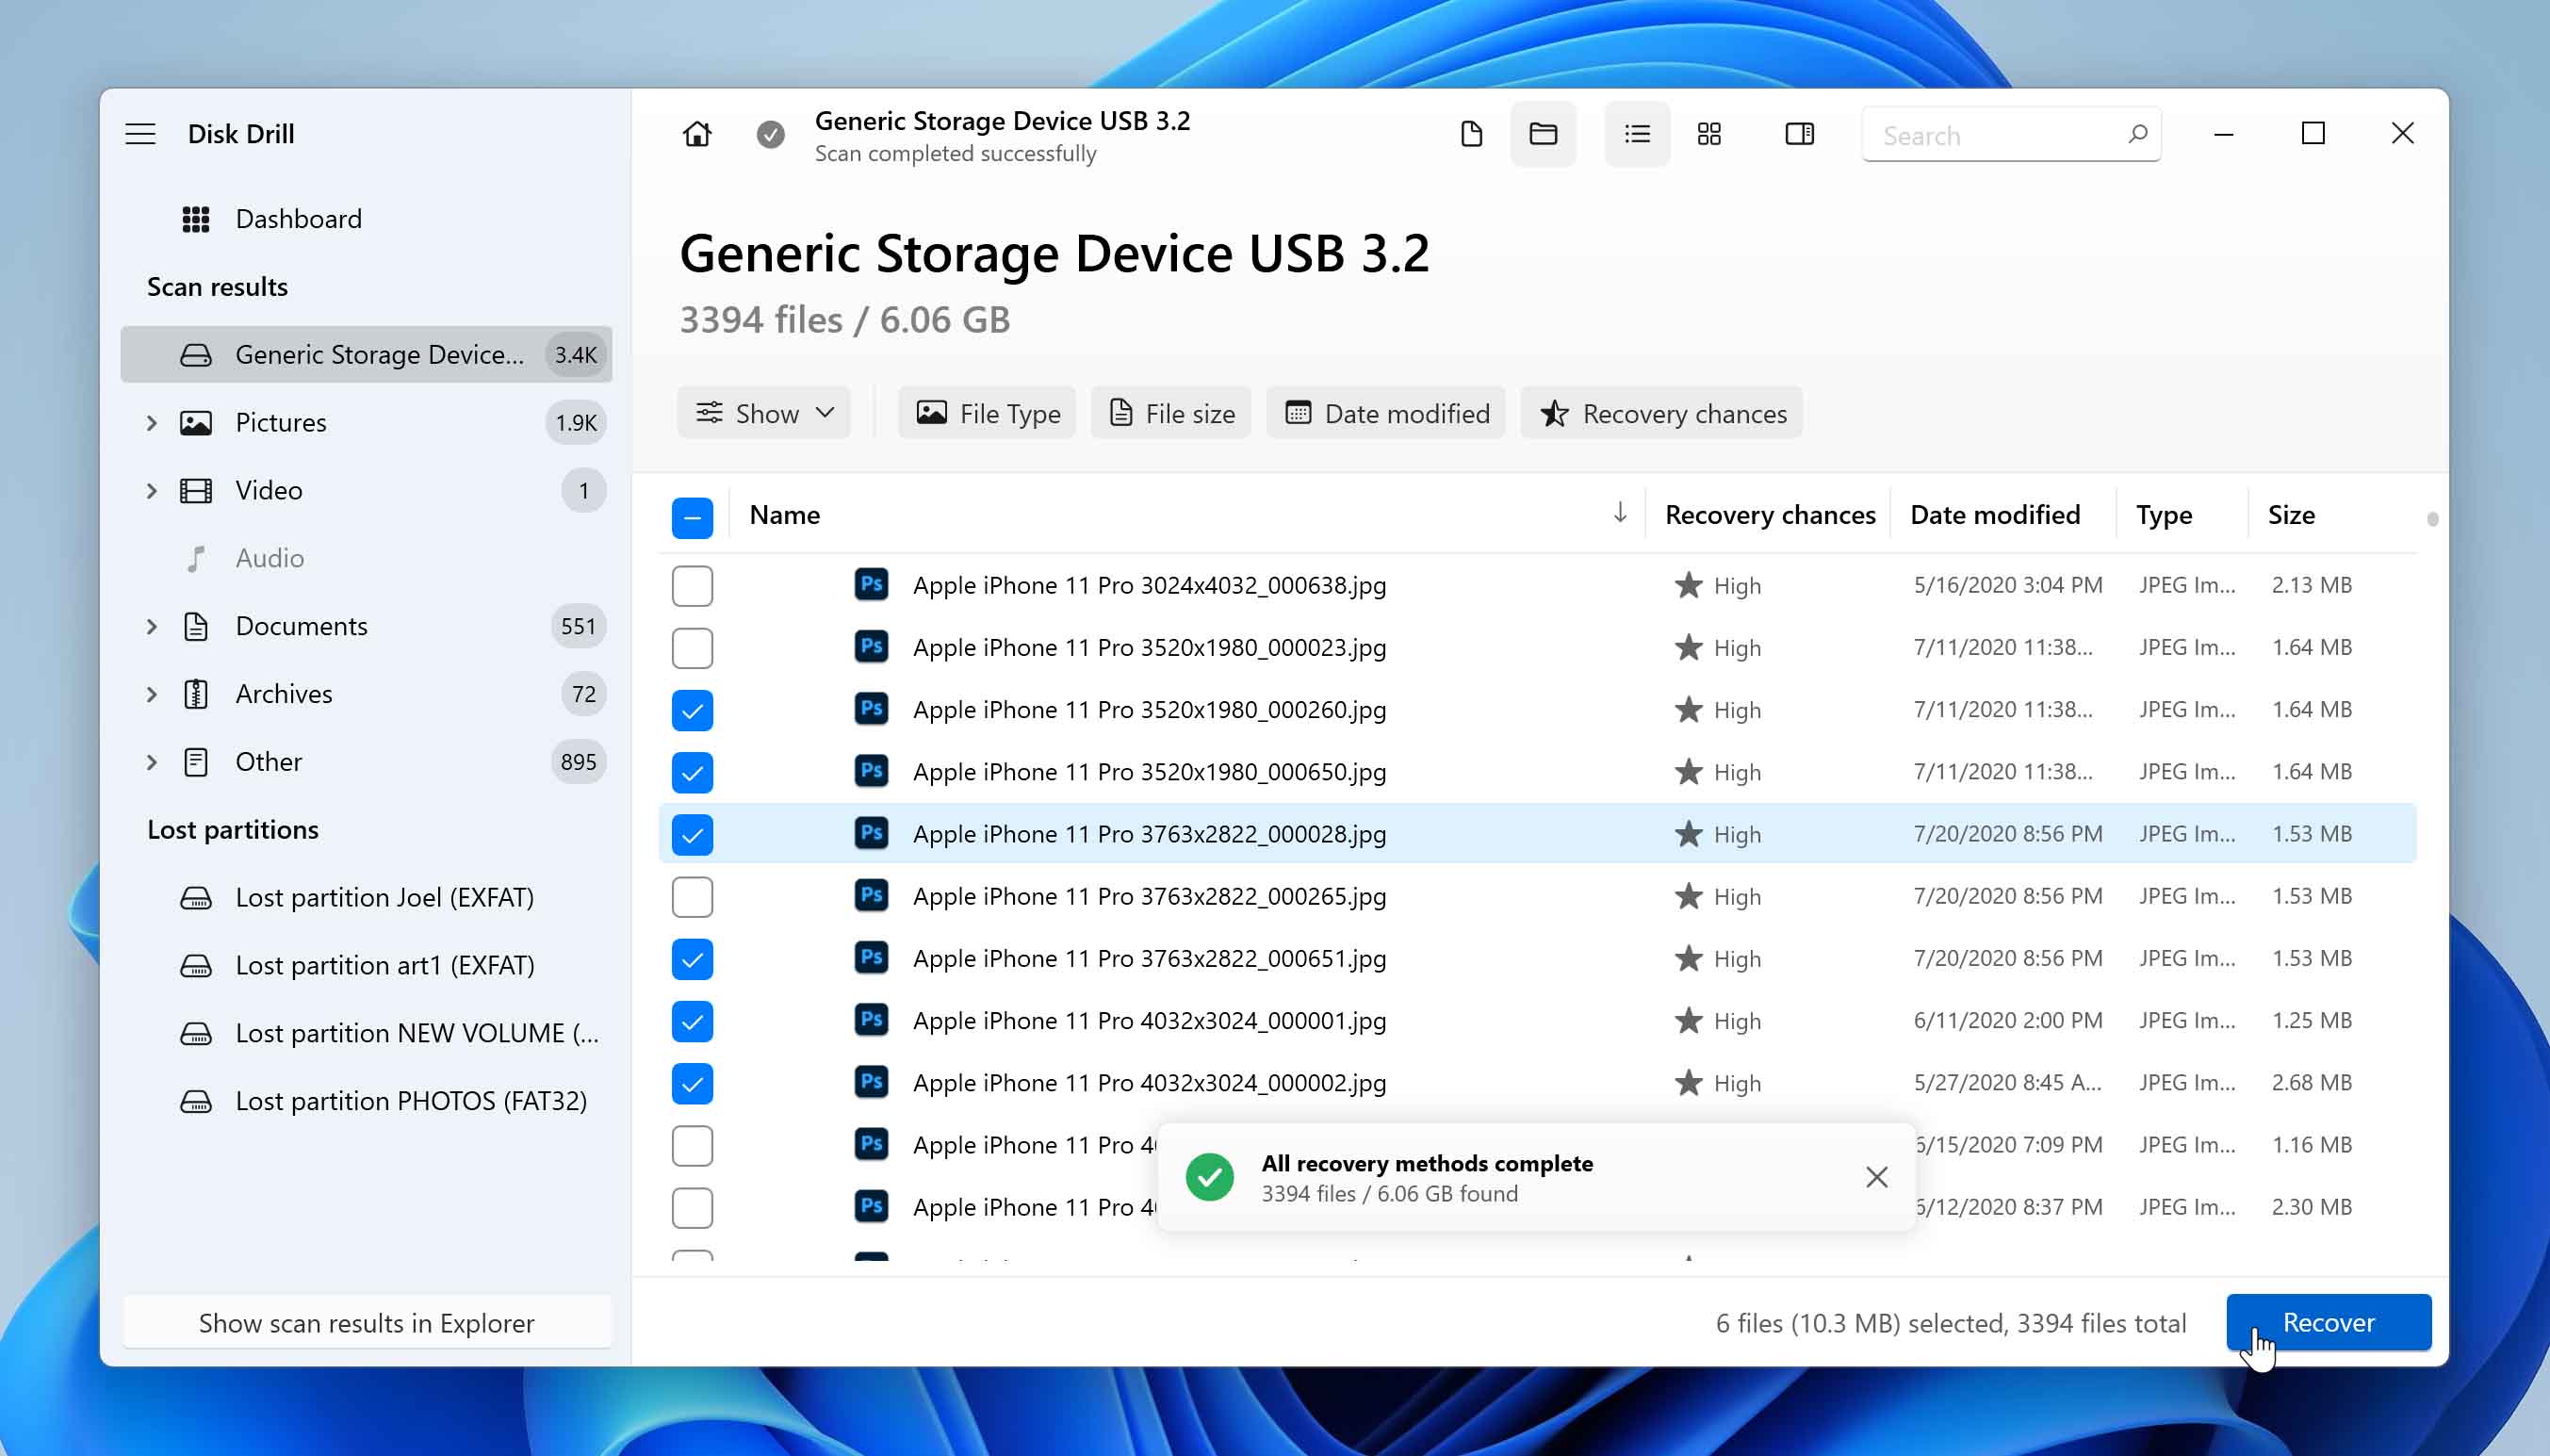
- Disk Drill will display all the data it found. Use the search bar and the navigation sidebar to find your files faster.
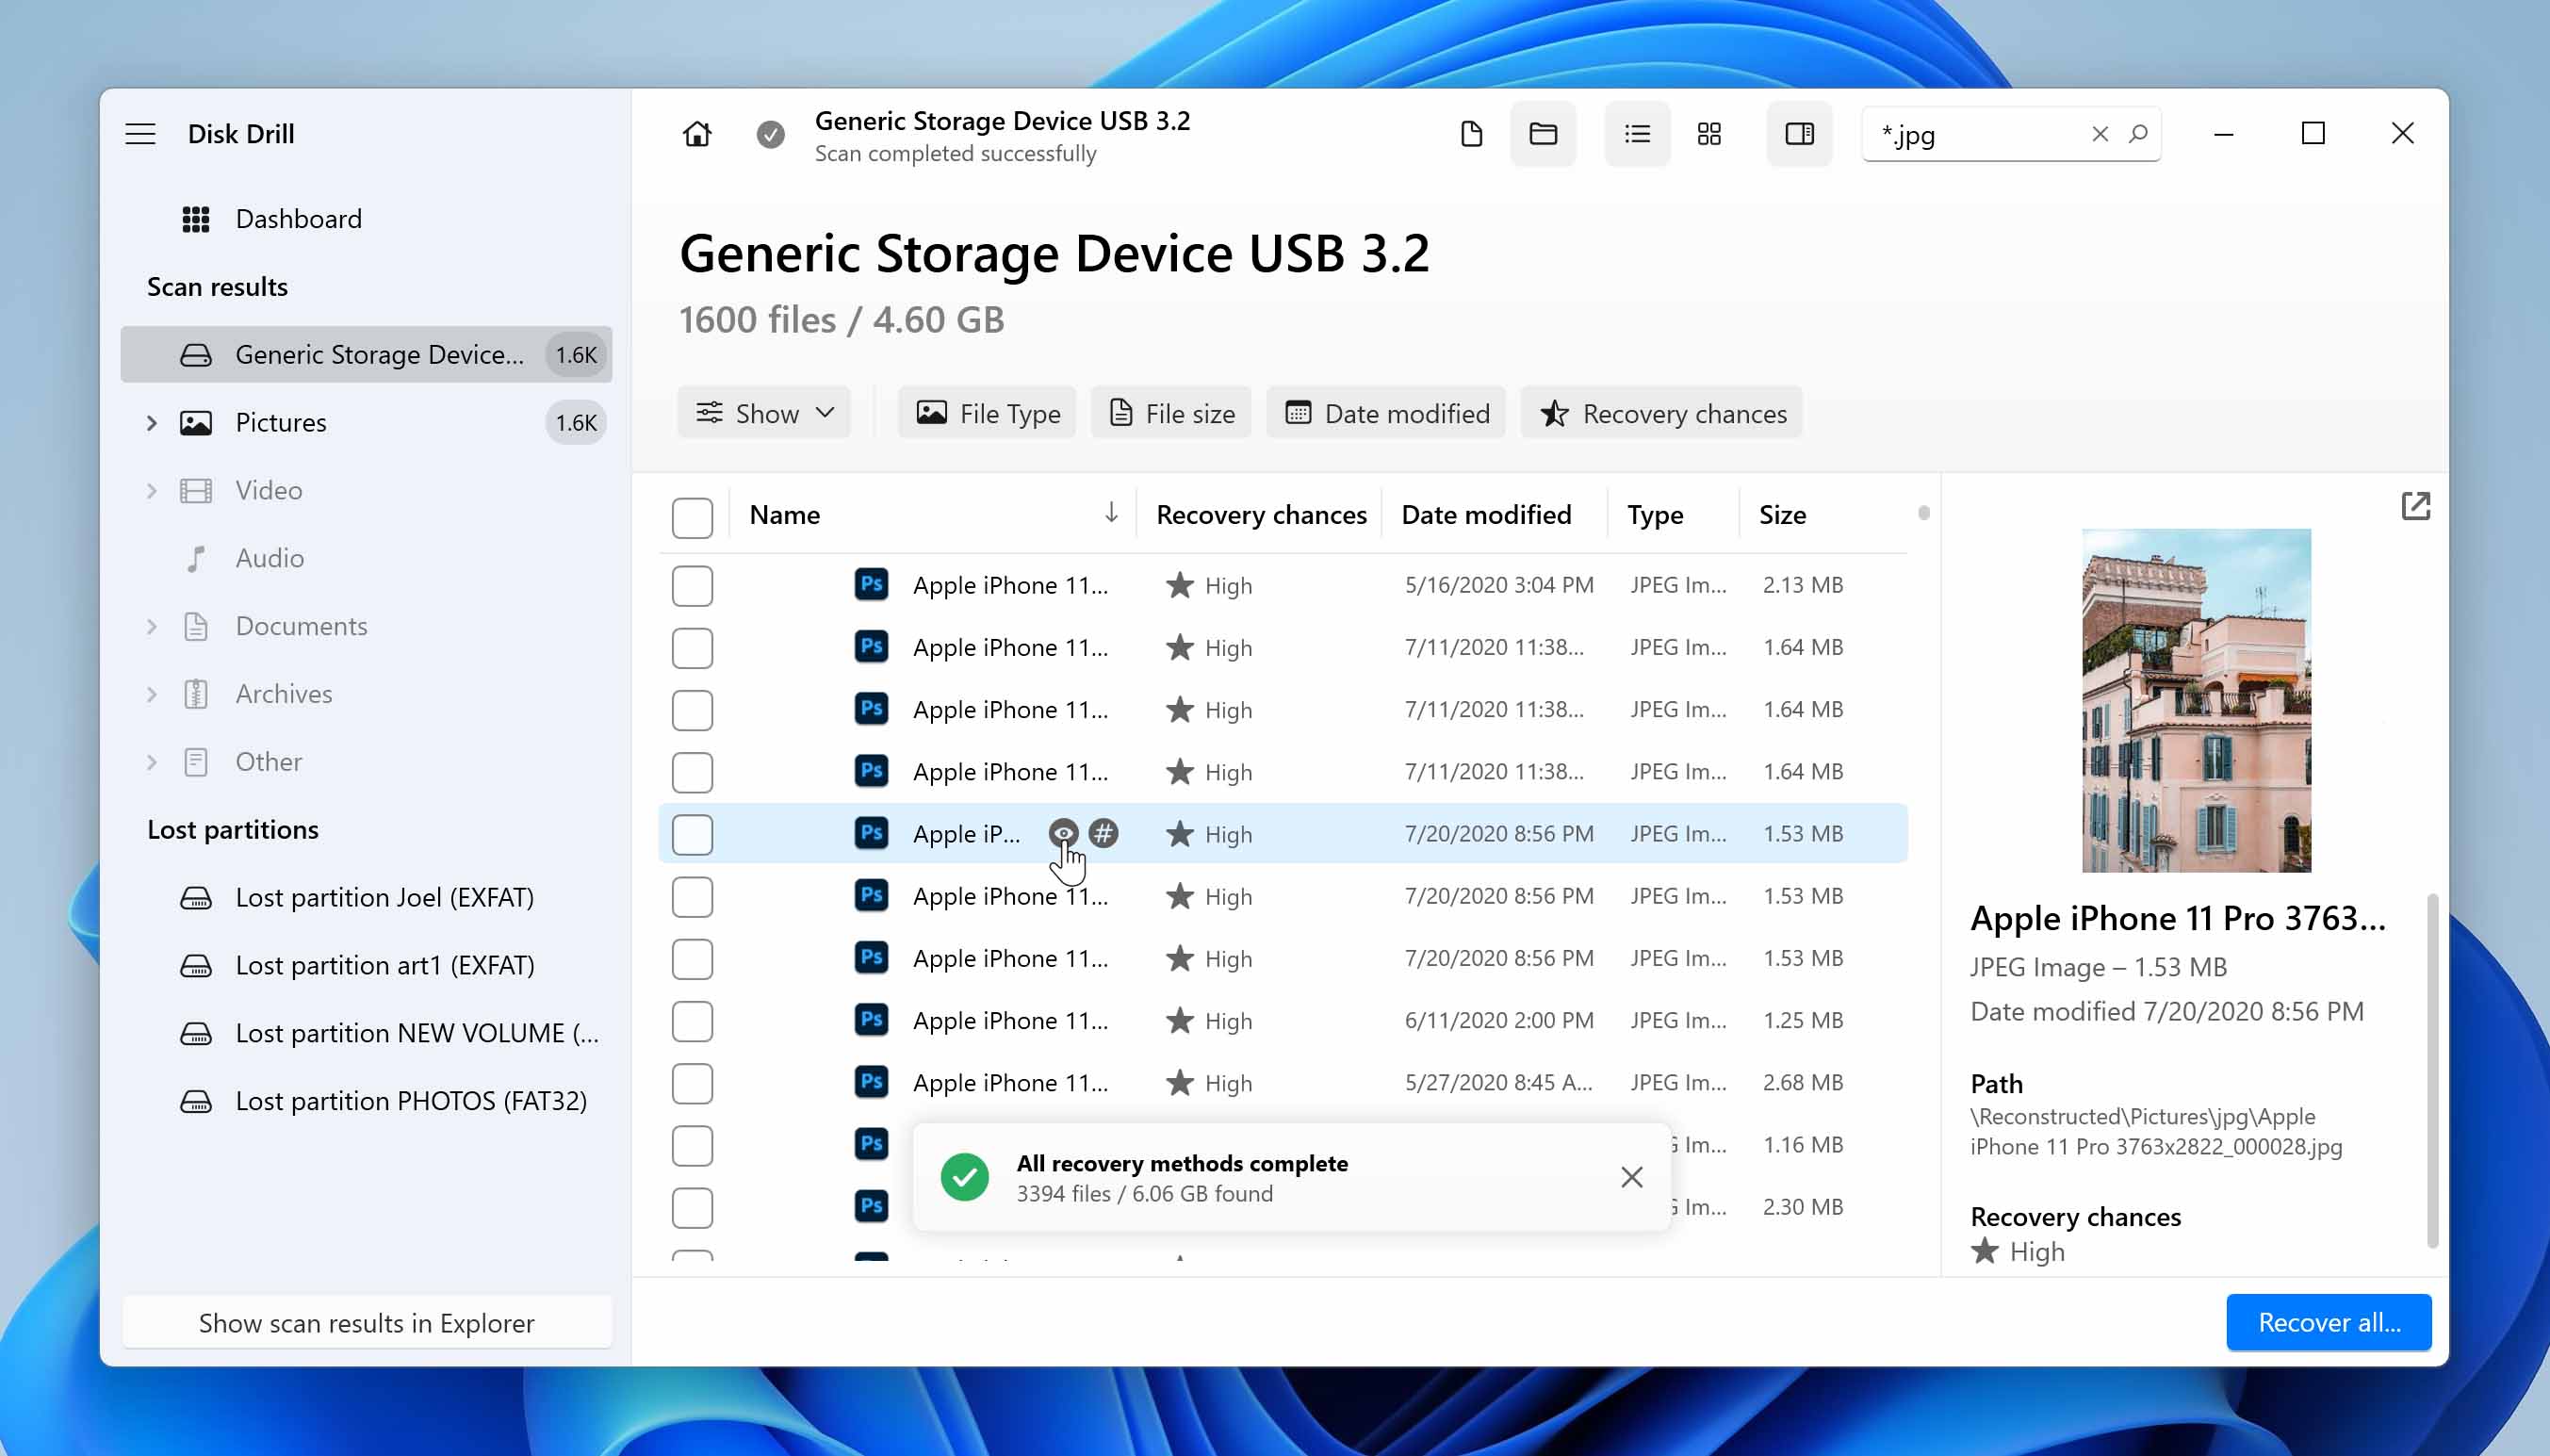
- You can preview your files by hovering your mouse pointer to the right of their filenames and clicking the eye button that appears. This also indicates the success rate of recovering a file. For example, if you can preview the videos that disappeared from your SD card, you have a high chance of recovering them intact.
- Tick the checkboxes to the left of the files you want to restore. To proceed, click “Recover”.
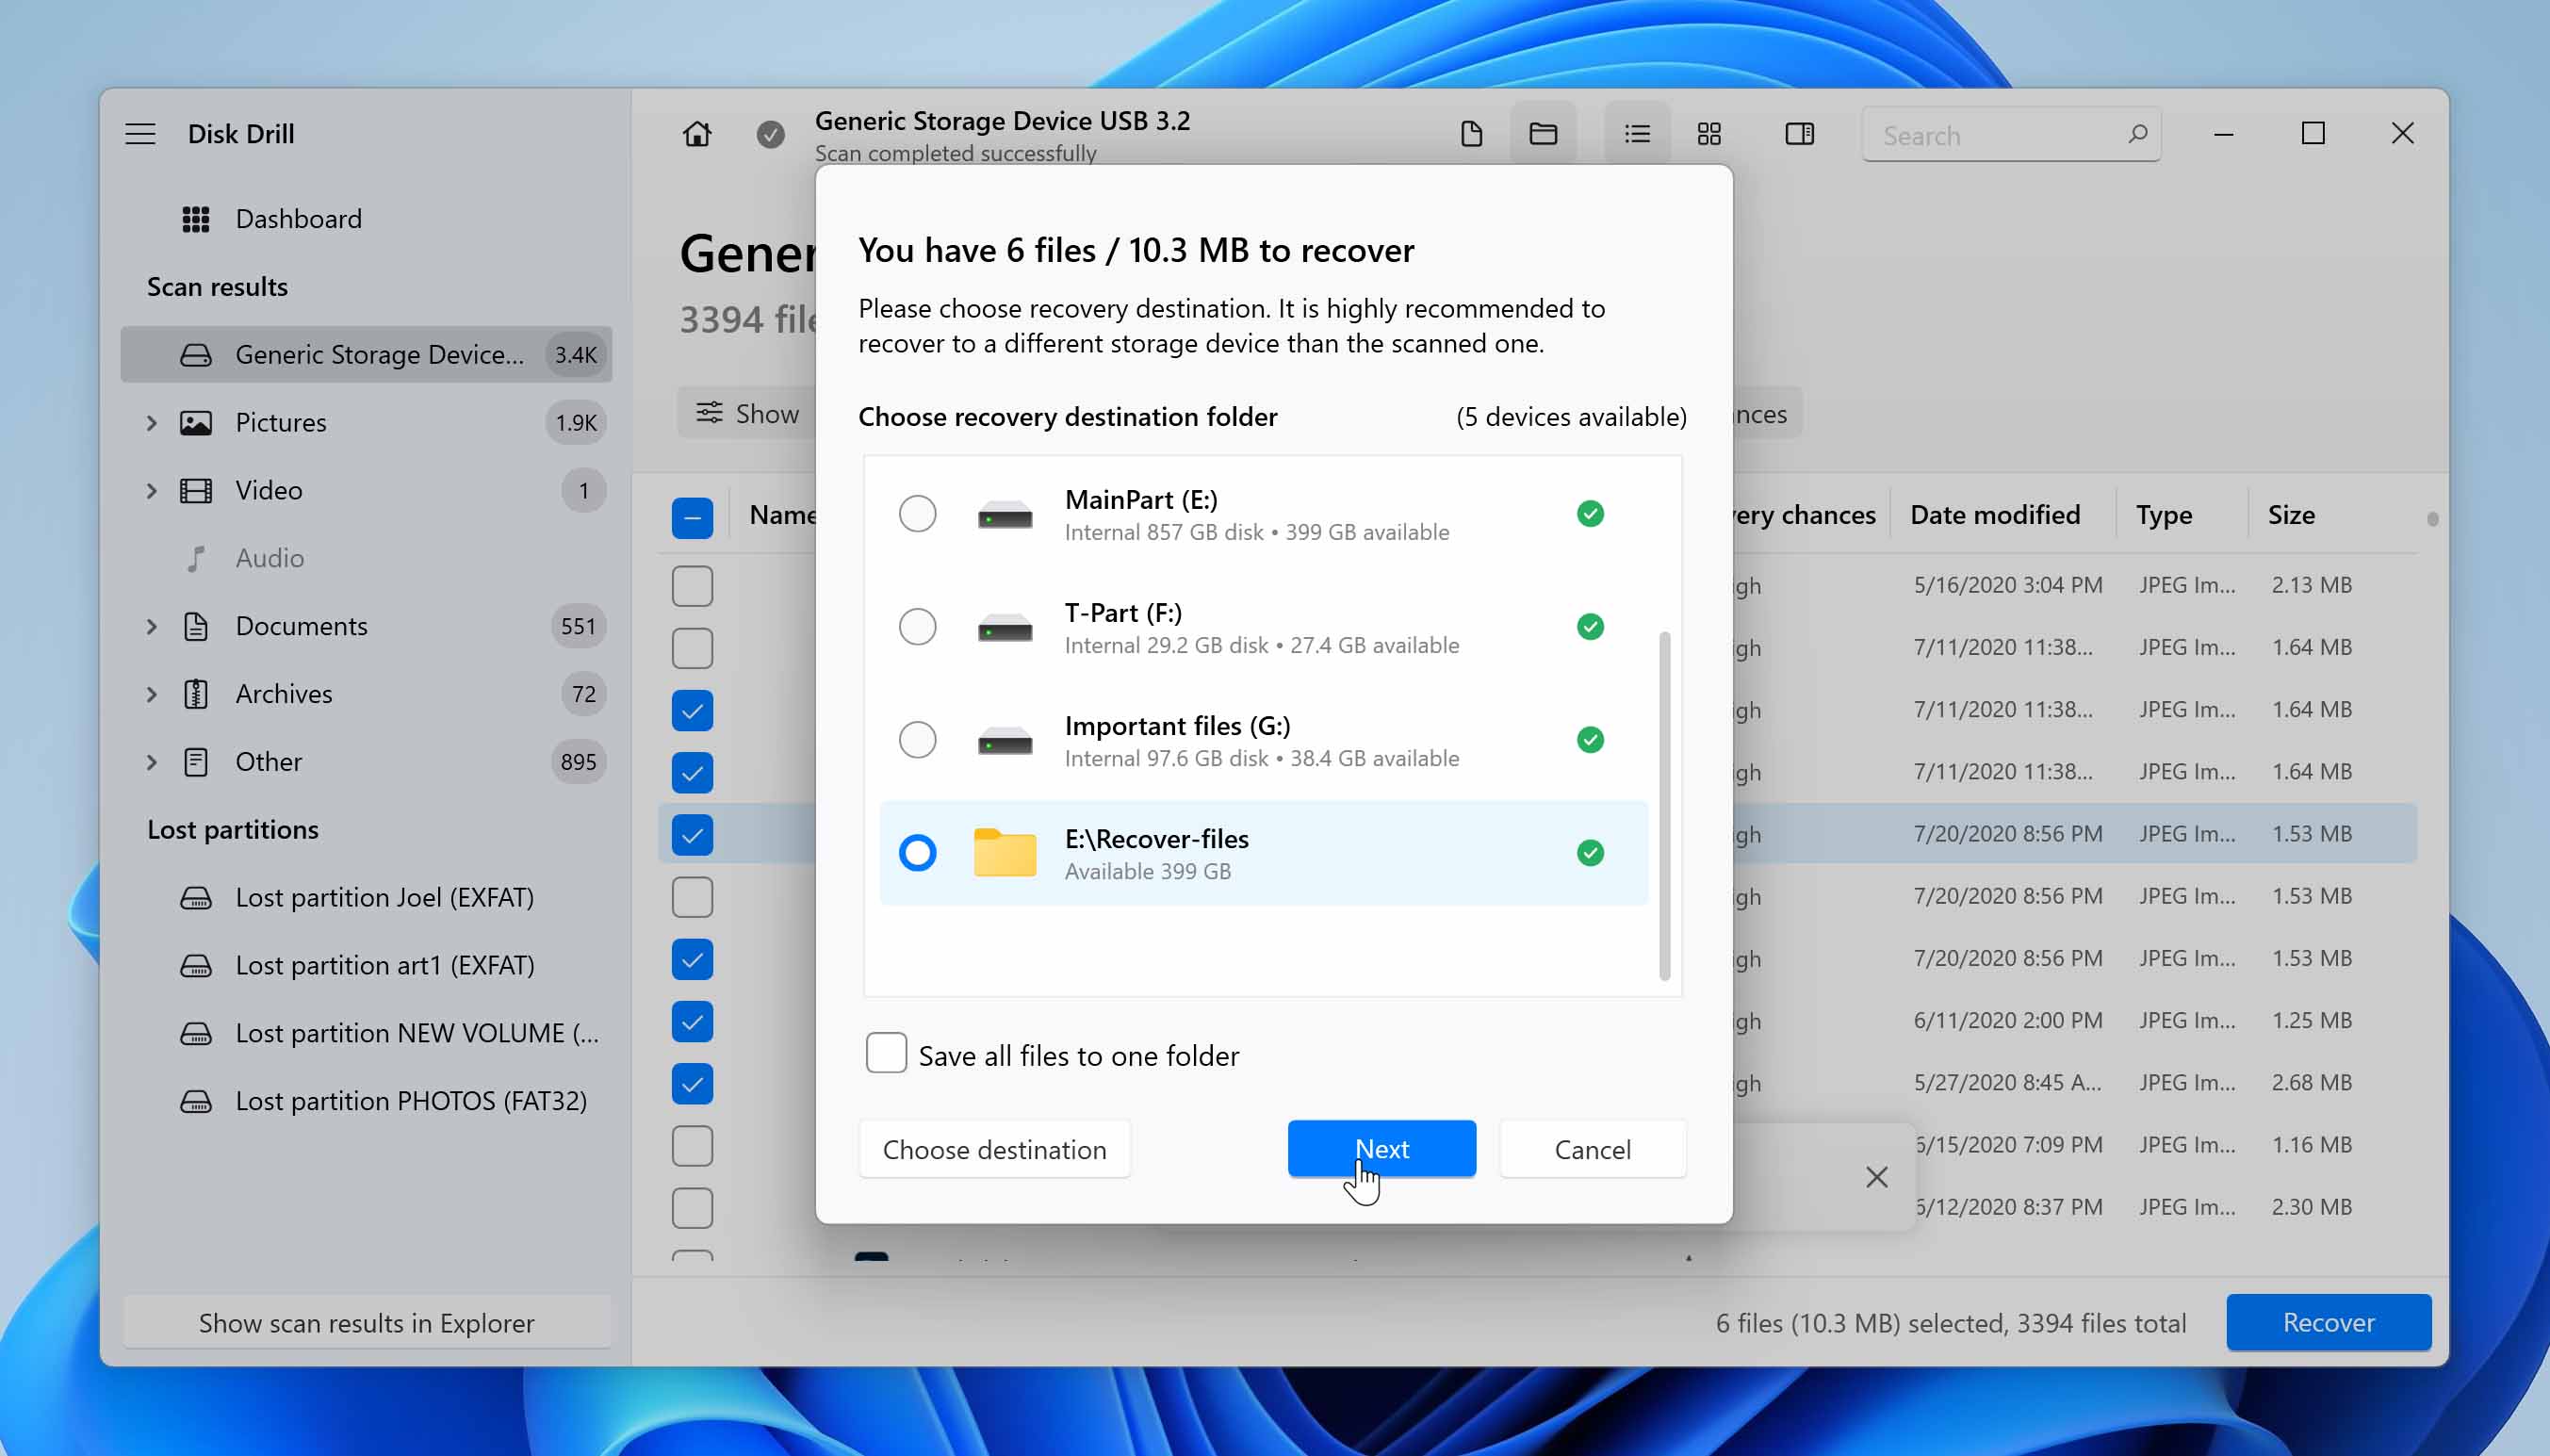
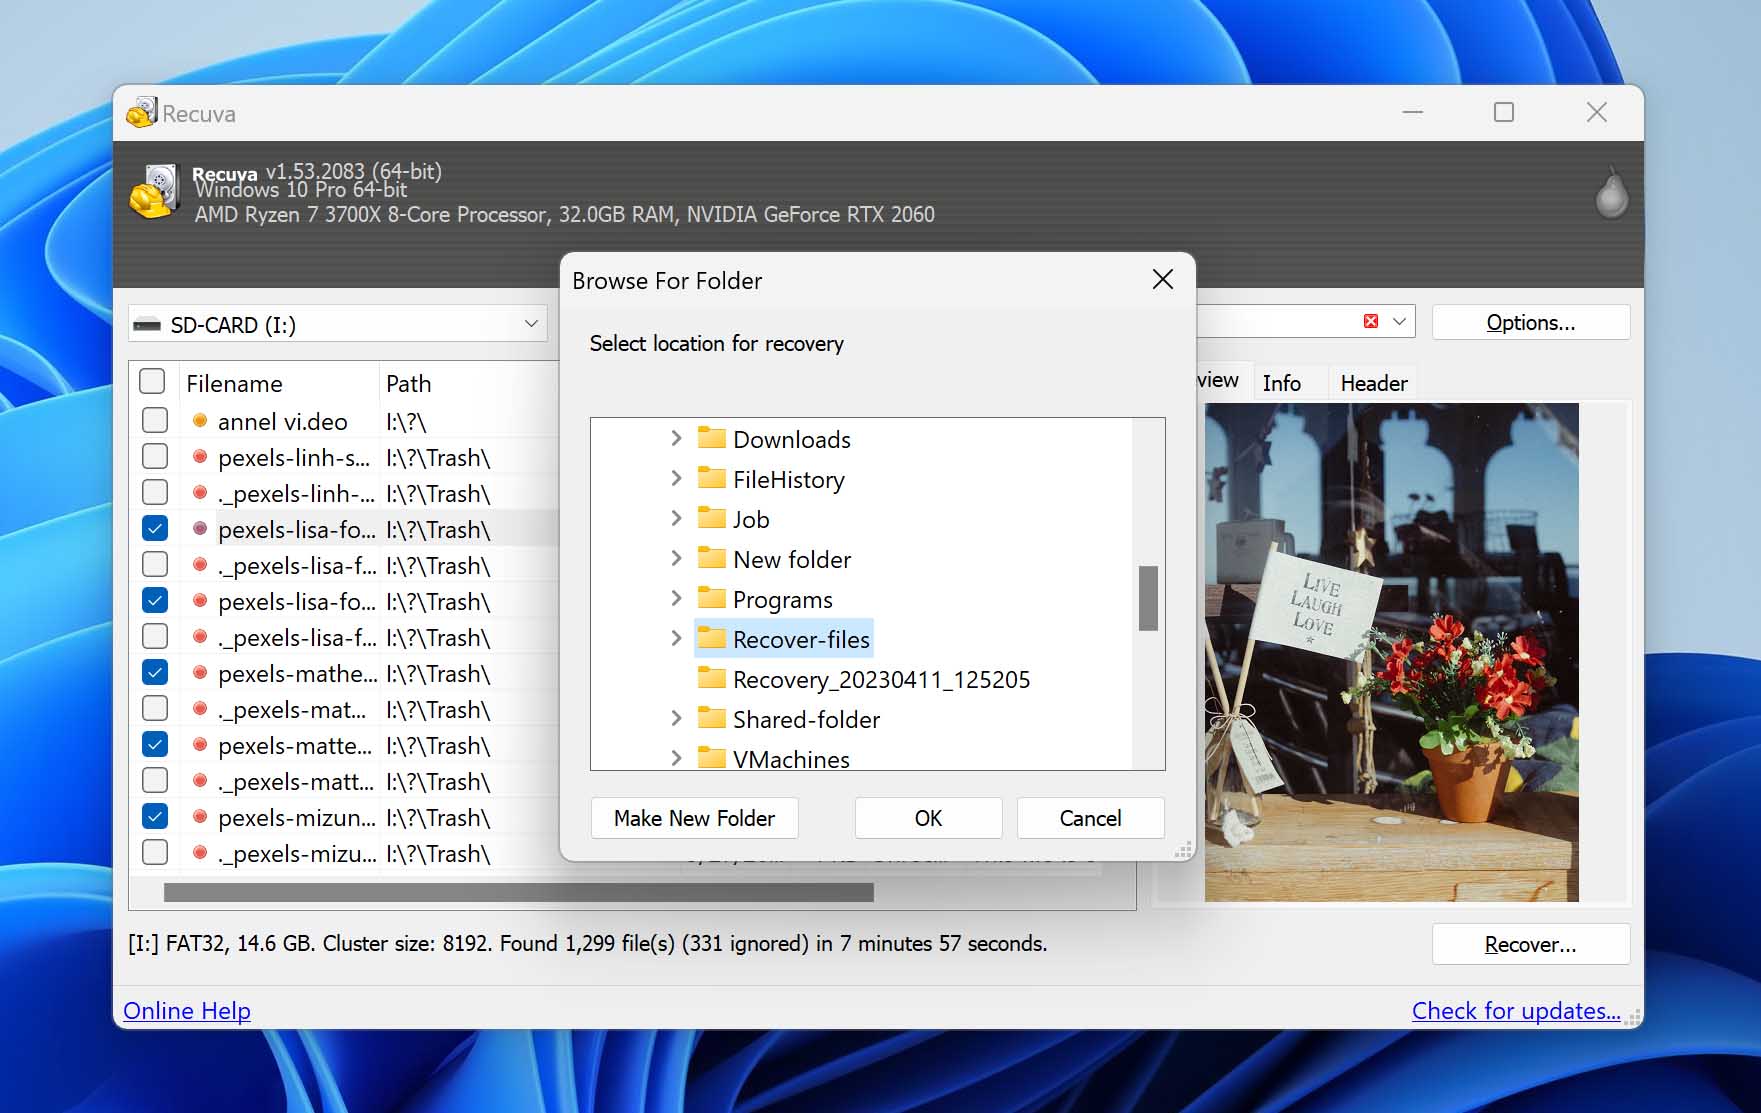
- On the dialogue box that pops up, use the folder button to select the destination for your recovered files. Make sure you save them to somewhere other than your SD card to avoid overwriting data. Finally, click “OK” to proceed.
Disk Drill Basic offers 500 MB of free data recovery for your SD card. Larger sessions require an upgrade to the premium version.
For a more detailed breakdown of Disk Drill and all the features it offers, read our full Disk Drill review. If you are unsure about the safety of the tool, we invite you to read our comprehensive safety analysis.
Option B: Recuva
![]()
Recuva is a Windows-only data recovery tool from Piriform (the people who developed CCleaner) that is a lot more limited than Disk Drill, which could be a pro or a con depending on your needs. It only has one feature – data recovery – and also offers free and premium versions of the app. The premium version provides advanced data recovery, virtual drive support, premium customer support, and automatic updates.
Main Features
- Advanced Data Recovery – Recover deleted videos, photos, documents, and music files that disappeared from SD cards. Restore formatted or corrupt disks on your external hard drives, SSDs, SD cards, USB flash drives, and more.
- Virtual Drive Support – Restore data from virtual hard drives.
- Free Unlimited File Preview – Preview as many files as you want before attempting recovery.
- Easy-to-Follow GUI – Recuva’s GUI isn’t as nice as Disk Drill’s, but it’s relatively simple to figure out.
How to Recover Data Using Recuva
- Download and install Recuva.
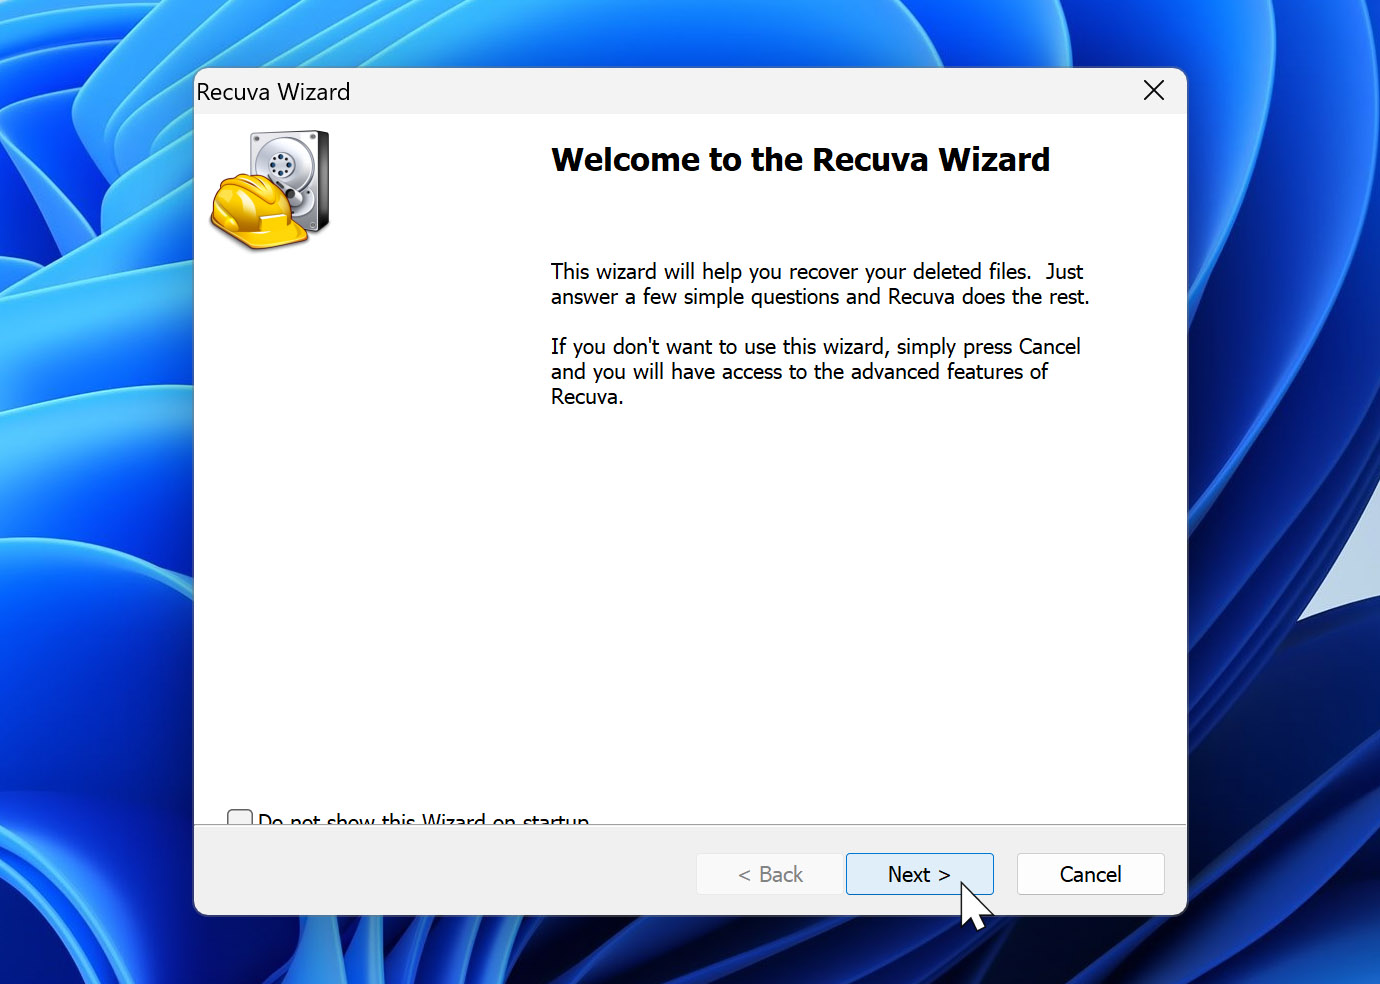
- Launch Recuva by double-clicking its icon on your desktop. On the initial Recuva Wizard window, click “Next”.
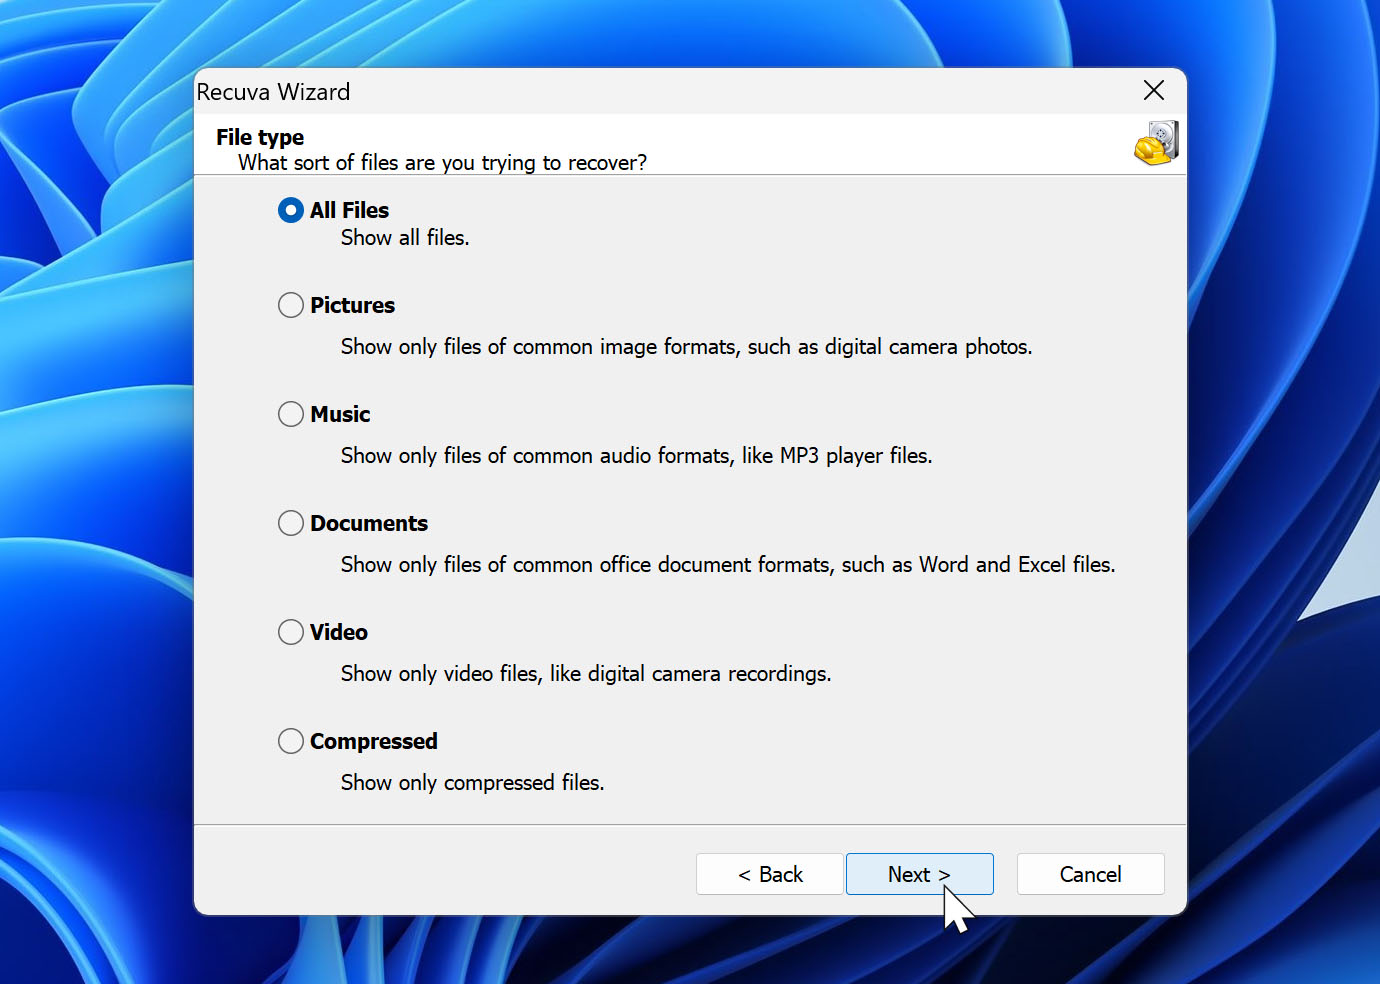
- On the next window, select the type of files you want Recuva to scan for. For example, select “Pictures” if you want to recover deleted photos from your SD card. If you want to retrieve all the data on your device, select “All Files”, then click “Next”.
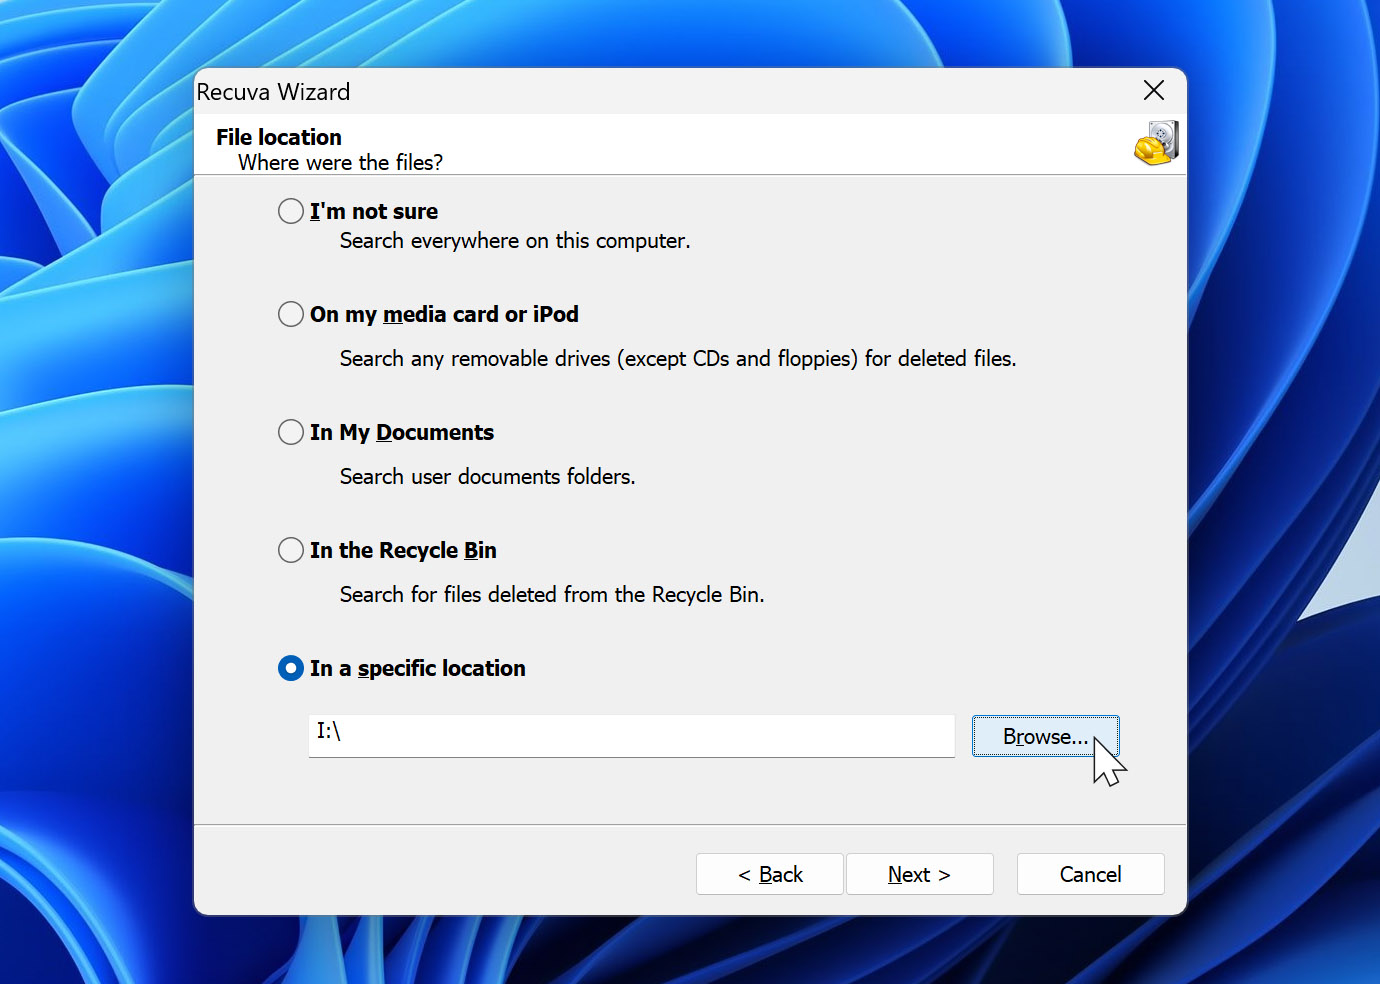
- On the File Location window, select the “In a specific location” option and use the “Browse” button to navigate to your SD Card. Then, click “Next”.
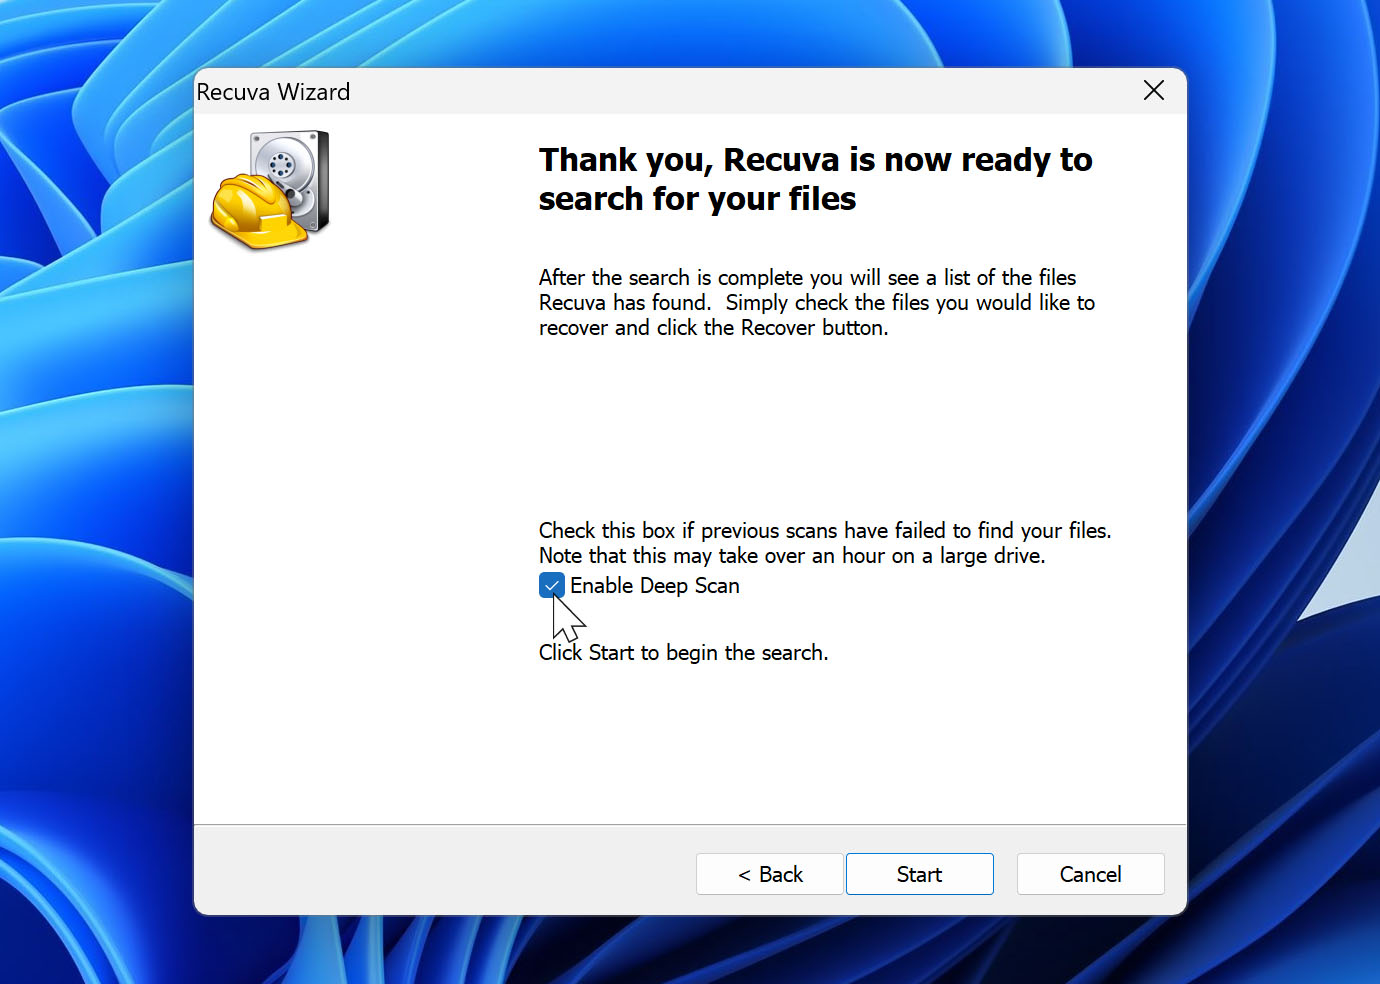
- For the best results, tick the box beside “Enable Deep Scan” and click “Start”.
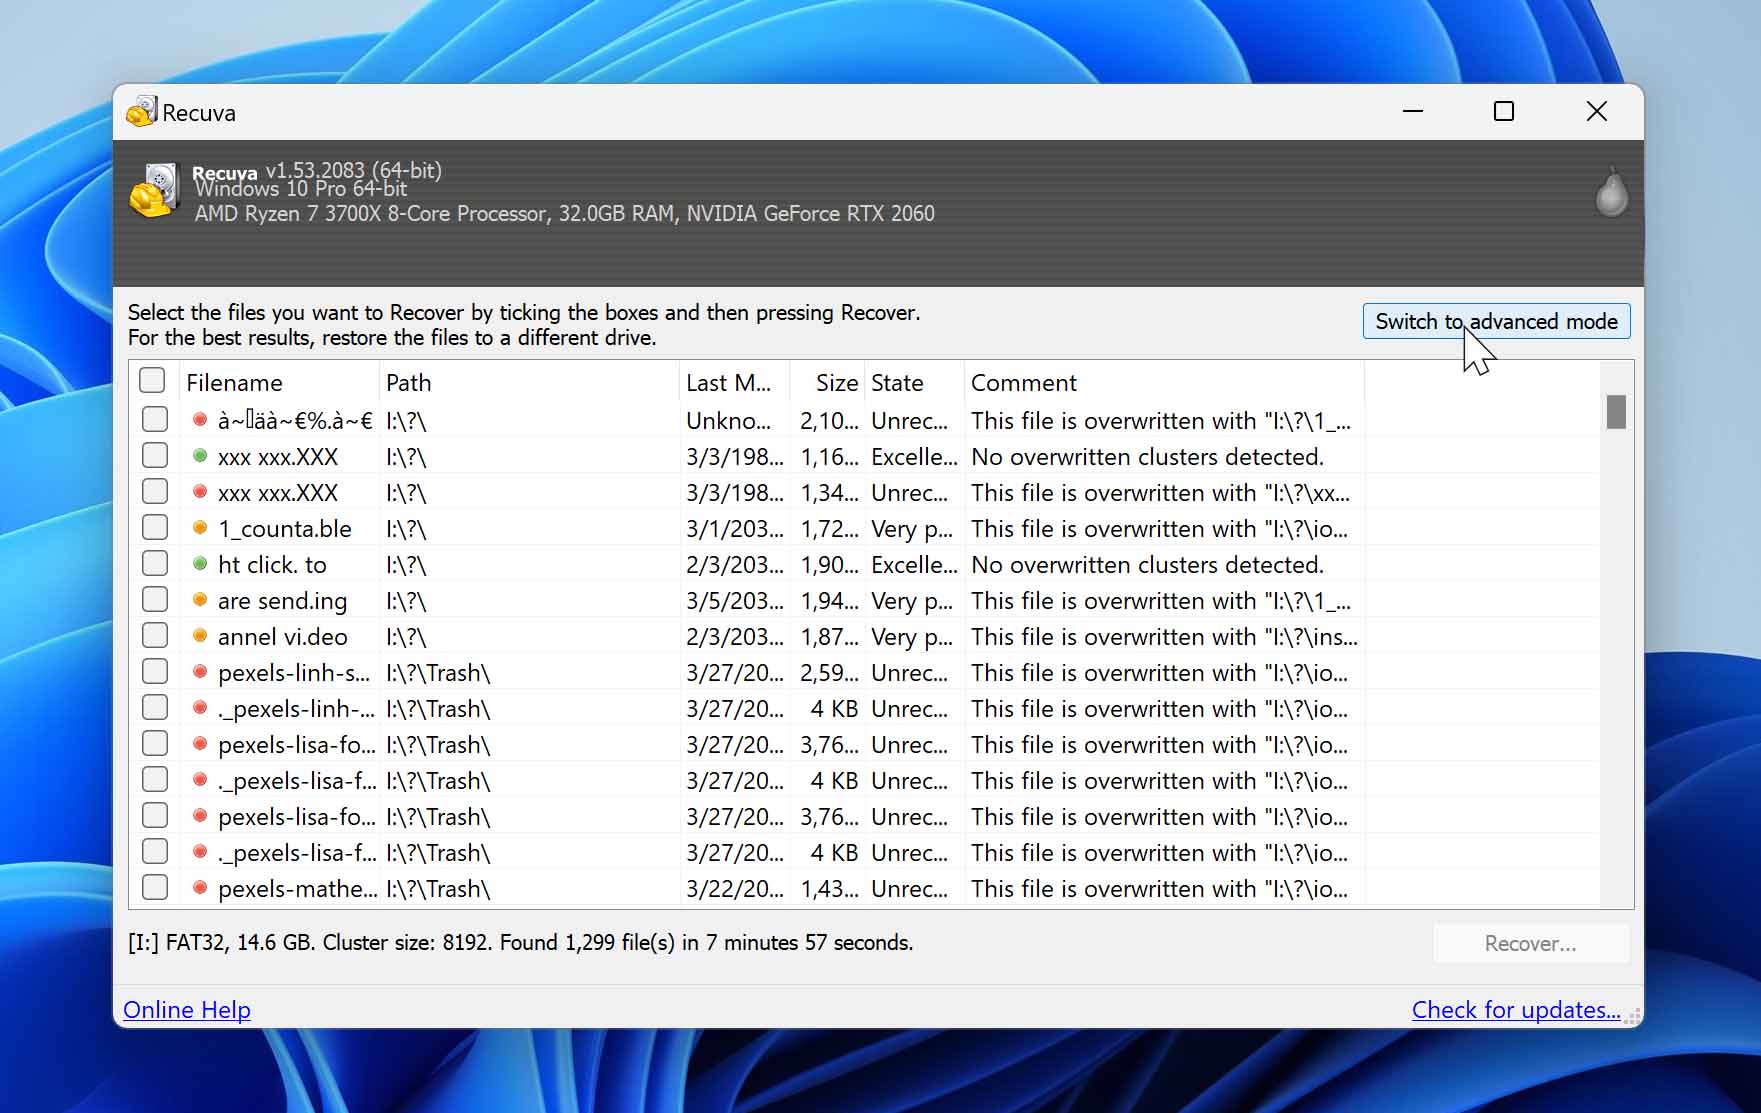
- Wait for the scanning process to complete and the main window to appear. Then, click “Switch to advanced mode” on the top-right corner of the window.
- Click “Options” on the top-right corner of the window, navigate to the “Actions” tab and tick the option to “Scan for non-deleted files.” This lets Recuva discover and restore files from formatted SD cards or corrupted media. Click “OK” to close the Options window, and click the “Scan” button on the main window.

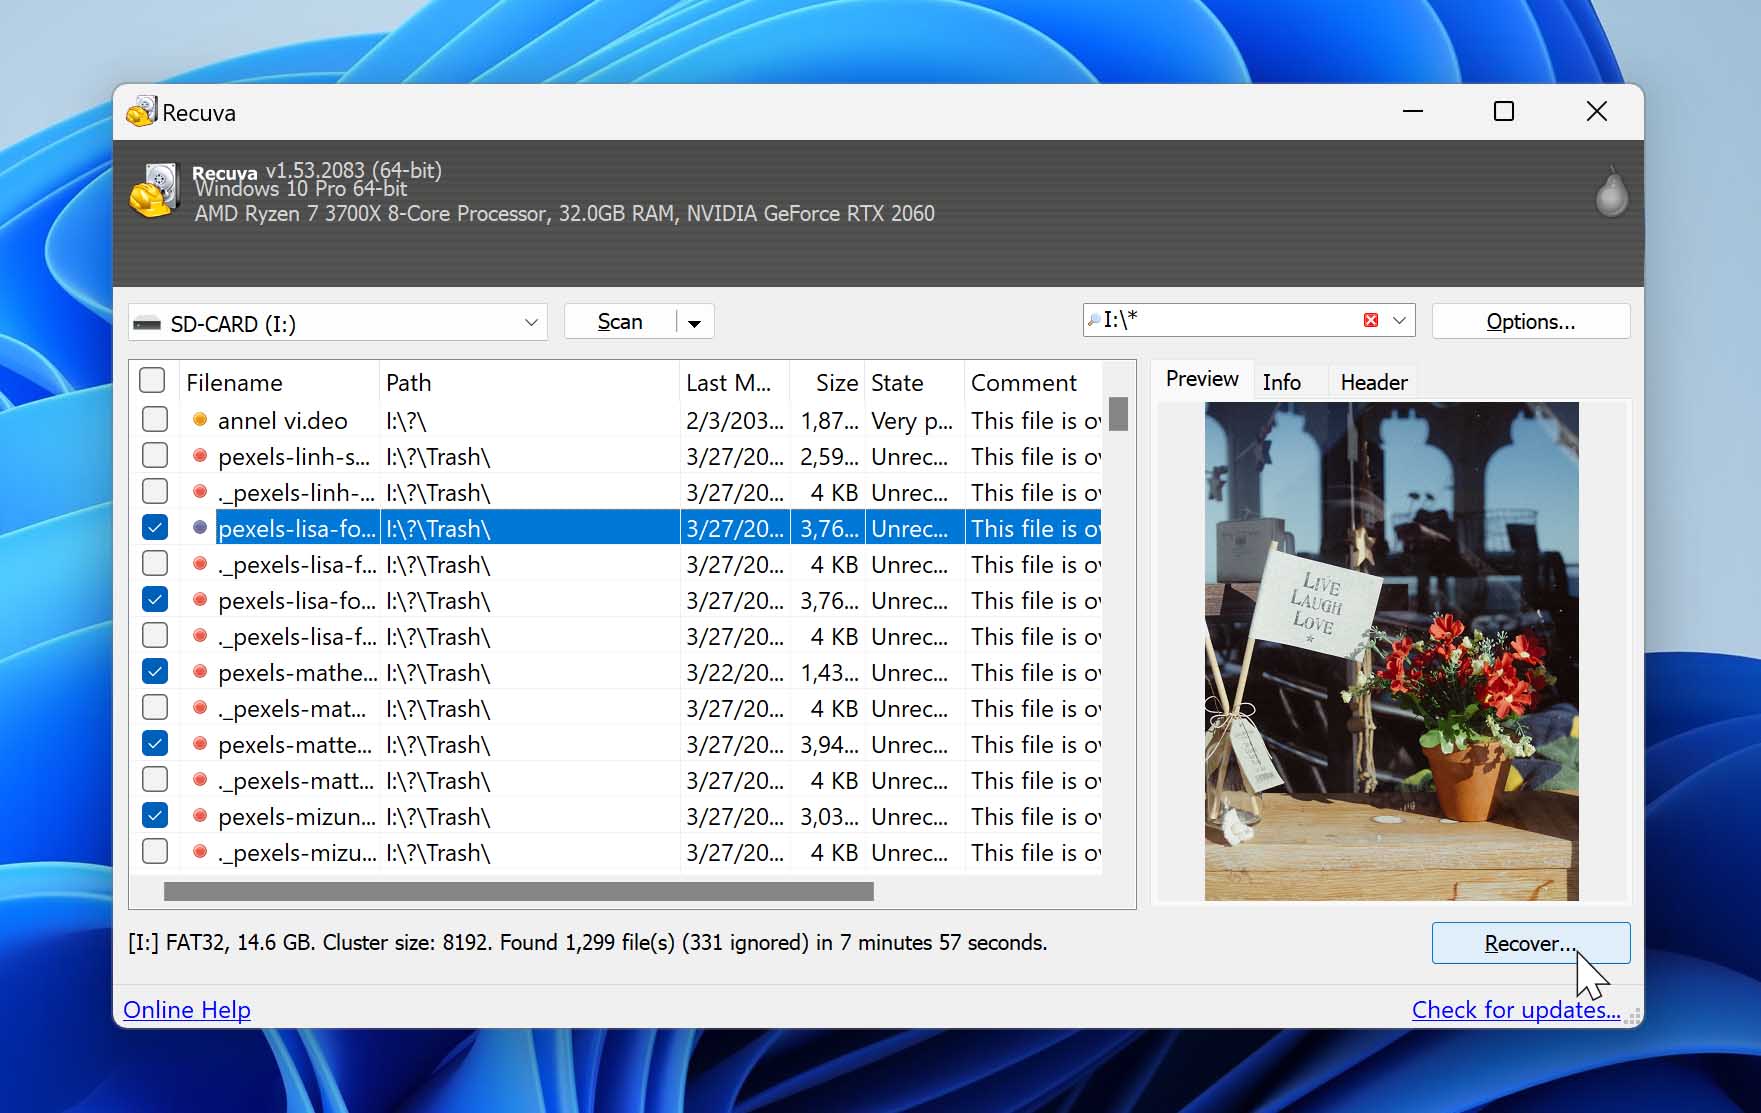
- Click the filename to display a preview of the file on the right side of the window.

- To select the files you want to recover by clicking the boxes to the left. Then, click the “Recover” button on the bottom-right corner of the window.
- On the dialogue box that appears, select the destination for your recovered files. Make sure to choose a location not on your problematic SD card. Then, click “OK”.
You can read more about our experience with Recuva and the features that come with it by checking out our full Recuva Data Recovery review.
What to Do if Files Keep Disappearing From SD Card
What do you do if you continue to find the SD card erased itself? Having an SD card deleting files by itself is a common symptom of corruption, which will only lead to more data loss the more you use the storage device. In this section, we walk through all the ways to repair such a card. You’ll be using Command Prompt to do it, but just follow the step-by-step guide and you should be fine.
Before attempting repair, backup or recover your files from a corrupted SD card first. Further interacting with it may cause additional data loss or damage. You may also need to format your SD card, which deletes all its data.
Method 1: Invoke the CHKDSK Command
The CHKDSK command can be used to scan the SD card’s file system and its metadata for logical errors. It can also check for any bad sectors. Upon running, it attempts to fix the errors, patch up soft bad sectors, and isolate hard bad sectors to prevent them from being used. These actions can help stop the SD card from deleting files automatically.
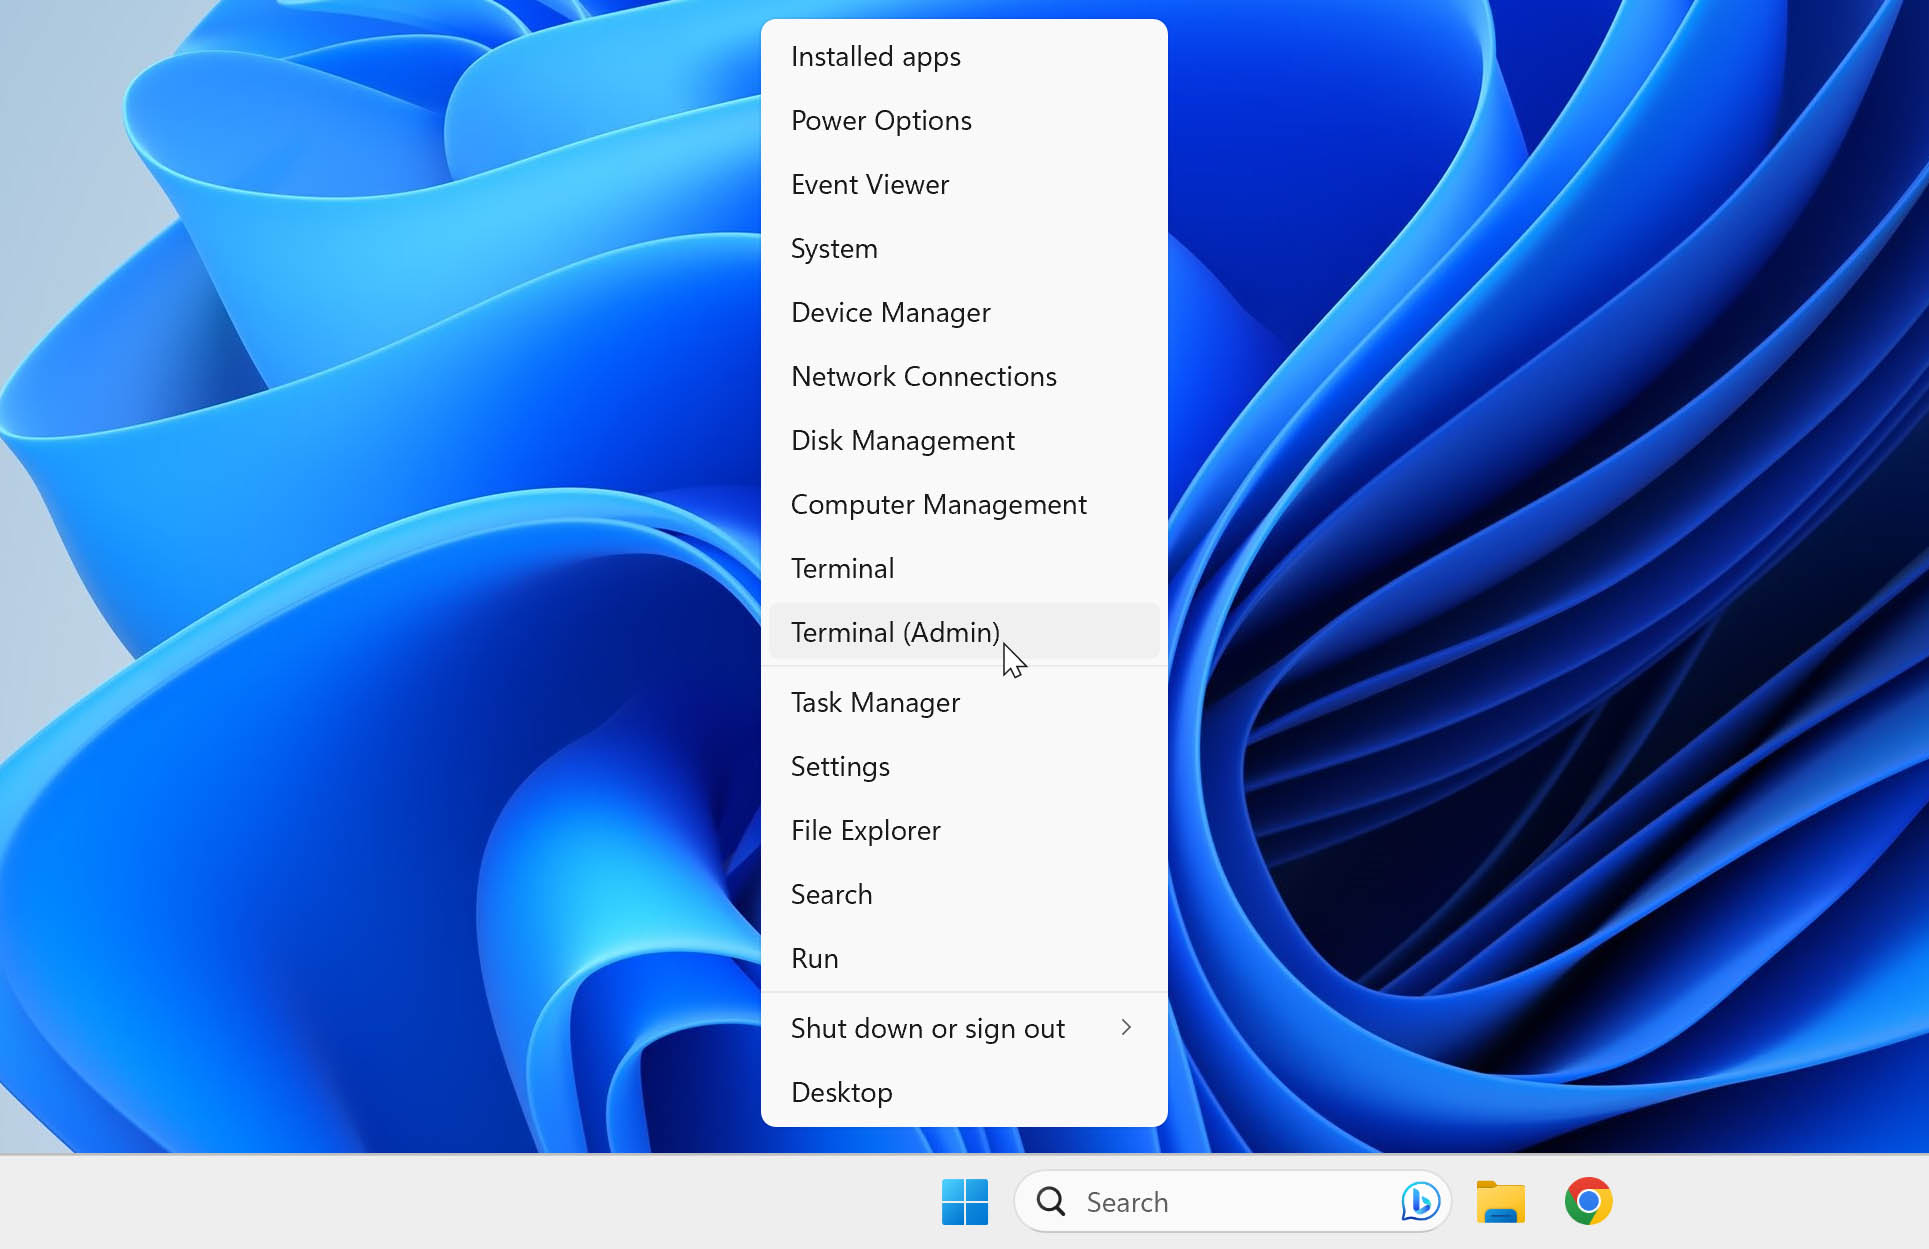
- Press WIN + X, then select “Terminal (Admin)” from the menu to open the terminal with administrator privileges.
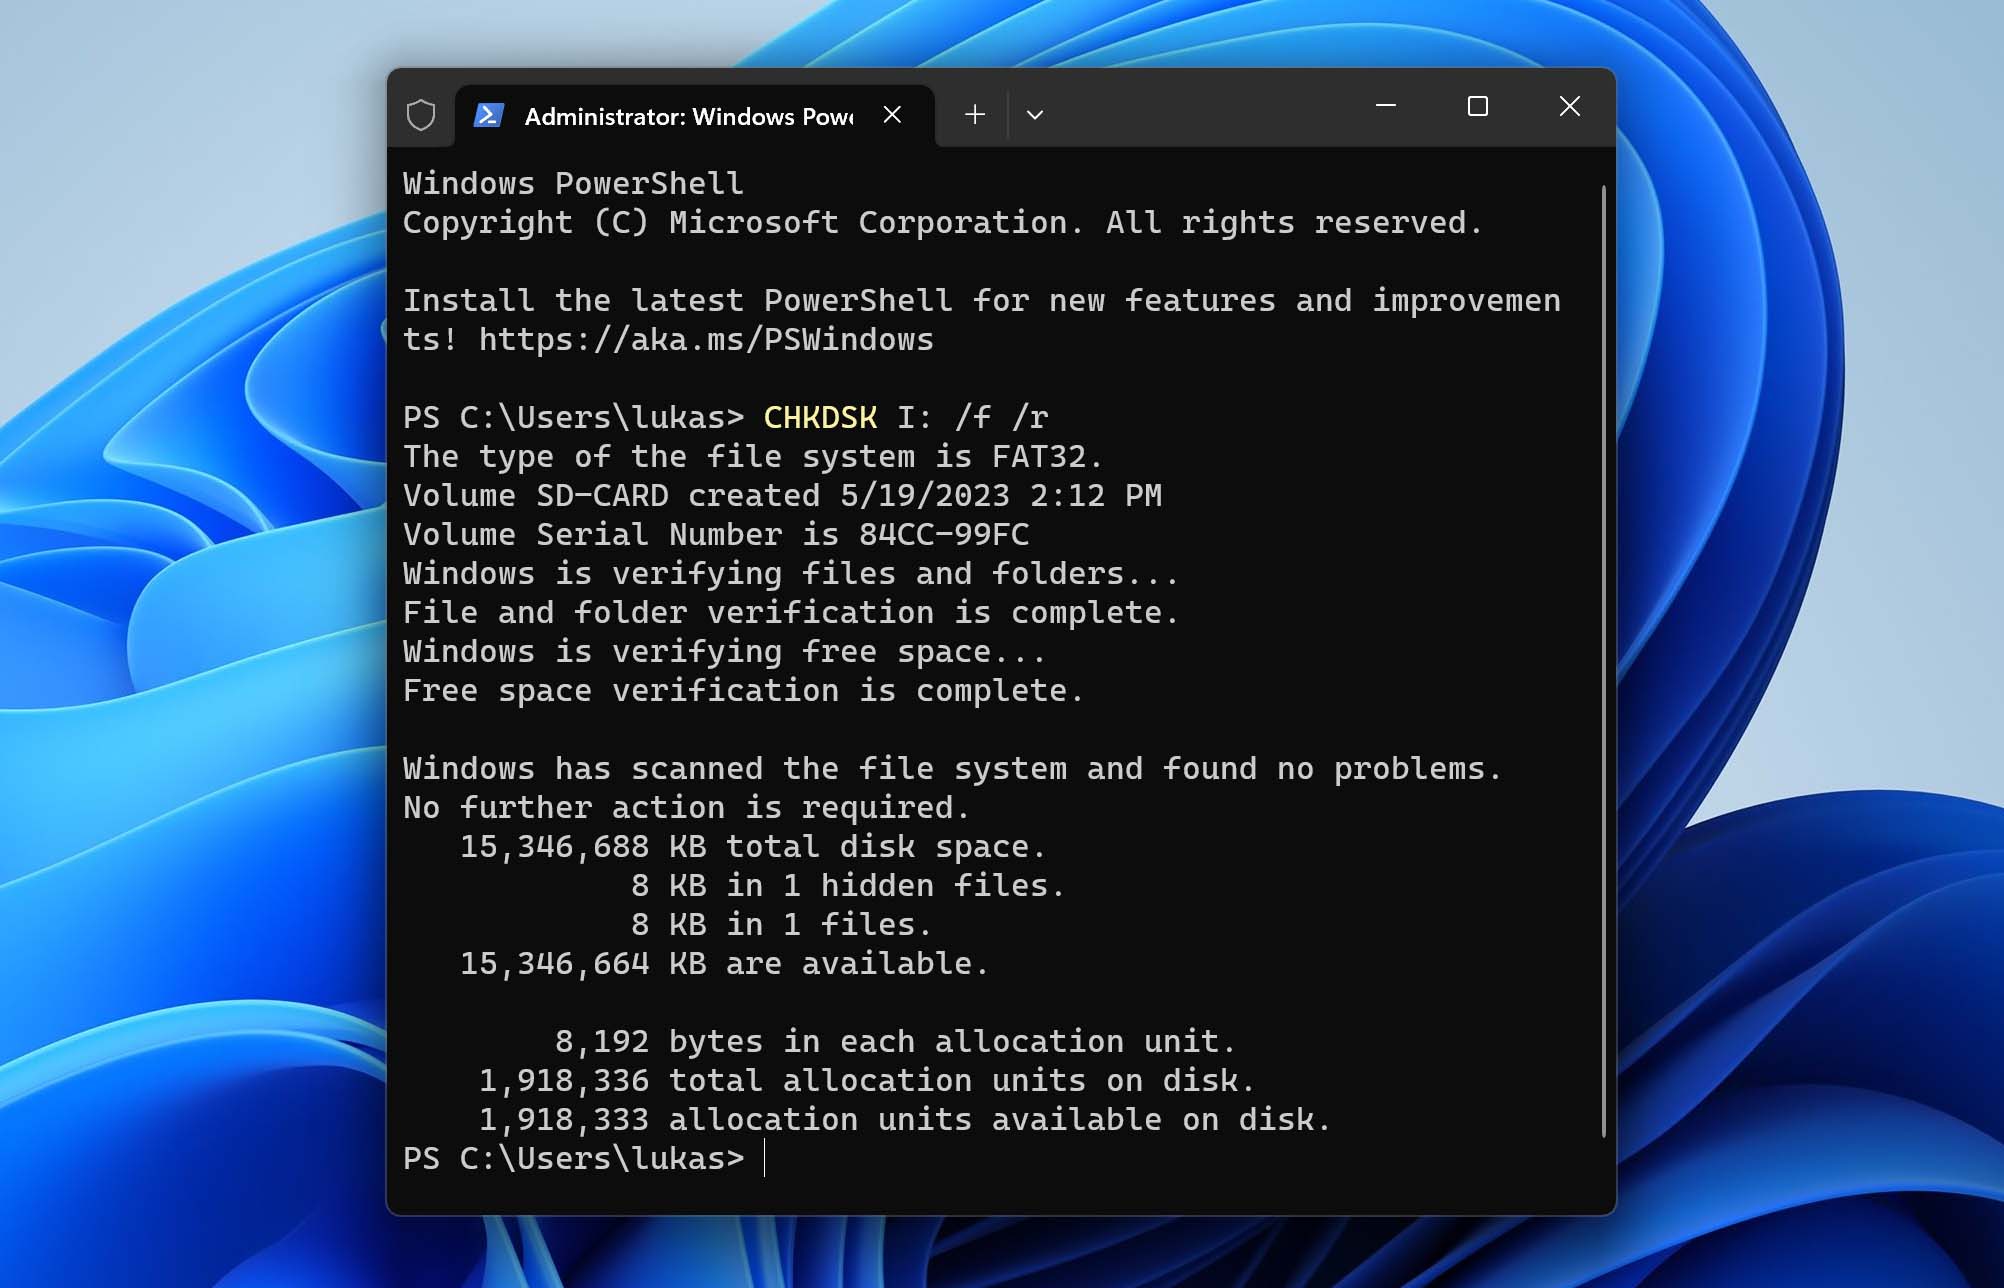
- Type the following text:
CHKDSK D: /f /r
Replace the drive letter with the one corresponding to the SD card (in this case, designated as “D:”). Then, press Enter.
- Wait for the process to finish, then check the results for error logs.
Reports indicate that certain users have been experiencing an issue where CHKDSK deletes files while running. To address this problem, we have dedicated an article specifically designed to offer a solution.
Method 2: Use Windows Error Checking
The SD card should be functioning normally after a CHKDSK command scan. However, if the issue of files keeps disappearing from the SD card, users can try fixing it through the Error Checking feature, another built-in tool for checking drives and devices for errors.
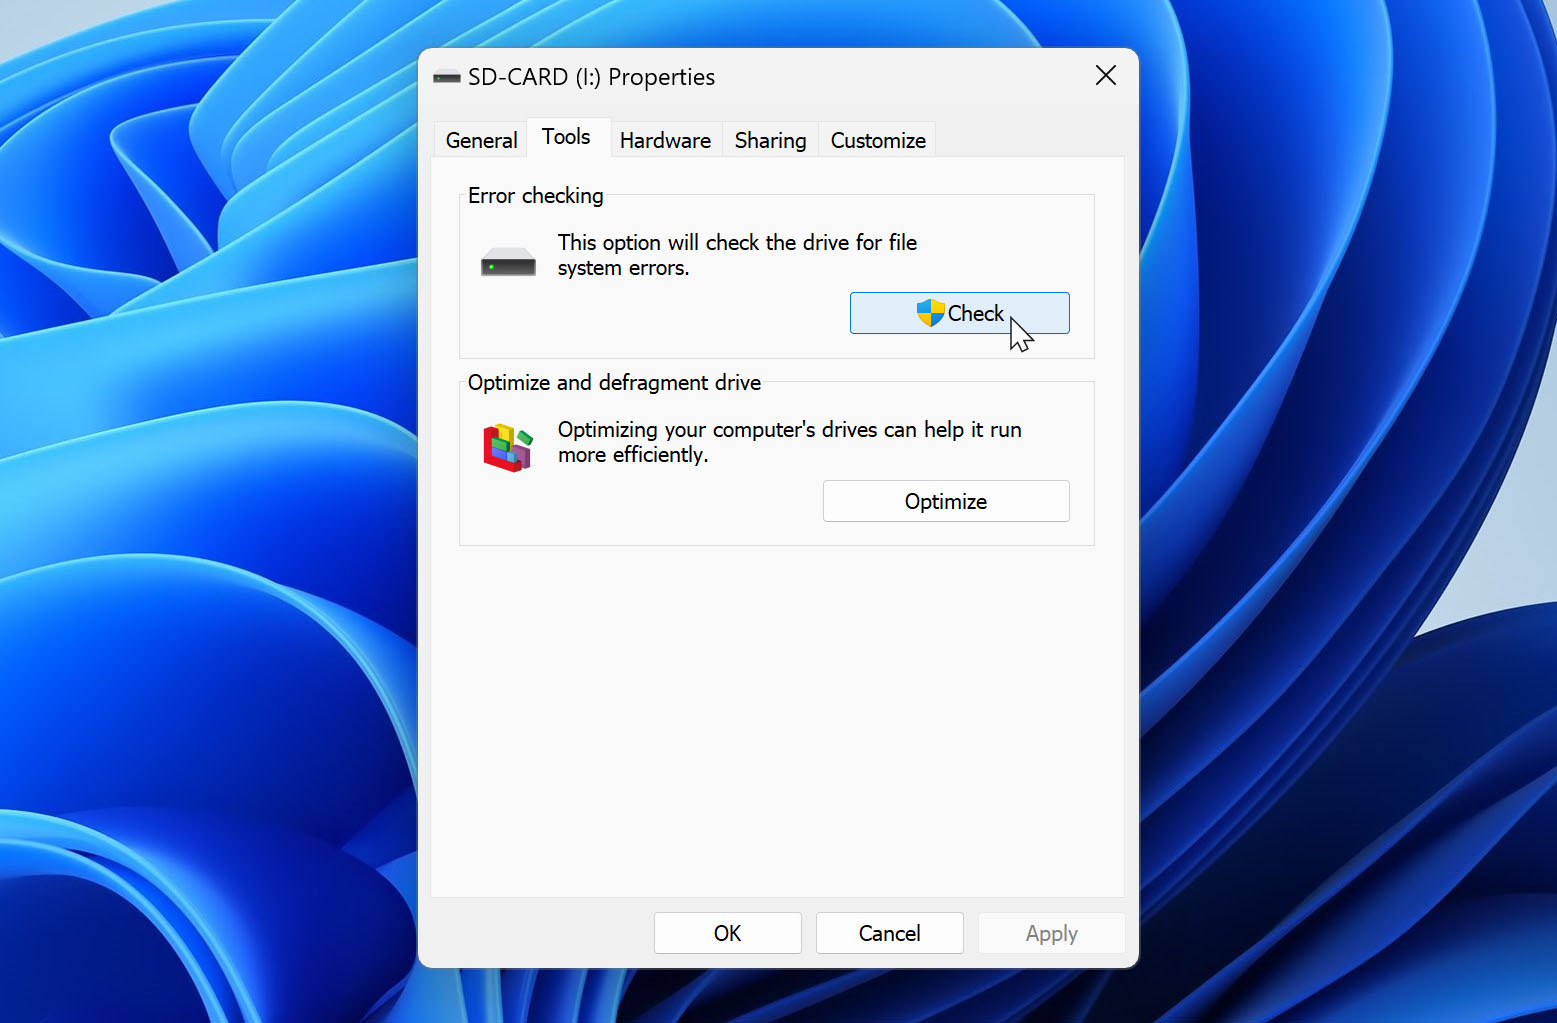
- Ensure that no other programs are using the SD card. Open Windows File Explorer, right-click on your SD card, then click “Properties”.
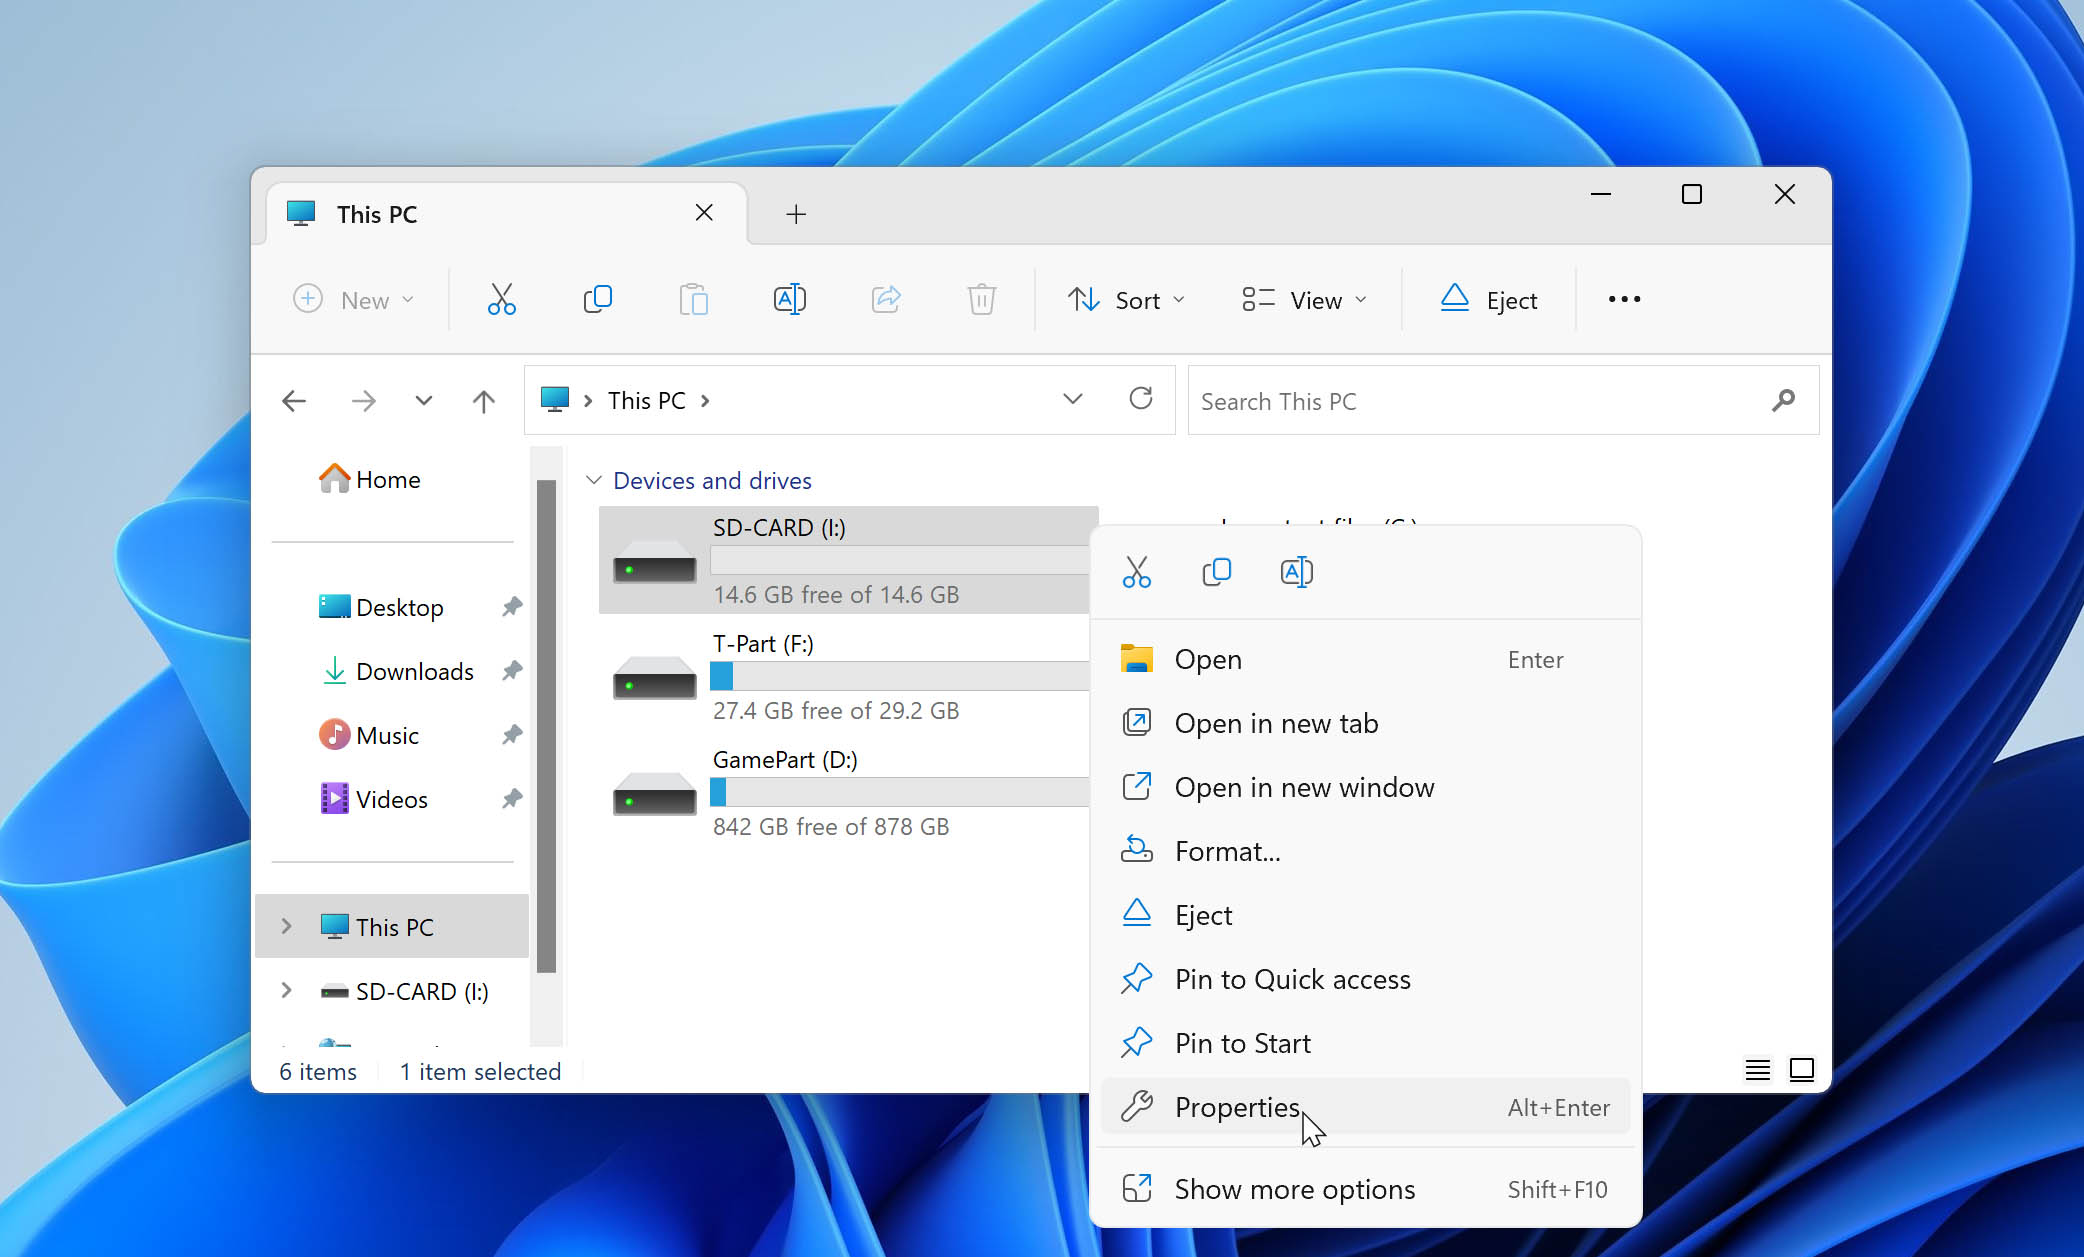
- Navigate to the “Tools” tab, then click the “Check” button. Grant administrator privileges when prompted.
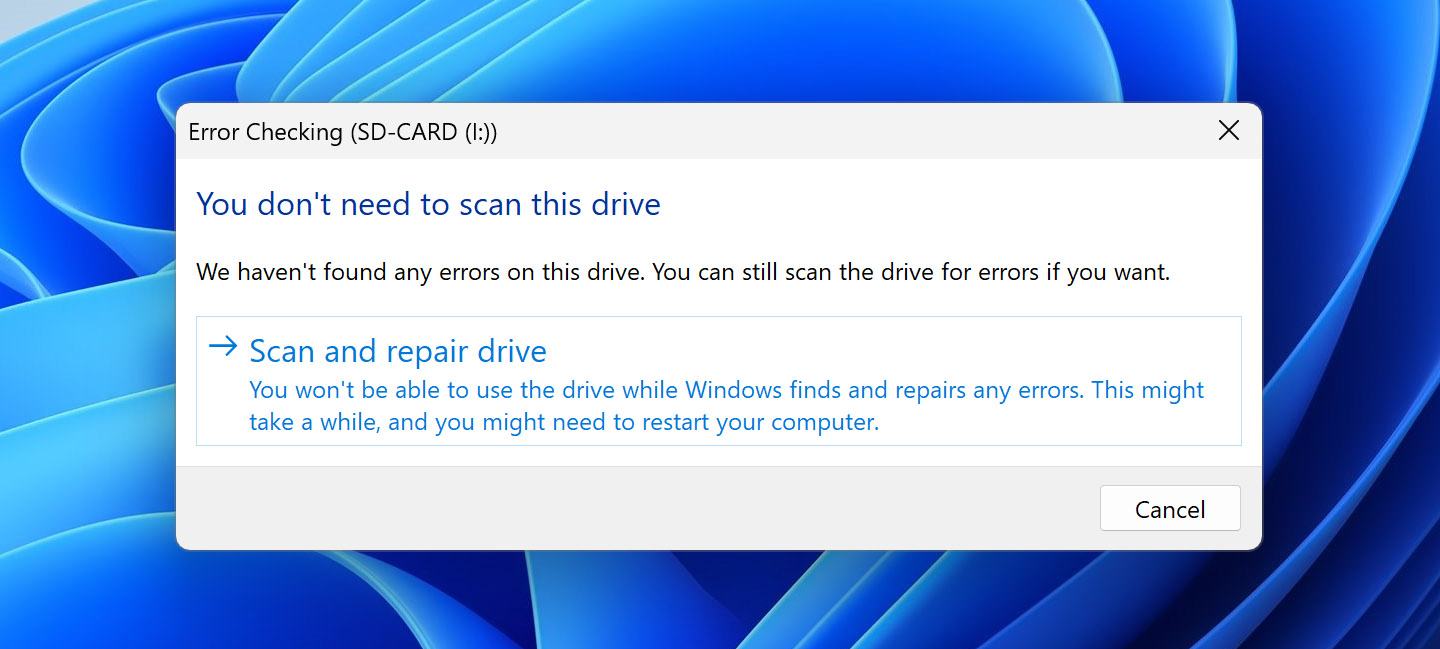
- Click “Scan and repair drive”.
Method 3: Format the SD Card
If files keep disappearing from the SD card but the user exhausted all the methods above, they can simply resort to formatting the SD card to its normal state. It should be noted that doing so will delete all data on the card. Hence, it’s necessary to back up its contents for extra measure.
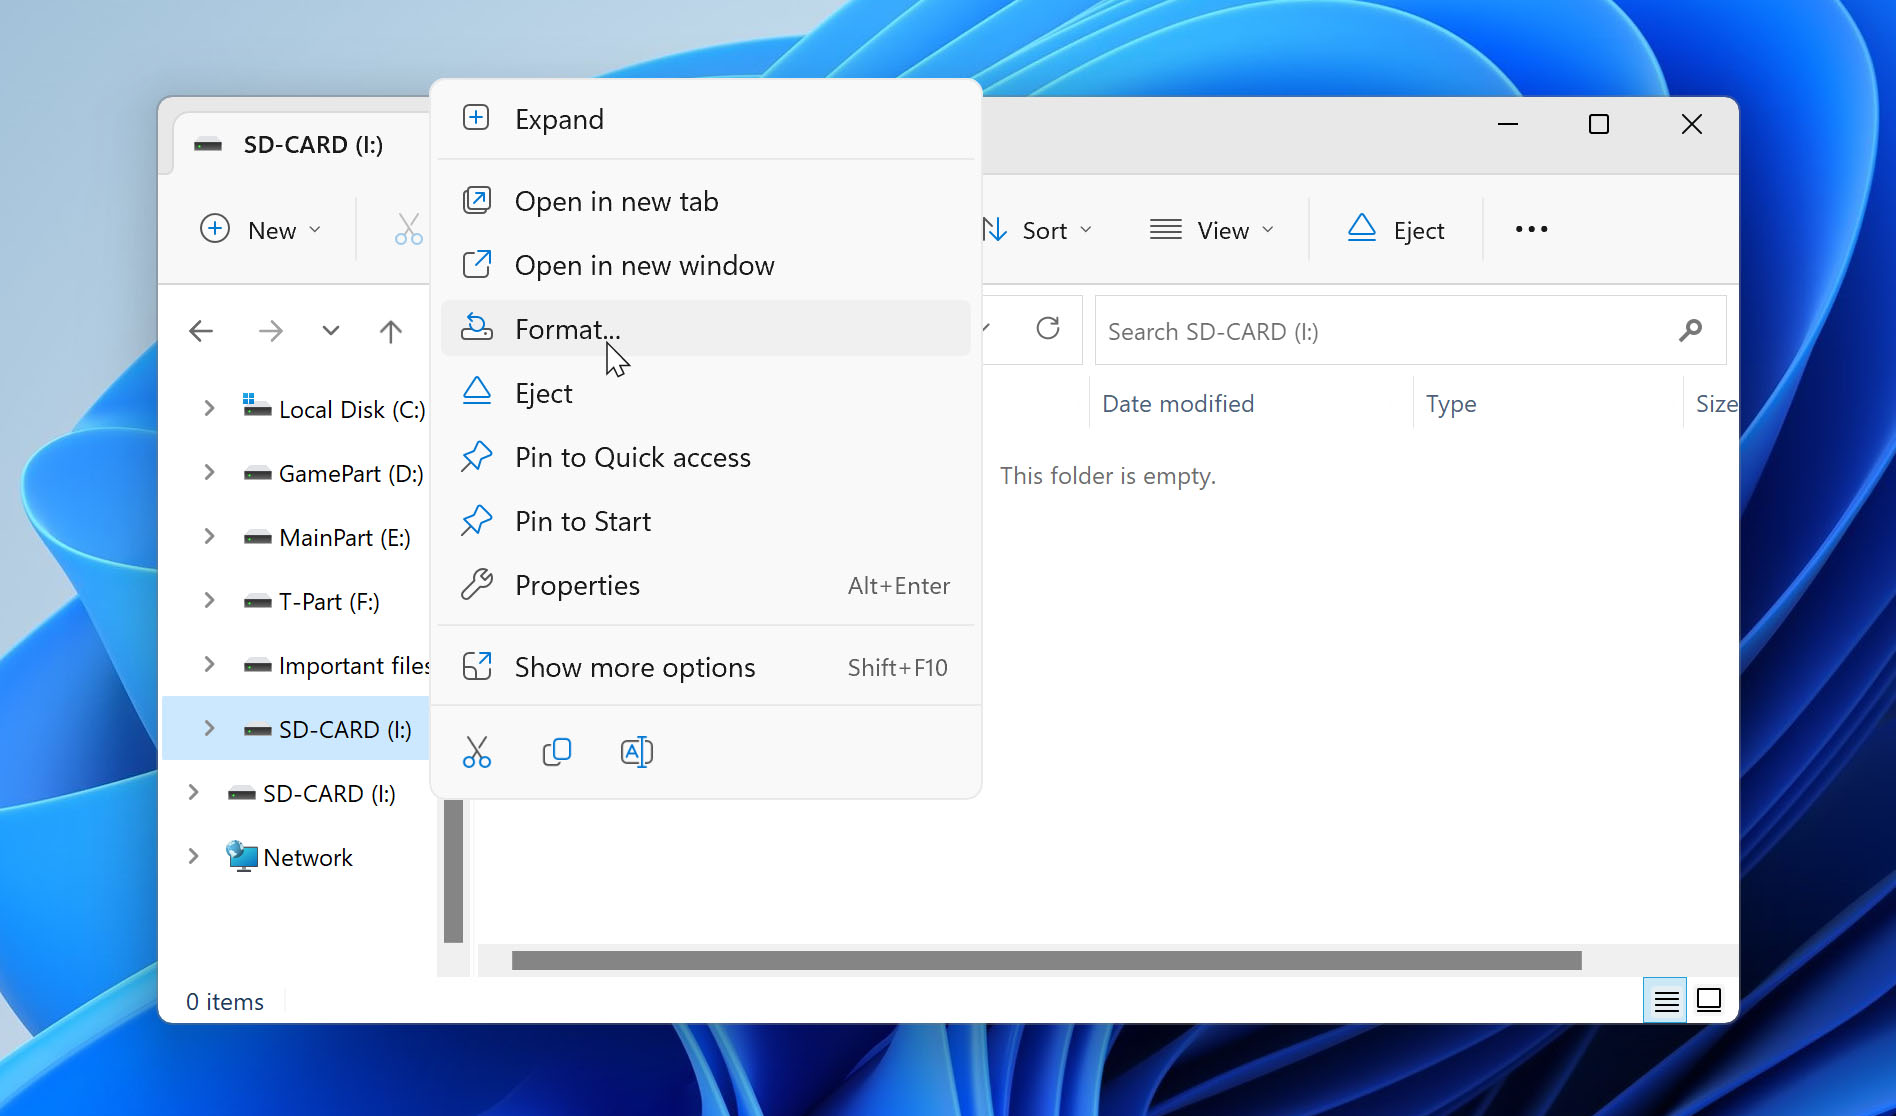
- Open File Explorer.
- Right-click your SD card on the left sidebar, then click “Format…”.
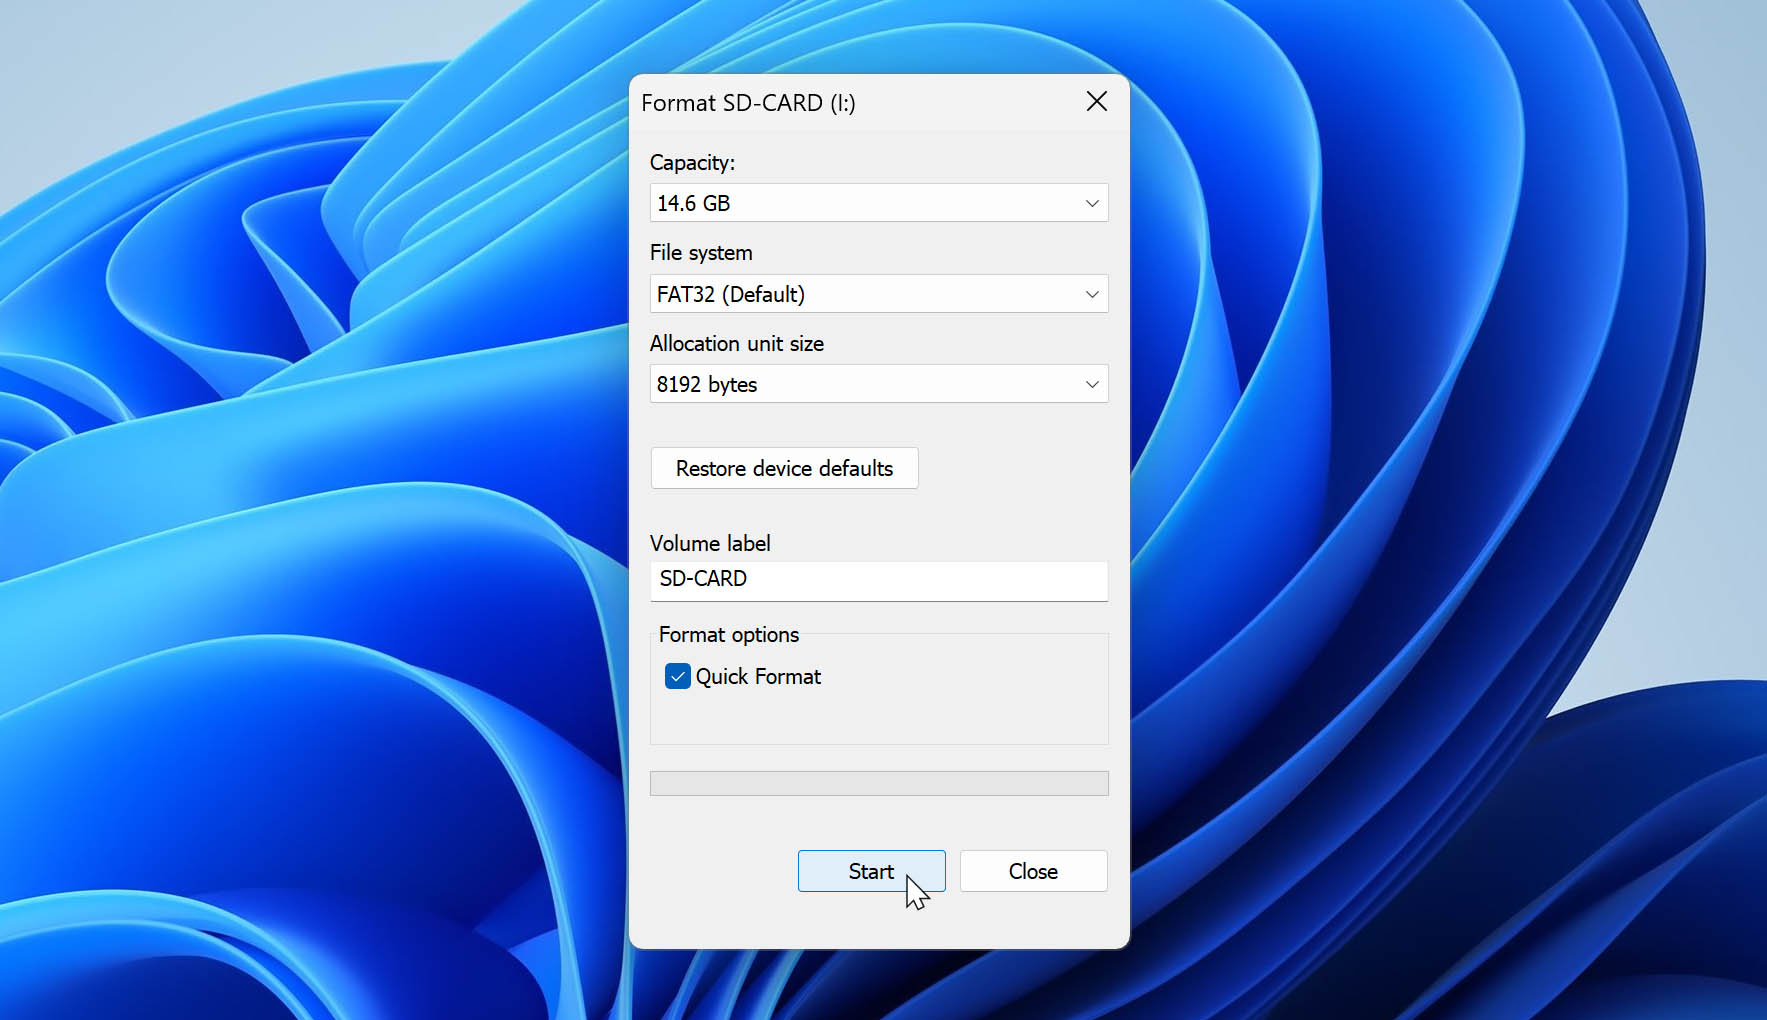
- On the dialogue box that appears, select your filesystem (we recommend FAT32) and name your volume. Finally, untick the option for “Quick Format”, then click “Start”.
FAQ
Why did my SD card files disappear?
The common reasons for SD card files disappearing are the following:
- Accidentally deleting your files or formatting your SD card
- Transferring a lot of files at once may overwrite data or cause data to get lost
- Malware and other virus infections
- Physical damage
- Improperly ejecting your SD card from your computer
- A corrupted file system
- Using counterfeit SD cards
Why did photos on my SD card disappear?
If your photos are missing from your SD card, try restarting your computer and checking if your SD card is physically unlocked (there’s usually a tiny lock mechanism on the edge). If none of these things work, you may be dealing with a corrupted or infected SD card.
Immediately stop using it to prevent further damage and data loss. Download a data recovery tool and restore your files before attempting to repair or format it.
Can SD card files be recovered?
SD card files can be recovered, as long as you act fast. Immediately stop using it, as you may accidentally overwrite your files with new data. If you’re dealing with a corrupted, infected, or formatted SD card, you should be able to resolve it yourself with data recovery software.
But if your SD card has been physically damaged, send it to a professional data recovery center. DIY methods may only make it worse.
How do I recover lost files on my SD card?
To restore files from your SD card, immediately stop using it to avoid overwriting any data. Next, install a data recovery tool like Disk Drill or Recuva on a computer. Data recovery tools can scan and restore documents, images, videos, audio files, and more from SD cards, external hard drives, SSDs, mobile devices, and other media.
Conclusion
SD cards are useful, but prone to data loss and damage. To lower the chances of data loss, make sure to safely eject your SD card, keep it in a safe and try place, and most importantly – back up your data!
This article was written by Alejandro Santos, a Staff Writer at Handy Recovery Advisor. It was also verified for technical accuracy by Andrey Vasilyev, our editorial advisor.
Curious about our content creation process? Take a look at our Editor Guidelines.