
Hard drive data recovery can be tricky, but you can achieve great results if you approach it methodically and pick the best approach to address the specific data loss situation you’re dealing with. Using the solutions described in detail in this article, you should be able to know when it’s best to hire professional help and when you can recover your data at home with readily available Windows, macOS, and Linux software and techniques.
The good news is that hard drive recovery is usually possible and can be performed at home using hard drive recovery software.
We say “usually” because there are many different kinds of hard drive issues that can cause data loss, and not all of them can be addressed at home, which is why you should always perform a hard drive diagnosis to determine the best hard drive data recovery approach possible.
Is It Possible to Perform DIY Hard Drive Recovery?
Yes, in many cases, it’s possible to recover lost data from your hard drive at home, using solutions that are readily available to anyone. In other cases, however, DIY hard drive recovery isn’t possible because the storage device in question is in a completely unusable state.
These two contrasting scenarios reflect the two broad categories of hard drive damage that often lead to data loss:
- 💻 Logical damage: Hard drive issues that belong to this category have something to do with software and the way data is stored on and retrieved from the file system. It can occur due to buggy firmware, driver problems, malware, reformatting, power outages, and other causes. A hard drive that has suffered logical damage works as intended, but the data stored on it may not be accessible. In most cases, you can recover the data stored on a logically damaged hard drive using data recovery software.
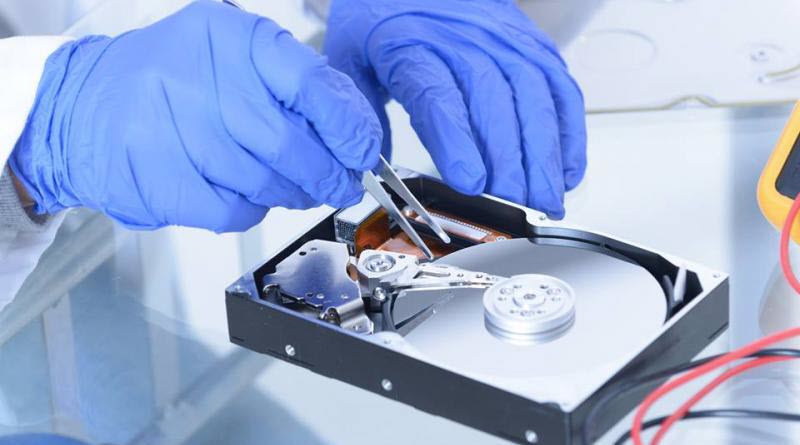
- 🔨 Physical damage: On the other hand, hard drive issues caused by some kind of physical damage prevent the hard drive from operating correctly (or even turning on at all). Such issues include dead and torn heads, platter scratches and other damage, stuck motor, and environmental damage. These issues often manifest themselves by clicking sounds and other noises, and they must be addressed before data recovery software can be used to perform data recovery.
Here’s are some common symptoms to help you determine if you’re dealing with logical or physical damage:
| Common symptoms | Type of damage | Recommended solution |
|---|---|---|
The hard drive doesn’t turn on |
Physical Damage |
Check the hard drive connection. If it doesn’t help, recover data using a backup. |
The hard drive makes unusual noises |
Physical Damage |
Diagnose the state of your HDD to determine its overall health. If the drive is failing, then you might have to recover data using a backup. |
Slow performance, system crashes, or freezes |
Logical Damage |
Repair hard drive errors using built-in error-checking tools or Victoria HDD/SSD and, if data loss has occurred, recover data from the drive. |
Unexpected data loss or file corruption |
Logical Damage |
Recover lost data using specialized software and repair hard drive errors using built-in error-checking tools or Victoria HDD/SSD. |
The hard drive disappeared or isn’t being recognized by the system |
Physical or Logical |
Ensure the hard drive is properly connected and use TestDisk to fix file system corruption. |
The data on the hard drive is inaccessible |
Logical Damage |
Attempt data recovery using software tools and diagnose the HDD to determine if it’s safe to keep using it. |
How to Recover Data from Hard Disk
When it comes to the recovery of formatted hard drives and individual files that have been accidentally deleted, hard drive recovery software is your best option. Before we explain how to recover hard disk data with it, let’s talk briefly about its capabilities.
During the data restoration process, data recovery software scans the drive, looking for pieces of data that can be undeleted. It then pieces the salvaged data back together in a readable format. Data recovery software applications can recover all types and brands of drives.
Types of Hard Drives |
||
Internal Hard Drives (SATA, PCIe, M.2, U.2, mSATA, SATA Express, SCSI, SAS) |
External Hard Drives (USB 2.0, USB 3.0, USB-C, eSATA, FireWire, Thunderbolt) |
Laptop Hard Drives (M.2 or 2.5-inch SATA and SSD used by Dell, Acer, HP, Asus, and other laptop brands) |
Hard Drive Manufacturers |
|||
There’s a number of hard drive recovery software solutions for users to choose from. You should select a reliable solution that runs on your operating system and supports all the file formats you need to recover.
For the purposes of this article, we selected Disk Drill as our top choice for Windows and Mac, and we picked PhotoRec as a reliable solution for Linux.
Data recovery tips: Before you begin, here are a few data recovery tips for increasing your hard drive recovery success rate.
- Always recover to a different storage device than the one on which your files were stored.
- Avoid unnecessary data transfer operations until you complete the recovery of your files.
- Use a reliable hard drive recovery software application.
How to Recover Hard Disk Data on Windows
Data recovery might seem like a herculean task, but armed with the right tools like Disk Drill, a potent DIY data recovery software, it doesn’t have to be. You might find yourself pleasantly surprised by the sheer amount of files that can be salvaged.
Disk Drill can be a true lifesaver in scenarios where your data appears inaccessible due to issues like accidental deletion or formattting, a corrupted file system, or a hard drive that’s playing hide and seek with File Explorer.
But enough talking, let’s now take a closer look at how to recover data from hard disk on Windows:
- Install Disk Drill Data Recovery for Windows: First, download Disk Drill for Windows and install it on your computer. The installer will ask for administrator privileges, so don’t be surprised when it does. Remember to install Disk Drill on a different drive than the one you’re trying to restore.

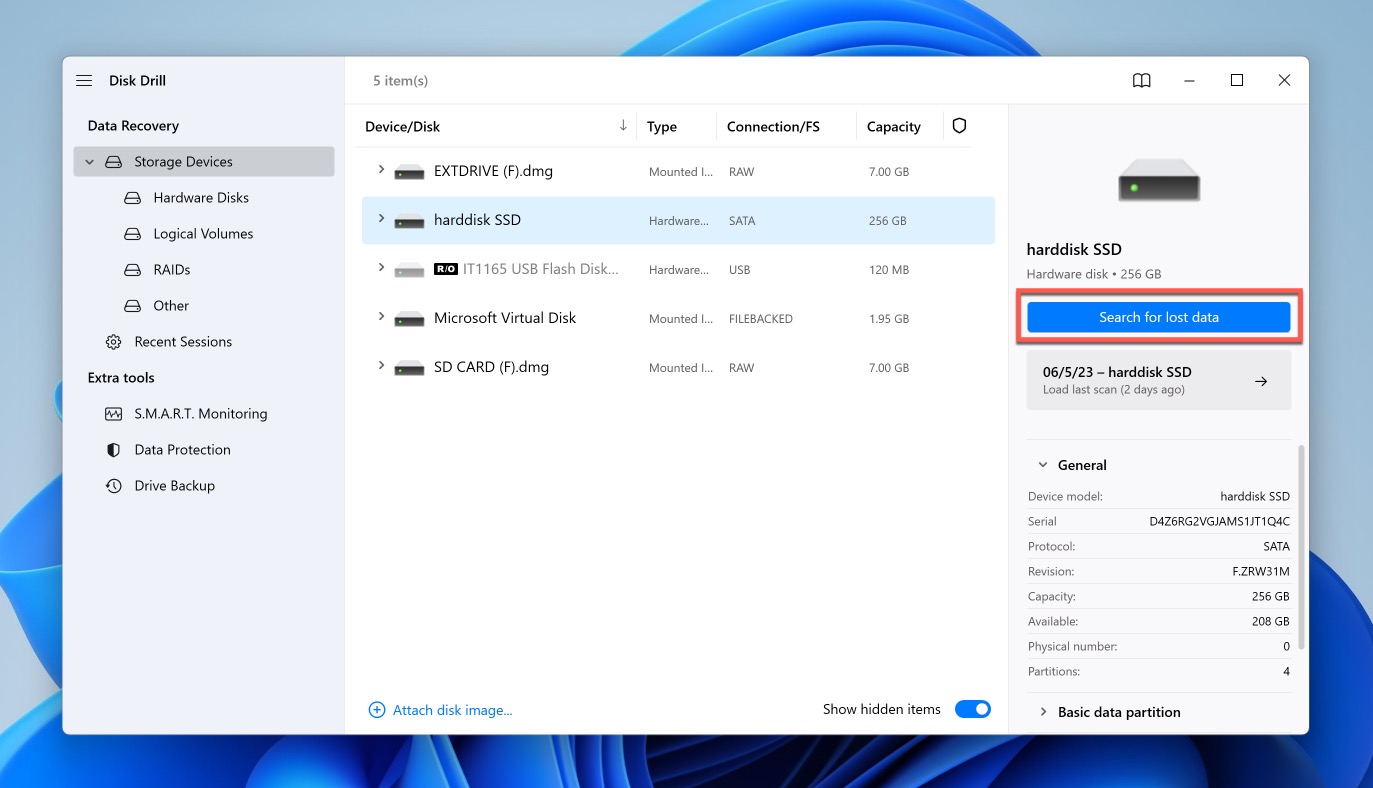
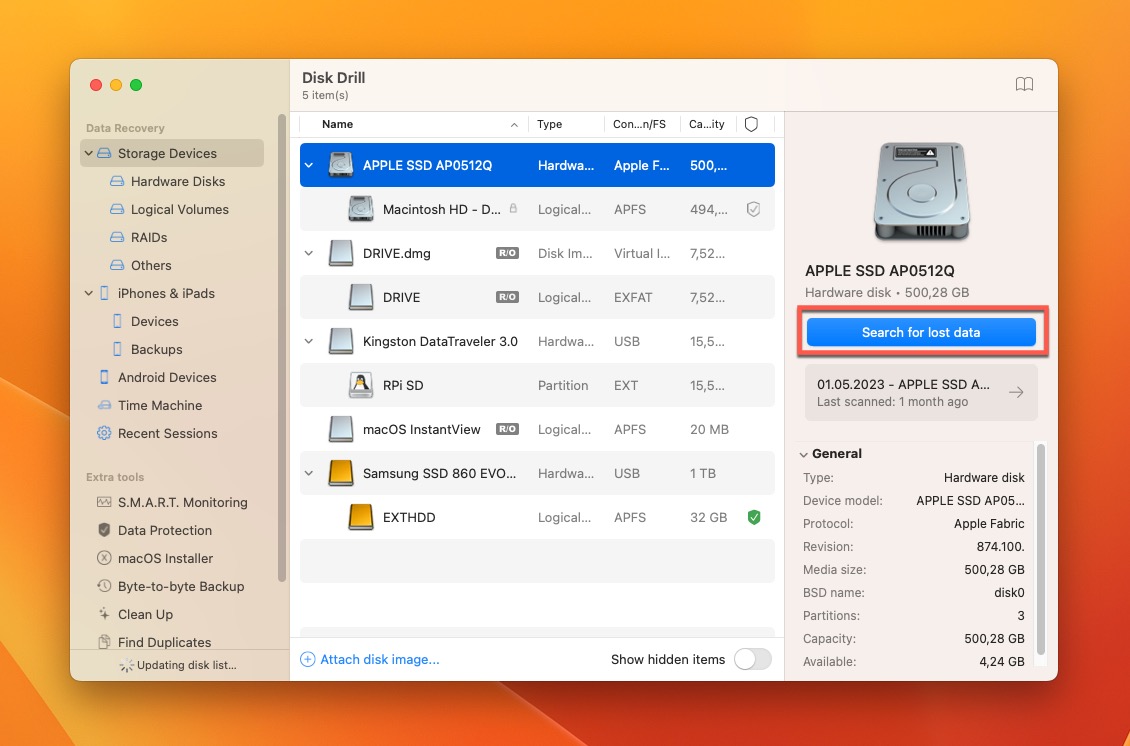
- Launch Disk Drill & Initiate a Scan: With Disk Drill installed on your computer, you can go ahead and launch it. Again, it will ask for administrator privileges, which are required to access storage devices at the file system level. Once the main window appears, you should see a list with your storage devices, and your hard drive should be included among them. Select it and click Search for lost data to initiate a scan.
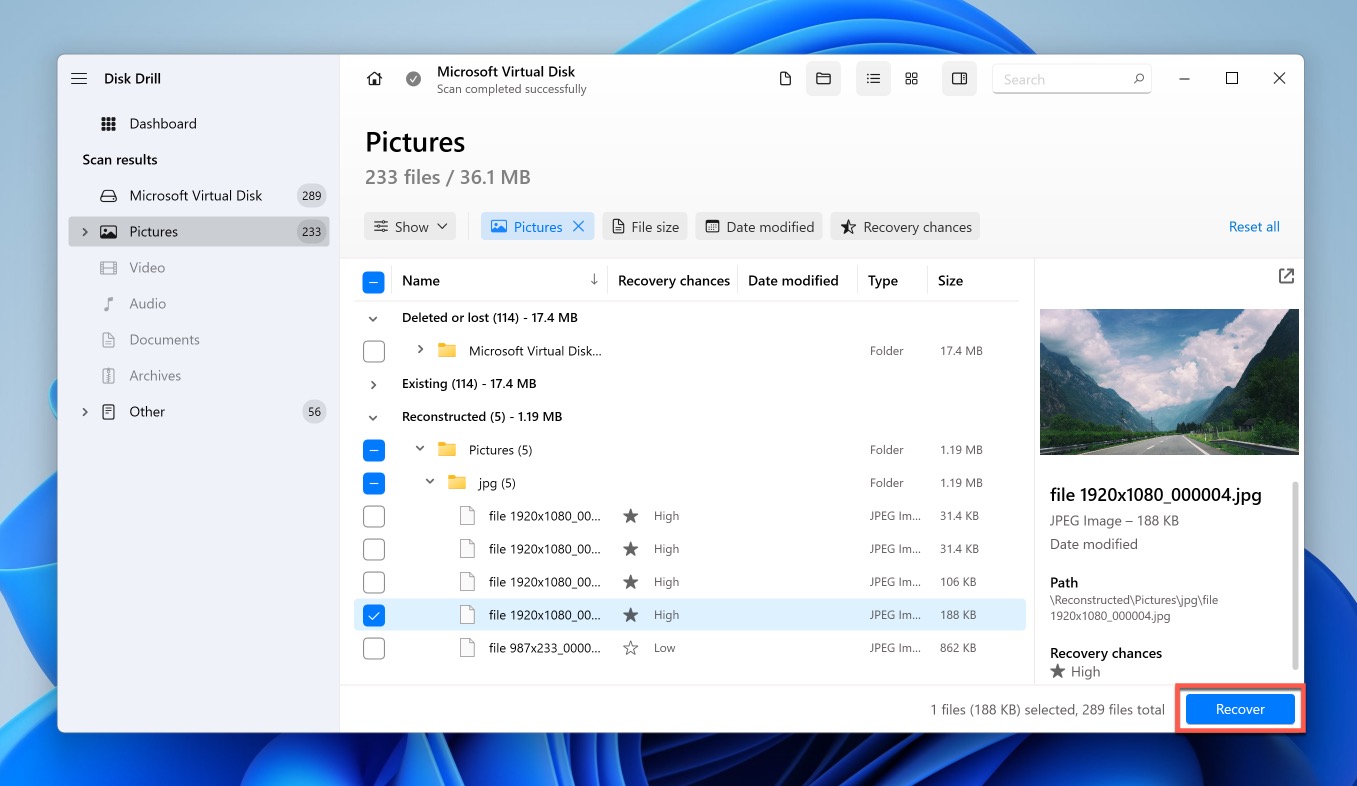
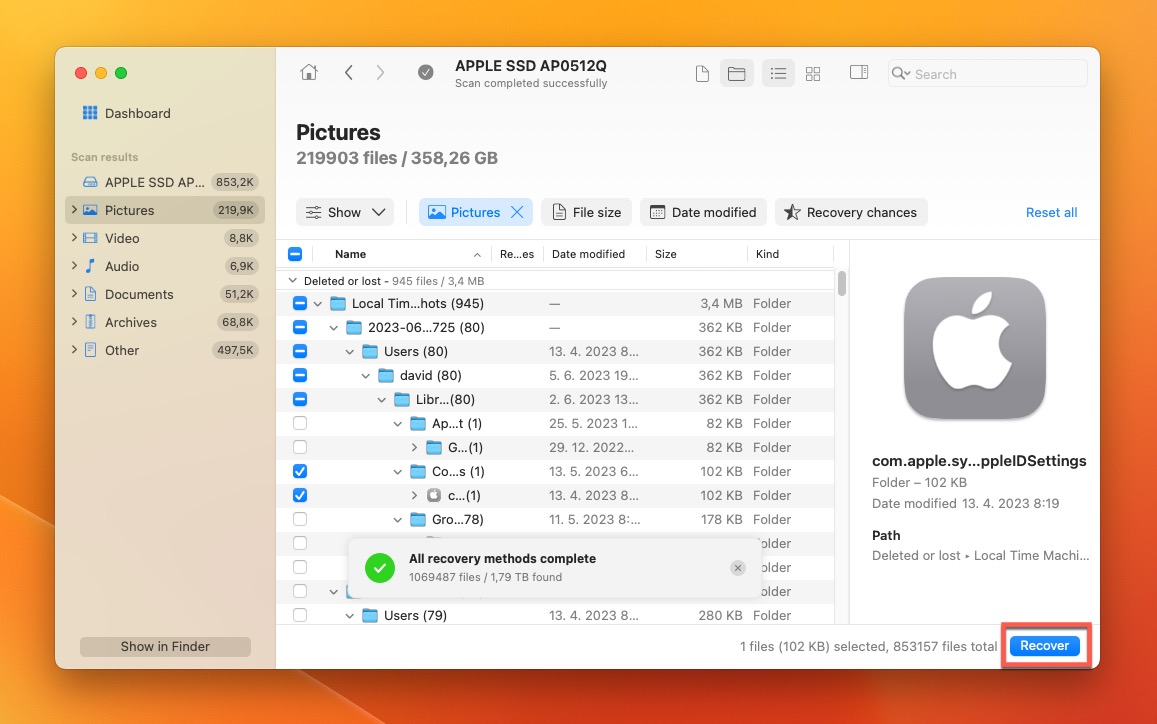
- Select Your Files and Recover Them: Give Disk Drill some time to find the missing files and then use the filters in the left pane to locate the files you want to recover. You can hover your mouse over any file and click the Preview this item button to view the file before you recover them. To select files for recovery, click the small checkbox next to them. When you’re ready to recover them, you can click the Recover button. Disk Drill will help you select a suitable recovery drive.
Did you know that we’ve thoroughly reviewed Disk Drill? But wait, there’s more! We also have a dedicated article that assesses the safety of Disk Drill.
How to Recover Files from Hard Drive on Mac
Although Macs are built on a completely different foundation than their Windows-based counterparts, you can use many of the same data recovery techniques to get back lost files, including DIY-style data recovery software applications like Disk Drill.
Disk Drill shines particularly in scenarios where your data might seem unreachable due to problems file system corruption, Finder not displaying your hard drive, and files not being in Trash or any of your backups.
So, without any further ado, here’s how to get data from a hard disk on Mac:
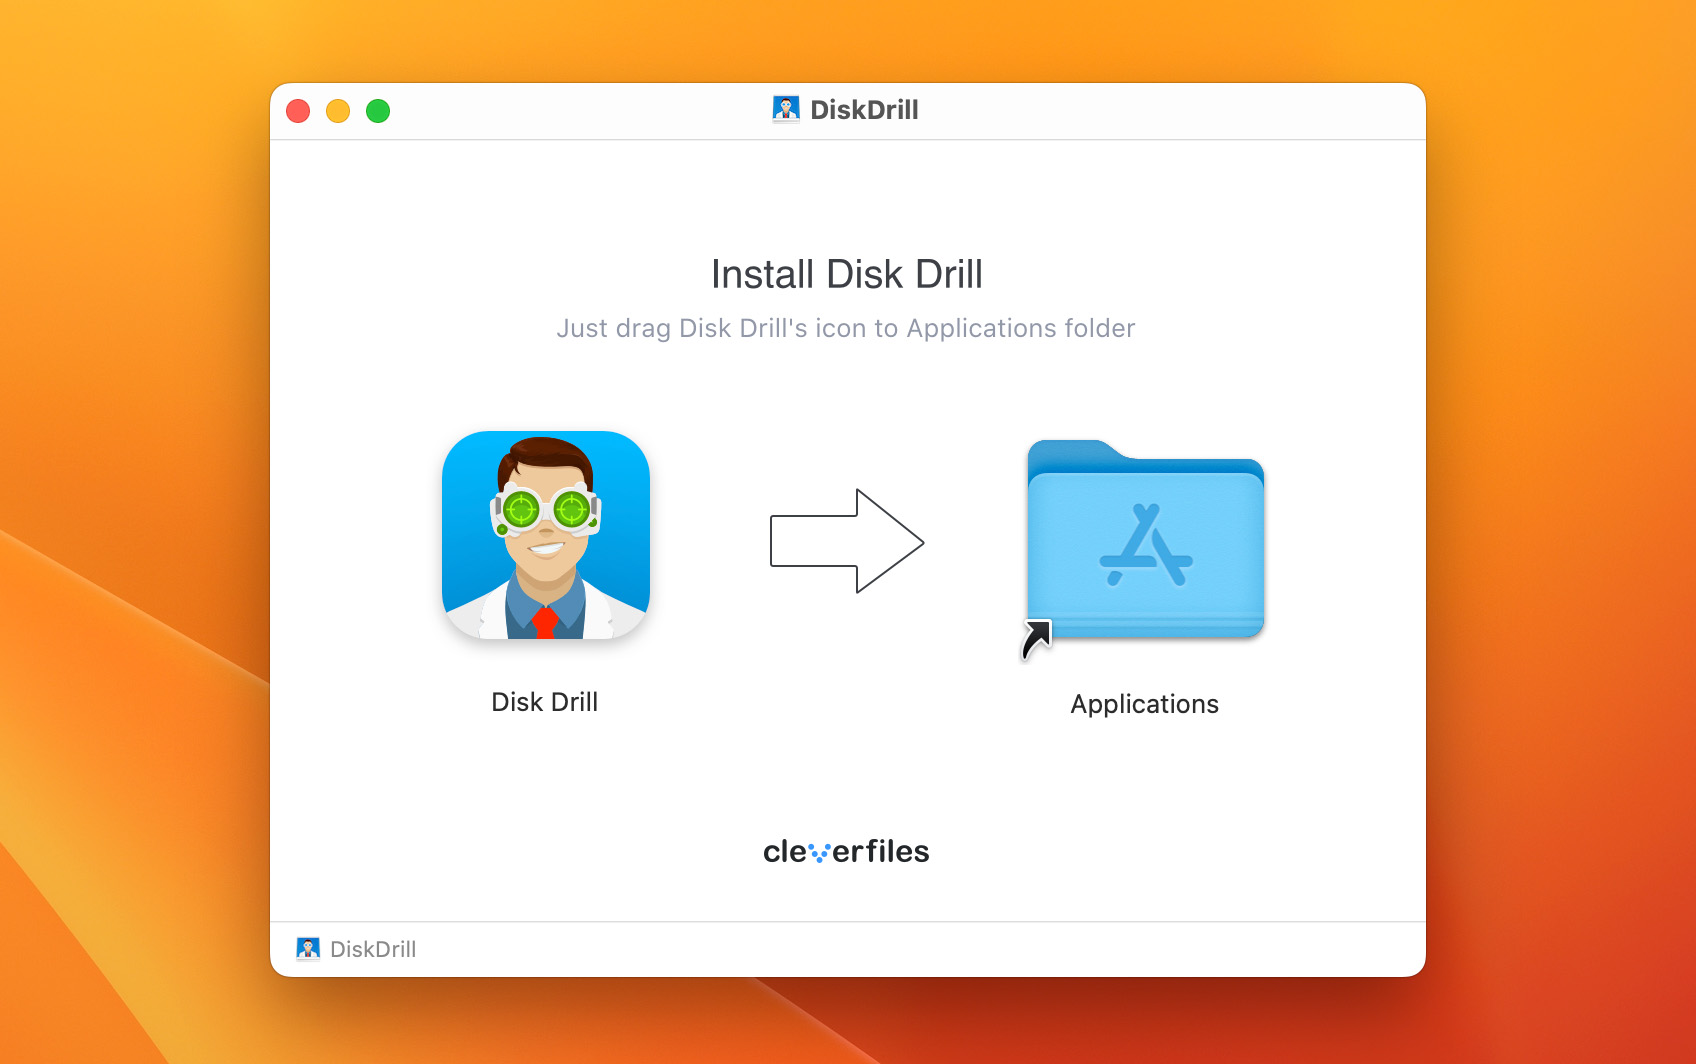
- Install Disk Drill for Mac: Despite sporting a different design, the Mac version of Disk Drill has a lot in common with its Windows counterpart. You can install it just like any other Mac app, but you need to grant it Full Disk Access to access your storage devices for data recovery purposes. This tutorial explains how, and Disk Drill for Mac also displays similar instructions when you first launch it.
- Launch Disk Drill & Initiate a Scan: You can now launch Disk Drill and initiate a scan by clicking the Search for lost data button next to your hard drive. The recovery process is completely automatic from start to finish, so you can go make a cup of tea and let it finish.
- Select Your Files and Recover Them: After just a few minutes, you should see all recoverable files listed in the main window. You can preview each file by clicking the little eye icon. Use the scan result filters in the toolbar to narrow down the search results. Click the checkbox next to each file you want to undelete and begin the recovery process by clicking the Recover button in the lower-right corner. Make sure to restore the deleted files to a different drive than the one on which they were originally located.
Are you in need of data recovery from an external drive? Look no further and check out our informative article on the topic. If you’re curious about other options, we’ve got you covered with a comprehensive ranking of the top macOS data recovery software.
How to Get Data from Hard Disk on Linux
Just because Linux users can’t choose from the same broad selection of data recovery software applications doesn’t mean they are without great options. PhotoRec, for instance, is a powerful open-source data recovery solution that runs on virtually every Linux distribution and offers the ability to recover hundreds of file formats from all commonly used Linux, Windows, and macOS file systems.
Here’s how to recover data from HDD using PhotoRec on Linux:
- Install PhotoRec: Because PhotoRec is a popular data recovery application, you should be able to find it in your distribution’s repositories (PhotoRec is part of Testdisk, so look for it as well). If not, you can download it directly from its official website.
- Launch PhotoRec: You can launch PhotoRec from your favorite terminal using the following command:
$ sudo photorec
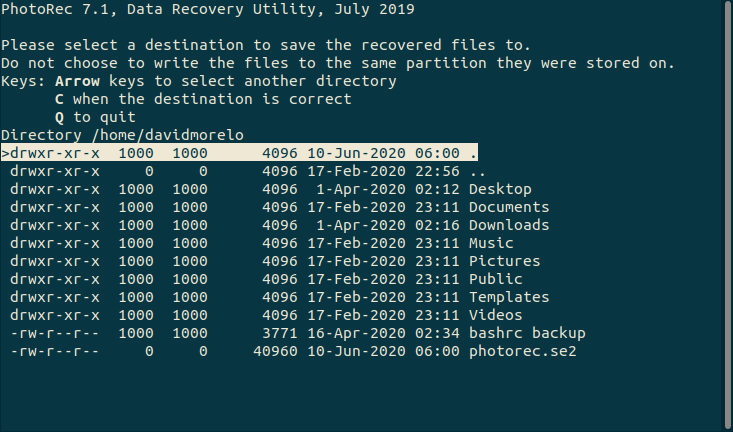
- Begin the recovery process: Using the arrow keys, select the drive you want to recover and choose Proceed. Next, select either a specific partition or the entire drive if you’re not sure on which partition your files were located. PhotoRec will ask you to specify the file system type on which your files were stored. Finally, select where you want to save the recovered files and hit C on your keyboard to confirm. Unfortunately, PhotoRec always recovers all deleted files it finds, and there’s no way to recover only certain files.
Delve deeper into PhotoRec with our comprehensive review. And for those seeking insights on recovering deleted files on Linux, our related article has you covered.
How to Recover Data Using a Backup
![]()
Backups are your best friends when it comes to data recovery, especially when dealing with a physically damaged hard drive that’s impossible to access normally or repair at home. The good news is that both Windows and macOS come with built-in backup tools designed to help you recover your lost files.
File History
For Windows users, File History is the go-to tool for backing up and restoring lost files. Once you’ve enabled File History, it continuously backs up your files from specified folders, creating a ‘history’ you can tap into whenever required.
To restore files using File History, follow these steps:
- Open File Explorer.
- Locate the folder where your lost data was stored.
- Right-click the folder and choose the Properties option.
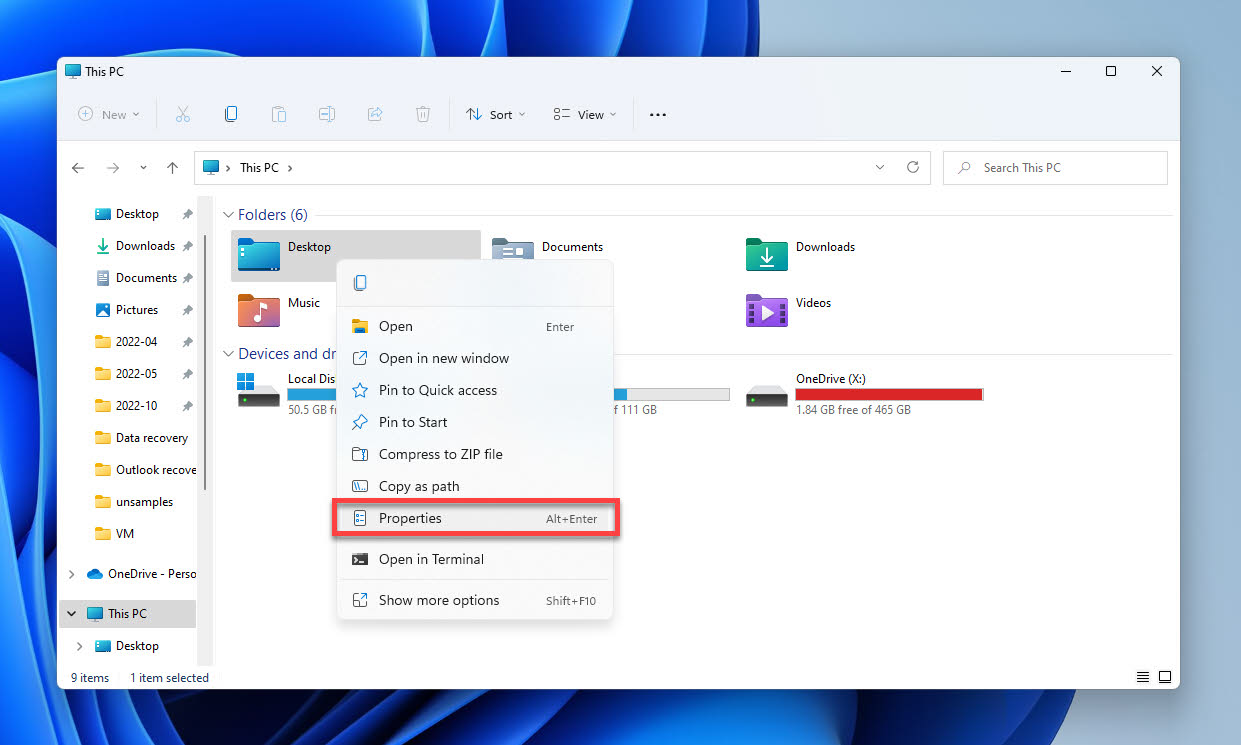
- Navigate to the Previous Versions tab.
- Select a previous version of the folder that should still contain your lost data.
- Click Open and find your missing data.
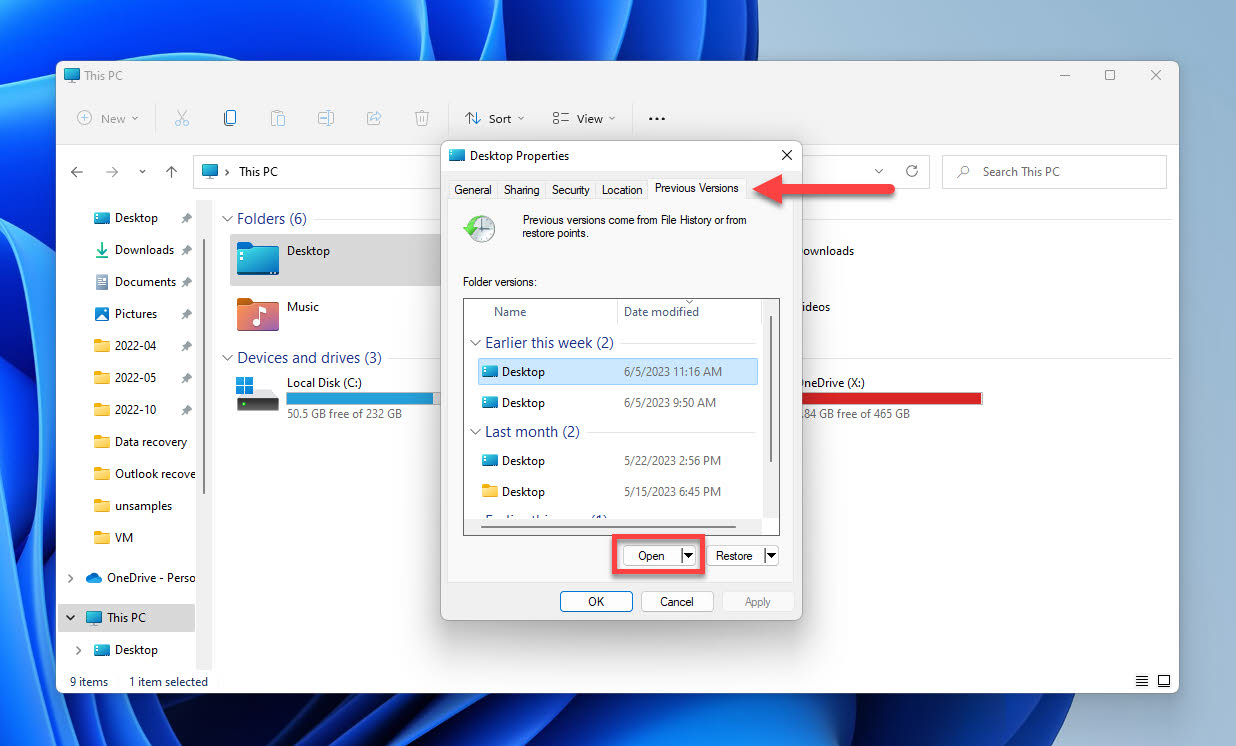
- Select everything you want to recover and click the Recover button.
Time Machine
For those on team Mac, Time Machine is your savior when dealing with data loss affecting your files, applications, accounts, preferences, messages, and more. This incremental backup tool works much like File History in Windows, but it’s arguably even easier to use.
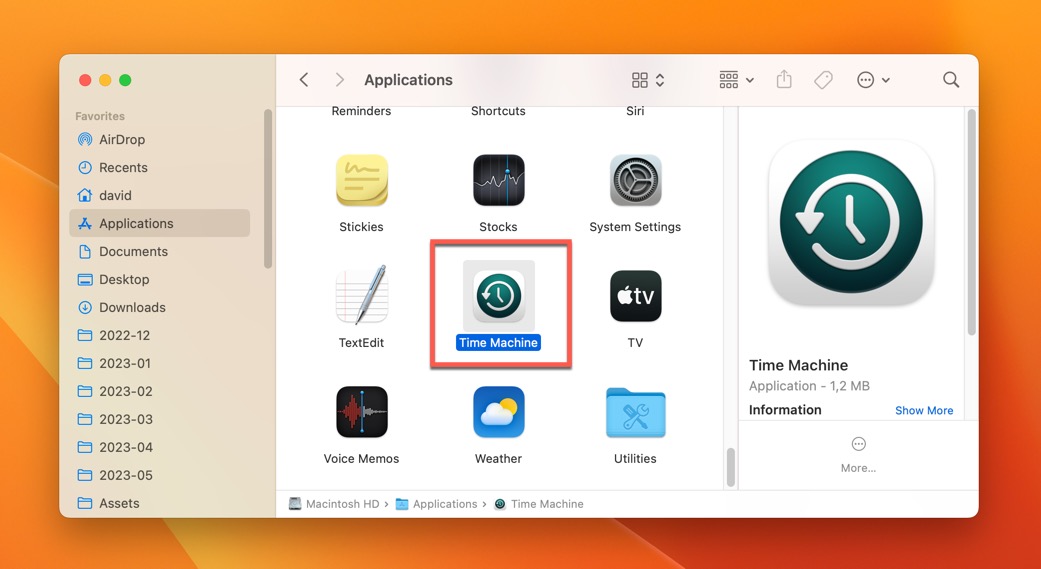
Here’s what you need to do to recover lost files using Time Machine:
- Launch Time Machine. You can find it in the Applications.
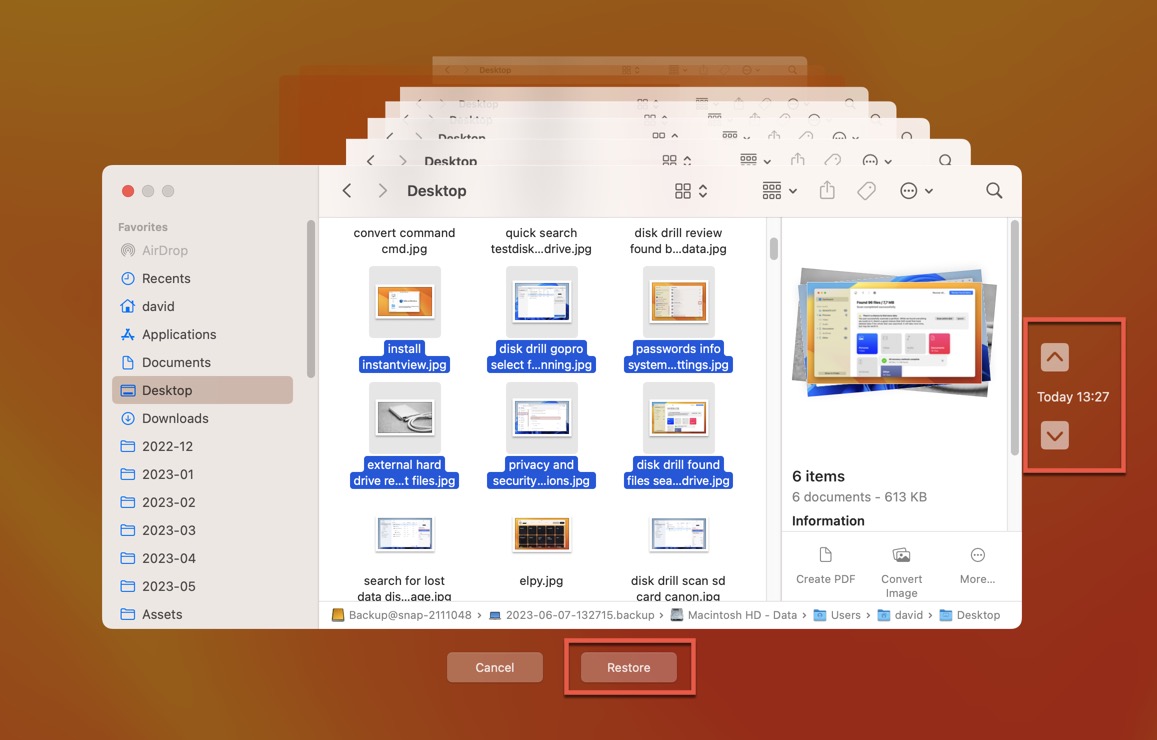
- Navigate to the folder where your lost data was stored.
- Use the timeline or the up and down arrows to find a backup of the folder that contains your missing data.
- Select everything you want to recover.
- Click the Restore button.
How to Perform Hard Drive Recovery Yourself
Hard drive recovery software is the only way to recover permanently deleted files, but not all inaccessible or accidentally deleted files are necessarily permanently deleted. Here are three solutions that you can try instead of using a software application like Disk Drill or PhotoRec.
Solution 1: Check the Hard Drive Connection

Before you start exploring more complicated solutions, you should check the hard drive connection. It’s more common than you might think for issues to arise from a loose or damaged cable.
If you’re using an external hard drive, unplug it from your computer and plug it back in, ensuring the connection is secure at both ends. If possible, use a different USB port and, ideally, also a different USB cable.
To reconnect an internal hard drive, you need to shut down your computer, disconnect it from power, and open the case. Then, you can locate your hard drive, unplug the cables connecting it to the motherboard and power supply, and, finally, plug them back in.
Remember to handle your hardware with care, especially if you’re dealing with internal components.
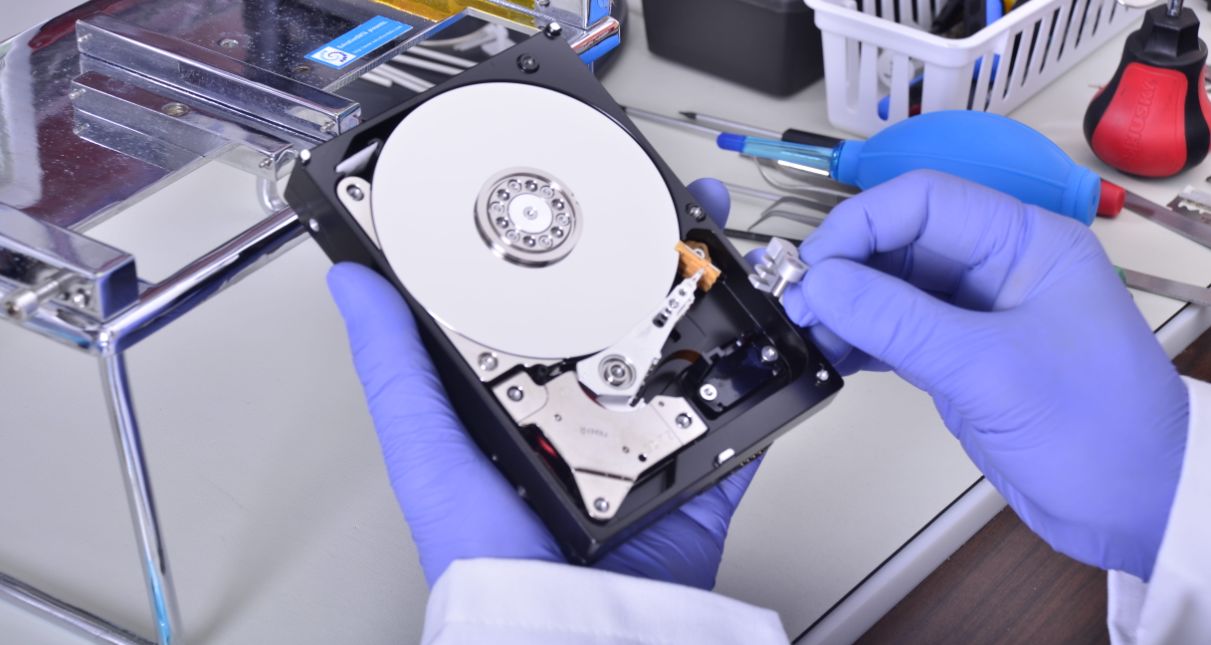
Solution 2: Diagnose the State of Your HDD
 Modern hard drives are smart enough to tell you when there’s something wrong with them thanks to a diagnostics feature called Self-Monitoring, Analysis, and Reporting Technology (S.M.A.R.T.).
When enabled, S.M.A.R.T. works tirelessly in the background, collecting a whole range of useful data reliability metrics that can help you gauge the overall health of your hard drive. This includes data like error rates, the number of hours the hard drive has been operational, the temperature of the drive, and even indicators of potential impending failure, like the number of bad sectors or re-allocated sectors.
To see the data collected by S.M.A.R.T., you can use various free and paid tools, such as:
- CrystalDiskInfo: CrystalDiskInfo is a hard drive utility software that supports a selection of USB, Intel RAID, and NVMe drives. This utility offers a graphical representation of the S.M.A.R.T. information collected by your hard drive, providing a visual and accessible way to monitor your drive’s health. A notable feature of CrystalDiskInfo is its Alert Mail functionality, which can notify you via email when potential drive issues are detected.
- HDDScan: HDDScan is a free tool that offers hard drive diagnostics for a variety of storage devices, including RAID arrays. The software provides access to S.M.A.R.T. attributes and allows for modifications of certain hard drive parameters. HDDScan can also conduct tests on your storage device for errors, such as bad blocks and sectors.
- Hard Disk Sentinel: HDSentinel provides comprehensive information about the hard disks and solid-state disks inside your computer and in external enclosures, with detailed textual descriptions and tips. The application runs across all major operating systems, so you can use it to monitor and diagnose just about any storage device.
If any of these tools indicates logical damage, then you should proceed with the repair tools described in the following solution.
Tip: Disk Drill, our data recovery tool of choice, comes with a free S.M.A.R.T. monitoring feature.
Solution 3: Repair Hard Drive Errors Using In-build Tools
![]()
If you encounter hard drive corruption, bad sectors, and internal errors that make it impossible to access certain files, you should try to repair the hard drive using the hard drive repair tool included with your operating system.
- Windows: The go-to hard drive repair tool on Windows is CHKDSK, and you can tell it to scan your hard drive by entering the following command in Command Prompt: chkdsk /r c: (replace “c:” with the letter assigned to the hard drive you want to fix).
- macOS: Apple’s Disk Utility contains a feature called First Aid, and you can use it to repair a storage device with a few simple clicks. First Aid performs various partition map checks and automatically attempts to repair any corruption or logical damage it encounters.
- Linux: Short for file system consistency check, fsck is a handy utility for fixing file system errors, and it’s available to all Linux users. Because each Linux distribution is slightly different, you may need to improvise a bit when following an online tutorial on how to use fsck, such as this one.
Discover our carefully curated recommendations for the ultimate hard disk repair software for Windows. Don’t miss out on our selection of the finest disk repair software for Mac.
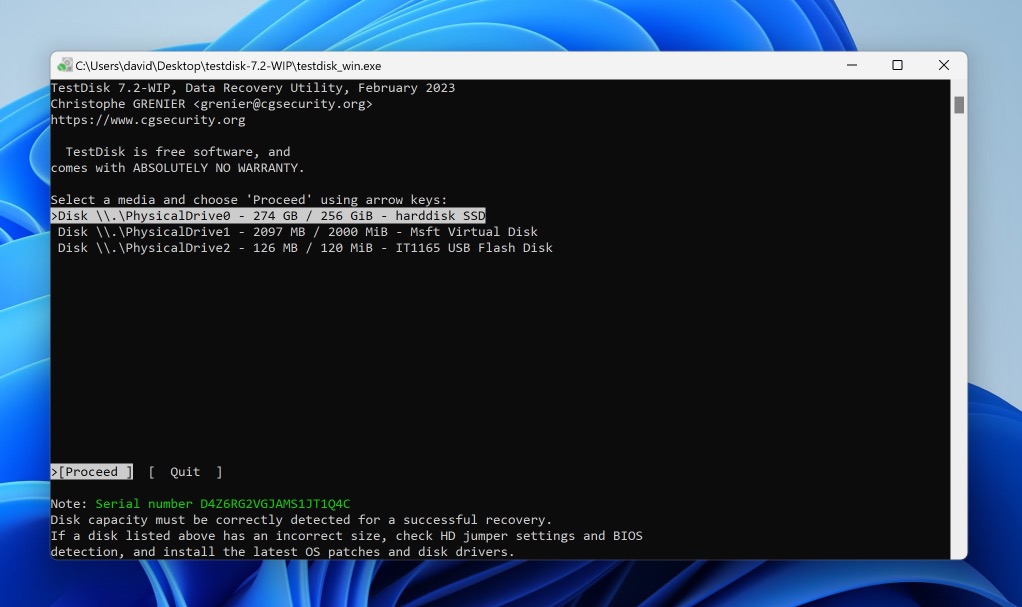
Solution 4: Fix File System Corruption Using TestDisk
![]() Encountering file system corruption can seem like a dire situation, but don’t worry—there are powerful third-party tools available to help, and one of them is TestDisk.
Encountering file system corruption can seem like a dire situation, but don’t worry—there are powerful third-party tools available to help, and one of them is TestDisk.
TestDisk is a free, open-source software designed specifically to recover lost partitions, fix disks that aren’t booting, and repair all sorts of other disk issues. The software supports a wide range of file systems, including FAT, NTFS, exFAT for Windows, ext2, ext3, ext4 for Linux, and HFS+ for macOS.
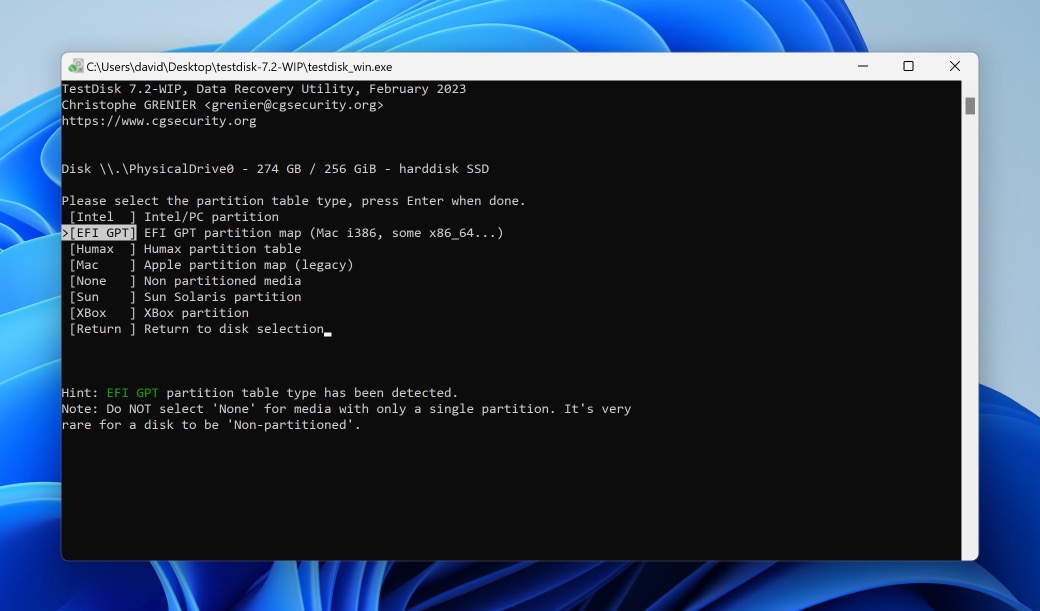
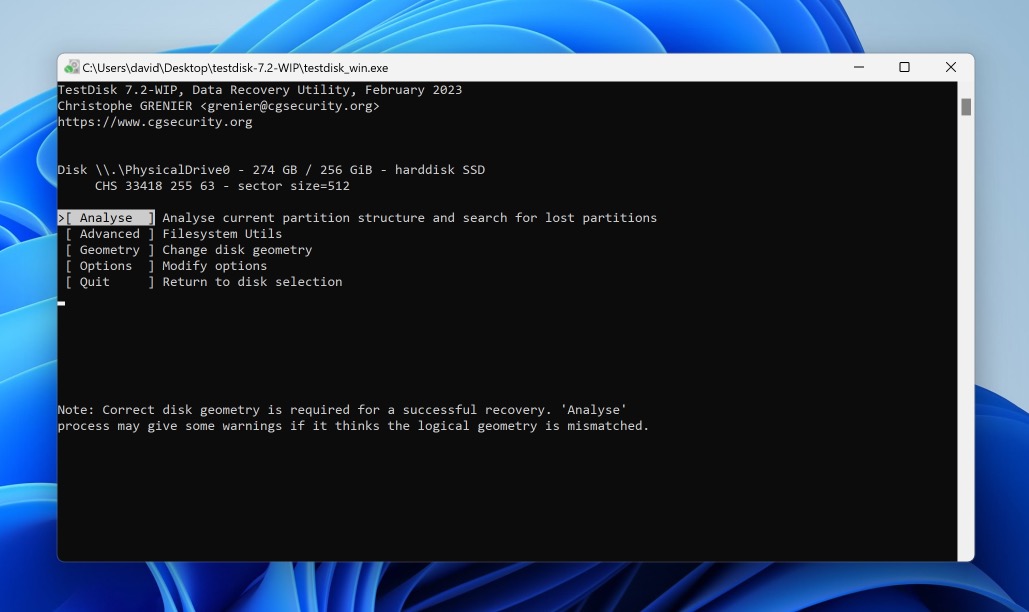
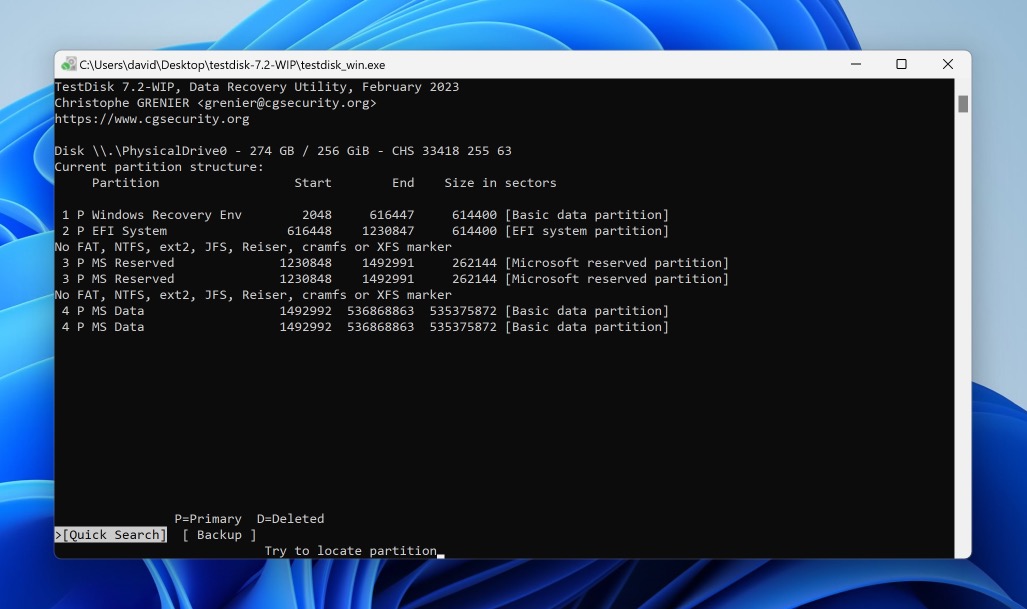
Here’s a simplified guide to using TestDisk to repair a corrupted file system:
- Download TestDisk from its official website and install/extract it on your computer.
- Launch TestDisk and decide if you want to create a log file (doesn’t matter).
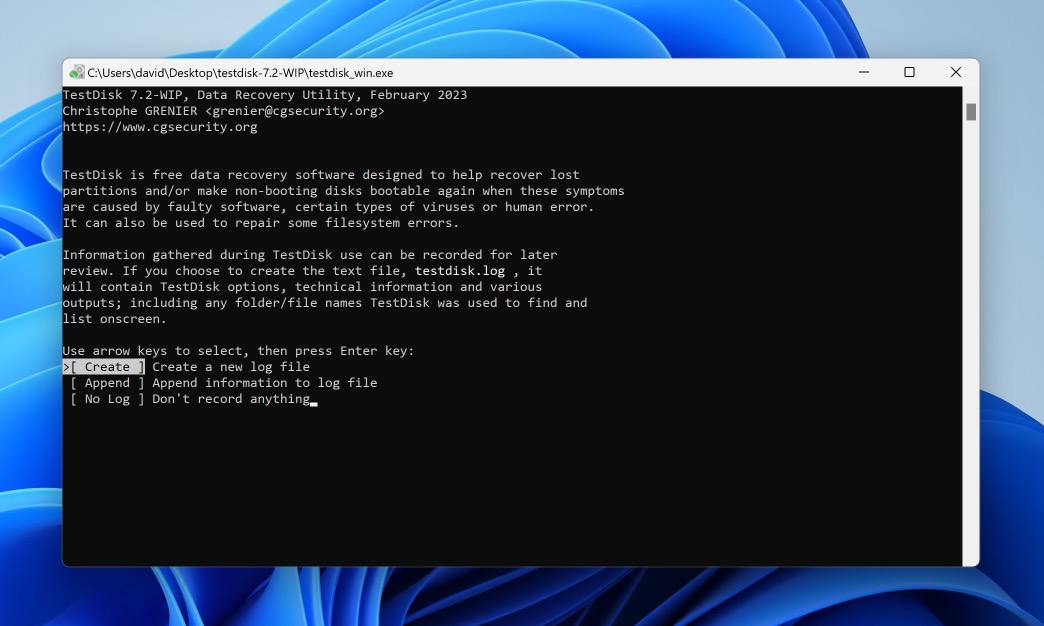
- Select the hard drive you want to repair and choose the Proceed option to continue.
- Choose the matching partition table type and continue.
- Analyze the current partition structure and search for lost partitions.
- Perform Quick Search when given the option to do so. Wait for Quick Search to finish then then continue.
- Perform Deeper Search to find even more lost partitions.
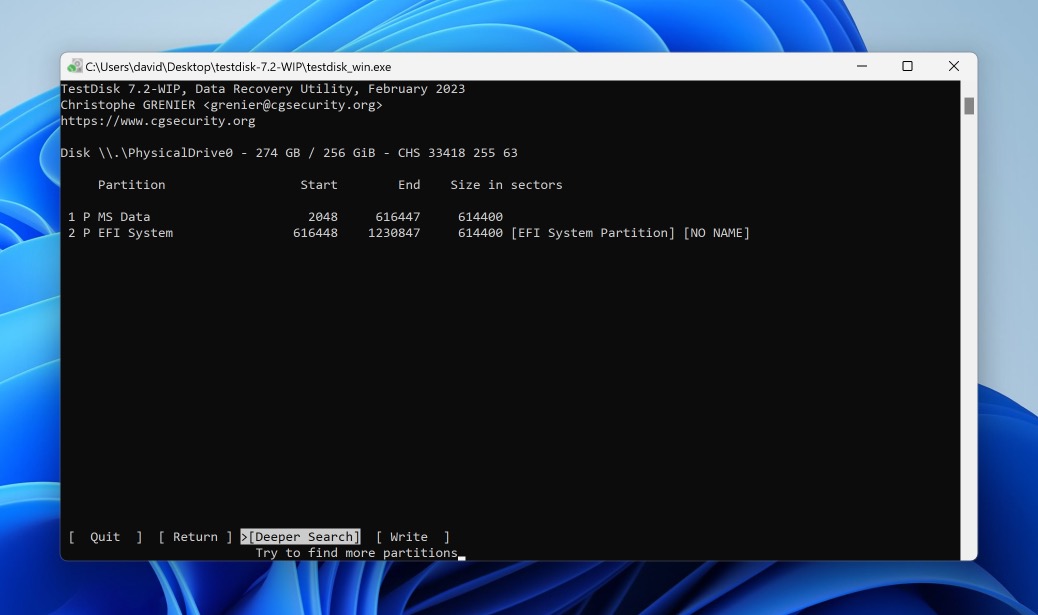
- Write the repaired partition table.
Solution 5: Manage Bad Sectors Using Victoria HDD/SSD
![]() Bad sectors can lurk on your hard drive, causing glitches, slowdowns, and even total system crashes. That’s where tools like Victoria HDD/SSD come in handy. Victoria is a robust and free program designed for diagnosing, testing, and conducting minor repairs of your drives on the Windows operating system
Bad sectors can lurk on your hard drive, causing glitches, slowdowns, and even total system crashes. That’s where tools like Victoria HDD/SSD come in handy. Victoria is a robust and free program designed for diagnosing, testing, and conducting minor repairs of your drives on the Windows operating system
It comes with a potent HDD surface scanner that helps you identify and repair problematic areas in just a few steps. Unfortunately, Victoria isn’t the most user-friendly hard drive repair tool in the world, but our concise instructions should make it slightly more approachable.
To repair bad sectors using Victoria HDD/SSD, you need to:
- Download the application from its official website (the link is at the bottom) and extract the downloaded archive. Don’t mind what the download link says; Victoria’s GUI supports English.

- Launch the application and select your hard drive.
- Click the Test & Repair button.

- Select the Remap option and click Scan.
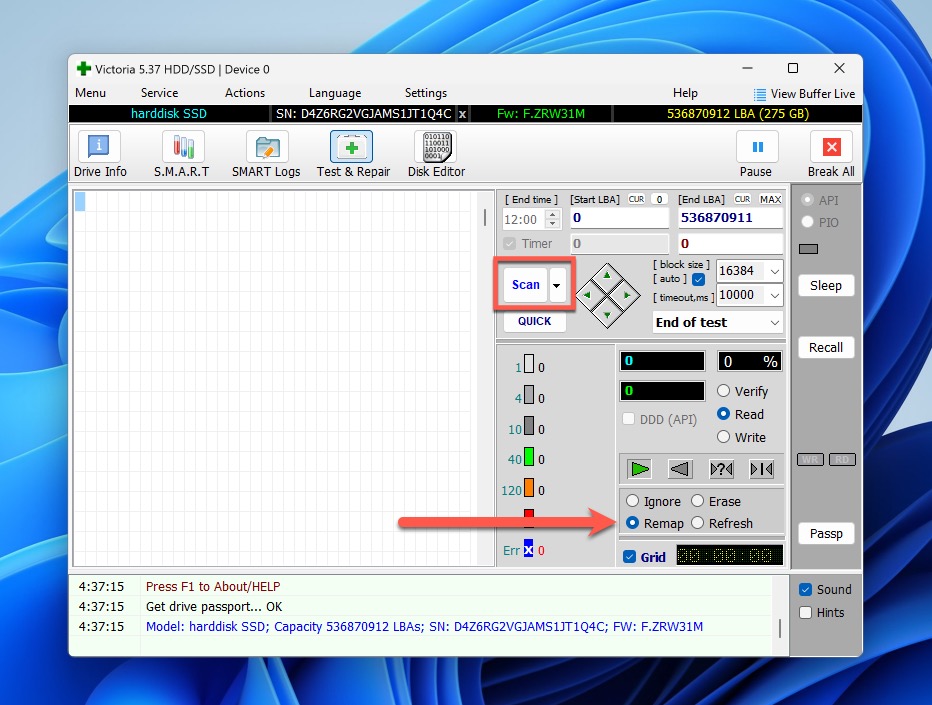
- Wait until Victoria finishes scanning your hard drive and remapping bad sectors.
Recovering Lost Data With Hard Drive Data Recovery Services
As we’ve explained earlier in this article, you should never attempt to fix physical hard drive damage at home unless you really (REALLY!) know what you’re doing and have the right tools for the job. In virtually all cases, it’s better to ship the hard drive to a data recovery service and have experienced professionals working in clean rooms figure out what’s wrong with it.
Here’s a brief comparison of hard drive recovery services and recovery software to help you decide which is right for you:
Parameter |
Recovery Services |
Recovery Software |
Can recover: |
Physically and logically damaged drives. |
Logically damaged drives. |
Speed: |
24 hours or more. |
Between several minutes and several hours. |
Reliability: |
High. |
Moderate to high. |
Cost: |
Typically starts at several hundred dollars. |
Rarely more than $100. |
Privacy: |
Low |
High |
As you can see, both hard drive recovery services and recovery software have certain advantages and disadvantages, but that doesn’t change the fact that recovery software can’t overcome physical damage.
Conclusion
The next time you encounter a hard drive data loss problem (and we hope that it won’t be anytime soon), you’ll know how to perform a hard drive diagnosis to determine the best data recovery approach possible. Hopefully, you’ll have your data safely backed up and won’t need to use hard drive recovery software like Disk Drill or spend money on professional data recovery services.
This article was written by David Morelo, a Staff Writer at Handy Recovery Advisor. It was also verified for technical accuracy by Andrey Vasilyev, our editorial advisor.
Curious about our content creation process? Take a look at our Editor Guidelines.