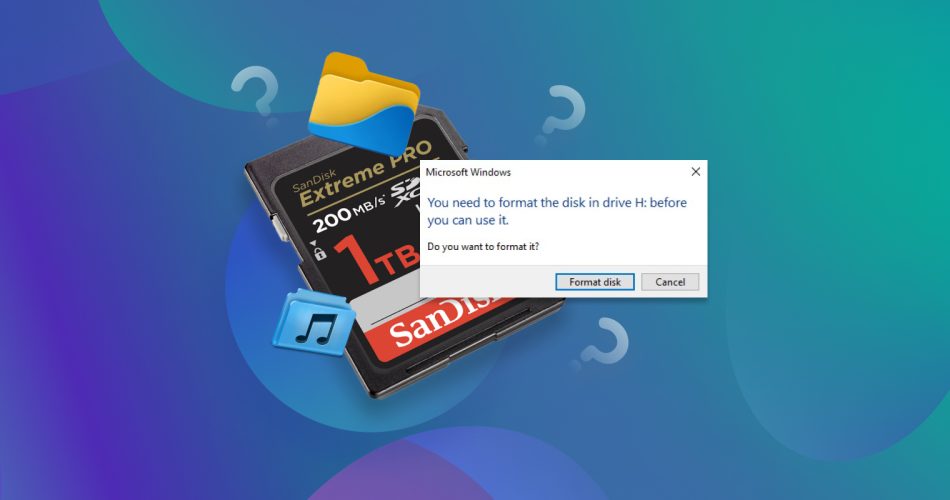
Ran into a problem with your SD card and it looks like formatting is the only fix? The system keeps pushing “format disk”, and it really does feel like the fastest way out. But what if there’s important data on that memory card? Formatting would wipe all of it in one click.
In today’s walkthrough, we’ll show you how to fix your SD card without formatting it and recover your data in the process. No advanced skills needed. All the methods here were tested by our team and proven to work in specific scenarios. Along the way, we’ll share our own hands-on impressions and explain which situations each method is actually useful for.
How this guide is structured: We know most people aren’t here just to make the SD card usable again. In most cases, there’s something important still on that card, and formatting would erase all of it. That’s the real reason you’re probably reading this. And you’re right to be cautious. That’s why we’re starting with recovery. Before we touch any repair tools or commands, we’ll walk through how to safely extract your data from the corrupted SD card while it’s still possible.
Once that’s done, we’ll cover actual fixes that can get your SD card working again without formatting.
Yes, you can skip ahead to the repair steps, but we don’t recommend it. Some fixes can make recovery harder. Always better to play it safe and rescue what you can first.
Quick Orientation
To help you get your bearings fast, here’s a quick reference table. Match what you see with the symptoms below, and we’ll point you to the method that makes the most sense.
What you see in Windows |
What it usually means |
Best next move |
SD card works on another reader/PC, but not on yours |
Reader/port/adapter issue |
Go straight to Method 1. If it works elsewhere, copy your files off right away. |
SD card does not show in File Explorer, but shows in Disk Management with the correct size and a Healthy partition |
Windows did not mount it (often missing drive letter) |
Try Method 2 first. |
SD card shows in Disk Management but file system shows RAW |
File system damage, Windows can’t mount it |
Start with data recovery (image backup + scan). Then try Method 5 (TestDisk). Skip CHKDSK unless your data is already safe. |
SD card shows as Unallocated in Disk Management |
Lost partition entry / damaged partition table |
Start with data recovery if the files matter. Then try Method 5 (TestDisk). |
SD card shows in File Explorer but asks to format when opened |
Windows sees the device but can’t read the file system cleanly |
Start with data recovery. If you already recovered, try Method 3 (CHKDSK) or Method 4 for a repair attempt. |
Files are visible, but errors appear |
Logical file system inconsistencies |
If Windows lets you copy your files normally, do that first. If copying fails, recover the data using data recovery software. After your data is safe (or if it isn’t important), you can try CHKDSK (Method 3) as a repair attempt. |
CHKDSK says it can’t run because the drive is RAW |
CHKDSK has nothing it can repair |
Don’t waste time on CHKDSK. Do data recovery, then Method 5 (TestDisk). |
SD card keeps disconnecting, reads extremely slow, shows I/O errors |
Unstable media, failing controller, or bad sectors |
Do image backup first if the card stays online long enough. If it won’t stay connected, skip DIY and go to Recovery Lab. |
SD card shows wrong capacity (for example, 32 GB shows as 128 MB or 0 bytes) |
Controller/firmware problem, often not fixable with software |
DIY fixes usually won’t help. Go to Recovery Lab if the data matters. |
SD card does not appear in Disk Management at all |
Hardware-level issue or reader issue |
Re-check Method 1 (different reader/PC). If still invisible, Recovery Lab is the realistic path. |
While there are cases where you can still recover some or even all of your data after formatting your SD card, this article is about avoiding a format – so read on.
How to Retrieve Data from an SD Card Without Formatting
Since such cases are often rooted in malfunctions with the SD card itself, you’ll need a way to restore your data without aggravating it. Our recommendation is to create an “image backup”, which is a total copy of your SD card’s disk. Then, you can use data recovery software to scan the backup file (as if it were a physical disk) instead of scanning the SD card itself.
For this article, we’ll be using Disk Drill. It’s easy to use, works great with SD cards that don’t show up properly in File Explorer (as long as they appear in Device Manager), and includes tools for both disk imaging (Byte-to-Byte Backup) and data recovery from image files. They’ve also recently added an Advanced Camera Recovery module (great for fragmented photo and video files on SD cards used in cameras and drones). For SD card issues like this, Disk Drill really makes the most sense.
You can learn more in our full review of Disk Drill, but for now, let’s jump into the practical steps.
To recover your SD card without formatting using Disk Drill:
- Download and install Disk Drill.
- Connect your SD card via your built-in reader or an external one. Then, launch Disk Drill.
- On the left sidebar, click on Byte-to-Byte Backup.
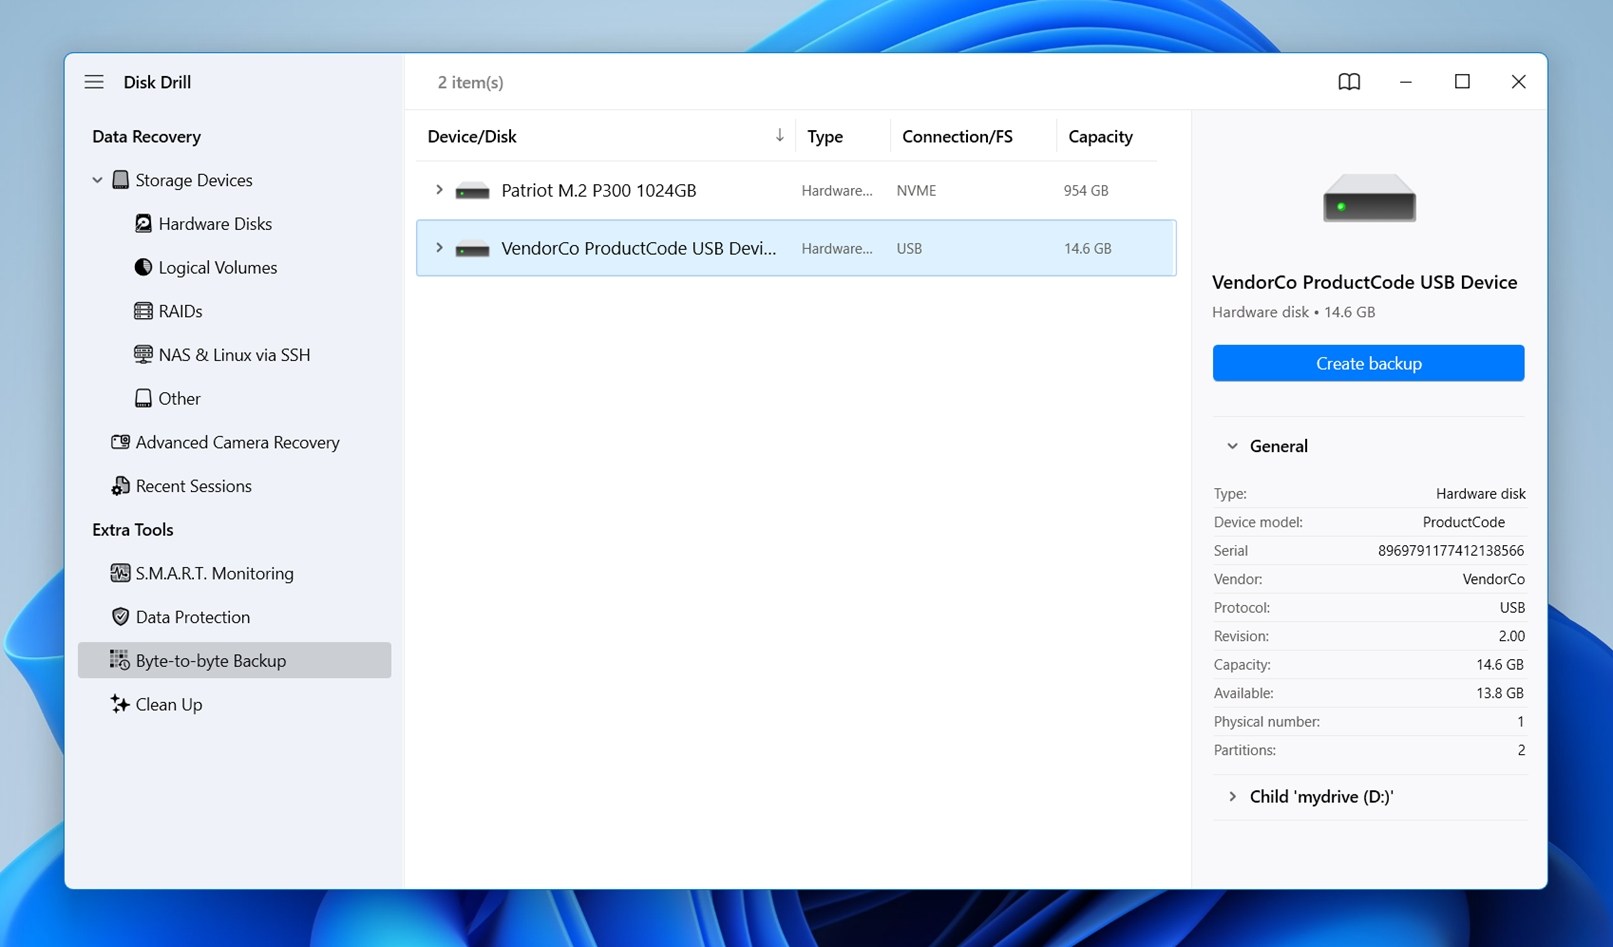
- From the list of connected devices, find your SD card.
- Click on Create backup and choose where to save the image. Make sure the location has enough free space (if your card is 64 GB, you’ll need at least that much free).

- Let the backup process finish. It might take some time.
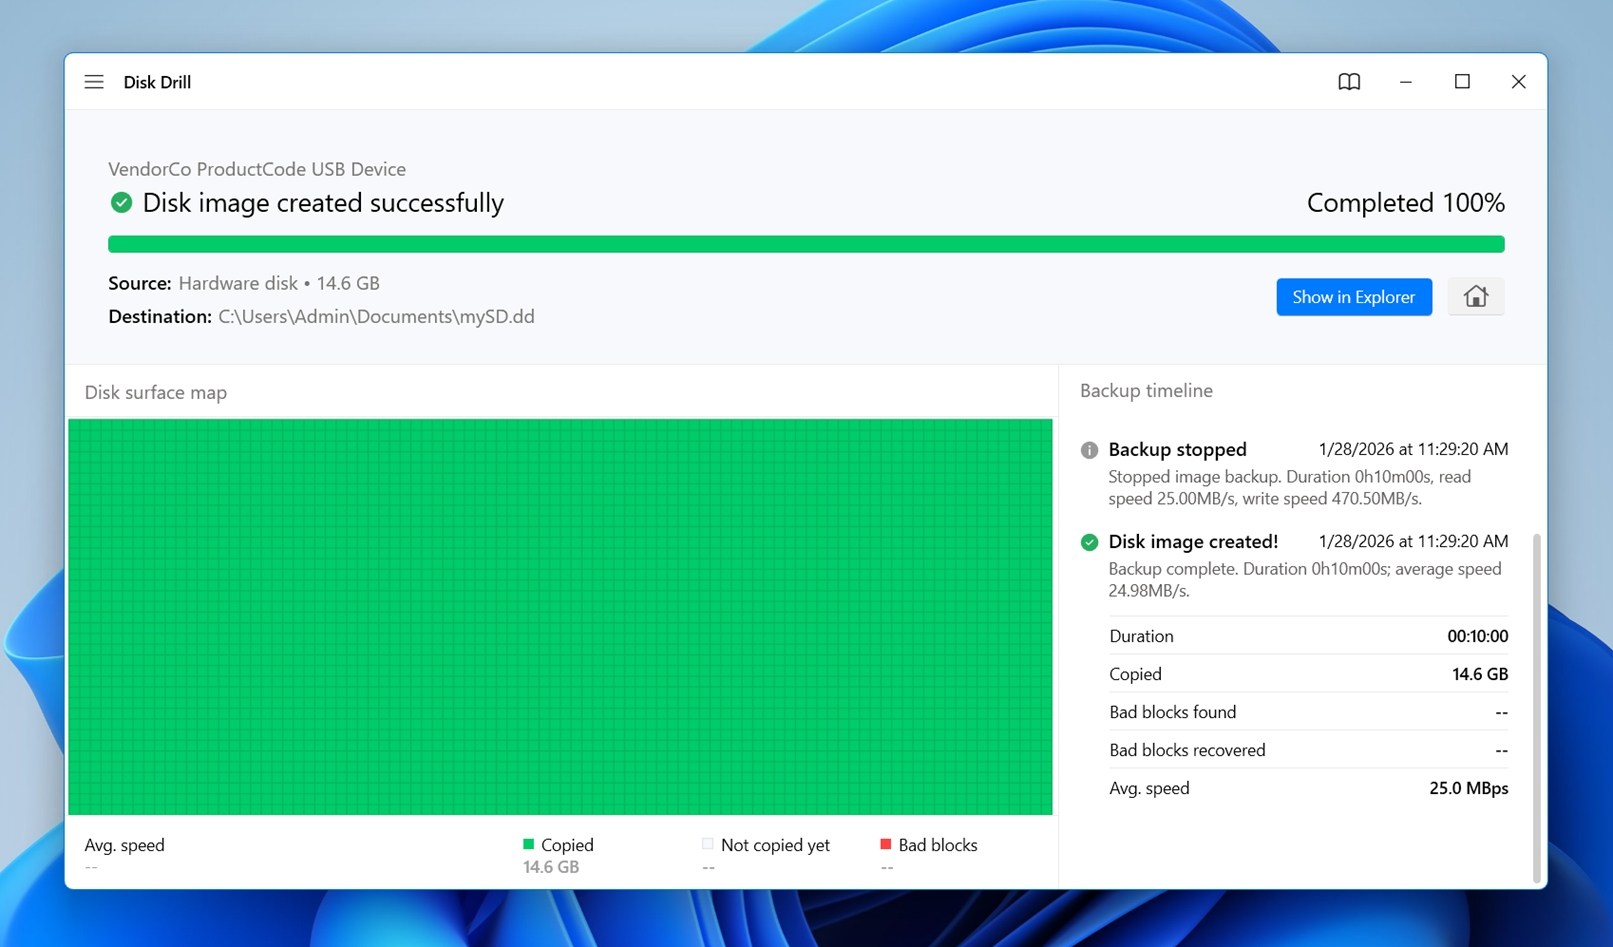
- Now, go back to Storage Devices in Disk Drill.
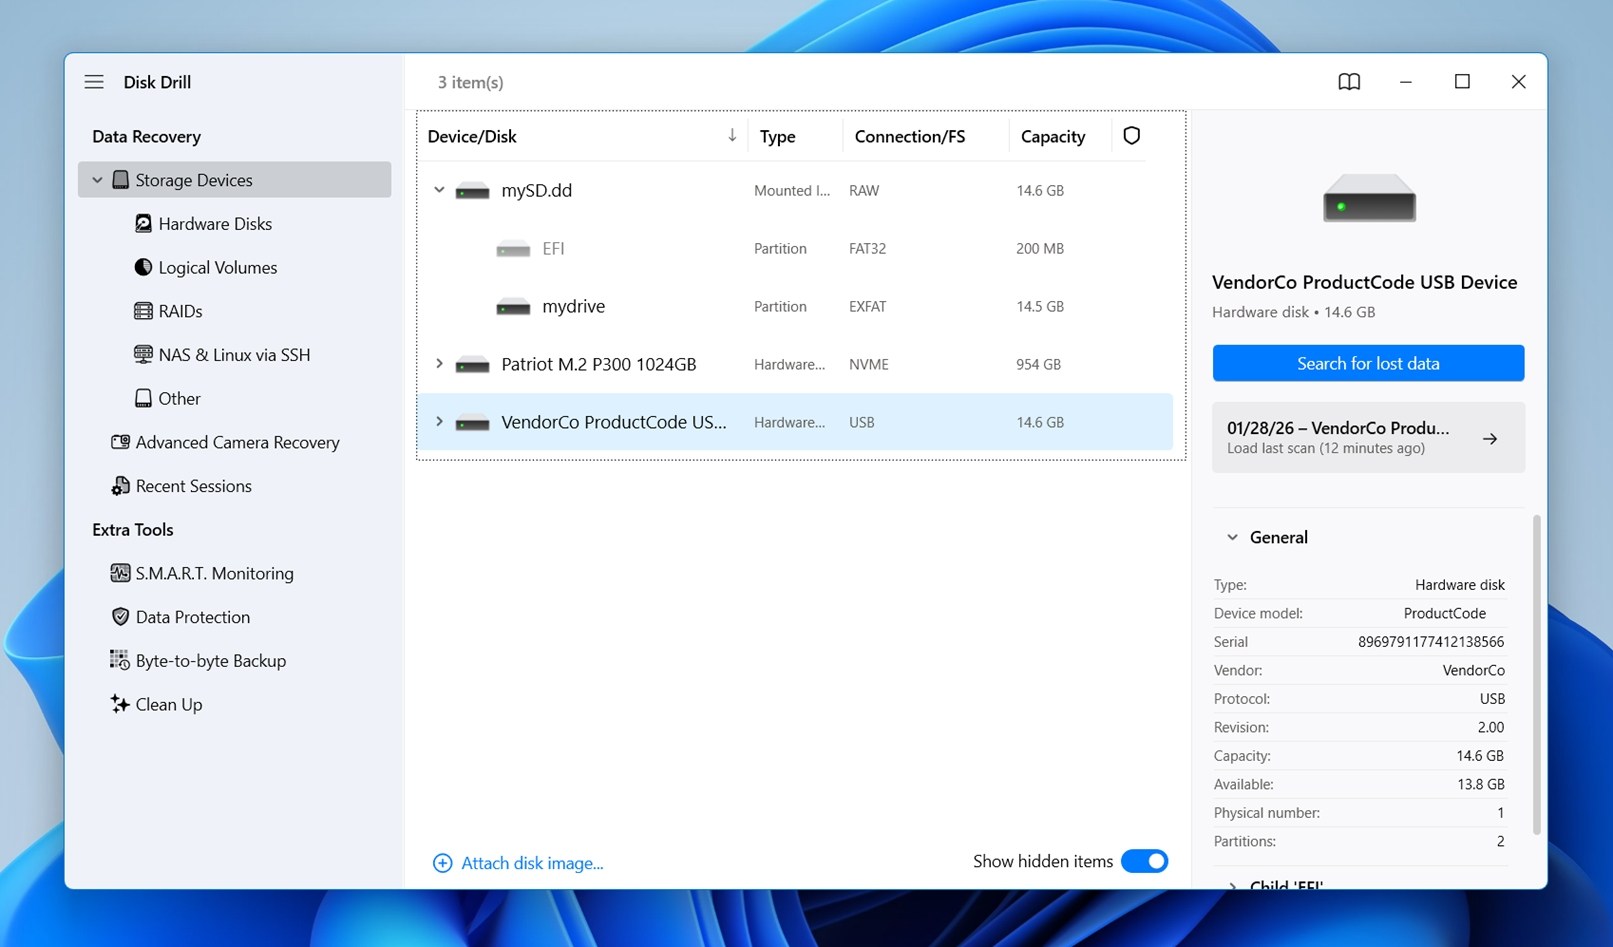
- Scroll down and click Attach disk image.
- Browse to where you saved the backup, select the file, and open it. Disk Drill will mount the image and show it in your list of drives, same as if it were a real SD card.
- From there, select your backup and click Search for lost data to start the scanning process.
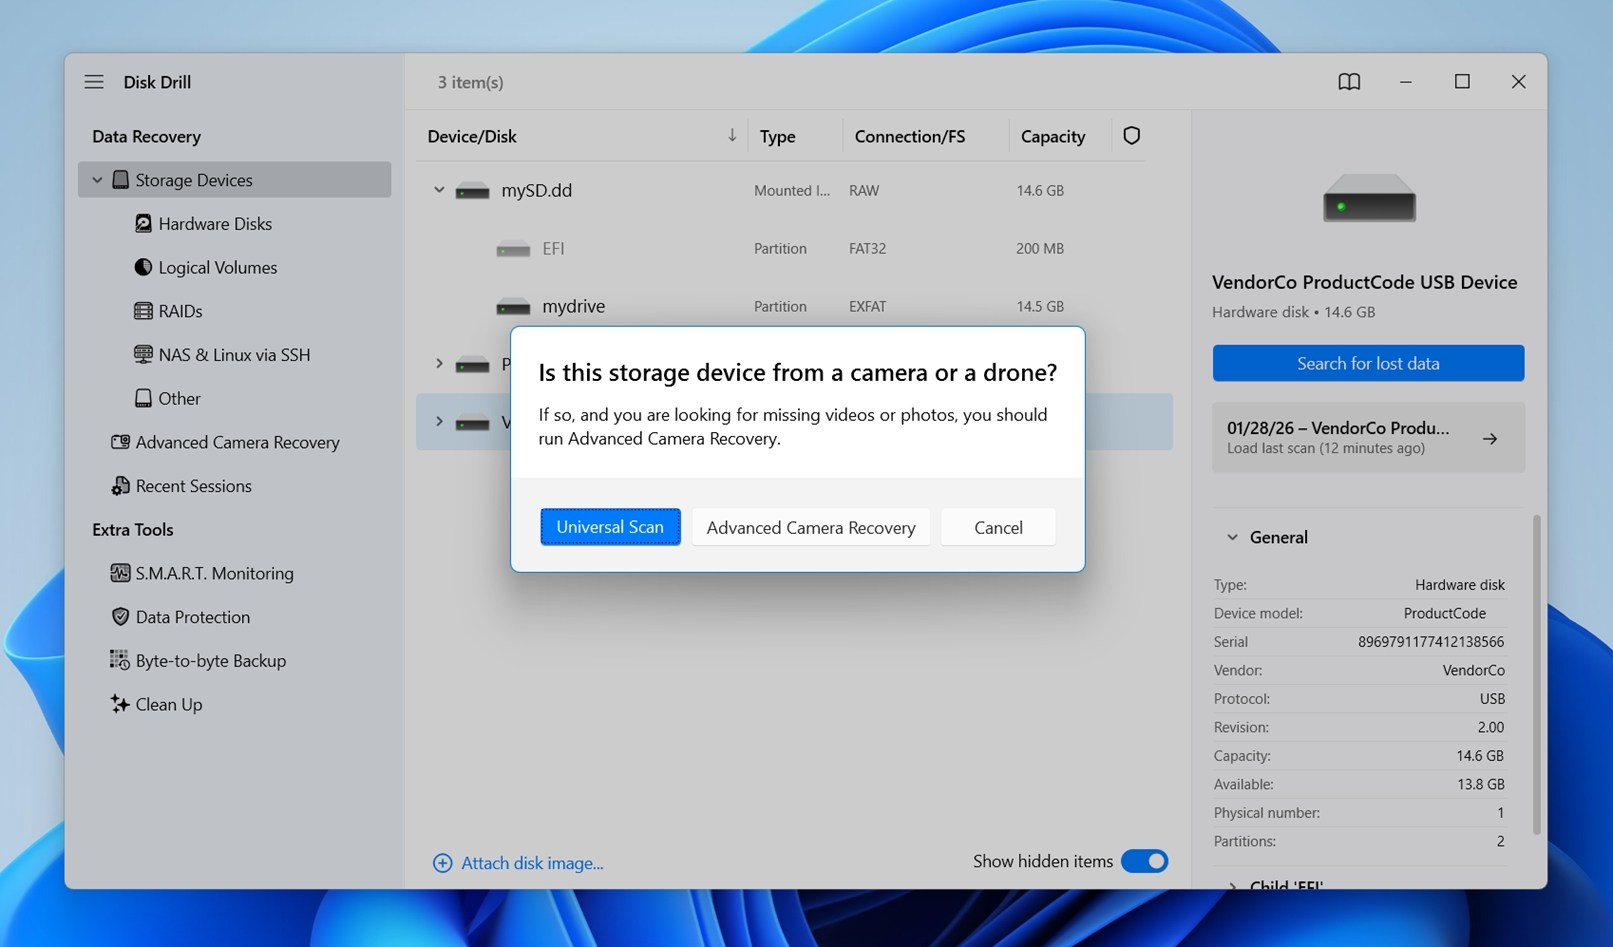
- Disk Drill will ask you to pick a scan mode: Universal Scan or Advanced Camera Recovery. Universal Scan is usually the best first choice. It’s faster and does a great job in typical corruption or deletion cases. Advanced Camera Recovery, on the other hand, is built for trickier SD card situations (large video files that got fragmented, or when a camera stopped recording mid-way).👀
Since you’re scanning an image file, you can try both scan modes as many times as you want without damaging anything. No extra wear on the original card.
- Click Review found items.
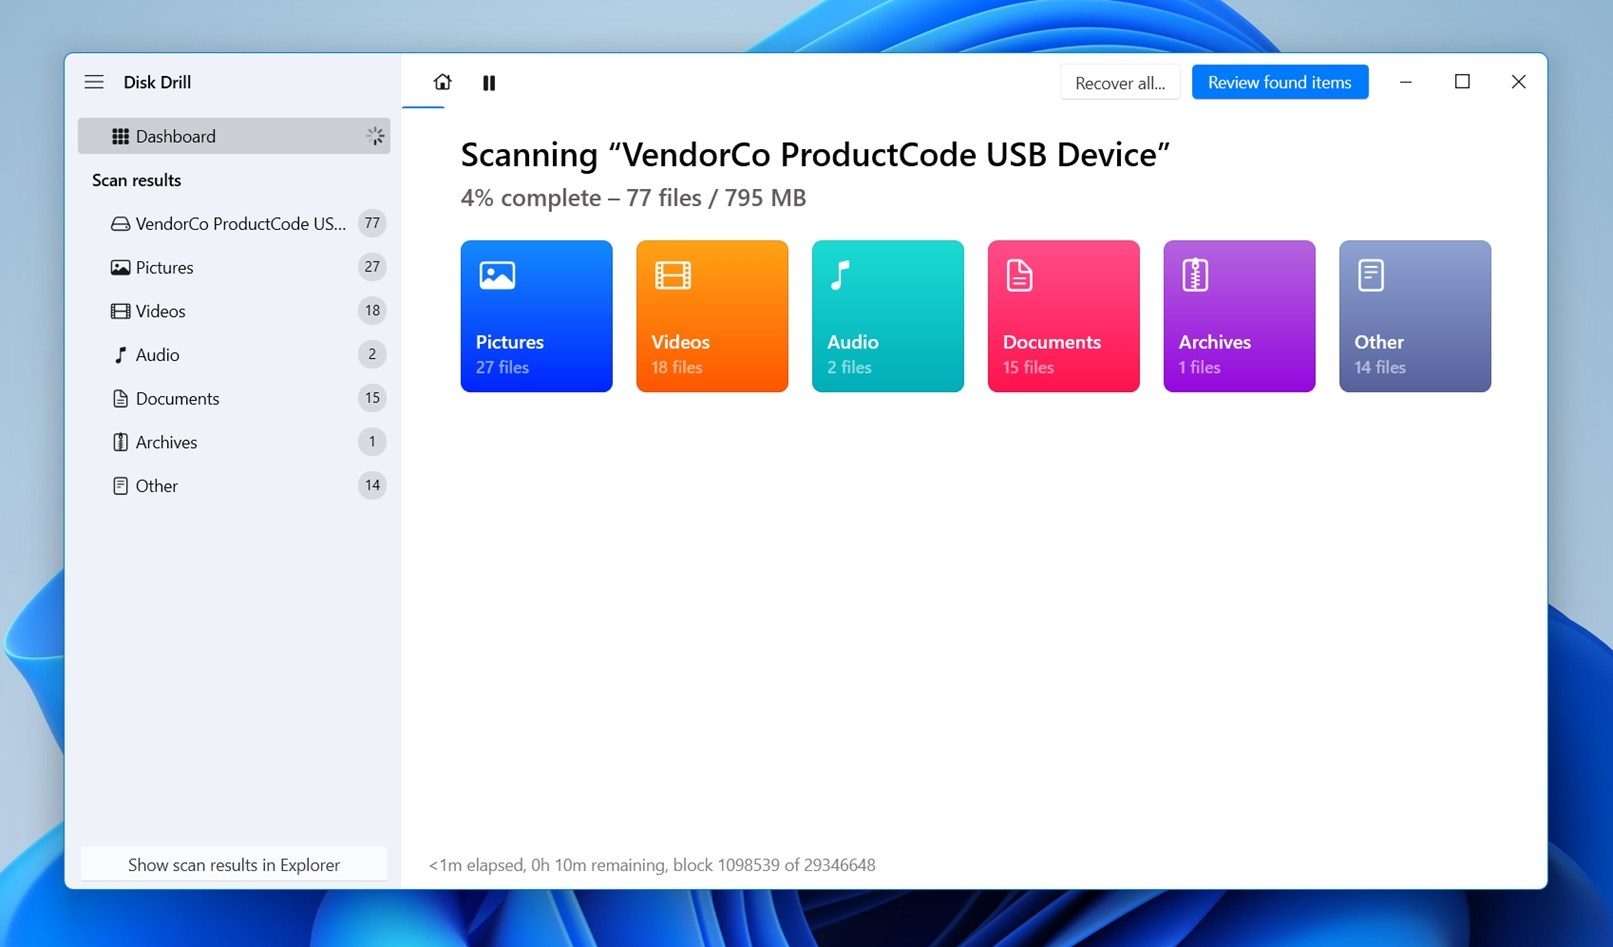 It will direct you to the list of recoverable files.
 - Use the search bar and the filters in the sidebar to narrow the file list or locate specific files. We also recommend that you preview your files.
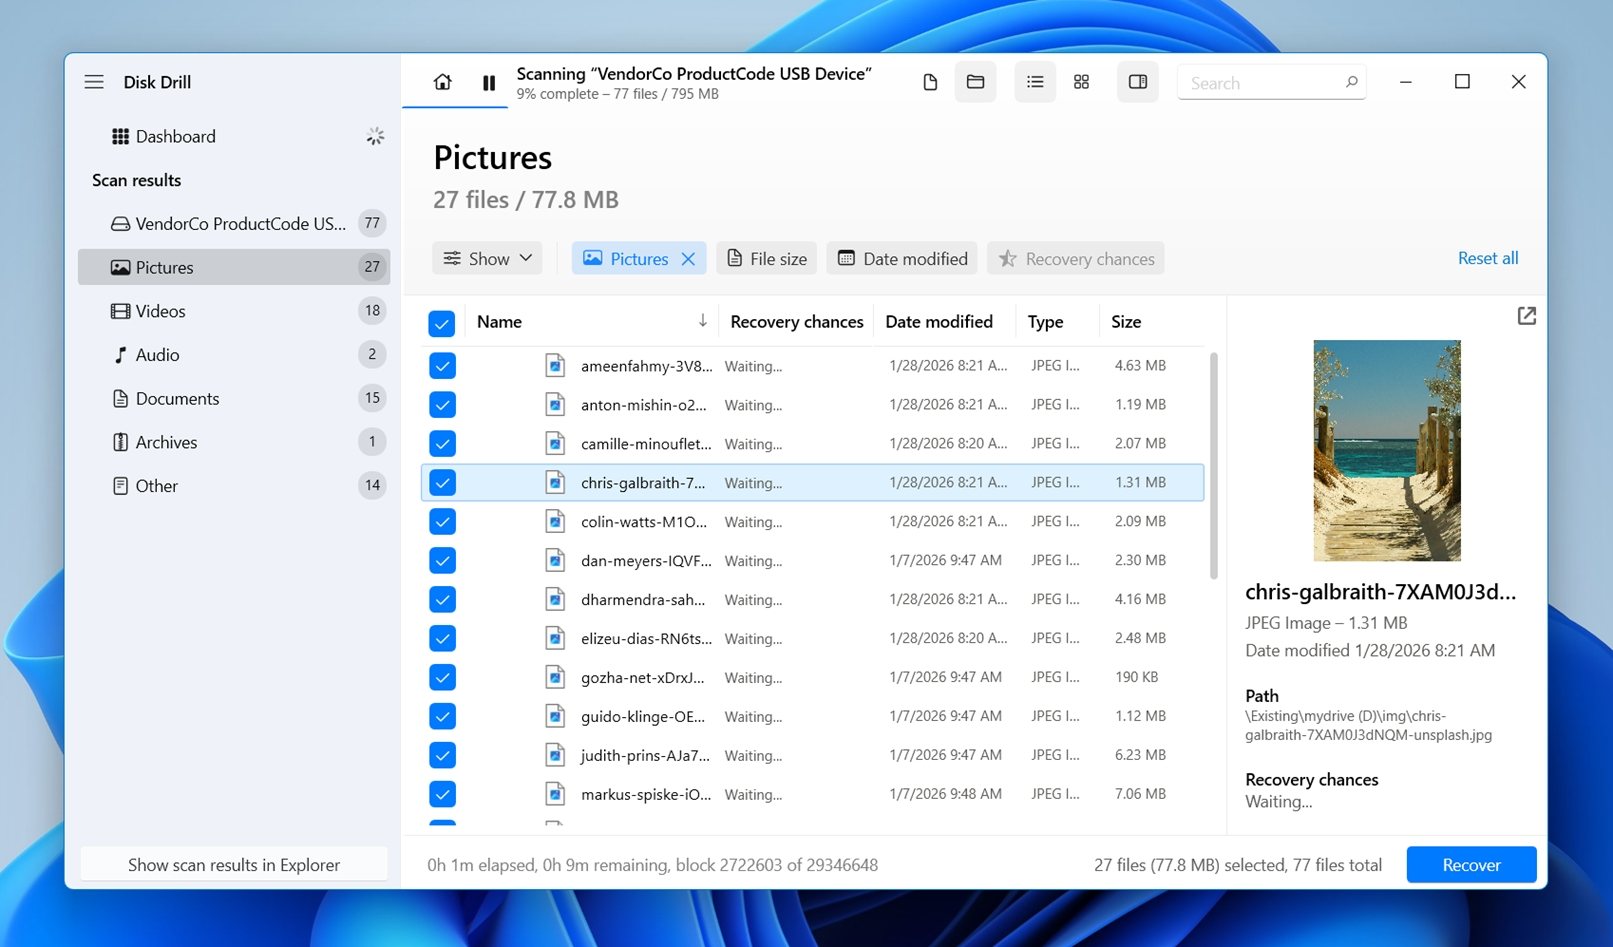 To do that, click on any item in the list and look to the right side of the screen. If you don’t see anything, click the little eye icon to toggle it on.
 - Previews are your best bet for confirming whether a file is intact. If you can see it in the preview window, that file is 100% recoverable.
- Tick the checkbox next to the file you want to recover and click Recover. Alternatively, you can leave them blank and click Recover all.
- Choose the destination folder for your recovered files.
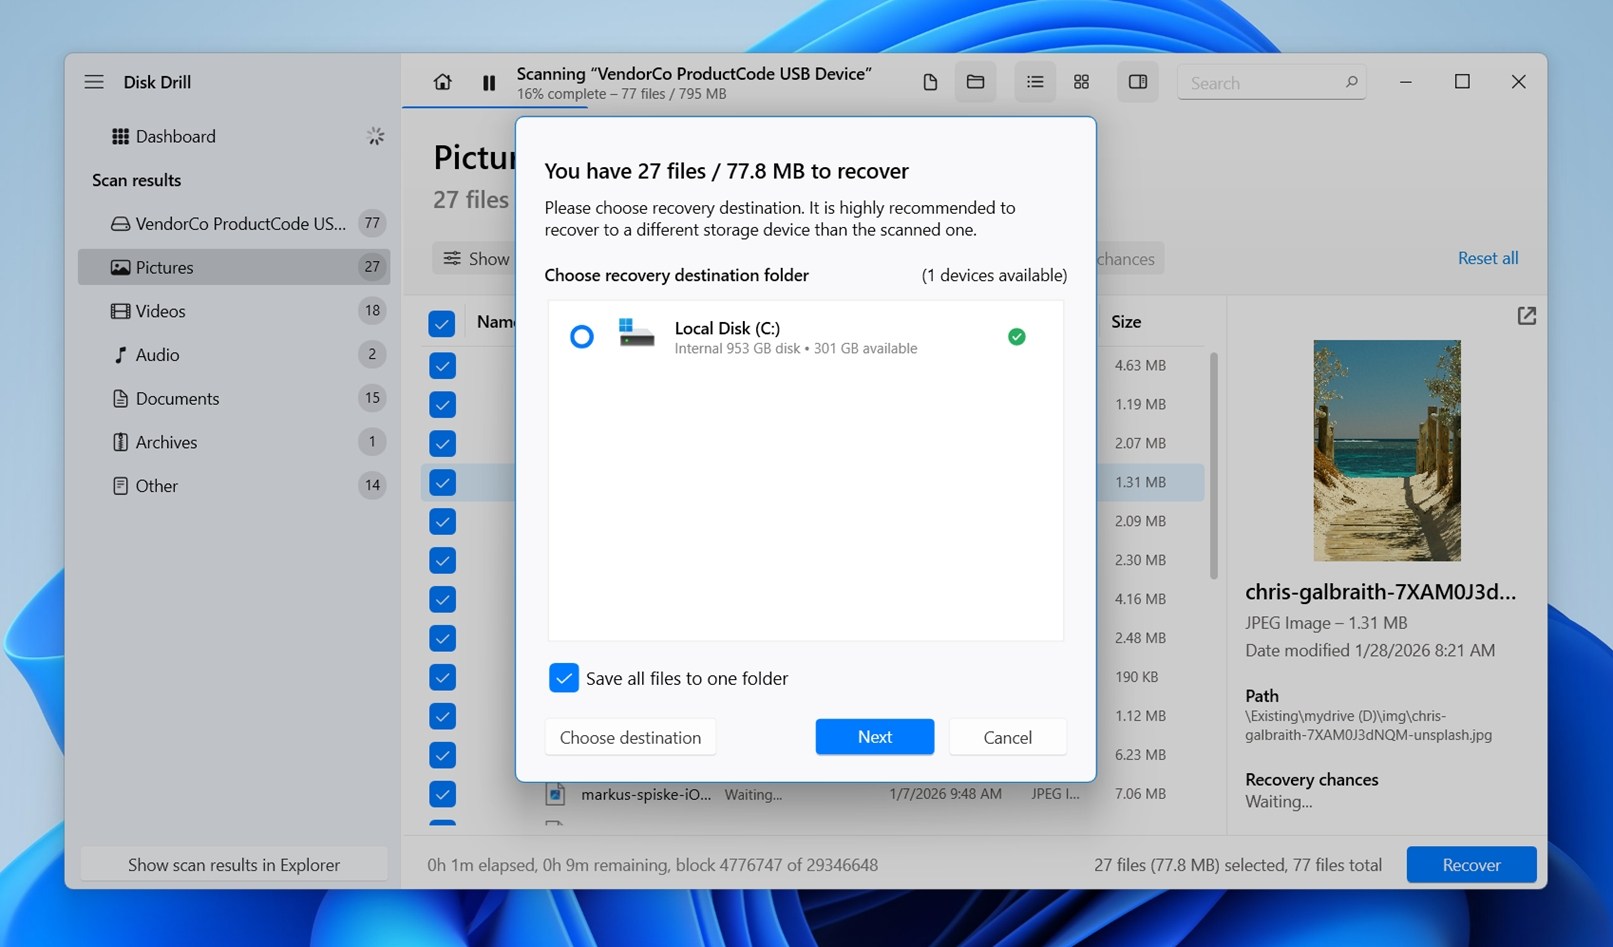 Just make sure to select a location other than your SD card to avoid any existing files or delete file data still on the disk. Then, click Next to begin the recovery process.
This is the safest way to recover data from a problematic SD card. You’re scanning a backup, so there’s zero risk of making things worse. And for what it’s worth, Disk Drill itself is safe and well-vetted. We’ve tested it thoroughly. If you want the full breakdown, you can read it here.
How to Fix a Corrupted SD Card Without Formatting
Now let’s talk about the ways to fix an SD card without formatting it.
Most of these methods assume your SD card isn’t dead (it shows up in Disk Management and shows a capacity). That usually means the problem is in the file system, not the hardware itself.
We’ll talk about hardware failure later, but for now, let’s go through the methods.
If you’ve already backed up the data, then formatting isn’t a big deal anymore. You can wipe the card clean and use it again (if it’s still physically reliable); the important part (saving your files) is already done.
Method 1: Diagnose the Connection
Before anything else, check the mechanical components of your SD card. Mechanical issues can be the root of many of the issues we discuss in this article but are easiest to fix; resolving mechanical malfunctions often returns a storage device to normal function.
- Check the sides of your SD card for a small, physical switch. This locks and unlocks your SD card – this is what it looks like. Try unlocking it and reconnecting it to your computer.
- Use a dry, microfiber cloth to clear your SD card and/or ports of any dust and debris.
- Use another port, SD card adapter (if you are using a micro SD card), or an entirely different computer and see if the error appears.
What we think about this method: This is always the first thing we check, and for good reason. This method is completely safe and doesn’t touch the data on the SD card at all. It won’t fix file system corruption, but when the problem is just a bad reader or port, it can save you a lot of time.
Method 2: Assign a New Drive Letter
A faulty OS update or even a laggy computer can mess up drive letter assignment. If your SD card isn’t showing up in File Explorer, it may have a conflicting letter with a local drive or it might not even have one.
To assign/change the drive letter, follow the steps below:
- Hit (Windows key + X) and select Disk Management.
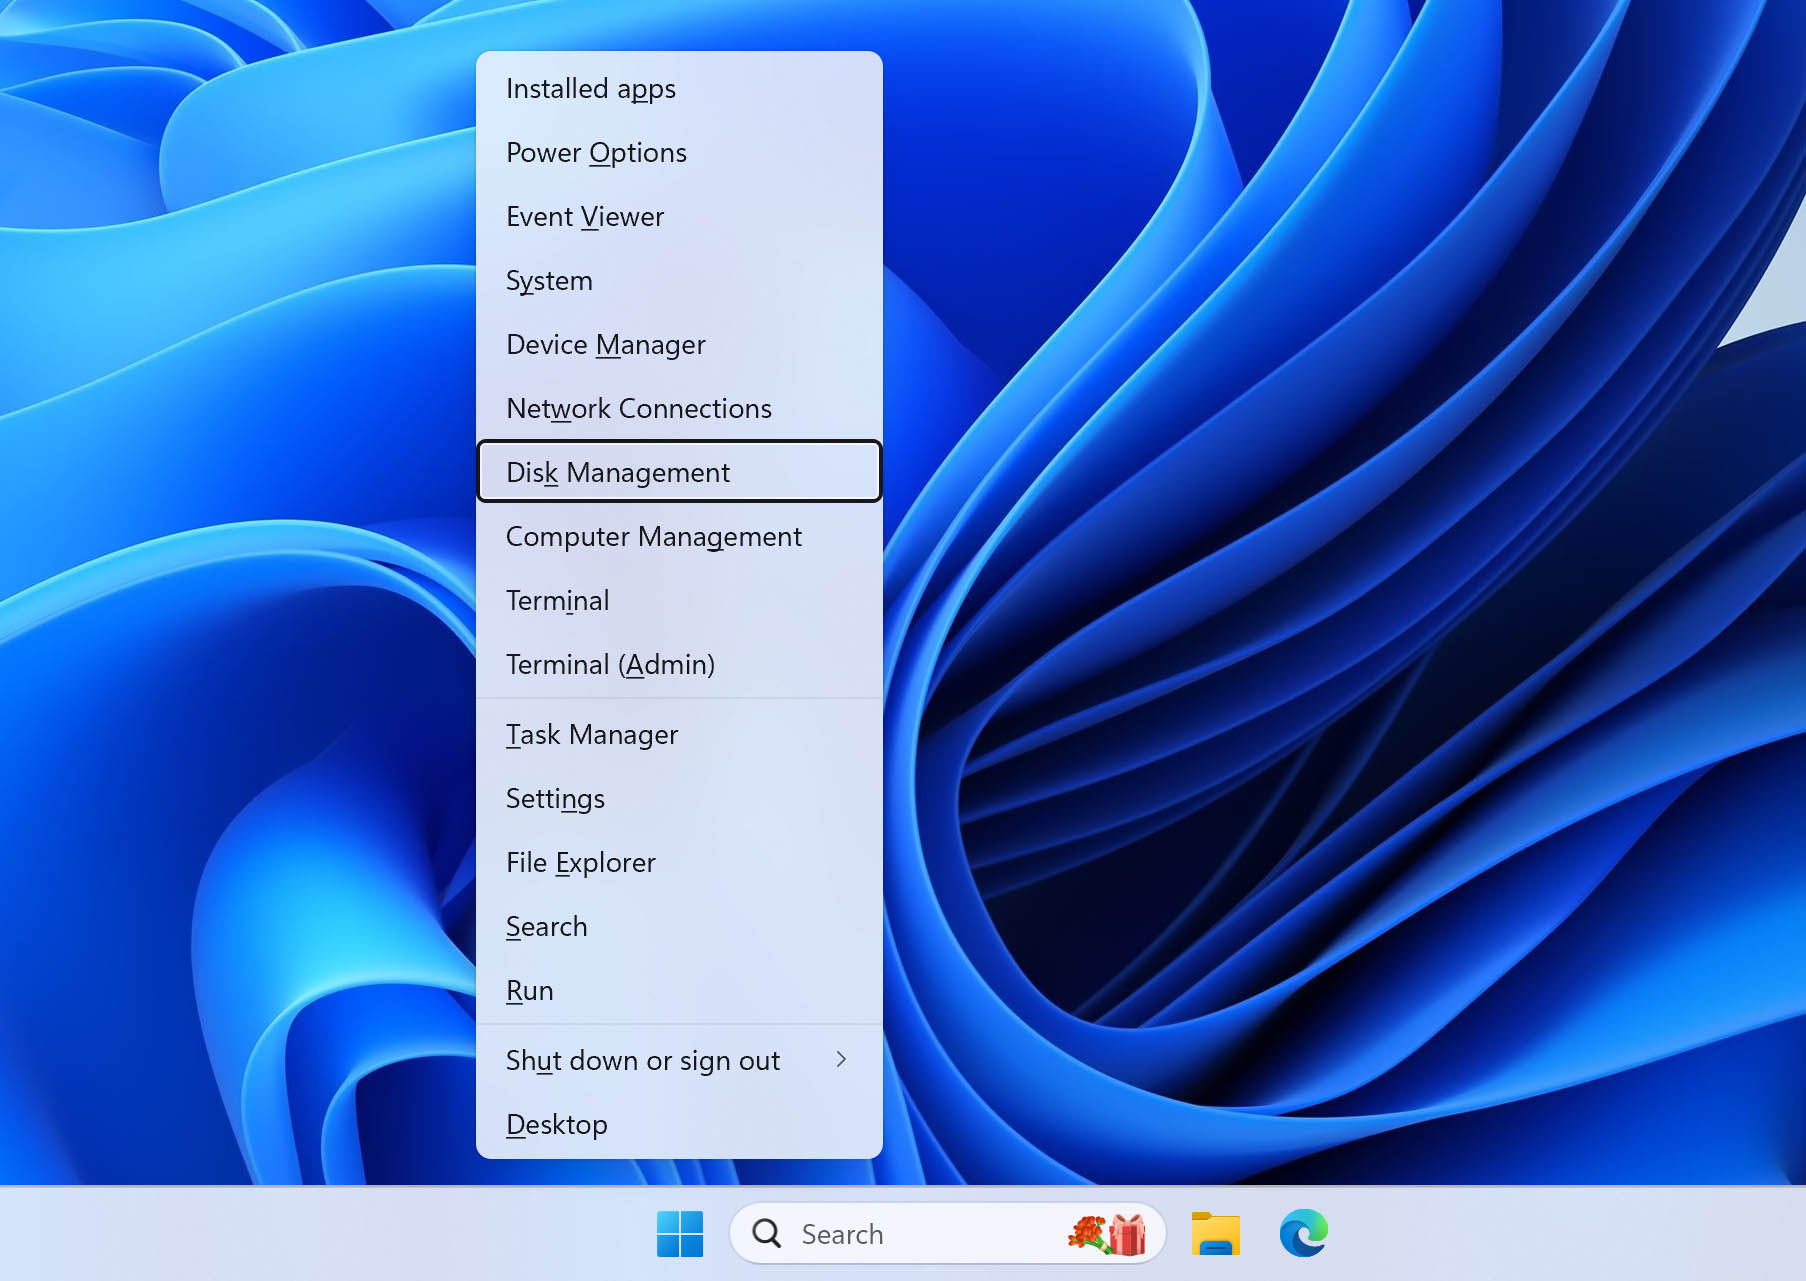
- Right-click on the corrupted SD card. And select Change Drive Letter and Paths from the drop-down list.
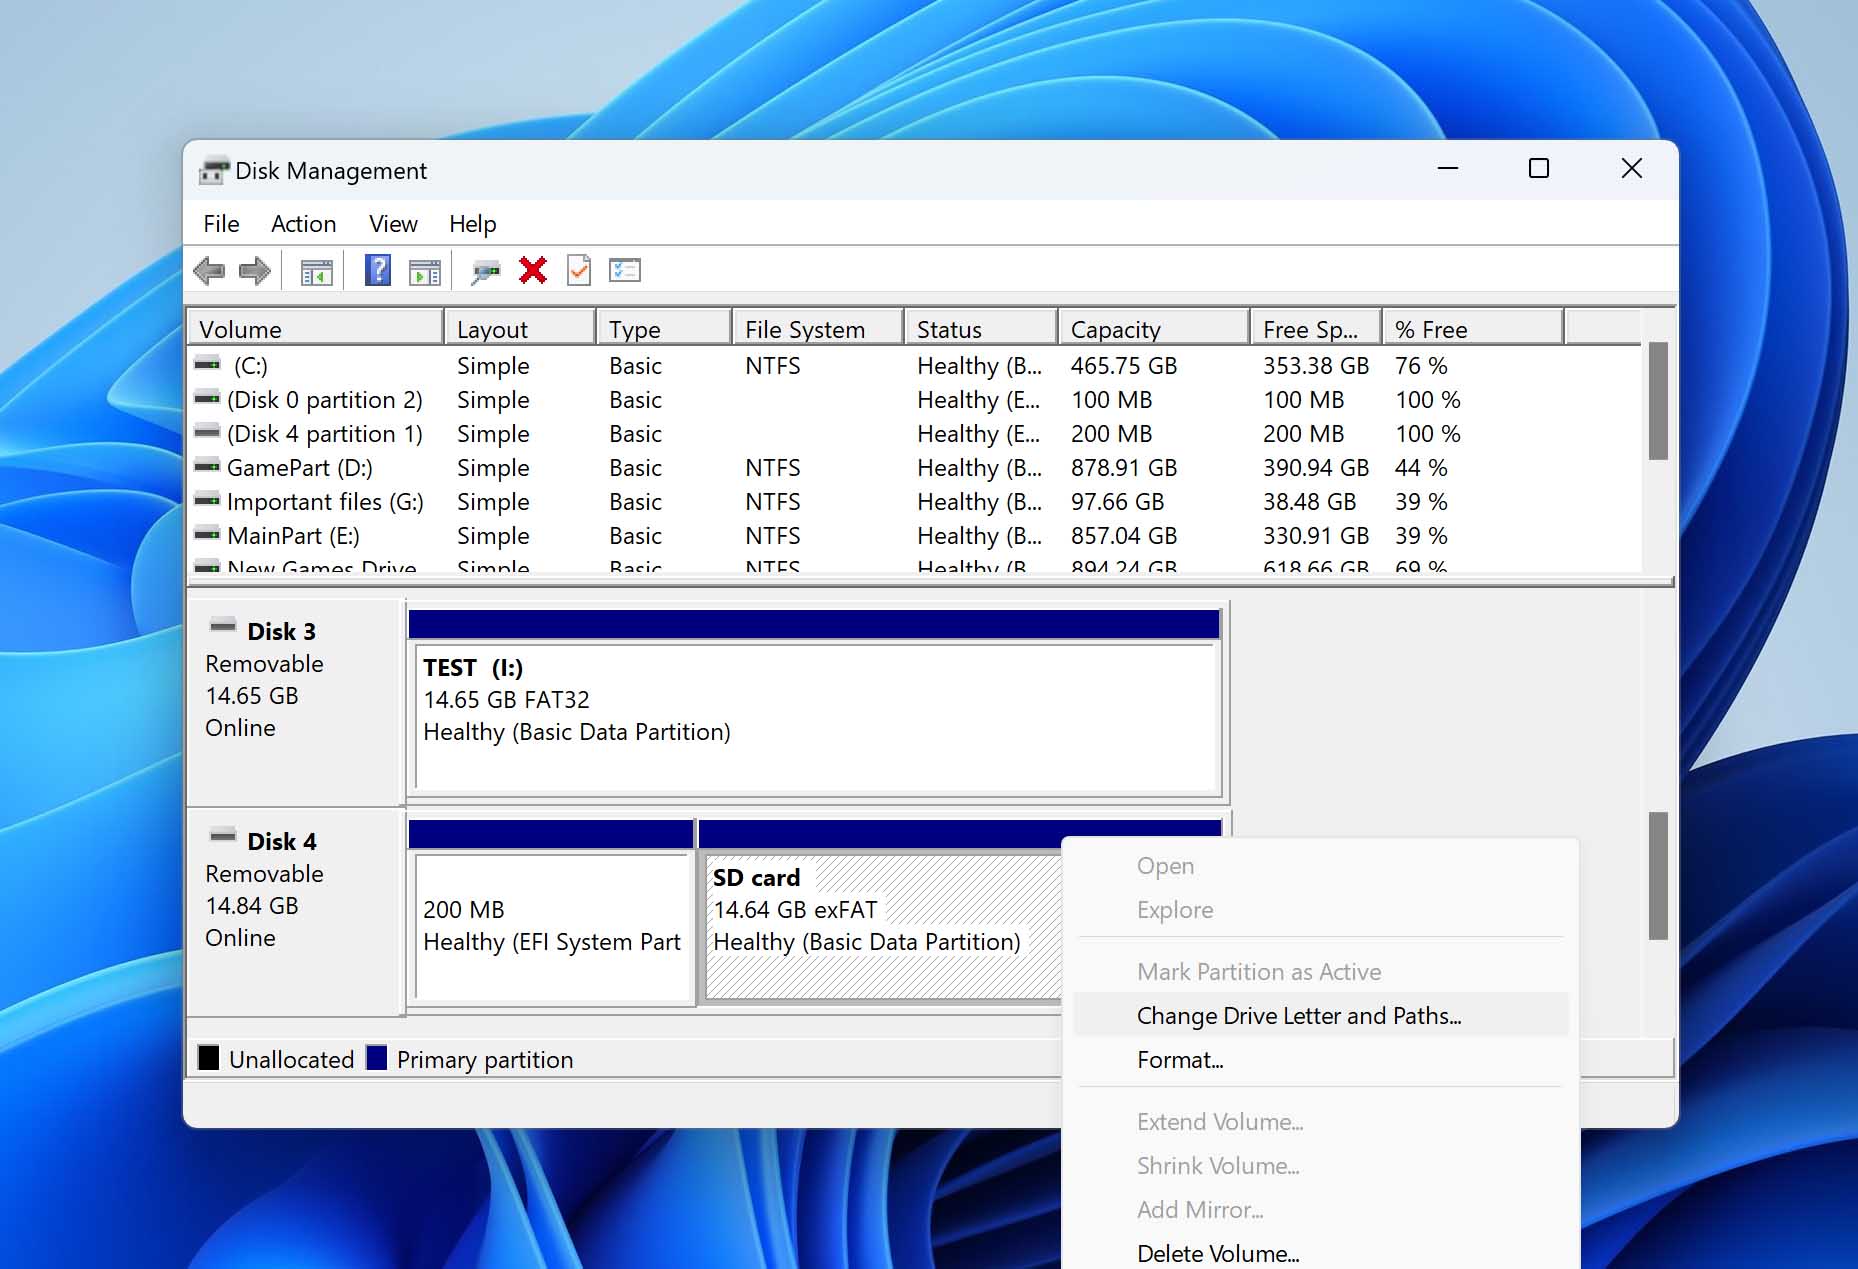
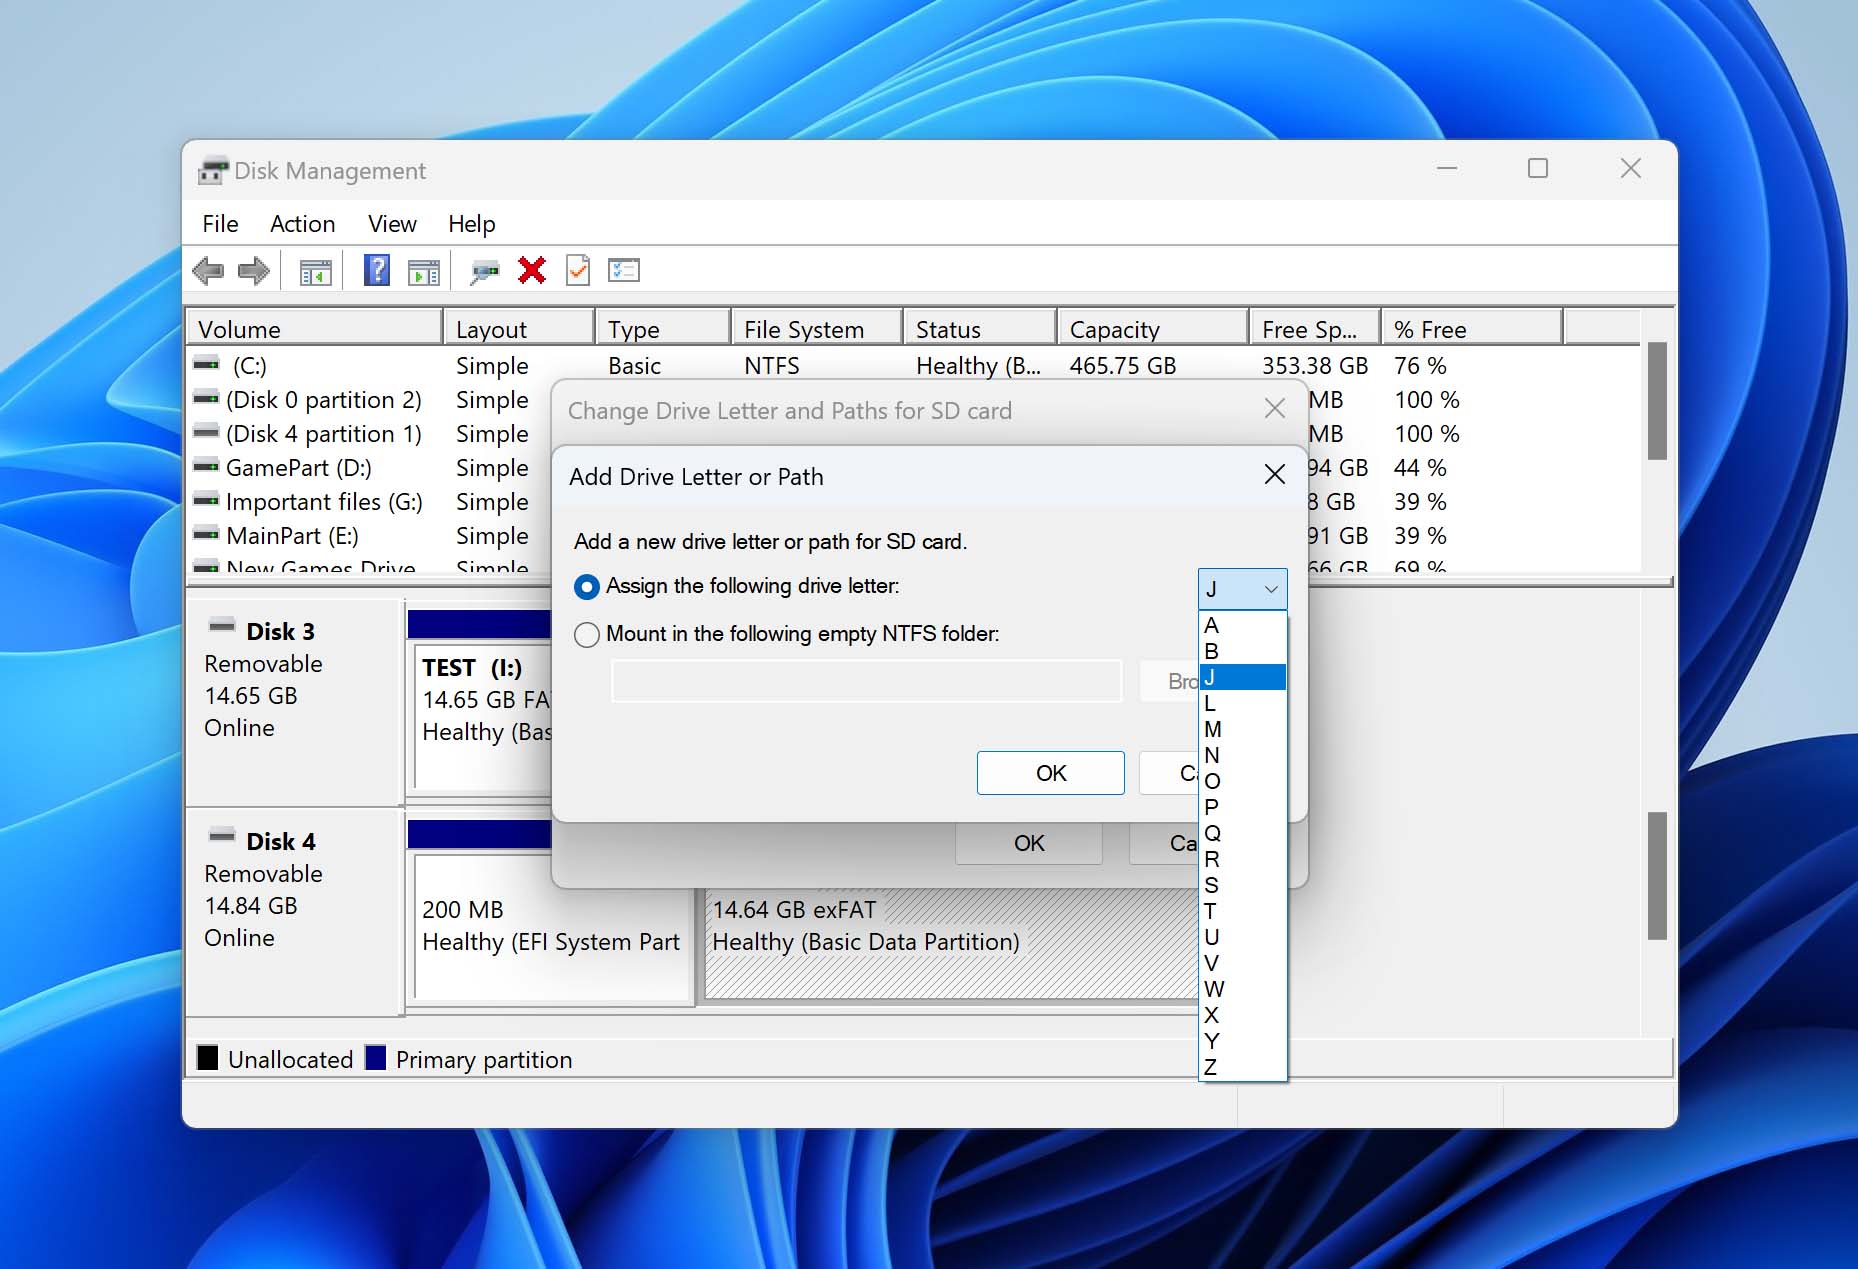
- If your SD card is missing a Drive Letter, click the Add button. If it already has one (leading to possible conflicts or other issues), click the Change button instead.
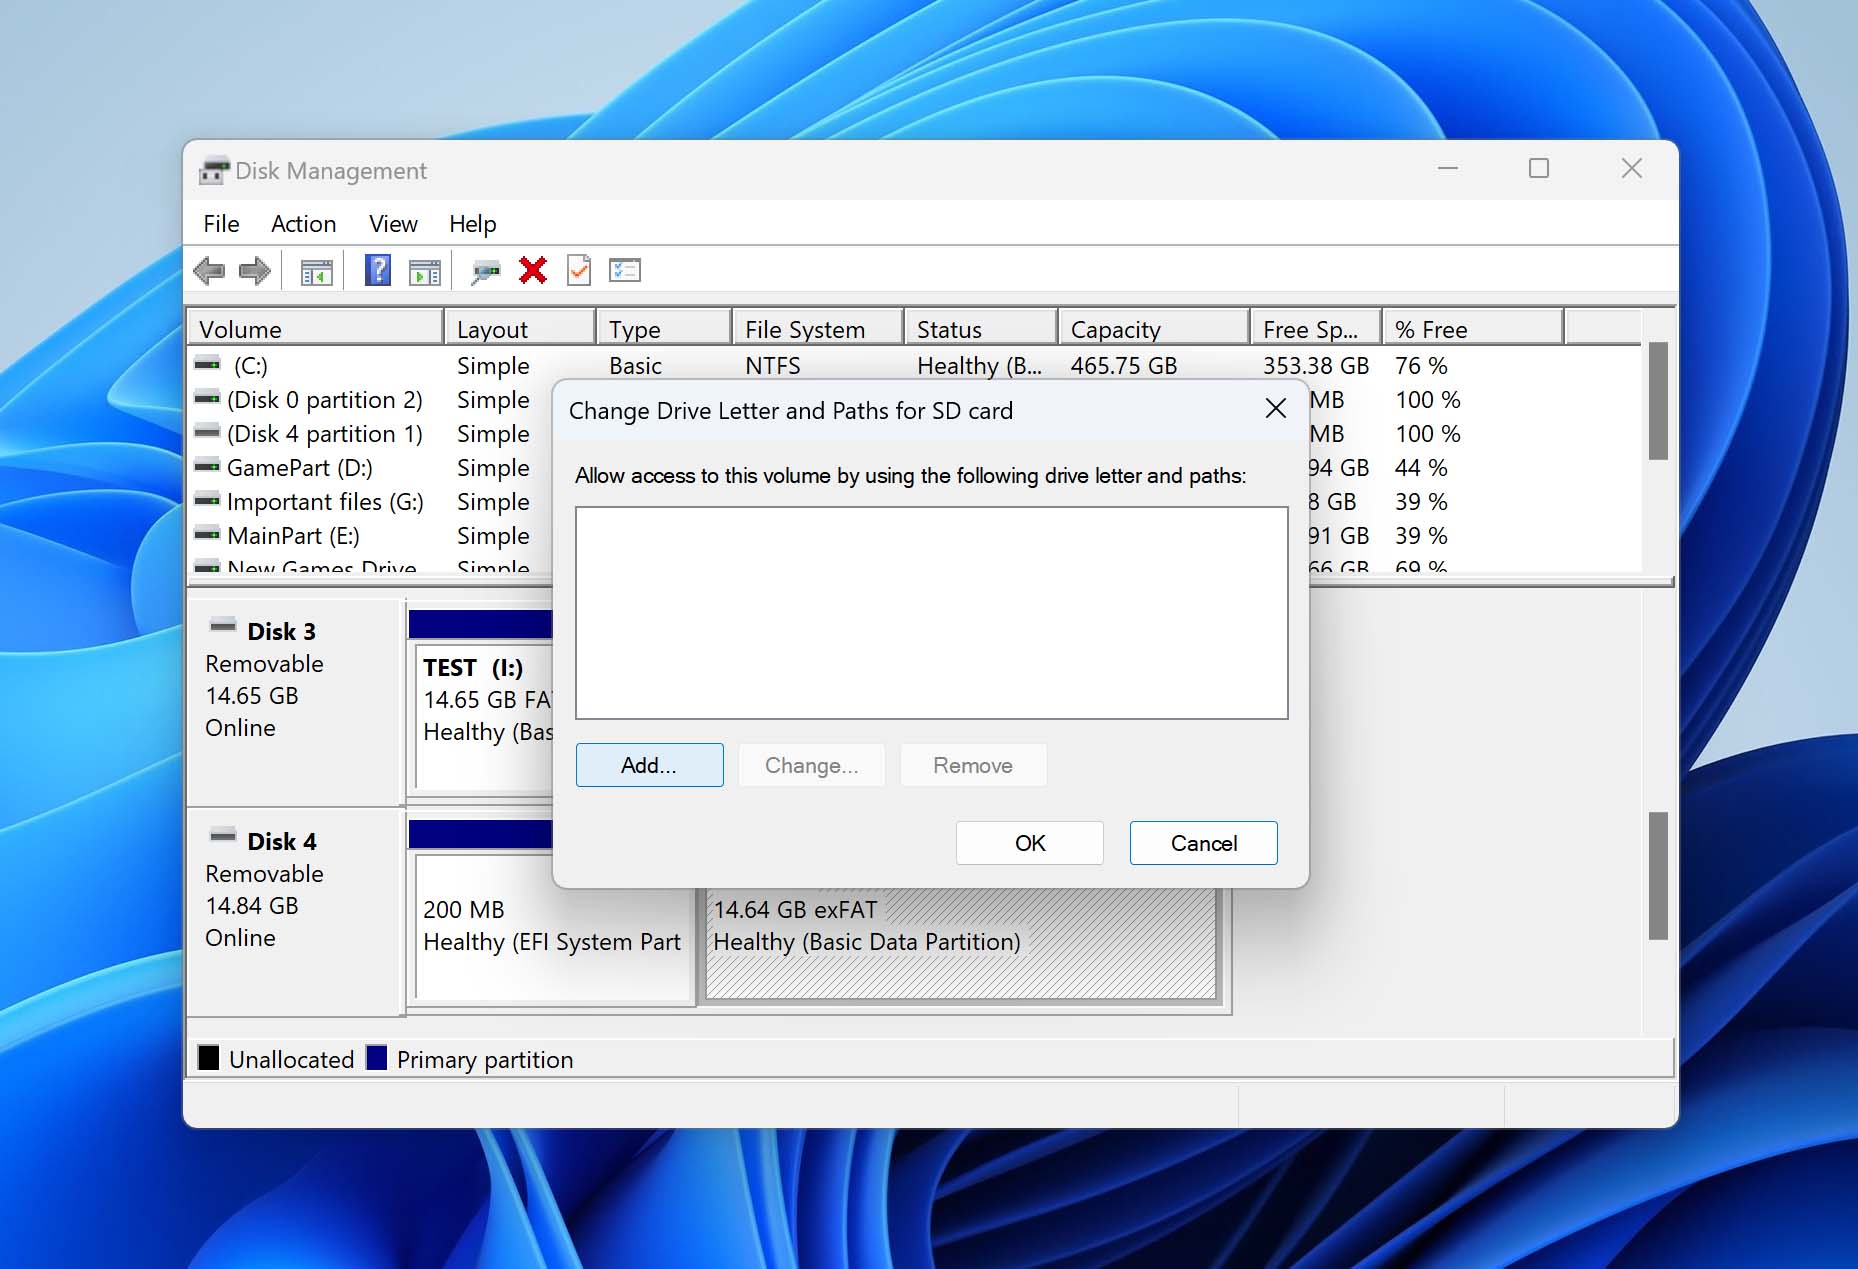
- Assign a letter and click OK to apply changes.
What we think about this method: This is a quick and harmless check that literally takes seconds. Drive letter issues aren’t the most common cause of SD card problems, but when they do happen, this fixes the issue instantly. Because it’s so easy and doesn’t touch the data on the card, we place this method near the beginning.
Method 3: Use CHKDSK Command
If none of the previous methods work, you can try using the CHKDSK command to check for any memory card errors. We can’t guarantee that your data will be 100% intact after the process (CHKDSK has a bit of a reputation when it comes to data loss). That’s why we strongly recommend you don’t skip the data recovery step we covered earlier.
Here’s how to fix a memory card without formatting using CHKDSK:
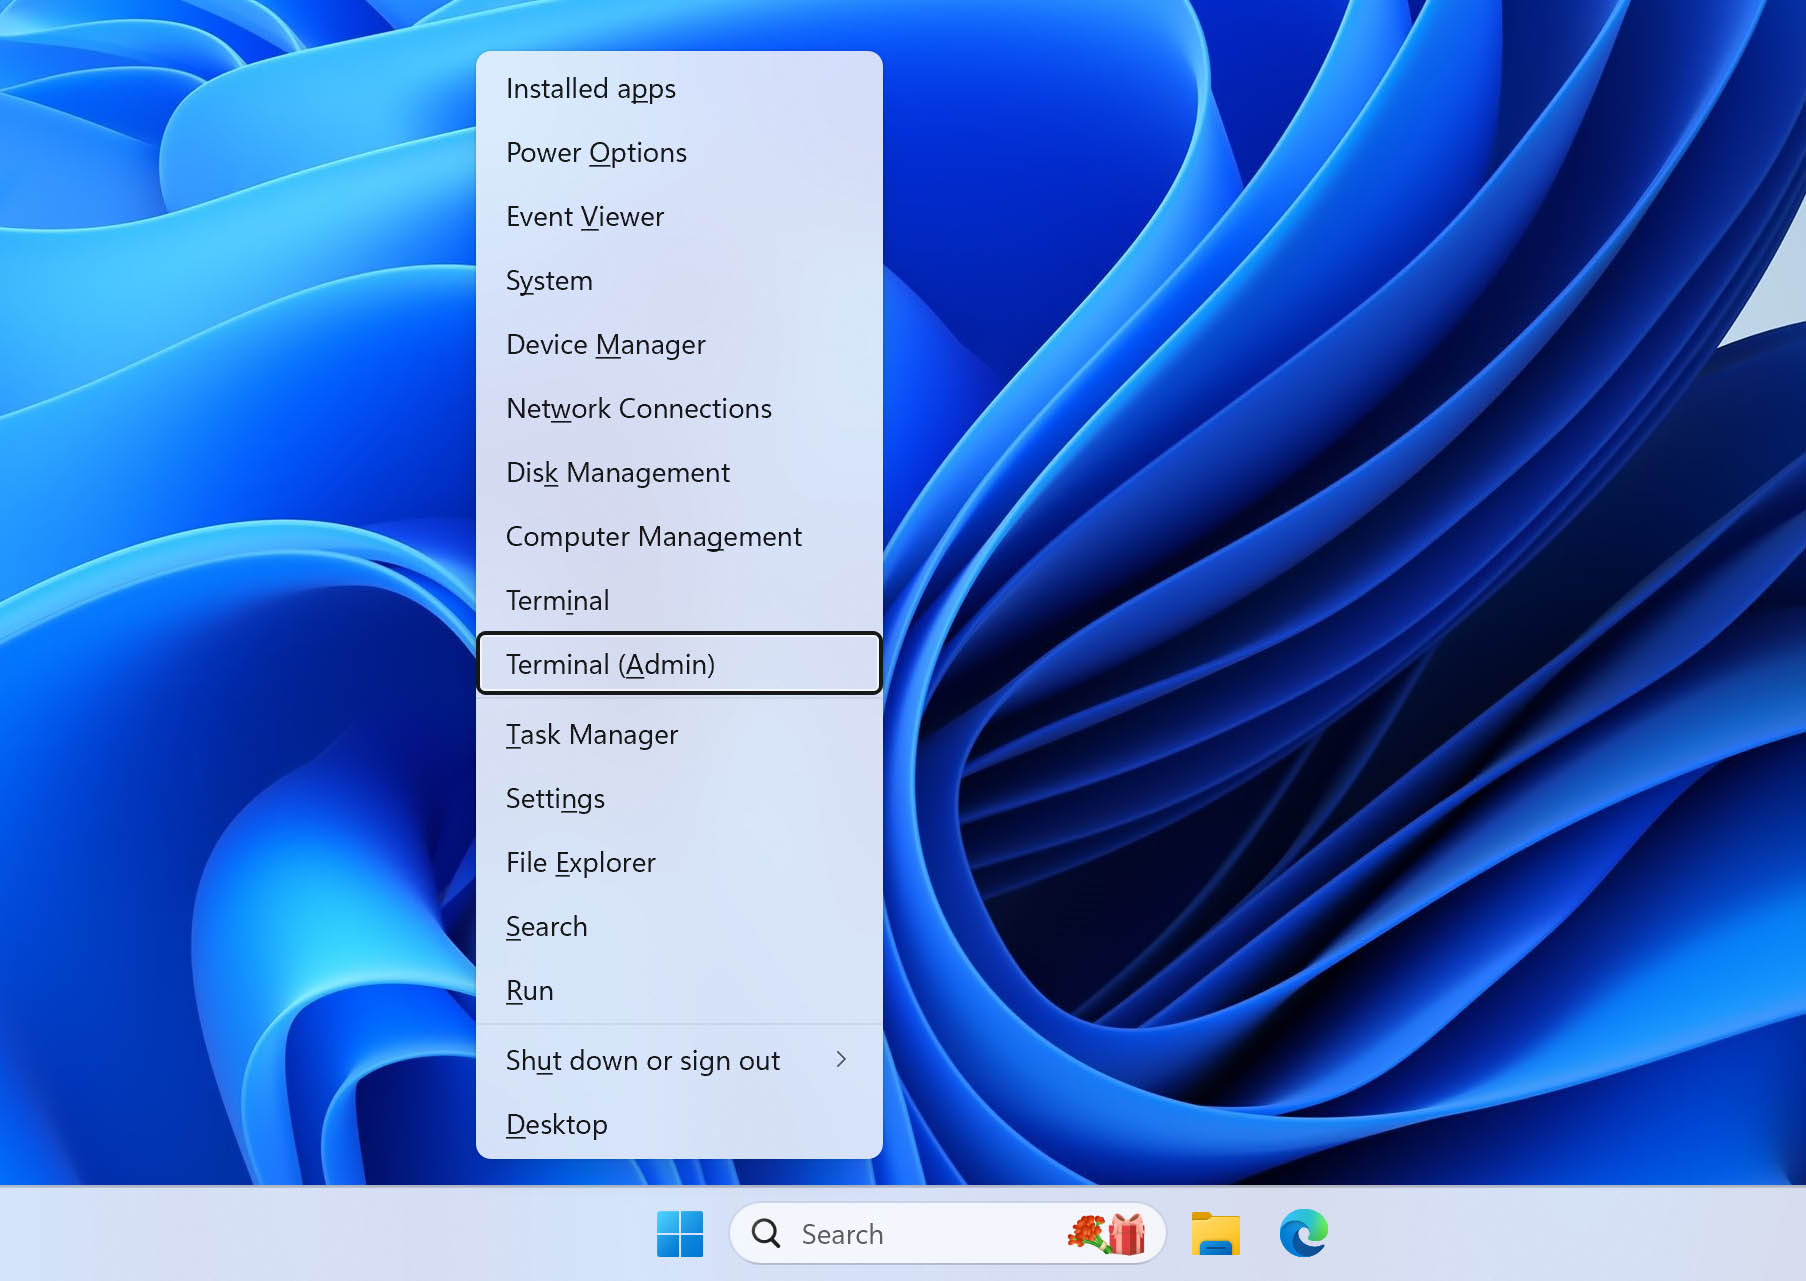
- Hit (Windows key + X).
- Select Terminal (Admin) [or PowerShell (Admin)] to run as administrator. Alternatively, you can type cmd in the search bar.
- Type this command: chkdsk drive letter: /f (Don’t forget to replace “drive letter’ with the actual one, like so: “chkdsk F: /f”). Then, press the Enter button. Wait for it to finish.
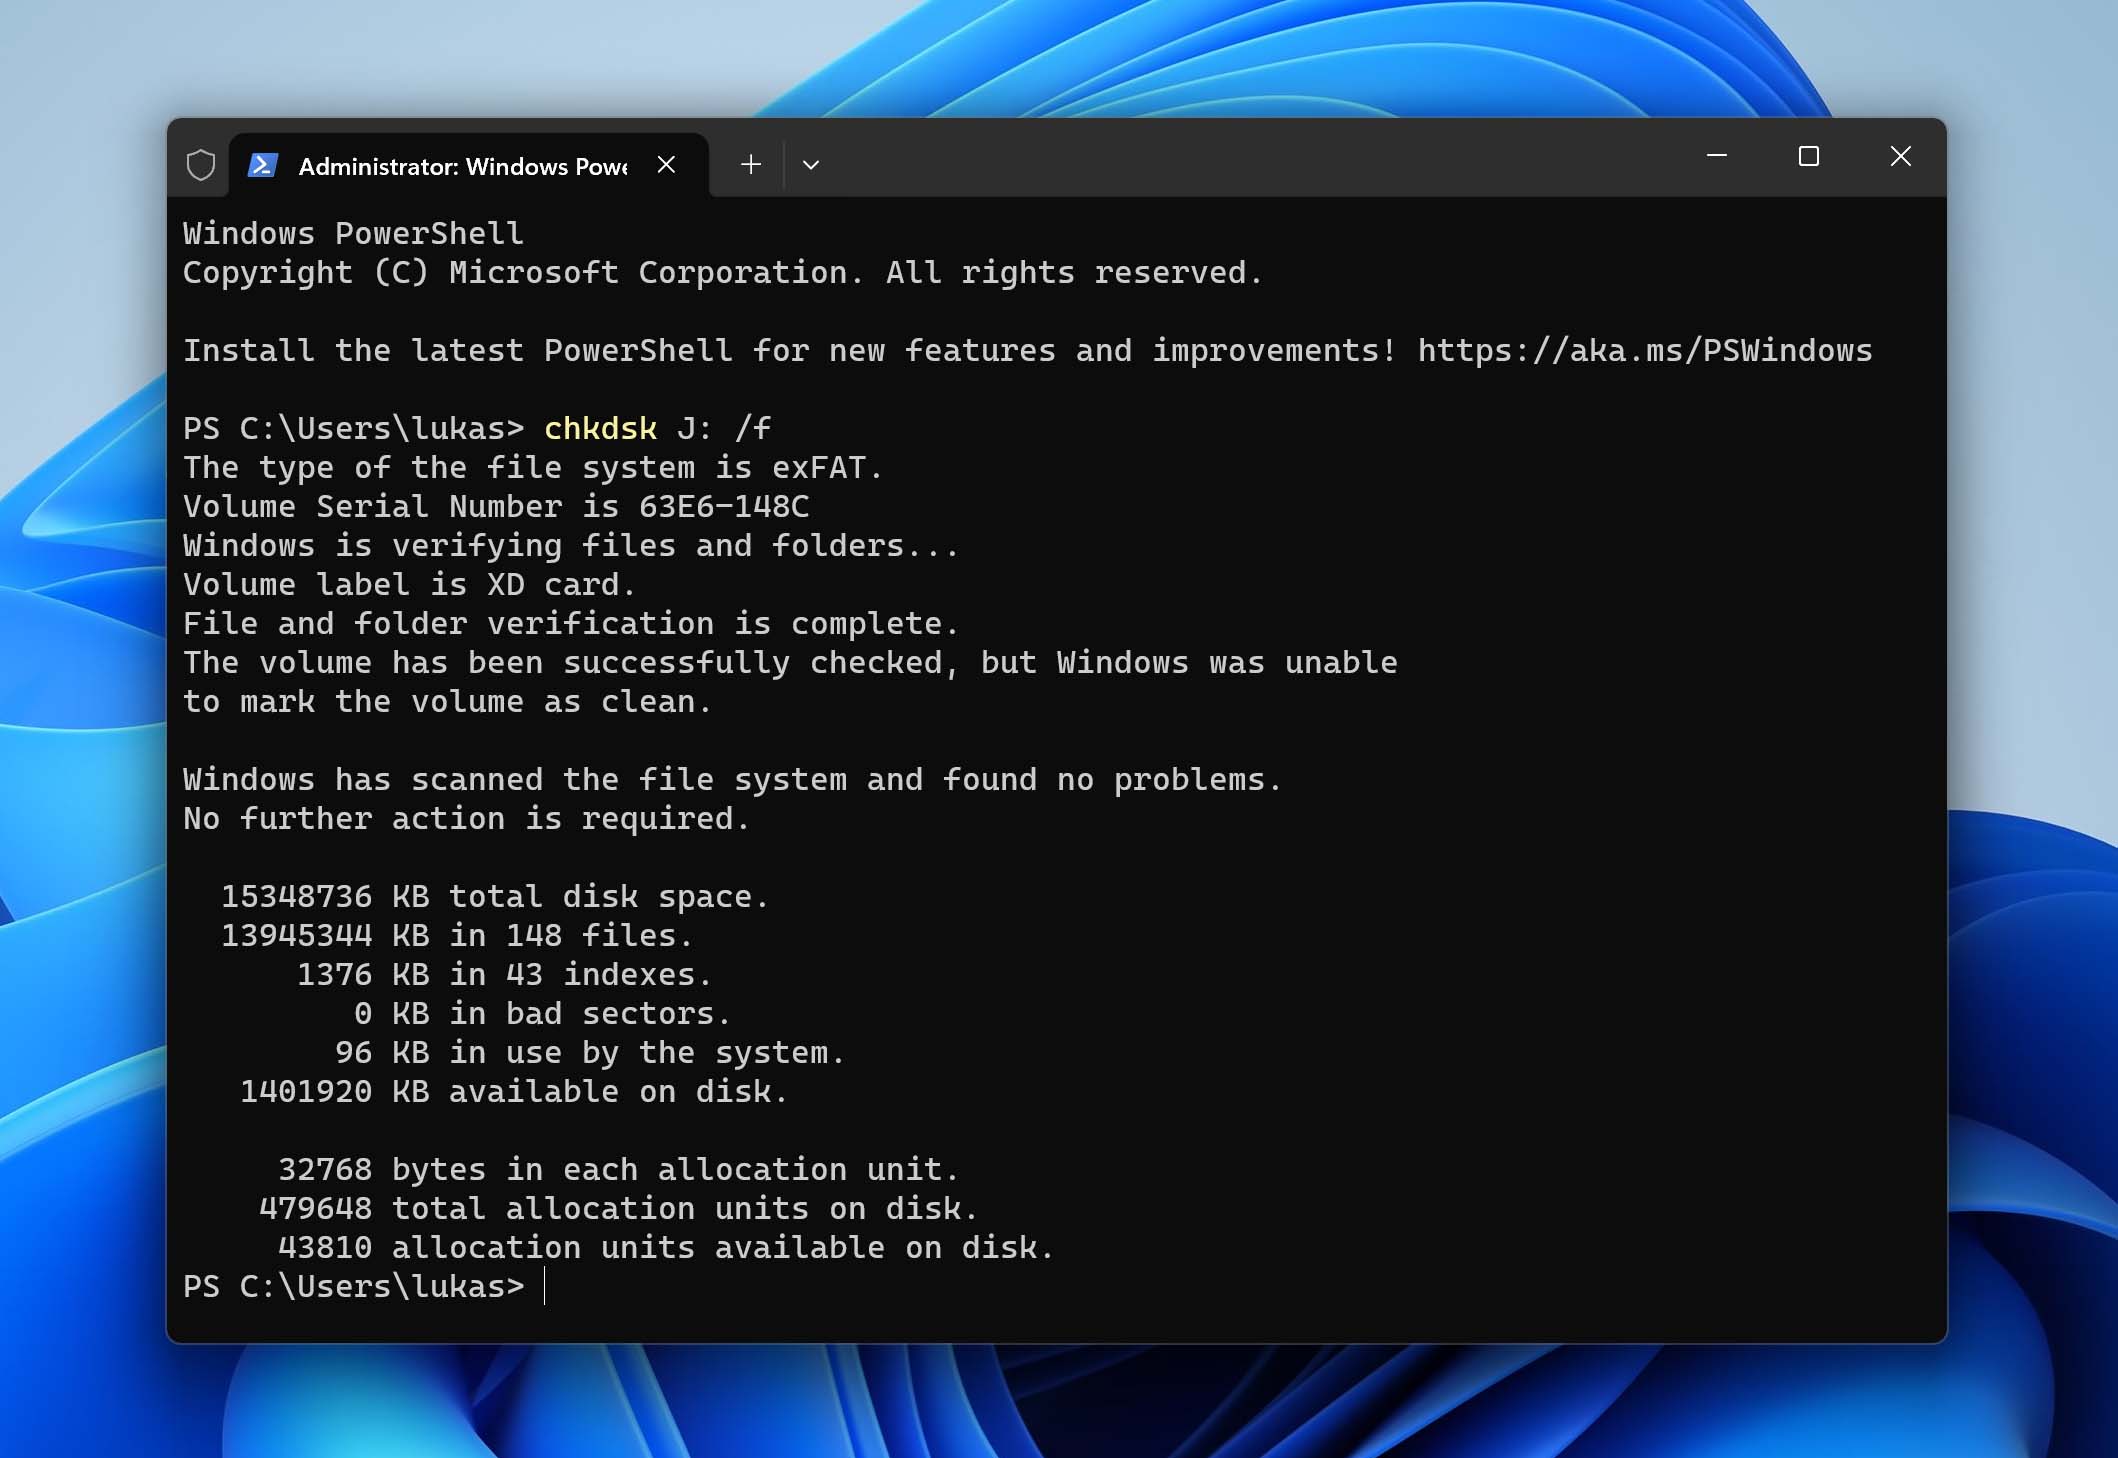
- If the system detects bad sectors, you will receive a notification. When this happens, type Y and hit Enter again to begin restoring the file structure of your SD.
- Wait for the process to finish, which may take a few minutes to hours, depending on the size of your SD card.
On some SD cards, CHKDSK may get stuck mid-process. One of our readers ran into this with a drive that froze on stage 4 for hours. This usually indicates a high number of damaged sectors, and the tool can’t move past them.
What we think about this method: CHKDSK can’t really be left out of a guide like this – it’s a tool that many users will try sooner or later. That said, CHKDSK isn’t as universal as many people hope, and it won’t fix every SD card problem. But when the issue is a minor file system inconsistency and your data is already backed up (or not critical), it can be an effective repair tool.
Method 4: Use Windows Error-Checking Tool
This method is more of a variant of CHKDSK – it uses the same underlying scan but wraps it in a GUI. It’s a bit easier to use if you’re not comfortable with command-line tools, and it sometimes helps with quick file system issues.
If this doesn’t pop up automatically, you can manually launch it by following the steps below:
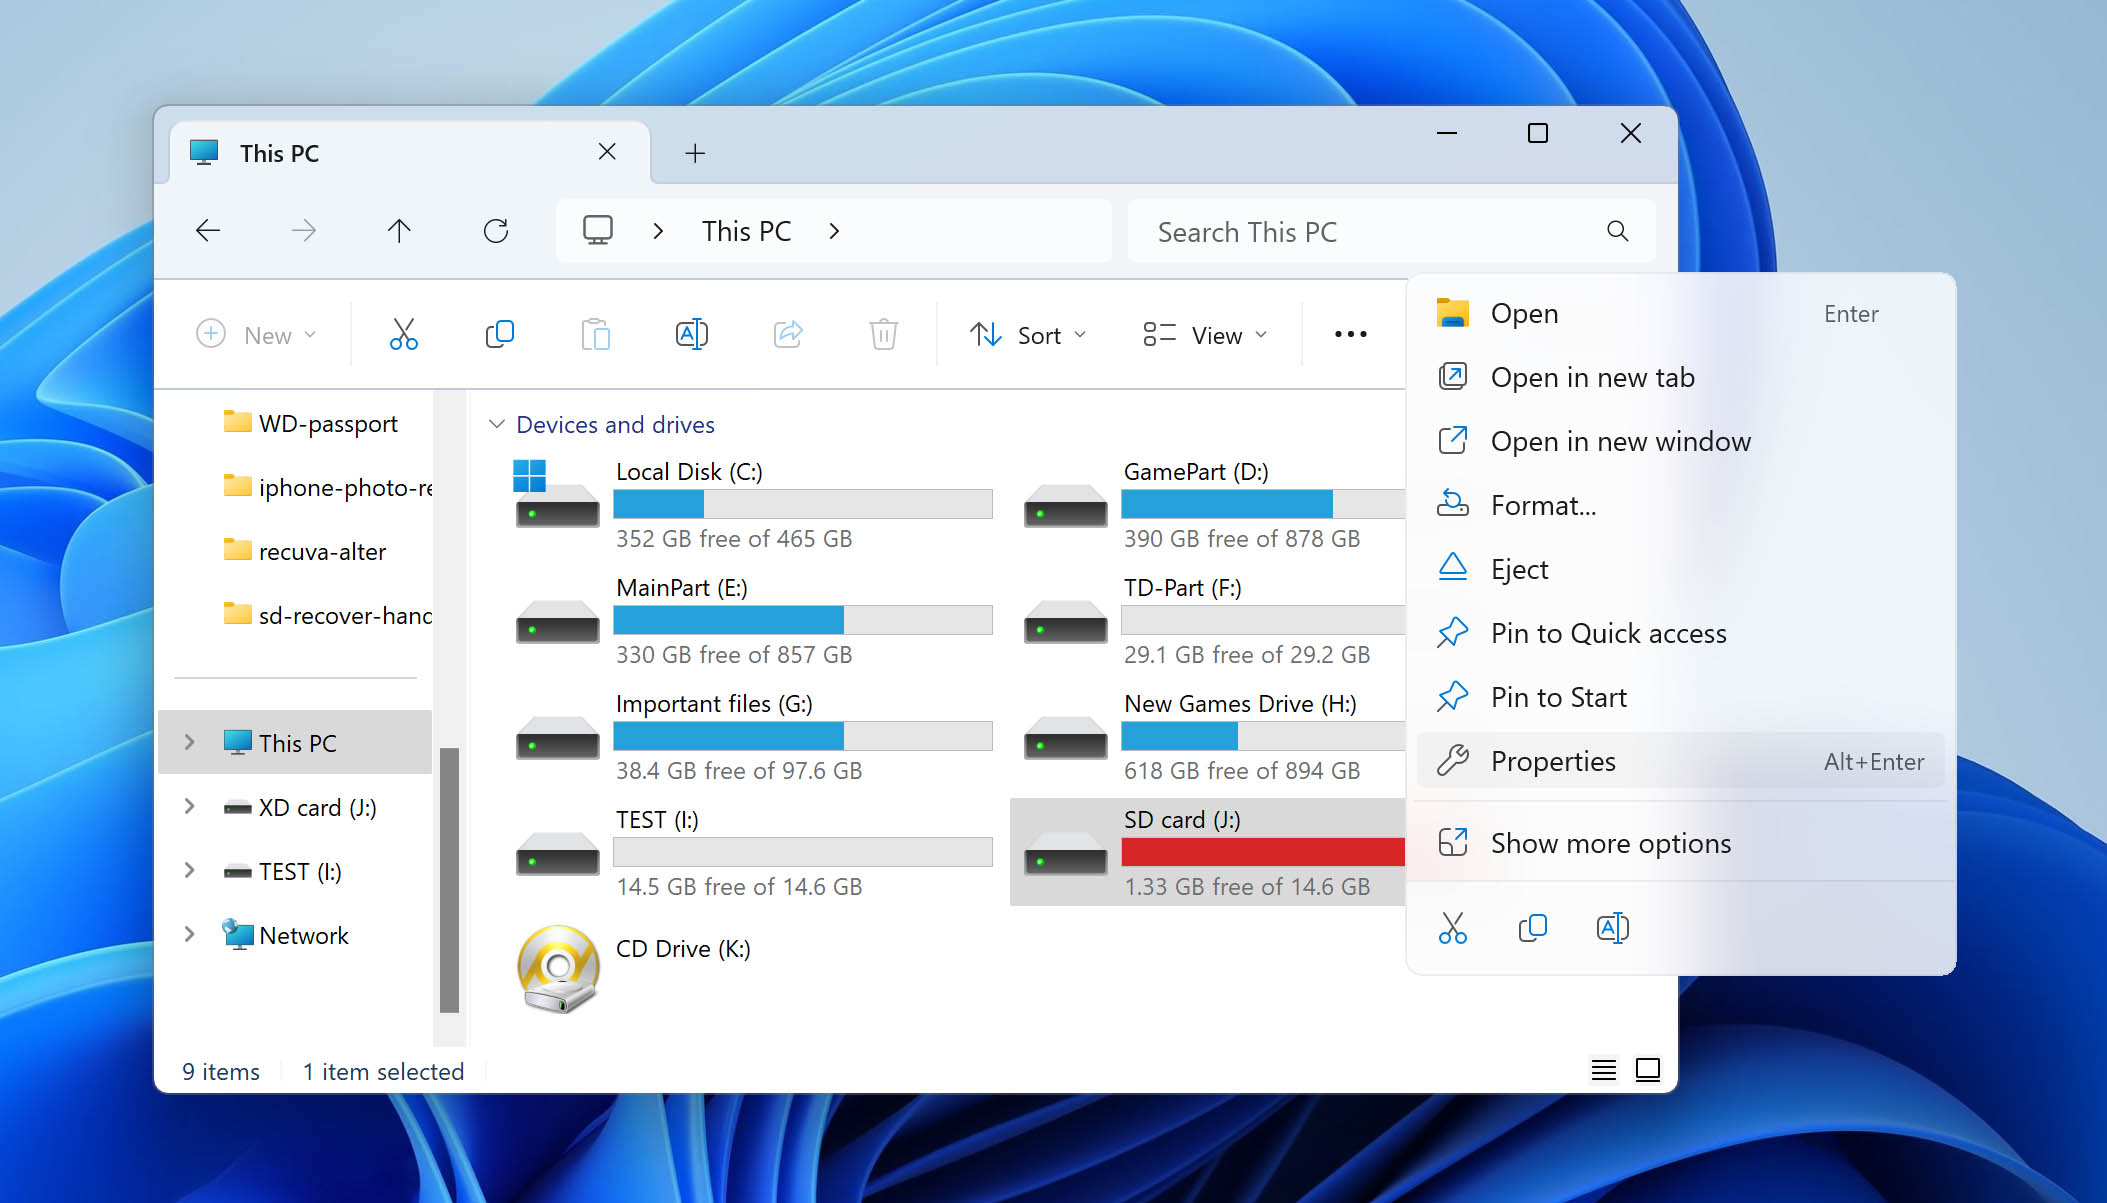
- Open File Explorer.
- Select This PC on the left sidebar.
- Right-click on the corrupted SD card and click Properties.
- Navigate to Tools and click Check.
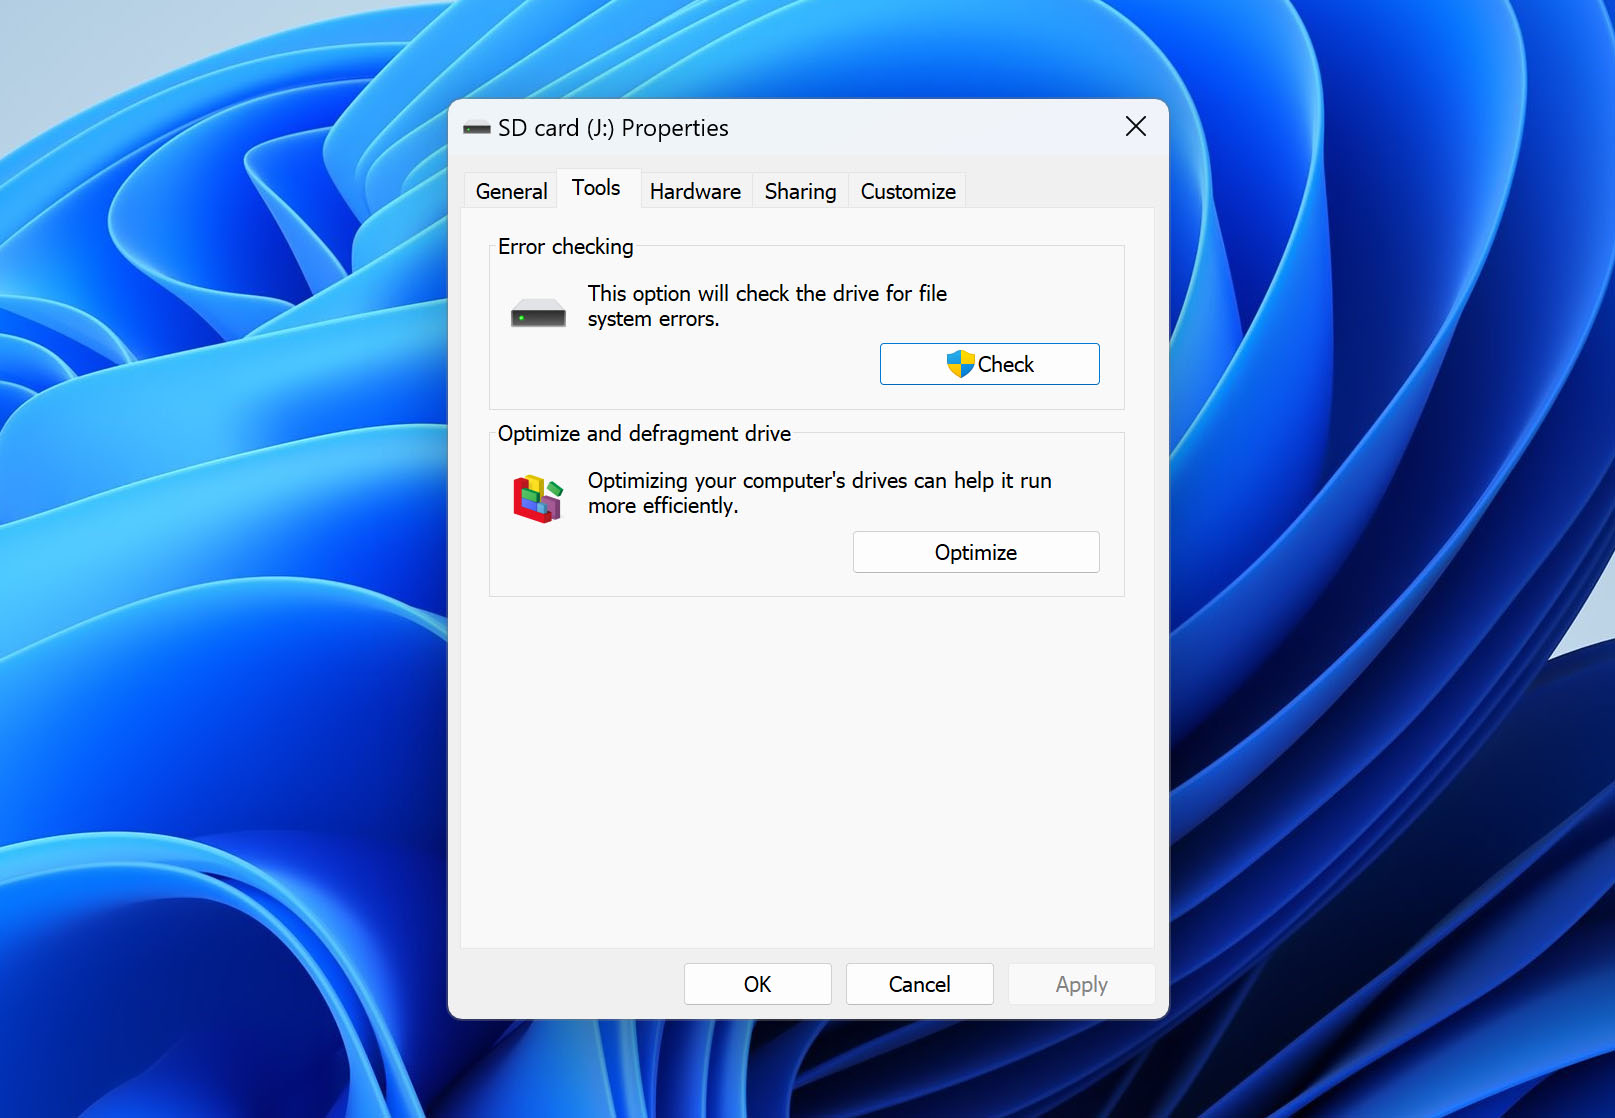
- Click Scan and repair drive to start the process.
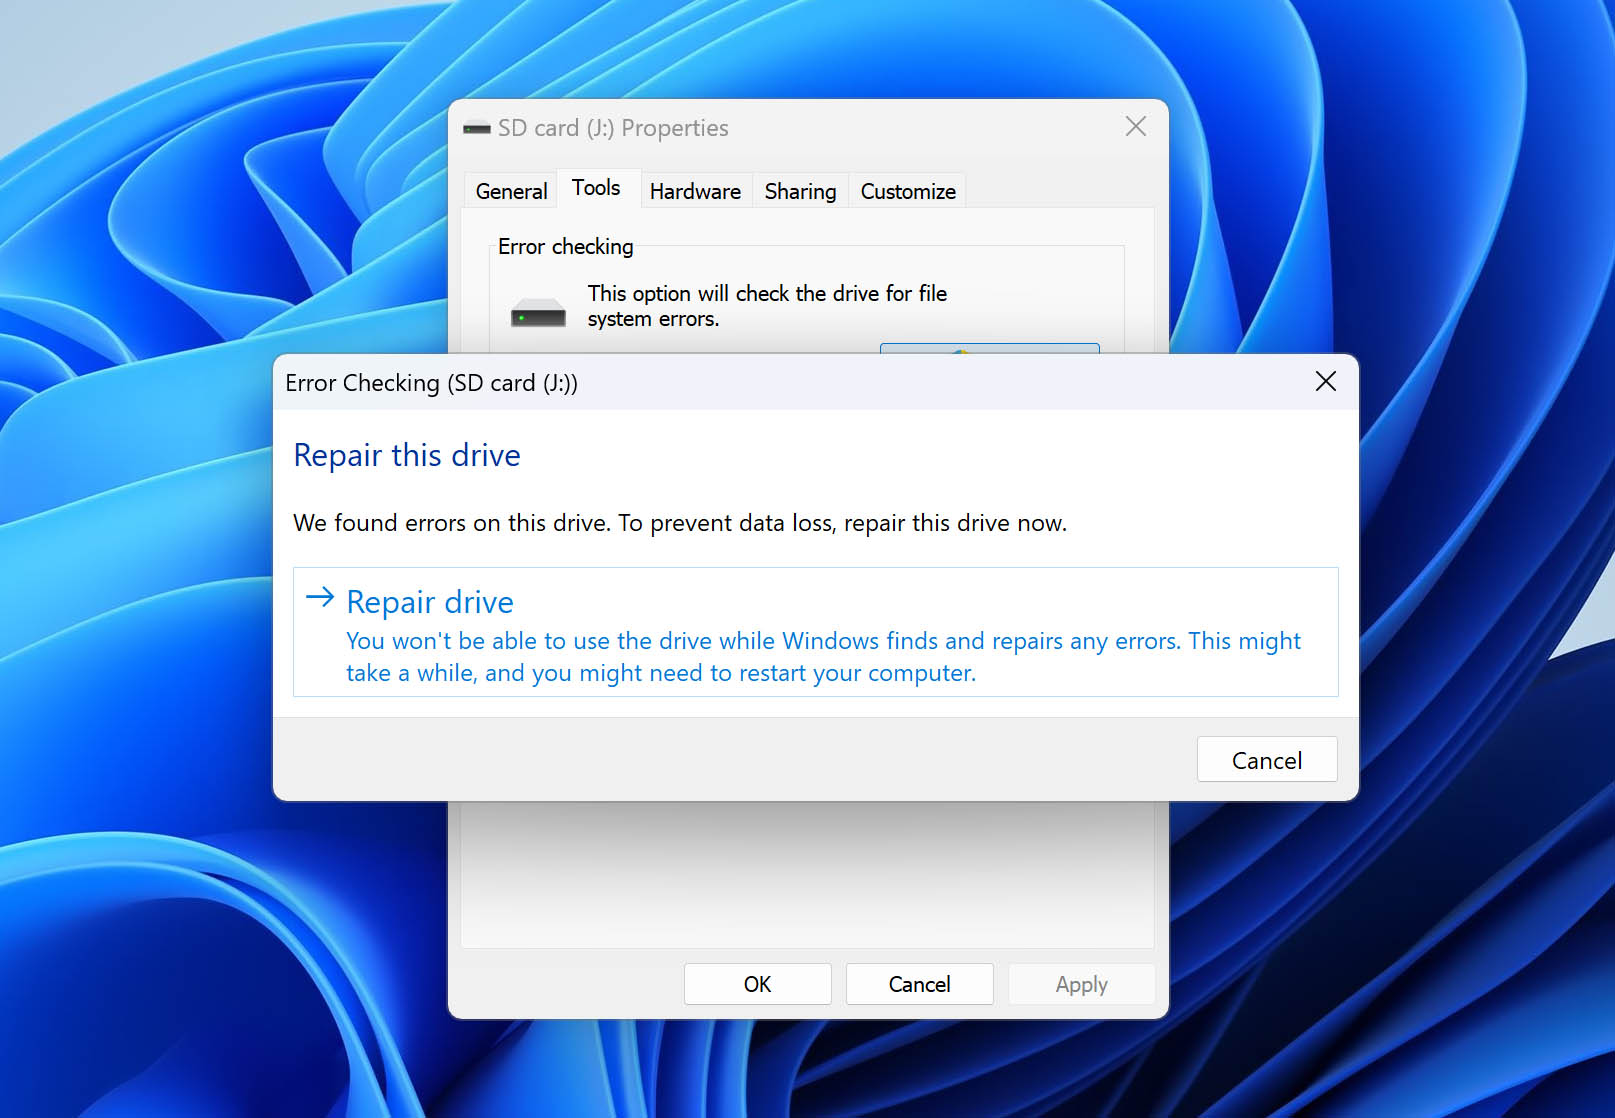
A Can’t Repair While In Use error message will appear if there is any unsaved file from the corrupted SD Card. You need to save and close it before you can proceed with the repair.
What we think about this method: This is CHKDSK with a GUI. If your SD card is visible in File Explorer and you don’t want to touch the command line, this is the easier option. Just like with CHKDSK, it’s only suitable for minor file system issues and should be used after your data is already safe.
Method 5: Repair the Partition Using a Third-Party Utility
If your SD card shows up as RAW or unallocated in Disk Management, there’s a good chance the partition table or boot sector is damaged. In situations like this, third-party utilities can sometimes repair the issue.
For this, we recommend using TestDisk. It’s a free, open-source tool that’s been around for years. It’s not flashy (it runs in a command-line-style window), but it works, and more importantly, it can fix partition structures without formatting your card.
TestDisk is powerful, but it’s not beginner-proof. If you use the wrong option or write changes to the wrong disk, you could make things worse instead of better. That’s why we strongly recommend creating a disk image first (and recovering your files) before using anything that modifies the card directly. We explained how to do that earlier in the guide.
Here’s how to repair an SD card without formatting it using TestDisk:
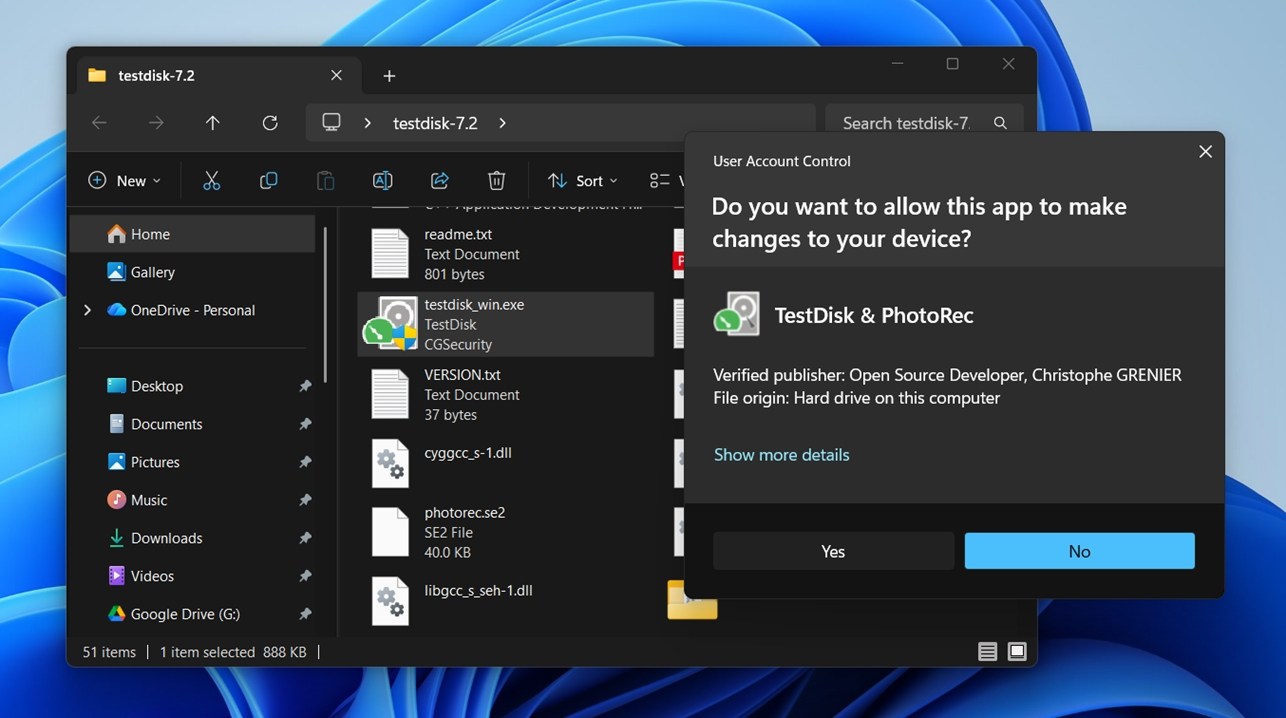
- Download TestDisk from its official website and extract the ZIP file.
- Inside the folder, run testdisk_win.exe – this will open a terminal-style window.
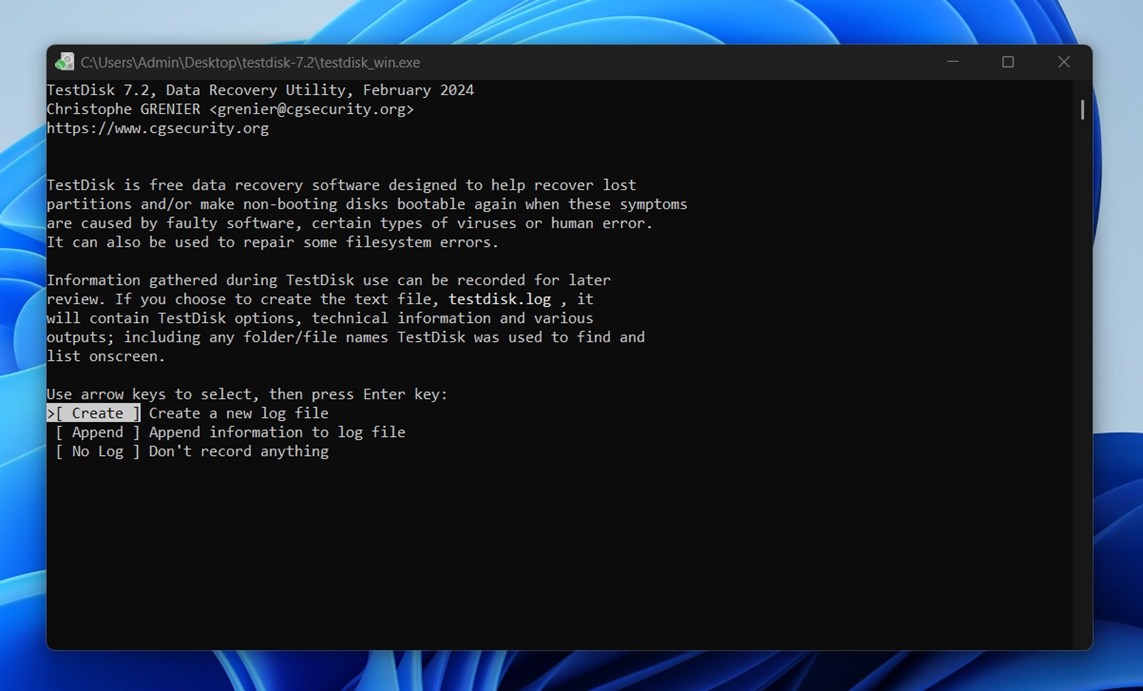
- When asked, choose Create to start a new log. You’ll then see a list of all connected drives.
- Use the arrow keys to pick your SD card – match it by size, then press Enter.
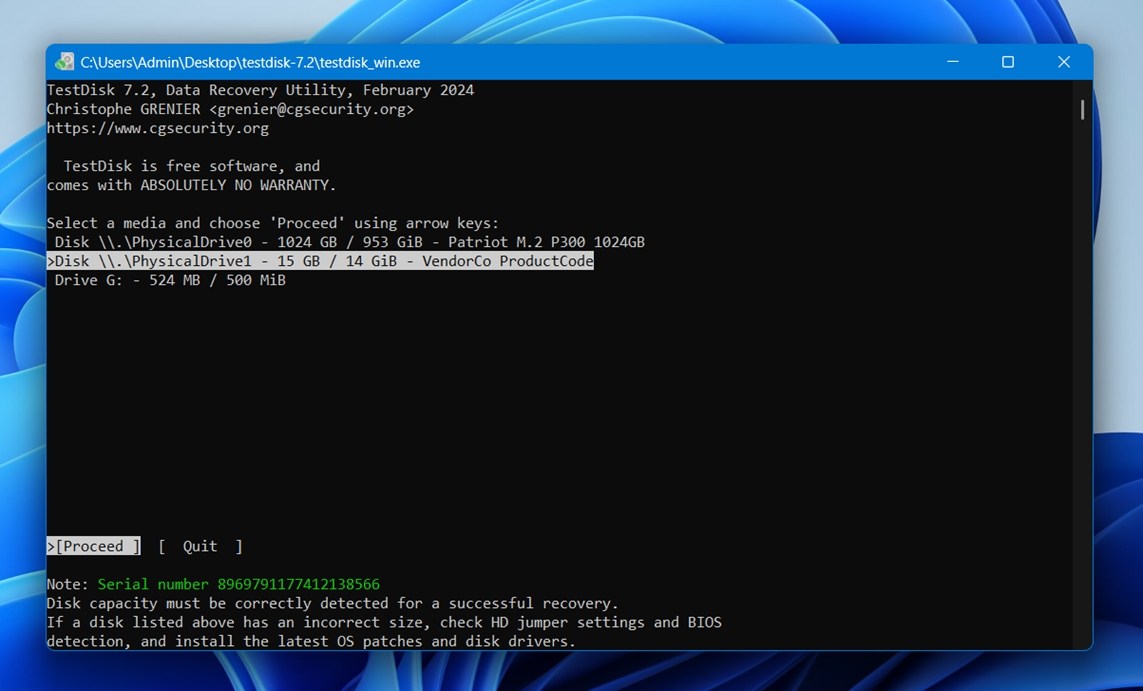
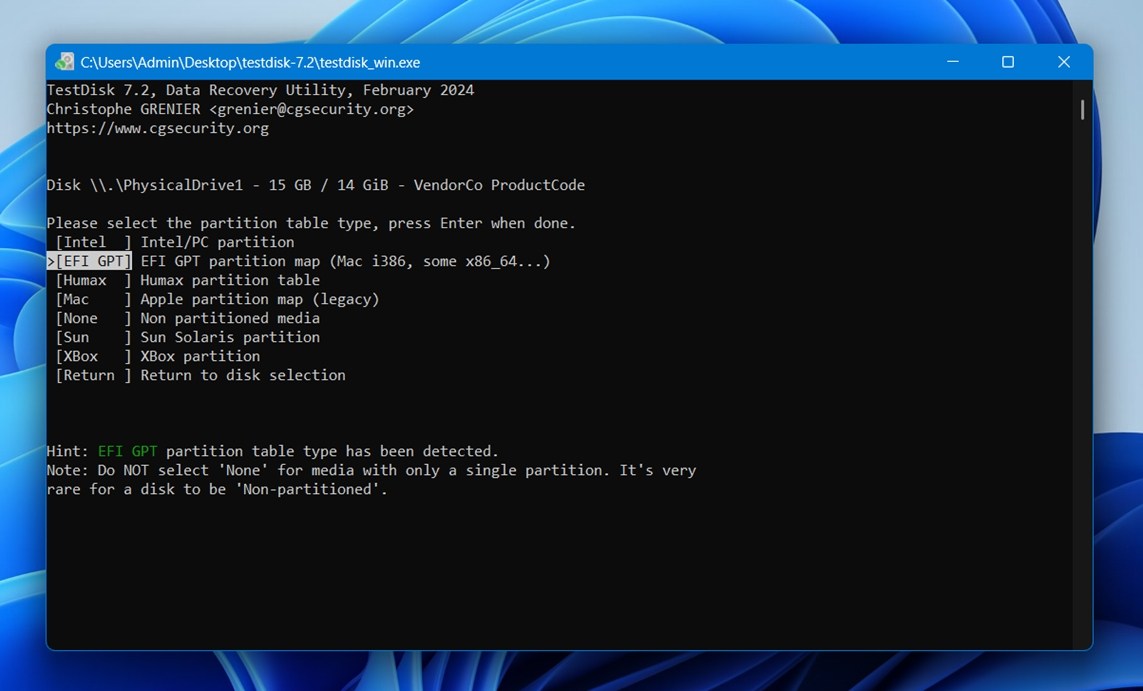
- TestDisk will ask about the partition table type. For most SD cards, the default option is correct. Accept it.
- Next, choose the Analyse option, then start a Quick Search.
 TestDisk will look for lost partitions. If it finds one, highlight it and press P to view the files. If your files are listed, the partition is recoverable.
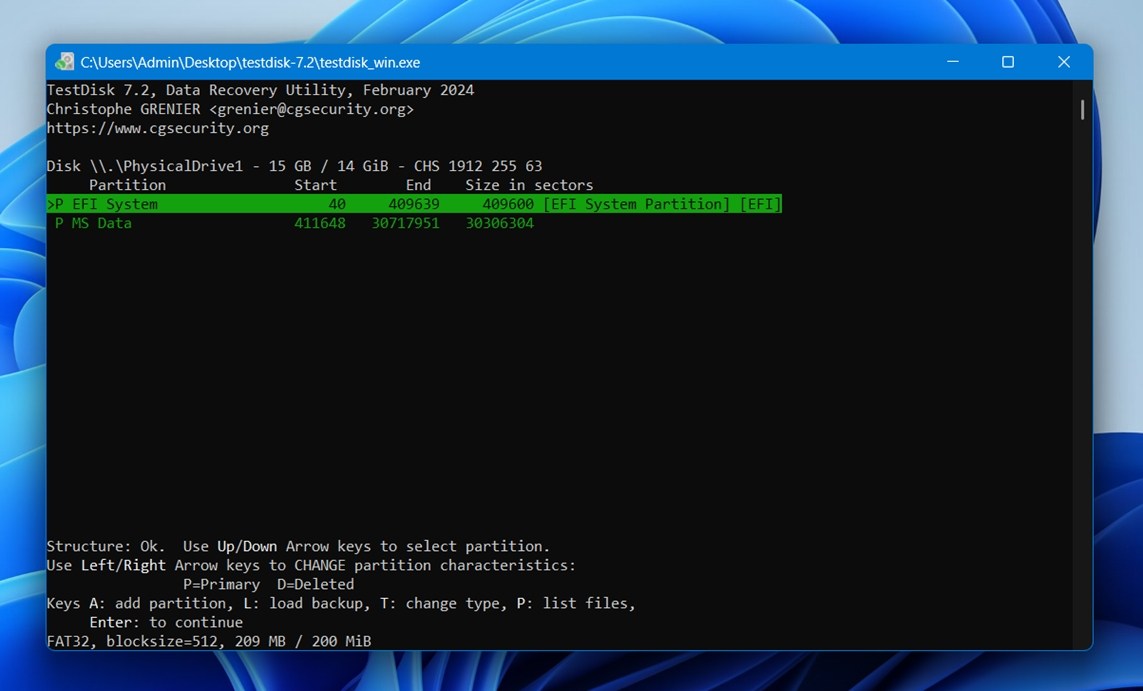
- Go back, mark the found partition as “Primary,” and select Write to update the partition table. Confirm the action when prompted.
- Once done, close TestDisk, safely remove your SD card, and plug it back in. If the repair worked, Windows should recognize it normally and show your files.
If TestDisk doesn’t find any valid partitions or says the file system is too damaged to recover, a full fix might not be possible. At that point, you may have to accept that the card needs to be formatted.
What we think about this method: We place this method last because it demands more from the user and isn’t a universal fix. Tools like TestDisk can be very effective when the problem is a damaged partition table or boot sector, but they don’t help in every scenario (and mistakes are easy to make). We see this as a targeted solution for people who are already familiar with disk and partition concepts.
When to Use a Recovery Lab
As we mentioned earlier, physical damage is also a real possibility with SD cards. If your card doesn’t show up at all, not in File Explorer, not in Disk Management, there’s a good chance it could be a controller failure, bad solder joints, or full hardware degradation.
So what can you do if you have important files on it and nothing works?
In that case, your best bet is a professional data recovery service. Yes, they can be expensive, and yes, they usually take time, but when the card is totally unreadable and the data matters, they’re often the only real option left.
If you’re not sure where to start, our team has reviewed some of the best SD card recovery services out there. These include well-known labs with good reputations, clean handling policies, and transparent pricing. But there are also many smaller or local options, and depending on where you live, a nearby lab might be able to help.
Here’s what we recommend looking for in a data recovery service:
- Free evaluation (you shouldn’t have to pay upfront to find out if your data is recoverable).
- No-recovery, no-fee policy (if they can’t get your data back, you don’t pay).
- Cleanroom facilities.
- Secure handling (you want encrypted delivery options, safe packaging instructions, and a written confidentiality policy).
Conclusion
If you skipped straight to the end, here’s the short version.
Yes, formatting your SD card can fix a lot of problems. It’s often the easiest solution, but not the only one. There are plenty of ways to repair an SD card without formatting, and in many cases, they work just as well without wiping your data.
Start with recovery. Back up the card if you can. Create a disk image. Run recovery software and get your data to a safe place. Once that’s done, then you can look into repairs: CHKDSK, TestDisk, whatever fits your case.
Not every SD card problem requires a full wipe. And the sooner you stop using the card and start thinking recovery-first, the better your chances of saving what’s on it.
If you still have questions, don’t forget – we have an active community where you can ask for help, share your situation, or browse what others have run into.
FAQ
How to recover files from a memory card without formatting?
To recover files from a memory card without formatting, we recommend that you do the following:
- Stop using the memory card until you’re ready to perform the next steps.
- Create a byte-to-byte backup (or image backup) of your memory card.
- Use data recovery software to restore data from the backup file.
The normal data recovery procedure is to scan the memory card directly using software; scanning a backup file instead prevents aggravating the existing issues on the memory card itself.
What’s the quickest SD card corrupted fix without formatting?
It depends on what’s actually wrong with the card.
If it’s something simple, like a missing drive letter, it can take just a few seconds to fix in Disk Management. But if the card has a damaged file system or a lost partition, things get more complicated. In those cases, you’ll likely need to recover your data first, then repair the card using a tool like TestDisk. That takes more time, especially if the SD card is large or the corruption is severe.
How to recover photos from an SD card without formatting?
To recover your deleted photos from an SD card without formatting it, use photo recovery software. These are special tools that can extract and rebuild data directly from the SD card’s file system, without having to format it.
How to fix a corrupted SD card without formatting on Android?
Here are ways you can recover a corrupted SD card without formatting using your Android:
- Update your Android device
- Unlock the write-protection on your SD card
- Clean your SD card, the card slot, and card reader
- Use an external card reader that fits the port of your Android device
If you have no choice but to format it, use data recovery software first to retrieve your files and back them up to a secure location.
How to fix my SD card without formatting when it's not detected?
If your SD card doesn’t show up in File Explorer, but does appear in Disk Management with the correct size, try the following:
- In Disk Management, right-click on the SD card volume and choose Change Drive Letter and Paths. Click Add (or Change, if it already has one), pick a letter, and hit OK. Sometimes Windows just forgets to mount it properly.
- Run a quick CHKDSK scan (after backing up or imaging).
- If the card shows as RAW or unallocated, TestDisk might detect a lost partition and restore it. Ideally, after you’ve recovered your data or made a disk image.
If the SD card doesn’t appear in Disk Management at all, and you’ve already tried basic steps like using a different card reader, USB port, or checking the contacts, then it may be a case of controller failure or physical damage. In that situation, your best option is a professional data recovery service.
How to format a corrupted SD card on Android?
You don’t need a computer to format an SD card; you can do it straight from your Android mobile phone. Here’s how:
- Go to Settings > Device Care
- Select Storage
- Tap Advanced
- Under Portable storage, select your SD card. Then, tap on the three-dot icon.
- Select Format
- Tap Format SD card to confirm the process
Is there any reliable SD card repair tool?
Yes! We recently wrote about the best SD card repair tools on the market, considering their cost, performance, and user ratings.
This article was written by Alejandro Santos, a Staff Writer at Handy Recovery Advisor. It was recently updated by Roman Demian. It was also verified for technical accuracy by Andrey Vasilyev, our editorial advisor.
Curious about our content creation process? Take a look at our Editor Guidelines.