
Recovering CCTV footage is a relatively simple task, depending on how quickly you act and how old the surveillance video was. Nonetheless, it’s crucial to know how to recover overwritten CCTV footage safely and quickly because of how important it is for enterprises and home users alike. In the sections below, we’ll take you through the overwritten CCTV file recovery process, as well as the factors that affect the success rate of the process.
Can You Retrieve Overwritten CCTV Footage?
Yes, it’s possible to recover overwritten CCTV footage, but you should act quickly to maximize the success rate of the recovery process. The best way to retrieve overwritten CCTV footage, is to use a good data recovery app to scan the storage drive that contained the surveillance videos.
The data loss itself can be caused by various factors such as logical corruption of the drive, storage drive failure, malware, and accidental deletion. Most CCTV camera systems use a digital video recorder (DVR) device that receives and stores footage from the actual camera. DVR systems automatically delete videos that are older than a certain date (depending on how the system is configured). This helps the system manage storage space more efficiently.
Due to how DVRs work, the data recovery chances depend on how soon you begin the data recovery process as. Additionally, it’s always recommended that you regularly back up old videos to a different storage device or the cloud, for easier recovery.
The storage drive itself will affect the CCTV overwritten data recovery process too. While most systems use an HDD, or a memory card to store the footage, some also store it on SSDs. It’s tricker to recover data from SSDs because of a feature called TRIM.
In case of physical damage, it’s highly recommended that you contact a professional data recovery service to recover your files. Attempting DIY overwritten CCTV file recovery, in this case, can exacerbate the damage.
How to Recover Overwritten CCTV Footage
As mentioned earlier, the best way to recovery overwritten CCTV footage, is to use a video recovery program. Naturally, you should use a good CCTV data recovery software to do this, keeping in mind the importance of CCTV footage.
In our tutorial, we’ll use Disk Drill Data Recovery, a highly capable CCTV and DVR data recovery software. Not only does it support all major storage device types like HDDs, SD cards, SSDs, and USB drives, it also recognizes CCTV video formats such as AVI, MOV, FLV, and more. Disk Drill is also compatible with all major file systems that include NTFS, FAT32, HFS+, EXT2, and EXT3, among others.
Windows users can take advantage of Disk Drill’s free trial that lets them recover up to 500 MB of data at no cost.
To recover overwritten CCTV footage using Disk Drill, you first need to create a disk image of the storage drive and then scan it for missing data. Here is how to do this:
Step 1. Create a Byte-to-Byte Backup Using Disk Drill
A byte-to-byte backup ensures that no more overwriting of data will take place on the storage device. The backup is essentially a soft copy of the entire hard disk or storage device. After creating it, you can connect the drive back to the DVR, because you can scan the disk image instead of the physical hard drive.
To create a disk image using Disk Drill, follow these steps:
- Download Disk Drill and install it.
- Connect the drive that contained the CCTV footage to your computer.
- Open Disk Drill and click the Drive Backup option in the left navigation pane.
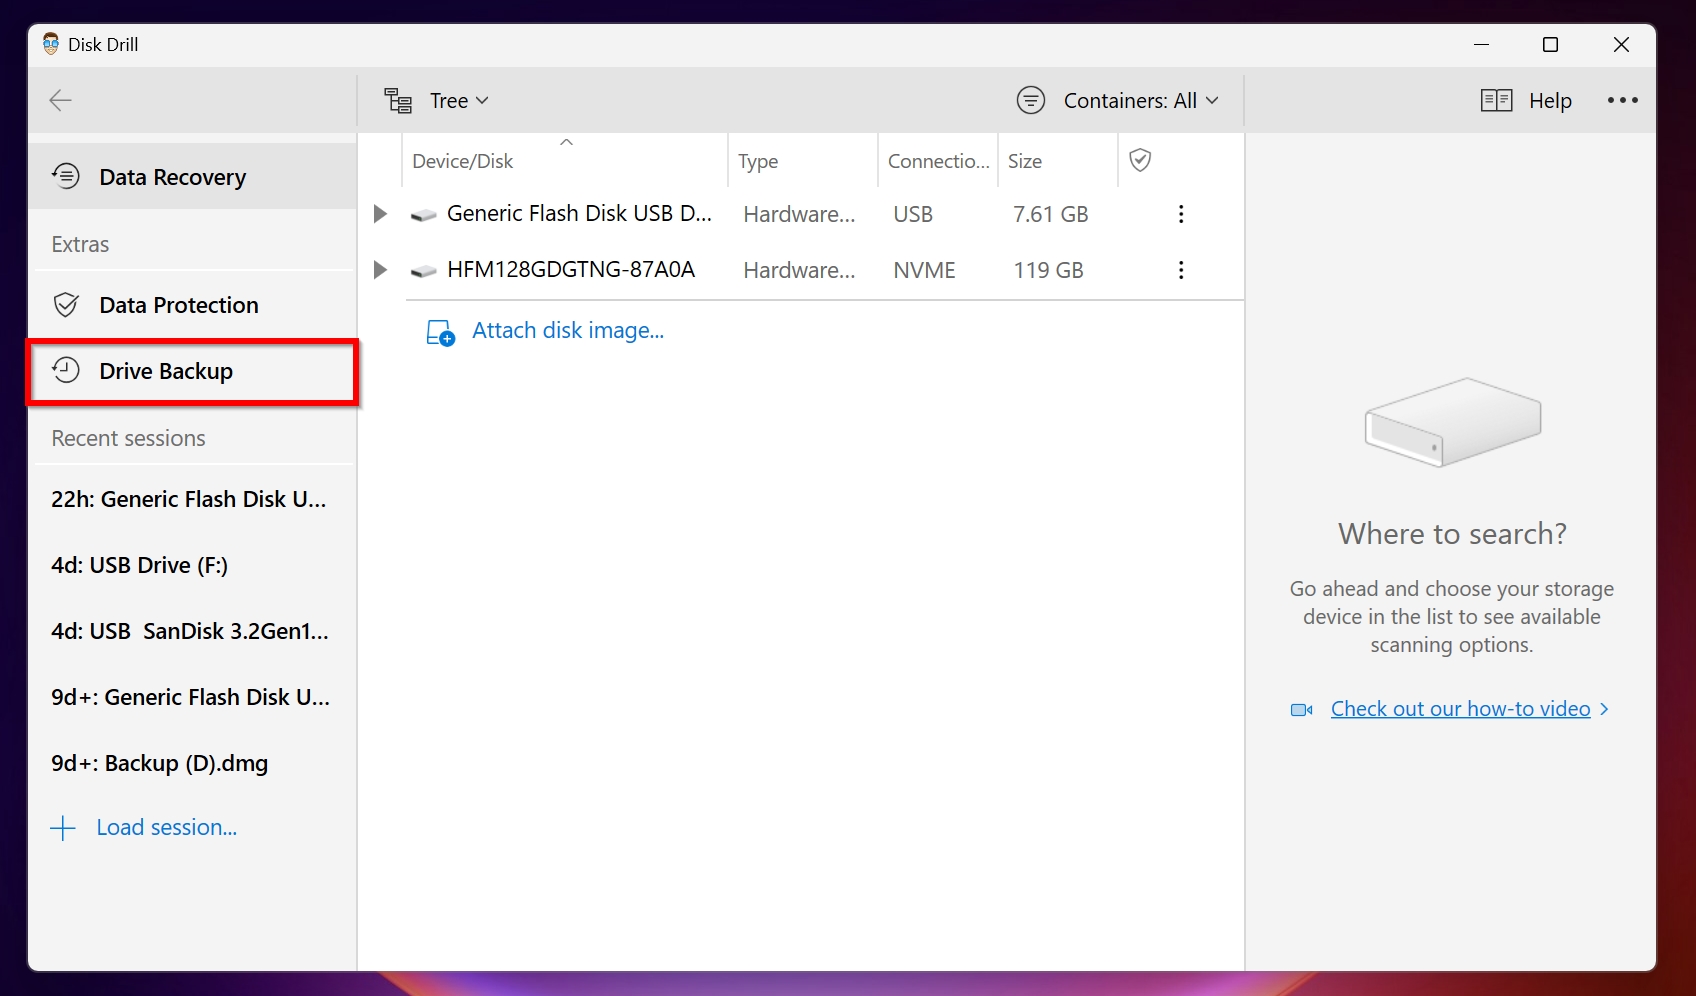
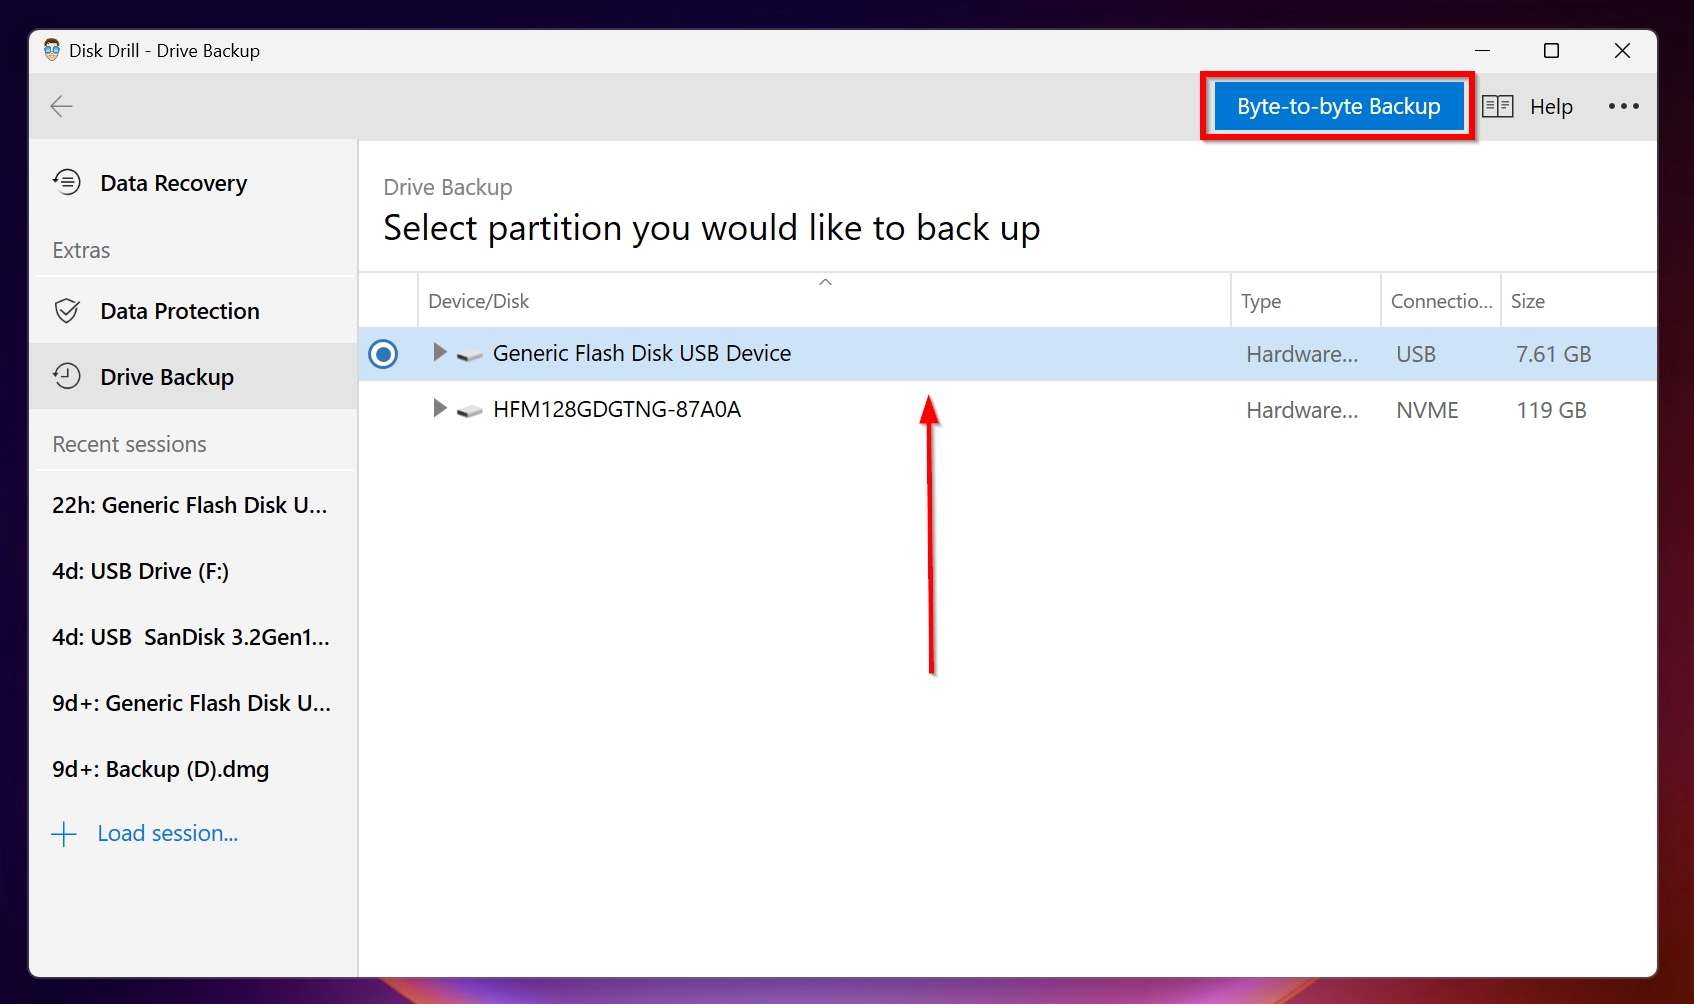
- Select the relevant storage device and click Byte-to-byte backup.
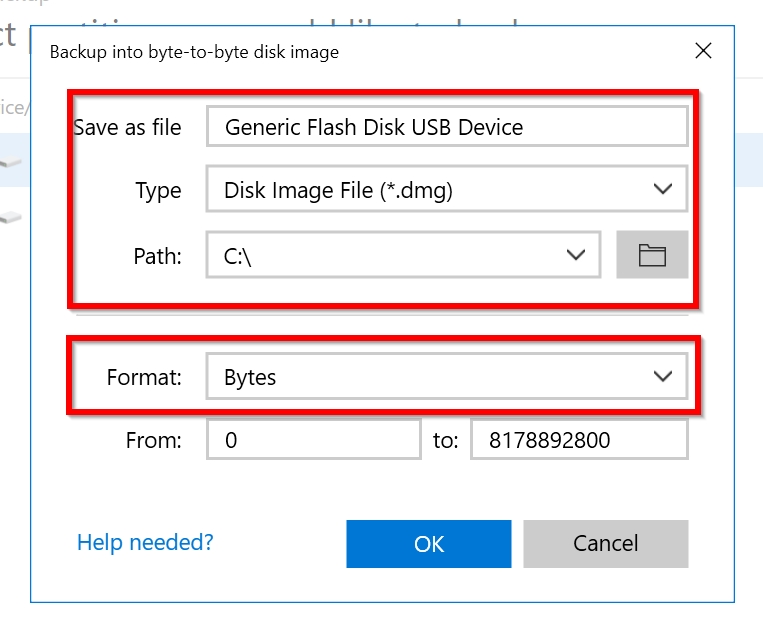
- Choose a destination to save the disk image. Ensure that you have free storage space on your PC equivalent to the size of the CCTV footage drive. Click OK.
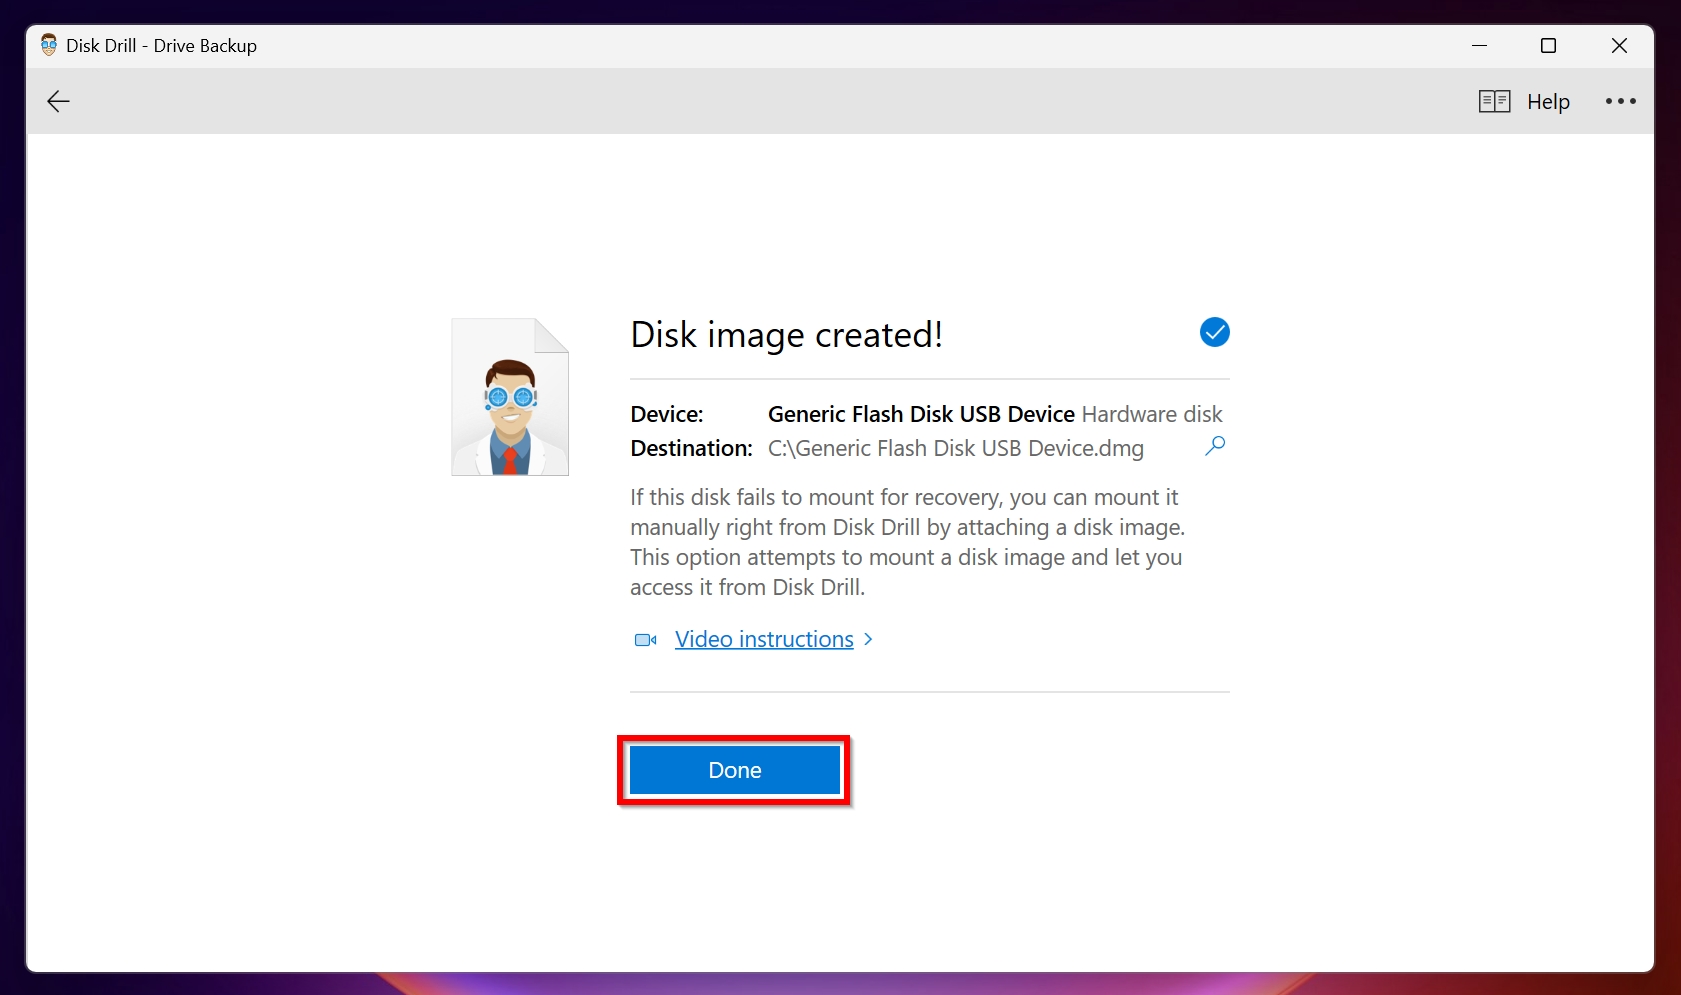
- Disk Drill will create the disk image. The process may take time, depending on the size of the drive as well as your computer’s specs.
Step 2. Scan the Disk Image Using Disk Drill
Now, we’ll use Disk Drill to scan the disk image (created in the previous step), to retrieve the overwritten CCTV footage:
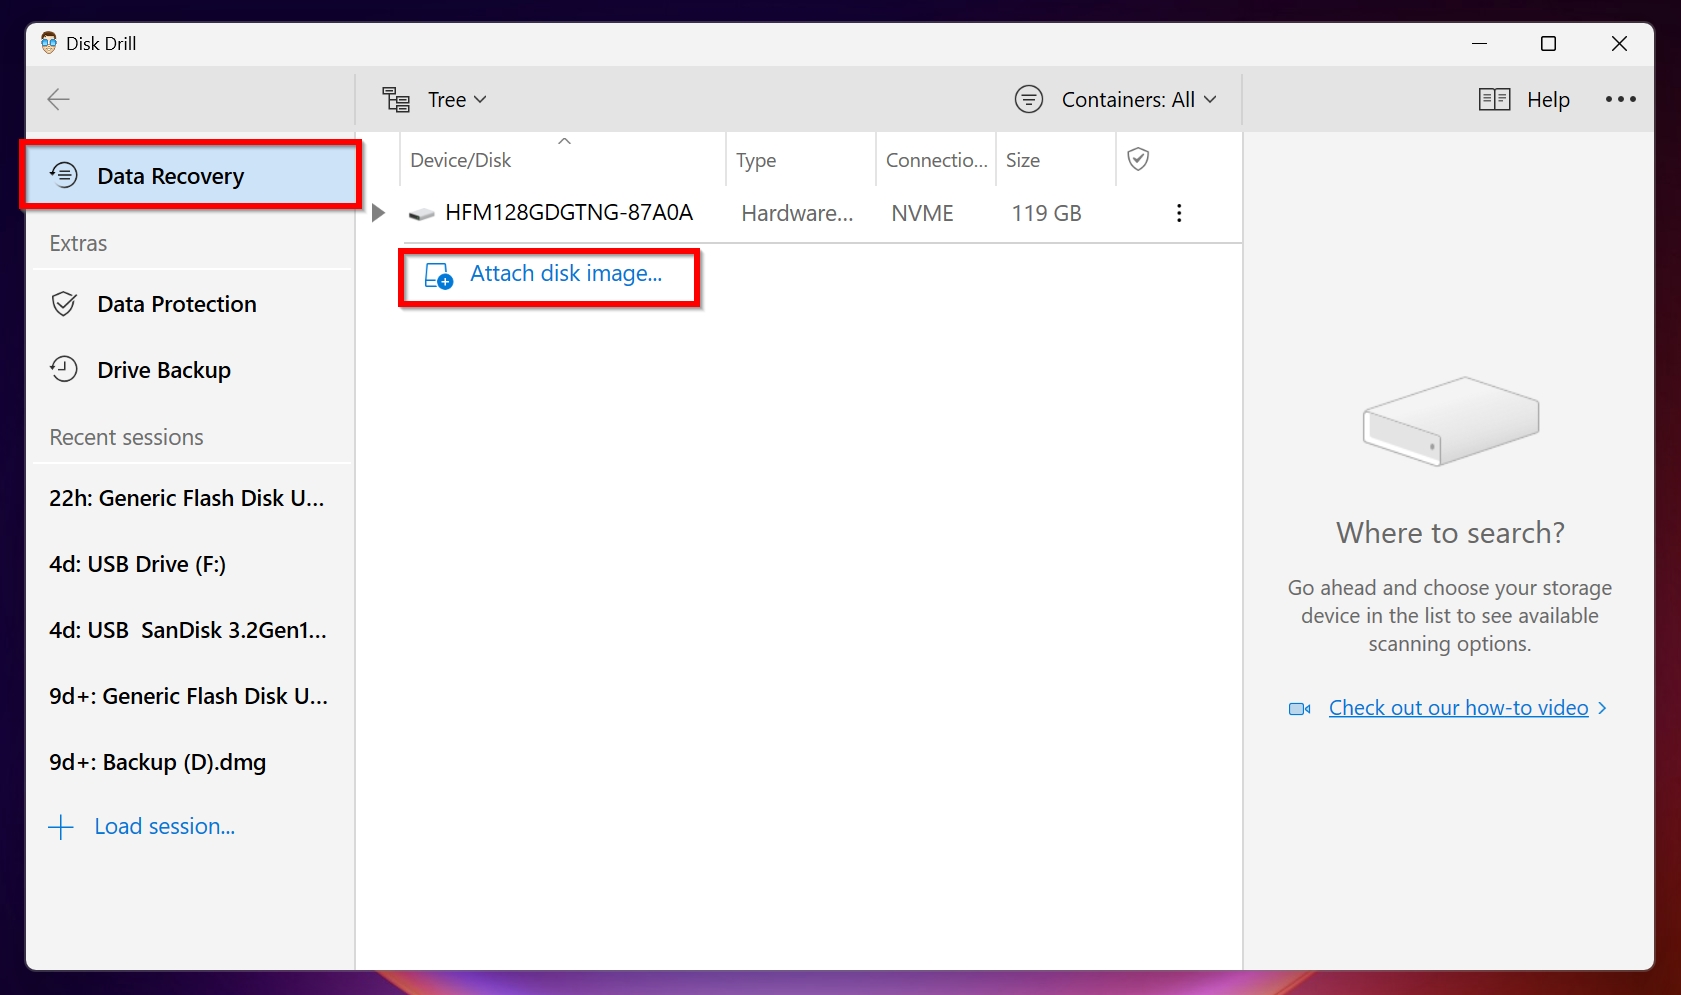
- Open Disk Drill, and ensure you’re on the Data Recovery tab. Click on Attach disk image and browse for the disk image you had created.
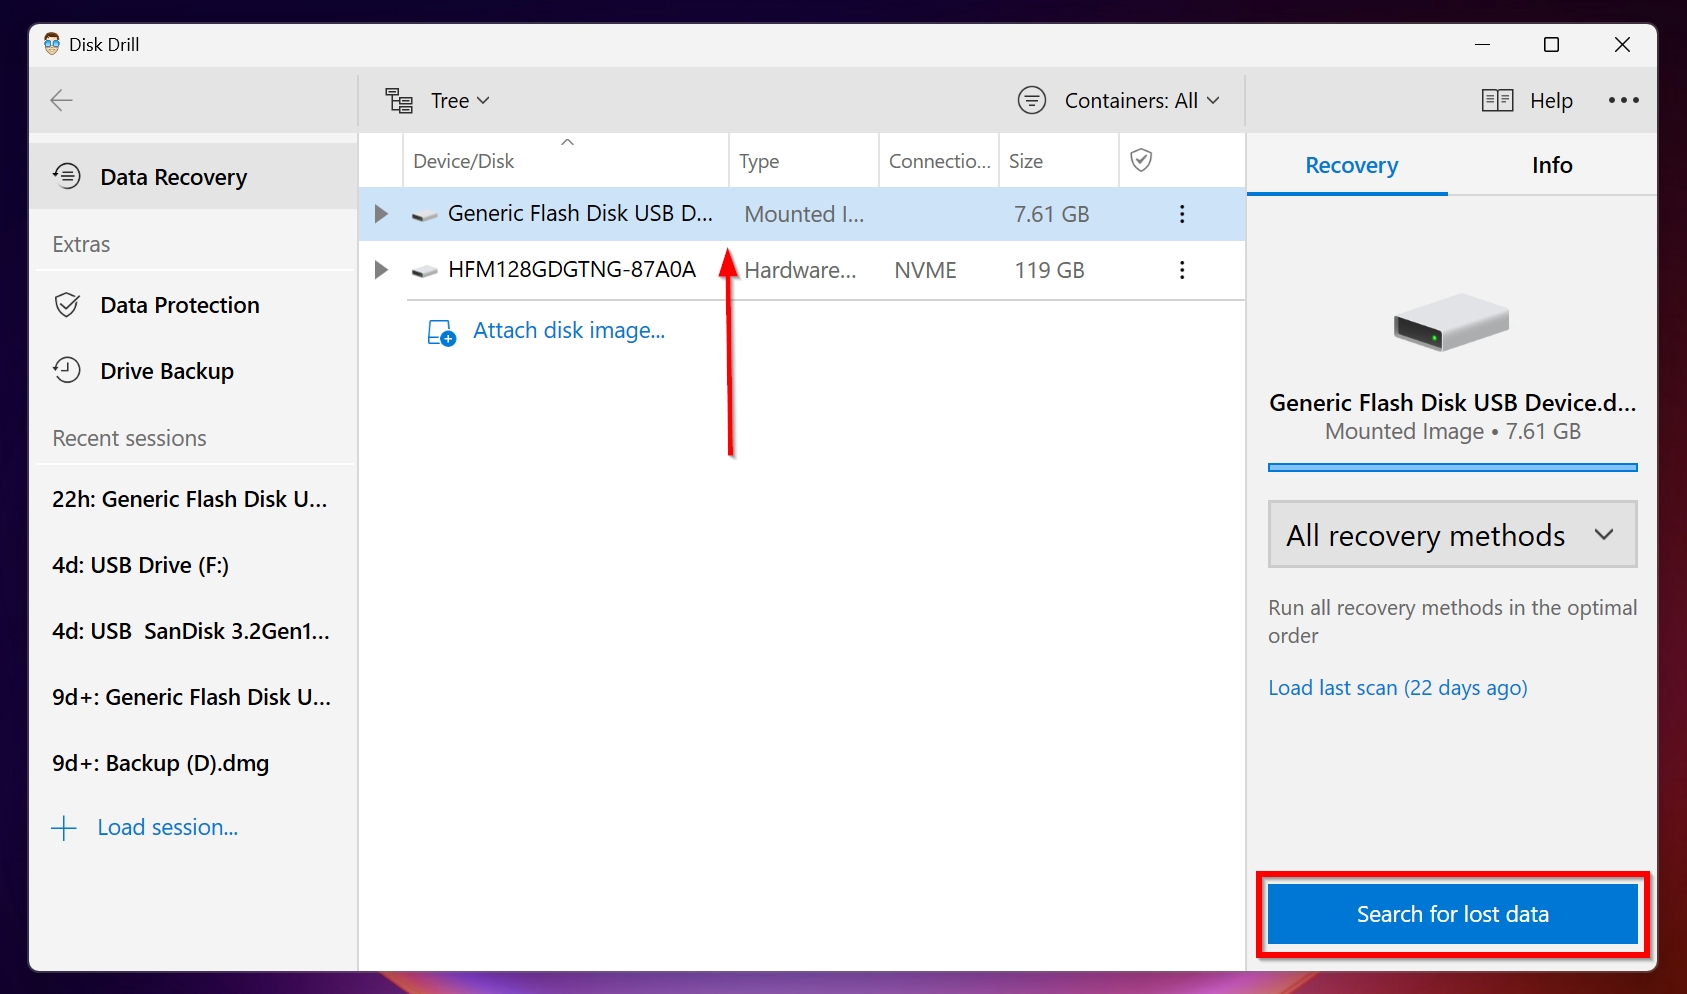
- The disk image will show up as a regular storage device on Disk Drill. Select it and click Search for lost data.
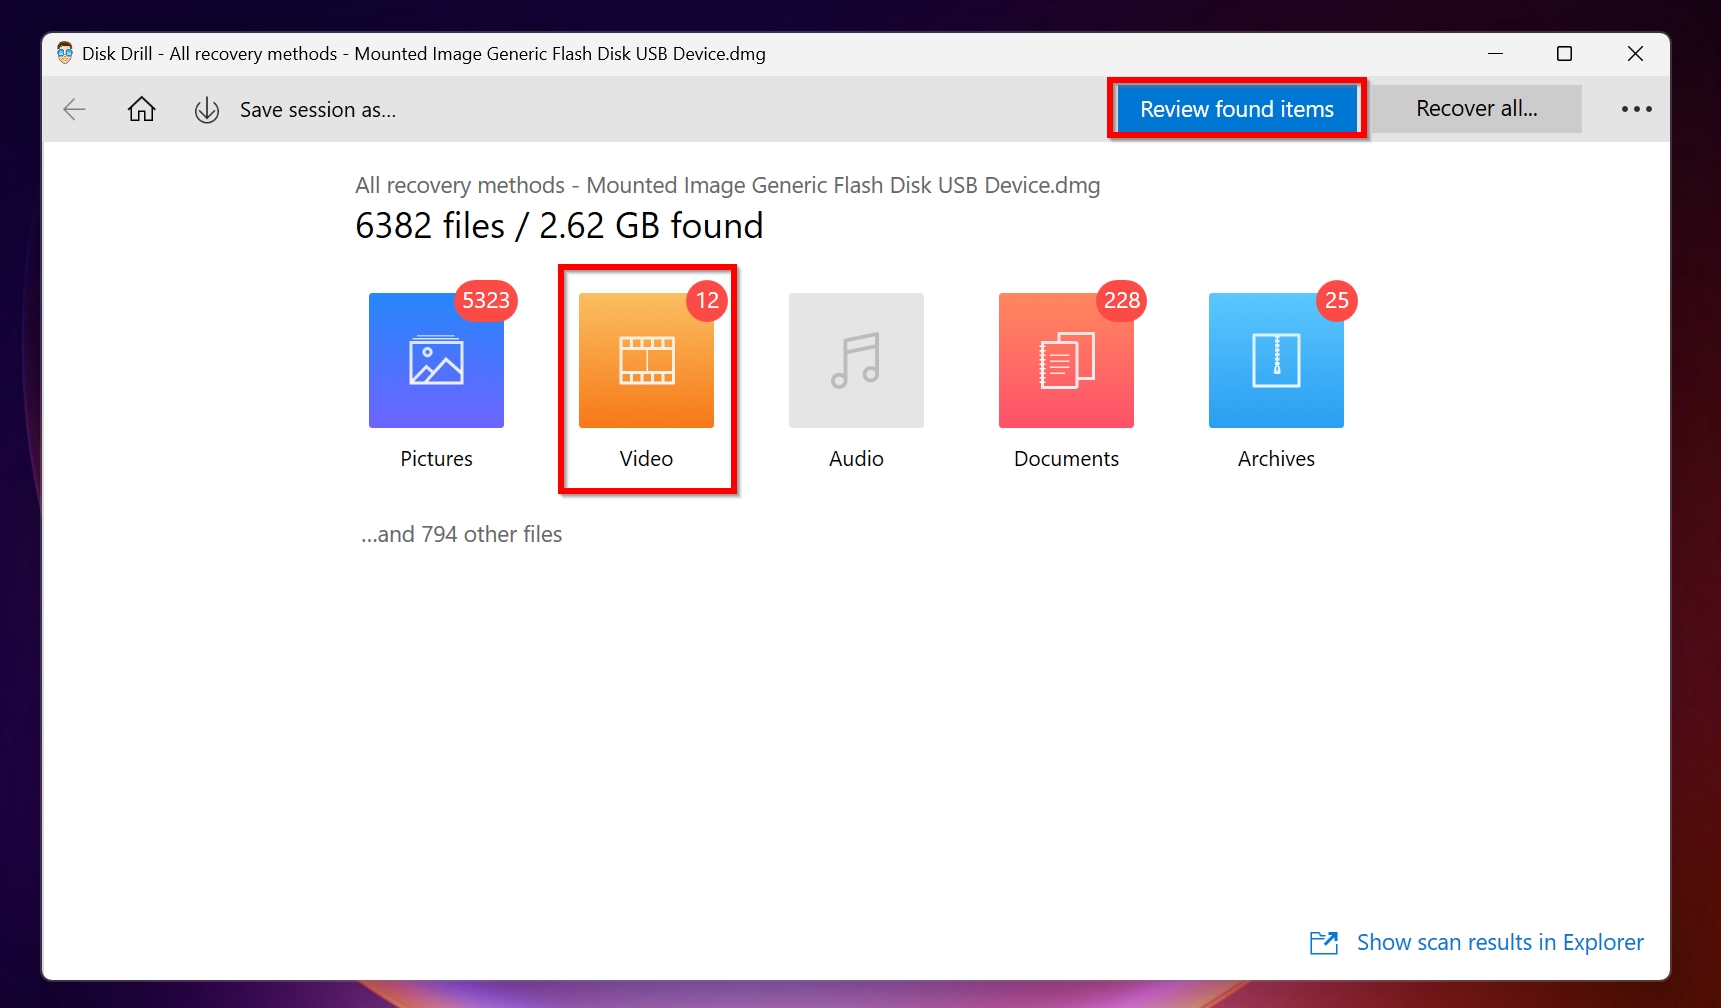
- On the next screen, click Review found items to view all types of recoverable data, or simply click on Video to only view video files.
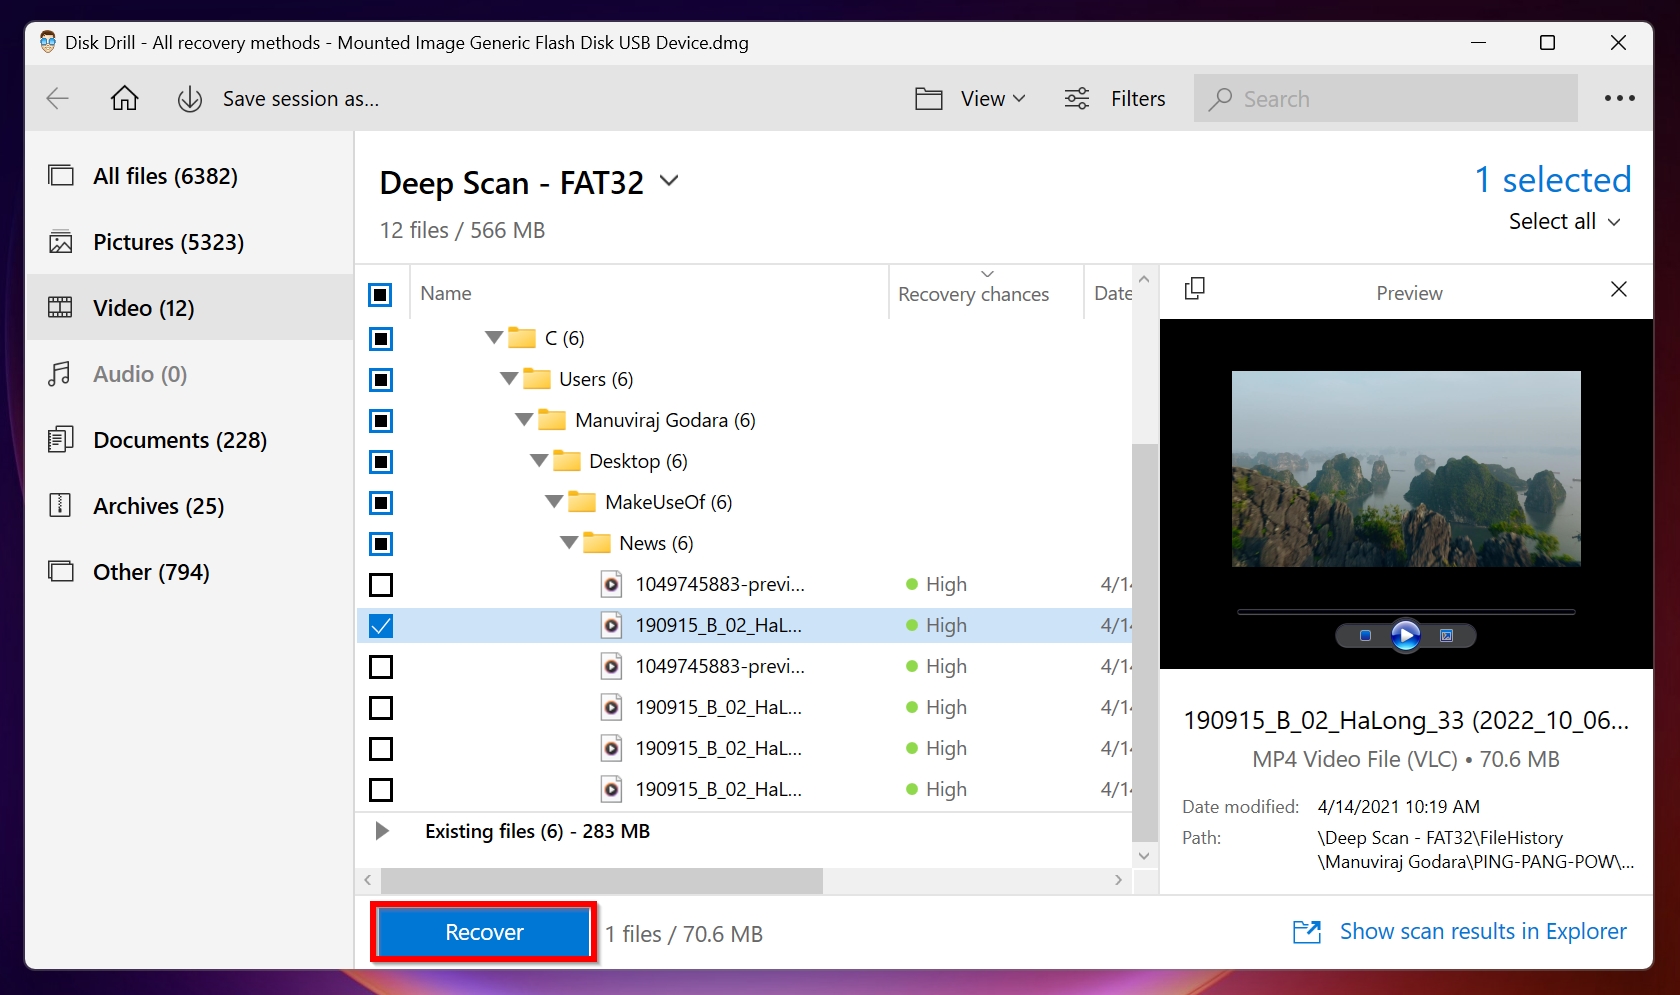
- Disk Drill will display a list of recoverable files. Here, double-click on a file to preview it. You can select a file using the checkbox next to it. Once you’ve selected the overwritten CCTV videos you want to retrieve, click on Recover.
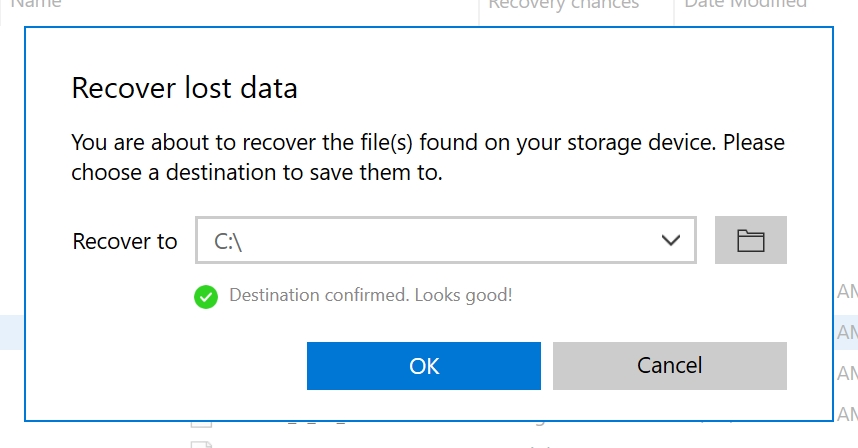
- Select a recovery destination for the files and then click OK.
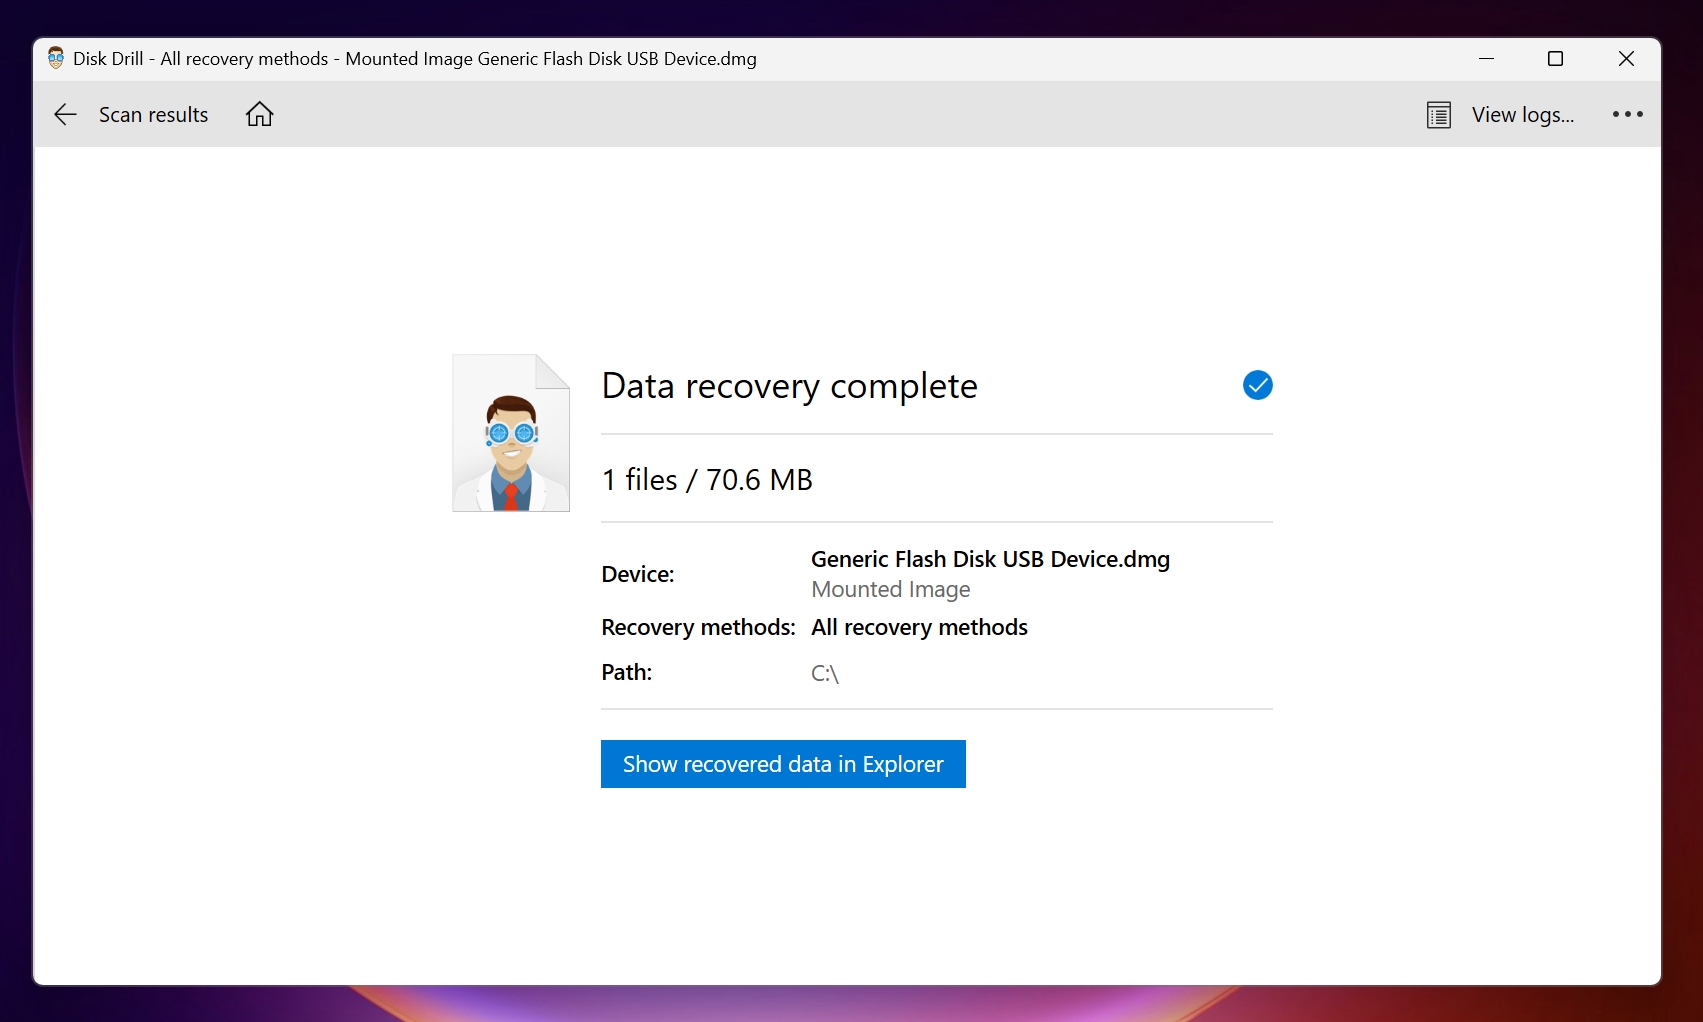
- Disk Drill will recover the selected files.
FAQ
Is it possible to recover overwritten CCTV Footage?
Yes, it’s absolutely possible to recover overwritten CCTV footage. But, you need to act quickly to prevent further permanent overwriting of the data, and use a good data recovery program to scan the drive.
How do I recover overwritten CCTV footage from my DVR?
Here is an easy guide on how to recover overwritten CCTV footage from your DVR:
- Download and install Disk Drill.
- Connect the CCTV drive to your PC.
- Open Disk Drill, select the drive and click Search for lost data.
- Click on Review found items.
- Select the required overwritten videos and click Recover.
- Select a recovery destination and click OK.
Can I recover old CCTV footage?
Yes, you can easily recover old CCTV footage using a good data recovery program like Disk Drill. If there is physical damage to the drive, it’s better to make use of a professional data recovery service.
Besides Disk Drill, here are some other programs you can use to recover old CCTV footage:
- Recuva (Windows)
- Wondershare Recoverit (Windows & Mac)
- Stellar Data Recovery (Windows & Mac)
- TestDisk (Windows, Mac, and Linux)
Does CCTV footage get deleted automatically?
Old CCTV footage gets deleted automatically to make space for the newest recordings. Thus, it’s best to regularly backup old surveillance videos.
Conclusion
Quick action combined with the use of a good data recovery program ensures that you can safely recover overwritten CCTV footage. But, it’s still best to regularly back up your old CCTV footage to another external storage drive.
This article was written by Manuviraj Godara, a Staff Writer at Handy Recovery Advisor. It was also verified for technical accuracy by Andrey Vasilyev, our editorial advisor.
Curious about our content creation process? Take a look at our Editor Guidelines.