
Photos disappeared from Mac? There are a couple of reasons this could happen, ranging from faulty updates to data overwrites to something as simple as forgetting to turn on iCloud. And depending on what caused your photos to go missing, there are multiple solutions we can try.
This article walks you through all possible methods to recover photos that disappeared from your Mac. These methods work with the latest macOS Ventura release, but we also successfully tested them with Monterey and Big Sur. We provided screenshots and step-by-step instructions so you don’t get lost along the way. Read on!
Check If Your iCloud Photos is Turned On
iCloud is Apple’s proprietary cloud storage service that not only serves as a backup tool but also syncs your data across all of your devices (that are signed into iCloud). If photos from your iPhone or iPad are missing on your Mac or vice versa, you may have turned off iCloud sync.
To turn it on, log in with your Apple ID on your Mac. Open the Photos app (Finder > Applications > Photos) and enable iCloud Photos in the settings window.
If you want to recover your photos using iCloud, log into iCloud.com. Click Photos > Recently Deleted album and select the photos you want to recover. Then, click Recover.
How to Recover Permanently Disappeared Photos From Mac
In cases where your lost photos seem to have gone permanently missing (such as deleting them from Finder and then from the Trash folder), we’ll need to use a special tool called data recovery software to restore them. This tool can extract data directly from your drive’s file system even if they don’t show up in Finder.
For this article, we’ll be using Disk Drill. It’s powerful yet beginner-friendly, and it’s excellent at restoring missing pictures as it supports most common image file types such as JPG, PNG, GIF, and even professional graphics like PSD or AI. It also recognizes RAW image files that manufacturers use like CR2 and CR3 (Canon RAW), GPR and 360 (GoPro RAW), DCR (Kodak RAW), NEF and NRW (Nikon Raw), CinemaDNG (Blackmagic RAW), and many more.
And even if your disk is formatted or corrupted, Disk Drill will still work. Here’s how to use Disk Drill to restore pictures that disappeared from Mac:
If you want more information on Disk Drill before trying it yourself, you can read our full Disk Drill review. If you want to read about the macOS version of Disk Drill specifically, you can find some helpful reviews here and here.
- Download and install Disk Drill for Mac.
- If you’re restoring data from your system drive, we suggest launching Disk Drill from recovery mode. If you’re restoring photos from an external drive, skip to step 3. To enter recovery mode, reboot your Mac and immediately press and hold Command + R as it boots. Then, click Utilities > Terminal, type the following command, and hit Return: sh <(curl http://www.cleverfiles.com/bootmode/boot4.xml) You should be able to proceed with Disk Drill as normal.
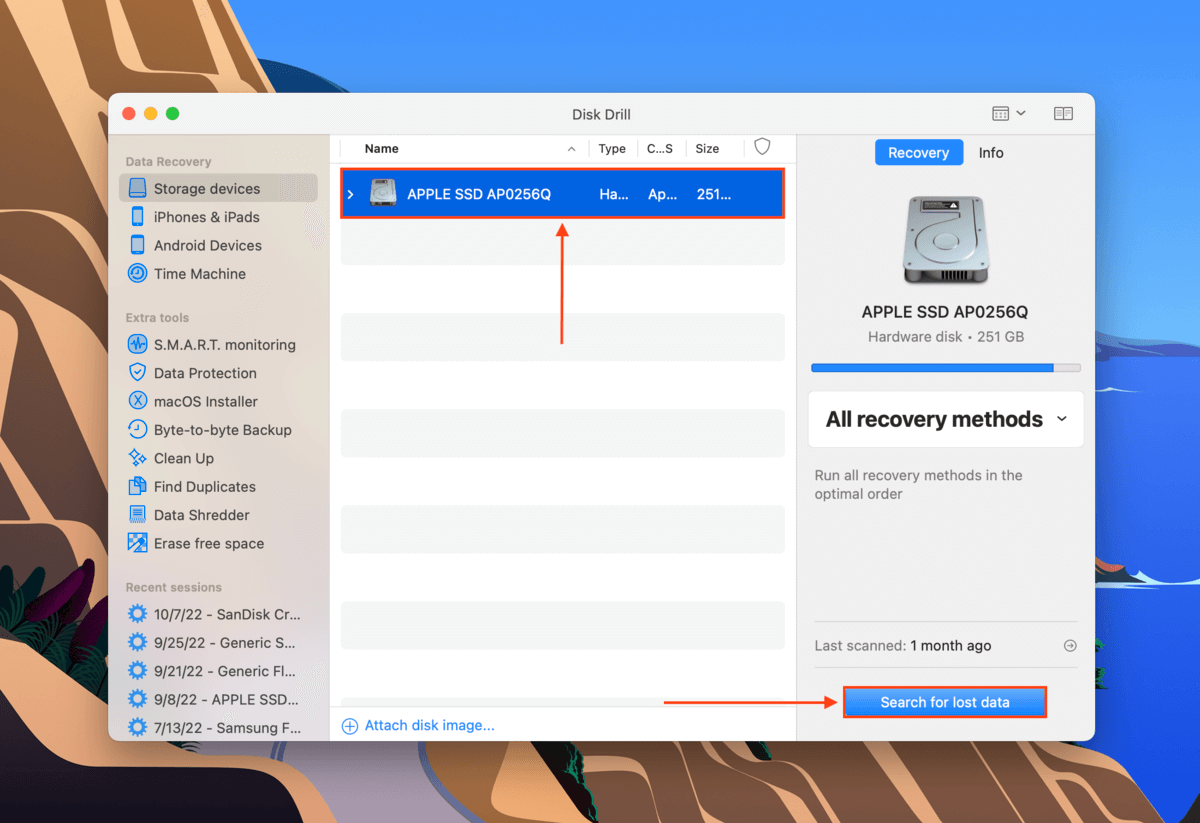
- Launch Disk Drill and select the drive that contains your missing photos. Then, click Search for lost data.
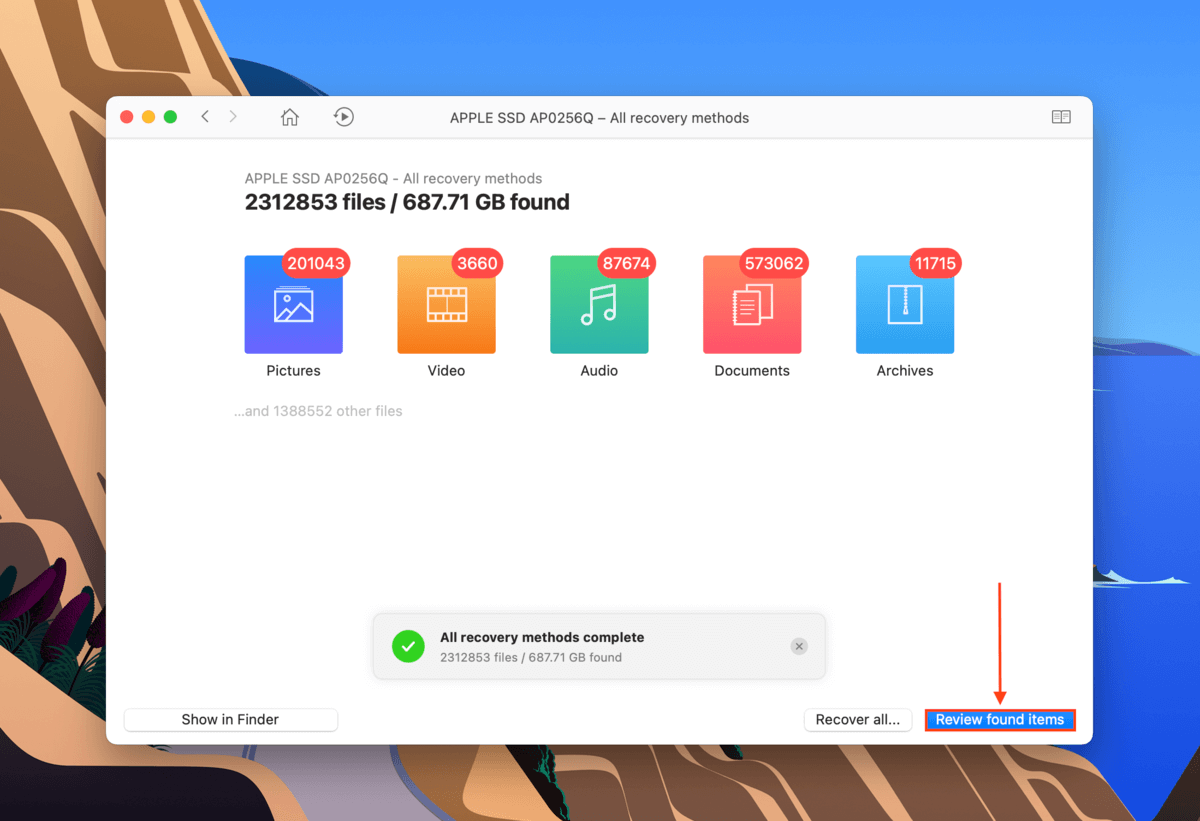
- Once the scan is complete, click Review found items.
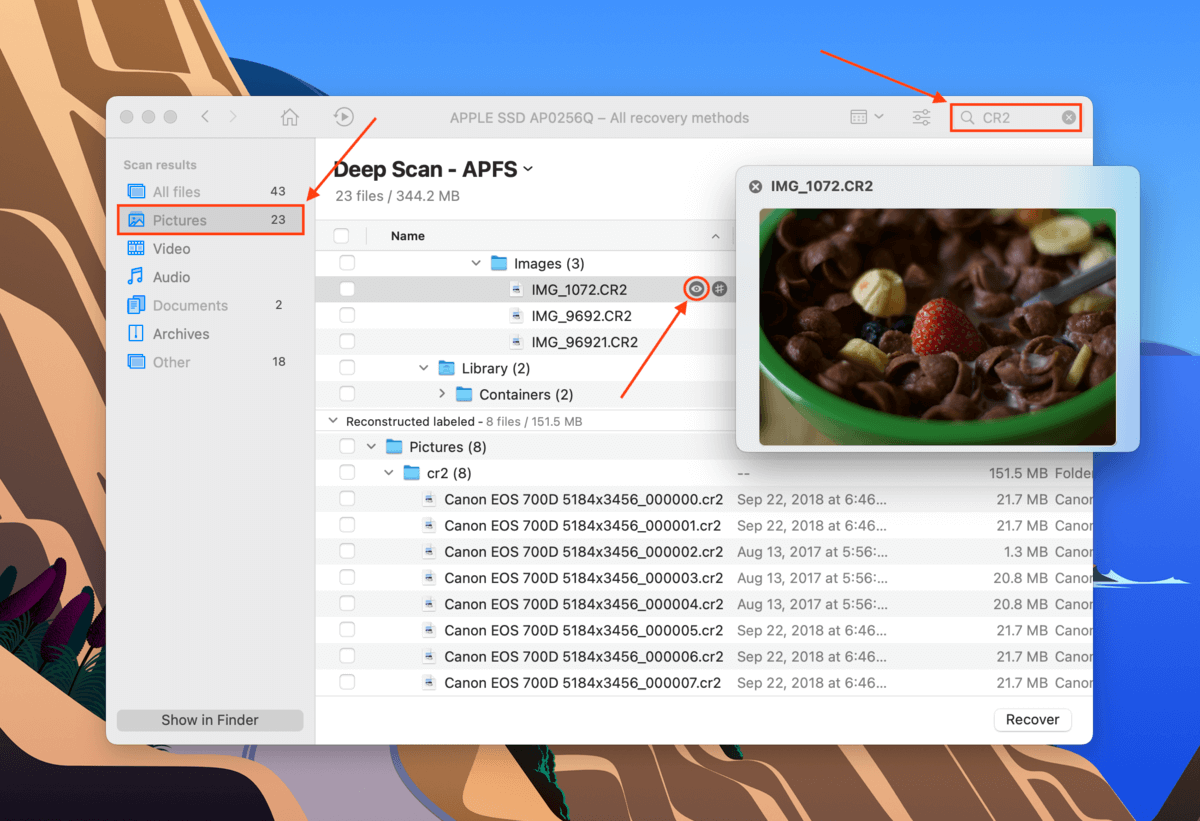
- If it can, Disk Drill restores original folder structure as well. If you want to restore files from Trash, you can try locating the Trash folder by following the folder tree. Or you can use the search bar and sidebar to quickly find the photos you want to restore. You can also preview them by hovering your mouse pointer beside each file name and clicking the eye button that appears.
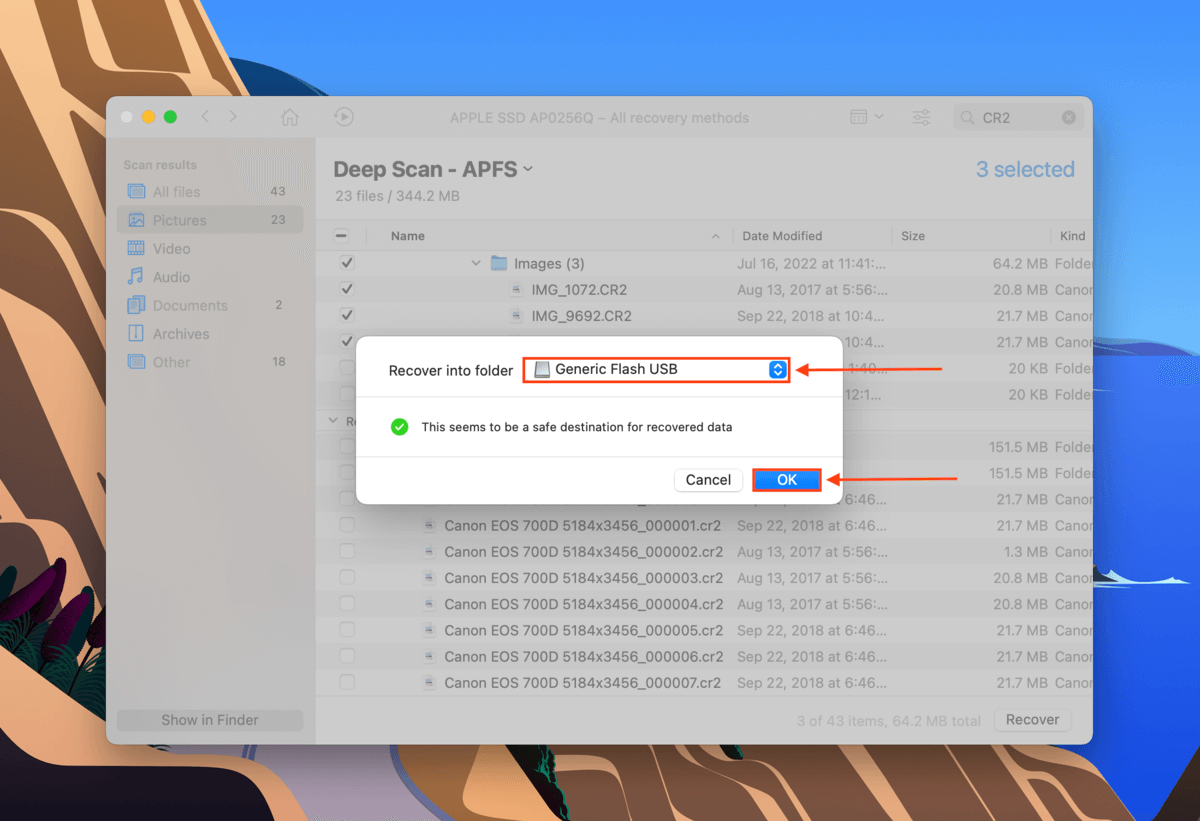
- Tick the boxes beside the files you want to restore. Then, click Recover.
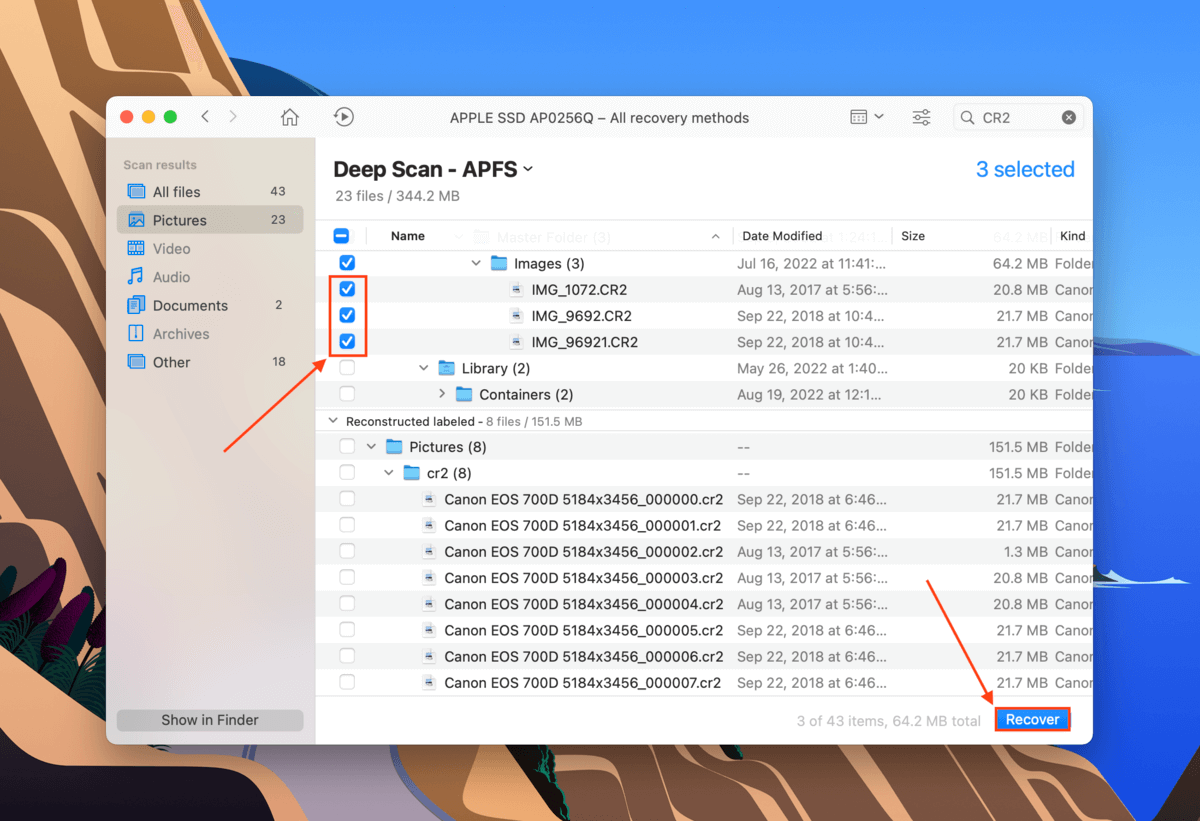
- Select a location where you want Disk Drill to save your data. We highly suggest restoring your files to a different drive to avoid overwriting your data. Then, click OK to recover your deleted photos.
Disk Drill Basic for Mac does not offer free data recovery, but you can preview as many files as you want. Free photo recovery software exist, but they all have their own limitations. Manage your expectations.
How to Recover Photos Disappeared From Mac
There are some cases where data recovery software may not be necessary. In such cases, your photos may have just been hidden or your photo library might have gotten corrupted. Below are step-by-step instructions to address all possible causes of disappearing photos on Mac.
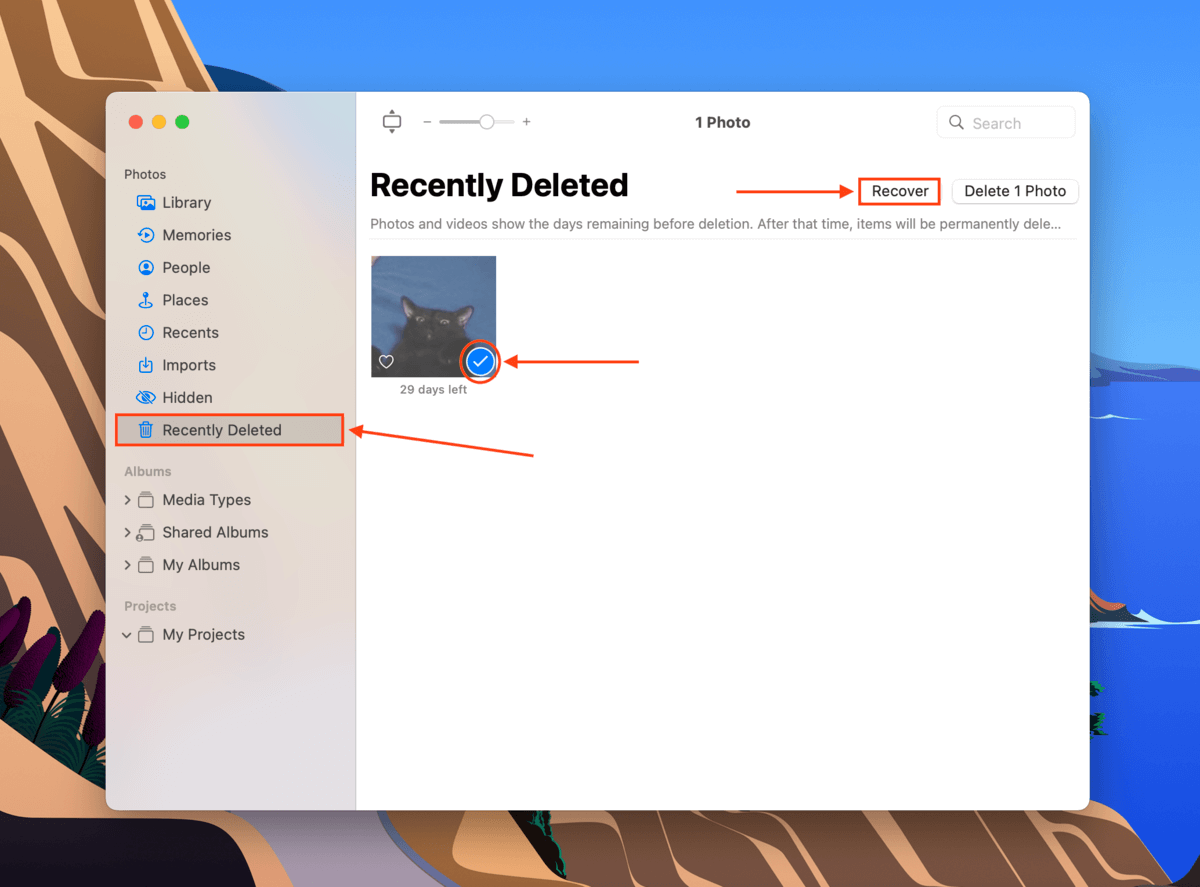
Step #1: Check the Recently Deleted Album
Accidental deletion happens often, which is why the Photos app has a Recently Deleted album where you can recover deleted screenshots, photos, and other images within 30 days after deletion. After the 30-day period, any photos in that album are permanently deleted and you’ll need data recovery software to get them back.
If you still haven’t gone over the 30-day limit, restoring your photos from the Recently Deleted album is easy. Launch the Photos app (Finder > Applications) and click Recently Deleted in the left sidebar. Select the images you want to restore, then click Recover. The images should now be viewable in their previous albums.
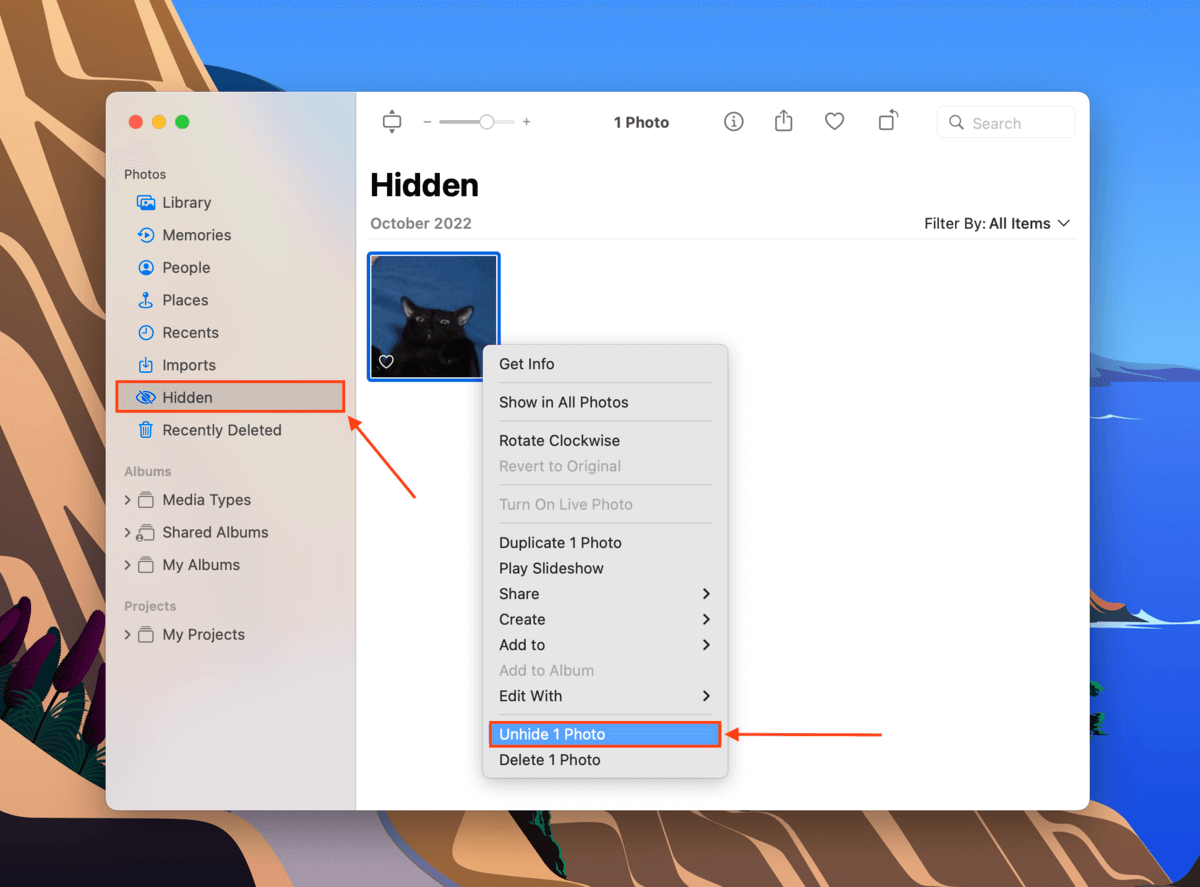
Step #2: Unhide Your Hidden Album
If your photos disappeared from your MacBook Pro and you’re sure you didn’t delete them, it’s also possible that you hid them by mistake. And if you enabled iCloud Photos, you can hide your photos on one device and have that change reflected across all your devices that are logged into iCloud.
To unhide your photos, launch the Photos app (Finder > Applications) and click View > Show Hidden Photo Album, which makes this album accessible in the left sidebar. Click it, then right-click the photos you want to recover and click Unhide.
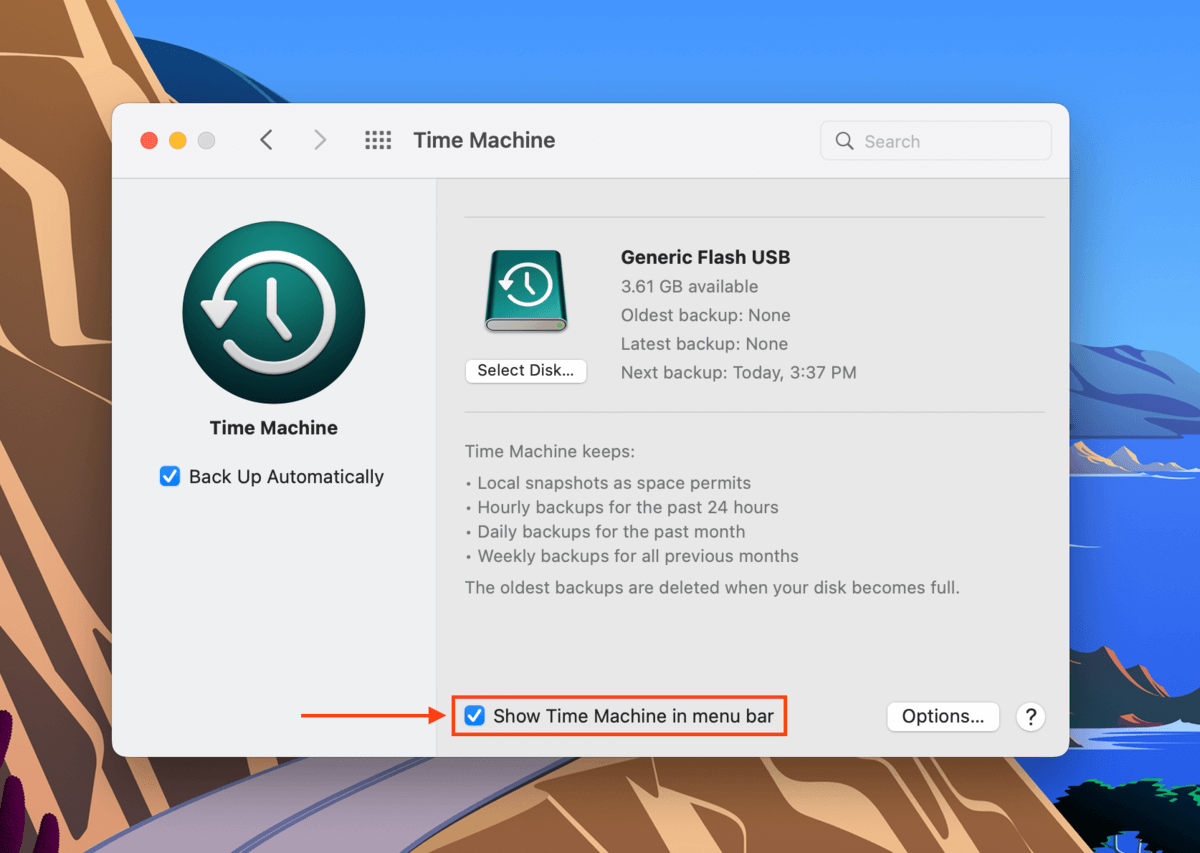
Step #3: Restore Photos & Videos From the Time Machine Backup
Time Machine is a macOS backup utility that stores “snapshots” or previous versions of your files and folders, including your photos. When you restore data from a Time Machine backup, your files will be replaced in the location they were stored before they went missing. Aside from data recovery software, this is the best method to recover photos that disappeared from Mac after an update. Here’s how to do it:
This step requires that you enabled Time Machine before your photos went missing.
- Close the Photos app and connect your Time Machine backup drive to your Mac.
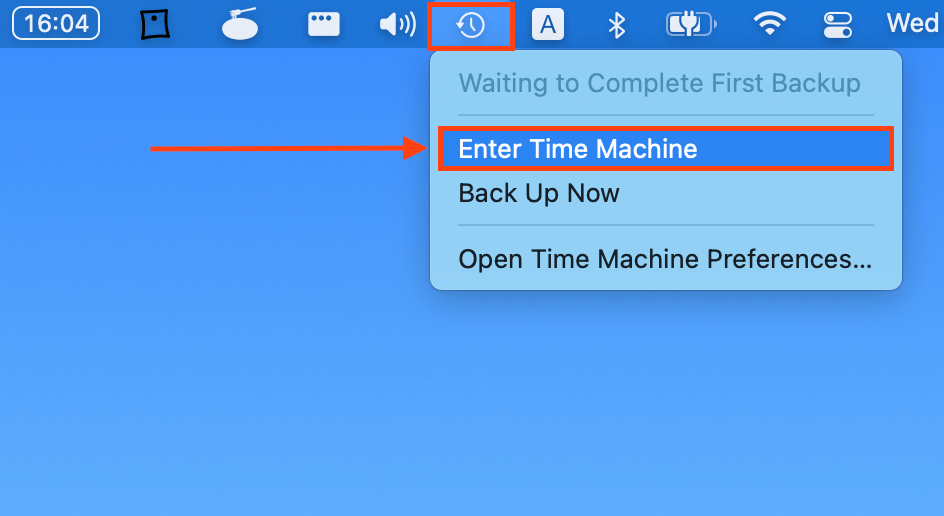
- Open the Time Machine settings window (System Preferences > Time Machine) and tick the box beside the Show Time Machine in menu bar setting.
- Open the folder that previously stored your photos. If your photo library disappeared on your Mac, you can open /Users/”your username”/Pictures/ in Finder (this is also the default photos location on Mac). If you want to restore your iCloud Photo Library, open the iCloud folder in Finder. Then, click the Time Machine button > Enter Time Machine in the Apple menu bar.
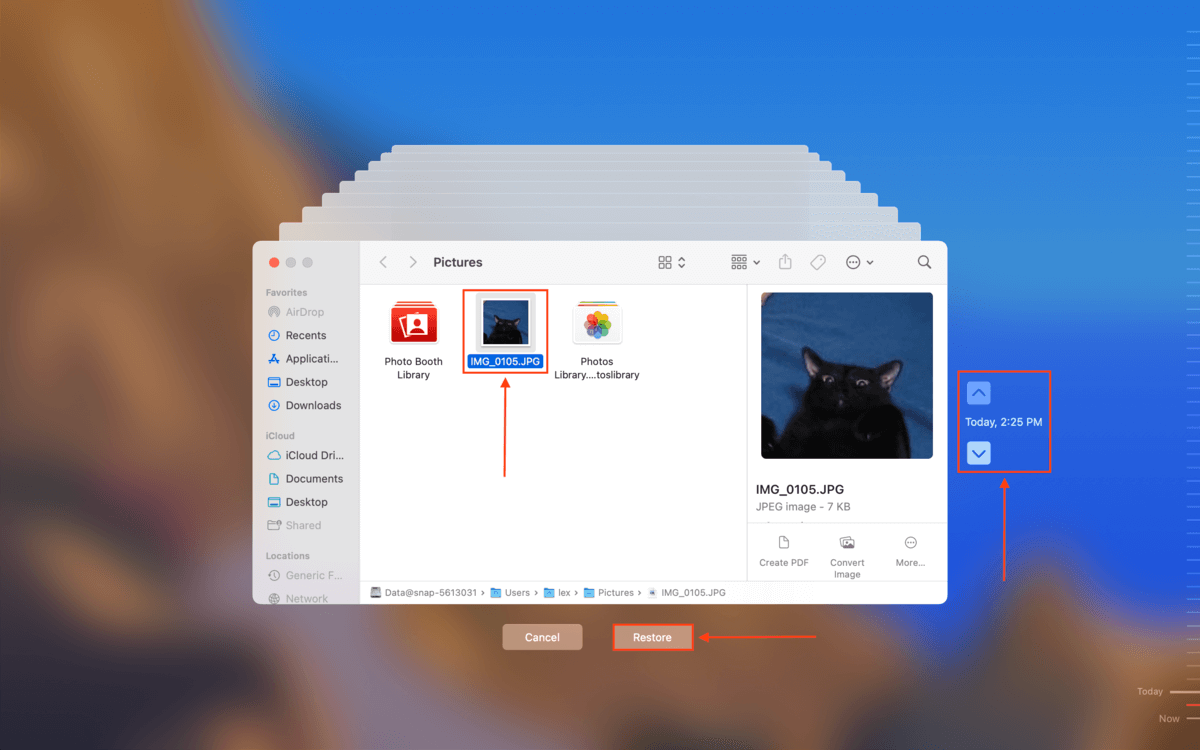
- Use the arrows on the right of the screen to browse through your snapshots. Select the photos or photo library you want to recover and click Restore. Once the process is complete, you should find your recovered photos in their original location.
Step #4: Perform a Repair of Photo Library
The Photo library is a database that stores your photos. On the other hand, the Photo app is a tool that pulls your photos from the database and makes them viewable to you. When the photo library is corrupted, you may find that your pictures disappeared from your MacBook. Fortunately, the Photos app has a built-in repair tool that may help restore your missing images.
Before you attempt to repair your photo library, we highly suggest creating a Time Machine backup first!
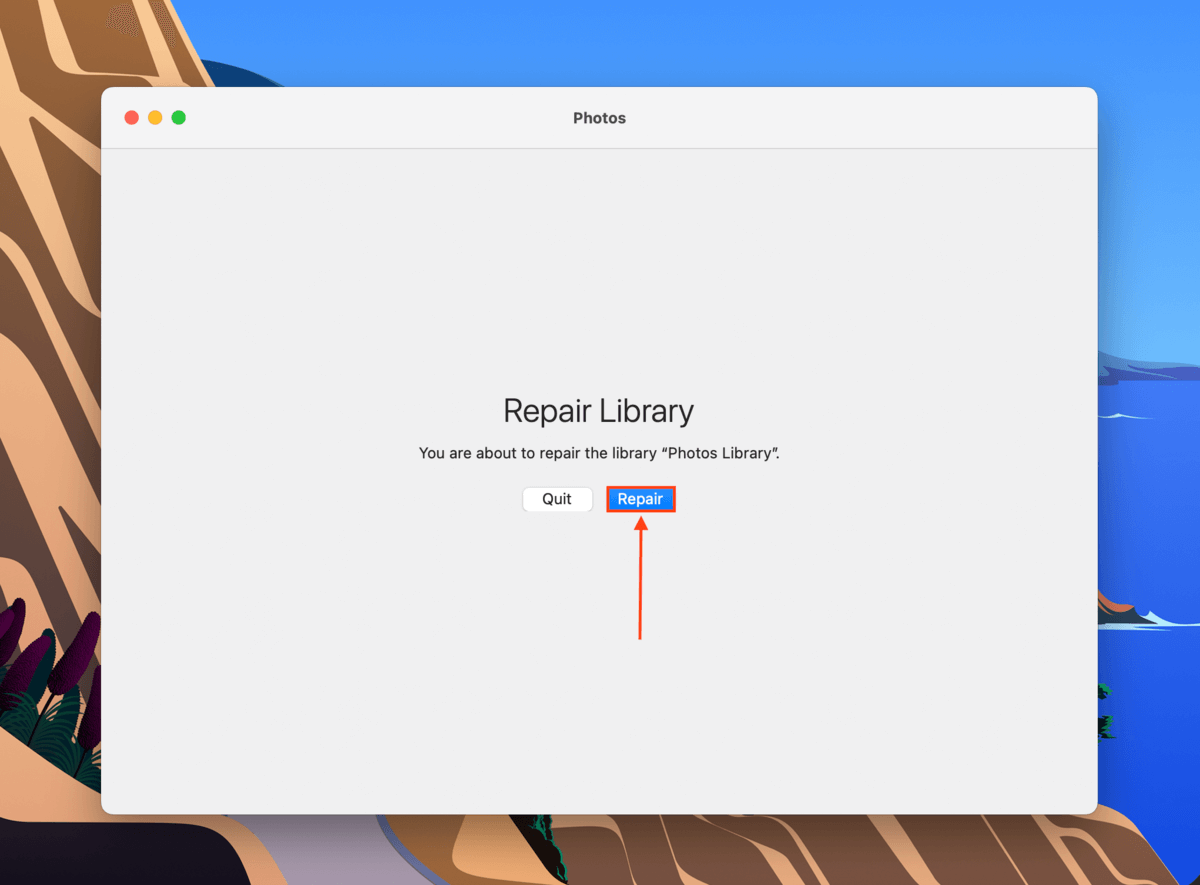
To launch the Photo Repair Library tool, locate the Photos app in Finder > Applications but don’t open it yet. Hold the OPTION + CMD keys, then double-click the Photos app. This should launch the repair tool, where you can simply click Repair and let macOS handle the rest.
FAQ
Where did iPhoto App go?
If you just recently updated to OS X Yosemite 10.10.3 and beyond, iPhoto disappeared from Mac because it has been replaced by the Photos app. iPhoto has been discontinued since 2015. Your existing photos will have been automatically migrated to the new Photos app during the update.
However, this only works for your default library. If you had multiple libraries before iPhoto missing on Mac, you’ll need to migrate them manually. To launch the migration wizard, hold down the OPTION key while opening the Photos app.
Where did my Photos go on my Mac after an update?
Updating macOS requires disk space, and a buggy update may opt to overwrite existing data to make space for itself. The update tool in System Preferences will also update Photos aside from macOS itself, which may be another reason why your photos are not showing up (macOS Catalina had one of the most significant updates to the Photos app).
You may find them in the Recently Deleted album, in the Trash folder, or buried in your drive’s file system where only data recovery software can restore them.
How do I find my lost iPhoto library?
Open Spotlight (CMD + F) and type kind:photolibrary or kind:migratedphotolibrary. If Spotlight can’t find your library on your Mac, you’ll need to use data recovery software to restore it or you can restore a Time Machine backup.
How do I restore my photo library on Mac?
You have the following options to restore your photo library:
- Restore from Recently Deleted album
- Restore photos from the Hidden Photo Album
- Restore a Time Machine backup
- Repair your photo library
If none of these methods work, you’ll need to use data recovery software.
How do I restore my photo library from iCloud?
To restore your photos from iCloud, log into iCloud.com and click Photos > Recently Deleted album. Here, you can select the photos you want to restore and click Recover. To restore your photo library specifically, log into iCloud.com and click the Settings button. Scroll down to the Advanced section, and click Restore Files.
Conclusion
Accidental deletion, faulty updates, drive corruption… There are loads of potential causes for disappearing photos on Mac. Sometimes, it’s completely out of the user’s control. To avoid the worst consequences of data loss, we highly suggest creating backups of your photos and even your photo libraries.
This article was written by Alejandro Santos, a Staff Writer at Handy Recovery Advisor. It was also verified for technical accuracy by Andrey Vasilyev, our editorial advisor.
Curious about our content creation process? Take a look at our Editor Guidelines.