
Many rely on Panasonic cameras for their quality and durability. Amidst all its photography glory, Panasonic cameras are, unfortunately, storage devices susceptible to data loss.
The good news is you can recover deleted photos from Panasonic cameras by following our step-by-step instructions. Stay tuned for some straightforward photo recovery tips.
Common Reasons Behind Data Loss in Panasonic Cameras
Before diving into the data recovery instructions, here’s a list of culprits behind photo deletion on Panasonic cameras:
- 😖 Accidental deletion or formatting – Unintentionally formatting or deleting data can arise from carelessness and human error. Fortunately, recovering data from a formatted SD card. is pretty straightforward
❗️
Note: If you are dealing with accidental deletion, ensure you stop using the Panasonic camera or memory card immediately to maximize the probability of data recovery.
- 📂 File transfer interruption – Unstable connection and device flaws can result in file transfer interruption: thus, leading to data loss. Additionally, improper SD card ejection from your Panasonic camera can result in data corruption. Sometimes, your PC might prompt you to format an SD card. Even in such alarming situations, there is hope! Here’s how you can format an SD Card without losing data.
- 🦠 Viruses and Malware – Viruses and malware pose a significant threat to your data and can damage your Panasonic camera and SD card. If you’re dealing with a virus attack, here’s how you can recover files deleted by virus. Unlike popular misconceptions, you can fix and recover data from an SD card without formatting.
- 📸 Camera’s internal memory or SD card corruption – Corrupted storage devices can harm your data. Turn off your Panasonic camera before ejecting the SD Card. Moreover, don’t drain your camera battery to the edge. Here’s a step-by-step guide on recovering data from a corrupted SD Card.
How to Recover Permanently Deleted Photos from Panasonic Digital Cameras
When it comes to recovering data from digital cameras (often essentially memory cards), third-party data recovery tools are your best bet for a swift data recovery process. In this section, we brief two methods to restore deleted photos from your Panasonic camera.
Our team of application critics loves ranking software. Here are our rankings of the best SD card recovery software tools and the best photo recovery software tools.
Option A: Disk Drill
![]() Disk Drill is a renowned data recovery tool that can recover lost or deleted files from your Panasonic camera. Disk Drill supports various photo and video formats (including the RW2 (Panasonic LUMIX raw image file)).
Disk Drill is a renowned data recovery tool that can recover lost or deleted files from your Panasonic camera. Disk Drill supports various photo and video formats (including the RW2 (Panasonic LUMIX raw image file)).
- 💯 Disk Drill boasts of features like file preview, recovery vault, and byte-level backups (particularly helpful for dead and inaccessible file storage). Check out our Disk Drill review for a more comprehensive tool walkthrough.
- 🔰 The UI is clean and intuitive – thus, enabling first-time users to recover data seamlessly. Moreover, Disk Drill offers free data recovery of up to 500 MB. As a result, you can recover a considerable chunk of your deleted photos for free!
Earlier this year, our marketing team accidentally deleted critical digital assets. Disk Drill was the savior in recovering deleted data from our Panasonic SD cards. Guess what? Disk Drill also works like a charm for other popular camera OEMs, including Sony, Nikon, and Fujifilm.
Note: Most Panasonic Lumix cameras (including the S and G series) get recognized as data storage. Conversely, if you can’t access your internal camera storage, you can eject the SD card and access it via your laptop’s in-built card reader or an external SD card adapter.
Here’s how to recover deleted photos from a Panasonic camera using Disk Drill:
- Download, install and launch Disk Drill.
- Insert the SD card into your PC and launch Disk Drill. Alternatively, you can connect the Panasonic camera if it gets recognized as a data storage.
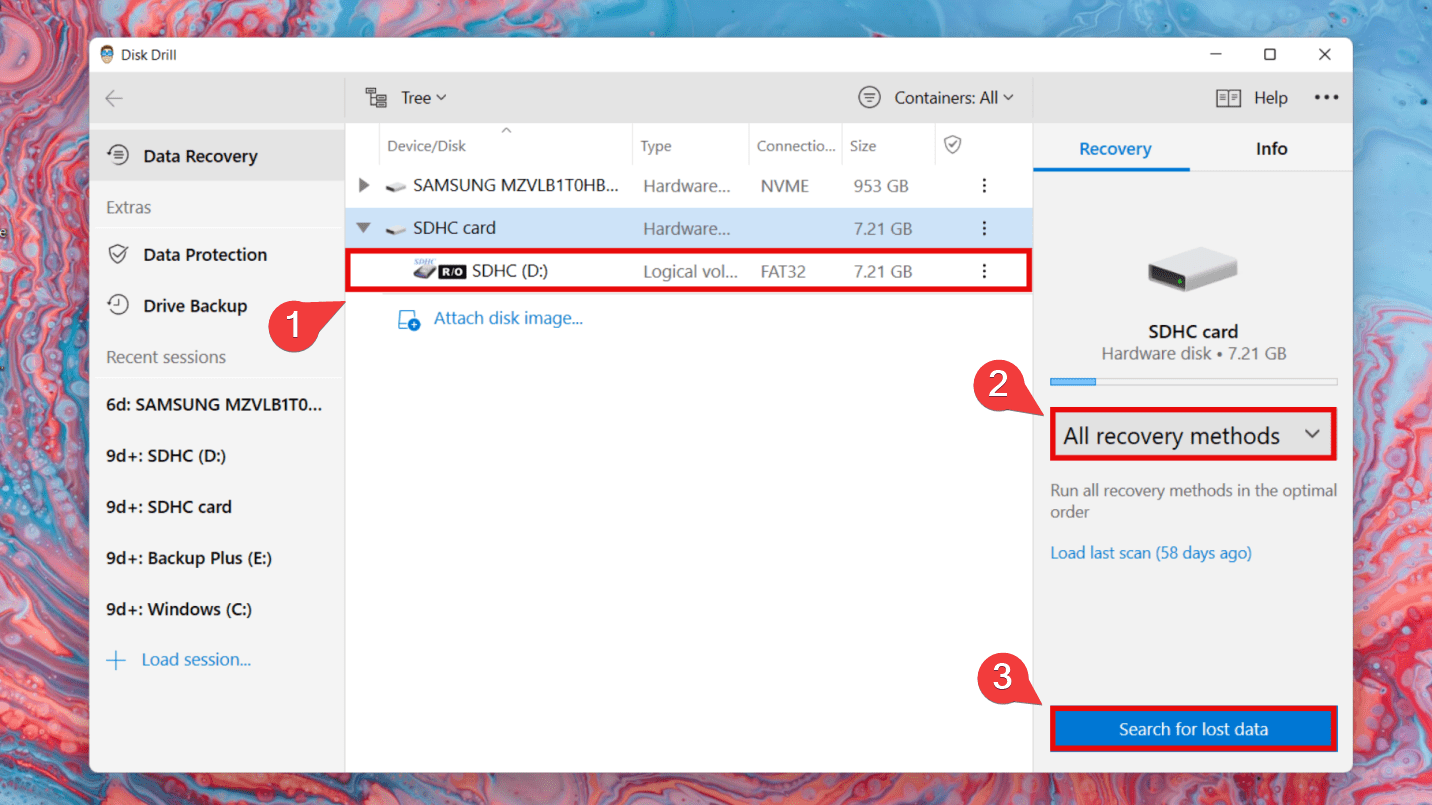
- Select your SD card from the list of available disks and click on Search for Lost Data. We recommend going ahead with the default All recovery methods scanning option. You could also trigger a Quick Scan or Partition scan.
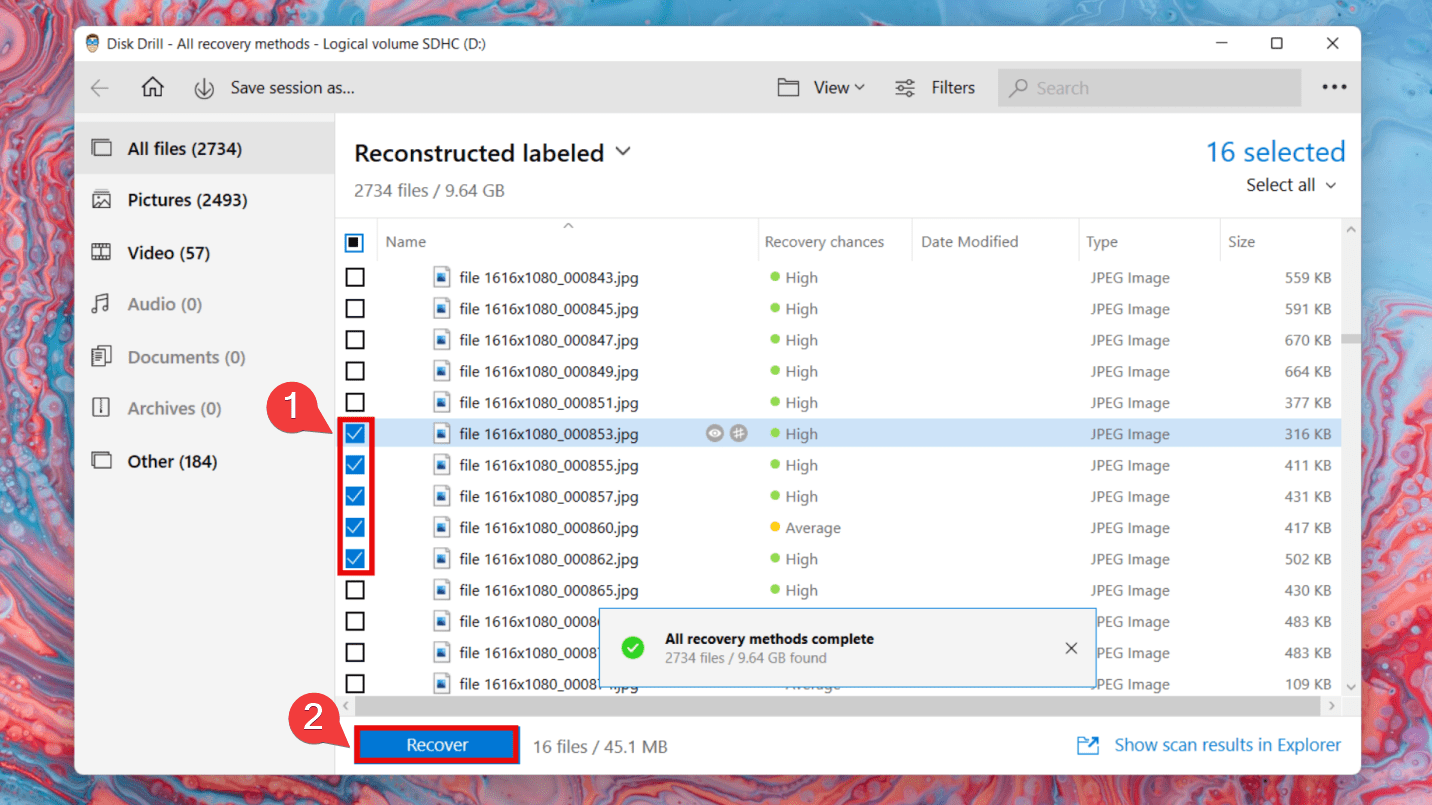
- Once the scan terminates, click on Review Found Items.

- Scroll through the files discovered by Disk Drill. You can preview files by clicking on the eye icon (while hovering over a file) to reveal details like the file path and size.
✅
Additionally, filters can make your file search effortless. Key in the file format “.jpg” or “.rw2” into the text field at the upper right corner and hit Enter.
- Navigate through the files lost from your Panasonic camera. Select files you wish to recover and click on Recover.
- Specify your data recovery destination and click on OK.
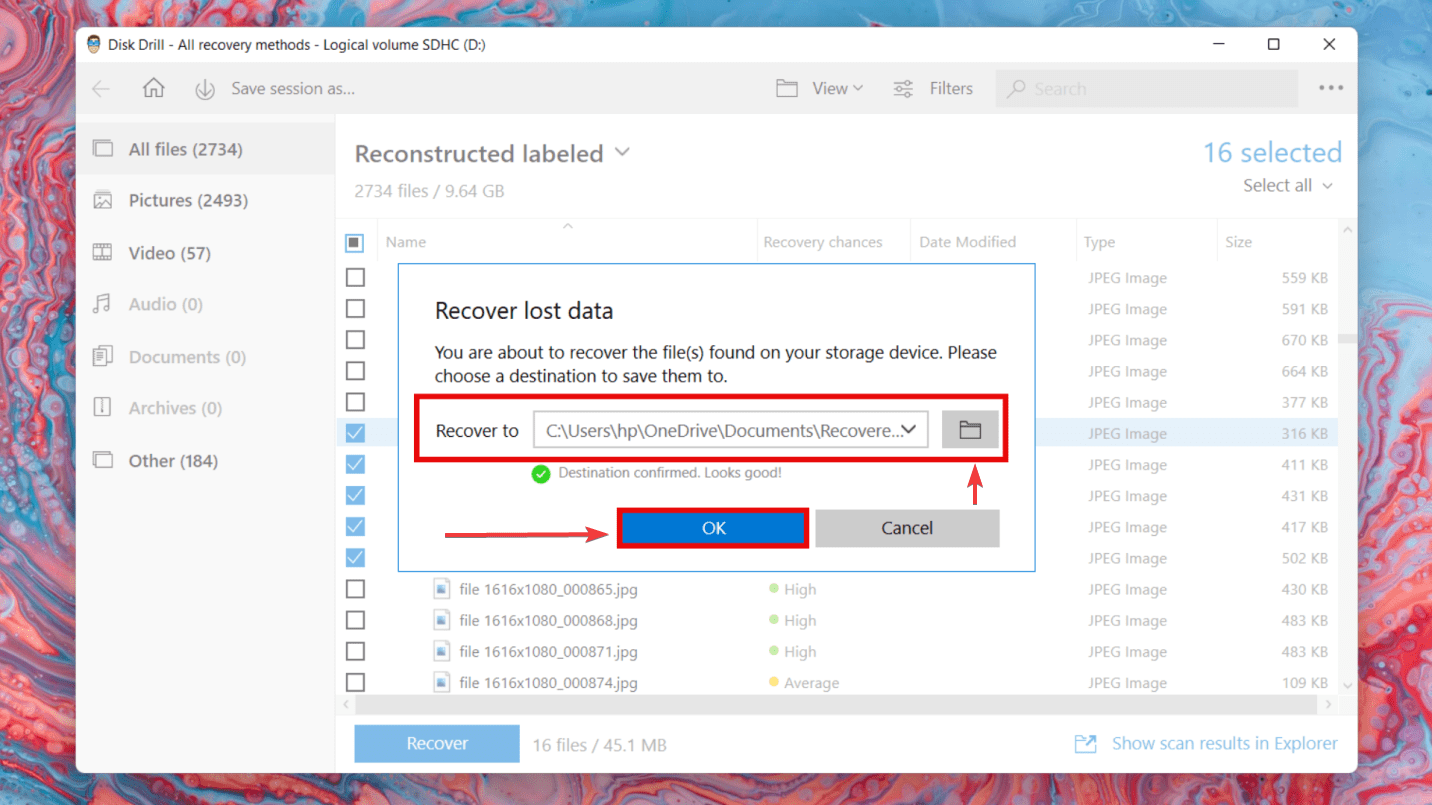 Note: We recommend selecting a new location to save your recovered data. Don’t risk saving the data on the Panasonic camera or SD card.
Check out our expert tutorial on recovering disappeared photos from an SD Card.
Option B: DiskGenius
![]() DiskGenius is a commendable data recovery tool with many great features like partition management, disk cloning/migrating, and disk repairs. This tool also supports a myriad of photo and video formats including those proprietary to Panasonic digital cameras.
DiskGenius is a commendable data recovery tool with many great features like partition management, disk cloning/migrating, and disk repairs. This tool also supports a myriad of photo and video formats including those proprietary to Panasonic digital cameras.
Here’s a quick guide on recovering photos using DiskGenius:
- Download, install and launch DiskGenius.
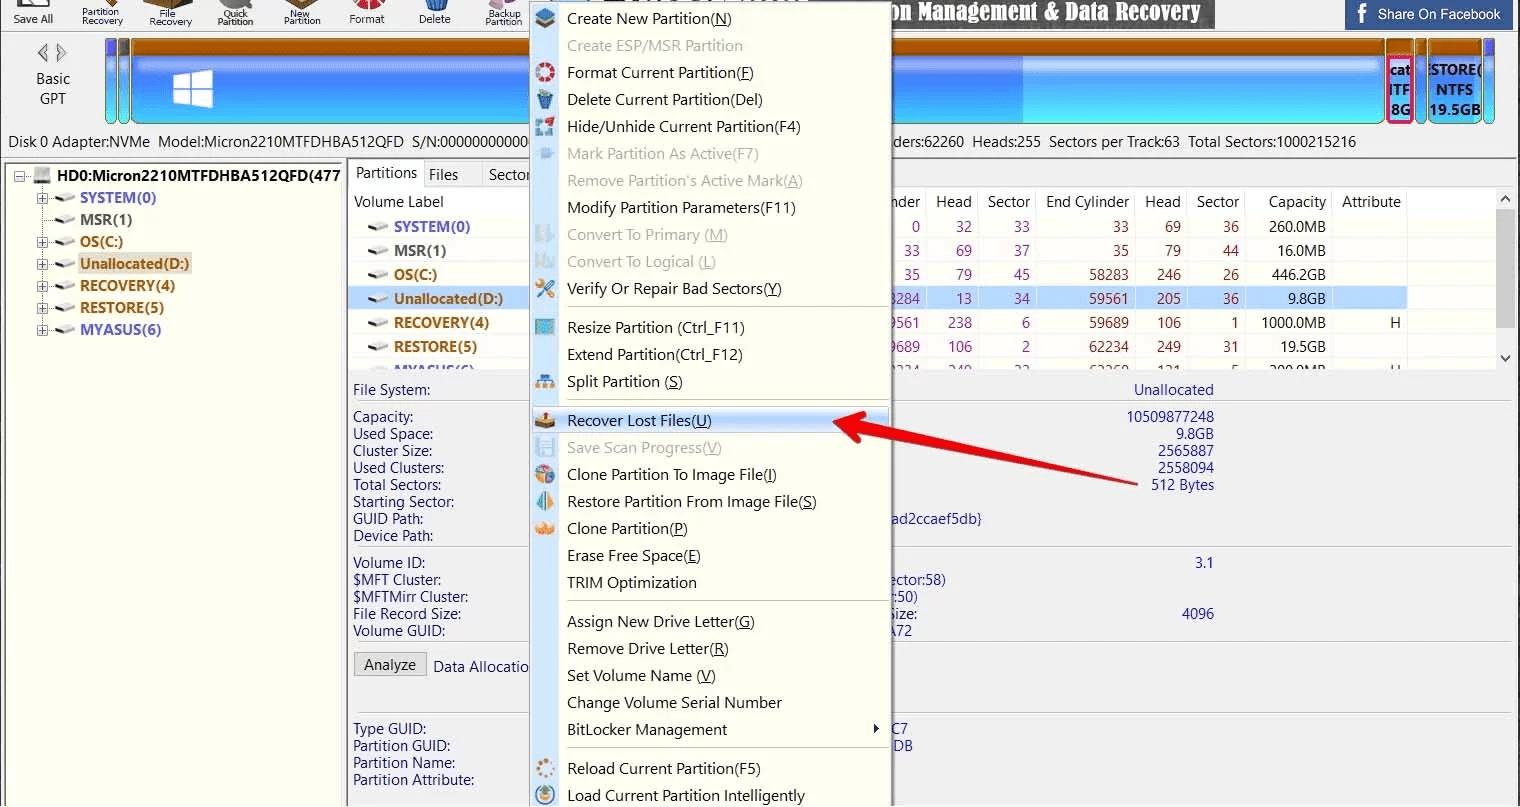
- Right-click on your storage device and click on Recover Lost Files.
Note: This demo features an HDD (D: drive). However, the data recovery procedure for SD cards is pretty much the same.
- Check the Recover Deleted Files option.
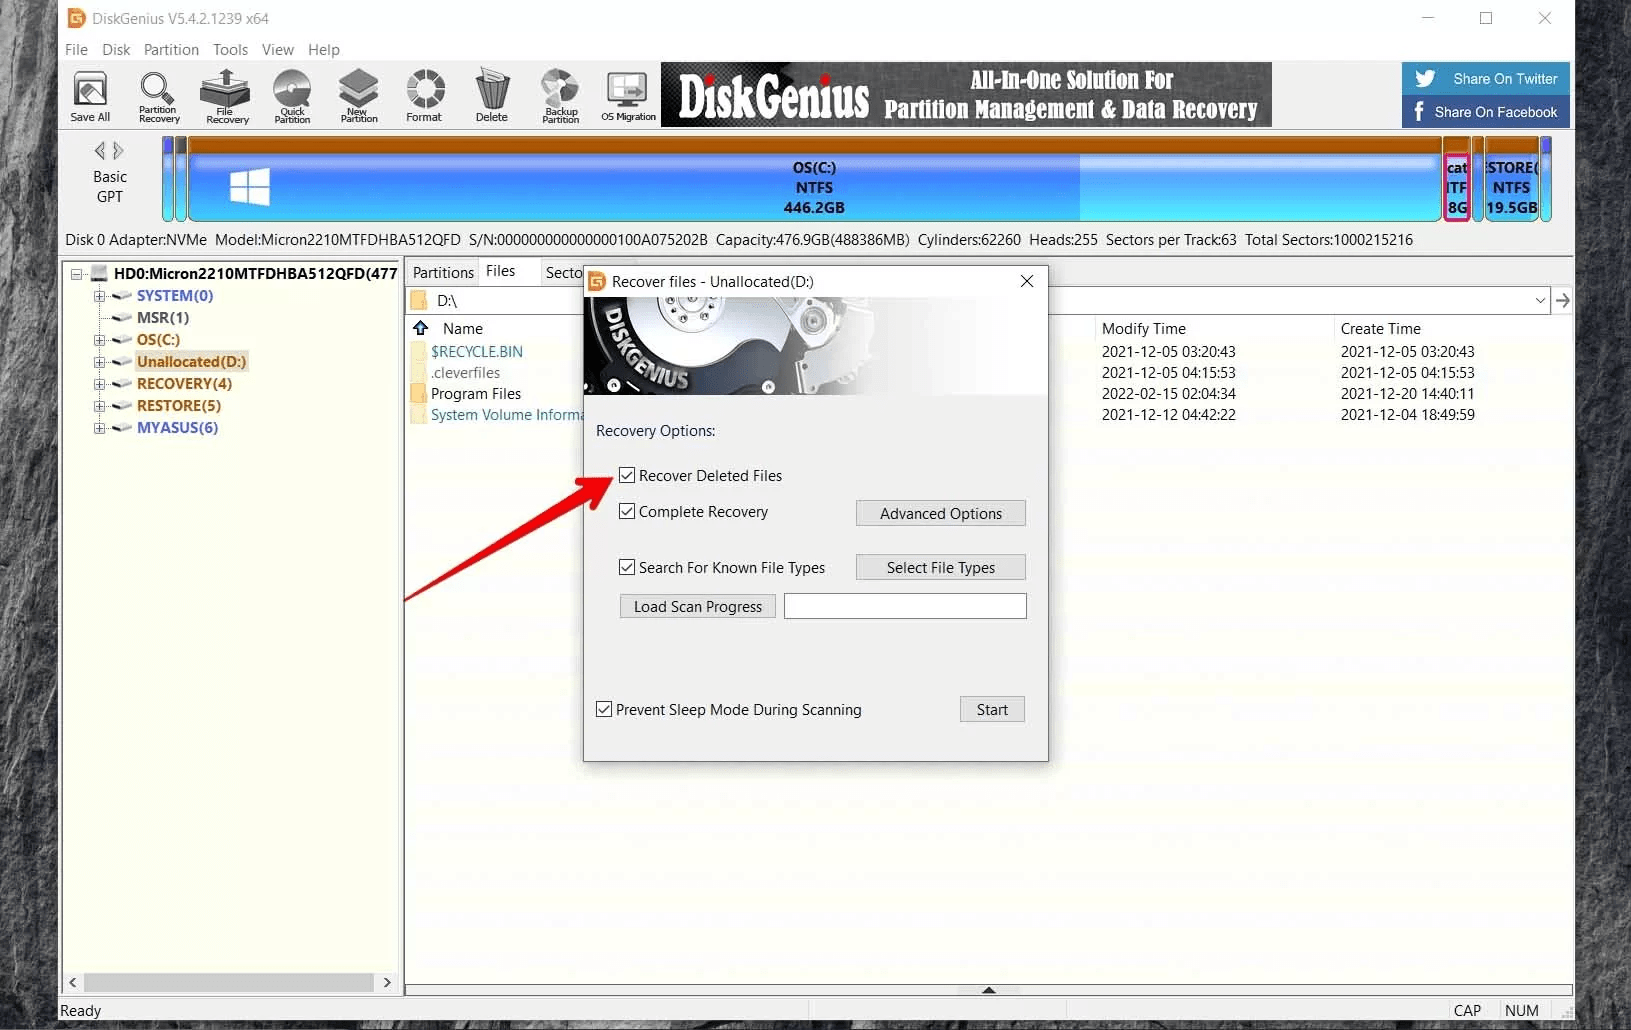
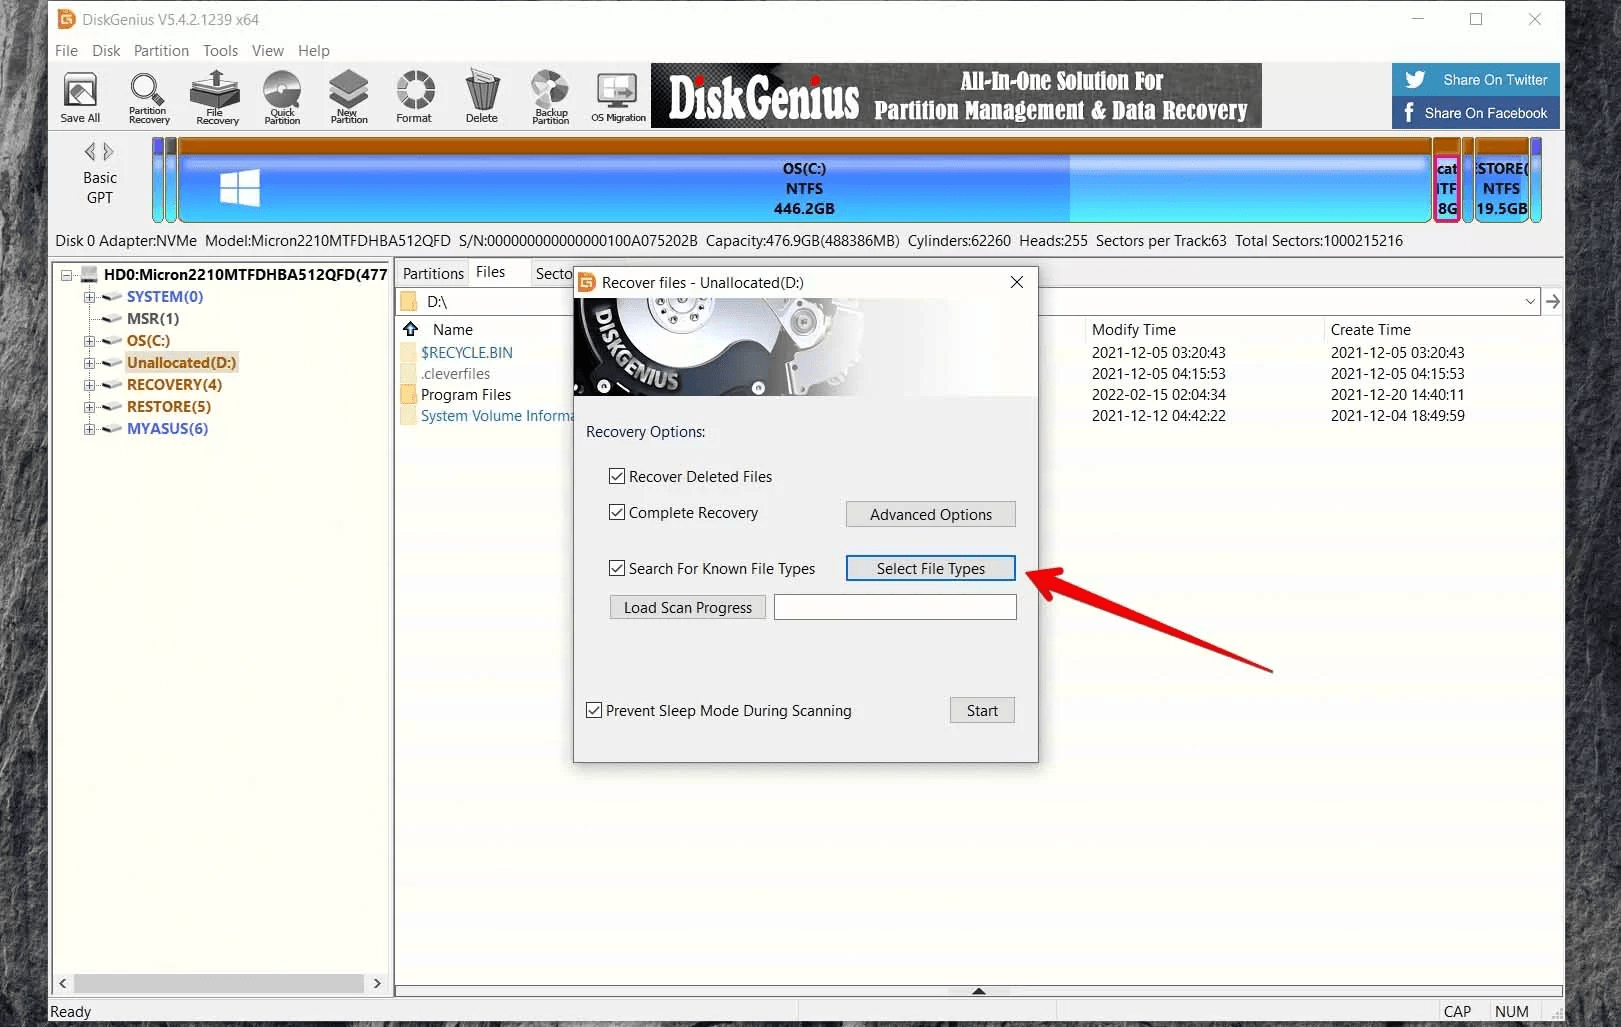
- To recover a particular file format, click on Select File Types. Then, select the file formats > OK > Start.
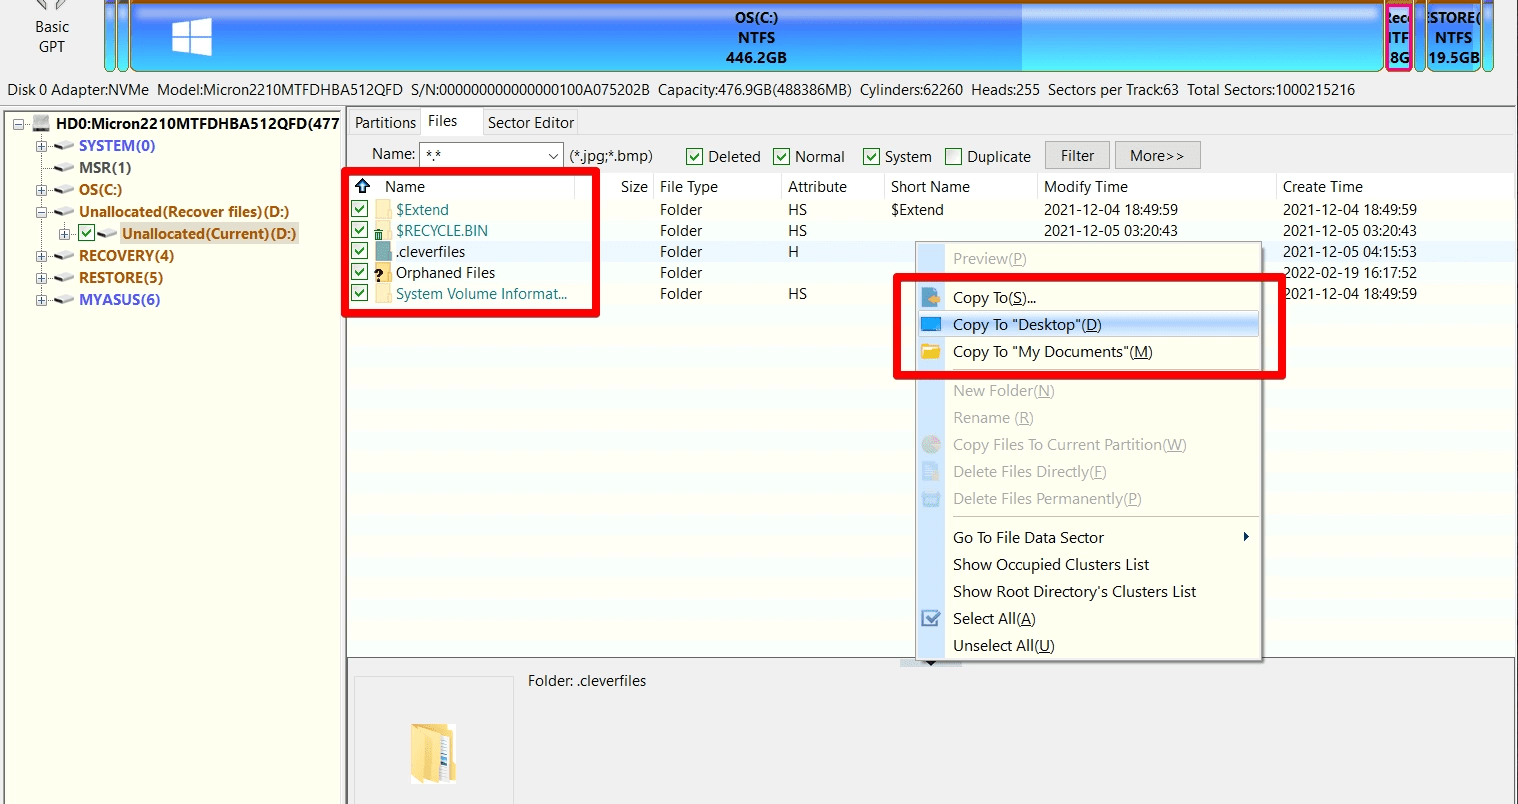
- Once the scan terminates, select the files you would like to recover. Then, specify the destination for saving your recovered files.
FAQ
Can I recover deleted pictures from my camera memory card?
Yes, you can recover deleted photos from a camera’s memory card using data recovery software like Disk Drill. While dealing with data loss, it’s critical to act immediately to avoid data overwriting. It doesn’t matter what device you are on! Here’s the ultimate SD card photo recovery guide for Windows/Mac/Android.
How do I recover deleted files from my Panasonic camcorder?
Here’s how to recover deleted files from your Panasonic camcorder:
- Download, install & launch Disk Drill.
- Connect your Panasonic camcorder or its SD card to a PC.
- Select the relevant file storage & click on Search for Lost Data.
- Select your files & click on Recover.
- Select the destination to retrieve the deleted files.
If you’re a Sony user, check out our Sony Handycam video recovery tutorial.
How do you format a memory card on a Panasonic Lumix camera?
You can format an SD card from the thumbnail screen on your Lumix:
- Select [FORMAT] from the menu > [CLIP].
- Choose [SD CARD] and press down on the camera analog button.
- Select [YES].
How to import photos and videos from a Panasonic camera to the smartphone?
Here’s how you can set up an automatic transfer of assets from a Panasonic camera to your smartphone:
- Pair the camera with your smartphone.
- Set [Auto Transfer] to [ON] on your camera.
- Hit MENU/SET > Wrench icon > Wi-Fi icon > [Bluetooth] > [Auto Transfer]>[ON].
- Confirm the incoming connection on your smartphone.
- Select [OK] on your camera.
How do I connect my Panasonic Lumix to Wi-Fi?
Here’s how to enable Wi-Fi on your Lumix:
- Open the menu and head over to settings.
- Navigate to the Wi-Fi section and select New Connection.
- Open Wi-Fi settings on your smartphone and connect to the Lumix.
- Enable [Auto Transfer] for automatic image migration.
Using Wi-Fi, how do I transfer pictures from the Lumix camera to the computer?
Follow these steps to transfer pictures to your computer:
- Enable Wi-Fi on your Lumix.
- Open Wireless settings on your PC > Add Network.
- Enter the SSID (as visible on your camera).
- Set a password > Save.
- Enable [Auto Transfer] for automatic image migration.
Conclusion
Data loss is a very nasty mishap. However, there are some actionable tips for quickly recovering deleted photos from a Panasonic camera. We have illustrated data retrieval using third-party data recovery tools like Disk Drill and DiskGenius – which eases the whole procedure of recovering lost photos.
This article was written by Joshua Solomon, a Contributing Writer at Handy Recovery Advisor. It was also verified for technical accuracy by Andrey Vasilyev, our editorial advisor.
Curious about our content creation process? Take a look at our Editor Guidelines.