Screenshots, also referred to as screencaps or screengrabs, make it possible for us to take captures of our screens and instantly share them with our friends, family, and colleagues. The ability to snapshot exactly what’s on your screen makes this feature useful for many different situations.
Like all data, screenshots can spontaneously disappear from our machines. This could be the result of accidental deletion, a virus attack, or even just a failing storage device. No matter the cause, you do have some avenues you can explore to get the screenshots back. Let’s take a look at some practical and effective methods for how to recover deleted screenshots on Windows and Android.
If your screenshots have been permanently deleted, you need to act fast so that they’re not overwritten by new data or erased by a TRIM command. The faster you act, the better your chances of recovery are. Jump directly to our section of the article where we cover how to get permanently deleted screenshots back.
Quick Navigation
Problem |
Solution |
I have recently deleted the screenshot in question |
|
I have accidentally deleted an important screenshot and it’s not in the Recycle Bin |
|
I lost my screenshot and I can’t find it |
|
I need to recover screenshots from a formatted storage device (SD card, USB) |
|
I need to recover deleted screenshot from my Android phone |
|
I need to recover screenshot from Google Photos |
|
I deleted my screenshot folder on Windows |
Where Are My Screenshots Saved?
There are many different ways to take a screenshot. Because of this, the location of where those screenshots are saved will be different depending on how you’ve taken them. Let’s take a look at the most common methods of taking a screenshot and where their default save locations are.
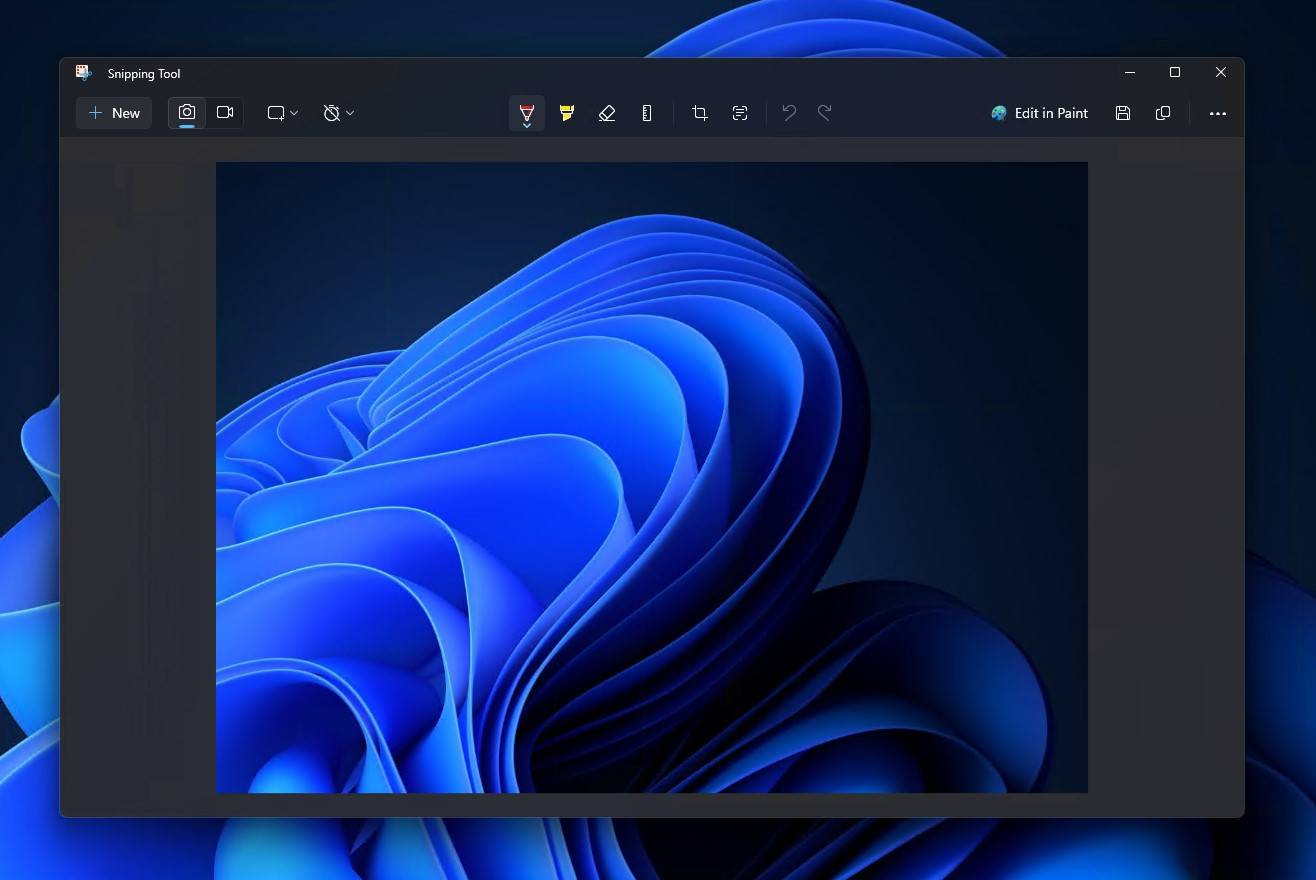
Snipping Tool
Snipping Tool is the primary tool for capturing screenshots in Windows. You can access the tool either by manually searching for it and opening it or by pressing Windows Key + Shift + S on your keyboard.
The default storage location that Snipping Tools uses is the Screenshots folder located in Pictures (%userprofile%\Pictures\Screenshots). Therefore, if Snipping Tool is your preferred screenshot-taking tool, check this folder first to see if your screenshots are there.
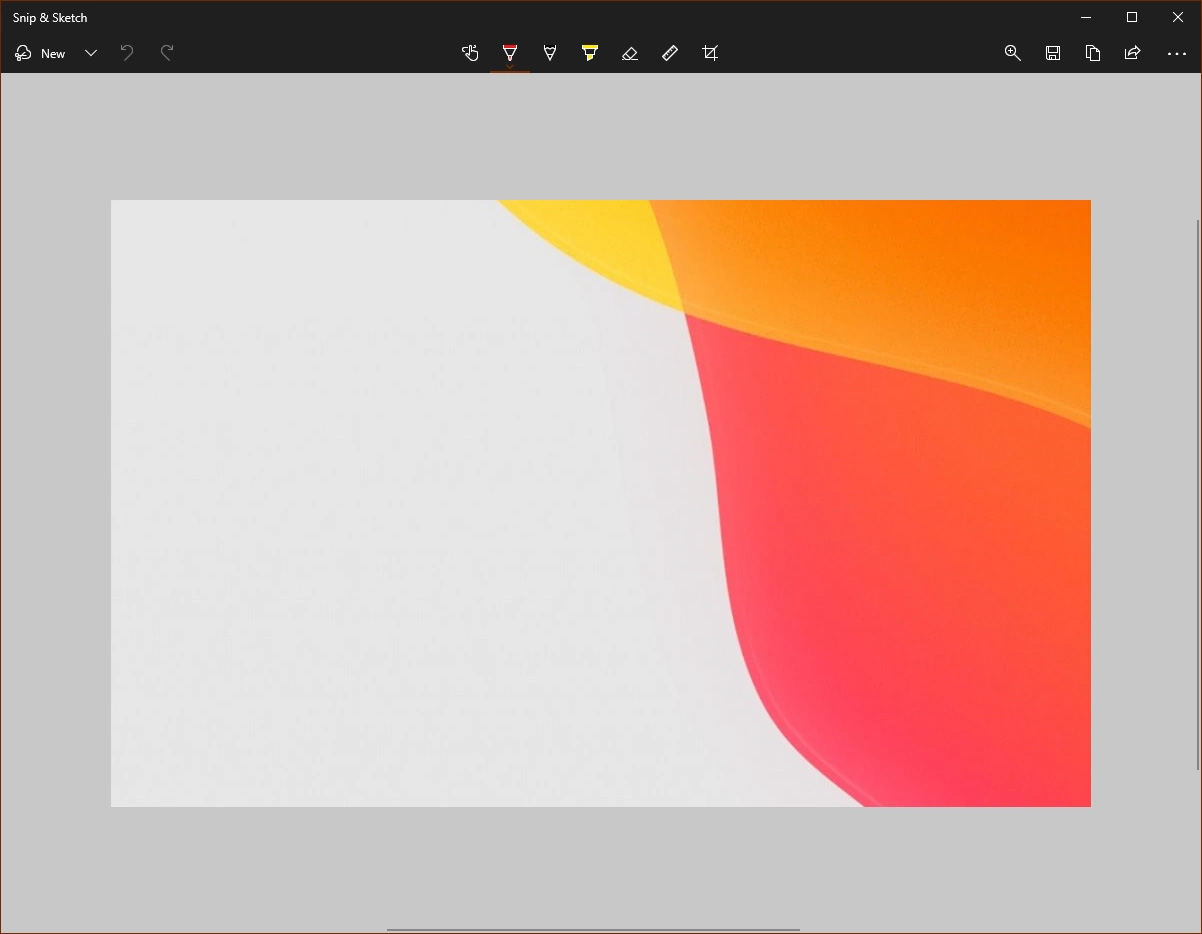
Snip & Sketch
Snip & Sketch temporarily replaced Snipping Tool as the preferred screenshot utility when it was released with Windows 10. You can access Snip & Sketch using the keyboard shortcut Windows Key + Shift + S – the same that Snipping Tool uses on Windows 11.
When you take a screenshot with Snip & Sketch, you will need to manually select a save location; none is specified by default. If you cannot remember where you saved your last screenshot, you can use the Save As function to jump straight to the folder where your last screenshot was saved.
Again, like Snipping Tool, you can use the Save As function to find the last location you saved a screenshot.
Third-Party Tools
If you prefer third-party screengrab options in favor of increased functionality or familiarity, such as Monosnap, Lightshot, or Greenshot, the location of your screenshots may reside in a folder created by the software.
Probably the fastest way to see where these screenshots are stored is by looking up the documentation for the third-party tool you use. You may also be able to find them in a sub-folder located in your Pictures folder, as many screenshot tools prefer to use this as the default location for easy accessibility.
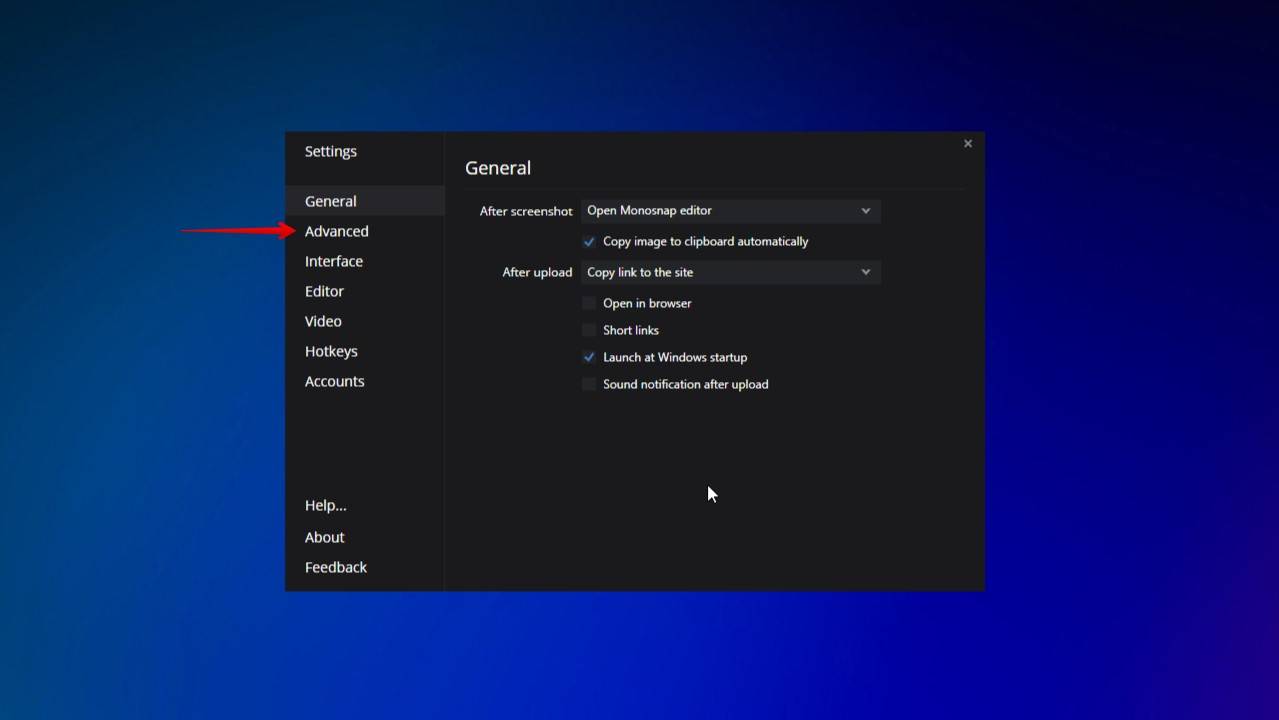
As a demonstration, we’ll show you how to find the default location for Monosnap. By default, Monosnap opens a saving dialogue after each screenshot unless you have specified a default folder using the following steps.
- Right-click on the Monosnap icon in your taskbar, then click Settings.
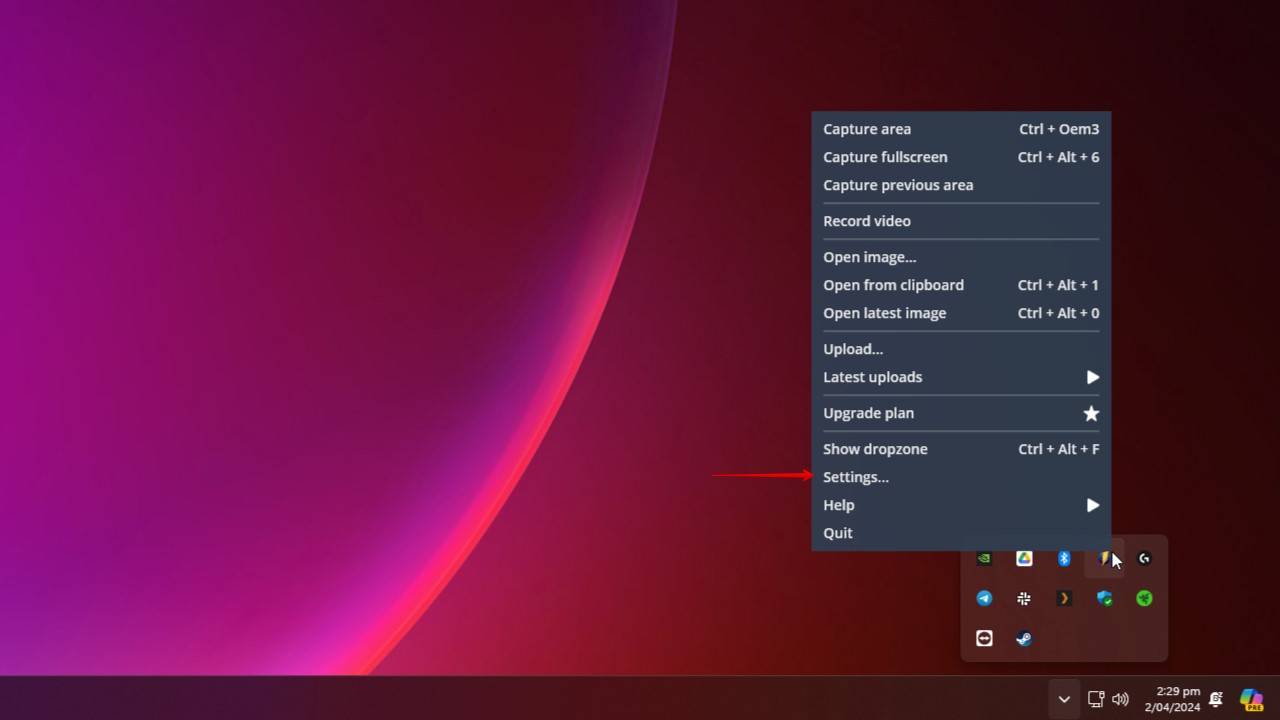
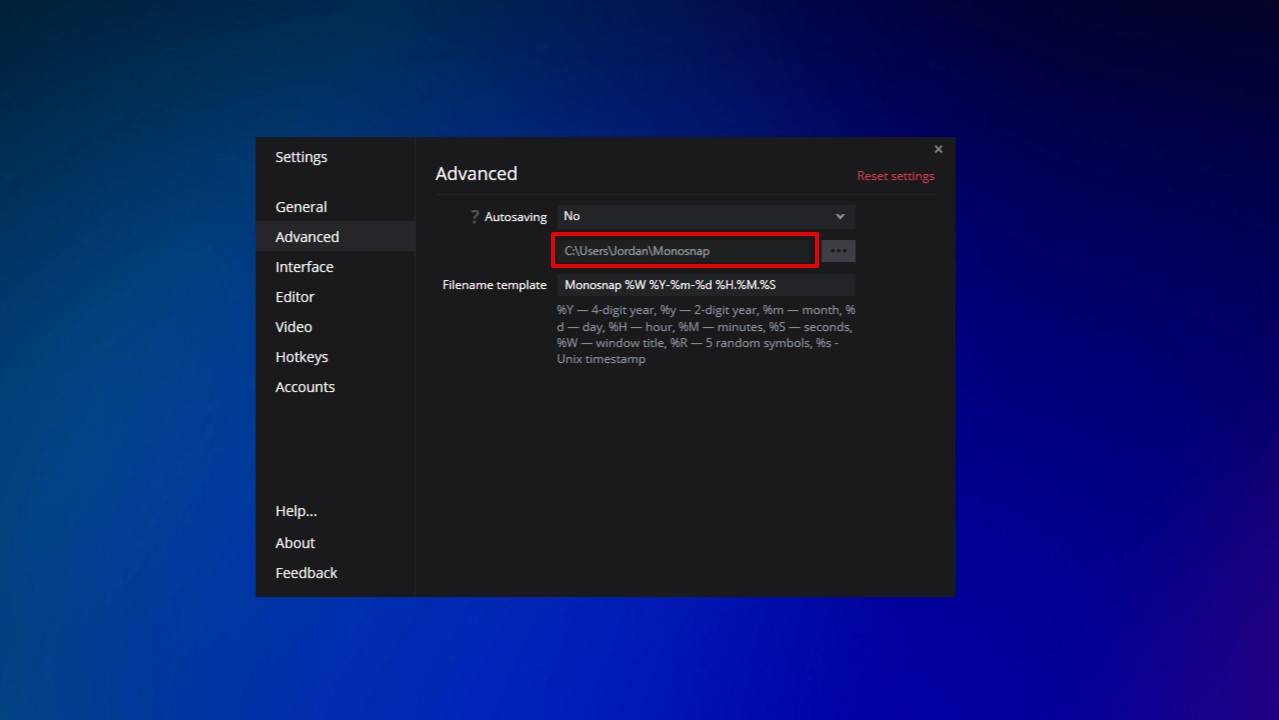
- Click Advanced.
- Open the path specified as your default location.
Android
Each Android phone can be different in how screenshots are taken. For most, you simply need to press the Power and Volume down buttons at the same time. You’ll know when it’s done as there will be some indication (like a border flash or sound) that a screenshot has been taken.
Android screenshots are automatically saved to a Screenshots folder on your device. This Screenshots folder can be accessed through any app that allows you to view images and videos on your device, like Google’s Photos app or your phone’s built-in Gallery app.
How to Recover Deleted Screenshots from Windows PC & Android
The success rate for recovering deleted screenshots from your Windows PC or Android phone heavily depends on how long ago those screenshots were lost. If they were lost recently, you have a good chance of getting them back as there hasn’t been much time for the data to be overwritten. Let’s take a look at the various ways you can recover those lost or deleted screenshots.
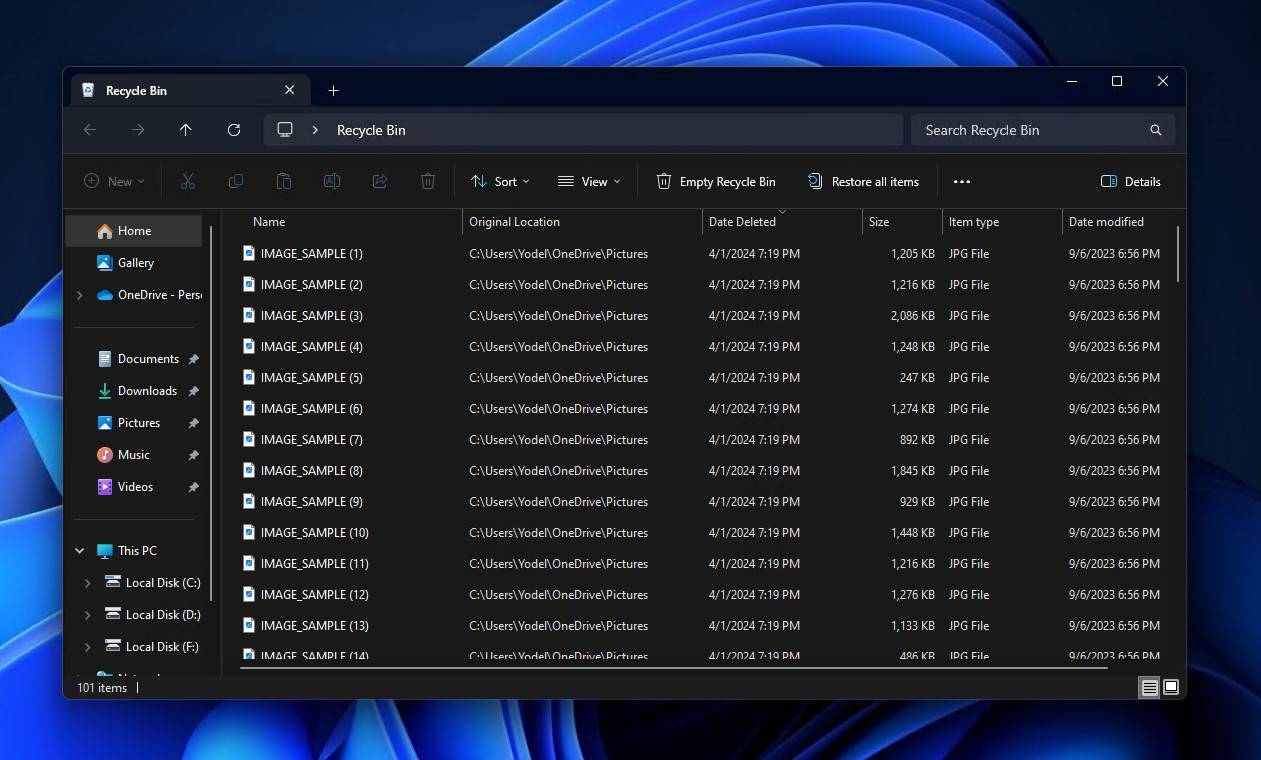
Method 1: Check the Recycle Bin (Windows)
The Recycle Bin in Windows is where your data temporarily sits when it’s deleted. The Recycle Bin has a limit to how much data can be stored in it at any given time, and this limit is different for each computer as it reserves a percentage of your total disk space.
- Go to the Recycle Bin found on your desktop and open it.
- Click on the file you’d like to restore, then click Restore the selected items.
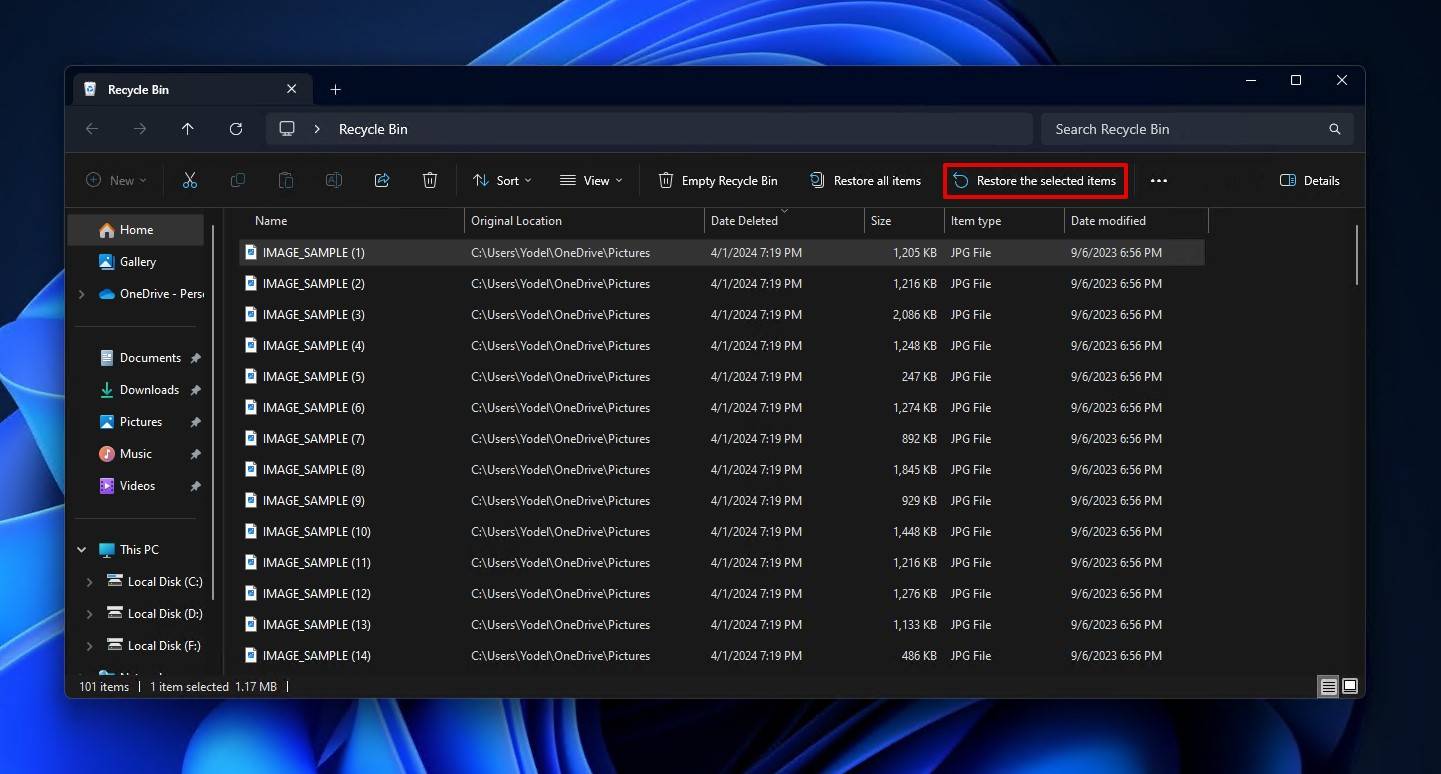
Once the files are restored, they’re restored back to their original file location. If you want to restore them to a different location, simply drag and drop them into a different folder.
Is the deleted file not in the Recycle Bin? Don’t worry, you can still recover your files even if the Recycle Bin has been emptied.
Method 2: Search for Your Screenshots (Windows & Android)
In some cases, your file hasn’t actually been deleted, but instead, it’s sitting somewhere on your drive where you can’t find it. Both Windows and Android phones allow you to search for files on your device. Making use of the search function can save you a lot of time that might otherwise be spent trying to recover a file that’s actually still there.
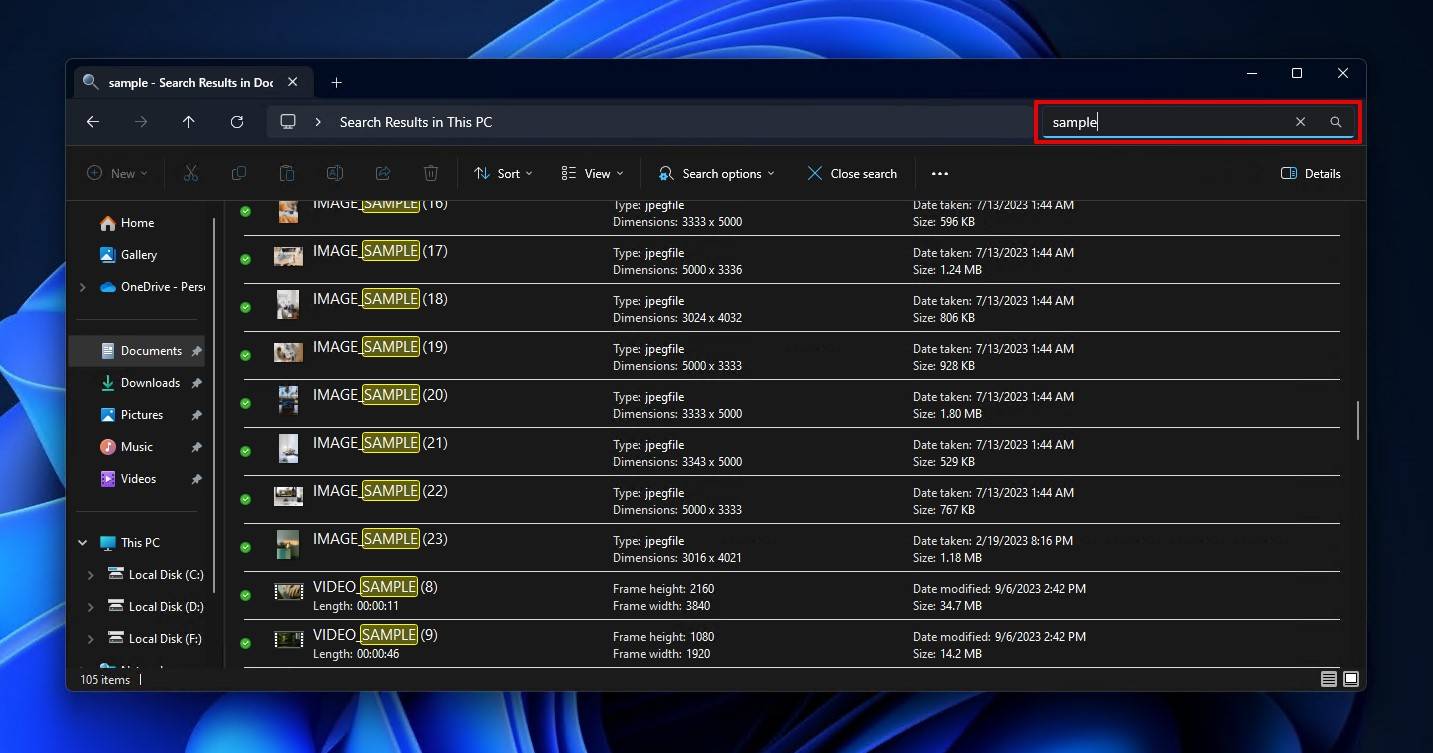
- Open File Explorer and click on This PC. If you know what folder the screenshot might be in, go into that folder instead as it will cut down the search time for Windows.
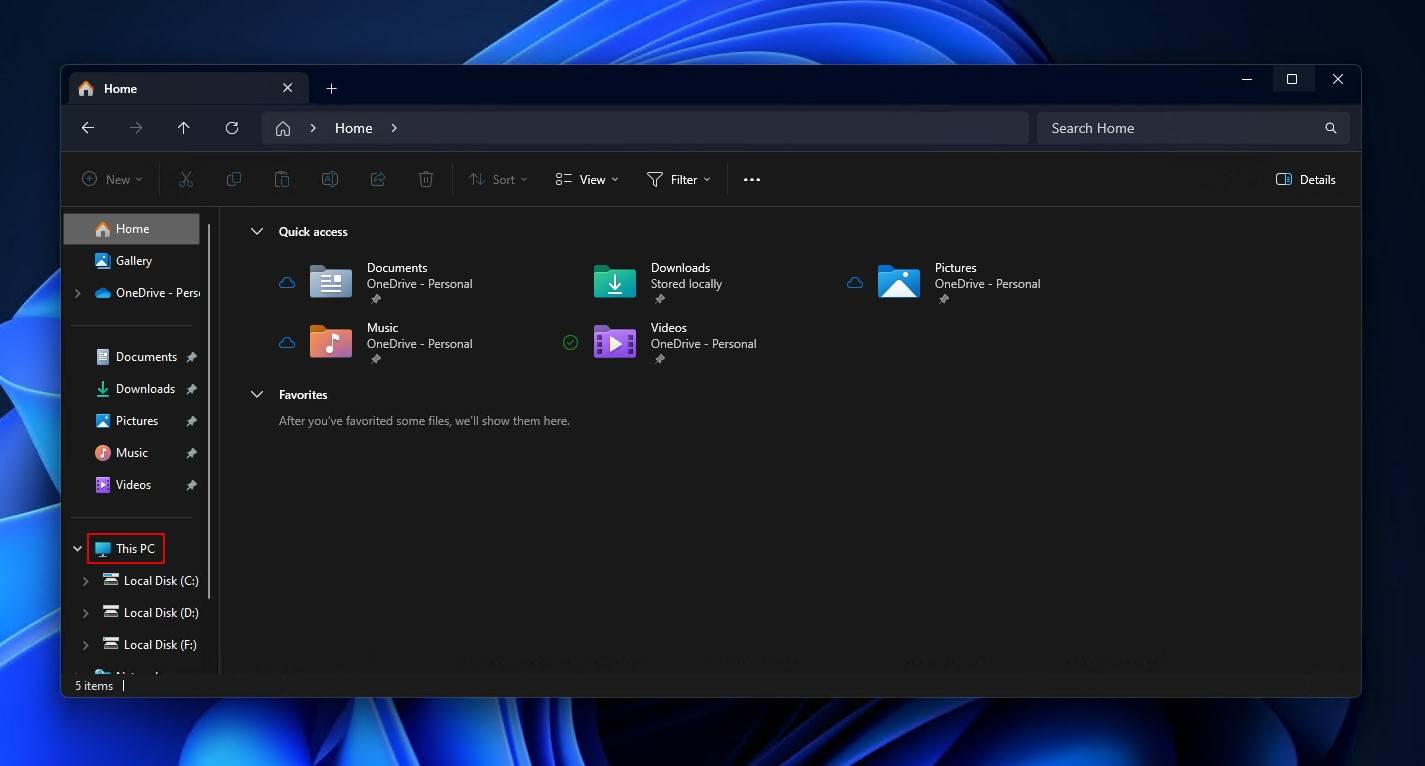
- In the Search This PC field, type in the name of the screenshot. If you don’t remember it, try searching for generic terms like “screenshot”. Press Enter.
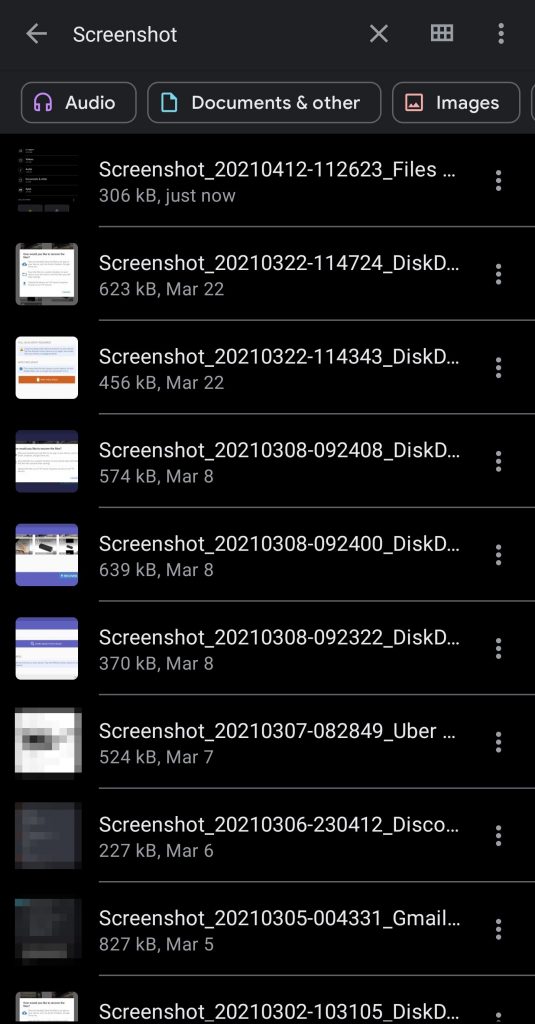
- Open the Files or My Files app on your Android device. Tap on the magnifying glass.
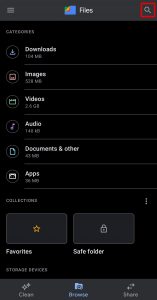
- In the search field, type the name of the screenshot. If you don’t remember it, try searching for generic terms like “screenshot” and search.
Method 3: Restore Using File History
If File History was enabled at the time, it’s possible that a copy of your Screenshots folder exists in the File History backup. File History is the preferred backup utility for Windows 10 and 11. When active, it backs up all of the default libraries of your user account, which includes Pictures (where your Screenshots folder is located).
Follow these steps to see if you can restore your screenshots using File History:
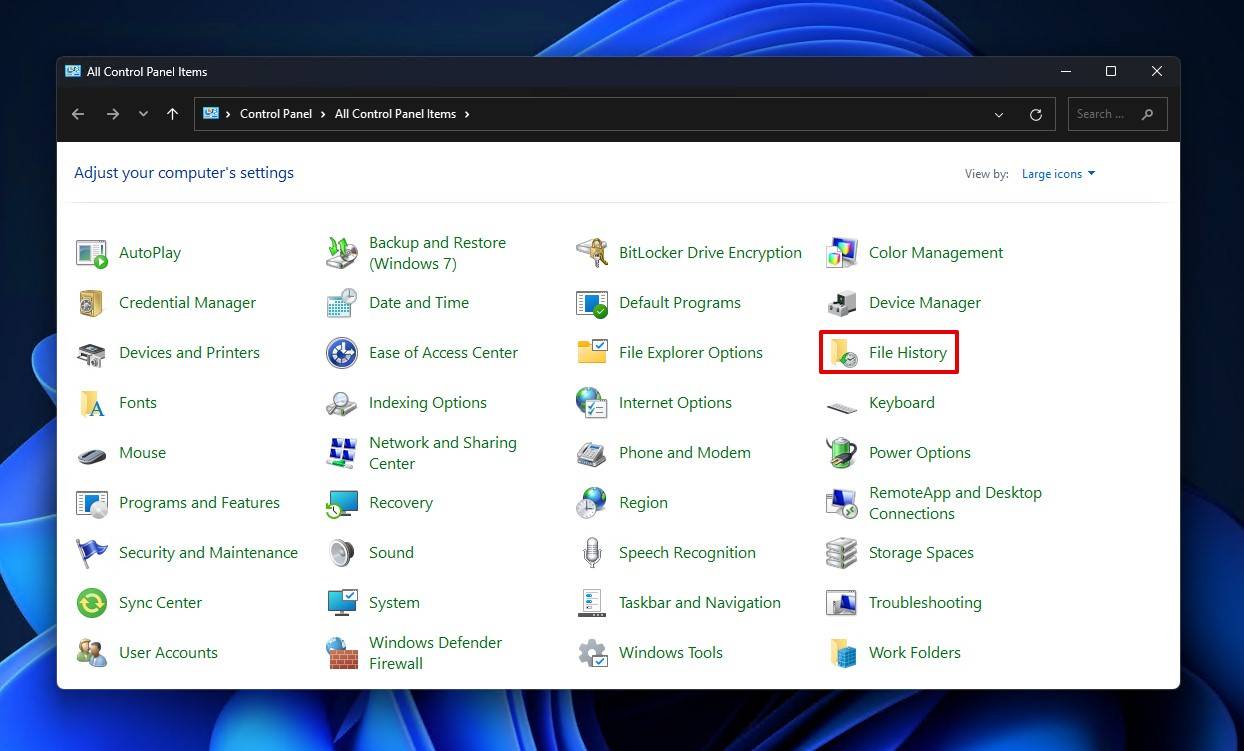
- Open Start and search “Control Panel”. Open it.
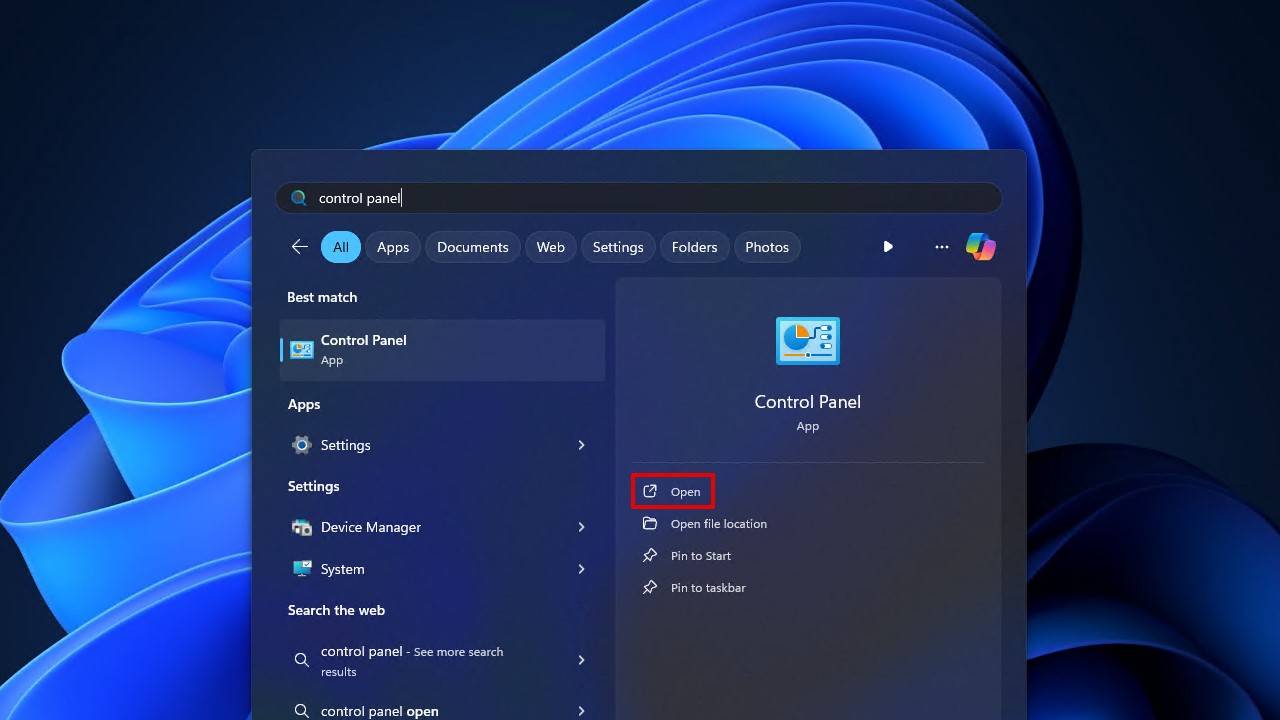
- Click File History. If you don’t see it, change your view mode at the top-right of the window.
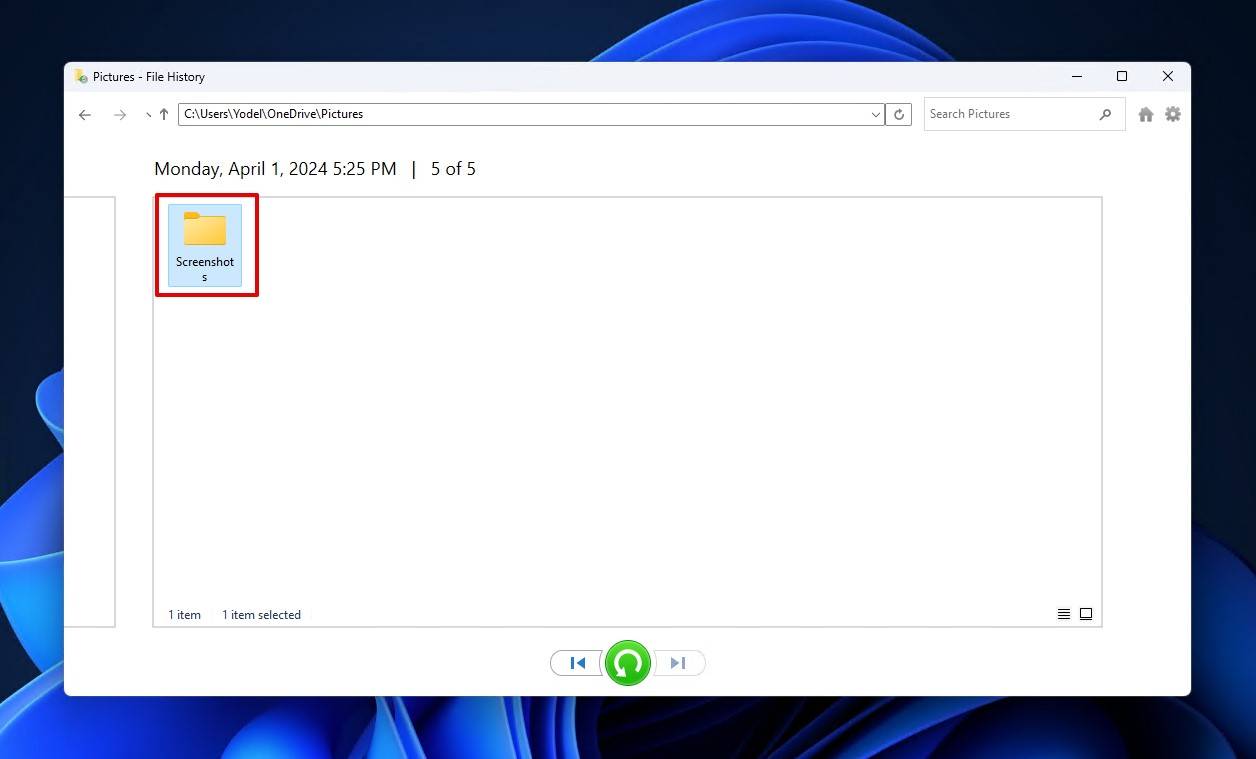
- Click Restore personal files.

- Select the Screenshots folder.
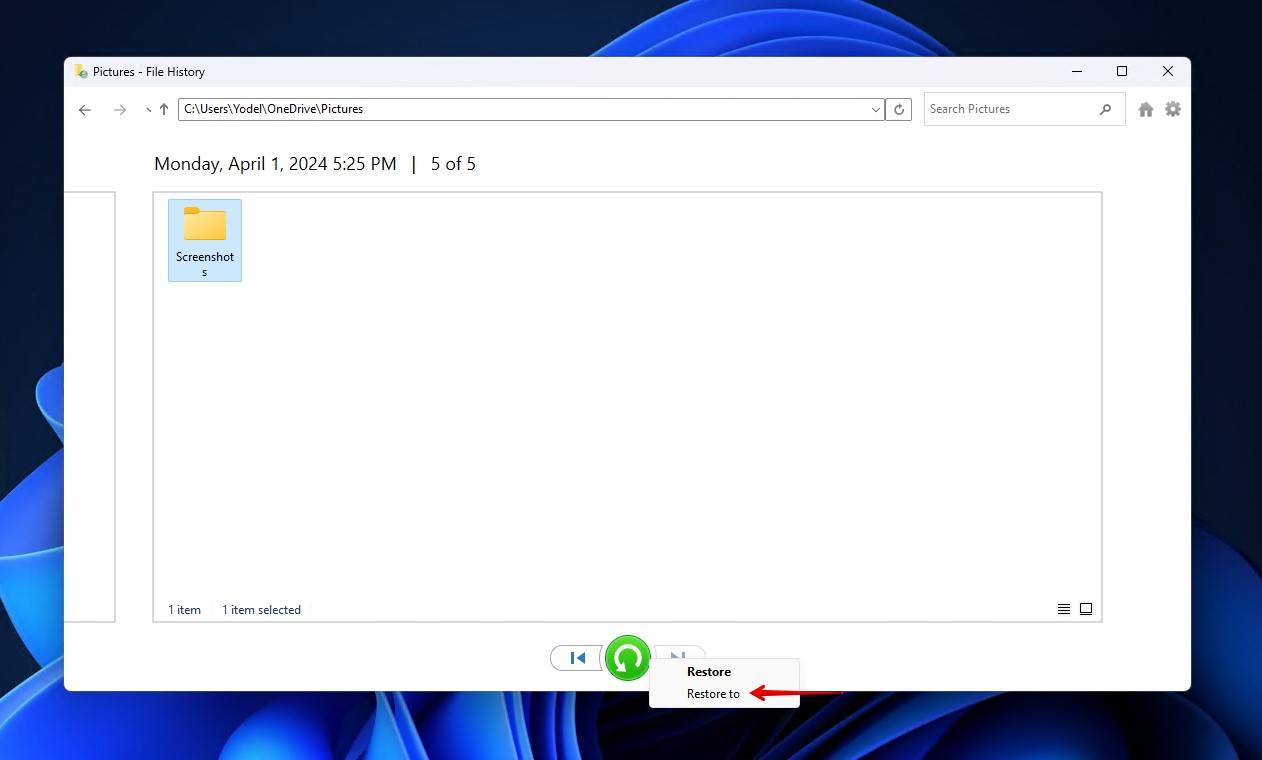
- Right-click the green restore button, then click Restore to. Then, just choose where you want to restore the folder.
Method 4: Try Data Recovery Software (Windows & Android)
Data recovery software is software that specializes in the recovery of lost or deleted data. Both Windows and Android offer a wide range of recovery options. Below we’ll touch on different ways you can make use of data recovery software to recover screenshots from Windows and Android devices.
Method 4.1: Use Data Recovery Software for Windows
There’s a seemingly endless amount of recovery solutions available for Windows. Despite the vast landscape of software to choose from, you must choose a recovery tool that has a recognized ability to recover image files.
Our choice of software is Disk Drill. Disk Drill is a professional data recovery solution that is trusted by many due to its combination of great usability, excellent recovery performance, and easy preview functionality (making it particularly useful for previewing and recovering screenshots). It has good support for 100 different photo file formats, and this list is only getting bigger.
If your system drive is an SSD, it may use TRIM technology to assist with garbage collection. When a TRIM command is run, any deleted screenshots will become permanently irrecoverable. Therefore, either disable TRIM or recover the data as soon as possible.
We’ve included the steps you can follow to recover deleted screenshots using Disk Drill:
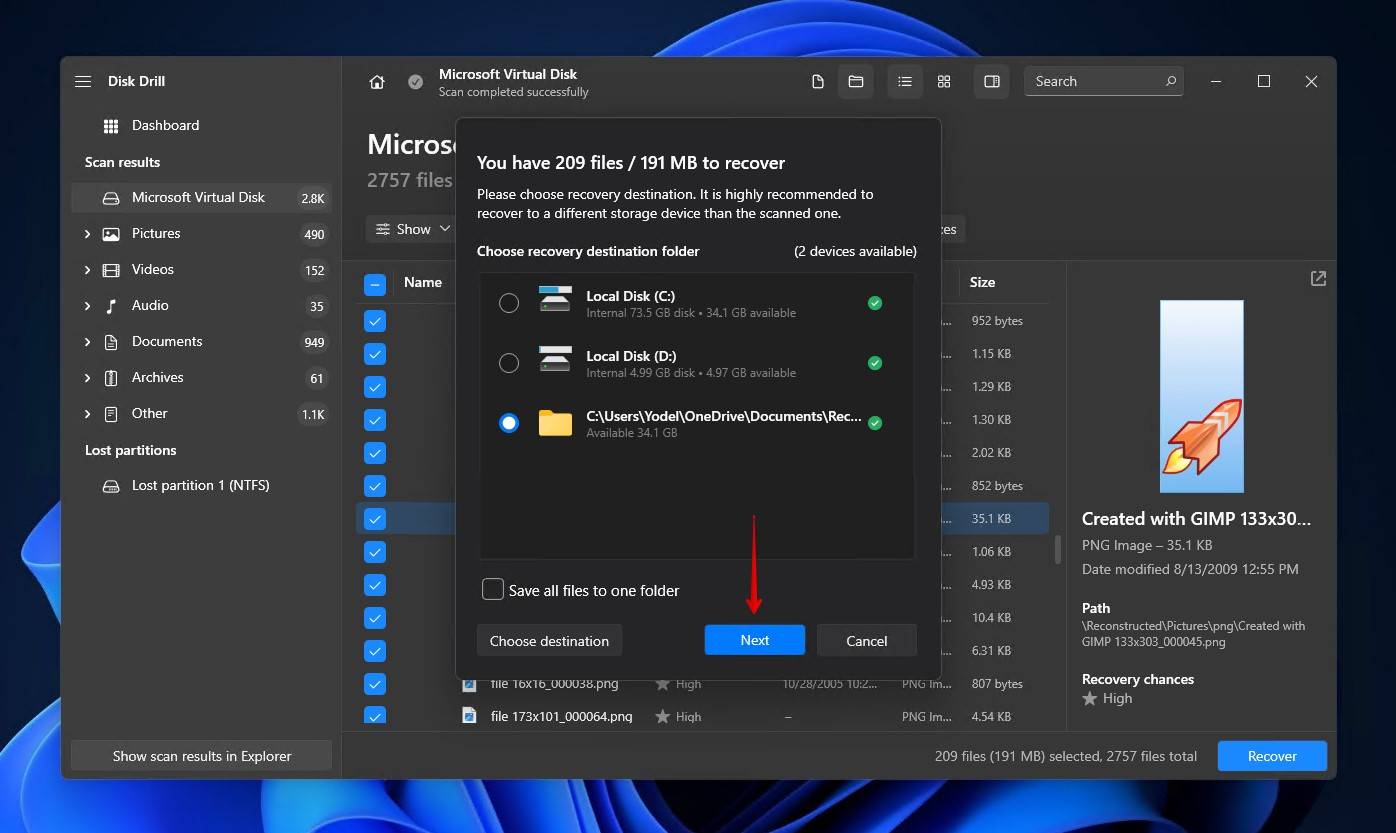
- Download and install Disk Drill. Do not install Disk Drill to the same disk from which you’re recovering the data.
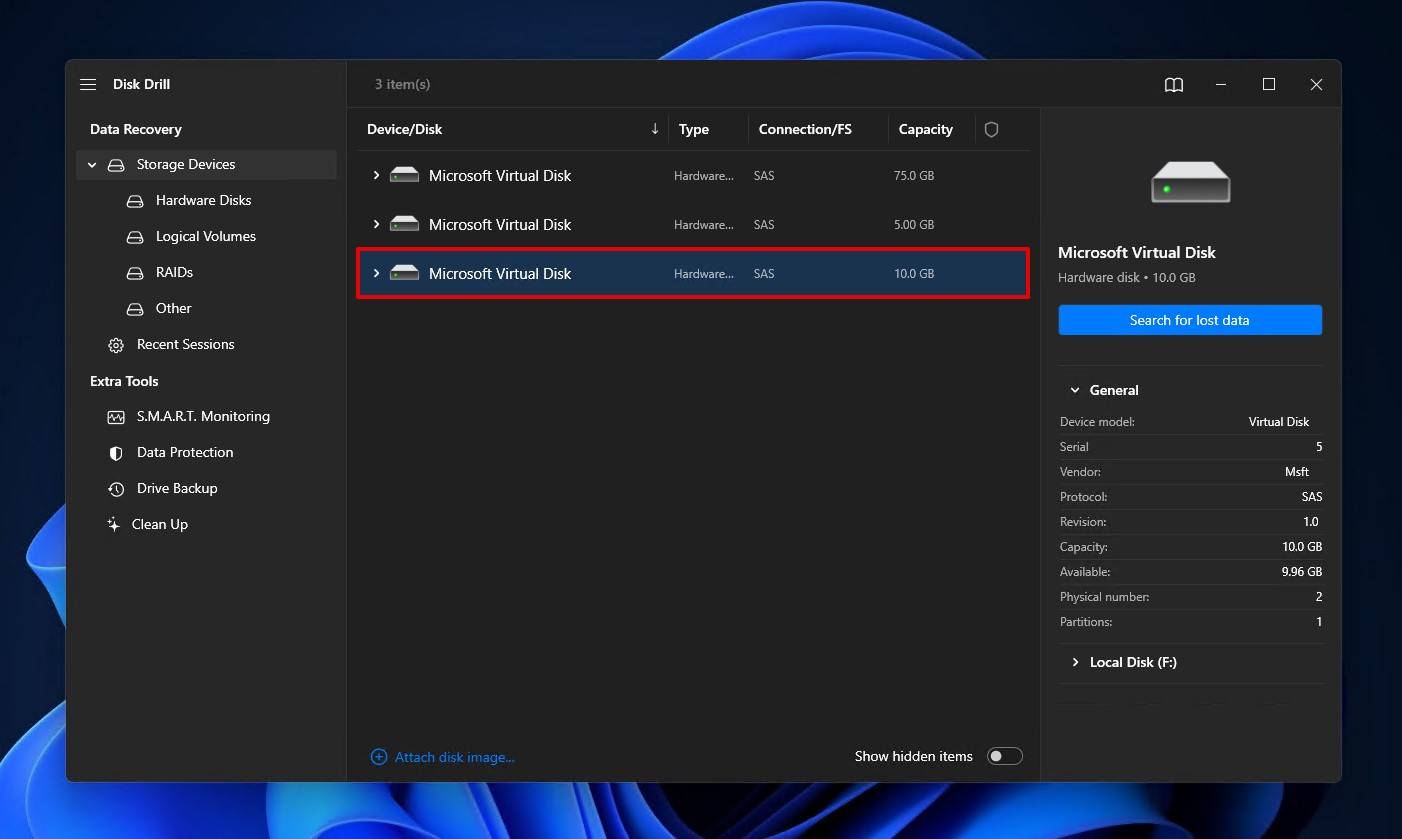
- Open Disk Drill and select the drive that held the screenshots before they were lost. If the storage device that contains your deleted screenshots is damaged, we recommend creating a byte-to-byte backup of the drive before proceeding.
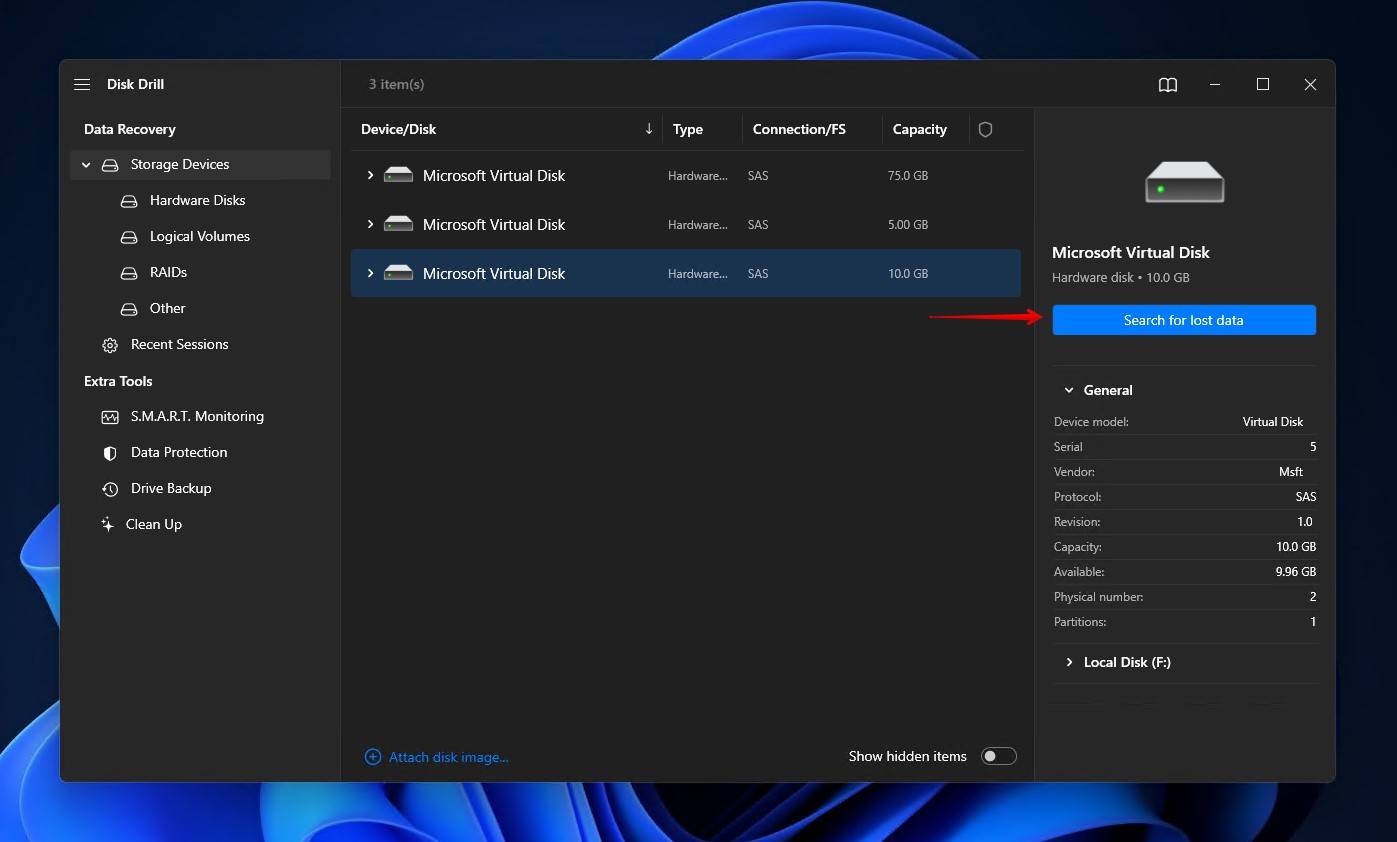
- Click on Search for lost data. Disk Drill will start scanning this particular drive for any recoverable files. This scan may take some time on larger storage devices.
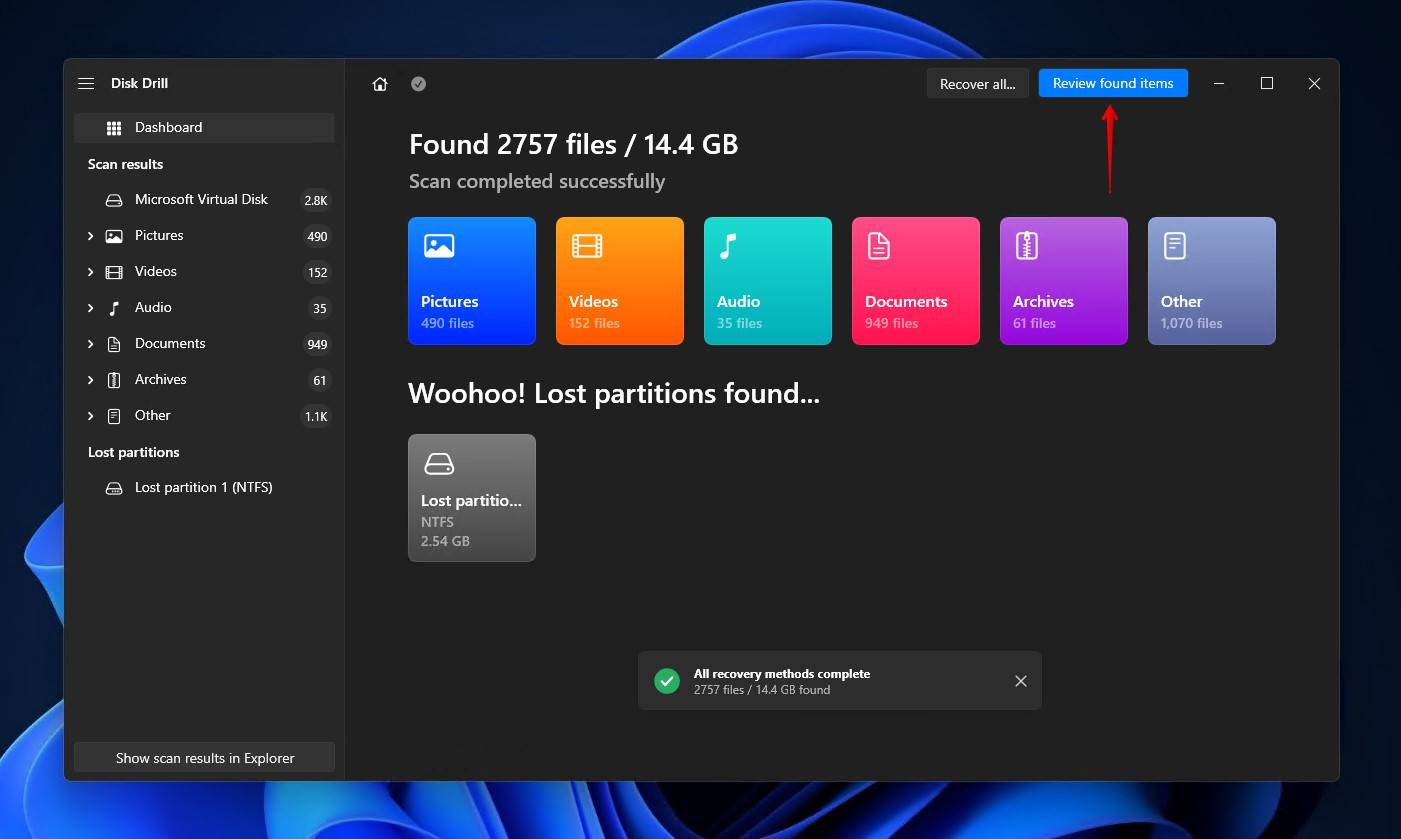
- Once the scan has finished, click on Review found items. If you only want to view images, click on the colored Pictures icon. Or, click Recover all to recover everything that was found.
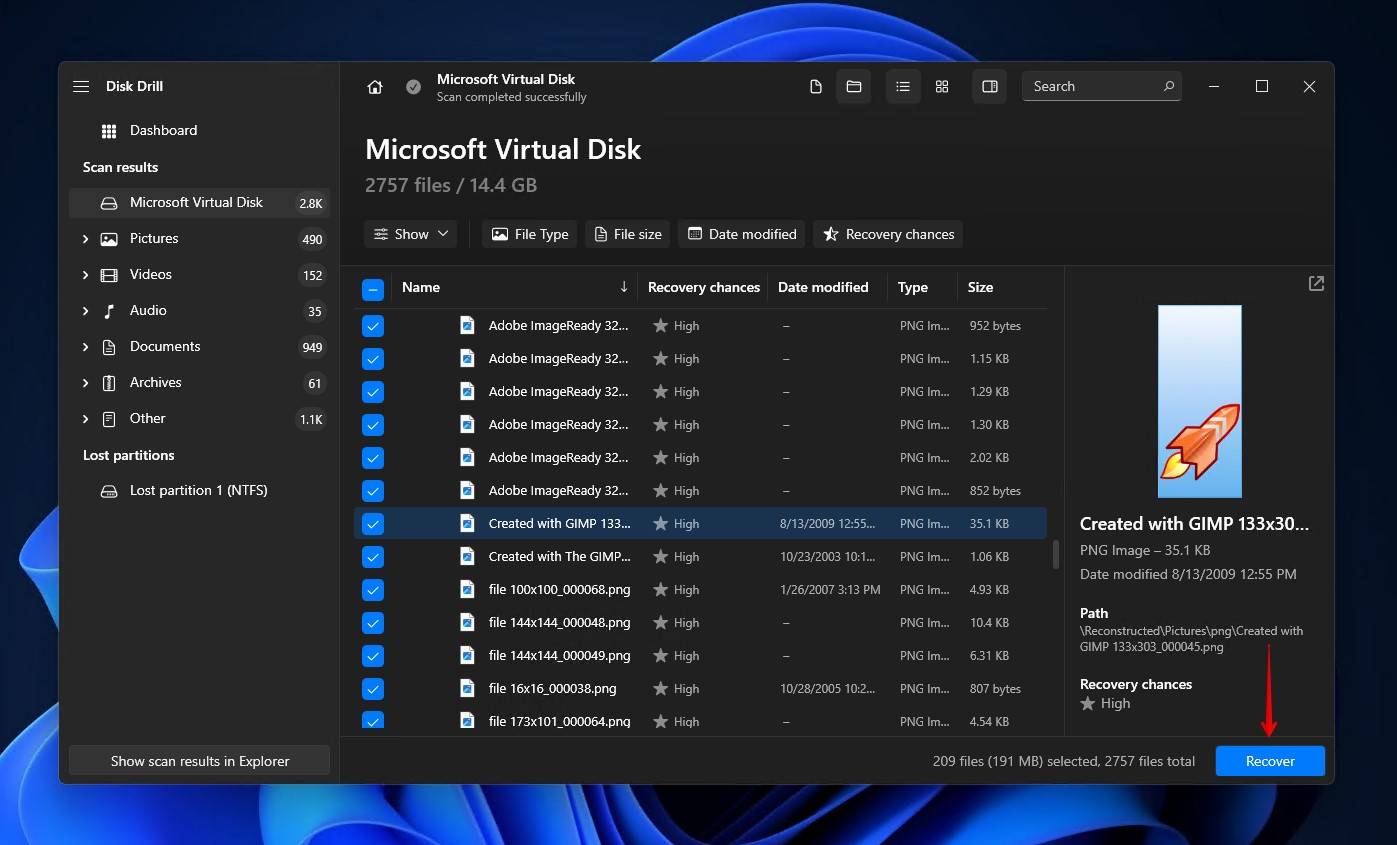
- Look for your screenshots and select them by ticking the checkbox next to their filename. In the Deleted or lost dropdown section, you can navigate to your default screenshots location (\Pictures\Screenshots\ to preview each file and determine its recoverability. Once you’ve selected the screenshots you want to recover, click on Recover.
- Choose where you want to store the recovered screenshots. Avoid choosing a location on the same device you’re recovering from, as they may end up being corrupted. When you’re ready to finish recovery, click Next.
Method 4.2: Use Data Recovery Software for Android
Just like Windows, there are numerous recovery solutions available for Android. Today, we’re going to take a look at two ways to recover screenshots from an Android device. You can either scan the device from your computer by plugging it in, or you can attempt recovery from the device directly. Let’s take a look at both methods.
How to recover data from your Android device using FoneLab on a Windows PC
FoneLab is a recovery application you can install on your Windows PC to recover screenshots from your Android phone. By connecting your device to the PC, FoneLab can scan the device’s internal storage for lost or deleted content and attempt to recover it.
FoneLab will let you scan your device for free, but in order to recover the files, you will need to pay for the registered version.
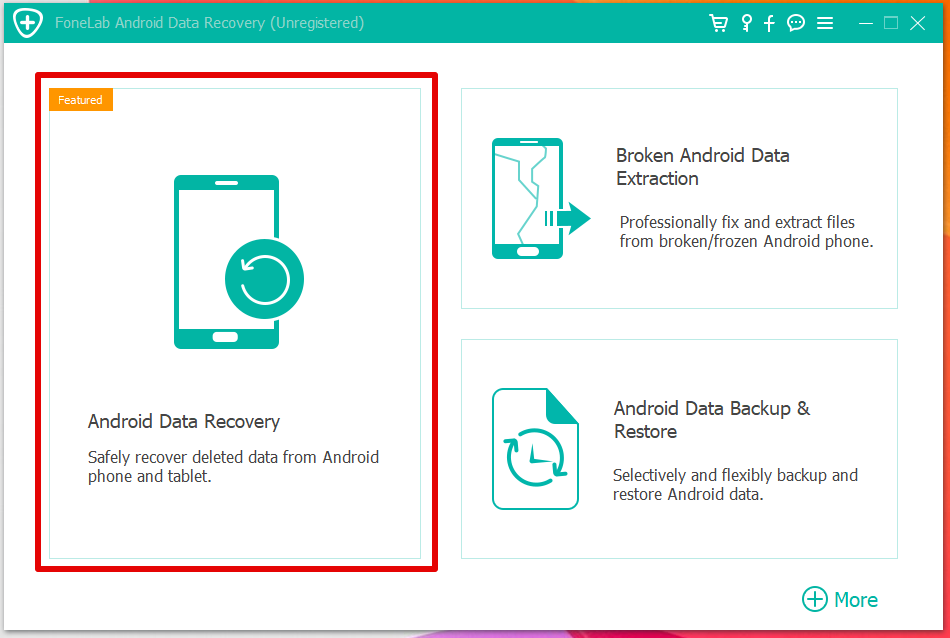
- Download and install FoneLab.
- Click on Android Data Recovery.
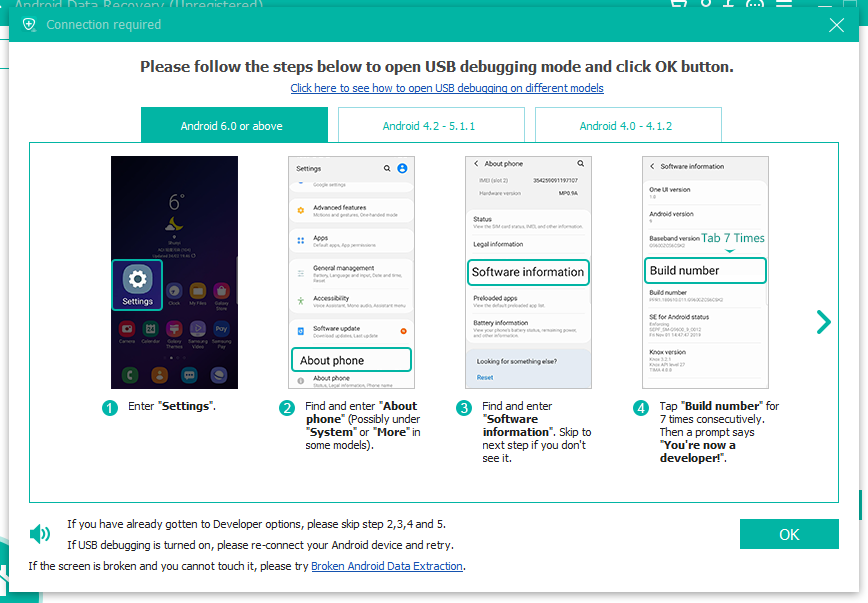
- Follow the on-screen instructions for giving your PC access to the device.
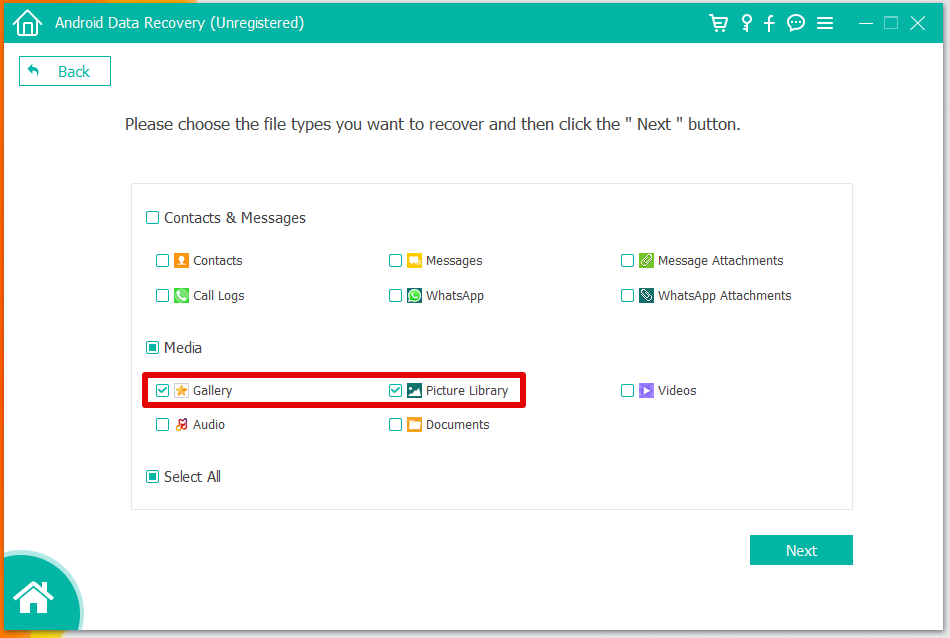
- Select the checkboxes for what file types you’d like to recover. For screenshots, select Gallery and Picture Library. Press Next.
- Go through and allow the necessary permissions for your device. Once all permissions have been granted, the scan will begin.
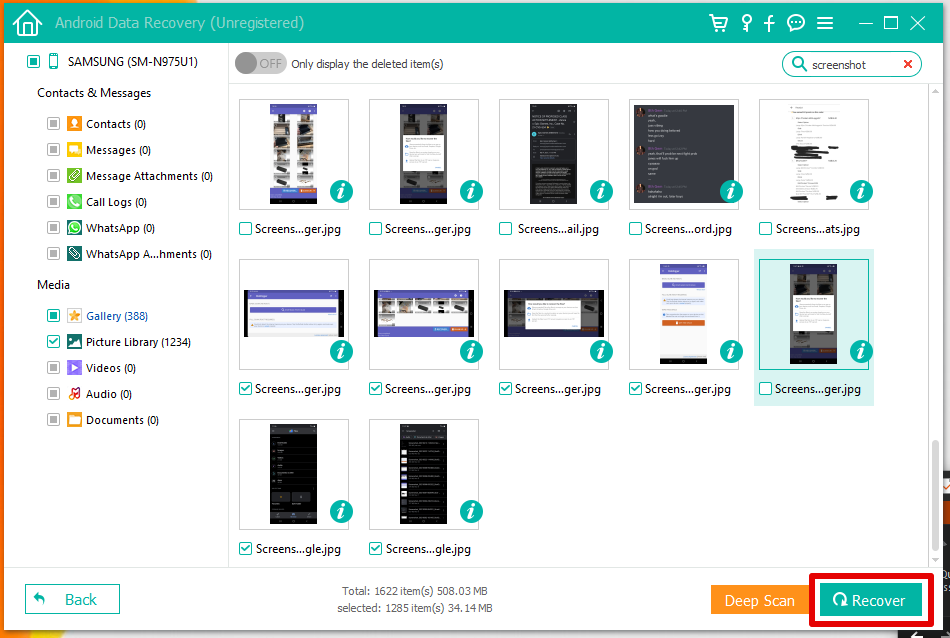
- When the scan is complete, you can filter through the results using filenames.
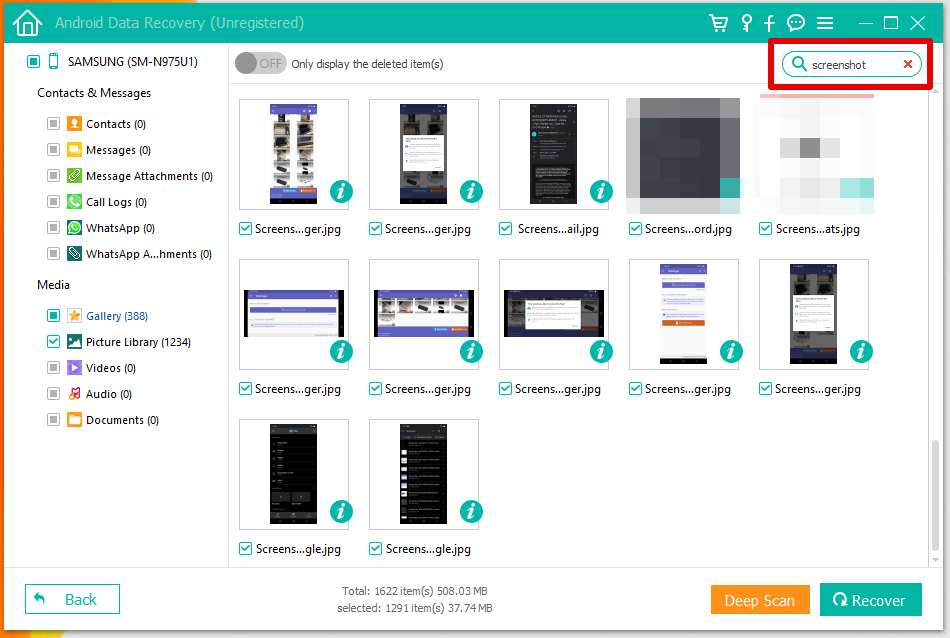
- Select the files you’d like to recover by ticking their box, then select Recover.
How to recover data from your Android device using DiskDigger
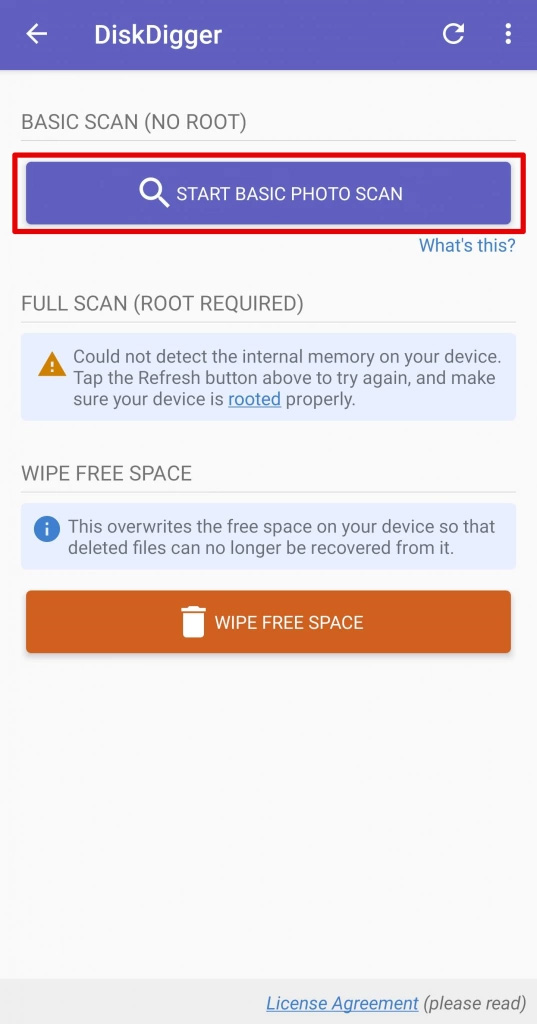
DiskDigger is a recovery app you can download directly to your Android device and use to recover files from your internal and external storage. In function, it’s very similar to Disk Drill and is designed to be easy to use for any user. Note, however, that if you don’t have root access to your device, only compressed versions of the screenshots can be recovered.
- Install DiskDigger from the Google Play Store.
- Open the app and select Start Basic Photo Scan. DiskDrill will begin to scan your device for recoverable files, including screenshots.
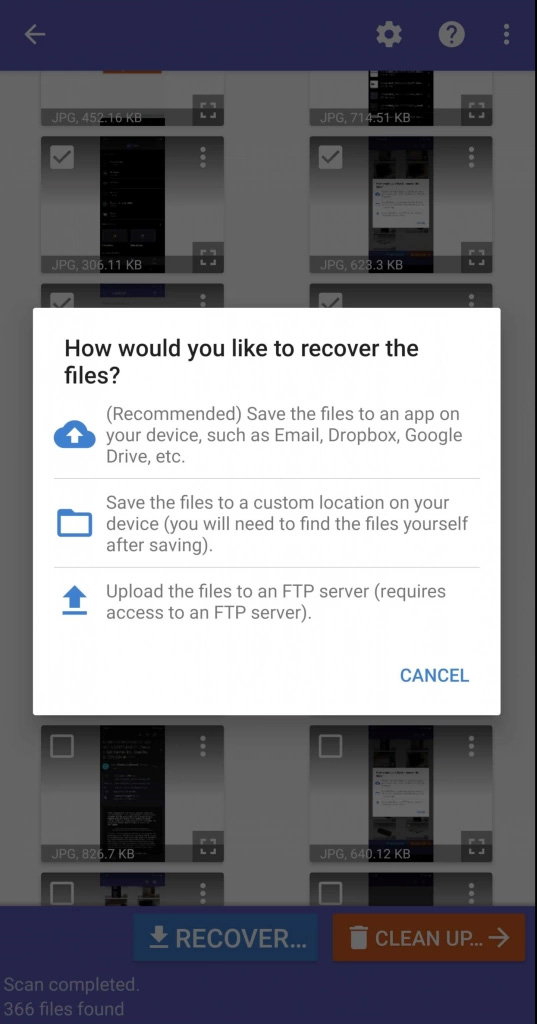
- When the scan is complete, you’ll be met with a gallery of recoverable photos. Select the photos you’d like to recover by tapping on them. When ready, tap Recover.
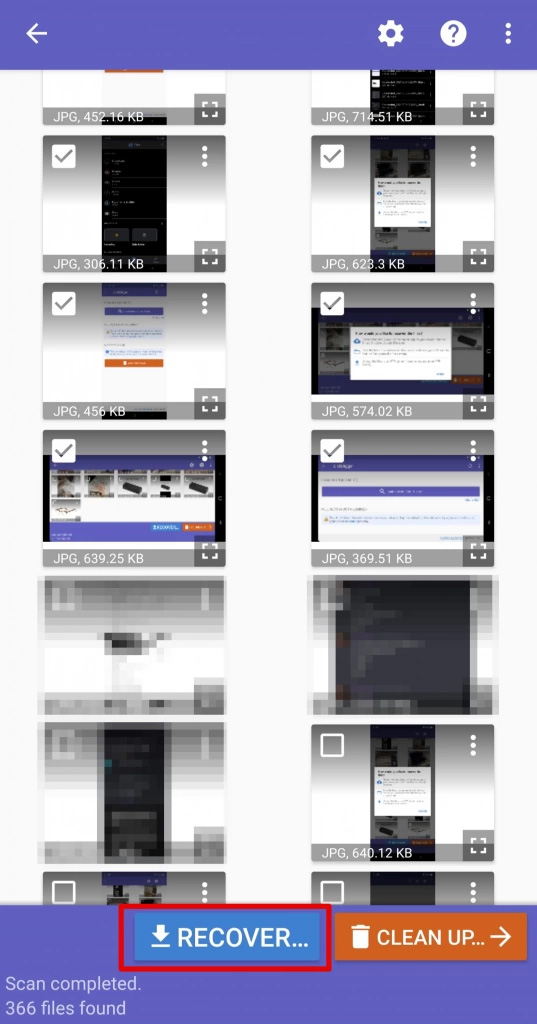
- To finalize recovery, you will need to specify a location for the files to be restored to.
Did you know that DiskDigger offers a PC version of their software? We were aware of this, and have completed a review of it.
Method 5: Explore the Recently Deleted Folder (Android)
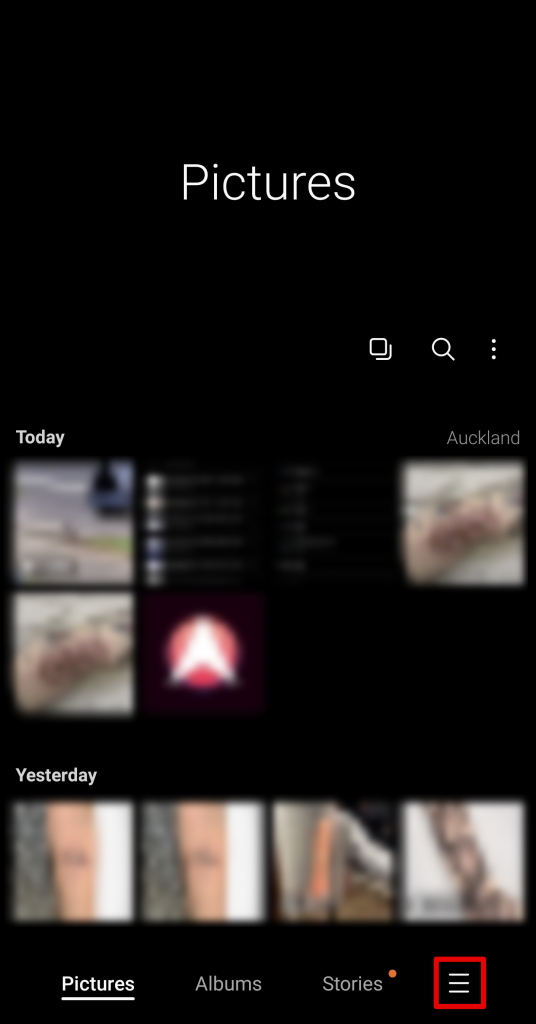
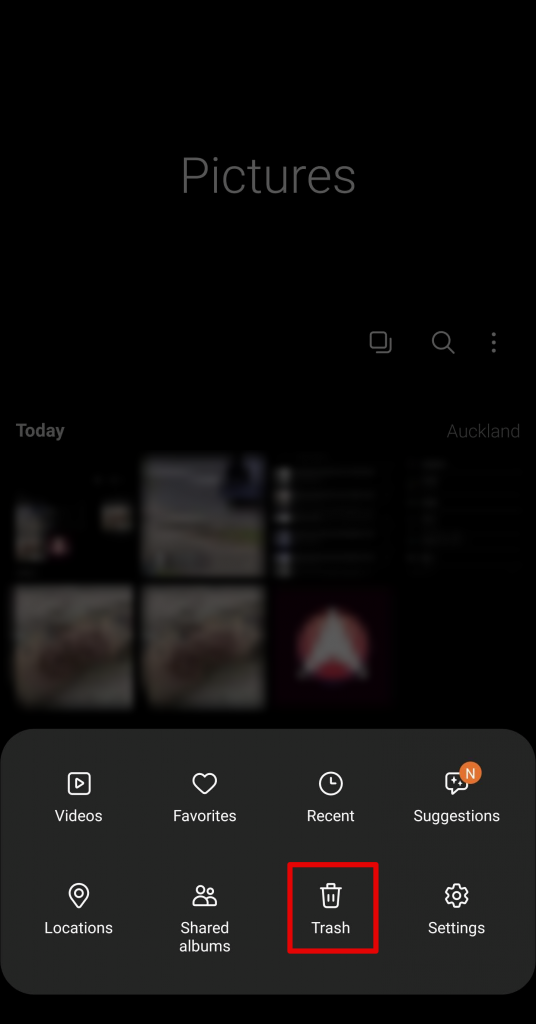
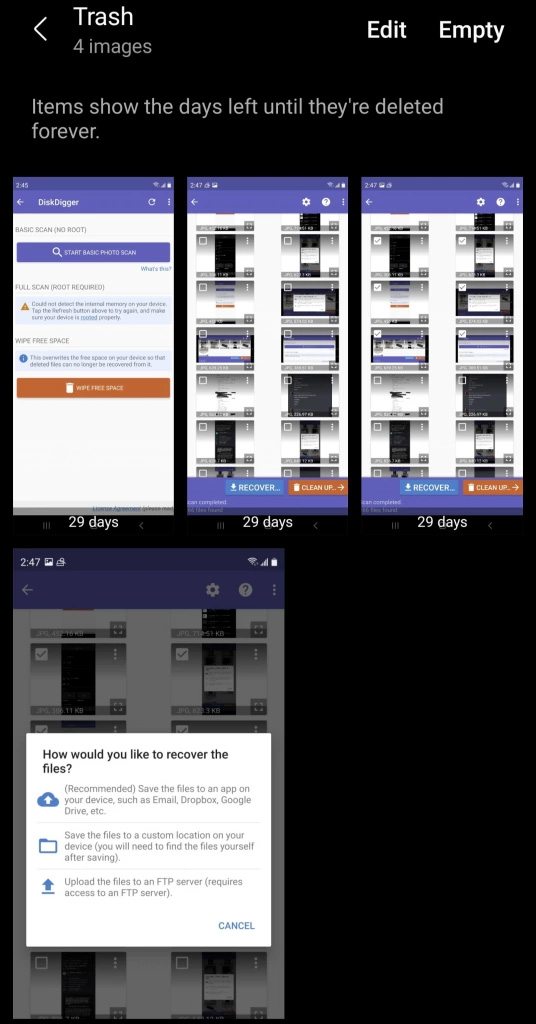
Depending on your device, you may have a “Recently Deleted”, “Trash”, or “Bin” folder where your photos go when they’re deleted. On Samsung, the Gallery app has a Trash function where deleted photos and videos reside for 30 days before being permanently deleted. You can access this by following the below steps:
- Open the Gallery app on your device and tap on the three horizontal bars.
- Tap on Trash.
- In here, you will find all of your deleted photos and videos from the past 30 days. You can recover each one by tapping on them, or hold your finger on one and select multiple to restore at once.
Method 6: Use the Google Photos App (Android)
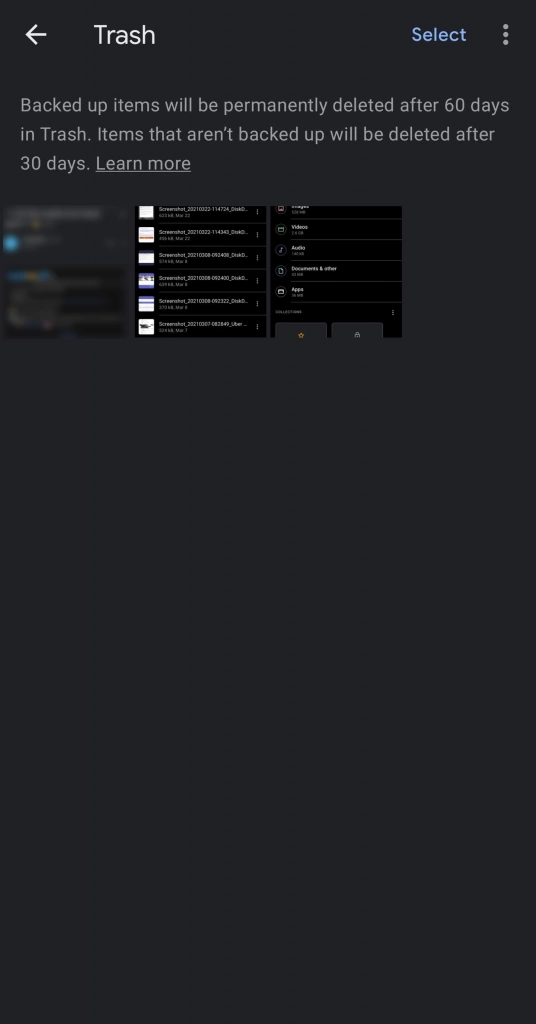
The Photos app offered by Google has a Trash folder where recently deleted photos and videos will sit for 60 days before being permanently deleted. This gives you a chance to recover deleted photos, similar to how the Recycle Bin works on Windows.
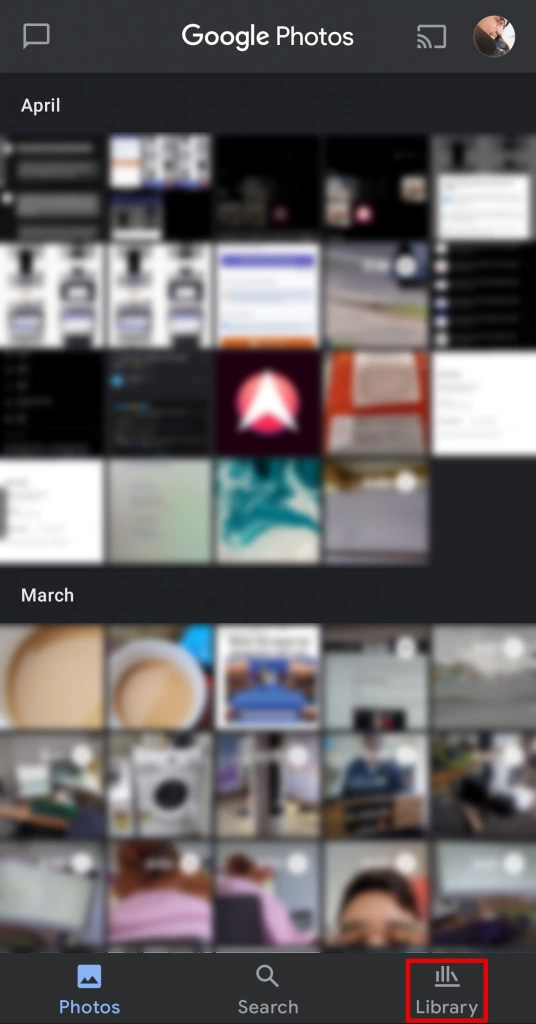
- Open the Photos app and tap on Library.
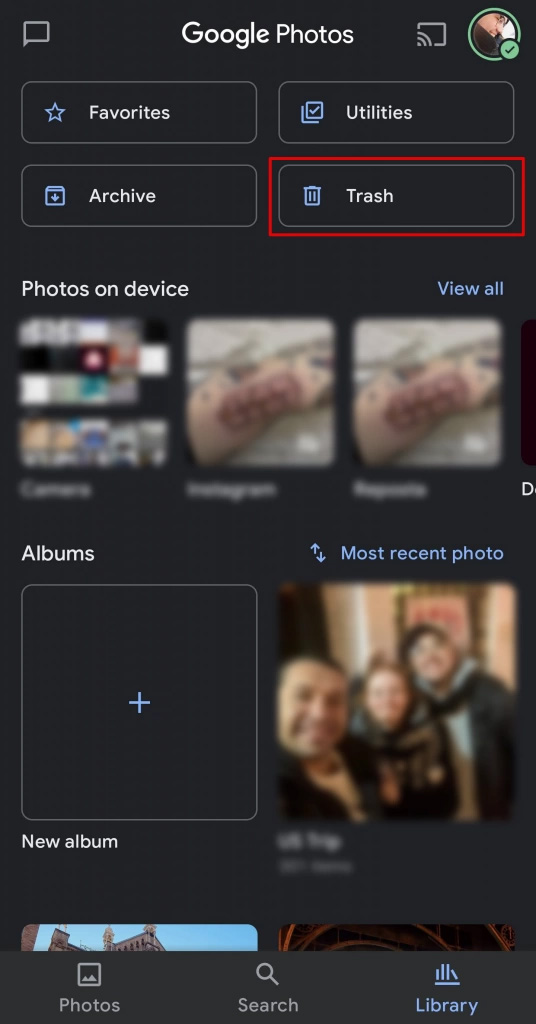
- Tap on Trash.
- Review the photos that you’d like to recover.
Method 7: Review the Google Drive Backup (Windows & Android)
If you’ve backed up your screenshots to a Google Drive account, you can easily restore them. This is because Google Drive is a cloud-based storage solution, meaning your files are stored on Google’s servers for easy access.
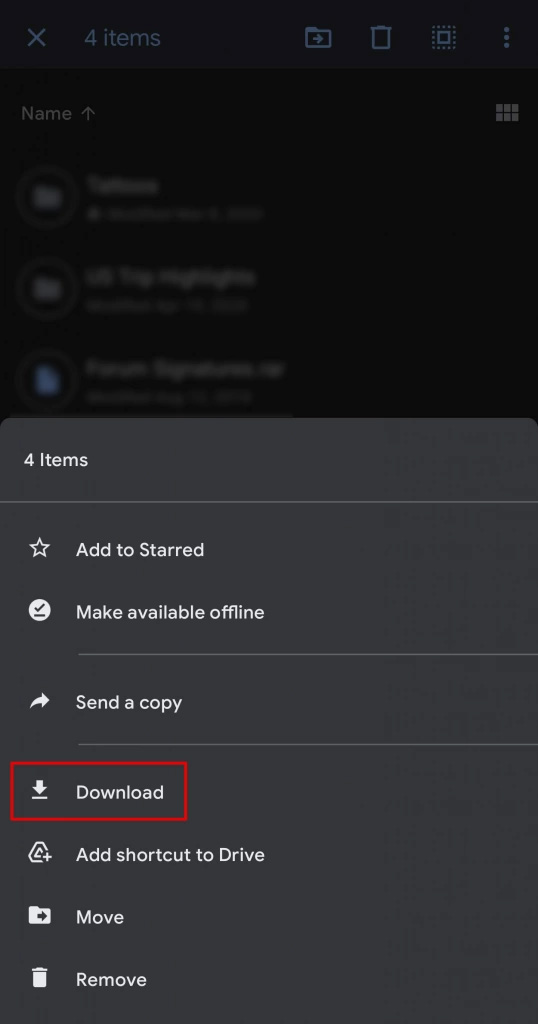
- Open the Google Drive app and navigate to where your screenshots are saved.
- Hold your finger down on a screenshot, then select the other screenshots you’d like to restore. Tap the three dots in the top right corner.
- Tap Download.
Method 8: Check Other External Sources
If you use a third-party application for capturing screenshots, there’s a chance that the screenshots have been automatically uploaded to cloud services like Google Drive, Dropbox, or OneDrive. This is only possible if the cloud service was connected to the application before the screenshots were deleted from your computer.
To see if this is the case, check the preferences of the software you use. You may be able to see where these screenshots are uploaded. If not, it may at least provide you with the path of the folder where the screenshots are stored locally.
Again, we’re going to use Monosnap for this demonstration. In this case, we’ll guide you through how to access the cloud storage provided with a free account to see if any deleted screenshots are available to download:
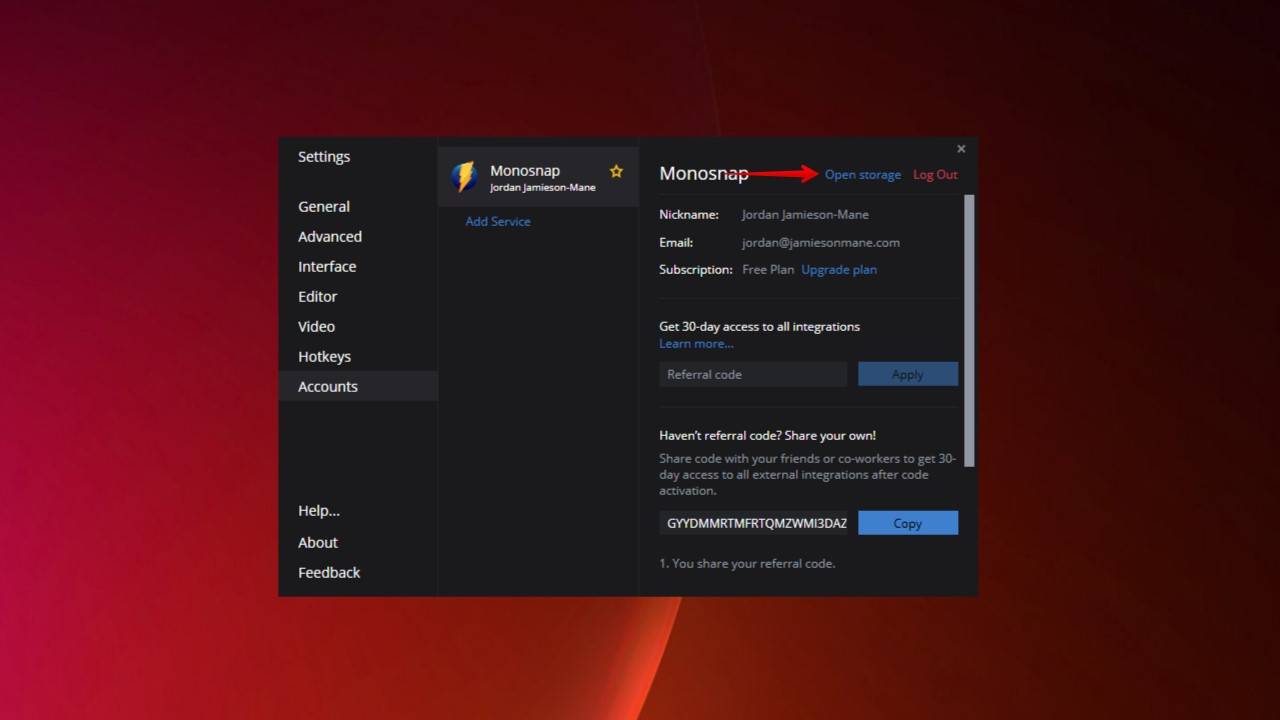
- Right-click on the Monosnap icon in your taskbar, then click Settings.
- Click Accounts, then click Open Storage.
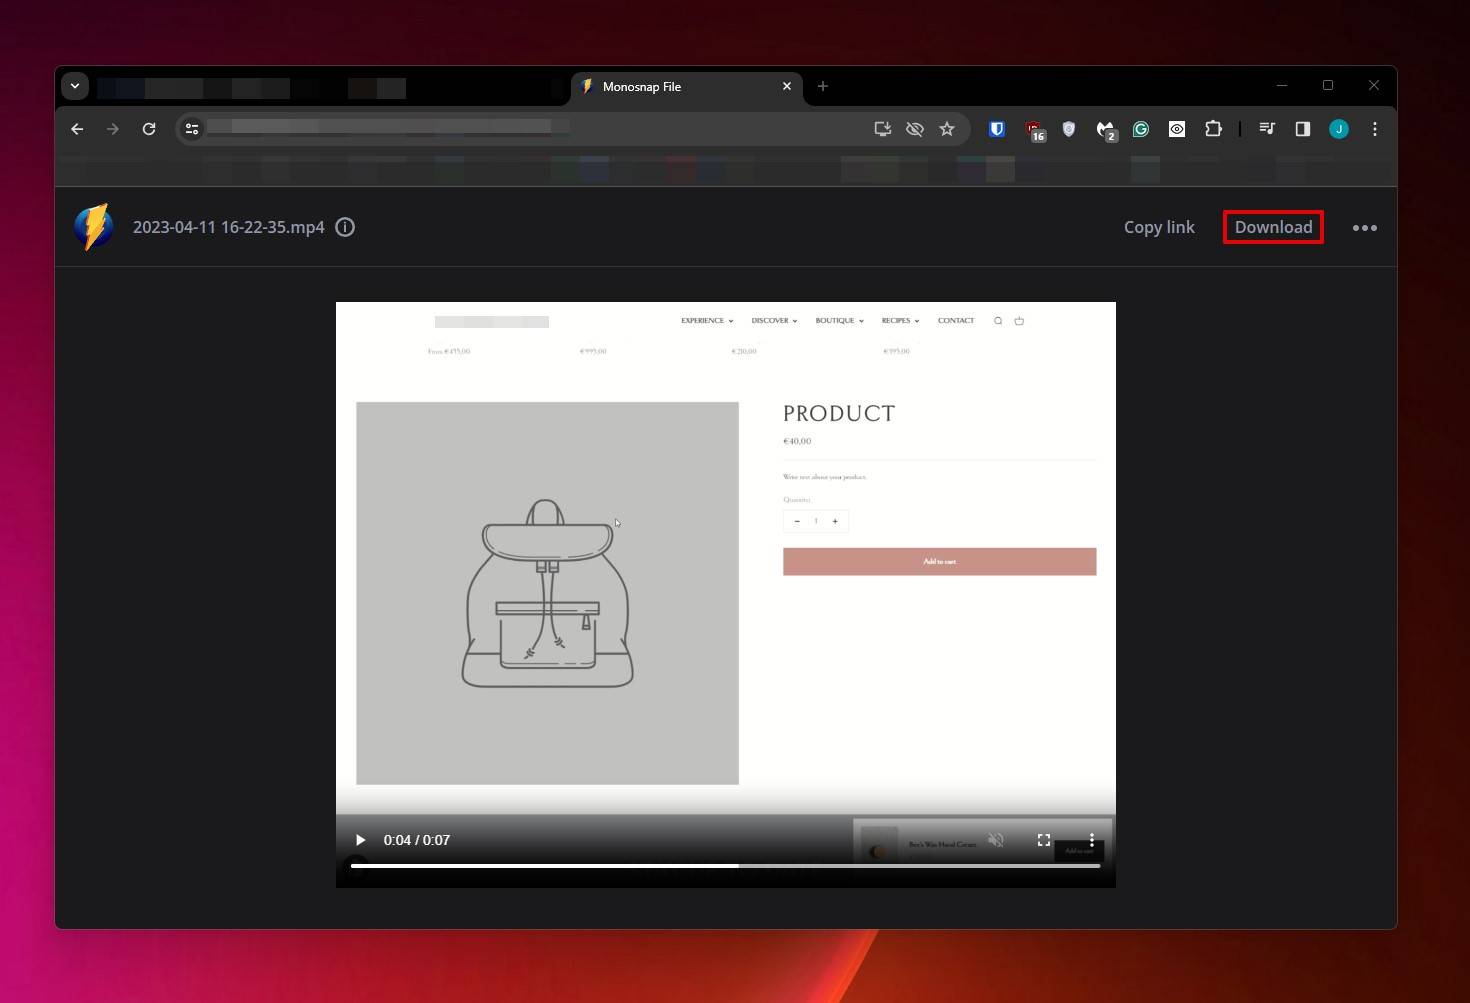
- Find your screenshot and open it. Once you open it, you will receive the option to download it.
Reasons Why Your Screenshots Are Lost or Deleted from Android & Windows
Like all data, screenshots can be lost for various reasons. If you’ve noticed that you’re regularly losing screenshots, perhaps you should take a look at some of the most common reasons why screenshots are lost below so you can better understand why it’s happening.
- 💽 Disk corruption – A disk drive can become corrupted because of sudden power failure, an interrupted drive format, or simply because the disk drive is on its last legs. When this occurs, it can cause some files to become inaccessible and disappear from your computer or Android device.
- ❌ Accidental deletions – Accidental deletion is caused by human error. It happens to all of us at some point, especially when we’re deleting multiple files at once.
- 🦠 Malware or virus attack – Viruses and malware can be found on both Windows and Android systems. They can be designed to specifically target your files to render them useless, or worse, encrypt them and force you to pay a hefty sum to regain access to them.
- ✂️ Formatting – In the process of formatting a drive, all contents are erased. If your screenshots resided on the drive that was formatted, there’s a good chance that they were deleted in the process.
FAQ
How do I restore a screenshot folder?
If the Screenshots folder has been deleted from your Windows computer, you can restore it using the native backup utility File History. However, this is only possible if File History is active and contains a backup of the folder. If it wasn’t active at the time of deletion, then you will need to use data recovery software to restore the folder.
Can you retrieve old print screens?
Yes, you can. Although the screenshots may seem like they’re gone forever, in most instances, they can be recovered fairly easily. The key to recovering old print screens is to act with haste. If they have been deleted, then you need to attempt recovery before the drive has a chance to overwrite the deleted screenshots with new data.
How to recover deleted screenshots on a Mac?
There are a lot of ways you can recover data, including screenshots, from a Mac. Take a look at our top solutions to recover deleted screenshots on your Mac.
How to recover deleted screenshots on Chromebook?
Unless your screenshots were stored in the cloud through Google Photos or Google Drive, there is likely no way to recover deleted screenshots from your Chromebook. The internal storage on Chromebooks is temporary, and should not be used to store files locally for long. And, because the Chromebooks are always encrypted, there’s no way to recover the data by removing the drive and attempting to access it externally.
Can you recover deleted screenshots on iPhone?
In the Photos app on your iPhone, you can find your deleted pictures and screenshots in the Recently Deleted album. Anything stored in the Recently Deleted album is stored for 30 days, so be sure to recover them before they’re permanently deleted.
Conclusion
Losing screenshots can be a pain. Luckily, through the methods explained in this article, you can get your screenshots back in no time.
To help protect your data, make it a habit to backup your screenshots and other files to an external media like a USB or external disk drive. To make sure that your files are always secure and safe from loss, consider using a cloud-based solution like Google Drive or Dropbox.
This article was written by Jordan Jamieson-Mane, a Staff Writer at Handy Recovery Advisor. It was also verified for technical accuracy by Andrey Vasilyev, our editorial advisor.
Curious about our content creation process? Take a look at our Editor Guidelines.