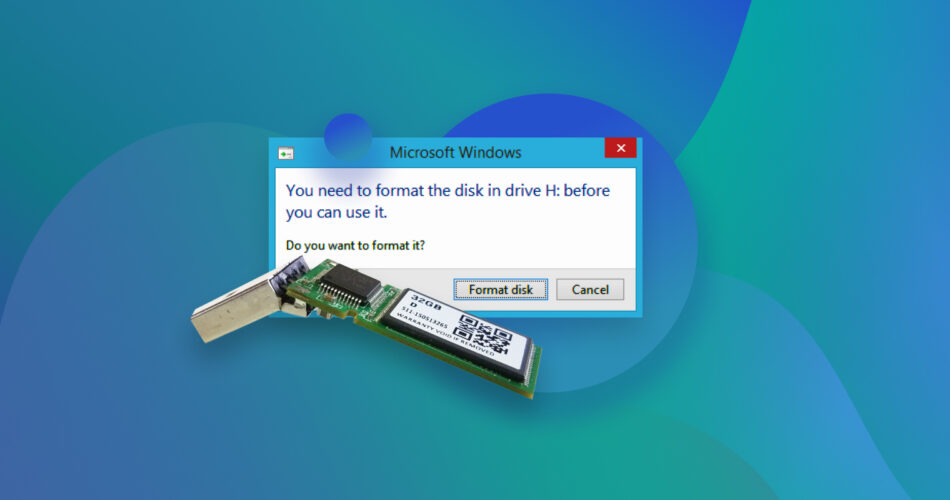
Is your USB throwing some variation of the “You need to format the disk” error? Or maybe it’s acting up in ways that make you think wiping it is the best move, but you don’t want to risk losing your files. While formatting does refresh the drive, there are other less destructive ways to get your USB drive back in working order. So, don’t hit that format button just yet because I’ll take you through multiple ways to fix a corrupted USB drive without formatting it.
Why is My Flash Drive Indicating the Need for Reconfiguration?
There are three primary reasons that can lead to an unreadable USB flash drive, prompting Windows to request reconfiguration:
- 🦠 The pen drive could have become corrupted due to a damaged file system, malware attack, or improper usage. In case of file system issues and corruption due to improper usage, users are advised to create a disk image of the drive and scan it for recoverable data. If malware caused the corruption, first perform an antivirus scan to remove the virus, then recover your data.
- ❌ The USB drive’s file system may be corrupted, formatted in an unrecognized format, or RAW, causing Windows to display the USB drive not recognized message. You can opt to recover your data, then reformat the flash drive to a Windows-recognized format.
- 🧩 Conflicting, or missing drive letters (C:, D:, E:, etc) can cause the USB drive to not show up in Windows Explorer. This typically occurs due to a Windows slip-up, not a problem with the USB drive itself. You can fix this by assigning a new drive letter manually, or changing the conflicting drive letter.
- 🔌 Power outages, and improper ejection are two other common culprits behind USB drive corruption—especially if they happen while the drive was being read from, or written to. There are reports claiming that safely ejecting a USB drive is unnecessary, but real-world experience suggests otherwise. I still strongly suggest ejecting the USB drive using Windows’ safely remove hardware option before physically removing it.
- 🛠️ Physical damage could be the culprit behind the corrupted USB drive. Physically damaged USB drives are best left to experts and professional data recovery services.
How to Make Sure You Can Fix a Corrupted Flash Drive Without Losing Data
Do not skip this section, as it shows you how to back up, and recover your USB’s data without formatting. It works even if the corrupted drive is inaccessible in Windows Explorer. There’s no telling how severe the corruption is, and the drive could be on the verge of failure. Backing up your data will ensure that you keep your files, regardless if the fixes work or not.
The first course of action to take when looking to repair a USB drive without formatting is to create a disk image of the pen drive and then use a USB data recovery software tool to recover data from it. A disk image is essentially a soft copy of your entire USB drive.
The disk image eliminates the need to keep the USB drive connected to your PC when scanning it for lost data. It also protects the drive against further corruption.
Some of you may be hesitant about the efficacy of DIY data recovery. After all, it’s not always free, and data recovery programs are only tools—they can’t guarantee complete success. But the good news is that our research shows nearly 79% of DIY data recovery attempts are successful. I’d say those are good odds, considering the only other option you have is contacting a professional data recovery service that’s going to cost you exponentially more.
Disk Drill is a program that can create a disk image as well as scan the corrupted flash drive for recoverable data, even if the drive is not recognizable by Windows File Explorer. It has an easy-to-use GUI that makes even the most inexperienced PC users feel right at home. Additionally, Windows users can recover up to 100 MB of data for free, as part of Disk Drill’s free trial.
For an extensive overview of the program and all its features, take a look at our Disk Drill review. For those interested in the security aspects, we’ve also written a separate article evaluating the safety of Disk Drill.
Step 1: Backup Your USB Drive
Disk Drill’s disk imaging feature, called Byte-to-Byte Backup, is an easy way to back up the contents of your USB drive. It’s simple to use, while offering control freaks (like me) more than ample scope for fine tuning. Windows users can pick from three disk image formats—.iso, .dd, or .dmg, but macOS users are limited to .dd.
Creating a disk image is optional—you can scan the USB drive directly as well. However, we highly recommend you create one as it’s quite straightforward, and doesn’t take long at all for flash drives.
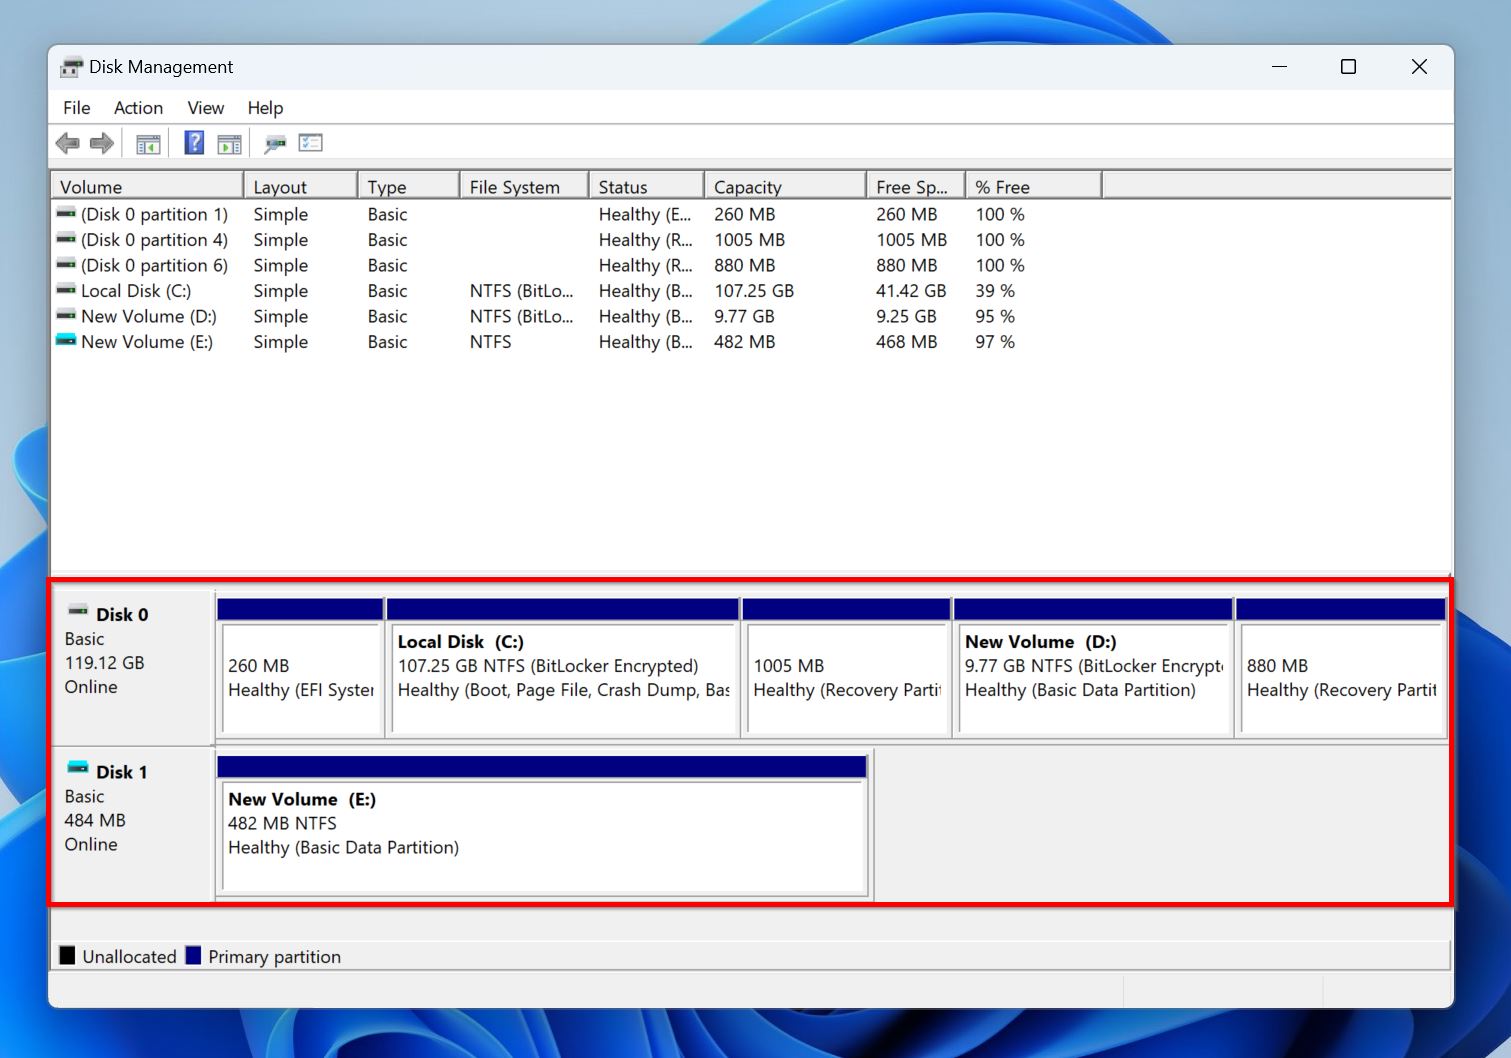
Disk Drill can create a backup of any drive as long as it’s visible in Disk Management, even if it’s inaccessible in Windows File Explorer.
Here’s how to verify your USB drive’s visible in Disk Management:
- Right click on the Start button, and click Disk Management.
- Look for your USB drive in the list of drives. If it’s there, you’re good to go.
Note: Advanced users can modify various other parameters via the Registry Editor on Windows, or Terminal on macOS. These include:
- backupSkipBlocks (0 to 128): The number of blocks to automatically skip after encountering a bad block.
- backupRetryCount (0 to 10): The number of additional attempts to read a bad block when Disk Drill encounters one.
- backupBlockSize (131072–2097152):This lets you modify the backup block size (value in bytes) manually. The value must align with your drive’s sector size.
Here’s how to back up your drive using Disk Drill:
- Download Disk Drill, and install it.
- Connect the corrupt USB drive to your PC.
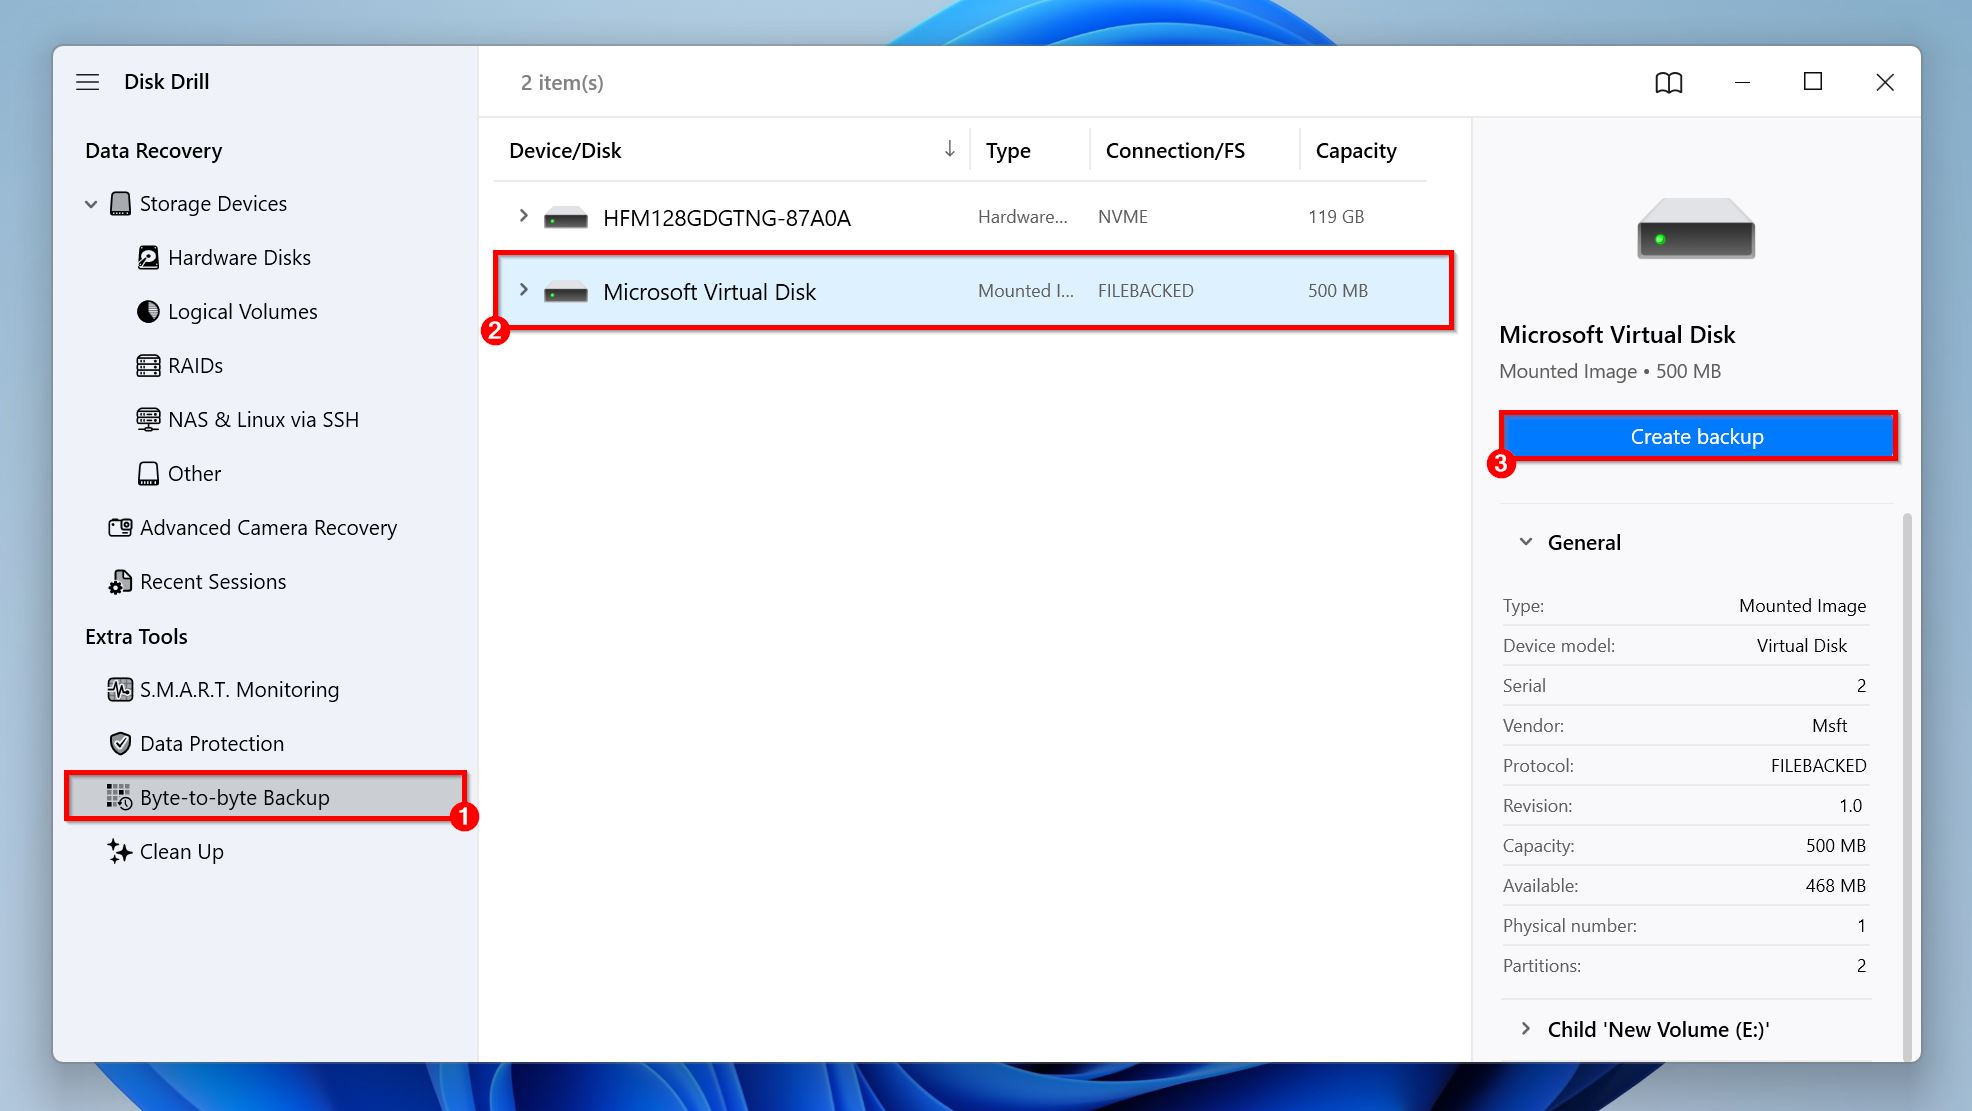
- Open Disk Drill, and click on Byte-to-byte Backup, under Extra Tools.
- Select the corrupt USB drive, and click on Create Backup.
- Click the three dots (…) next to Path and choose the location where you want to save the disk image. The destination should have enough free space (more than the USB drive’s total storage capacity). Click OK.
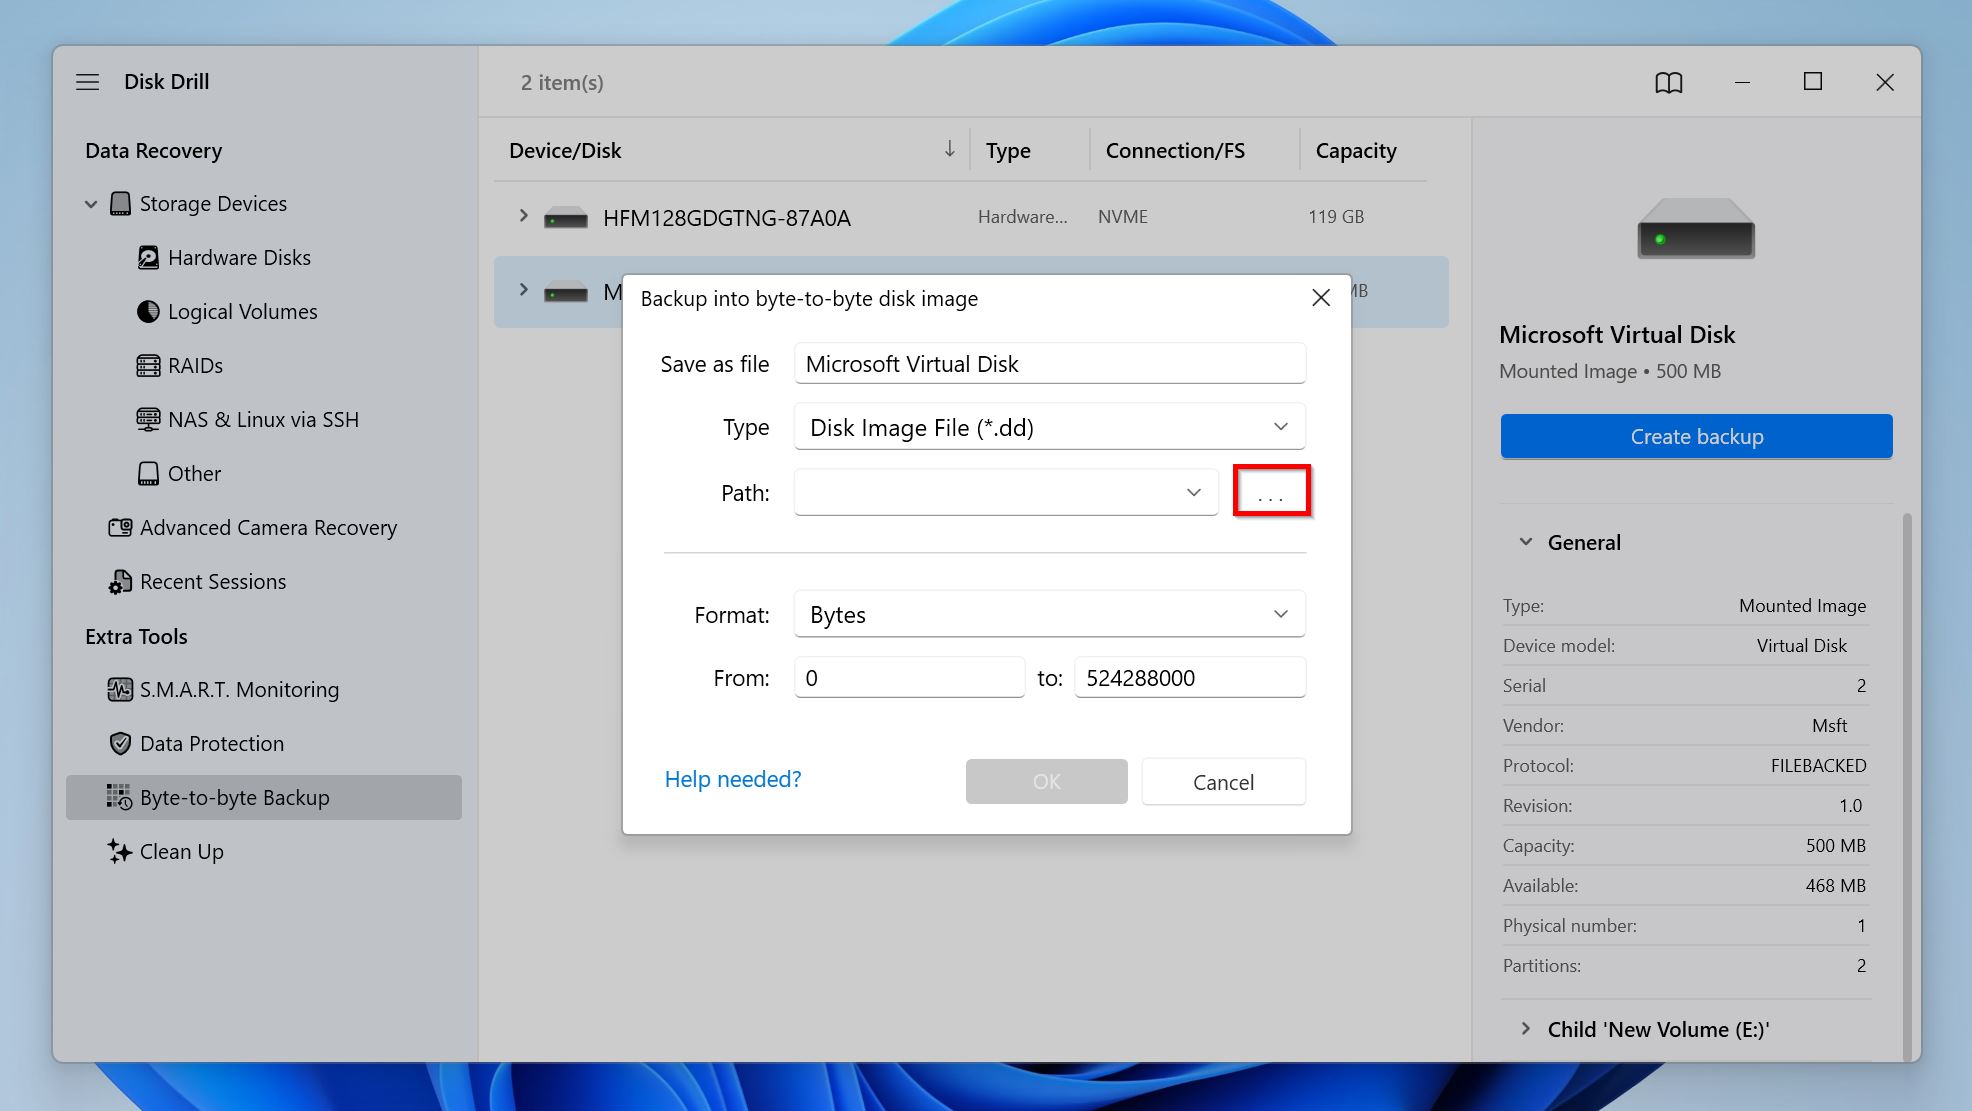
- Disk Drill will create the disk image. Bad blocks will show up in red in the Disk surface map area. The entire process may take a while, depending on your PC’s specs, and the USB drive’s size.
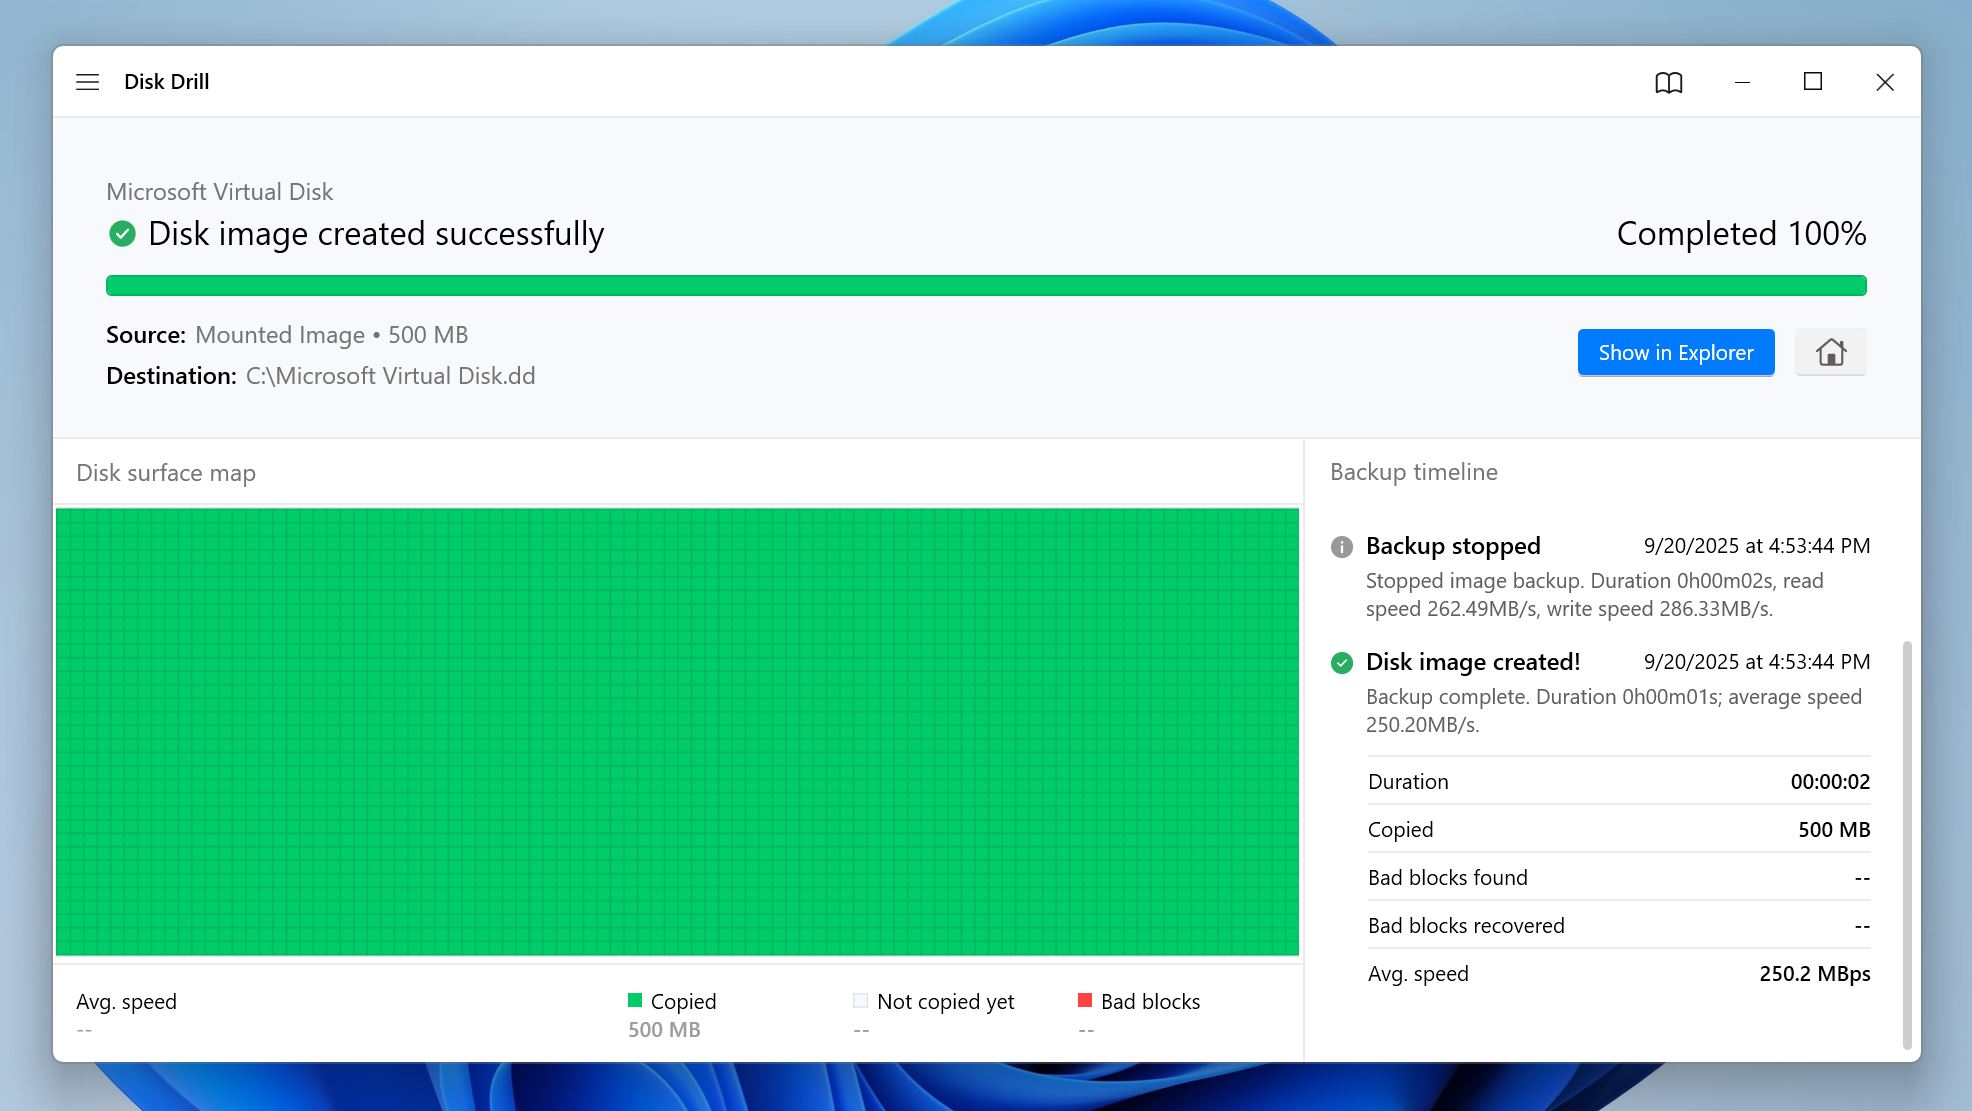
Disk Drill has versions that are compatible with modern Windows versions like Windows 7, Windows 10, Windows 11, and versions that’ll run on older Windows OSes as far back as Windows XP. The program is also compatible with macOS (Mac OS X 10.5 onwards). However, thenewer, more improved Byte-to-byte Backup feature with the Advanced Backup Module is only available on Disk Drill 6.
Step 2: Retrieve Data With a Recovery Tool
Once you’re done creating the USB drive’s disk image, you can scan and recover all your data from it using Disk Drill. While you can always try all the repair methods and come back here later, you might as well retrieve your files now since Disk Drill’s already open.
If you skipped the previous step and didn’t create a disk image, simply select your USB drive directly from the drive list (see Step 3 below).
Here’s how to recover the corrupted USB drive without formatting, using Disk Drill:
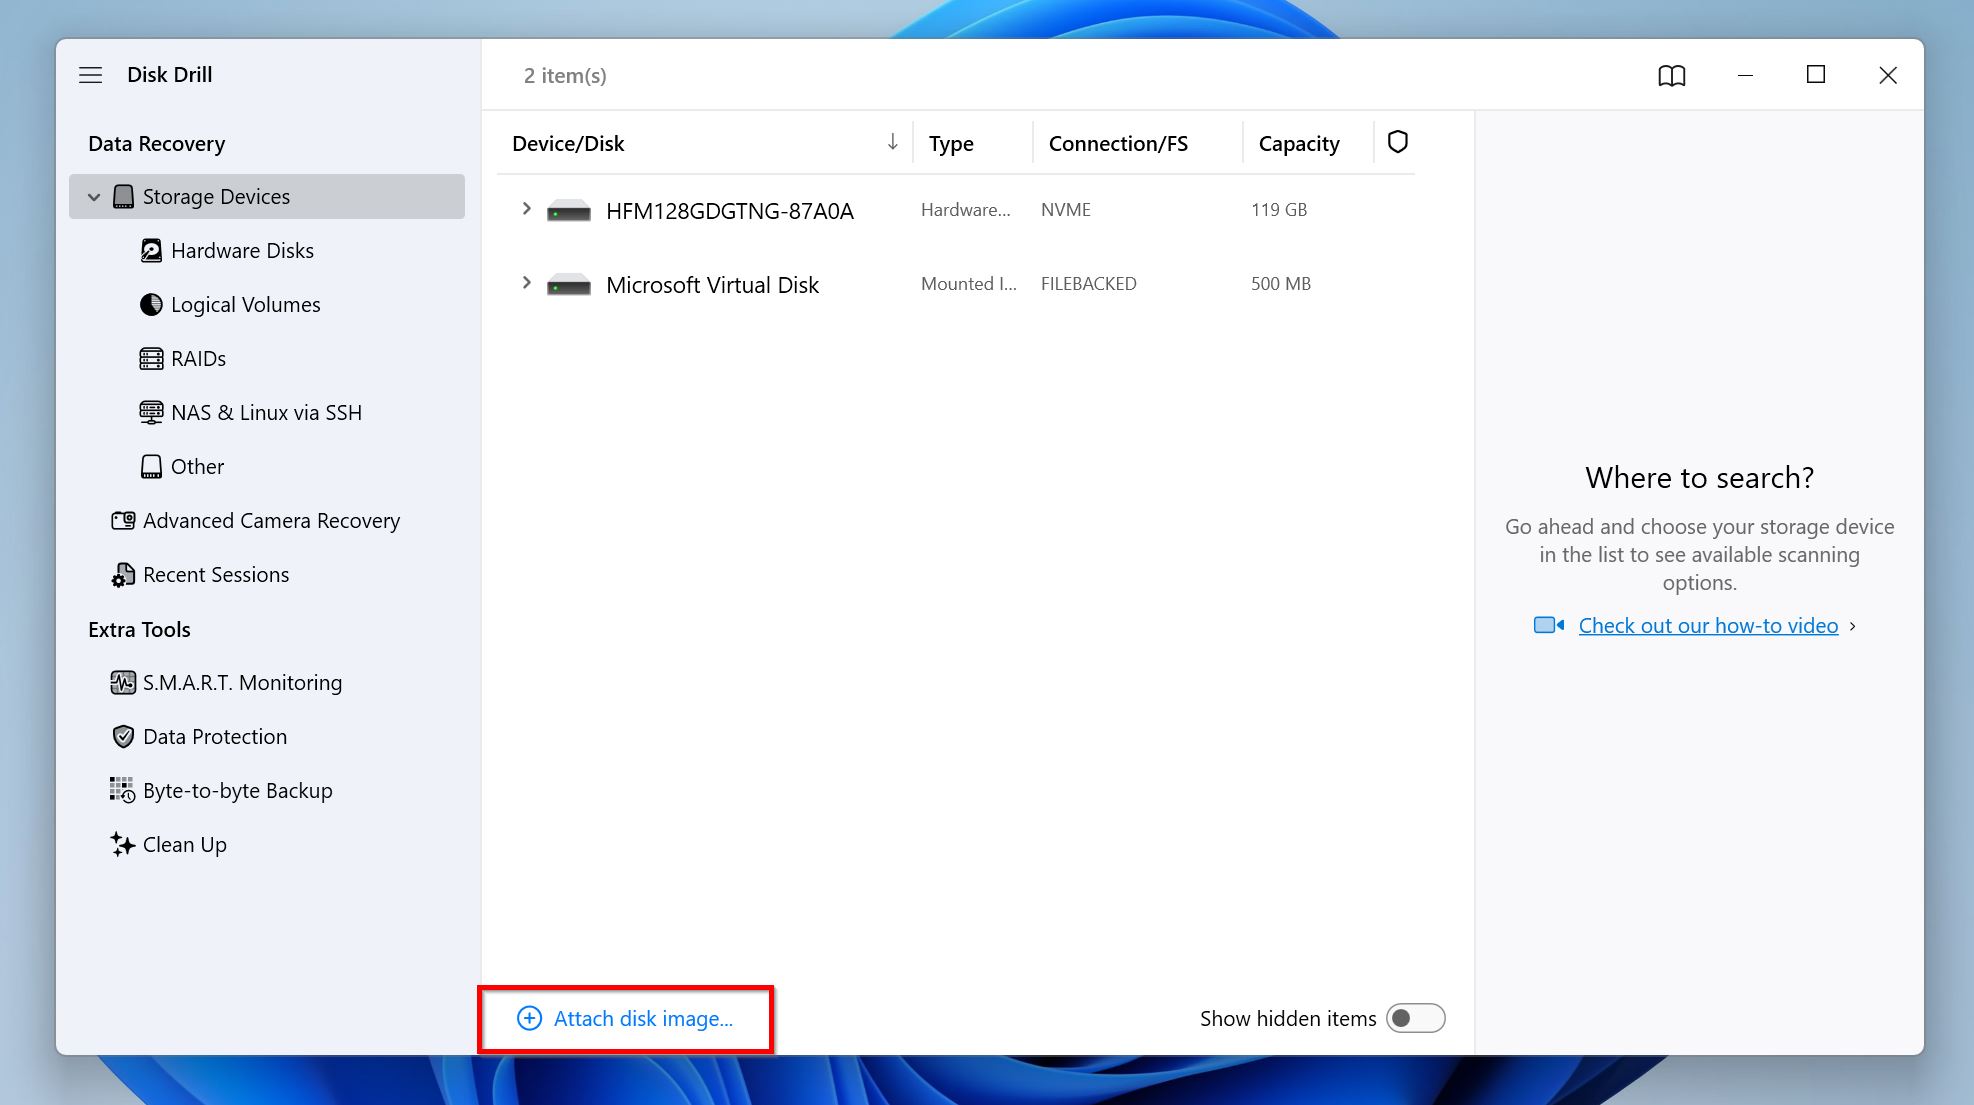
- Open Disk Drill, and click on Storage Devices, under Data Recovery.
- Click on Attach disk image, find the disk image and double-click it. It’ll be added to Disk Drill’s list of storage drives as a Mounted Image.
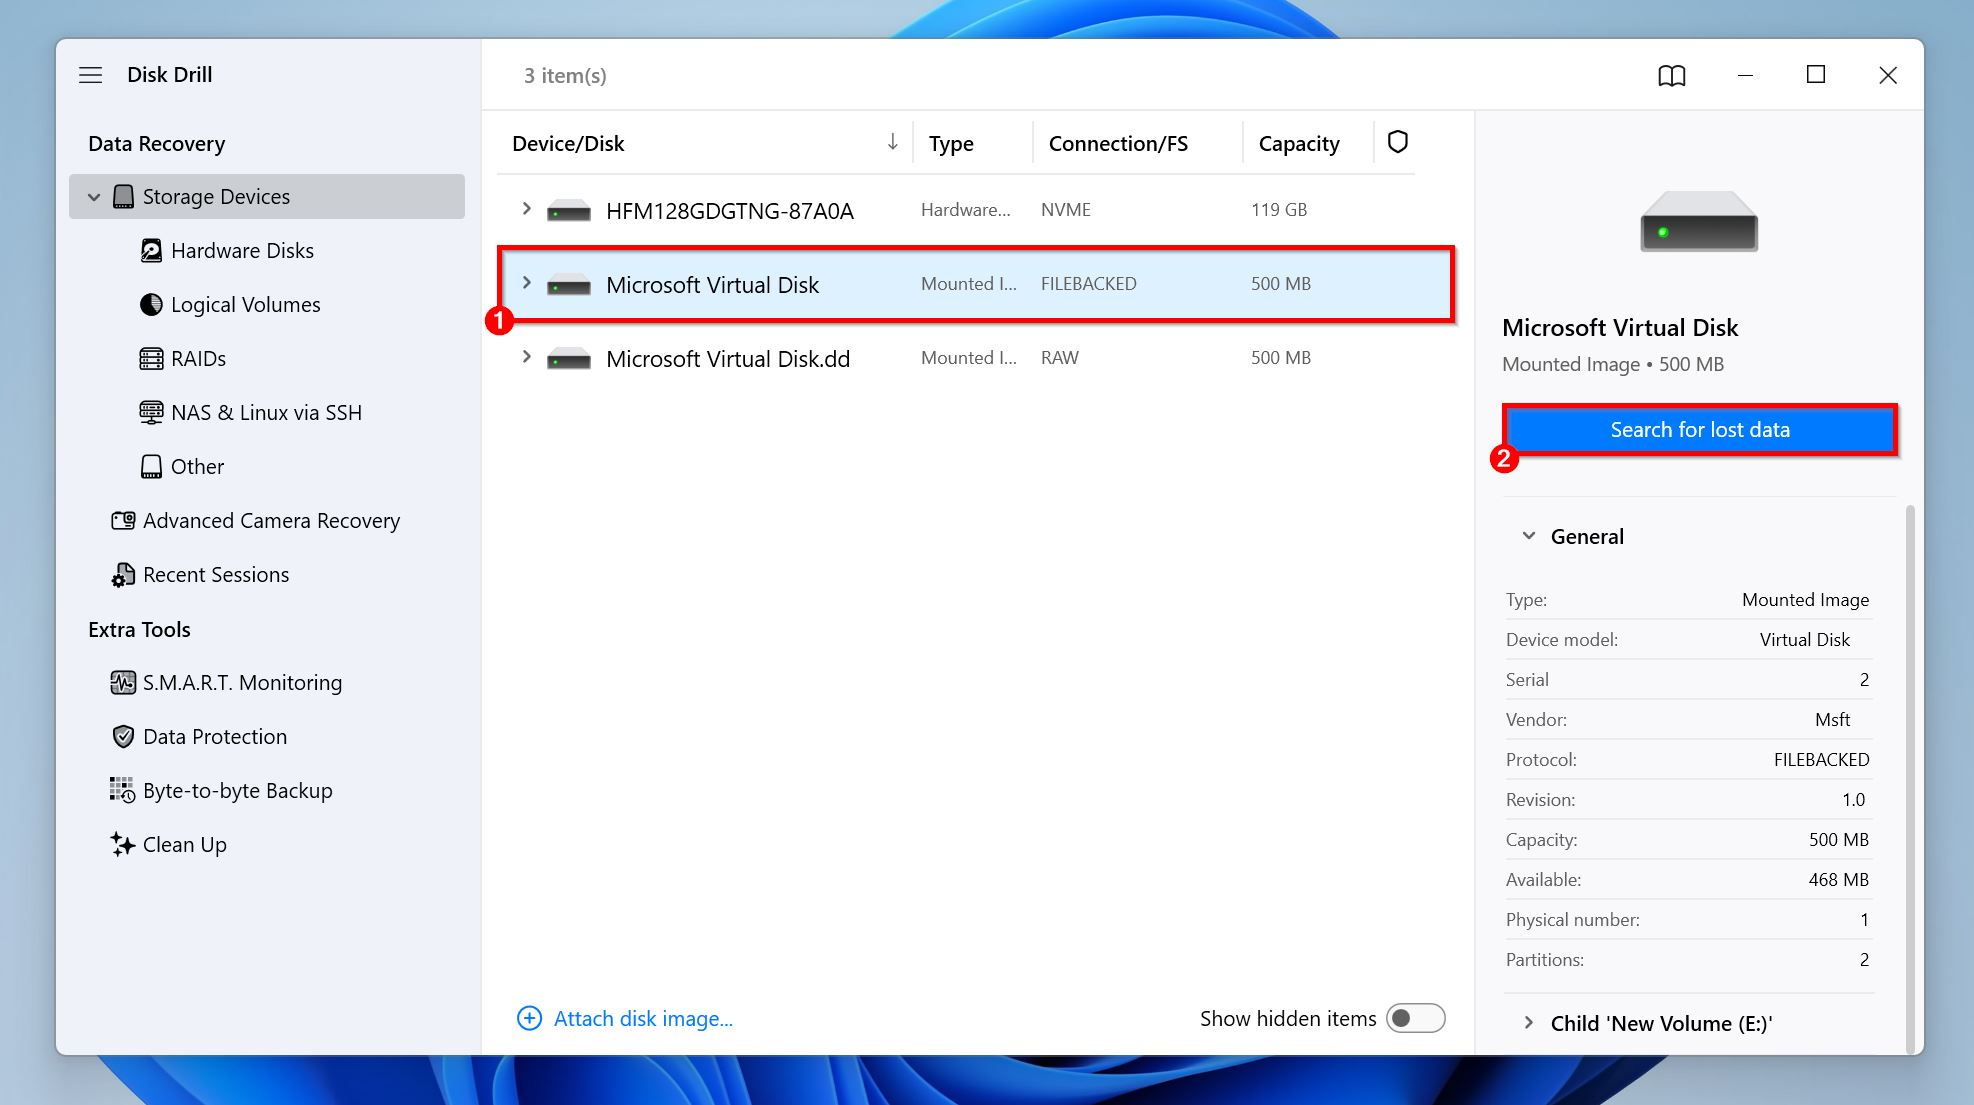
- Select the disk image you added, or select the USB drive directly in case you didn’t create one. Click on Search for lost data. Here, Disk Drill may prompt you to choose the Advanced Camera Recovery mode—choose this onlyif you’re looking to recover unedited footage from cameras and drones. Else, choose Universal Scan.
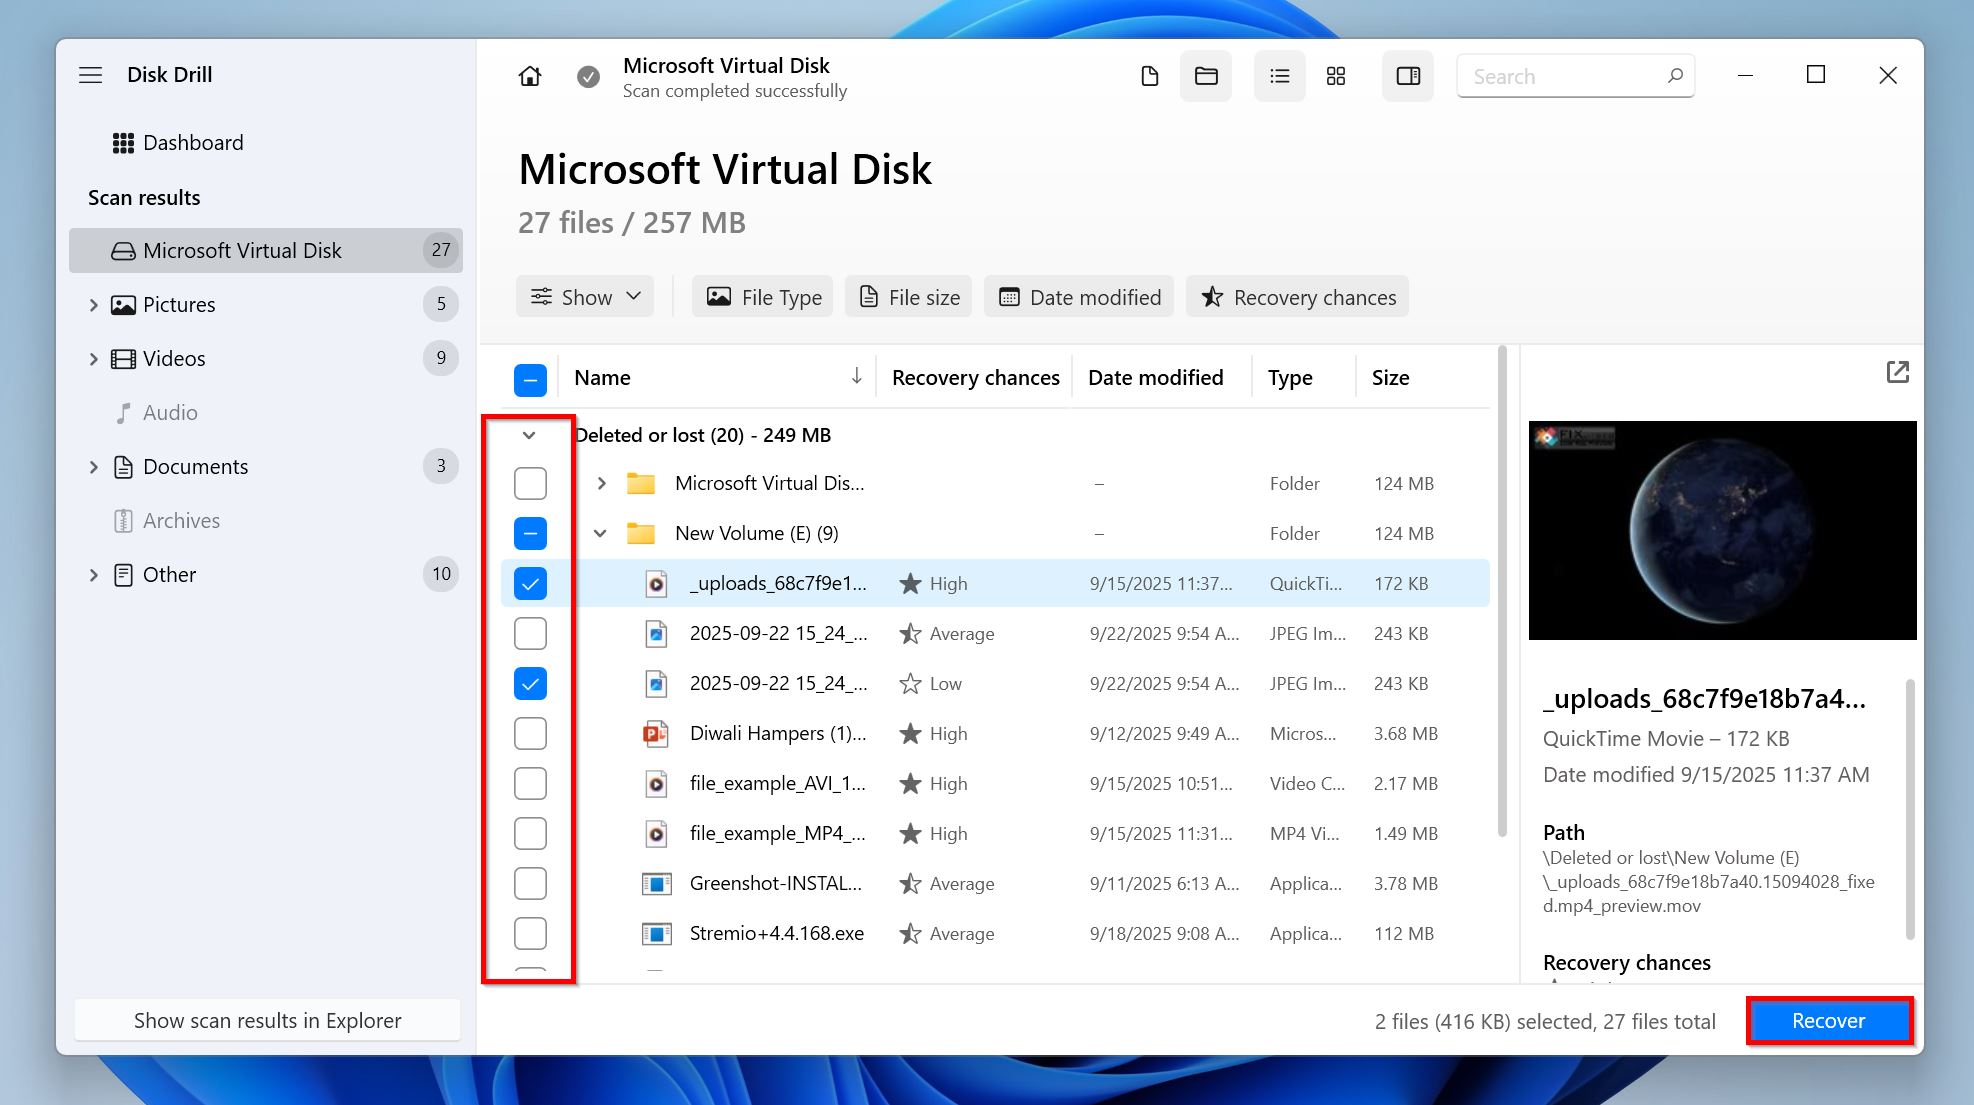
- Wait for the scan to complete. Once it’s complete, click on Review found items to see the entire list of recoverable files, or directly click on Recover All, and pick a recovery destination to retrieve all files from the USB drive’s disk image in one go. To filter results, use the relevant file type tiles. For example, if you wish to recover CorelDRAW files, click on Pictures to filter out the results, whereas if you’re looking to recover deleted Word files, click on Documents. If you suspect the files you want don’t fit squarely in any category, click on Other.

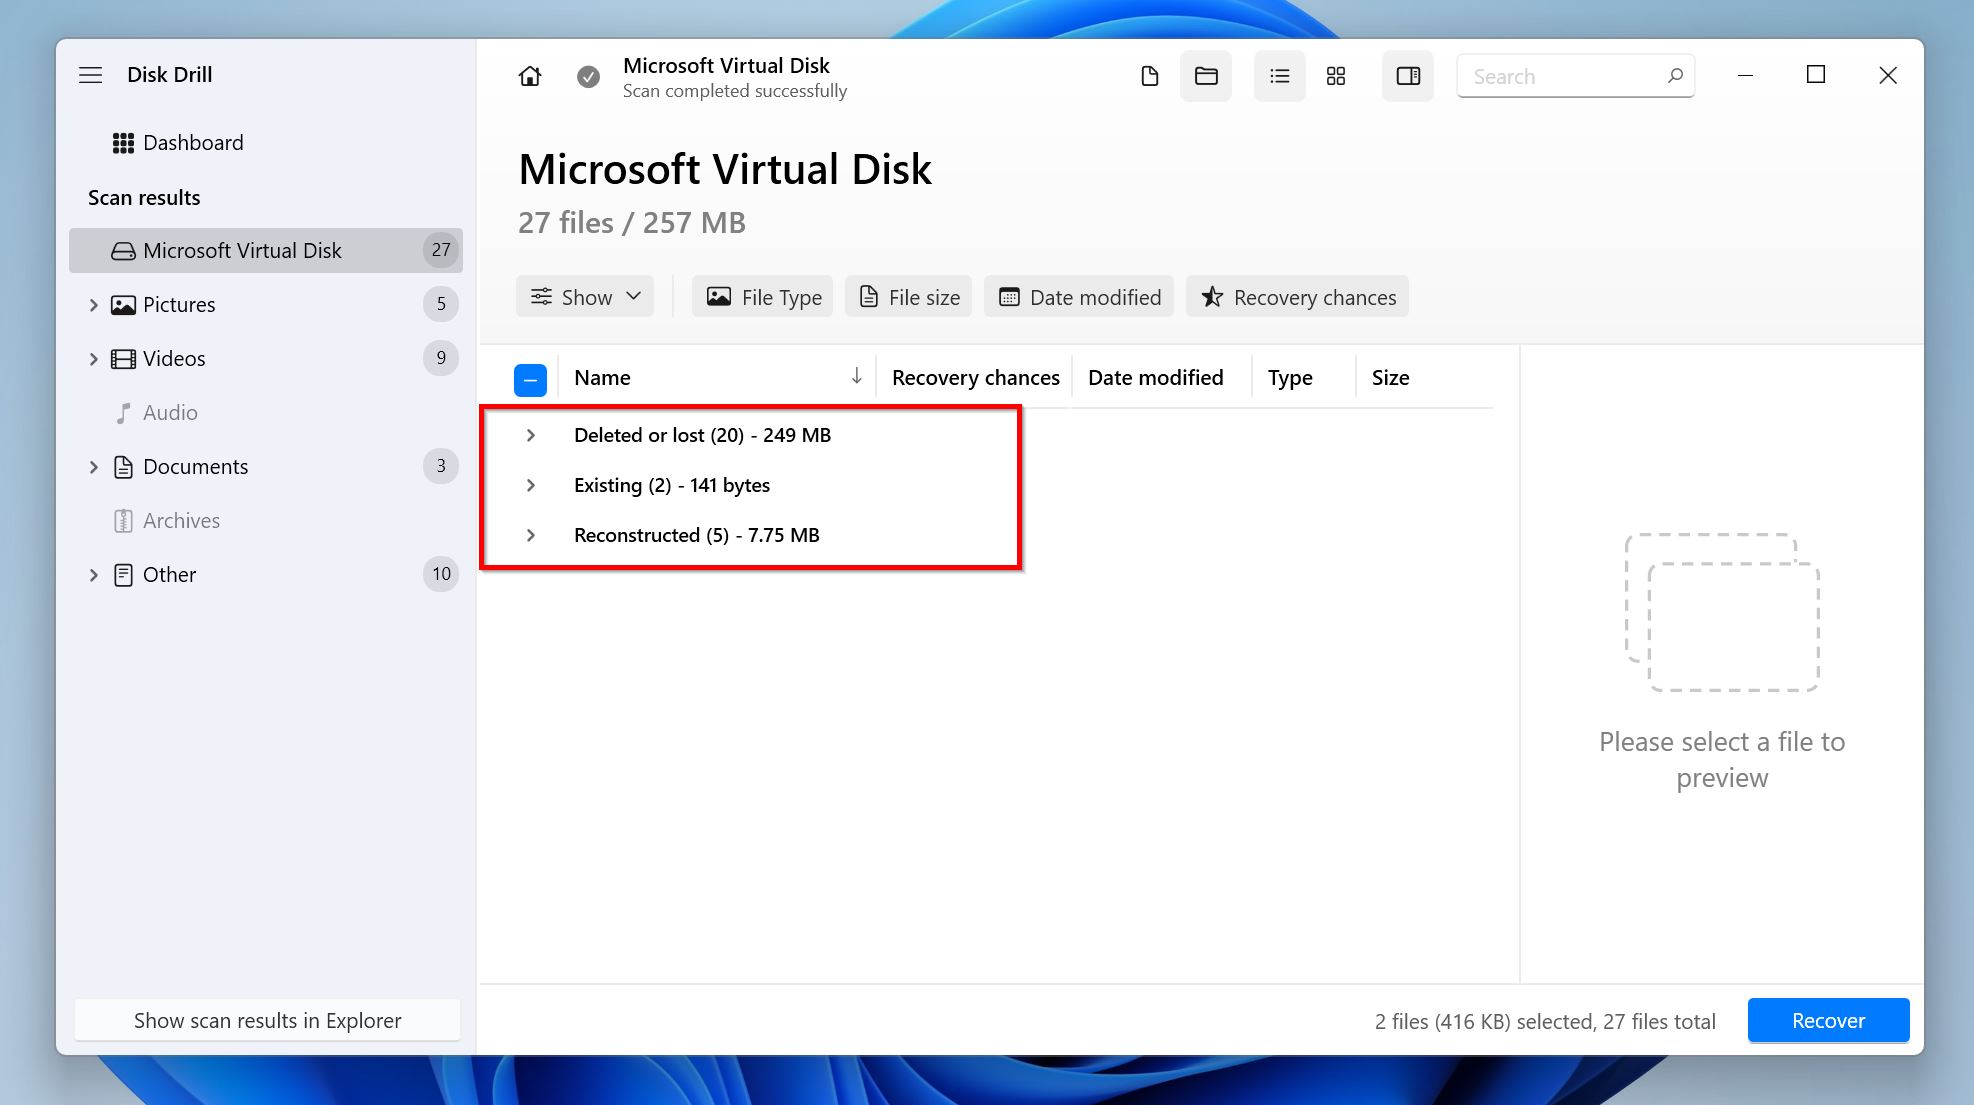
- Expand the Existing, or Deleted or lost sections to view currently stored files, and deleted files on the USB drive, respectively. Expand the Reconstructed section to view files found by their file signature—these files won’t have their previous filenames and will be listed by file type.
- Select the files you wish to recover by ticking the checkbox next to them. Disk Drill automatically previews the currently selected file—practically all file types can be viewed as long as they’re natively supported by your OS or a third-party app on your system. You can manually preview a file by hovering your cursor next to it and clicking the eye icon that appears—if a file can be previewed, it’s recoverable. Once you’re done selecting, click on Recover.
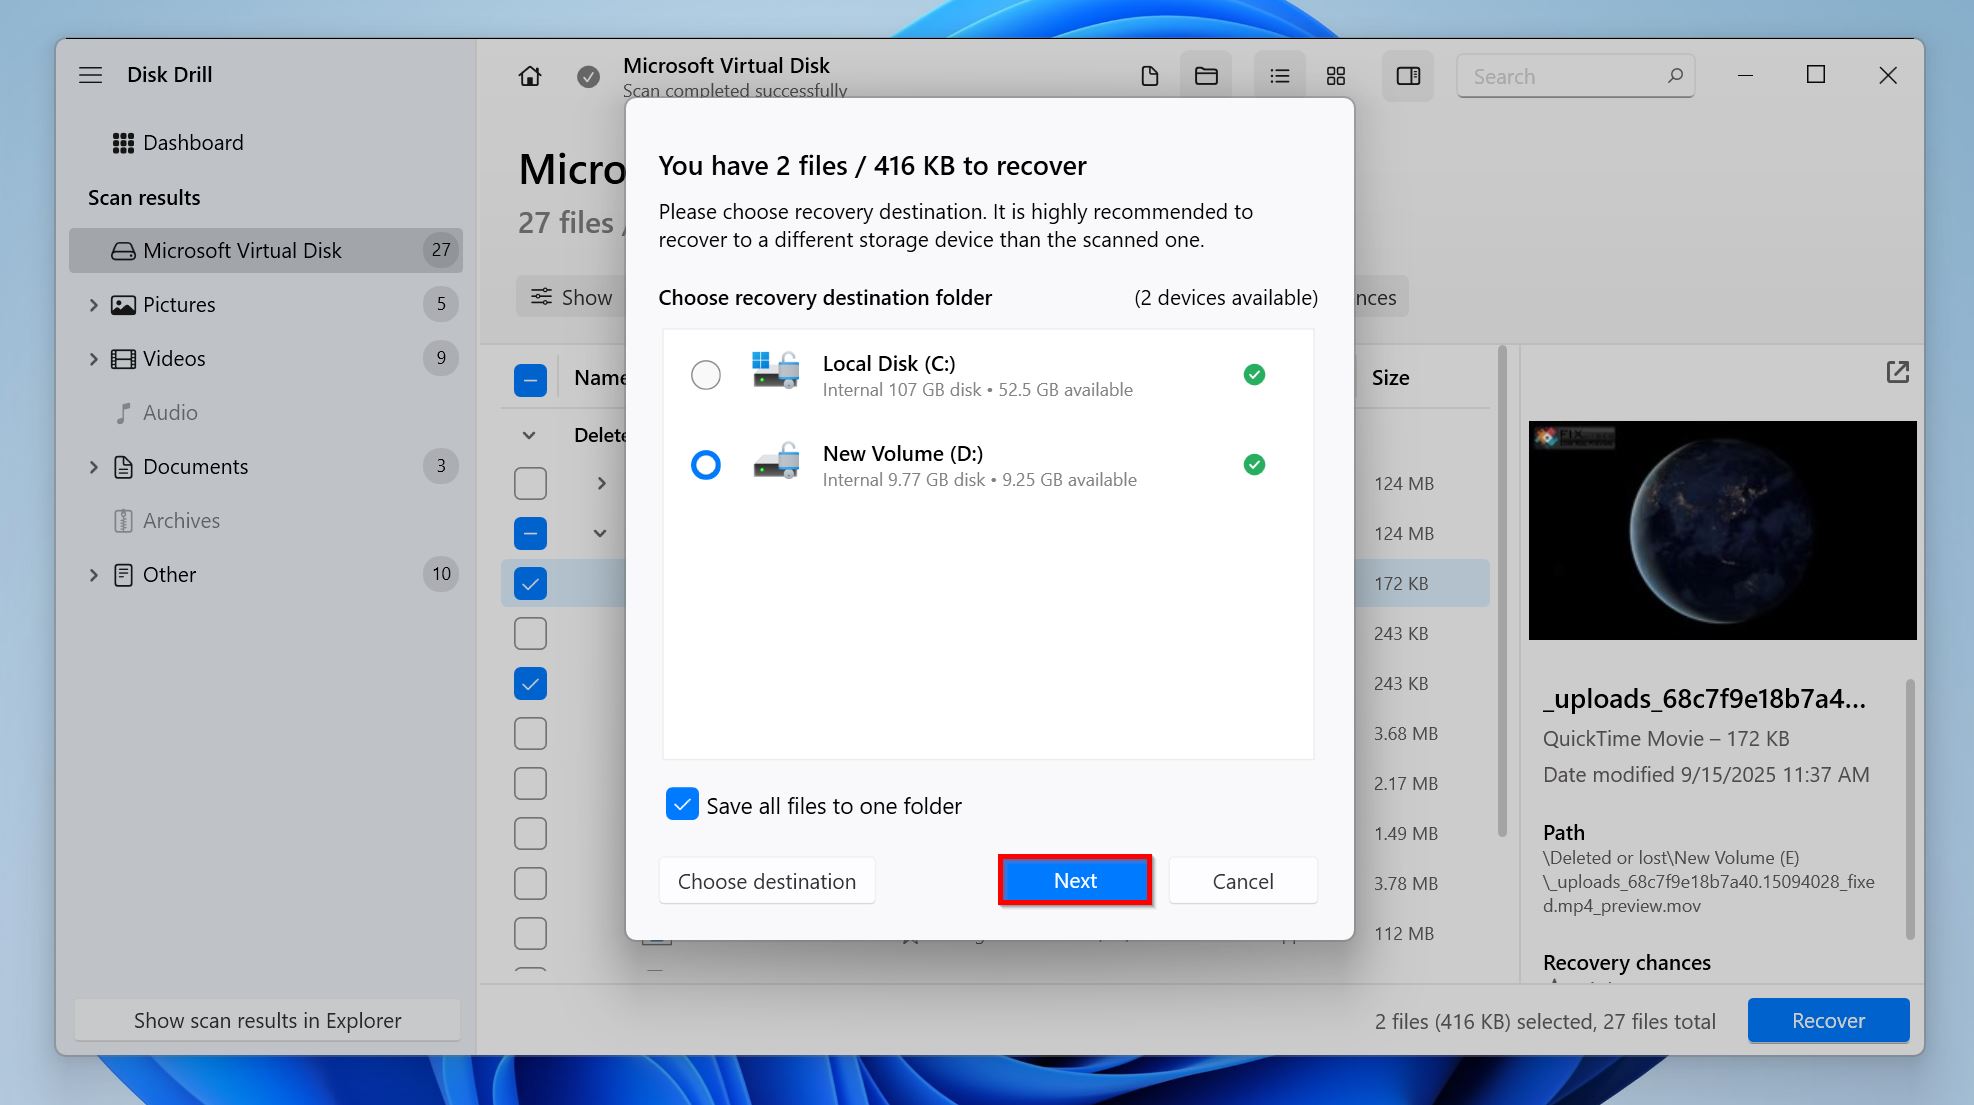
- Choose a recovery destination for the files, and click Next.
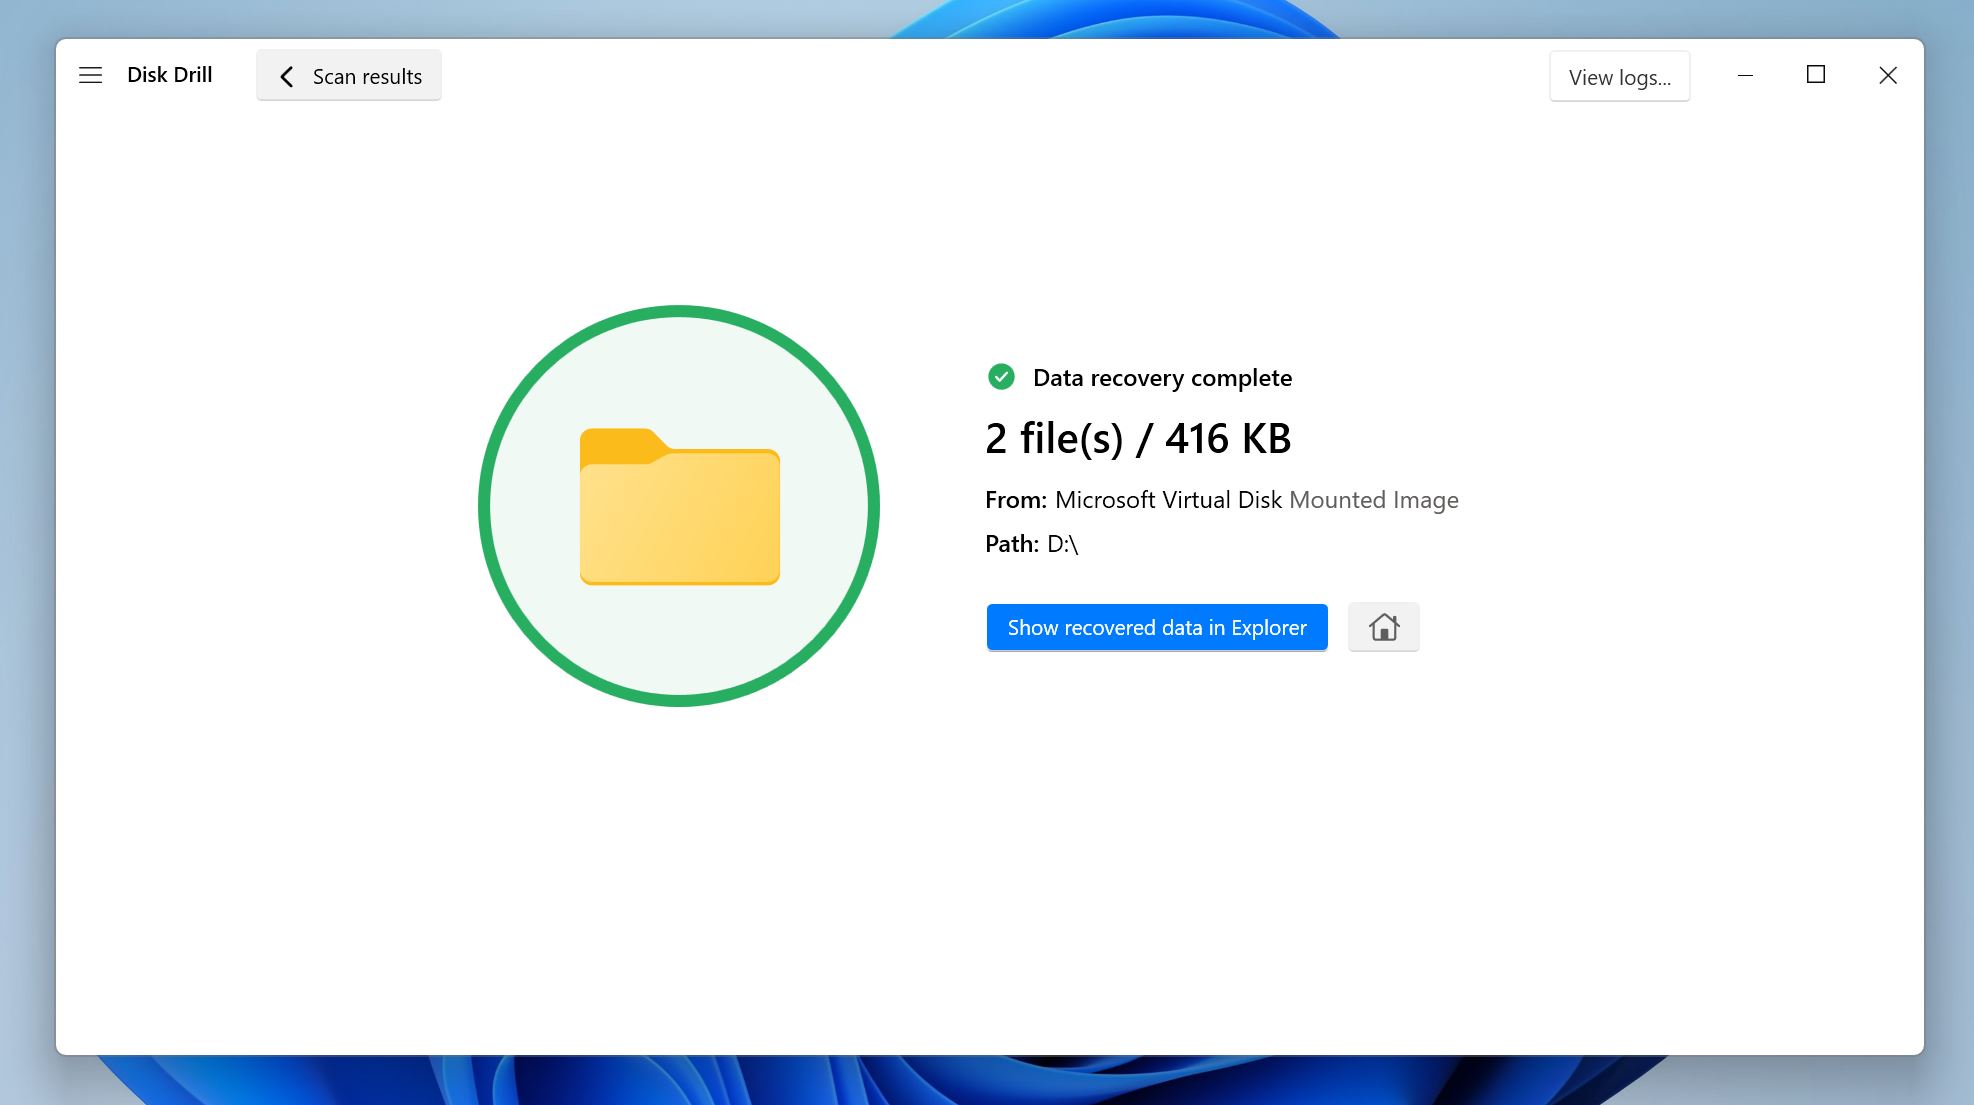
- Disk Drill will recover the selected files.
How to Fix a Pen Drive Without Formatting
There are 4 effective ways to fix the corrupted USB drive without formatting. All of them are quite simple to execute as long as you follow the instructions carefully. Should you face any trouble attempting any of these methods, you can always create a thread on the Handy Recovery Advisor forum, and our experts will help you out.
Let’s get to it:
Method 1: Try Different USB Ports
When trying to fix a corrupt USB drive without formatting it, first try connecting it to a different USB. If you’re using a desktop PC, connect the drive to a USB port at the back of the PC cabinet as the ports there are directly attached to the motherboard, offering a more reliable connection than the ones on the front panel. Additionally, avoid using USB hubs, or extension cables—connect the USB drive directly.
If possible, connect the USB flash drive to another computer and see if you still face the same issue.
After confirming that the problem is indeed with the USB drive, move to the other fixes listed below.
Method 2: Repair File System on Your USB
Prefer a simpler approach? You can use the Windows Error Checking tool which is basically a GUI version of CHKDSK. However, it only works on drives with a recognizable file system (NTFS, FAT, and exFAT)—it won’t work on drives that are RAW or missing a file system.
Here’s how to fix a corrupted USB drive without formatting it, using the Windows Error Checking tool:
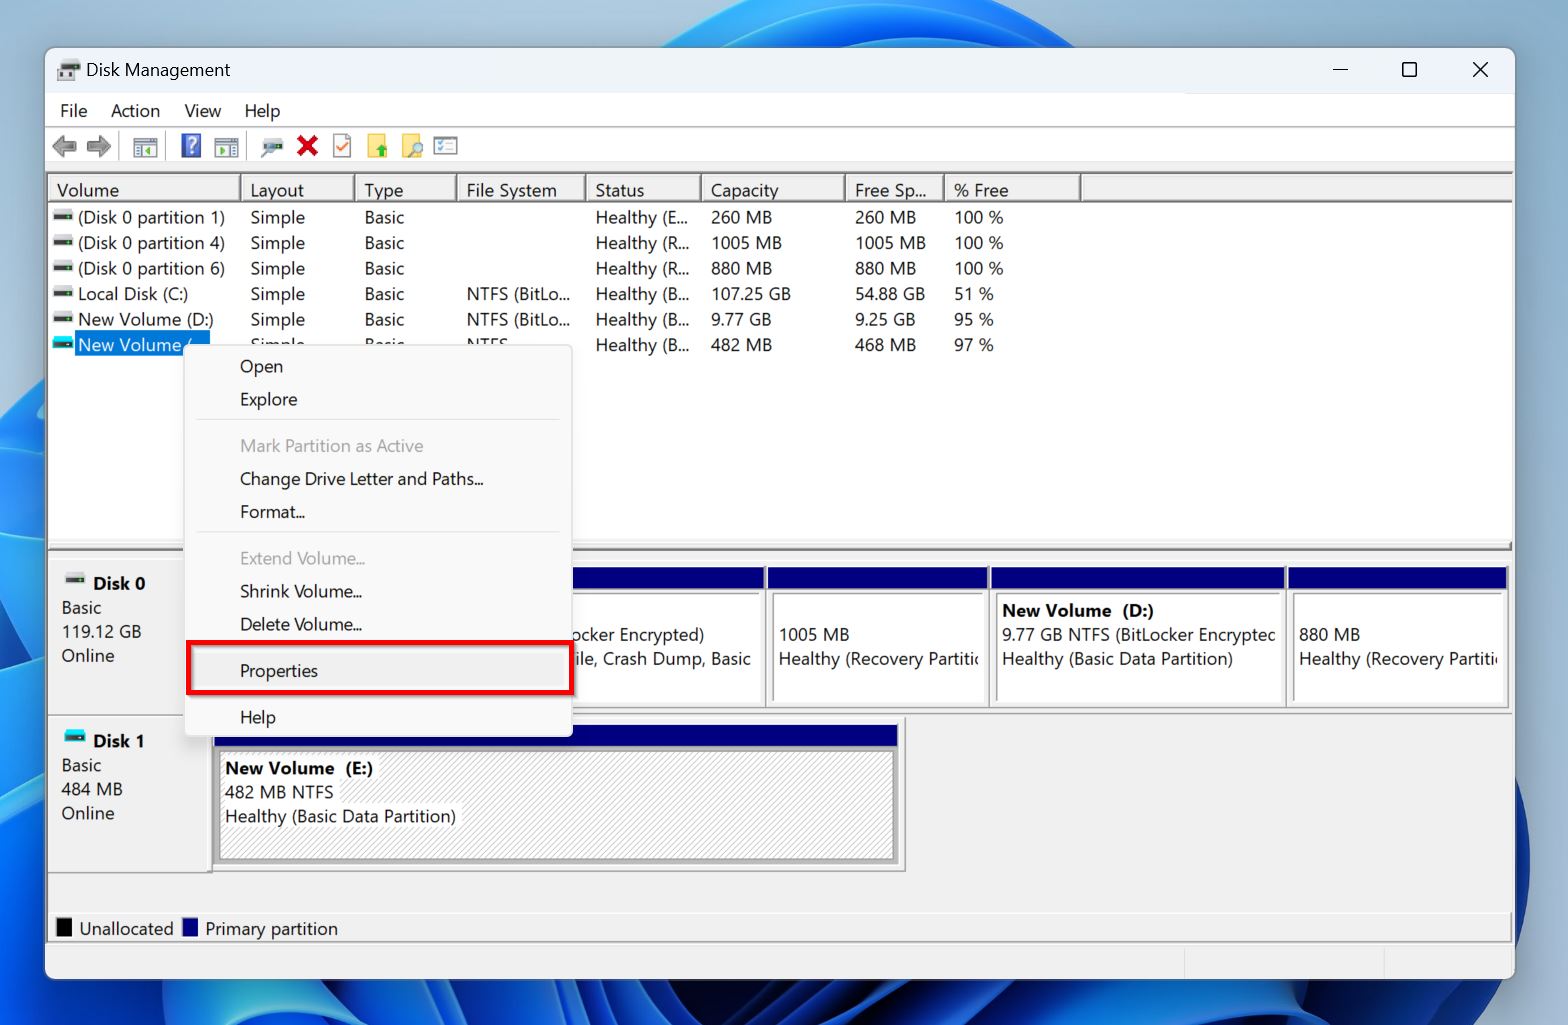
- Right-click on the Start button, and choose Disk Management.
- Find the USB drive in the list of drives, right-click it and select Properties.
- Click on the Tools tab and then click on Error checking.
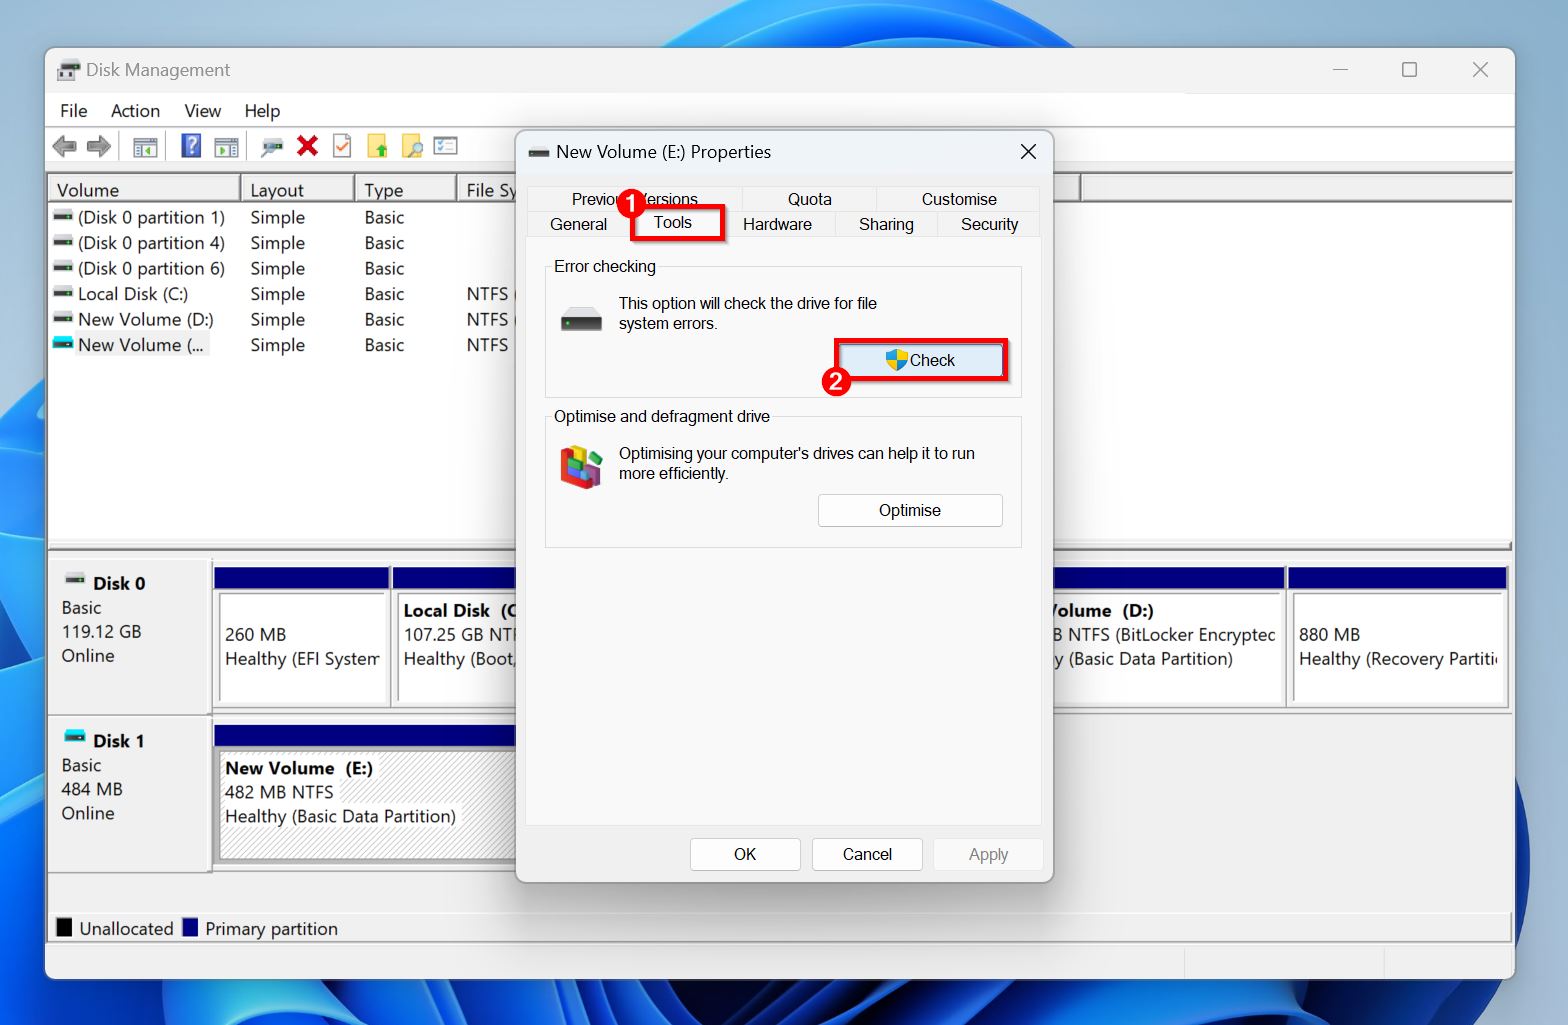
- Click on Scan drive.
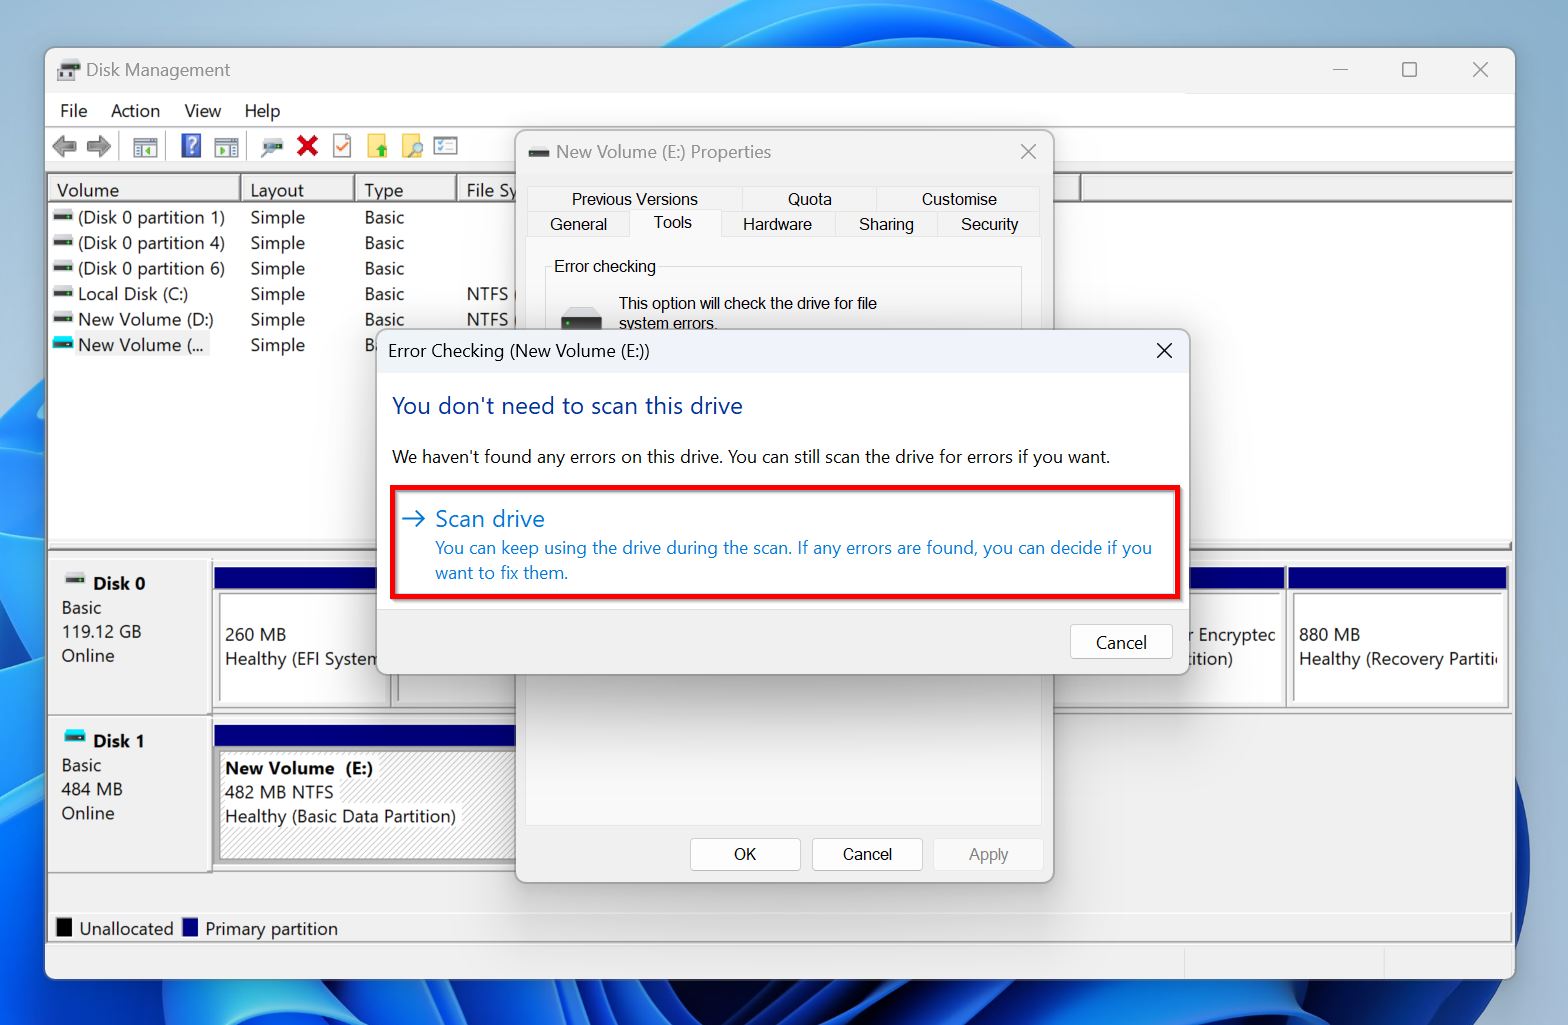
Note: We strongly recommend recovering your data before attempting this method, as CHKDSK scans are known to cause minor data loss. Some users also reported CHKDSK scans getting stuck.
Method 3: Re-Assign a Drive Letter
Windows automatically assigns a unique drive letter to each volume and external drive connected to your PC. However, it may have assigned a duplicate drive letter, or failed to assign one to your USB drive, preventing it from showing up in Windows Explorer.
In this case, simply assigning, or changing a drive letter is enough to fix the corrupted flash drive without formatting it:
- Connect the USB drive to your PC.
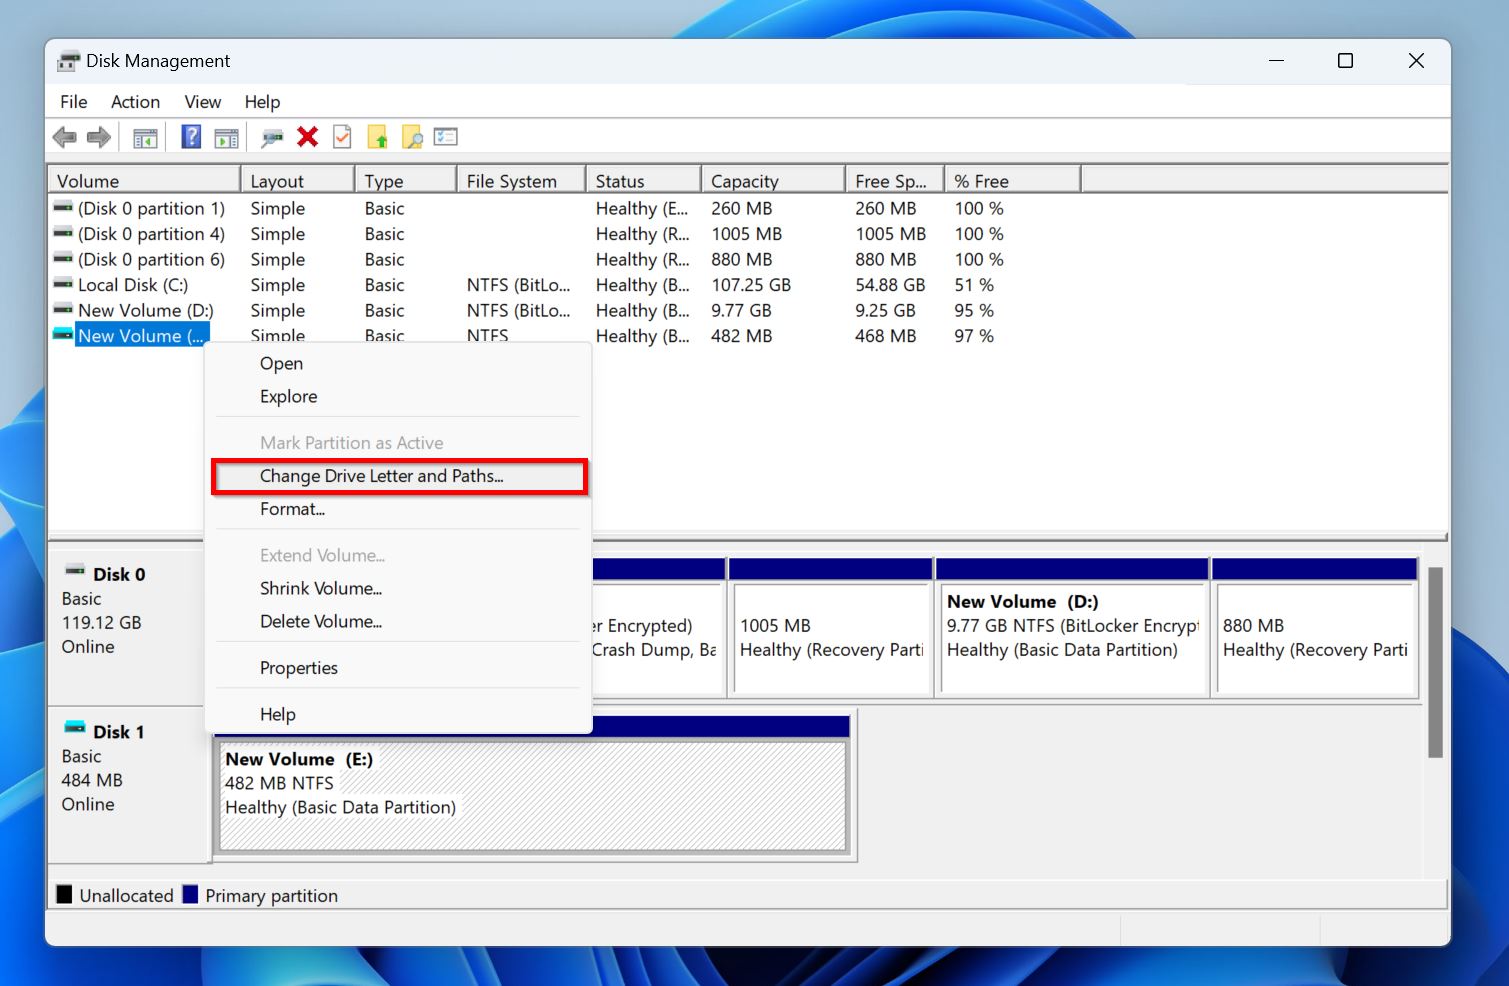
- Right-click on the Start button and choose Disk Management.
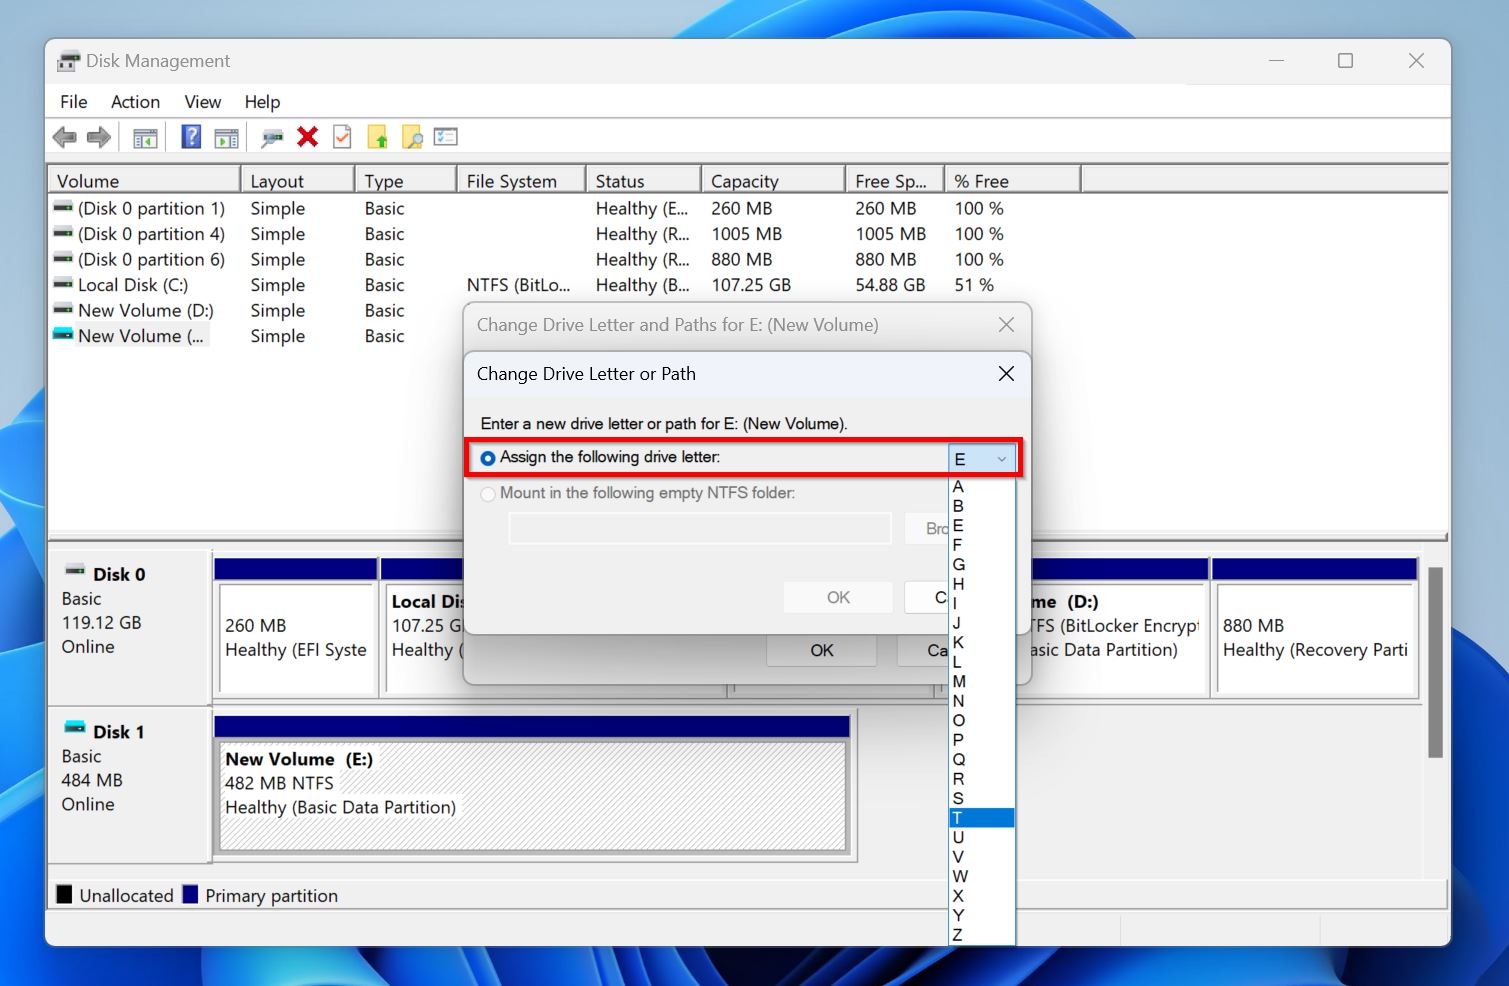
- Find your USB drive in the list of drives, right-click it, and choose Change Drive Letter and Paths.
- If it doesn’t have a drive letter, click on Add. If it has a duplicate one, click on Change.
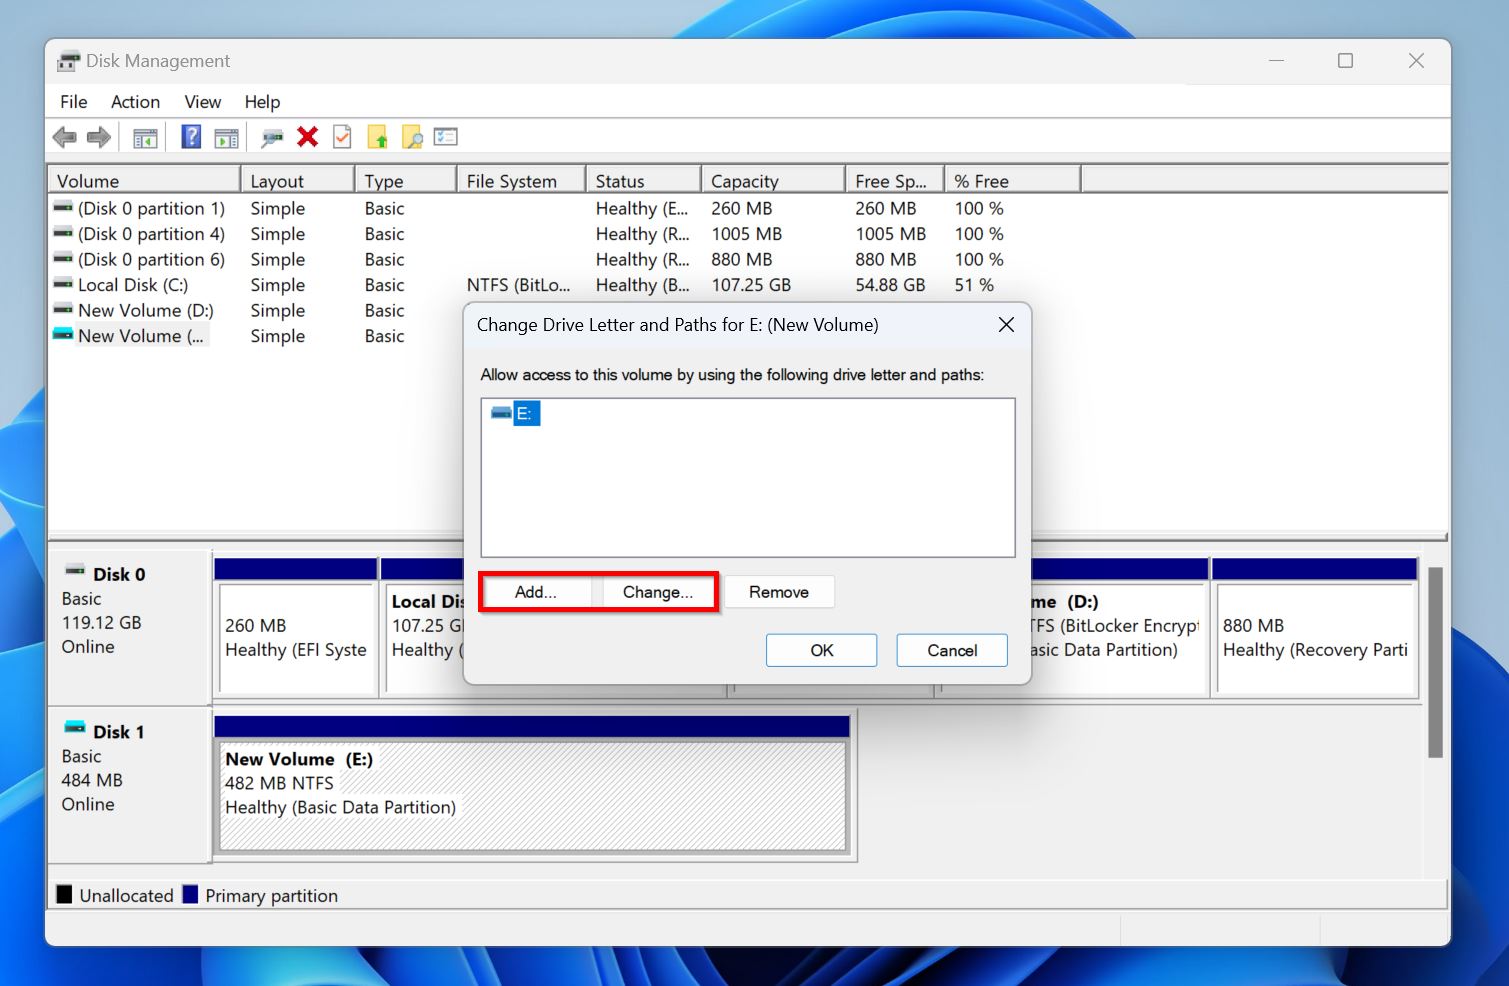
- Select a drive letter from the drop-down menu. Pick one that appears later on in the alphabet (like S:, T:, X:, Y:, Z:, etc) since those are usually not taken. Click on OK.
Method 4: Fix Damaged USB Partition with TestDisk
TestDisk is a popular, open-source data recovery program that specializes in recovering damaged or corrupt partitions. Since it doesn’t have a GUI, new users may initially find the program challenging to use.
Closely follow the instructions below to fix a USB drive without formatting:
- Download TestDisk and extract the archive. The download page has version 7.3 listed as the latest version, but that’s still in Beta. We suggest downloading version 7.2 for better stability.
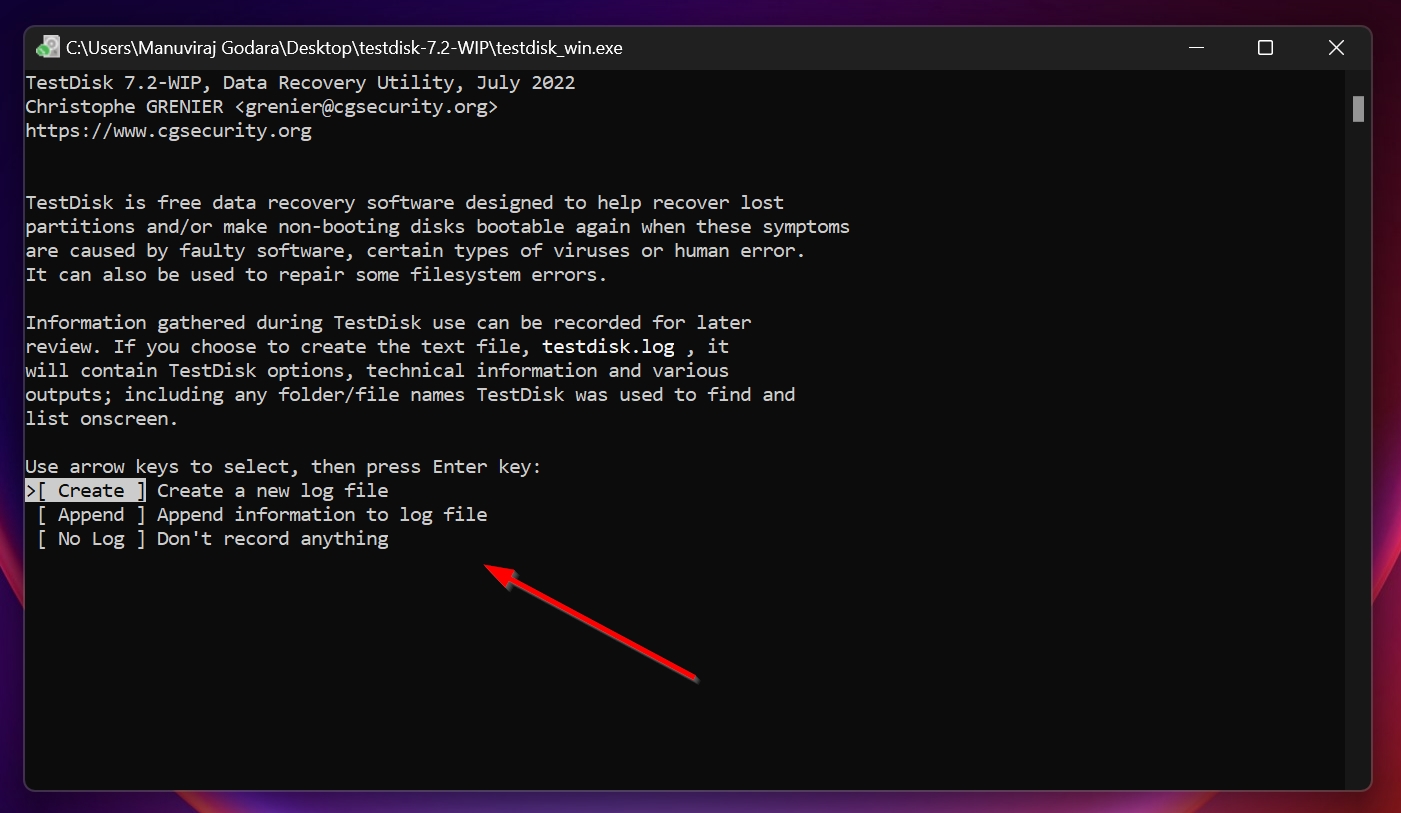
- Run the testdisk_win.exe file from the folder.
- Choose whether you want to create a log file. Use the arrow keys to navigate and press Enter to select the desired option.
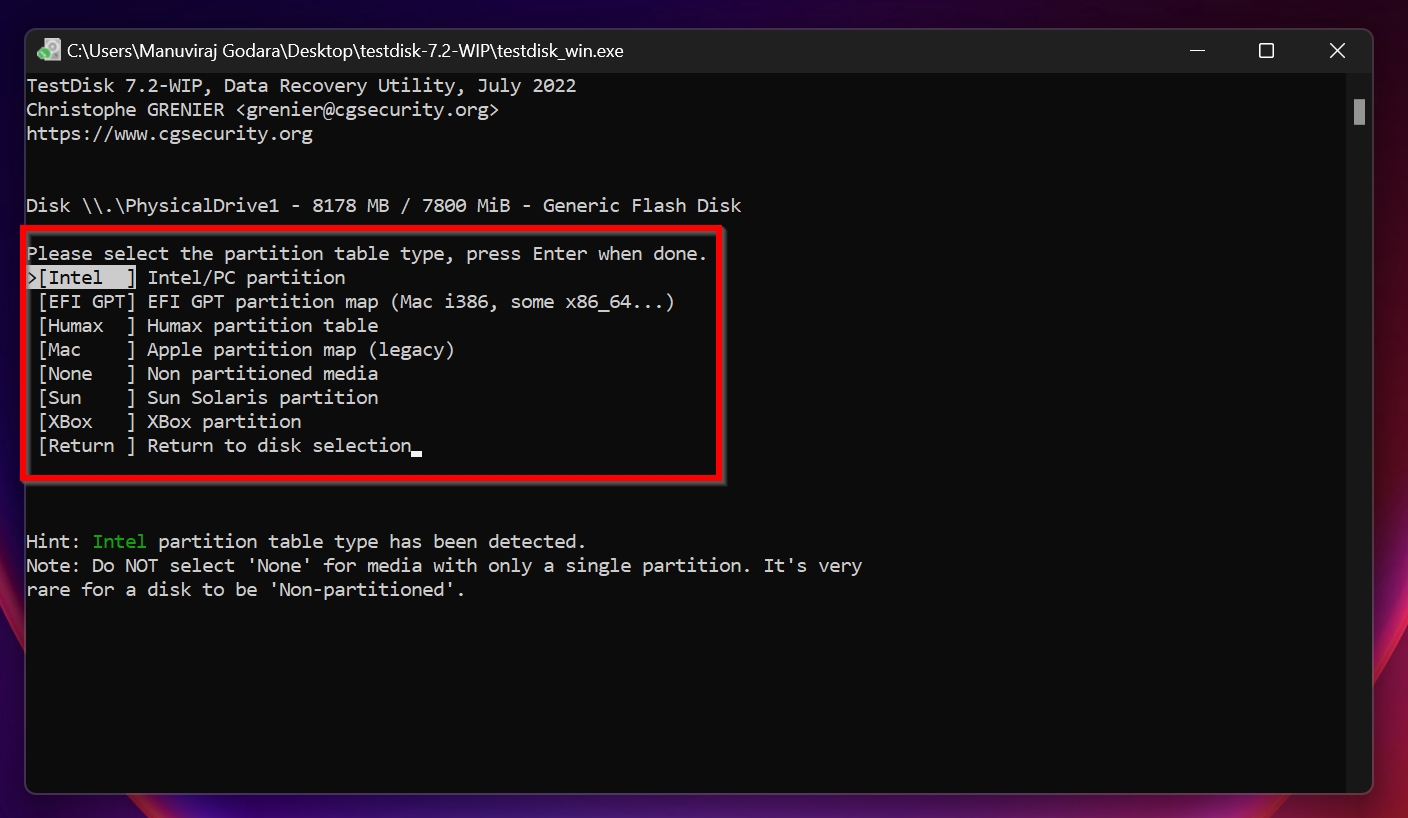
- Select the corrupt USB drive from the device list and press Enter.

- On the next screen, select the partition type. TestDisk automatically detects the partition type, so just leave this option as it is and simply press Enter.
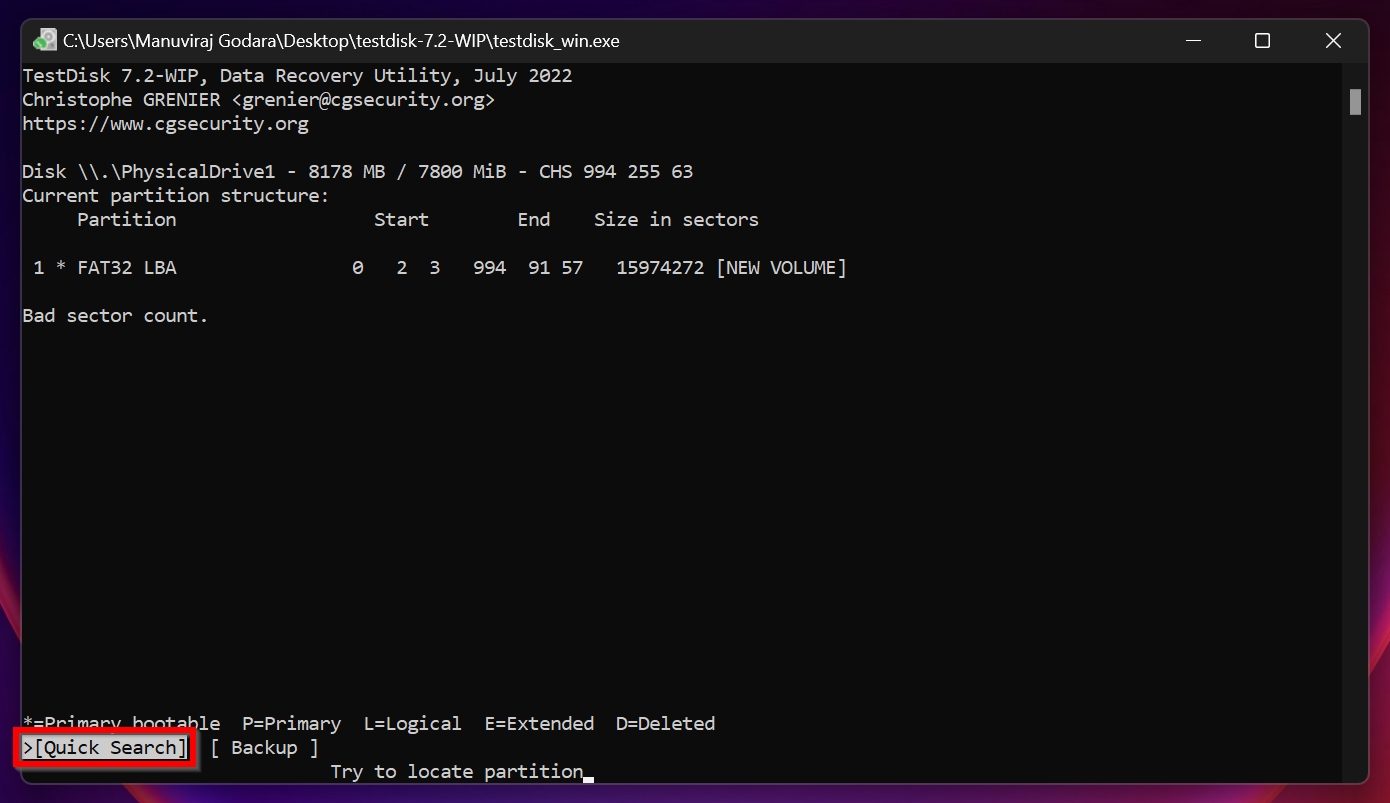
- Next, highlight the Analyse option and press Enter.
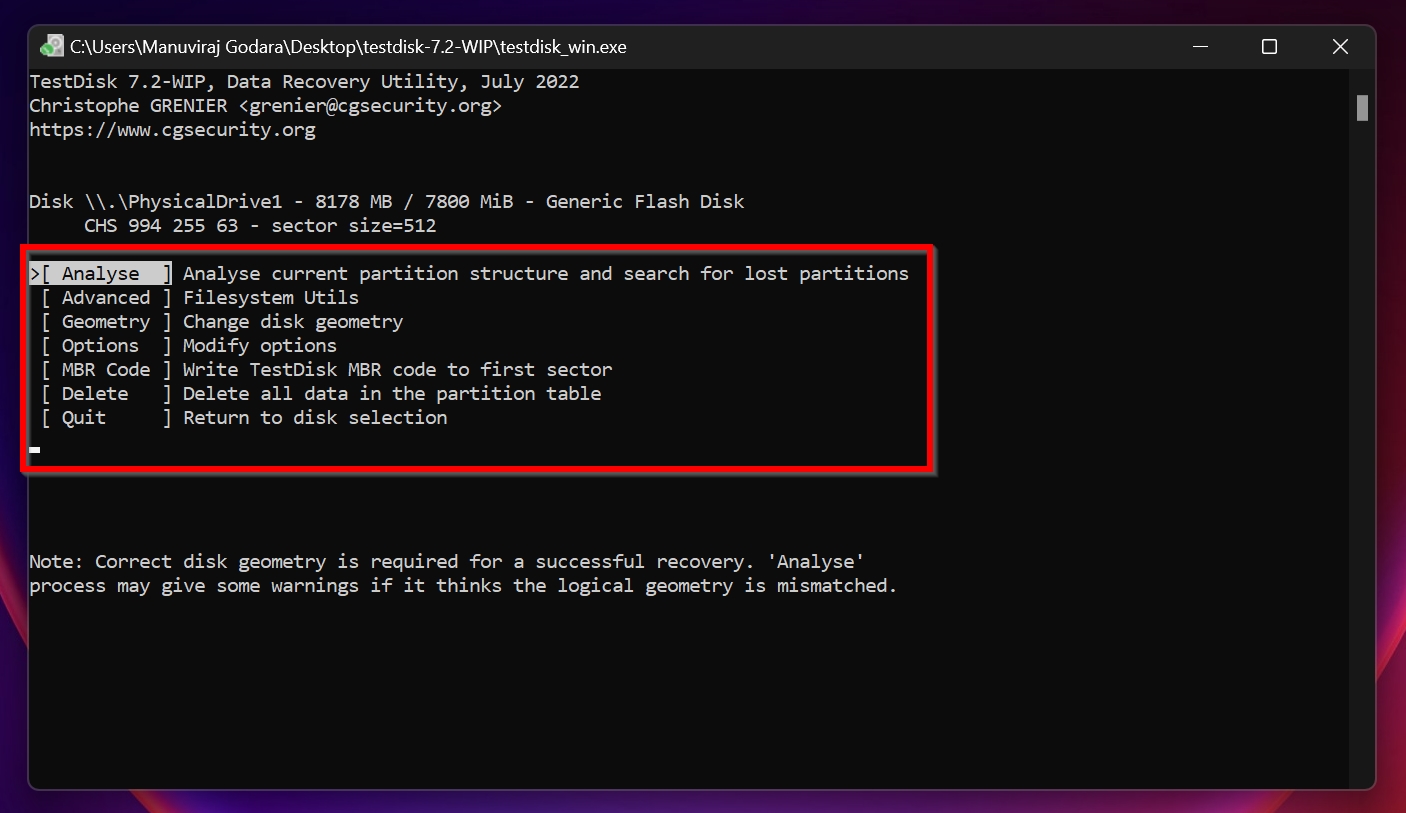
- Ensure that Quick Search is highlighted and press the Enter key.
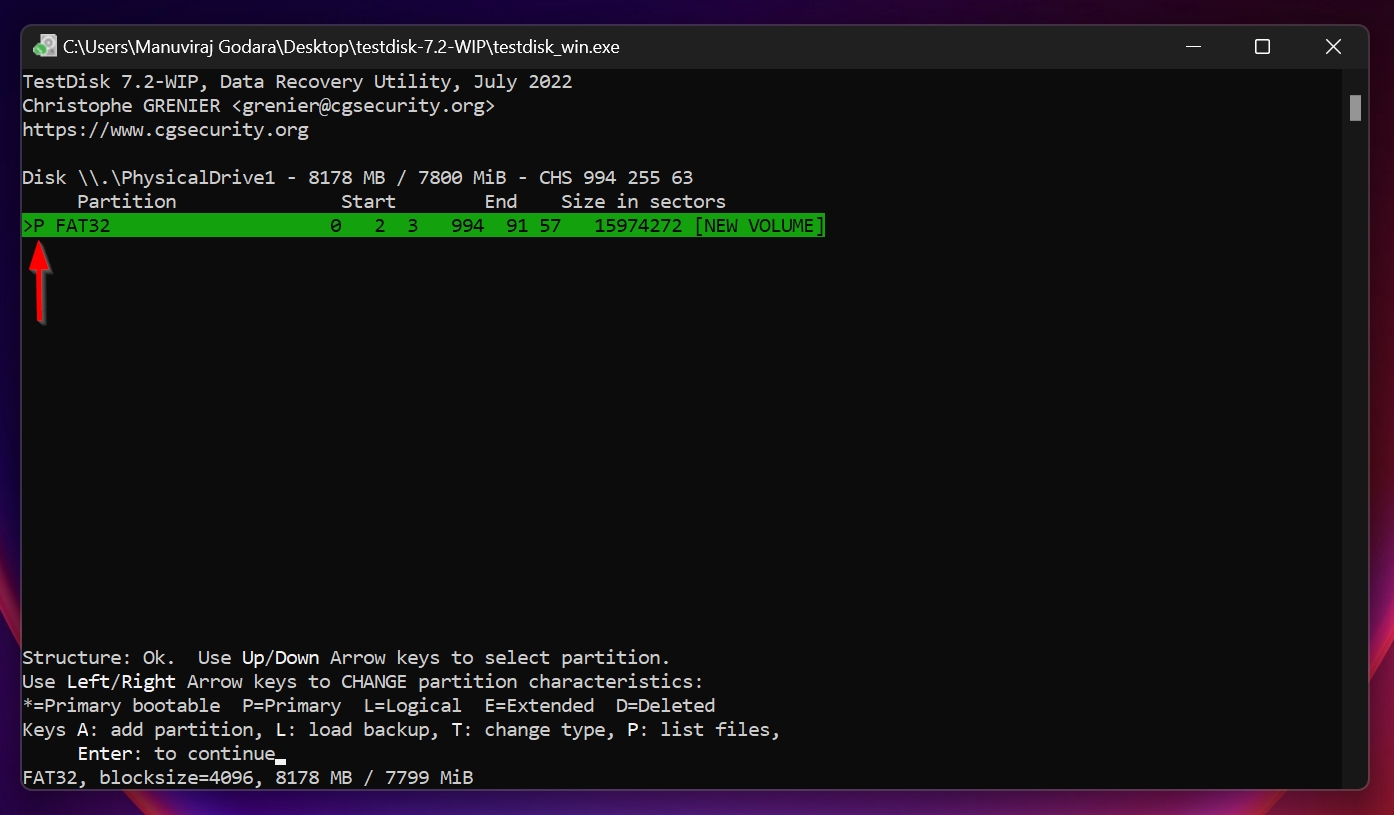
- On this screen, press P on your keyboard to view recoverable files and then press Q to return to the previous screen. Use the left and right arrow keys to ensure there is a P before the partition name. Refer to the image below. Press Enter once you’ve done this.
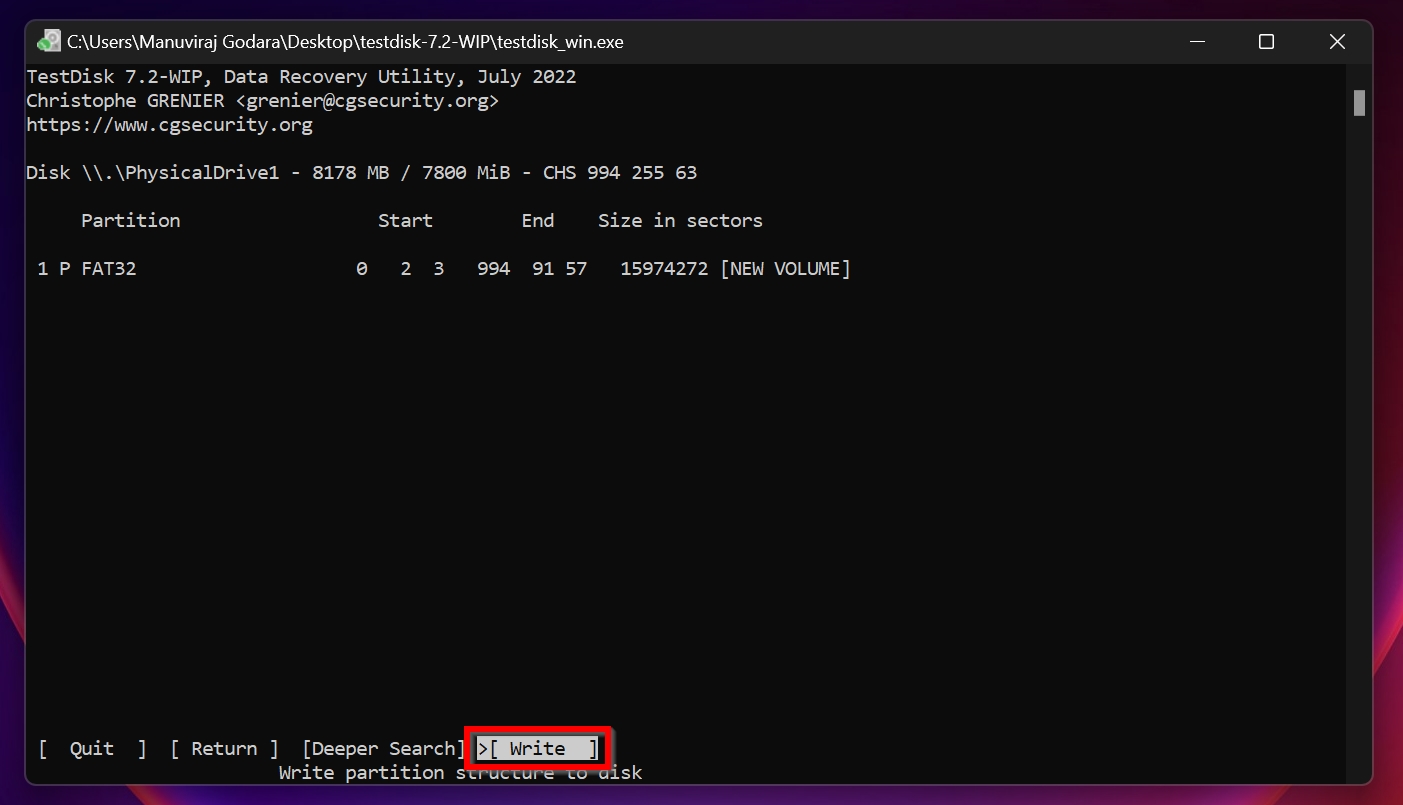
- Now, select the Write option and press Enter.
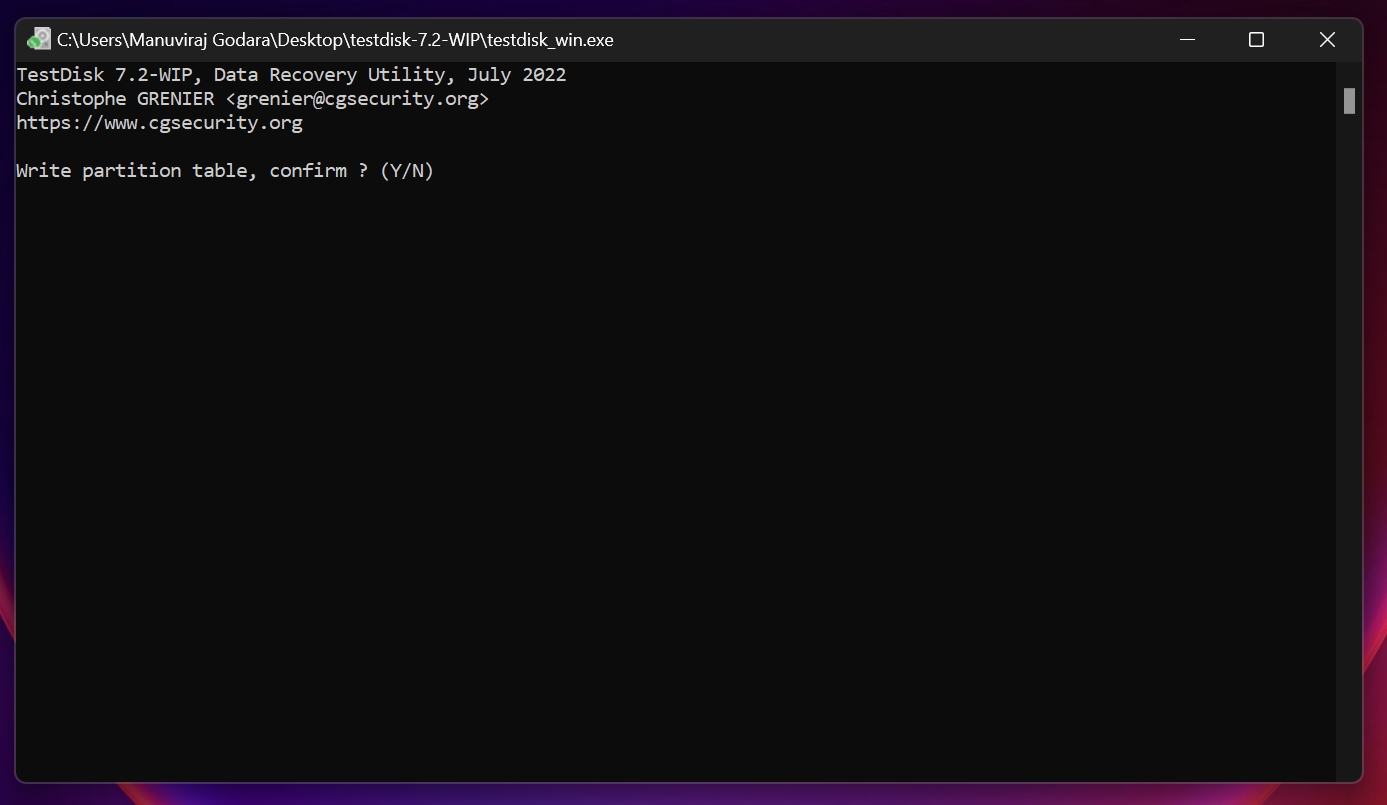
- Press Y on the next prompt. TestDisk will recover the damaged partition for you.
To further familiarize yourself with the software, take a look at our detailed TestDisk review.
There’s also a data recovery app, PhotoRec, bundled with TestDisk—it’s user friendly and offers decent data recovery capabilities considering it’s free to use. For more details, check out our review of PhotoRec.
Nothing Helped? Format Your Flash Drive
Unfortunately, if none of the methods above fixed your corrupt USB drive, the only thing left is to format it. Yes, it does wipe all your files, but if you followed our data recovery guide, you likely saved them beforehand.
We suggest you perform a full format as opposed to a quick format because it’s more thorough, and checks each sector of the USB drive for bad/corrupt blocks.
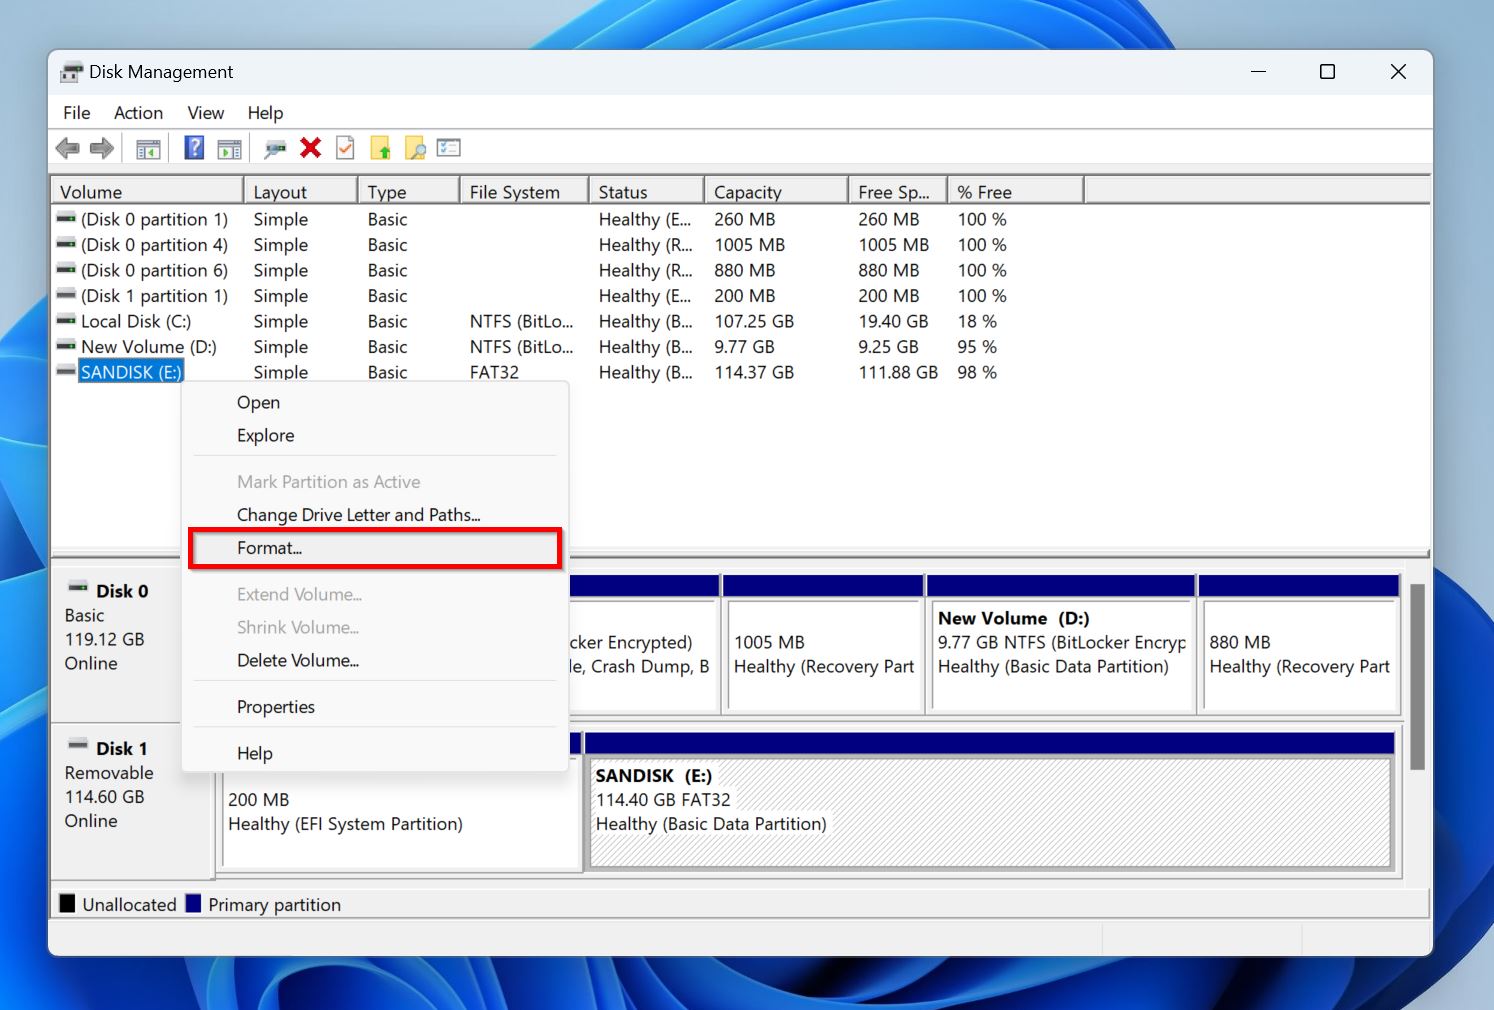
Here’s how to fix your corrupt USB drive by formatting it:
- Connect the USB drive to your PC.
- Right-click on the Start button and click Disk Management.
- Right-click on the USB drive, and choose Format.
- Uncheck the Perform a quick format option, and click OK.
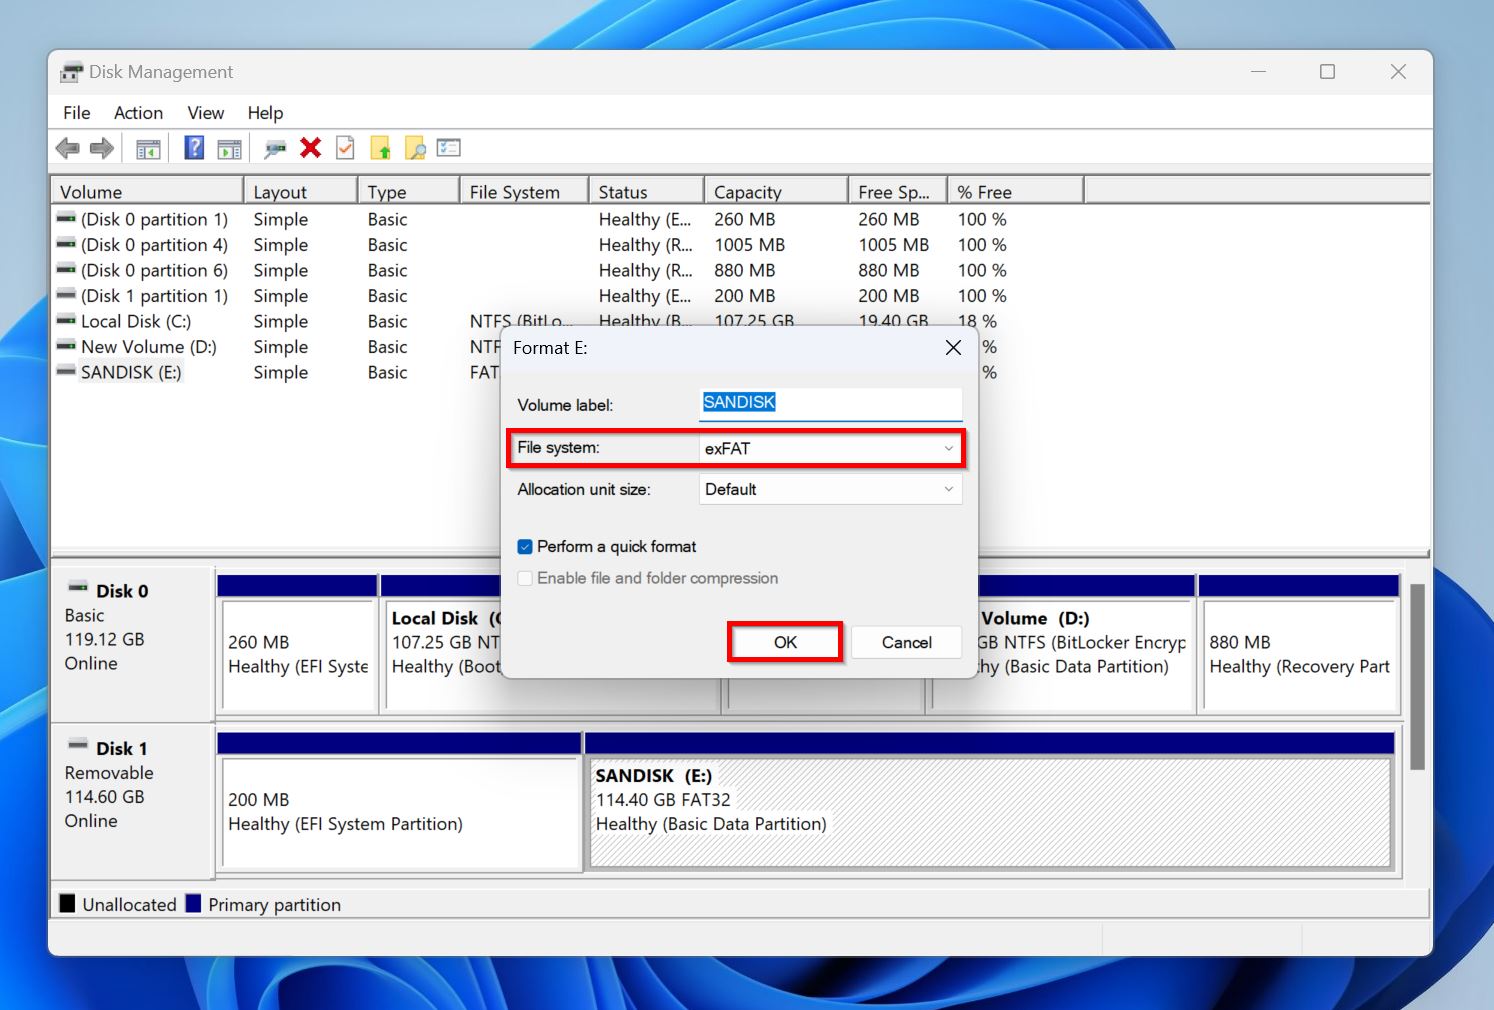
- Windows will format the USB drive. This may take a while, so hang in there.
Final Thoughts
Based on my experience, 7 out of 10 times a corrupt USB drive can be fixed without needing to format it. However, there are some cases when you simply must format the USB drive to bring it back to life. But this shouldn’t be an issue if you recover data from it beforehand. If you didn’t, some data can be recovered even after formatting, but this only applies to drives that were formatted with the Perform a quick format option enabled. A full format (described in the sections above) can’t be undone.
Data loss and corruption induced by physical damage—like a busted controller or bent contacts—is usually best handled by a professional data recovery service. Keep in mind, these services tend to be pricey, although a few relatively cheaper options exist. We suggest choosing services that offer free valuations and a No Data No Fee policy. Unless you know what you’re doing, DIY data recovery and repairs can worsen the condition of a physically damaged USB drive.
FAQ
How to fix a corrupted flash drive without losing data?
You can fix a corrupted flash drive without losing data by first recovering your files using a data recovery tool. Pick one that lets you create and scan disk images as it protects you against further data loss while preventing additional stress of a data recovery scan to an already damaged drive.
Once you’ve recovered your data, try one of these methods to repair the corrupt USB drive:
- Run a CHKDSK scan.
- Use TestDisk to recover the damaged USB partition.
- Re-assign the drive letter.
Can I fix a corrupted flash drive without formatting in CMD?
Yes. To fix a corrupted flash drive using Command Prompt (CMD), follow these steps:
- Run CMD as administrator.
- Type chkdsk X: /r in the console and press Enter. Replace X: with the drive letter of a flash drive.
- CHKDSK will scan and attempt to fix the corrupted USB flash drive.
How to fix a corrupted USB on Android Phone?
To fix a corrupted USB on an Android phone, read the steps below:
- Ensure the OTG feature is enabled on your device using the Settings > More connections option.
- Connect the USB drive to the Android phone using an OTG cable.
- In Settings, tap the Storage option.
- Look for the USB drive, then use the Format option to reformat it. Remember, this will erase all the data on the drive.
If your Android device doesn’t detect the USB drive at all, you will have to use a computer to fix it.
How to fix a corrupted RAW flash drive without formatting?
The first thing you should do is recover data from the RAW flash drive using appropriate data recovery software. Once that’s done, here are some ways you can fix a corrupted RAW flash drive without formatting it:
- CHKDSK doesn’t usually work on RAW drives. But, in rare cases when the drive was originally formatted to NTFS and turned RAW because of a boot sector issue, the CHKDSK X: /r command may work. Replace X with the drive letter of the USB drive.
- If CHKDSK doesn’t work, or refuses to run, TestDisk can repair the corrupt USB drive with the data intact in most cases.
In case both CHKDSK and TestDisk don’t work, we suggest formatting the USB drive to repair it. This shouldn’t be an issue if you’ve already recovered your data using a data recovery program as advised earlier.
This article was written by Manuviraj Godara, a Staff Writer at Handy Recovery Advisor. It was also verified for technical accuracy by Andrey Vasilyev, our editorial advisor.
Curious about our content creation process? Take a look at our Editor Guidelines.