If you deleted files from a CFast card, formatted it, or lost data some other way, you’ll be glad to know it often isn’t a dead end. In many cases, the files are still recoverable. We’ll walk you through a few simple ways to recover data from a CFast card at home with step-by-step instructions you can follow even if you’ve never done this before.
Is It Possible to Recover a CFast Card?
Yes, in most cases, data recovery is possible. However, the outcome depends on the type of data loss and the actions taken afterward.
Here’s how these situations usually play out and what typically helps:
Reason for Data Loss |
What Usually Happens |
What We Recommend |
Recovery Chances |
Accidental deletion |
Files are deleted in-camera or on a computer, but the data remains on the card. |
Stop using the card immediately and scan it with recovery software. Avoid any new recordings. |
High, as long as nothing has overwritten the data. |
Quick format (in-camera or on a computer) |
The file system resets, but data blocks usually remain intact. |
Do not record anything new. Run recovery software as soon as possible. |
High to medium, depending on card usage after formatting. |
The card overwrites stored data instead of simply resetting the file system. |
You can try scanning the card with recovery software, but do not expect meaningful results. |
None. The data is permanently erased. |
|
Format followed by new recordings |
New footage overwrites portions of the old data. |
Stop using the card immediately and scan it. |
Low to medium, depending on how much data was overwritten. |
Improper card ejection or file system errors |
File system corruption causes the card to appear as RAW or unformatted. |
Ignore format prompts and scan the card directly with recovery software. |
Medium to high, as files often remain intact. |
Virus or malware exposure |
File access breaks or files disappear after connecting the card to an infected system. |
Scan both the computer and the card for malware, then attempt recovery. |
Medium, depending on the extent of damage. |
Physical damage (connector issues, cracks, water exposure) |
The card fails to mount or disconnects repeatedly. |
Stop DIY attempts and contact a professional recovery service. |
Low with software, higher when handled by a professional lab. |
How to Recover Data Using CFast Recovery Software
Now that you know the reasons behind a possible data loss, let’s talk about how to recover data using specialized memory card recovery software tools. We’ll walk you through the process using two popular programs as examples and explain why we chose them specifically.
Method 1: Disk Drill
Disk Drill handles both standard file-system recovery and camera-specific reconstruction through its Advanced Camera Recovery module, which makes it well suited for CFast cards used in cinema cameras and high-end DSLRs. In practice, all you need to do is install the software, scan the card, and review what files can be recovered. We’ll cover the full recovery steps first, and go into more detail about the software itself later if you want to dig deeper.
Here’s how to use Disk Drill to recover CFast card data:
- Download Disk Drill and install it on your computer.
- Connect your CFast card to your computer using a compatible reader.
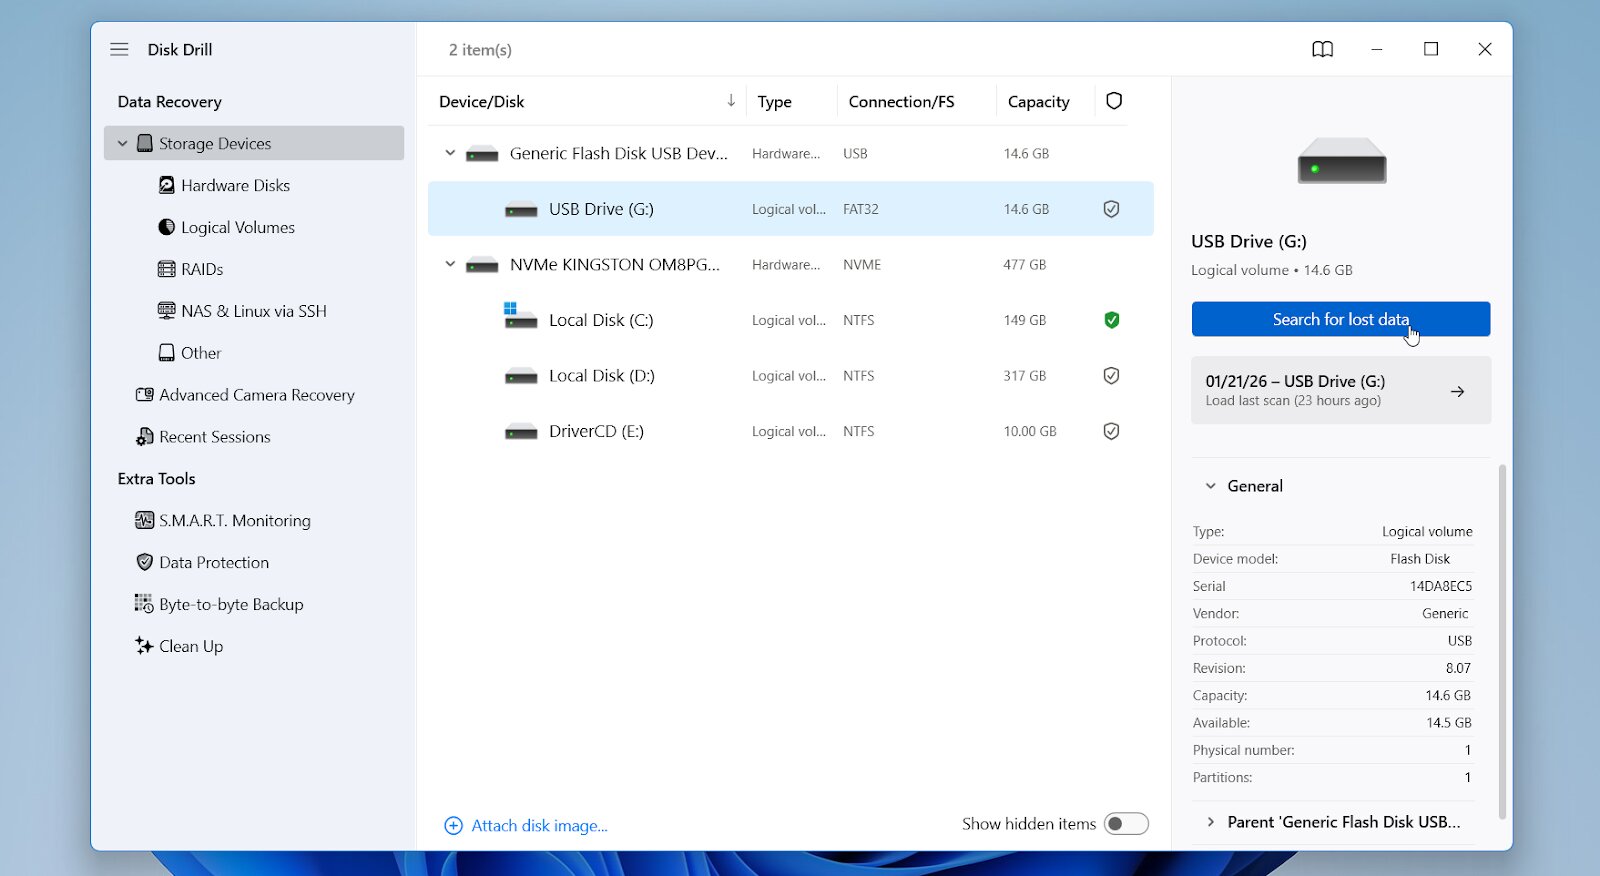
- Launch the Disk Drill app. You will see a list of storage devices currently connected to your PC. Locate and select your CFast card.
- Click Search for lost data.
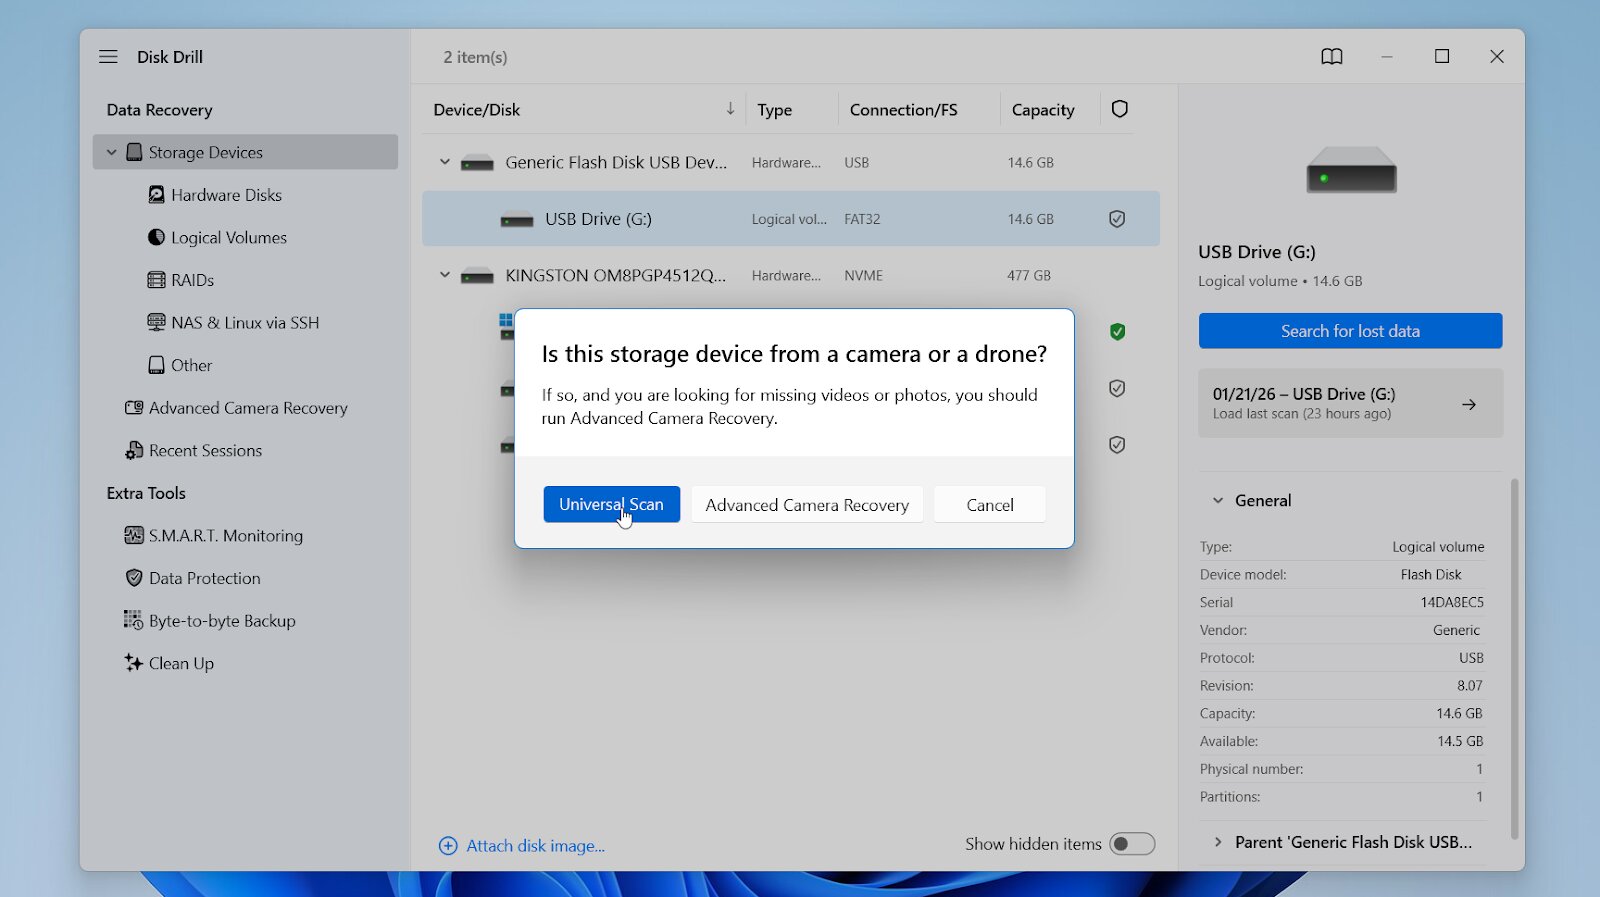
- Choose between Universal Scan and Advanced Camera Recovery. Use Advanced Camera Recovery when videos disappeared in-camera or recordings failed to save. In other cases, start with Universal Scan.
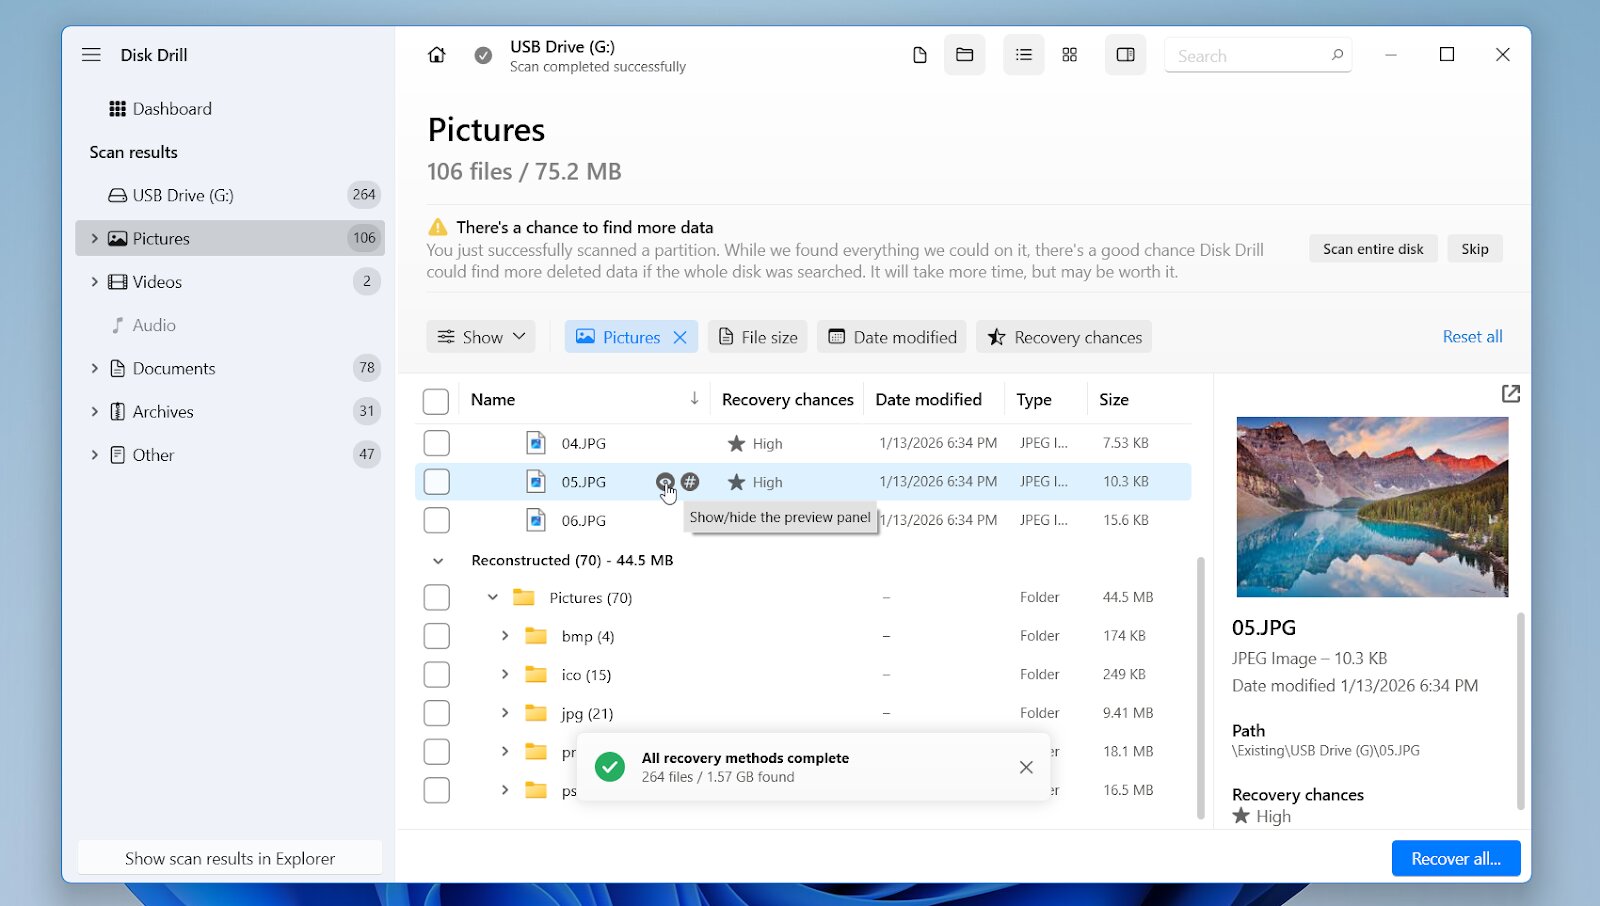
- Wait for the scan to finish. You can preview results during the scan and stop the process at any time.
- Use the left sidebar to filter by file type or use the search bar to find files by name or extension. You can also filter by file size, date modified, and recovery chances.
- Click the preview icon to confirm file integrity. A working preview is the best indicator that the file can be restored successfully.
- Select the checkboxes next to the files you want and click Recover.
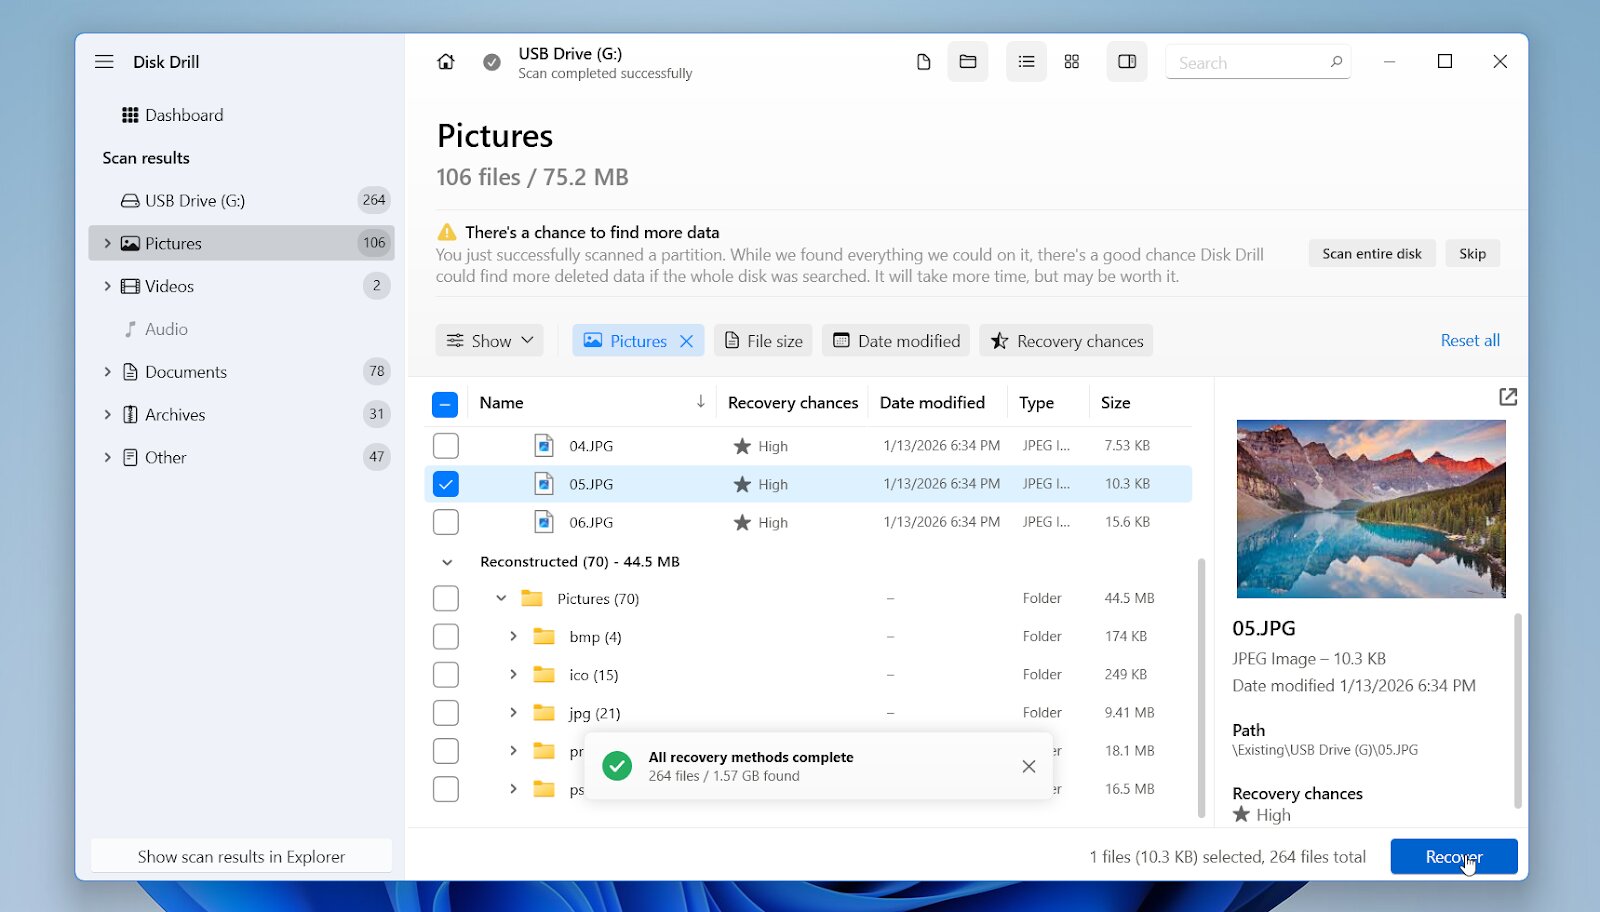
- Choose a destination on a different drive, not the CFast card itself, and click Next to restore the files.
Over the years, we have tested and reviewed different recovery tools across various devices and scenarios. Among the solutions we evaluated, Disk Drill consistently ranked at the top thanks to its balanced approach and stable results.
Disk Drill supports both standard file system–based recovery and camera-specific reconstruction through its Advanced Camera Recovery module. This feature is especially important for CFast cards commonly used in cinema cameras and high-end DSLRs. For CFast recovery, Disk Drill supports file formats widely used by professional cameras:
- MP4, MOV, MXF, MTS, AVI
- JPG, TIFF, PNG
- CR2, CR3, NEF, ARW, ORF, RAF
- WAV, MP3, AAC
When file system records are damaged or missing, Disk Drill can still detect and reconstruct many of these formats based on their internal structure. This capability is particularly useful for large video clips and RAW photo files.
On Windows, Disk Drill’s free version allows recovery of up to 100 MB of data, which is sufficient for testing. Scans and previews remain fully available so you can confirm what is recoverable before upgrading. If the card is corrupted or unstable, you can also create a byte-to-byte backup first and scan the image instead of the card itself. This approach reduces stress on failing media and helps preserve the card’s current state while you test recovery options.
Want to learn more about Disk Drill? Read our full review.
Method 2: PhotoRec
Another solid option is PhotoRec, a free open-source recovery tool from the TestDisk project. It works on Windows, macOS, and Linux and relies on signature-based recovery (file carving). This means it scans raw storage blocks and attempts to rebuild files based on their internal structure rather than folder records.
One important thing to keep in mind: PhotoRec does not offer file previews. If you do not limit file types before the scan starts, the tool will recover everything it finds in bulk. The content is often intact, but expect additional time for sorting and verification afterward.
PhotoRec is primarily a command-line tool. It works reliably, but it is not everyone’s preferred interface. That’s why we usually recommend qPhotoRec, the official graphical interface included in the same package for Windows users.
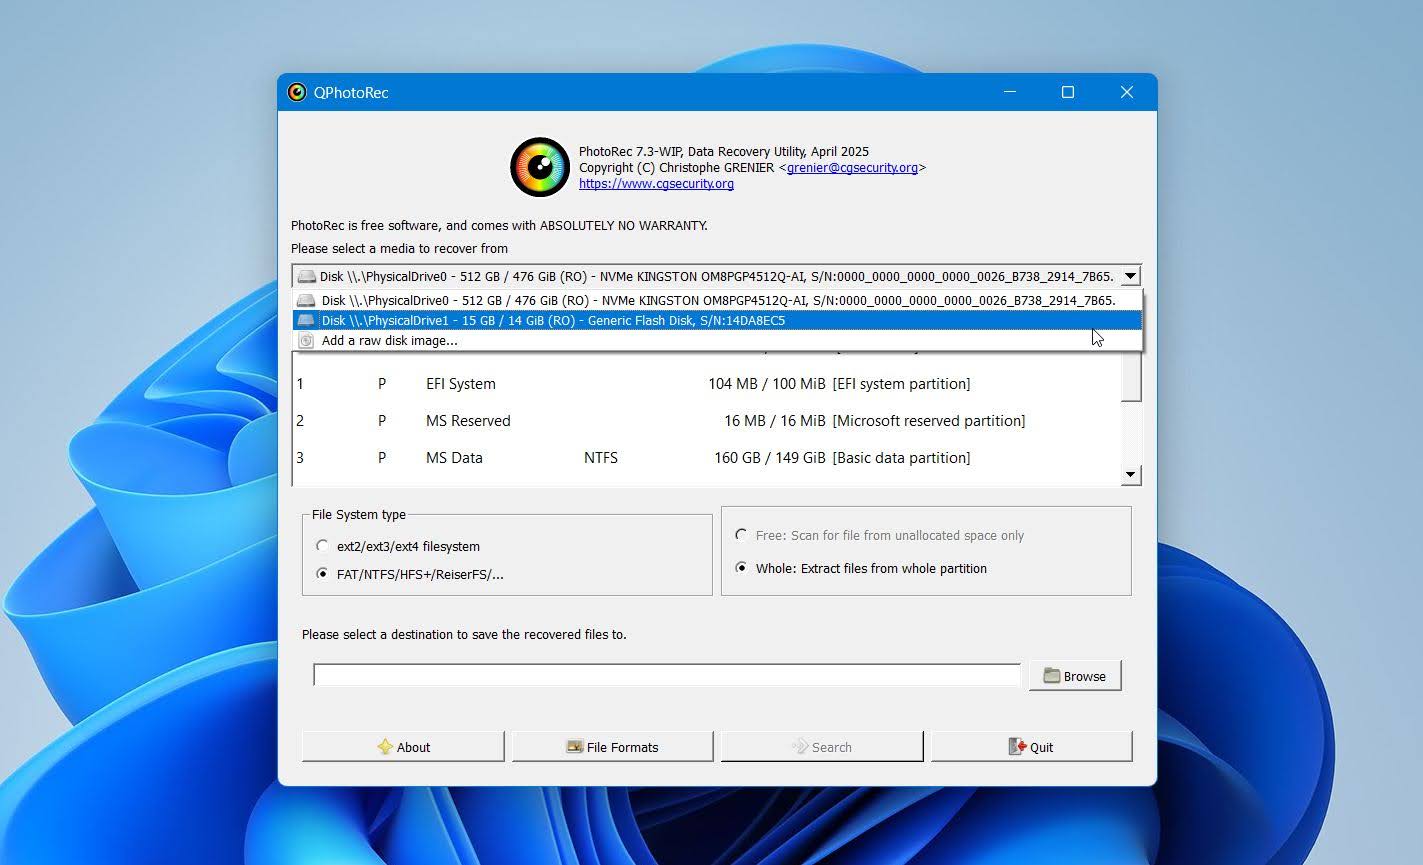
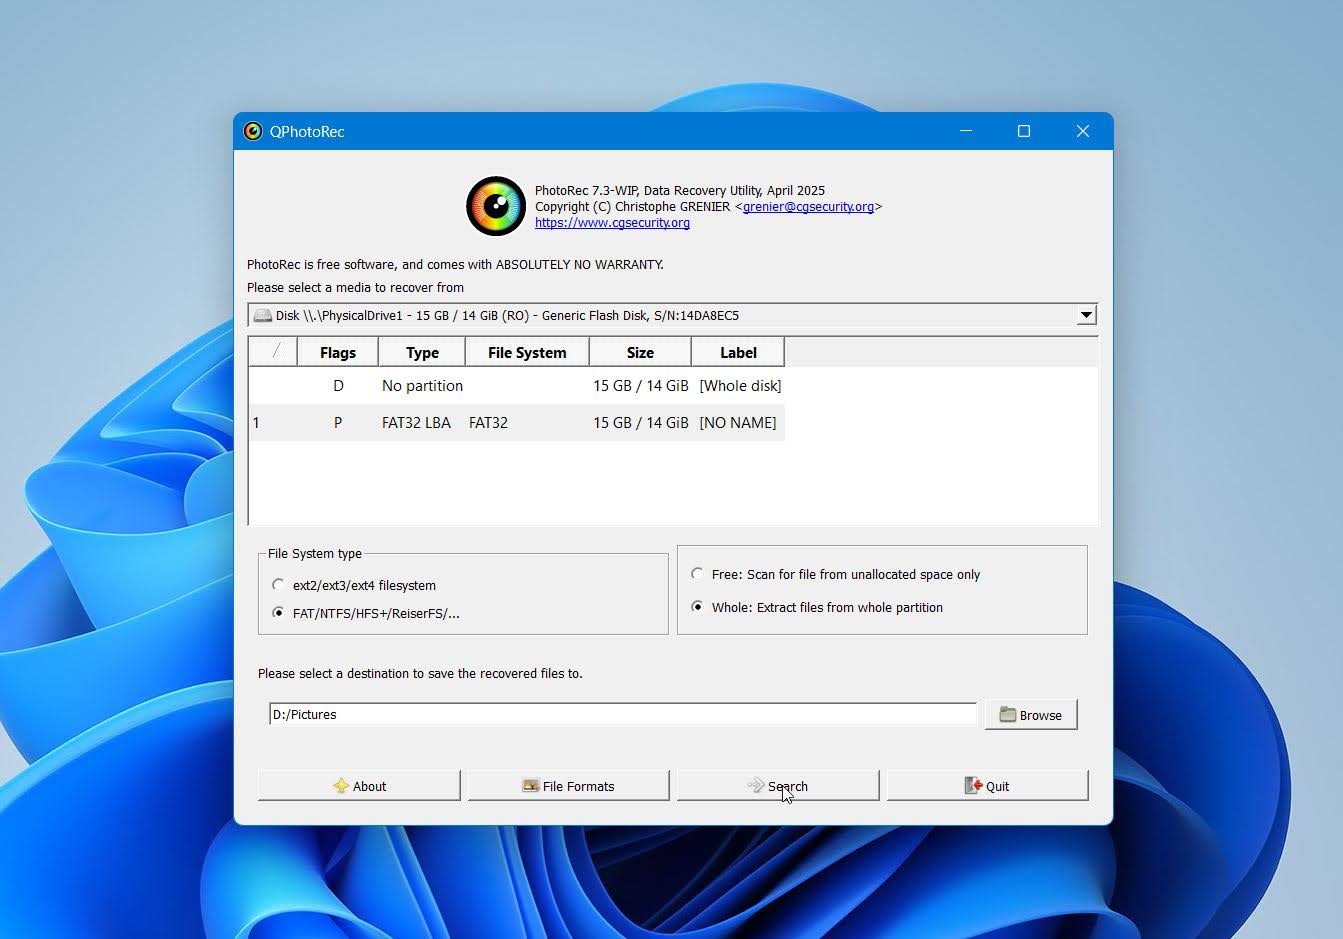
Here is how to recover files from a CFast card using qPhotoRec:
- Download and install the TestDisk/PhotoRec package on your computer.
- Connect the CFast card using a compatible card reader.
- Launch qPhotoRec (the GUI included in the package).
- In the top dropdown menu, select your CFast card. If both a physical device and partitions appear, start with the full device.
- Select the file system used by the CFast card.
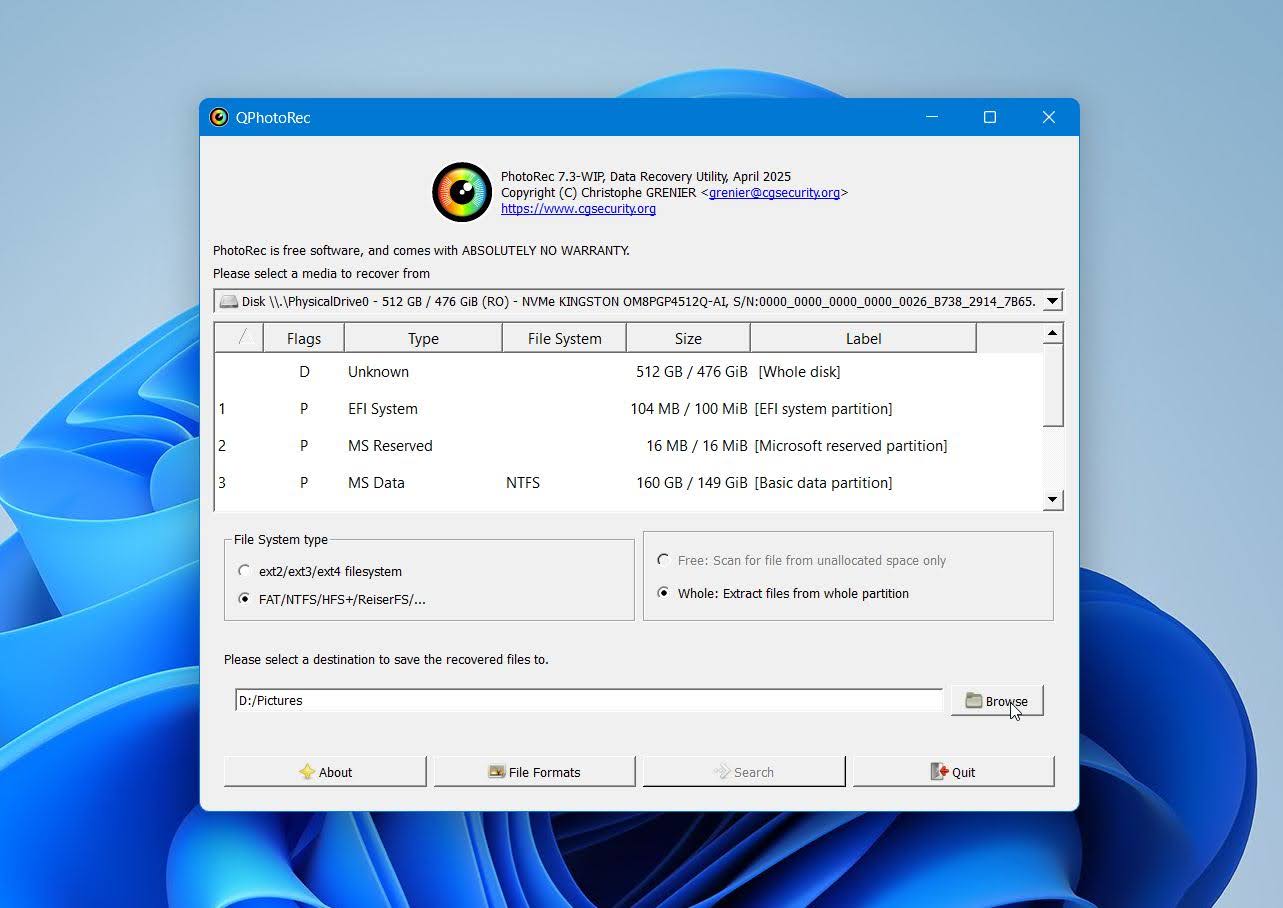
- Choose the scan scope. Free works best for simple deletion cases. Whole scans the entire device and is better after formatting or when the file system is damaged.
- Click Browse to select a destination folder on a different drive.
- Click File Formats and select only the formats you need (for example: JPG/RAW formats, MOV, MP4, MXF). This reduces unnecessary results and speeds up recovery.
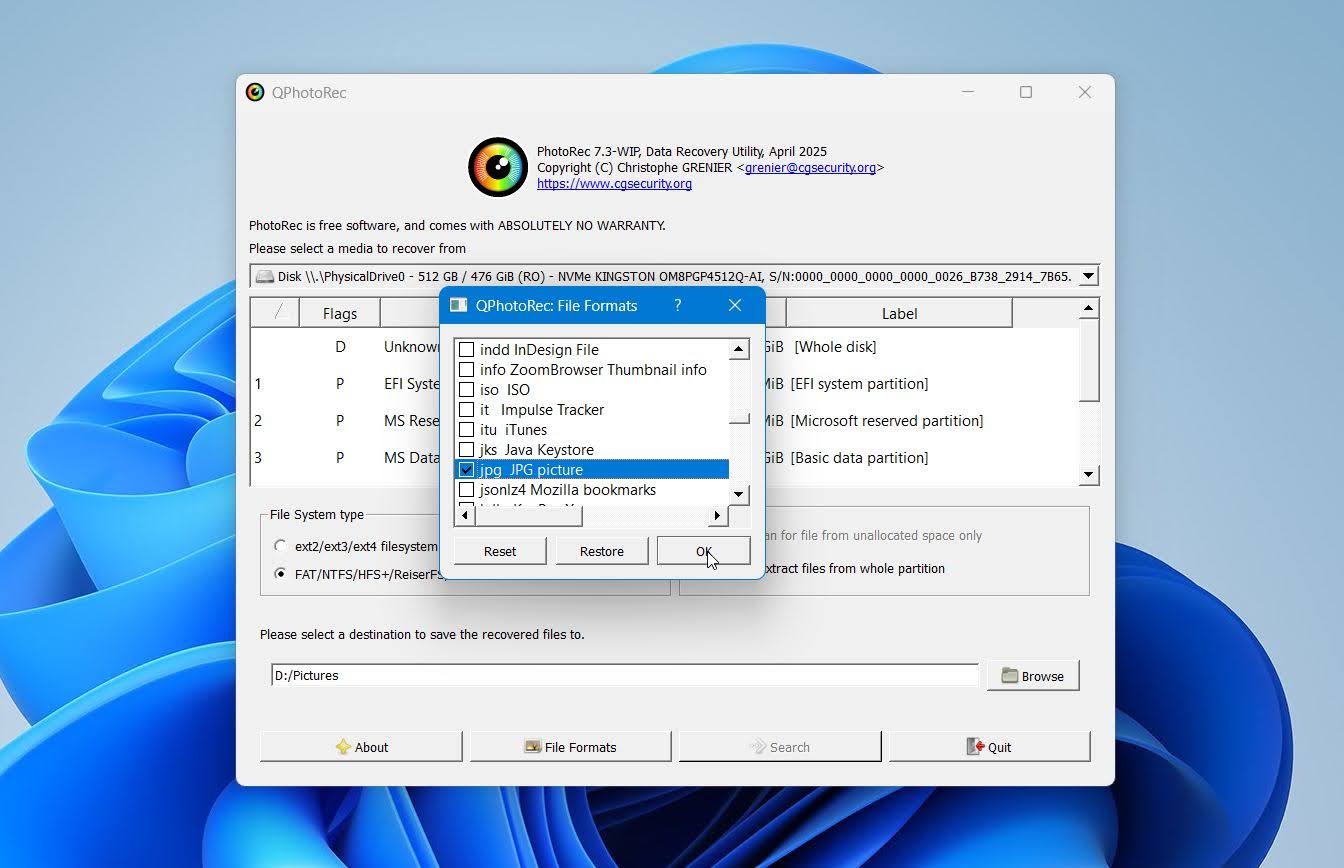
- Click Search. qPhotoRec will begin extracting files and automatically save them to the selected destination folder.
Expect generic filenames and multiple folders containing recovered batches. Sort files by type and size first, then verify content in a media player or image viewer.
TestDisk is bundled with PhotoRec but serves a different purpose. It is primarily a partition recovery tool, not a file recovery utility. It focuses on partition recovery and file system repair rather than file extraction. It can be useful when a card or drive is not detected properly before or alongside file recovery. We cover its strengths and limitations in our full review.
If you want to learn more, check our PhotoRec review.
Should I Run CHKDSK on My Corrupted CFast Card?
Short answer: not right away. CHKDSK is a built-in Windows tool that checks and repairs file system errors. It works only when a drive has a readable file system (NTFS, FAT, exFAT). CHKDSK does not work on RAW drives. When a CFast card shows up as RAW, unformatted, or unreadable, CHKDSK usually fails outright.
Even when CHKDSK does run, it repairs the file system by modifying metadata. That means it may rename files, move fragments into .CHK files, or mark sectors as unusable. From a recovery standpoint, this is risky. Once those changes happen, file recovery can become much harder or even impossible.
That’s why we strongly recommend recovering your data first, or at least creating a full byte-to-byte backup, before running CHKDSK. If you skip this step and CHKDSK removes files, recovery is sometimes still possible, but the window narrows quickly.
Here is how to use CHKDSK:
- Insert the CFast card and confirm it has a drive letter in Windows.
- Right-click Start and select Terminal (Admin) or Command Prompt (Admin).
- Enter the command chkdsk E: /f (replace E: with your card’s letter).
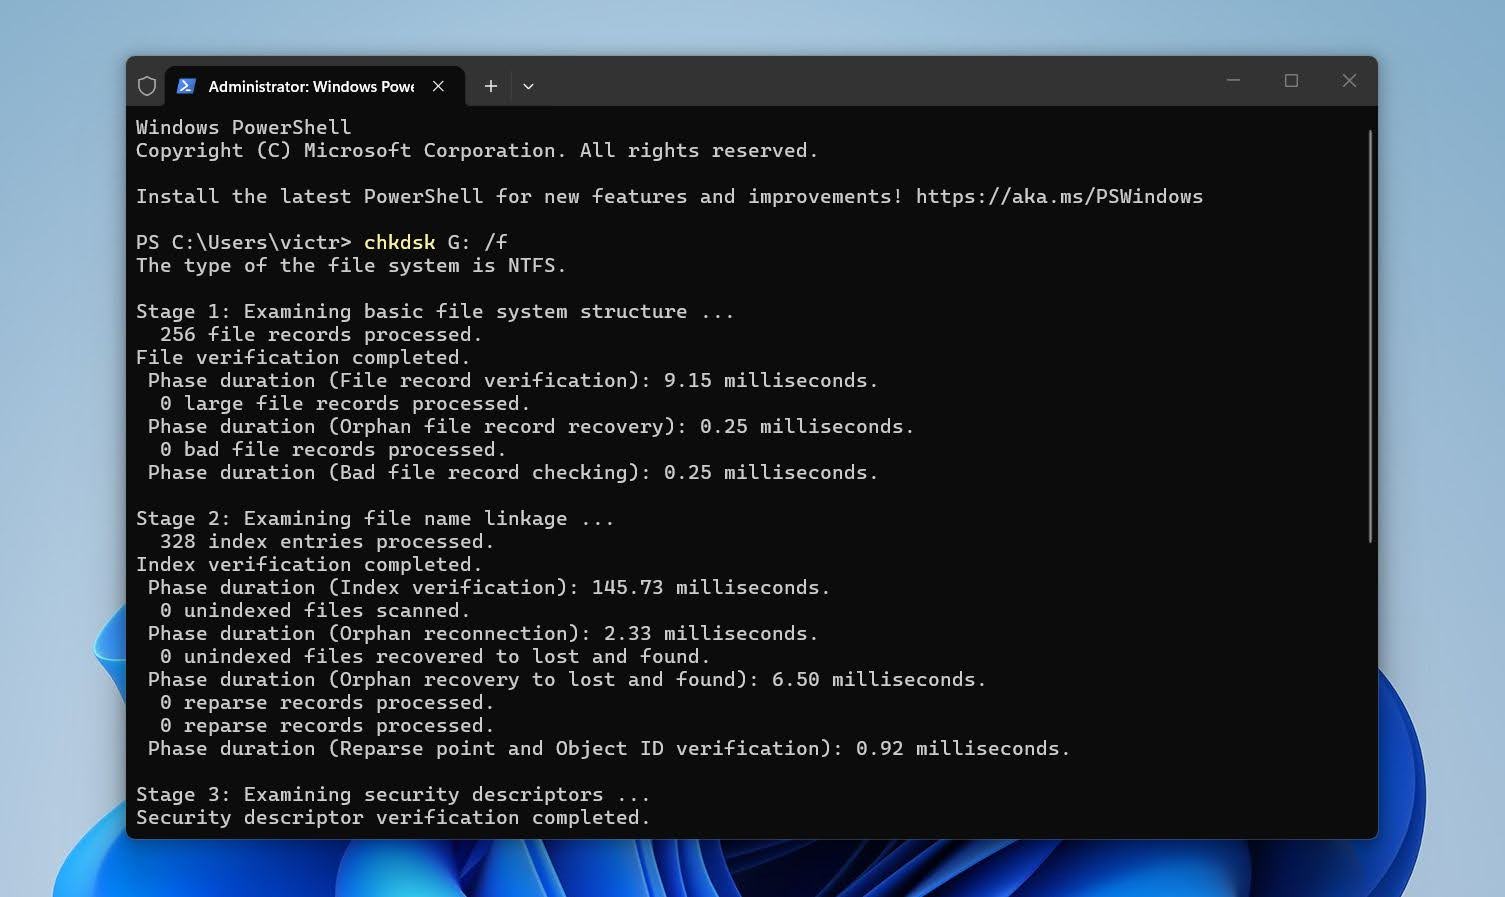
- Press Enter and let the process finish. Do not interrupt it.
If CHKDSK freezes, takes hours on a single stage, or appears stuck (stage 4 is a common example), do not force-close it immediately. This is a known scenario and often points to deeper disk issues rather than a simple file system error. For CHKDSK-related problems, browse related recovery articles on our site or post your specific case on our forum.
When Should I Contact a Professional CFast Recovery Service?
In some cases, at-home recovery simply will not work. If you know when to turn to a professional service, it can save time and prevent further damage.
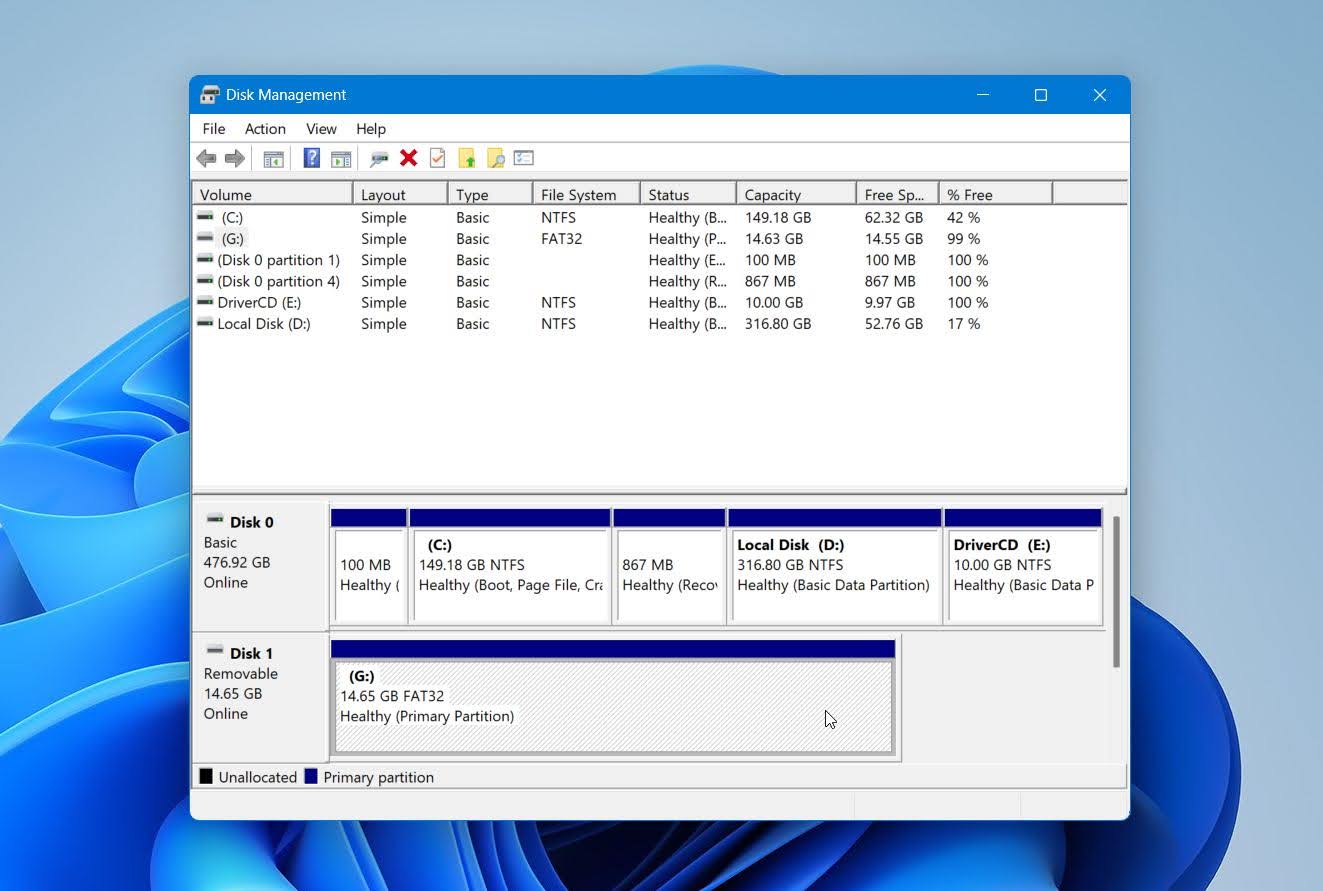
If the card does not show up in Disk Management at all, across multiple computers and card readers, this usually points to a low-level or physical failure. In that situation, recovery software has nothing to work with. Software can scan a drive without a file system, but it cannot scan a device that the operating system does not detect. At that point, only a professional lab can attempt recovery using specialized hardware to bypass the card controller and access the memory chips directly.
If the CFast card does not appear in File Explorer but does appear in Disk Management, perhaps as RAW, unallocated, or without a drive letter, home recovery is still possible. This is a common scenario after file system corruption, and recovery software can usually scan the card directly.
Here is how to check if the card appears in Disk Management:
- Right-click the Start button and select Disk Management. You can also press Win + R, type diskmgmt.msc, and press Enter.
- Browse the list of drives and look for your card. If you see your CFast card listed in Disk Management and its size looks correct, you can try scanning it with recovery software.
Physical damage is another clear indicator. Cracked cards or water exposure require professional handling. We often see cases where attempts to open or repair a card at home make recovery impossible. Labs work in cleanroom environments and use specialized tools to handle damaged flash memory safely.
Unusual setups can also complicate recovery. Most CFast cards store standard, unencrypted files, but proprietary systems or encryption require specialized handling. In those cases, professional labs can assess what recovery options remain.
If you are not sure where to turn, we maintain a list of reliable memory card recovery services worth considering. We generally recommend labs that specialize in flash memory and operate under a “no data, no fee” policy, which means you pay only when data is successfully recovered.
Conclusion
We hope we helped clear up what usually happens when a CFast card loses files and how recovery works. In many cases, the data is still there, and the outcome depends more on the next few actions than on the original mistake. To keep problems rare, back up footage as soon as possible, format cards only in-camera after backups, avoid pulling a card mid-write, and retire cards that start to behave strangely.
If you still have questions, feel free to start a new thread in our community forum or reach out via our contact form, we’ll do our best to help.
FAQ
Can deleted files be recovered from a CFast card?
In most cases, yes. Deleted files often remain on the card until new data replaces them. Recovery usually works best when the card stays unused after deletion.
Here’s how to recover deleted files from CFast card:
- Stop using the CFast card immediately.
- Insert it into a computer using a proper CFast card reader.
- Scan the card with recovery software.
- Preview recoverable files.
- Recover files to a different drive.
Does formatting a CFast card erase data permanently?
What happens when you format an SD card depends on the type of format. A quick format, which most cameras use by default, does not erase the underlying data. It resets the file system, which means recovery often remains possible. A full format or secure erase is different. That process overwrites data across the card, which leaves nothing to recover.
Is CFast card recovery possible on both Windows and macOS?
Yes. The recovery process works the same on both platforms. A CFast card connects through a compatible reader and appears as a standard storage device that recovery software can scan directly.
Earlier in this guide, we already linked to our list of the best data recovery software for memory cards. For Mac users, we also maintain a separate, dedicated ranking that focuses specifically on the best macOS data recovery tools for SD cards with macOS-specific features and limitations taken into account.
Why does my CFast card show as RAW or ask to be formatted?
This usually points to file system corruption. Interrupted writes, sudden power loss, or unsafe card removal often cause this issue. The files may still exist on the card, but the system can no longer interpret the structure.
This is where many users run into trouble. When users accept the format prompt, the system can overwrite key metadata. In most cases, recovery software can scan a RAW CFast card directly and reconstruct files based on their internal layout, even when the file system appears unusable.
How can you recover a corrupted CFast card?
Recovering files from a corrupted memory card follows the same general approach as recovery after deletion or formatting. Remove the CFast card from the camera and connect it to a computer with a proper card reader. Then run a data recovery program to scan the card and review the recoverable files. Select the files you need and restore them to a different drive.
When the corruption reaches a level where the system cannot detect the card at all, software recovery no longer applies. In that case, a data recovery professional service becomes the only realistic option, since recovery labs can diagnose and handle controllers or memory-level failures that DIY tools cannot address.
This article was written by Mako Young, a Contributing Writer at Handy Recovery Advisor. It was recently updated by Victoria Rybtsova. It was also verified for technical accuracy by Andrey Vasilyev, our editorial advisor.
Curious about our content creation process? Take a look at our Editor Guidelines.