
CCleaner is an application that promises to wipe out unwanted and useless files from your computer. When you run CCleaner, it looks for files users typically don’t use, such as temporary internet files, and deletes them so you don’t have to clean your computer manually. But what if CCleaner deleted files that turned out to be not so unwanted?
If CCleaner has deleted important files from your PC, we’ll explain how you can recover files deleted by CCleaner in this guide.
Can Files Deleted by CCleaner be Recovered?
CCleaner is essentially a faster way to remove unwanted junk from your computer, but it comes with a cost. CCleaner has no way to tell if a file in the Recycle Bin is important to you. If you had removed a file but didn’t delete it permanently thinking you might need it later, CCleaner will still delete it when cleaning your computer. In addition to files in the Recycle Bin, CCleaner can also delete browser data including cookies and saved passwords, and corrupted Registry entries.
These important files are deleted permanently, but fortunately, it’s possible to recover them. You can recover deleted files after CCleaner has completed the cleaning process except in the following cases:
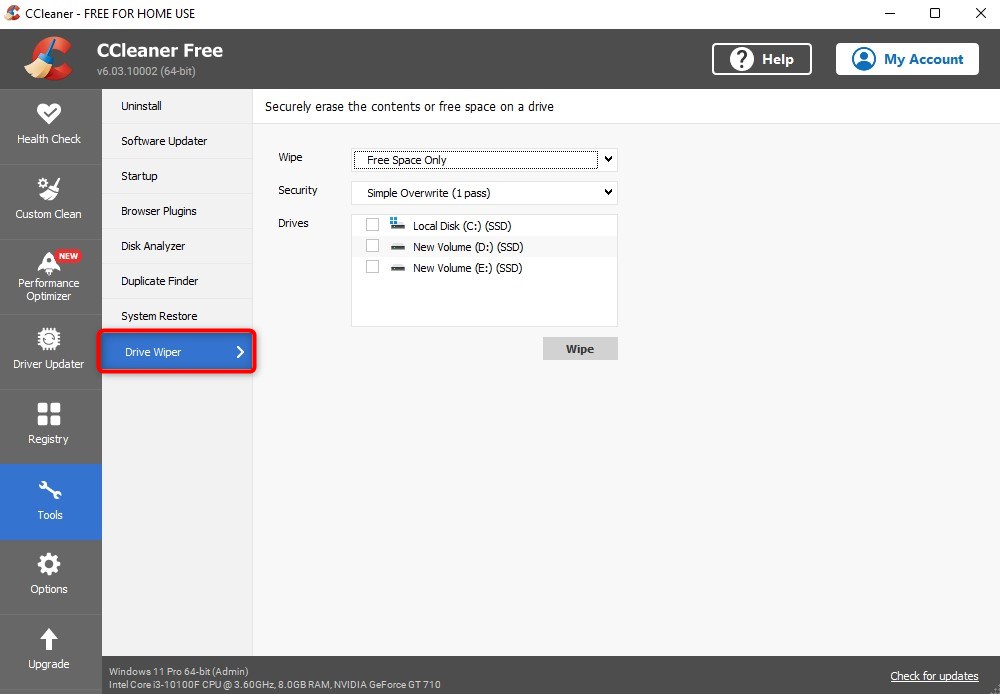
Used Drive Wiper
Drive Wiper is a built-in CCleaner feature that helps you delete confidential data to make it irrecoverable. For example, if you have financial documents you want to get rid of, you can use Drive Wiper to overwrite the disk, so the data becomes irrecoverable.
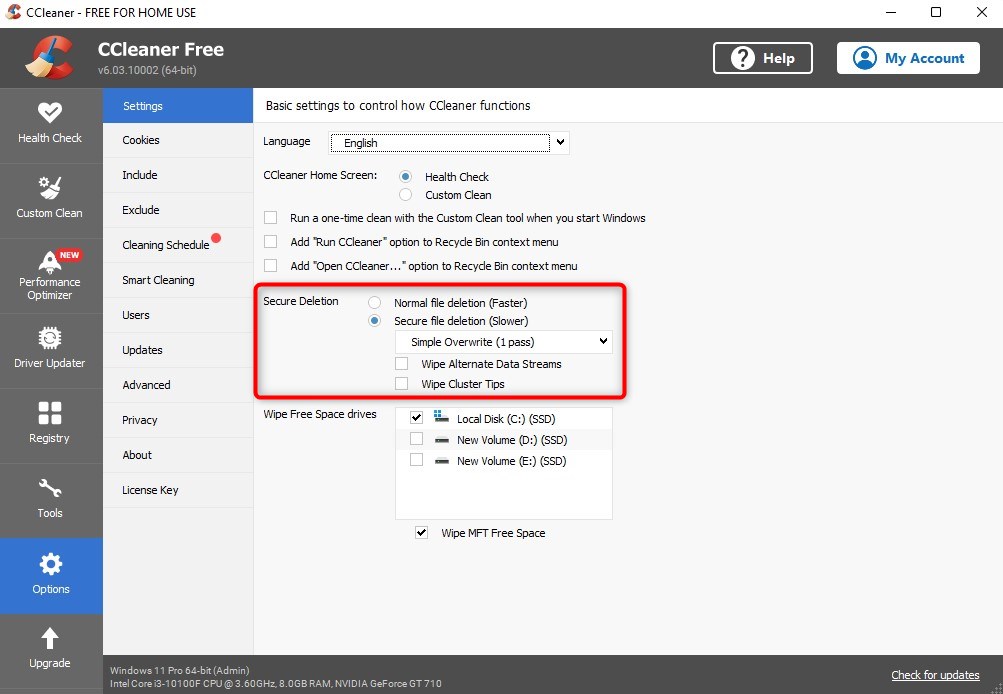
Enabled specific CCleaner settings
You’ll also eliminate chances of recovery if you use CCleaner settings like secure file deletion, wipe alternate data streams, or wipe cluster tips.
If you didn’t use the Data Wiper feature and haven’t enabled any of the CCleaner settings mentioned above, you’ll be able to recover data. This is because the way data recovery software works only allows recovering files that haven’t been overwritten.
How to Restore Files Permanently Deleted by CCleaner?
As long as your files haven’t been overwritten by CCleaner or yourself, a data recovery tool can help you with CCleaner deleted files recovery. Below, we explain how to recover files deleted by CCleaner using two popular data recovery tools.
Option A: Disk Drill
![]() Disk Drill is an intelligent data recovery software (read our Disk Drill review) solution that helps you recover up to 500MB of data for free. It’s also easy to use regardless of the file type you want to recover. Whether you need to undelete files CCleaner deleted from the Recycle Bin or recover other file types (.log, .reg, and more) that CCleaner is capable of deleting.
Disk Drill is an intelligent data recovery software (read our Disk Drill review) solution that helps you recover up to 500MB of data for free. It’s also easy to use regardless of the file type you want to recover. Whether you need to undelete files CCleaner deleted from the Recycle Bin or recover other file types (.log, .reg, and more) that CCleaner is capable of deleting.
Here’s a four-step method to recover files deleted by CCleaner using Disk Drill:
Step 1. Download and Install Disk Drill
Download Disk Drill and install it on your computer. It’s best to install Disk Drill on a separate drive than the one you want to recover data from to avoid overwriting data.

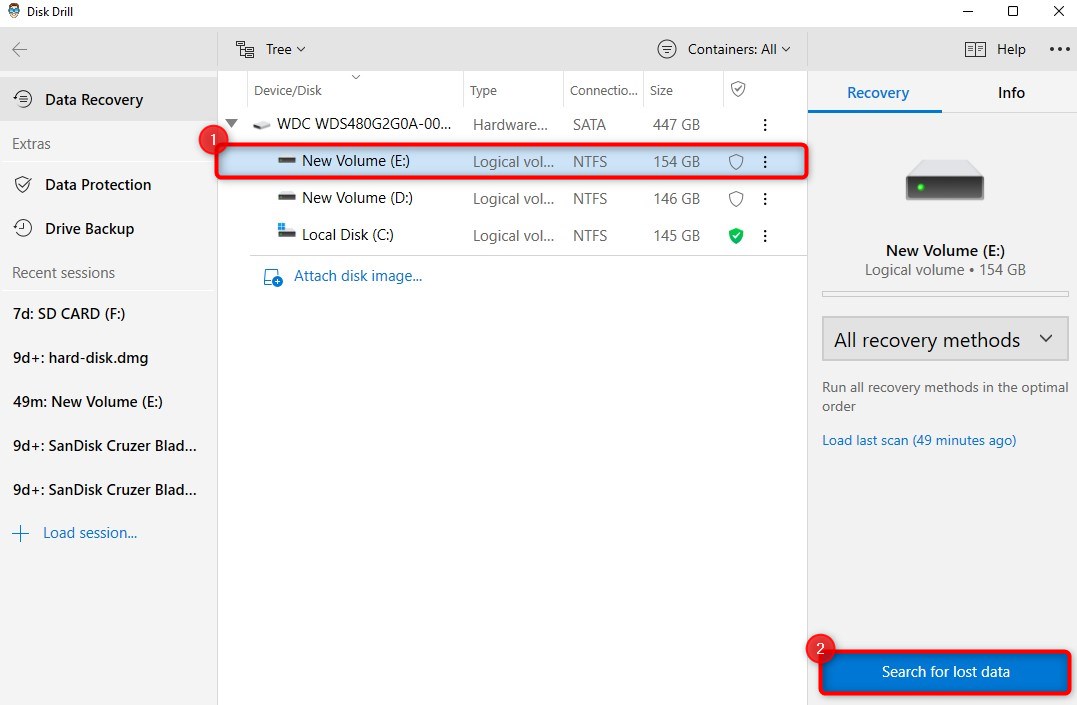
Step 2. Scan the Drive
When you launch Disk Drill after the installation is complete, you’ll see a list of drives connected to your PC. Select the relevant drive to scan it. Ideally, you want to select a specific volume so you can complete the process faster.
For example, if you want to recover files CCleaner deleted from the Recycle Bin, you’ll need to scan the C drive (or the drive where you’ve installed Windows). However, if you’re looking for a specific file you saved in a different drive, select the relevant drive letter. If you’re unsure about the file’s location before deletion, just scan the complete drive.
Click on Search for lost data once you’ve selected a drive to start the scan.
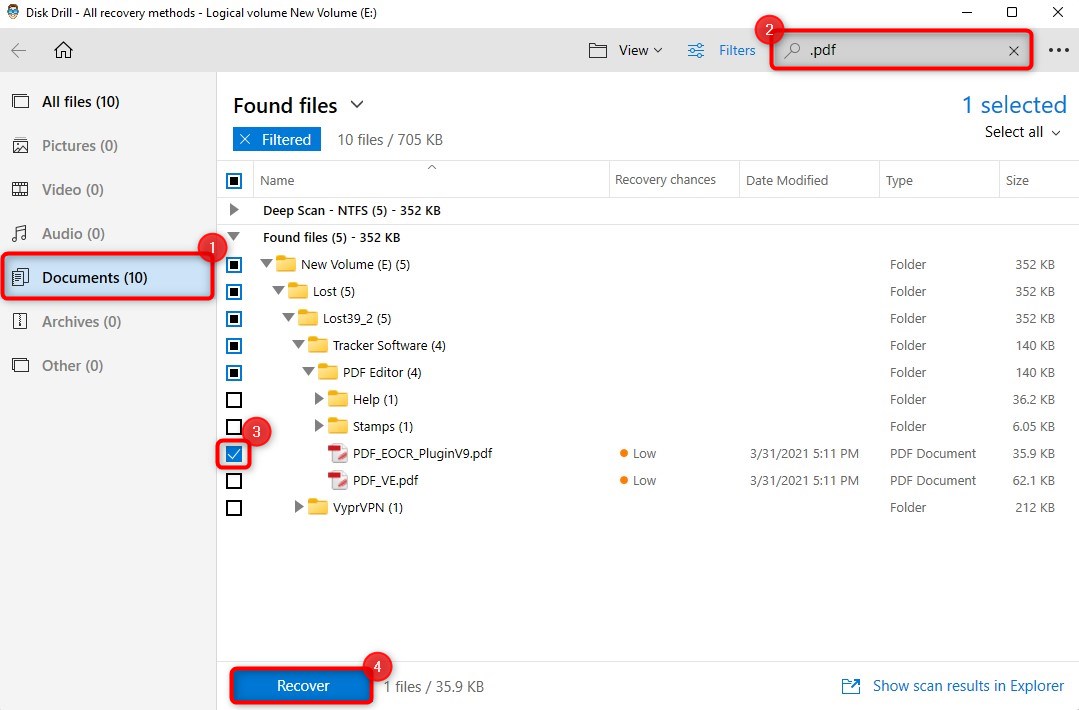
Step 3. Look for Files
Once the scan completes, you’ll see a list of files Disk Drill can recover from the drive. Disk Drill lets you filter these results based on file types as well as file extensions.
For example, if you’re trying to undelete an important document that CCleaner deleted from your Recycle Bin, select Documents from the left sidebar. If you’re looking for documents with a specific file extension (such as .pdf), enter the file extension in the search bar at the top right to further filter the results. If it’s an image file, you can also preview the file on Disk Drill before recovering it.
Once you find the files you’re looking for, check the box to their left.
Step 4. Recover Files
Once you’ve selected the files, click on the Recover button at the bottom. Select a recovery location that’s different from the source drive to ensure the recoverable data doesn’t get written over. Click OK once you’ve selected the location.
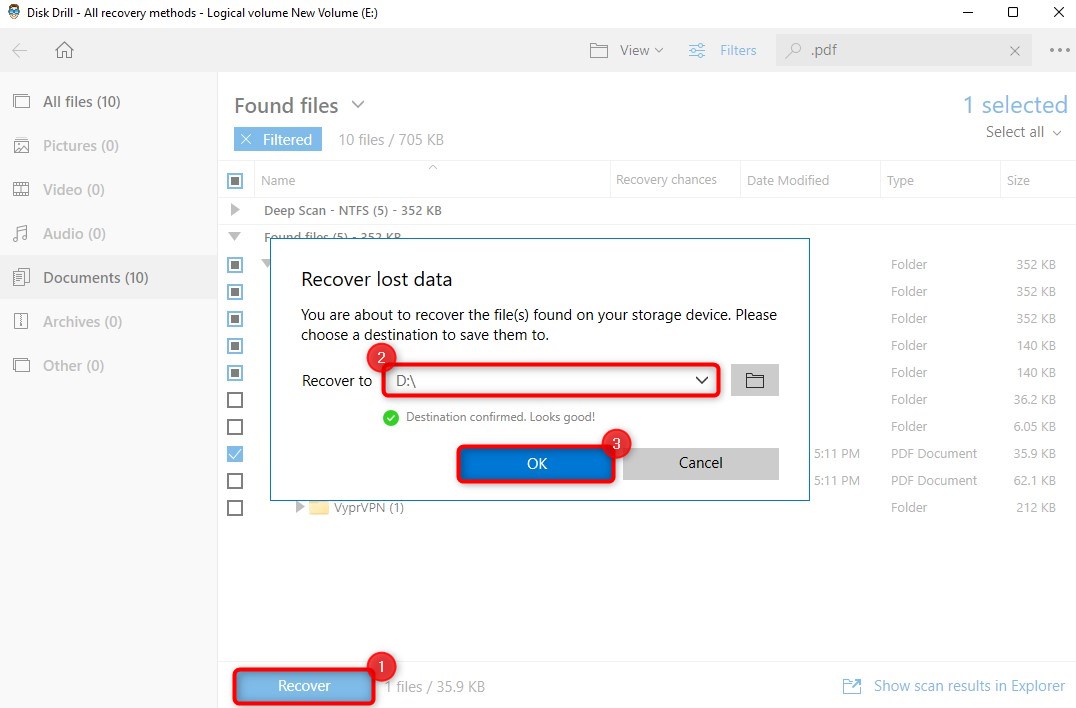
Go to the selected recovery location after the process is complete and you’ll find your recovered files there.
Option B: Recuva
![]() Recuva is another data recovery software solution from the same company that made CCleaner called Piriform. Though not as robust as Disk Drill and relatively bare-boned in terms of feature set, it’s still one of the best data recovery apps and can generally get the job done. Read more about Recuva in our review.
Recuva is another data recovery software solution from the same company that made CCleaner called Piriform. Though not as robust as Disk Drill and relatively bare-boned in terms of feature set, it’s still one of the best data recovery apps and can generally get the job done. Read more about Recuva in our review.
Below is the process to recover files deleted by CCleaner using Recuva:
Step 1. Download and Install Recuva
Download Recuva and install it on your PC, on a drive different from the one you’re trying to recover data from to avoid overwriting.
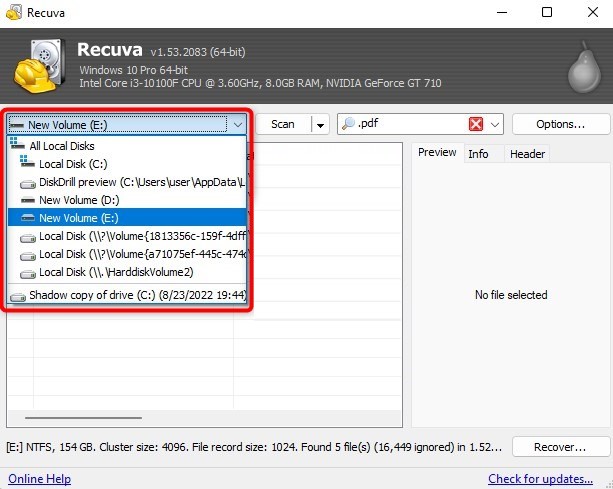
Step 2. Select a Drive to Scan
When you launch Recuva, you’ll see a wizard. You can use the wizard or skip the wizard by clicking Cancel (which is what we’ve done). Skipping takes you to the Advanced mode. Select the drive where you had saved the files deleted by CCleaner. Choosing a specific volume will save you time when scanning. However, if you don’t remember the file location, select All local disks on Recuva.
Step 3. Start the Scan
Once you’ve selected the disk, click on the Scan button. This should start the scan.
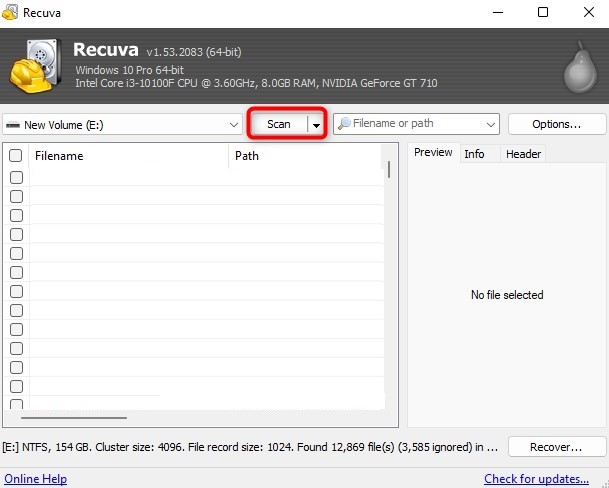
You can also choose to run a Deep Scan if the normal scan doesn’t detect the files you want to recover. Deep scan can be enabled from Options > Actions. Just check the box next to Deep Scan and select OK.
Step 4. Recover Files
Once the scan is complete, select the files you want to recover by checking the box next to their left. Click on the Recover button, select a recovery location, and click OK.

When you’re done, check the recovery location and you’ll see the recovered files there.
How to Protect Your Files in the Future?
Now that you’ve recovered the files deleted by CCleaner, you should take steps to ensure you don’t end up in a similar situation in the future. The best way to protect your data is to back it up.
Backing up user-critical files ensures you’re able to get them back even if you delete the original copy from your computer permanently.
You have several options for backing up important files:
- Windows Backup: Windows offers two built-in options to create a backup of your files called Windows Backup and Restore and File History. While both options work fine when trying to recover files deleted by CCleaner, they’re easy to miss because they’re buried away inside submenus either in the Settings or the Control Panel.
- Third-Party Backup Tools: Third-party tools typically offer a broader feature set compared to the built-in functions in Windows. For example, third-party tools offer an intuitive user interface and one-click data recovery. The feature set varies among third-party backup tools, but we give you an overview of the best third-party backup & recovery tools in one of our guides.
Disk Drill is the best option for creating a backup of your data because it offers several backup options even on the free version.
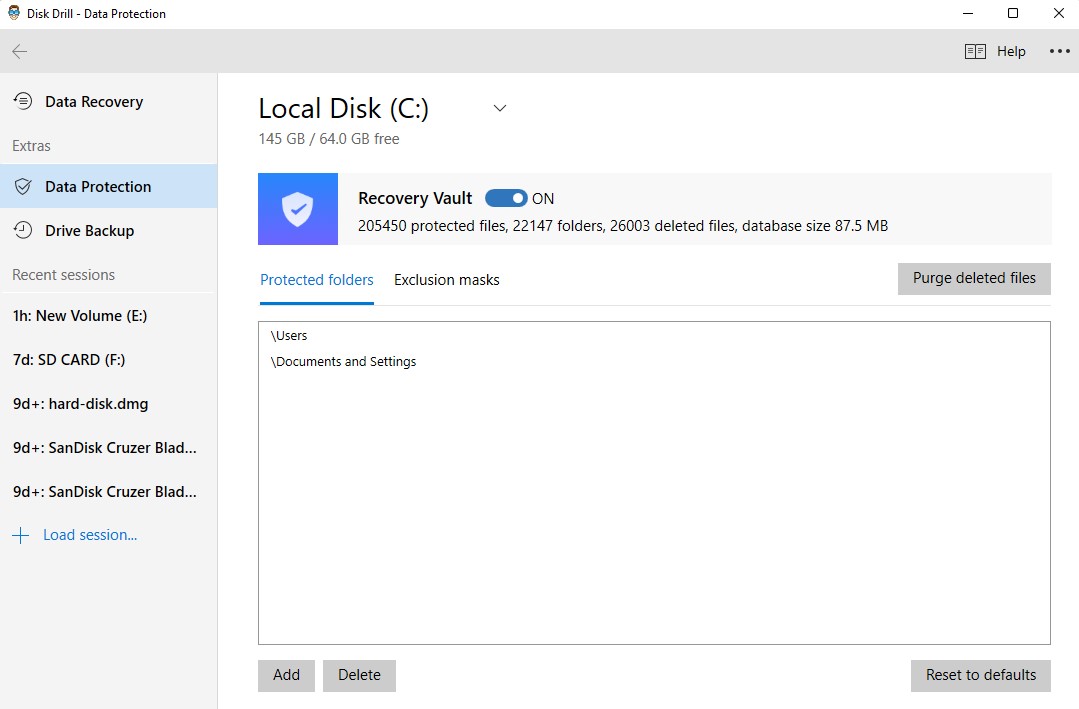
For example, you can use the Data Protection feature to protect highly sensitive files. It effectively works the same way as a second Recycle Bin. Just select the folders you want to protect and add them to the Recovery Vault and Disk Drill will ensure you don’t lose them. Any files you need to restore from the Recovery Vault are completely free.
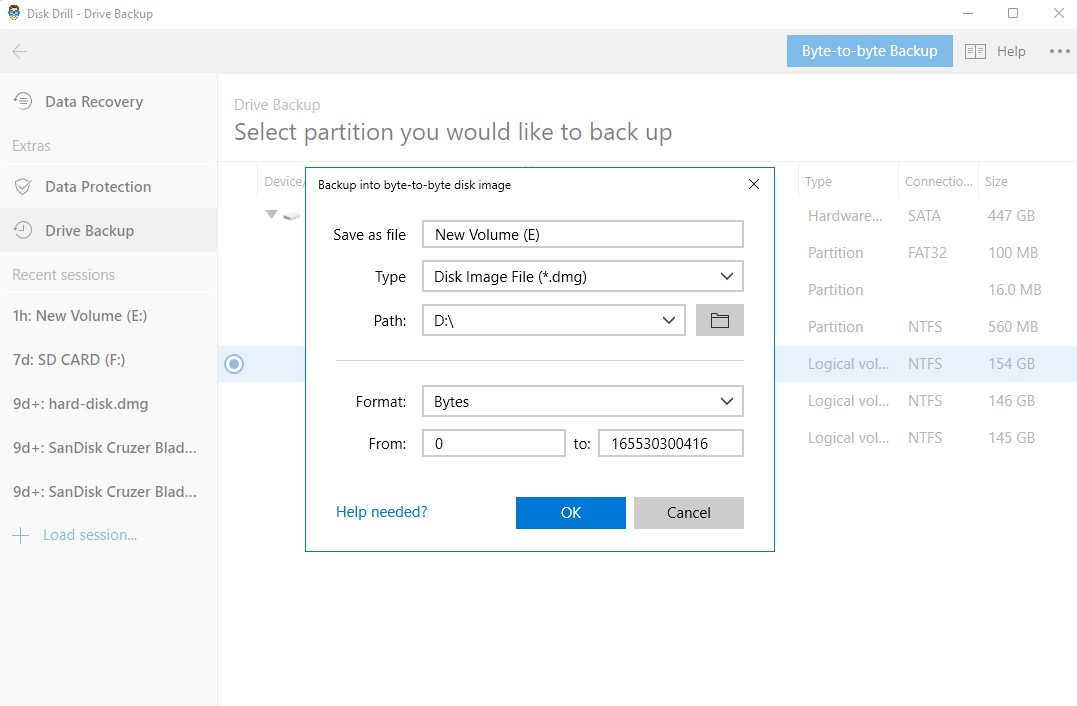
More importantly, Disk Drill offers Byte-to-Byte backups. It’s a backup feature that helps you quickly create a backup within minutes. Unlike the built-in Windows backup options, you won’t have to go through a long wizard. Your backup will be ready with a few clicks, and the same goes for recovery.
If you need to recover files deleted by CCleaner using a backup you took using Disk Drill, you can just scan the backup image and select the files you want to undelete—it’s that simple.
FAQ
Can I restore files deleted by CCleaner on Android?
Yes, if you used CCleaner to clean your junk from mobile and lost important files, you can recover those files on Android with a tool like Disk Drill. Storage devices work the same way regardless of the operating system, so as long as your storage device isn’t severely physically damaged and the data hasn’t been overwritten, you can use a third-party app to recover data from SD card on Android.
How do I restore the registry in CCleaner?
To restore registry:
- Find the CCleaner registry backup file.
- Identify the backup file based on the date and time. The file name is usually in the cc_date_time.reg format.
- Right-click on the file and select Merge.
Can I retrieve permanently deleted files?
Yes, you can recover permanently deleted files. Whether the files were permanently deleted by a tool like CCleaner or by accidentally pressing Shift + Del, a third-party data recovery software solution can usually help you recover those files.
Can CCleaner be trusted?
CCleaner is trustworthy in most cases. It won’t infect your computer with viruses or delete files without permission. However, it’s best not to use the registry cleaner feature on CCleaner unless you have a good understanding of how the registry works.
Can CCleaner damage my computer?
CCleaner won’t maliciously damage your computer. However, it does have the potential to damage your computer if you don’t understand its features and use them anyway. For example, if you inadvertently end up deleting a registry key when using CCleaner’s registry cleanup, you could end up with a corrupt operating system.
This article was written by Arjun Ruparelia, a Contributing Writer at Handy Recovery Advisor. It was also verified for technical accuracy by Andrey Vasilyev, our editorial advisor.
Curious about our content creation process? Take a look at our Editor Guidelines.