
Adobe Lightroom is a great photo enhancement software widely used by photography professionals and enthusiasts alike. But the app experience could easily turn into a nightmare if you accidentally lose your catalog in the middle of a project.
If, for whatever reason, you encountered a frustrating data loss and urgently want to know if there’s any way you can get your files back, we’re here to tell you: you can perform data recovery by yourself to retrieve a deleted Lightroom catalog.
In this guide, we’ll teach you different ways how you can recover deleted .lrcat (Adobe Lightroom Classic Catalog) files in no time.
What are Lightroom LRCAT files?
Adobe Lightroom Classic organizes your photos using a digital catalog where you can select which photo to edit. This catalog is saved in a .LRCAT file extension that can only be opened by installing Adobe Lightroom Classic.
LRCAT files contain all the information about the photos you import into your Lightroom catalog, including the file locations and edit history for each photo.
Pro tip: With LRCAT files, you can edit your photos without overwriting the actual files in your storage. Instead, every change will be stored in the catalog file and its accompanying LRCAT-DATA file. This process is referred to as non-destructive picture editing.
Is It Possible to Recover a Deleted Lightroom Catalog File?
It is possible to recover deleted Lightroom catalog files. However, the chances of successfully retrieving the file depending on how it was lost and whether or not you have any backup of your data.
Some of the most common reasons why a Lightroom catalog file can be lost are accidental deletion, accidental formatting, malware and viruses, and even program or PC crashes. The good news is that in all of these scenarios, you still have a good chance of recovering your file.
You can also increase your chances of repairing Lightroom catalog files by following the first aid kit of file recovery:
- ❌ Avoid using the partition where you lost your files. This may cause the data you want to recover to get overridden by new files or metadata.
- 💻 Scan your device as soon as you can.
- ⭕️ If you will download a third-party data recovery app, make sure not to place it in the same partition as your lost files.
How to Recover Permanently Deleted LRCAT Files
For most users who suddenly and accidentally lost their files, the first resort is often to search for any way to recover them. A lot of data recovery software claim to have the power to rescue your LRCAT files. But here are the ones you can start from, based on our experience with data recovery.
Option A: Disk Drill
Disk Drill is a trusted recovery software with numerous satisfactory reviews from customers around the world. It is reliable and consistent in delivering successful file recoveries. In addition, the software approaches data recovery with a user-friendly interface that even non-tech-savvy users can understand the first time they use it.
Plus, it has the ability to scan and recover LRCAT files, among many other file extensions. You can also preview media files (images and videos) on the scan results page even before recovering them. The only catch is that the free version will only allow you to retrieve up to 500 MBs worth of data.
To know more about Disk Drill, check out our complete take on the software here.
Here’s how to use Disk Drill to recover your LRCAT files:
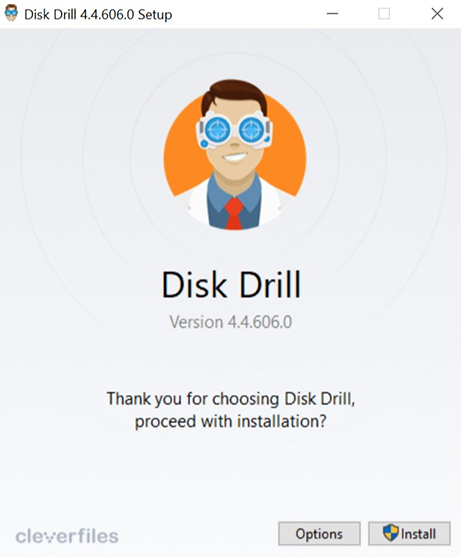
- First, download the Disk Drill setup file from the app’s official website.
- Next, open the setup and start the installation by clicking the Install button. You can also select the Options button to set up Disk Drill’s install location. Then, wait for the installation to finish.
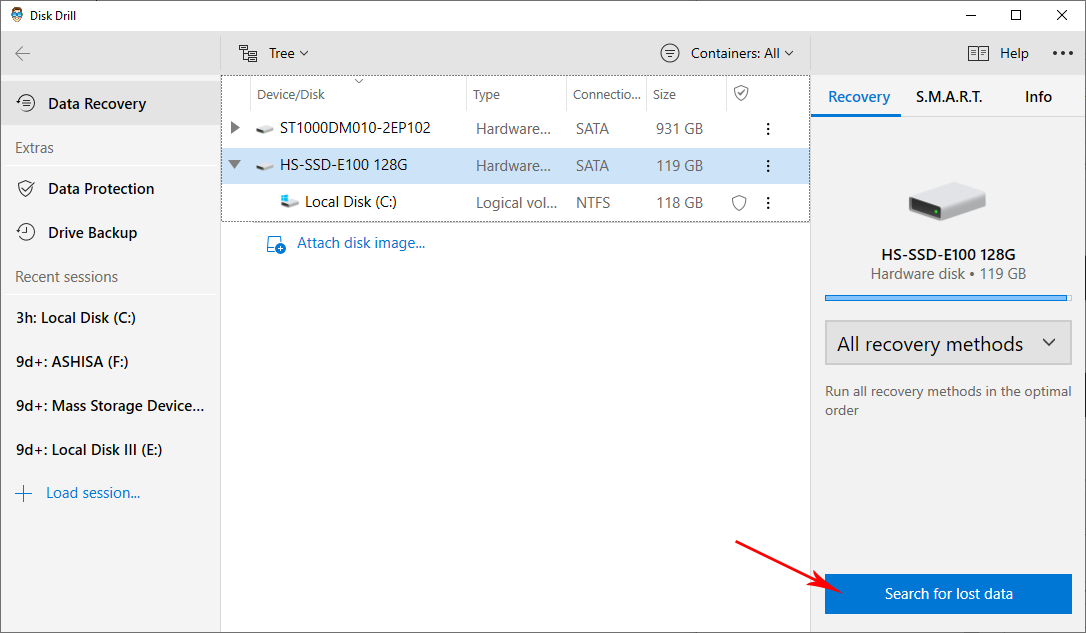
- Once the installation is complete, launch Disk Drill. Afterward, select the partition you want to scan, and click the Search for lost data button. Disk Drill will now start scanning your partition. The amount of time the program will take to finish scanning your partition will depend on its total storage capacity. Note: It is better to scan the entire device and not just the partition because data can be lost due to formatting the device.
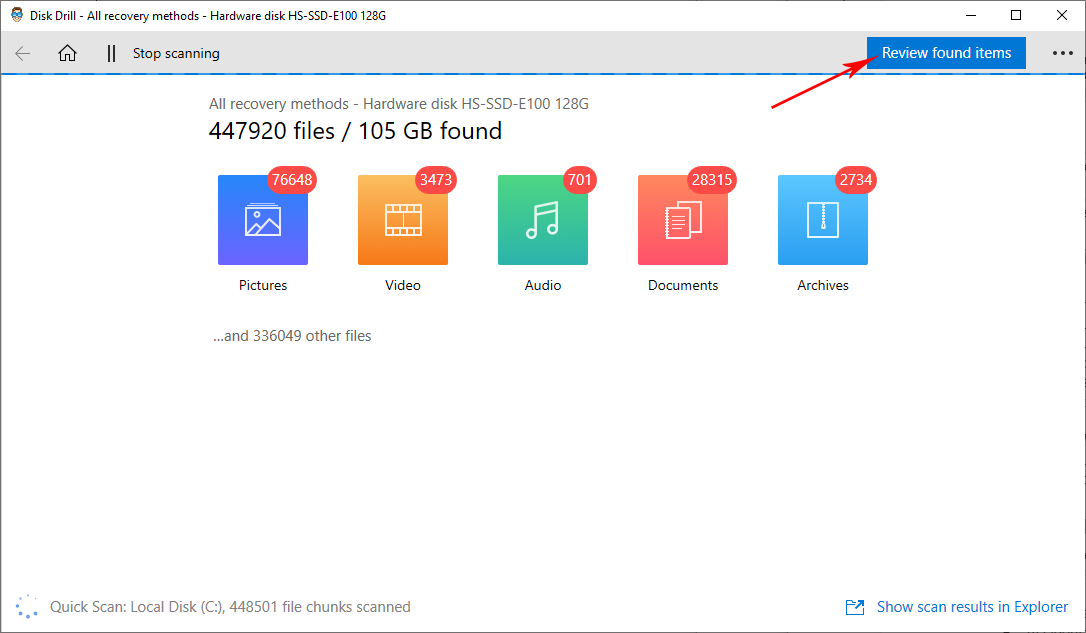
- You can view what files Disk Drill has scanned so far by clicking the Review found items button. You can also just wait until the scan is done and click the same button to browse the results.
- On the results page, search for the files you want to recover. First, select all files related to your catalog file by ticking each checkbox next to the file name. Then, after choosing your files, click the Recover button.
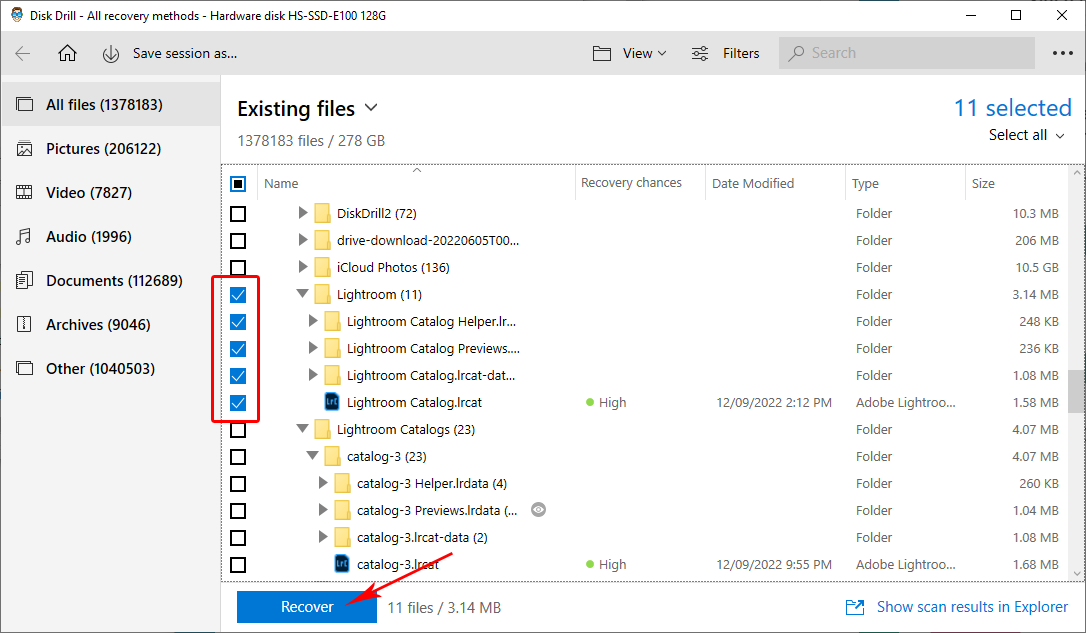
- A pop-up will appear and ask where you want to save your recovered files. After selecting the file destination, click the OK button.
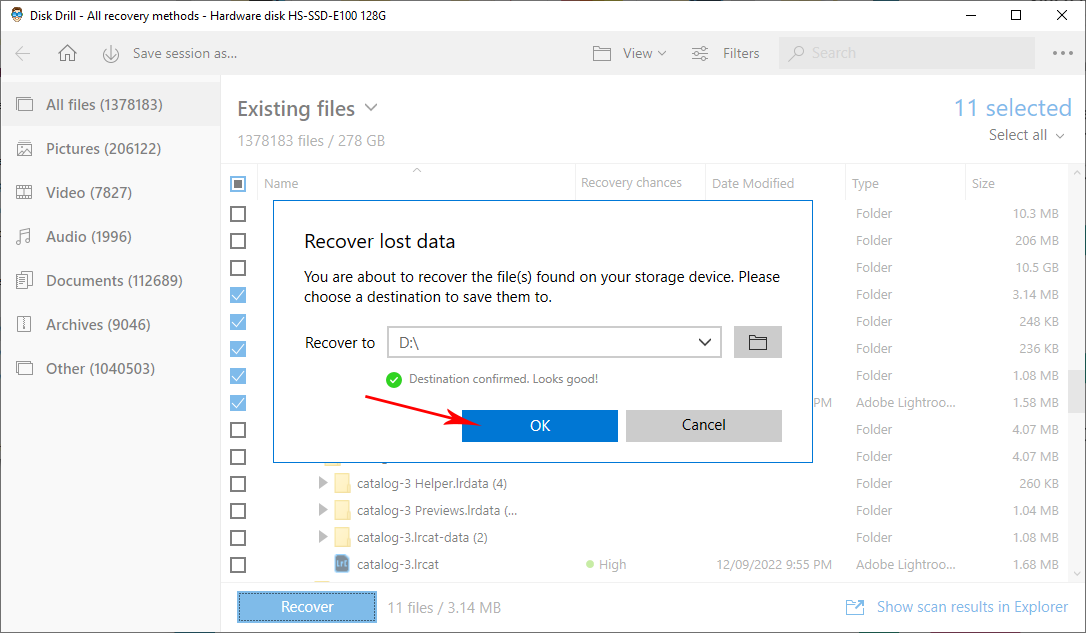
- Disk Drill will now attempt to recover your Lightroom catalog files. Lastly, you will be redirected to the next page once the file recovery is completed. There will be a notification showing if file recovery is successful. You can click the Show recovered data in Explorer to browse the files you recovered.

Option B: DiskGenius
Despite being known as a disk partition management tool, DiskGenius is also a great option for data recovery, especially for files in HDDs, and SDDs, among others. Its recovery capability can take you far enough in your attempt to recover deleted LRCAT files if you don’t mind a user interface that is a little more complicated and outdated.
Get a complete view of DiskGenius’ capabilities in our full review.
To recover your LRCAT files using DiskGenius, simply follow these steps below:
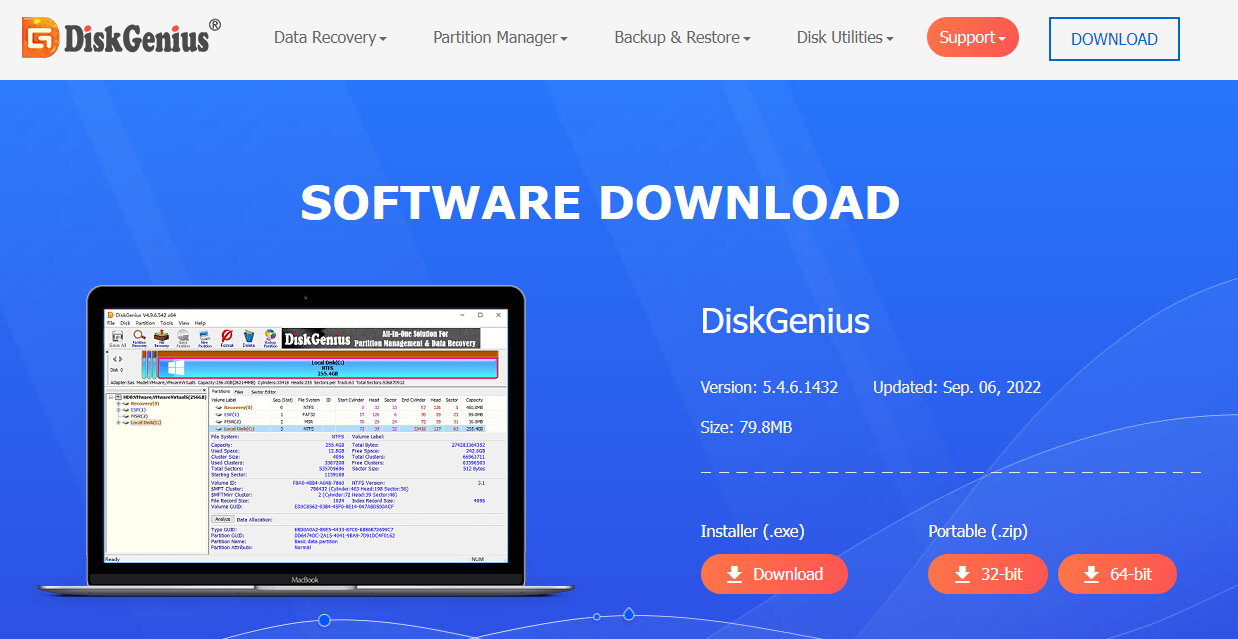
- First, download DiskGenius from their website and launch the app.
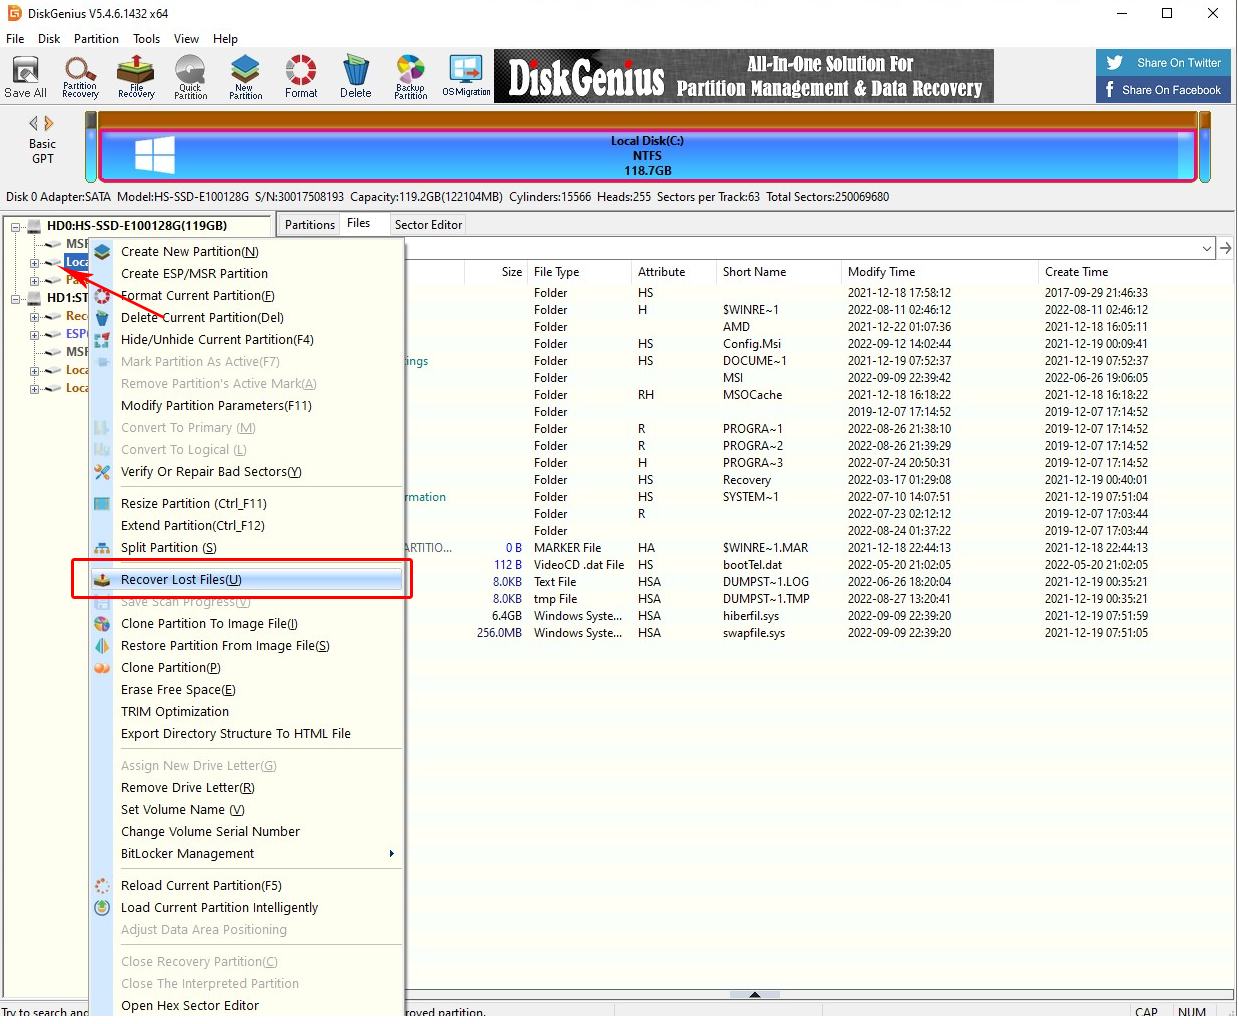
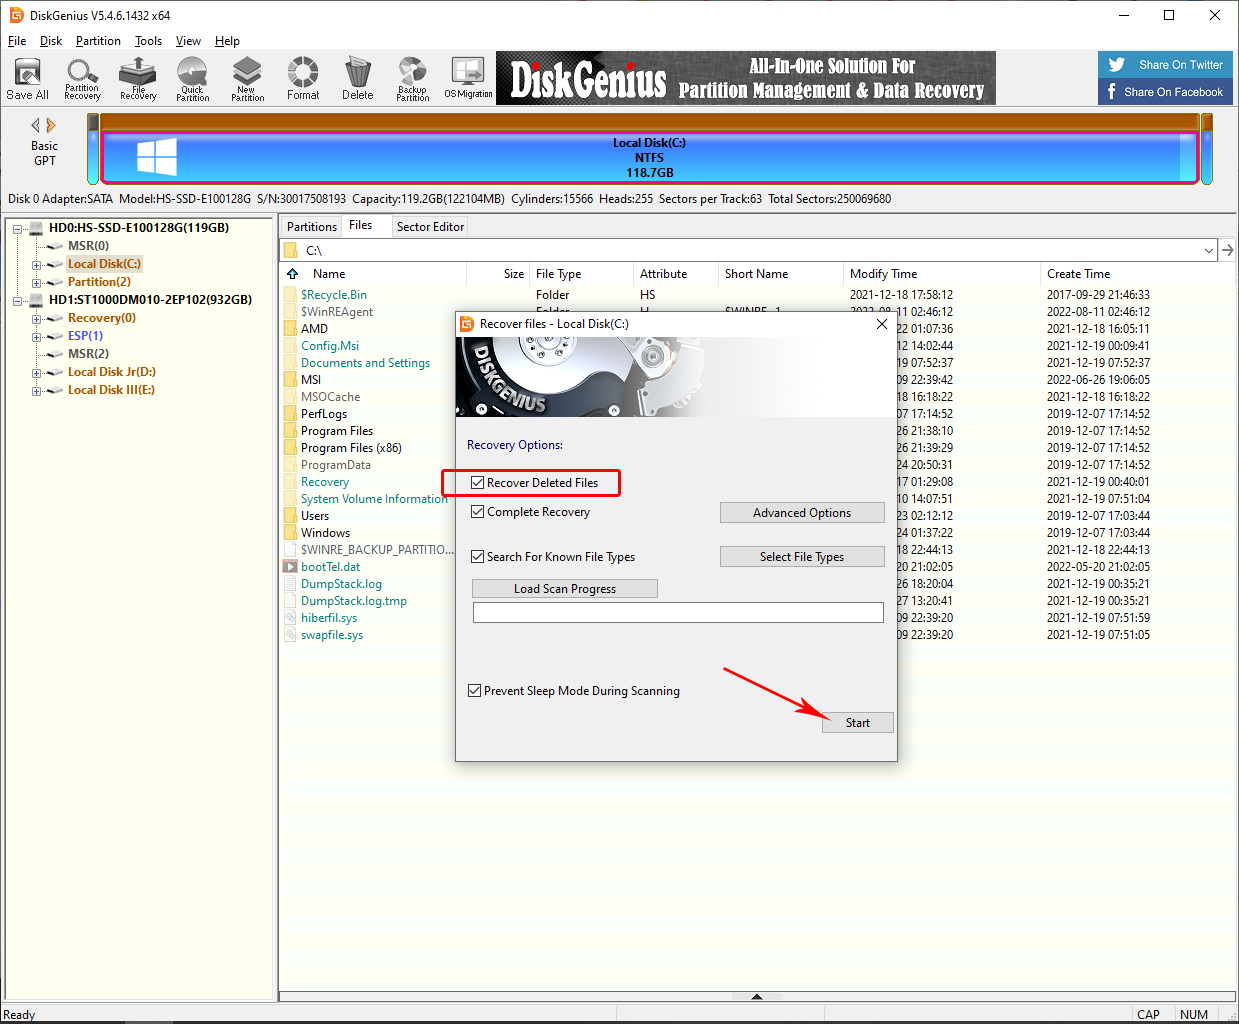
- On the first screen, you will see all available partitions you can scan. Right-click on the one you need to scan, then select the Recover lost files option.
- Upon clicking, a pop up will appear with different scanning options. Make sure to tick the Recover Deleted Files checkbox if it isn’t already selected. Once you have changed all your desired settings, click the Start button on the lower right of the pop up window.
 A. To recover specific file types, click the Select File Types button. Then, choose the file type you want and click OK. In the example, however, we decided to scan for all file types.
 B. You can also select the file system type to scan by clicking the Advanced Options button on the pop-up window.

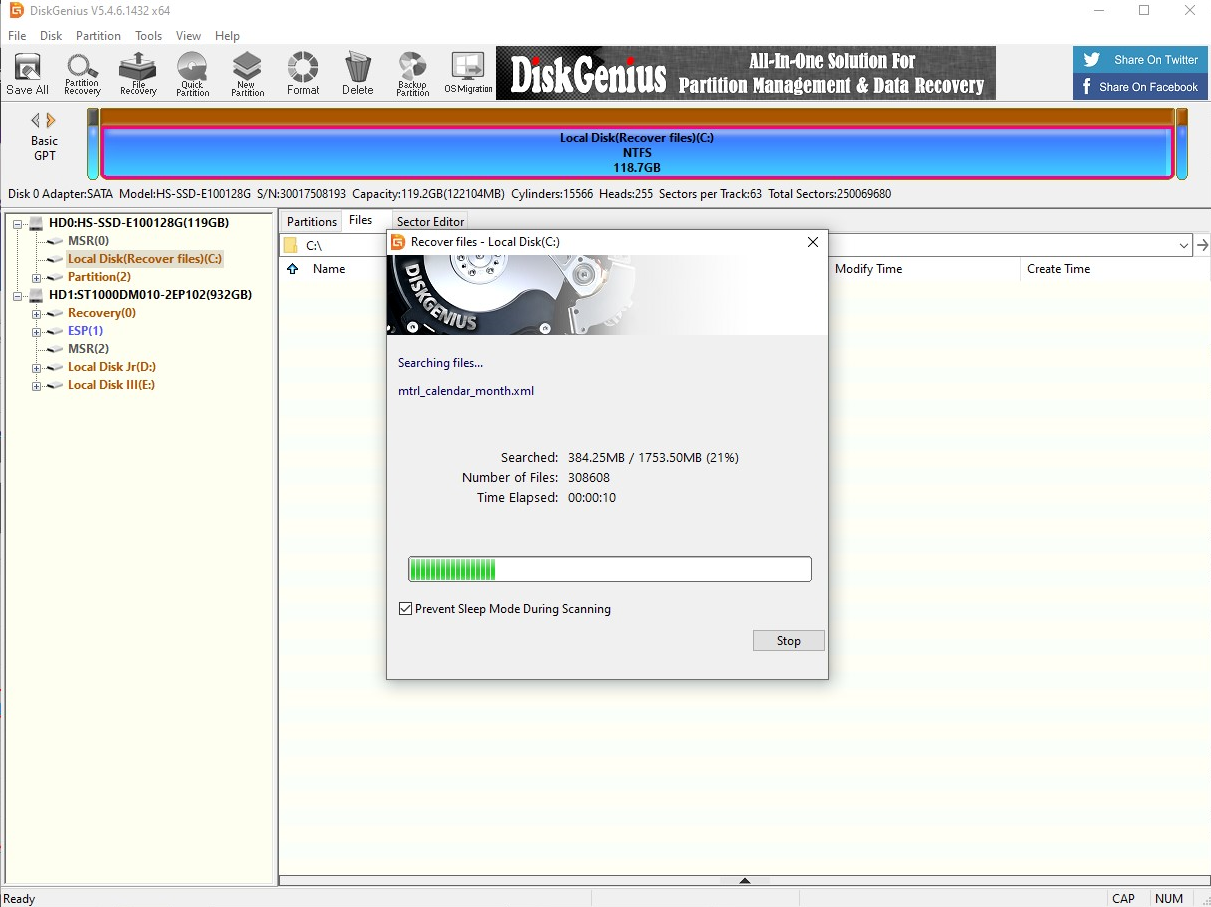
- After clicking the Start button, DiskGenius will begin scanning your partition. Wait for the scan to finish. This will take more time, depending on how large your storage size is.
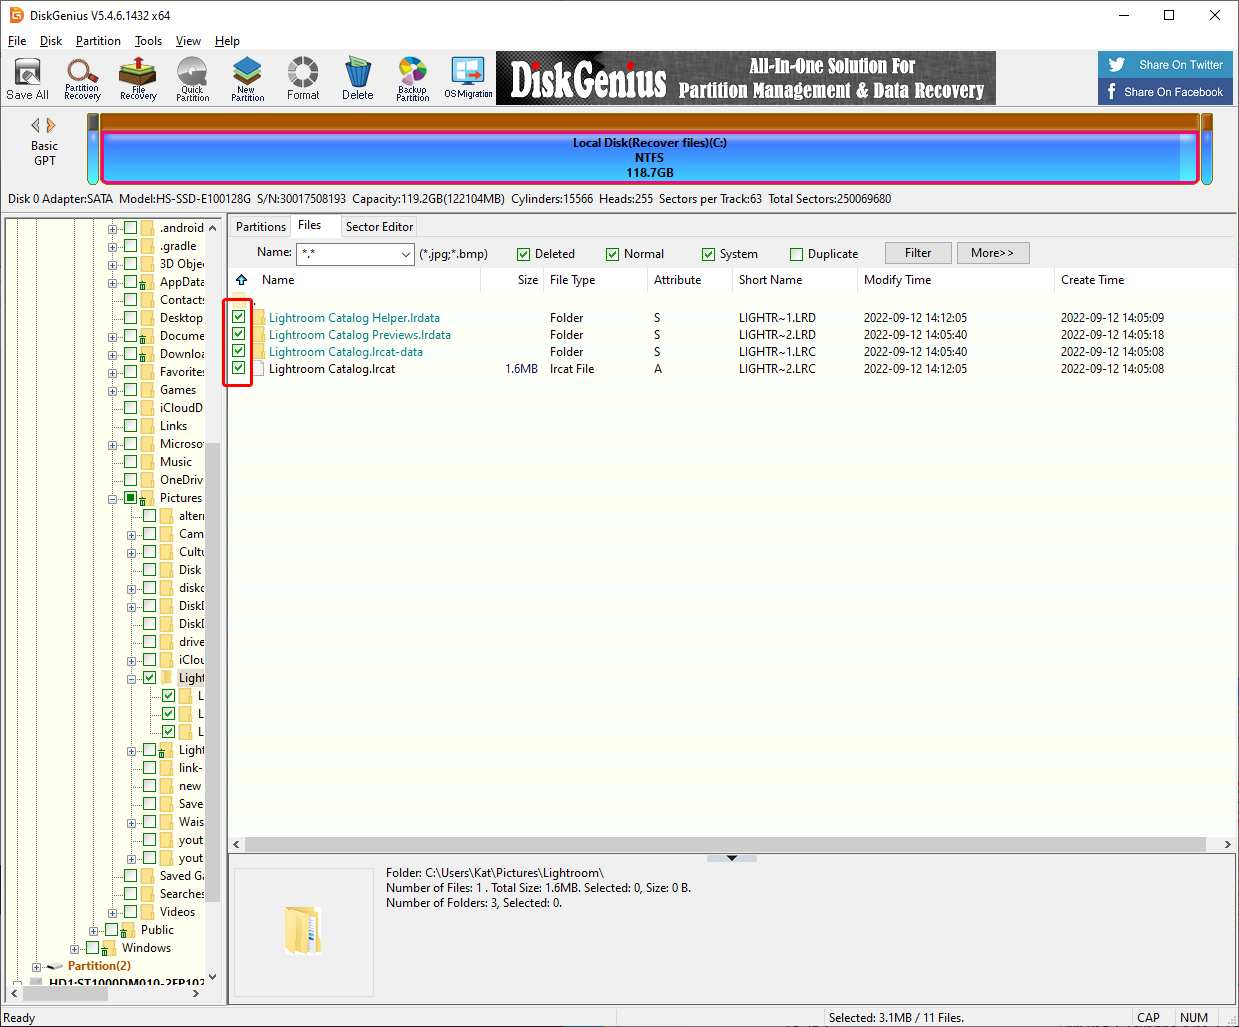
- After the scan is complete, you will see all the files DiskGenius was able to detect. Select the files you want to recover by ticking the checkboxes next to their file names.
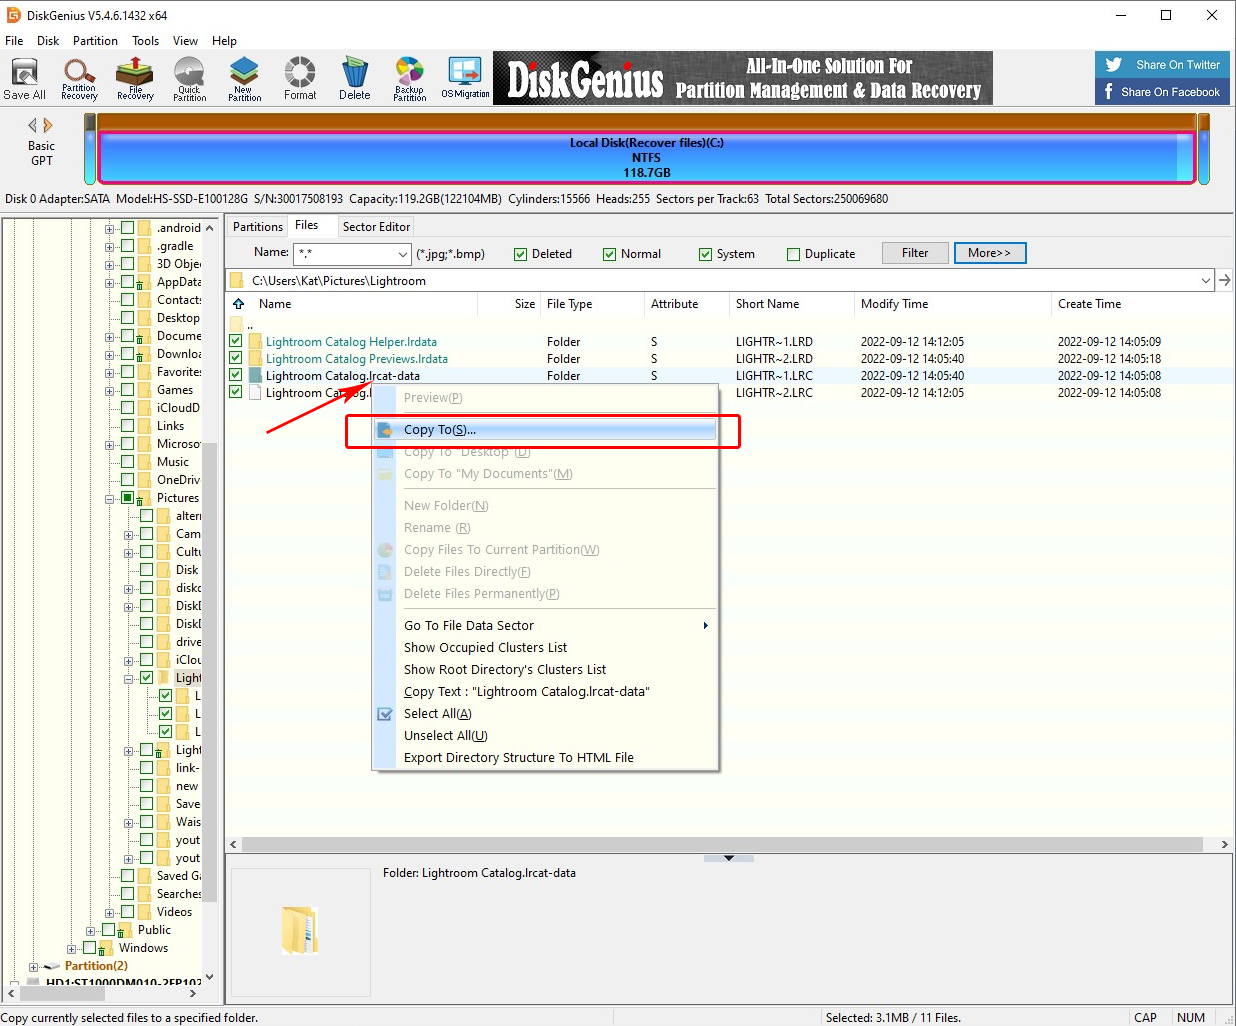
- To start the recovery process, right-click on the selected files, choose the Copy To(S)… option, and specify the location where you want to place your recovered files.
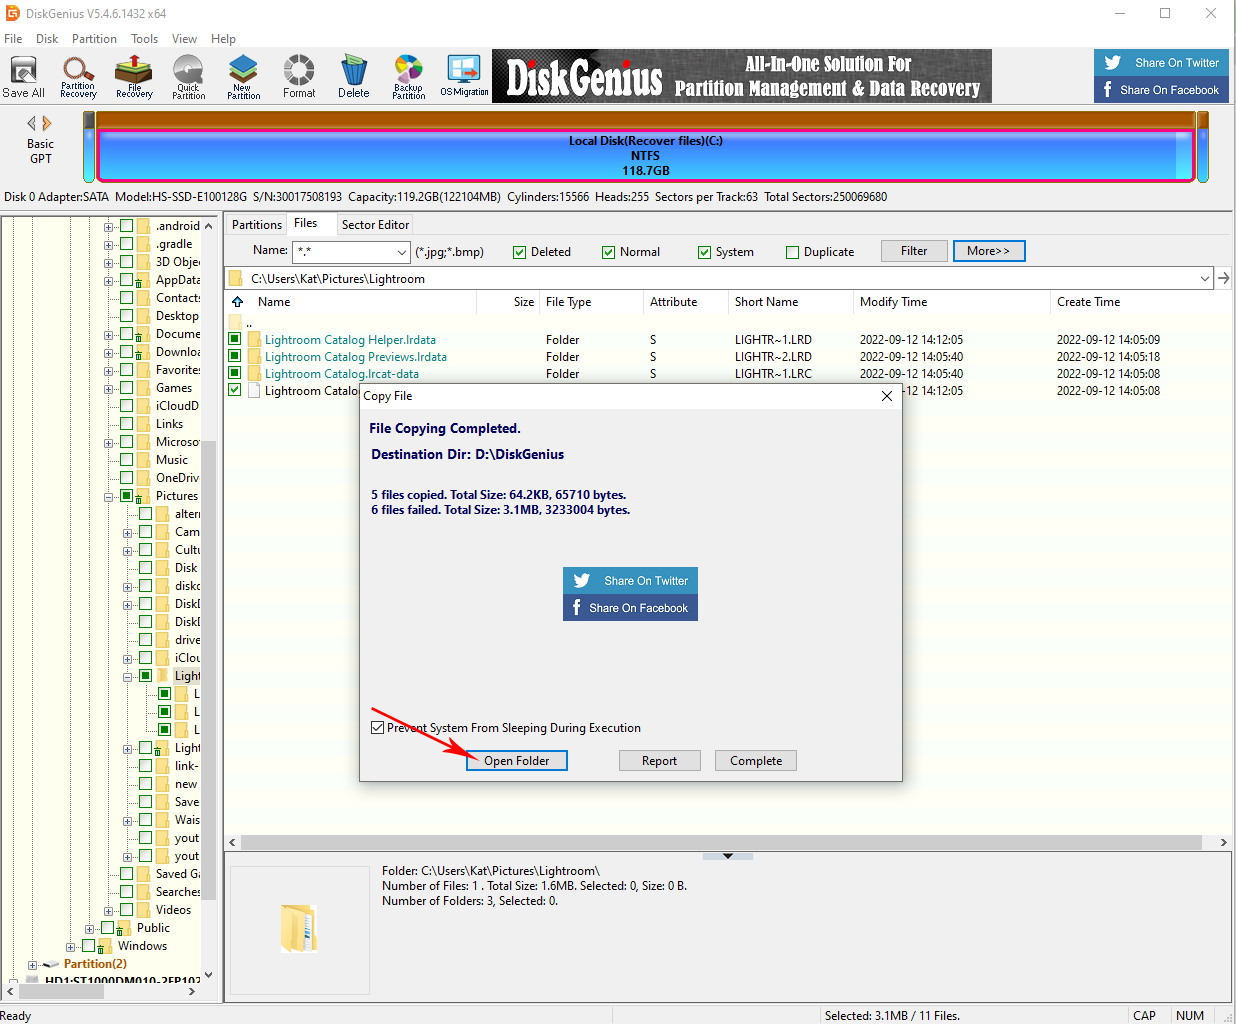
- Once the recovery process is completed, a pop up will appear with information about the files recovered. You can check your retrieved files by clicking the Open Folder button, or you can select the Complete button to close the pop up.
Is it Possible to Recover a Corrupt Lightroom Catalog?
Adobe Lightroom catalog files can be corrupted due to different reasons, such as system crashes or sudden power outages that can interrupt Lightroom while it is trying to write data to the catalog. While it is possible to recover a corrupt lightroom catalog, there is no guarantee that the process will be successful.
You can try to recover a corrupt Lightroom catalog by following Adobe’s troubleshooting guide.
FAQ
What happens if I delete the Lightroom catalog?
Deleting a Lightroom catalog will erase all the edits you’ve performed on all the photos you have imported into that catalog. However, the deletion will not affect any of your original files.
Where do deleted Lightroom files go?
For deleted Lightroom photos, you can access the files using the recently deleted folder of the app. If you removed your photos by selecting Delete from Disk, you could still access them in your computer’s recycle bin.
How do I find old Lightroom catalogs?
Browse your old Lightroom catalogs by going to Edit > Catalog Settings… then click the Show button to open your current catalog folder. There, you can find other Lightroom catalogs you previously worked on.
How to recover accidentally deleted .lrcat files?
You can easily recover accidentally deleted .lrcat files by using third-party data recovery software such as Disk Drill:
- Download and install Disk Drill on your computer.
- Then, open Disk Drill and select the partition you want to scan.
- Choose the LRCAT files you want to recover.
- Click the Recover button.
- Choose the destination for your recovered files.
How do I fix the “Local catalog damaged” error in Lightroom?
Before trying to fix the error, verify your sync status by clicking the Sync Icon.
If all images are synced and backed up:
- Close Lightroom.
- For Windows users, go to Users > [username] > AppData > Local > Adobe > Lightroom CC > Data > [Catalog ID string] and locate and rename the MCAT file to Managed Catalog.old.
- Locate and delete the previews folder and previews.db files in the same folder.
- Launch Lightroom and let it sync the catalog.
If some images are not synced:
- For Windows users, go to Users > [username] > AppData > Local > Adobe > Lightroom CC > Data > [Catalog ID string] > originals.
- Back up the originals folder.
- Follow the steps in the ‘all images are synced and backed up.’
What should I do if my Lightroom catalog is not recognized as a valid catalog?
If your catalog suddenly fails to open with an error message saying it is not recognized as a valid catalog, you can check and import a recent backup instead. If the error persists, check if you are running in the latest version of Lightroom and download the version if you are not.
How to open an LRCAT file?
.LRCAT files can only be opened through the Adobe Lightroom Classic. To do so, open Adobe Lightroom, head to File, then select Open Catalog. Then, select your LRCAT file to open.
Conclusion
Time is one of the most important assets of anyone working in the photography industry, especially during post-production. While it is scary to suffer data loss, you don’t have to bid farewell to your Lightroom files if you accidentally delete them.
With the help of smart data recovery programs such as Disk Drill and DiskGenius, you can recover the LRCAT files you poured hours of work into.
This article was written by Princess Lescan, a Staff Writer at Handy Recovery Advisor. It was also verified for technical accuracy by Andrey Vasilyev, our editorial advisor.
Curious about our content creation process? Take a look at our Editor Guidelines.