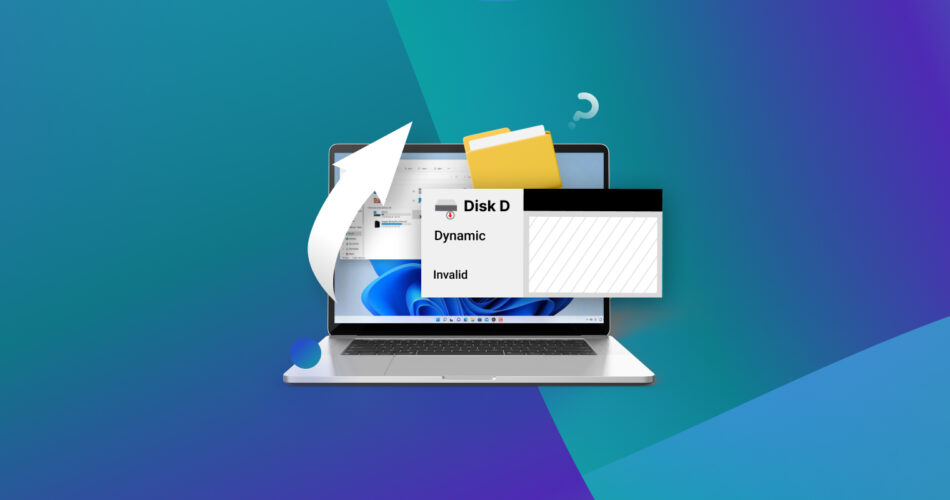
It’s absolutely heart-wrenching! When you accidentally delete files from the D Drive, you might feel that all hope is lost.
Don’t panic, as this article lists four step-by-step methods to recover deleted files from the D drive.
Common Causes of Data Loss on the D Drive
There’s no one simple answer for ‘why’ data loss occurs.
The following table dives into the common causes of data loss on the D drive:
Reason | Description | Solution |
📁I accidentally deleted files from the D drive | Accidentally deleting a file or folder that contained important files. | Start by looking through the Recycle Bin. Next, look through Windows File History (if previously enabled). Alternatively, try using a third-party data recovery program. |
💿I accidentally formatted the drive D | Due to a momentary lapse in attention, you could have accidentally selected the format option for your D drive. | Data recovery is possible only in the case of a quick format. To recover data, use a data recovery program to recover D drive data. Alternatively, you can recover data from a previous backup. |
🔧My D drive file system got corrupted | Indicators of D drive corruption may include D drive not showing up on File Explorer, or if you receive error messages like ‘The File or Directory is corrupted and unreadable’ that prompt you to format the hard drive. | To retrieve data from a corrupted D drive, first attempt to fix the corrupted drive and then use professional data recovery software. But if that doesn’t work, it’s best to contact professional data recovery services. |
💻 I lost my data on my D drive after the system update | A major Windows system update may occasionally cause data loss from the D drive. | Usually, you can use System Restore to undo a problematic update. However, to recover your specific personal files after a Windows update, you can use Windows File History or a third-party data recovery tool. |
❌I accidentally deleted an entire D drive partition. | Deleting a partition (or volume) on a disk erases all memory and marks it as unallocated. | To recover a deleted D drive partition, use TestDisk. |
🦠 My D drive was infected by viruses or malware | A virus or malware attack can manifest through unusual error messages and result in D drive data loss. | Use professional data recovery software to retrieve files deleted by viruses. |
How to Recover D Drive Data on Windows 10/11 PC
Here are four actionable methods to assist you with D drive recovery:
Ensure that you perform data recovery as soon as possible after data loss, to minimize damage.
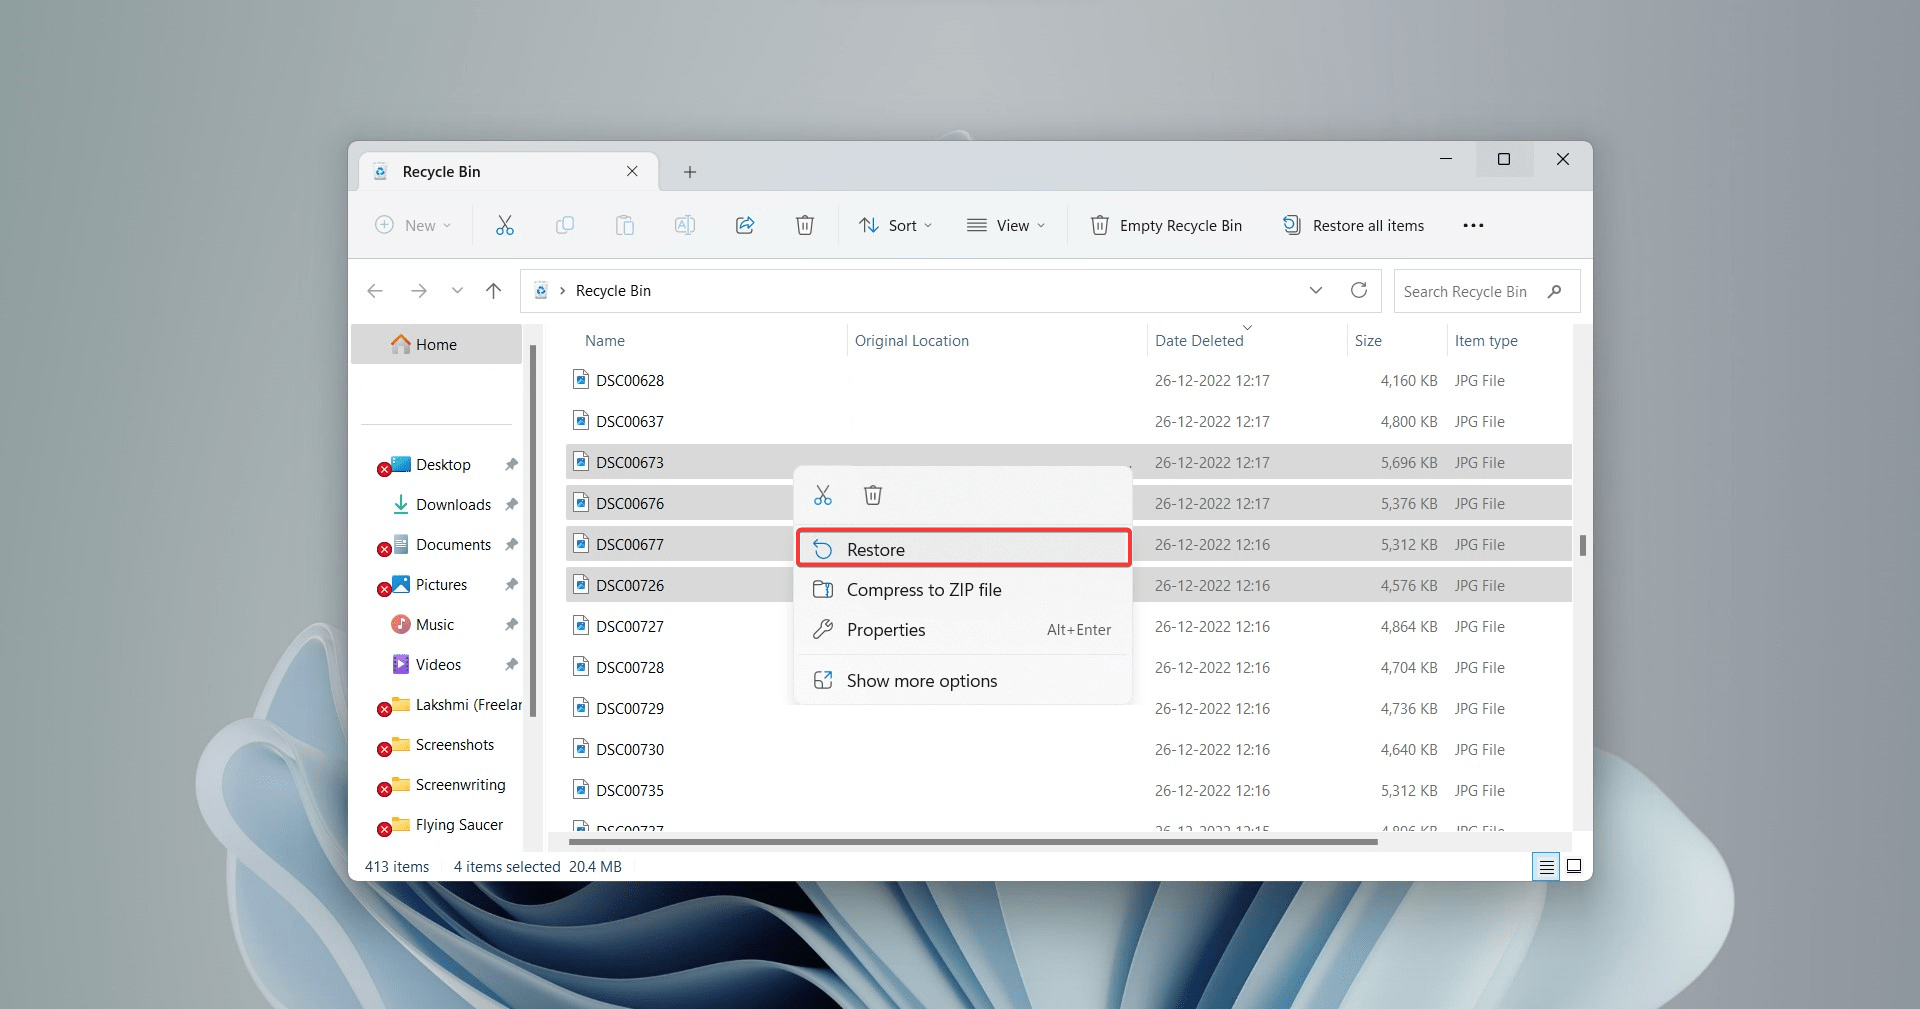
Method 1: Check Your Recycle Bin
The Recycle Bin grants you a second chance for accidentally deleted files.
To recover deleted files from local disk D, access the Recycle Bin.
You cannot retrieve files deleted via the Shift + Delete shortcut using this method.
Follow these steps to restore files from the Windows Recycle Bin:
- Double-click the Recycle Bin icon on the Desktop.
- Select the files you’d like to restore.
- Right-click on the file, then select Restore. Access the restored file at its original destination.
Method 2: Recover D Drive Data Using a Recovery Tool
Disk Drill clinches a notable spot amongst the best data recovery tools.
The tool ships powerful data scanning algorithms for effectively recovering data from the D drive. Disk Drill supports popular Windows’ file systems like FAT32, NTFS, and exFAT. Additionally, Disk Drill facilitates data recovery from RAW file systems.
Disk Drill addresses various causes of data loss. Be it accidental deletion, partition deletion, or file system corruption, Disk Drill can help you recover data.
Here’s how you can recover the D drive data using Disk Drill:
- Download, install and launch Disk Drill.
👀
Note: This demo features a Windows 11 PC. Disk Drill is also compatible with Windows 10 and other previous versions.
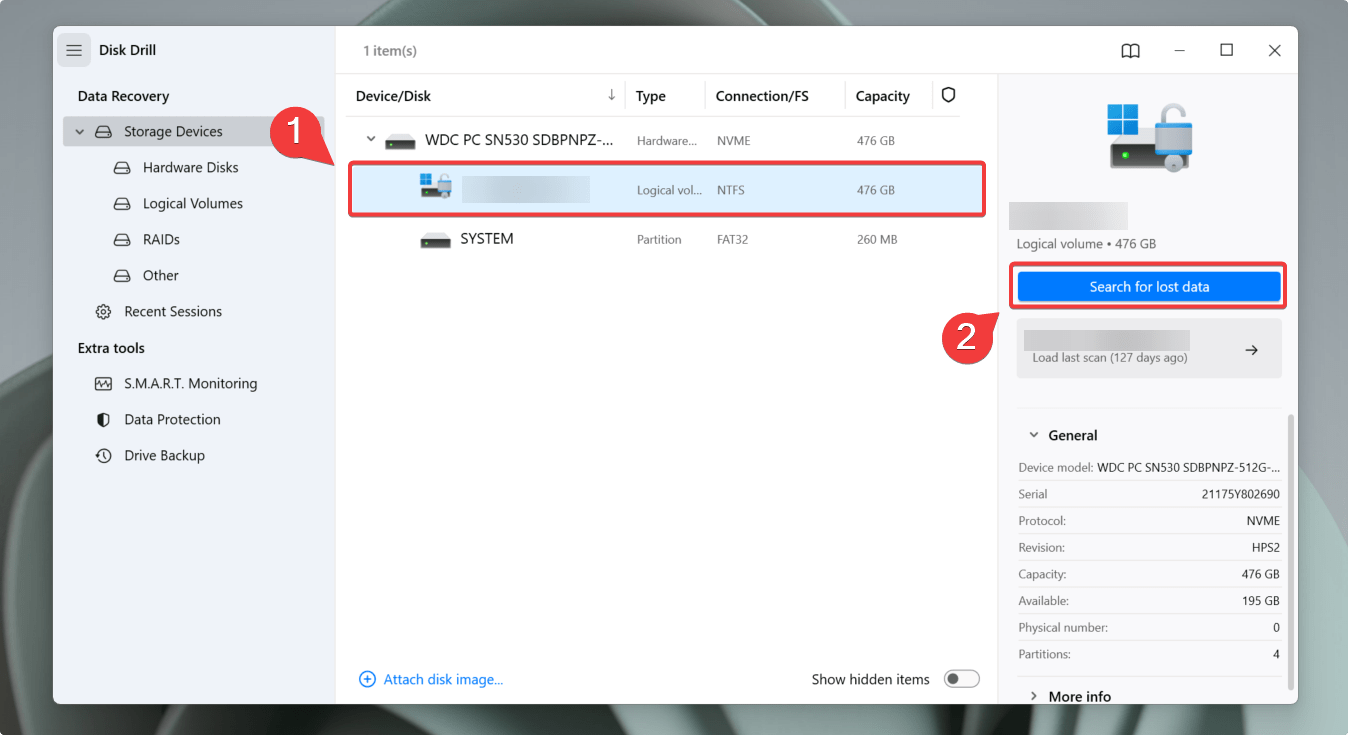
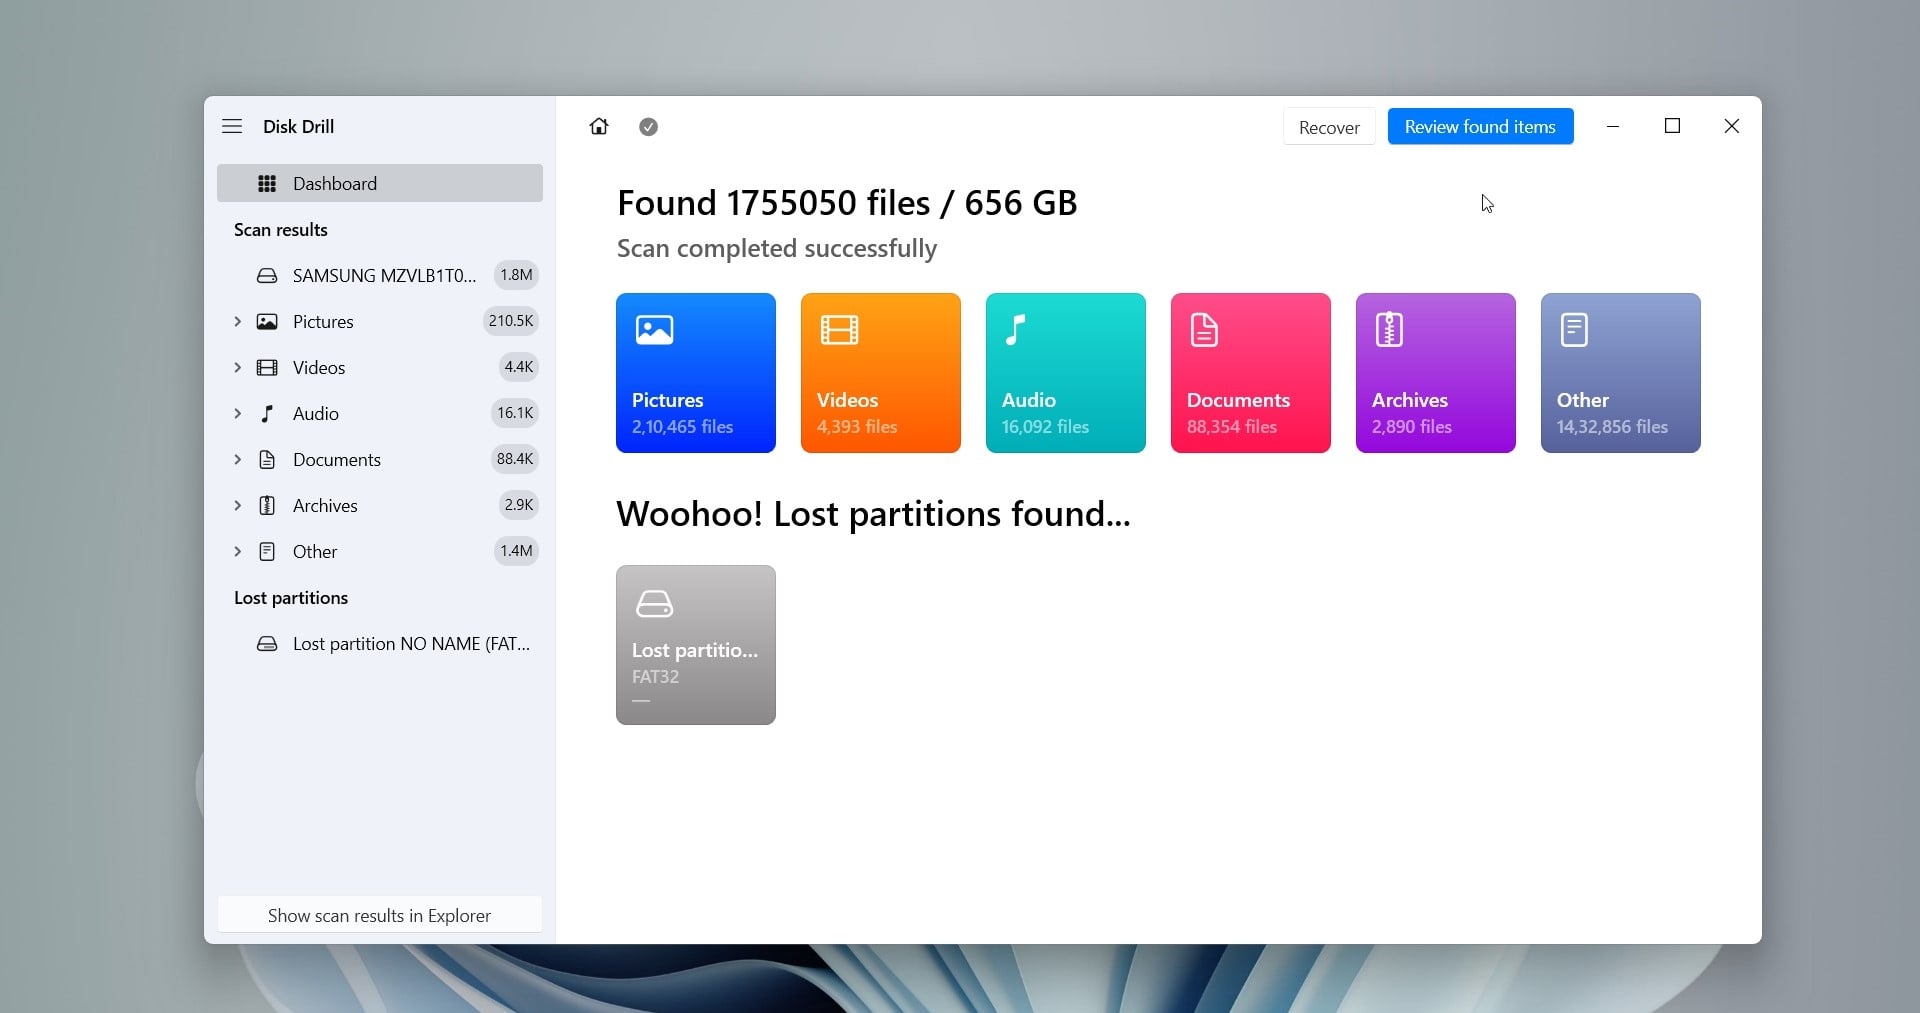
- Select the D drive, and click Search for lost data.
- Disk Drill’s algorithm will now scan your D drive for deleted files. Once the scan is complete, click Review found items. You can filter results by selecting the relevant file type (Pictures, Video, Audio, Documents, Archives, and Other).
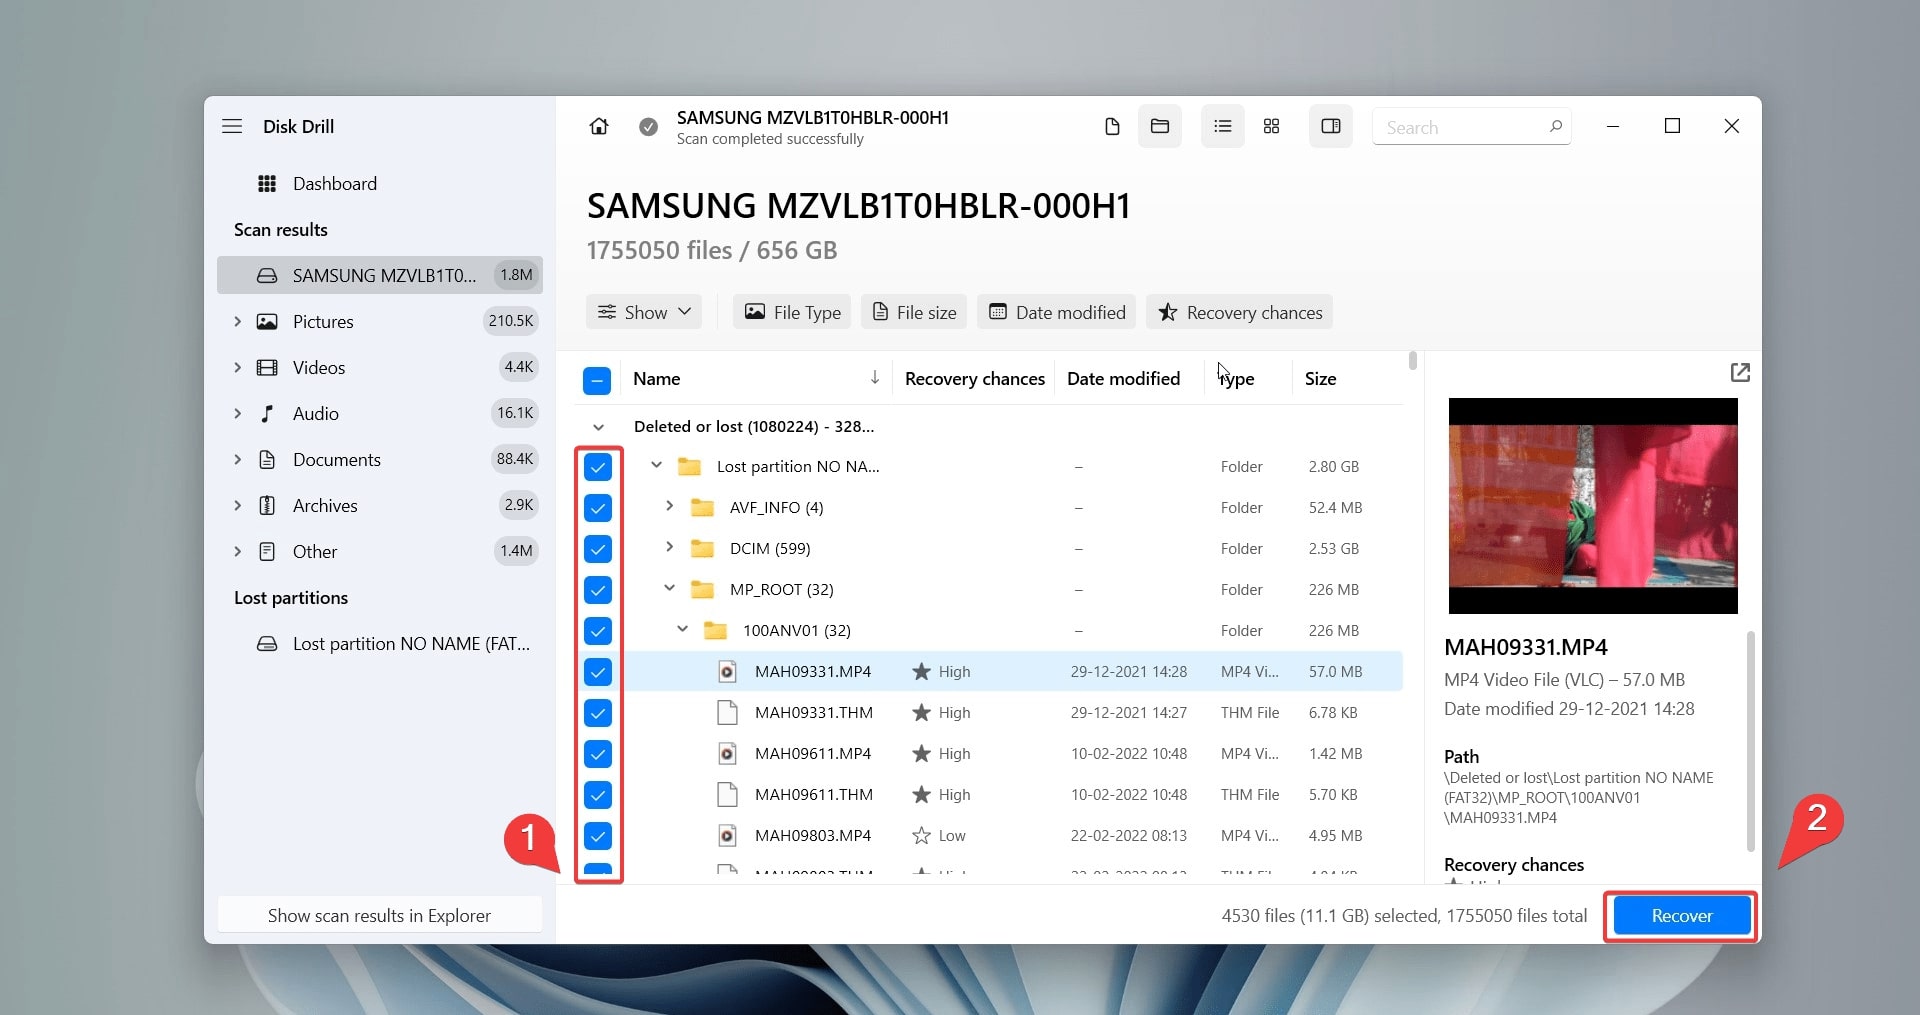
- Preview and select the files you want to recover by clicking the ‘eye’ button. If you know specific file names on your D drive, type them into the search box (in the top right corner) and hit Enter.
- Use the checkboxes to select the files that you want to recover. You can either search for the file using the Search box or use the Filter option. Then, click Recover.
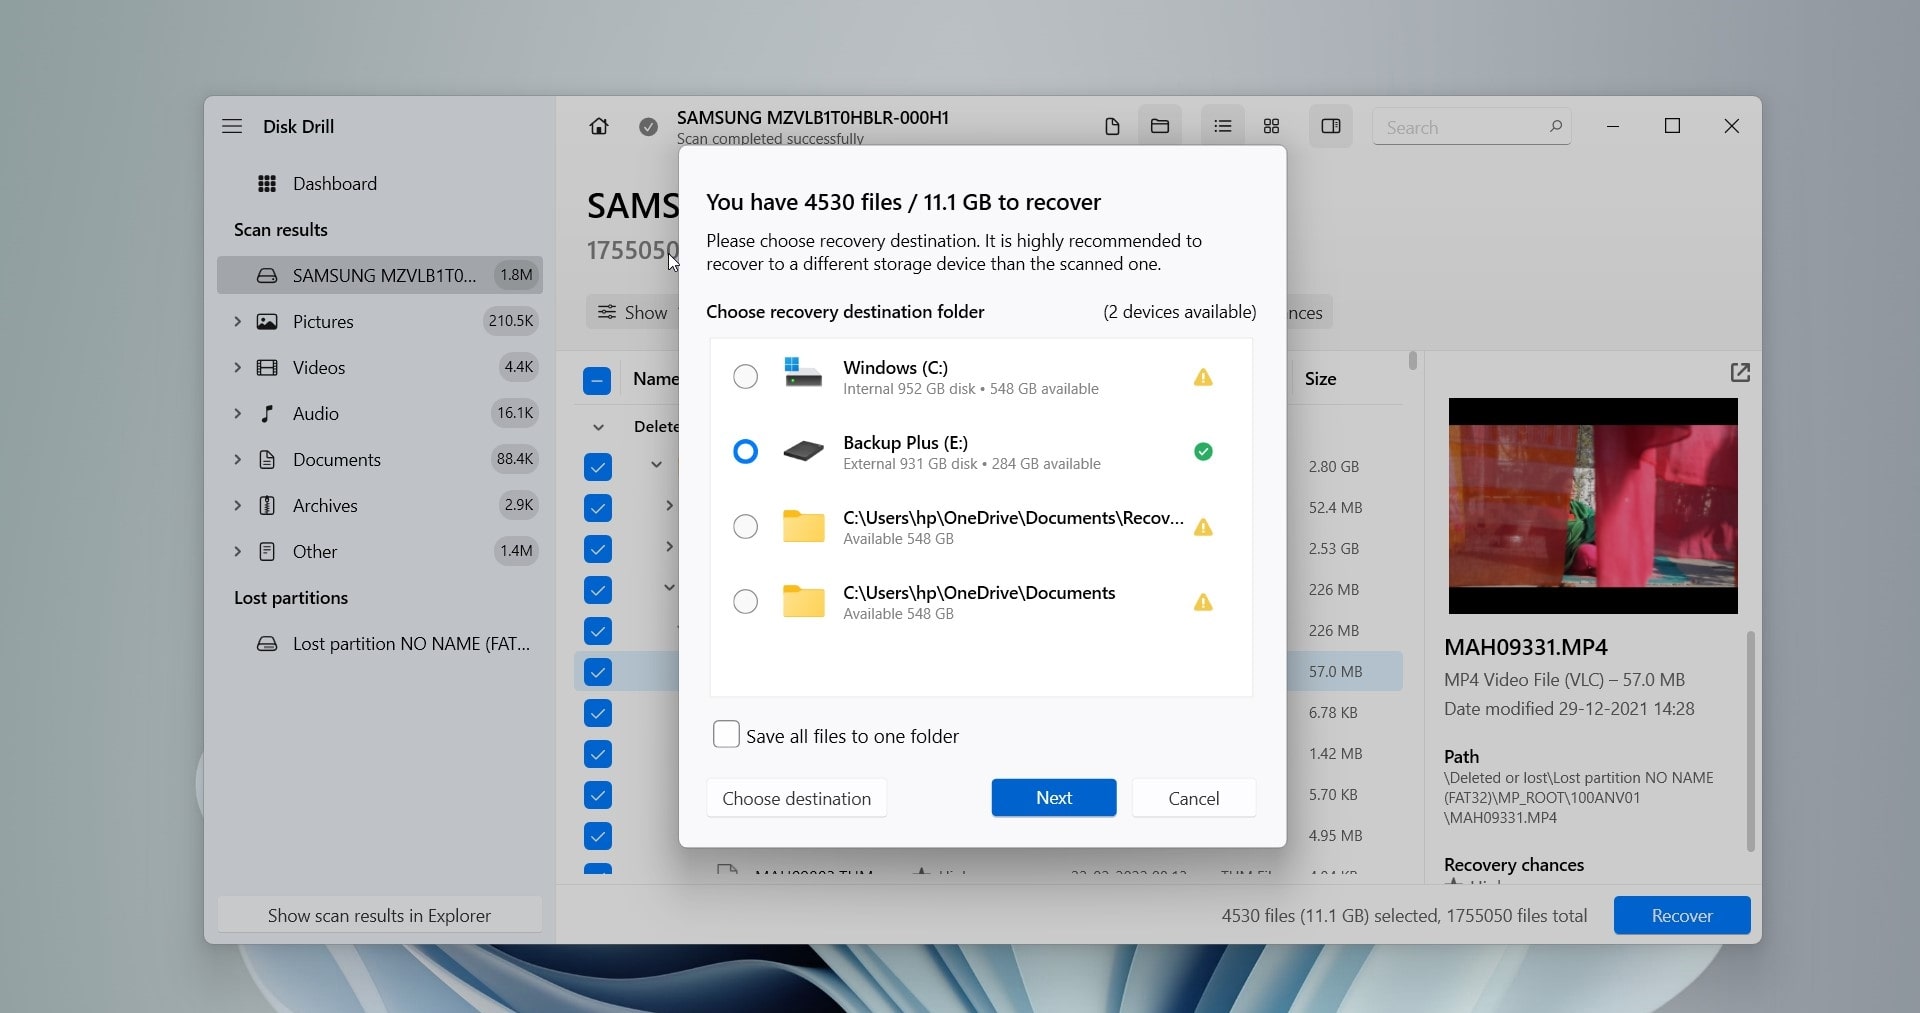
- Disk Drill will ask you to specify a destination to store the recovered files, so ensure that you choose a device other than the D drive — Press Next to complete data recovery.
You can go through our comprehensive Disk Drill review to learn more about the tool and its many features. Also, check out our safety review of Disk Drill.
Method 3: Restore Lost Files from File History
If you wish to recover deleted files without using data recovery software, there’s an alternative available. Windows File History is a backup solution introduced in Windows 10 that you can use to restore deleted data from the D drive.
For this method to work, File History must already be configured beforehand.
Follow these steps to attempt D drive data recovery using Windows File History:
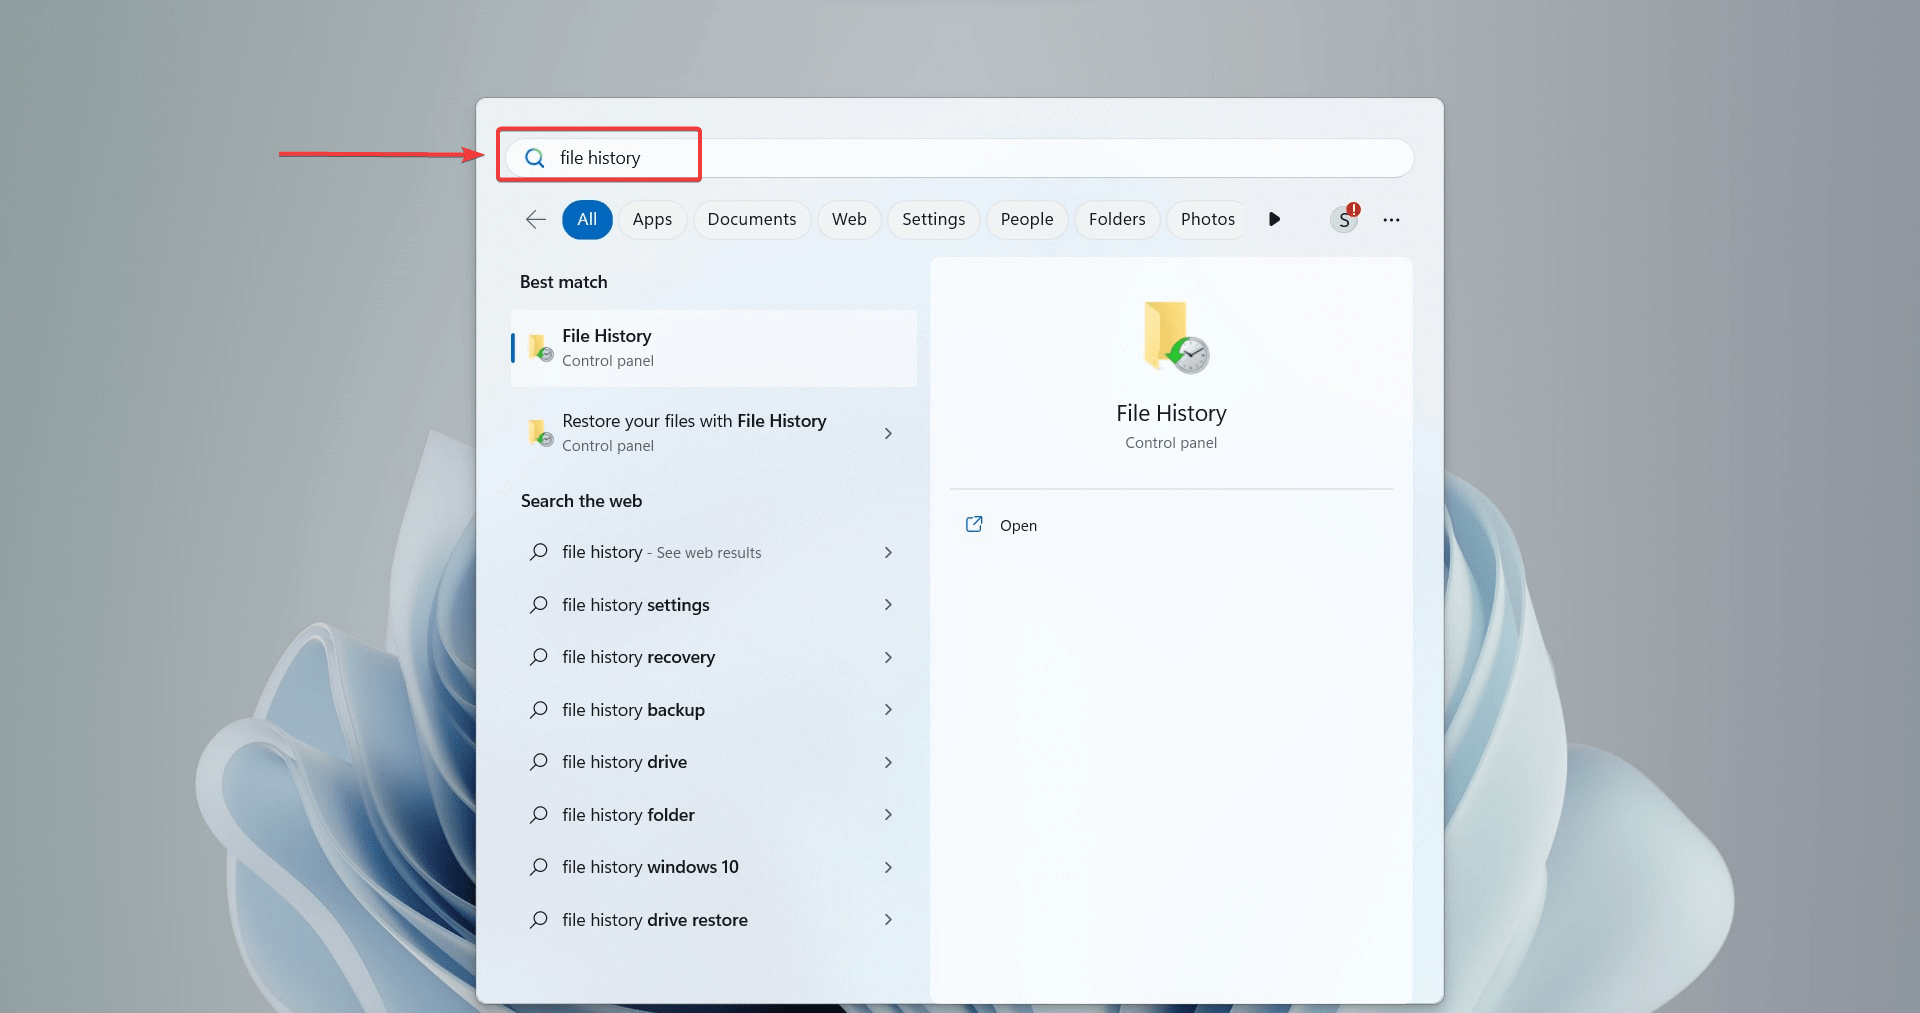
- In the Search box, type “File History”, then open the control panel.
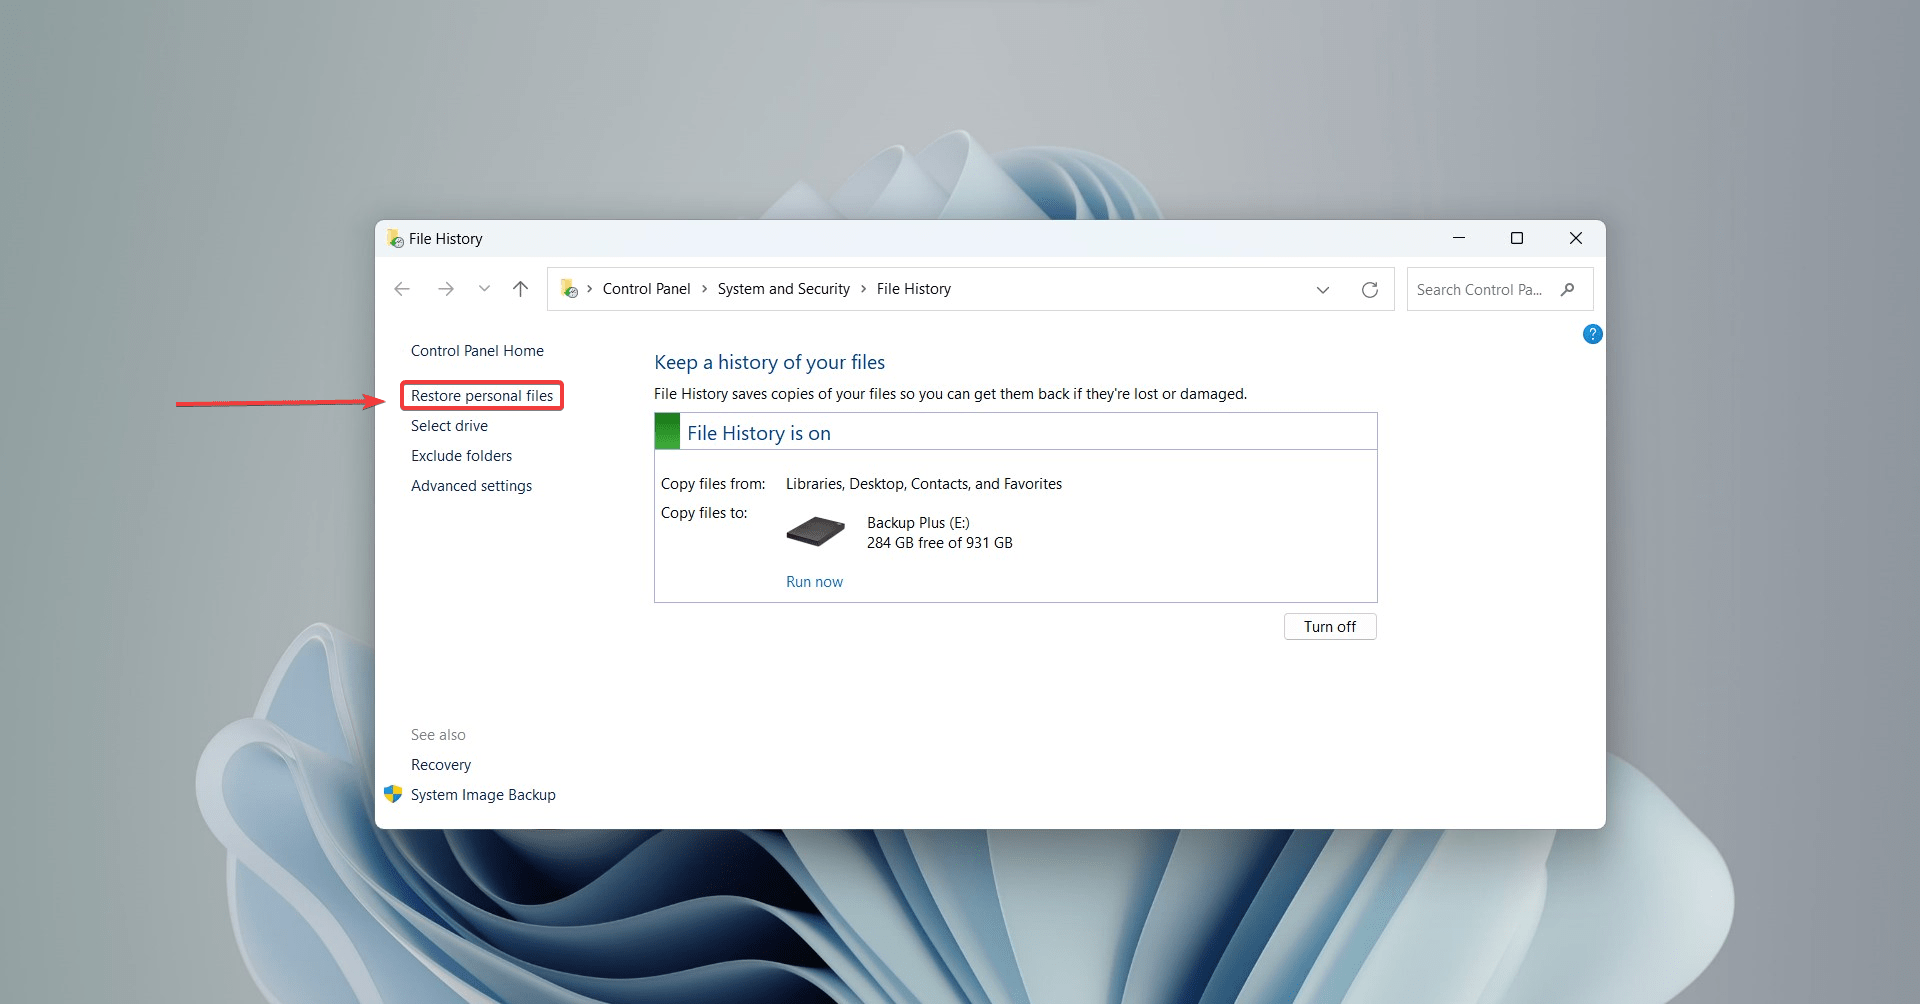
- Ensure that the File History option is turned on. To enable it, click “Configure File History Settings”, choose the external device as the place to store backups, and click on “Run Now”.
- Now, select the Restore personal files option.
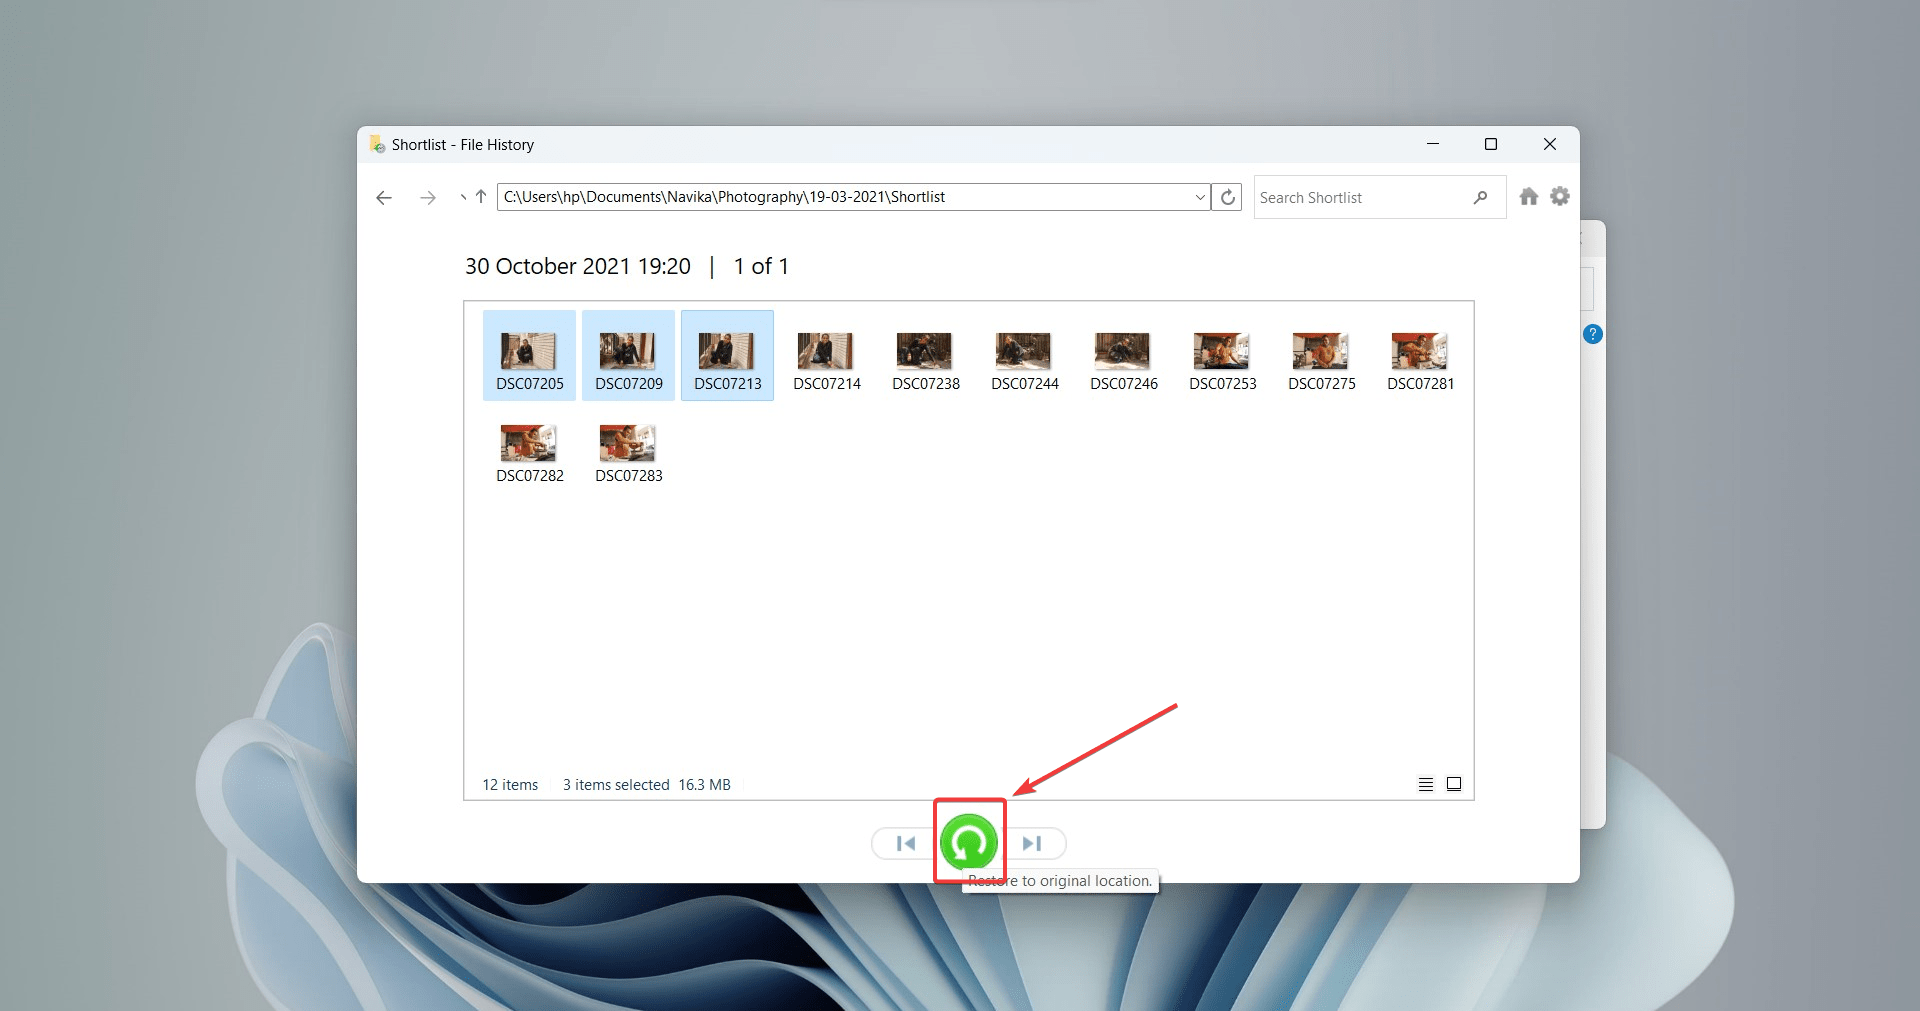
- Select the files that you want to restore and click on the green Recover icon. Your file will then be restored to its original location.
Method 4: Retrieve Access to the D Drive Files Using TestDisk
To recover the entire deleted D drive partition, TestDisk is a viable option. It is an open-source recovery tool designed to repair corrupted file systems and recover lost partitions.
Here’s how you can recover the deleted D drive partition with TestDisk:
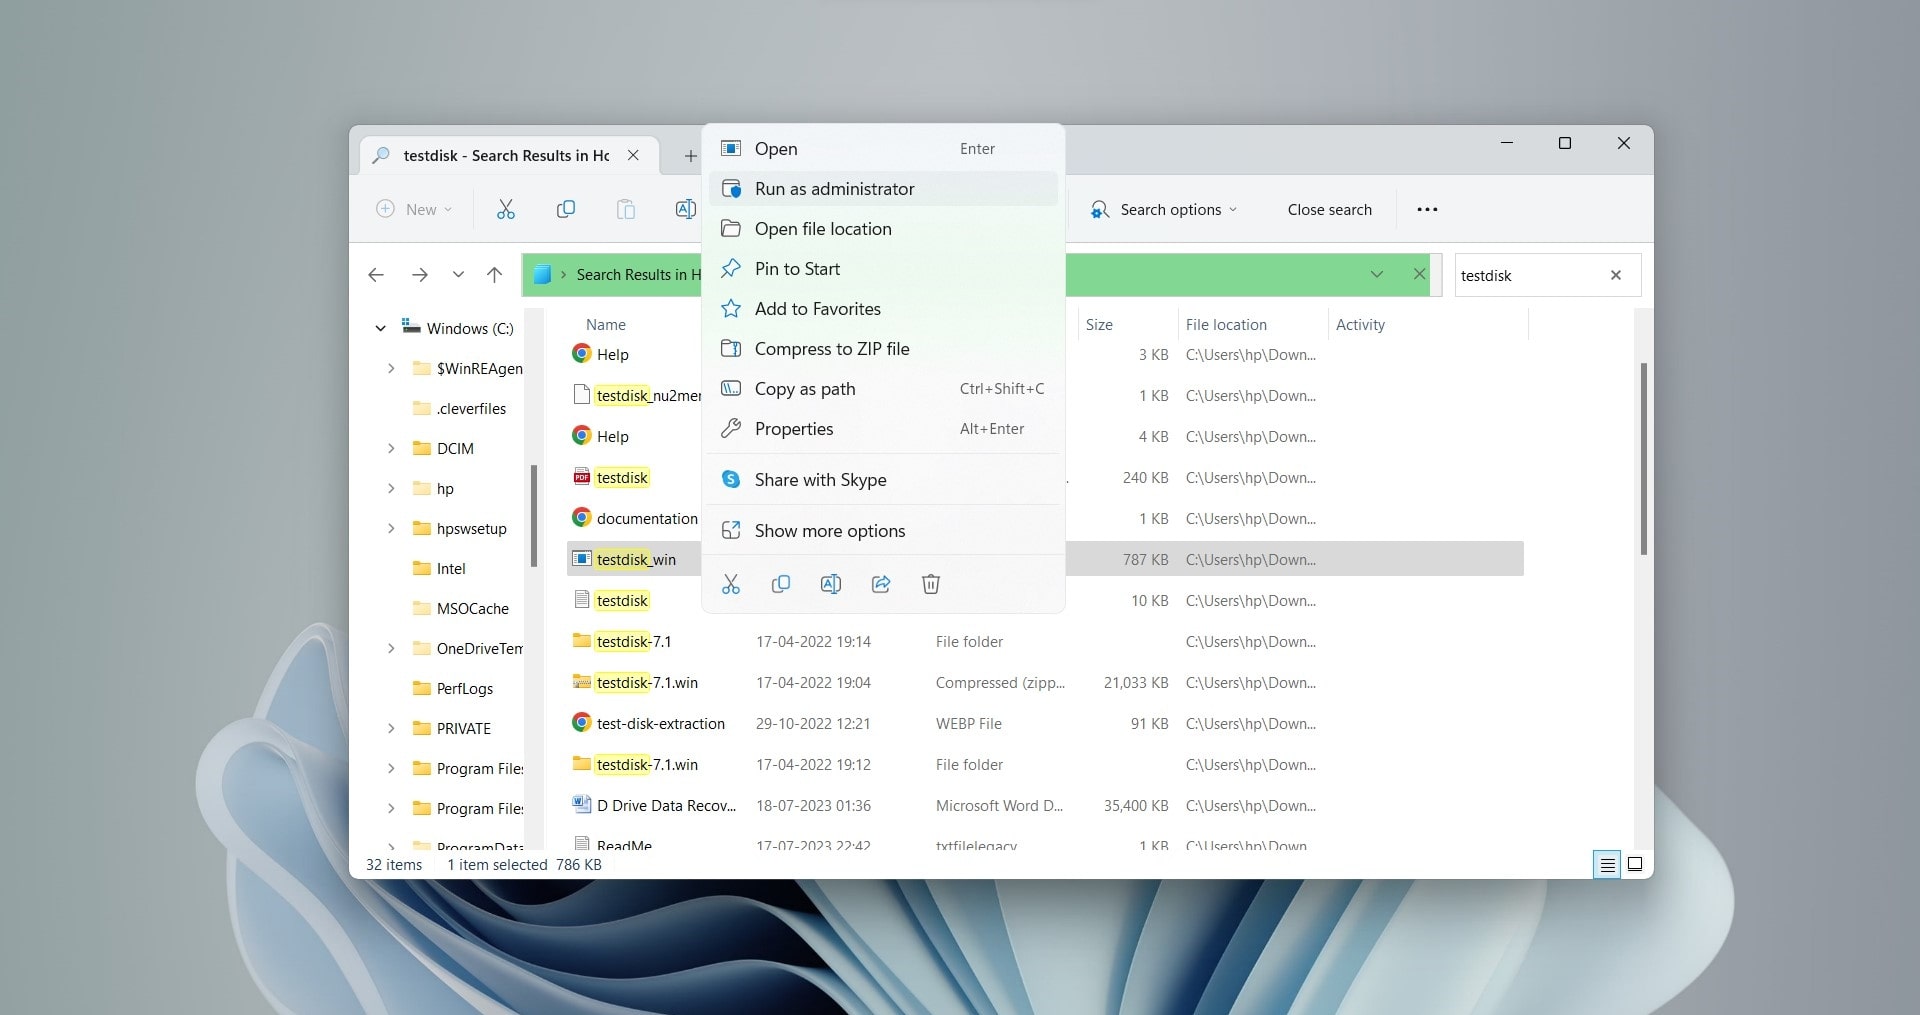
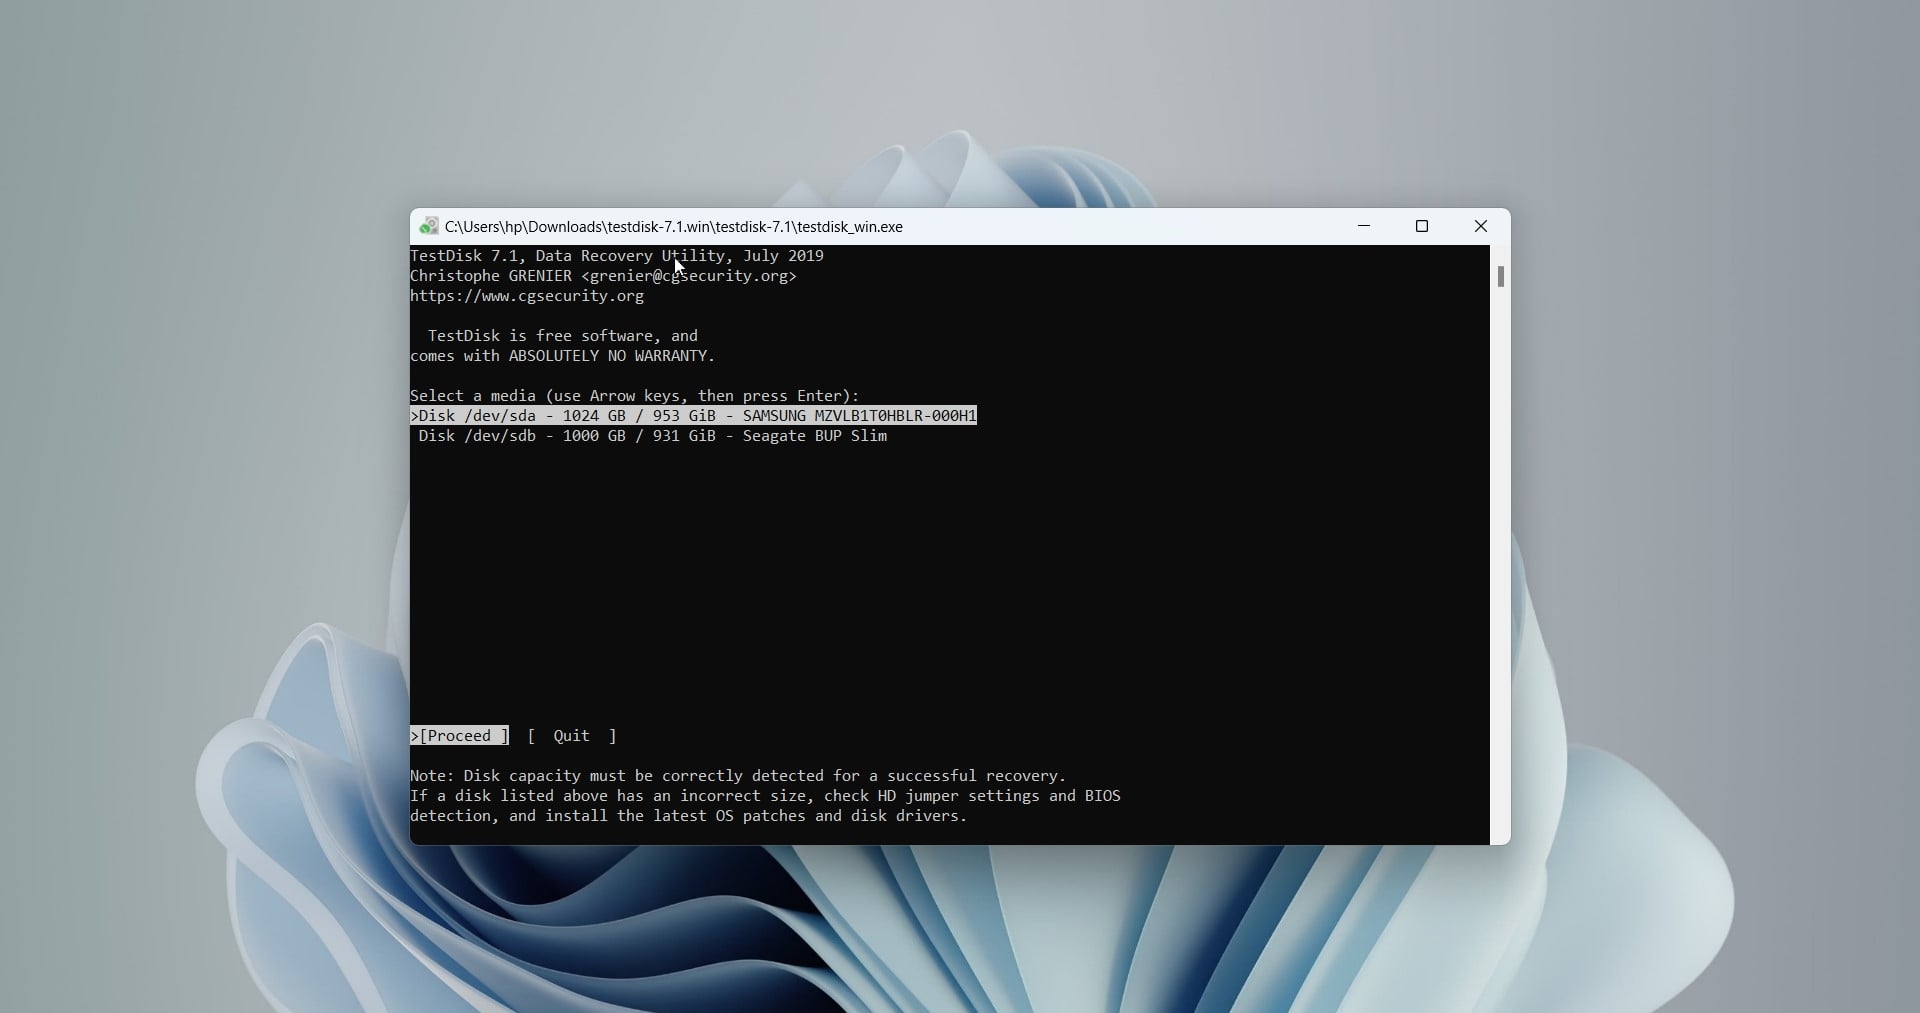
- Download and unzip the TestDisk folder. In our case, the folder was named “testdisk- 7.1.win”.
- Right-click testdisk_win and click Run as administrator.
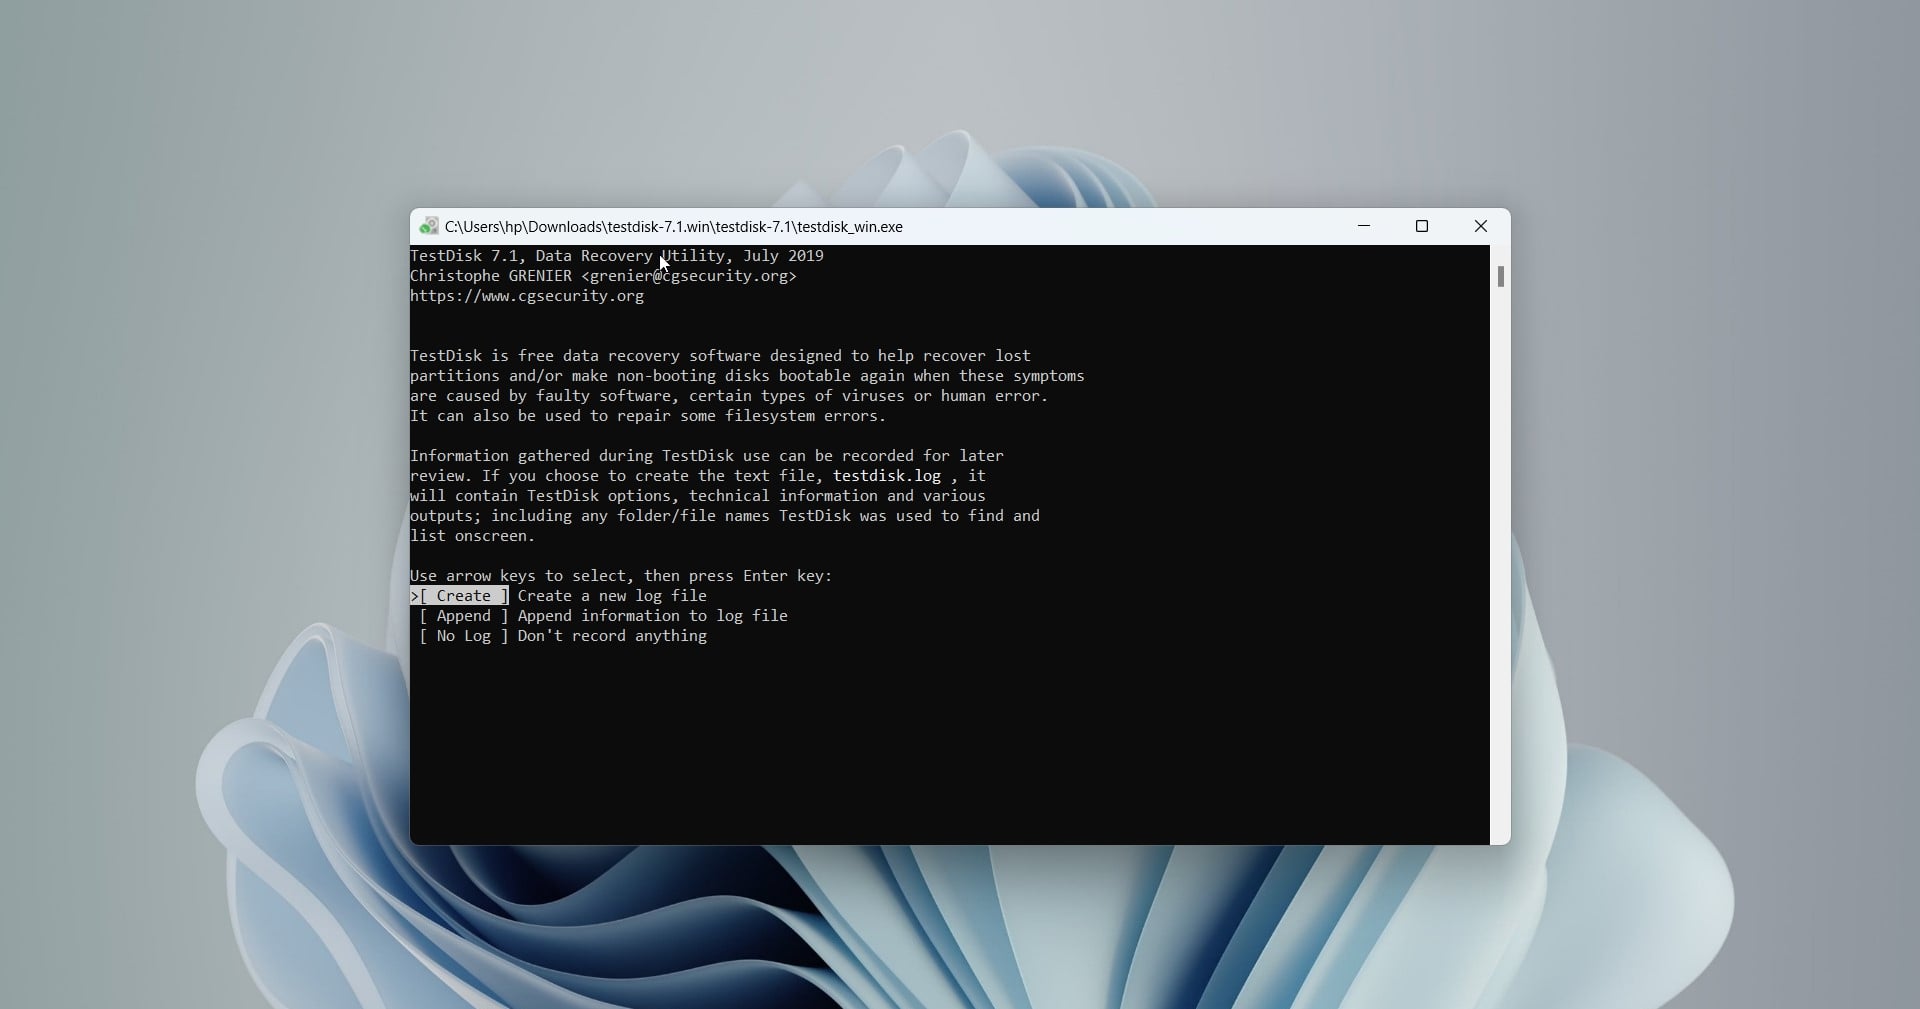
- Select the Create option, then hit Enter.
- Now, select the D drive using the arrow keys and press Enter.
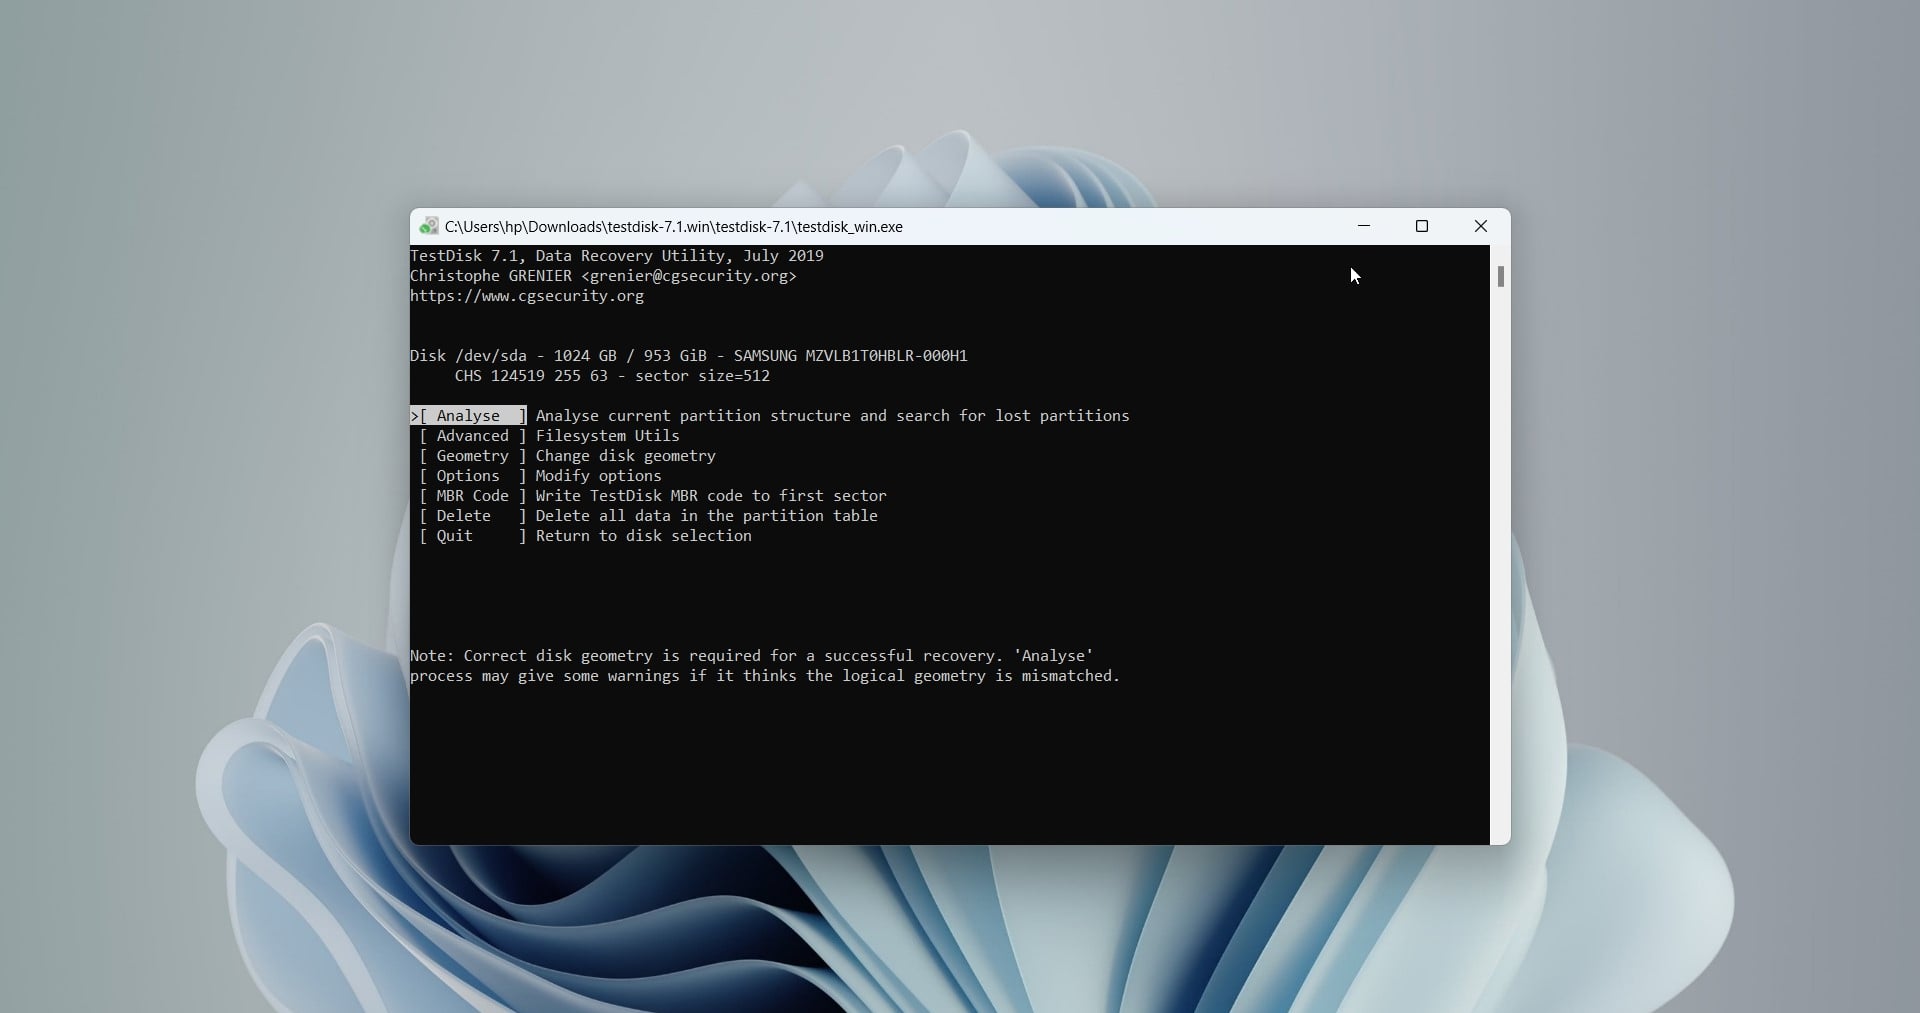
- Select the partition table type. Since we’re on a Windows 11 PC, we selected Intel. Press Enter again to search for lost partitions.
- You can select the Analyse option and initiate a Quick Search to begin the partition recovery process.
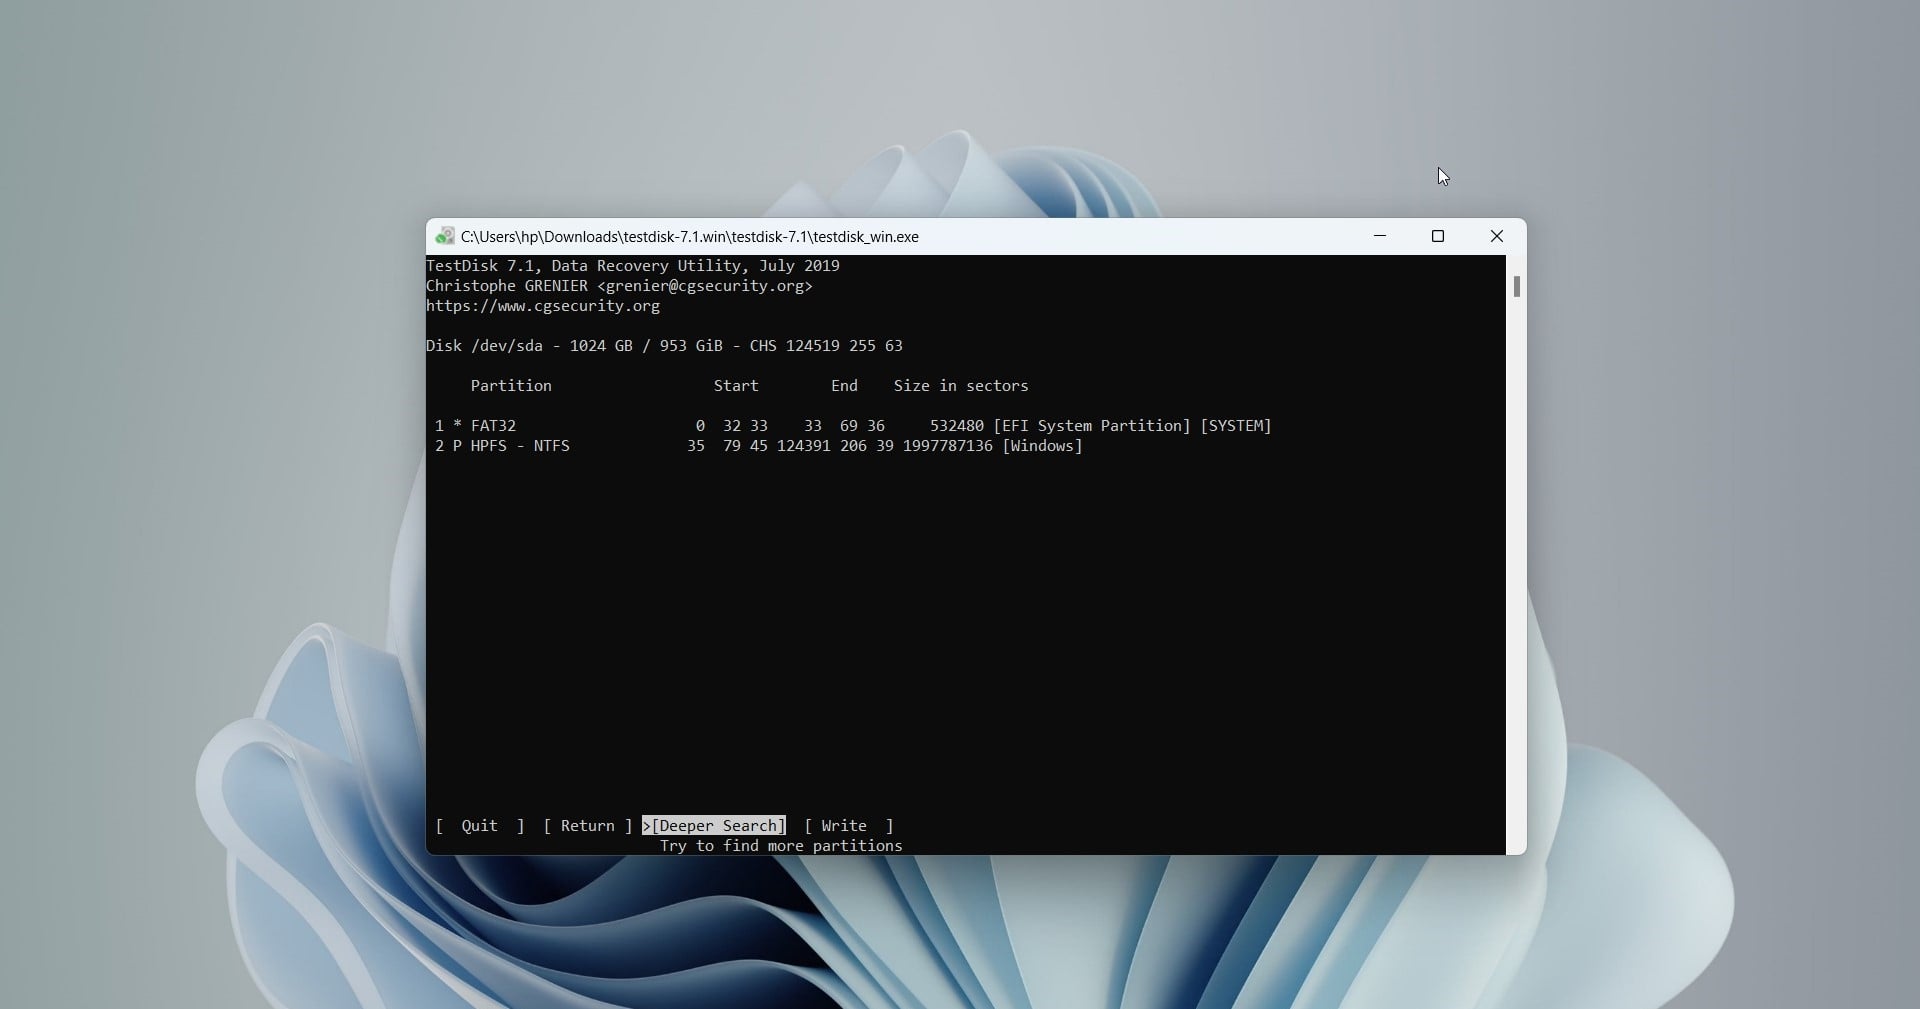
- After the scan is complete, choose the Write option if the D drive partition has been found. Otherwise, choose the Deeper Search option if you’re still missing the partition, and only then write the new partition structure.
Additional Tips for Recovering a Lost D Drive and Its Data
While the above-mentioned methods are helpful when files or the D drive partition has been deleted, you might encounter other scenarios. For instance, if your drive goes suddenly missing, or appears as an unallocated partition. This can also happen due to system updates, accidental deletion, hard drive damage, etc. In such situations, you would have to attempt other solutions, such as:
- 📜 Reassigning drive letters
- 💽 Unhiding partition in Disk Management
- 💻 Updating drivers.
- ♻️ Changing drive letter
If your D drive shows any of these symptoms and becomes inaccessible, read through our detailed tutorial: Why is Your D Drive Not Showing Up And How to Recover Data From It?
FAQ
How to recover D drive data in Windows 10?
Follow these steps to recover D drive data in Windows 10 using Disk Drill:
- Download, install, and launch Disk Drill.
- Select the D drive from the list of drives, and click Search for Lost Data.
- Once the scan is complete, click Review Found Items.
- Select your files for recovery, and click Recover.
- Finalize a destination, then click Next.
How to recover D drive after formatting?
To recover data from D drive after formatting, use a data recovery program like Disk Drill. But if that doesn’t work, it’s best to get in touch with professional data recovery services.
Can I recover D drive data after the Windows update?
Yes, you can use System Restore to undo a problematic Windows update and recover the D drive data. You can also use Windows File History or a D drive data recovery software to recover specific deleted files after a faulty update.
Can you recover deleted files from D drive for free?
Yes, you can recover deleted D drive data from the Windows Recycle Bin or using File History. If this doesn’t work, you can also use Disk Drill, which allows up to 500 MB of free data recovery.
Conclusion
Your D drive files are always susceptible to data loss. But the good news is that these files are easily recoverable in most cases. If your files are deleted, the best course of action is to begin data recovery immediately using reliable software like Disk Drill. We would also recommend that you regularly backup your D drive to avoid any unforeseeable data loss.
This article was written by Joshua Solomon, a Contributing Writer at Handy Recovery Advisor. It was also verified for technical accuracy by Andrey Vasilyev, our editorial advisor.
Curious about our content creation process? Take a look at our Editor Guidelines.