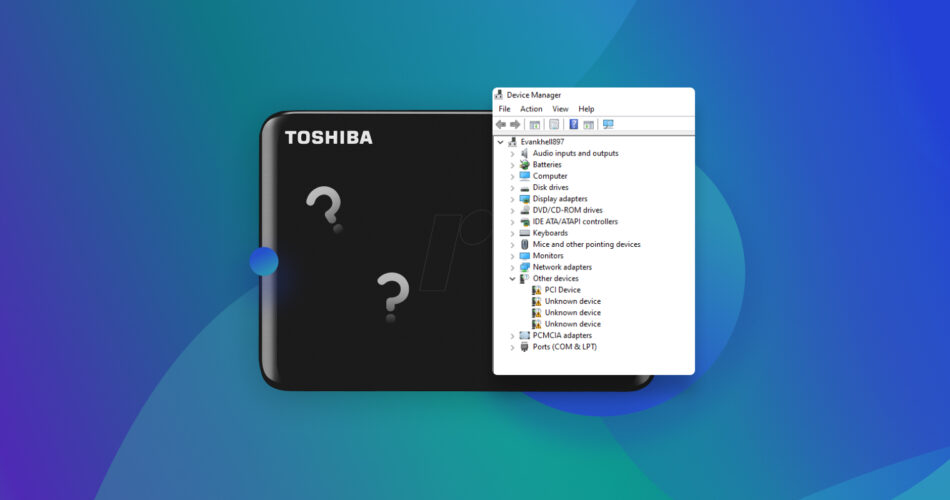
Toshiba external hard drives have cemented themselves as being a reliable and decently priced option for additional storage. But, they are not without their issues. If you’ve plugged in your Toshiba external hard drive and it isn’t appearing, it’s easy to start panicking.
If you’ve started frantically searching Google for a fix and landed yourself here, don’t worry, you’re in the right place. Follow these steps to fix the issue of your Toshiba external hard drive not showing up.
Common Reasons For Toshiba External Hard Drive Not Showing Up
Causes of Toshiba hard drive not showing up |
Description |
How to fix |
Improper connection or insufficient power |
An improper connection will prevent your Toshiba external hard drive from being read. Common culprits include faulty cables and blocked USB ports. Additionally, some USB ports don’t provide adequate power for operation. |
Method 1. Check Your Toshiba Drive Connection Method 2. Try To Connect Your Toshiba Drive to a Different PC/Laptop |
USB port malfunction |
USB ports can malfunction due to some Windows settings. They can also be damaged due to improper use. |
Method 2. Try To Connect Your Toshiba Drive to a Different PC/Laptop |
Uninitialized disk or drive letter issues |
Uninitialized disks will not be read by your operating system, nor will hard drives without a valid drive letter. |
Method 3. Reassign the Toshiba Drive Letter Method 5. Initialize Toshiba Hard Drive Manually |
Faulty hard drive |
If the external hard drive has sustained physical damage, the motor may be faulty and prevent it from spinning. |
Consult a data recovery service |
Unsupported, missing, or corrupted file system |
Incompatible, missing or corrupted file systems will often prevent the hard drive from being accessed as it cannot be read by the operating system. |
Method 5. Initialize Toshiba Hard Drive Manually Method 6. Format Your Toshiba External Hard Drive |
Corrupted/outdated operating system or system drivers |
Hardware drivers and some system files are essential to the operation of your hard drive. If they’re corrupted, outdated, or missing, the hard drive may not appear. |
How to Backup/Recover Data From a Toshiba External Hard Drive
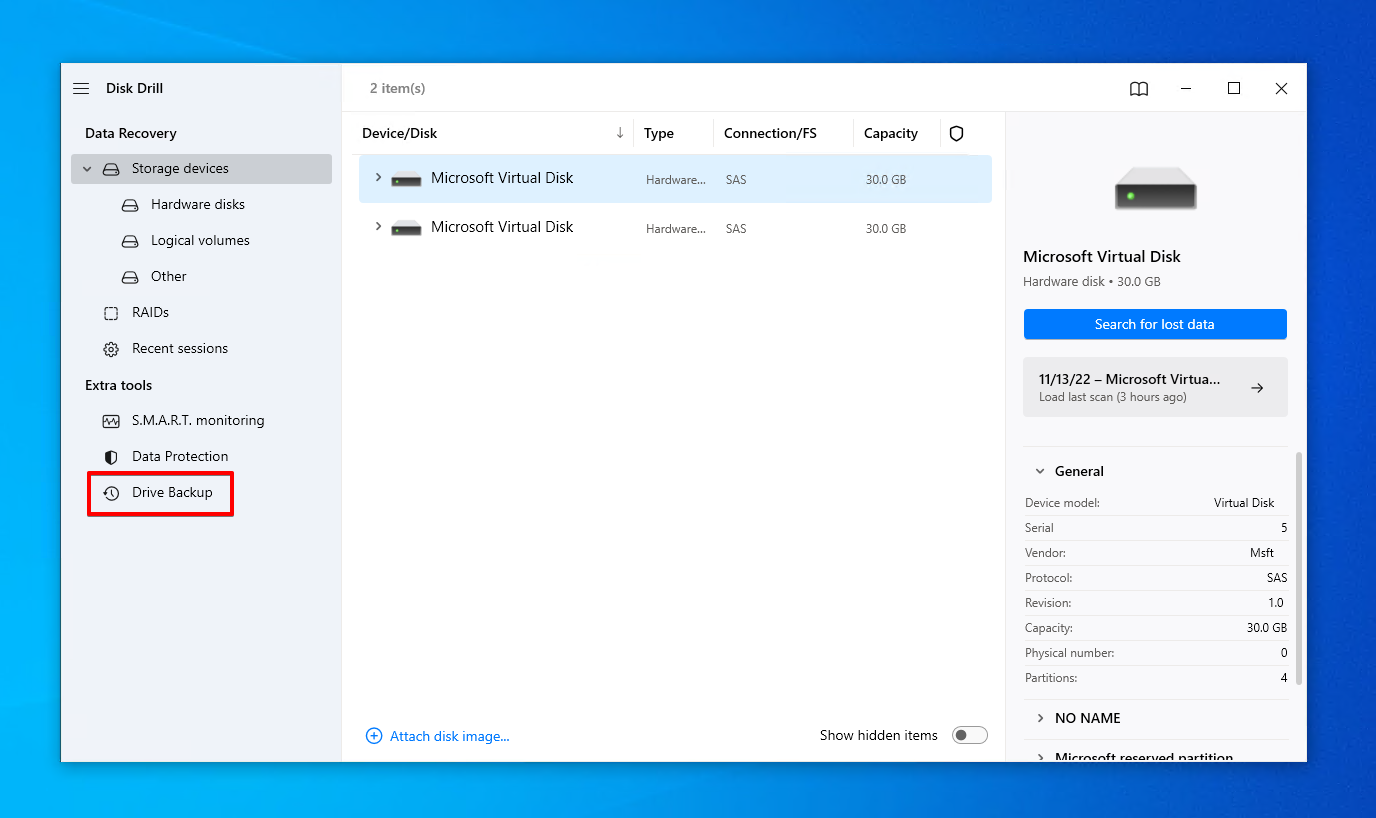
Before you proceed, it’s important that you back up your Toshiba external hard drive that’s not being detected and recover all the data you can. You may be wondering how you can do this if the hard drive isn’t appearing. You’ll be surprised to find that, as long as the drive is visible in Disk Management, there’s a pretty good chance you can access it with specialized software. This is where Disk Drill Data Recovery comes in handy.
Disk Drill is a data recovery tool that has won the favor of many for its ease of use and impressive data recovery capabilities. It uses advanced algorithms to scan your Toshiba hard drive for typically inaccessible data and recover it to a location of your choice. It also includes a byte-to-byte backup solution. Disk Drill is more than capable of getting your data back. In fact, it supports recovery from major Windows and macOS file systems, such as FAT16, FAT32, exFAT, APFS, HFS+, and EXT 2/3/4. It also supports RAW drives and recovery from macOS file systems on Windows computers.
But, you need to act quickly, as the issue could stem from physical damage. With each passing moment, your chances of performing successful Toshiba hard drive recovery decrease.
Follow these steps to make a backup of your Toshiba external hard drive and recover data from it:
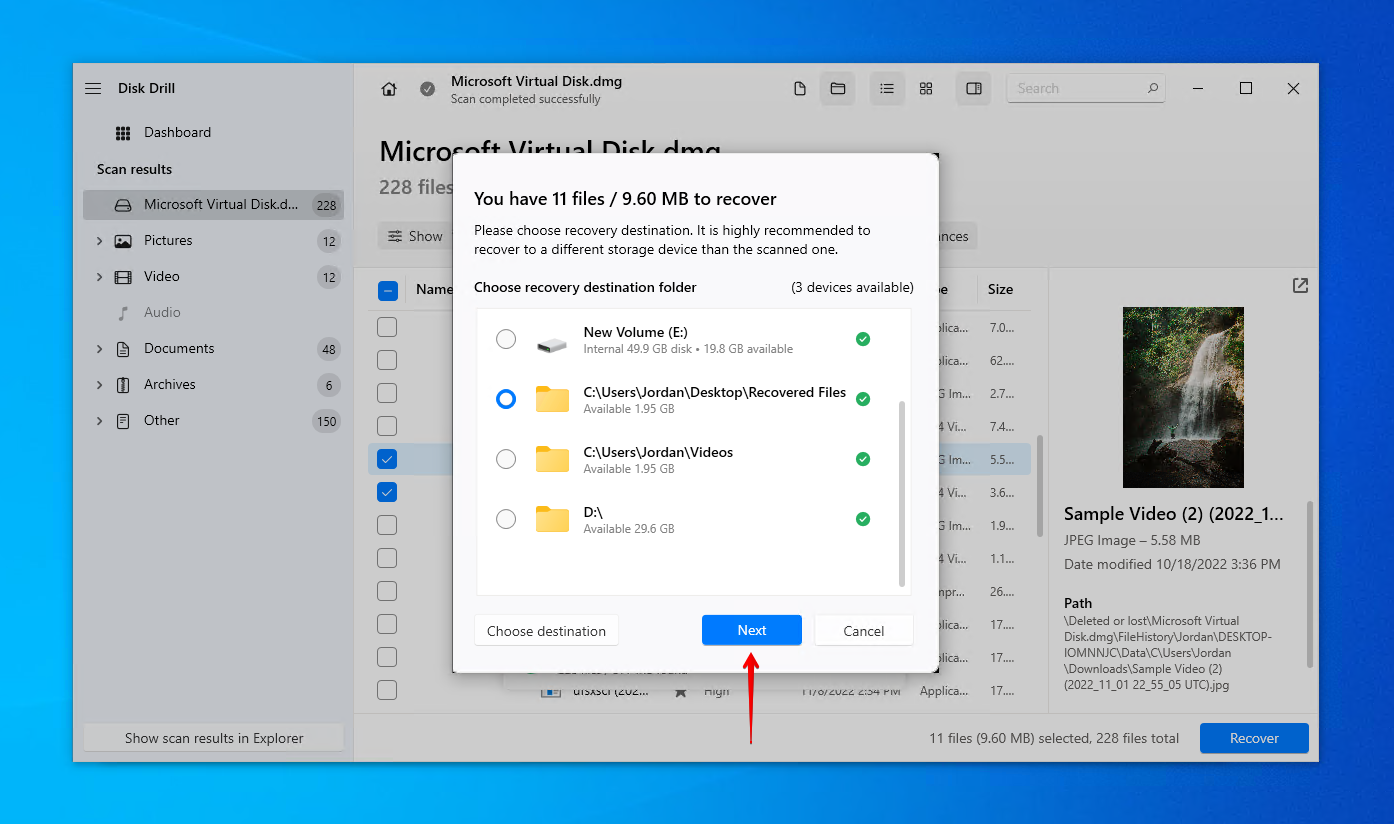
- Download and install Disk Drill.
- Click Drive Backup.
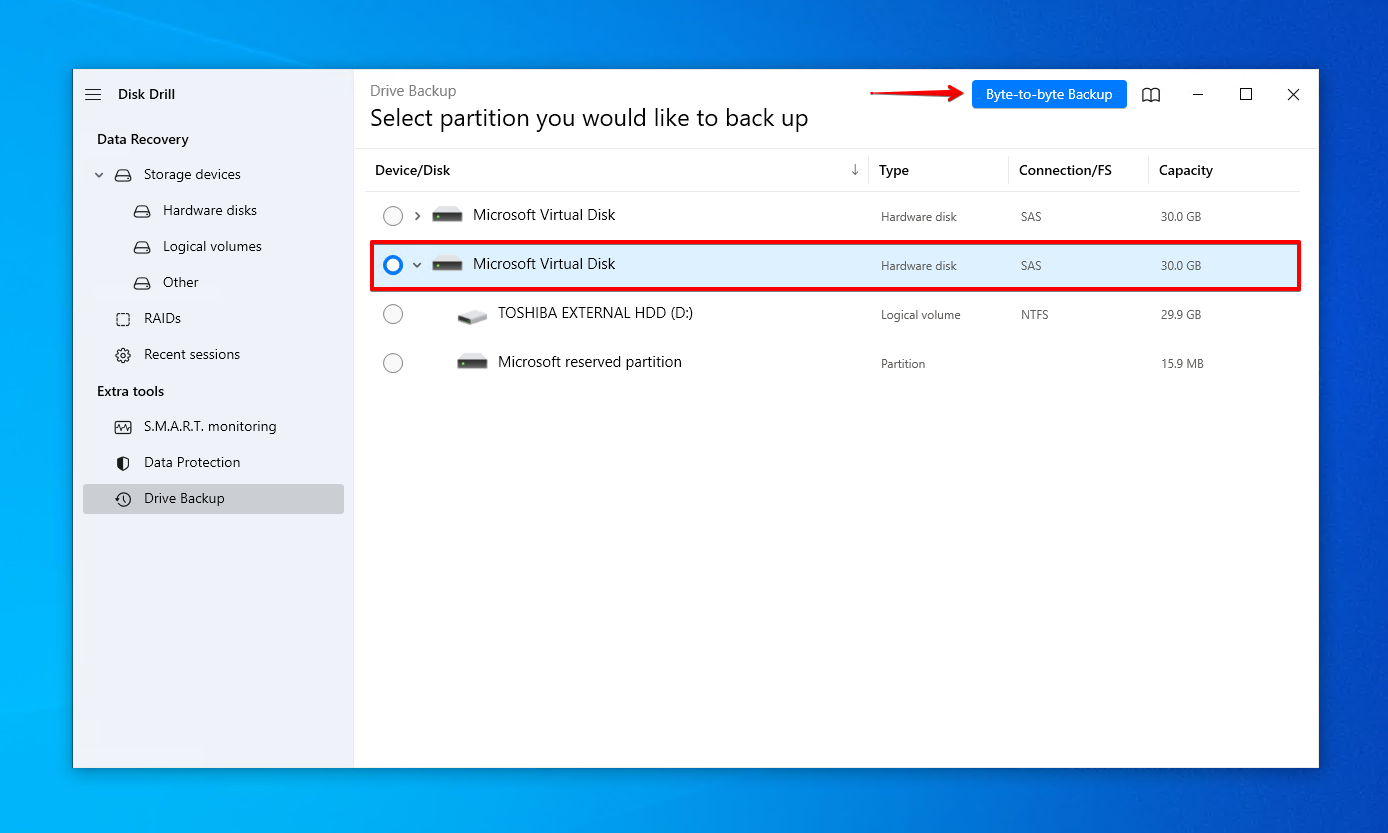
- Select your Toshiba external hard drive and click Byte-to-byte Backup.
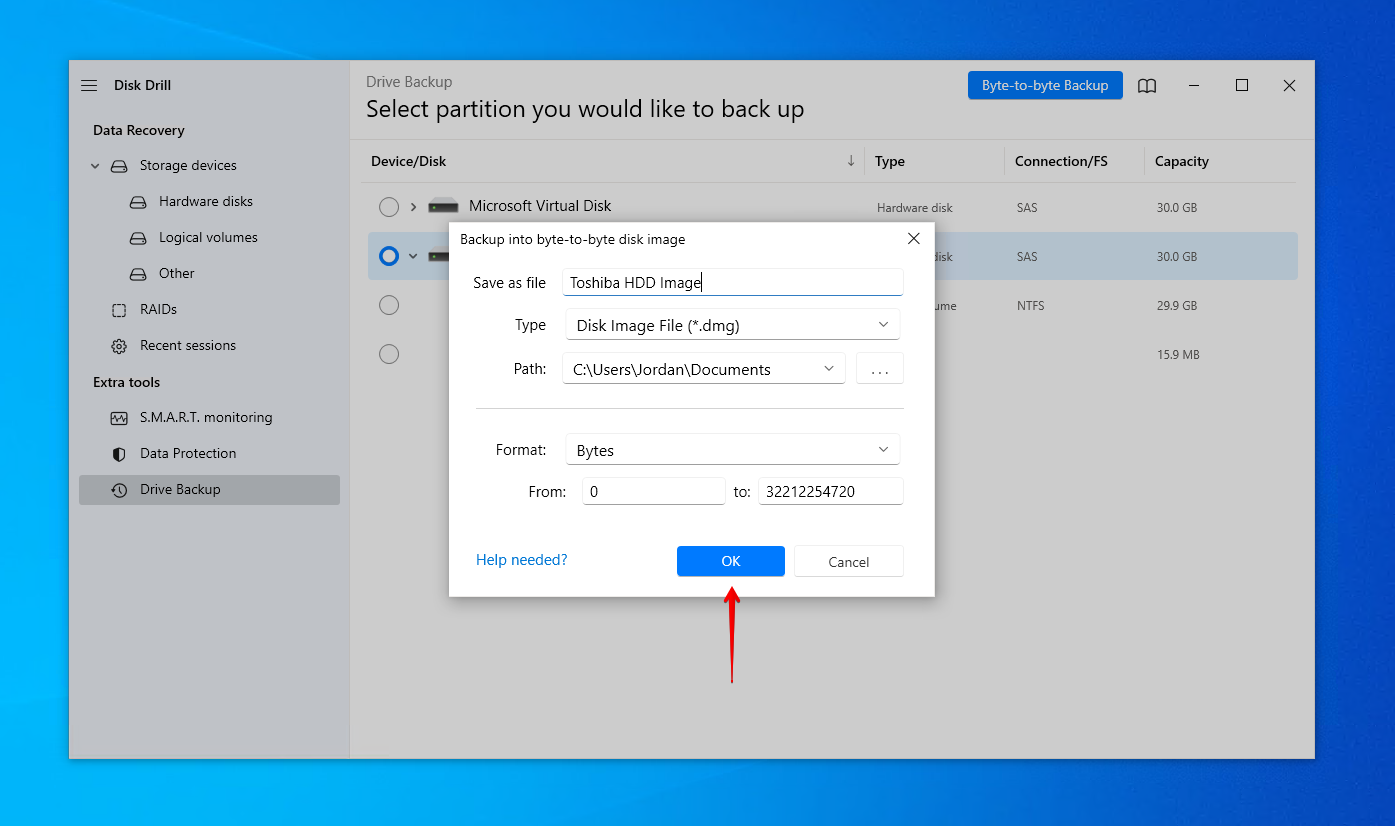
- Name the backup and specify where you want to store it. When ready, click OK.
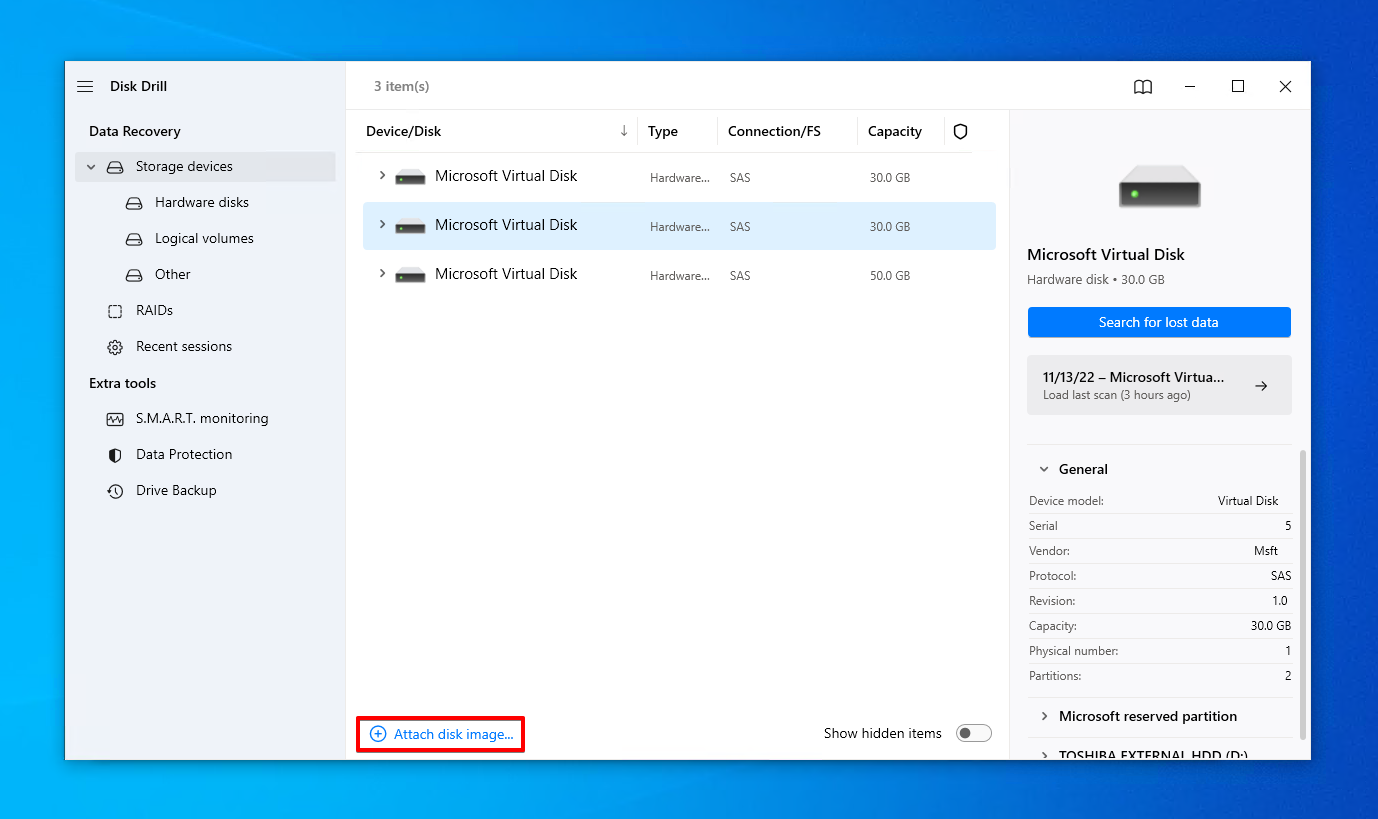
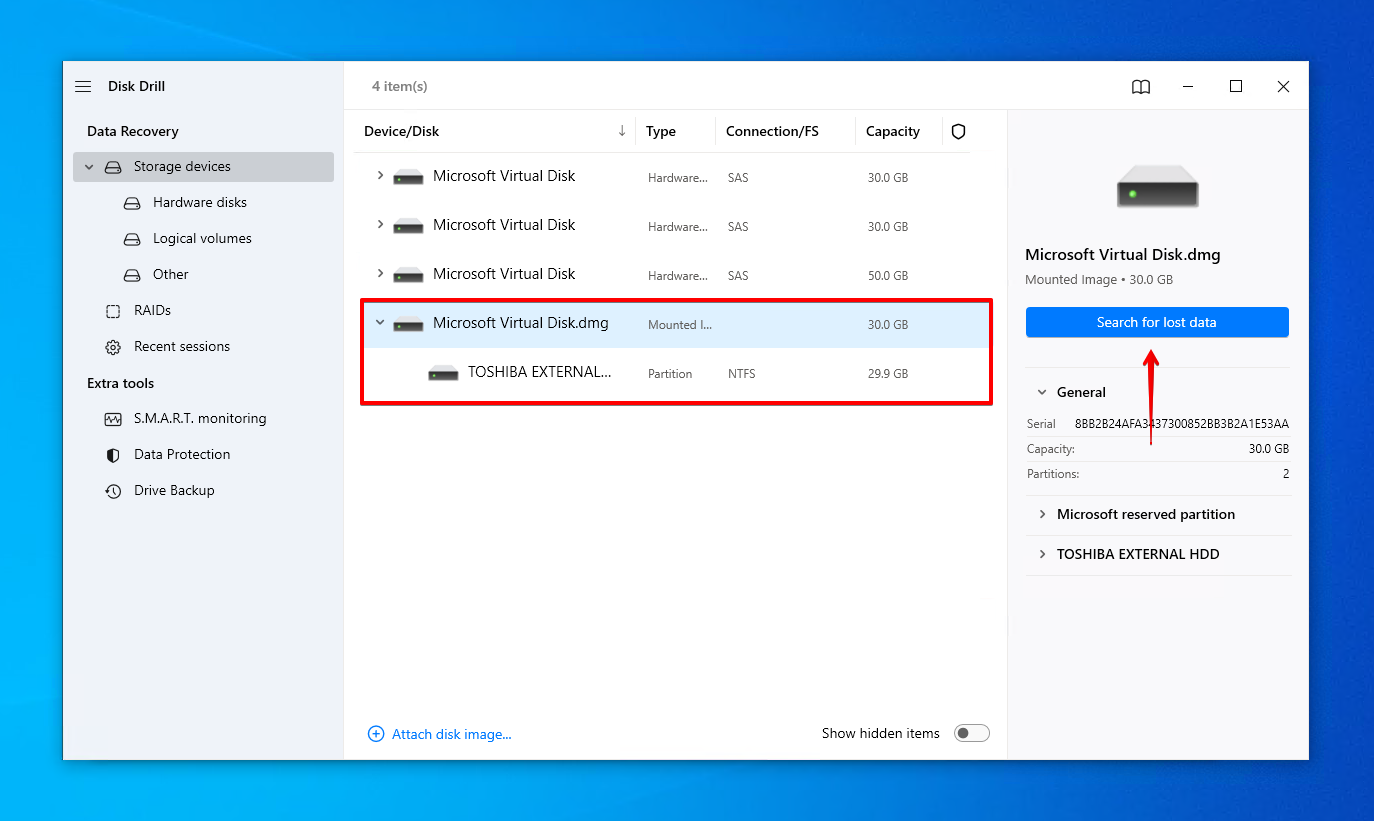
- Return to the Storage devices screen and click Attach disk image. Choose the disk image we just created.
- Select the Toshiba external hard drive image and click Search for lost data.
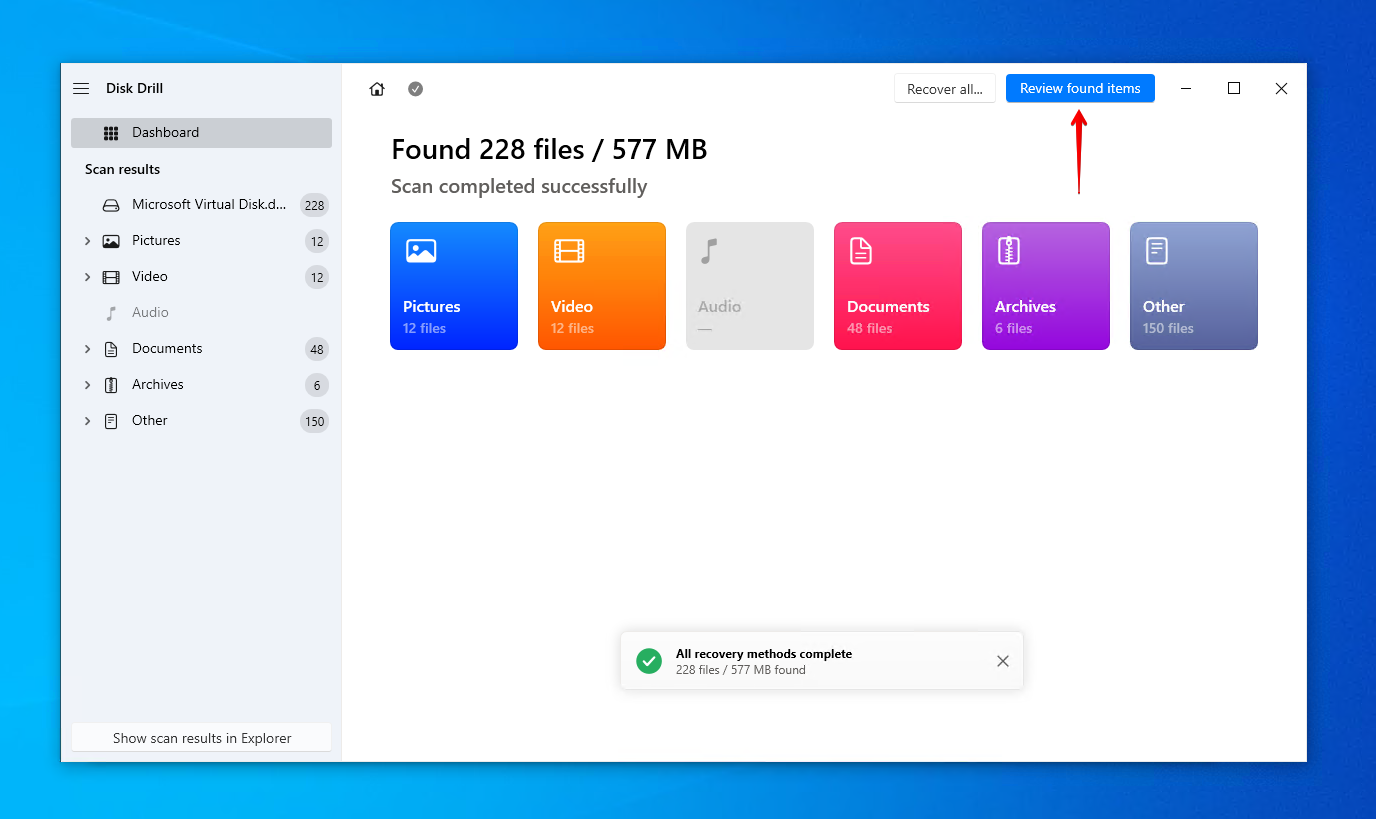
- Click Review found items when the scan is complete. Or, if you want to recover everything, just click Recover all.
- Mark the files you want to recover. Use the preview panel to see what you’re recovering and the filter options at the time to organize the results. When ready, click Recover.
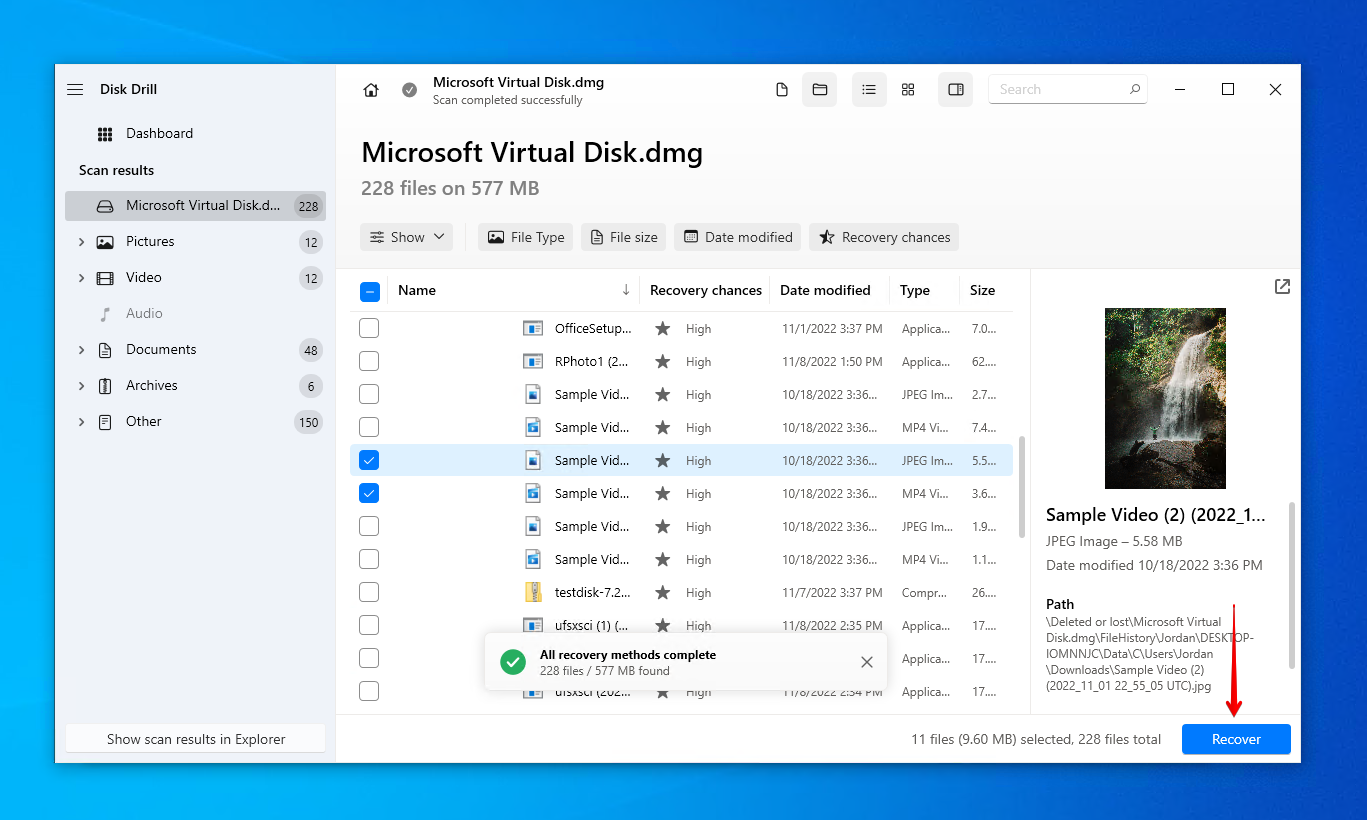
- Select the recovery location, then click Next to complete recovery.
Once the data is recovered, you can find it in the output location you specified. If you’re not too keen on Disk Drill, check out some alternatives in our list of the best data recovery apps instead.
How to Fix Toshiba External Hard Drive Not Showing Up
If you’ve finished with external hard drive data recovery, let’s take a look at the various methods you can use to fix your Toshiba external hard drive not being recognized.
Method 1. Check Your Toshiba Drive Connection
Your computer will not be able to read the hard drive if it’s not making physical contact with the connection point. Be sure to check the USB connection of your hard drive and the USB port on your computer for any build-up of substances like dust or lint. Also, be sure to try another cable if you have one readily available.
Although external hard drives use a relatively small amount of power, the USB port you connect it to will directly affect its ability to function. For instance, USB 2.0 ports only provide up to 500 mA of power, whereas USB 3.0 provides up to 900 mA. Additionally, plugging it into an unpowered USB hub may prevent it from getting enough power as it’s being shared with other devices. Check your external hard drive specifications to see how much power it draws and connect it to an appropriate port.
Method 2. Try To Connect Your Toshiba Drive to a Different PC/Laptop
It’s best to get the easy troubleshooting steps out of the way first to ensure you don’t spend unnecessary time troubleshooting areas that are of no concern. To isolate the issue to your hard drive, connect the Toshiba hard drive to a different computer. If it connects, it means the issue sits with the computer you connected it to first.
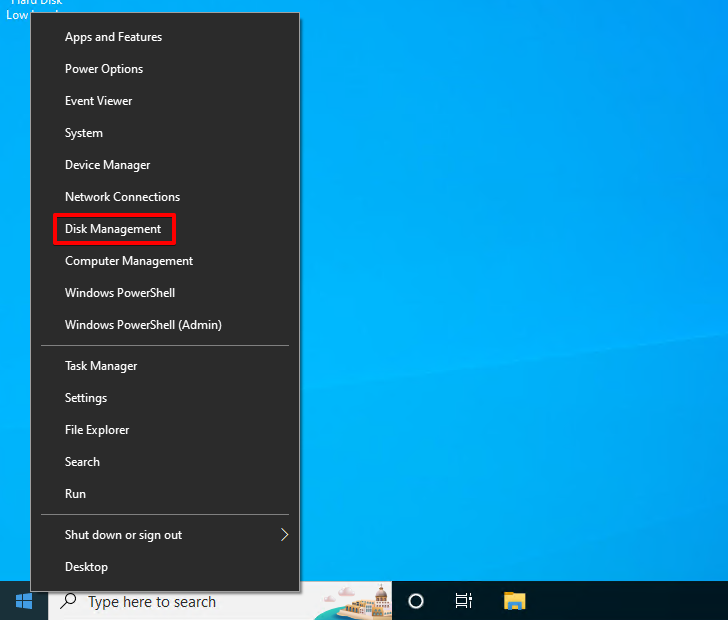
Method 3. Reassign the Toshiba Drive Letter
When your Toshiba external hard drive is appearing in Disk Management, but not File Explorer, you can try changing the drive letter to fix it. Changing the drive letter, or removing it and re-assigning it, gives Windows another opportunity to read the hard drive again if it was being prevented by a system anomaly. This method also allows you to add a drive letter if one wasn’t assigned for any given reason.
Follow these steps to change/reassign the drive letter of a Toshiba external hard drive not showing up in File Explorer:
- Right-click Start and click Disk Management.
- Right-click the partition on your Toshiba external hard drive and click Change Drive Letter and Paths.
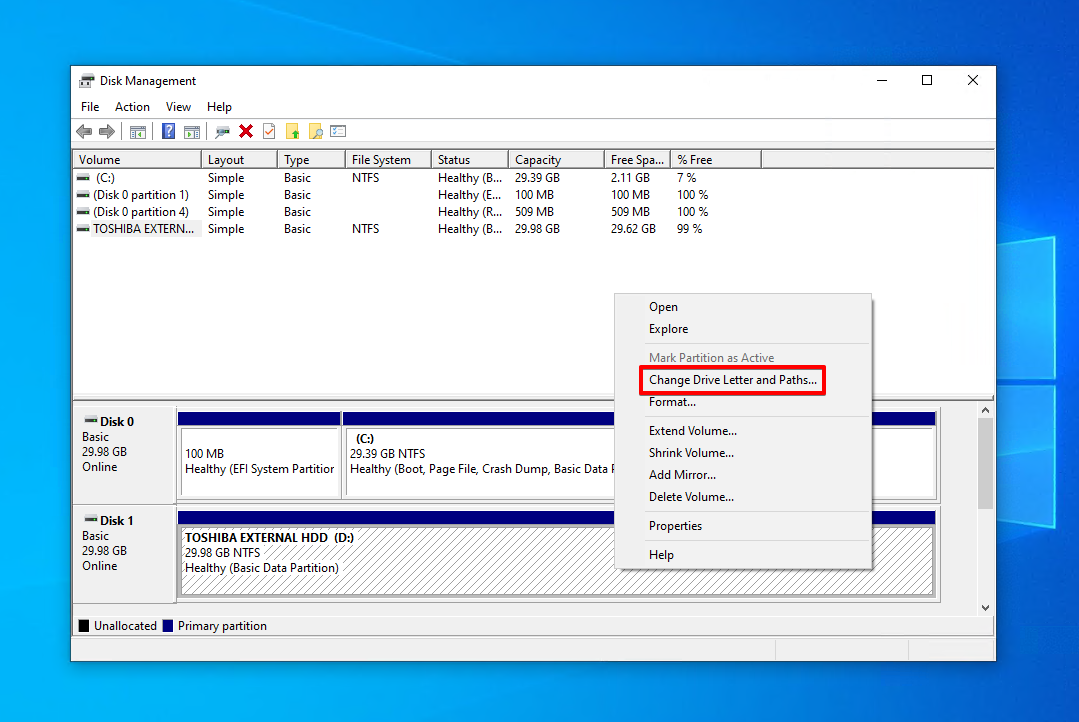
- Select the existing drive letter and click Change. If there is no drive letter, click Add instead.
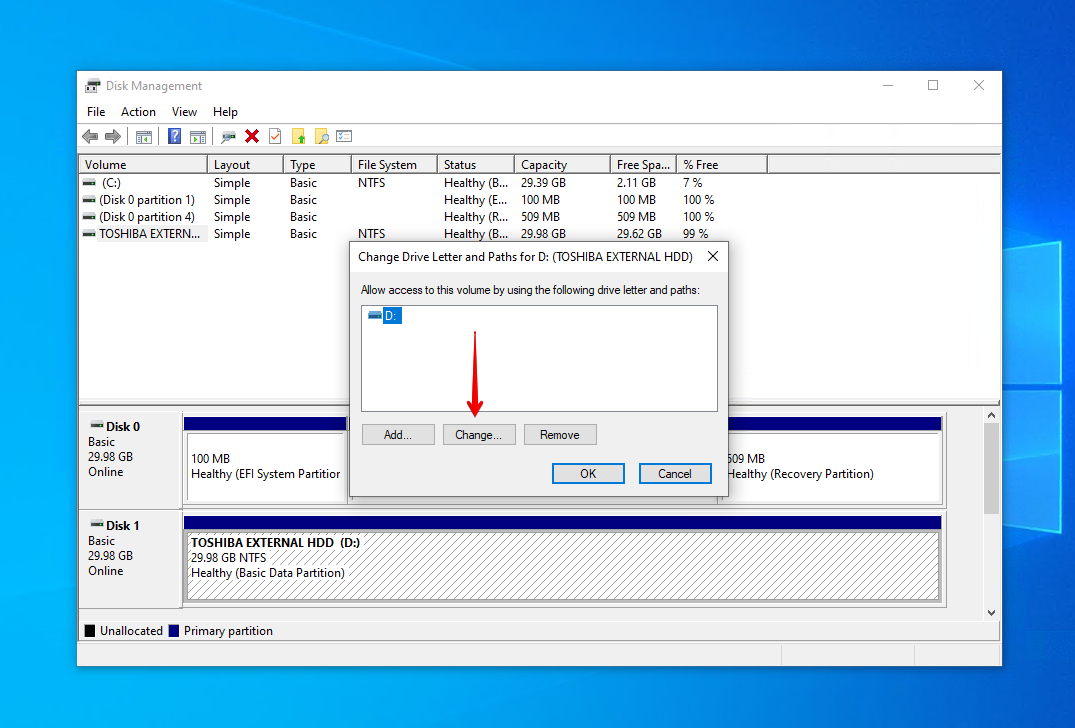
- Select a new drive letter and click OK.
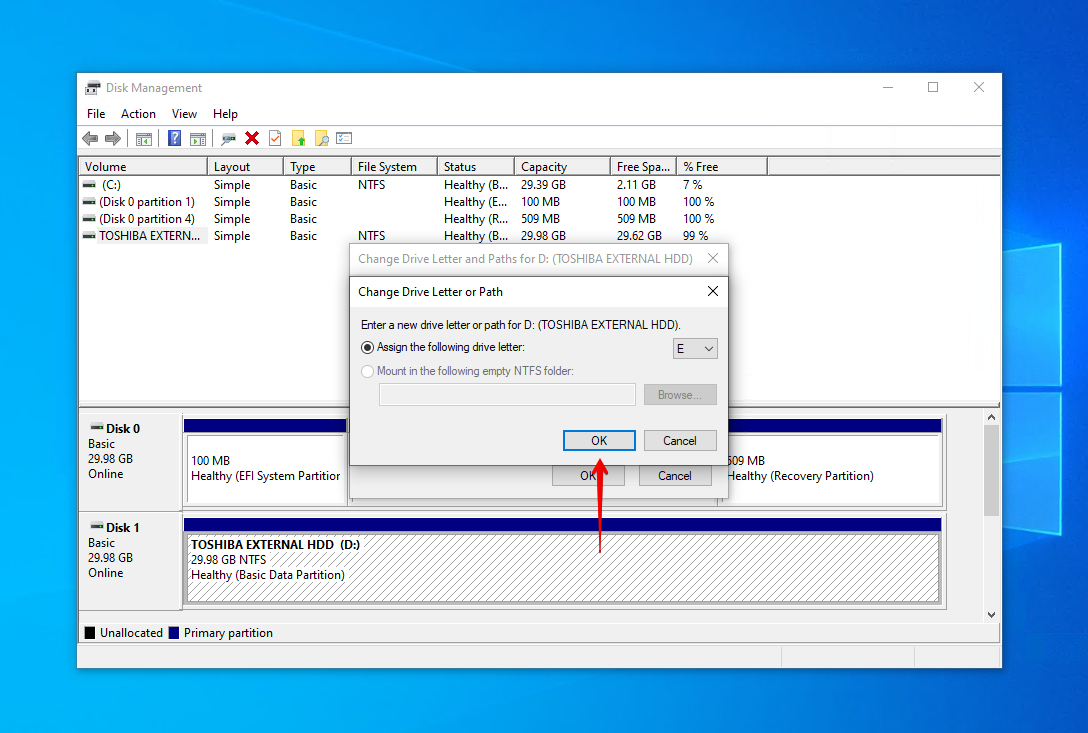
- Click OK.
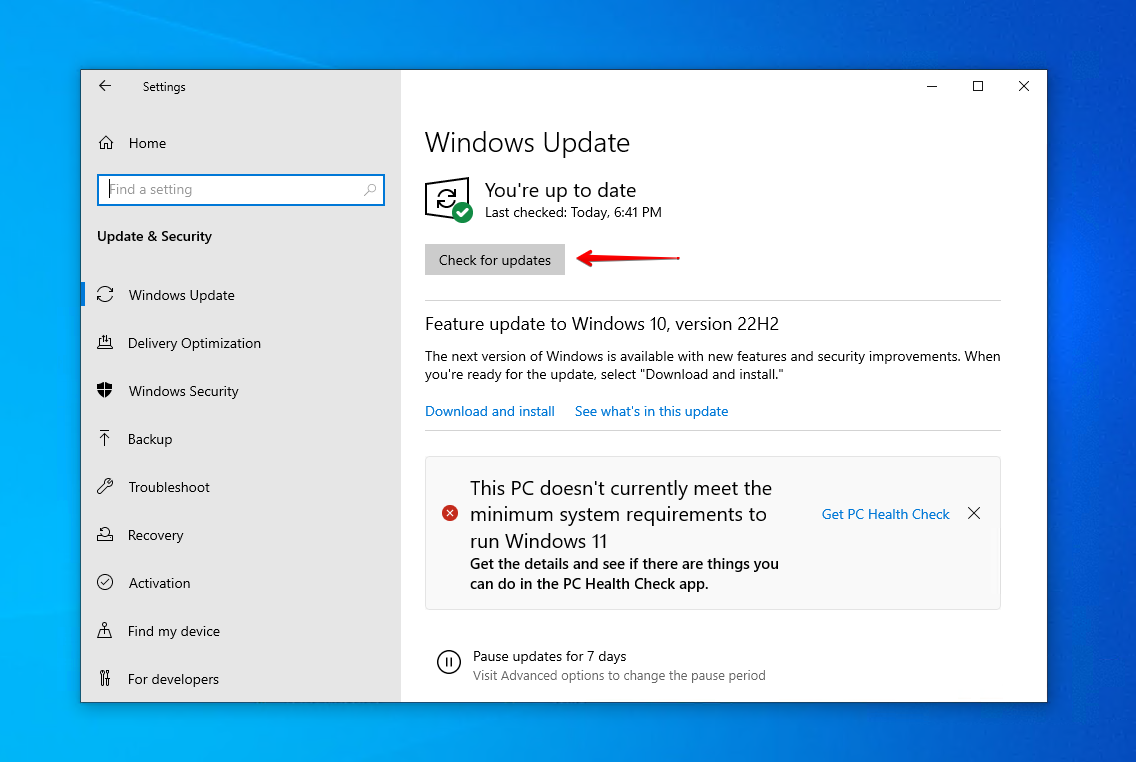
Method 4. Update System Drivers and Operating System
Keeping your computer updated is critical for its performance. Missing important updates can result in your hardware drivers becoming outdated, resulting in your drive becoming susceptible to problems that have already been fixed in updated versions.
These instructions will guide you through how to update your Windows operating system and unreadable external hard drive drivers:
- Press Windows Key + I on your keyboard.
- Click Update & Security.

- Click Check for updates. If there are no updates, continue on to see how you can search for driver updates for your Toshiba hard drive specifically.
- Right-click Start and click Device Manager.
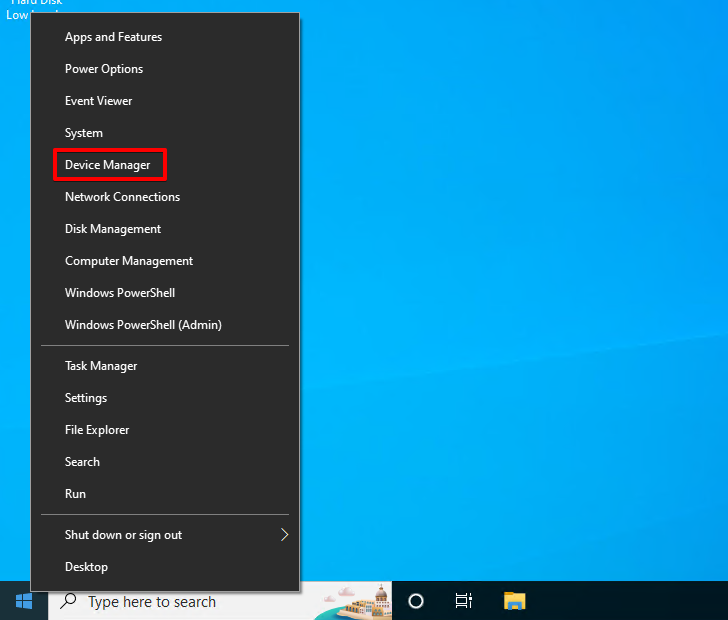
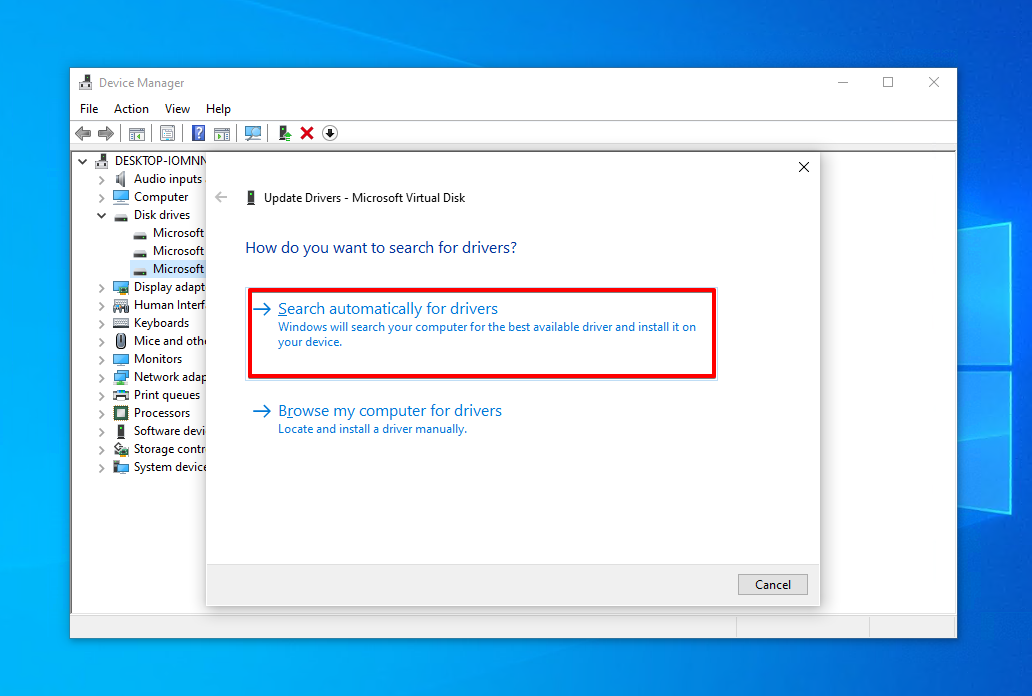
- Expand Disk drives, then right-click your Toshiba hard drive and click Update driver (the device name will vary).

- Click Search automatically for drivers. Or, if you already have the updated driver downloaded, click Browse my computer for drivers.
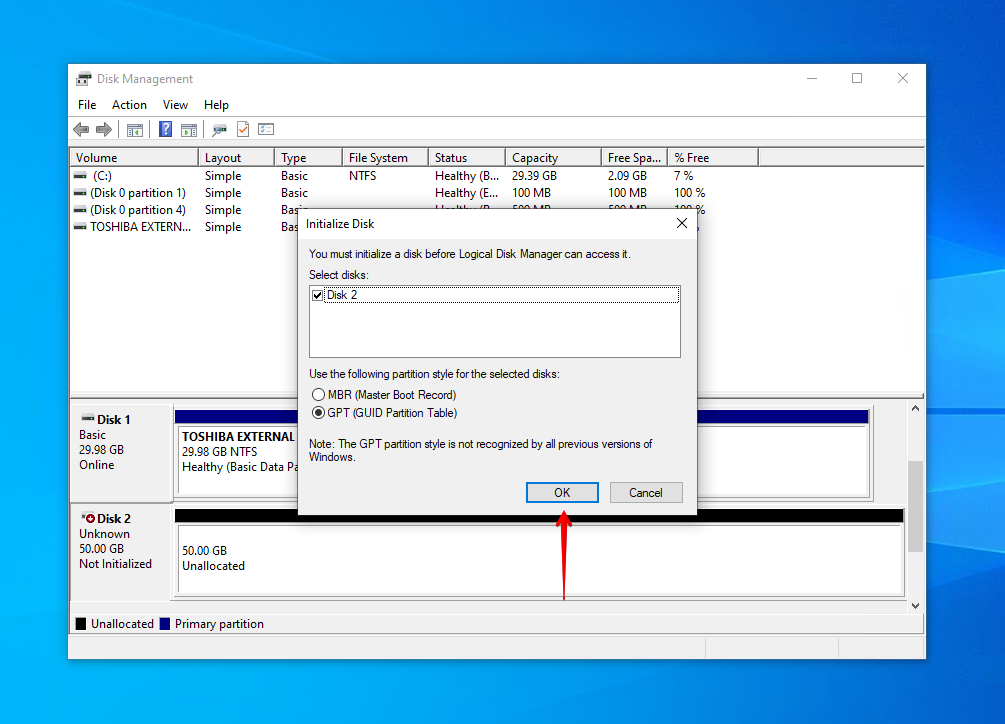
Method 5. Initialize Toshiba Hard Drive Manually
Toshiba hard drives that haven’t been initialized won’t appear in File Explorer. Initializing a disk erases the data on it and gives it a partition table. When a partition table is created, you can then create partitions and format them with the file system of your choice to begin storing data. If your external Toshiba hard drive is new, there’s a chance you need to initialize it first. Conversely, if your Toshiba drive was working fine but has since become uninitialized, see our guide on how to recover data from an uninitialized disk.
This is how you initialize a Toshiba hard drive manually to fix the error:
- Right-click Start and click Disk Management.
- Right-click the Toshiba external hard drive and click Initialize Disk.
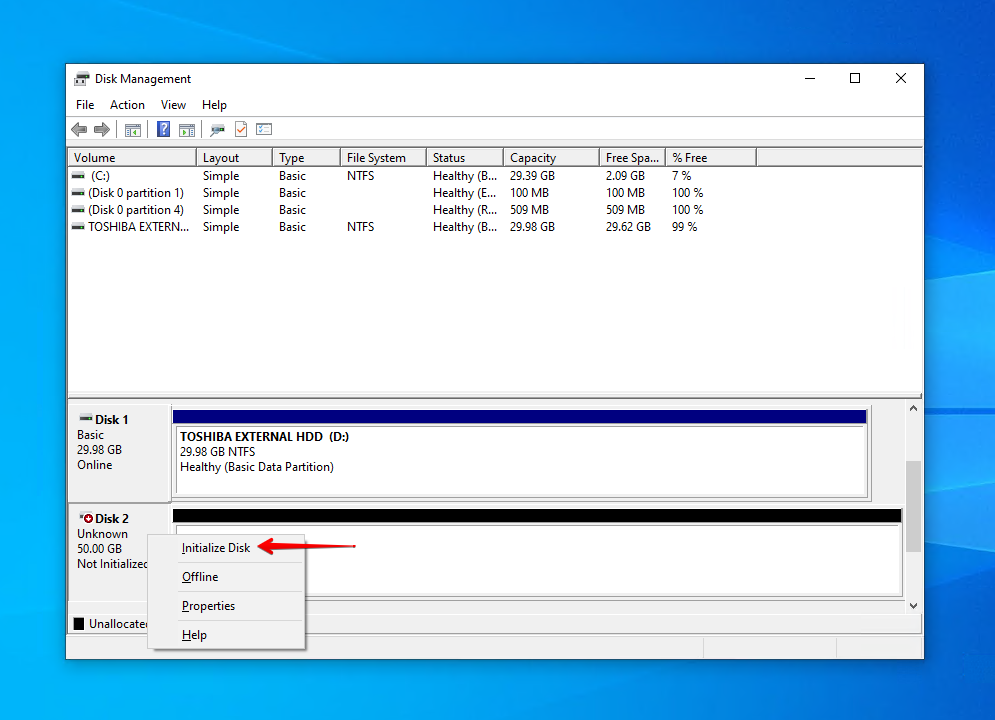
- Select a partition style and click OK.
Method 6. Format Your Toshiba External Hard Drive
Not all file systems are compatible with Windows by default. For instance, if you connect a hard drive using an Apple file system (such as APFS), Windows will not recognize it. The same is true if the hard drive wasn’t formatted properly. For instance, if the hard drive was previously removed before a format could be completed, it may not show up. Therefore, you must format it with a compatible file system.
This process will delete all data present on the hard drive, so bear this in mind. Alternatively, you can look at ways to format the hard drive without losing data.
- Right-click Start and click Disk Management.
- Select the volume of your Toshiba external hard drive and click Format.
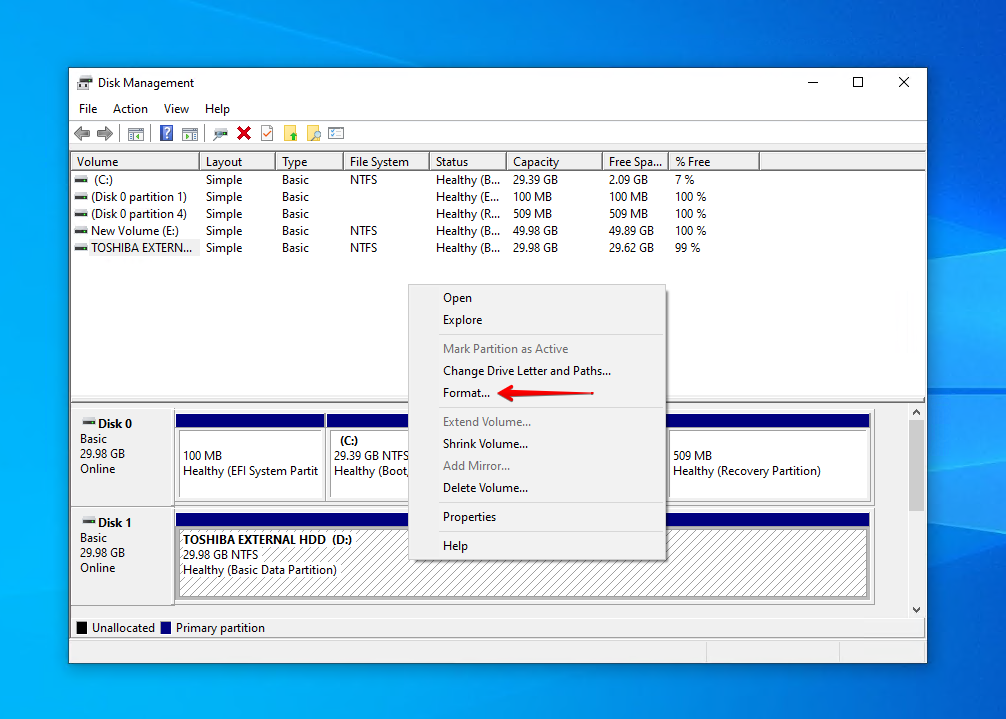
- Ensure Perform a quick format is selected and click OK.
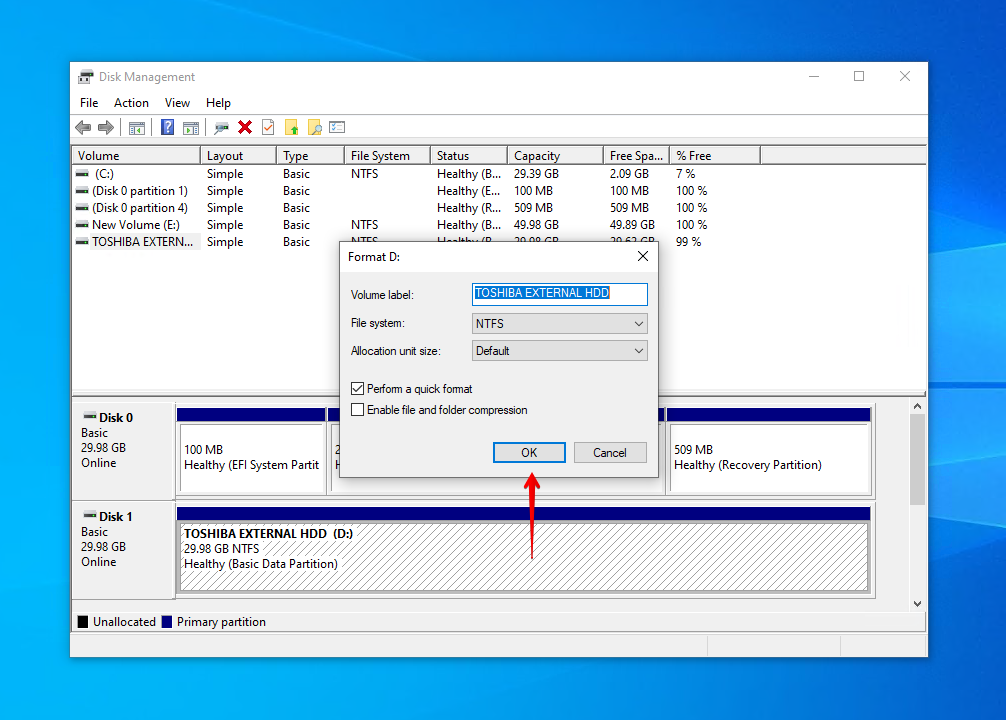
- Click OK again.
Should you need to format your drive with your data on it, it is still possible to recover the data afterward with Disk Drill.
FAQ
Are Toshiba external hard drives good?
Toshiba external hard drives are a trusted choice by many and work great with Windows 7, Windows 10, and Windows 11 computers. They also accept file systems from other operating systems, like macOS and Linux. Of course, like any external hard drive, they are not without their faults.
How to Fix Toshiba external hard drive not showing up on Mac?
There are multiple ways to fix an external hard drive not showing up on Mac. Try some of the below:
- Check the connection point and ensure you’re using a working cable.
- Mount the external hard drive using Disk Utility.
- Run the First Aid feature on the external hard drive.
- Format the drive.
How to recover data from the Toshiba external hard drive?
You can recover data from a Toshiba external hard drive in no time using the data recovery tool Disk Drill:
- Download and install Disk Drill.
- Connect your Toshiba external hard drive and select it.
- Scan it for recoverable data.
- Select the data that you wish to recover
- Specify an appropriate recovery location.
What does the blue light mean on my Toshiba external hard drive?
The blue light on your Toshiba external hard drive indicates that data is either being written to or read from your drive. If there is no light, even when it’s plugged in and you’re trying to access it, there may be something interrupting the connection or a problem with your drive.
Why is my new Toshiba external hard drive not appearing on my computer?
A brand new hard drive may need to be initialized and formatted with a working file system to be used. Here’s how you can do it:
- Right-click Start. Click Disk Management.
- Right-click the Toshiba external hard drive. Click Initialize Disk.
- Select a partition style. Click OK.
Conclusion
Usually, a repair tool like CheckDisk is enough to fix most hard drive-related problems. But, that’s not the case if you can’t even see your external hard drive. Using the fixes outlined in this article, you can easily fix a Toshiba external hard drive that’s not being recognized on Windows 7/10/11. In fact, all of the suggestions we’ve presented will work for any external hard drive not showing up. Once all is said and done, be sure to check the hard drive health to see if there are any reasons why it occurred.
If none of the methods provided here worked and your Toshiba external hard drive is still being undetected, you may need a professional’s touch. In this case, consult a data recovery service, as they are the next step above data recovery software.
This article was written by Jordan Jamieson-Mane, a Staff Writer at Handy Recovery Advisor. It was also verified for technical accuracy by Andrey Vasilyev, our editorial advisor.
Curious about our content creation process? Take a look at our Editor Guidelines.