
Just like any file, you can easily lose Sticky Notes from corruption, faulty OS updates, and even accidental deletion. But because Sticky Notes are actually stored both locally and in the cloud, you have a pretty good chance to retrieve them as long as you act fast and don’t overwrite them by downloading or saving new data.
In this article, we’ll explore the different ways to recover deleted Sticky Notes on Windows 10 using the cloud and even directly from your computer’s local storage. Read on.
Are Microsoft Sticky Notes Backed Up?
When you sign in with your Outlook account in the Sticky Notes app, it creates copies of your notes to the cloud. You will find them under the Notes folder of your Outlook account. When deleted, it then goes to the Deleted Items folder.
However, Windows also stores Sticky Notes locally. Specifically, it’s saved as a database file called plum.sqlite-wal; however, recovering that file isn’t going to be enough. You’ll also need to restore the plum.sqlite file, which is what opens the database file and and gives you access to its contents. To find your sticky notes’ location, open this path using Windows Start Menu > Run:
C:\Users\username\AppData\Local\Packages\Microsoft.MicrosoftStickyNotes_8wekyb3d8bbwe\LocalState\
In earlier Windows 10 releases, Sticky Note app data is saved as a Stickynotes.snt file that you can find in
C:\Users\AppData\Roaming\Microsoft\StickyNotes
In either situation, you can restore sticky notes on Windows 10. Check the table below to find the best solution for your case:
Case |
Solution |
My Sticky Notes are synced with my Outlook account |
|
I want to recover my Sticky Notes manually |
|
I know that my Sticky Notes were deleted permanently |
Recover Permanently Deleted Sticky Notes With Data Recovery Tool |
How to Recover Deleted/Disappeared Sticky Notes
If you backed up your data before your sticky notes disappeared, recovery is straightforward. But if not, don’t worry – there are still a few options you can try. You can do it manually, from a cloud-based service, or with the help of data recovery software.
We wrote step-by-step instructions for every single method below, along with screenshots. Read on.
Step 1: Check if Your Sticky Notes Actually Disappeared
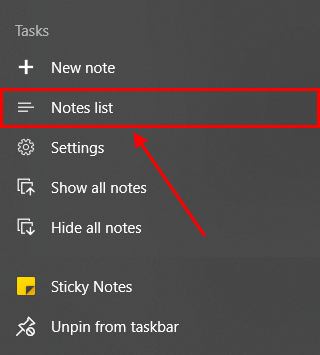
It may appear that your sticky notes are gone when you minimize or close the app or when it fails to show up on Start after a reset or reboot of your computer. To verify whether your notes are still there or not, check the Notes List of your Sticky Notes app.
You can access it by doing either of the following:
- If the Sticky Notes app launched automatically but only a single note popped out, click the ellipsis button (…) on the upper-right corner of the note. Then, select the Notes list button from the drop-down menu; or
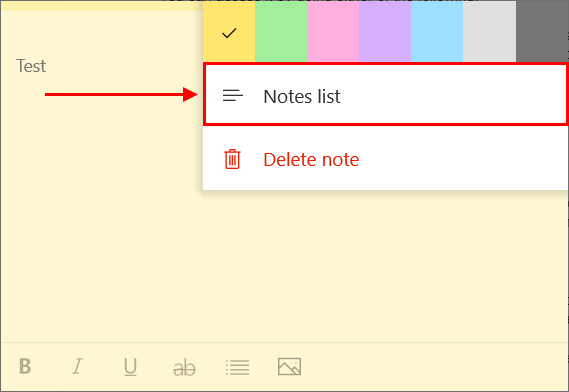
- Manually launch Sticky Notes in the Start Menu. You can also right-click on its icon and select the Notes list button.
Step 2: Check Your Outlook Account
When synced, Microsoft Outlook saves a copy of your sticky notes under its Notes folder. This makes them accessible on any device as long as you log into your account. But in case you delete one, Outlook moves the deleted note to the Deleted Items folder.
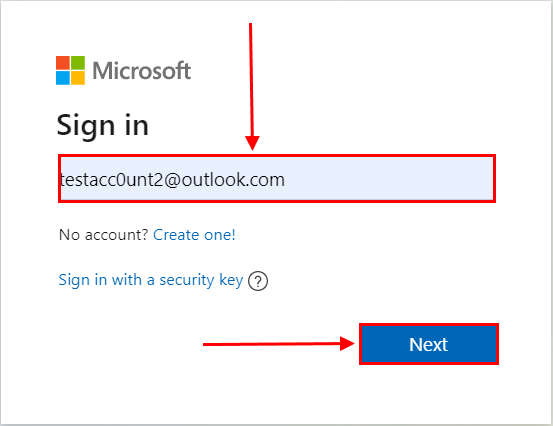
To undelete Sticky Notes in Outlook, follow the steps below:
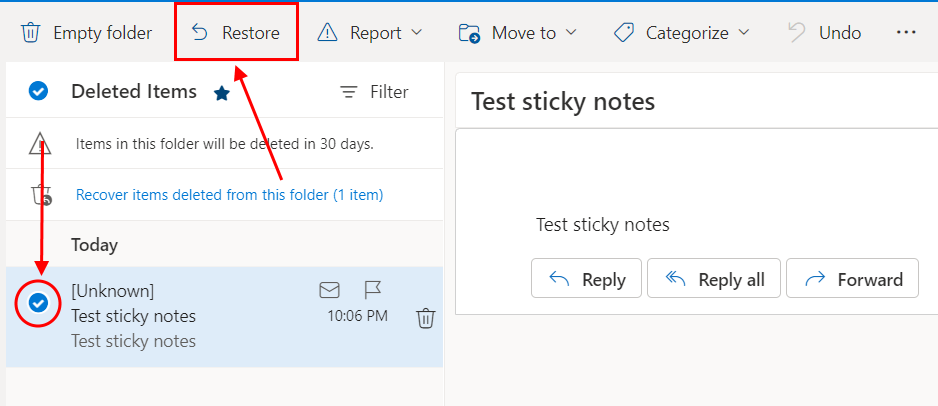
- Launch your Microsoft Outlook application on your device (or login via the Outlook website). Then, sign into the same account you used to log into your Sticky Notes app.
- On the left sidebar, click the Deleted Items folder. Check if your lost notes are in the list.
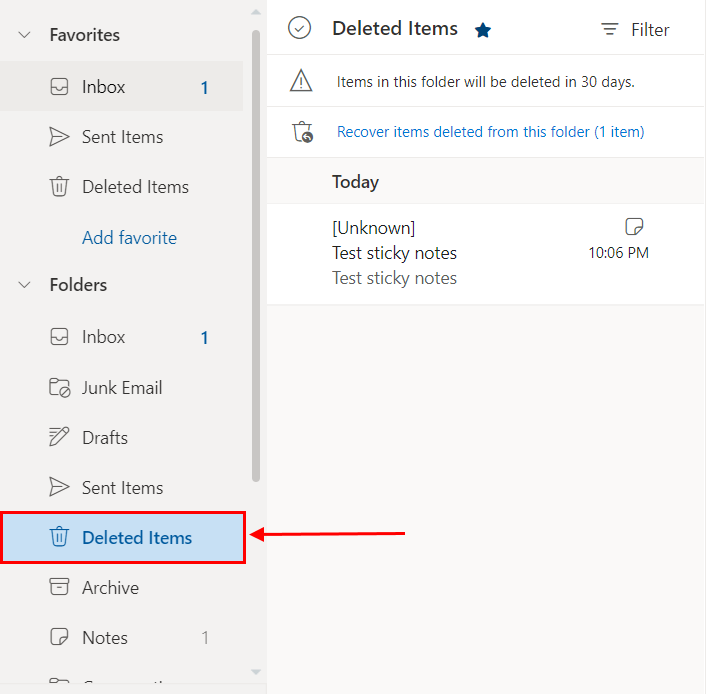
- Select the sticky notes you want to recover. Then, click the Restore button.
If you’re subscribed to Office 365, chances are it saved a copy of your sticky notes to its cloud-based storage. You can then access this to restore your deleted notes.
Step 3: Restore Previous Version Of Your Sticky Notes Archive File
If you enabled your File History before the notes were deleted, then this method is for you. File History is a Windows backup utility feature that creates incremental saves of your data. Not only can you restore lost files backed up with File History, but you can also choose a specific version of that file to recover.
While it is powerful enough to recover deleted files on Windows 10, it has its own limitations. Maybe none of the previous versions contain the specific note you want to recover. It’s also possible that you created and deleted the sticky note before File History was able to save a version. But it doesn’t hurt to check!
This method only works if the AppData folder (located in the path shown in step 1 below) was manually added to File History’s selection of backed-up folders. It’s not included by default.
To use File History to recover sticky notes on Windows 10:
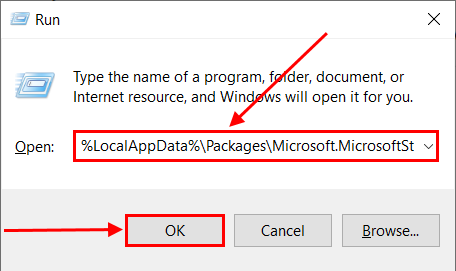
- Locate your Sticky Notes folder. If you’re using Windows 10 (version 1607 or later), open Run (Windows key + R). Then, type the following autosave folder location path and hit OK: C:\Users\username\AppData\Local\Packages\Microsoft.MicrosoftStickyNotes_8wekyb3d8bbwe\LocalState\
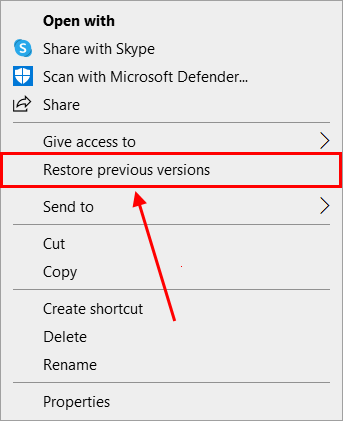
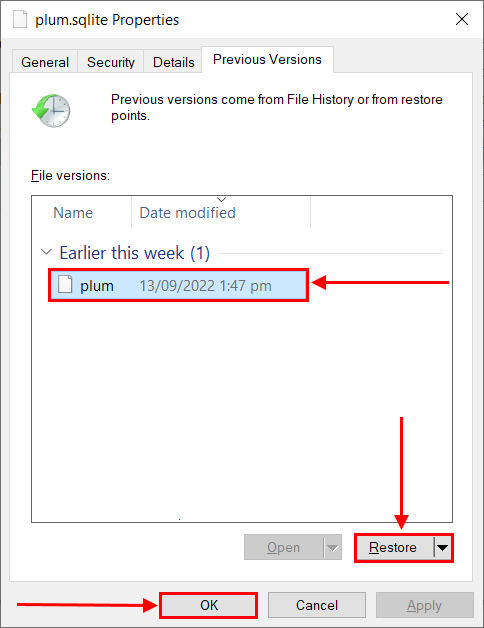
- Right-click on the plum.sqlite file. Then, click the Restore previous versions button. This will open the list of previous versions, which you can restore to get back the deleted sticky notes. You can also browse previous versions in the file’s Properties menu.
- Select the version of the file that contains the lost notes. Then, click Restore.
You can also use File History to recover deleted files on Windows 11.
Step 4: Recover Permanently Deleted Sticky Notes With Data Recovery Tool
If none of the previous methods worked, you can still recover your deleted Sticky Notes file using data recovery software. Data recovery software can scan your drive and recover files directly from the file system – it can even recover entire folders on Windows.
For this article, we’ll be using a tool called Disk Drill. It has an easy-to-use interface that even a complete beginner can operate.
To use Disk Drill to restore deleted Sticky Notes:
- Download and install Disk Drill.
- Launch Disk Drill by double-clicking on its app icon.
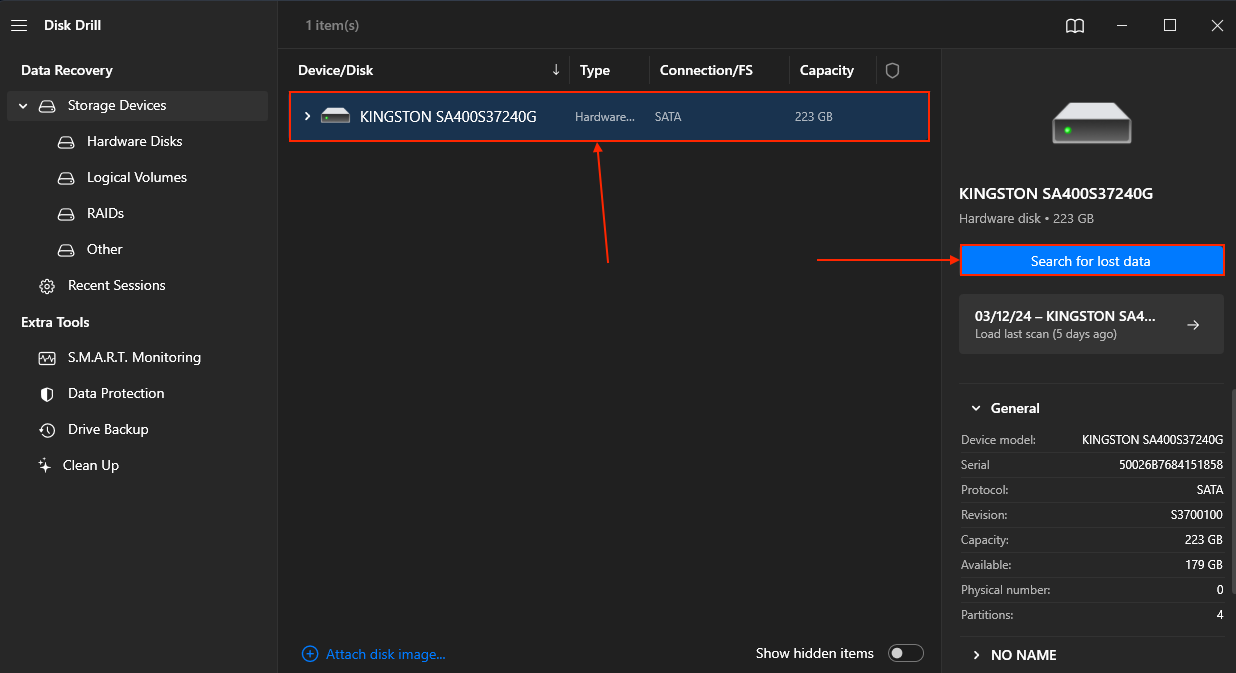
- From the list, select the drive where the autosave folder is located (by default, it should be in C:/ drive). Then, click Search for lost data to begin the scanning process.
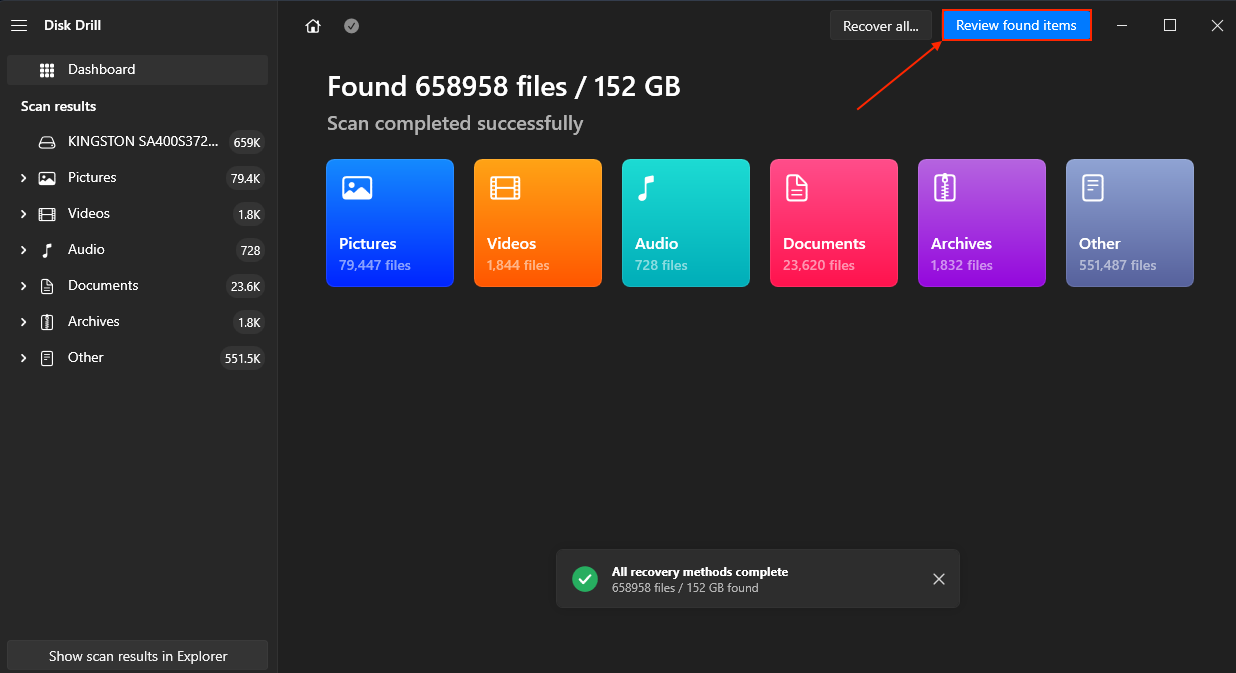
- Once the scan is complete, click the Review found items button in the upper-right corner of the screen.
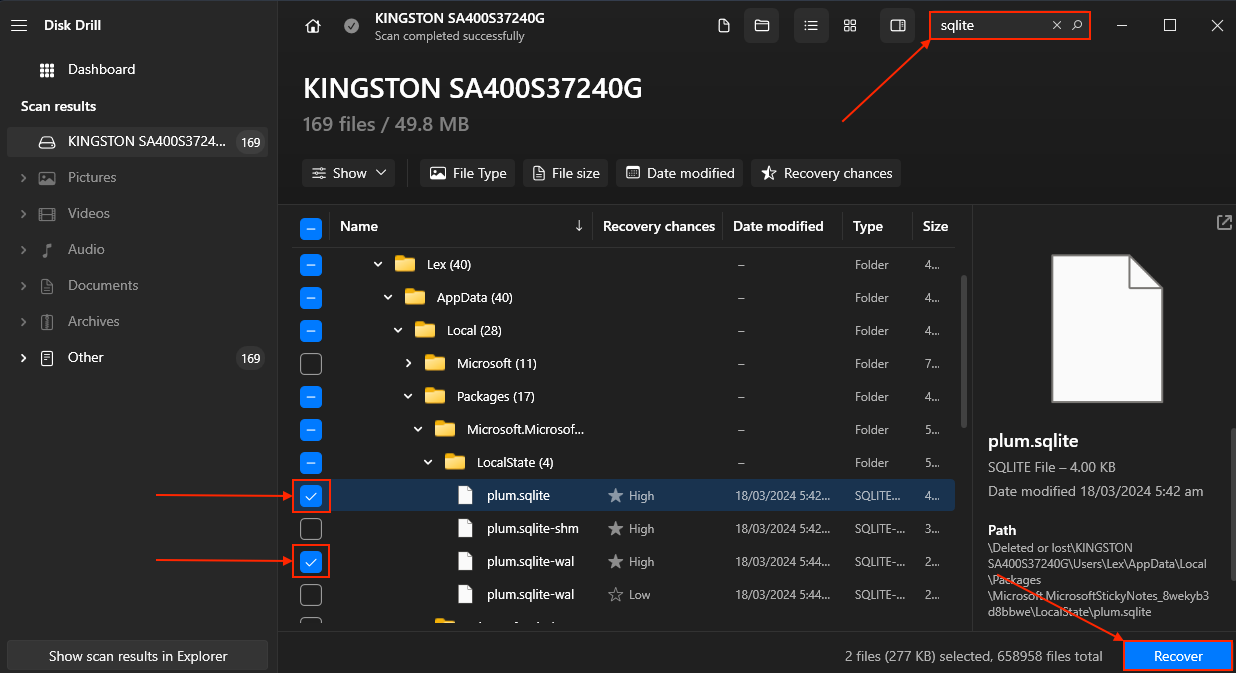
- Locate and select the Sticky Notes file. Most of the time, Disk Drill can restore the original folder structure (for example, you can recover your desktop files from the Desktop folder). However, we recommend inputting plum.sqlite and then plum.sqlite-wal in the search bar (one by one) so you can find the files faster. Once you locate the files, mark the box next to them and click Recover.
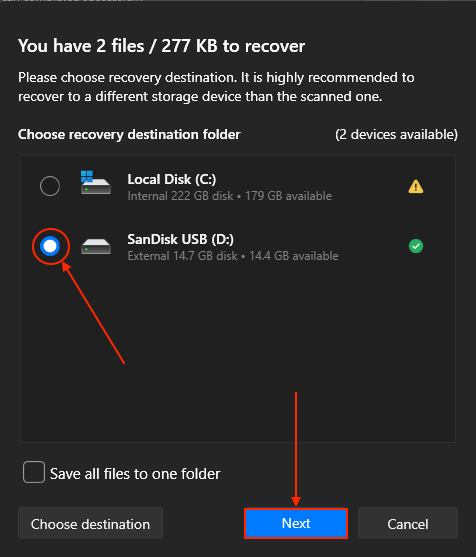
- Choose the destination folder where you want to save the recovered file. Once recovered, don’t forget to move it to its original location to restore the Sticky Notes.
For macOS users, you can also use Disk Drill for Mac to recover deleted notes on Mac. As of this writing, CleverFiles (Disk Drill’s developers) is offering a 2-for-1 license that gets you licenses for both Windows and Mac versions for the price of one. If you want to know more about this app before downloading it to your own machine, check out our Disk Drill review.
You can also use Disk Drill to recover deleted OneNote files in the similar manner.
Tired of Sticky Notes Inconveniences? There ARE Alternative Options to Consider!
Bugs, glitches, and app limitations can ruin the user experience with Sticky Notes. If it’s no longer serving you, you can check out other alternatives.
If you prefer a similar-looking app, Simple Sticky Notes is a free, intuitive, and lightweight alternative that lets you customize colors, titles, and opacity, among others. It also stays on top of all windows. More importantly, you can access your notes across your devices when you share your notes via email.
For a more robust note-taking app, try Evernote. It’s a cross-platform program that can sync on all your devices and can be used offline. It’s great for clipping webpages and media files quickly and has loads of organization features. Evernote is also 100% free to use with up to 3 devices.
If you want to stick with Windows but you miss the fast and minimalistic Classic Sticky Notes app from Windows 7, you can just reinstall it on your Windows 10 machine. It works with Windows 10 version 1809 or later.
FAQ
Where do deleted Sticky Notes go?
The data of your Sticky Notes is stored in a database file called plum.sqlite-wal, which is located in your AppData folder with the following path:
C:\Users\username\AppData\Local\Packages\Microsoft.MicrosoftStickyNotes_8wekyb3d8bbwe\LocalState\
For recovery purposes, you’ll also need to locate the plum.sqlite file, which is required for opening the database and accessing its contents.
Do deleted Sticky Notes go to the Recycle Bin?
No, Sticky Notes don’t go to the Recycle Bin when deleted. This is because all data related to Sticky Notes are saved in its database file, which you can’t interact with the same way you do with files in Explorer. If you delete a note within the Sticky Notes app, the database will be updated to reflect this change – in other words, that note will no longer exist.
Where are sticky notes stored on Windows 10?
Windows 10 stores sticky notes in two locations: the local autosave folder or to the Microsoft cloud (if you logged into the app using your Outlook account).
How do I recover permanently deleted sticky notes on my computer?
To recover permanently deleted sticky notes on your computer, you can use a data recovery software tool like Disk Drill:
- Download, install and launch Disk Drill.
- Select and scan the drive where the autosave folder is located.
- Select the deleted Sticky Notes file and click Recover.
- Save the file to a safe folder.
- Move the recovered file to its original folder.
How do I backup my Sticky Notes in Windows 10?
To backup your Sticky Notes in Windows 10, try these options:
- Use your Outlook account – If you use your Outlook account with Sticky Notes, your notes will automatically be saved on Outlook’s server. You can find them in the Notes folder in the Outlook app.
- Copy the Sticky Notes AppData folder – You can copy the data in this folder: C:\Users\username\AppData\Local\Packages\Microsoft.MicrosoftStickyNotes_8wekyb3d8bbwe\LocalState\ to save your Sticky Notes database in its current state.
- Export your Outlook data – Export your Outlook Notes data (Outlook > Import/Export > Export to a File > CSV > Notes) so you can keep a copy of it in a safe location. If you ever need to access your old nates, you can import the CSV file into Outlook.
How do you sync Sticky Notes?
To sync Sticky Notes, you first need to create a Microsoft Outlook account, if you don’t have one. Then, sign into your account in the Sticky Notes app and it will sync on its own. In case it’s still not syncing, go to Settings (gear icon) in the upper-right corner of the Notes List. Then, click Sync Now.
Can I transfer Sticky Notes to another computer?
Yes, there are two ways we recommend to transfer your Sticky Notes to another computer:
- Simply log in to your Outlook account in the Sticky Notes app on the new computer and your notes will be synchronized.
- You can transfer your local Sticky Notes database by copying its file (plum.sqlite-wal) to another computer. Make sure to copy plum.sqlite as well so you can open the database file.
How do I recover my Sticky Notes after upgrading to Windows 10?
When you upgrade your computer, your old data is saved to a folder called Windows.old – this includes your Sticky Notes database. Specifically, you should find your Sticky Notes data in the following path (which you can copy to another location): C:\Windows.old\Users\”Your Username”\AppData\Local\Packages\Microsoft.MicrosoftStickyNotes_8wekyb3d8bbwe\LocalState
Conclusion
Sticky Notes is a super useful native Windows tool – but its files are prone to accidental deletion and data loss like any other. To avoid this, make sure to back up your sticky notes. You can also enable the note deletion prompt via the settings of Notes List to prevent unwanted deletion. But if worse comes to worst, you can always rely on data recovery software to get that note back.
This article was written by Alejandro Santos, a Staff Writer at Handy Recovery Advisor. It was also verified for technical accuracy by Andrey Vasilyev, our editorial advisor.
Curious about our content creation process? Take a look at our Editor Guidelines.