Although the technology isn’t new, several enterprises and individuals harness eSATA hard drives for their fast data transfer speeds and robust technology.
Unfortunately, eSATA external hard drives are susceptible to data loss. If you’ve deleted your data or your files have disappeared from the external hard drive, you’ve come to the right place.
This article will explain how to recover data from eSATA external hard drives in a few simple steps.
Can You Restore Data from eSATA Hard Drives?
Yes, it’s possible to retrieve files from eSATA hard drive storage devices. Here are some critical factors influencing the data recovery from eSATA hard drives:
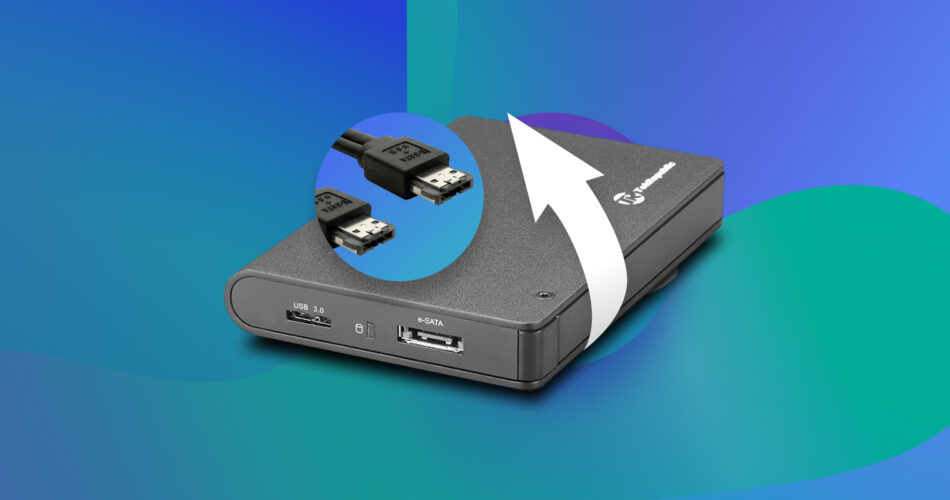
- 🔌 The devices must support the appropriate eSATA interface to connect host adapters and mass storage devices. Usually, such devices also have USB connectors in addition to the eSATA port.
- 💾 Successful external hard drive recovery depends on whether the external device uses RAID (or redundant array of independent disks), which is a way of storing the same data in different places on multiple HDDs or SSDs to protect data.
- 🔧 Data recovery also relies on the ability of advanced data recovery tools to retrieve files from external storage devices that use NAS and RAID arrays, such as the Buffalo external hard drive.
Note: Before beginning the recovery process, it’s important to understand that eSATA (or External Serial Advanced Technology Attachment) is an external expansion specification for the SATA interface. While most hard drives use the SATA interface internally, eSATA enables the SATA hard drives to connect your computer externally. The eSATA interface is a prominent feature in hard drive enclosures added to both controller and devices and in Network-attached Storage (NAS) devices.
How to Recover Files from eSATA External Data Storages
Disk Drill is one of the best recovery apps to restore lost or deleted eSATA external hard drive files. It is an efficient and versatile tool for both Windows and macOS in addition to other commonly supported file systems (FAT16 / FAT32, exFAT, NTFS / NTFS5, HFS / HFS+, APFS, ReFS, ext2 / ext3 / ext4).
Disk Drill is one of the few advanced data recovery tools that supports recovery from data storage disks such as RAIDs. If your eSATA HDD is enclosed in a RAID array, you can use Disk Drill to retrieve your lost files. Disk Drill allows individual hard drive recovery from RAID storage levels such as RAID 0, 1, 5, 6, 10.
Our editorial team vouches for Disk Drill mainly thanks to the no-nonsense UI. The recovery process is quite seamless and often requires no more than a couple of clicks.
In some cases, data recovery tools don’t detect the RAID present within your NAS or hard drive enclosure. As a result, you must eject the drives from the hard drive enclosure. Then, connect these drives to your PC for a scan. The data recovery software will then attempt to rebuild the RAID and recover data.
Let’s go through the straightforward process to recover data from eSATA external hard drives via Disk Drill:
- Download and install Disk Drill.
- Connect your eSATA external hard drive to the computer via the eSATA port or through the hard drive enclosure.
- Launch Disk Drill and select the eSATA external hard drive. If your eSATA HDD is part of a RAID array, you can find the drive under the RAIDs option in the left bar.
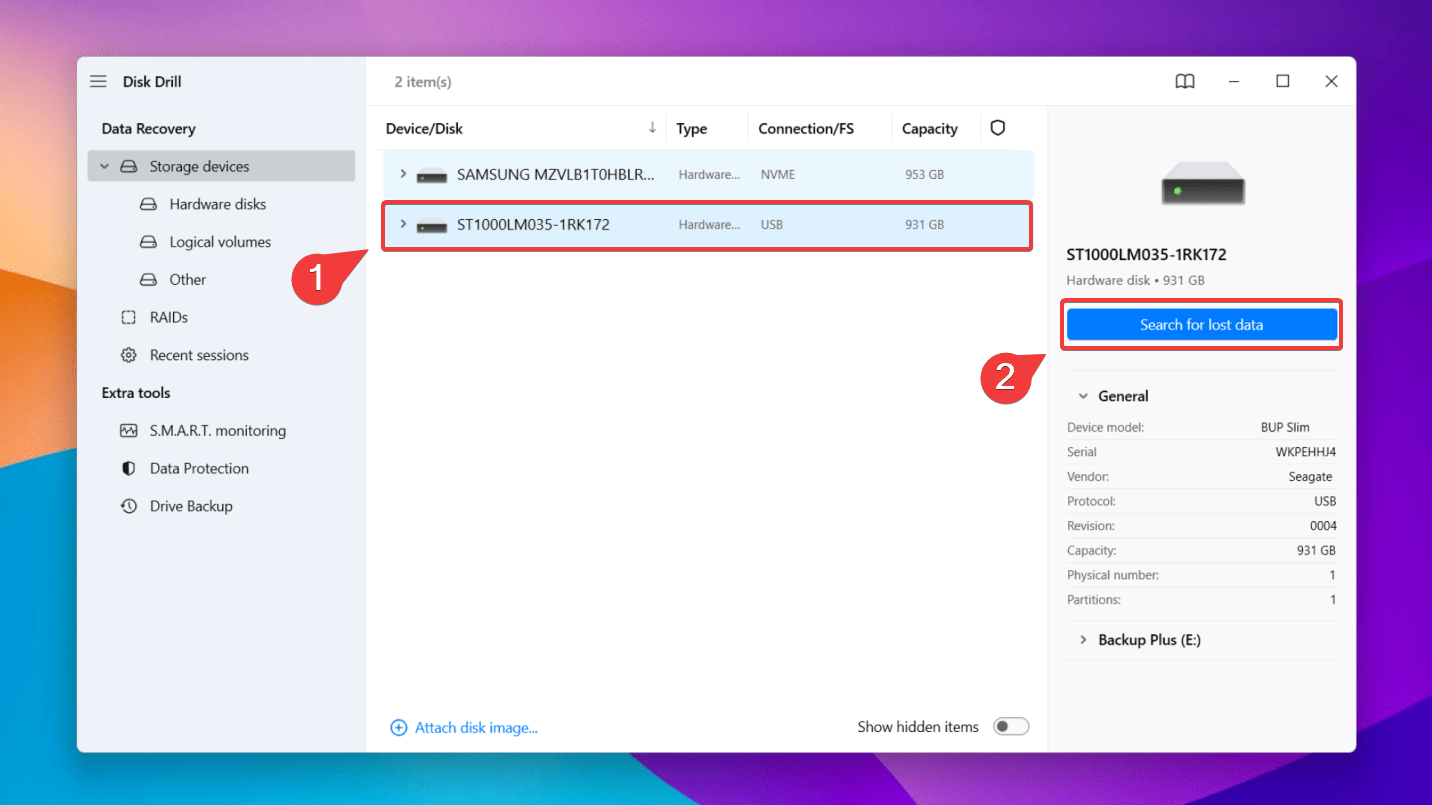
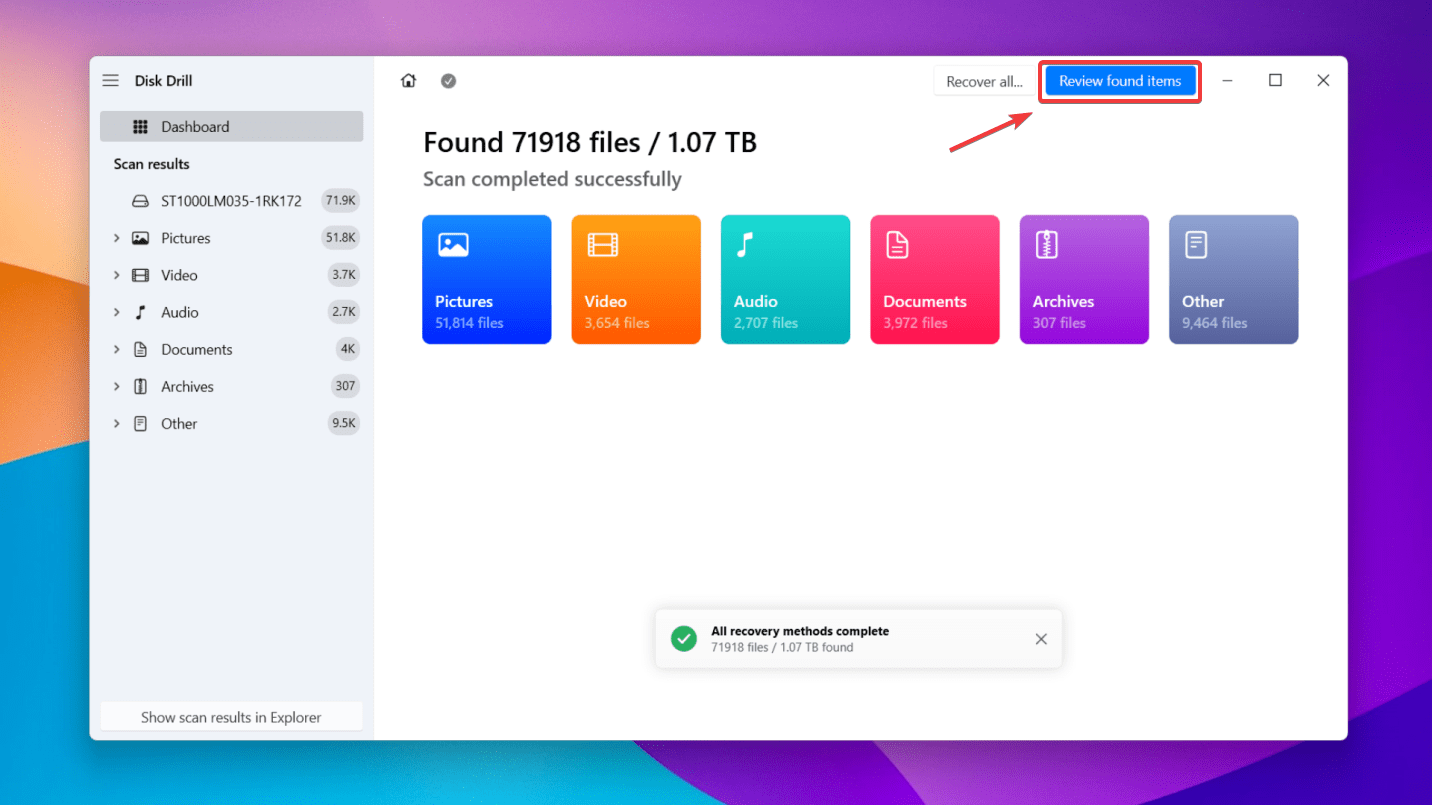
- Now, click Search for lost data. Disk Drill’s powerful algorithm will thoroughly scan through your eSATA external hard drive, but this may take some time as these hard drives have large storage capacities. Once the scan is complete, click Review found items.
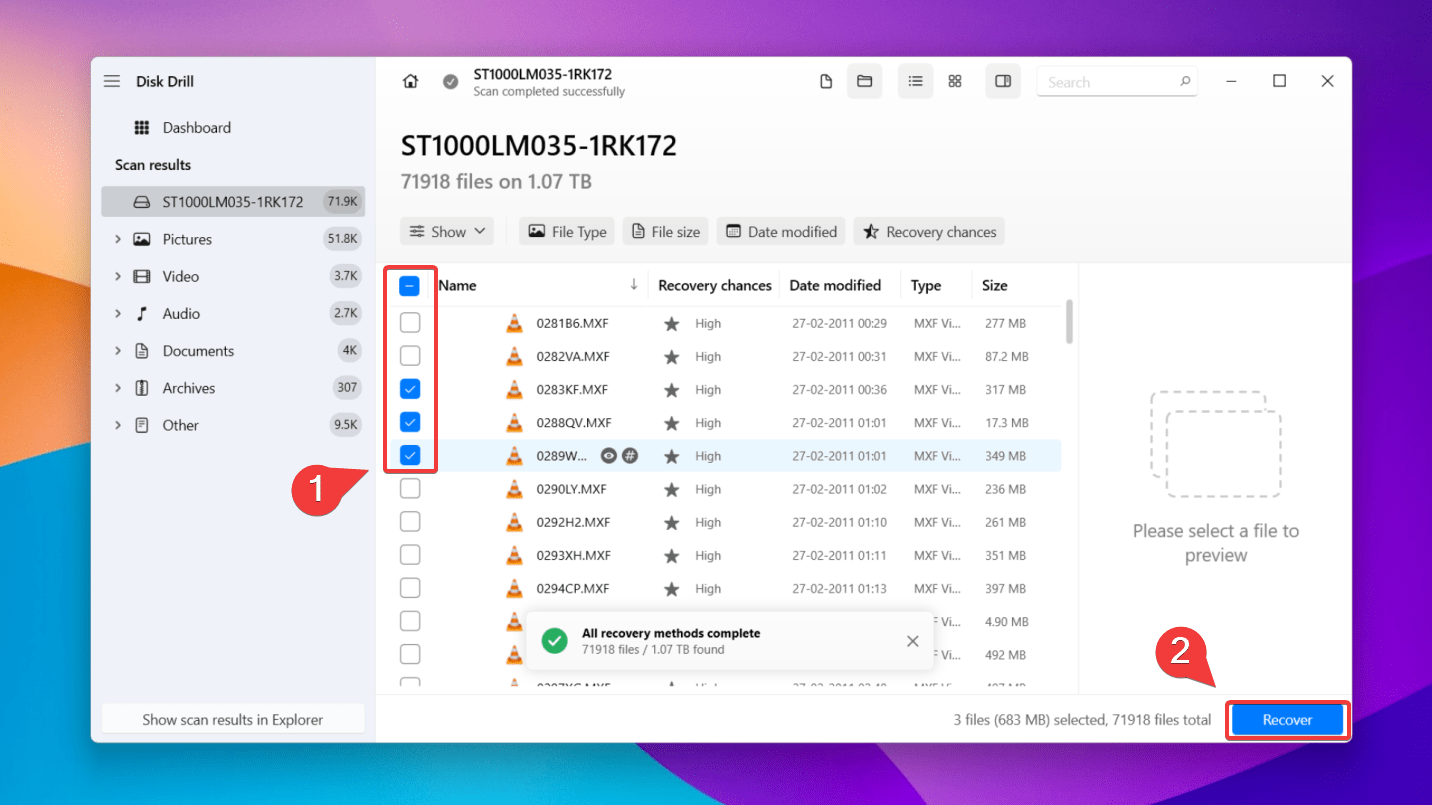
- If you’re hunting for a particular file type, key in the file extension into the text box and hit Enter. Now, your list becomes filtered displaying only your desired file type.
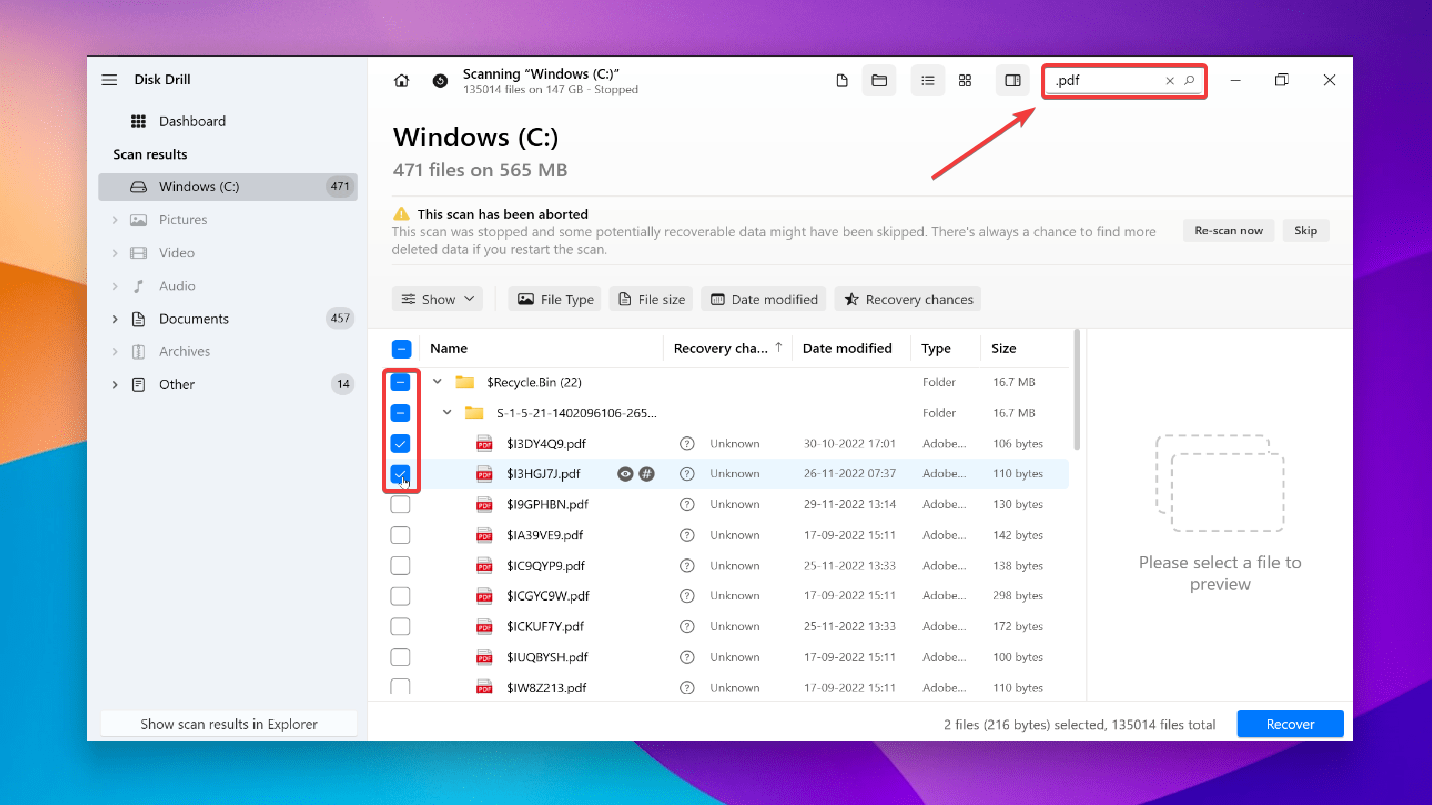 ✅
✅Use the preview feature (by clicking on the eye icon while hovering over a file) to view your files. Then select the files you want to recover by ticking the checkboxes next to the file name. Now, click the Recover button.
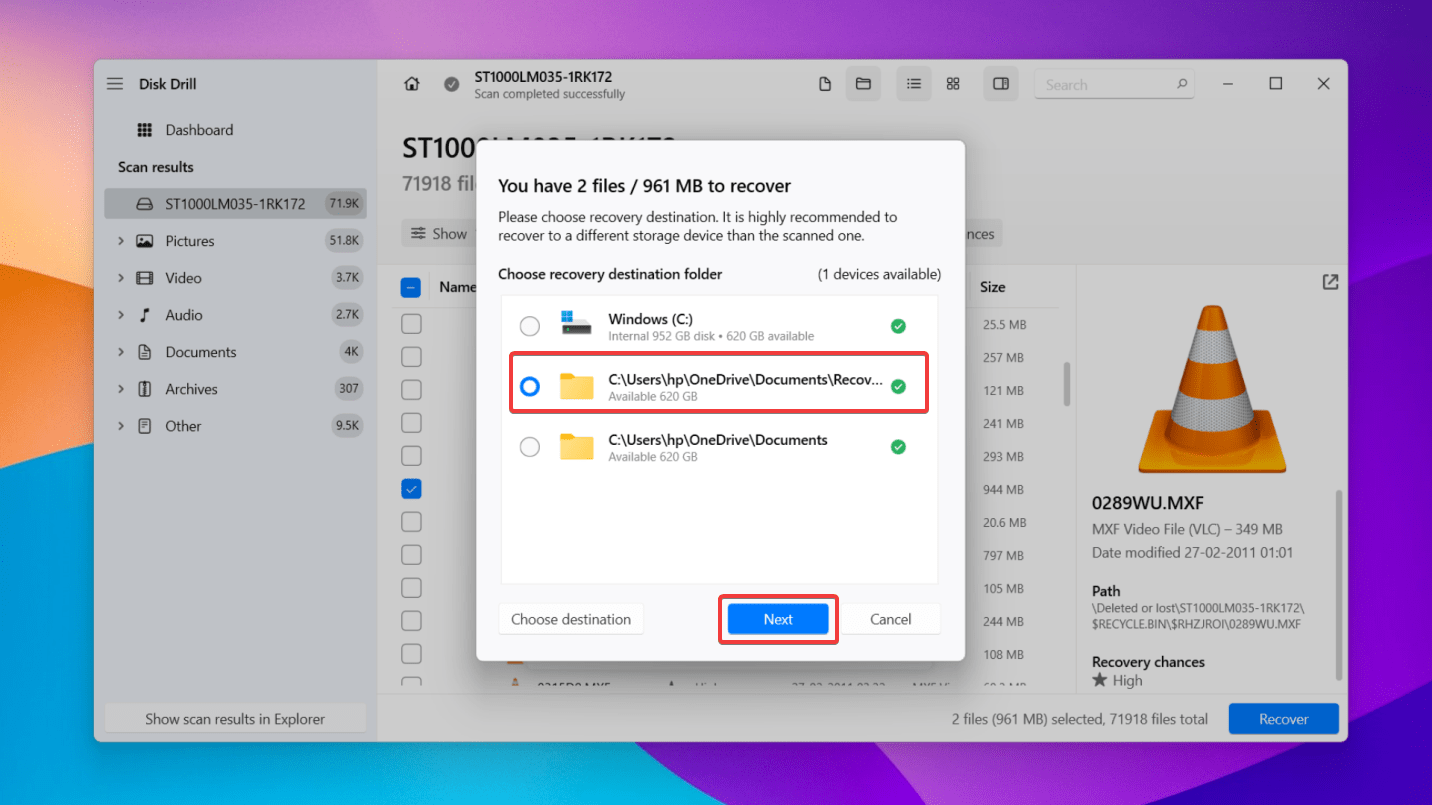
- Select a destination to save your recovered files from the eSATA hard drives. Ensure that this location is on a different storage device than the one from which you’re trying to recover files. Finally, click Next to complete the eSATA data recovery.
You can recover up to 500 MB of data using the free version of Disk Drill. To know more about the tool and its various features, go through our comprehensive review.
If the above-mentioned method doesn’t work, the next best option would be to consult a reliable data recovery service.
FAQ
What is an eSATA used for?
An eSATA port provides a signal connection for external storage devices like hard disk drives (HDDs) or optical drives with an eSATA cable. eSATA hard drives are faster and more efficient. However, if your computer lacks an eSATA port, you can purchase an adapter.
Is USB 3.0 or eSATA faster?
While USB 3.0 external hard drives are more common, eSATA external hard drives are relatively faster since they are directly compatible with the SATA interface. Thus, while USB 3.0 external hard drive speed won’t exceed 500 MB/s, eSATA external hard drives transfer speed can be up to 600MB/s (6GBps).
How to recover files from eSATA external hard drive enclosure?
Follow these steps to recover files from eSATA external hard drive with Disk Drill:
- Connect the eSATA HDD to your PC.
- Select the eSATA drive & click Search for lost data.
- Preview the files for recovery.
- Click Recover & select a recovery location.
Conclusion
eSATA external hard drives are becoming popular due to their fast data transfer speeds and efficient technology. While they are cost-effective and reliable, no data storage device is foolproof against data loss. Fortunately, there are ways to deal with this.
If you find yourself in such a situation, refer to the methods mentioned in this article to retrieve data from eSATA HDD, hard drive enclosures, or NAS data storage devices successfully.
This article was written by Joshua Solomon, a Contributing Writer at Handy Recovery Advisor. It was also verified for technical accuracy by Andrey Vasilyev, our editorial advisor.
Curious about our content creation process? Take a look at our Editor Guidelines.