Deleted or lost DJI drone files are, unfortunately, very common. On top of memory card-related issues like disk corruption, accidental deletion, or formatting, drones are uniquely at risk of physically crashing and causing unexpected shutdowns.
Here’s the good news — recovering your lost DJI drone footage is not only possible, but it also has a pretty good success rate IF you perform the right steps in the right sequence (the opposite is also true). Our goal with this guide is to walk you through the entire process so you can recover your DJI drone footage as quickly (and safely) as possible.
Can DJI Drone Photos & Videos be Recovered?
Yes, it’s possible! As of this writing, the recovery guide we provide below works by default for every currently released DJI drone: Phantom, Mavic, Air, Avata, and DJI Mini. However, there are certain factors that can affect your chances to retrieve lost DJI footage, and they are largely dictated by what caused the data loss in the first place.
To help you better understand what happened to your data and what you can expect from your DJI file recovery attempt, we put together a short info table:
Causes of data loss |
Description |
Recoverability |
Accidental deletion |
Accidental deletion is a common cause of lost drone videos (and one of the easiest to resolve). The user may have accidentally clicked the wrong video to delete or unintentionally tapped the delete button. |
With data recovery software, you can recover files from you memory card as long as the file hasn’t been overwritten yet with new footage. So it’s important that you act fast when this happens. But even if it happened a long time ago, it’s still worth scanning your drone’s storage to see what turns up. |
Accidental or improper formatting |
The process of formatting a drive wipes its data clean. If the formatting process was interrupted resulting in improper formatting, that may also damage the existing data. |
There are two types of formatting: (1) a quick format marks data to be overwritten by new files, while (2) a full format overwrites data with zeroes. If you only performed a quick format on your DJI drone’s memory card, you can still recover files from your formatted card and you can even repair damaged data with the right software (more on this later). |
Drone crash |
In the event of DJI drone crashes, one must not only consider physical damage but also logical damage to the SD card caused by a sudden power interruption. |
If you observe physical damage on the drone’s SD card or if it has become inaccessible due to damage, we strongly urge you to send your memory card and/or drone to a professional data recovery service. They have the right tools, facilities, and specialists to extract your data intact. In case of logical damage (such as corruption), see next row. |
Corruption |
Corruption may be caused by viruses or interrupting the read/write process – such as pulling the SD card from the drone as it’s saving data or a sudden loss of power like in the drone crash scenario. It may also happen to a worn-down memory card. |
As long as you act fast, you have a good chance to restore deleted DJI videos and photos from a corrupted SD card using data recovery software. We’ll demonstrate this process below with our software of choice, but the steps should apply to most similar tools. |
How to Recover Deleted DJI Video Footage & Photos
The most efficient way to recover deleted DJI video footage and photos is by using DJI video recovery software. It’s a downloadable tool that can restore data from your drone’s SD card or from the drone itself (as long as your PC reads it as a “mass storage device”).
For this guide, we’ll be using Disk Drill. It’s a powerful and easy-to-use data recovery software that recognizes most of the formats DJI drones use – such as MP4, MOV, JPG, and DNG. Beyond recovering deleted files, this software can also retrieve data from formatted media and from the corrupted devices we mentioned earlier. Disk Drill doesn’t need the card to appear in File Explorer or be error-free to scan it.
In any case, the rule of thumb is simple: scan the memory card, and you’ll see what turns up and what can be recovered.
To use Disk Drill for DJI data recovery:
- Connect your drone’s SD card to your computer using a card reader or adaptor or connect your drone directly to your computer via USB. In the latter’s case, your computer must read your drone as a “mass storage device” for this method to work.
- Download and install Disk Drill, then launch it.
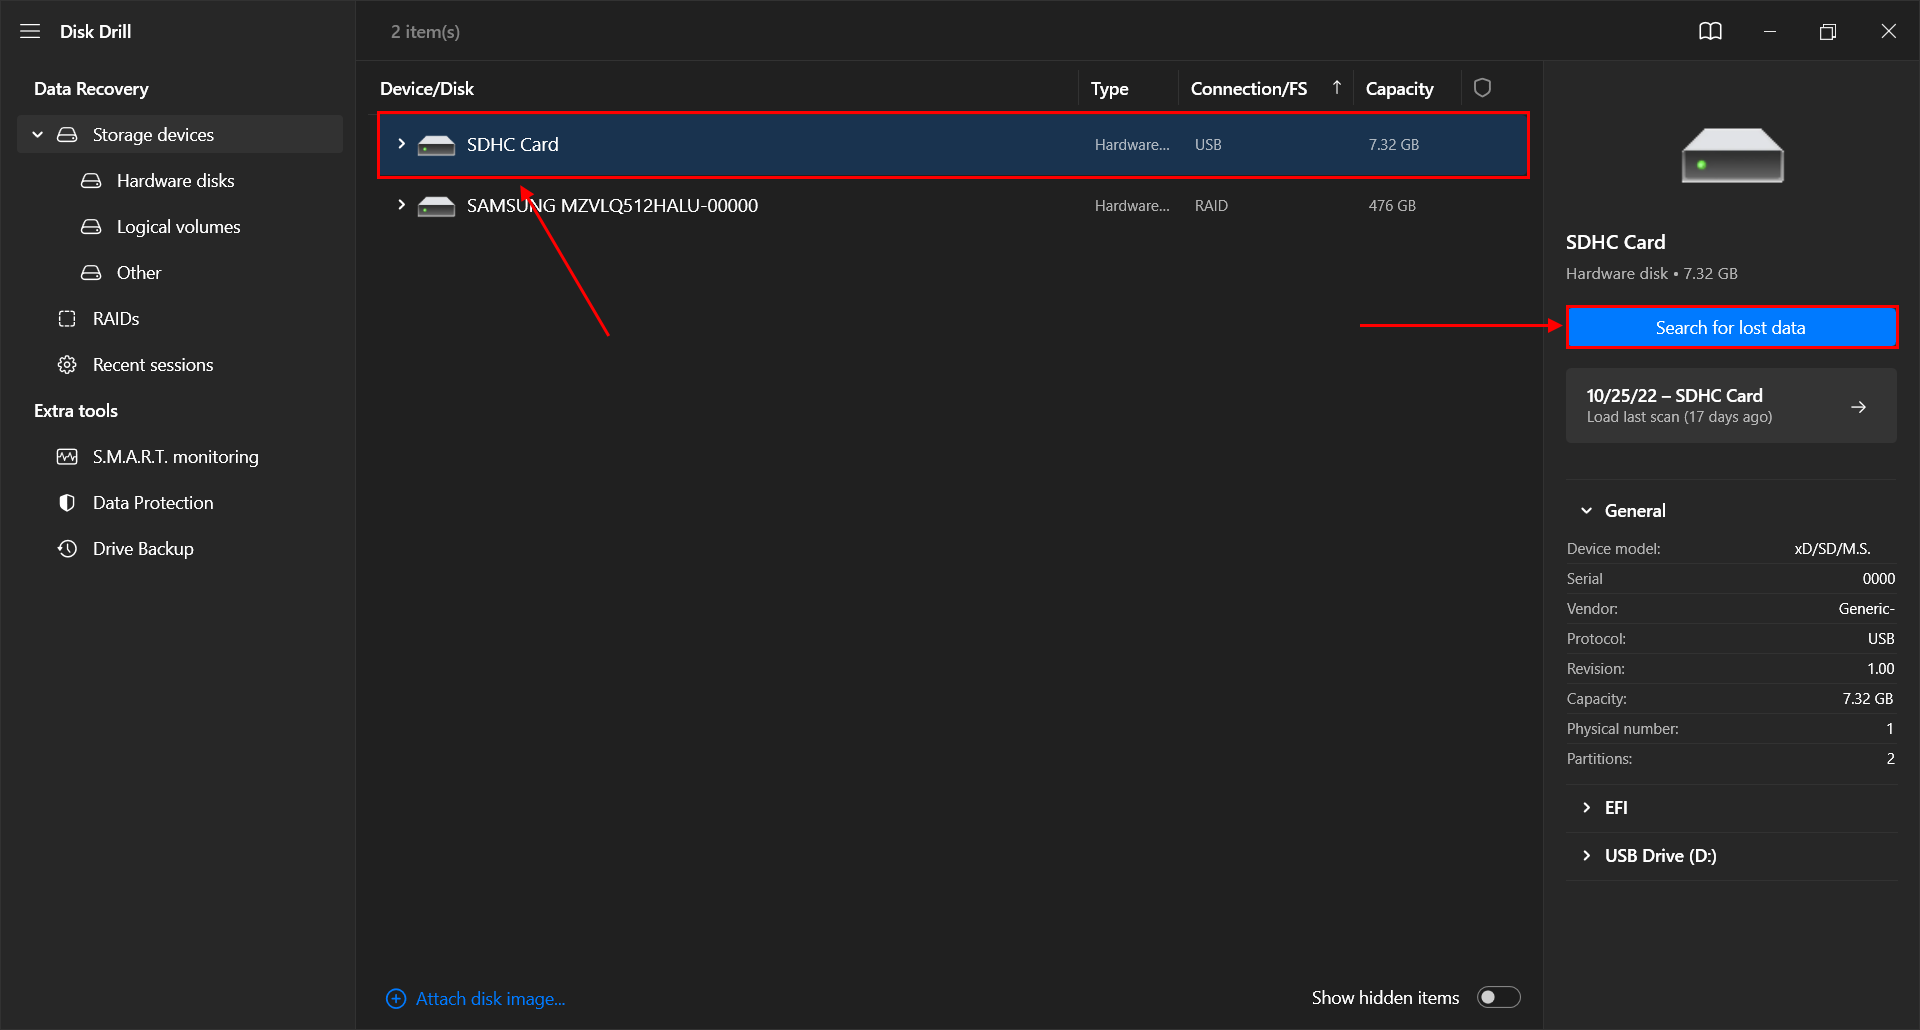
- From the middle pane, select the DJI SD card or mass storage device. Then, click Search for lost data.
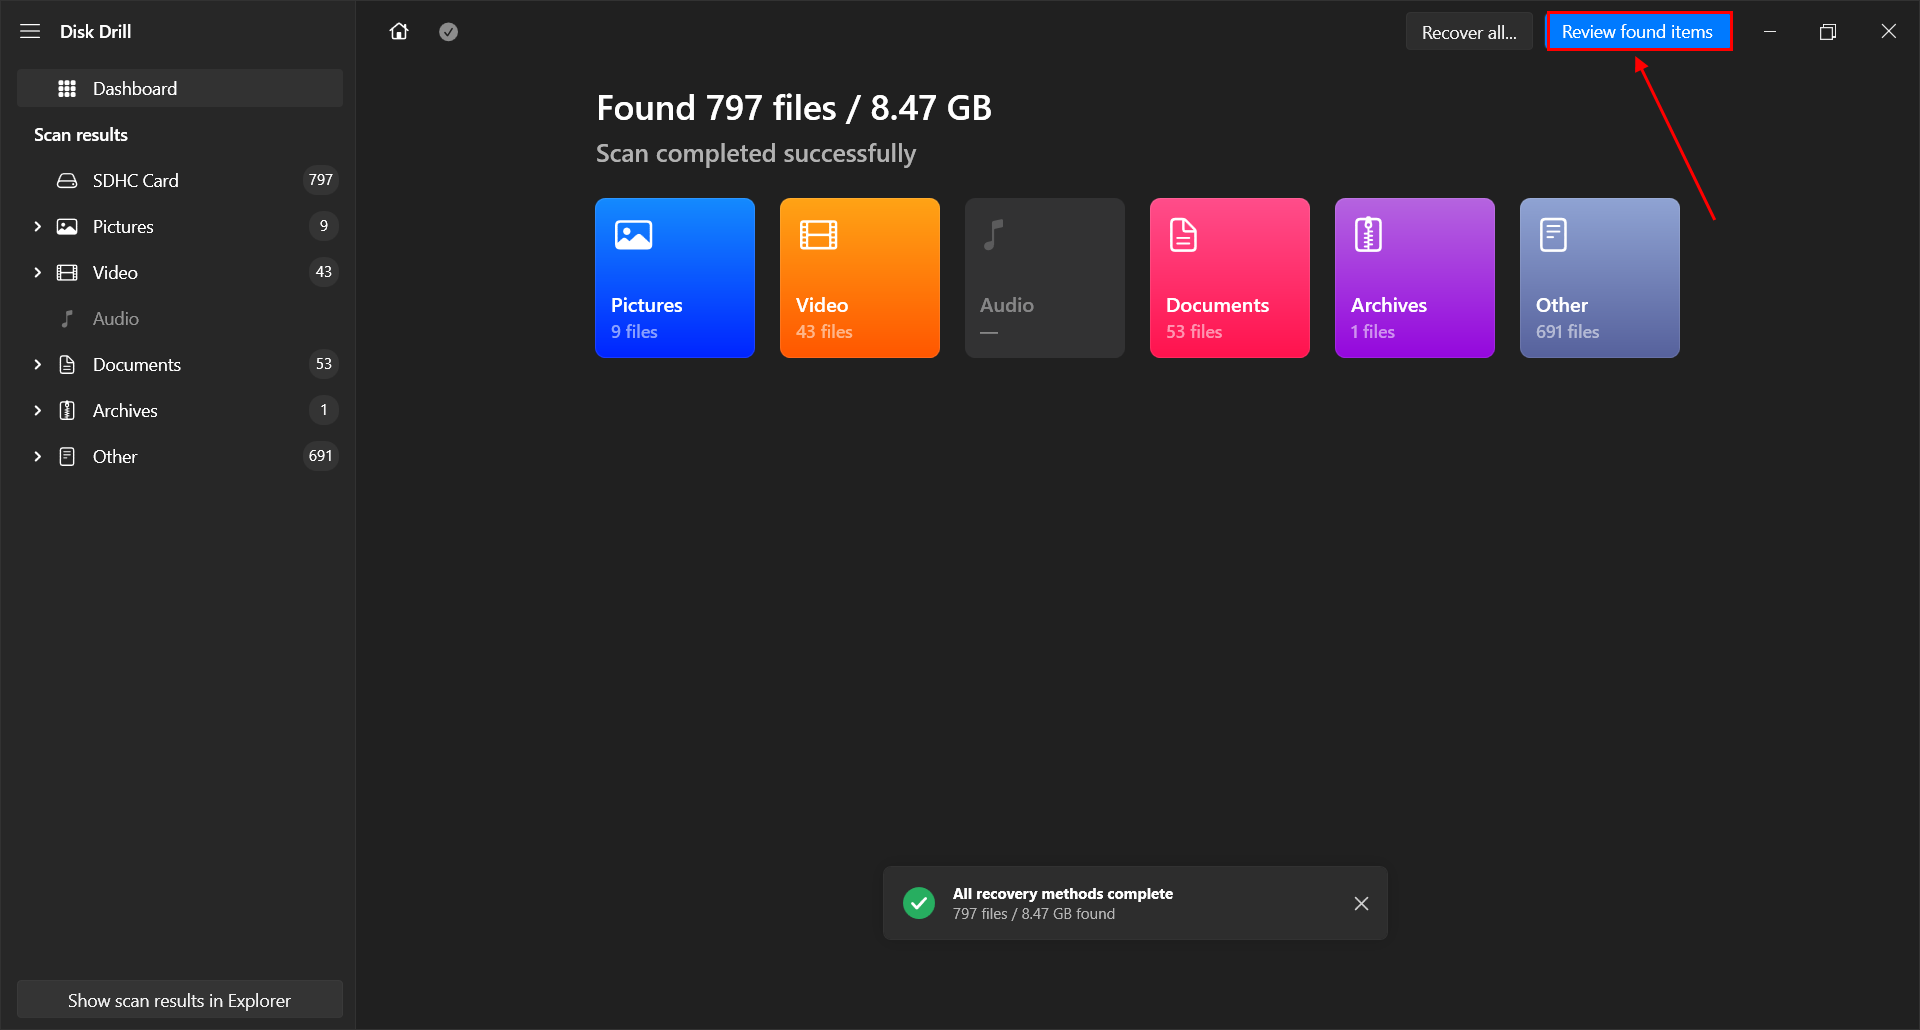
- Once the scan is complete, click Review found files.
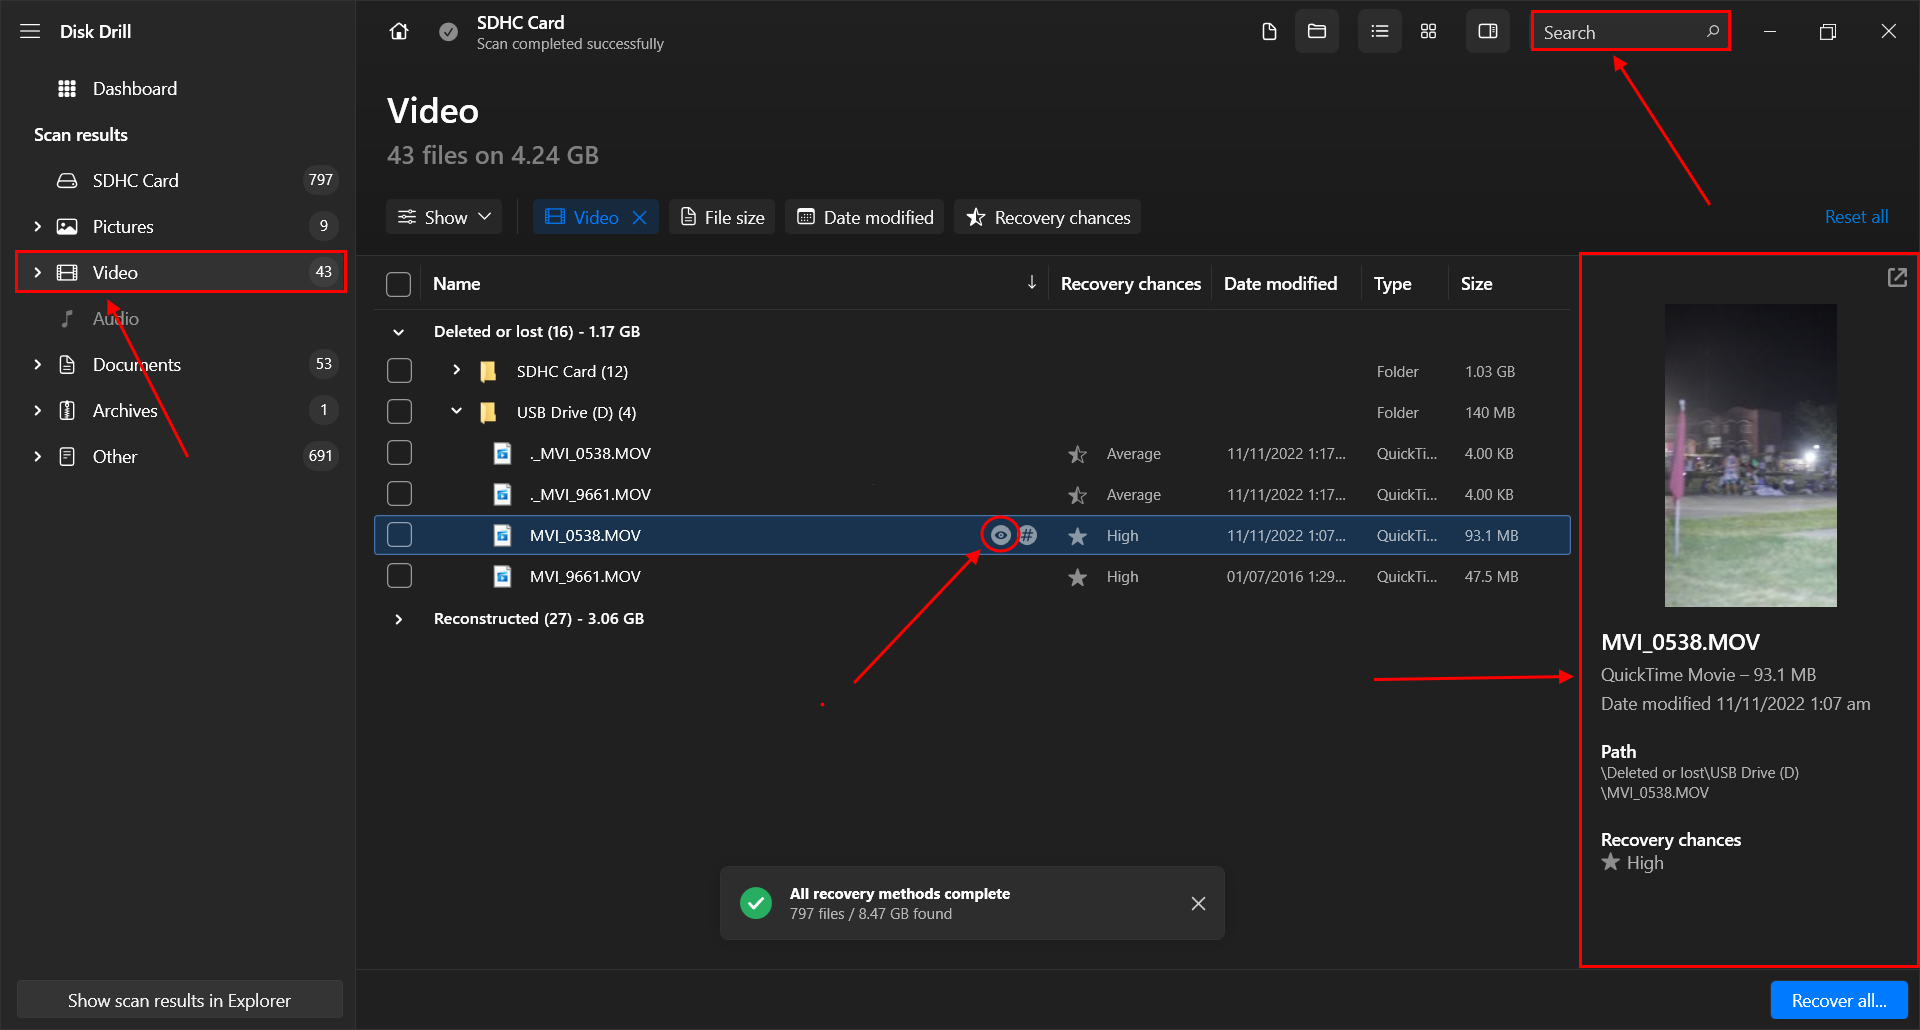
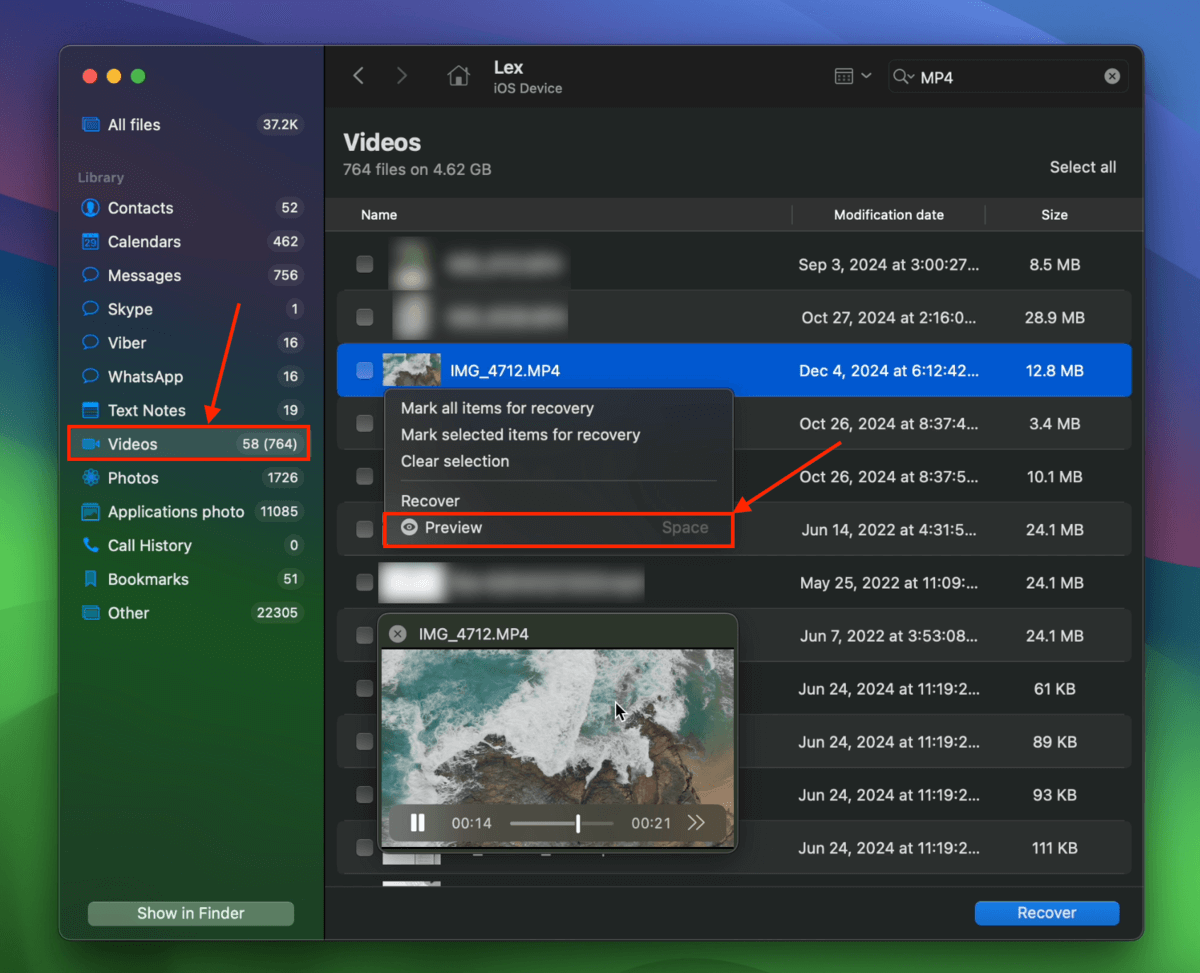
- You will see the list of recoverable files. You can look for a particular video/picture using the search bar or you can sort by file type. You can also preview them by hovering your mouse pointer to the file name and clicking the eye button that appears.
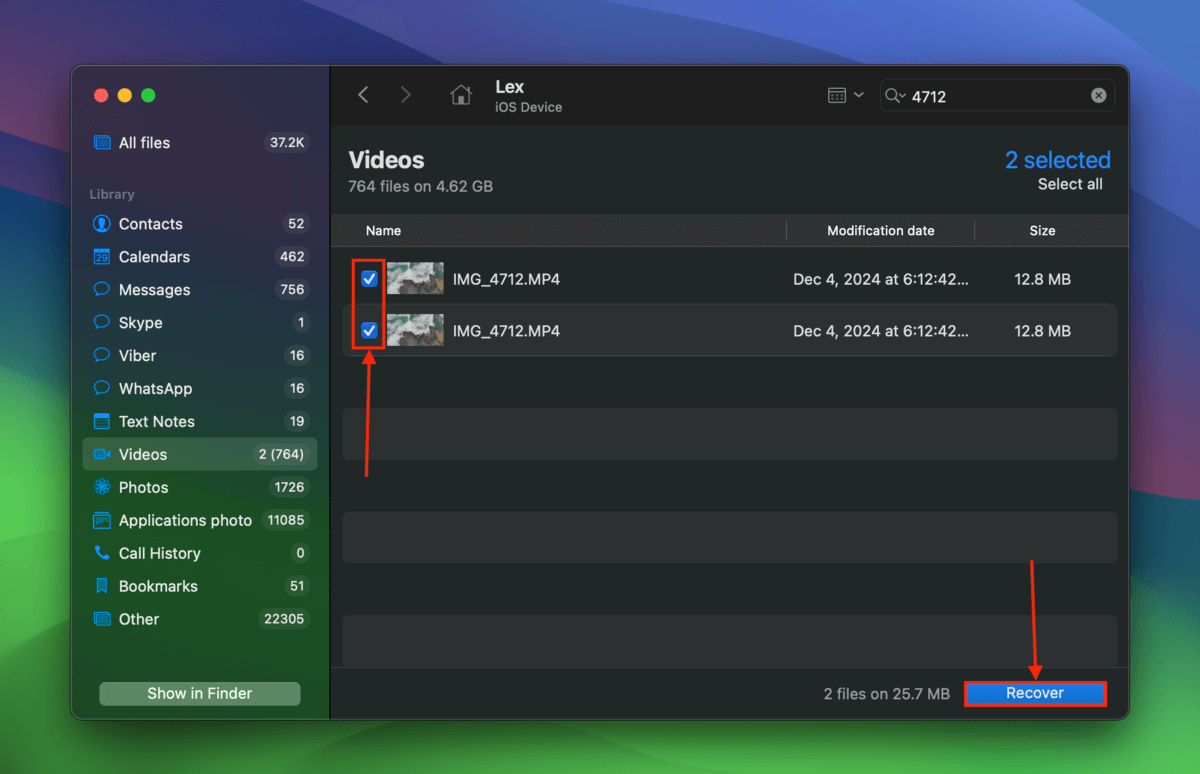
- Select the videos and pictures you want to recover. Then, click Recover. Alternatively, you can also choose to Recover All.
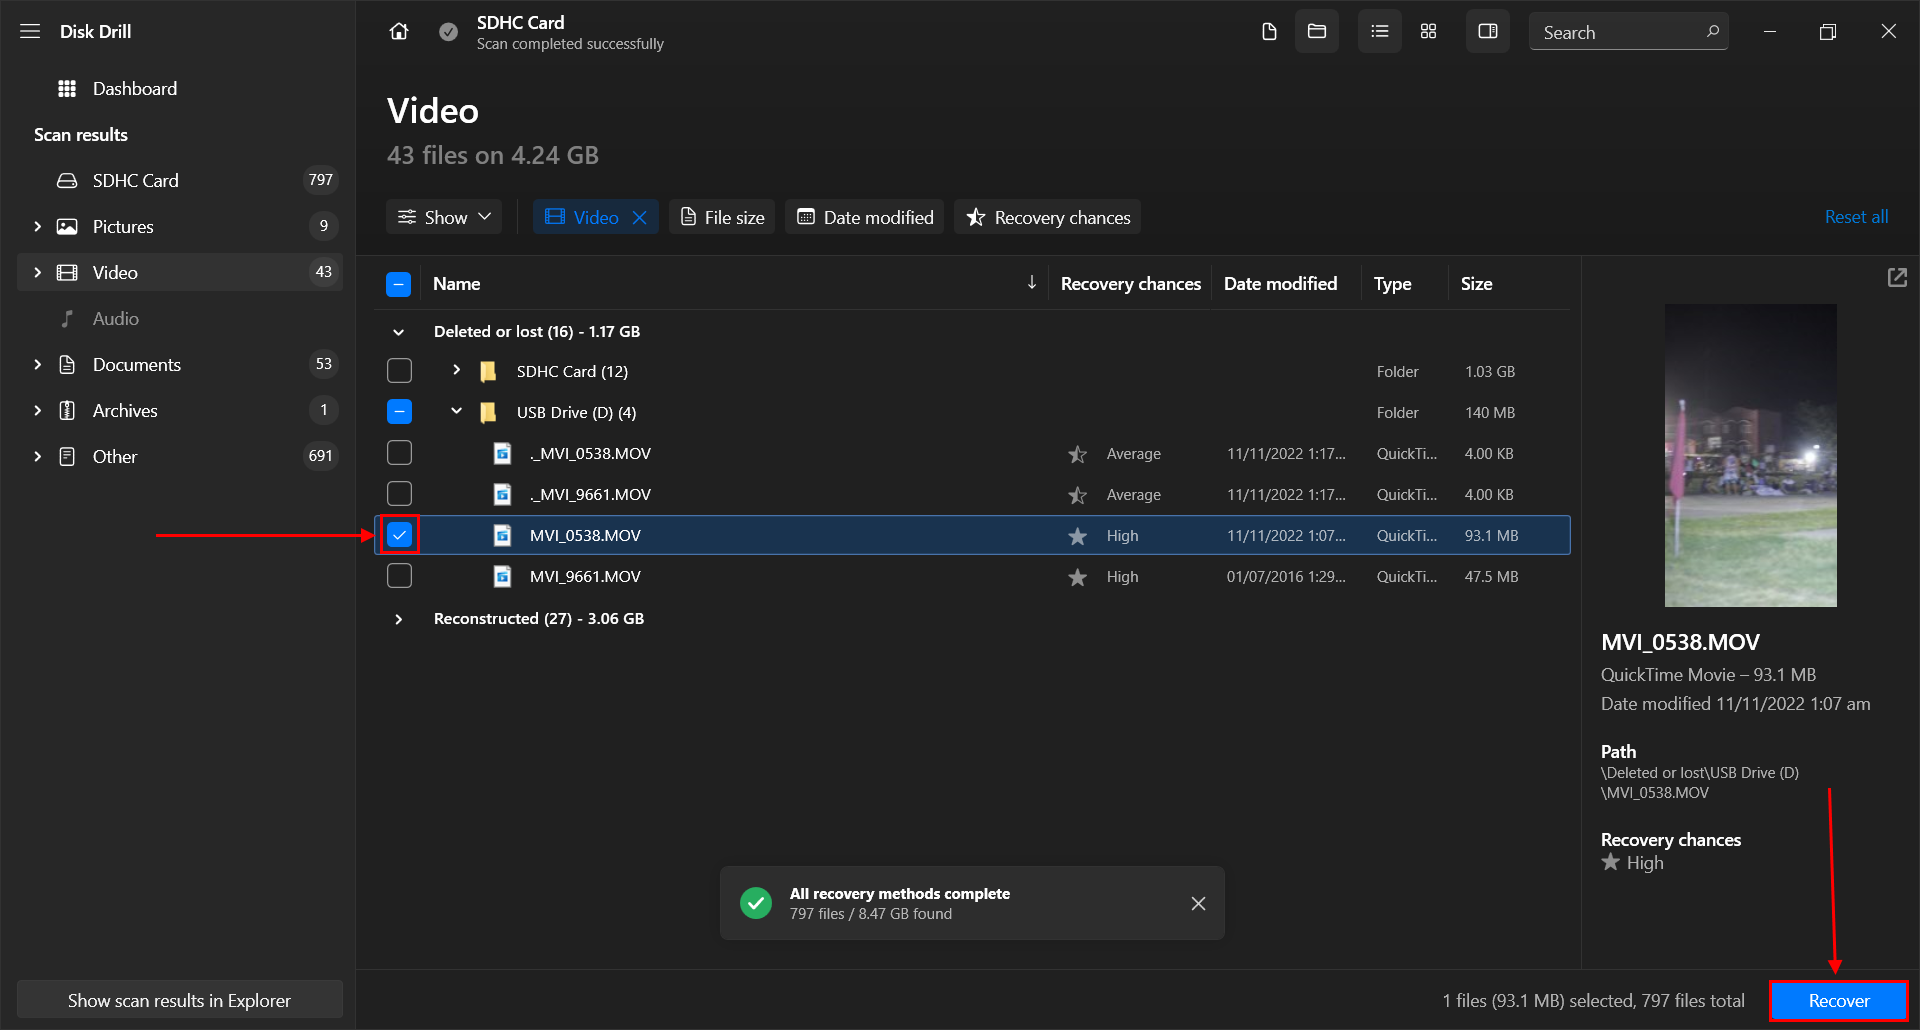
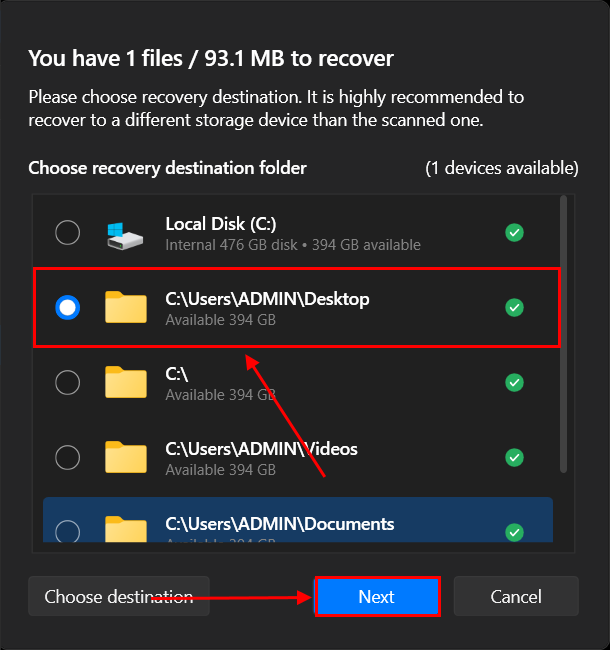
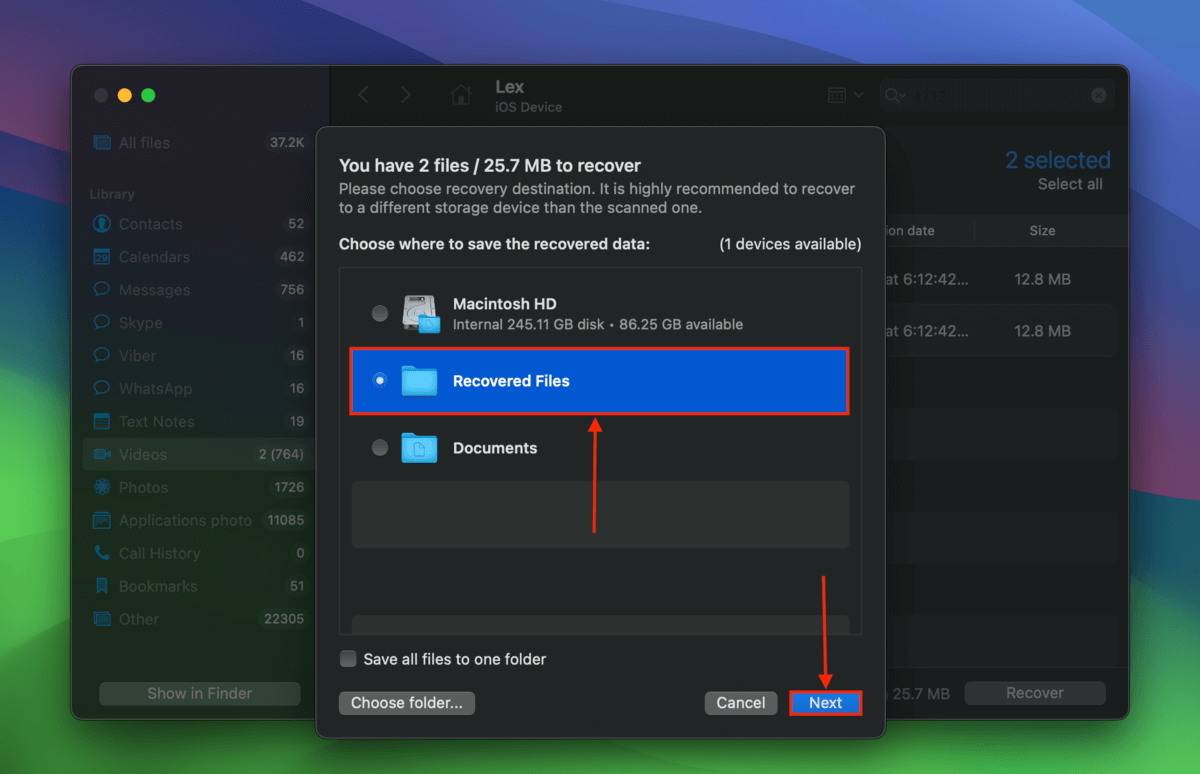
- Choose the folder where you want to store your recovered files. Ideally, it should be on a different location from the original SD card or internal storage to avoid overwriting the files. Then click Next to recover your deleted videos.
Disk Drill Basic for Windows offers 100 MB of free data recovery. That should be enough to test the software and even recover a few photos or a short video. If you want to restore more data, you’ll need to purchase a license. But before you purchase a license, you’ll be able to confirm that your data is recoverable. Free data recovery software exists, but not all of them support DJI formats and they all have their own limitations. If you want to know more about Disk Drill before installing the app on your own computer, read our full Disk Drill review.
How to Recover Deleted GoPro Footage from a Smartphone
DJI Go is a smartphone app that helps you configure and operate your drone, log flights, and share and store footage, among other things. And if your drone videos are missing from their original location, it’s possible that copies, video streams, or cache versions of the footage have been saved in the app (and, most importantly, on your smartphone’s internal disk or SD card).
In the guide below, we’ll show you 2 different ways to access your DJI GO files on your smartphone.
Method 1: Browse DJI GO Folders Using iTunes
If you use the DJI Go smartphone app with an iPhone, you can directly access DJI Go’s internal folders on your device using iTunes for Windows. We’ll show you how to access the exact folders where your footage might be.
- Connect your iPhone to your PC via a USB cable. Then, open iTunes.
- On the left sidebar under Settings, click File Sharing.
- In the Apps panel, click the DJI GO app. Then, in the DJI GO Documents panel, check the following folders for your missing drone footage: FlightRecords, videoCache, and hg300 storage.
- Select the folder where you discovered your missing drone videos. Finally, click Save to… to download the selected folder and its contents to your computer. You can opt to save multiple folders just to be sure. Once the drone videos have been downloaded to your PC, make sure they work by opening them with a media player.
Method 2: Restore Your DJI Go Data Using Data Recovery Software
If you were unable to find your missing videos in your DJI Go App folders via iTunes, they may have been deleted from your smartphone’s storage disk as well. You can use data recovery software to scan your smartphone for the video files and restore them.
We’ll demonstrate this process using an app we already used earlier – Disk Drill, which can scan both Android and iPhone devices when using the Mac version. We chose Disk Drill for this guide because it’s the easiest data recovery software to use for (and demonstrate to) beginners and it’s really good at finding and restoring videos of almost every known file signature, at least from removeable storage devices.
Recovering data from phones is a bit – well, actually, a lot – more complicated, but, most importantly, you can use the free version to scan your smartphone and fully preview your videos to make sure they work and are recoverable (many data recovery apps fall short when it comes to previewing videos in-app). That way, you’ll know whether or not it’s worth paying for recovery software.
- Download and install Disk Drill on a Mac computer.
- Connect your iPhone or Android device to the Mac. Then, open the Disk Drill app.
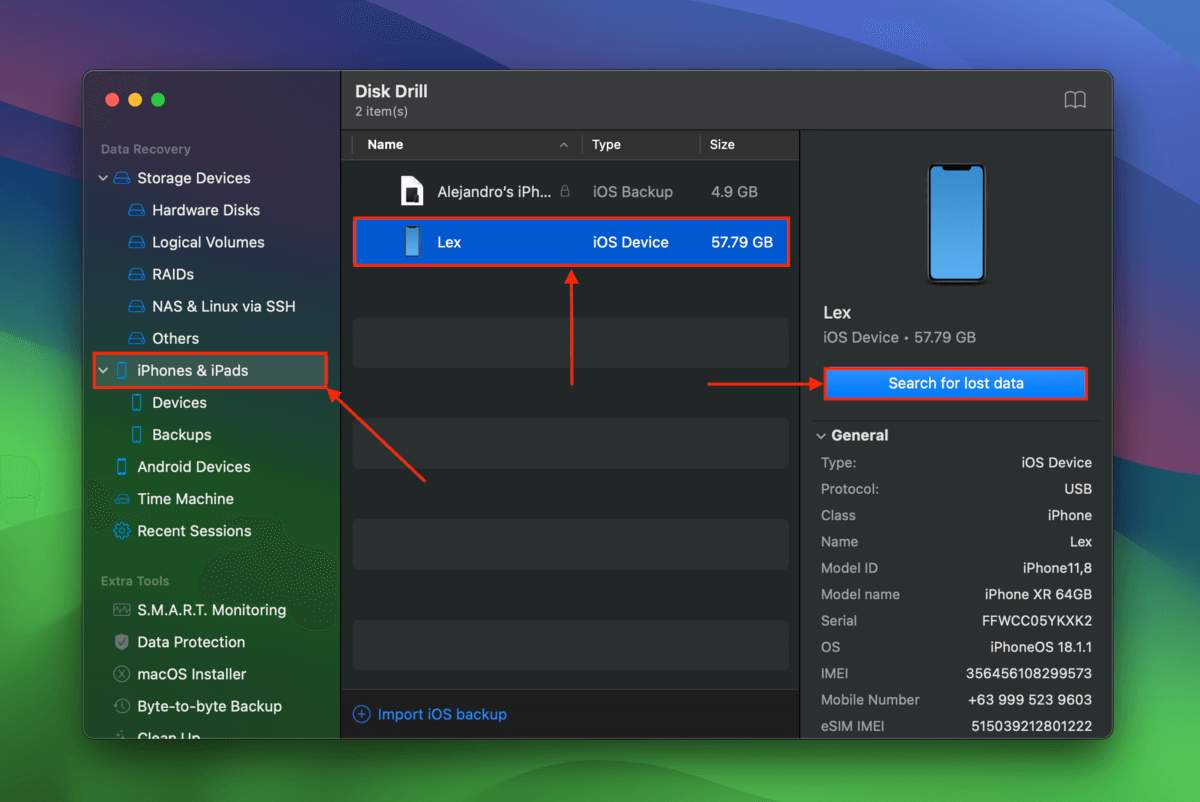
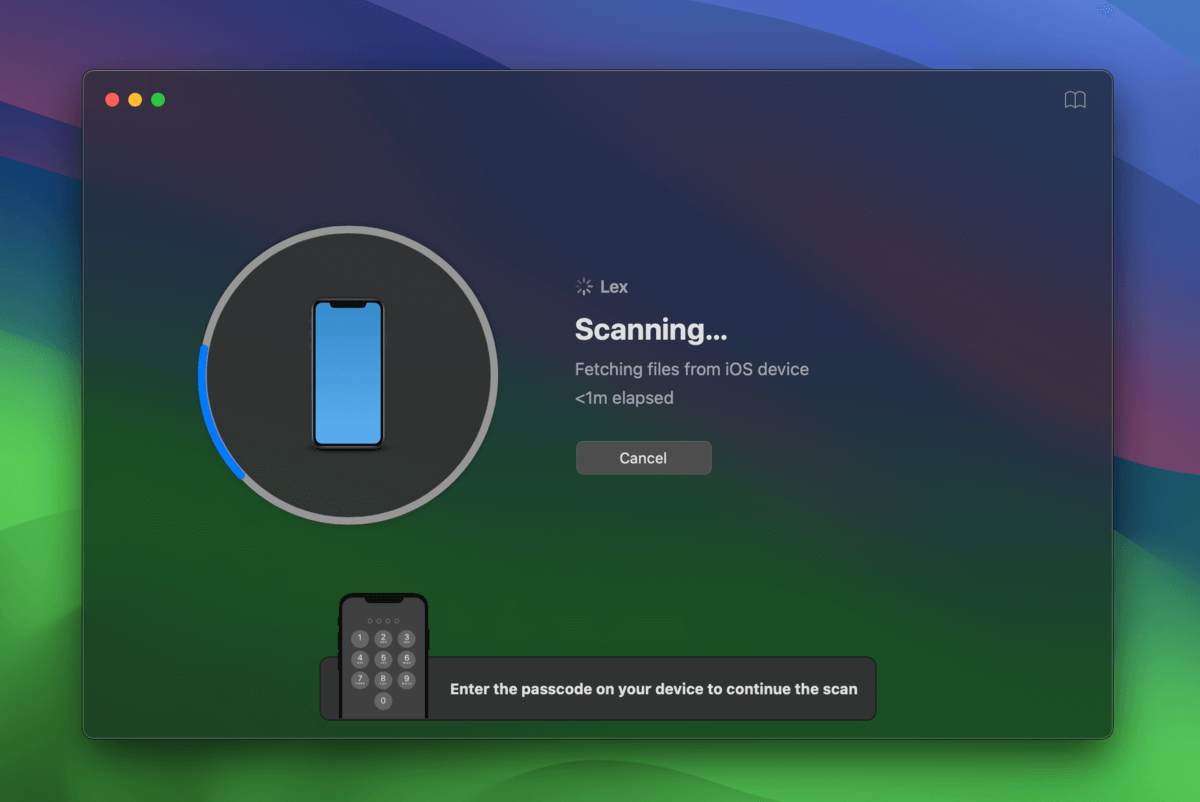
- On the left sidebar, expand the iPhones & iPads section and select Devices. Or, click Android Devices. Then, select your device from the source selection list and click Search for lost data (you may be asked later to unlock your smartphone with the unlock code (on the phone itself).
- Disk Drill may ask you to enter your lock screen pass code to proceed with the data recovery scan. Enter it on your iPhone.
- Once Disk Drill is done scanning your device, click Review found items. On the left sidebar, select the Videos filter. Before recovering your videos, make sure they work first by previewing them. Right-click the video’s file name and click Preview.
- After confirming your videos work, mark the boxes beside their file names and click the Recover button.
- Choose any folder on your Mac where you want Disk Drill to save your recovered drone footage. Finally, click Next to start saving your files.
Once Disk Drill is done with the file-saving process, you should find your videos in the location you specified in step 7. Try opening them again using a media player to ensure that Disk Drill saved your files properly.
If you opted to expand your DJI GO app storage using an SD card (e.g. “Cache to SD card” option), you can use the Windows version of Disk Drill to scan the SD card itself and potentially recover your data for free (if you don’t find any videos in your smartphone’s internal disk).
If you need to scan an iOS or Android device on Windows, we recommend checking out FoneLab’s products. That said, when you’re recovering anything from a phone, keep your expectations low. The best results usually come from a memory card, other removable storage, or a PC’s internal drive—so long as it isn’t an SSD.
Tips to Prevent DJI Drones Data Loss
When it comes to data preservation, it’s much more effective to prevent potential corruption and data loss than it is to resolve it. In this section, we prepared 5 tips to help you prevent data loss as much as possible, based on how we know SD cards and drones work.
These simple tips will show you how to get rid of underlying logical damage (which can eventually cause data loss when left unchecked), rebuild your memory card’s file system with 100% integrity, and perform basic due diligence checks.
Tip #1: Fix Errors on the Drone’s SD Card Using CHKDSK
If you have recently noticed weird behavior from your SD card (e.g. disappearing files, you’re having a hard time safely ejecting it, opening it in File Explorer causes system lag, etc.), then corruption is a distinct possibility.
It’s also possible for your SD card to sustain minor file system issues and other errors without you noticing them if you’re not looking (because you’d still be able to capture footage in many cases). For these reasons, we recommend that you proactively (and regularly) perform scan and repair operations on your memory card if you use it often.
CHKDSK is a command line tool that can automatically scan and repair minor errors on any internal and external disk (like your SD card). If you’ve never used Command Prompt before, don’t worry! CHKDSK only takes one command to run.
- Safely eject your SD card from your DJI drone. Then, insert it into your PC using the appropriate adapter.
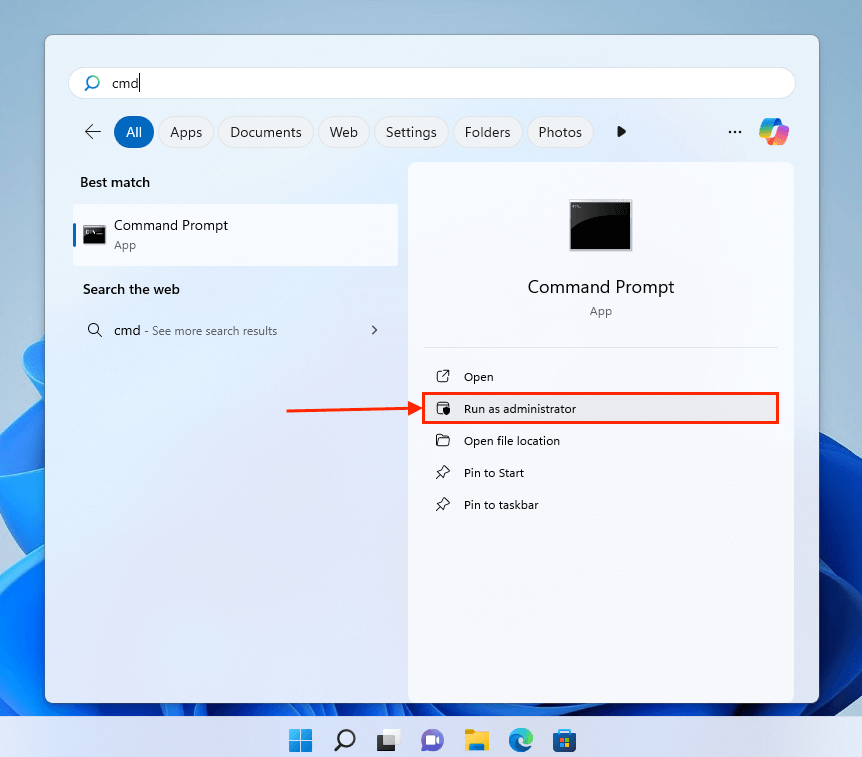
- In the Start Menu search box, type “cmd” to search for the Command Prompt program. Then, click Run as administrator beneath it (confirm if prompted).
- The next command will run CHKDSK on your SD card with the /f parameter, which adds a repair functionality to the CHKDSK scan.
chkdsk G: /f
Replace G: with the drive letter assigned to your SD card.
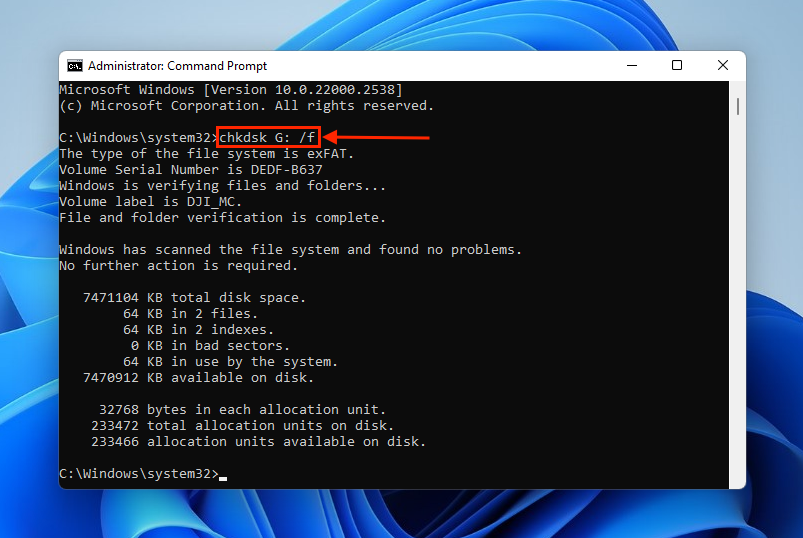
- The Command Prompt window will display the progress of the scan and repair process, whether or not it found any errors, and whether or not it succeeded in repairing them.
If you notice weird behavior on your SD card even after running CHKDSK, try running it again with the /r parameter instead of /f (which executes everything /f does and locates bad sectors as well).
Caution: CHKDSK may behave unpredictably and could lead to data loss. Proceed carefully.
Tip #2: Create Backups of Your Footage
Depending on your drone, you can use the DJI GO app, DJI GO 4 app, or the DJI Fly app. These apps can be installed on your phone or tablet and will wirelessly download your videos from the drone. DJI Fly also offers Quick Transfer Mode, which lets you download 4K videos with up to a 20 MB/s transmission rate. Make it a habit to back up your footage every time you use your DJI drone and enable cache video recording for extra security.
You can also connect your drone’s SD card to your computer and transfer videos and photos manually in their original quality.
Tip #3: Format Your Memory Card Properly
Formatting a storage device is the process of building its file system to prepare it for reading and writing data, as well as communicating with the devices it will be inserted into.
Not only does formatting allow you to select the optimal file system for your SD card (if you haven’t already), but it also builds the new file system from the ground up. This ensures that your SD card will have no integrity issues that can cause conflicts or corruption down the line.
To make room for the memory card’s new file system, any files stored on the device are deleted. This helps eliminate viruses or corrupted data that may cause problems in the future.
In this guide, we’ll specifically demonstrate how to do a Full Format, which ensures complete and permanent erasure at the disk level.
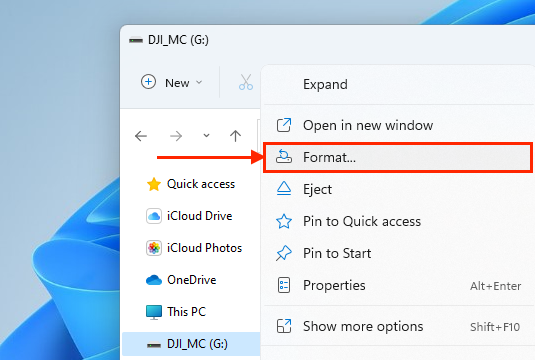
- Connect your memory card to your PC using the appropriate adapter.
- Open File Explorer. On the left sidebar, right-click your SD card and click Format.
- Choose a new label for your SD card and select ExFat as its new file system. Keep the box beside Quick Format unchecked. Finally, click Start to begin the process.
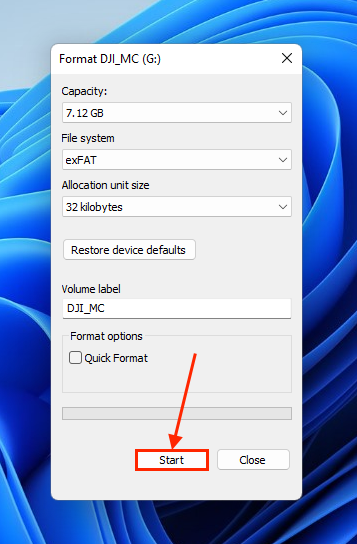
Once the formatting process is complete, your SD card should reappear in File Explorer’s sidebar. Try copying new files to and from the newly formatted SD card to make sure it works.
Tip #4: Use Recommended Memory Cards
Each DJI drone model has its own SD card recommendations with certain brands and specs. You can check the official DJI site and scope out each product’s page for more info about your specific drone’s model.
Tip #5: Always Check Your DJI Drone’s Batteries (Important)
Sudden shutdowns are one of the most common causes of data loss and other forms of logical damage (like corruption). This is because all devices follow a standard operating procedure when shutting down, which ensures that all read and write operations have properly concluded.
And if your drone shuts down while it’s capturing footage, it will have been unable to write the video’s metadata (or “Moov Atom”). This causes corruption and will make your video unplayable.
While there are ways to fix corrupted videos (including the exact scenario I just mentioned), there’s always a chance that repair attempts will fail. In other words, it’s better to lower the risk as much as possible.
FAQ
How do I recover my drone footage?
To recover your drone footage, use video recovery software:
- Connect your DJI drone’s SD card to your PC or Mac.
- Download, install, and launch the data recovery software of your choice.
- Select the SD card and run a scan.
- Select the videos you want to recover (if your tool supports selective recovery), then follow the remaining recovery steps.
- Choose a destination folder and recover your DJI drone footage.
How to repair corrupted DJI video files?
If your DJI drone videos have been corrupted (even if you have successfully recovered them), they will be unplayable. Fortunately, there are ways to repair corrupted videos using free and simple tools, which we cover in our guide on how to fix corrupted DJI files.
But if you want something easy you can try right now, we recommend the Clever Online Video Repair web app – you can quickly try fixing your video with just a few clicks and it’s free for files up 5 GB in size.
Is It possible to recover files from DJI drone's internal memory?
Yes, it’s possible to recover files from DJI drone’s internal memory by connecting it to your computer using a USB cable and running data recovery software. However, your computer should recognize your drone as a “mass storage device”.
Where does DJI fly store video?
In most smartphones, DJI Fly stores your videos in this location path: Internal Storage > DJI > dji.go.v5 > DJI FLY > Video. Some users have found theirs here: Phone > Android > data > dji.go.v5 > files > MediaCaches.
What is the difference between DJI GO and DJI Fly?
The main difference among DJI apps lies in the drones they are compatible with. DJI GO works for older models like the Phantom 3 series, Inspire 1, Mavic 2 Pro, Mavic Air 1, Matrice series, and OSMO Mobile series. In 2016, the company released DJI GO 4, which is compatible with DJI Inspire, DJ Inspire 2, DJI Mavic Pro, DJI Mavic Pro 2, DJI Mavic 2 Zoom, DJI Phantom 4, and DJI Phantom 4 Pro. On the other hand, DJI Fly is compatible with Mavic 3 series, Mavic Mini, Mavic Air 2, DJI Air 2S, DJI FPV, DJI Avata, and the Mini series.
Conclusion
Recovering deleted DJI photos and video footage is possible and even likely under the right circumstances. However, there may be times when the logical and/or physical damage to either the drone or its memory card will be too severe for recovery. To avoid the consequences of data loss, we strongly urge you to use the DJI GO/GO 4/Fly app to back up your data or manually copy and paste your files from your SD card to your computer every time you use it.
This article was written by Alejandro Santos, a Staff Writer at Handy Recovery Advisor. It was also verified for technical accuracy by Andrey Vasilyev, our editorial advisor.
Curious about our content creation process? Take a look at our Editor Guidelines.