File systems play a crucial role in organizing and managing your data. NTFS and FAT32 are both commonly used file systems–each with its unique strengths and limitations. FAT32 offers better compatibility with older devices, and you may find yourself wanting to switch to it from NTFS. In this step-by-step guide, we’ll explore how to convert an NTFS drive to FAT32, without losing data.
Converting NTFS to FAT32: Available Options
Converting a drive to FAT32 entails changing its file system. The previous file system is removed (NTFS) and the drive is reformatted to the new file system, i.e., FAT32.
Before switching the file system to FAT32, keep in mind that it supports a maximum partition size of 2 TB and an individual file size of up to 4 GB. If you want to convert a larger drive, consider splitting it into two or more partitions, then converting those to FAT32. For files that are larger than 4 GB, move them somewhere else before conversion. You can also compress or split these files to copy them to the FAT32 partition or drive.
There are several ways to convert your drive from NTFS to FAT32 without data loss. Use the table below as a guide:
Method |
Description |
Use Disk Management to shrink partitions with unused storage space and create a new volume with the FAT32 file system. |
Essentially, you’ll create a new FAT32 partition using the unused space on your hard drive. Your existing files will not be impacted in any way. You can transfer files to the FAT32 partition and convert the rest of the disk by repeating the process. However, the other partitions will have lesser storage space after using this method. |
Use Disk Drill to create a backup of your drive, format the drive to FAT32 using CMD or Windows Explorer, and then use Disk Drill to restore the data. |
In this method, you’ll create a soft copy (disk image) of your drive or partition before formatting it to FAT32. This way you can retain and recover all your data, even if there’s a mishap during the actual formatting process. The method works fine even if you face any issues getting the drive recognized. You can use this method to convert external storage drives such as pen drives and SD cards to FAT32 as well. Alternatively, for properly working drives, you can simply move your files to a safe place on another drive, format your drive to FAT32 using Windows, and then copy the files back to your drive. |
Download AOMEI Partition Assistant to convert the drive from NTFS to FAT32. |
This method lets you convert your drive from NTFS to FAT32 without creating a backup or reformatting it using Windows utilities. But, you could lose your data if the process is interrupted or fails. Additionally, if your drive contains files larger than 4 GB, they could be corrupted during the conversion process. |
Use Disk Drill to recover your data if formatting failed or was interrupted. |
If you already attempted FAT32 conversion, and it failed or was canceled, you can still use Disk Drill to recover some, if not all of your data. |
How to Convert NTFS to FAT32 Without Losing Data
There are four ways to convert your drive from NTFS to FAT32 without losing data. Regardless of the method you use, we recommend creating a disk image of your drive to protect against data loss in case the process fails or is interrupted. To learn how, take a look at method 2 below.
Method 1: Convert a Drive from NTFS to FAT32 Using AOMEI Partition Assistant
A popular name in disk management and data recovery, the AOMEI Partition Assistant lets you convert your disk from NTFS to FAT32 within a few clicks. You can use the tool to bypass the 32 GB FAT32 conversion limit in Windows.
Here’s a step-by-step guide on converting a drive from NTFS to FAT32 using the AOMEI Partition Assistant:
- Download AOMEI Partition Assistant and install it.
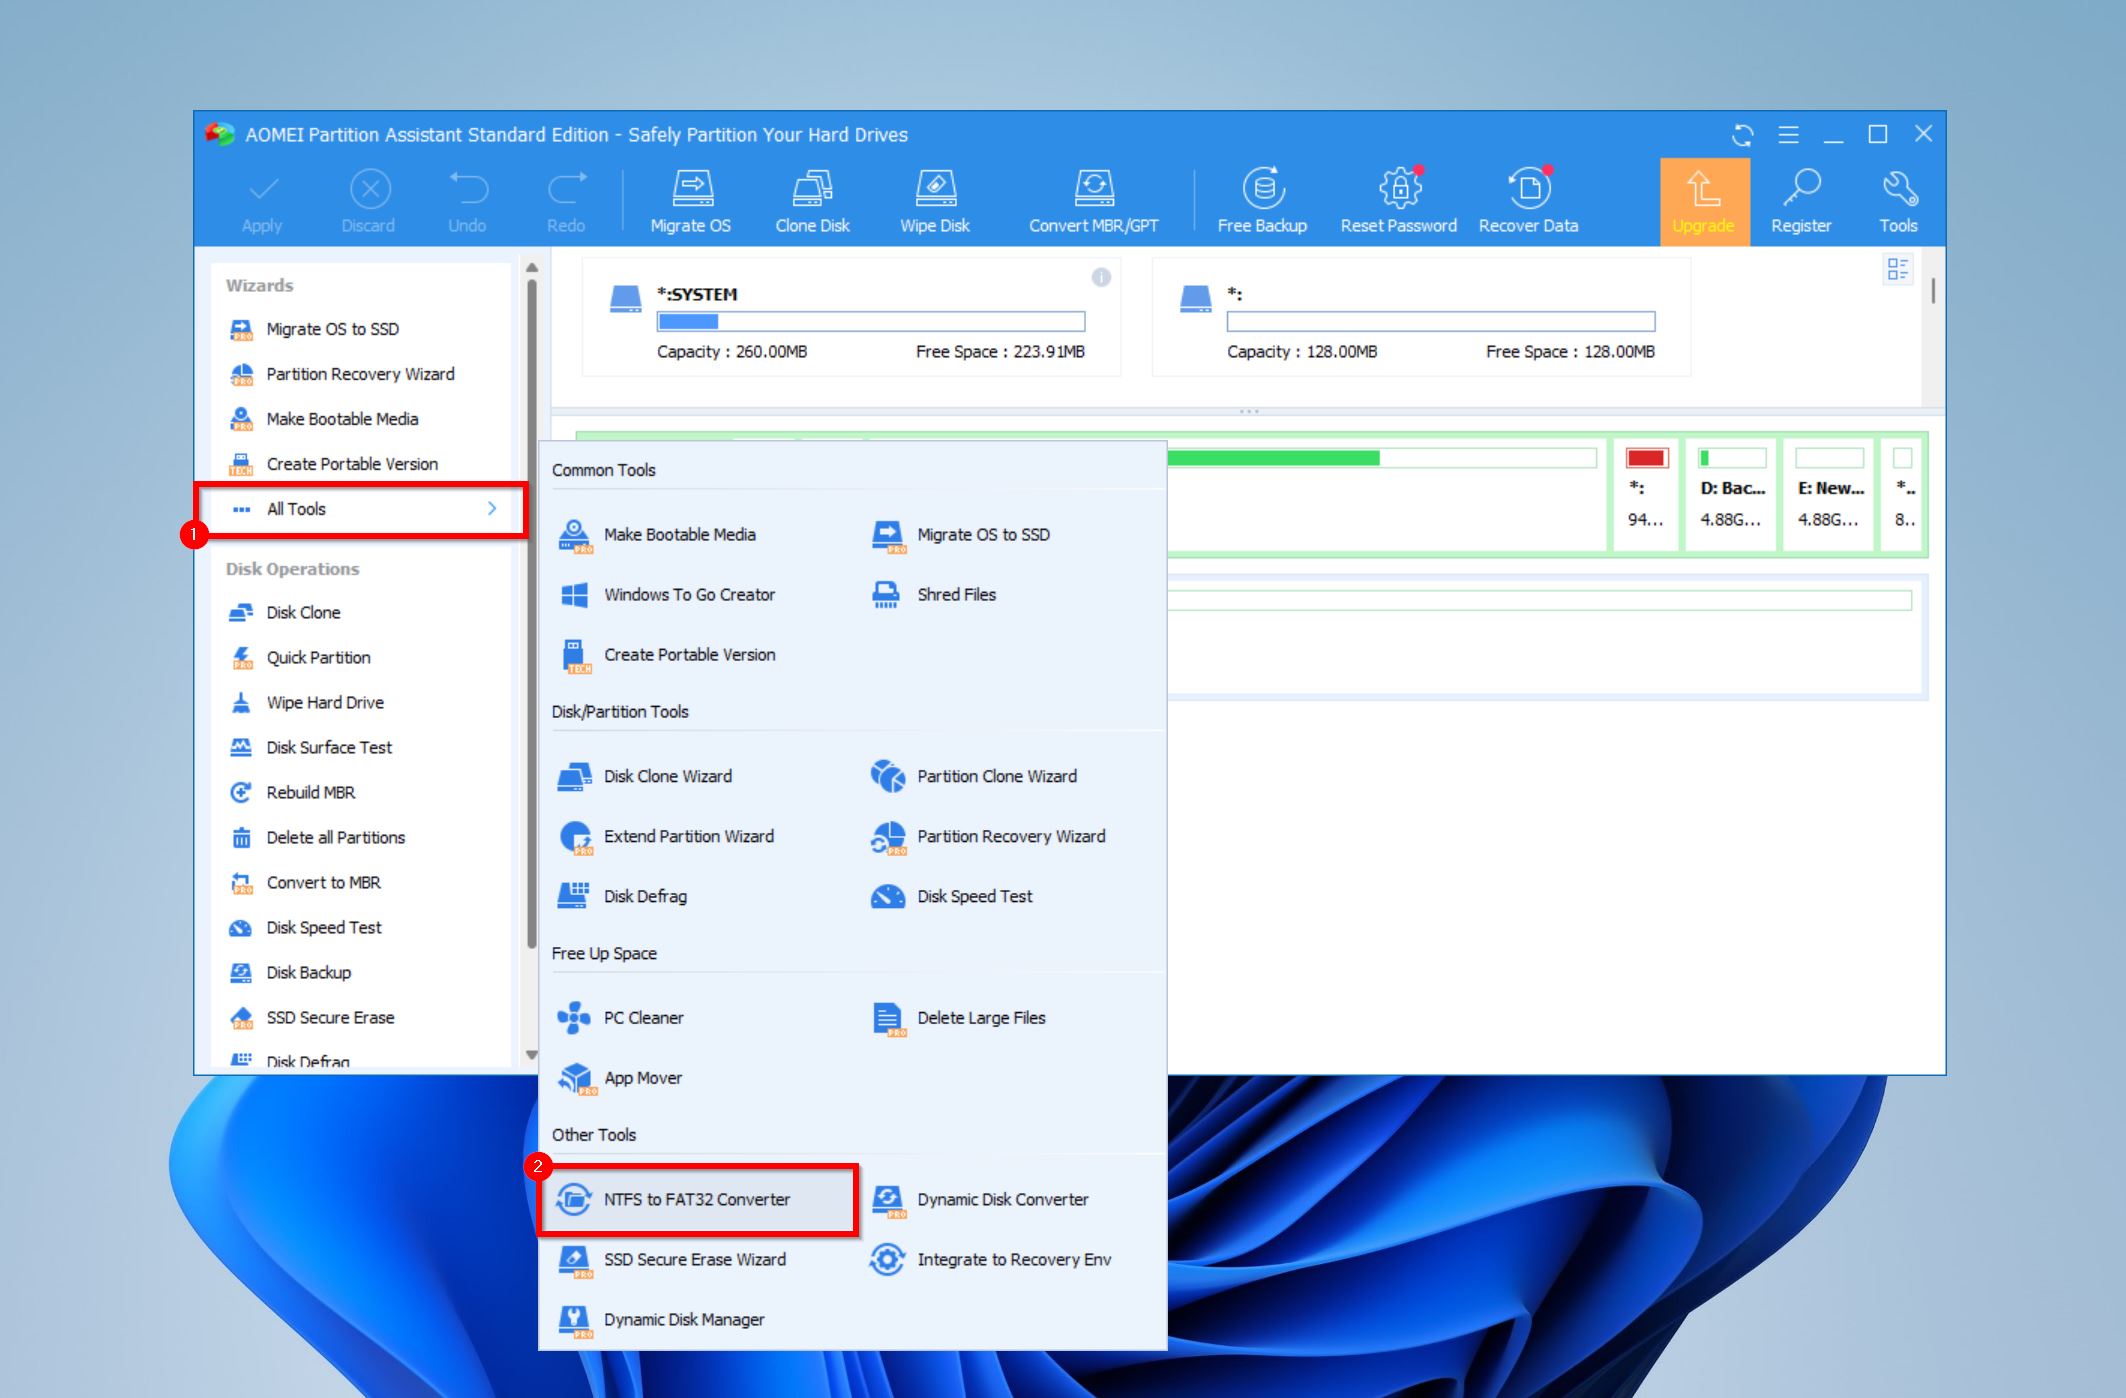
- Launch the program, click on All Tools, and then select NTFS to FAT32 Converter.
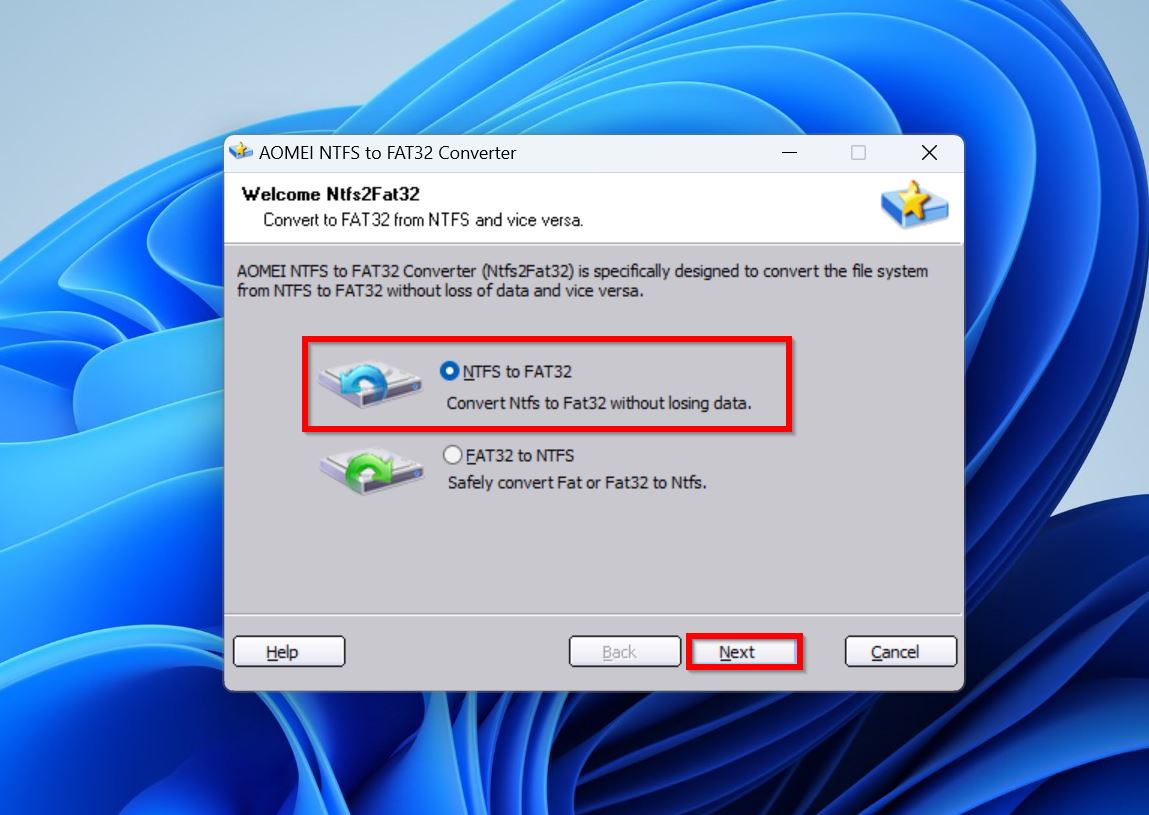
- Select the NTFS to FAT32 option in the wizard. Click Next.
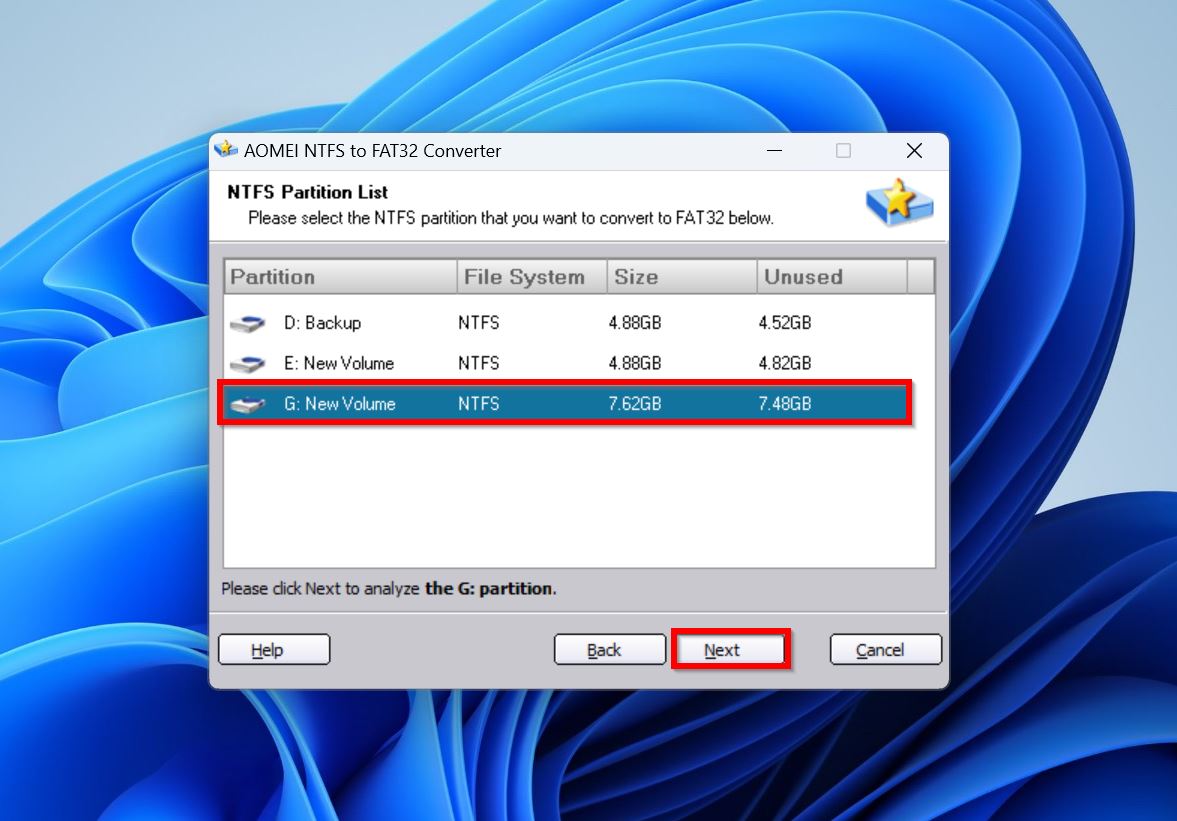
- Choose the drive you want to convert from NTFS to FAT32 and click Next.
- Finally, click Proceed and then select Yes to begin the conversion process.
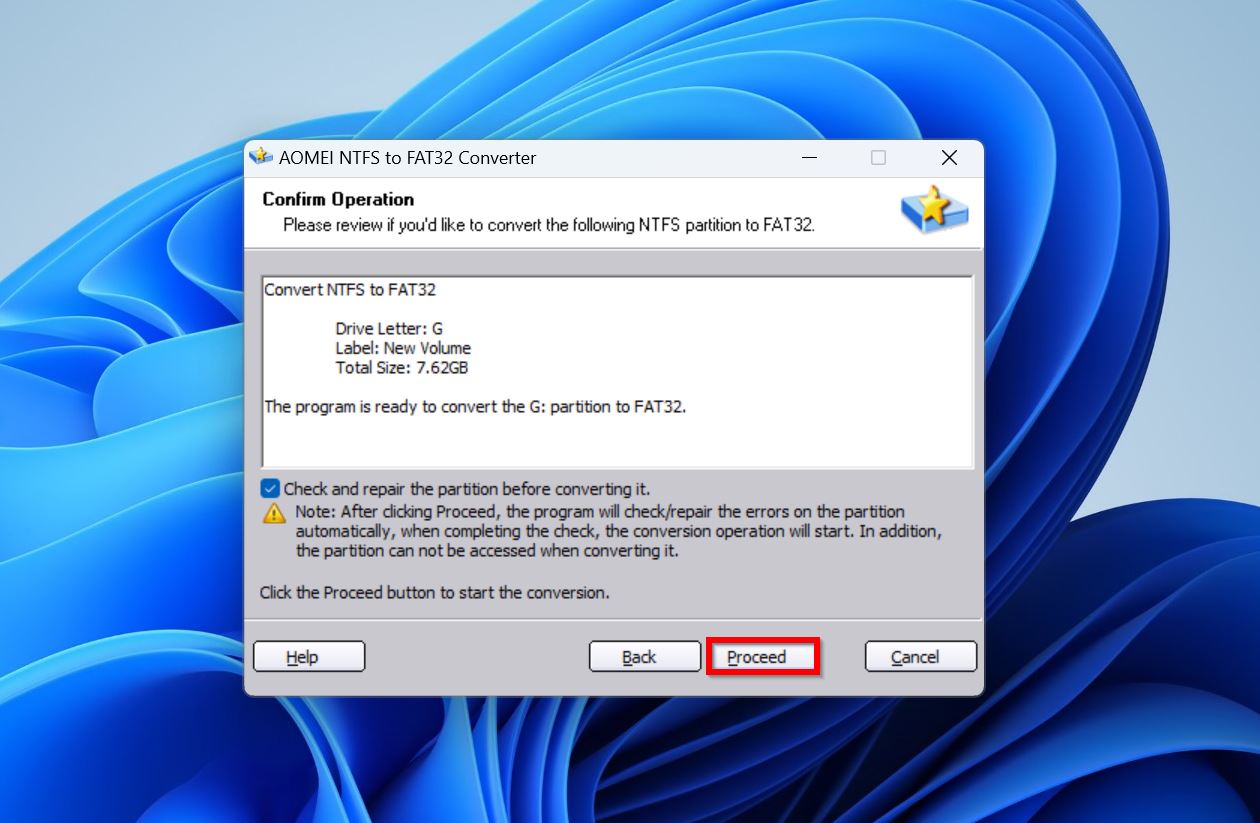
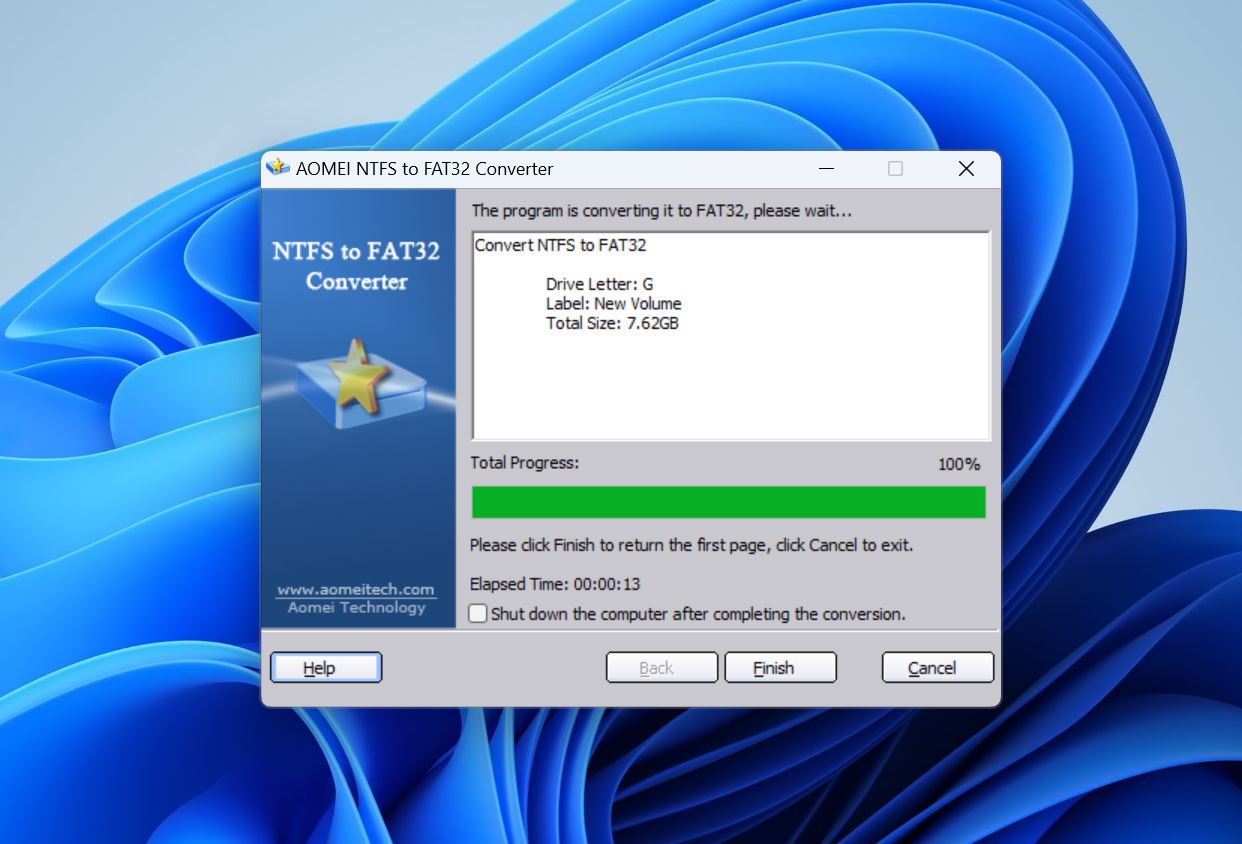
- AOMEI Partition Assistant will convert the drive to FAT32.
Method 2: Protect Your Data With Disk Drill and Change the File System With Native Windows Solutions
When using in-built Windows utilities, it’s impossible to convert the drive from NTFS to FAT32 without formatting. These methods will cause data loss. To retain your files, it’s best to create a disk image of the drive before conversion, and then pull out your data once the conversion is complete.
Does all this sound complicated? Well, it’s not. Thanks to third-party data recovery and backup utilities like Disk Drill.
The program offers the convenience of being able to create disk images and scan them within one interface. Disk Drill’s modern UI, coupled with a wizard-based approach, makes the image creation and data recovery process simple.
Regarding functionality, Disk Drill supports all types of storage devices including internal HDDs, external hard drives, pen drives, SD cards, and more. The program is versatile, and its advanced data recovery algorithm will be able to detect and recover data from all major file systems (NTFS, FAT32, HPFS, exFAT, and more).
Here’s how to convert your drive from NTFS to FAT32 without losing data using CMD or Windows Explorer in combination with Disk Drill:
Step 1. Create a Byte-to-Byte Copy of Your Hard Drive
- Download Disk Drill and install the program.
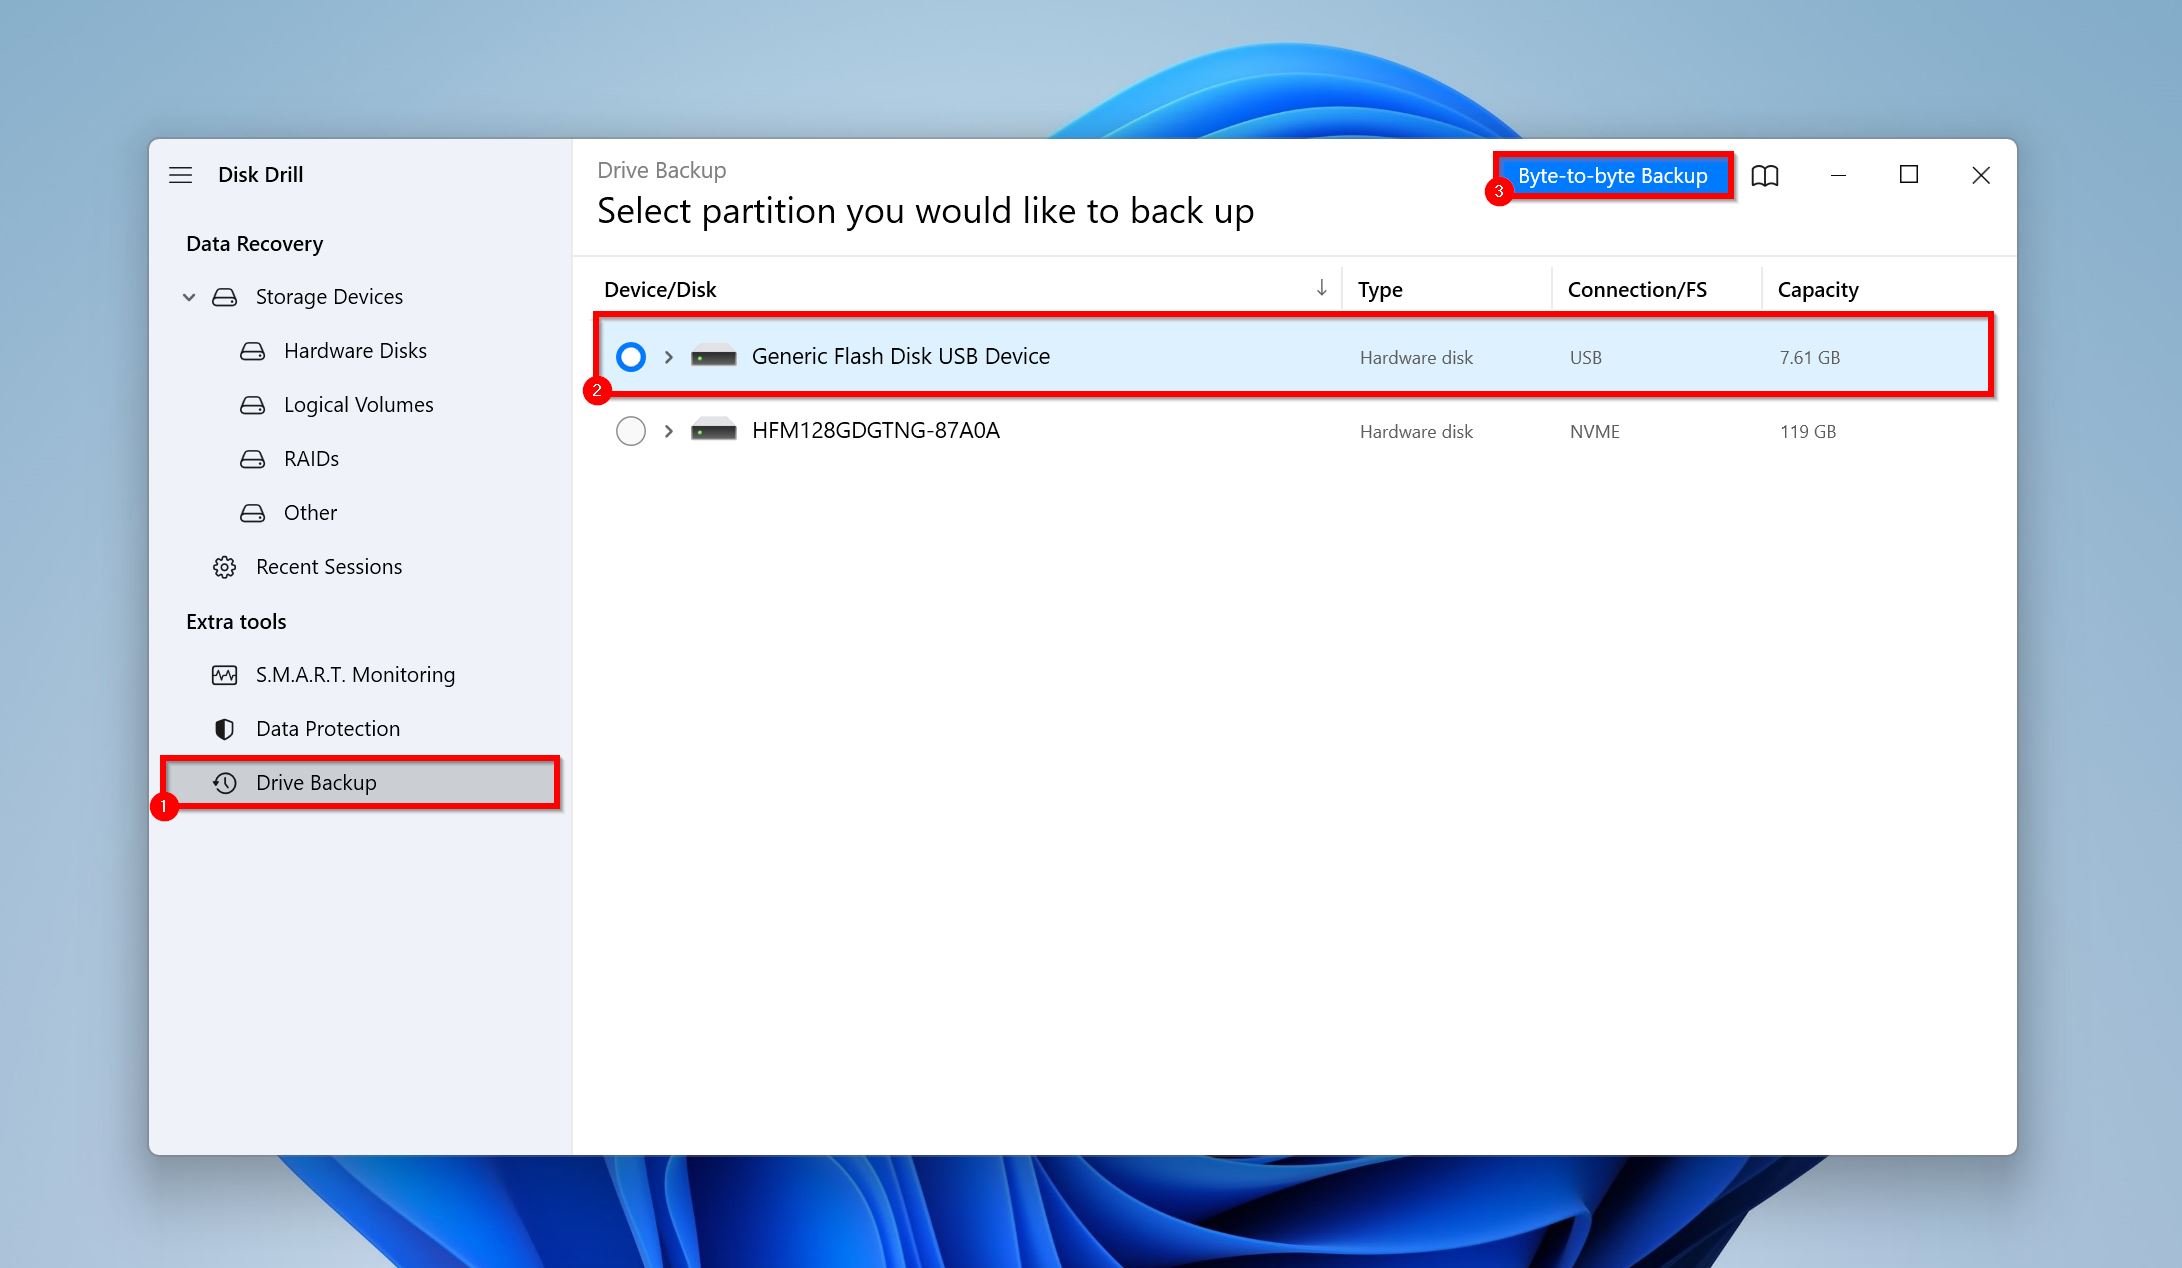
- Open the program, and click on the Drive Backup option under Extra Tools.
- Select the drive you want to convert from NTFS to FAT32 and click on the Byte-to-byte Backup button.
- Choose where you wish to save the disk image. The destination drive must have free space equivalent to or more than the storage capacity of the selected drive. Click OK.
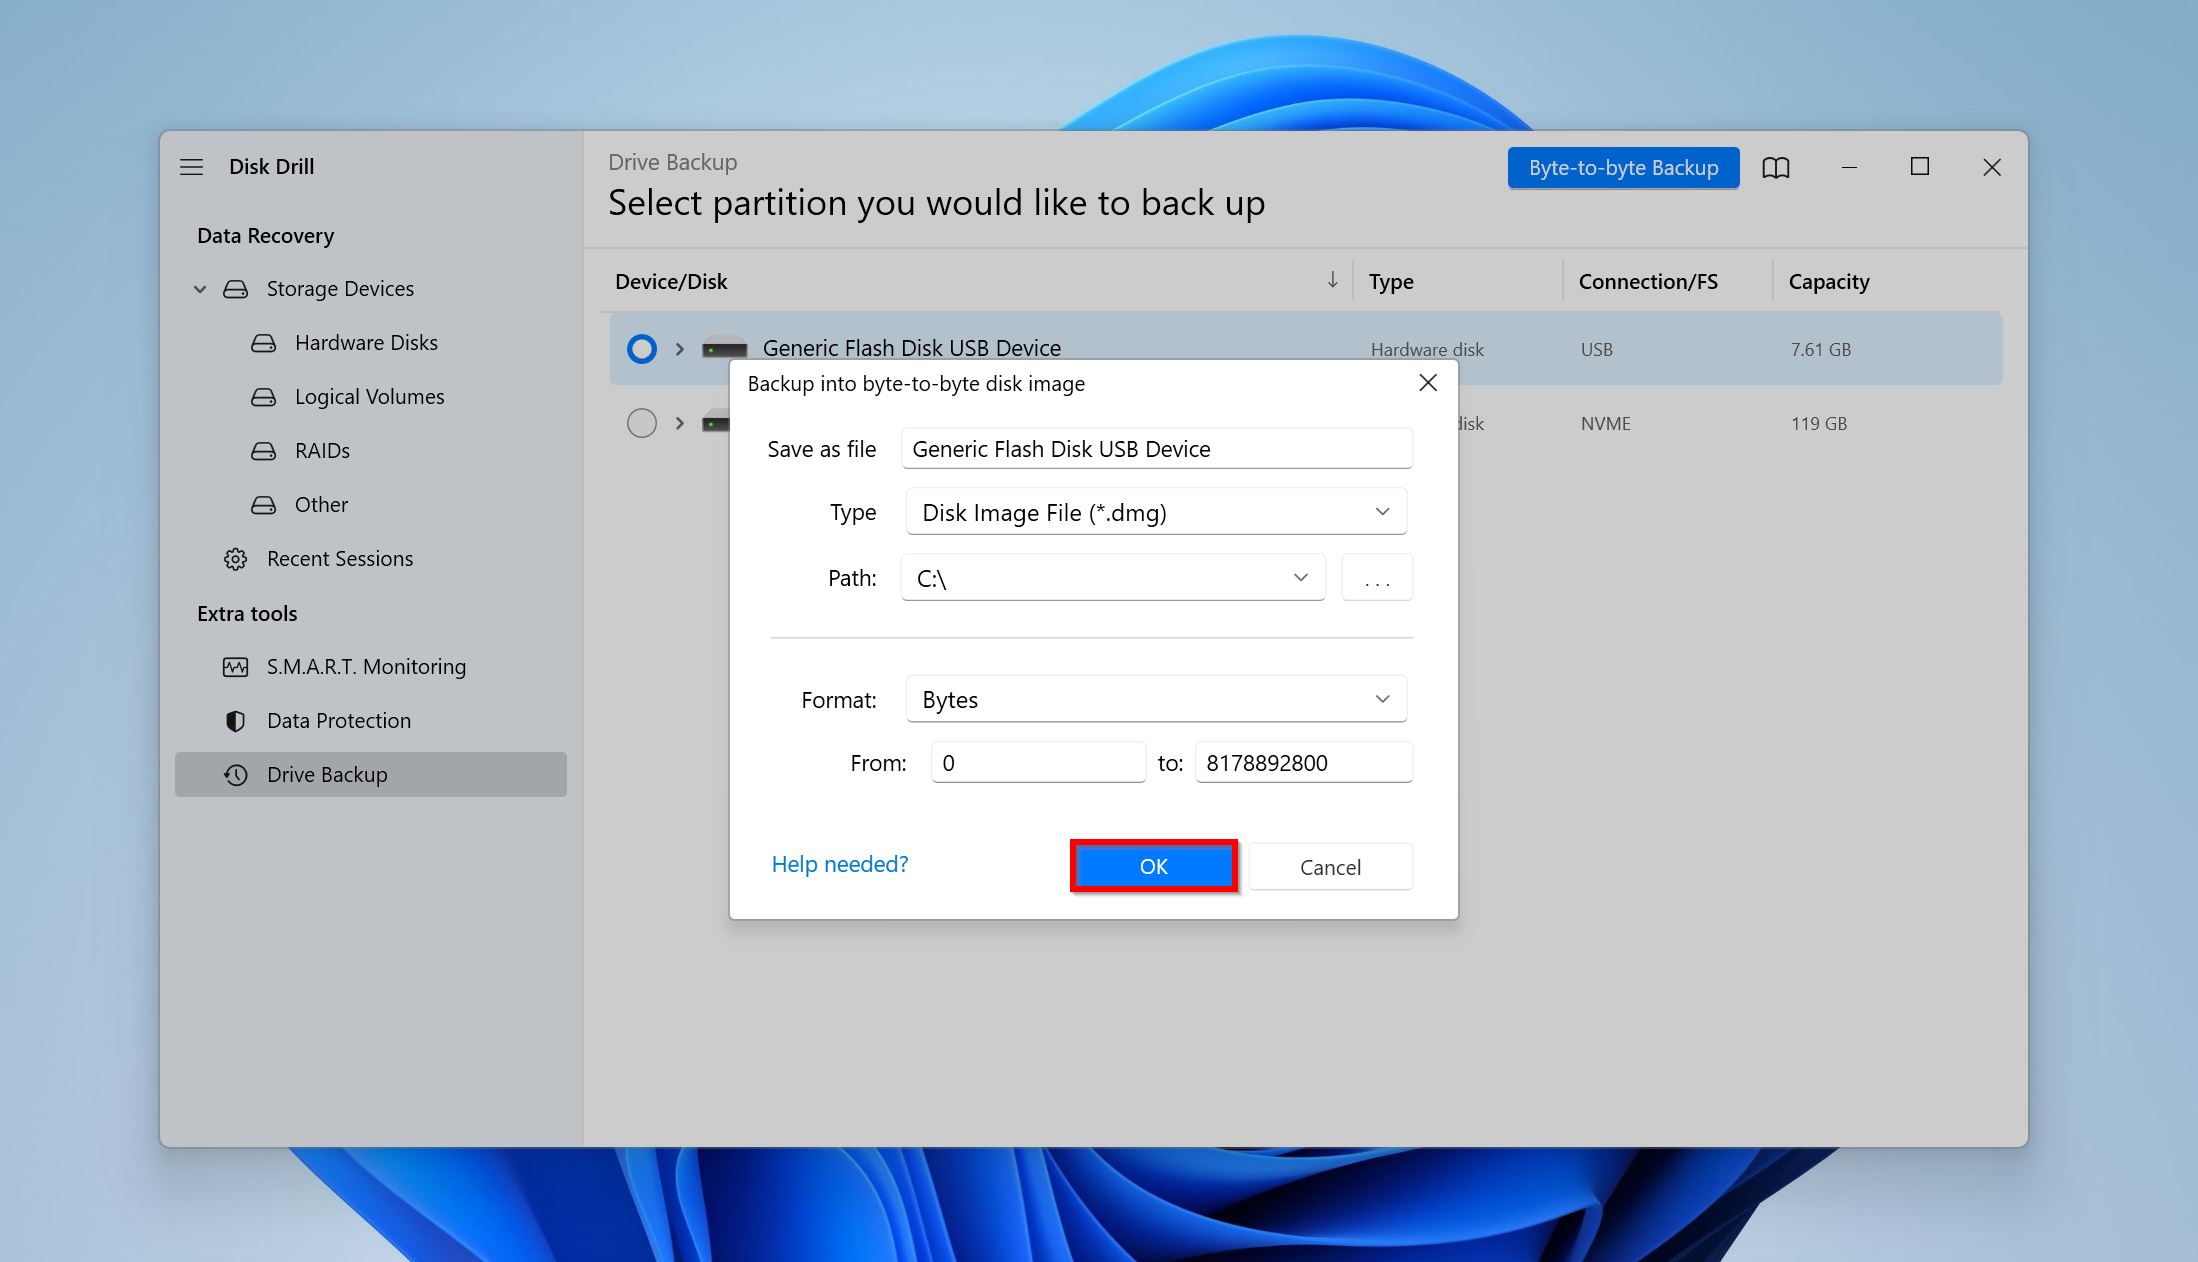
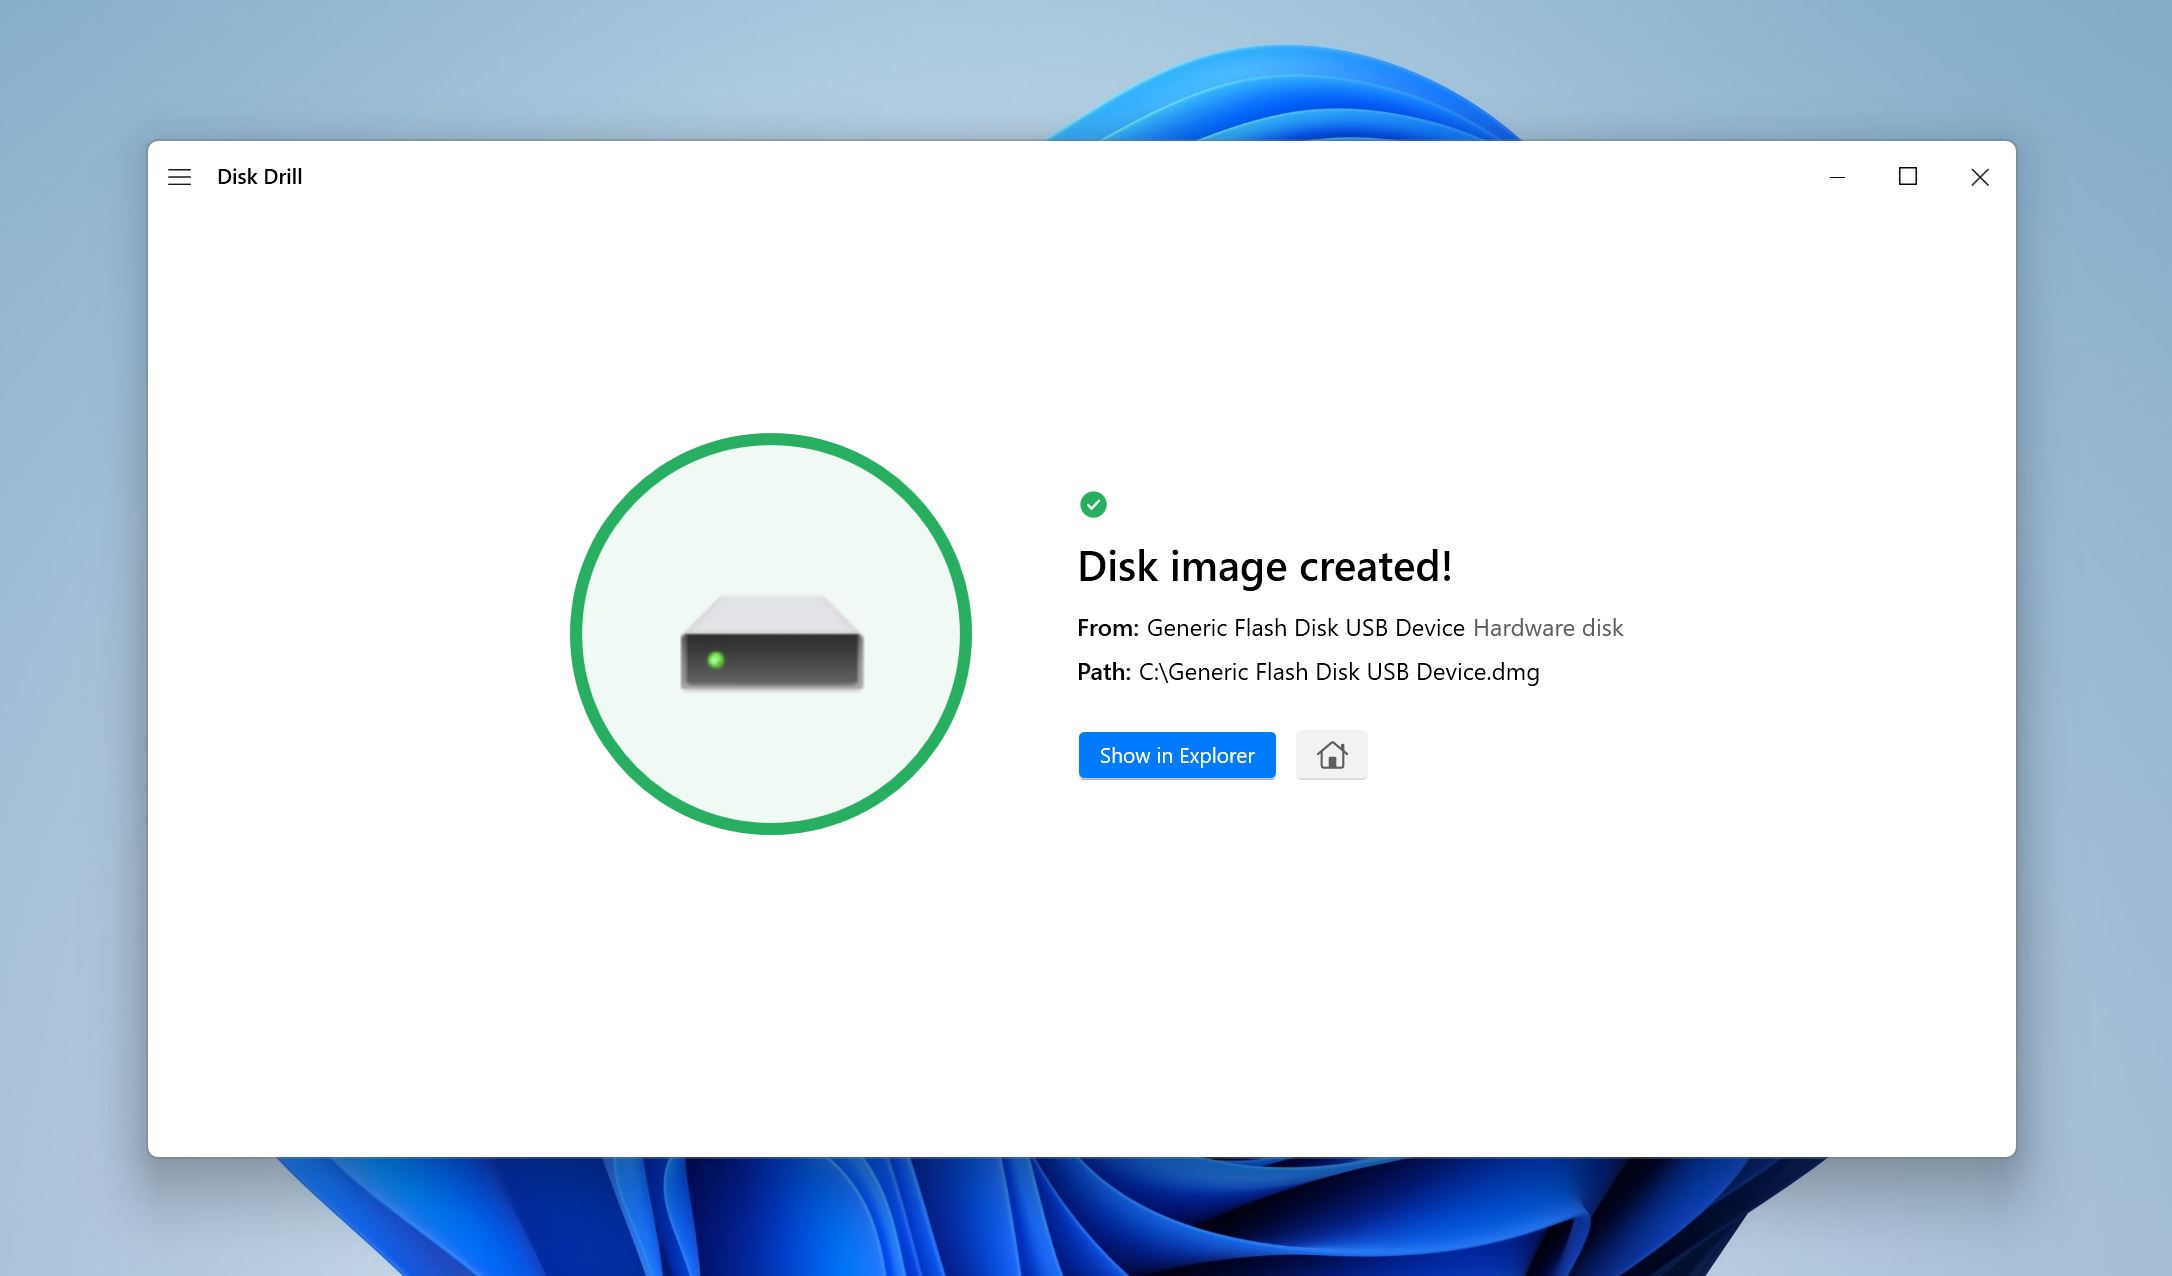
- Disk Drill will create the disk image.
Step 2. Convert the Storage Drive from NTFS to FAT32
On Windows, there are two primary ways to convert your storage device from NTFS to FAT32–using the Command Prompt or using Windows Explorer. Either way, all existing data on the drive will be removed.
Option A: Convert the Drive From NTFS To FAT32 Using CMD
- Type “cmd” in Windows Search (Windows Key + S) and right-click on Command Prompt > Run as administrator.
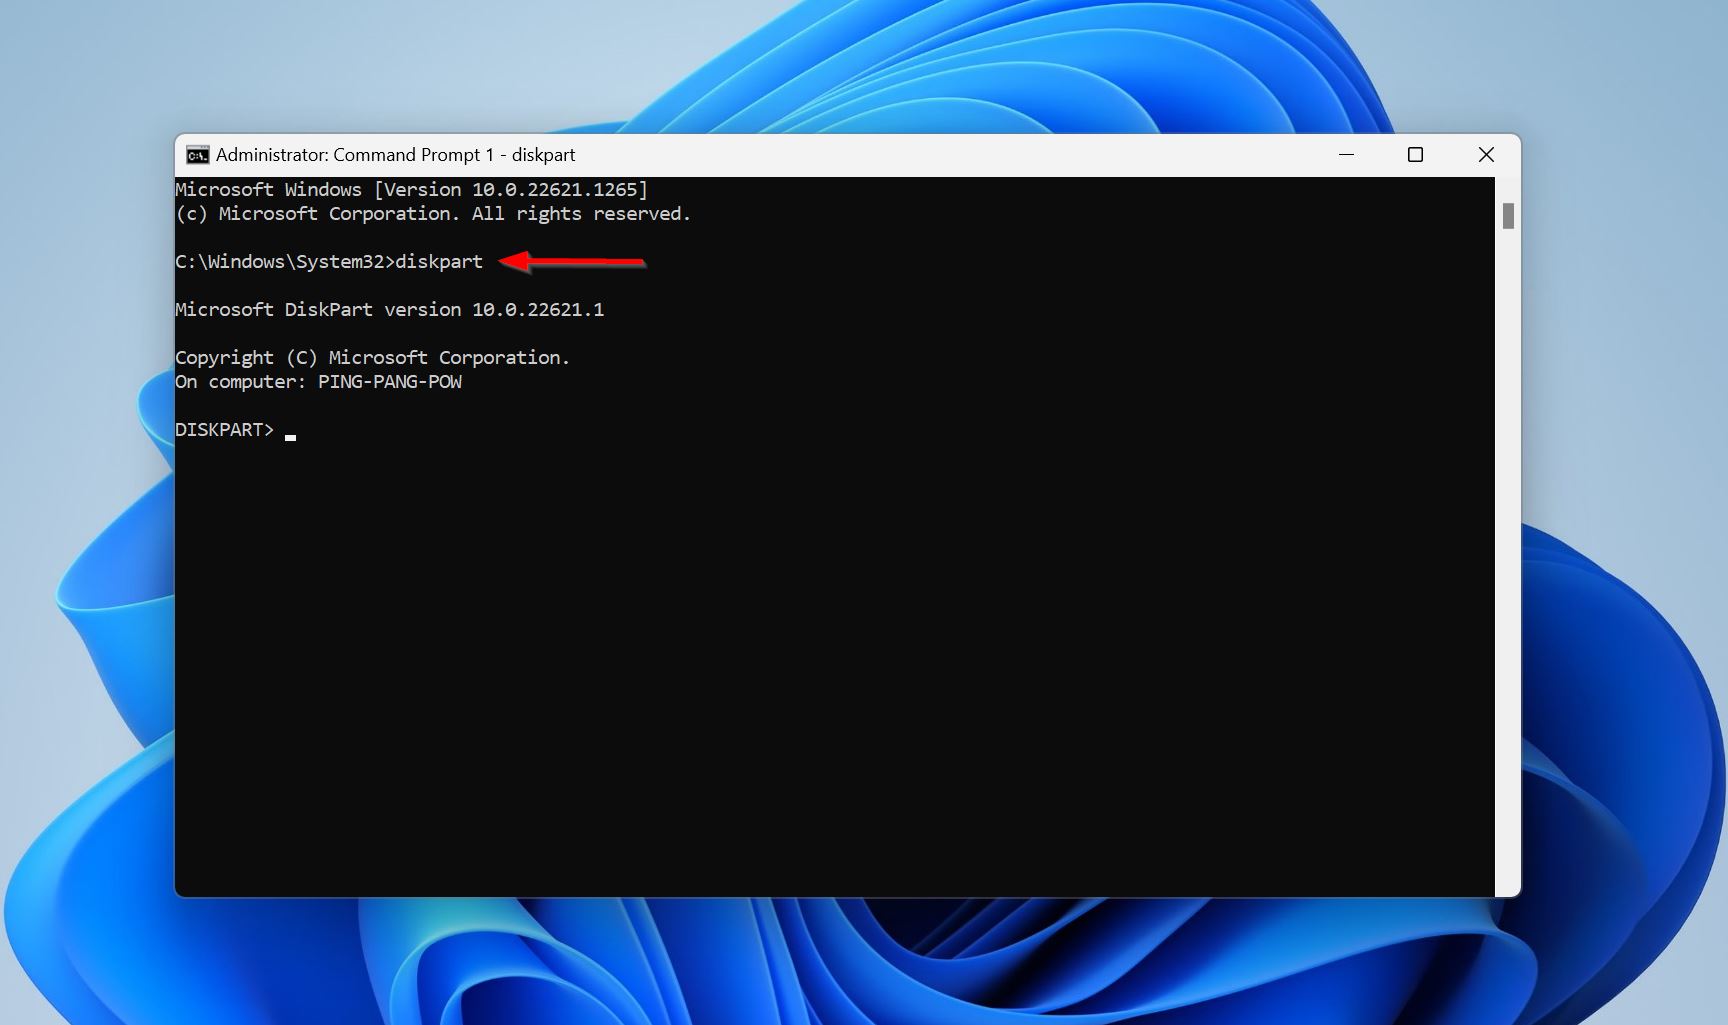
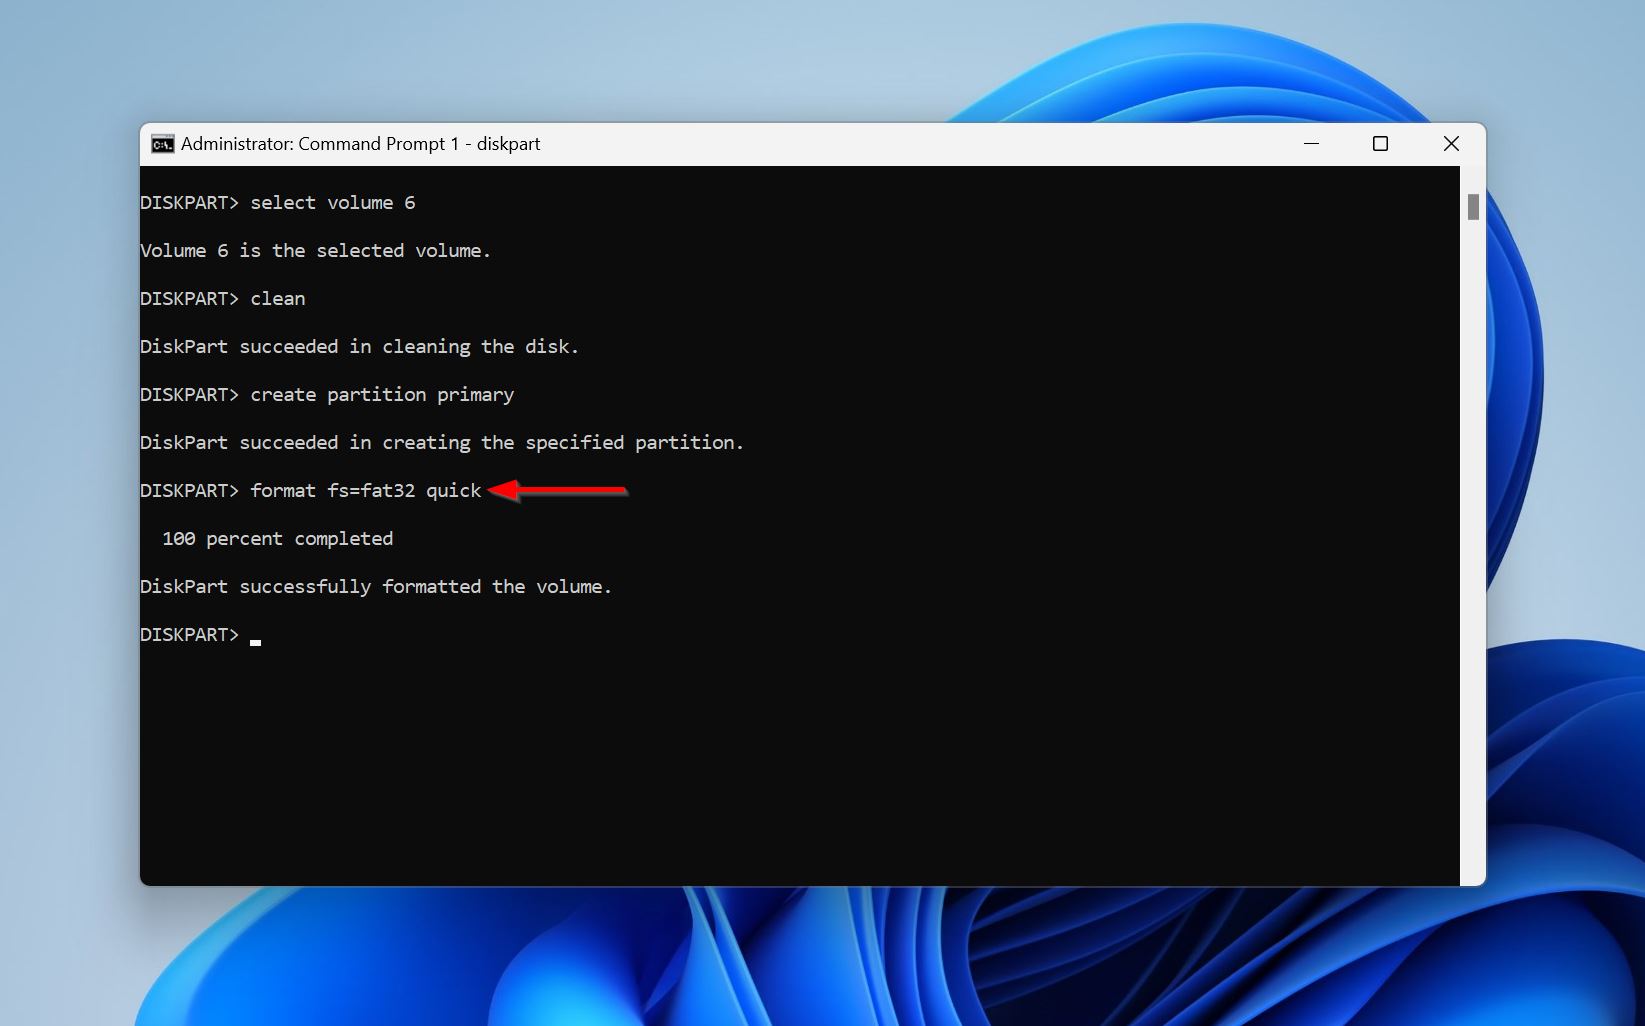
- In the console, type diskpart and press Enter.
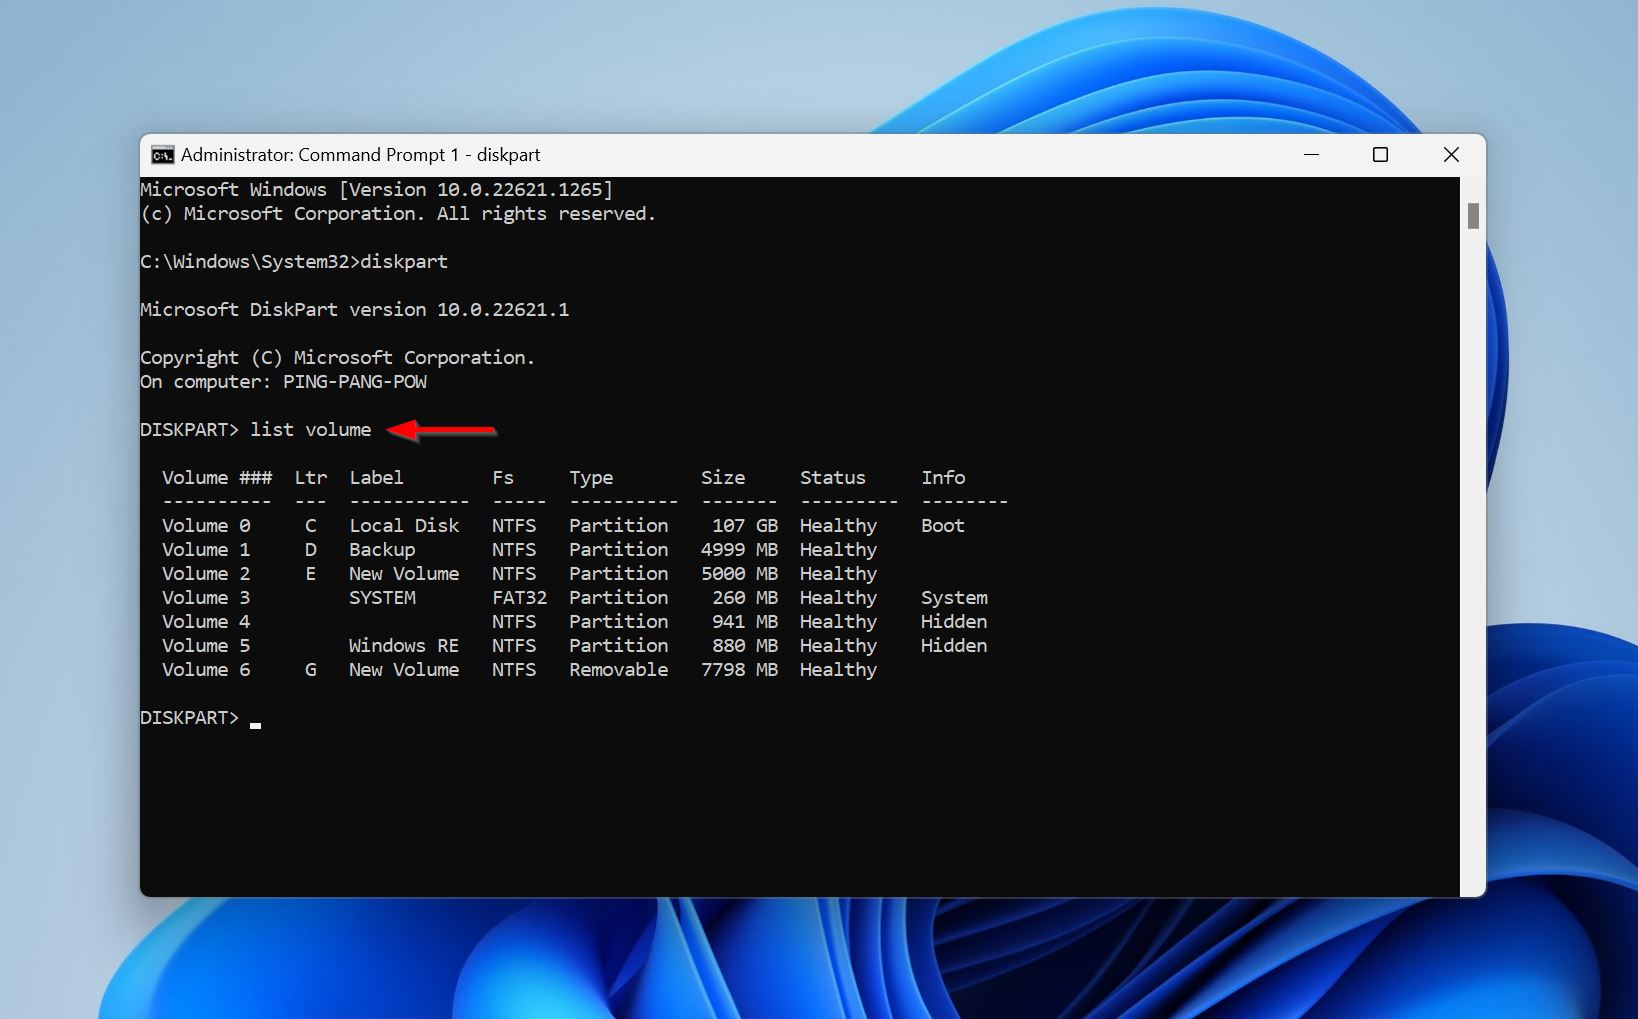
- Now, type list volume and press Enter to view the storage volumes attached to your PC.
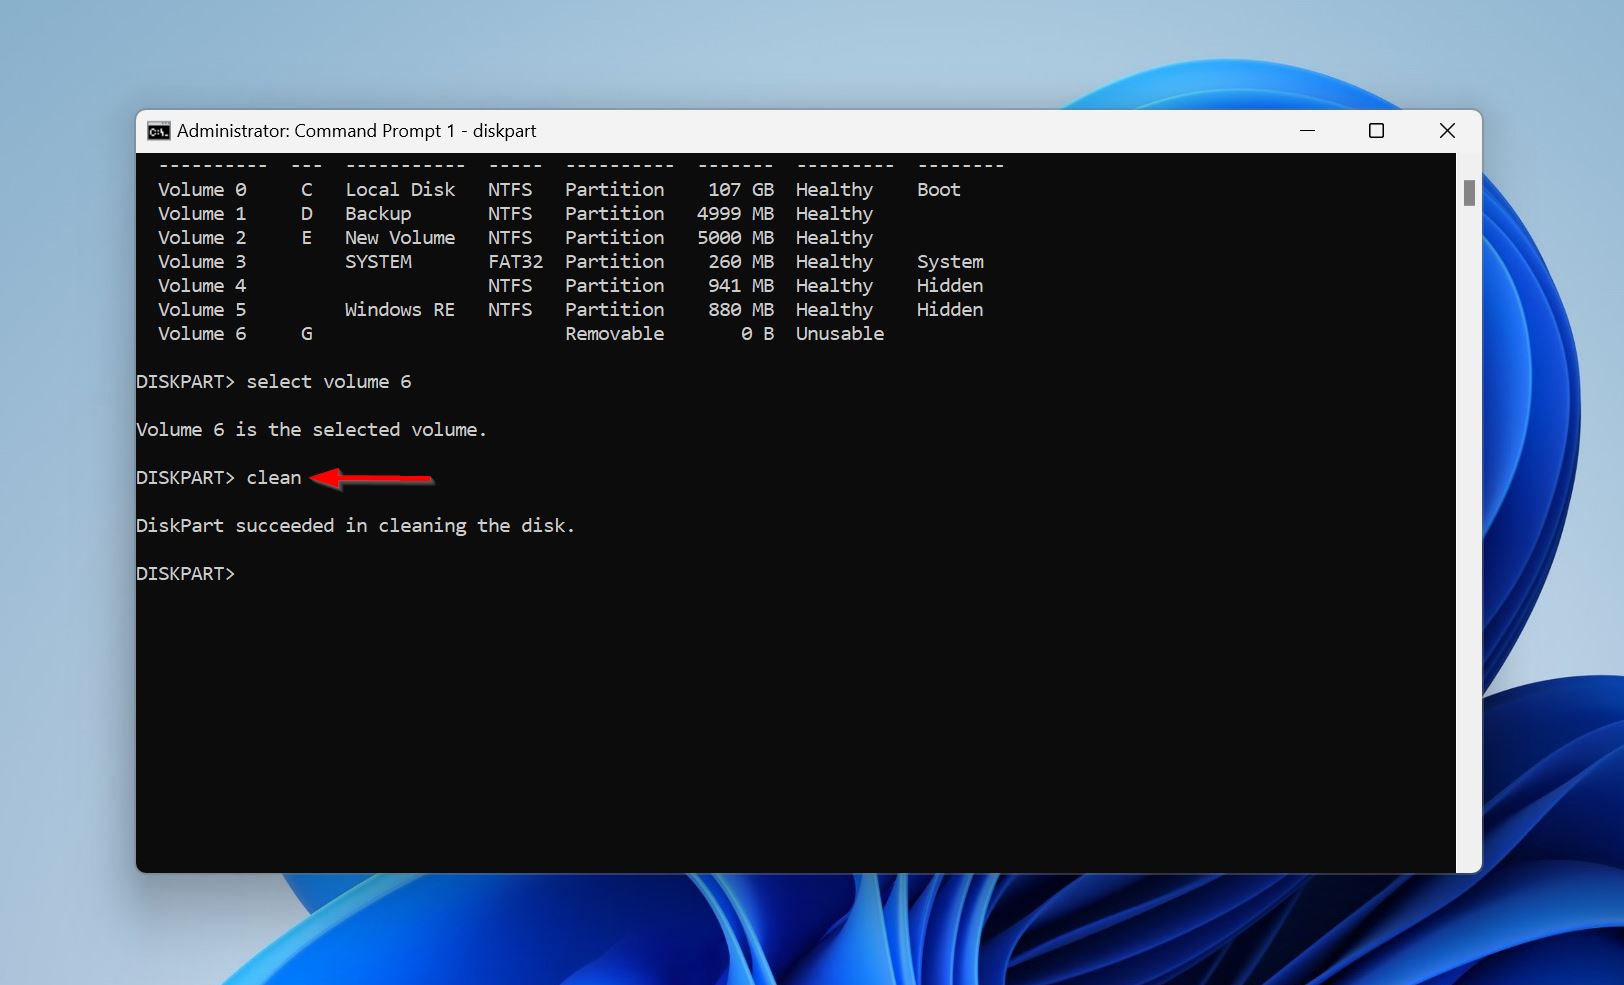
- Type select volume X and press Enter. Replace X with the drive number of the drive you want to convert from NTFS to FAT32. In my case, it’s 6.

- Type clean and press Enter.
- Type create partition primary and press Enter.

- Finally, type format fs=fat32 quick and press Enter to convert the drive to FAT32.
Option B: Convert the Drive From NTFS To FAT32 Using Windows Explorer
- Open Windows Explorer (Windows Key + E).
- Right-click on the drive you want to convert from NTFS to FAT32 and click Format.
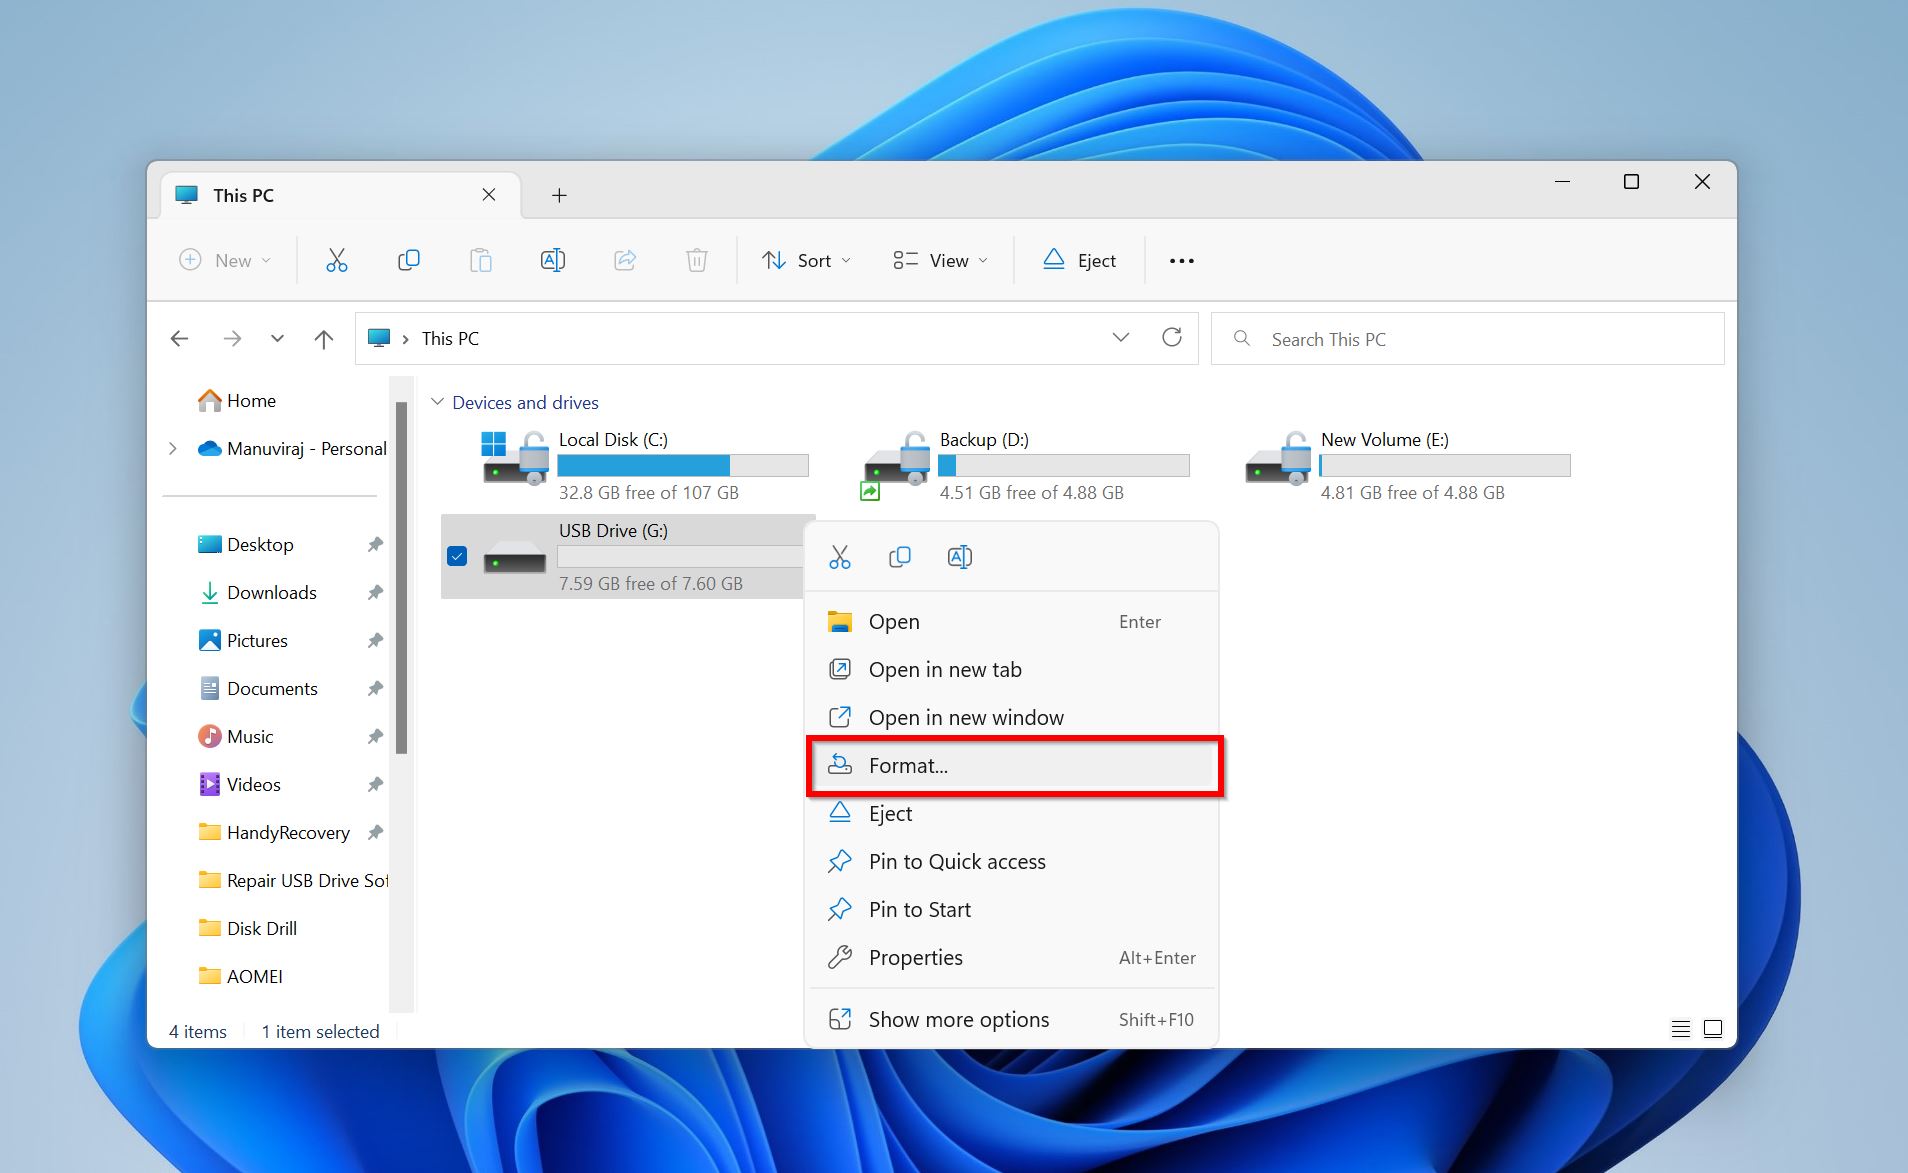
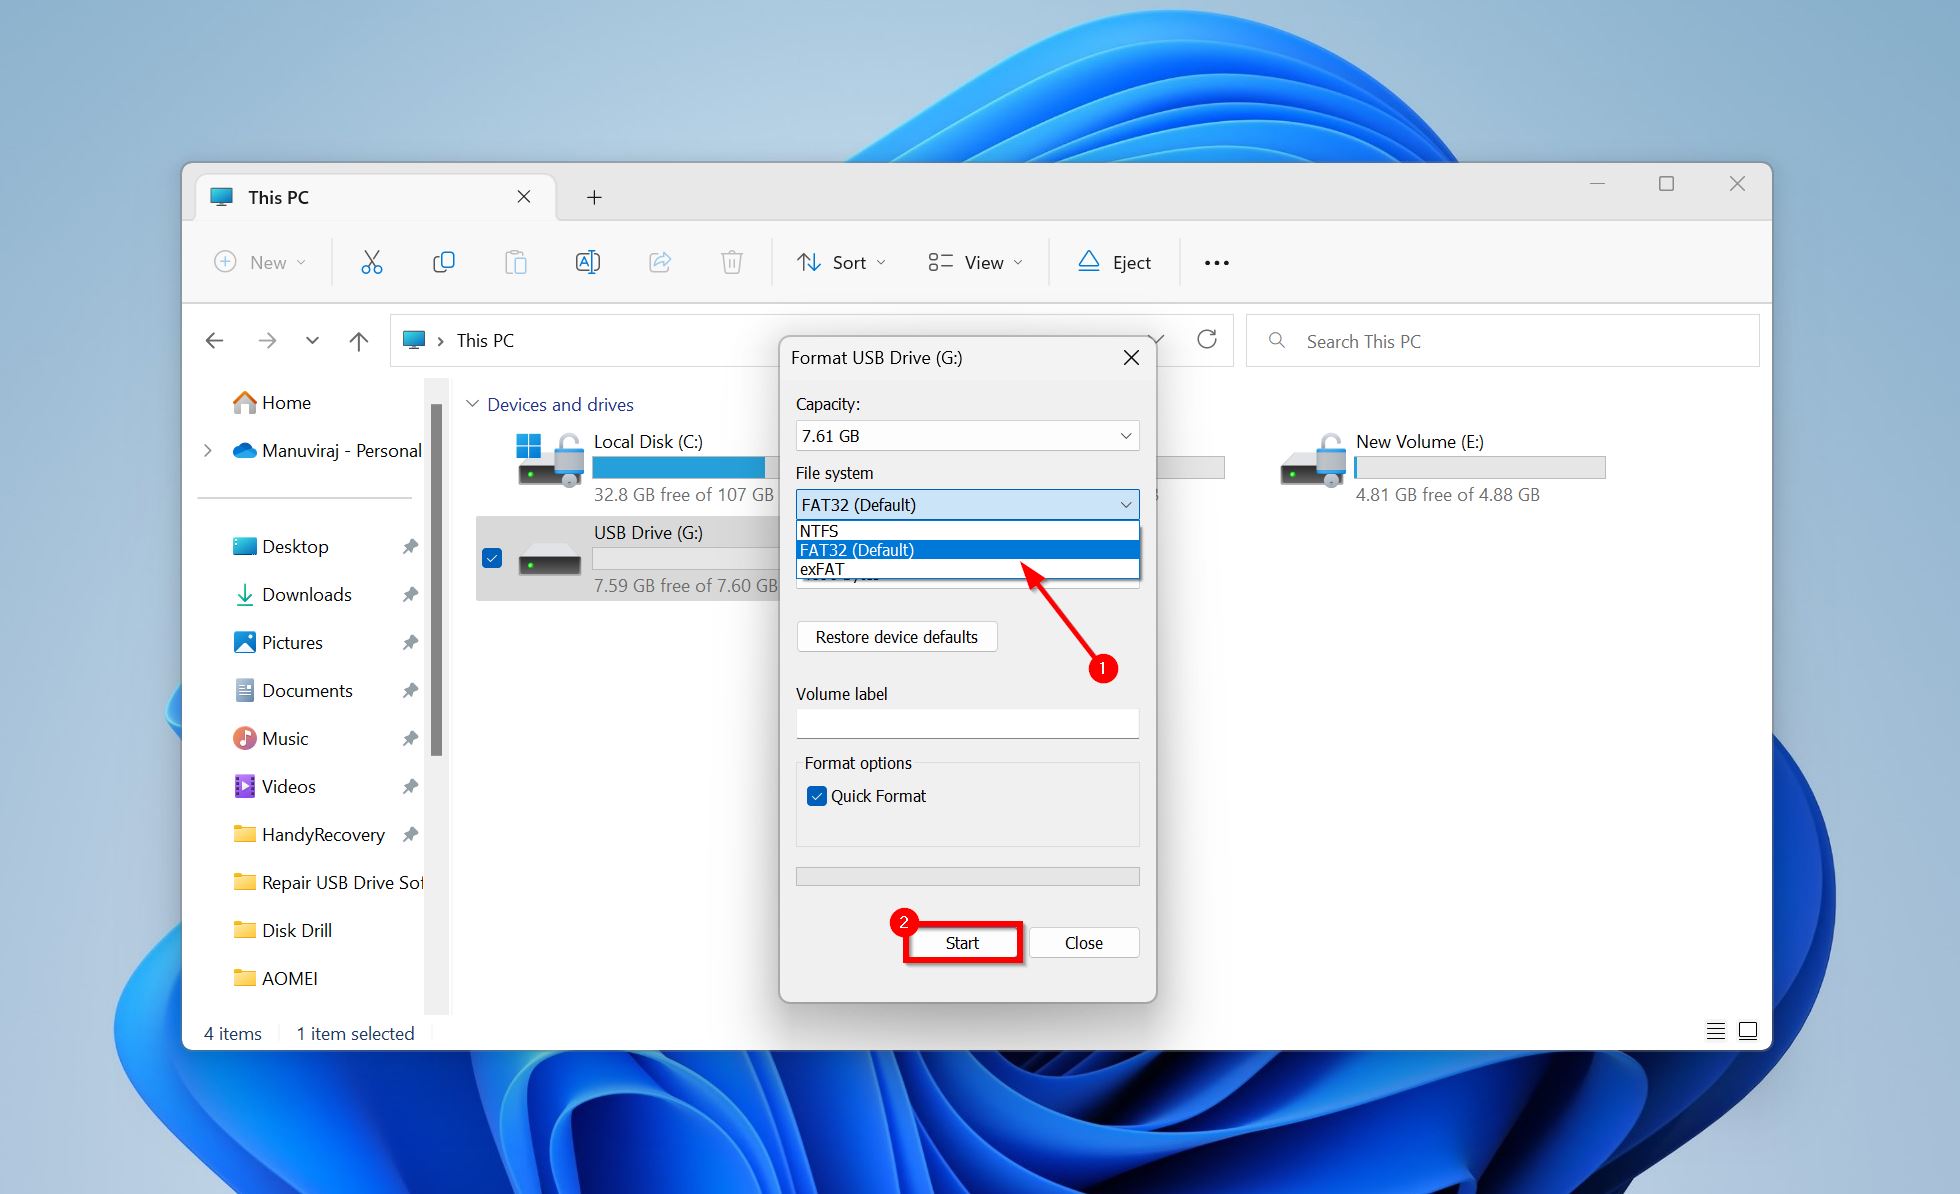
- In the Format parameters windows, select FAT32 from the File system drop-down menu. Click on Start.
Step 3. Recover Data From the Backup
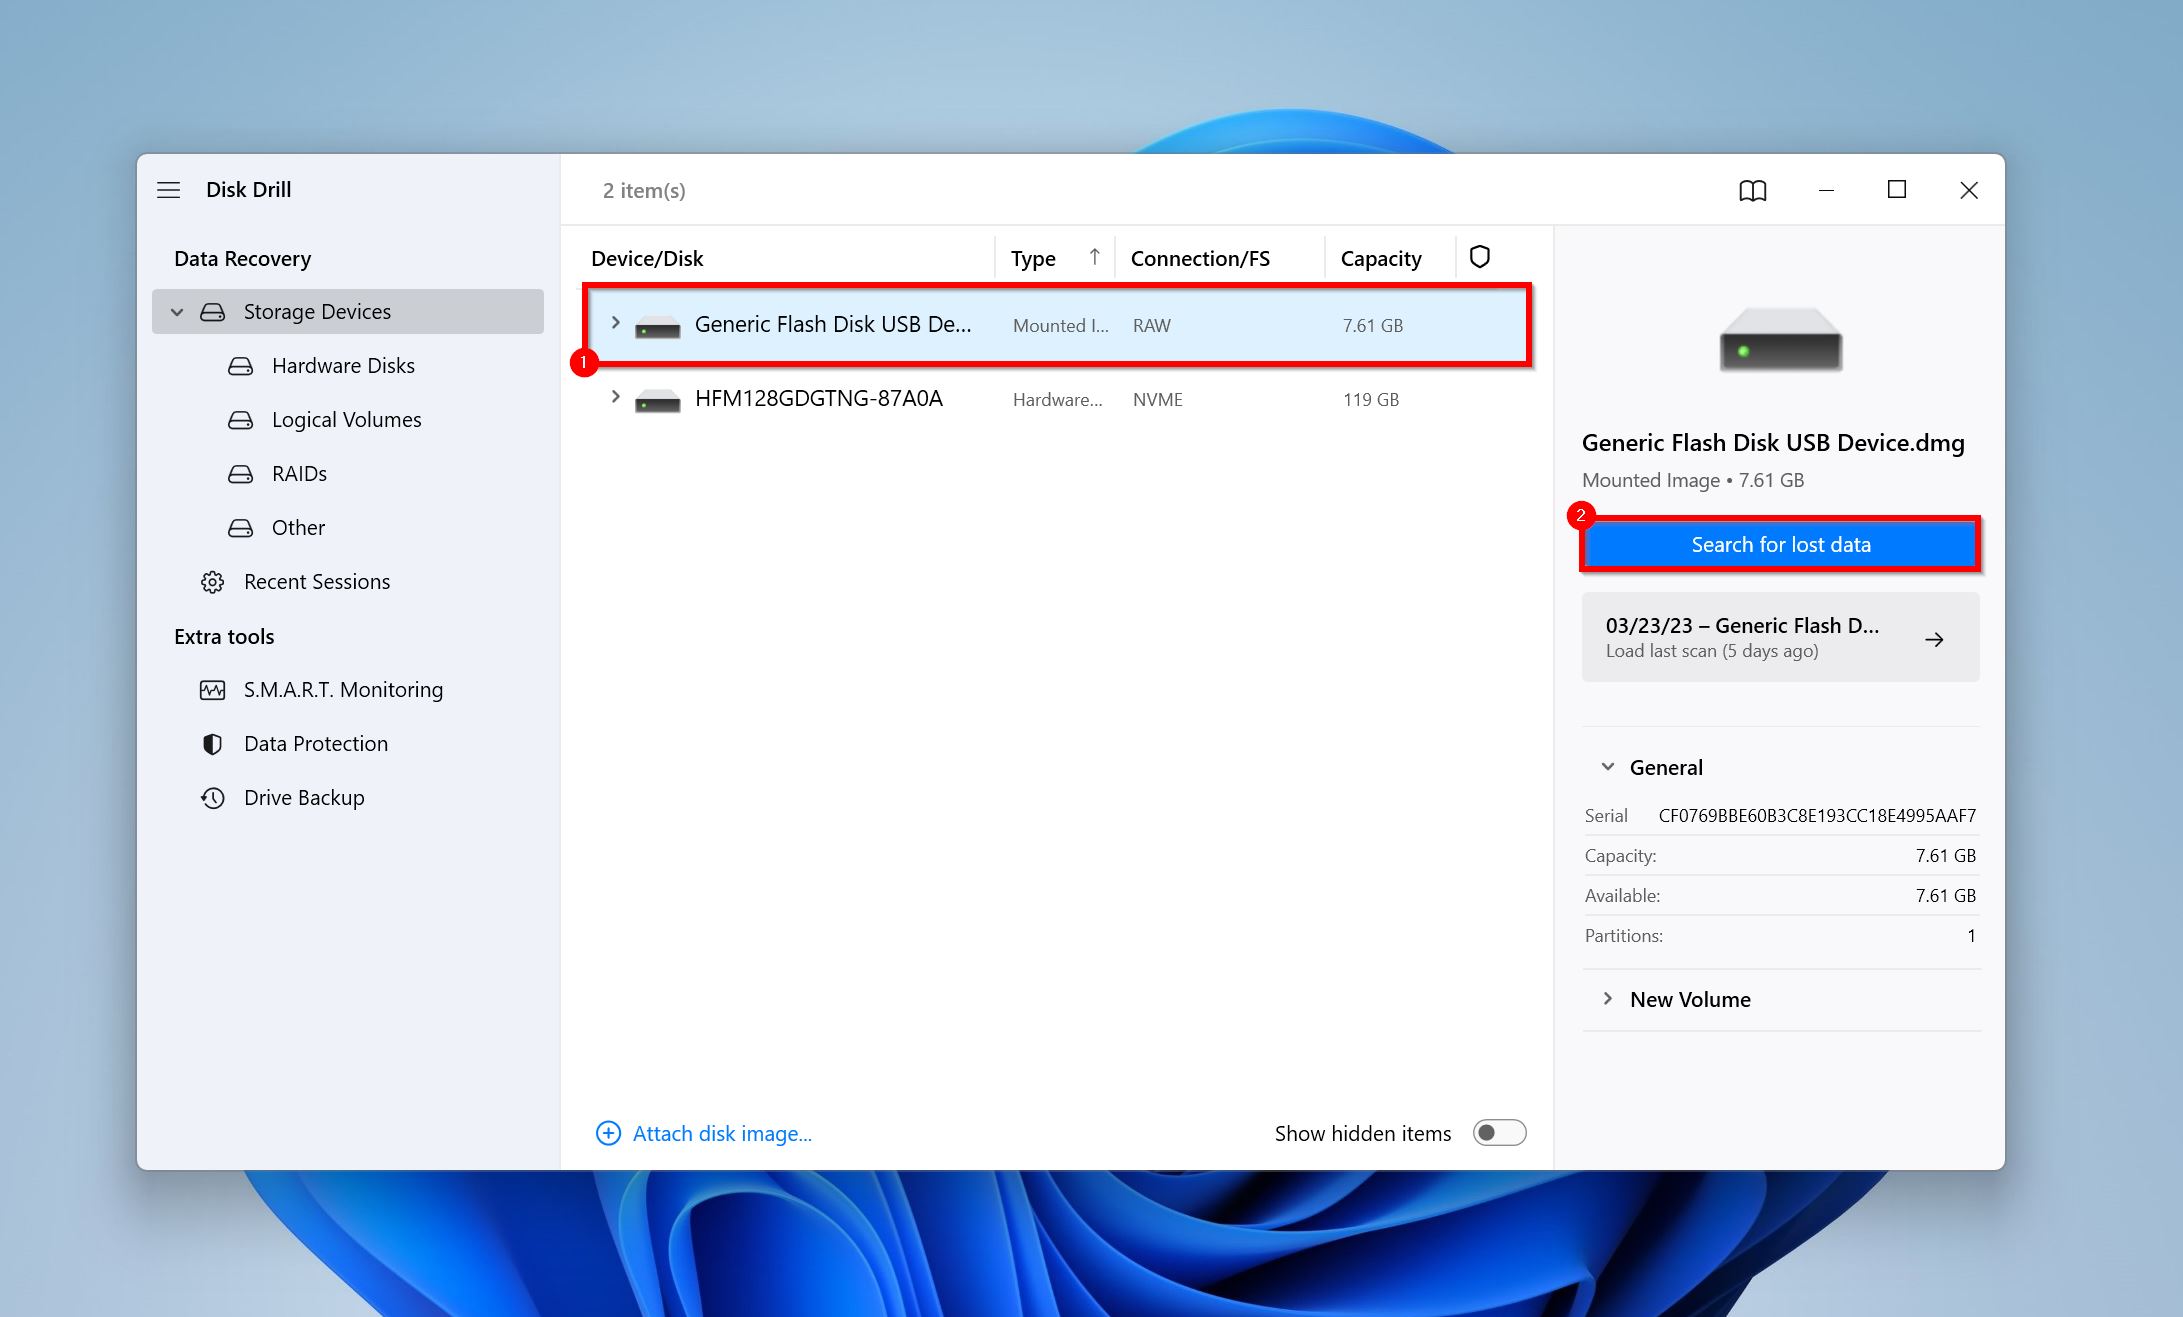
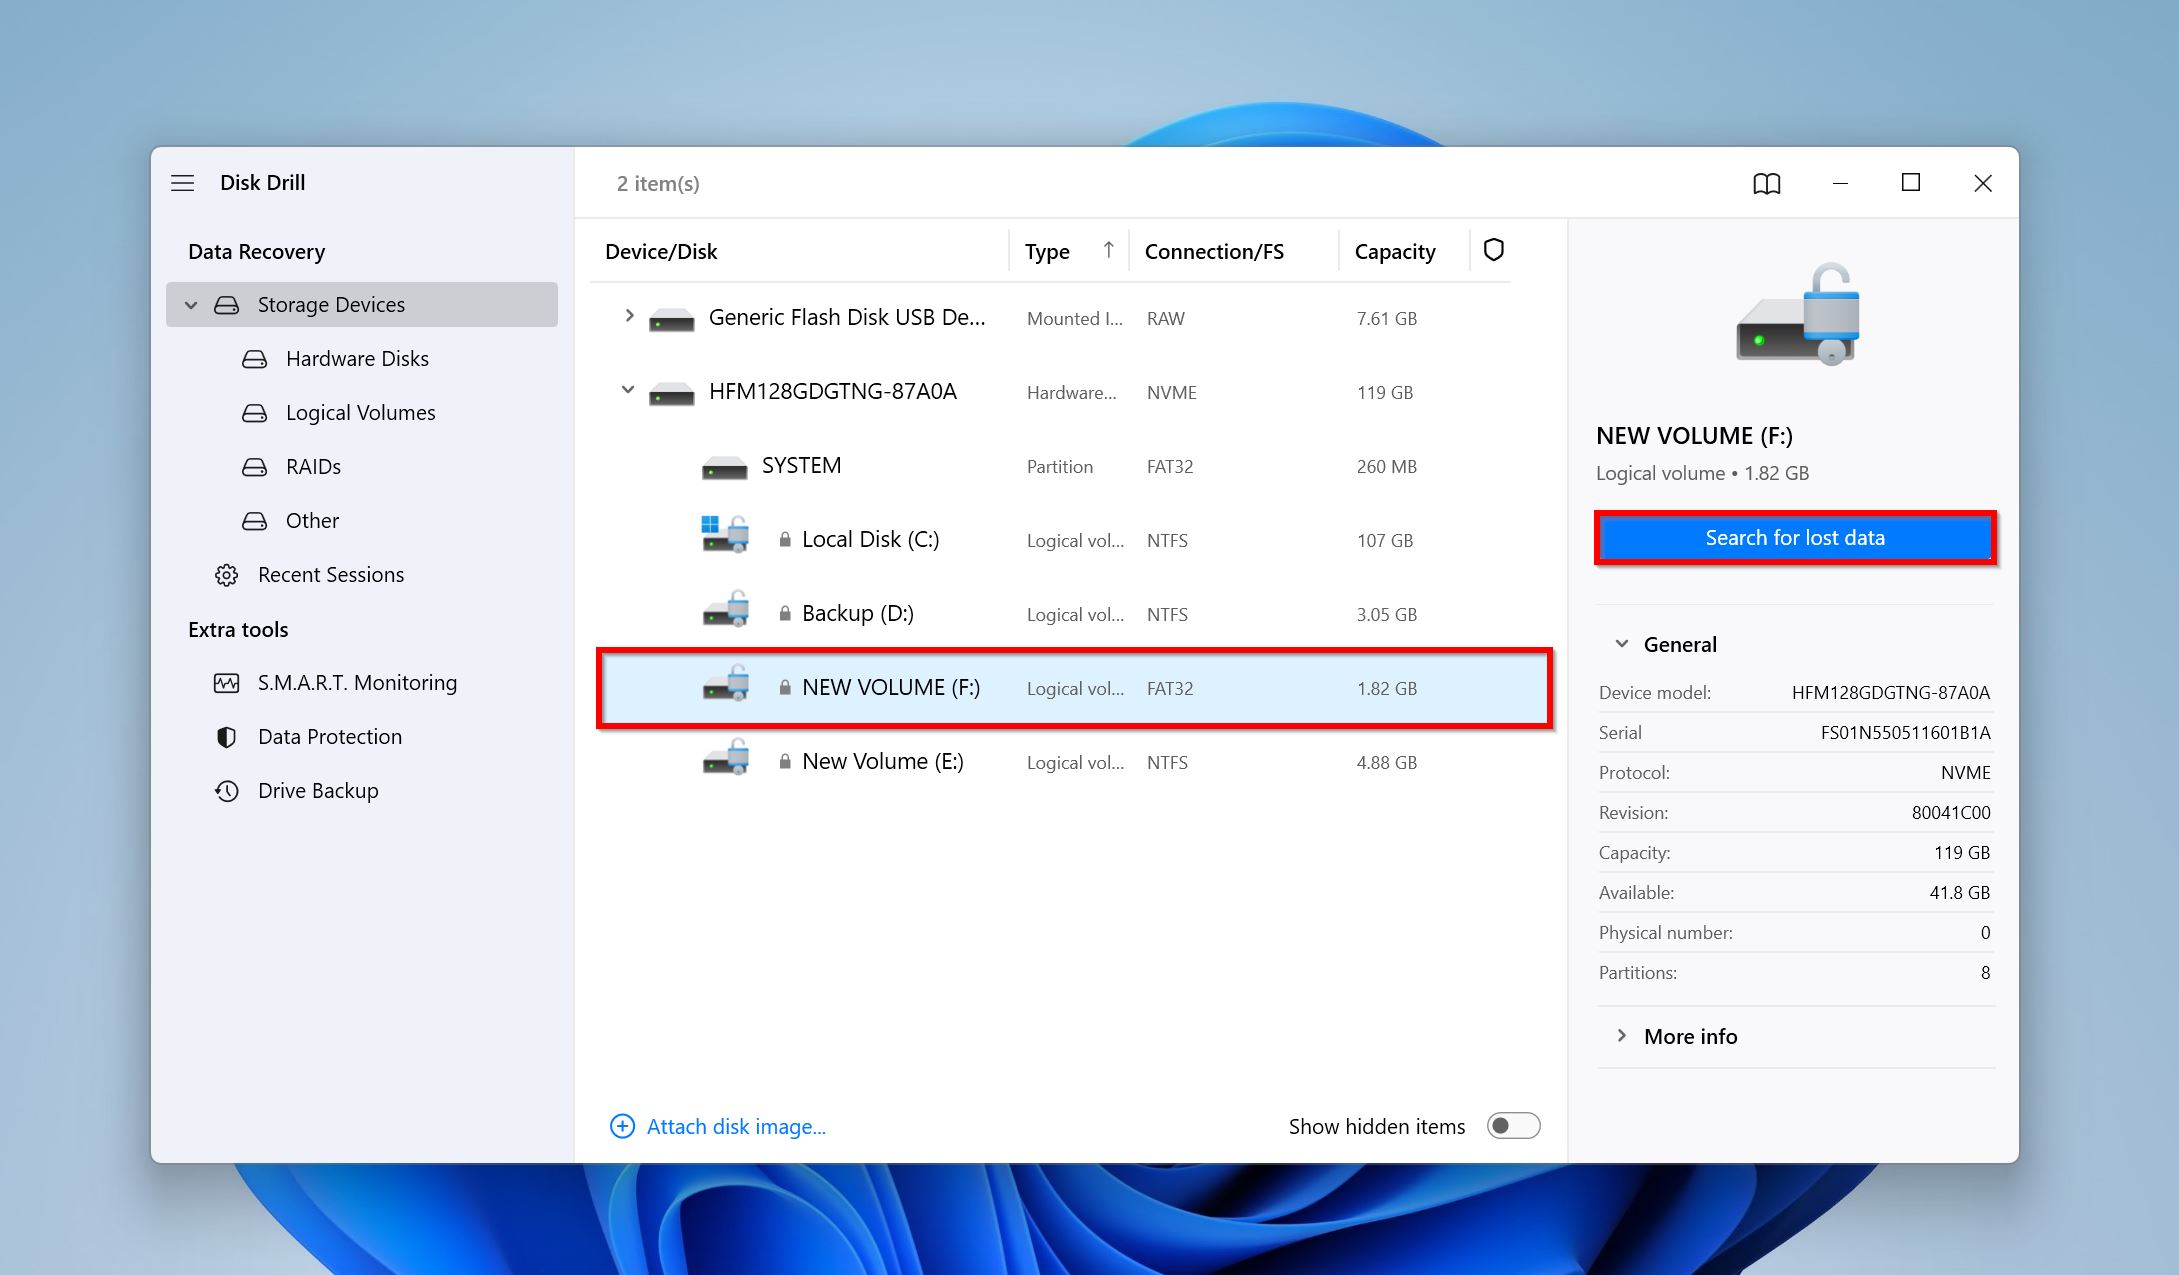
- Open Disk Drill and ensure you’re on the Storage Devices screen.
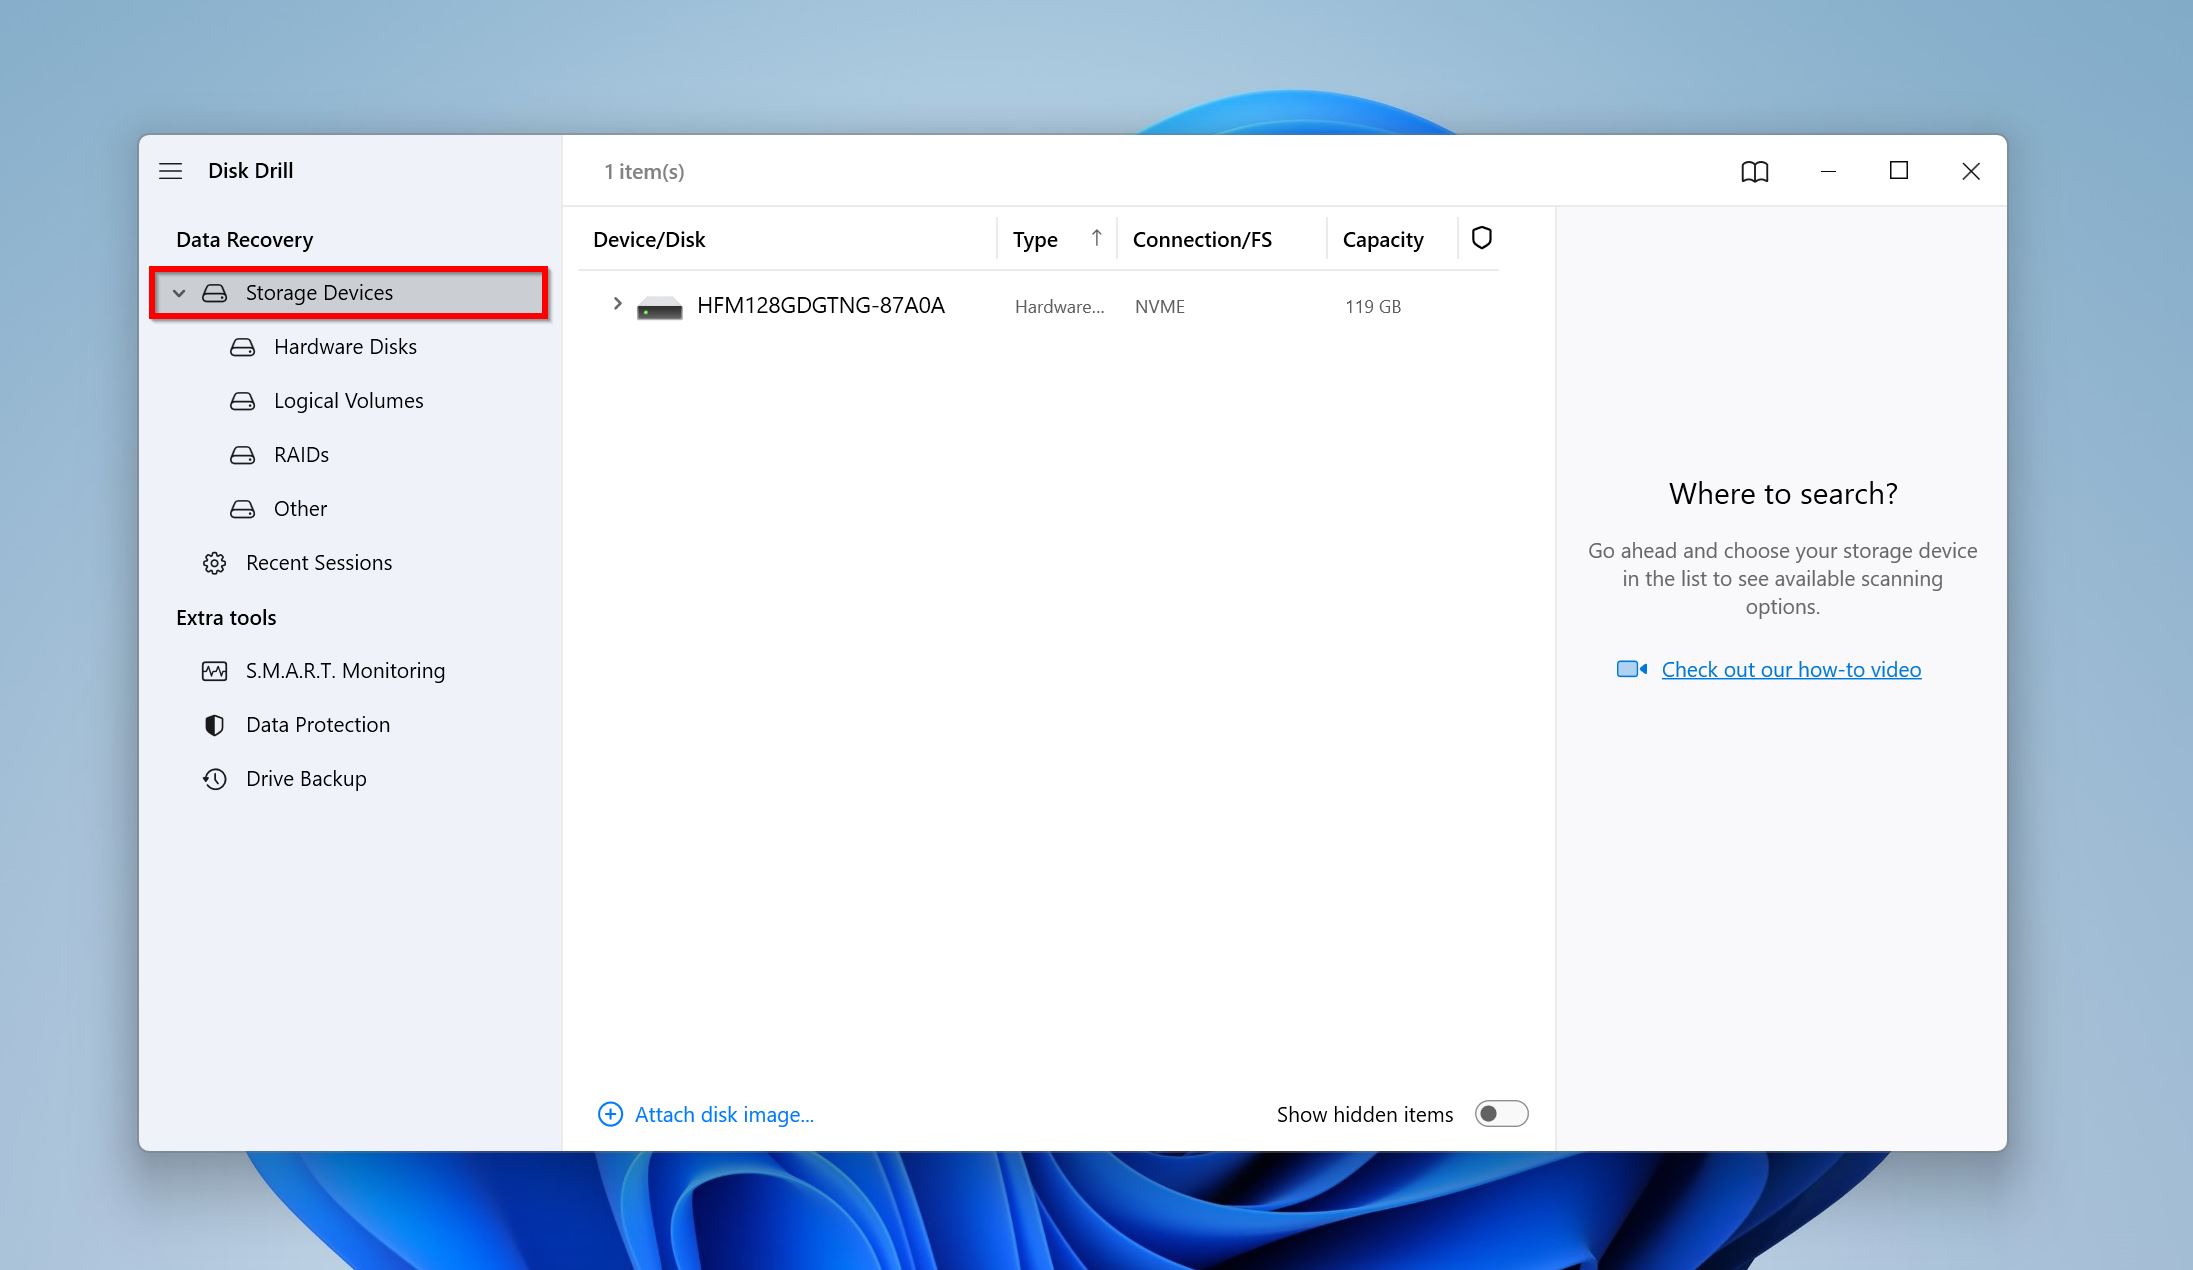
- Click on Attach disk image and browse for the disk image you’d created previously. Double-click on it and it’ll be added to Disk Drill.

- Now, select the disk image and click Search for lost data.
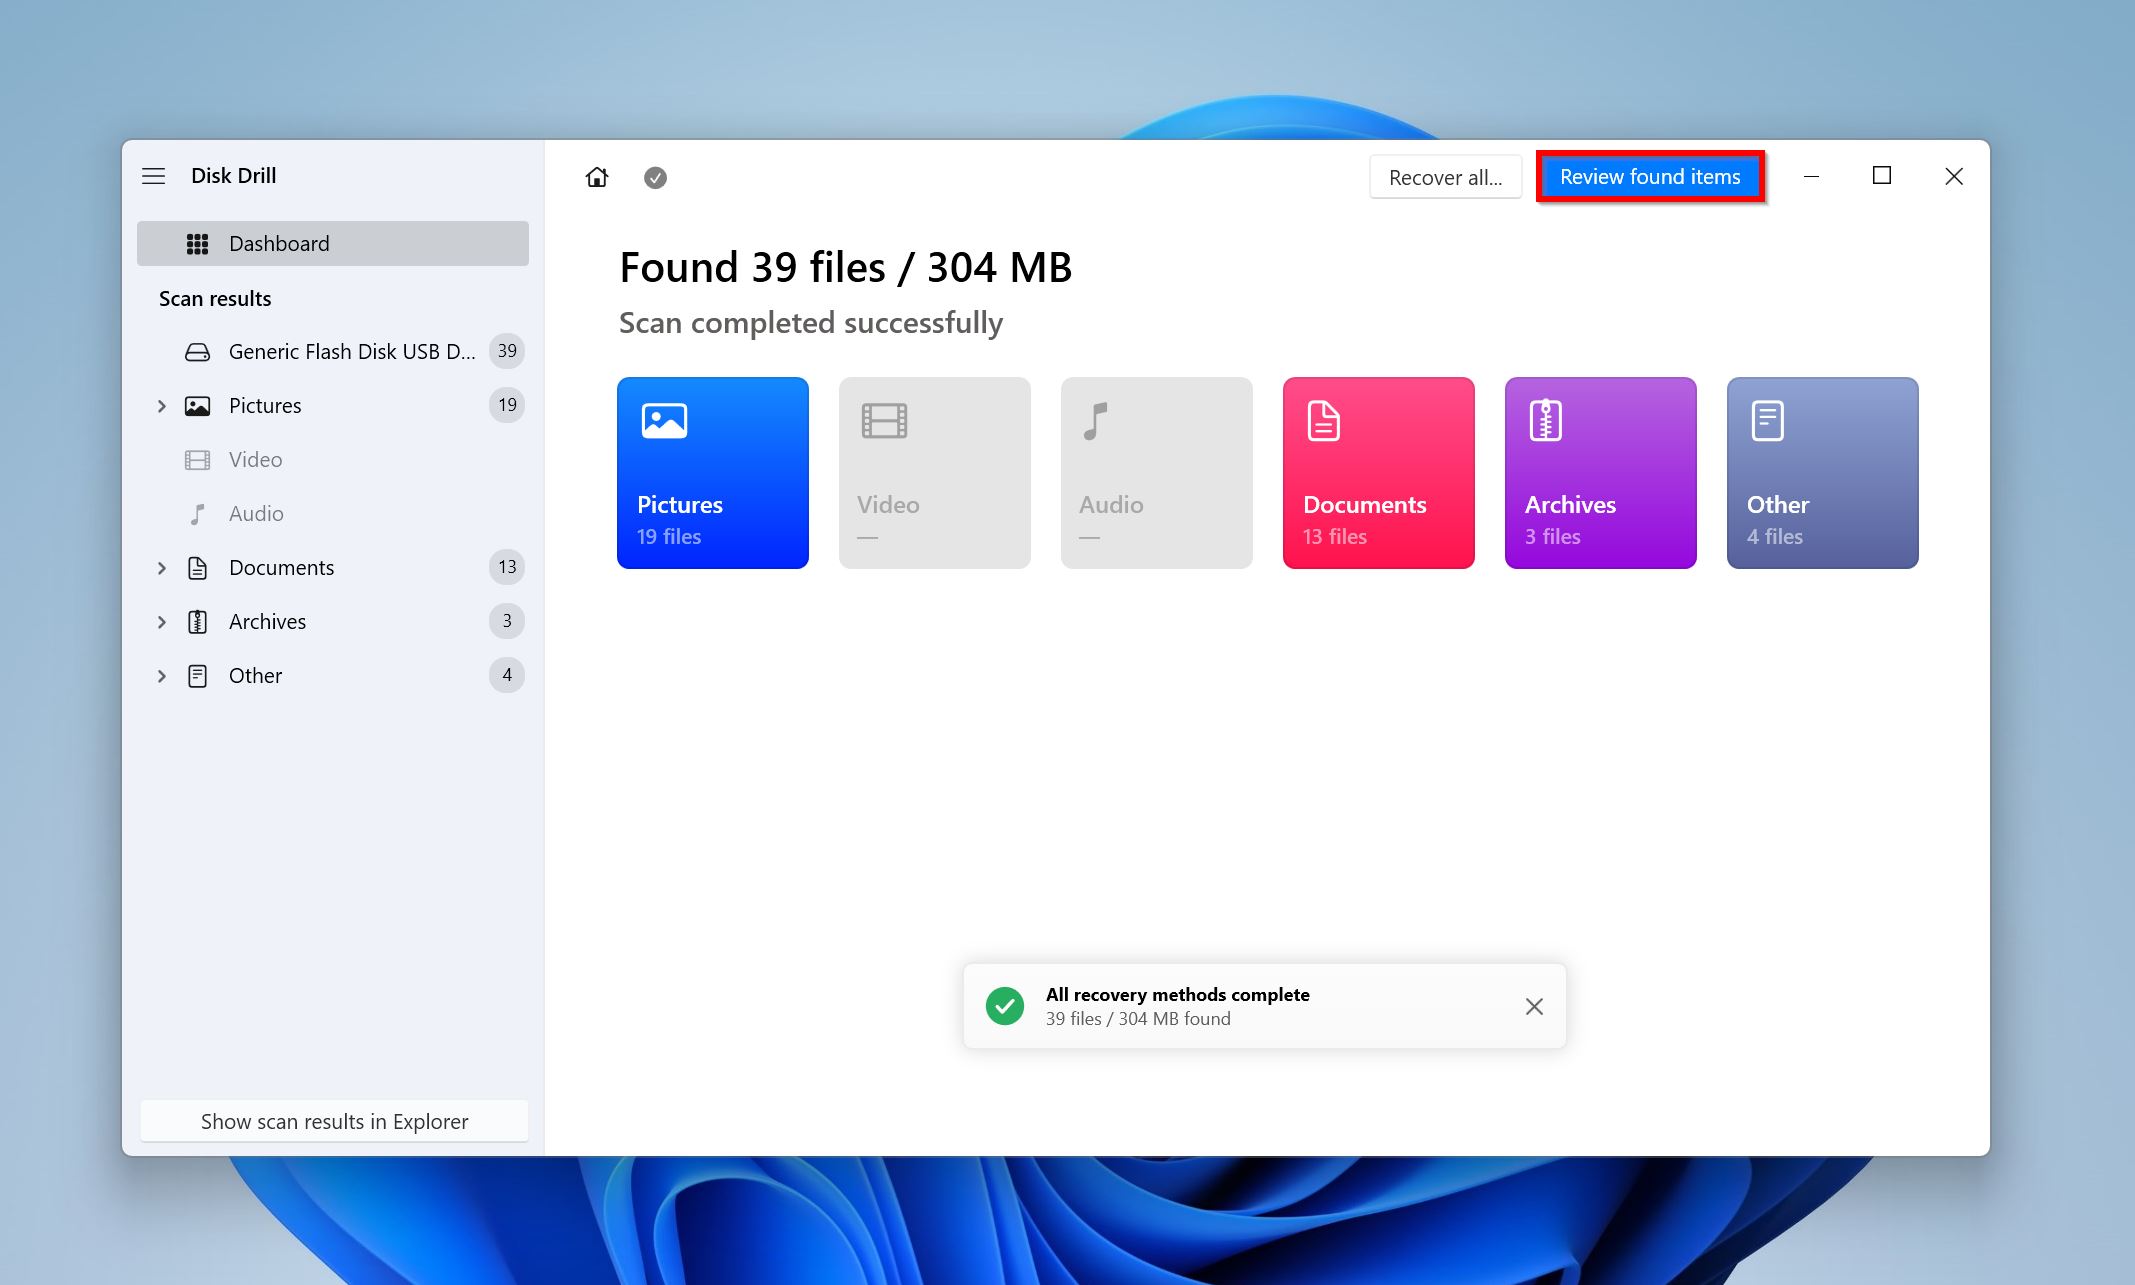
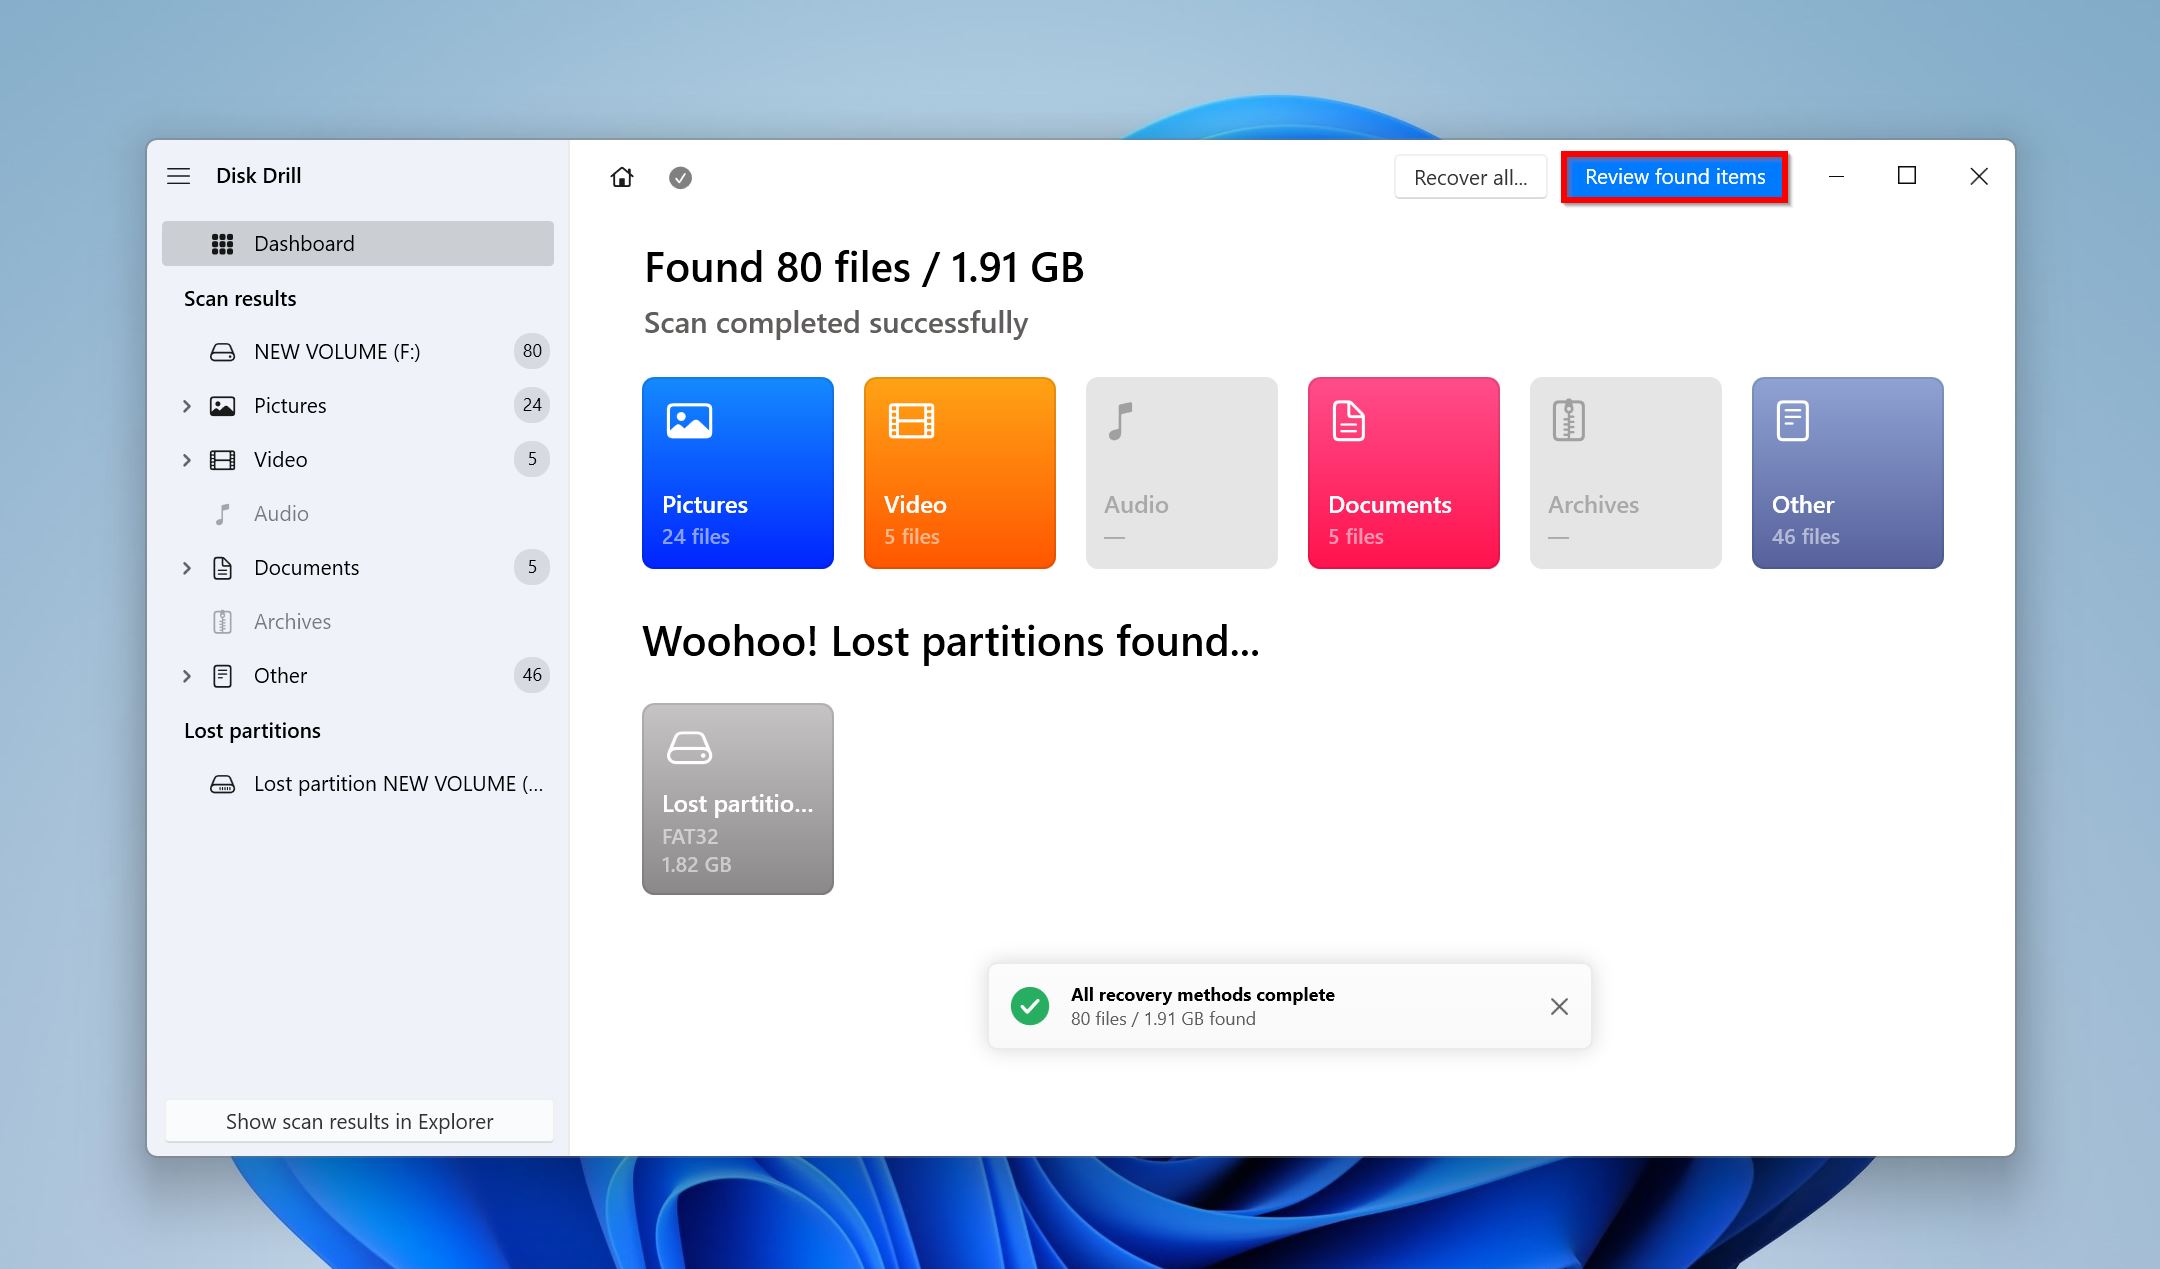
- Click Review found items once the data recovery scan is complete. You can view the results in real-time as well, but I recommend you wait until the scan is over to recover your files.
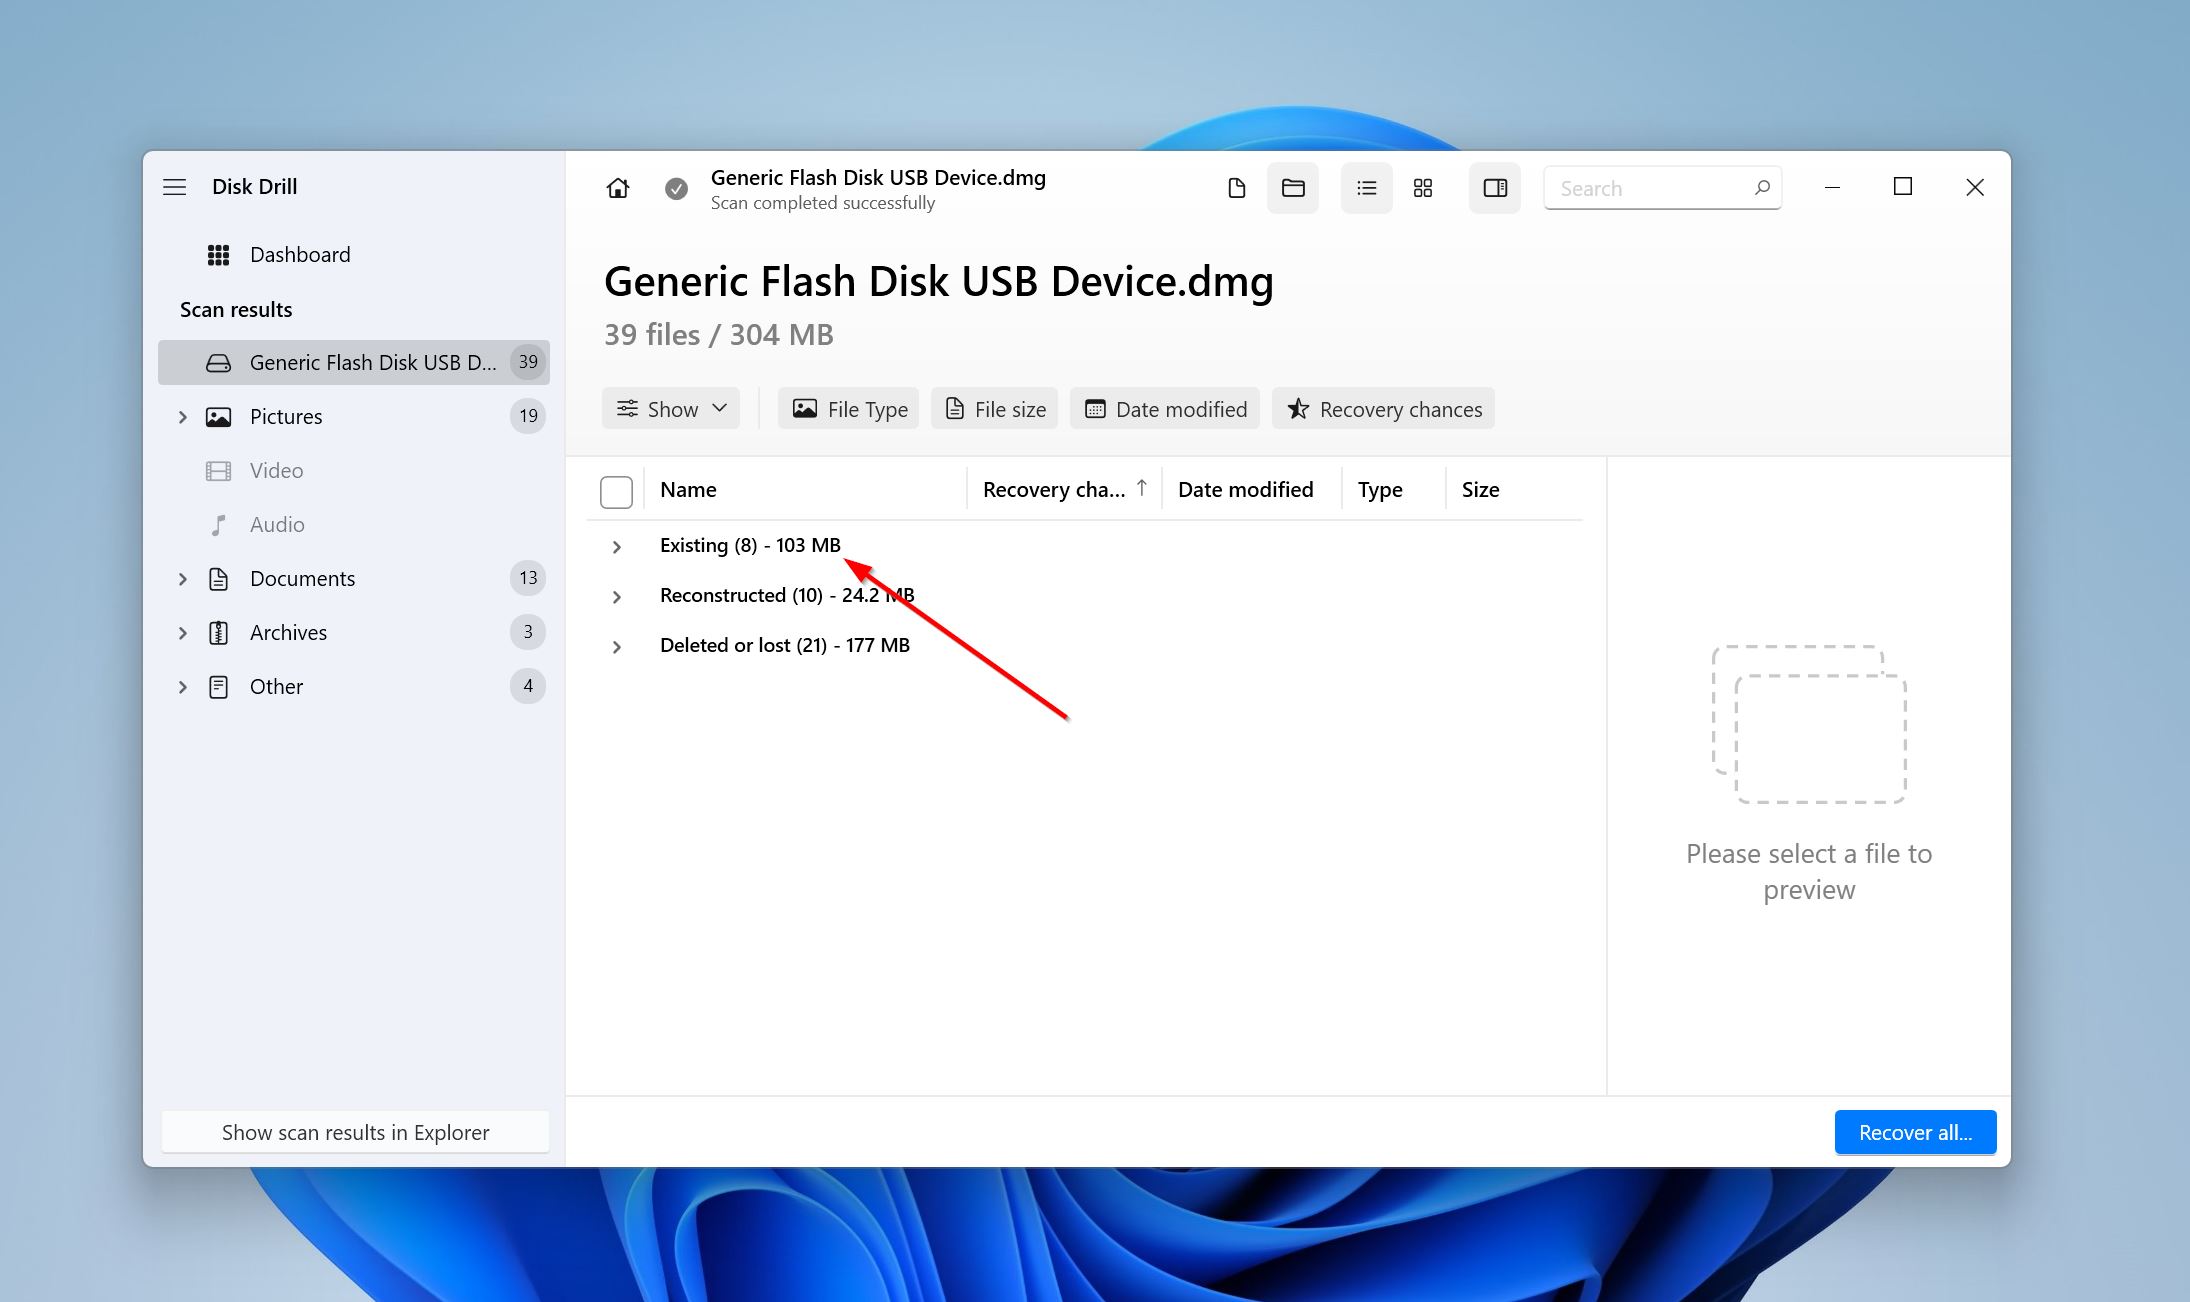
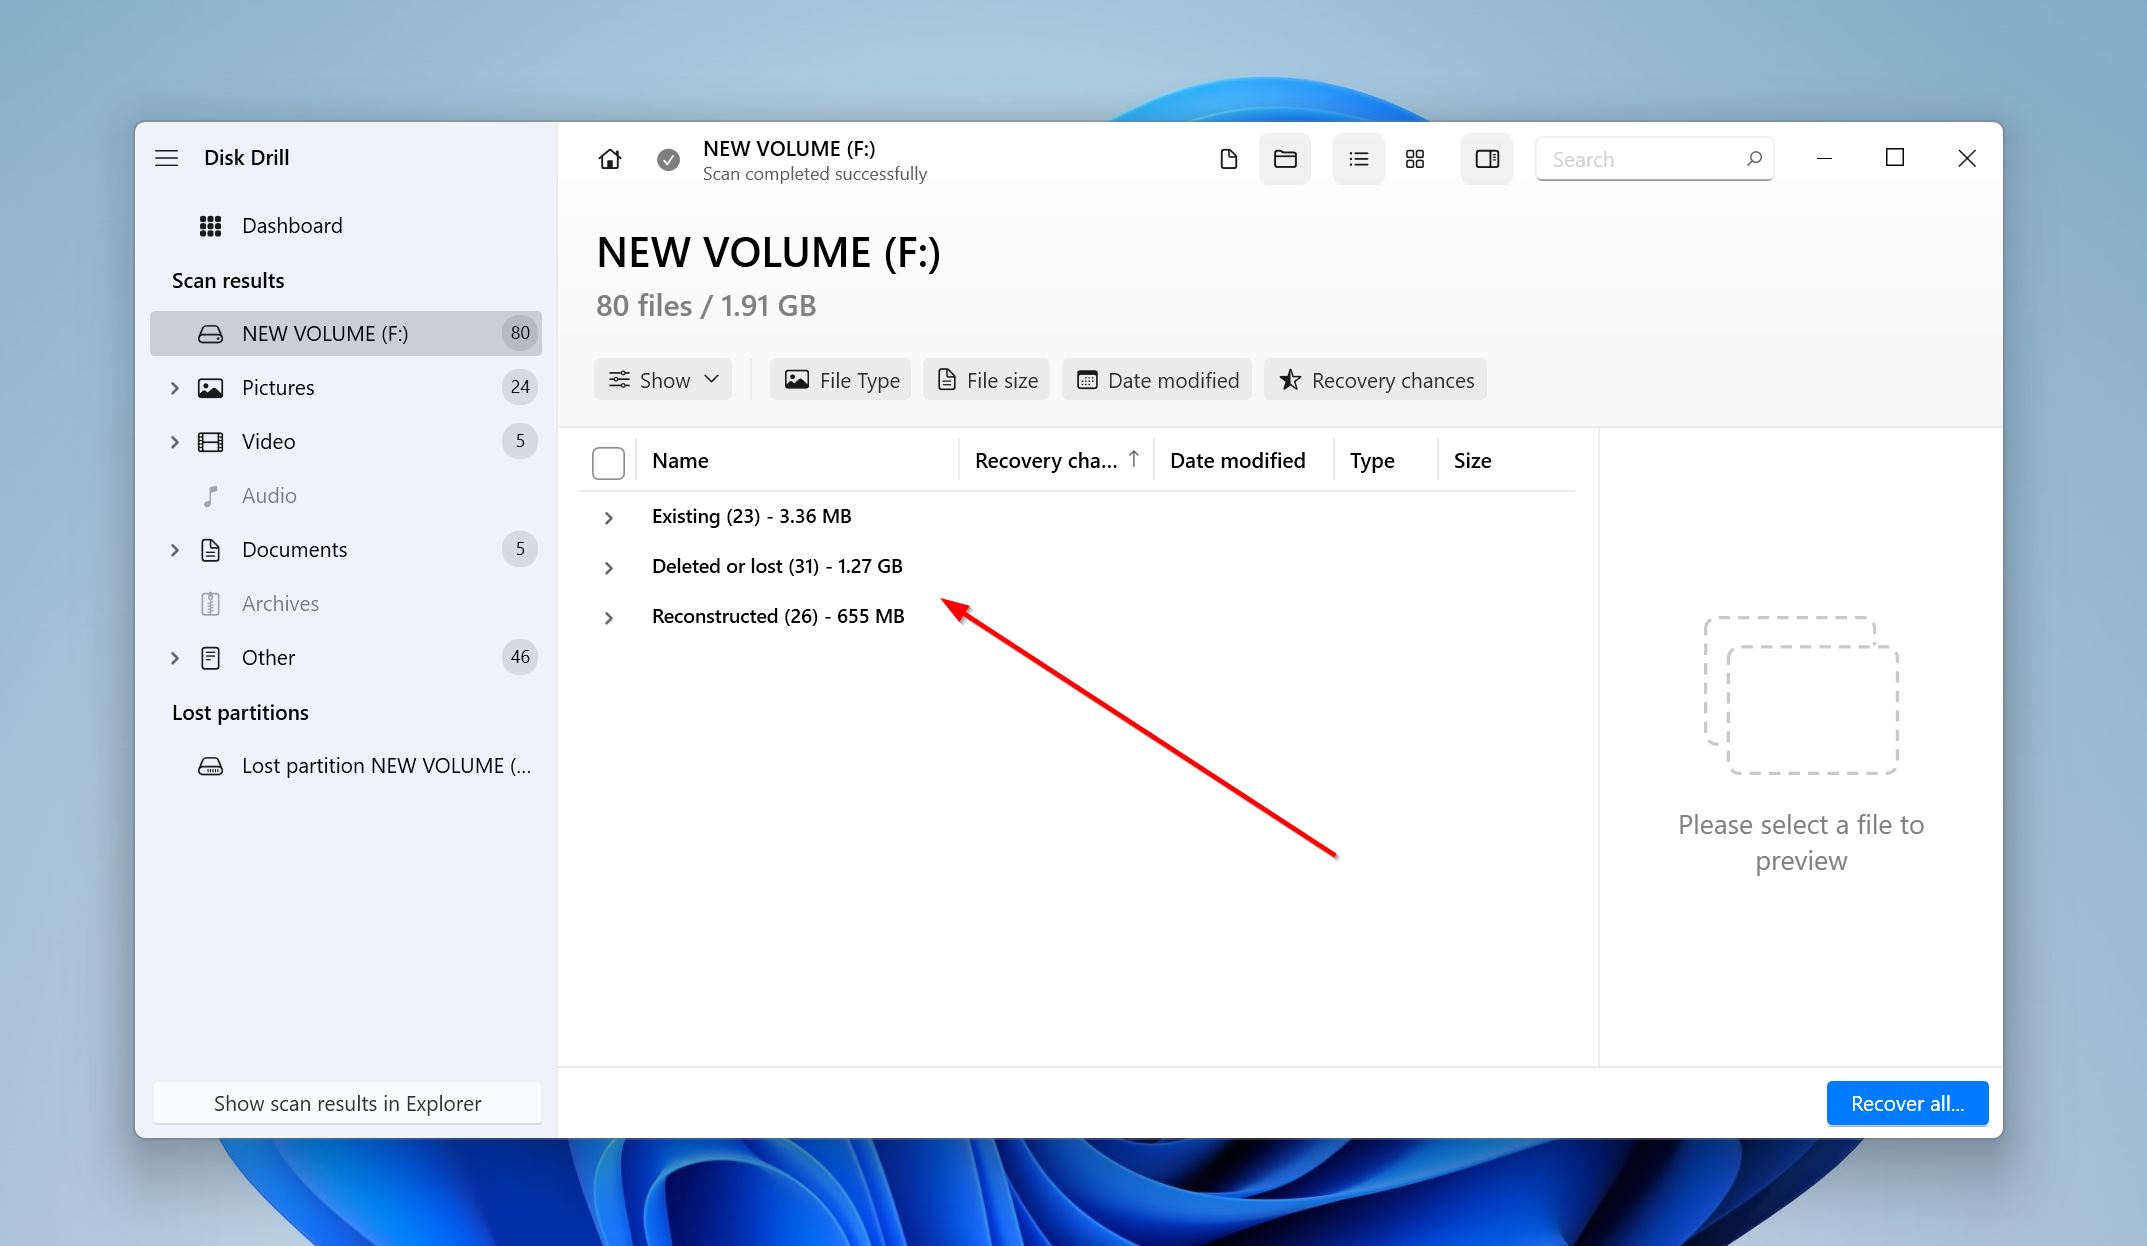
- Expand the Existing section to view the files that were stored on your drive when you created the disk image.
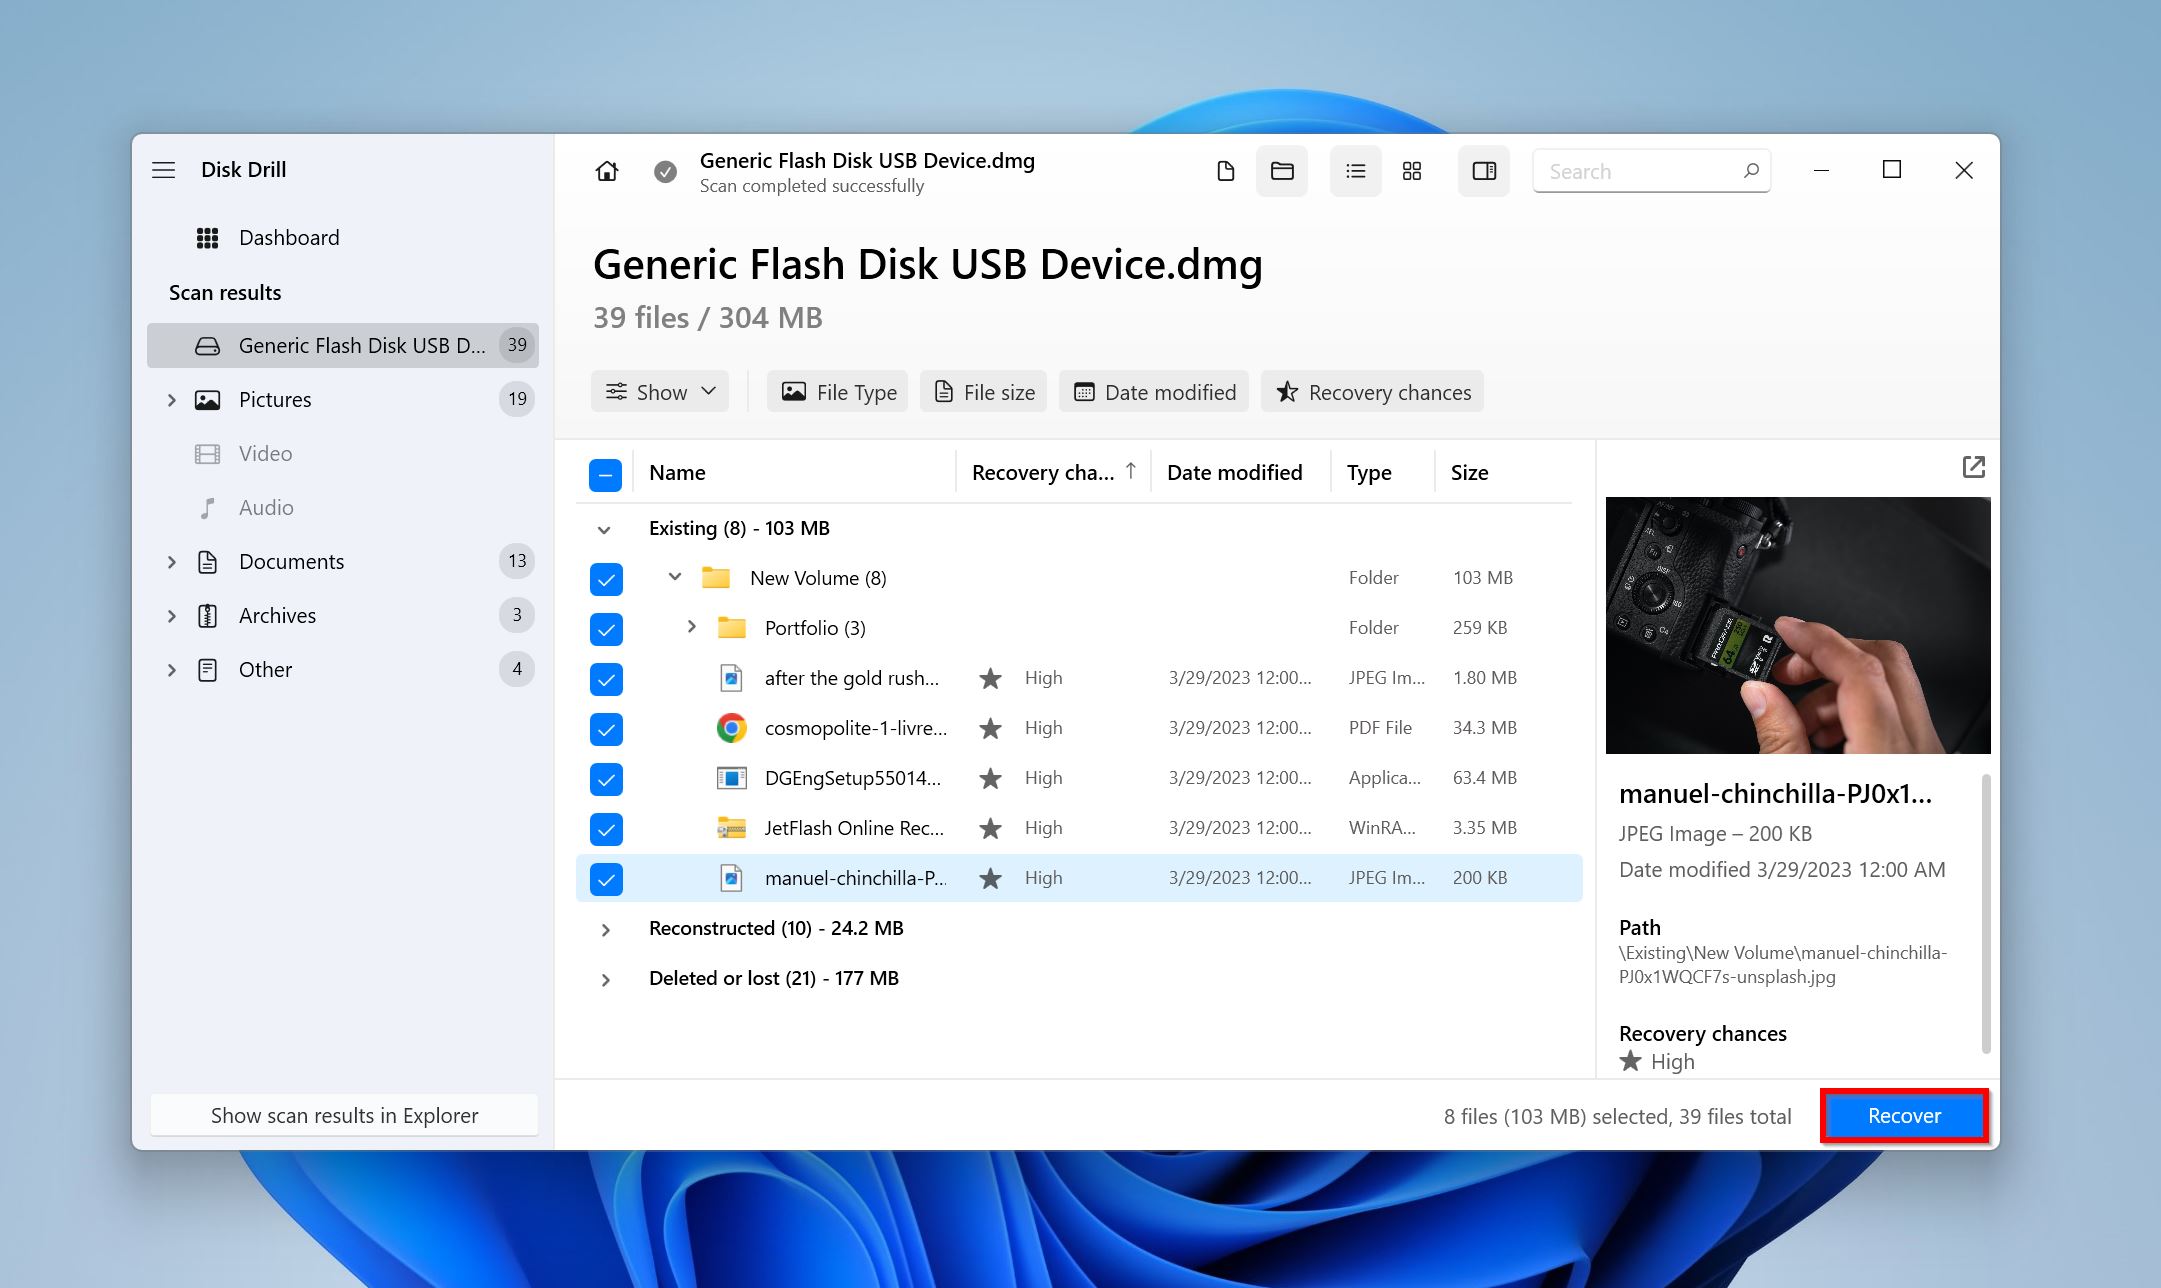
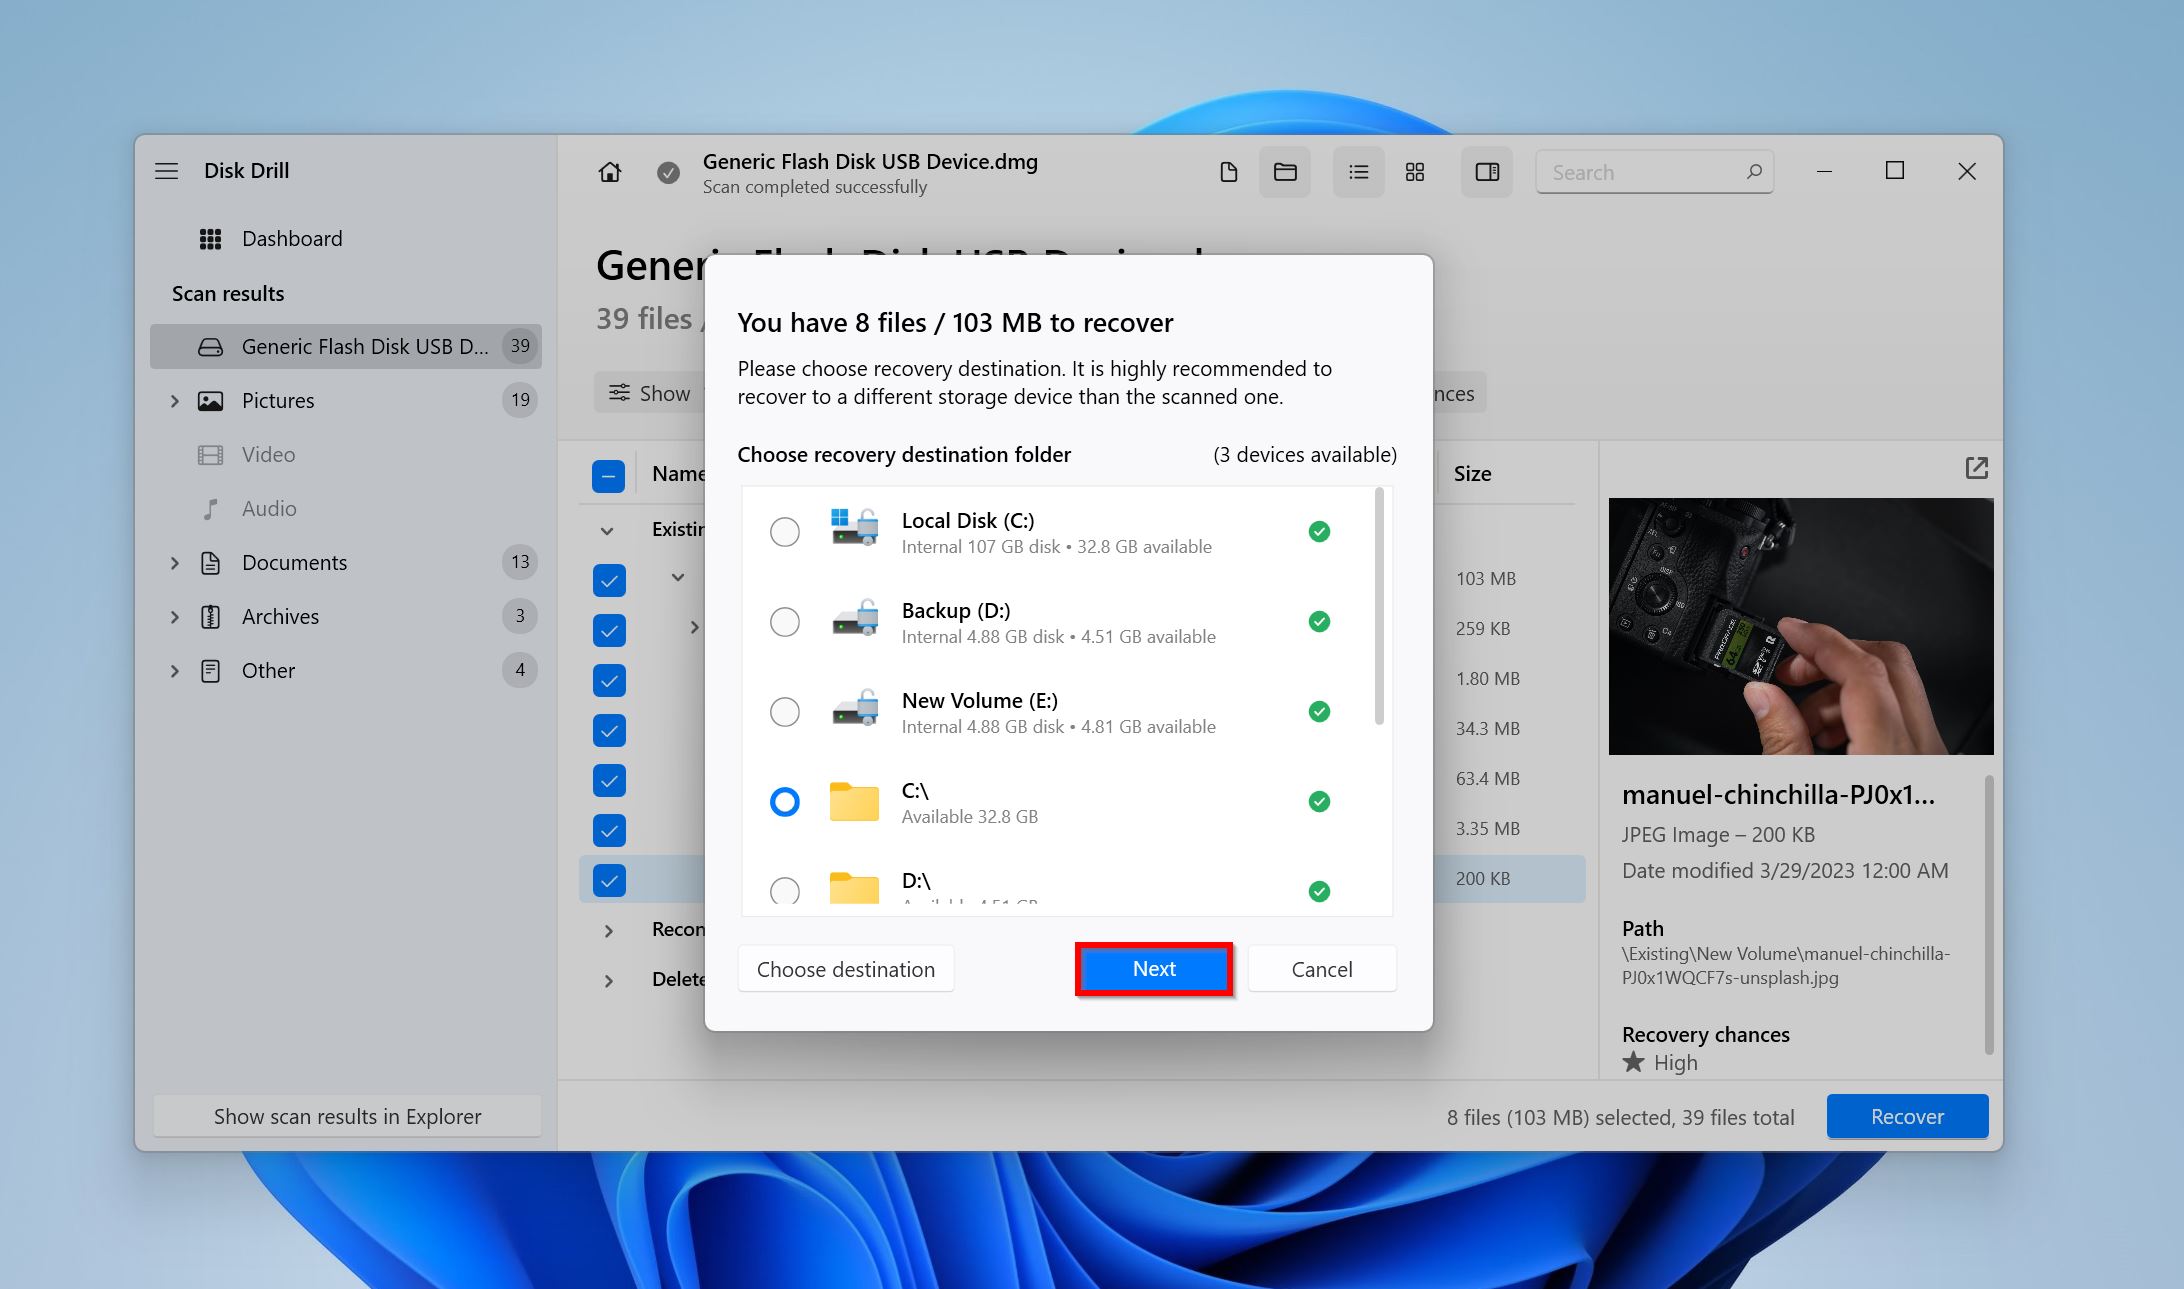
- Select the files using the checkboxes. Disk Drill displays a preview of the currently selected file for easy selection. Click Recover.
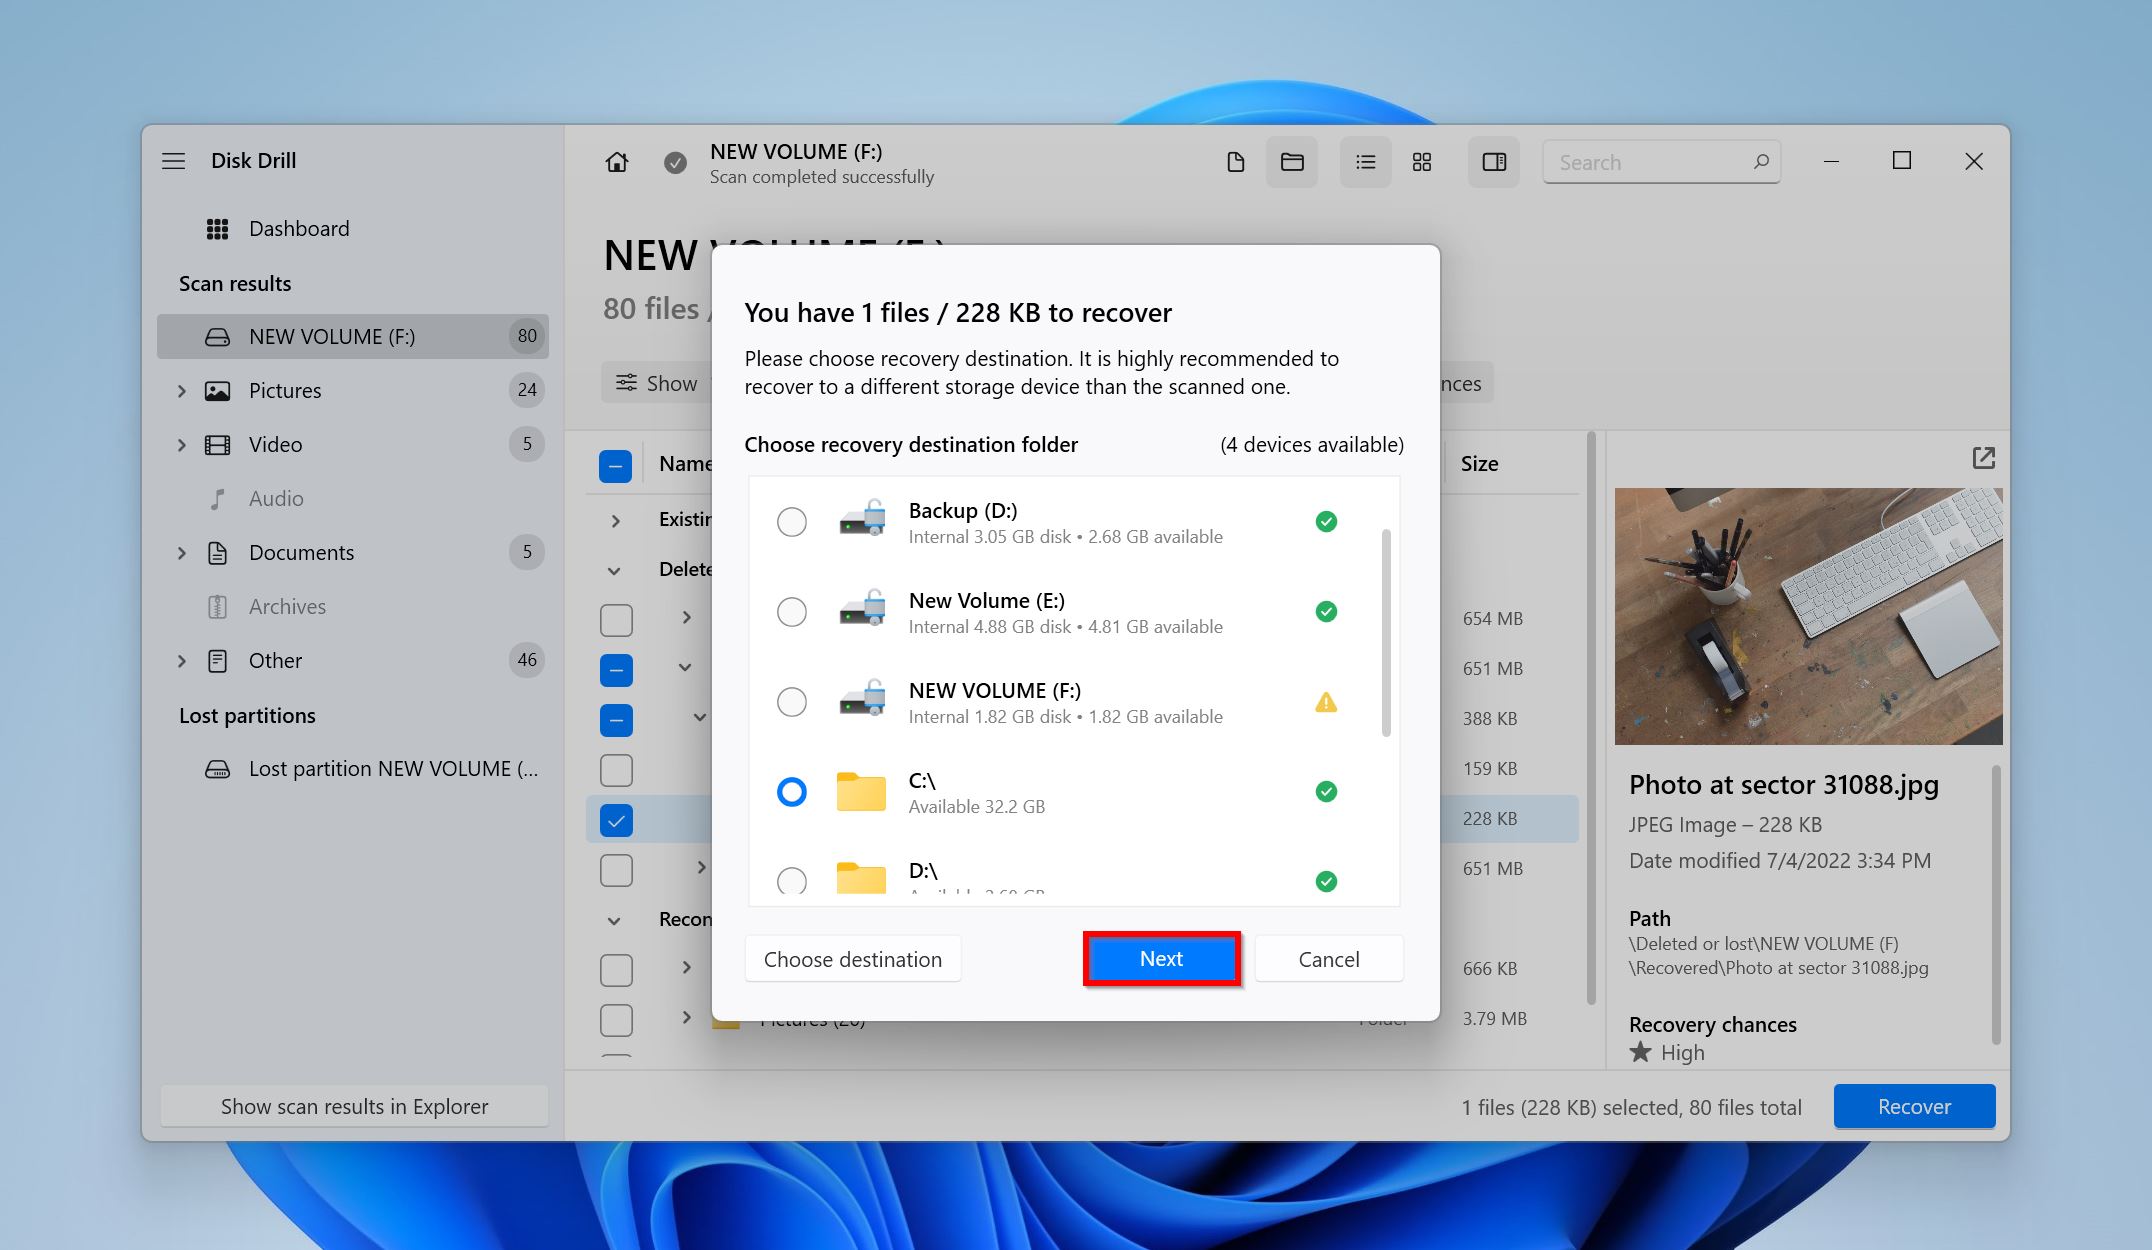
- Choose a recovery destination for your files. You can choose the recently converted drive as well, but remember that FAT32 doesn’t support individual files larger than 4GB. Click Next.
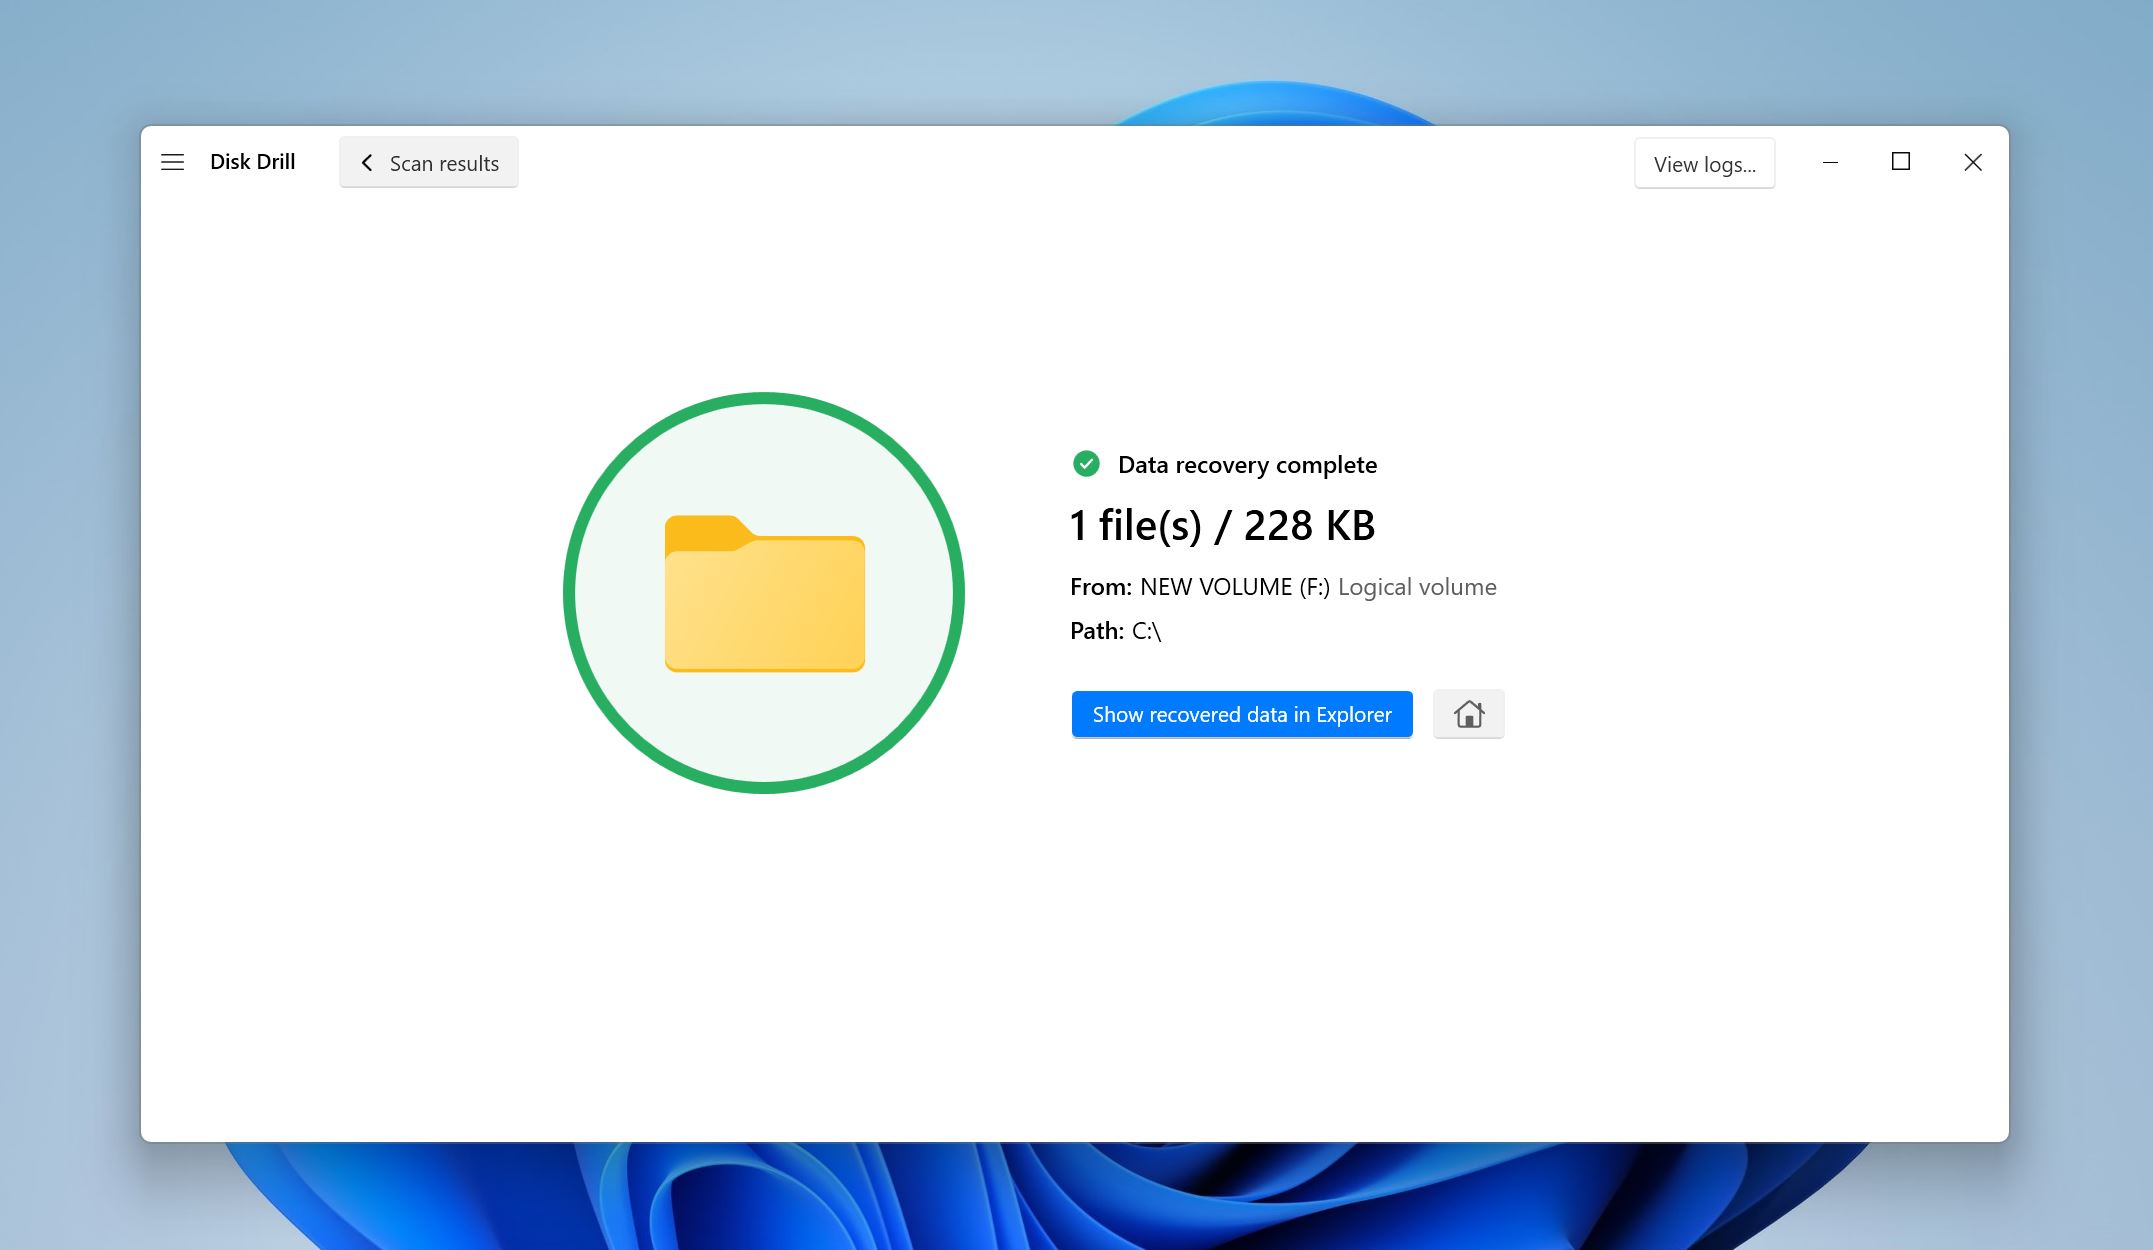
- Disk Drill will recover your data.
Method 3: Shrink Unused Space on Your Disk and Convert It to FAT32
If you have NTFS partitions on your PC with unused storage space, you can convert that extra space into a new FAT32 partition. This process is non-destructive, and you won’t lose any data in the process.
Keep in mind, Windows limits the partition size for FAT32 to 32 GB. If you want to convert a larger amount of storage space to FAT32, you’ll either need to use third-party tools or make multiple 32 GB partitions.
Here’s how to shrink unused space on your drive and convert it to FAT32:
- Type “disk management” in Windows Search. Click on Create and format hard disk partitions from the search results.
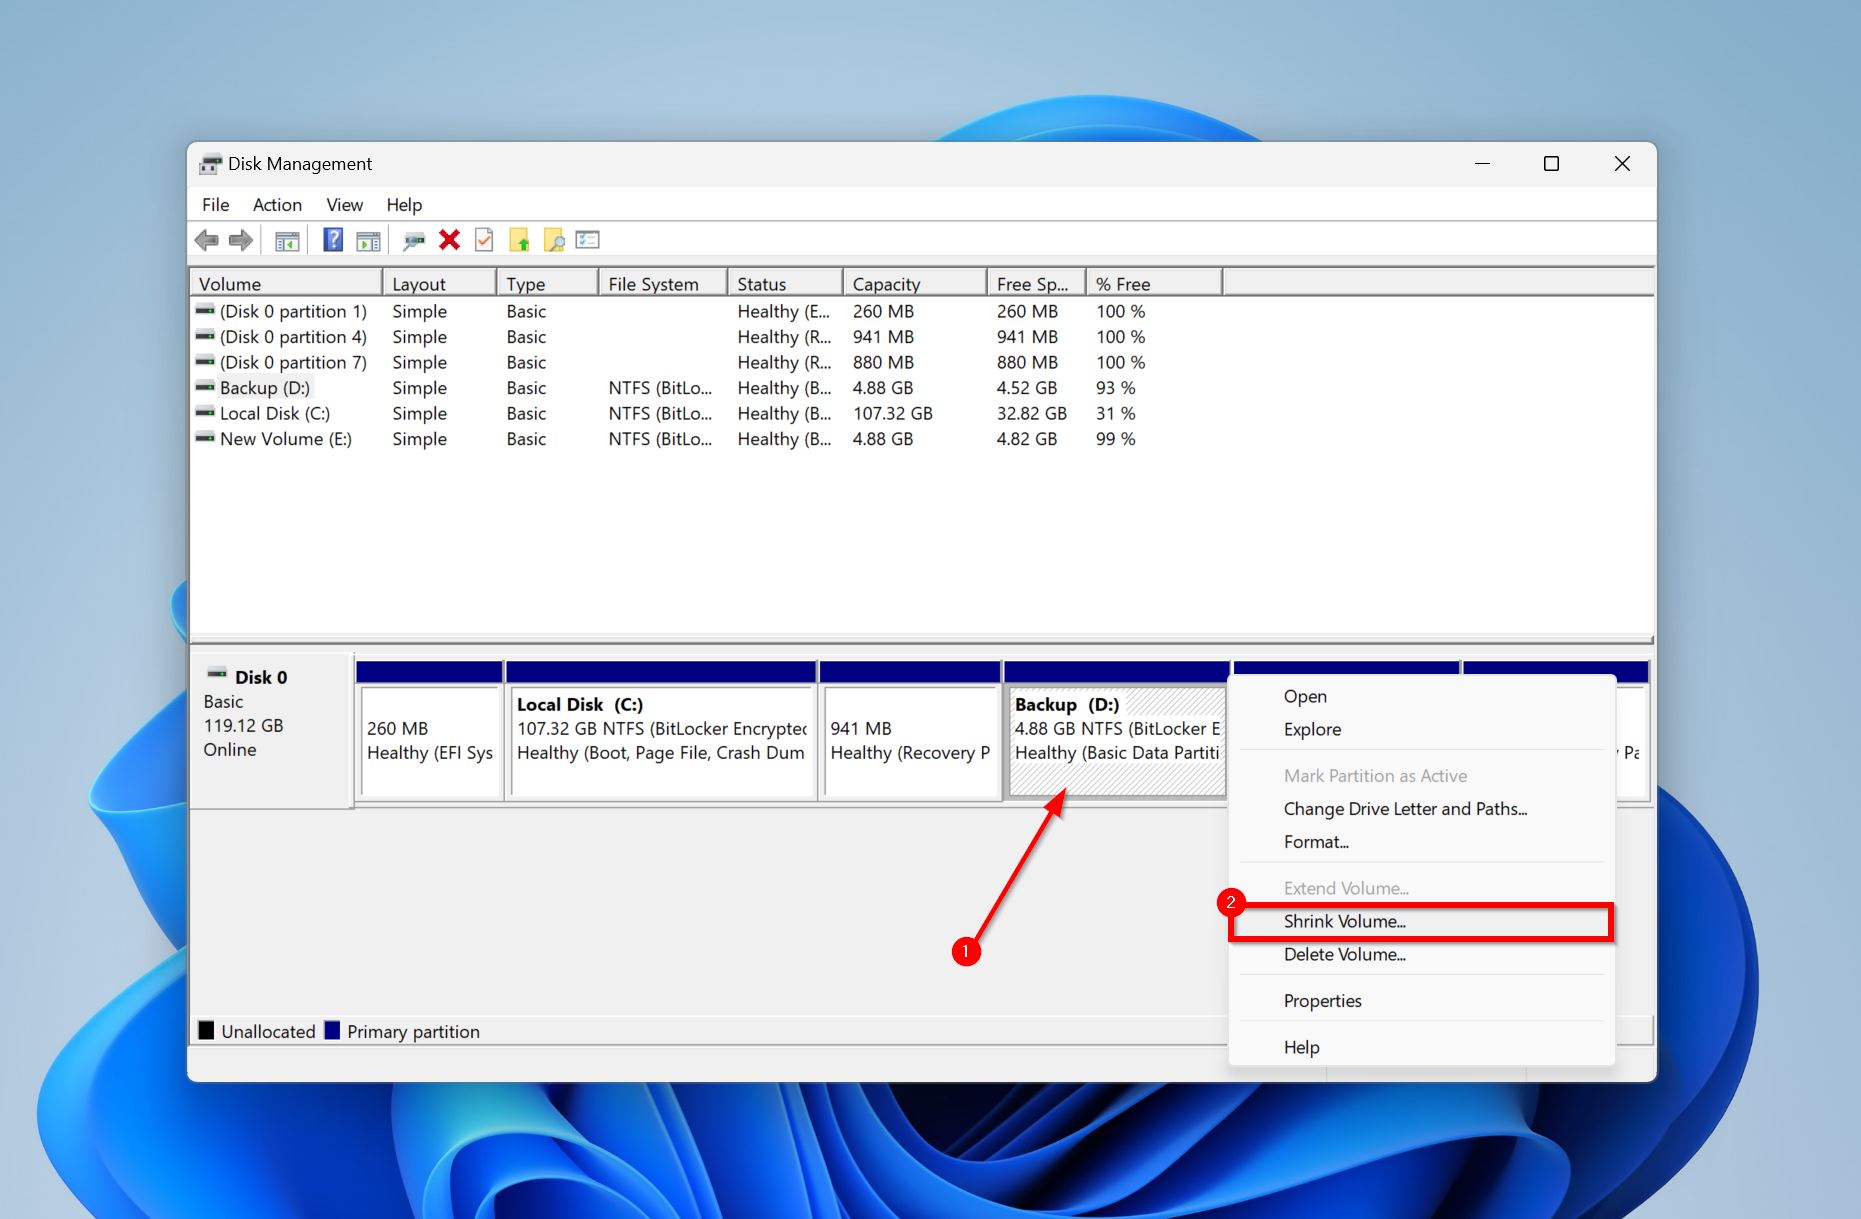
- At the bottom of the Disk Management window, right-click on the partition you want to shrink and click on Shrink volume.
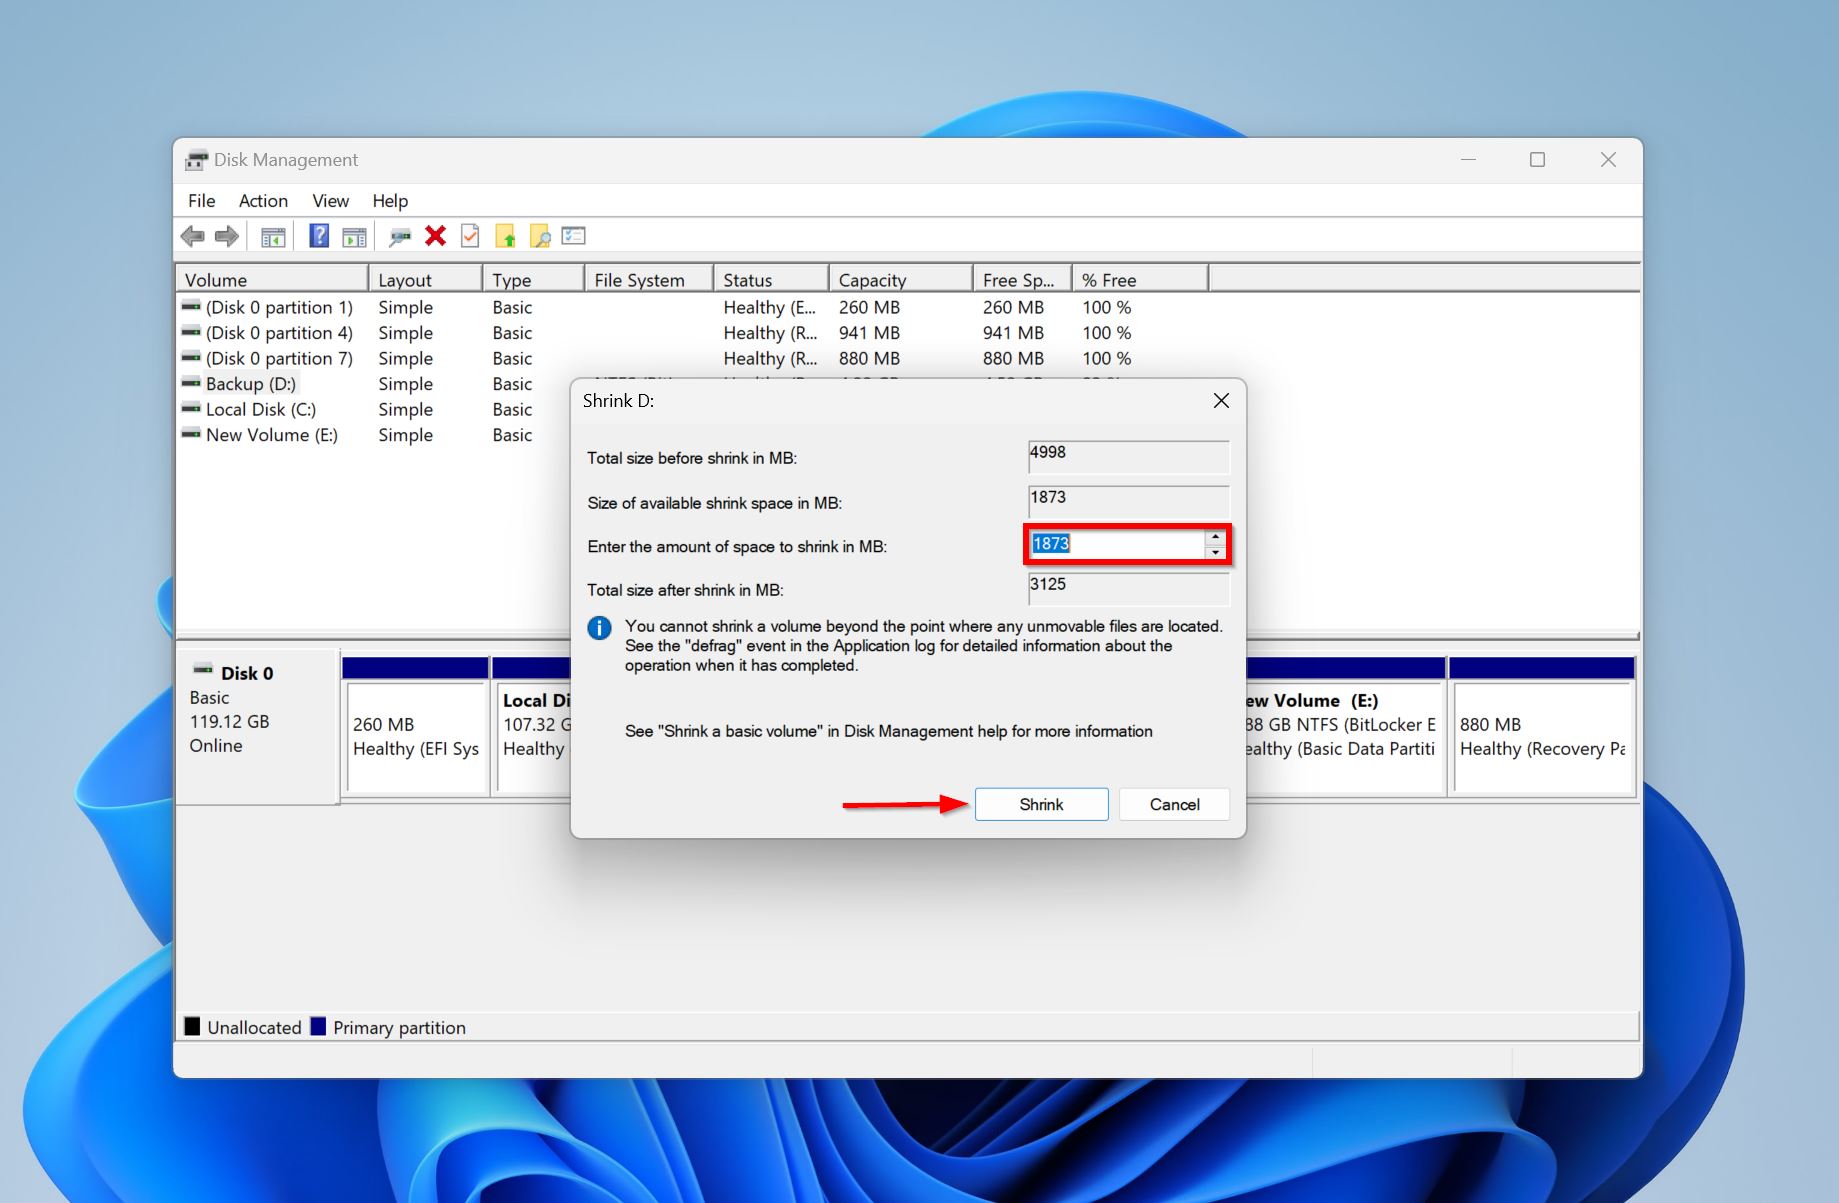
- Now, enter the amount of space you wish to shrink. We recommend you leave some free space on the partition unless you’re sure you won’t need it. Click on Shrink.
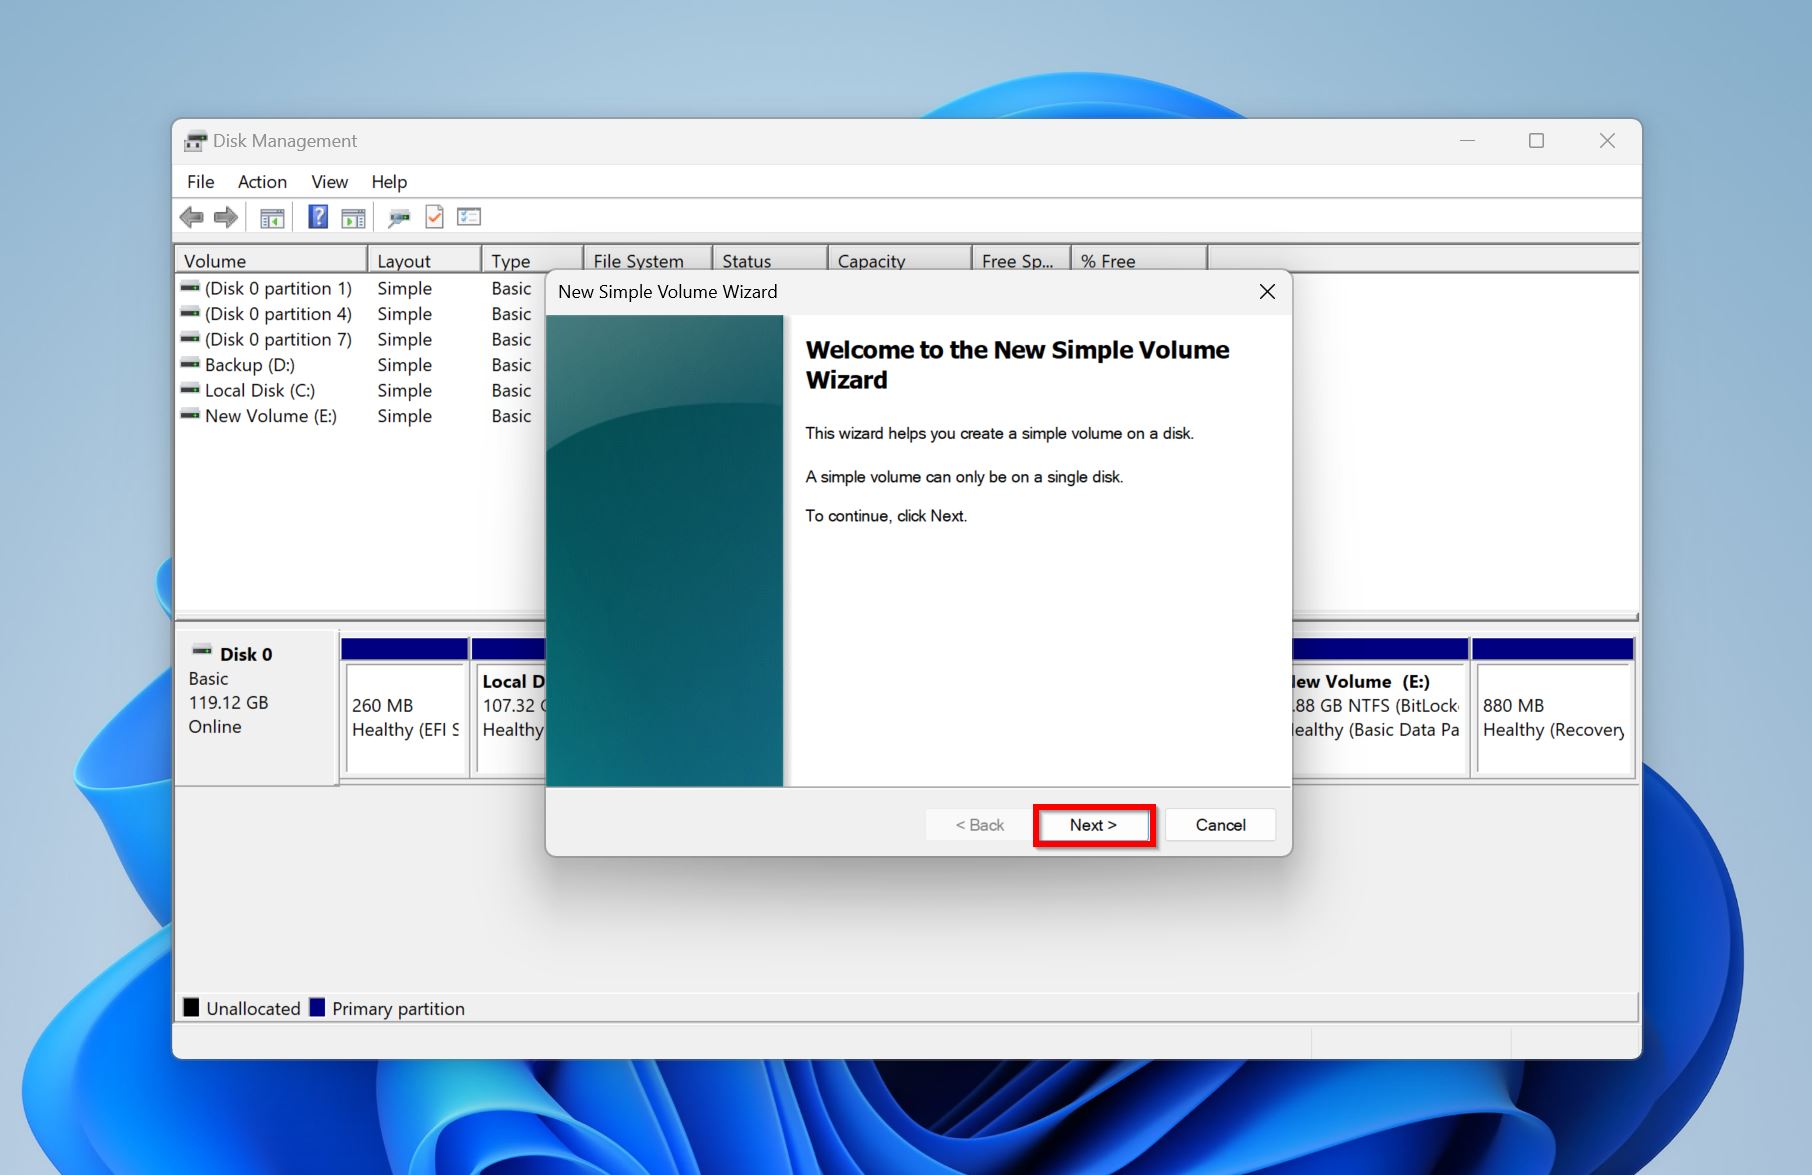
- The shrunk space will show up as Unallocated in Disk Management. Right-click on it and select New simple volume.

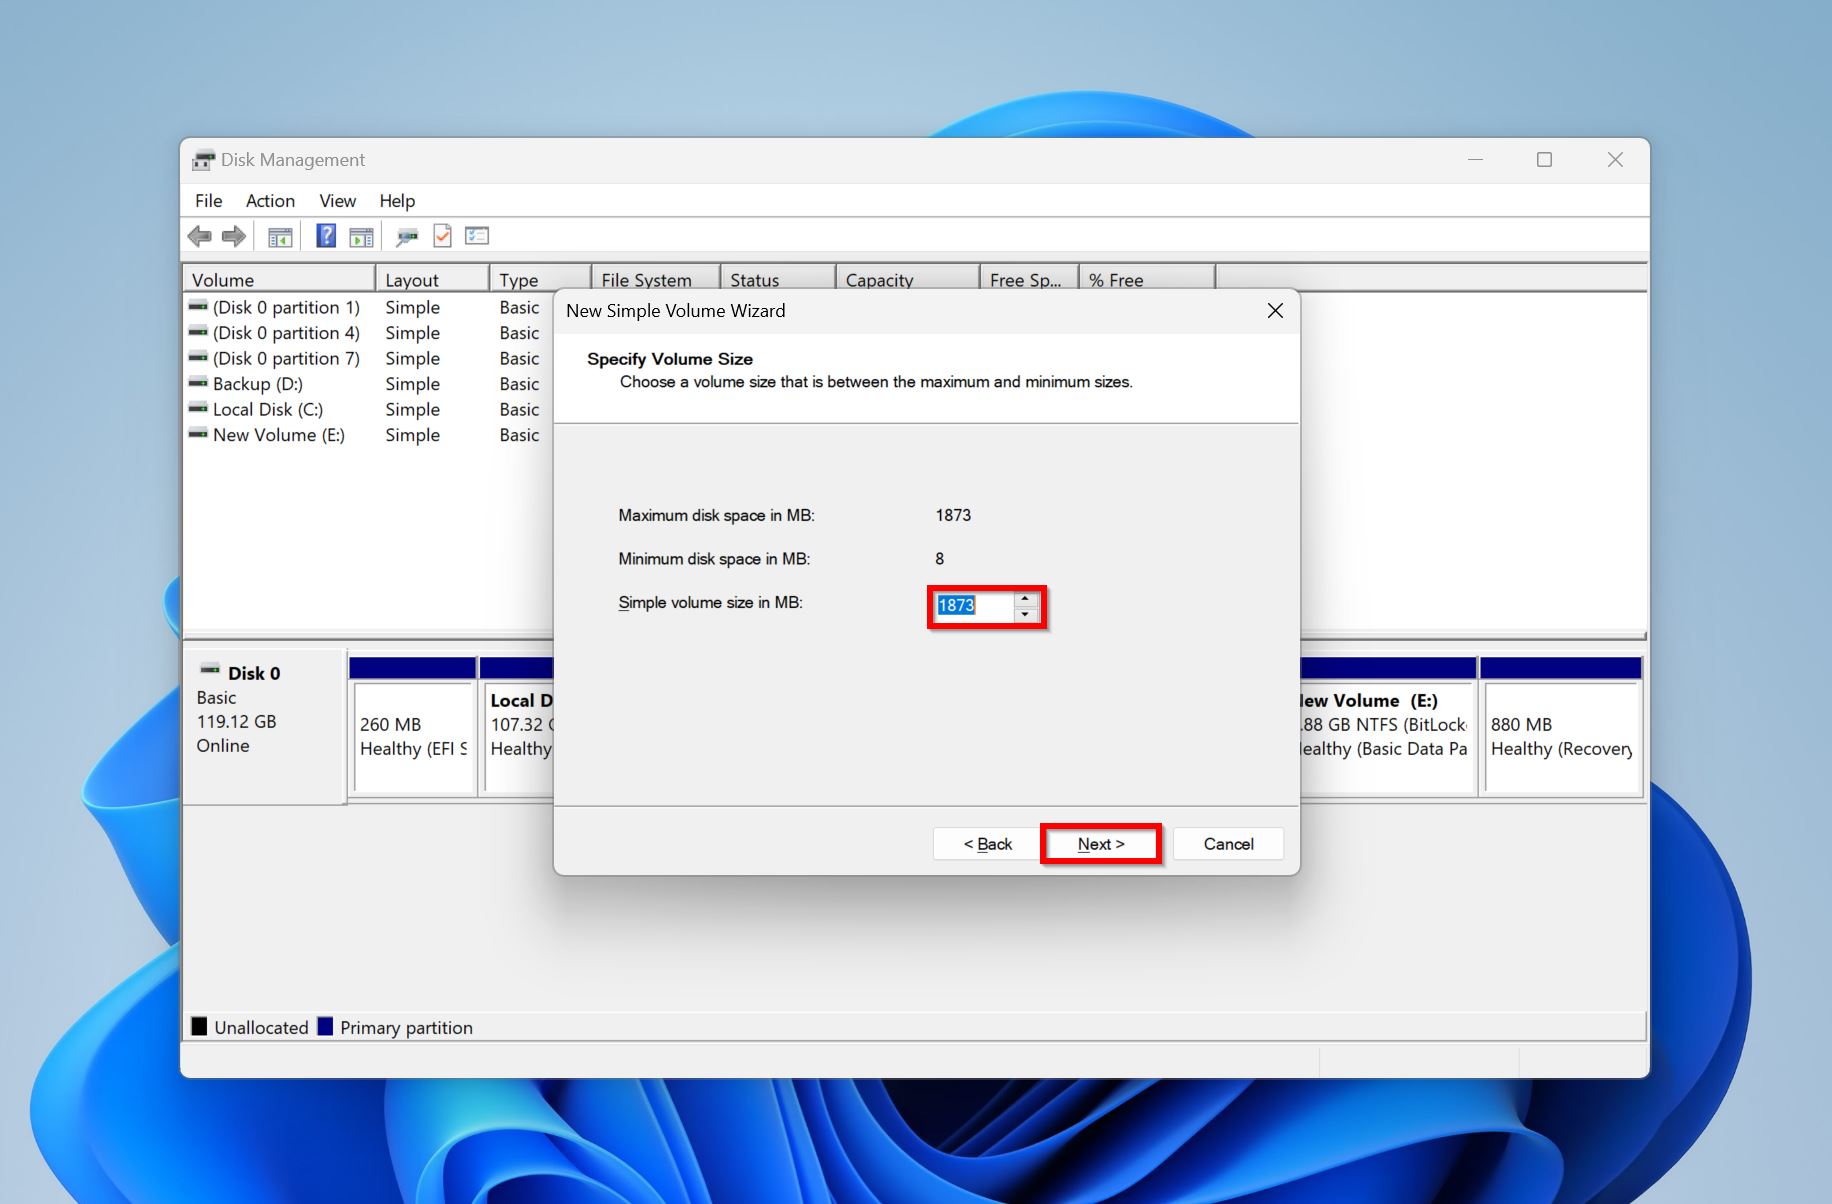
- Click Next on the New Simple Volume Wizard welcome screen.
- Enter the size of the FAT32 partition in Simple volume size in MB: column. Click Next.
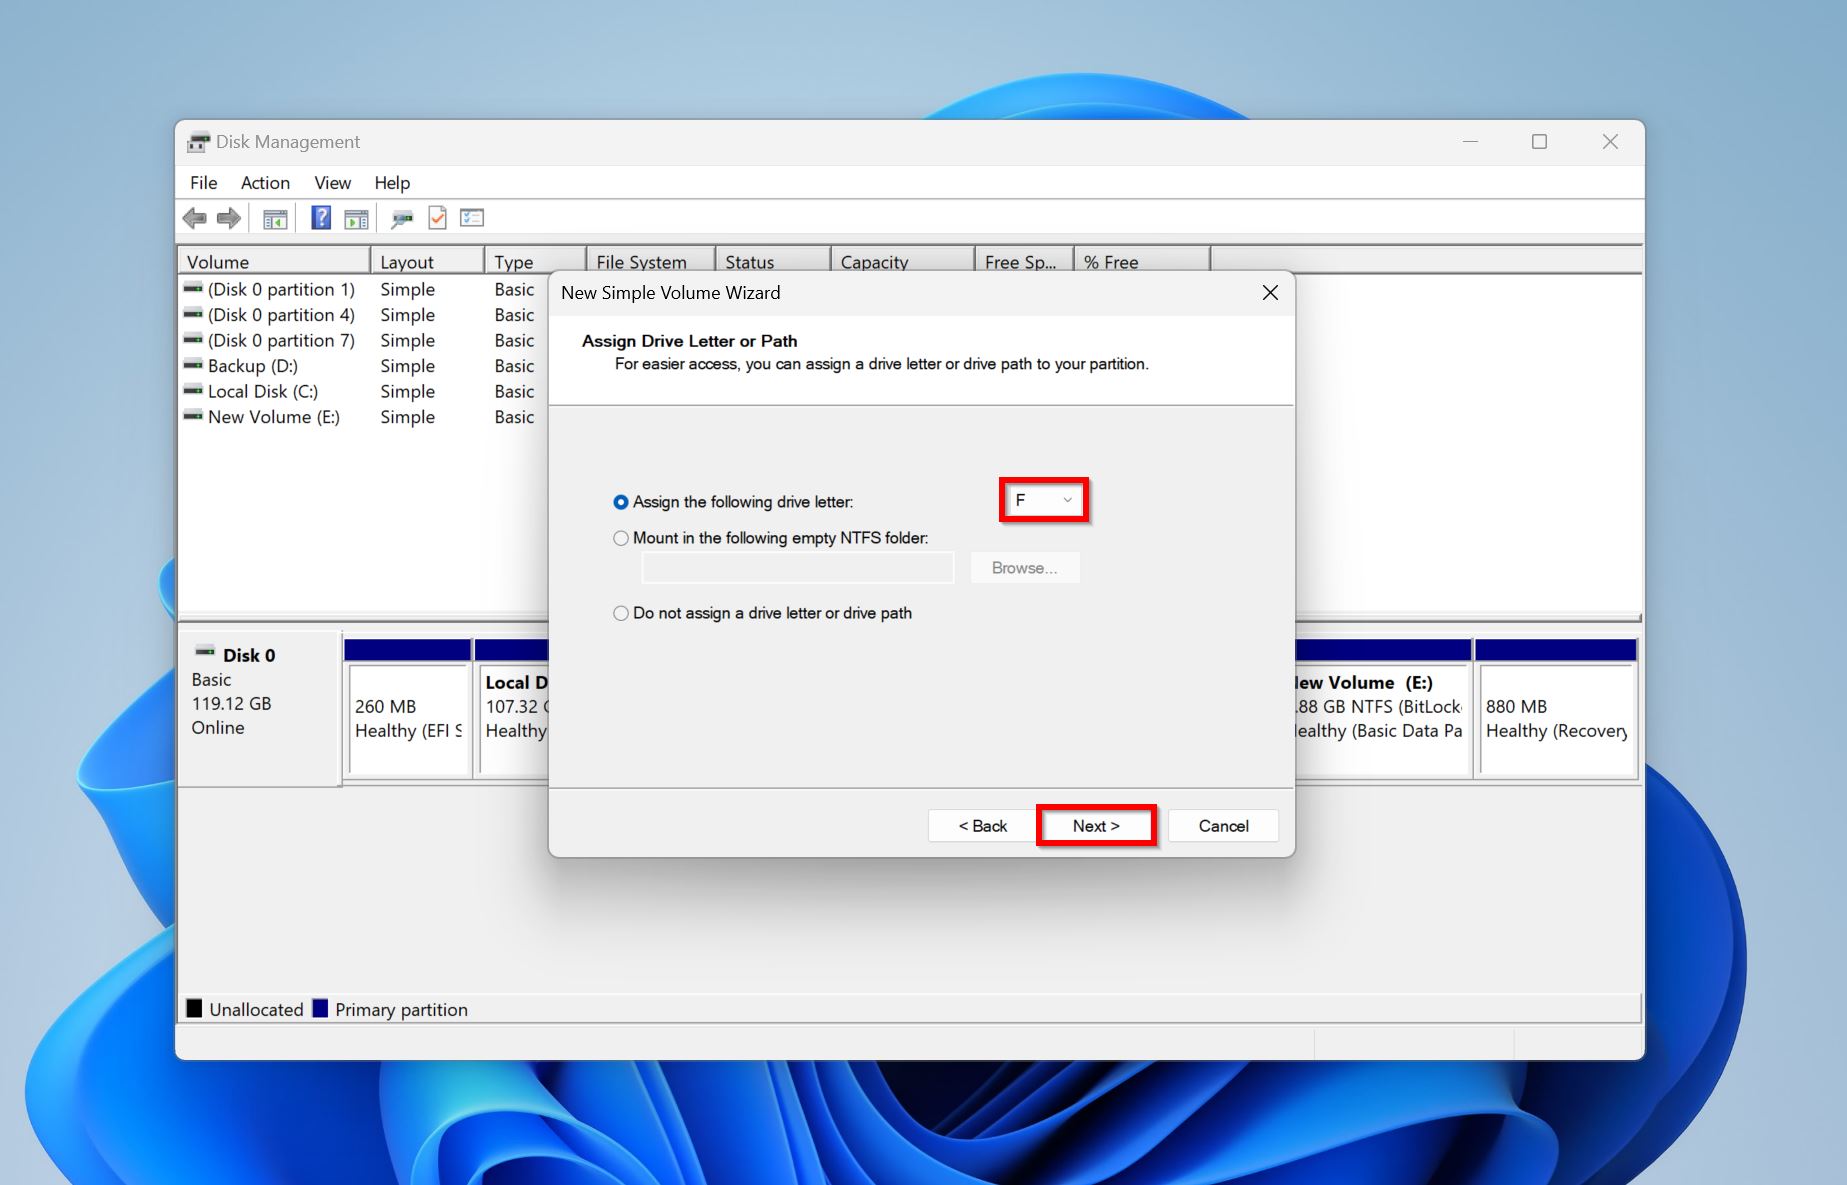
- Select a drive letter from the drop-down menu and click Next.
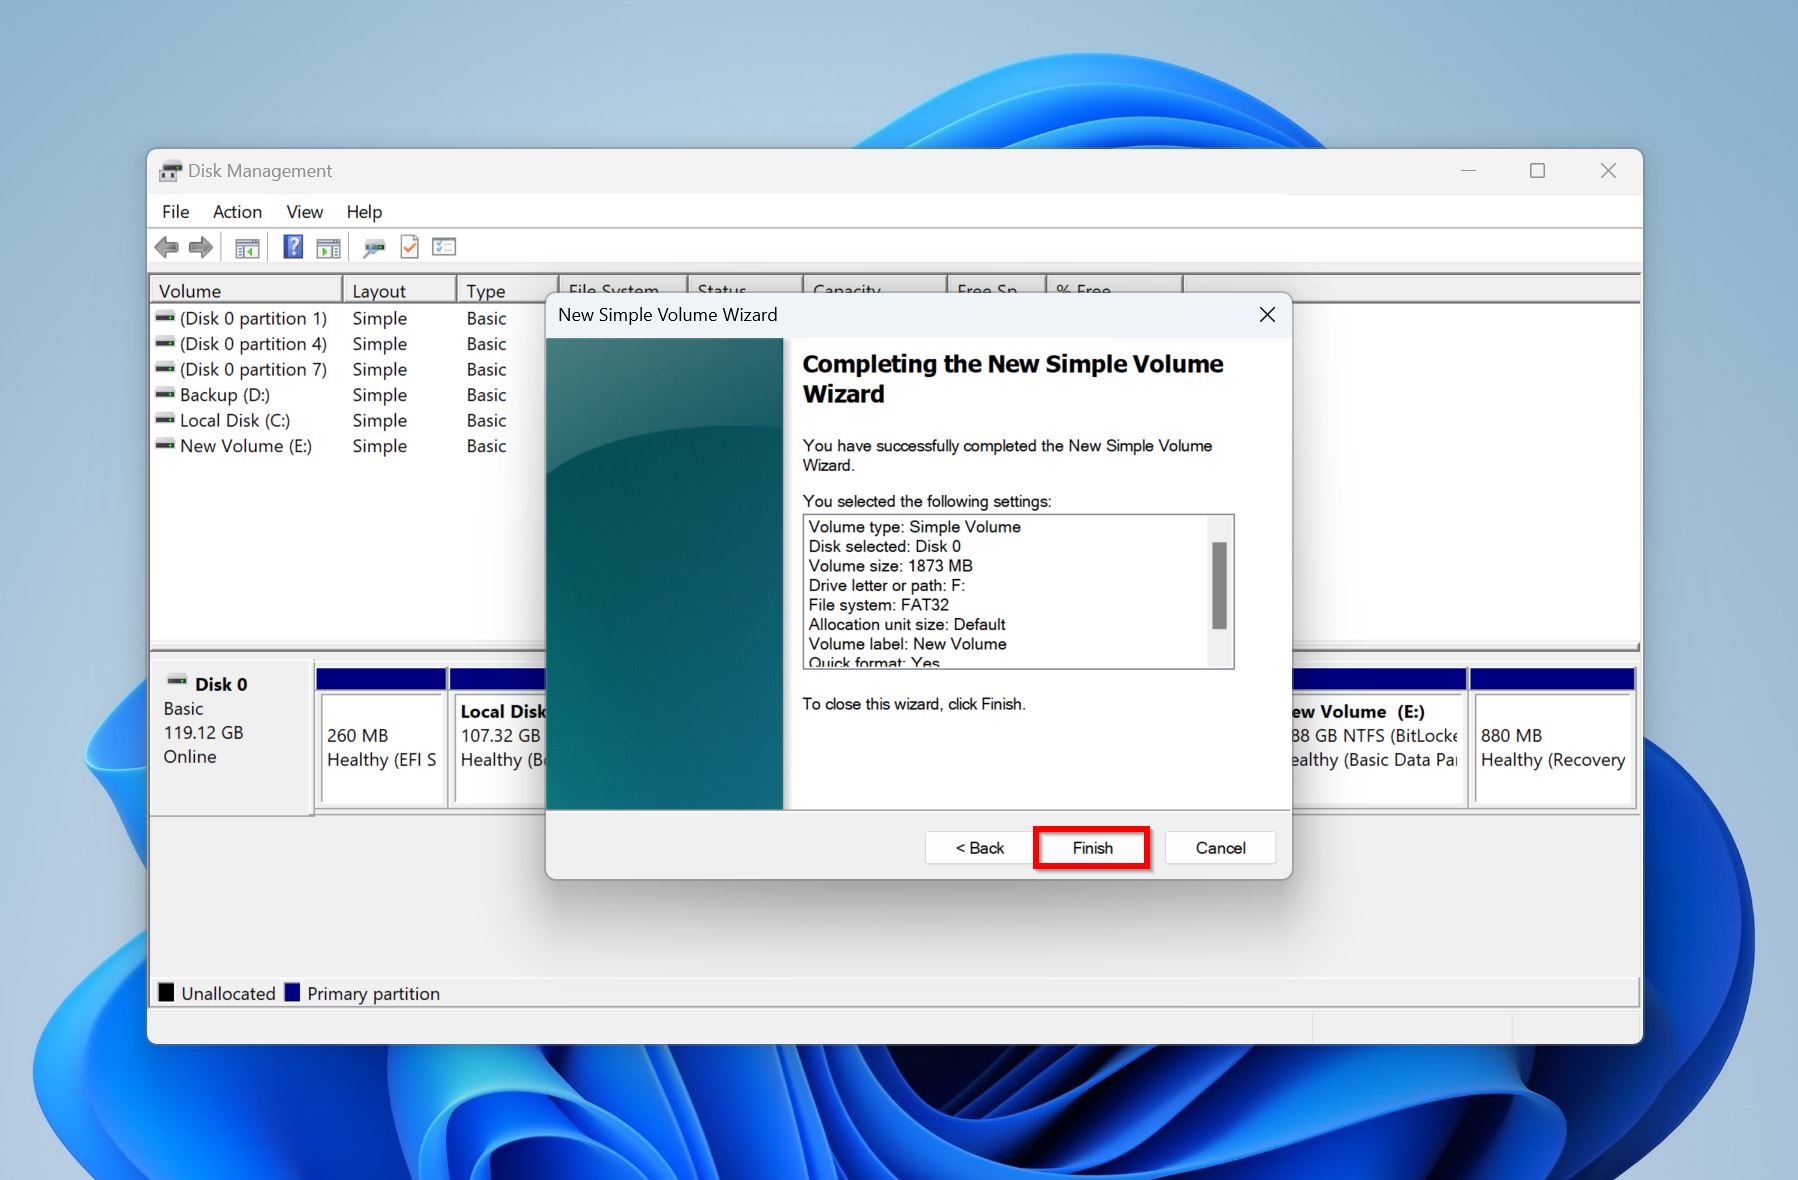
- Select FAT32 from the File System drop-down menu. You can also modify the Volume label on this screen. To move forward, click Next.

- Finally, click Finish to create the new FAT32 partition.
Recover Data Lost After or During the Process of Formatting
Did you format your drive to FAT32 without creating a backup, or lost data during the conversion process using the previous methods? Don’t fret, because it’s still possible to recover your data even after formatting your drive from NTFS to FAT32. However, it depends on whether the Perform a quick format option was ticked (the option is checked by default). If yes, you can recover your data using Disk Drill or any other competent data recovery app.
Partial recovery from a full formatted drive (with the Quick Format option unchecked) is possible only if the formatting process was canceled or otherwise interrupted. If the format was completed, your only option is to contact a professional data recovery service. Even then, it’s unlikely your data will be recovered.
For this tutorial, we’ll use Disk Drill to recover data after a quick format:
- Download Disk Drill and run the setup.
- Open Disk Drill, select the drive or partition you quick formatted, and click Search for lost data.
- Click Review found items to view recoverable data.
- Expand the Deleted or lost and Reconstructed sections to view all the deleted files that Disk Drill discovered.
- Select the files you wish to recover. Click on the eye icon next to the filename to see a preview of it. After confirmation, click on Recover.

- Pick a recovery destination and click Next.
- Disk Drill will recover the files for you. If the total size of your files is less than 500 MB, you won’t have to pay a penny to recover them. Additional recovery requires a license.
FAQ
How to convert NTFS to FAT32 without losing data on Mac?
There’s no way to convert an NTFS drive to FAT32 on macOS. You’ll need to back up all your data first, then use the Disk Utility to erase and format the drive to FAT32.
How to convert a USB drive from NTFS to FAT32 without losing data?
To convert a USB drive from NTFS to FAT32, use a third-party utility like AOMEI Partition Assistant, or use Disk Drill in combination with Windows utilities.
What are the disadvantages of the FAT32 file system?
Some disadvantages of the FAT32 file system are:
- FAT32 is more susceptible to corruption because it isn’t a journaled file system.
- Only supports a volume size of up to 2 TB.
- Maximum individual file size of 4 GB.
- Doesn’t offer any compression.
How to convert NTFS to FAT32 on Android?
Android doesn’t recognize the NTFS format, so it’s not possible to convert a USB or SD card from NTFS to FAT32 on Android. Likewise, any APK converters that claim to do this usually don’t work.
Conclusion
Using the methods above, you’ll be able to convert a drive from NTFS to FAT32, without losing data. Since FAT32 is an older, more corruption-prone format, create regular backups of your data. You can also consider the exFAT format if you want better compatibility across macOS, Windows, and Android.
This article was written by Manuviraj Godara, a Staff Writer at Handy Recovery Advisor. It was also verified for technical accuracy by Andrey Vasilyev, our editorial advisor.
Curious about our content creation process? Take a look at our Editor Guidelines.