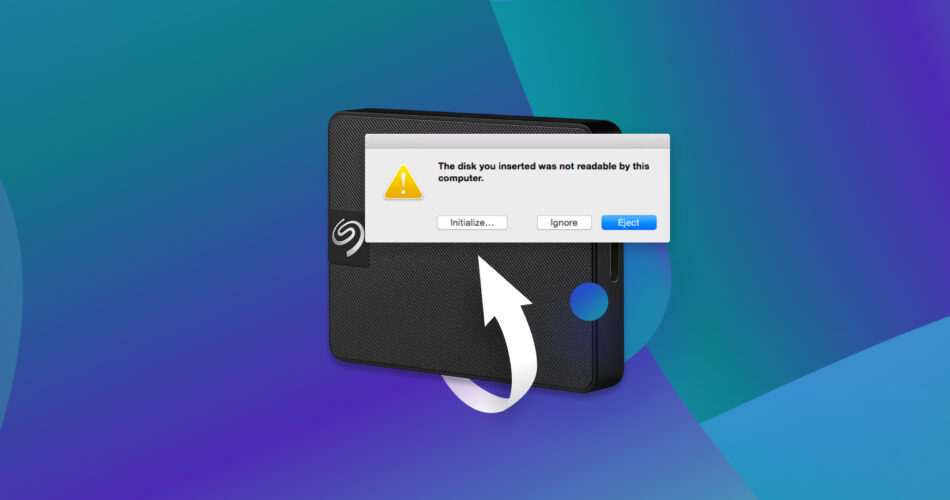
Tried to access the files on your external storage device but as soon as you’ve connected it to your Mac, you’ve received a pop-up saying that the disk you inserted was not readable by this computer? Don’t worry, it might still be possible to fix your drive and regain access to the data located there.
In this article, we’ll cover how to repair an unreadable or inaccessible external drive using the easiest and most effective methods.
How to Recover Data from an Unreadable Disk on Mac
First of all, we would like to emphasize the fact that if you believe that your USB drive or external hard drive that you’re trying to connect to your Mac is damaged, it’s a good idea to retrieve the files from it before moving forward with the repair. In some cases, even if your computer can’t access the data located on such a drive, a data recovery tool can do that.
Important: You should be able to recover the files from an unreadable drive using a specialized tool only if you’re able to see the disk in the Disk Utility app and if it shows the correct hard drive size. If the troublesome drive is not displayed in Disk Utility, you won’t be able to retrieve the data from it using this method.
In such a situation, we recommend using one of the best data recovery tools called Disk Drill to recover the files located on external hard drives that your Mac refuses to read and internal HDDs. Thanks to powerful scanning algorithms, this tool is capable of scanning and restoring data from an SSD, external HDDs, USB drives, SD cards, and other disks that are failing, unreadable, or not recognized by your Mac. Moreover, it supports most major file systems (including HFS/HFS+, APFS, NTFS, FAT16/FAT32/exFAT, NTFS5, EXT2, EXT3, EXT4, and RAW disks), so you can be sure that it’ll have you covered.
For more information about this data recovery software, check out this in-depth Disk Drill review.
Follow these steps to recover data from an unreadable disk on your Mac using Disk Drill:
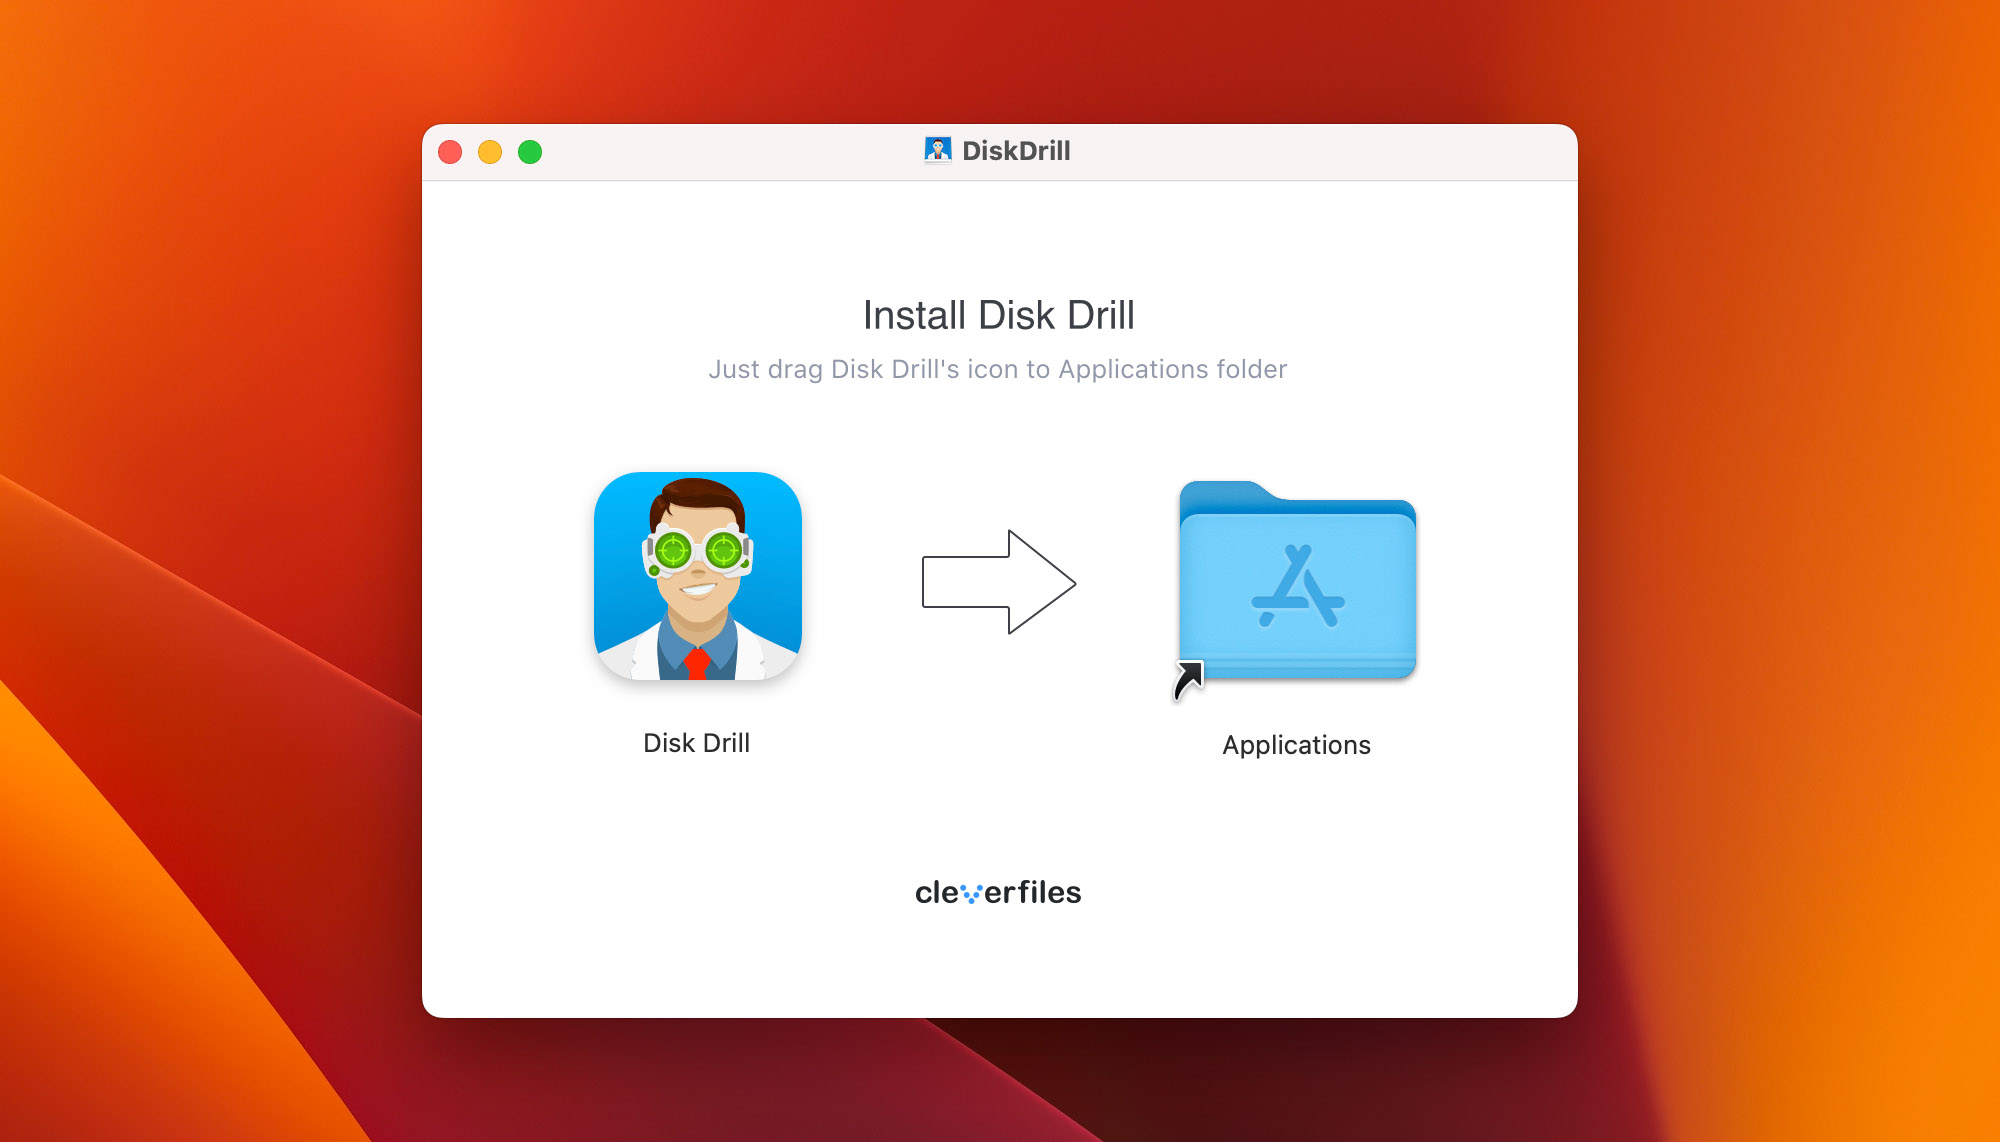
- Download Disk Drill and follow the onscreen instructions to install it.
- Connect the ‘not readable’ external storage device to your Mac.
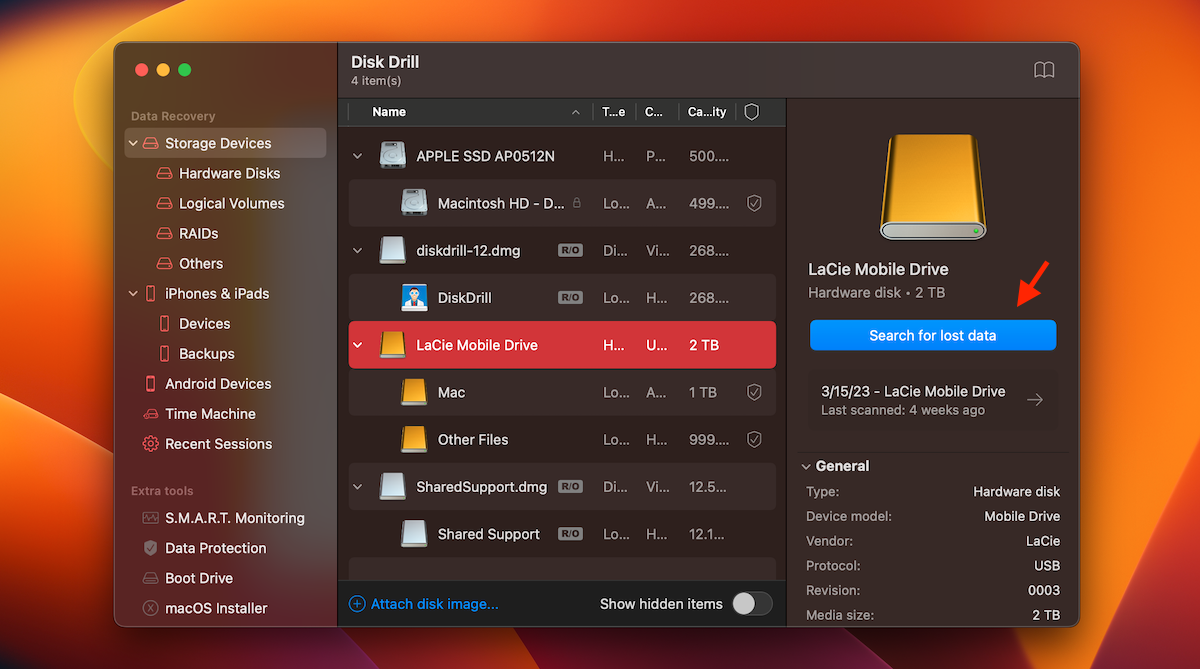
- Open the Disk Drill application and choose Storage devices from the sidebar on the left.
- Choose the needed drive from the list of available devices and click the Search for lost data button.
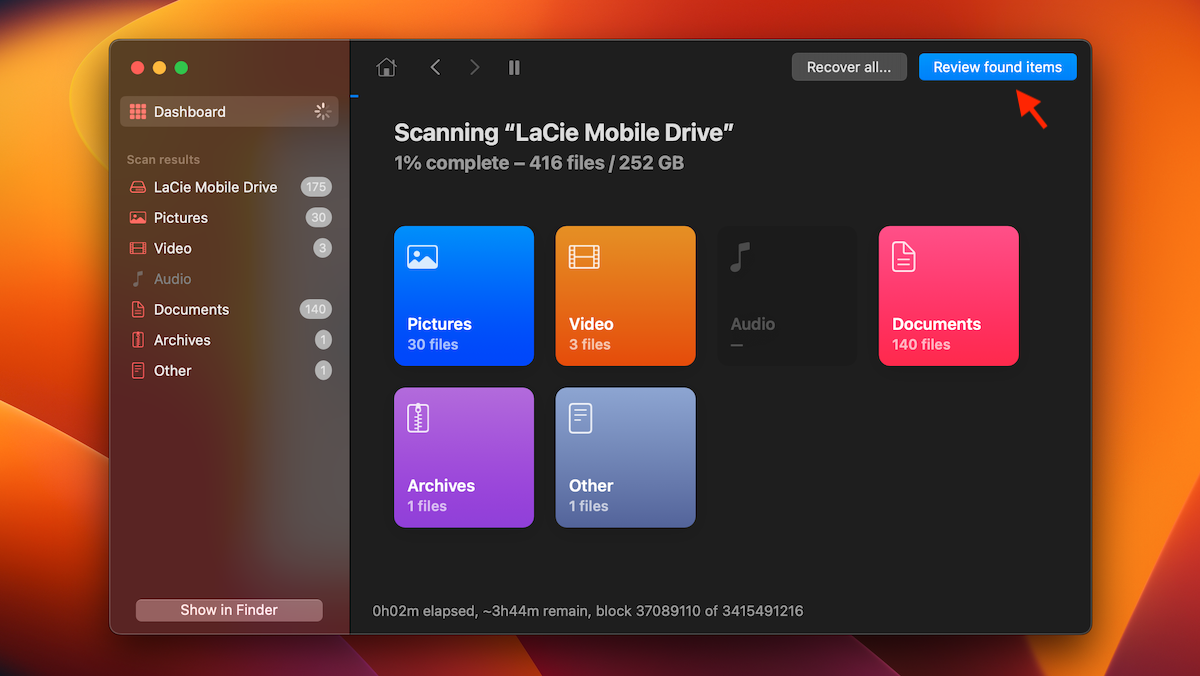
- Wait for the scan process to finish or click Review found items right away to look through the files as soon as the tool discovers them.
- Tap the eye icon near a file to preview it.
- To recover all of the discovered data, place a checkmark in the clear box at the top of the list of files. If you want to recover only certain files, you can use the sidebar on the left to choose the group of data it belongs to or use the search tool at the top-right of the screen to find a file if you know its name or the file’s extension.
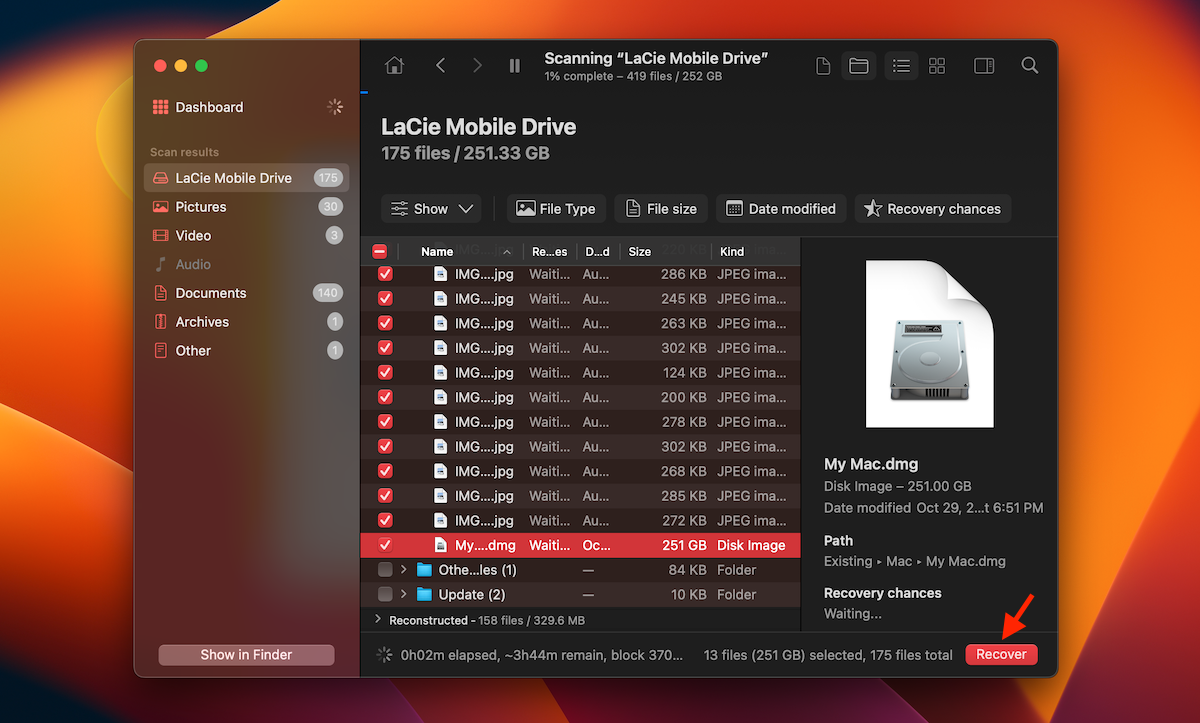
- When you’re done selecting the files you want to retrieve, click the Recover button at the bottom-right and choose the location where you wish to store the recovered files (it’s best to choose a folder located on a drive or device different from the one you were recovering it from).

Once you’ve successfully recovered the files from your unreadable drive, you can finally take a deep breath. Now the only thing that’s left to do is to try to fix the issue on your drive to be able to use it again.
Resolving “The Disk You Inserted Was Not Readable” Error on Mac
There are five main ways you can make an attempt at fixing the issue that’s stopping your Mac from accessing the files on your external storage device. We’ve organized these methods starting with the less invasive ones, so it’s best to try them one after the other in the same order. So, let’s dive in.
Method 1: Troubleshoot Unreadable Drives with Basic Techniques
Before digging deeper, it’s a good idea to start with the easy fixes to make your drive readable again. Here’s what you can do to troubleshoot your unreadable external storage device with the help of your Mac:
- 🔌 Try another cable: It’s possible that the cable that you’re using to connect the external drive to your Mac isn’t working correctly. So just to be sure, it’s best to change the USB cable to a different one and try to connect the device again.
- 💻 Try different ports: Just like with the cable, there is a chance that the port that you’re using isn’t working. So you should try to use a different one to see if that’s why your Mac won’t read a disk.
- ⏏️ Check the file format of the drive: If your Mac’s operating system version does not have native read/write support for the file system format of your external storage device, then that’s the reason why your computer cannot open the drive. For example, you might have this issue with drives formatted as EXT4. In this case, to rule out the issue, simply try to connect this drive to a Linux-based computer.
Method 2: Use the First Aid Utility to Repair Disk Errors
Another solution that might help you fix your unreadable device is to run the First Aid scan on the drive. You can find this tool on the Disk Utility app directly on your Mac. First Aid is good at repairing disk errors and directory structure issues, which might be the reason why you’re not being able to view the data located on your device.
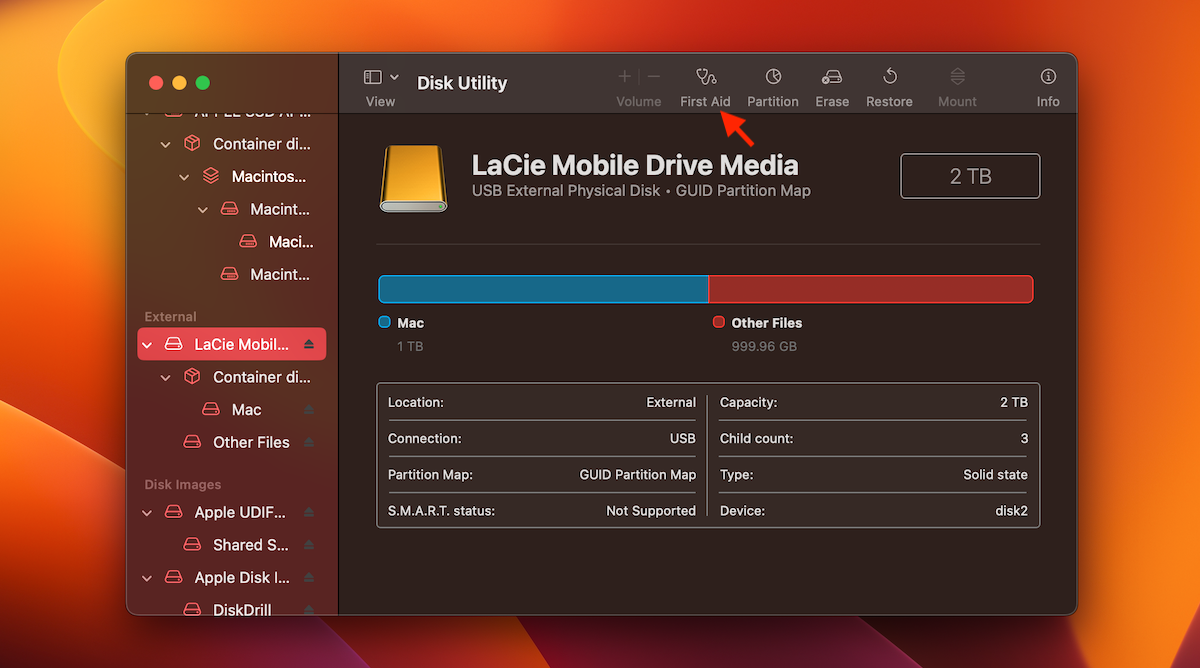
Follow these steps to fix your faulty drive using the First Aid feature on your Mac:
- Connect the unreadable drive to your Mac.
- Launch the Disk Utility app (go to Launchpad and type in Disk Utility in the search field at the top).
- Choose the needed external device on the list on the left.
- Click the First Aid button.
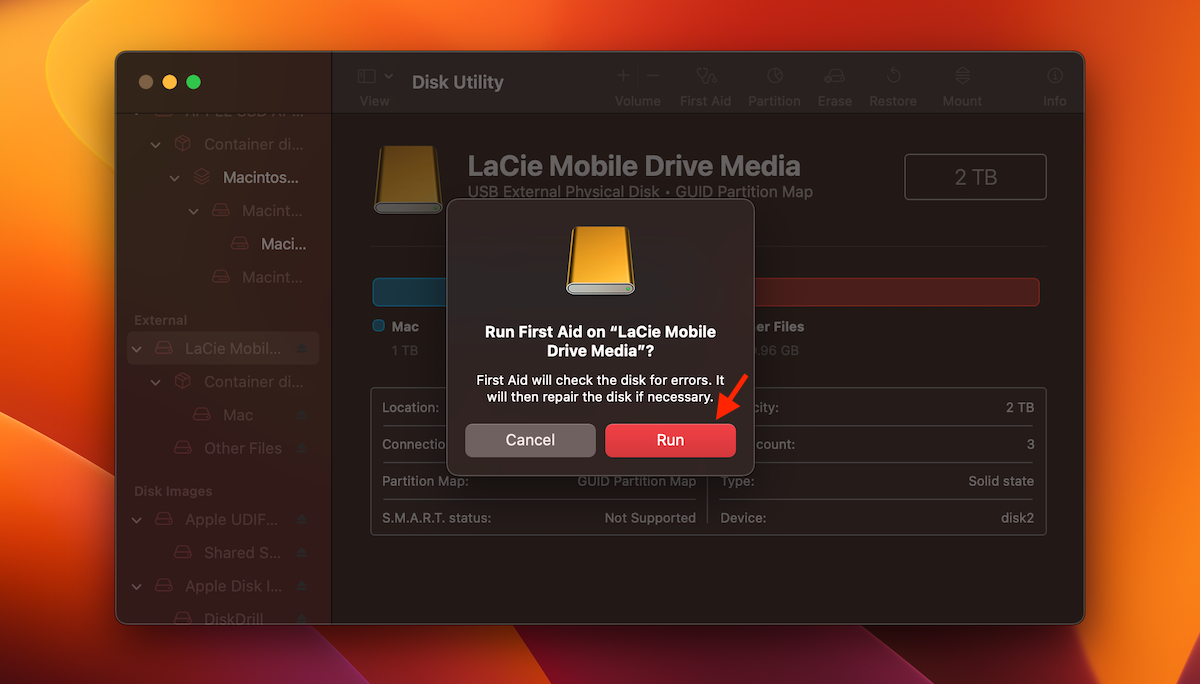
- Click Run to start the process.
- Wait for the repair to finish and eject the device. Plug the device back again to see if you’re able to open it on your Mac.
Method 3: Reset the SMC and PRAM/NVRAM
It’s possible that the reason why the disk you inserted was not readable is because of issues with the SMC (System Management Controller) and PRAM/NVRAM (Parameter Random Access Memory/Non-Volatile Random Access Memory) directly on your Mac computer. Usually, corrupt SMC or PRAM/NVRAM might be preventing your Mac from successfully mounting external storage devices.
If you’re using an M1 Mac, all you need to do to reset the SMC, PRAM, and NVRAM on your computer is to restart it.
To reset the SMC on an Intel-based Mac, follow these steps:
- Shut down your computer (go to the Apple menu and click Shut Down).
- Press and hold the following keys: Control + Option + Shift.
- Hold the keys for about 7-10 seconds and then press and hold the power button together with those keys.
- Keep holding the key combination for 7-10 more seconds.
- Let go of the keys, wait a few seconds, and press the power button to turn your Mac back on.
Once you’ve done that, follow these steps to reset the PRAM/NVRAM on your Intel-based Mac:
- Shut down your computer (go to the Apple menu and click Shut Down).
- Turn the computer back on by pressing the power button and pressing and holding the following key combination right away: Command + Option + P + R.
- Keep holding the keys until the Apple logo appears on your screen. Usually, it takes around 20 seconds.
Method 4: Update System Drivers
System drivers on your Mac help it to communicate with external storage devices, audio devices, printers, etc. So there is a chance that the reason why the disk you attached was not readable by this computer is outdated drives.
To get the system drivers up to date, you should simply update the operating system on your Mac.
Follow these steps to do that:
- Open the Apple menu.
- Click System Settings.
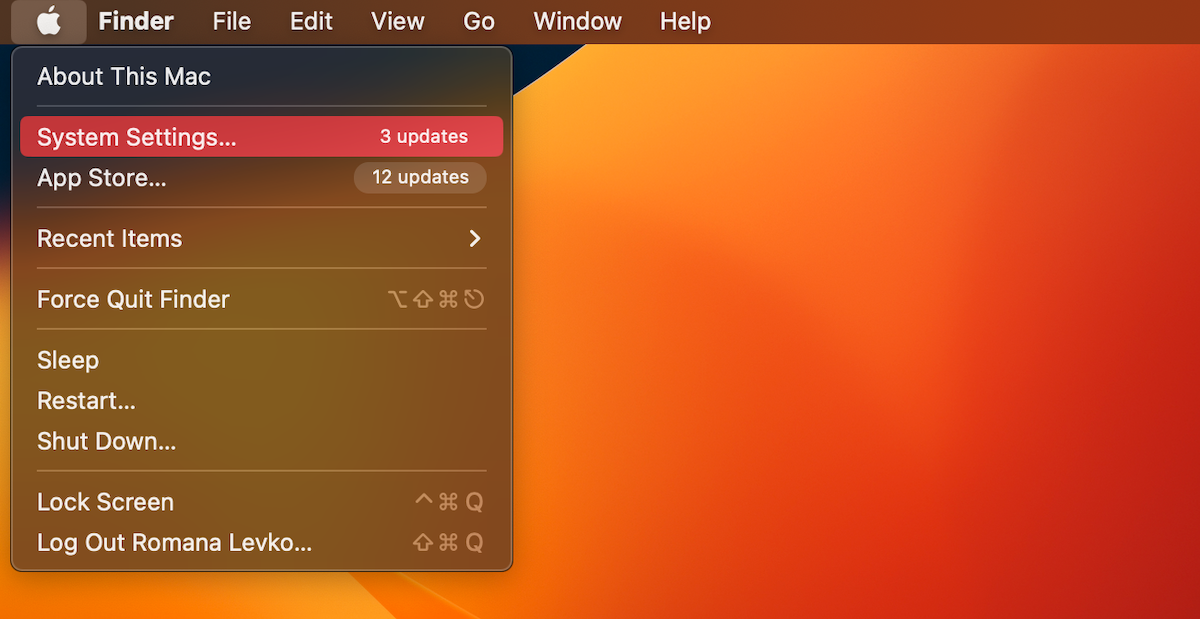
- Go to General > Software Update.
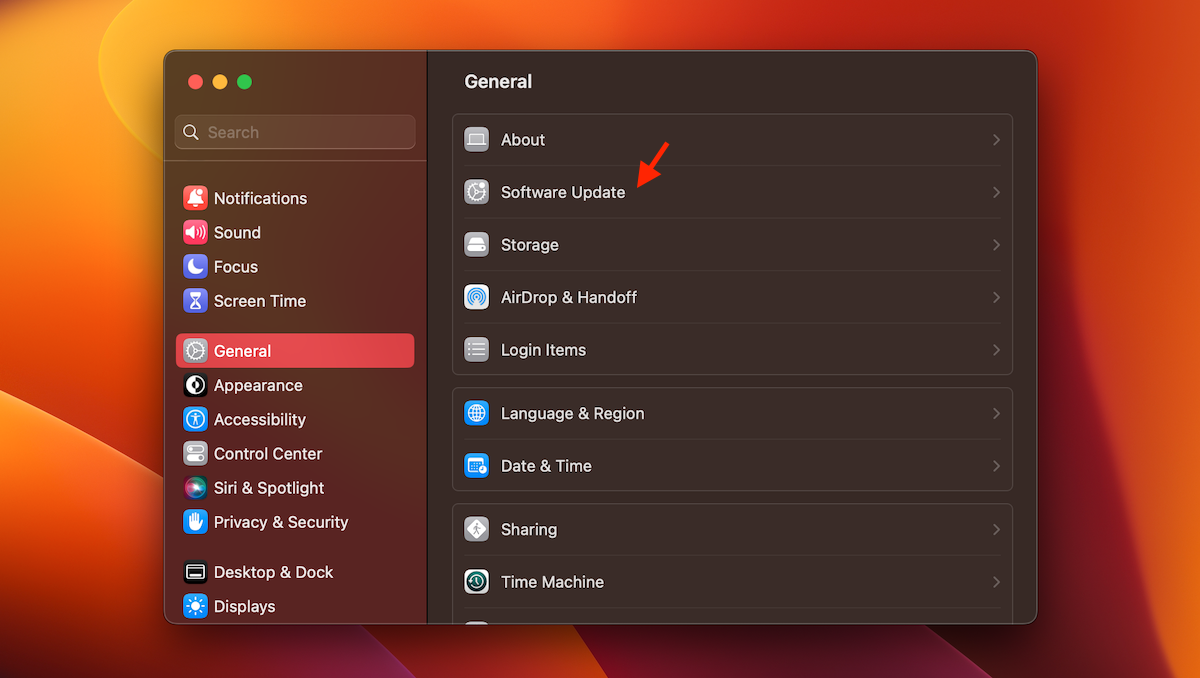
- If there’s an update available, click Update Now.
Once you’ve updated the macOS on your computer, restart it, and try to connect the external storage device again.
Method 5: Initialize Your Drive to Make It Readable
If you’re trying to connect a completely new external storage device and it shows up as uninitialized, it’s possible that there’s no boot information on it. In such a case, you should force it to initialize so that you’ll be able to use it with your Mac.
This issue can also occur to previously working drives. If that’s the case, then it’s possible that it’s experiencing corruption or is just malfunctioning.
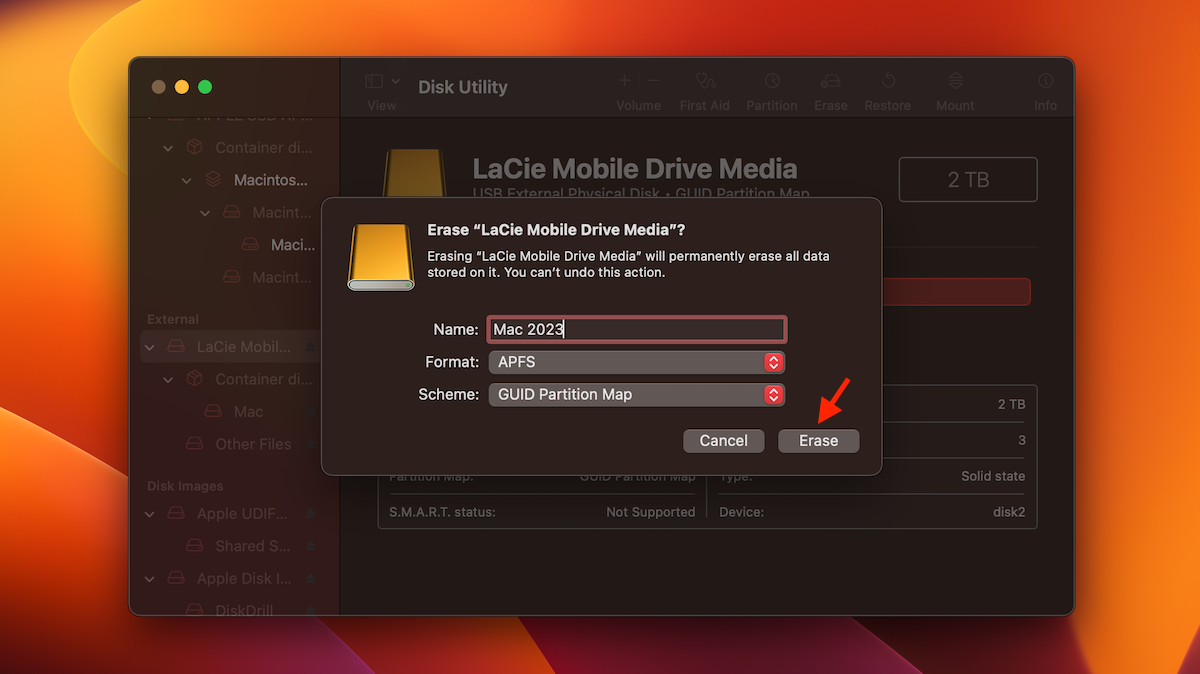
Important: Keep in mind that this process basically will format your external storage device and, therefore, will permanently erase all of the data stored on it.
Follow these steps to initialize your drive to make it readable on your MacBook:
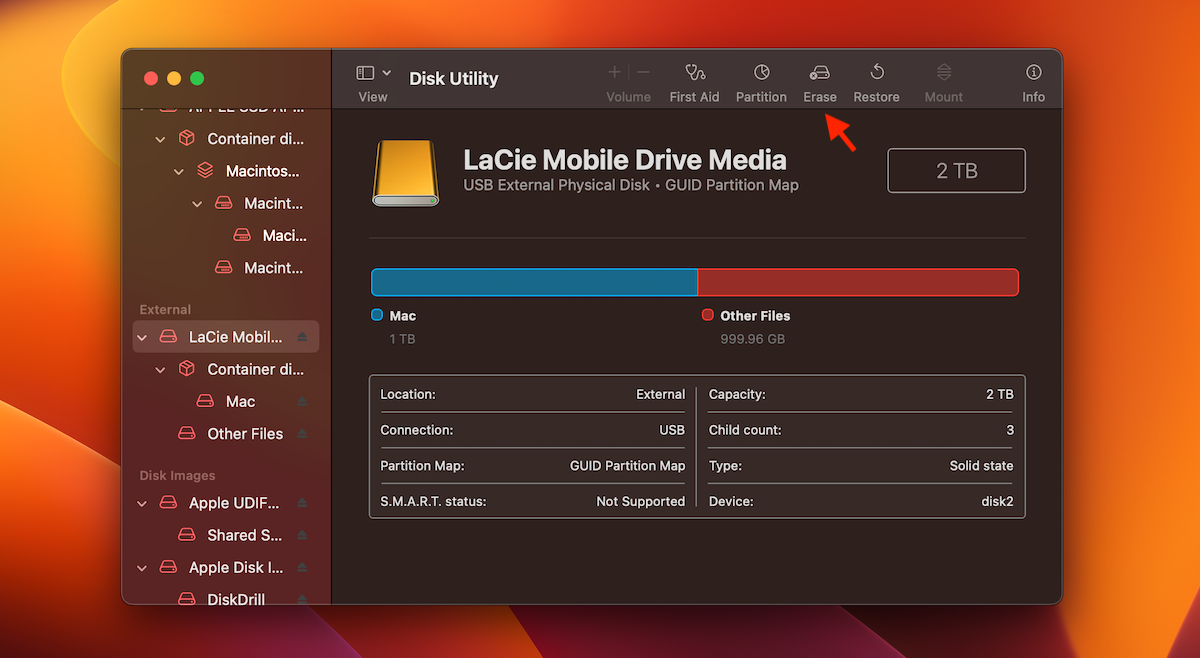
- Connect the external drive to your Mac.
- Launch the Disk Utility app (go to Launchpad and type in Disk Utility in the search field at the top).
- Choose the connected drive from the list of available devices on the sidebar on the left.
- Click the Erase button.
- Select the preferred file system format for the drive (if you’re planning on using it only with a Mac, it’s best to choose APFS; for both Windows and macOS platforms, choose ExFAT) and choose a scheme.
- Click Erase to start the formatting process.
What Causes a Drive to Become Unreadable on Mac?
It’s possible to receive an error on your Mac saying that the disk you inserted was not readable when trying to connect to it any type of external storage device: an SD card, USB flash drive, or hard drive. Usually, the potential reasons why your external hard drive is not showing up on your Mac are the same when having this issue with other storage devices.
Here’s what can be the cause of this issue:
- 🔨 Physical damage: Any kind of physical damage to an external hard drive can make it unreadable (for example, drops, exposure to extreme temperatures, etc.). If you think this might be the cause, it’s best to check your Mac’s hard drive health to rule out this reason.
- ❌ File system errors: There’s a good chance that the drive became unreadable because of file system corruption that was caused by software errors, sudden power loss, or hardware failure.
- 💻 Outdated drivers: Outdated or incompatible drivers may cause the drive to become unreadable.
- ⏏️ Sudden removal: It’s never enough to stress the importance of properly ejecting a drive from your Mac before actually physically removing it. If you don’t properly eject an external device from your computer, you risk ending up with file system errors that can result in making the drive unreadable.
- 🦠 Virus or malware infection: Any type of virus or malware infection can cause an external drive to become unreadable or inaccessible.
- ⛔ Partition table damage: If the partition table on your external storage device is damaged or corrupt, it can cause the device to become unreadable or inaccessible.
FAQ
How do you fix the disk you inserted that was not readable by this computer on Mac?
Here’s what you can try if your Mac is not able to read an external storage device that you’ve connected:
- Use a different cable or port to connect it
- Check if the file system format used by the drive is macOS-compatible
- Run the First Aid scan and repair
- Reset the SMC, PRAM, and NVRAM
- Update system drivers
- Initialize the drive to make it readable
Why is my USB unreadable on my Mac?
There can be numerous issues that might be causing your USB to become unreadable on a Mac. Here are a few of them:
- Physical damage
- Virus infection
- File system corruption
- Sudden removal
- Outdated drives
How do I eject a disc that is not recognized on my Mac?
Follow these steps to eject an unreadable drive from your Mac:
- Open Finder.
- Locate the drive on the sidebar on the left and click it.
- Click File from the menu at the top and choose Eject “name of the drive” from the drop-down menu (or use the Command + E keyboard shortcut).
Conclusion
We hope the information in this article has helped you make your unreadable disk readable again on your Mac. Just keep in mind it’s best to try to recover the data from the drive before moving forward with any kind of repair to ensure that you don’t lose any data.
This article was written by Romana Levko, a Staff Writer at Handy Recovery Advisor. It was also verified for technical accuracy by Andrey Vasilyev, our editorial advisor.
Curious about our content creation process? Take a look at our Editor Guidelines.