If your SD card suddenly tells you it needs to be formatted – don’t hit OK just yet. If you format the card without a backup, you could wipe everything permanently. We’ve seen this issue come up constantly. Reddit threads, support forums, same story. So we figured it’s time to lay out a clear, step-by-step guide that actually walks you through how to format SD card without losing data.
Do NOT format your SD card until reading this article… Especially if your data is important to you!
A Quick Route to the Right Path
We’re going to break this guide into 3 steps, and for each step, you’ll see 2 different options depending on your situation. At a high level, the process looks like this:
Step 1 (Get your data off the SD card) -> Step 2 (Format the SD card properly) -> Step 3 (Put your data back onto the card).
Sounds simple enough. But how you go about each step depends on one thing: is your SD card behaving or not?
- If you can access your files right now without issues – you see them in File Explorer, the card doesn’t throw errors, it doesn’t freeze up when you try to copy something – then follow Option A all the way through. That’s the simplest case, and you’ll be done in minutes.
- If your SD card is acting glitchy – maybe it asks to be formatted, won’t open, or disconnects randomly – that’s Option B territory. It takes a little more work, but it’s the safest way to avoid losing your files.
How to Format an SD Card Without Losing Data
In many cases, formatting an SD card is a pretty straightforward task: you back up your files, hit Format, and you’re done. But sometimes it’s not that simple.
We’ve seen all kinds of situations, from clean formats that go smoothly to messy cases where the card keeps disconnecting, throws read/write errors, or shows a “needs to be formatted” prompt. So instead of giving you one generic method, we’ll walk you through all the different ways this can go. You’ll see exactly what to do, when to do it, and why it matters. That way, you won’t get lost or make a move you regret later.
Let’s start with Step 1. Because if you skip that part, none of the other steps really matter. Here’s how to format memory card without losing data:
Step #1: Back Up Your Data From the SD Card
Before you even think about formatting, you need to back up everything on the SD card. We’ll give you two options here: one for when everything’s working as it should, and one for when your SD card is acting up.
Option A: Copy and Paste If the SD Card Works Normally
If your SD card is shows no errors, no weird delays, this is the simplest way to back up your data before formatting. No special tools needed. You just copy files from one place to another. Here’s how to do it:
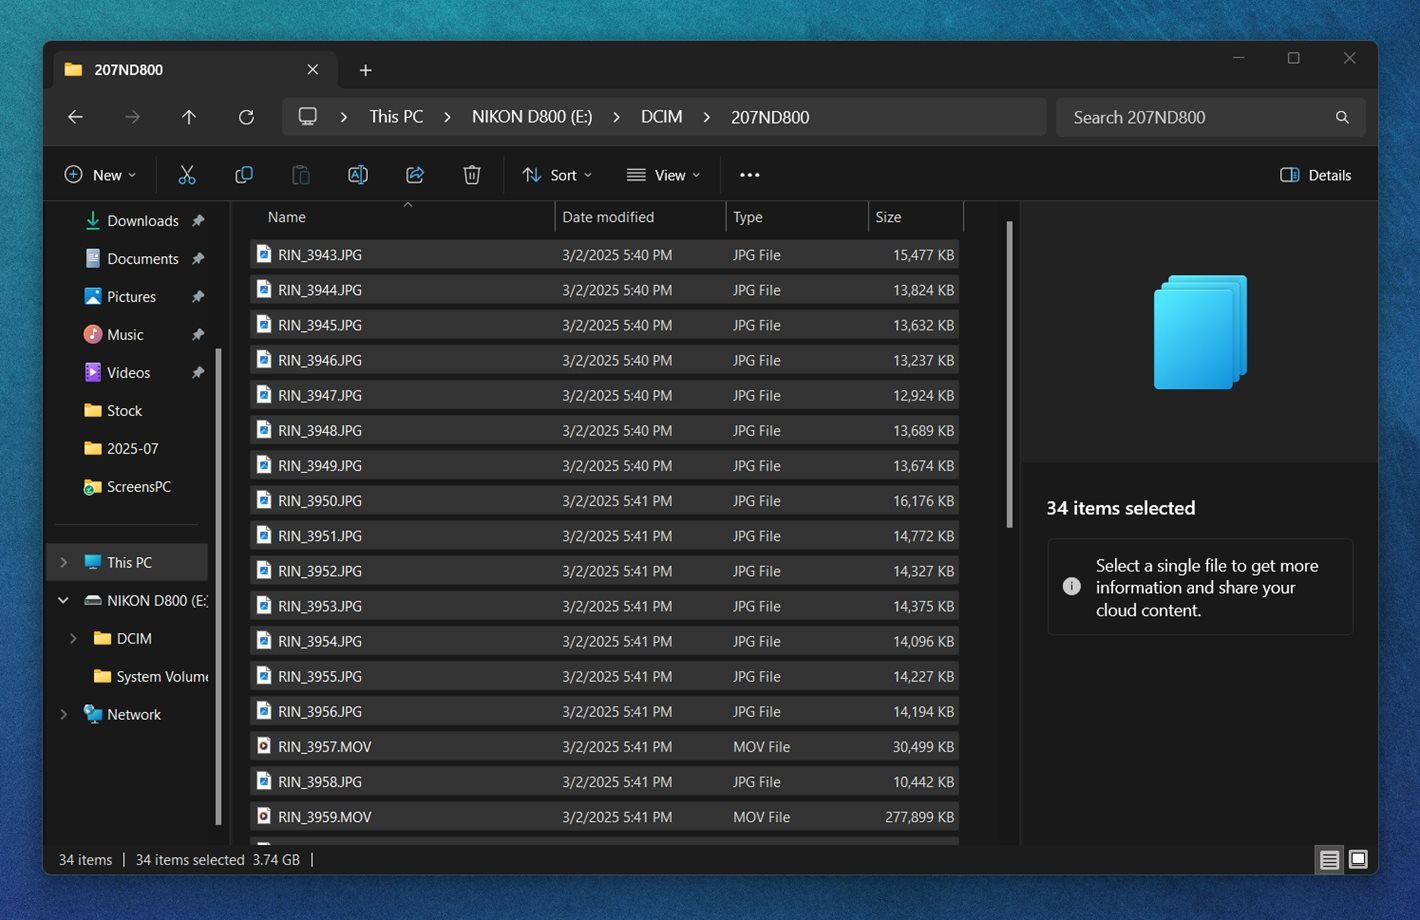
- Plug the SD card into your computer using a card reader or USB adapter. Once it appears in File Explorer, open the card. You’ll probably see folders like DCIM for photos and videos, or maybe some app folders if it was used in a phone.
- Press Ctrl + A to select everything. Then hit Ctrl + C to copy, and Ctrl + V to paste it into a safe location (your desktop, an external drive, wherever works for you).
- Give it time to finish. If you’re copying several gigabytes of media, don’t interrupt the process. Let it finish completely before you remove the card.
To avoid missing anything, show hidden files if needed. On Windows, go to the View tab and check “Hidden items.”
That’s all. Once you have the files copied over, your data is safe. You can format the SD card without losing anything.
Option B: Create a Full Image of the Card (If It’s Glitchy or Failing)
If your SD card throws errors, freezes your file browser, or doesn’t even show up in File Explorer, that usually means there’s something wrong. It might still work under the surface, but the file system is likely damaged (or the card is starting to fail). At that point, trying to copy files directly isn’t going to get you far. And forcing it to read again and again might make things worse.
Now, this step isn’t 100% necessary; you can skip it and scan the card directly to try and recover files that aren’t reading properly right now. But creating a full image first is the safer move.
The best move here is to create a full disk image of the card. That means copying every bit of data (good or bad) into one file on your computer. Once you have that image, you can scan and recover files from the image safely, without stressing the hardware.
Our go-to tool for this is Disk Drill. The latest version (6.x) includes a great Byte-to-byte Backup feature, and in our experience, it handles SD cards really well. You don’t need to see the card in File Explorer for this to work. As long as it shows up in Windows Disk Management with the correct size, you can create an image.
If you want the full breakdown, you can read our in-depth Disk Drill review to see why we recommend it.
Once the image is saved, you can scan it like a virtual SD card. Disk Drill lets you recover photos, videos, and documents straight from the image file; no need to touch the original again. It’s the safer way to work with fragile media; here’s how it goes:
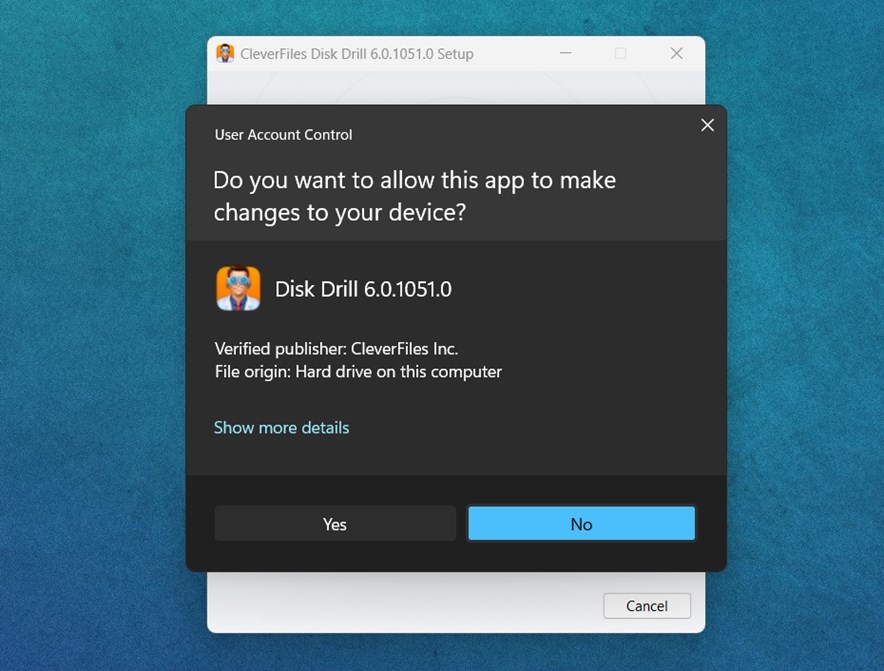
- Download Disk Drill for Windows, run the installer, and when prompted, allow it to make the changes it needs to set up properly on your system.
 The app is free to install, and the byte-to-byte backup feature is included at no cost. But, Disk Drill does put a cap on data recovery. You can recover up to 500 MB of data without upgrading to the Pro version. So, if the total size of your important files is under that limit (say, a few photos or documents), you can do the whole job without spending a cent.
 - To start the backup, open Disk Drill, go to Byte-to-byte Backup, and select your SD card. Set a destination folder where you want the image saved.
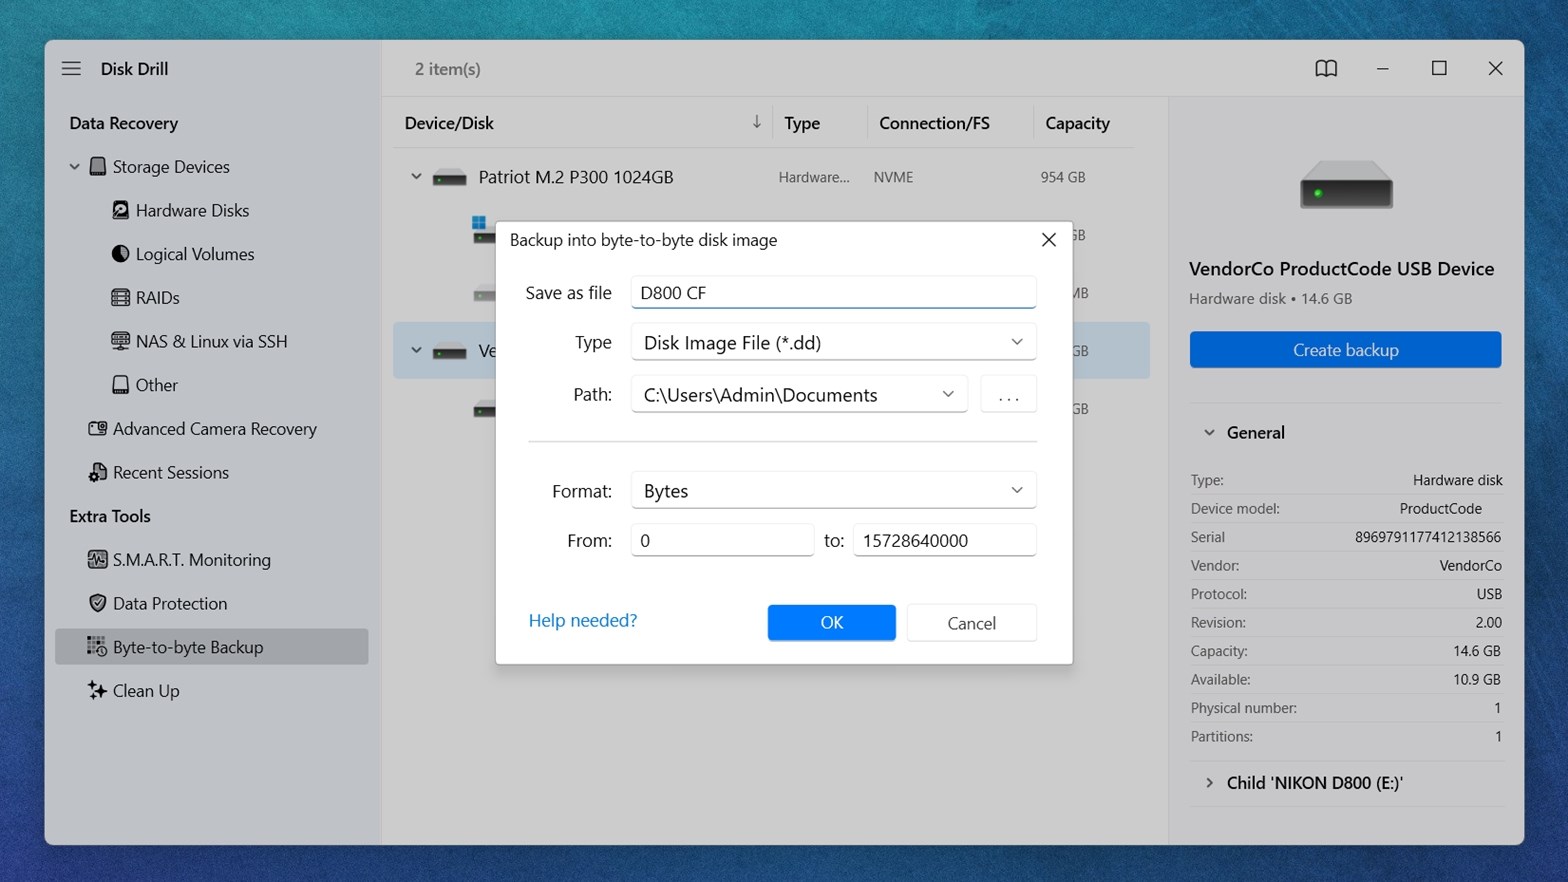
- Then click Create backup and let it run. Depending on the size of the card and its condition, it might take some time, so be patient. Disk Drill uses a smart multi-pass process that skips over bad sectors on the first pass, then tries to go back and read them again, slowly and carefully, without wearing out the card. It adjusts the block size automatically, retries failed sectors up to 8 times, and gives you a live visual map of where the bad areas are.
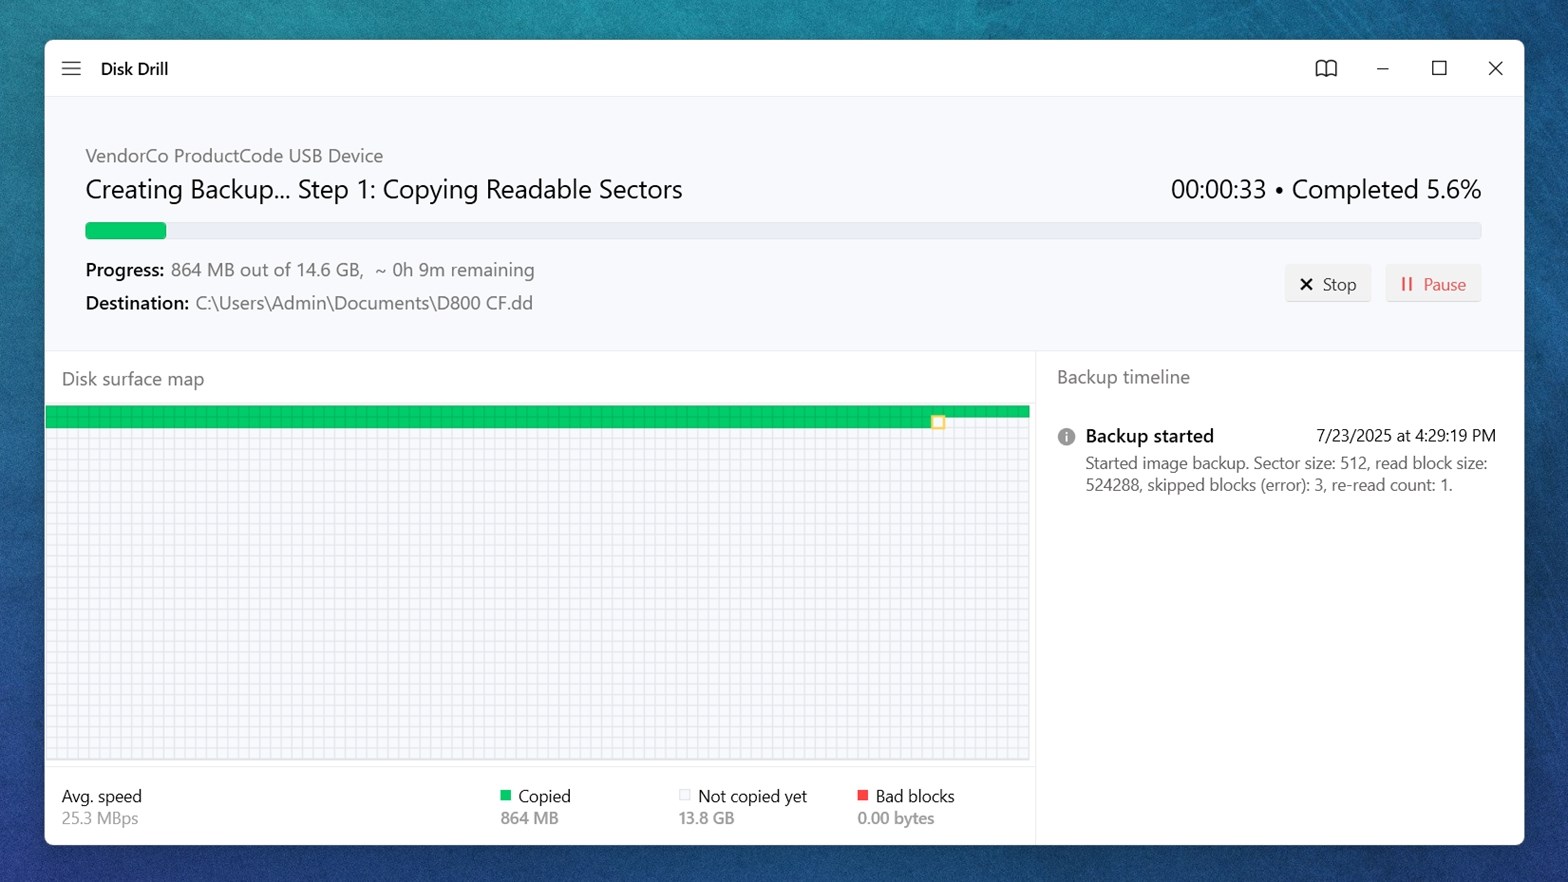
- Once the backup is complete, you’ll have a clean .dd or .iso image file on your system. From there, you can attach the image in Disk Drill’s recovery section, scan it like a virtual SD card, and pull out anything that’s still intact.
We’ll show you how to do all of this in detail here in Step 3. You can jump straight into recovery first: scan the image, extract the files to your system drive (like your desktop or an external folder), then format the SD card and copy everything back to it afterward. Or you can go ahead and format the SD card right away, then recover the files straight from the image back to the freshly formatted card. Either works, depending on what is more urgent for your situation.
But before you move on to formatting, make absolutely sure the image file was created successfully. Don’t skip this. Let Disk Drill finish the entire backup process without interruption. Wait for the confirmation, double-check that the file shows up in your destination folder, and confirm that its size matches what you’d expect based on the card’s capacity. If it’s a 32 GB card, your image should be roughly the same size.
This method gives you two big wins: you stop putting stress on a failing card, and you keep a frozen-in-time copy of what was on it, in case anything goes wrong. It’s the safest way to handle a problematic SD card.
Pro tip: Backups like this are made for recovery, not just storage. If you’re not sure yet whether the data needs saving, but still want to play it safe, you can use basic imaging software that doesn’t include recovery features. It’ll just create a raw copy of the card as-is, and that’s enough to lock in the current state.
Later on, if you decide you do need to recover data, you can load that image into proper recovery tools (many of them support scanning ISO or IMG files directly). Tools like Disk Drill or R-Studio handle this well. Still, if you already know recovery is your goal, it’s better to go with an all-in-one tool that handles both imaging and recovery from the start.
Step #2: Format the SD Card
Now, you’re ready to format the SD card. This is where you clear out the old file system, remove any lingering errors, and get the card ready for fresh use.
You’ve got a couple of ways to do it, and the right one depends on where your SD card is visible. If you can see the card in File Explorer, that’s the easiest route – go with Option A. But if the card doesn’t show up there (even though it’s connected), you’ll want to try Disk Management instead (Option B).
We’ll walk through both.
Option A: Use File Explorer
If your SD card shows up normally in File Explorer, this is the quickest and cleanest way to format it. Here’s how to do it, step by step:
- Plug the card into your PC using a card reader or USB adapter.
- Open File Explorer and look under “This PC.” The card should show up as a removable drive, maybe called “SDCARD” or “NO NAME.”
- Right-click on the card and choose “Format…” from the menu.
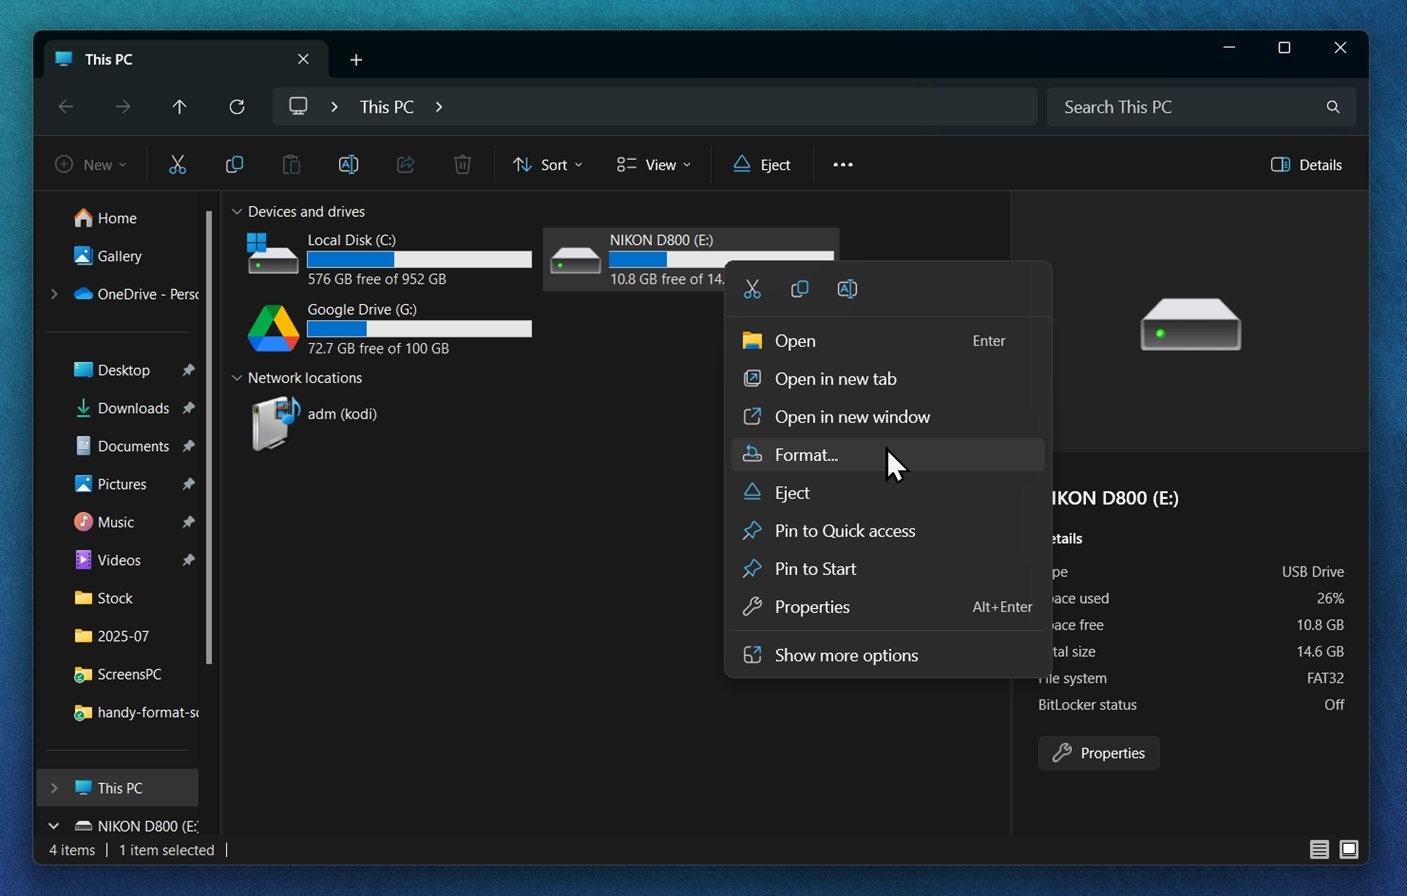
- A small window will pop up with a few settings you need to check.
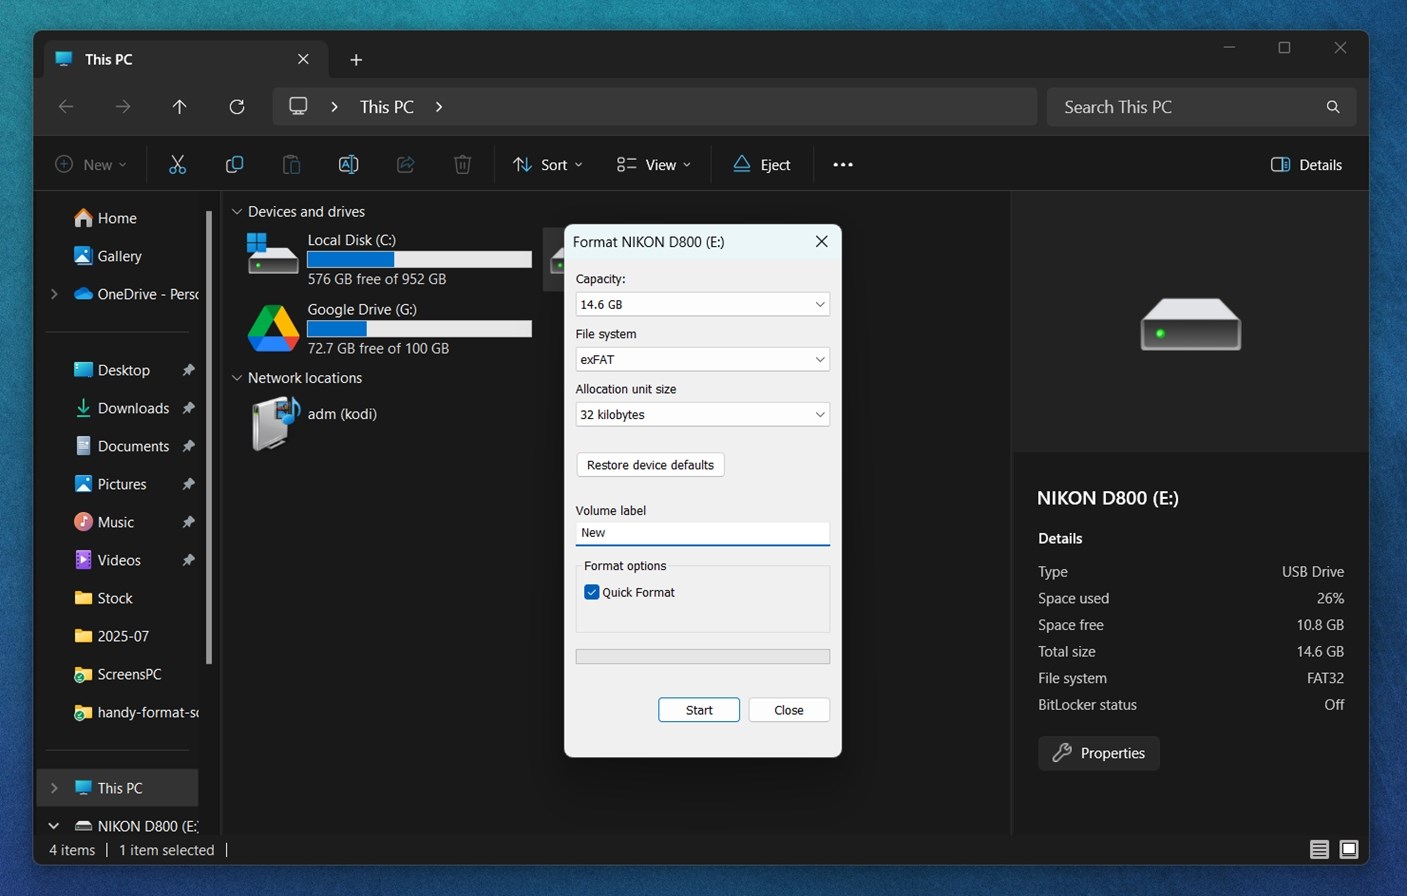
- File System. If the card is 32 GB or smaller, pick FAT32. For 64 GB, 128 GB, or anything larger, choose exFAT. exFAT handles bigger cards and files over 4 GB (handy for high-res video or RAW photos).
- Allocation Unit Size. Leave this on Default unless your device maker says otherwise.
- Volume Label. Name the card whatever you like (optional).
- Quick Format. Make sure this box is checked. A Quick Format skips over deep checking and finishes in seconds. If you leave it unchecked, Windows will do a full format, which takes longer and overwrites every sector.
- Once everything looks good, click Start.
 You’ll get a warning that all data on the card will be erased. That’s fine – you already backed it up.
Wait a few seconds, and you should see a message that the format is complete. At that point, the card is wiped clean, properly structured, and ready to use again.
Option B: Use Disk Management
If your SD card doesn’t show up in File Explorer but you’re sure it’s connected, Disk Management is the place to check. Here’s how to format the SD card using Disk Management:
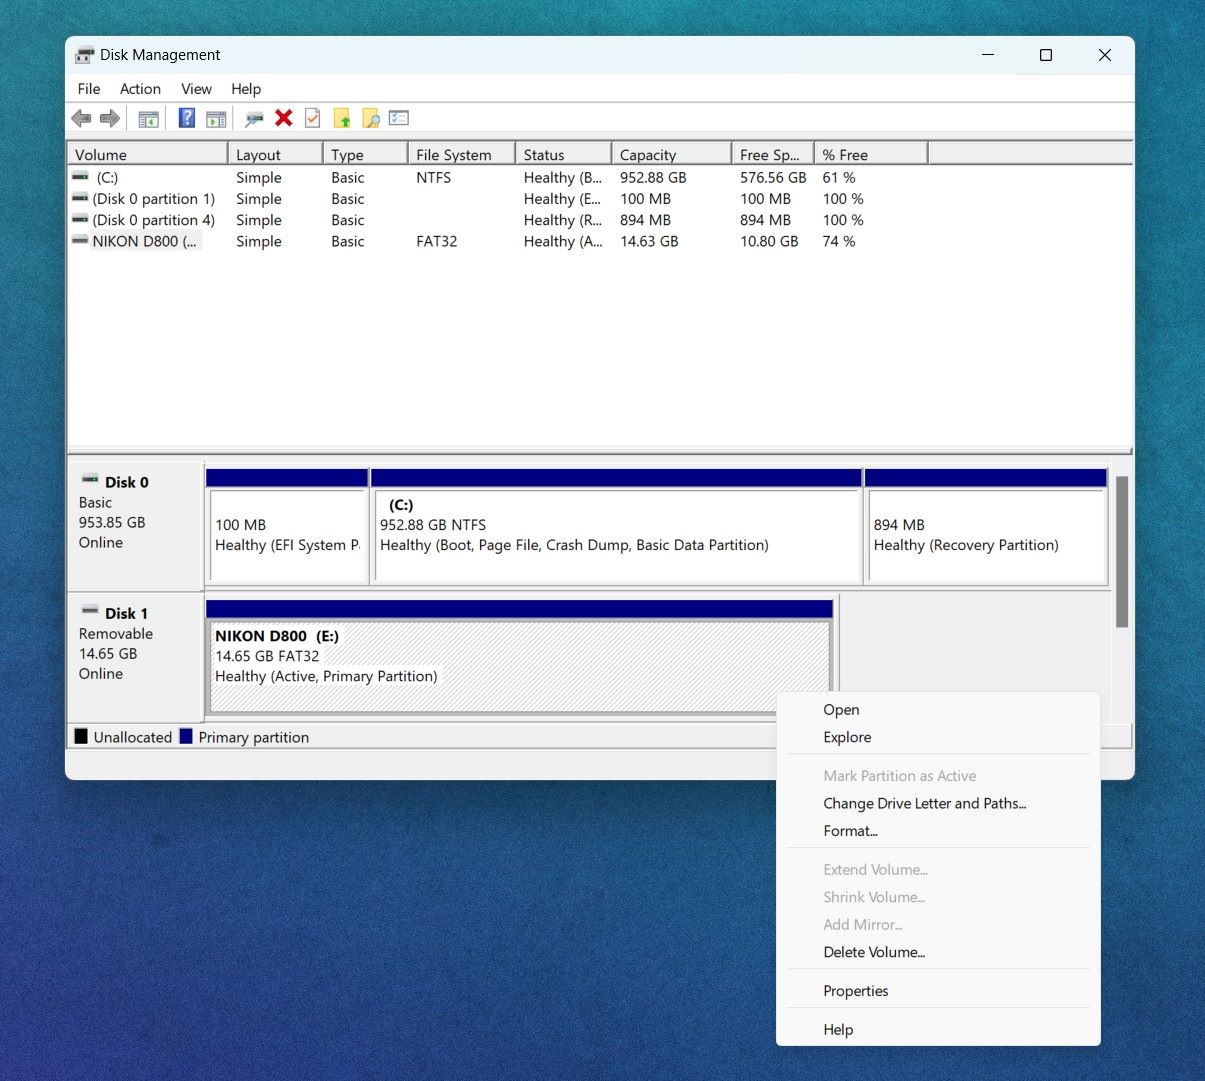
- Press Win + X and click “Disk Management.”
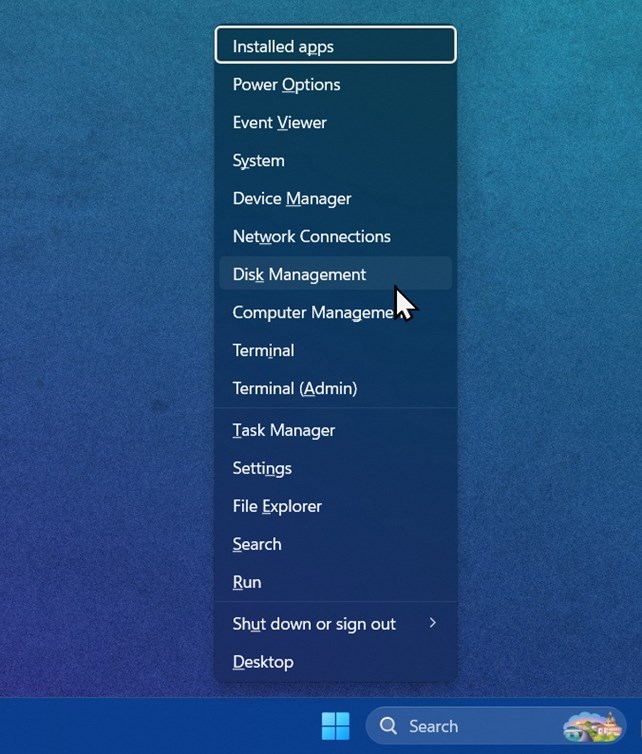
- Look through the list of drives at the bottom. Find your SD card – it should show up as Removable and list the correct size (like 29.81 GB for a 32 GB card). Right-click it and choose “Format…”
- Walk through the wizard. Set the volume size (leave it at the default unless you have a reason to split it). Assign a drive letter (Windows will suggest one). Choose a file system: FAT32 for cards 32 GB or under, exFAT for larger ones. Keep Allocation unit size on Default.
- Check Perform a quick format.
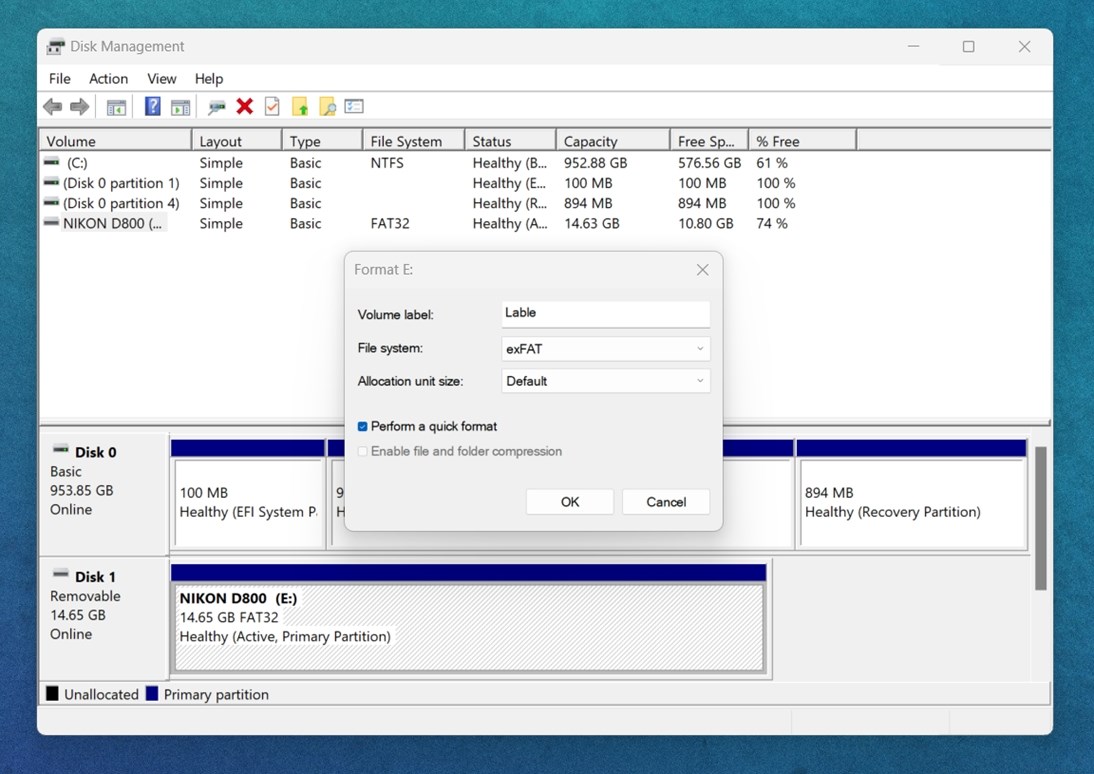
- Click Finish and let Windows create and format the partition.
In a few moments, your SD card should show up in File Explorer again, fully formatted and ready for use.
Disk Management is also handy if the card had multiple partitions, leftover formatting from another device, or you’re dealing with weird unallocated space.
Step #3: Restore Your Data Back to the SD Card
Once the SD card is freshly formatted, it’s time to bring your data back.
We also give you two options here, and the one you go with depends on what you did earlier (whether you did a simple backup or created a full disk image) and the condition of your card.
Option A: Copy Files Back Manually
If you copied your files manually before formatting, all you need to do now is follow the same steps as in Option A: Copy and Paste If the SD Card Works Normally, just in reverse. Here’s how:
- Plug in your freshly formatted SD card, open File Explorer.
- And navigate to the folder where you saved your backup.
- Press Ctrl + A to select everything, Ctrl + C to copy.
- Then open the SD card and press Ctrl + V to paste the files back.
That’s it. The transfer might take a few minutes.
Once it’s done, double-check that everything copied over. If everything looks good, you’re done. The card is formatted, your data is back, and you’re ready to use it again.
Option B: Recover Data From the Backup Image
If you created a disk image earlier, now’s the time to pull your files out of it. Here’s what you need to do:
- Open Disk Drill, and instead of selecting a physical drive, click “Attach disk image…” near the bottom of the window.
- Browse to the image file you saved earlier (it’ll usually have a .dd, .dmg, or .iso extension).
- Once attached, the image will show up in the list of recoverable drives. It looks and acts like a virtual copy of your SD card.
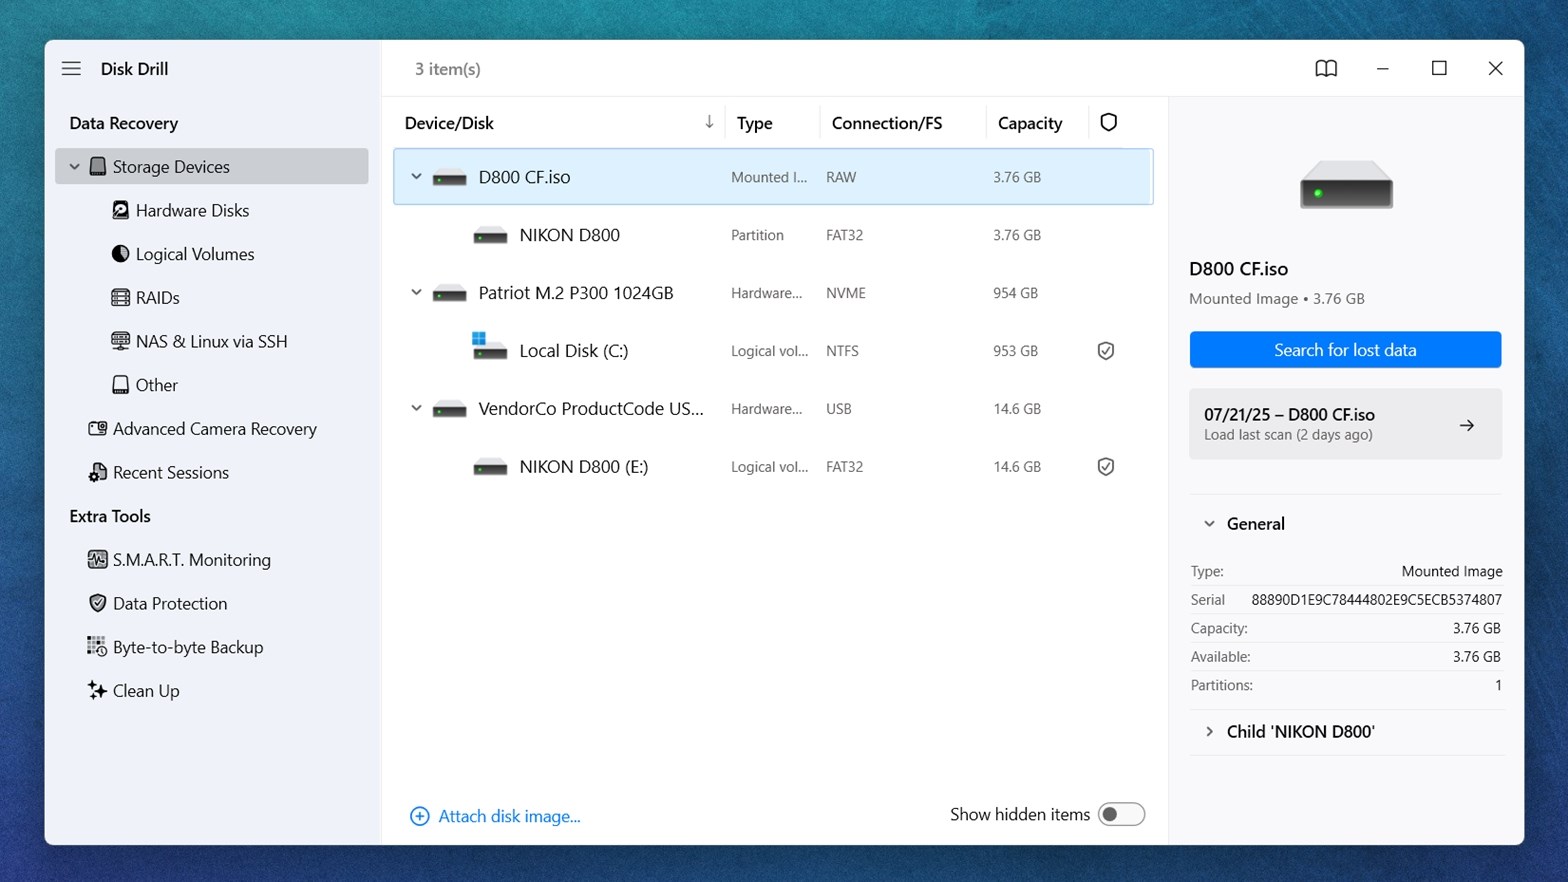
- Select it and click on “Search for lost data”. Next, Disk Drill will ask you to choose a scan mode. Go with Universal Scan, it’s the best fit here.
- As the scan progresses, Disk Drill automatically organizes all recoverable files into categories like Pictures, Video, Audio, Documents, Archives, and Other Files.
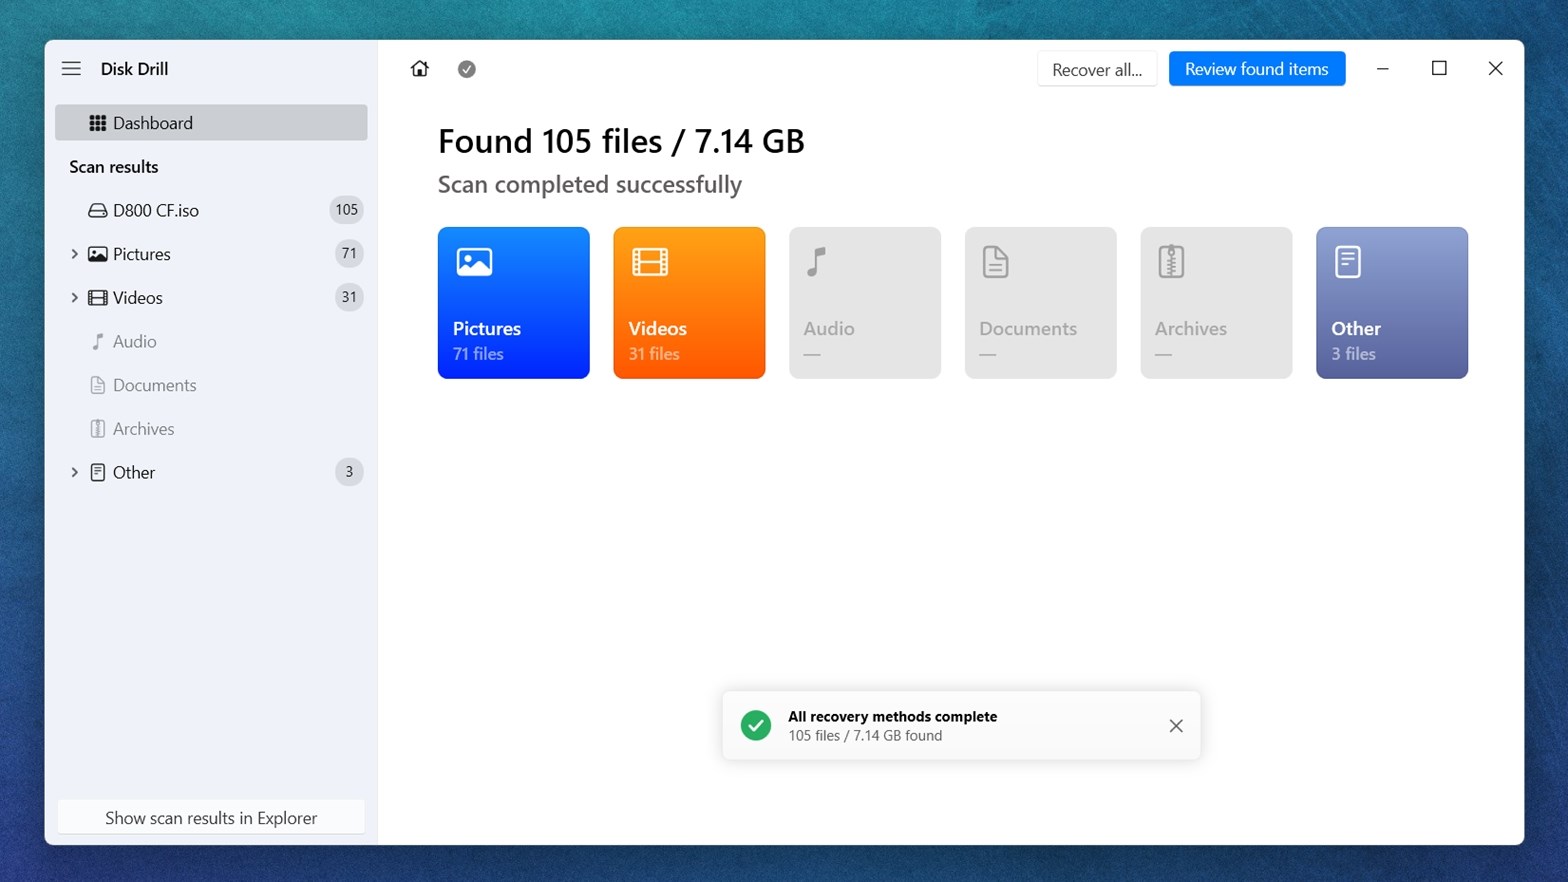 You’ve got two main options for how to recover: If you want to keep it simple, wait for the scan to finish and click Recover All. That’ll grab everything Disk Drill found and let you save it.
 - But if you’re looking for something specific (like one video, a group of photos, or a folder) you can go in while the scan is still running. Click on a category like Videos, or hit Review Found Items to see everything found so far. That lets you narrow things down without wasting time.
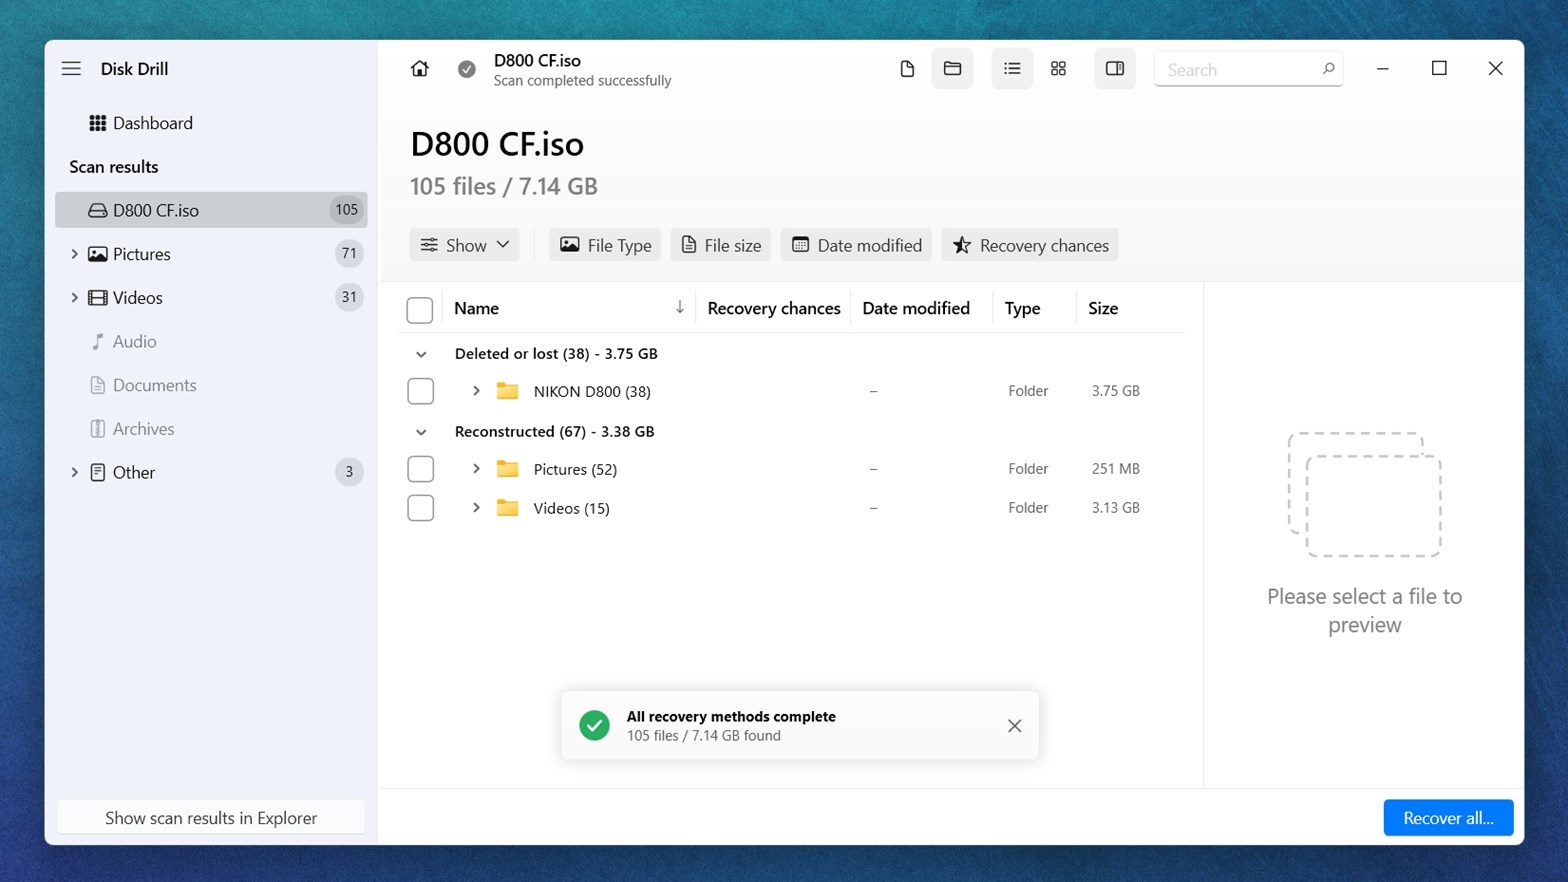
- Once you go into Review Found Items, Disk Drill displays the results in three sections: Deleted or Lost (files that were deleted or lost. You might see things here that you deleted some time ago; yes, those can often be recovered too, as long as they haven’t been overwritten). Reconstructed (these are files that Disk Drill pieced together based on known file signatures) and Existing (these are files that were still on your SD card.
- Click any file to preview it. Disk Drill supports common formats like JPG, PNG, MP4, MOV, and many others.
 As long as your operating system can open the file natively or with an installed viewer, Disk Drill can preview it too.
 - When you’re ready, check the boxes next to the files you want to bring back and hit Recover. At this point, you can choose your freshly formatted SD card as the recovery target. Disk Drill will save everything right back onto it – photos, videos, whatever you selected.
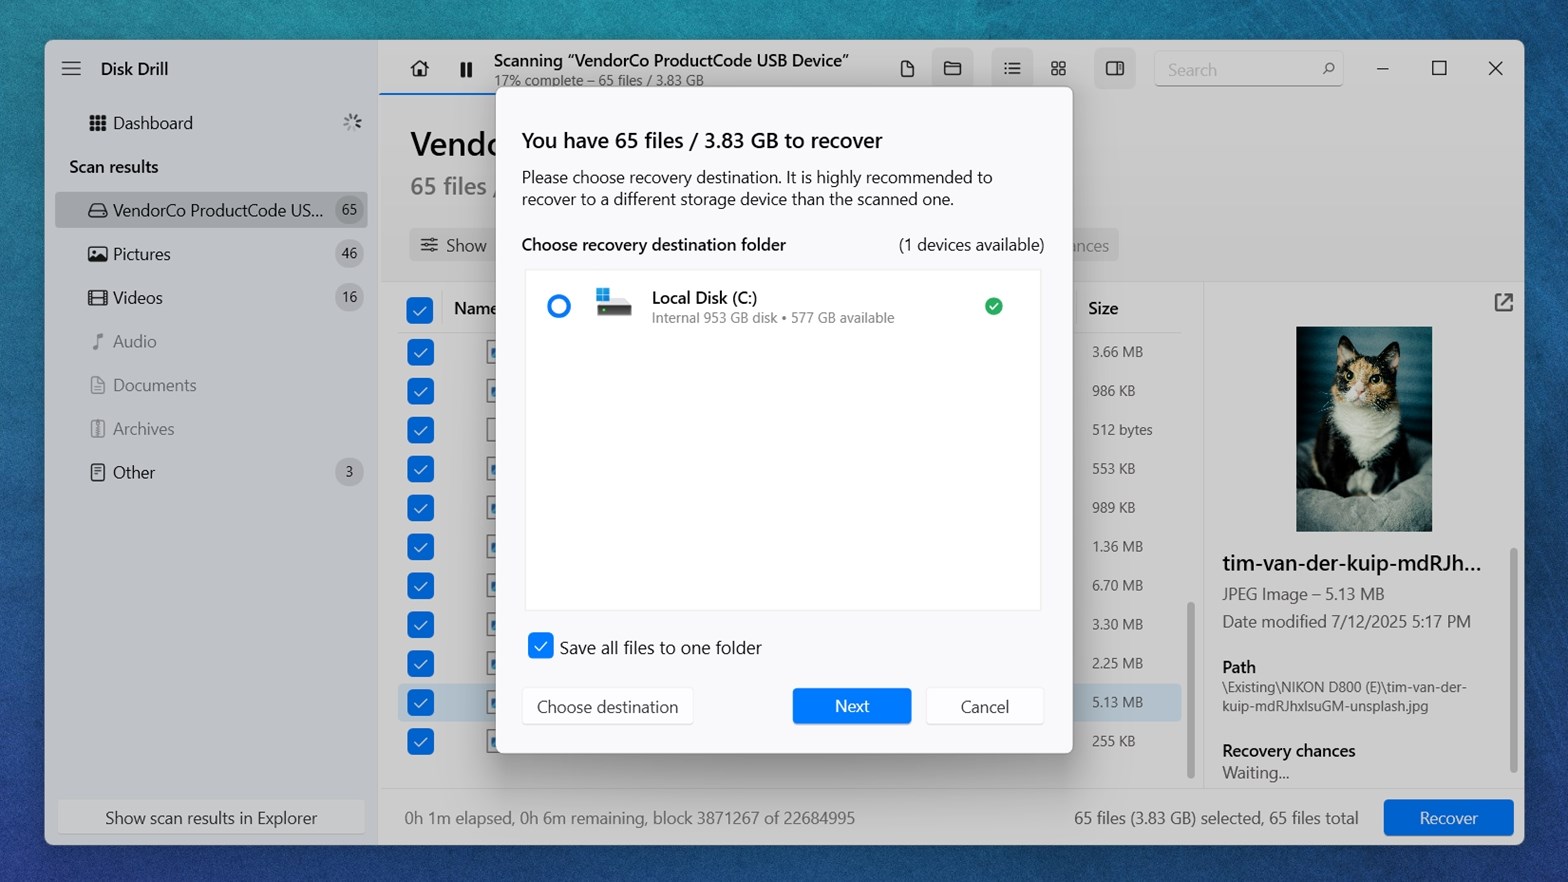
Once recovery is done, go to the folder you selected and check your files. As you can see, it’s not that complicated once you’ve got the steps lined up.
There are plenty of good SD card recovery tools out there. We’ve tested and compared a bunch side by side. But Disk Drill’s mix of simplicity and advanced features makes it stand out, especially for this kind of task. The byte-to-byte backup tool alone makes it worth using. And that’s not the only free feature. You also get S.M.A.R.T. monitoring to keep an eye on your drives, built-in data protection options, and even a disk cleanup tool to help free up space.
Why Do SD Cards Need to Be Formatted?
Now that we’ve covered safe ways to format an SD card without losing your files, let’s talk about why many people end up needing to format their card in the first place:
- One of the most common cases we see is this. You plug the card into your PC, and instead of showing your files, you get a message that you need to format the disk before you can use it. That one trips up a lot of people, especially when the card worked fine the day before.
- Another situation: your camera or computer suddenly stops recognizing the card. You haven’t dropped it, nothing obvious happened, but the device just says it can’t read it. Sometimes the files show up, but they won’t open. That’s usually a sign the file system corruption.
- We’ve also seen people run into this after using the same card across a bunch of devices. Like moving it from a GoPro to a laptop, then into a drone. At some point, the formatting gets inconsistent and the card starts to act up. Formatting it cleanly is often the fix.
- And sometimes, it’s nothing dramatic. You’re not getting error messages, it’s just that you need to change the format. Maybe your camera requires exFAT, but the card is still on FAT32. Or you’re working with large video files and ran into that 4GB size limit. Whatever the reason, reformatting makes sense.
In all of these cases, formatting can help. It clears the existing file system and sets the card up like new, ready for a fresh start (you can read more about what really happens during SD card formatting here). But here’s the catch: formatting will erase all the data. So if that’s not your goal, and you’re trying to keep the photos and videos already on the card, formatting the SD card without losing data requires a few extra steps.
By the way, while we did say that formatting will erase all the data (and that’s true), it doesn’t mean everything’s gone without a trace. In many cases, especially if you did a quick format, the files are still recoverable.
We’ve got a separate guide that walks through how to recover files from a formatted SD card here.
Quick Recap
If we had to summarize the entire guide in a few words, it’s these:
- Backup is non-negotiable. Whether your card is healthy or glitchy, save everything before you hit format. That’s the only way to format an SD card without losing data.
- Copy files manually if the card works normally (just drag and drop in File Explorer).
- Use byte-to-byte imaging with a tool like Disk Drill if the card is acting up. It saves every sector and protects your data.
- Format the card using File Explorer or Disk Management.
- Recover your files from the image or put them back manually.
If you follow those steps, you’ll successfully format your SD card without losing data. Yes, it’s more of a workaround than some magic Windows command you might’ve hoped for, but let’s be honest, it’s not complicated. It usually doesn’t take much time, and more importantly, it works.
If you still have questions we didn’t cover here, check out our Handy Recovery Advisor Community. You can search for existing threads or start a new one – there’s always a lively discussion going on, and someone’s probably dealt with the same issue already. Just ask a question and you’ll usually get useful replies pretty fast, whether it’s from our team or other users who’ve been through it.
FAQ
How do I save my SD card before formatting?
The safest way to save your SD card before formatting is to back up everything on it. If the card works normally, plug it into your computer, open File Explorer, and copy all the files to a secure folder on your hard drive or an external disk. That’s the simplest method. If the card is glitchy, slow, or throwing errors, don’t try to copy files manually. Instead, use a tool like Disk Drill to create a byte-to-byte backup (a full image of the card). This saves everything exactly as it is, including hidden files and deleted files. Once the image is saved, you can recover files from it safely without touching the card again.
What happens if I format my SD card and forget to back it up first?
If you do a quick format and haven’t saved a backup, there’s still a good chance you can get your files back. The data isn’t instantly wiped – it’s just marked as free space, which means data recovery software can often scan the card and recover what’s still intact. The key is to stop using the card immediately. Don’t save new files or take new photos, that increases the risk of overwriting the stuff you want to recover.
What is 'Allocation unit size' in the formatting menu, and why leave it on Default?
Allocation unit size is the size of the smallest block of data the file system uses to store files. Smaller units are more space-efficient for lots of tiny files, while larger units are better for big files like videos. Unless you have a specific reason to change it (like instructions from your camera or device manufacturer), just leave it on Default. It strikes a good balance and helps avoid performance or compatibility issues.
Is it possible to reformat an SD card without losing data?
In short: no – you can’t change the card’s file system in-place without risking data loss. Whether you’re switching from FAT32 to exFAT or to NTFS, Windows and other built-in tools will erase everything during the format process. Even the convert command on Windows can’t change exFAT to FAT32, it’s only available for FAT → NTFS (and it still requires backing up first). If you’re aiming to format SD card without losing data, the only reliable way involves two steps:
- Back up everything.
- Format the card with the desired file system.
- Restore your data from the backup.
This way, you effectively reformat the card to a new format without losing data. That’s the safest and only proven method.
Why are some files hidden by default, and what hidden files should I look for when backing up an SD card?
Windows hides certain files and folders by default (usually system or app-related data). But when backing up an SD card, these hidden items can include things like thumbnail caches, metadata, .nomedia files, or app-specific folders (common on cards used in phones, cameras, or consoles). If you’re doing a manual copy, you might miss these unless you turn on “Hidden items” in File Explorer. Just go to the View tab and check the box for “Hidden items” before backing up. If you create a disk image instead, all files (including hidden ones) will be backed up automatically, without the need to reveal anything manually.
How do I double-check that everything copied back to the SD card correctly?
If you used the manual copy/paste method, the easiest way to verify everything is to open a few files and make sure they open without errors. Scroll through image previews or play back videos to spot obvious issues. For a more thorough check, you can compare folder sizes or file counts between your backup and the SD card. Tools like WinMerge (for folders) or hash checkers (like HashMyFiles) can also confirm files were copied without corruption by comparing checksums.
Is it possible to format an SD card on Android without losing data?
Technically, no – formatting a card on Android still erases everything. Whether you’re using portable or adoptable storage, the OS will wipe the data. Google’s own support pages remind users that formatting will delete all content and advise backing up first. So, here’s how people usually handle it:
- Backup first. Copy files off using Android’s Files app or transfer them to a computer/cloud before formatting.
- Open Settings > Storage > SD card > tap the menu > Format SD card. This works whether the card is set up as portable or internal storage.
- Restore your files afterward (tap Move content or manually copy backup files back onto the card).
How to format SD card without losing data on a Mac?
To format an SD card without losing data on a Mac, we suggest cloning the SD card and using the clone as the recovery target for data recovery software. This should preserve most of your data, as long as it hasn’t been overwritten.
This article was written by Alejandro Santos, a Staff Writer at Handy Recovery Advisor. It was recently updated by Roman Demian. It was also verified for technical accuracy by Andrey Vasilyev, our editorial advisor.
Curious about our content creation process? Take a look at our Editor Guidelines.