
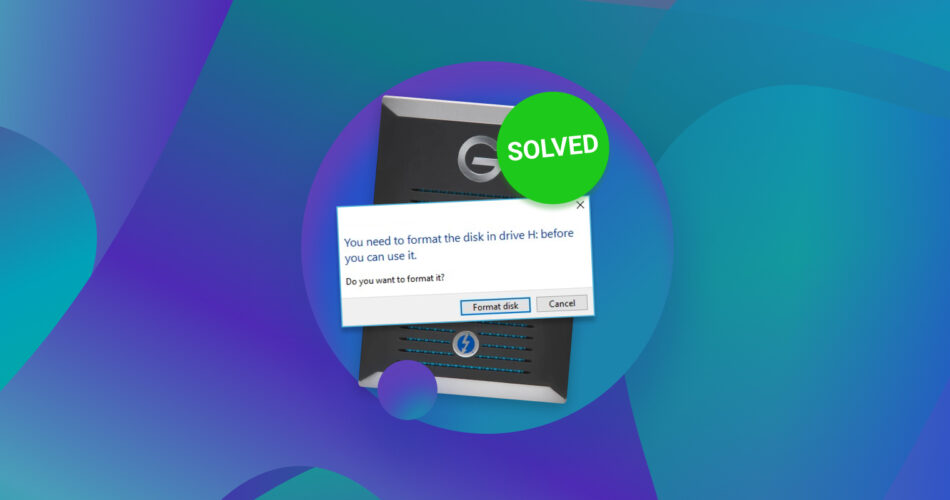
Has Windows shown a message saying your external hard drive needs to be formatted before you can use it? Fortunately, this message is rarely a sign of permanent data loss and the drive and its contents are likely still intact. We put together a guide to walk you through the most common causes of this error, how to recover your data, and how to fix the drive so it works again.
Here’s a helpful video if you prefer learning by watching:
Why My External Hard Drive Says It Needs to Be Formatted?
There are several reasons why external hard drives can ask for a format, and the right solution depends on which one applies to your situation. We put together the table to help you identify the most common causes and point you in the right direction:
| Situation | What It Means | What to Do |
|---|---|---|
File system corruption |
Windows detects the drive but cannot read how files are organized. This often happens after unsafe removal, power loss, or write interruption. |
Recover data first, then try Error Checking if the file system is still recognized. |
Drive shows as RAW |
Windows cannot detect any valid file system. Metadata is missing or damaged, but data may still exist. |
Do not run repair tools. Create an image and recover data. Avoid CHKDSK. |
Interrupted or incompatible formatting |
The formatting process failed or used a file system that Windows cannot read. The drive becomes inaccessible. |
Recover data if needed, then reformat the drive properly. |
Bad sectors or drive errors |
Parts of the drive cannot be read. This may be logical damage or physical wear. |
Check drive health, create an image, then recover data. Avoid repeated scans on unstable drives. |
Connection or enclosure issue |
The drive itself works, but the USB cable, port, or enclosure causes incorrect detection. |
Try another cable, port, or computer before attempting recovery. |
Encryption or BitLocker issue |
The drive may be encrypted and requires a key. In some cases, it appears as RAW or unreadable. |
Check if the drive is encrypted. Locate the recovery key. Do not format. |
Malware or system interference |
Rare, but system changes or malicious software can affect how the drive appears. |
Scan the system, then proceed with recovery if access is still blocked. |
Physical damage |
The drive may have suffered mechanical or electronic damage, especially after a drop, impact, liquid exposure, or power surge. Clicking, grinding, repeated disconnects, or failure to spin up can also point to a hardware problem. |
Stop using the drive and do not attempt DIY repairs or repeated scans. If the data is important, contact a professional data recovery service. |
Important: If Windows asks you to format an external hard drive that contains files you still need, do not click Format. Formatting changes the drive’s file system and can make recovery more difficult, especially if you continue to use the drive afterward. Recover or back up your files first, and only format the drive once your data is safely stored elsewhere.
How to Recover Data From an External Hard Drive Asking to Format
Now, let’s move on to data recovery. The safest thing you can do is create a disk image first and recover your files from that copy instead of the original drive. This way, if something goes wrong, you can always try again without risking further damage.
Disk Drill is one of the best data recovery tools and a great option for both steps. It lets you create a full copy of your external hard drive and then recover files directly from that image, all within the same interface. It supports RAW drives, recognizes nearly 400 file types, and lets you preview files before recovery so you know exactly what you are getting back.
Want to learn more about Disk Drill? Check out our detailed review. We talk about how it works and what it finds. We also have another article where we look at how safe it is.
Step #1: Install Disk Drill
Download and install Disk Drill on your computer.
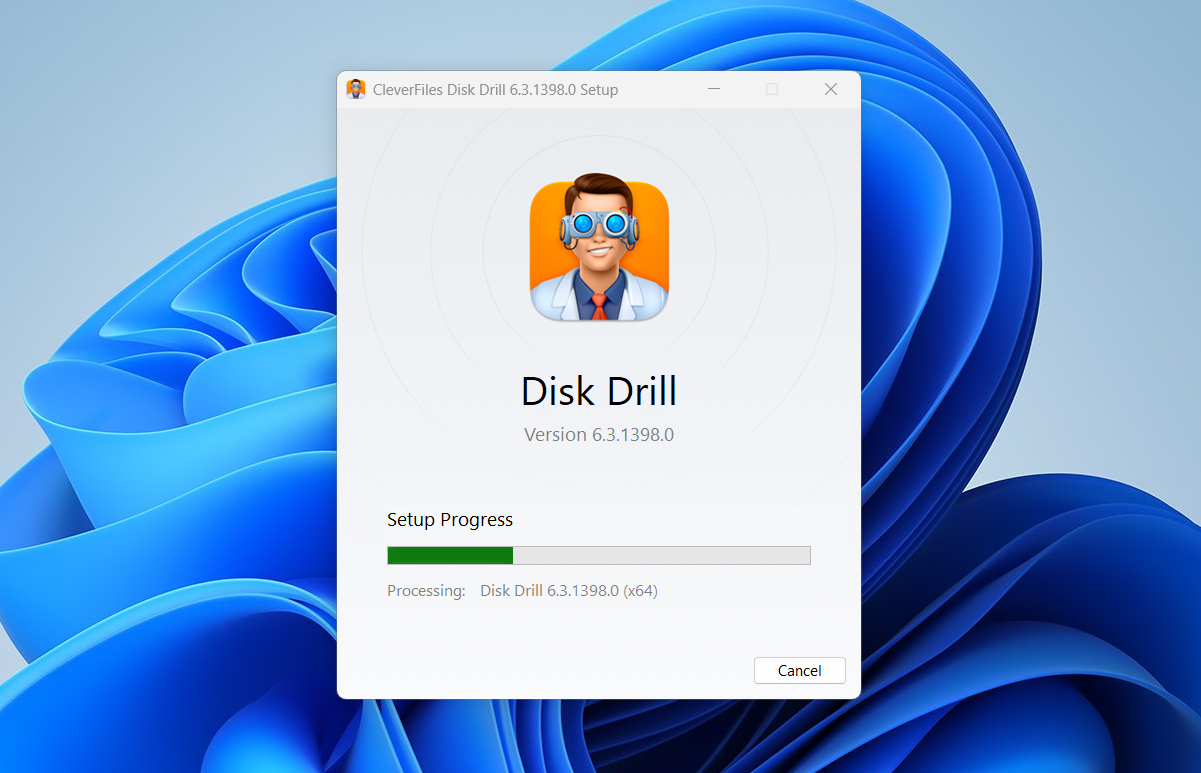
Do not install it on the external drive that asks to be formatted. This avoids overwriting recoverable data.
Step #2: Create a Disk Image (Recommended)
Open Disk Drill and go to the Byte-to-byte Backup section.
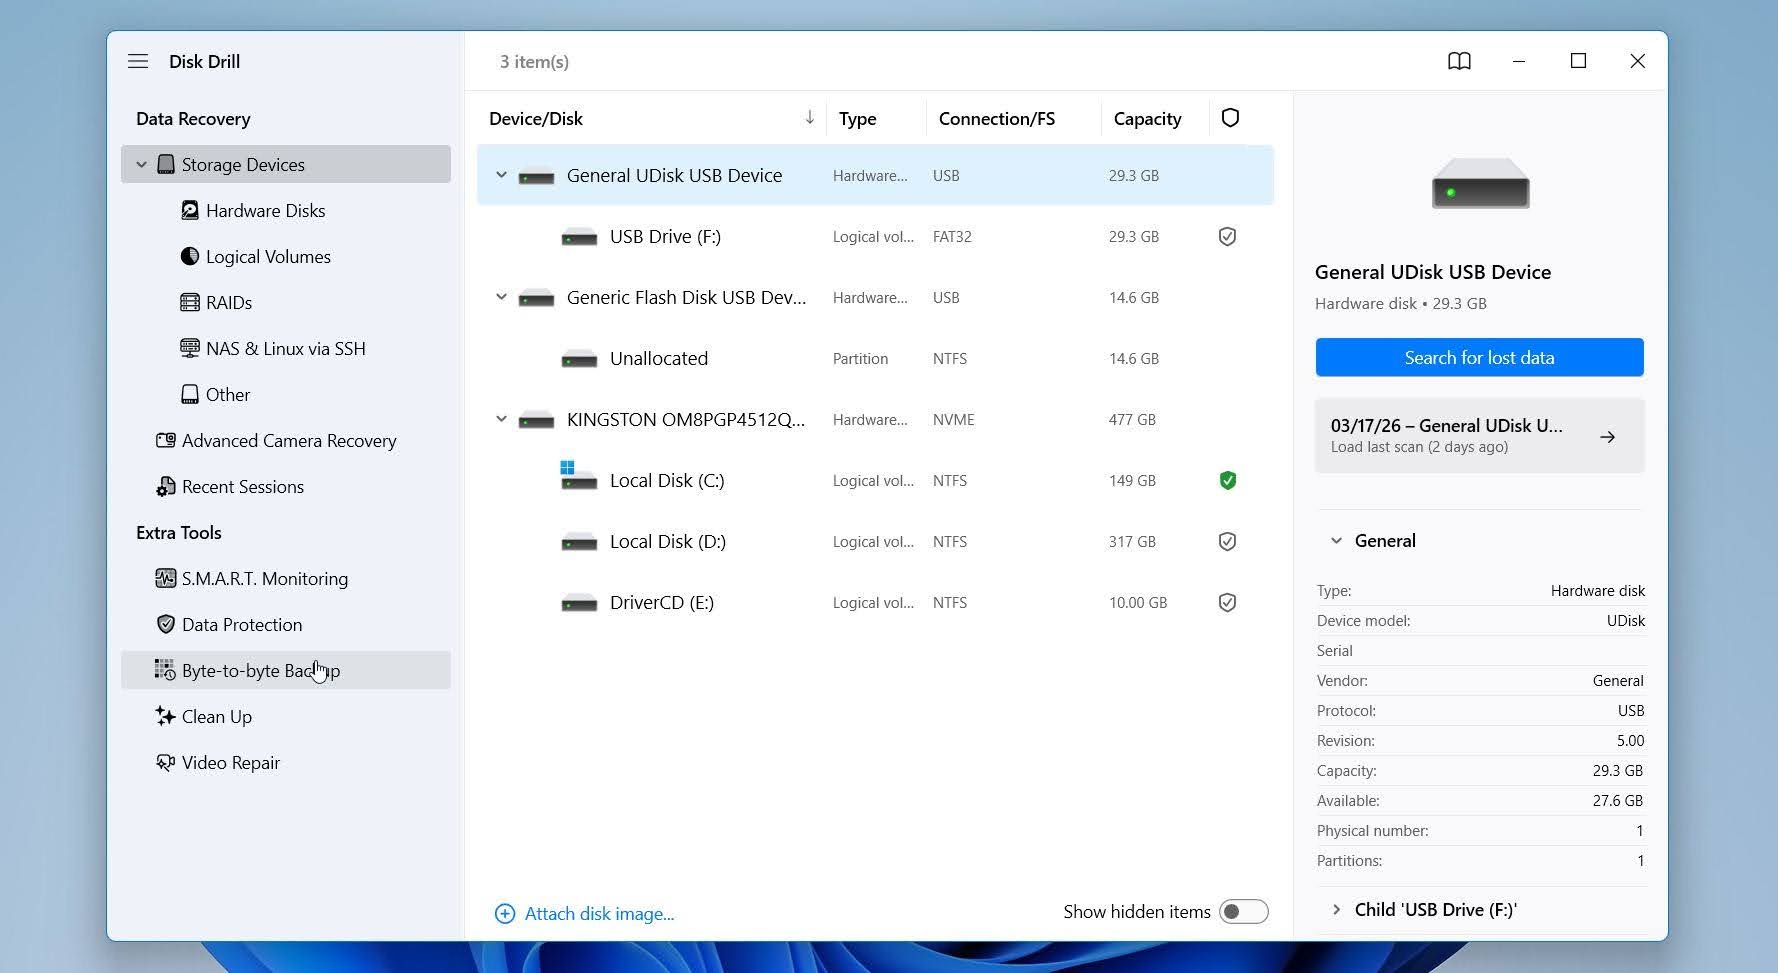
Select the external drive and click Create backup.
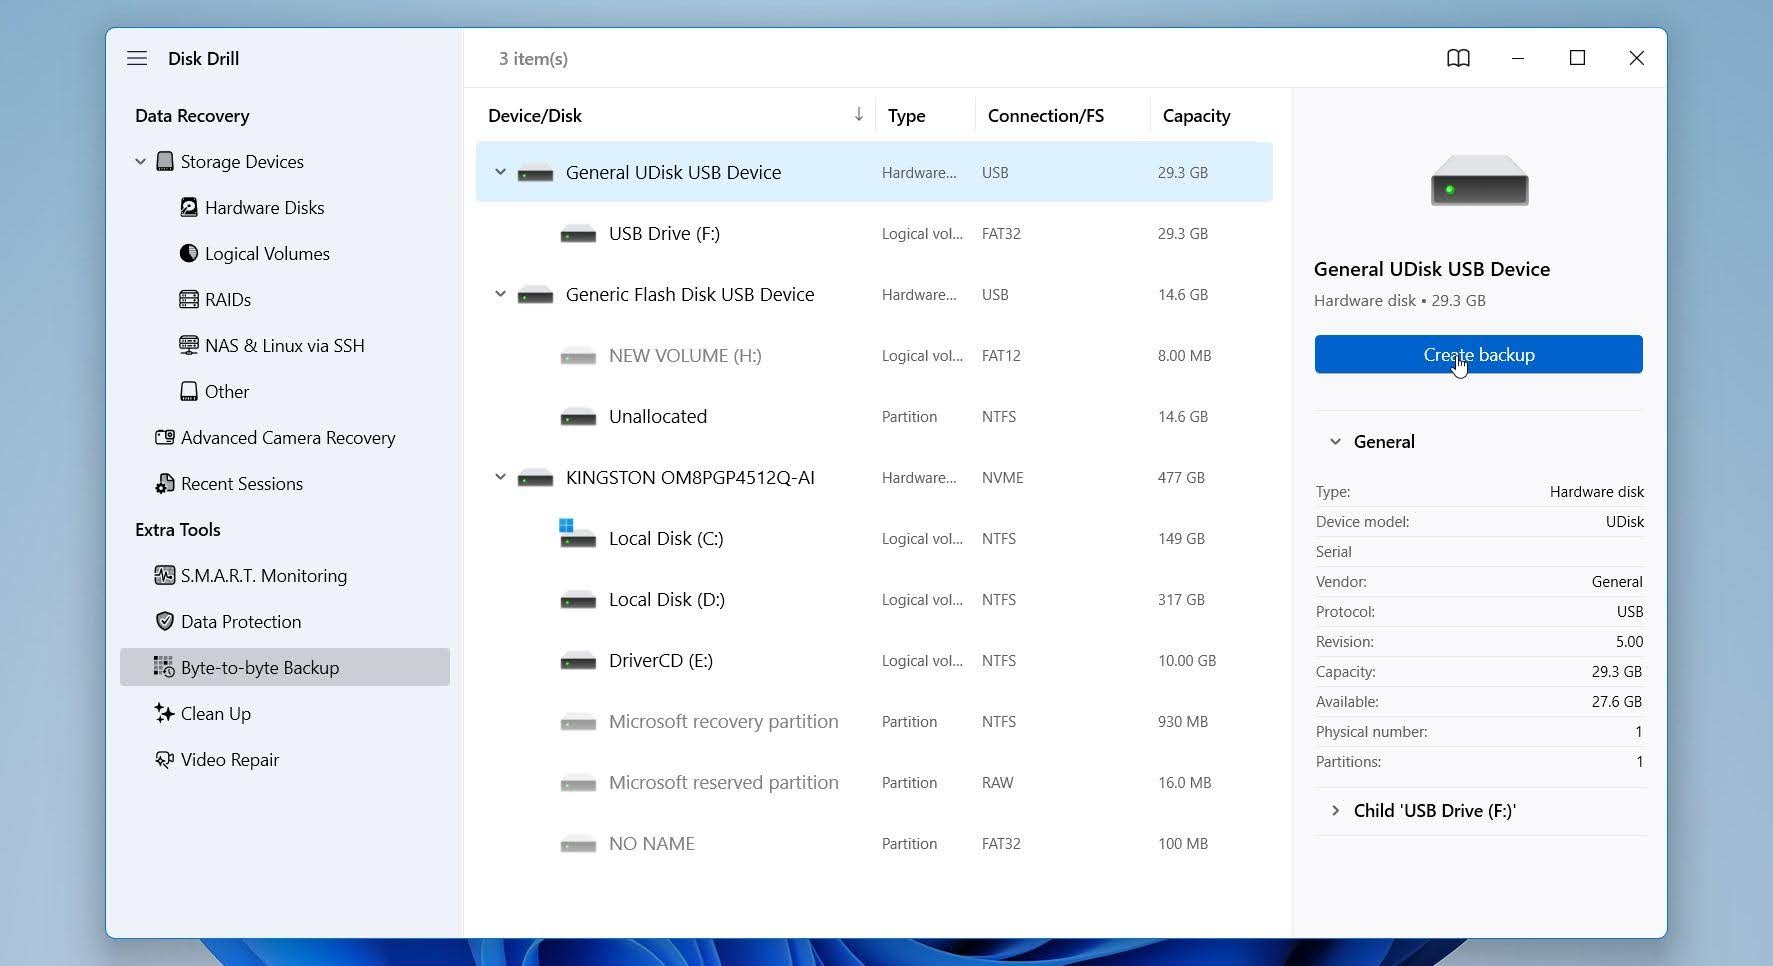
Choose a location on a different drive and start the process. Make sure the destination drive has more free space than the full capacity of the drive you’re imaging, not just the amount of data currently stored on it. This step creates a full copy of the drive, including inaccessible areas. It allows you to:
- avoid working directly with a potentially unstable drive
- reduce the risk of further damage
- run multiple scans without affecting the original
If the drive shows signs of instability, this step is strongly recommended before scanning.
Step #3: Attach the Disk Image
Go back to the main screen and select Attach disk image.
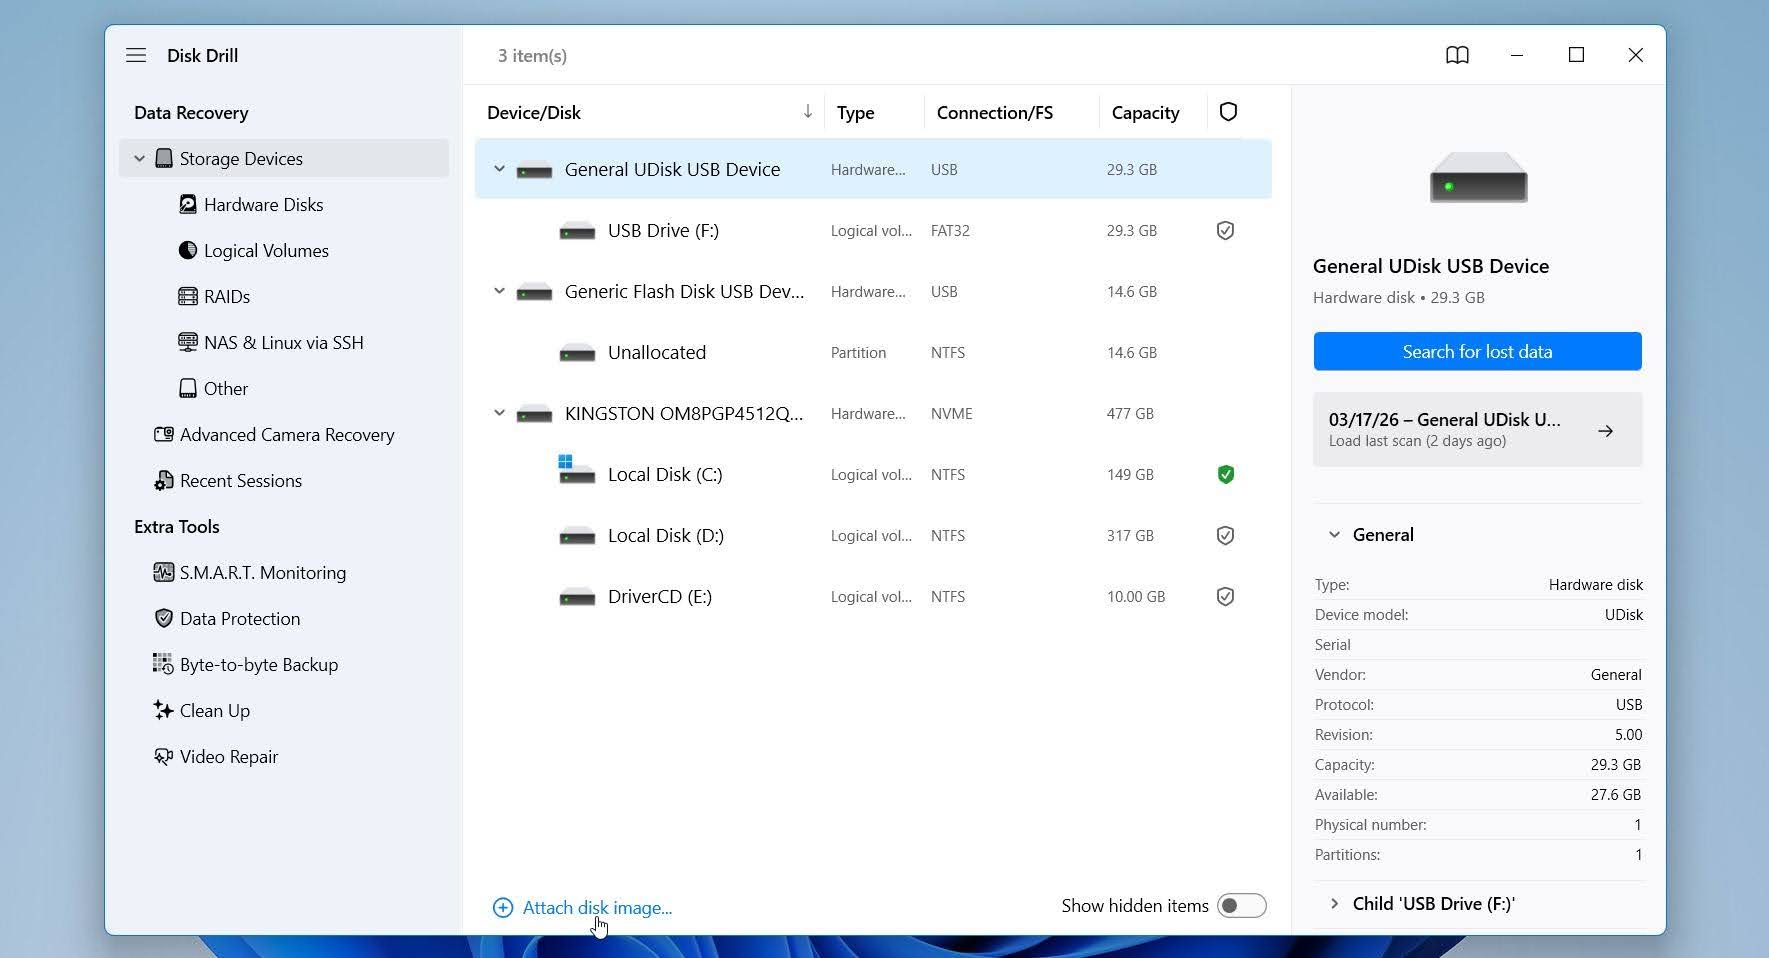
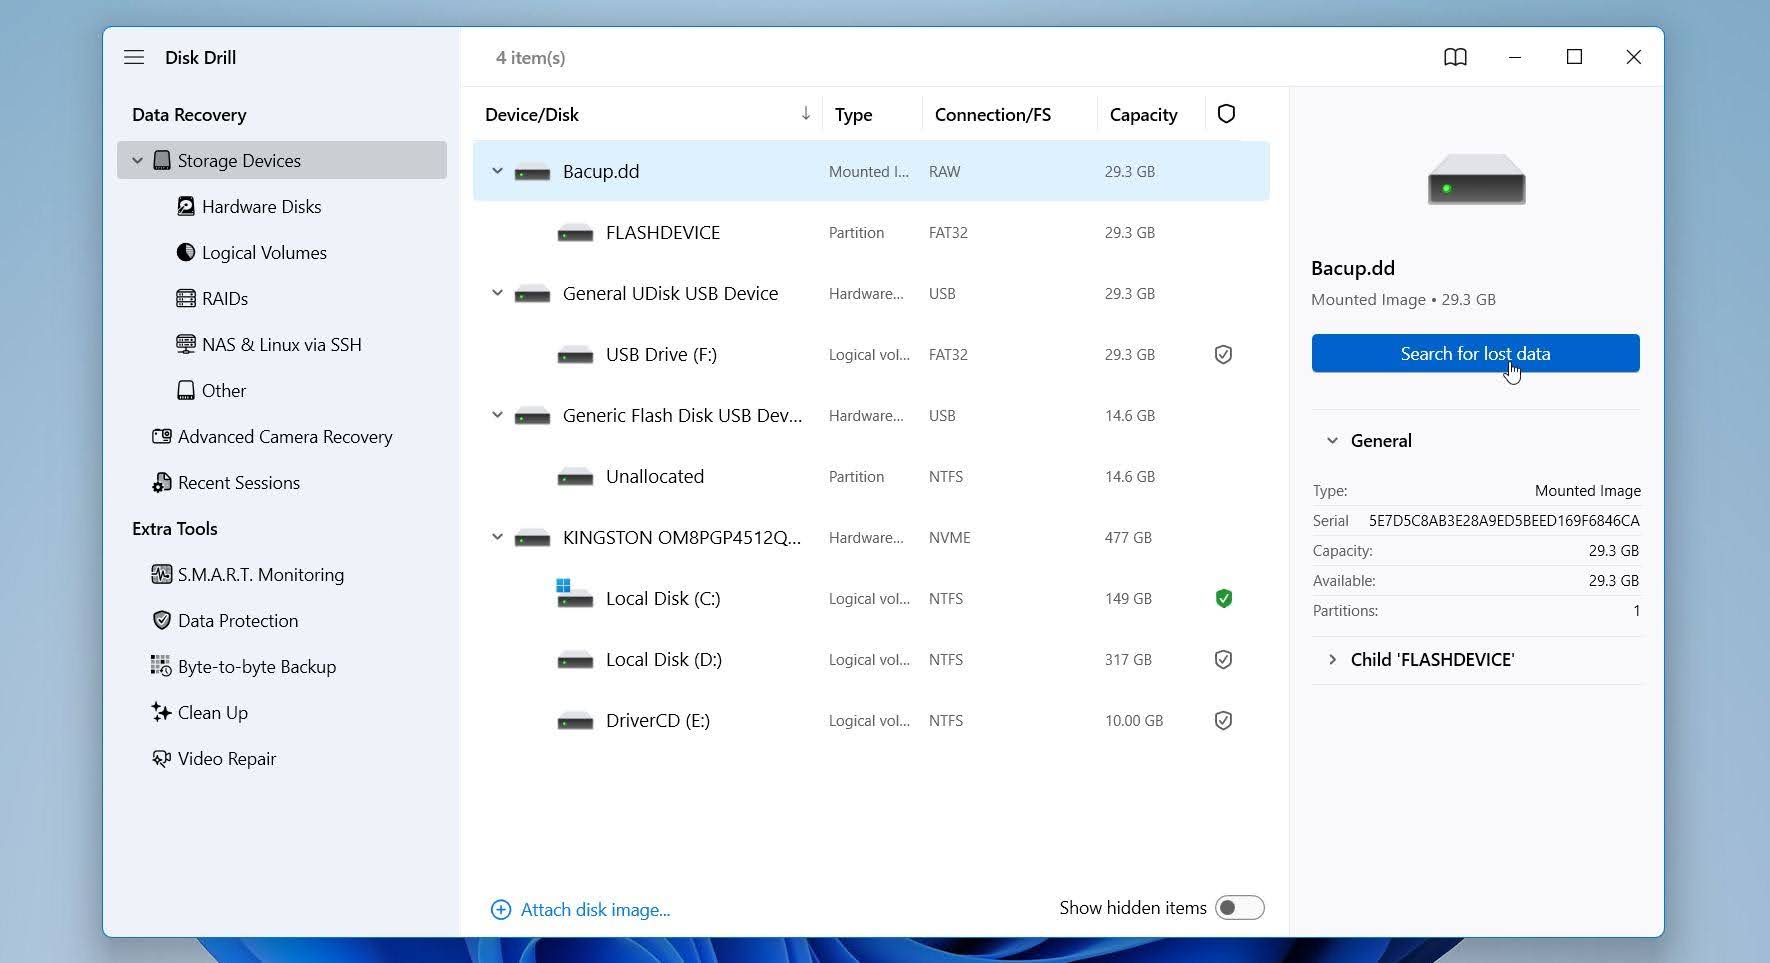
Locate the backup file you created and add it to the list of storage devices. Once it appears, start the scan with Search for lost data.
Step #4: Scan the Disk Image
Disk Drill may ask you to choose a recovery mode. The Universal Scan is best for most cases, including corrupted or formatted drives, while Advanced Camera Recovery is a mode for fragmented video files from cameras and drones. For most external drives, we recommend you to use Universal Scan.
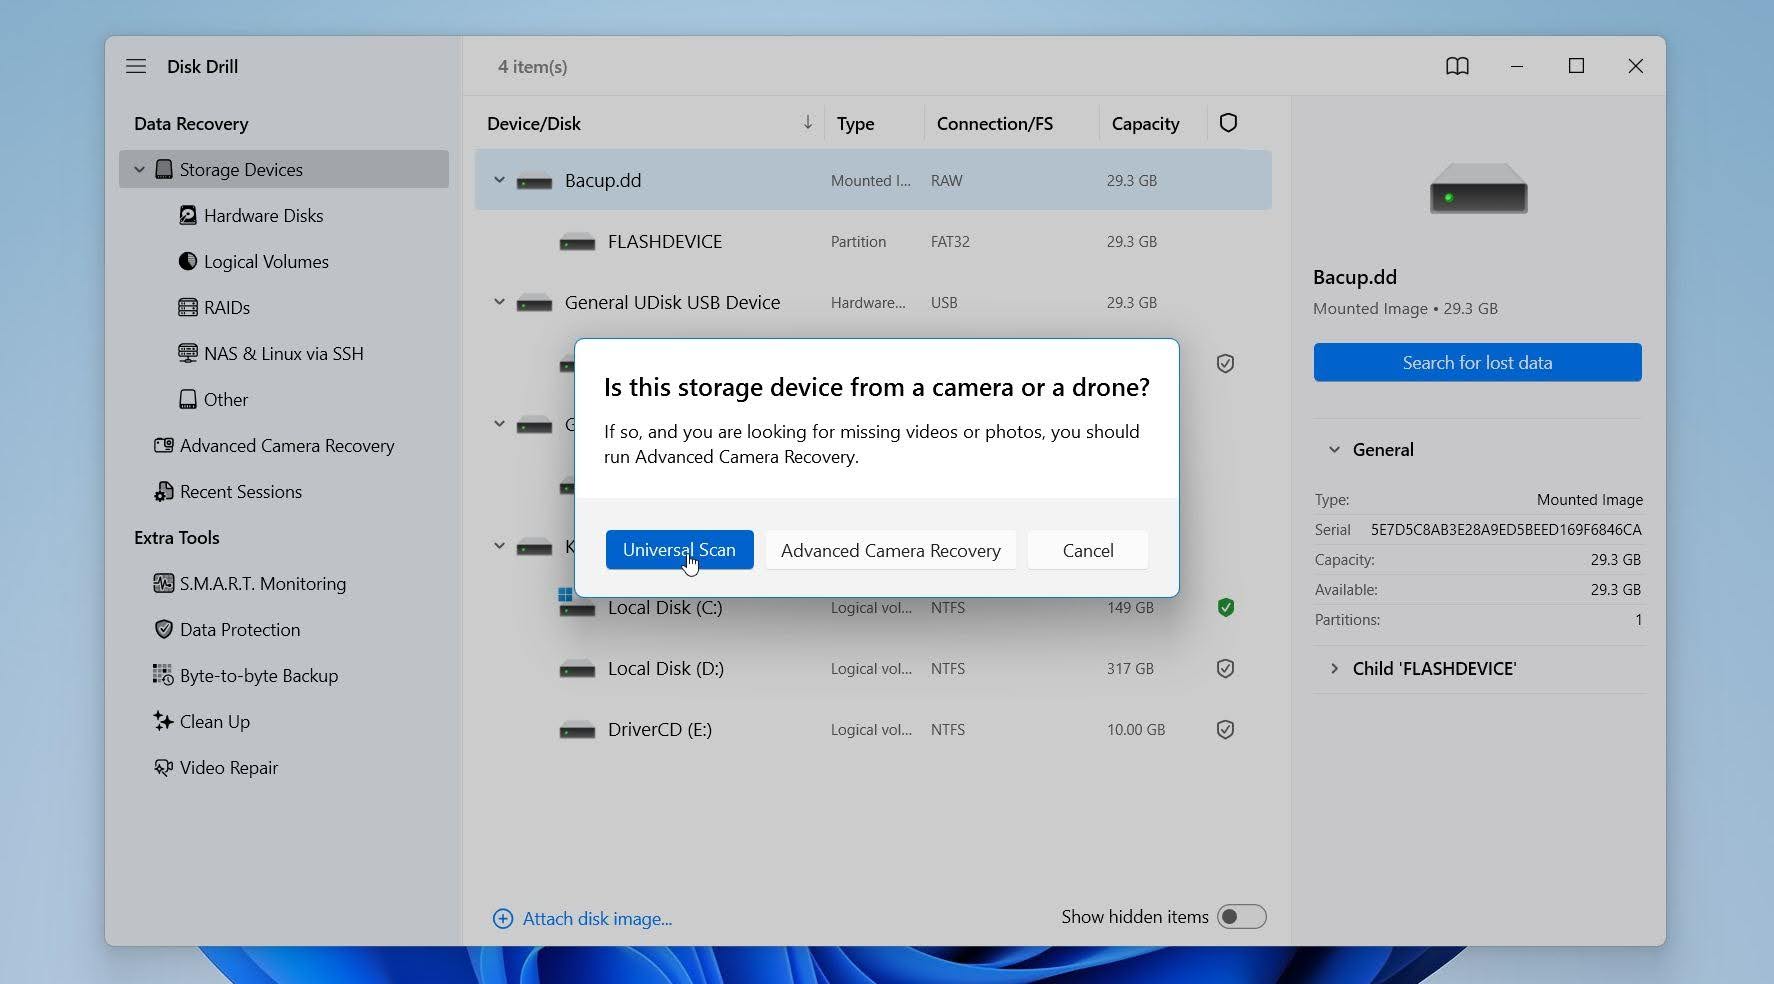
Disk Drill scans the entire device and shows progress at the top.
Step #5: Preview Files Before Recovery
Click Review found items to open the scan results.
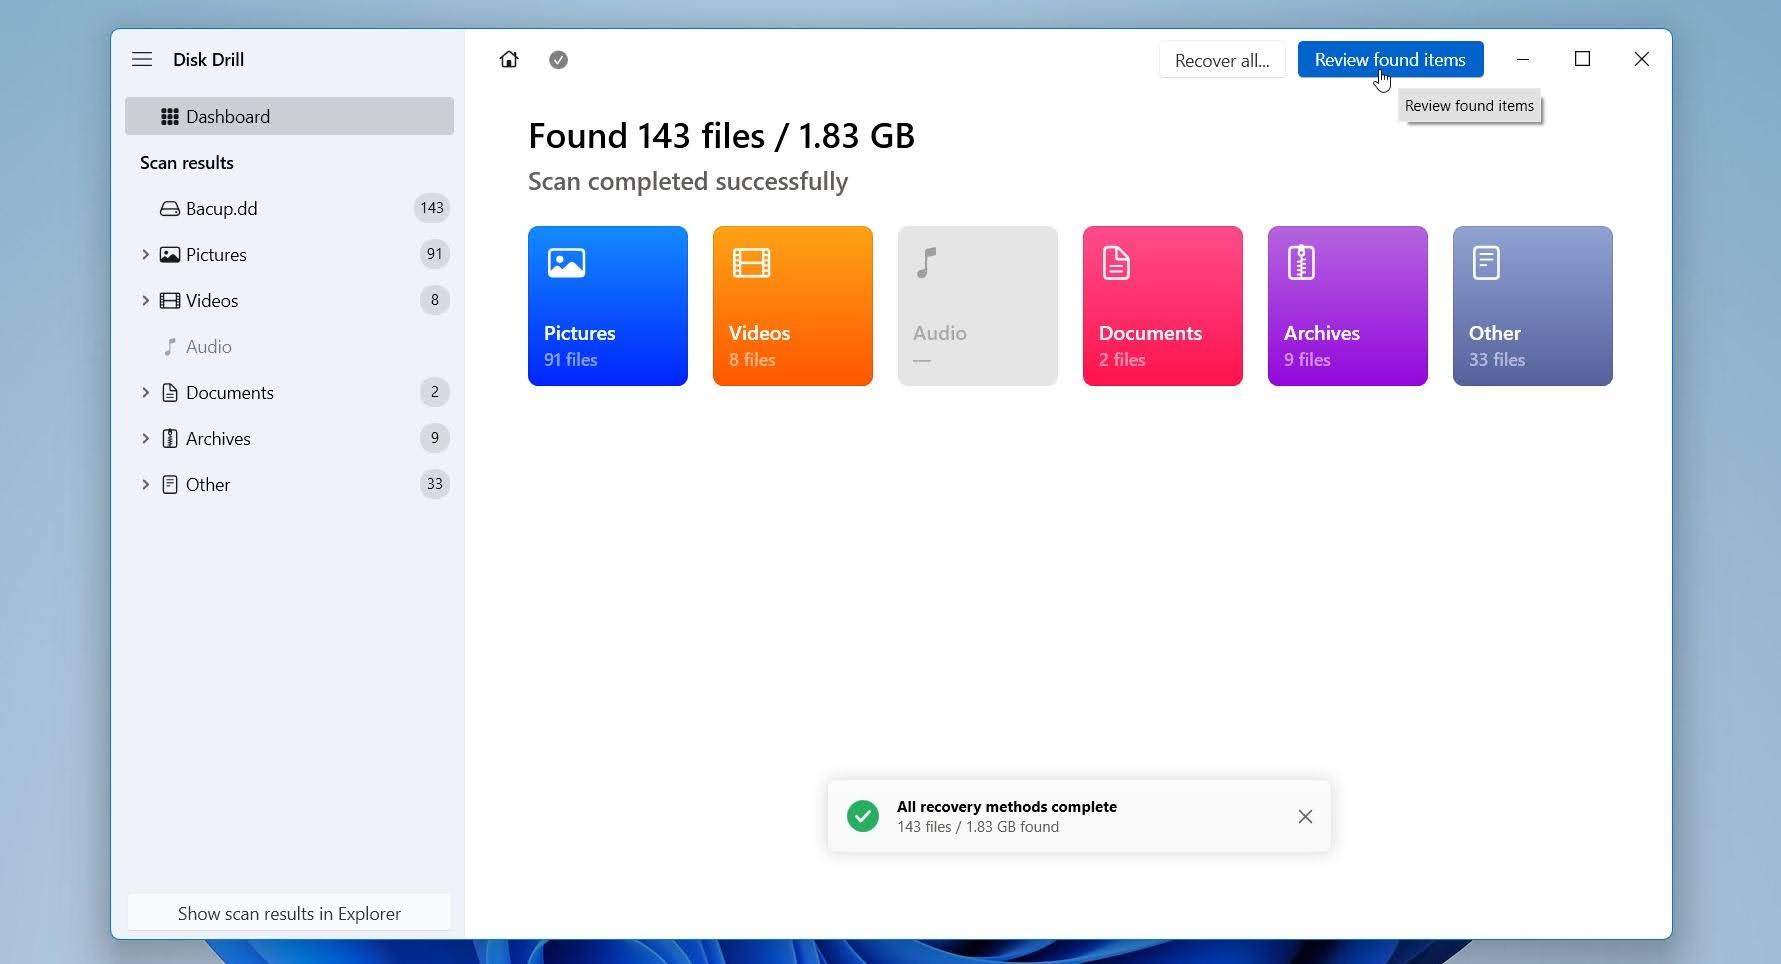
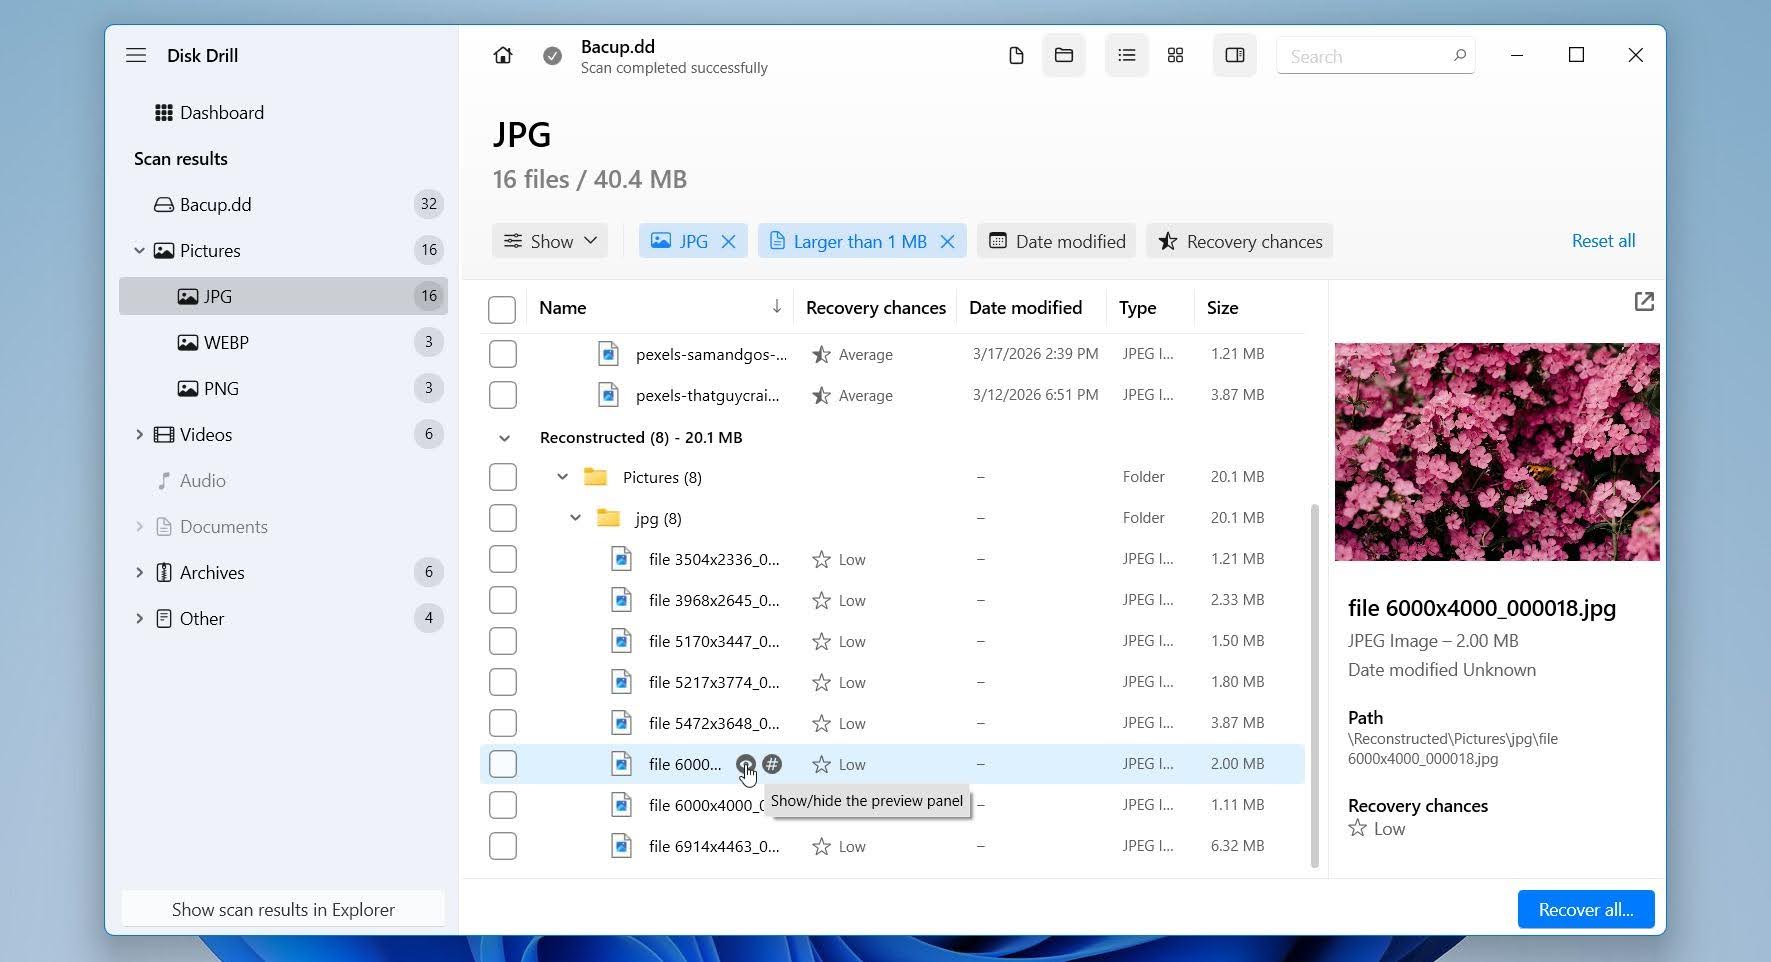
Disk Drill organizes files into categories such as Pictures, Videos, Documents, Audio, and Archives, which makes navigation easier. You can narrow the results using filters based on file type, size, date, or recovery chances. Another option is the search bar if you need to locate specific files by name or extension, such as .jpg or .mp4.
Click a file to open the preview. If the preview displays correctly, the file is usually intact and safe to recover. This helps you avoid restoring damaged or unusable files, which is especially important when the file system is corrupted.
Step #6: Recover Files
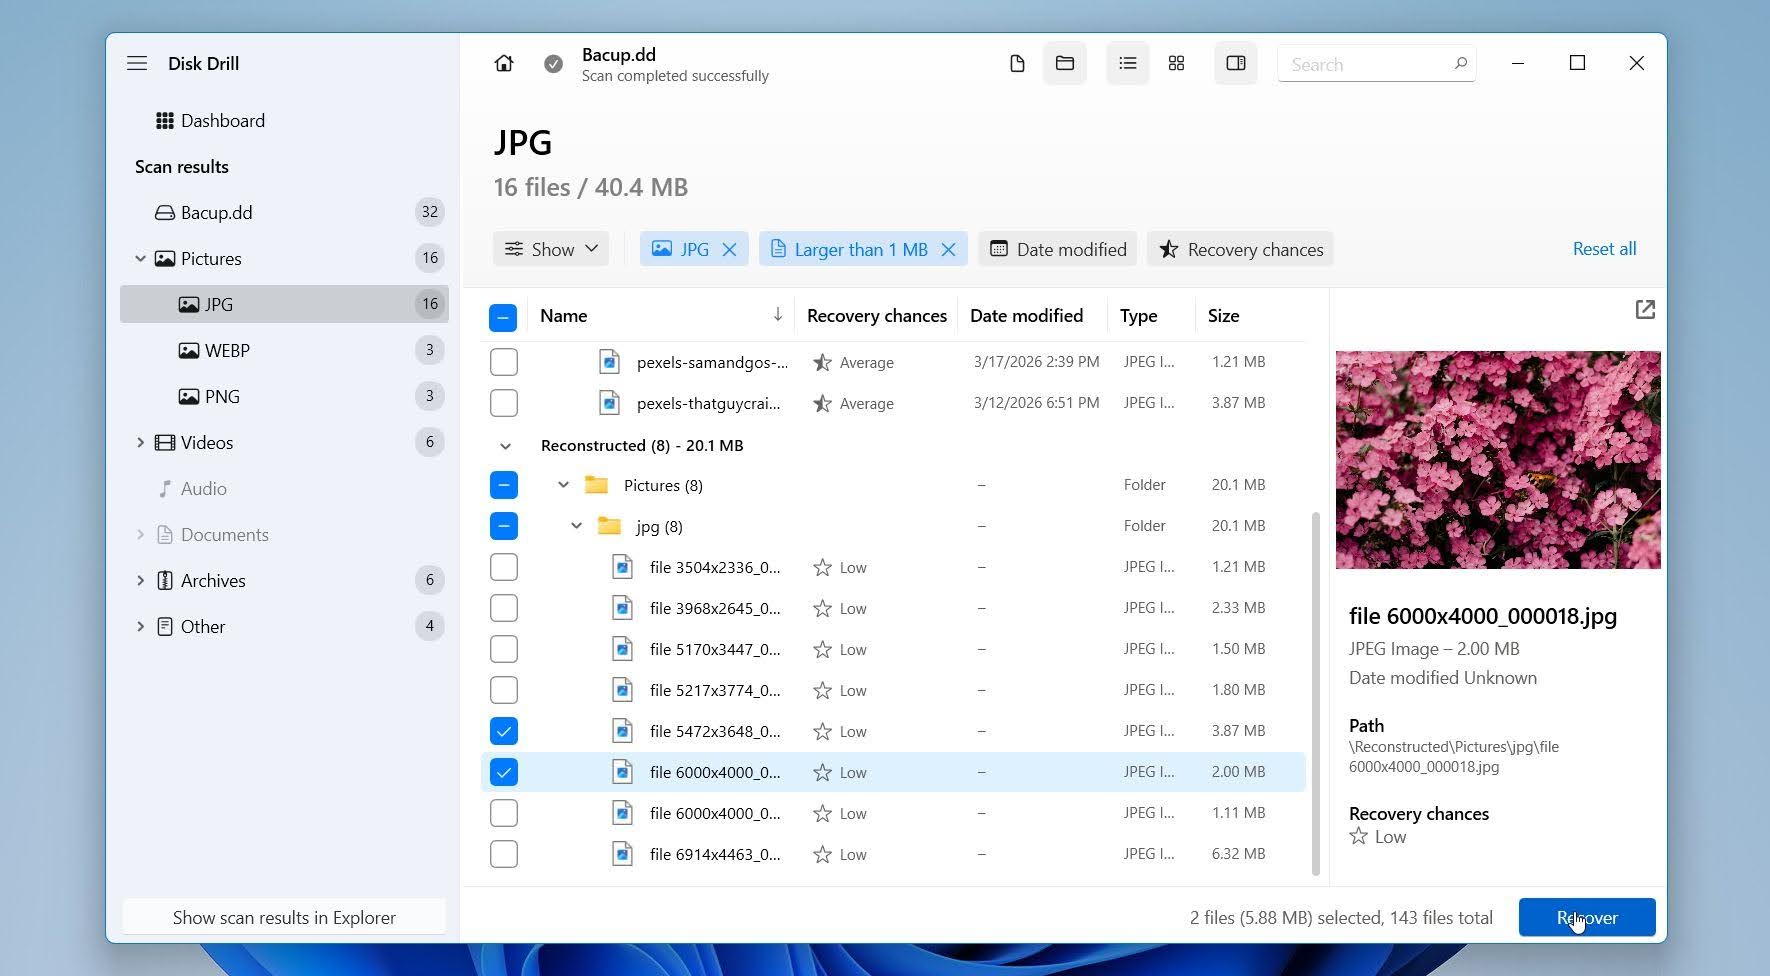
Select the files you want to restore and click Recover.
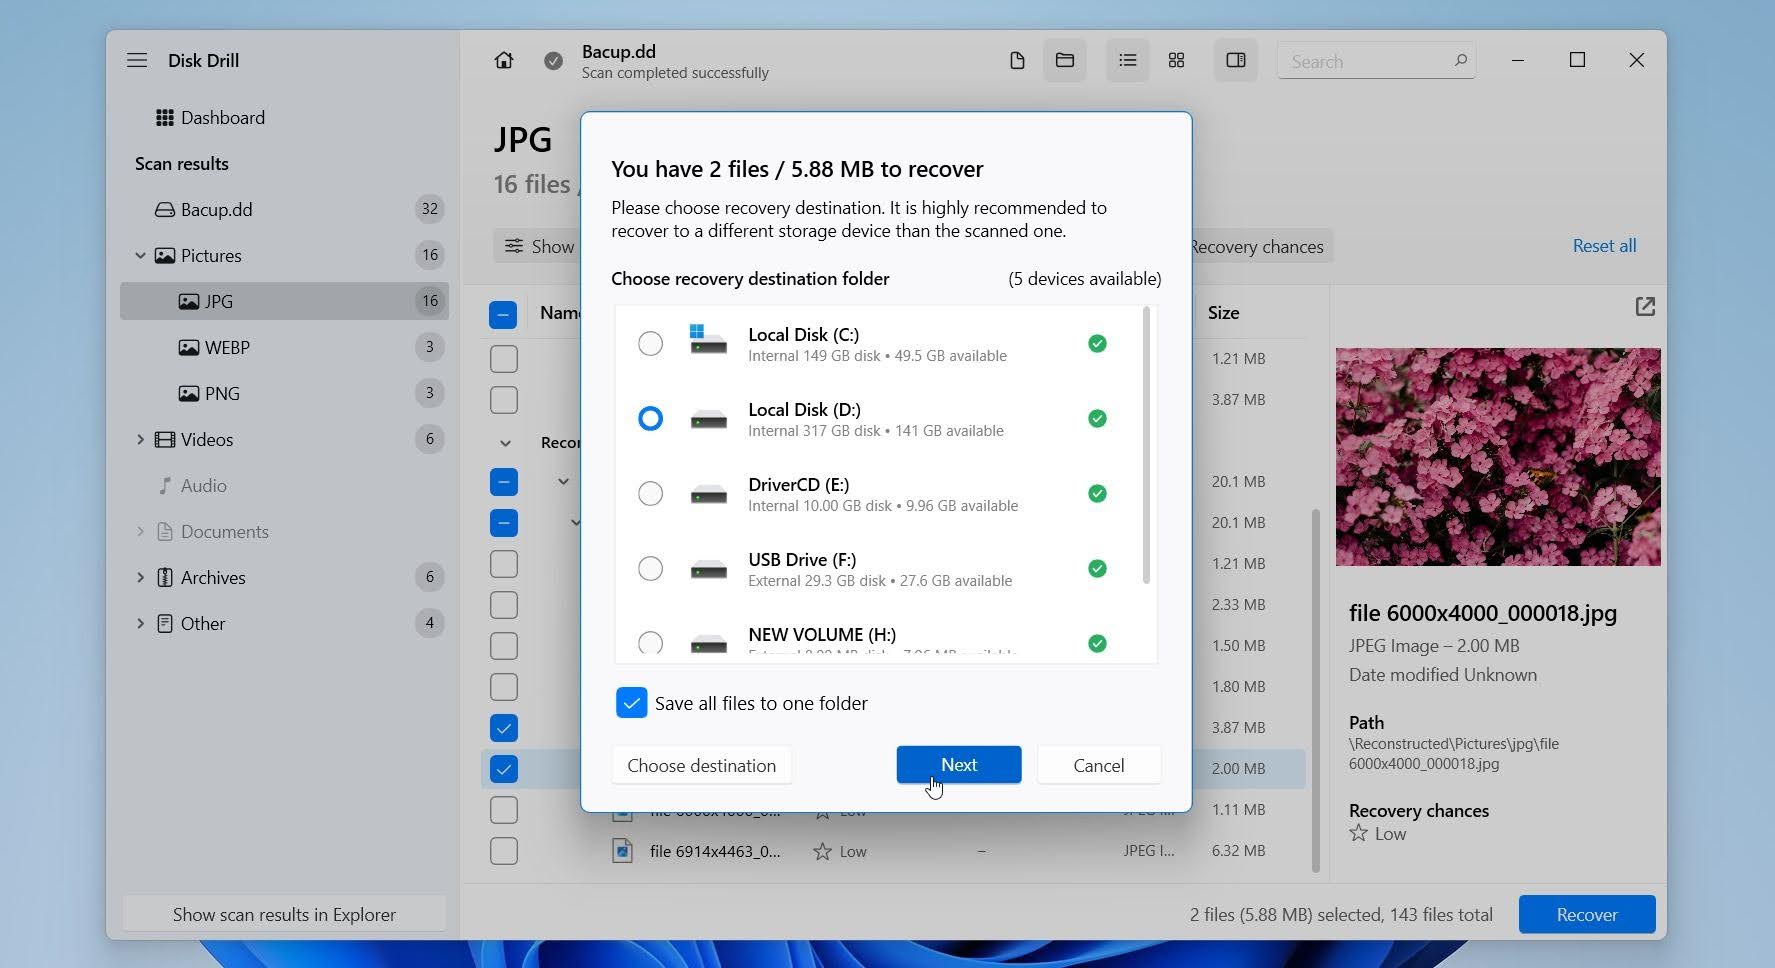
Choose a different location, not the same external drive, to avoid overwriting other recoverable data. Click Next.
Once the process completes, open the recovered files to confirm they work properly.
How to Fix an External Hard Drive Partition That Says It Needs to Be Formatted
Once your data is safe, you can try to fix the drive. Here are the methods we recommend to resolve the formatting prompt and get your external hard drive back to normal.
Method 1: Run Error Checking Tool
The Windows Error Checking tool is the best first repair attempt when the drive still shows a recognized file system such as NTFS, exFAT, or FAT32. It can correct minor file system problems and logical errors that prevent Windows from opening the drive normally.
Here is how to use it:
- Open the Start menu, type Disk Management, and press Enter.
- Find the external drive in the lower panel.
- Right-click the partition and choose Properties.
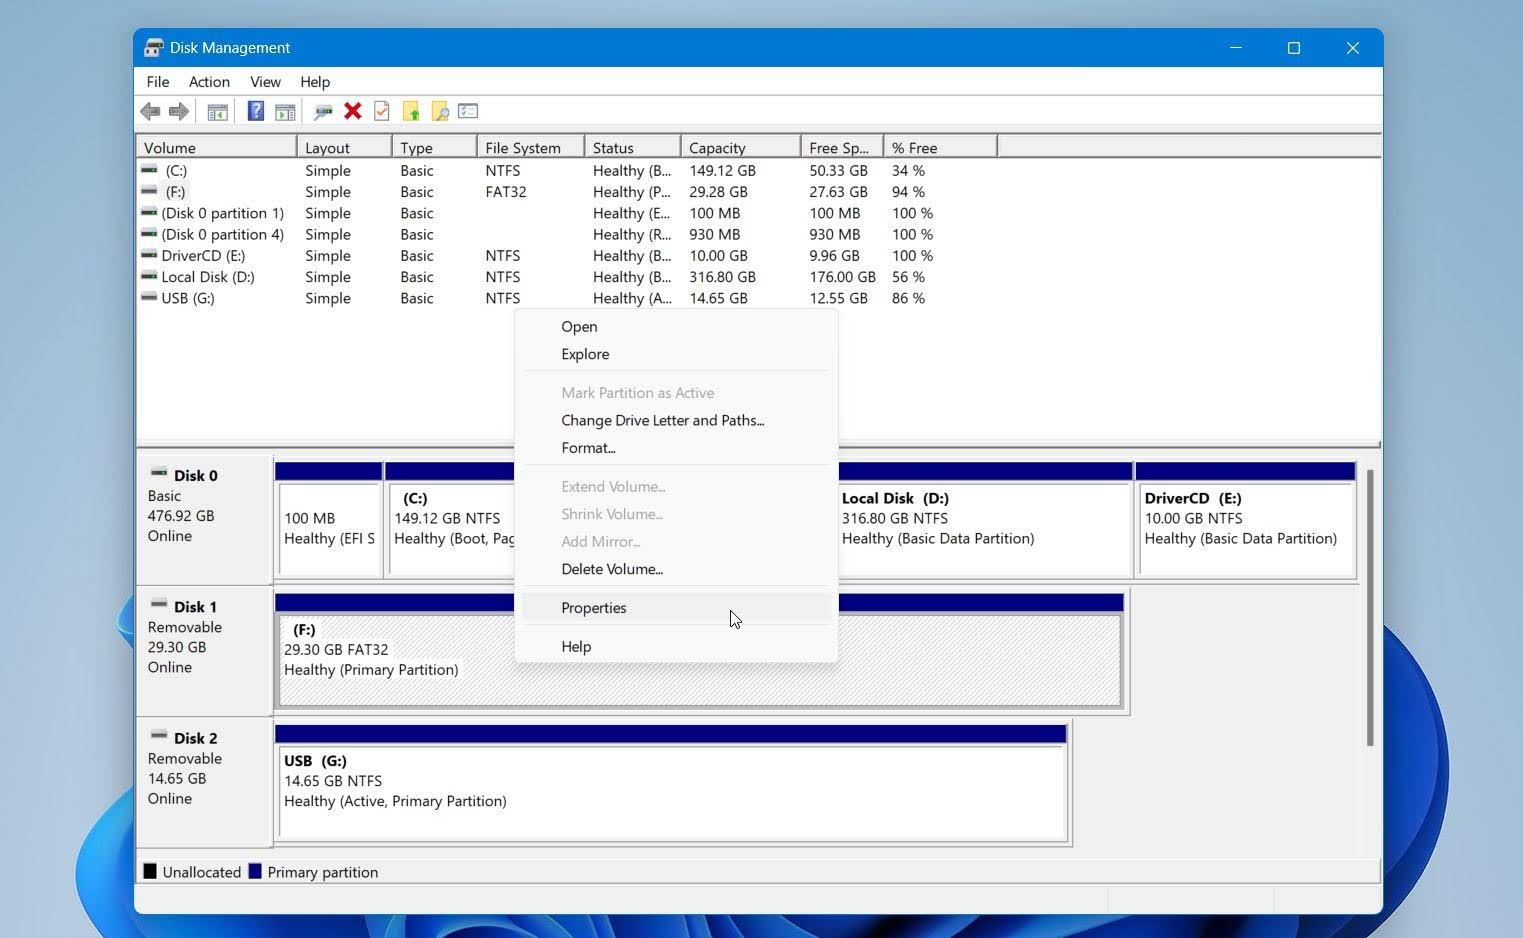
- Open the Tools tab.
- Under Error checking, click Check.
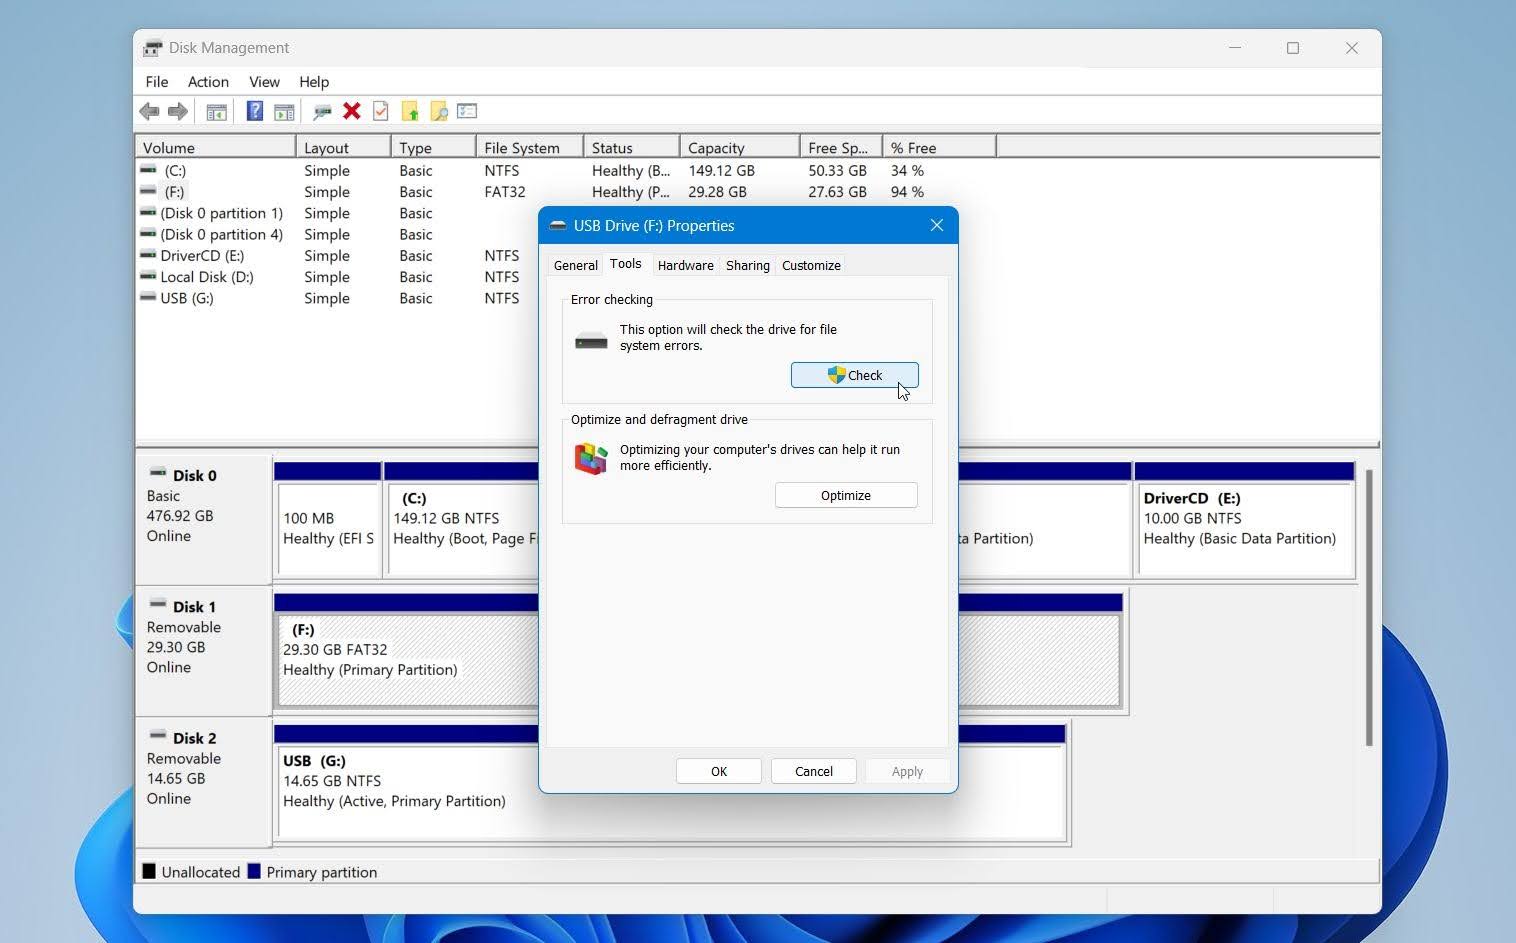
- Select Scan and repair the drive.
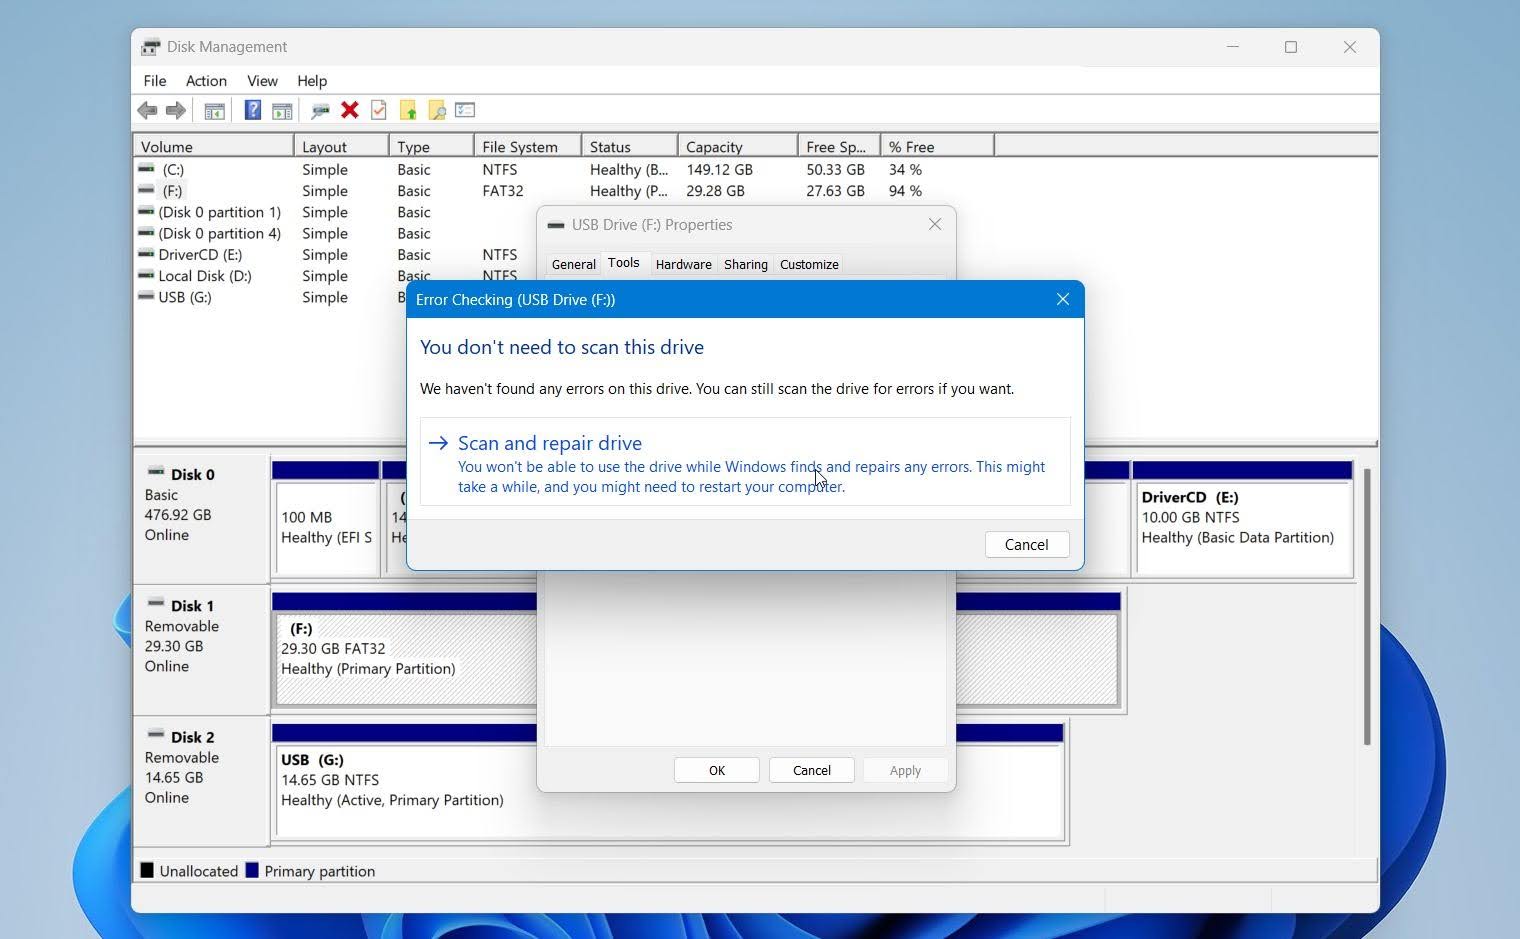
- Let Windows finish the scan and follow any repair prompts that appear.
This tool can help when the problem comes from file system corruption, improper removal, interrupted write activity, or soft bad sectors. It will not solve every case, and it is far less useful when Windows cannot identify the file system at all.
Method 2: Repair External Hard Drive Partition With TestDisk
TestDisk is an open-source data recovery solution that helps recover lost partitions and fix boot issues. This makes it useful in cases where the drive appears as RAW or shows incorrect information in Disk Management.
Interested in TestDisk? Check out our full review to learn more about its features and performance.
TestDisk does not include a graphical interface, which may look confusing at first, but we guide you through each step needed to repair the drive that asks for formatting.
Here is how to repair the partition with TestDisk:
- Download TestDisk and extract the archive.
- Open the extracted folder and run testdisk_win.exe.
- Select Create to make a new log file.
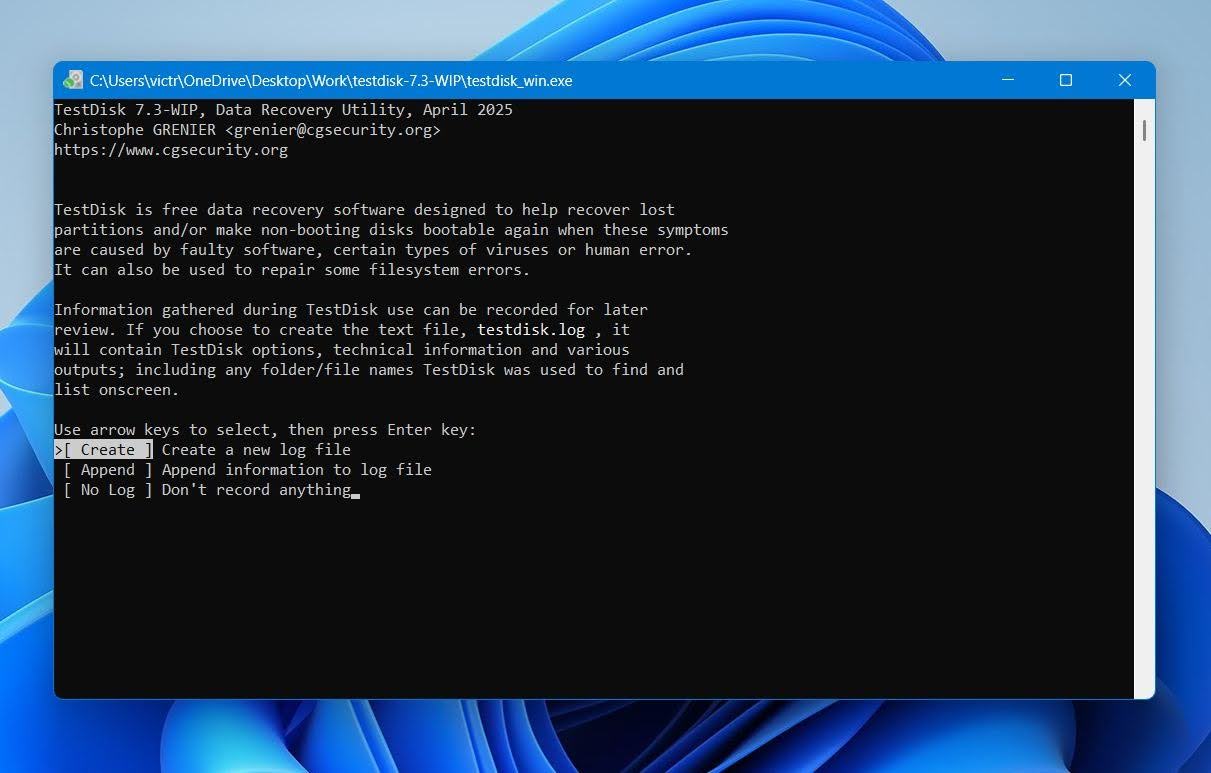
- Highlight the affected external drive and press Enter.
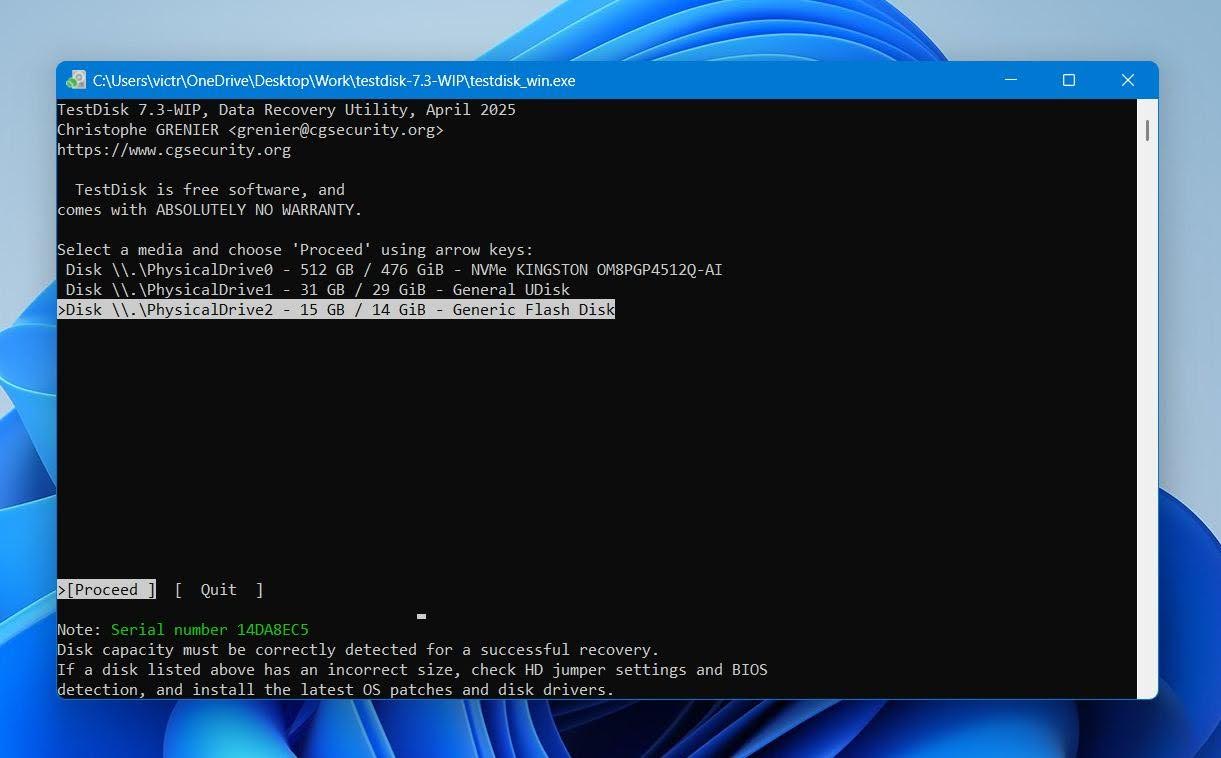
- Let TestDisk choose the detected partition table type unless you know it is wrong.
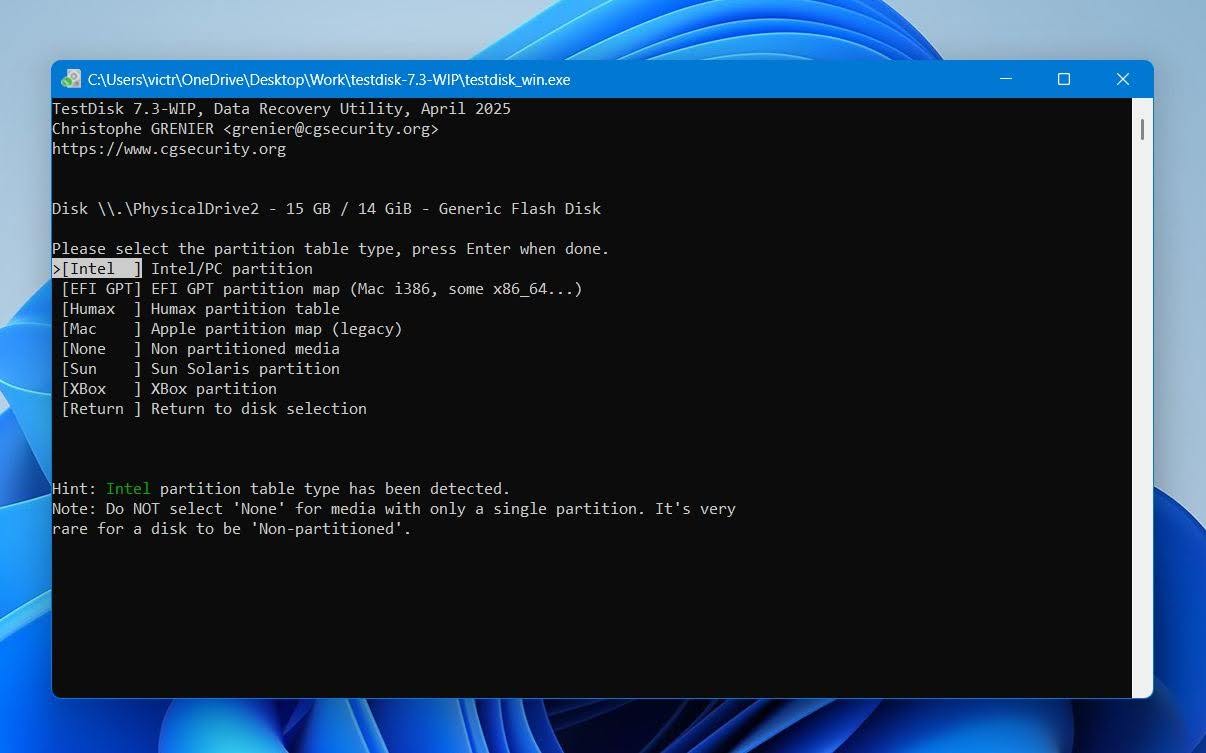
- Select Analyze and press Enter.
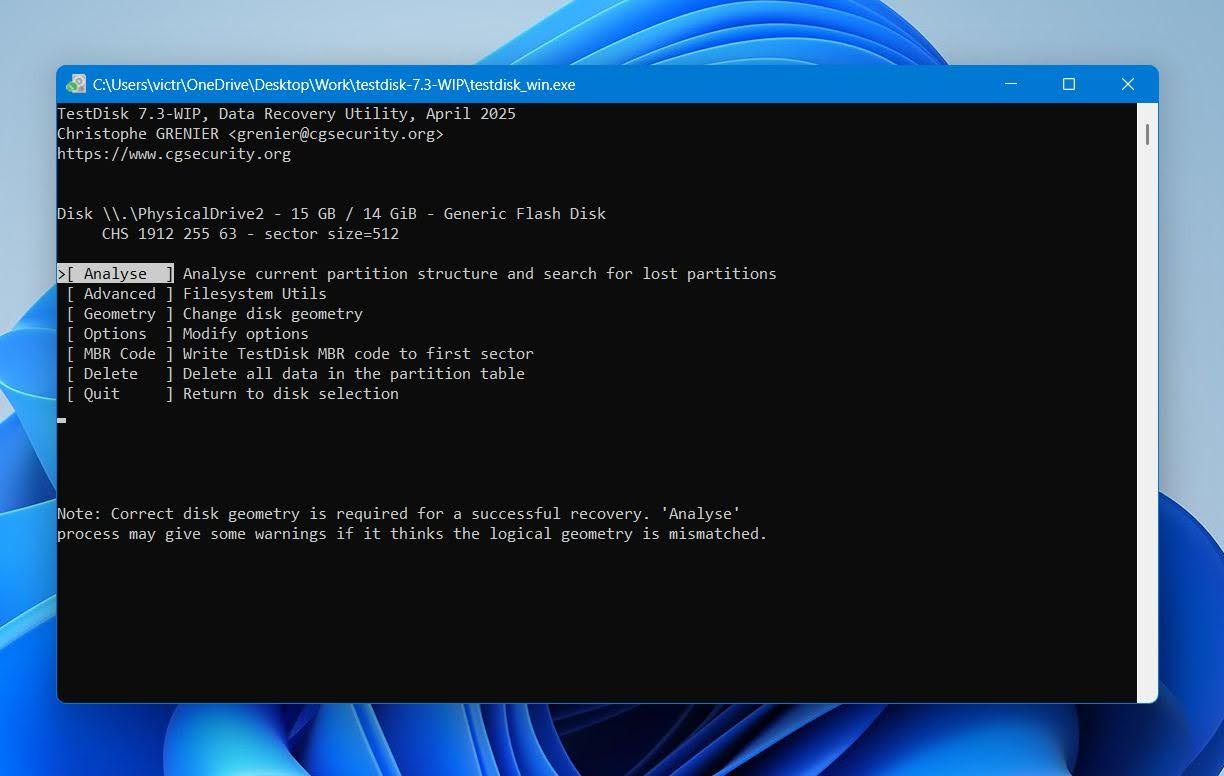
- Run Quick Search to look for lost or damaged partitions.
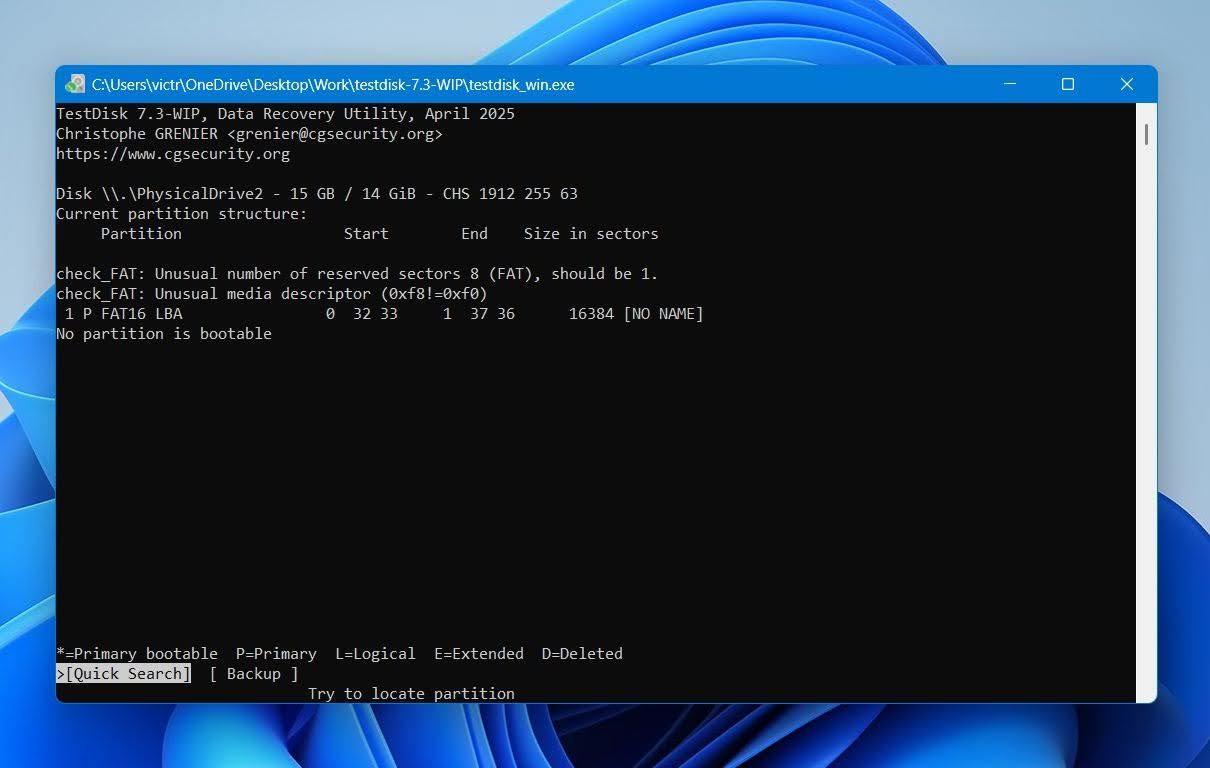
- Review the results and select the partition that matches your drive.
- Press Enter, then choose Write to restore the partition table.
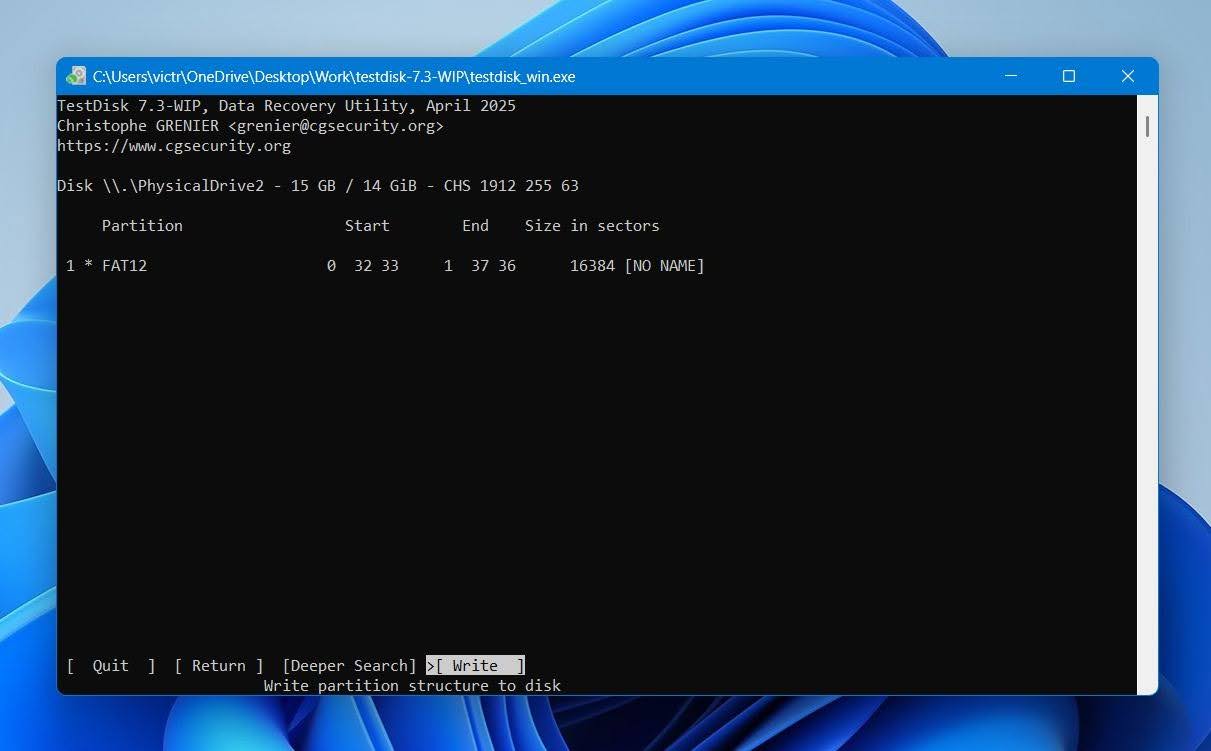
TestDisk can restore access when the main problem sits in the partition table rather than inside the files themselves. It is a strong option for advanced users, but it is still riskier than Error Checking because it writes structural changes to the drive.
Method 3: Perform Full Format
A full format is the final option when nothing else restores access to the drive. This method rebuilds the file system from scratch and removes the damaged structure that prevents Windows from reading the disk.
However, this step is destructive and should only happen after you recover all important data.
Here’s how you can perform a full format on Windows:
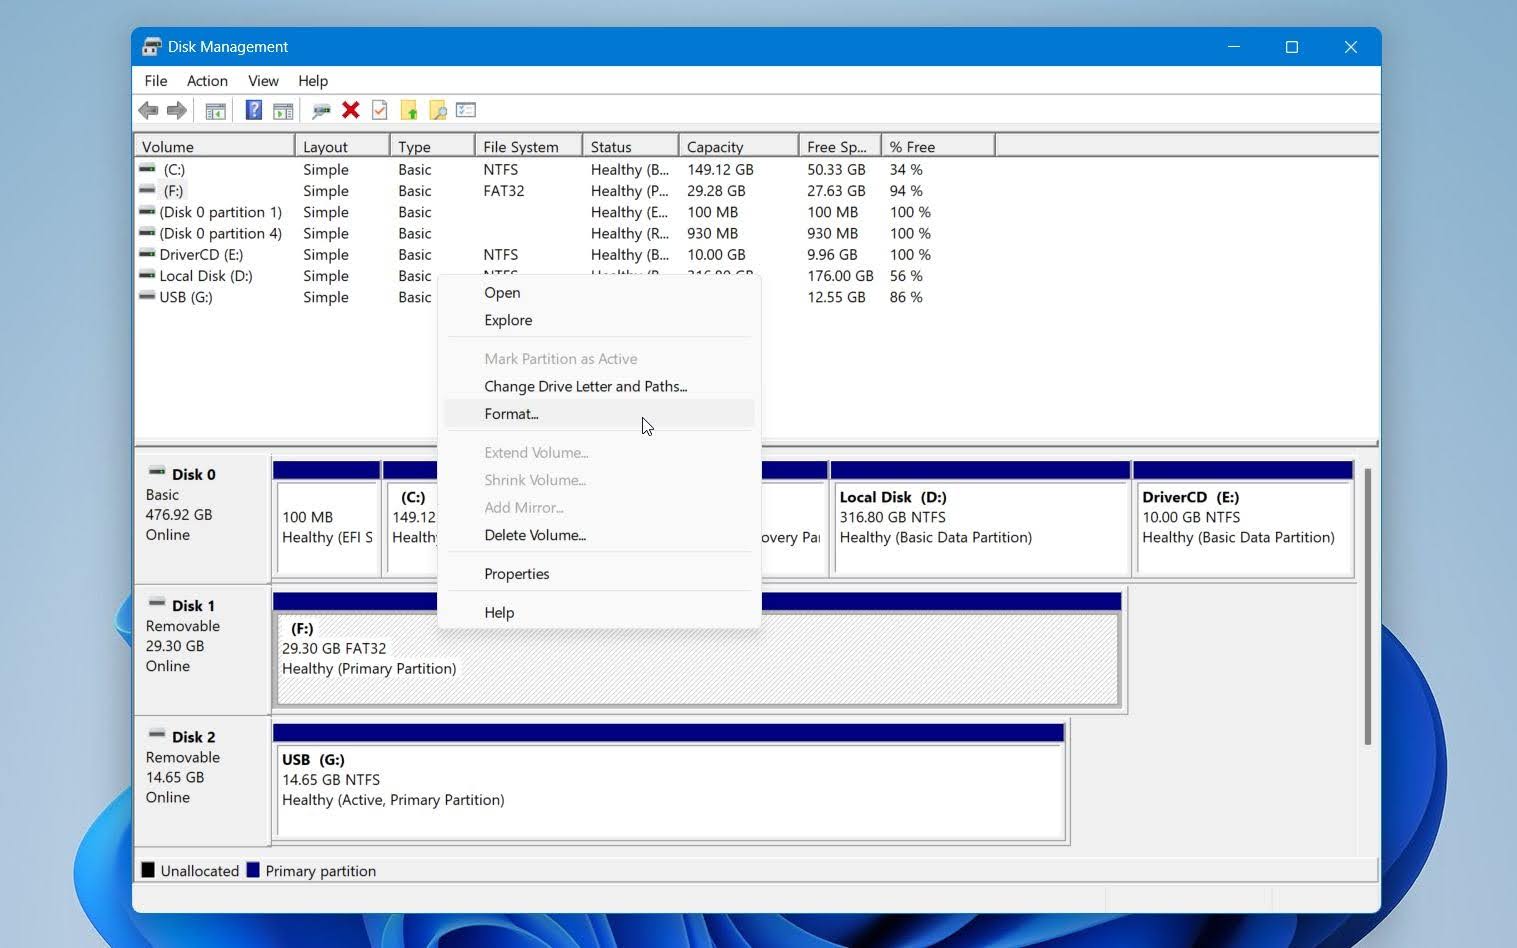
- Open the Start menu, type Disk Management, and press Enter.
- Locate your external drive in the list.
- Right-click the affected partition and select Format.
- Choose a file system, exFAT for general use and cross-platform compatibility or NTFS for Windows-only environments.
- Uncheck Perform a quick format.
- Click OK and confirm.
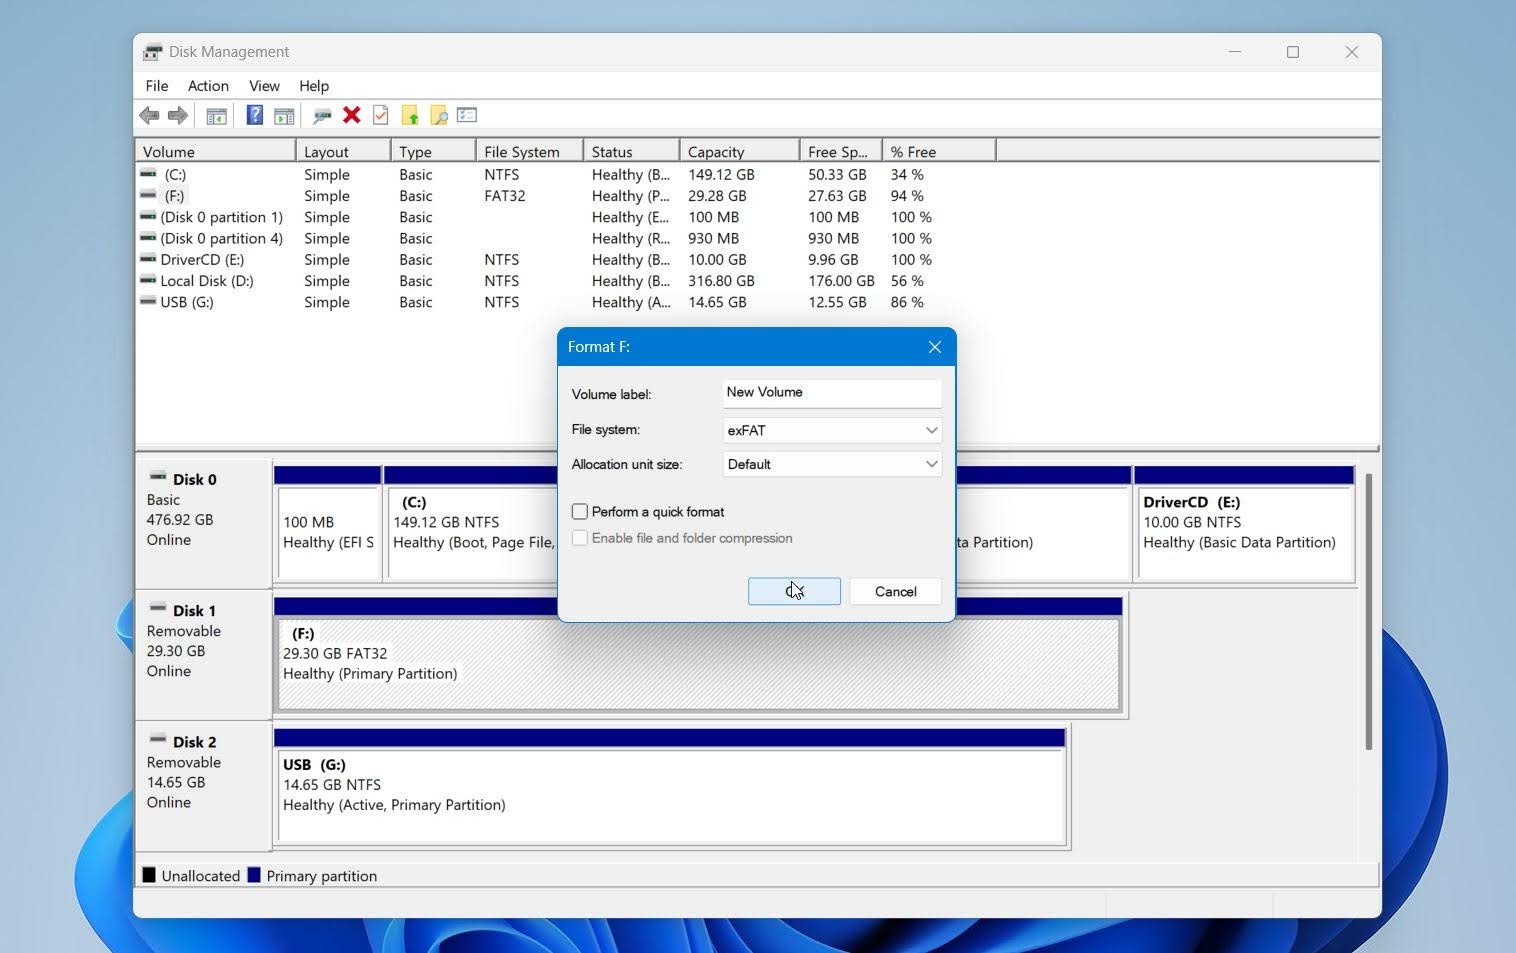
Windows will now perform a full format. This process may take longer because it scans and writes across the drive. Once the format is complete, you’ll likely be able to access the external drive again.
Closing Notes
We hope this guide helped you recover your files or at least identify the safest next step. If your external hard drive asking to format, don’t rush into repairs. Most likely, you can still recover your data if you stop using the drive and avoid writing new files to it.
Disk Drill is one of the best data recovery tools for this type of problem. It lets you create a disk image before recovery, so you can work with a copy instead of the original drive. It also supports RAW drives, recognizes hundreds of file formats, and lets you preview recoverable files before you restore them, which makes it suitable for both simple and more complex recovery scenarios.
If software cannot detect the drive, the drive makes unusual noises, disconnects repeatedly, or shows signs of physical damage, stop DIY attempts and contact a professional data recovery service. If you recover your files but the drive continues to ask for formatting or develops new errors after a full format, replace it. Drives that repeatedly fail are no longer reliable for storing important data.
FAQ
Why does Windows want to format my external hard drive?
Windows shows this message when it cannot understand how the data on the drive is organized. This can happen after you unplug the drive incorrectly or when parts of the drive get damaged. Because Windows cannot access the files, it assumes the drive is unusable and suggests formatting it to make it work again. This message does not mean your data is gone. It only means the system cannot read the drive right now.
Will formatting the drive delete all my data?
Formatting removes the file system structure that stores information about file names, locations, and folder hierarchy. A quick format clears this metadata but does not immediately erase the actual data, which means recovery may still be possible until new data overwrites it.
A full format performs a more thorough process and makes the recovery impossible.
After either type of format, files become inaccessible through normal means. Any further use of the drive increases the risk of permanent data loss, so recovery should always come before formatting.
How do you fix a hard drive that says it needs to be formatted?
Start with data recovery because any attempt to fix the drive can change its contents and make recovery harder. Use recovery software to scan the drive or its copy and save important files to another device.
After your data is safe, try fixing the drive. The built-in Windows Error Checking tool can fix small issues, and tools like TestDisk can restore damaged partitions. If nothing helps, a full format can make the drive usable again. If the problem keeps coming back or the drive works unstable, it is better to replace it.
Why does my external hard drive show as RAW?
A RAW drive usually means the operating system cannot detect a valid file system. This status appears when file system metadata becomes corrupted or overwritten. Despite this, the data often is still on the disk. The issue affects how the system reads the drive, not the presence of files. Recovery tools can scan the drive directly and reconstruct data even when no file system is detected.
This article was written by Arjun Ruparelia, a Contributing Writer at Handy Recovery Advisor. It was also verified for technical accuracy by Andrey Vasilyev, our editorial advisor.
Curious about our content creation process? Take a look at our Editor Guidelines.