Do you suspect your SD card might be failing and are seeking a method to check its condition? Do you like being prepared and proactive instead of dealing with the consequences of a worst-case scenario? Are you curious about your SD card’s state and would appreciate a way to stay informed about it?
Let’s see the best tools you can use to check SD cards’ health status, test their performance and capacity, and “fix” any problems with them.
When to Check SD Card Health
Even if “it looks alright” at a glance, often it’s crucial to perform an SD card health check before using your storage media.
- 🎂 Do you want to grab (and avoid losing) the best photos during your vacation, or some other important event?
- 🔍 Did some files stored on your SD card go missing or inaccessible? Was there any other similar sign of data loss or file corruption?
- 📅 Can’t you recall when (if?) you checked your SD card for errors in what could be a very long period of inactivity?
- 🐌 Did your SD card crawl when accessing its contents? Did you notice speed fluctuations or other performance issues?
- ❗ Did you see any error messages when using your SD card, indicating functionality issues?
Those are only a few reasons you should check the health of an SD card before using it. All storage devices have a finite lifetime, including your shiny brand-new micro SD card. Plus, many factors can affect a memory card’s performance, its integrity, and drastically reduce its remaining life.
How to Recognize Signs of SD Card Failure
Even if you don’t continuously monitor your SD card’s health, it’s easy to recognize some tell-tale signs of a memory card’s imminent failure.
- 💾 Are you often met with file errors when trying to read or write data to your SD card, or have to deal with other types of data corruption frequently?
- 🦥 Does your SD card perform at a suspiciously slow read/write speed?
- 👁️ Are your devices unable to mount and use your SD card, fail to recognize it correctly, or outright acknowledge its existence?
- 🔌 Does your SD card unexpectedly disconnect during transfers?
At the first such sign, it’s time to scan your SD card with (at least) one of the methods and tools we cover in this article.
The Best SD Card Health Monitoring, Checking, and Problem-Fixing Methods and Tools on Windows
Thankfully, there are many ways you can check an SD card’s condition, as well as tools you can use to try to fix any problems with memory cards from almost any brand, like Lexar, Samsung, SanDisk, Verbatim, etc.
Still, while helpful, some of those tools can also affect or completely wipe all data from your SD card. In the following table, you can see some of those tools listed in “progressive Stages”. The lower a tool on our list, and the higher the Stage, the more it can affect the data stored on your memory card.
For example, a thorough test of an SD card’s entire capacity requires completely “emptying it” and then filling it to the brim with data. That translates to writing new data in the available free space and over any existing files, erasing them from existence.
Even with no files directly affected, repeated tests and continuous monitoring may “stress” an already failing card, pushing it to the point of complete failure. In such cases, it’s advisable to stop using the SD card and refer to a professional data recovery service.
Stage |
Category |
Method |
Description |
1 |
Real-time monitoring |
System Performance Monitor |
Tracks various performance metrics, some of which can help estimate an SD card’s condition. |
1 |
Real-time monitoring |
Windows Error Reporting |
Logs errors during the use of Windows, some of which might be about problems with SD cards. |
1 |
Real-time monitoring |
Hard Disk Sentinel |
S.M.A.R.T. status monitoring, logging, and testing. It can also show basic information for SD cards, reveal the condition of some industrial SD cards, and test for and repair bad blocks (in its registered version) |
2 |
Manual Checkup |
Windows Error Checking |
Basic Windows tool for checking storage devices for errors. |
2 |
Manual Checkup |
CHKDSK |
DOS-era but still useful app for checking and repairing errors on storage devices. |
2 |
Manual Checkup |
CrystalDiskMark |
Benchmarking app for testing the performance of any storage device, including SD cards. |
2 |
Manual Checkup – Mobile |
SD Card Test |
User-friendly tool for effortlessly checking an SD card’s storage space. |
3 |
Non-Intrusive Testing |
Victoria |
Advanced tool that can check an SD card’s whole storage space for issues. |
4 |
Checking & fixing errors |
CHKDSK |
Can also try to repair any issues it finds. |
4 |
Checking & fixing errors |
Windows Error Checking |
Like a visual alternative to CHKDSK, it can also (attempt to) repair problems on storage devices. |
4 |
Checking & fixing errors |
Victoria |
Comes with options for repairing any issues it finds. |
4 |
Checking & fixing errors |
DiskGenius |
Among its many functions, DiskGenius includes the option to (try to) repair bad blocks. |
4 |
Checking & fixing errors |
TestDisk |
Can detect, recover, or rebuild partition tables, rendering inaccessible storage devices and SD cards usable. |
5 |
Intrusive Testing |
H2testw |
Can extensively test SD cards’ read and write performance. |
5 |
Intrusive Testing |
F3 |
Open-source friendly alternative to H2testw for testing an SD card’s storage space and revealing its true storage capacity. |
Many of those tools have overlapping functionality. Thus, for this article, we will only go over some of them.
Some tools can perform multiple tasks, like real-time monitoring and manual checkups or non-intrusive and intrusive testing. We’ll mention it where relevant, but only use them in one of those ways.
Method 1: System Performance Monitor
As its name states, Windows’ built-in Performance Monitor allows you to check various metrics related to the performance and, by extension, the health status of almost all hardware on a PC. And that includes SD cards.
To check your SD card with Performance Monitor:
- Seek it by typing its name in the Start menu or Windows Search. When found, hit Enter or click Open to launch it.
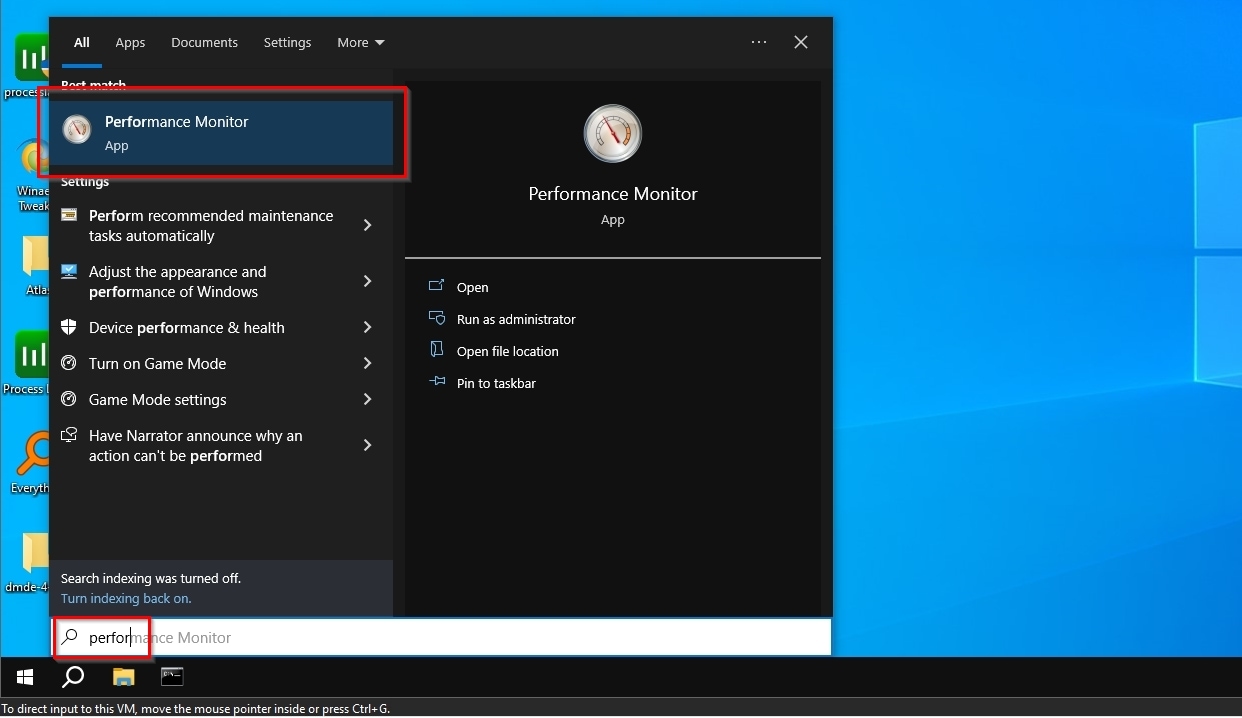
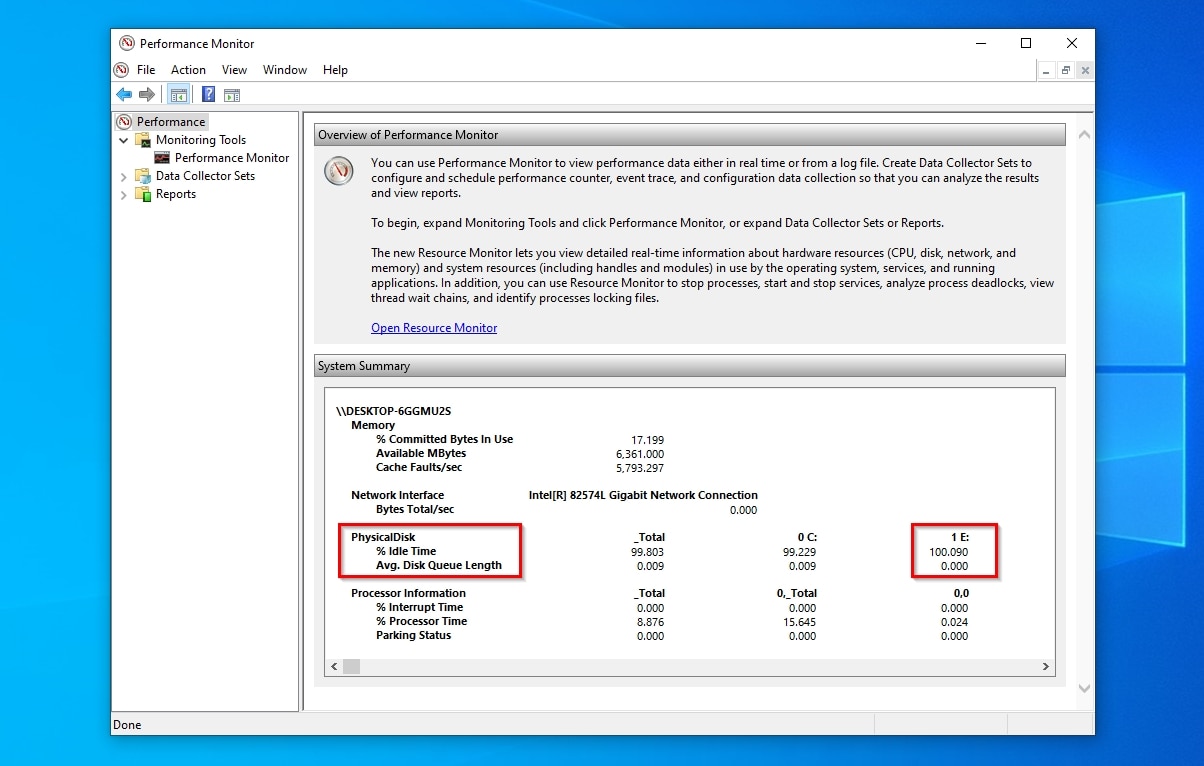
- The Performance Monitor “overview” starting page will show you a summary of your system. Your SD card should be listed next to PhysicalDisk. If it isn’t there, try removing and reconnecting your SD card or card reader. If the problem persists, you should try a different tool.
- Expand Performance > Monitoring Tools to find the Performance Monitor page. Click on it to select this view, and then on the plus button on the top toolbar to add more counters.
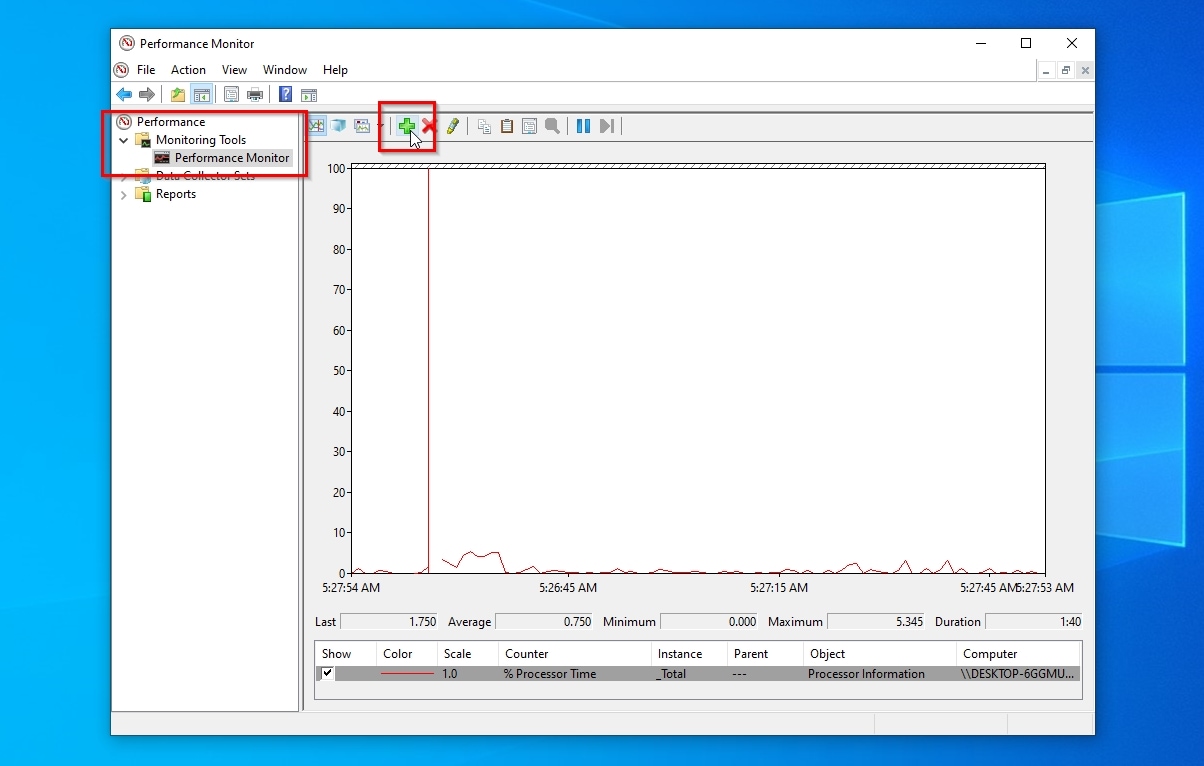
- Make sure the drop-down list under Available Counters is set to Local computer. Move to the list directly underneath. Scroll down, locate the PhysicalDisk group, and click on it. Then, choose the letter of your SD card from the next list under Instances of selected object.
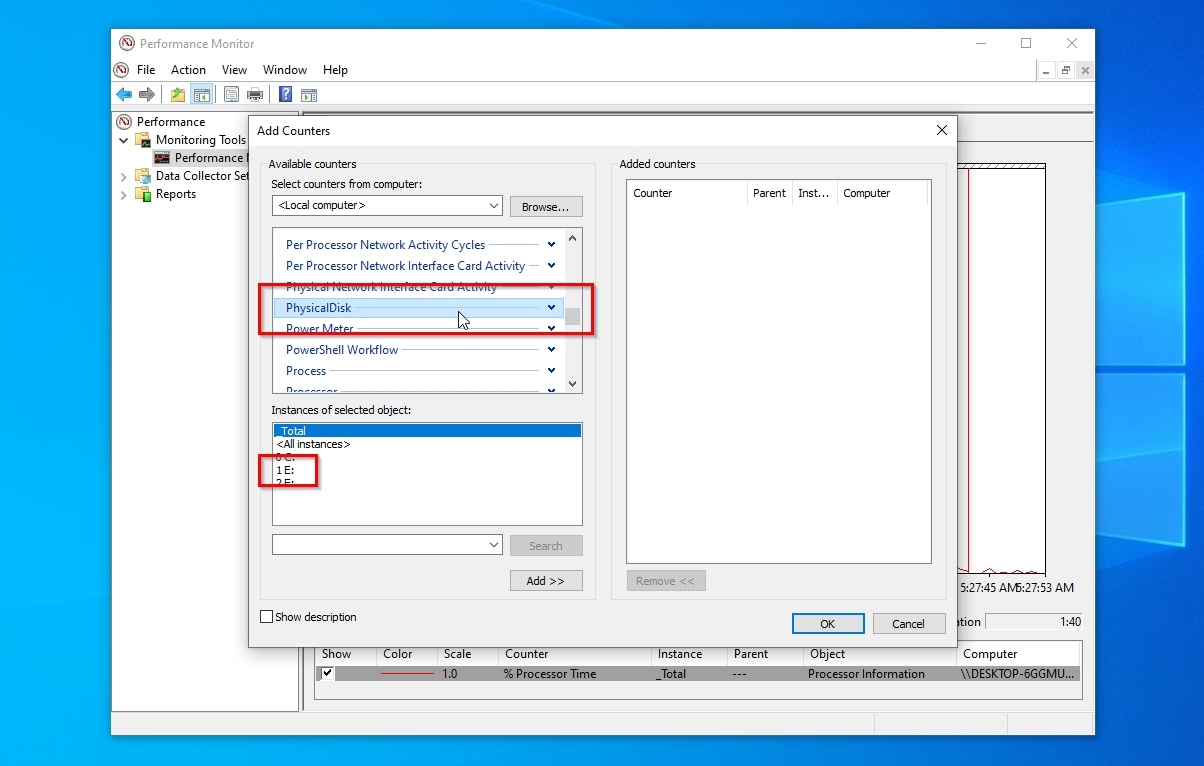
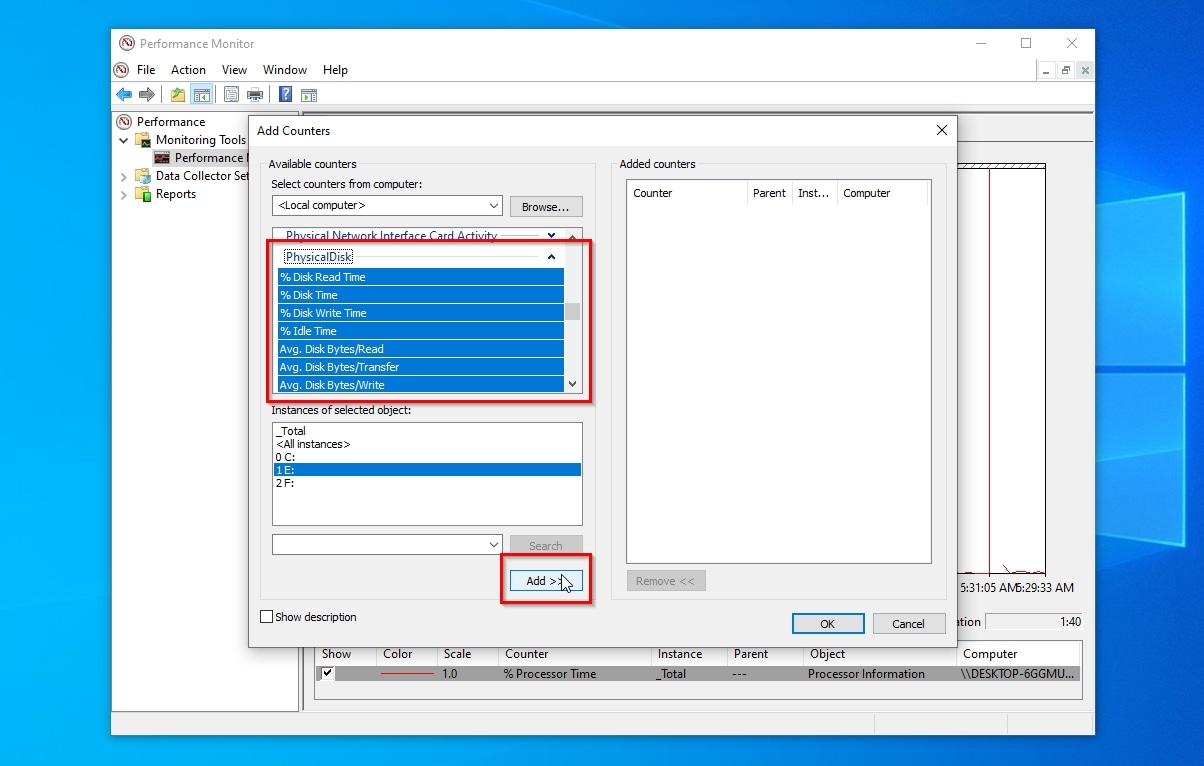
- Click on Add under that list to add all counters in the PhysicalDisk group for your selected drive letter to the Added counters list on the right. If you don’t want to add all counters, expand the PhysicalDisk group with a click on the arrow on its right, and select only the counters you want to include in Performance Monitor’s overview. Click OK to close the window and return to the Performance Monitor page.
- Performance Monitor will show you a list of all added counters at the bottom of the window and a visualization of their status above. If it looks chaotic, remove the checkmark on the Show column from any counters you’d like to hide temporarily.

If you aren’t actively using your SD card, there shouldn’t be any “action” on the graph. If there is, either some app is accessing your SD card without you realizing it, or Windows is trying to check the SD card’s condition or repair it in the background. If it’s the latter, you should revisit the graph after some time. If nothing’s changed, and your SD card still looks “active”, use one of the tools we’ll see next for a more thorough check of its condition.
Method 2: Windows Error Reporting
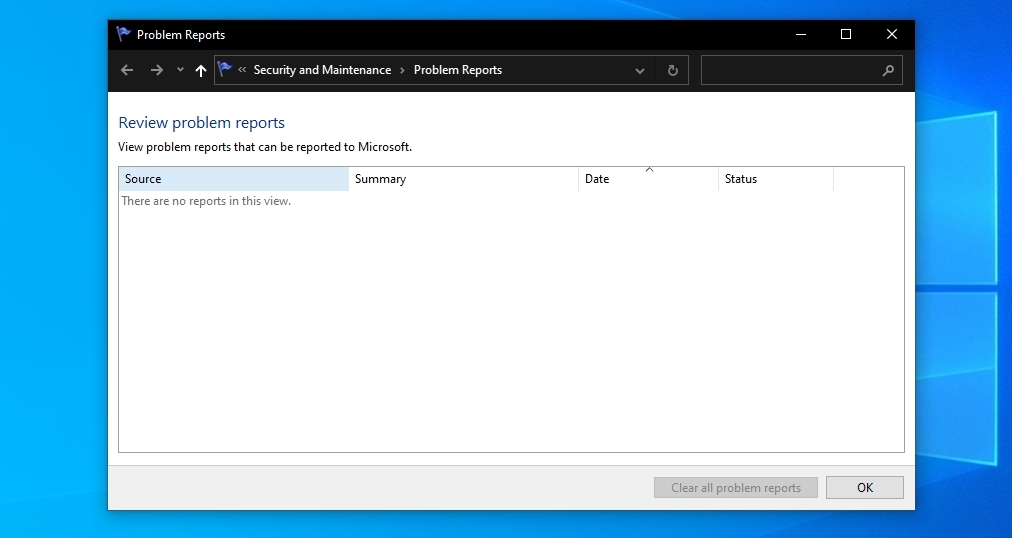
Microsoft’s Windows automatically keeps logs of any issues during the OS’s operation, including failed attempts to read from or write to your SD card. There are many ways to check those logs, but one of the easiest is through the Problem Reports panel.
To check for issues with your SD card that Windows noted in one of its logs:
- Either find Control Panel using the Start menu and move to Security and Maintenance > Problem Reports, or directly seek “problem reports” using Start or Search to jump to that panel directly.

- If nothing’s listed there, your PC’s fine, or Windows could not log any issues.
- To ensure Windows Error Reporting works correctly, you should ensure the service on which those reports rely isn’t disabled. Seek Services in the Start menu, or press Windows Key + R and type “services.msc” to find and launch the Services panel.
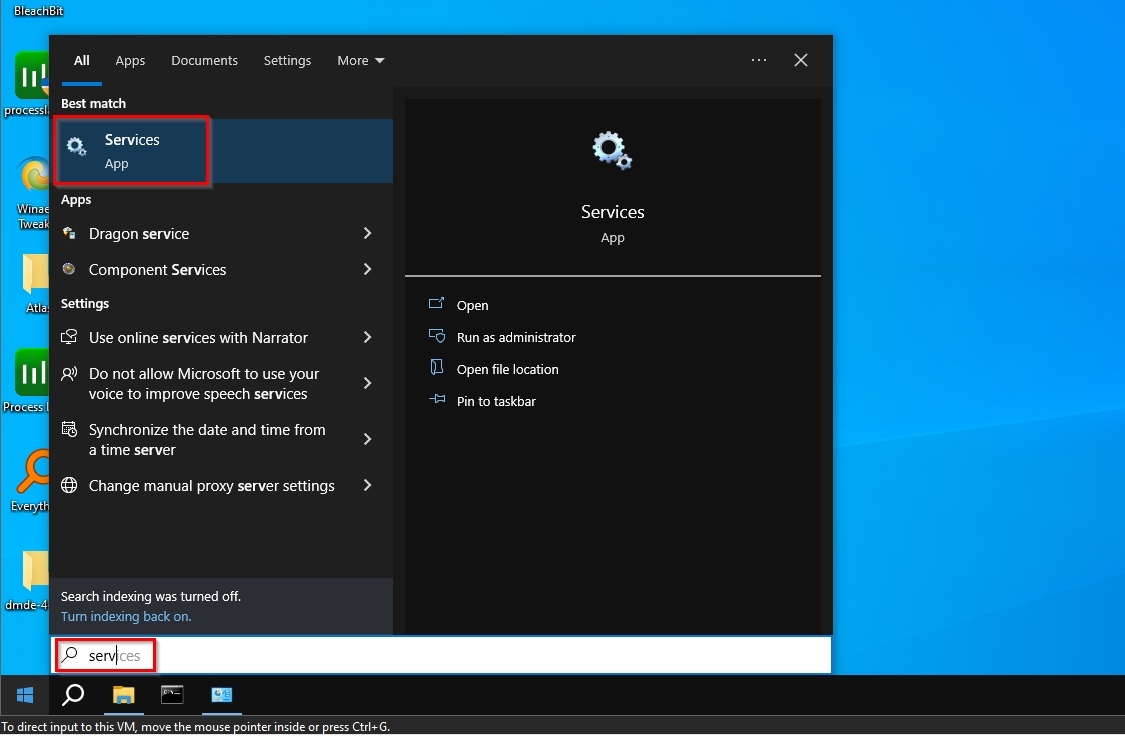
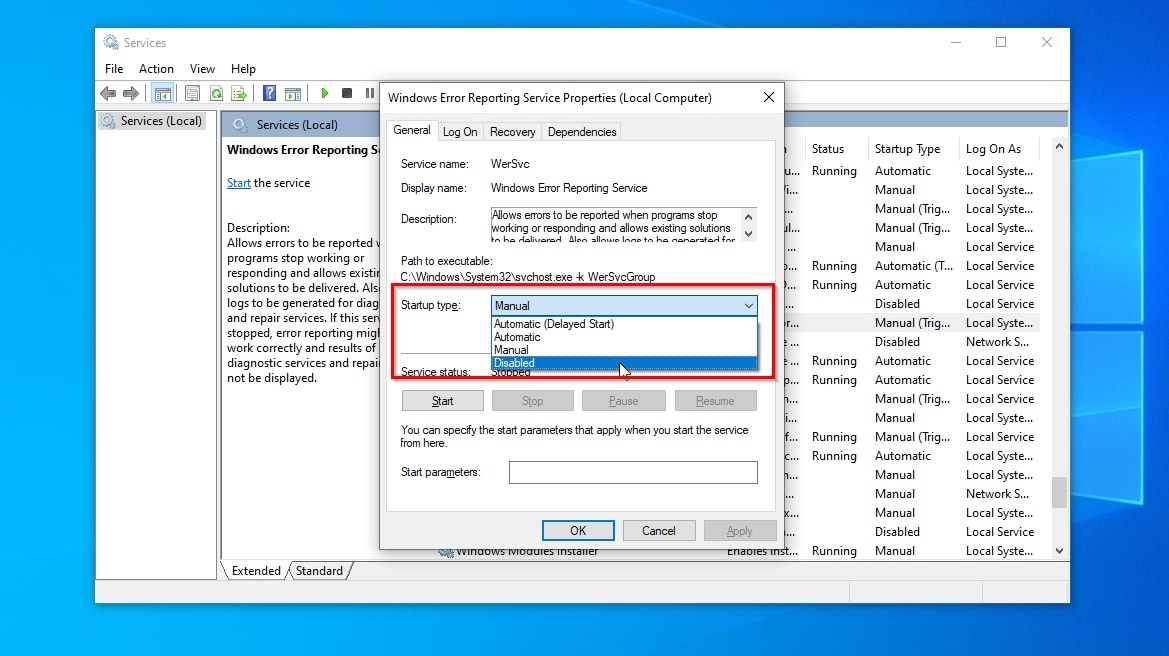
- Scroll down to locate the Windows Error Reporting Service, and double-click on it to “open it” and access its properties. Its Startup type should be set to Manual.
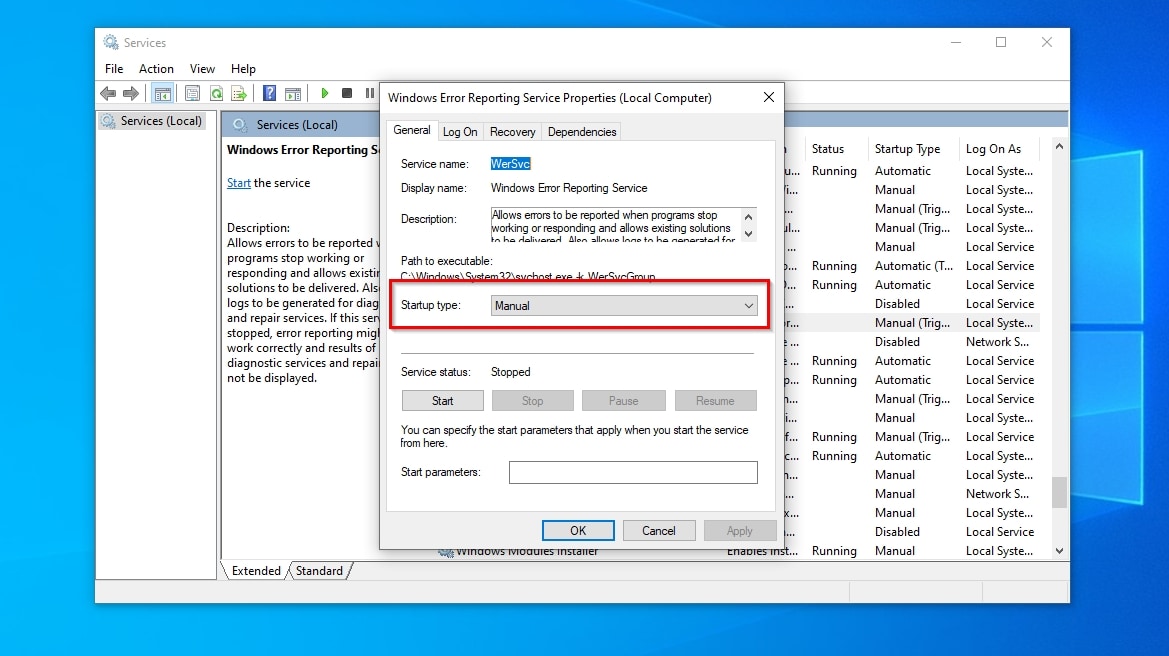
- You can set its Startup type temporarily to Disabled, restart your PC, and then set it back to Manual and reboot again to ensure it’s enabled and Windows can launch it as needed.
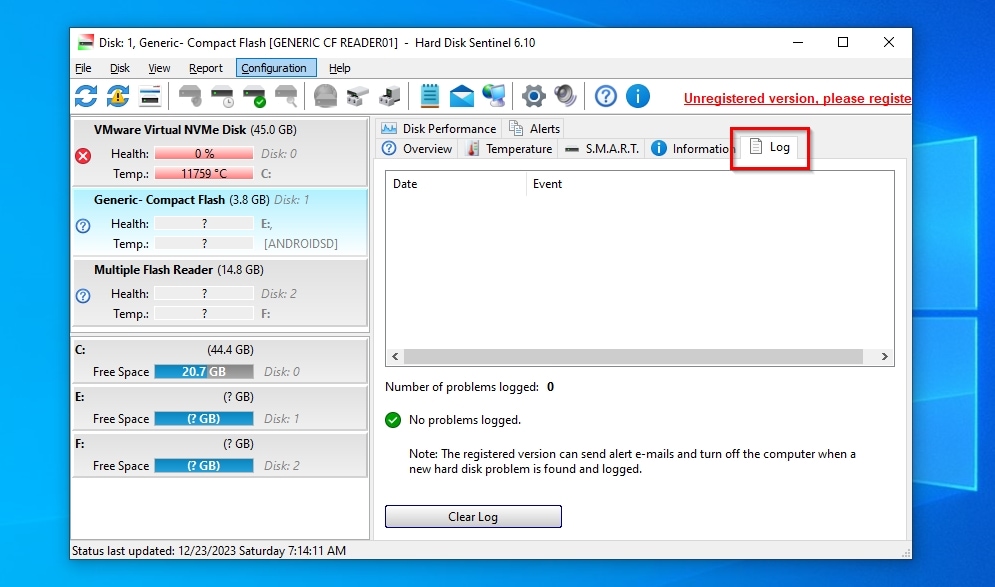
Method 3: Hard Disk Sentinel
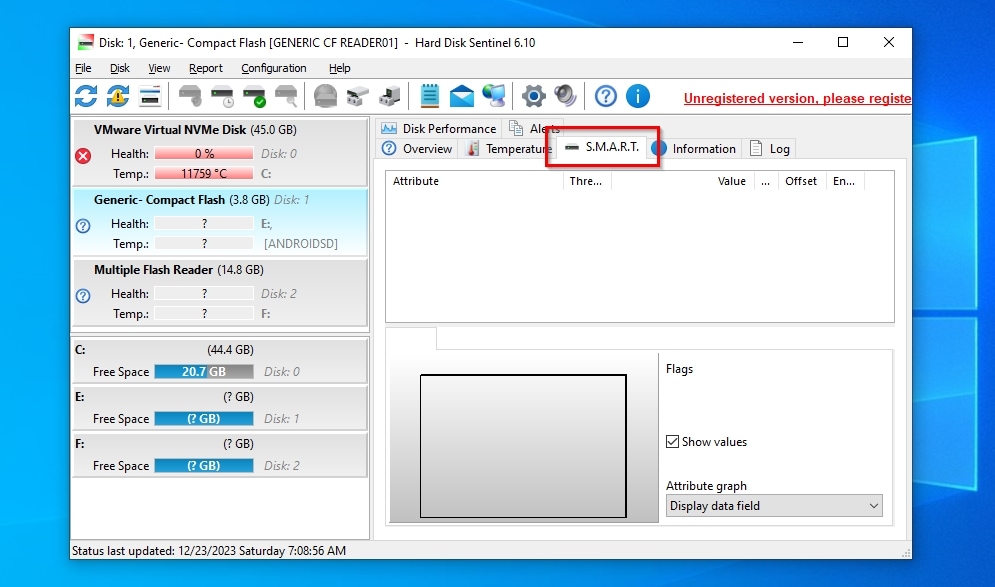
Hard Disk Sentinel is one of the most feature-rich apps for monitoring the S.M.A.R.T. status of storage devices. SD cards don’t support that feature, but Hard Disk Sentinel can still give you an idea of their condition, thanks to its performance statistics and problem logs.
To check your SD card with Hard Disk Sentinel:
- Download the app from Hard Disk Sentinel’s official site, install it, and run it. You should see your SD card among the other storage devices on the list on the left. Click on it to select it, and Hard Disk Sentinel will inform you that its status is unknown since the app can’t read any S.M.A.R.T. status information from it.
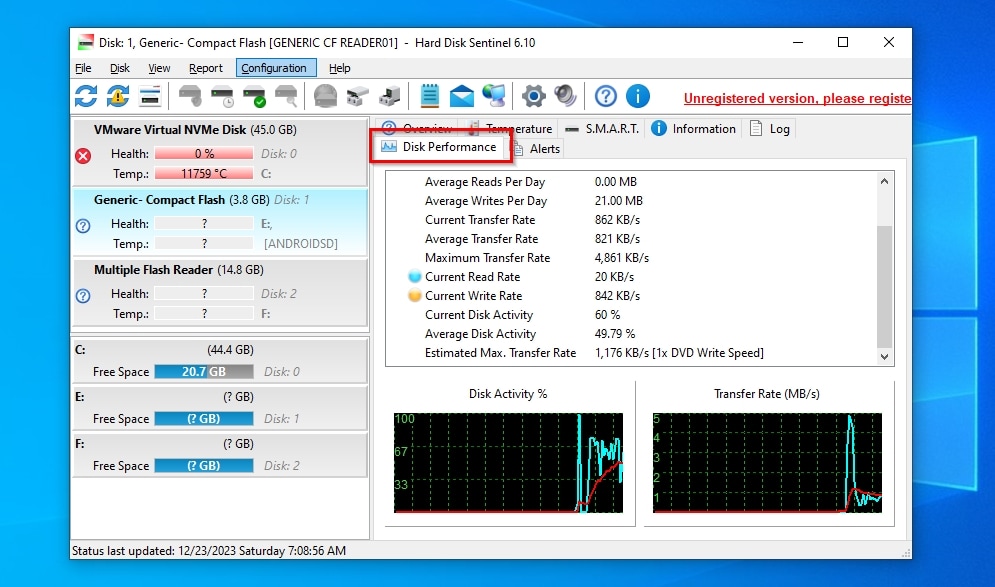
- Still, the Disk Performance tab reveals valuable information on the amount and speed of all related data read and write operations.
- If Hard Disk Sentinel detects any issues in those operations or the communication between your PC and SD card, you’ll find them listed on the Log tab. In our case, as Hard Disk Sentinel stated next to a friendly green checkmark, “No problems (were) logged”.
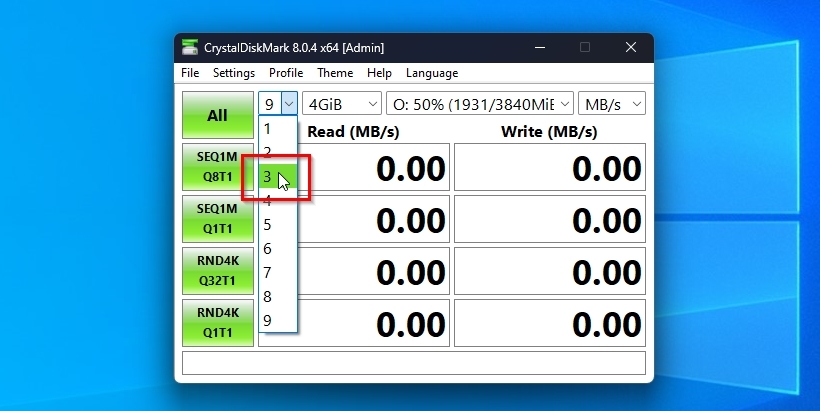
Method 4: CrystalDiskMark
Like Hard Disk Sentinel, CrystalDiskInfo is a popular tool that can reveal helpful information for many HDDs, SSDs, and NVMe drives, but doesn’t support memory storage devices. However, its sibling that we see here, CrystalDiskMark, can perform thorough read and write tests on most storage solutions to reveal their actual performance, in practice acting as an SD card health checker.
To check your SD card’s performance using CrystalDiskMark:
- Download the app from CrystalDiskMark’s official site, install it, and run it.

- Notice the three drop-down menus at the top of the app’s window. Use the third one to find and select your SD card among all detected storage devices.

- Use the first drop-down menu to choose how many times you want CrystalDiskMark to run a test. More times translate to more accurate results. We suggest you pick at least “3”.
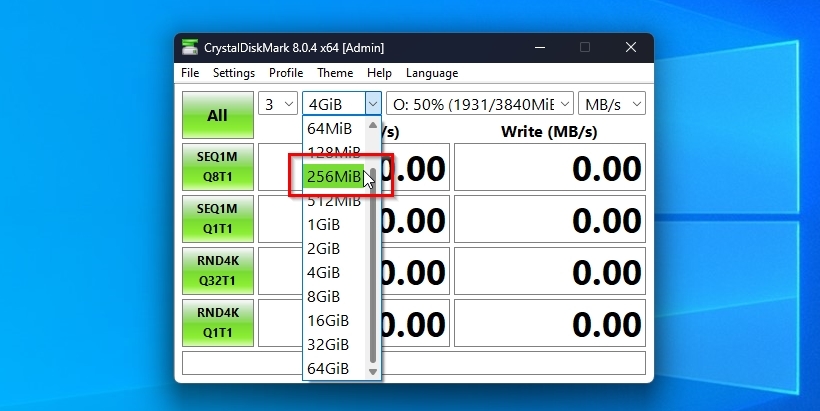
- From the second drop-down menu, you can define the size of a test file CrystalDiskMark will create on your SD card to test its performance. Ideally, the file should be as large as your SD card’s available storage for more thorough results. Otherwise, the app could miss problematic storage sections that perform slower, resulting in an inaccurate picture of only a fragment of your SD card.
- The green buttons on the left of CrystalDiskMark’s window start the app’s analysis of your SD card. It’s best to choose the first one, which runs all available tests. The app will prepare some test files and then use them to test the SD card.
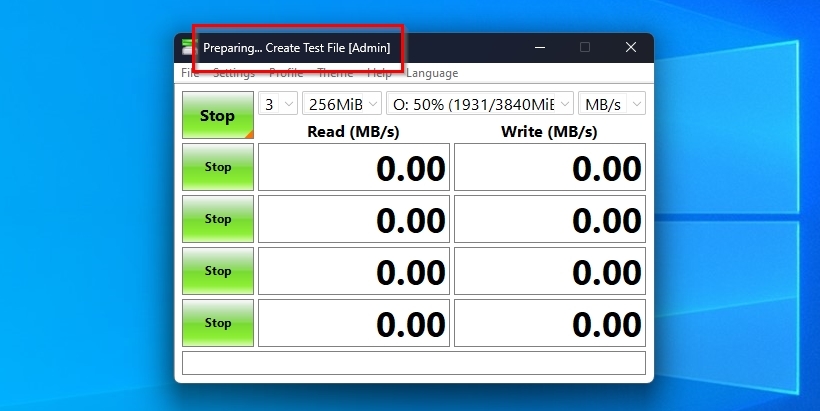
- When all tests are complete, CrystalDiskMark will show how your SD card performed in sequential and random reads and writes.
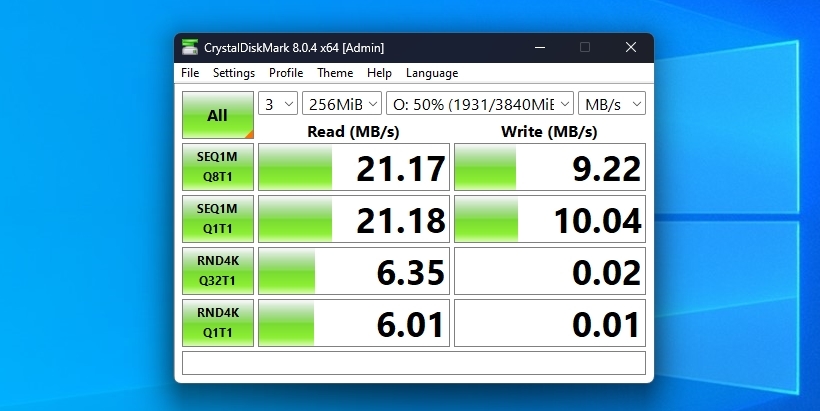
When testing its speed, make sure you aren’t using a lower-spec connection that restricts your SD card’s performance. For example, don’t test an SD card with a U3 rating (which can reach theoretical speeds of over 300MB/s for reads and 30MB/s for writes) using an external SD card reader that’s connected to a USB1 or USB2 port.
Method 5: Victoria
It’s a given that everyone who uses SD cards would add Victoria to their software collection if they knew about it. Unfortunately, most people have never heard about this handy app.
We believe that’s because of two reasons:
- Both the app and its site were initially only available in Russian. Nowadays Victoria also comes with an English version of its interface.
- Its interface looks convoluted and wouldn’t win any design awards.
Still, Victoria is one of the few apps that can thoroughly test SD cards, and also try to reinvigorate them by marking and “repairing” bad blocks.
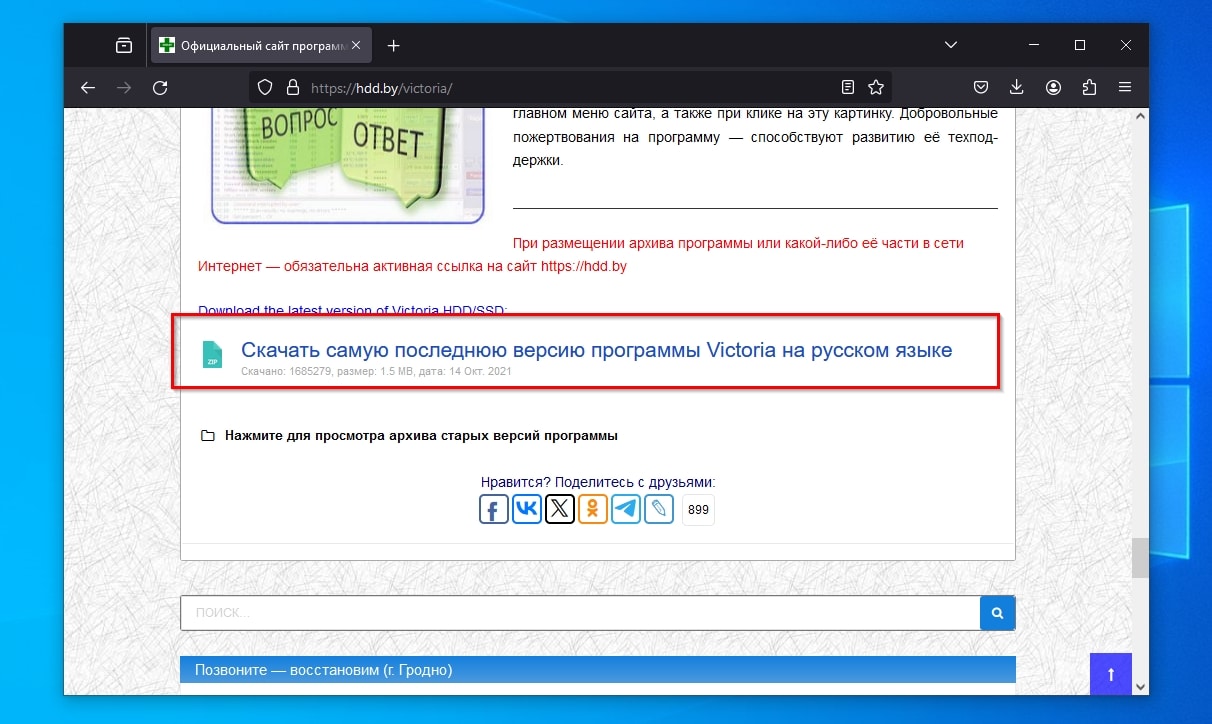
To download and use Victoria to check your SD card:
- Visit the app’s official site. The gray line close to the top is its navigation menu. Click on the entry that includes “Victoria” to visit the app’s page.

- Although the page is in Russian, if you scroll down, you’ll find the link to download the app under “Download the latest version of Victoria HDD/SSD” (yes, this part is in English). Click on it to download the app in a compressed ZIP archive.
- Extract the archive to a local folder or open it and rely on Windows’ support for automatic extraction to access its contents.
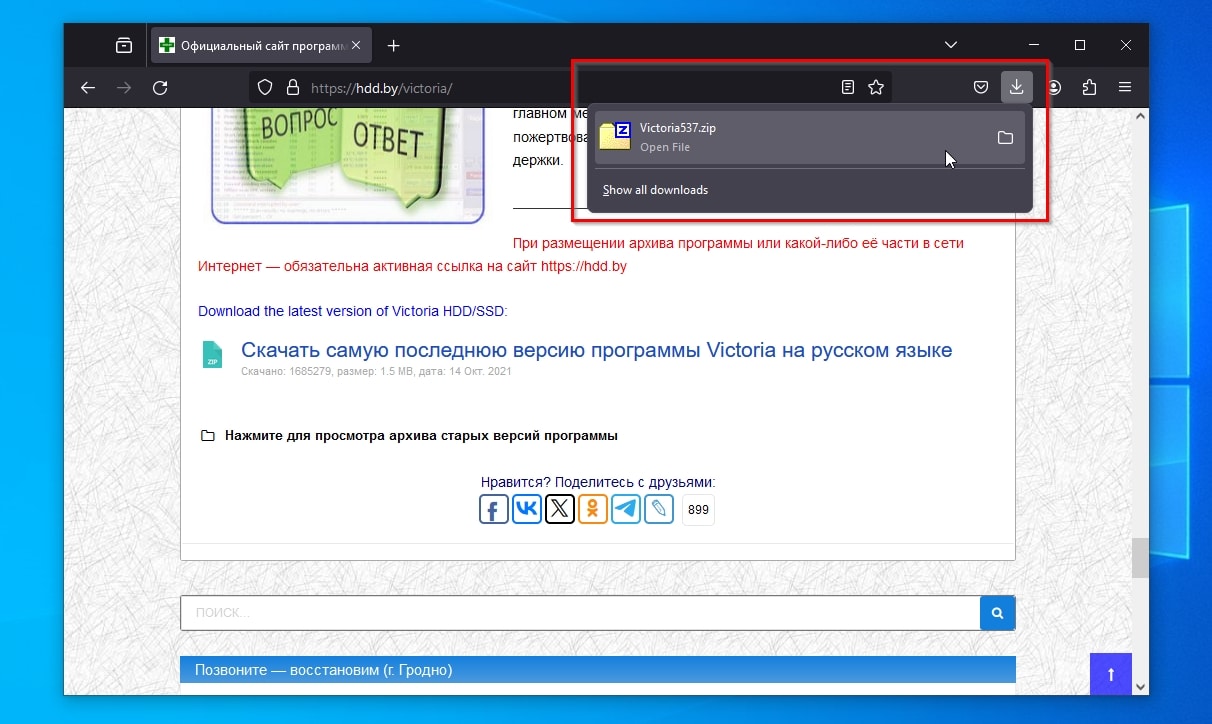
- Among its files, you’ll see Victoria’s executable, aptly named “Victoria.exe“. Double-click it to run it.

- Thankfully for everyone who doesn’t speak Russian, Victoria nowadays also supports English for its interface. You’ll see a list of the storage devices it detected on the top-right quadrant of its window. Click on your SD card to select it.
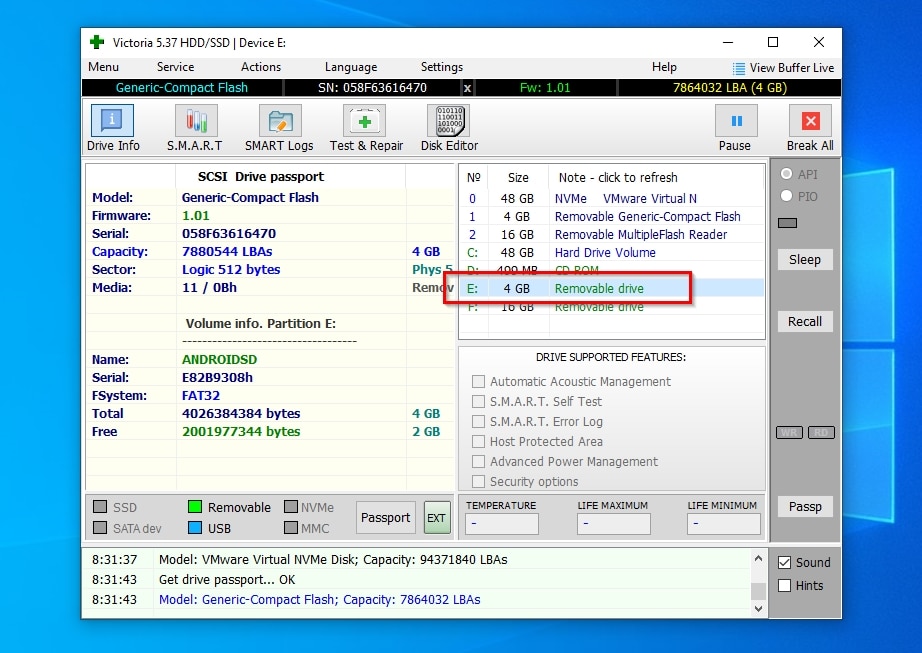
- Click on Test & Repair from the toolbar at the top of the window.
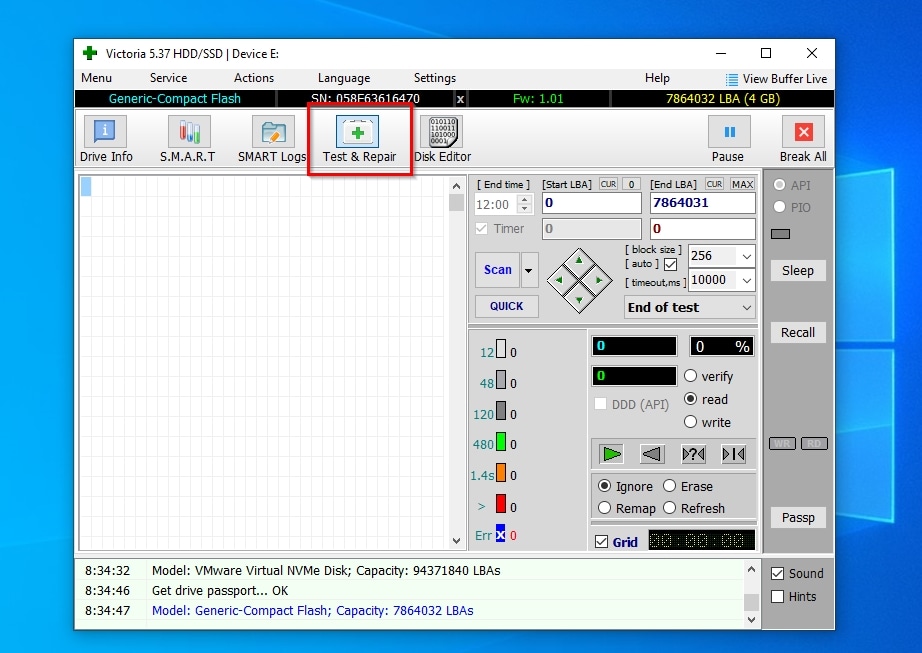
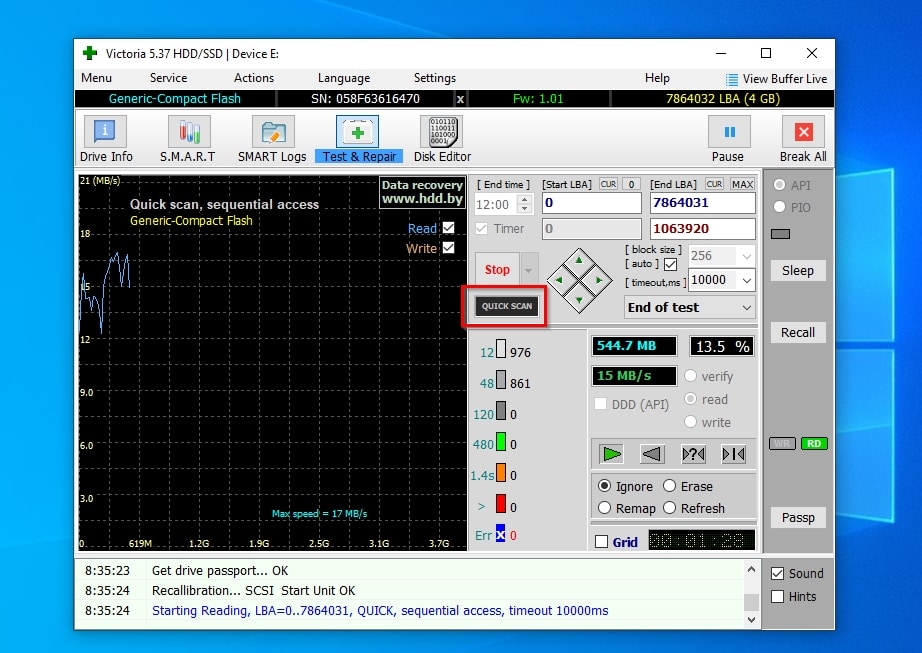
- Notice the Scan buttons close to the same spot from where you selected your SD card before. You can initiate a full or quick scan from there to check your SD card for errors.
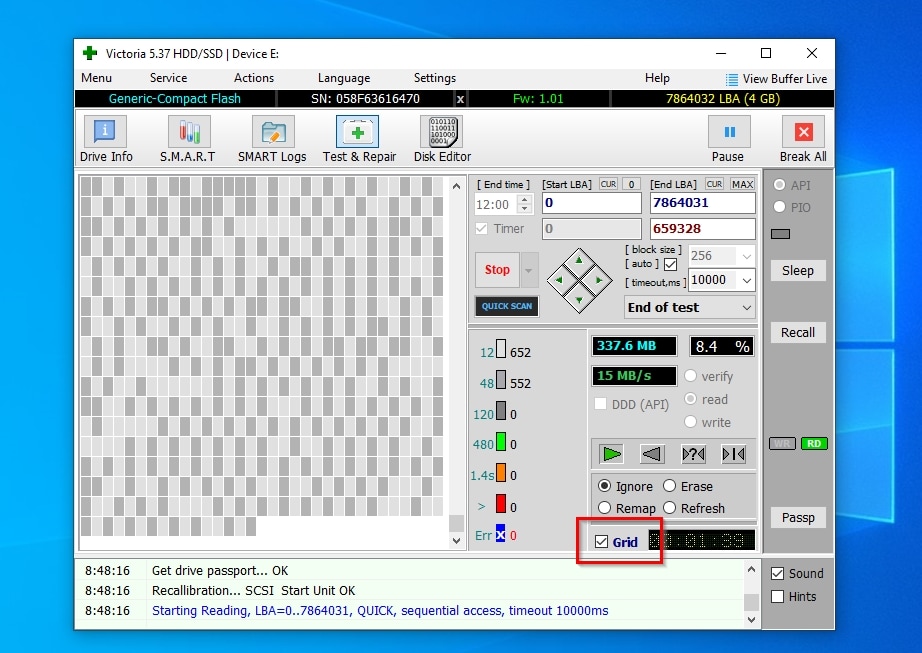
- If Victoria locates “bad blocks” on your SD card, you’ll easily see them on its Grid view. You can try to repair the problem by changing the app’s mode to “Refresh” (close to the bottom-right of the app’s window) and rerunning a complete scan. However, ensure you’ve backed up your SD card’s contents before choosing that option.
Method 6: CHKDSK
Since the DOS era, CHKDSK (short for “Checkdisk”) has remained the primary storage-related tool in all of Microsoft’s OSes. Showing its age, CHKDSK is still a command line tool, which means you can only use it by typing in a terminal.
Still, the fact it’s old doesn’t mean it’s also irrelevant. Quite the opposite, CHKDSK isn’t only a health checker for all storage devices detected by Windows, but it can also try to repair any issues it finds.
To check your SD card for problems like bad blocks with CHKDSK and attempt to fix them:
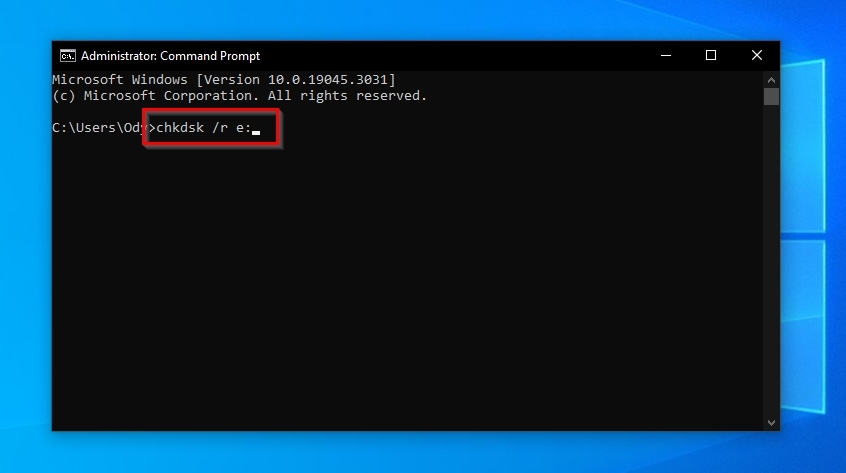
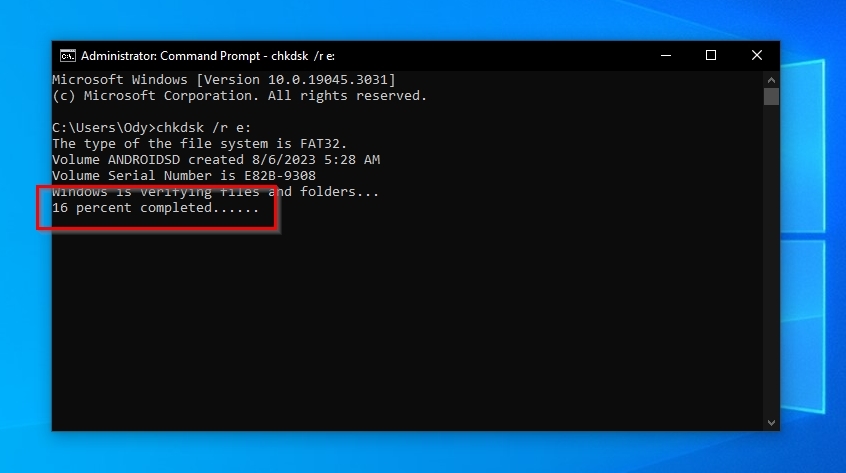
- Open an “elevated” terminal window by seeking “command prompt”, “cmd”, “powershell”, or “terminal”, using the Start menu and choosing you want to “Run (it) as administrator”. There, type chkdsk /f DRIVE_LETTER: to scan and fix file system errors on the device with the matching drive letter. For example, if your SD card is accessible “through” the letter “E”, use chkdsk /f e: to scan its file system for errors and try to fix them.

- If the cause of your storage-related issues is bad sectors on the SD card, CHKDSK can try to deal with those if you replace the /f flag with /r. So, the command we saw before would change to chkdsk /r e:.
- CHKDSK is as speedy or slow as your storage devices. It may take only minutes to scan an almost brand-new and quite fast 16GB U3 SD card with a minimally corrupted file system. But it may also take many hours if CHKDSK is repeatedly stumbling on the hundreds of bad sectors on an old and battered 64GB C2 SD card.
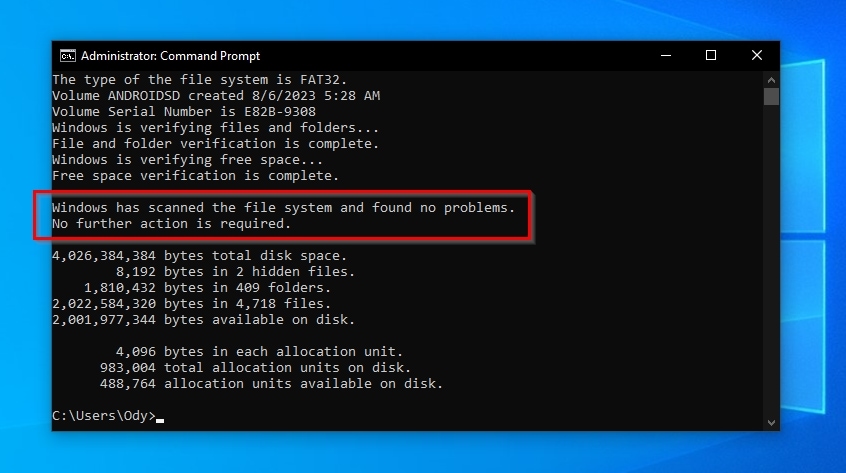
- When it completes its scan, CHKDSK will show a summary stating the size of the SD card, the number of files it scanned, if it found (and managed to fix) any issues, etc.
We’ve only covered the basic use of CHKDSK for anyone who needs to scan or fix their SD card quickly without overthinking it. However, CHKDSK is quite versatile, and offers more options. To learn more about it, its capabilities, and its use, check our guide on how to run CHKDSK to diagnose and fix disk problems on Windows.
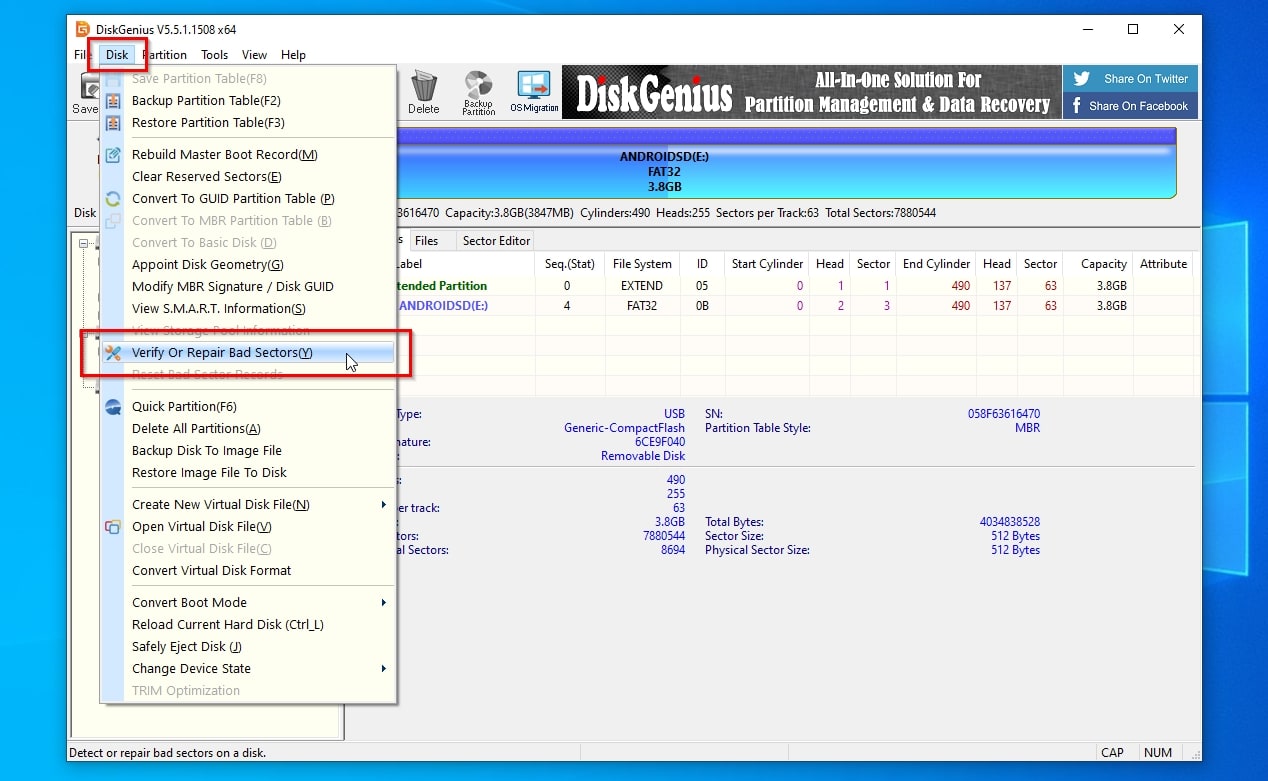
Method 7: DiskGenius
DiskGenius is the equivalent of a digital Swiss Army Knife for almost any disk-related task. We’ve already covered DiskGenius in a thorough review, where we saw how it can help with various tasks related to NVMe, SSD, and HDD drives.
Thankfully, DiskGenius also considers SD cards as “disks”. Although it won’t do if you’re seeking an SD card health monitoring solution, it’s one of the best tools for verifying your memory storage’s condition and, if possible, repairing any bad blocks on it.
To scan for and “fix” bad tracks on your SD card with DiskGenius:
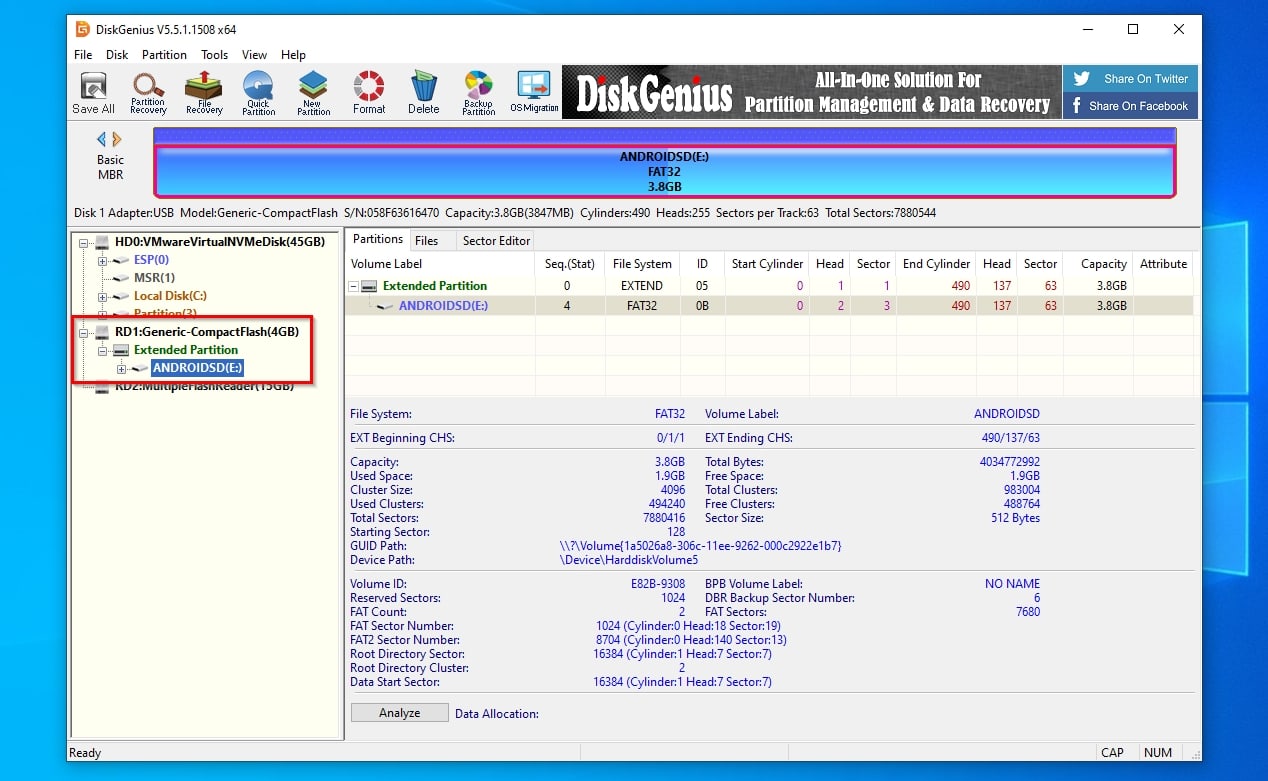
- Download the app from DiskGenius’ official site. Then, install and run it.
- Find your SD card among the rest of your PC’s storage devices in the device list on the left of the app’s window. DiskGenius will show you some details about it on the larger part of its window, on the right.
- Use the menu at the top of the app and select Disk > Verify Or Repair Bad Sectors.
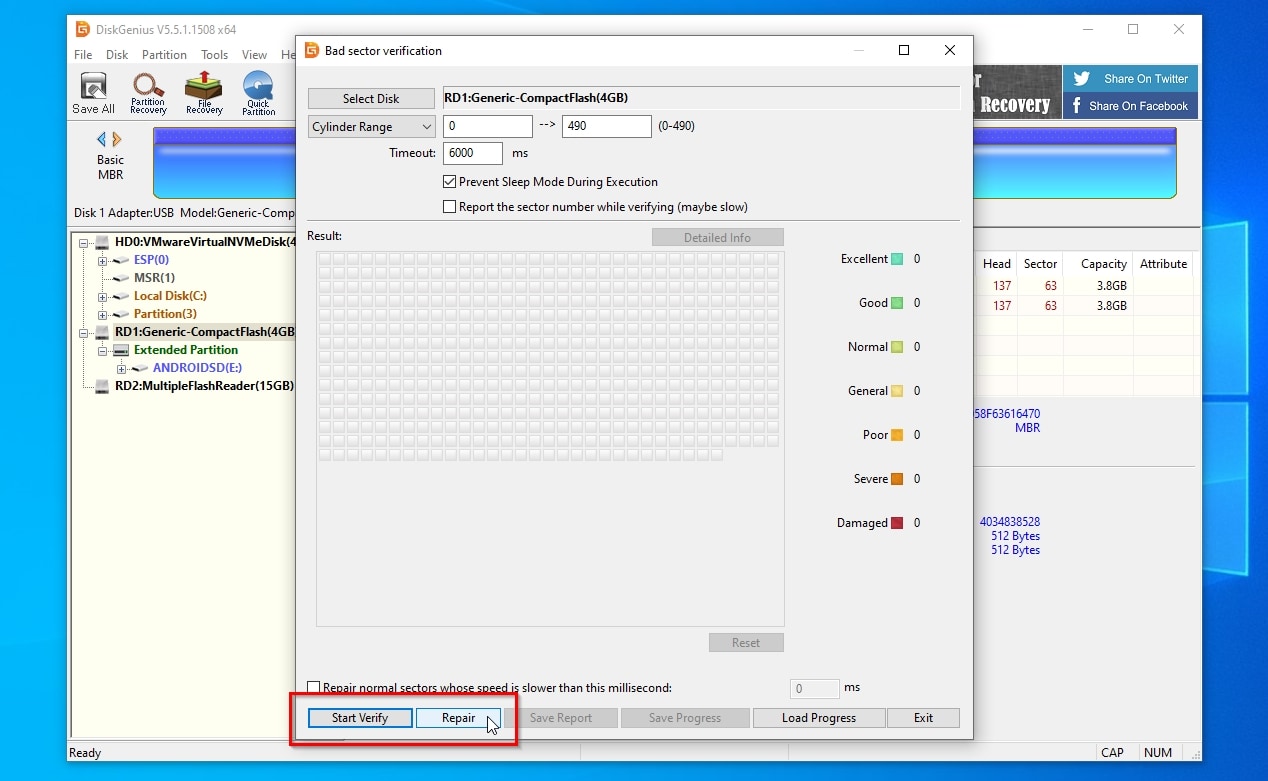
- From the new window that pops up, make sure your SD card is selected at the top, next to the Select Disk button. Otherwise, use that button to find and select it. Leave all options as they are, and if you only want to check the condition of your SD card, click Start Verify at the bottom left of the window. If you know it has some errors or are unsure but would prefer to perform a scan-and-fix process anyway, click the Repair button instead.
- If you haven’t backed up the contents of your SD card yet, move to the Disk Drill section of this guide for more information on how to take a complete and secure backup image of everything on it. If you did, acknowledge that you accept the inherent data loss the process will cause.
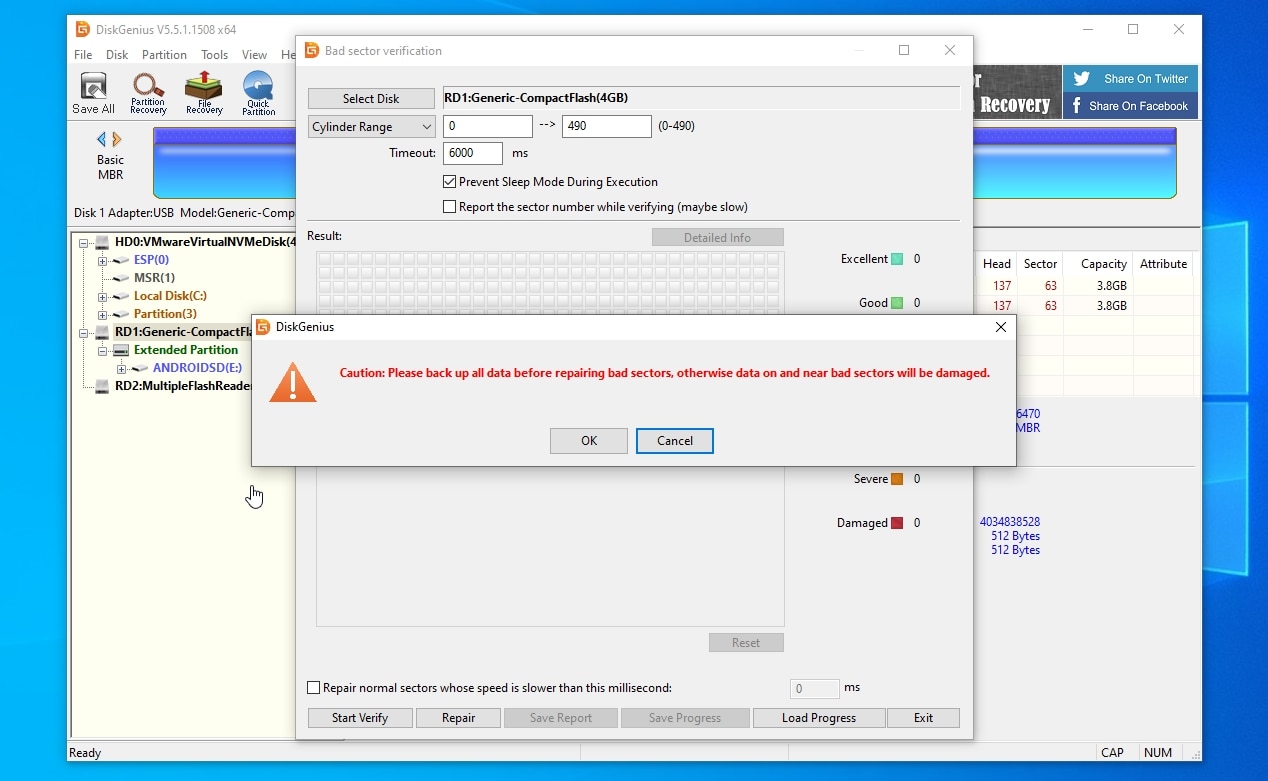
- Once more, double-check you have everything backed up from your SD card, and answer positively to DiskGenius’ prompt that the following steps may/will cause data loss.
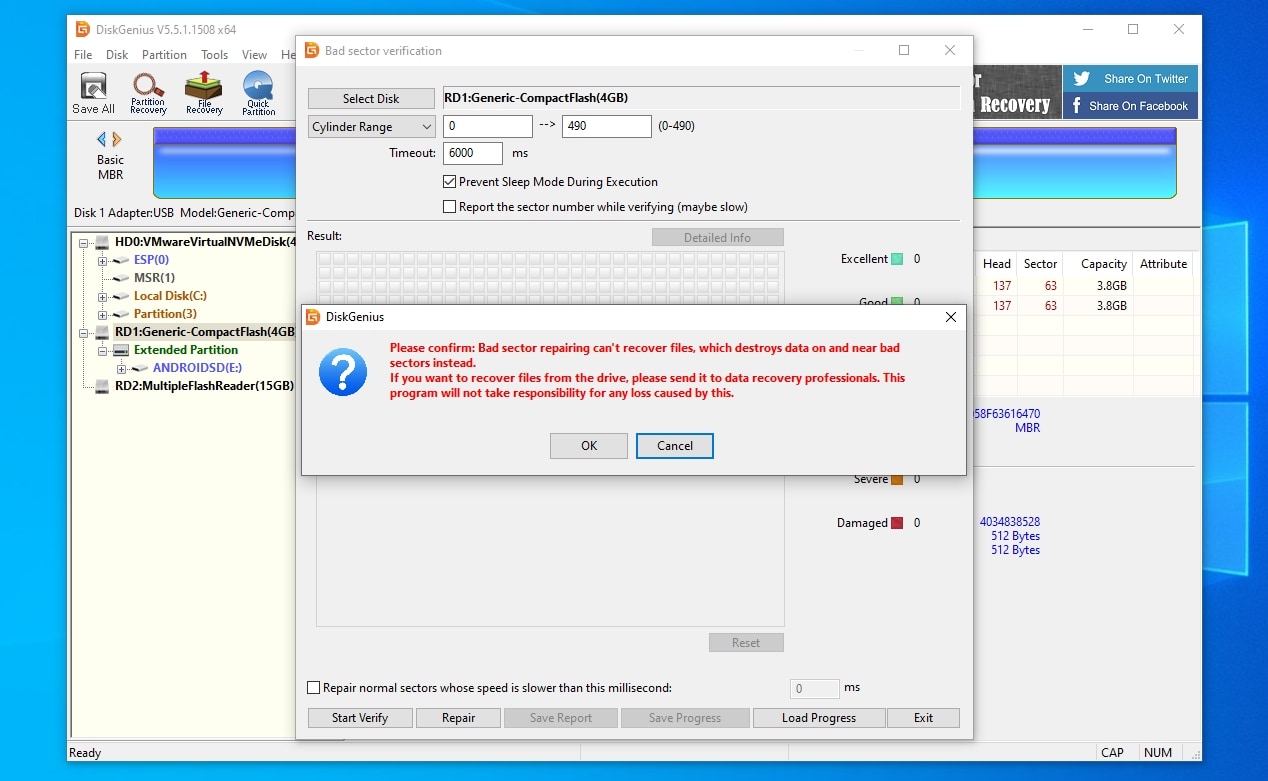
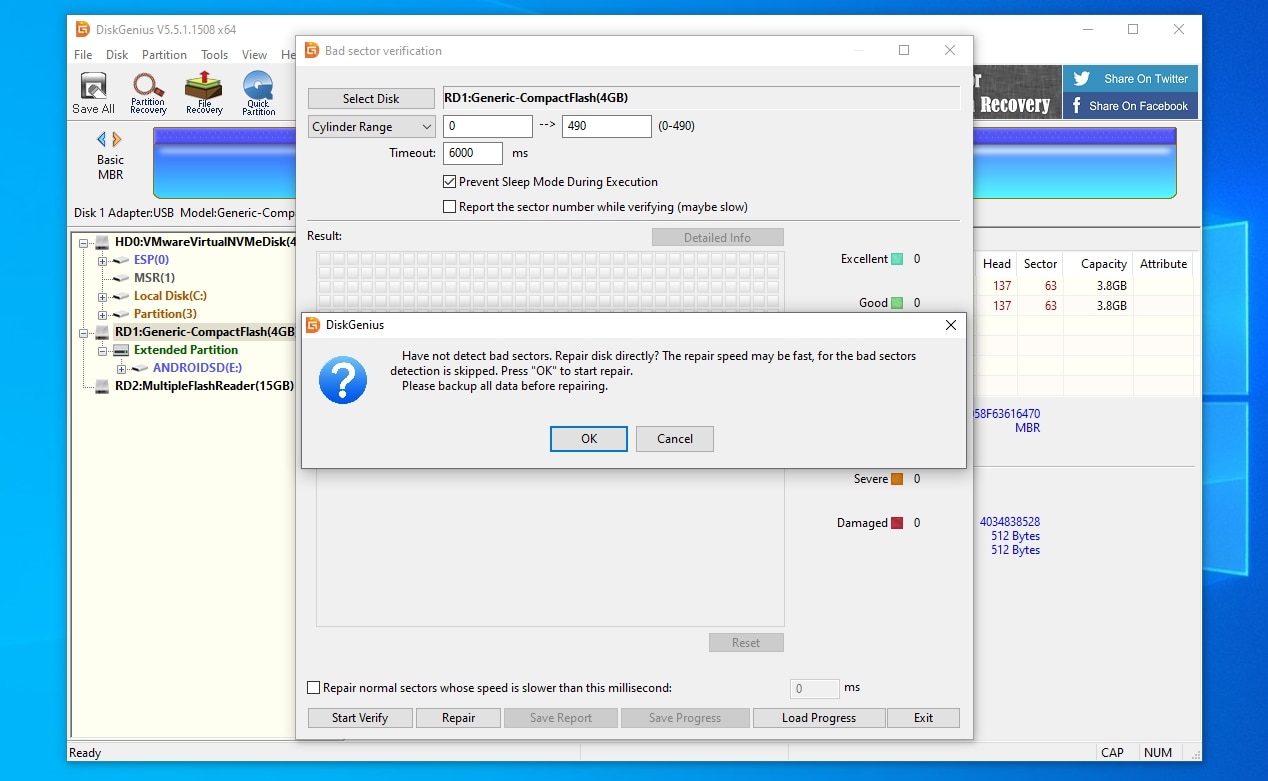
- If DiskGenius can’t locate any bad sectors with its initial SD card integrity test, it will ask if you want to try a direct disk repair instead. Answer positively if you know your SD card is damaged, and DiskGenius will try to “fix” and render it usable again.
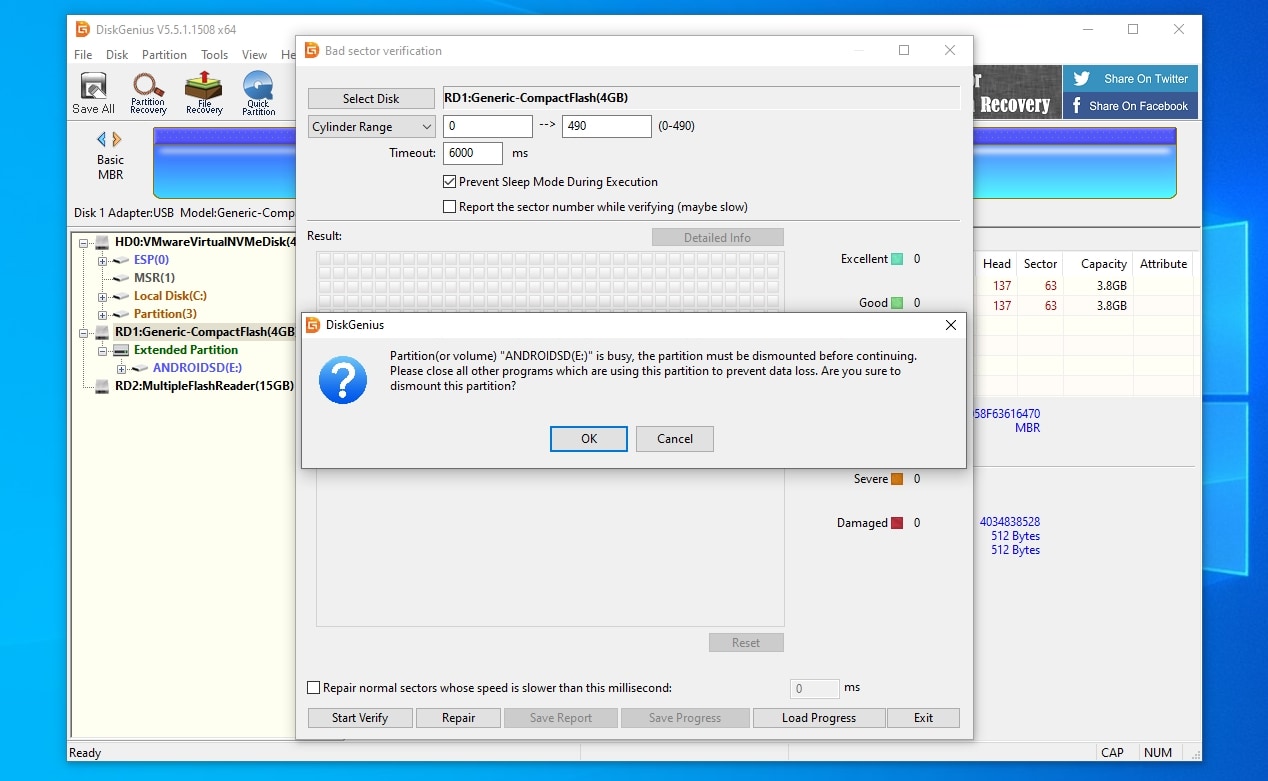
- DiskGenius requires full access to the SD card to repair it. If your SD card is “busy”, DiskGenius will inform you about its potential use by other apps. If you’re sure no program you’re using is accessing it, click OK to have DiskGenius forcibly dismount it and proceed to its repair.
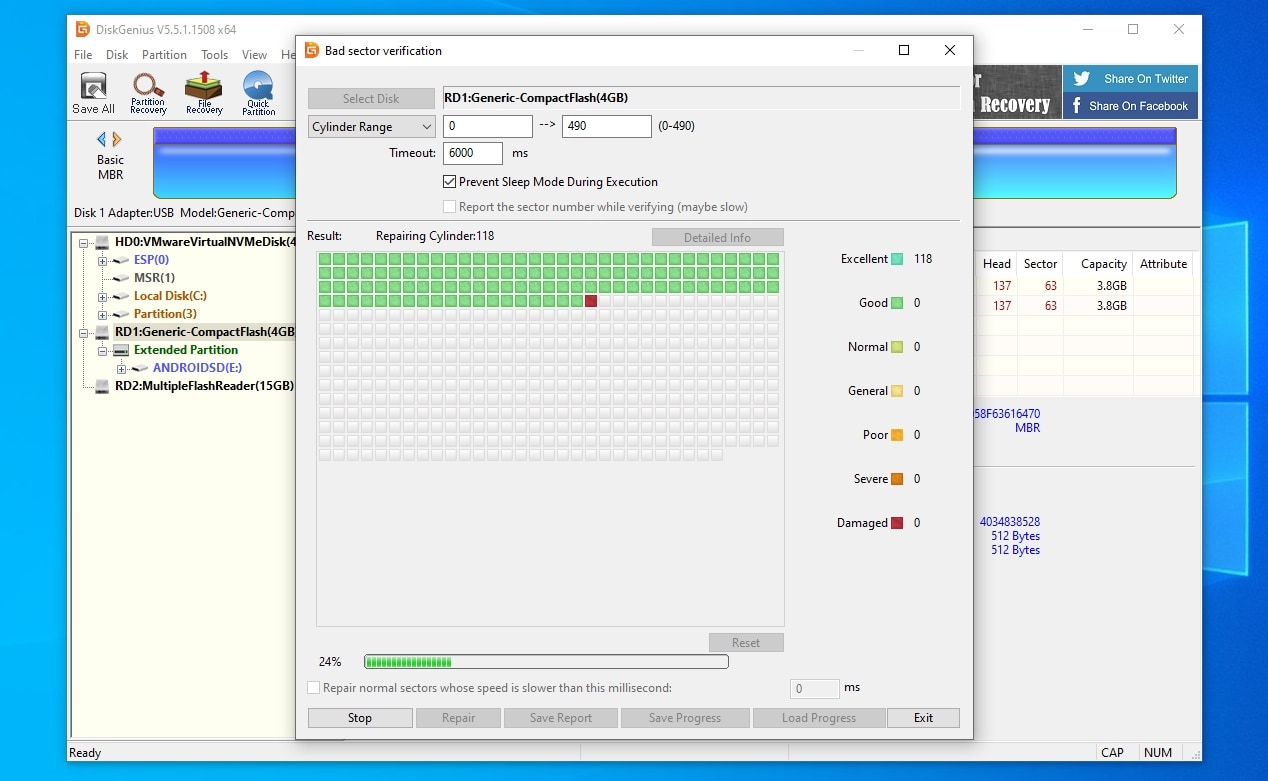
- The app will show you a visual representation of the status of the repair process and your SD card’s condition while scanning it. Thanks to its use of color-coding, it’s easy to check it at a glance.
- When the process is completed, DiskGenius will show a summary of its results. Click OK to return to the previous window. If DiskGenius didn’t find any problems, or if there were bad blocks but the app managed to fix them, your SD card should be usable again.
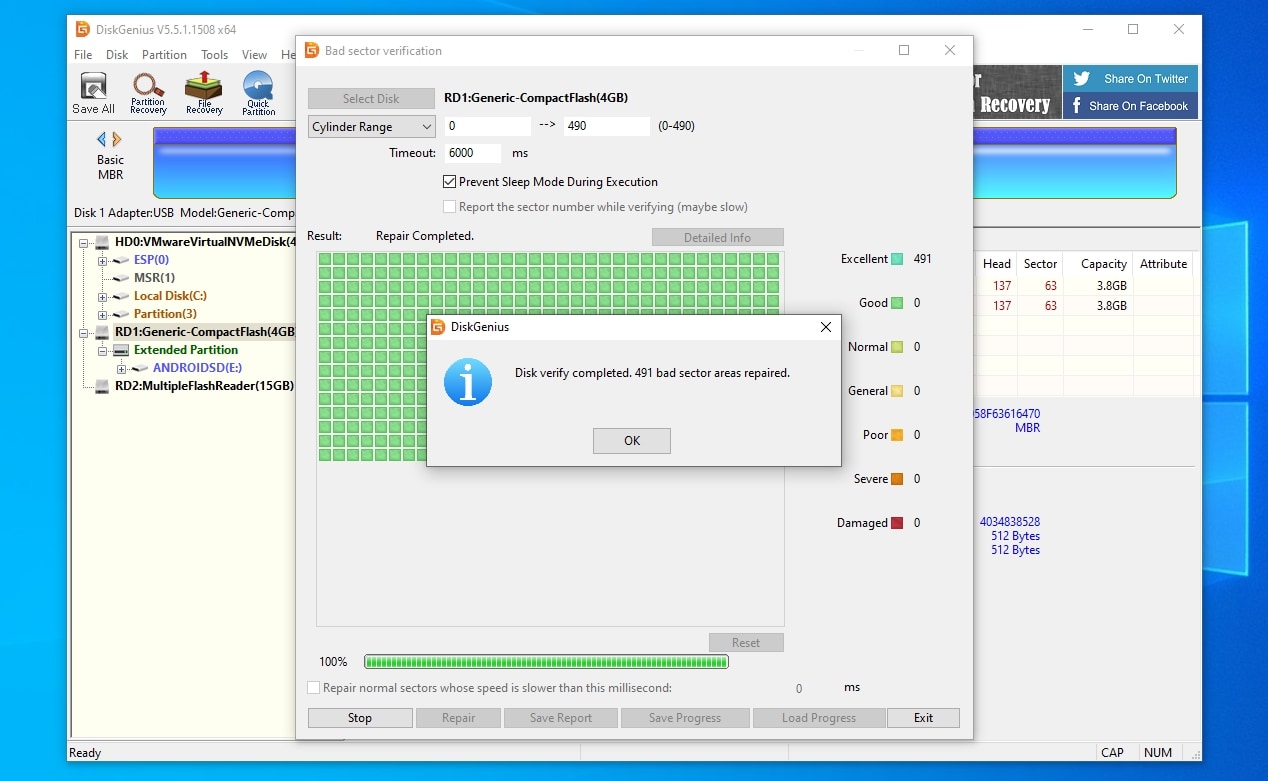
Did DiskGenius find and fix some bad blocks on your SD card? Take note of their number. Then, make sure to recheck your SD card for bad blocks in the not-so-distant future, for it might be failing faster than expected. Bad blocks are never really “repaired”, and are usually a sign that a storage device is approaching its End Of Life point. Thus, you should probably replace it as soon as possible.
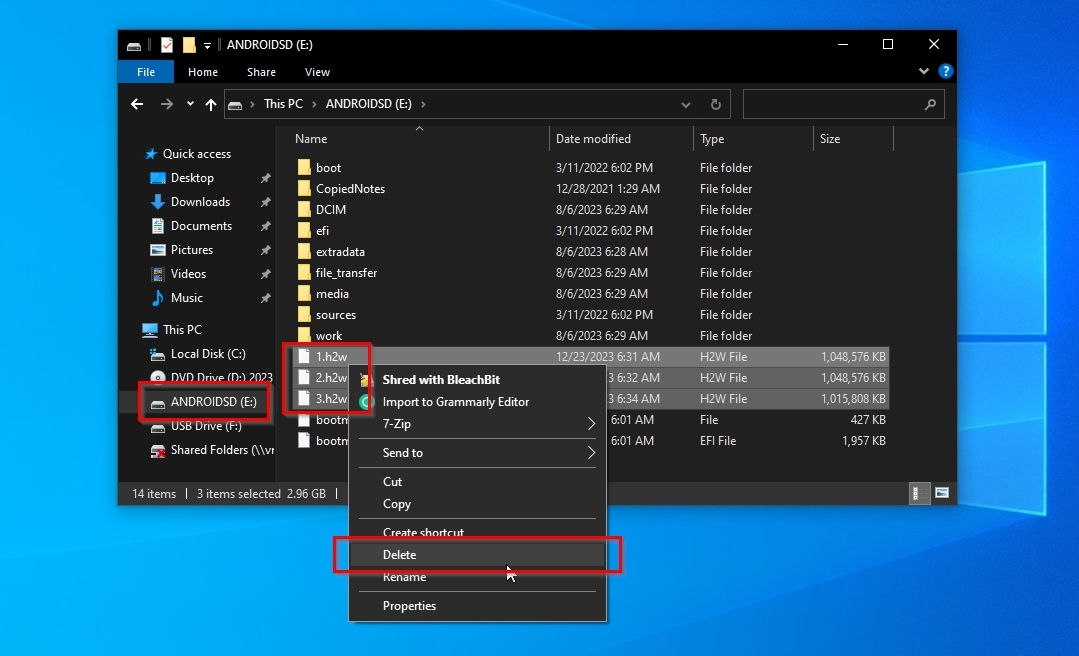
Method 8: H2testw
Unfortunately, the market’s filled with “fake” storage devices, advertised (and even “hacked” to look as) having a larger capacity than their actual specifications. Such frauds may shine in an SD card lifespan test but fail when you try to fill them to capacity. That is where H2Testw can help.
H2testw creates files that take up a user-defined or the whole amount of space on your SD card. If the process fails, there’s either a problem with the SD card or its capacity is much lower than advertised.
To check your SD card’s capacity with H2testw:
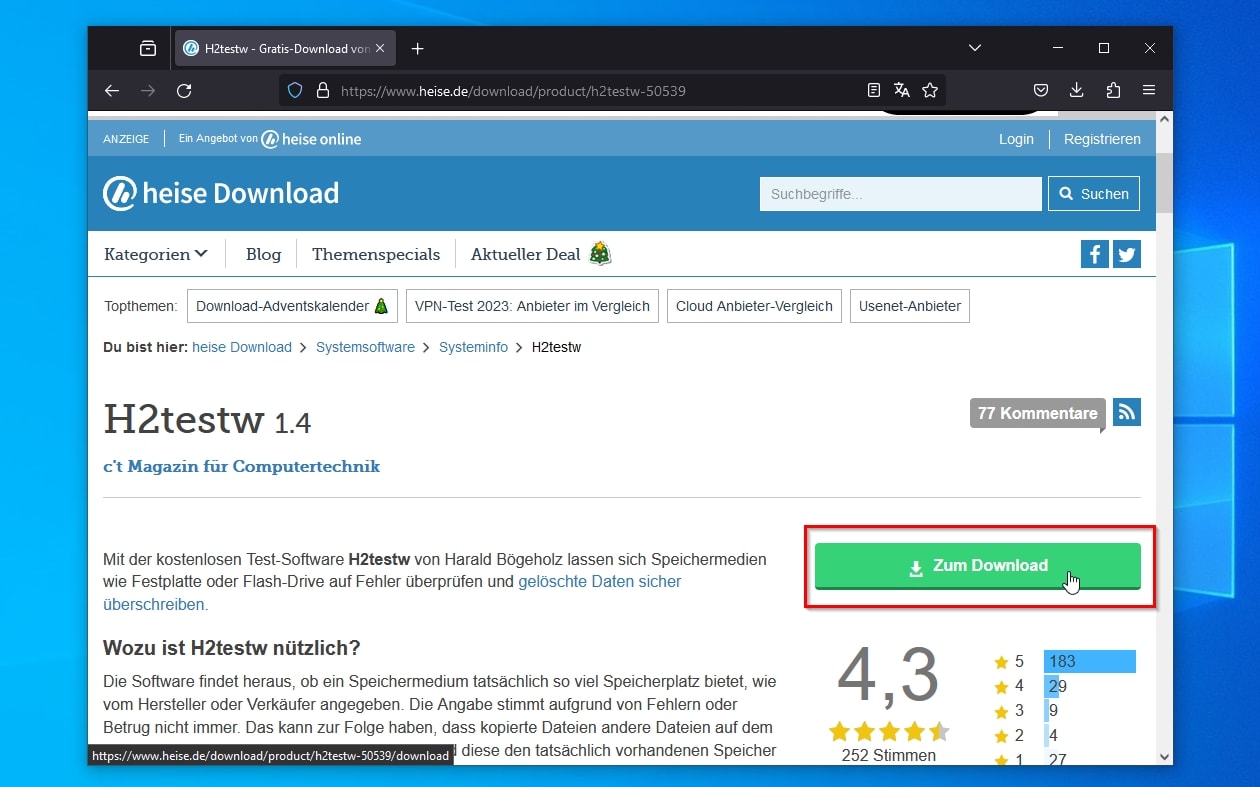
- Visit H2testw’s official page to find the app. Non-German speakers will find it by clicking the green “Zum Download” button on the right. This leads to another page, where a green “Download” button next to the app’s name is the actual link to download it.
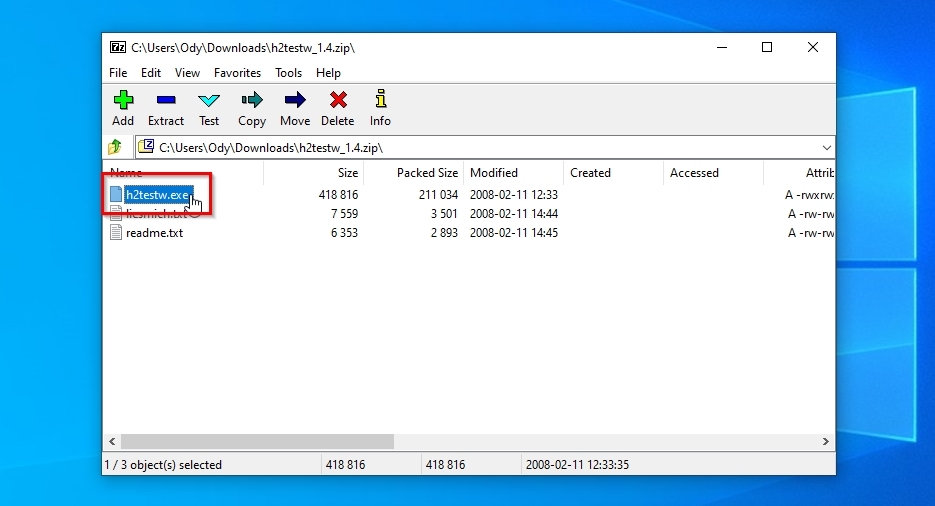
- If you want to keep using the app in the future, it’s better to extract the downloaded archive to a folder on your PC. If, though, you only want to scan your SD card this once, you can open the downloaded archive from your browser’s downloads list, and double-click the app’s executable file, “h2testw.exe“, to run it.
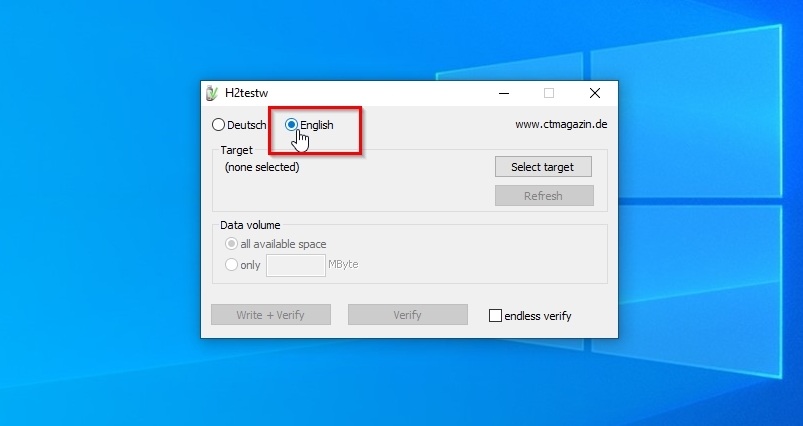
- If you can’t make sense of H2testw’s admittedly spartan interface in German, switch its language to English from the option at the top.
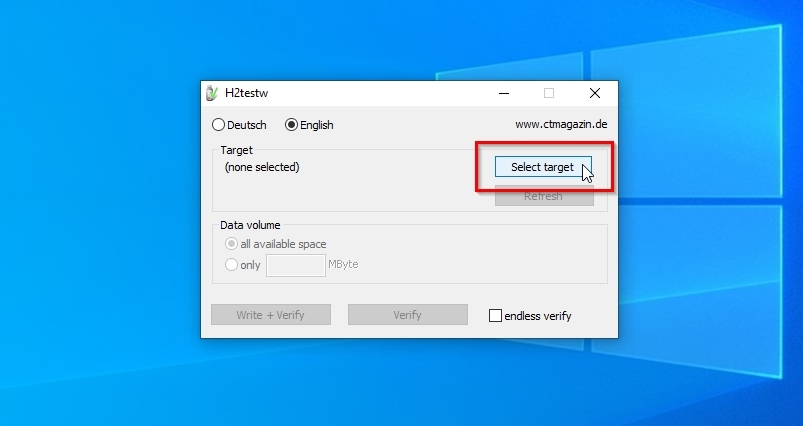
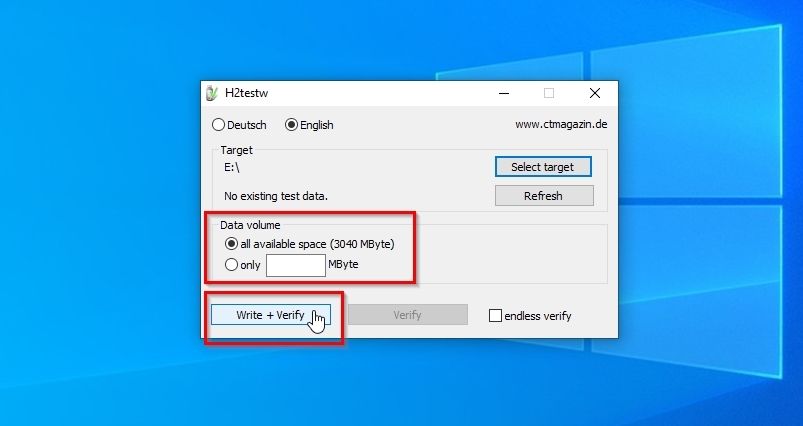
- Click the Select Target button and choose your SD card.
- Select all available space under Data volume to check your SD card’s entire capacity. Still, note that this will only test the free space not occupied by files on it. To quickly test only a section of your SD card’s space, place a checkmark before “only” directly underneath, and type the size of the test file you want H2testw to create on your SD card. Then, click on Write + Verify.
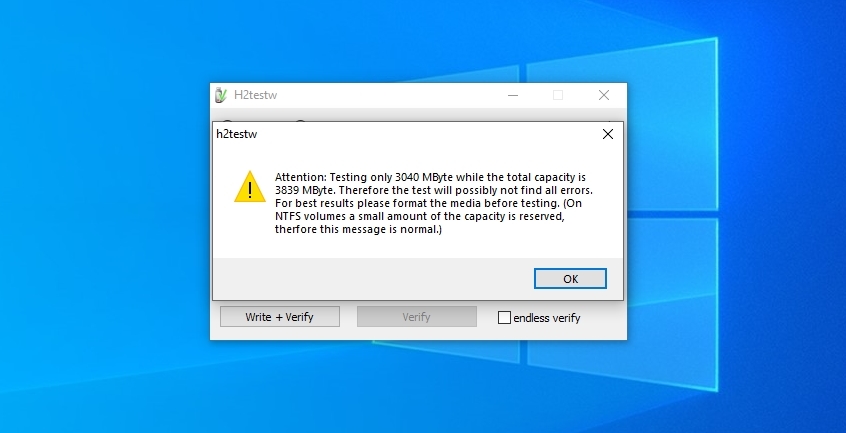
- H2testw will show a warning if the size of files written on your SD card is smaller than its reported capacity. As suggested, to test its entire capacity, first move any files off it and format it before trying to test it. This way, H2testw will have access to all of your memory card’s available storage space.
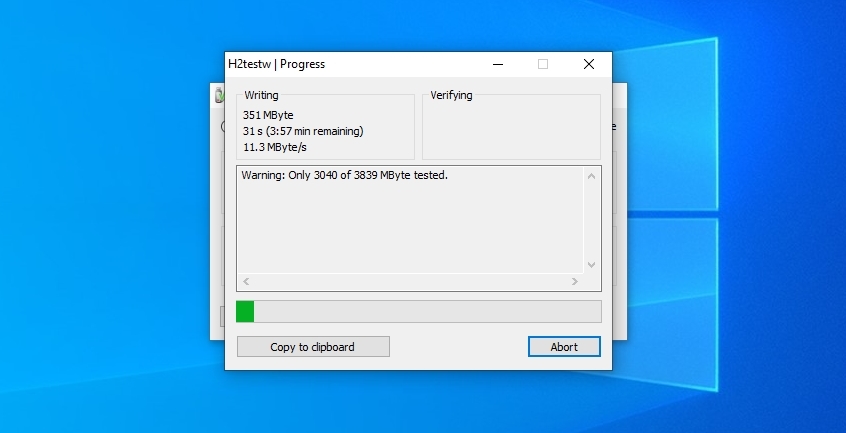
- H2testw will fill your SD card with the selected amount of useless data to test its writing capability and capacity.
- When done, H2testw will show you a report where you can see the amount of data successfully written to and read from your SD card and its average reading and writing speed.
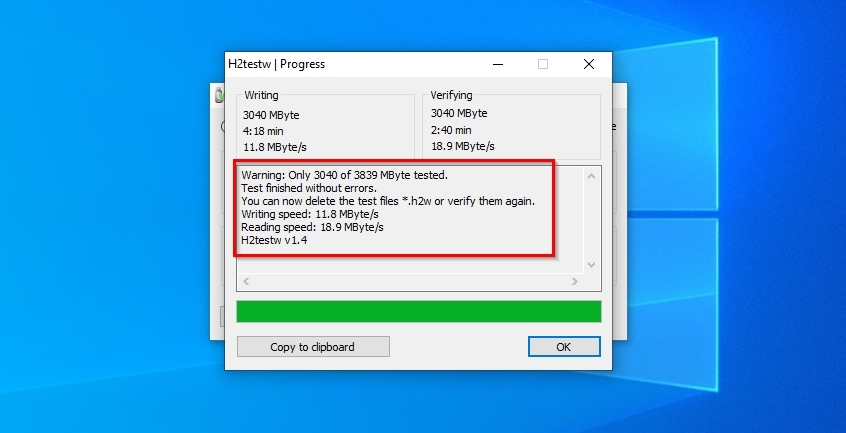
- After the test is complete, remove all test files from your SD card to reclaim any wasted space.
Method 9: TestDisk
A thorough check of your SD card’s health didn’t reveal any issues. However, it’s not accessible by any app, and all previously stored files seem gone. What now? Is your SD card useless?
When everything on a storage device has disappeared, and it appears as unusable, one of the most probable causes is a lost partition or a corrupted partition table. As we saw in our review of TestDisk, it’s an excellent app that can help with such issues, despite its rudimentary terminal-based interface.
To find lost partitions and fix or rebuild a partition table with TestDisk:
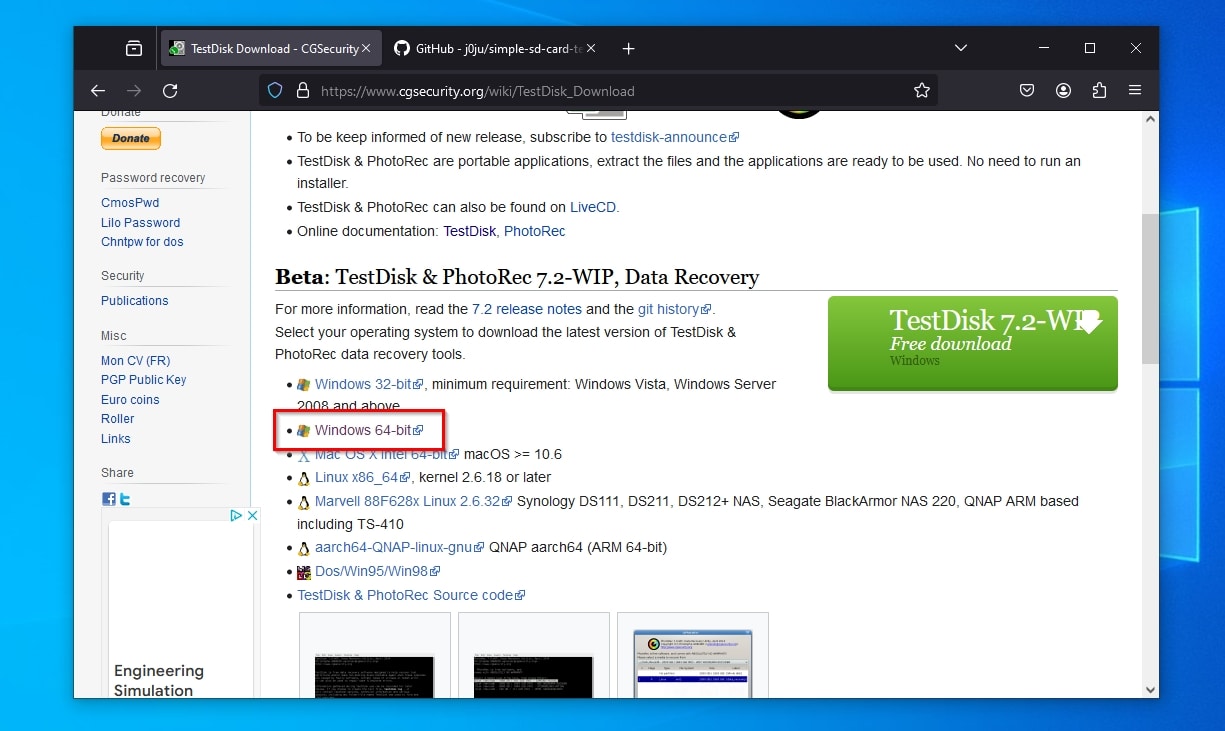
- Visit TestDisk’s official site and scroll down to find its download link. Click on it to move to a page with all available downloads. Pick the one for your operating system and computer’s architecture. For most people, this should be “Windows 64-bit“.
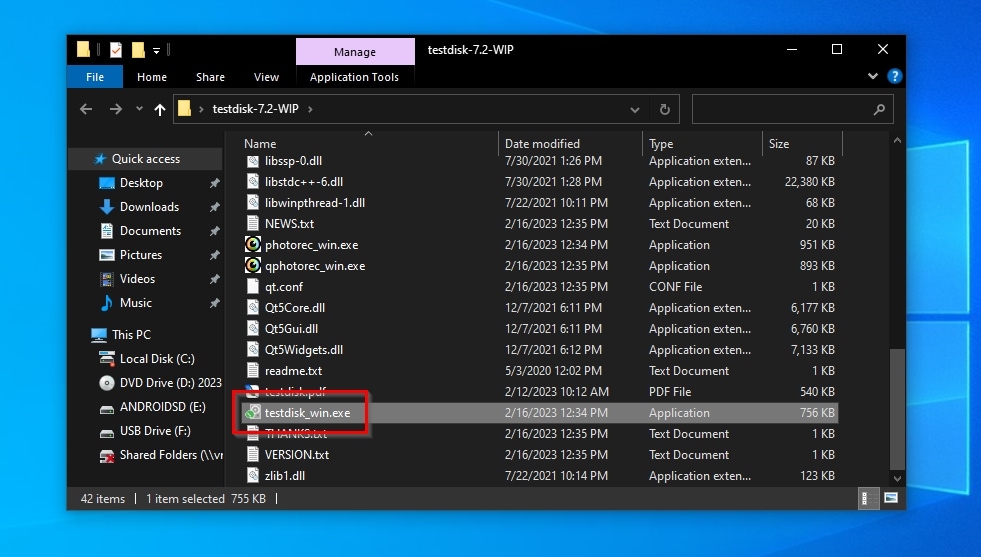
- Extract the downloaded archive to a folder on your computer. Inside it, locate “testdisk_win.exe” and double-click on it to run the app.
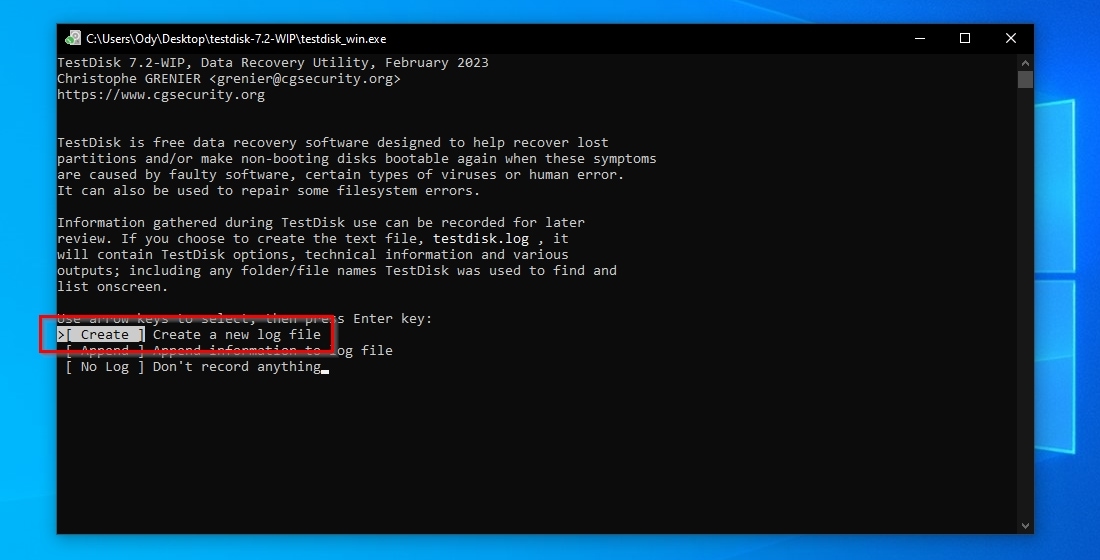
- TestDisk doesn’t come with a GUI, and you must use the app in a terminal window. You navigate its menu using the keyboard’s cursor keys and select the highlighted action with Enter. Start by choosing that you want to “Create a new log file” since that helps with troubleshooting if something goes wrong.
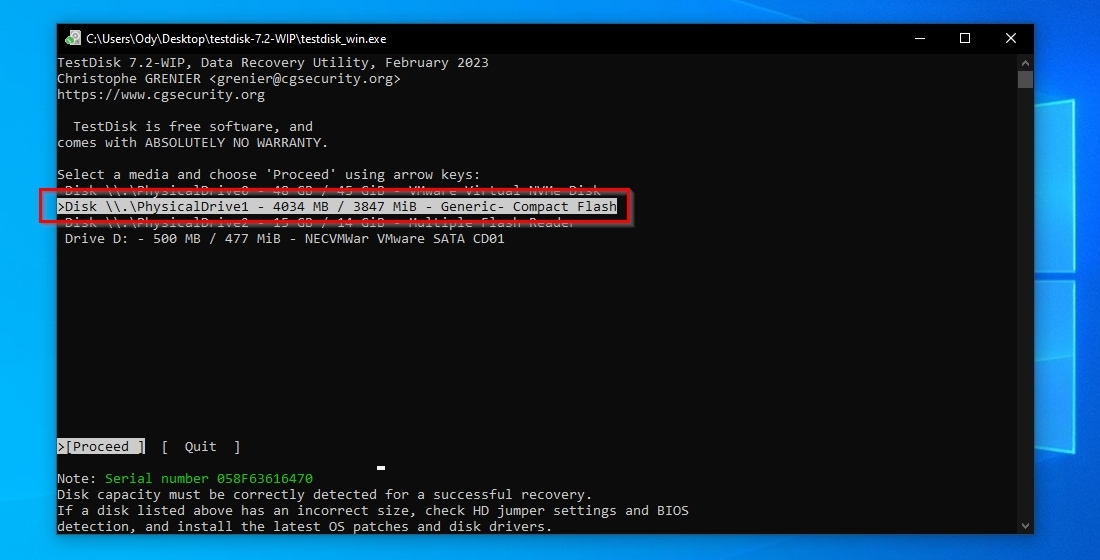
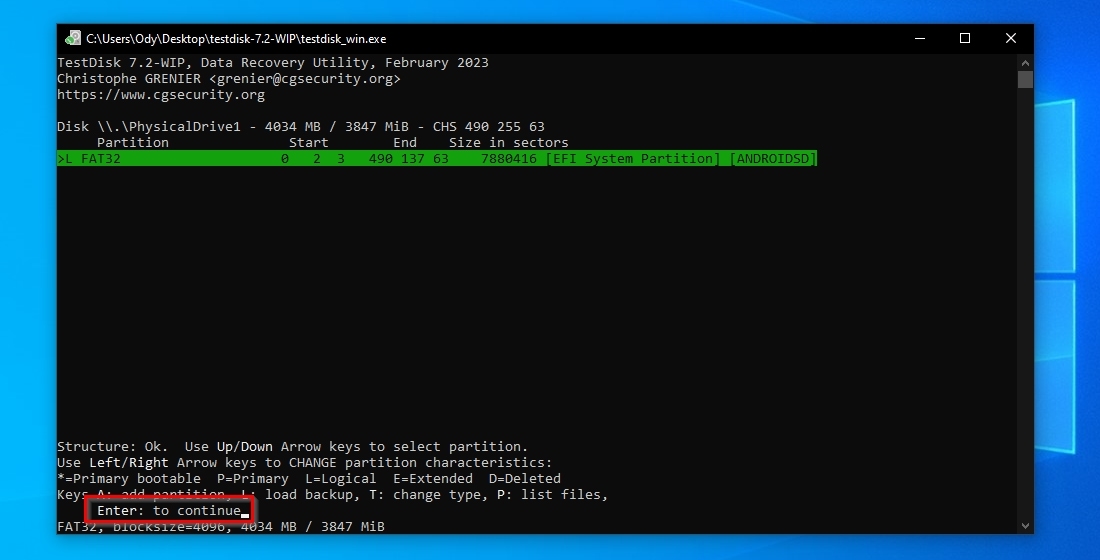
- When asked to select a media, choose your SD card from TestDisk’s list of storage devices.
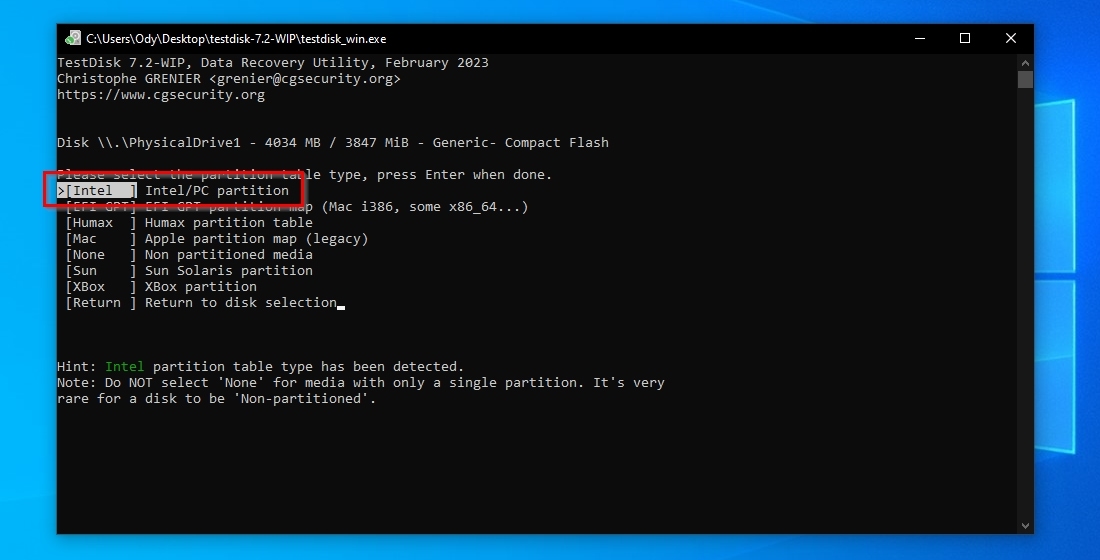
- You must select the correct partition table type to proceed. Usually, that’s the first option: “Intel/PC partition“. TestDisk also offers a hint, under the menu, on which partition table type it has detected.
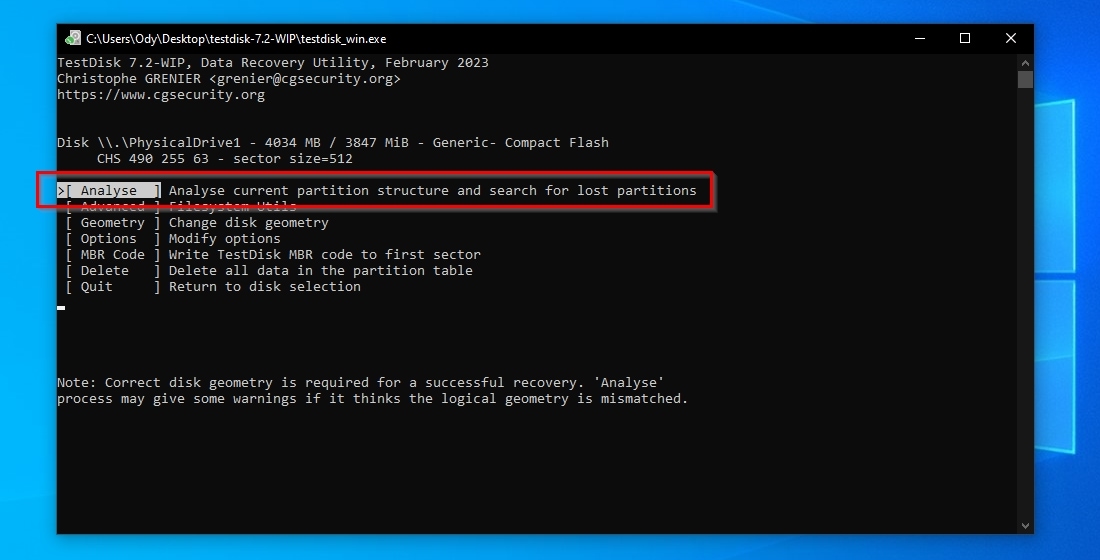
- With your SD card selected, choose “Analyse” from the available options.
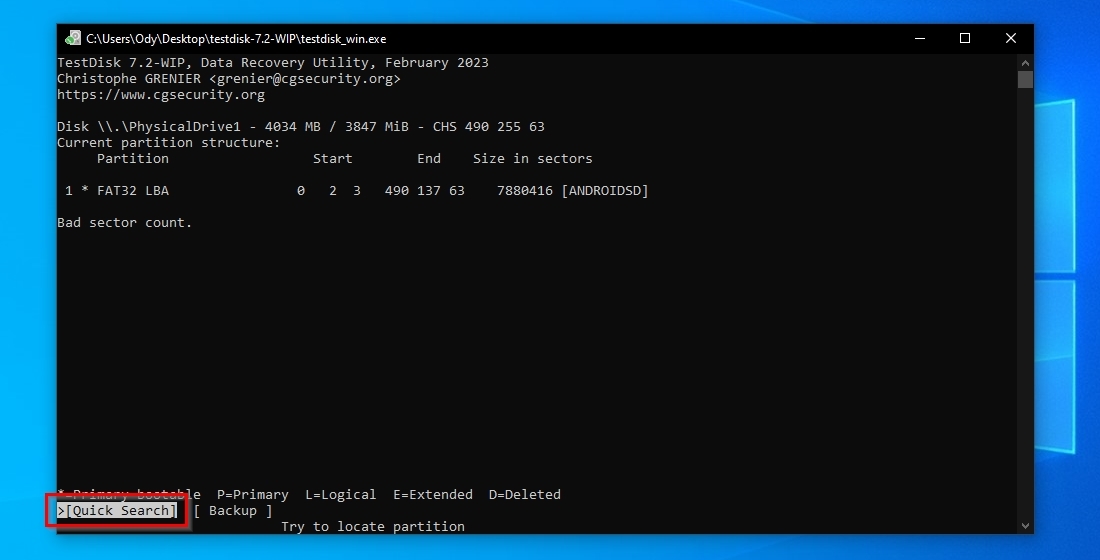
- From the following menu, start a “Quick Search” for partitions to have TestDisk scan your SD card.
- Removable media like SD cards usually use a single partition, so your next selection should be simple, and you’ll only have to press Enter to continue.
- If TestDisk fails to find any partitions, or you believe the one it found isn’t the correct one, you can perform a “Deeper Search” to try to find more.
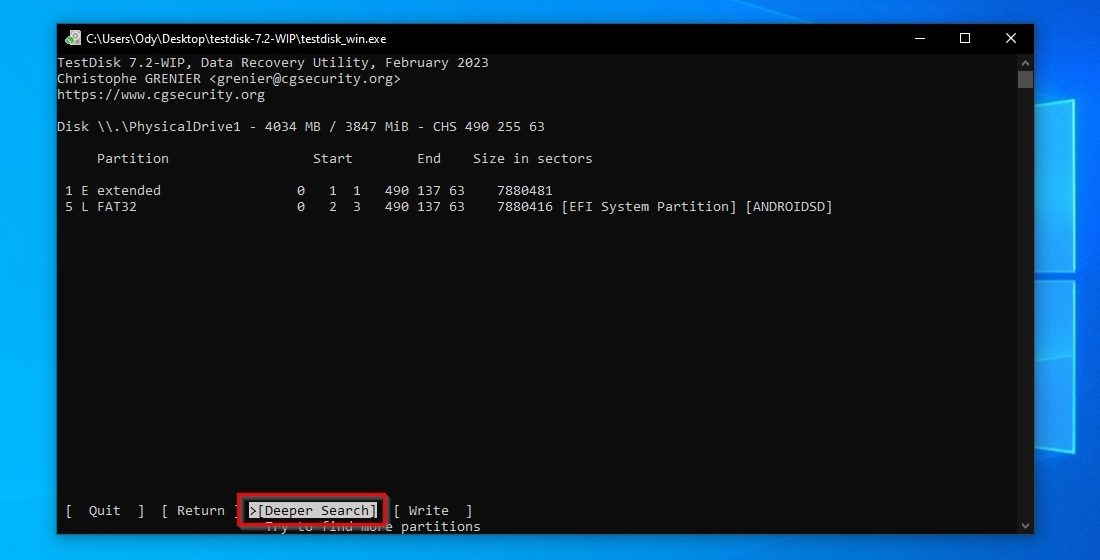
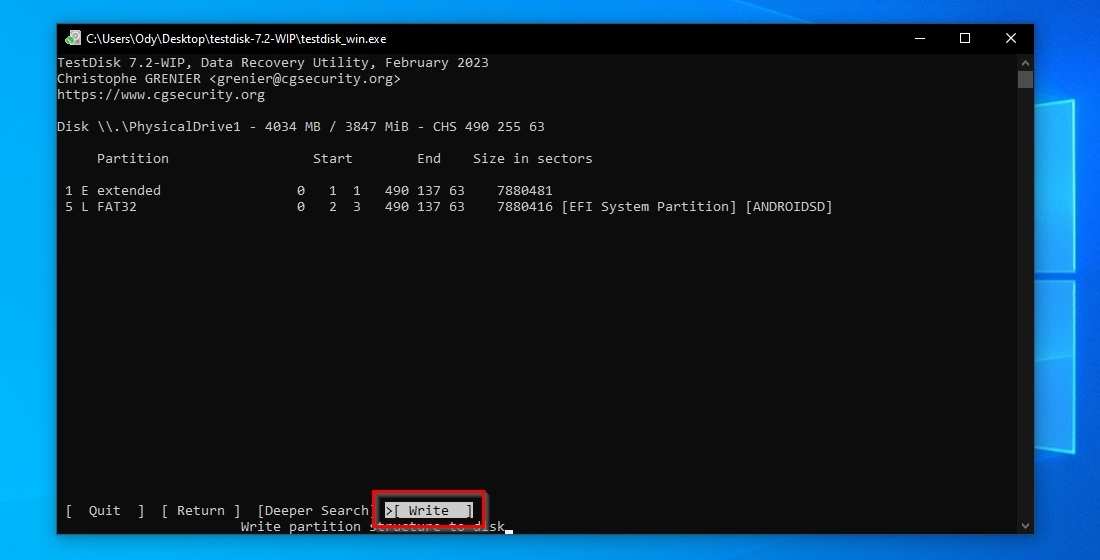
- If you’re happy with the partition TestDisk located, choose and select “Write” to do precisely that: write a new partition table back to your SD card and render your lost partition accessible again.
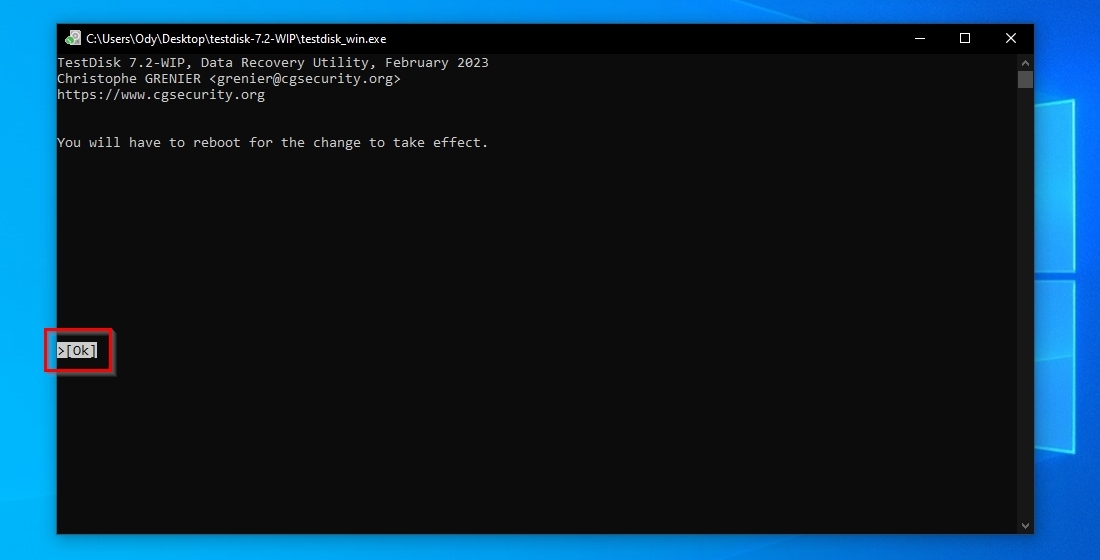
- Answer positively when TestDisk asks if you want to write the partition table.
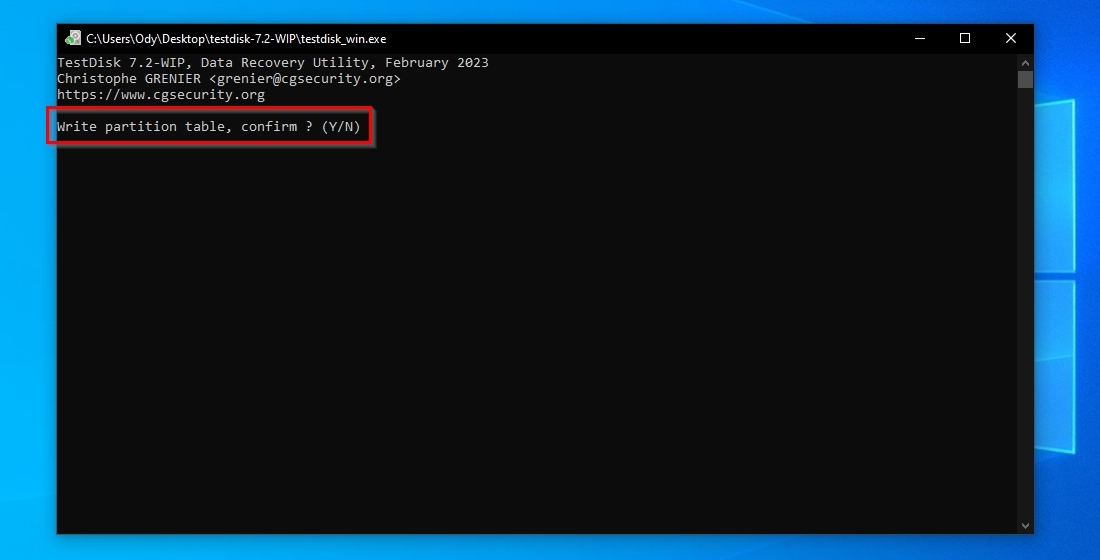
- With “OK” being the only available option, select it to return to the previous menu.
- Select and highlight “Quit” to return to the Disk Selection menu.
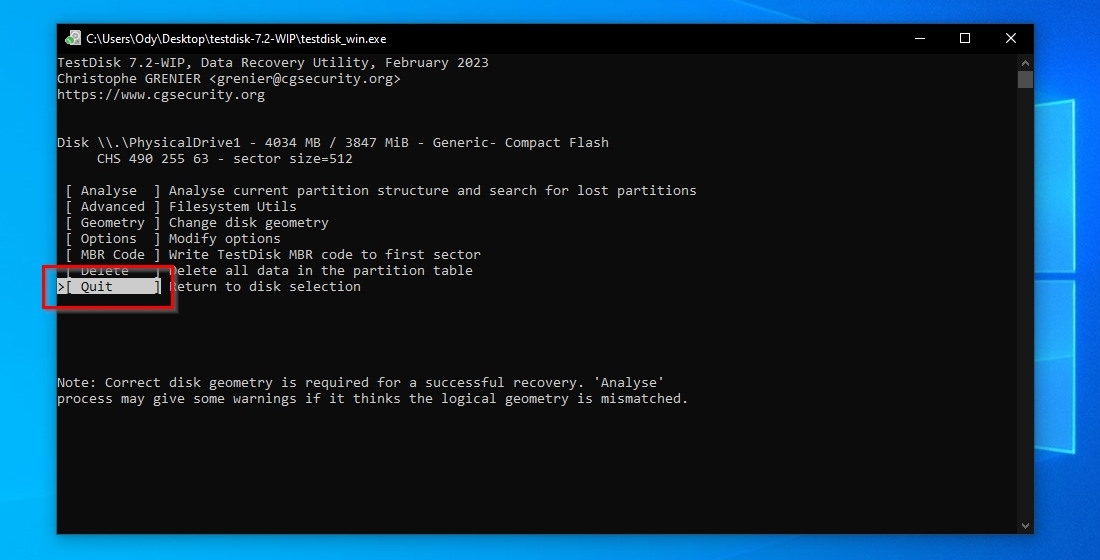
- With your SD card restored to its previous condition, select “Quit” to exit the app.

Method 10: SD Card Test
Do you want to check the health of an SD card you use as external storage for your Android smartphone? Is your smartphone or tablet the only device currently available, and you can’t use specialized tools on a PC to test your memory card extensively?
You can still use some apps that allow (admittedly more basic) testing of your SD card’s condition. One of the best is SD card test.
To scan your smartphone’s internal storage or SD card using SD Card Test:
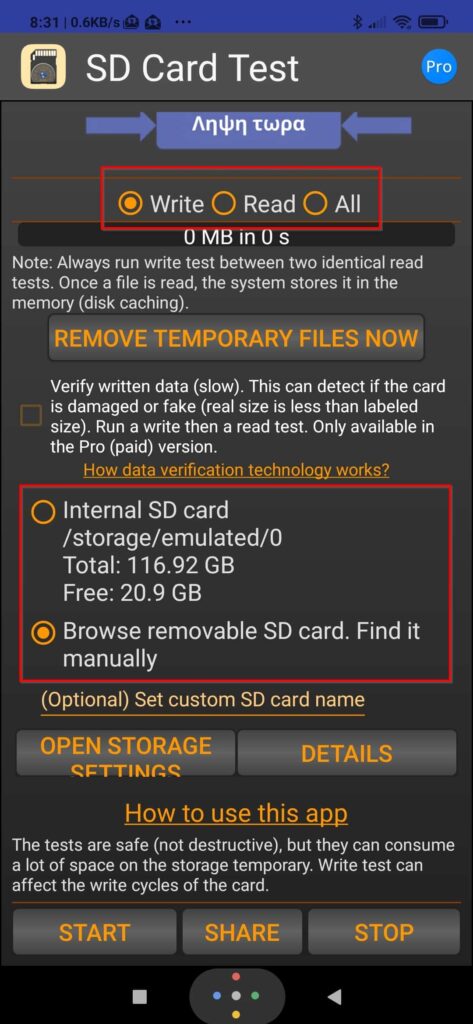
- Search for “SD Card Test” at the Play Store and install it. Launch the app and select if you want to perform write, read, or all tests, and to scan your phone’s internal storage (listed as “internal SD card”) or an external SD card (second option: “Browse a removable SD card. Find it manually.”).
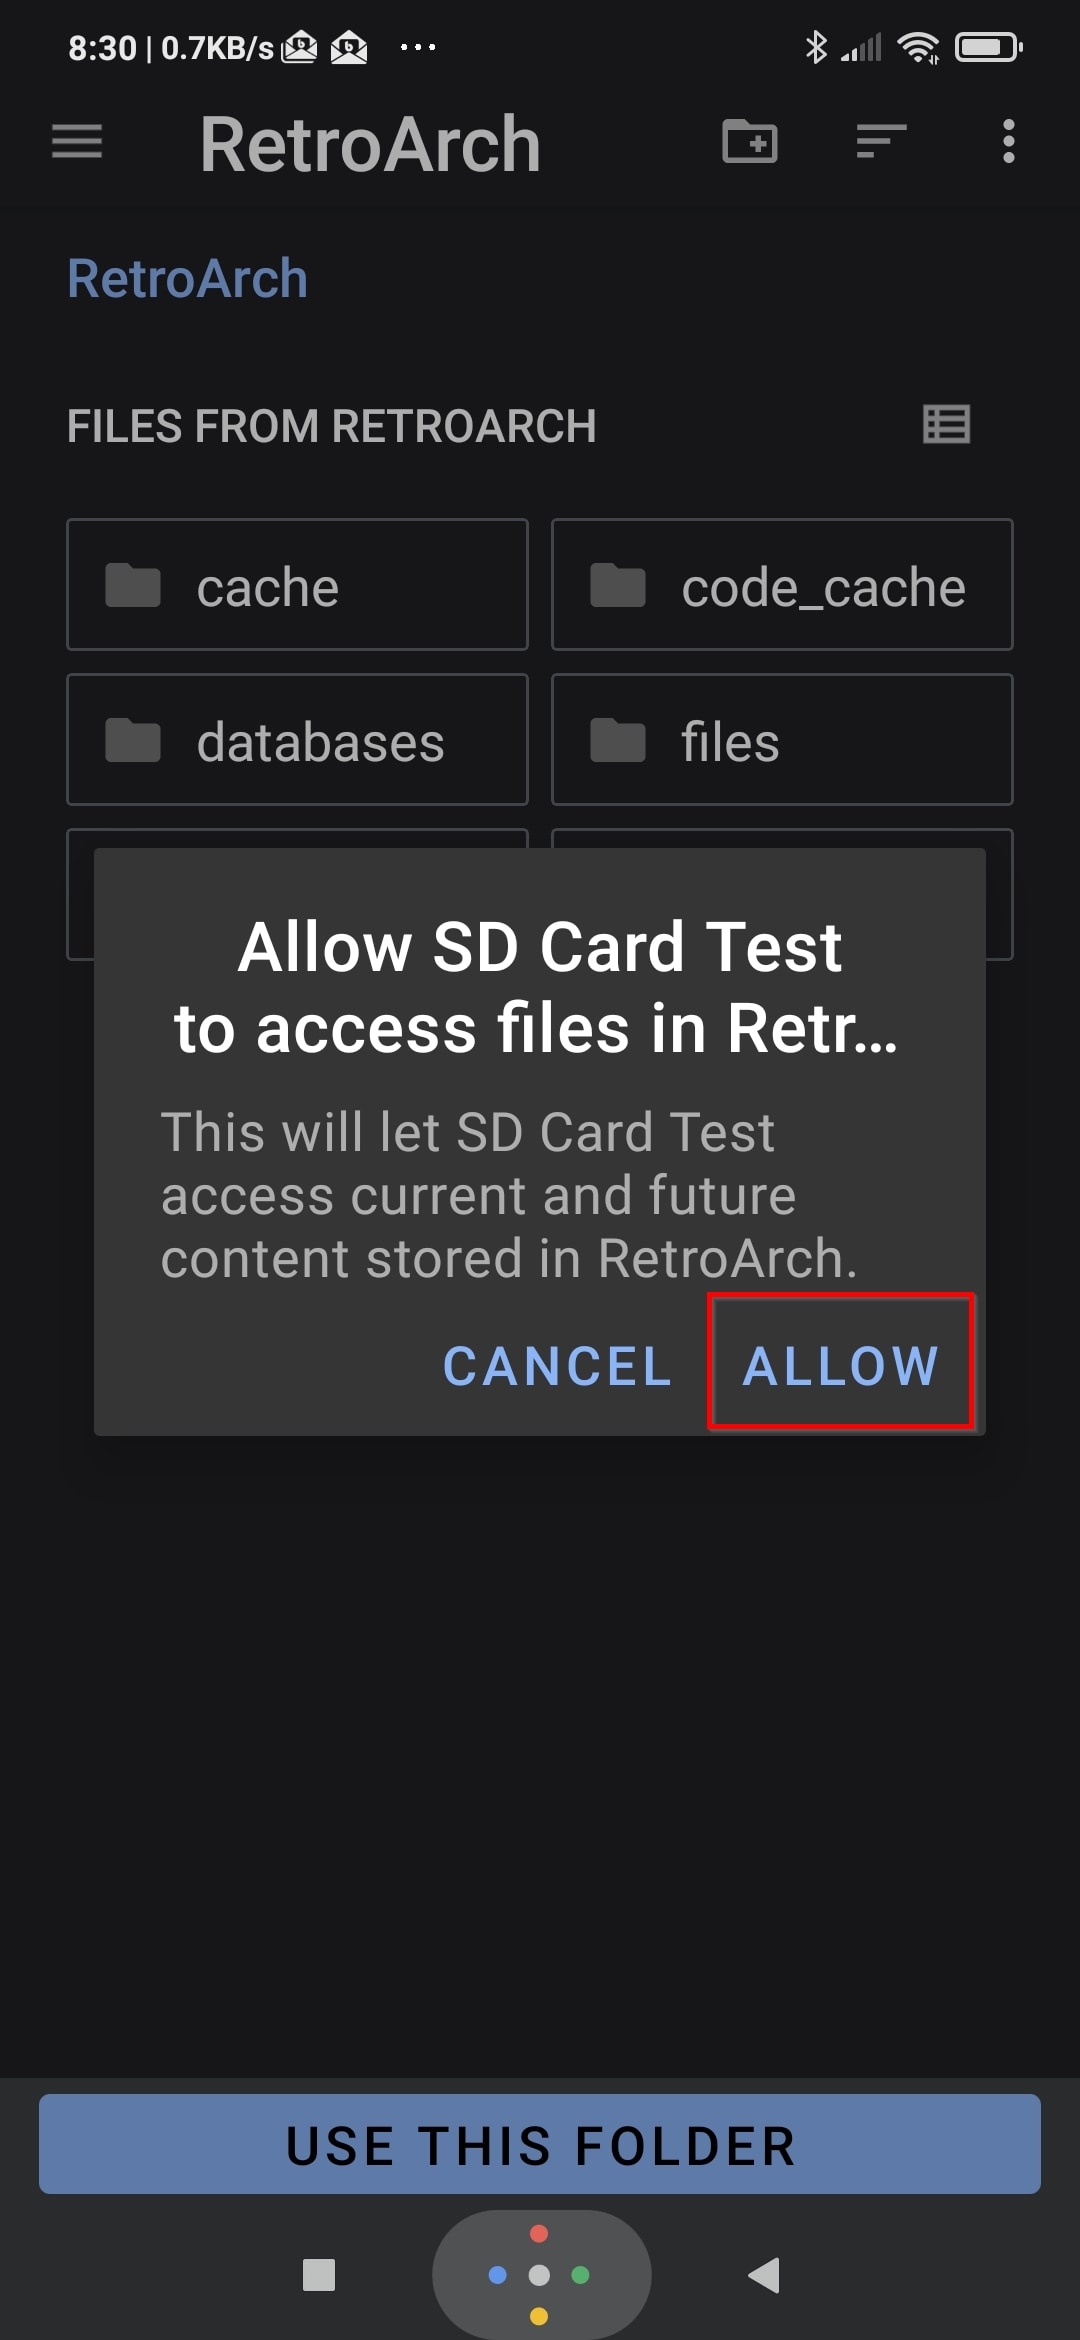
- Select your SD card’s root folder, and grant SD Card Test the right to access files in it.
- Tap Start at the bottom of the app to start testing your SD card. Although it’s not visually apparent, the words at the top of SD Card Test work as tabs. Select Visualization to see a graph of the process. This graph can help you judge your SD card’s health at a glance since its speed is a good indicator of its condition.
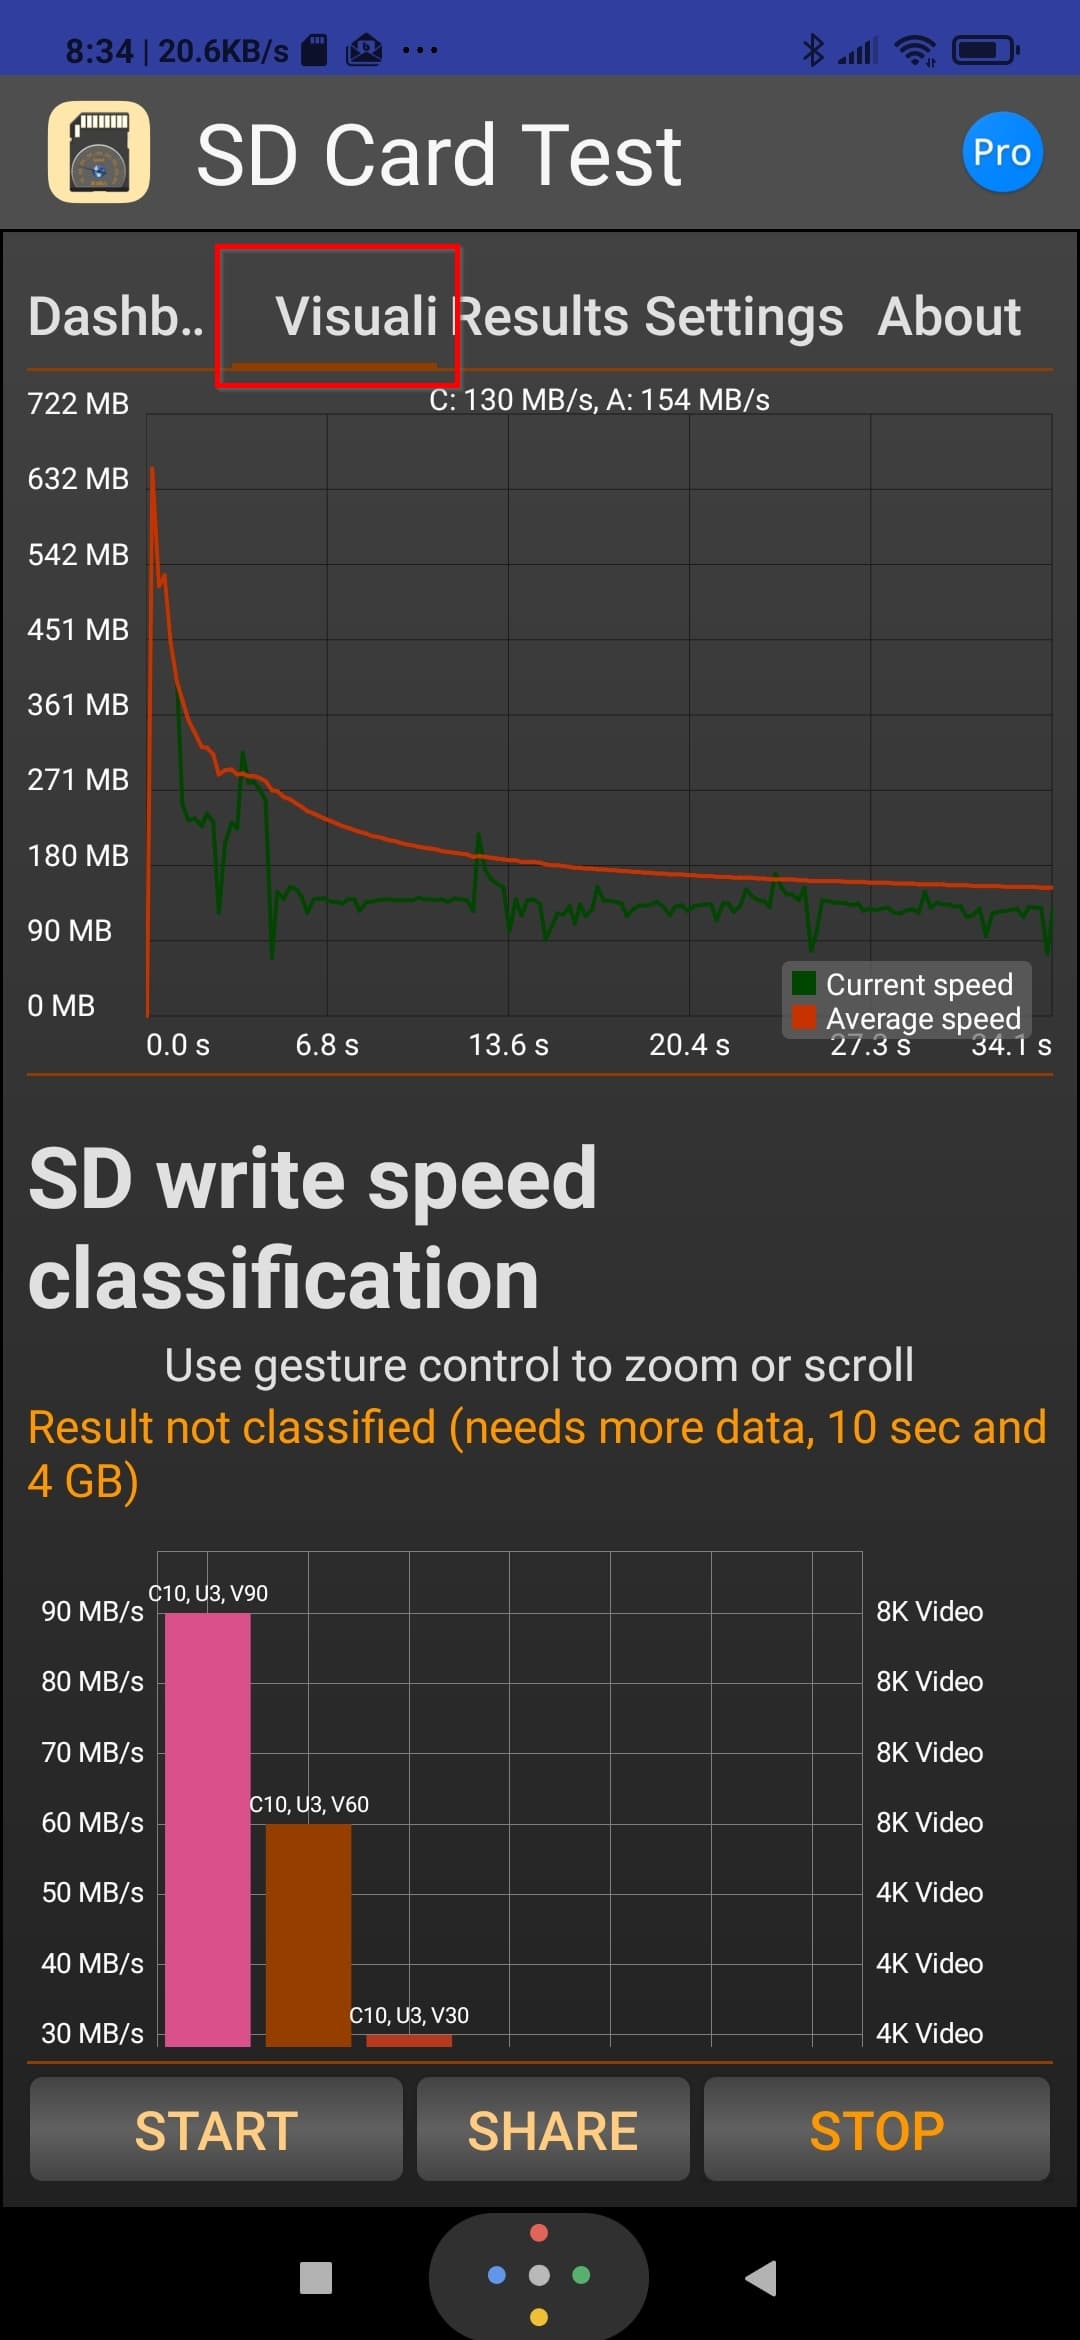
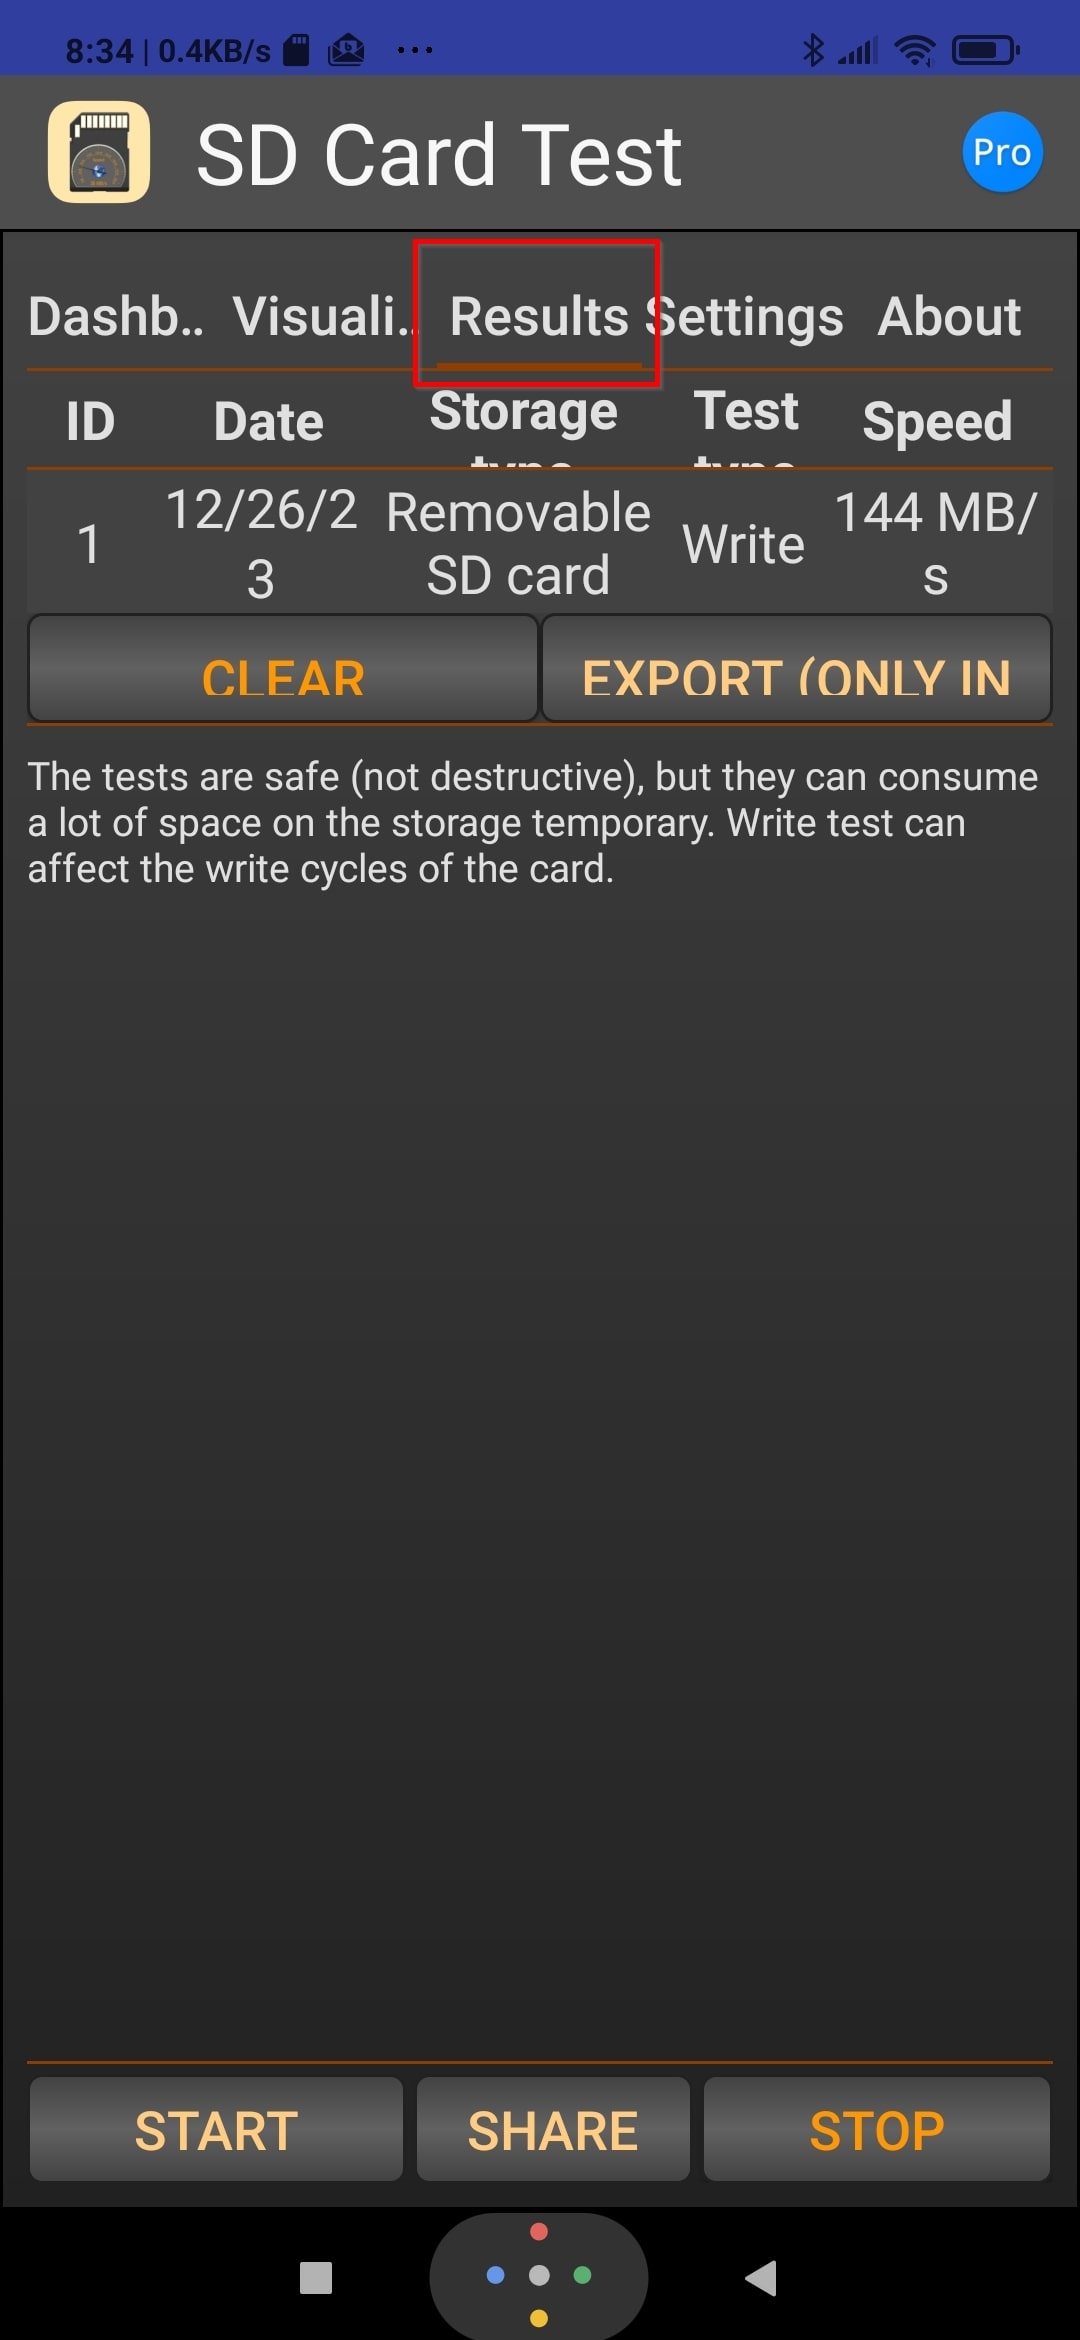
- When the test is complete, you can move to the Results tab to see a process summary.
Nowadays, almost everyone uses computers and smartphones. Thus, if you don’t have access to a PC or an Android smartphone, that’s probably because you’re a fan of Apple’s ecosystem, and you’re using a Mac. If that’s the case, no reason to worry: as we saw in another guide of ours, you can also check SD card health on Macs.
How to Secure Data and Recover It from a Failing SD Card
Disk Drill is considered one of the most trustworthy data recovery solutions, making it one of the first apps to try when you want to safely get your precious files out of a seemingly problematic SD card. The app was one of the few that managed to impress us when we reviewed it, thanks to its unparalleled user-friendliness, efficiency, and affordable pricing.
However, apart from a speedy and robust scan and recovery engine that leads to thorough and pristine results, Disk Drill also has another ace up its sleeve that can help when your SD card is rapidly failing: it includes an easy-to-use imaging tool that can effortlessly create byte-to-byte backups of any storage device – including memory cards.
Thanks to this tool, Disk Drill enables you to take a complete backup of a failing SD card at the first sign of any problem to ensure the perpetual availability of all stored data on it.
Then, you can recover your files from the backup image created by Disk Drill, even long after your SD card has failed.
To create a byte-to-byte backup image of your SD card:
- Download the app from Disk Drill’s official site. Proceed to install and run it.
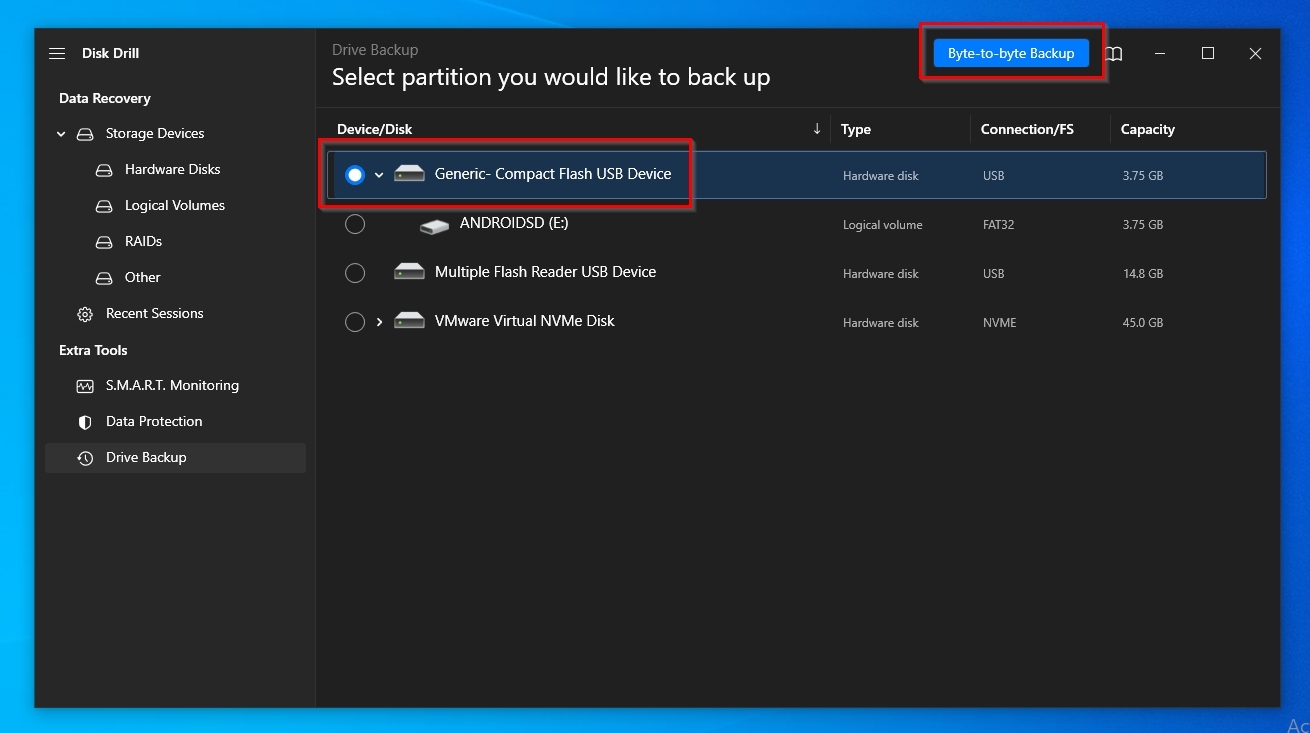
- Although you will see your SD card on Disk Drill’s Device/Disk list, ignore it for now and turn your attention to the menu on the left. From there, under “Extra Tools” select “Drive Backup“.
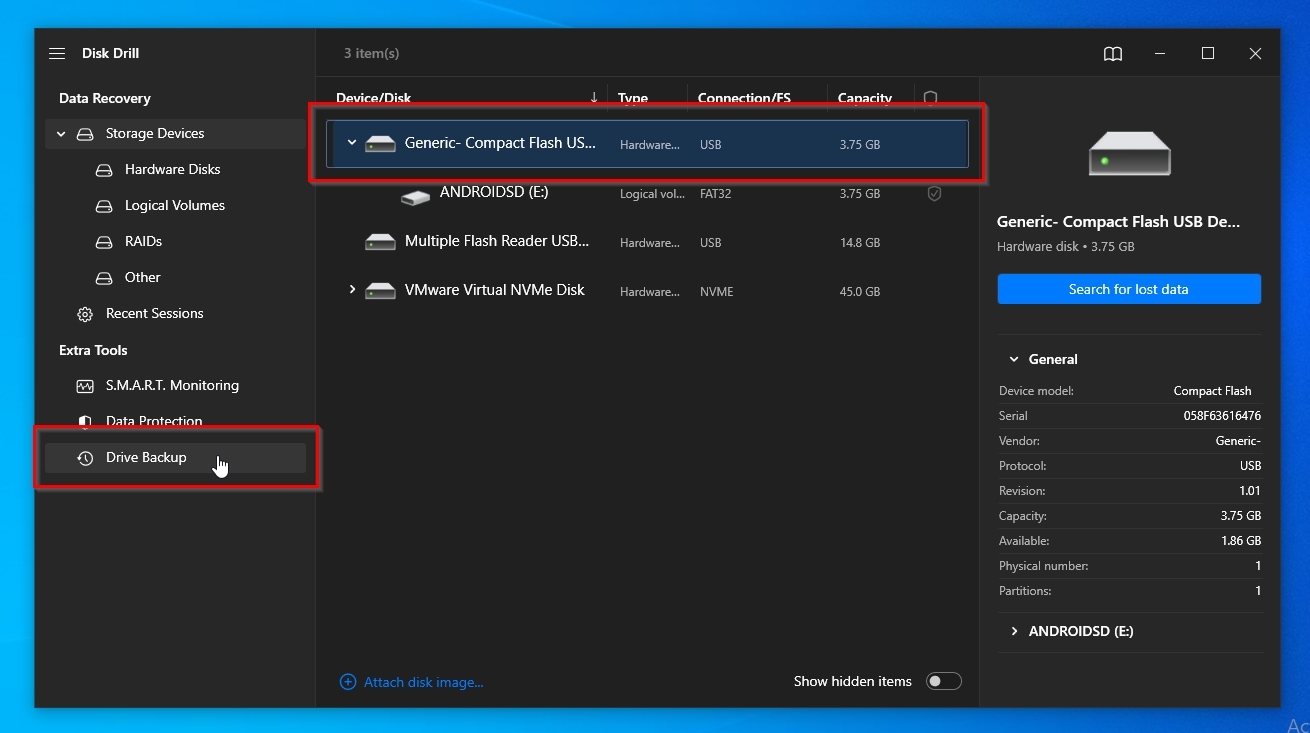
- Select your SD card from the new list of devices and their partitions that Disk Drill will show you, and click on the “Byte to Byte Backup” button on the top right of the app’s window.
- Click the button with the three dots to select a path where you want to store the backup image and use the requester that will pop up to choose a folder on one of the other storage devices on your PC. You can leave the rest of the options as they are. Click “OK” to proceed to the next step.

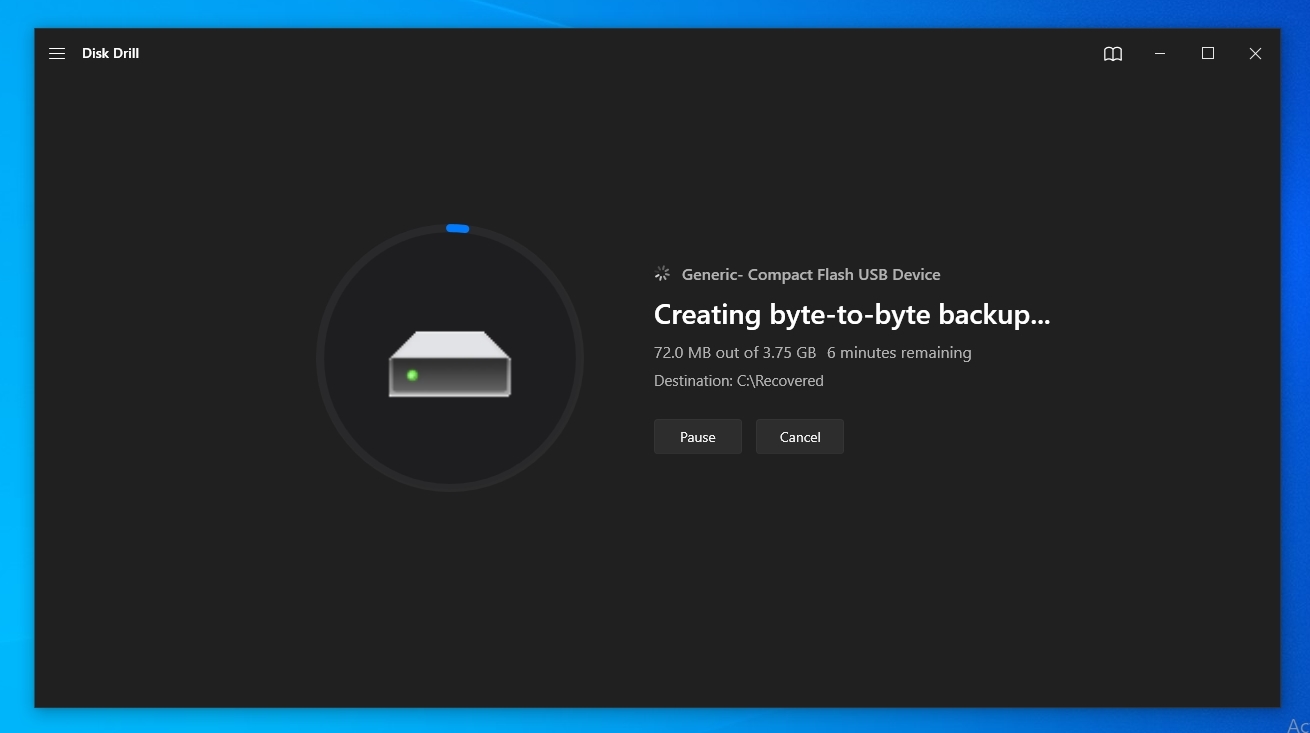
- Disk Drill will start taking a byte-to-byte backup of your SD card. The app will update you when the disk image is created. It will also offer a link in the form of a “Show in Explorer” button that will allow you to “visit” the backup image’s path using your operating system’s default file manager.
To recover your files out of a backup image created with Disk Drill:
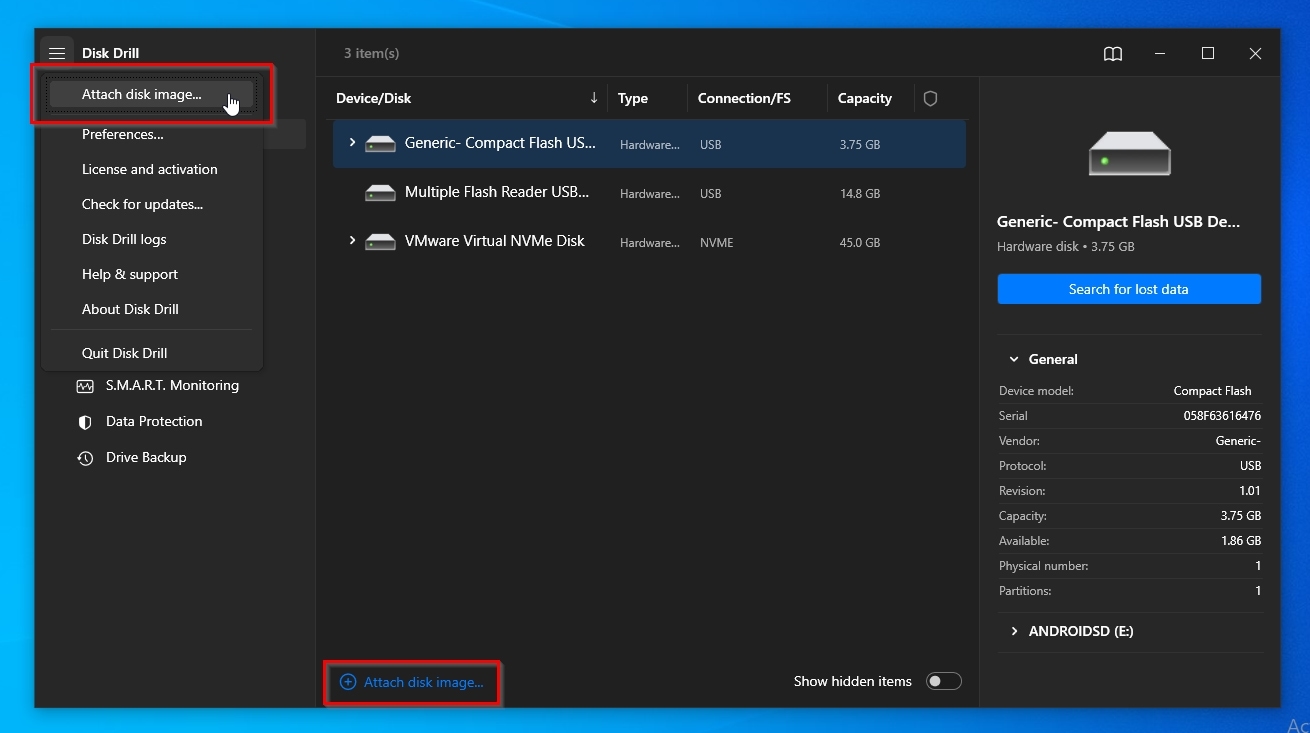
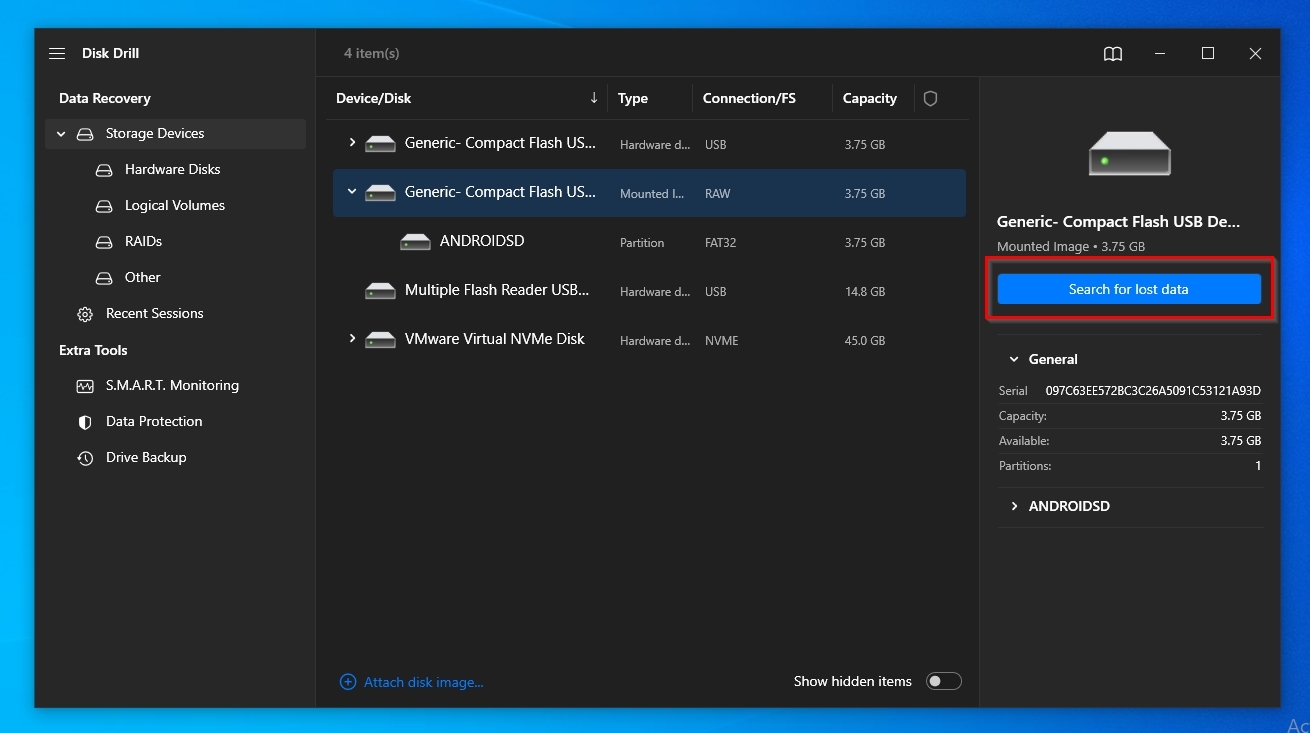
- Run Disk Drill and either click on the “Attach Disk Image” link on the bottom left of each device disk list, or use the “hamburger” menu accessible from the top left of the app’s window to select the “Attach Disk Image” option.
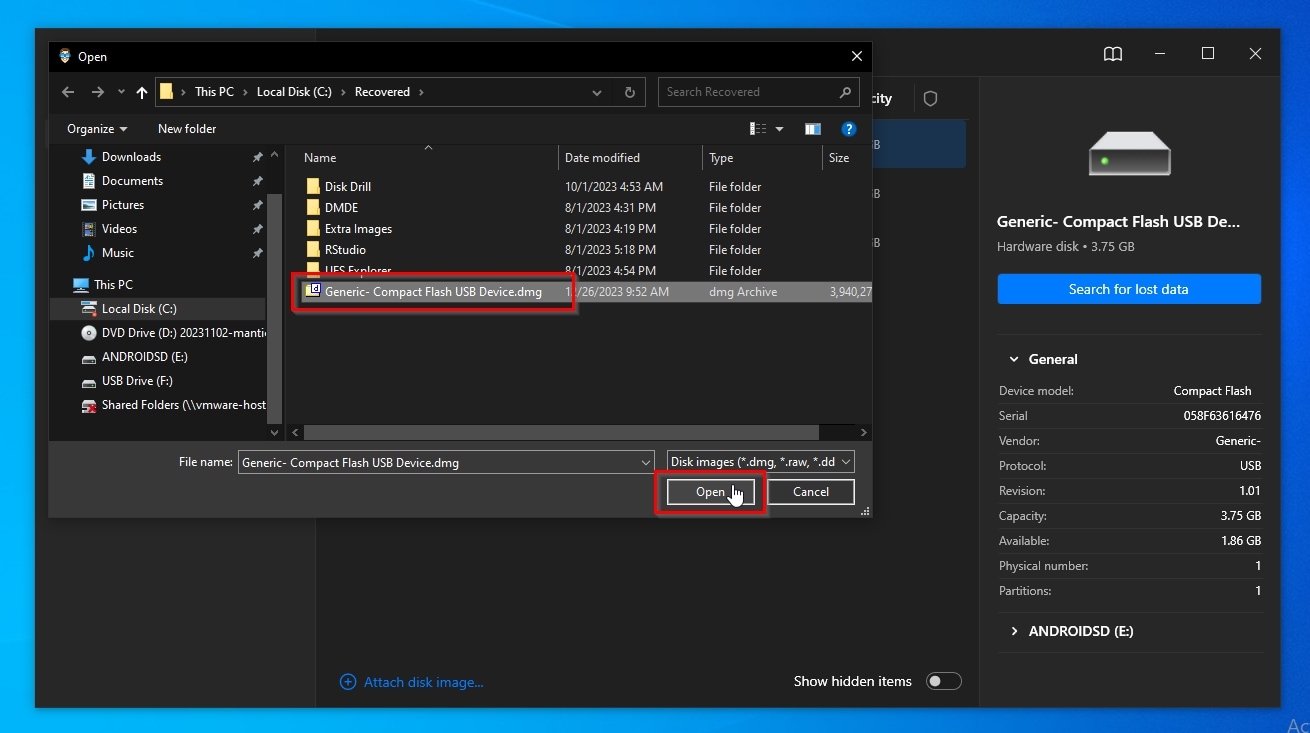
- Use the file requester on your screen to find, select, and open the backup image Disk Drill created from your SD card.
- The attached image will appear as a virtual device among the rest of your storage devices on Disk Drill’s Device/Disk list. Select it from there and click on “Search for lost data“.
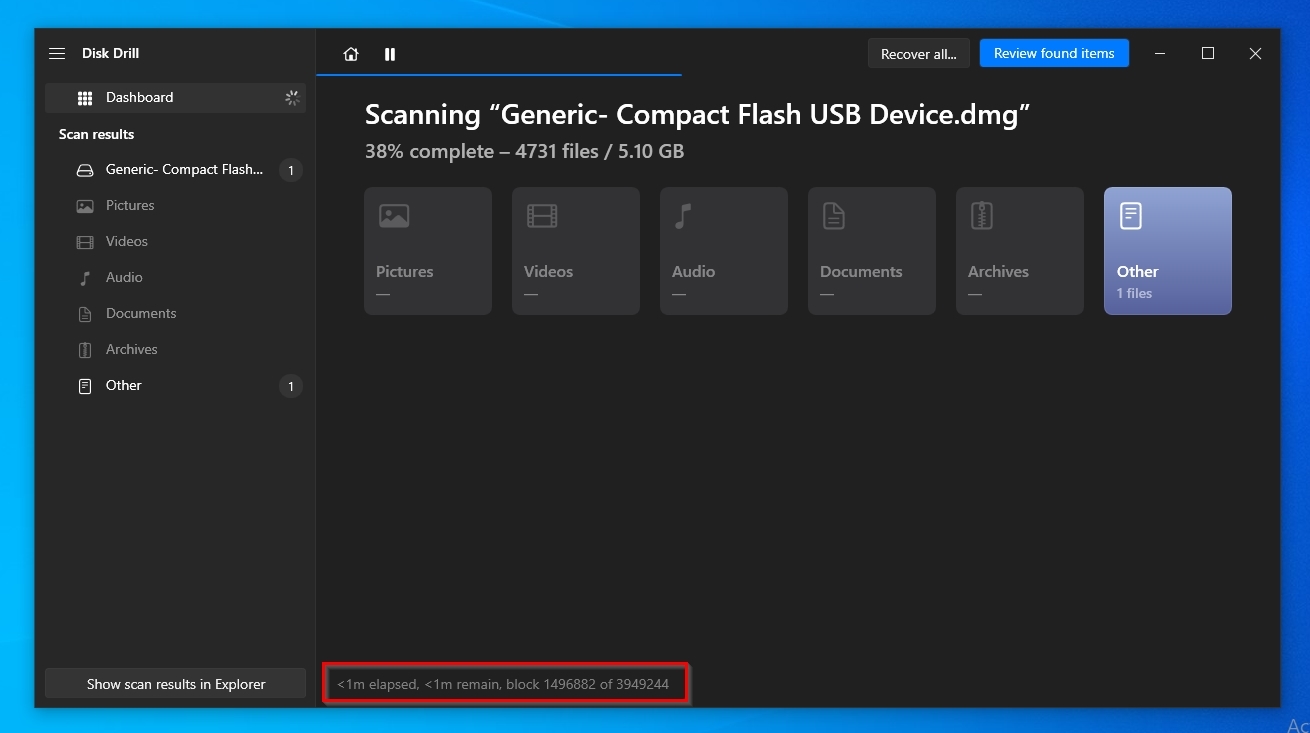
- Disk Drill will scan the attached image for files. The process is almost identical to scanning an actual SD card but (usually) much faster.
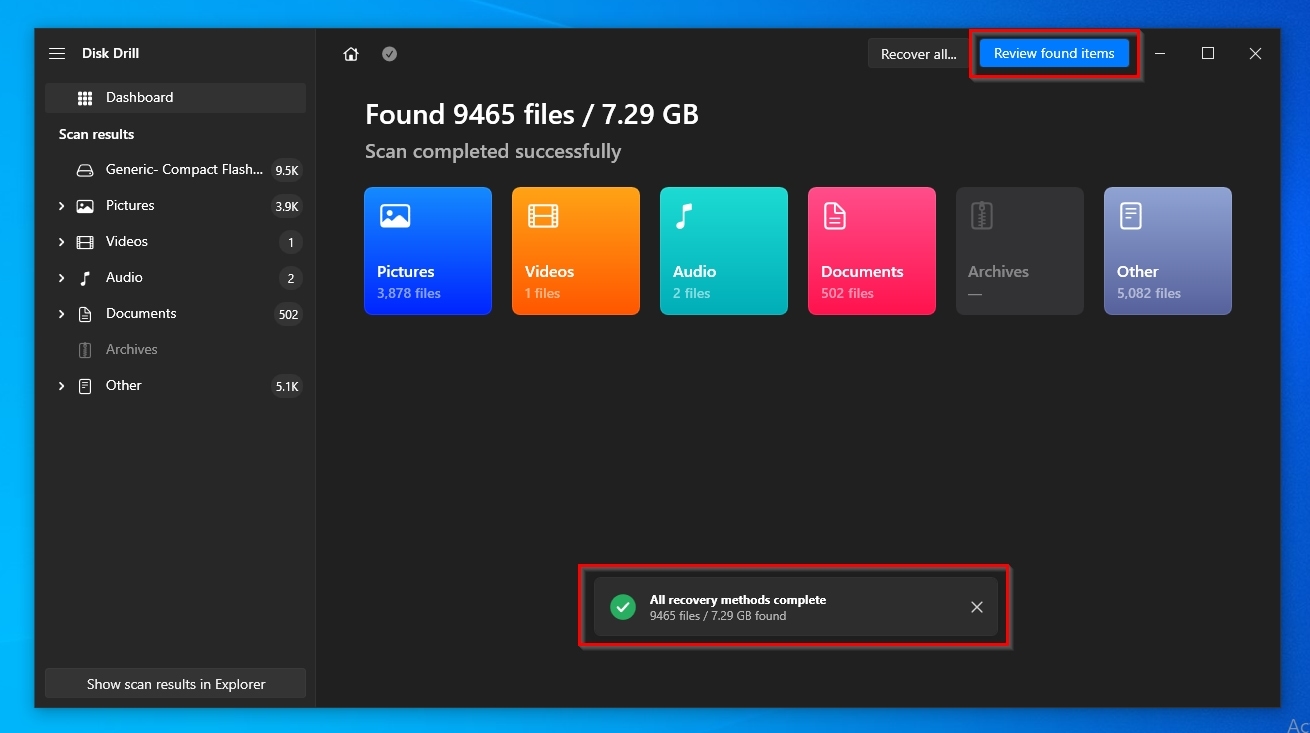
- When Disk Drill finishes scanning your SD card and informs you that “All recovery methods (are) complete”, close that mini pop-up, and click on “Review found items” on the top right of its window.
- If Disk Drill found too many files, and you can’t locate the ones you need among the results easily, use the Categories on the left or the Filters on top of the results list to have the app only show files matching the properties you select. You can choose to only see pictures, documents, files of a specific size, modified on a particular date, etc.
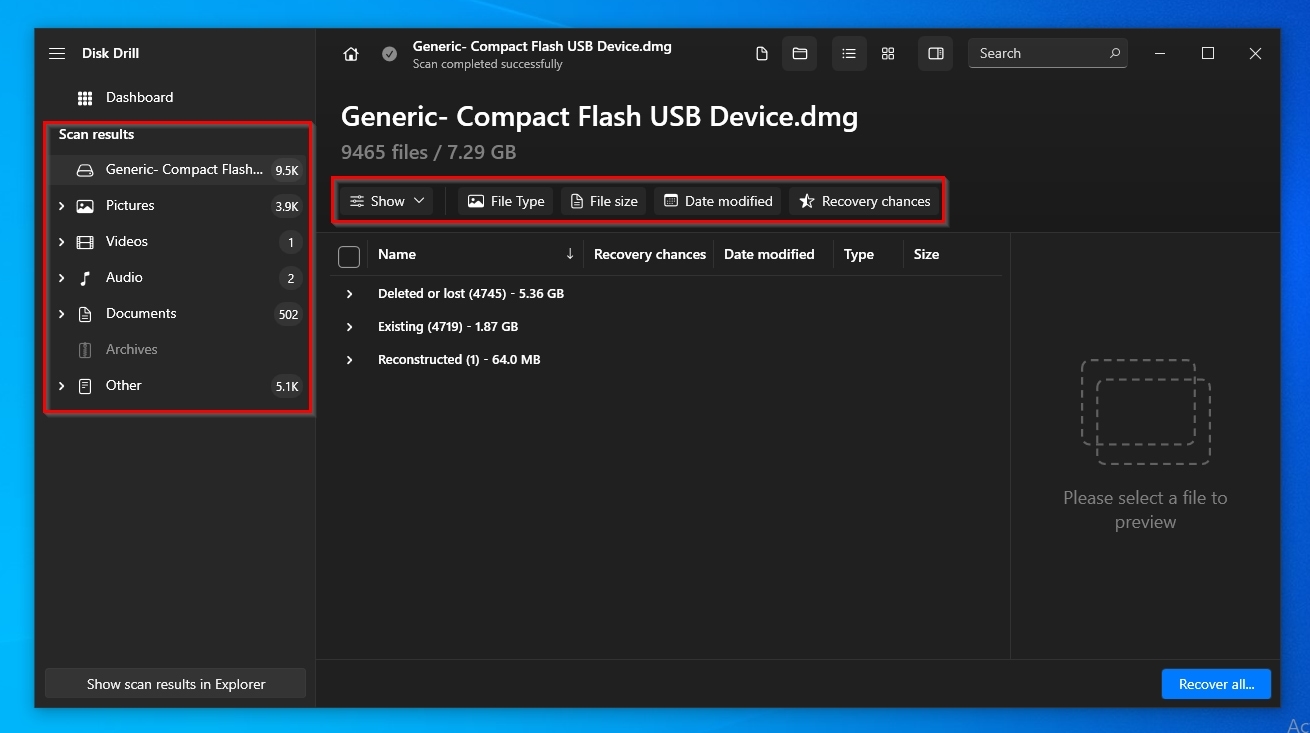
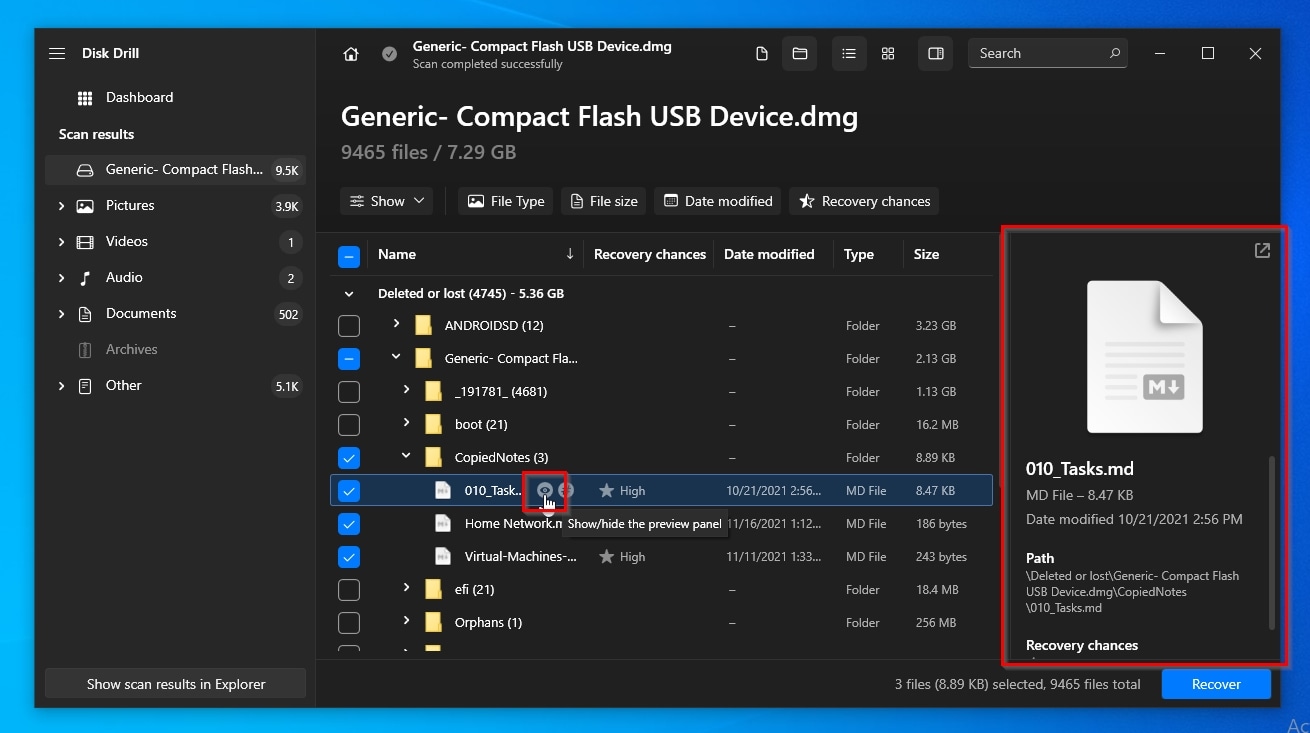
- If you can’t tell by a file’s name if it’s among the ones you want to recover, Disk Drill lets you preview the contents of many popular file types, including various documents and image files. To do that, point the mouse cursor at a file and click on the little icon with an eye to check some details about it or its contents on the preview pane on the right of the app.
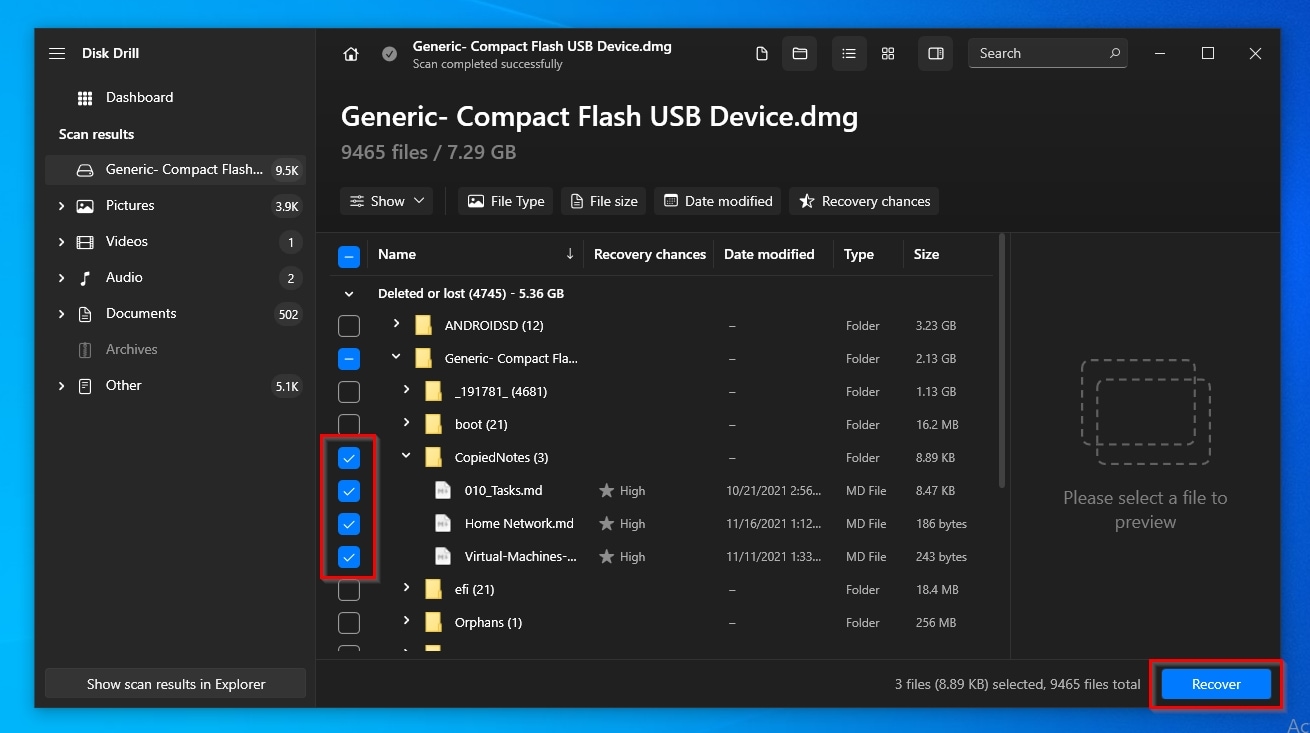
- When you find the files you want to recover, place a checkmark on their left to mark them for recovery. When you’ve marked all the files you wish to get back, click on the “Recover” button on the bottom right of the app.
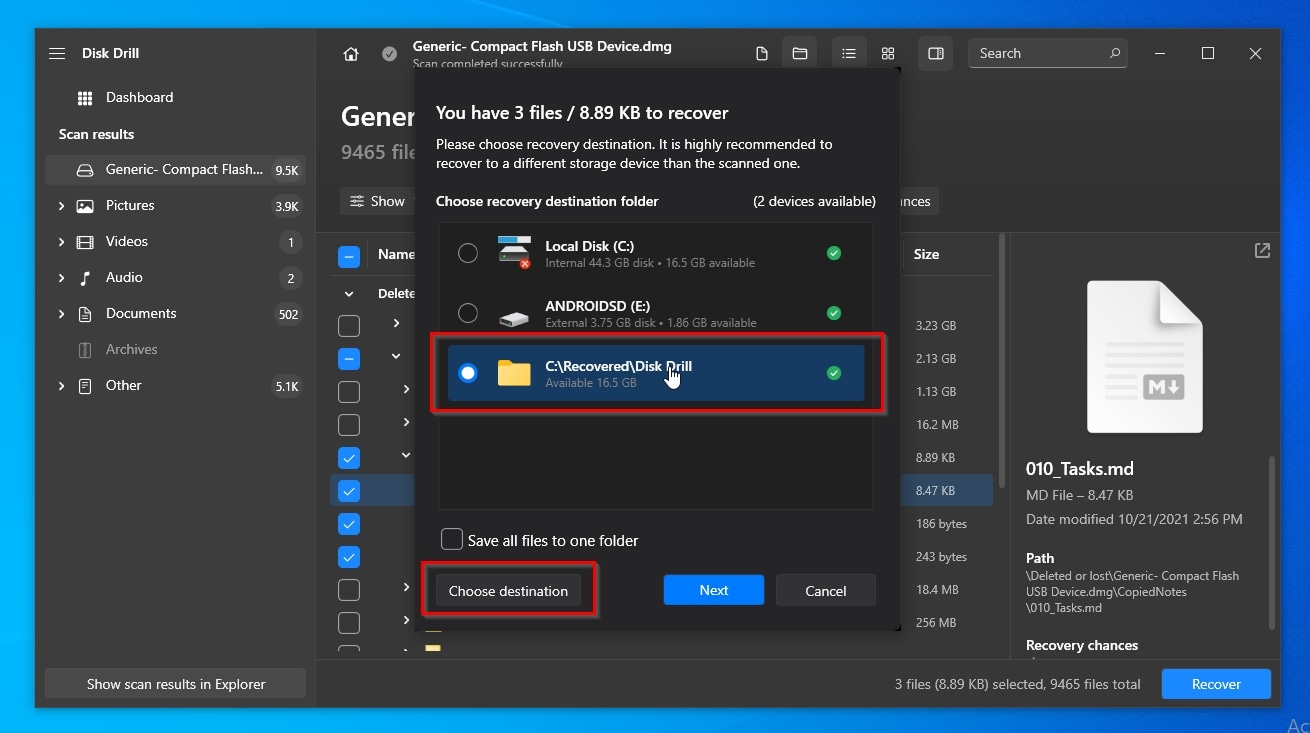
- Disk Drill will ask you to select a target destination where it will store all recovered files. If the destination you want isn’t listed among the existing ones, use the “Choose Destination” button to select a folder on one of your PC’s storage devices. Click “Next” to proceed with your file recovery.
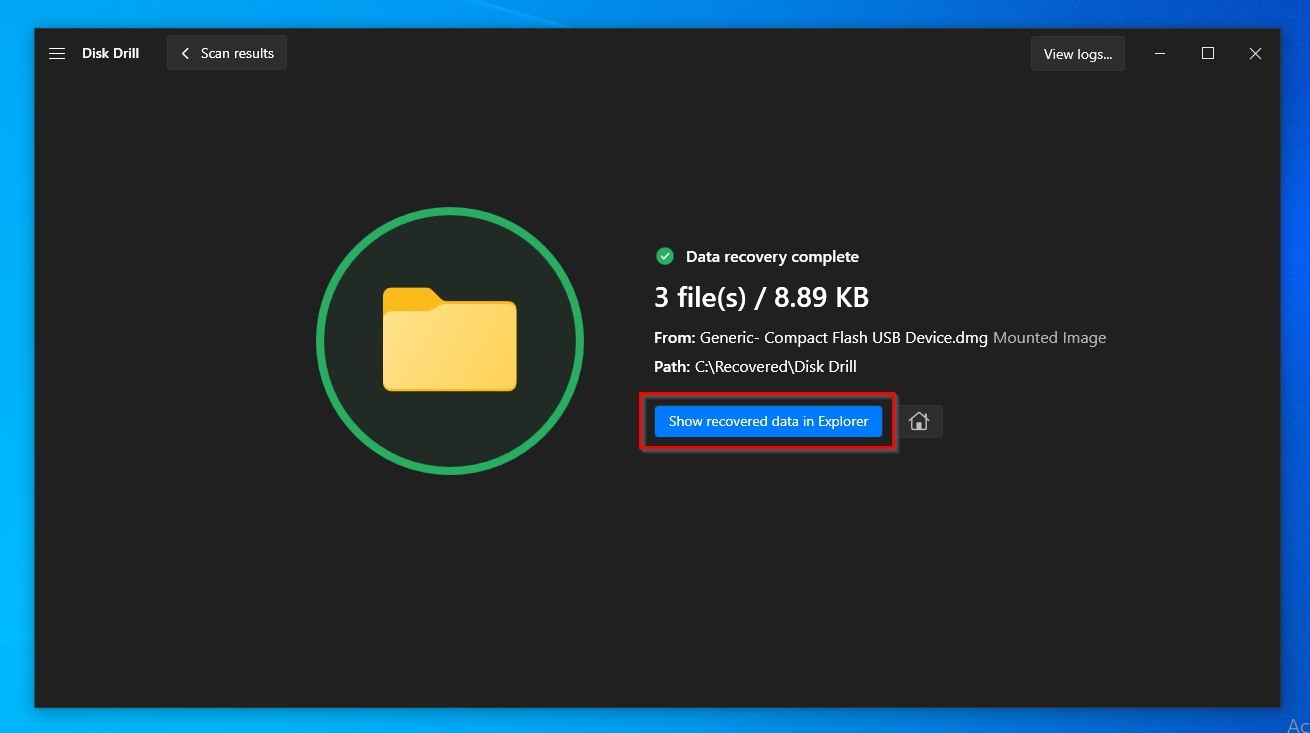
- Disk Drill will inform you that the data recovery is complete when the process finishes. Click on the “Show recovered data in Explorer” button to open the folder where Disk Drill saved your recovered files.
Conclusion
When dealing with any storage media, especially those removable, tiny, plastic, and prone to wear and damage SD cards, it’s best to keep an eye on their health. Replacing an affordable memory card is easy, but recreating the documents you were working on can be challenging, and replicating the snaps from the trip you just returned is simply impossible.
Thankfully, the tools we saw in this article can not only help you do that but also assist in case of problems, enabling you to recover your files and even “fix” your SD card. Even if you don’t believe you need them, we suggest you try out some of them. The results of an SD card health check might surprise you and become the reason you managed to save your precious photos from a rapidly failing memory card.
This article was written by Odysseas Kourafalos, a Editor-in-Chief at Handy Recovery Advisor. It was also verified for technical accuracy by Andrey Vasilyev, our editorial advisor.
Curious about our content creation process? Take a look at our Editor Guidelines.