Noticing slow performance, random dismounts, and files disappearing from your SD card? It’s time you performed an SD card health check on your Mac. From in-built utilities, to third-party tools, there are several ways to do this. The sections below take a look at the common indicators of SD card errors, the various methods to check your SD card’s health on a Mac, and how you can recover deleted data from the failing SD card.
Signs of SD Card Errors
SD card errors manifest themselves in several ways. These symptoms/signs usually indicate your SD card is on its way to failure. By recognizing these signs early, you can take preventative measures against further data loss, and also choose the appropriate solutions.
Here are some common signs of SD card errors on a Mac:
- ⏏️ The SD card refuses to mount: An SD card that’s invisible in Finder and doesn’t appear as mounted on the desktop, could be on the verge of failure. But, it’s also possible it’s the SD card adapter that’s faulty, and not the card. Problematic SD cards will refuse to mount on other devices—Windows computers, and cameras—as well.
- 🗂️ You can’t view the SD card’s contents: An SD card—that previously contained files—showing up as empty in Finder is likely logically corrupt. Use the Command + Shift + .(dot) shortcut to rule out the files being hidden, and confirm that it’s logical corruption that led to data loss.
- 📖 Files became read-only: Unless the SD card’s physical write-protection switch is set to the ON position, you should be able to read and modify the SD card’s contents. If you’re unable to delete data, or write any new files to the SD card, it could be failing.
- 🐌 Performance issues: A significant reduction in SD card read and write speeds usually indicates impending failure.
- 🔎 Missing files and folders: Logically damaged SD cards often suffer unexplained data loss. If you notice any files and folders missing from the SD card, it may fail soon.
- ❌ Incorrect storage capacity: MacOS’ Disk Utility usually has trouble reading the correct storage capacity of a failing SD card.
DIY Methods to Check SD Card Health on a Mac
There are several DIY ways to check your SD card’s health on a Mac. We recommend you periodically perform these checks to prevent potential data loss. If the SD card is already displaying errors, the listed methods also explore how you can detect and resolve minor issues on the SD card, as well as recover any lost data from it.
Note: If your SD card is physically damaged, or remains undetected on the Mac—stop using the SD card and contact an expert to fix it. In this case, we advise against using a third-party data recovery tool. Contact a professional data recovery service instead.
Let’s take a look at some ways to perform an SD card health check on macOS:
Method 1: Using the Terminal for Detailed Error Checking
Using macOS’ command-line interface (CLI), Terminal, you can run basic and advanced SD card health checks. By entering a bunch of commands, you can effectively gauge the health of your SD card and determine its file system state, S.M.A.R.T. status, and more. This fix may seem complex, but follow the step-by-step instructions below and you should be good.
Here’s how to perform a basic, or advanced SD card health check on a Mac, using Terminal:
Basic Check
- Connect the SD card to your Mac.
- Search for “Terminal” in Spotlight Search (Command + Space) and launch the Terminal app.
- Type diskutil list in the console and press Enter. This command displays all the drives connected to your Mac.
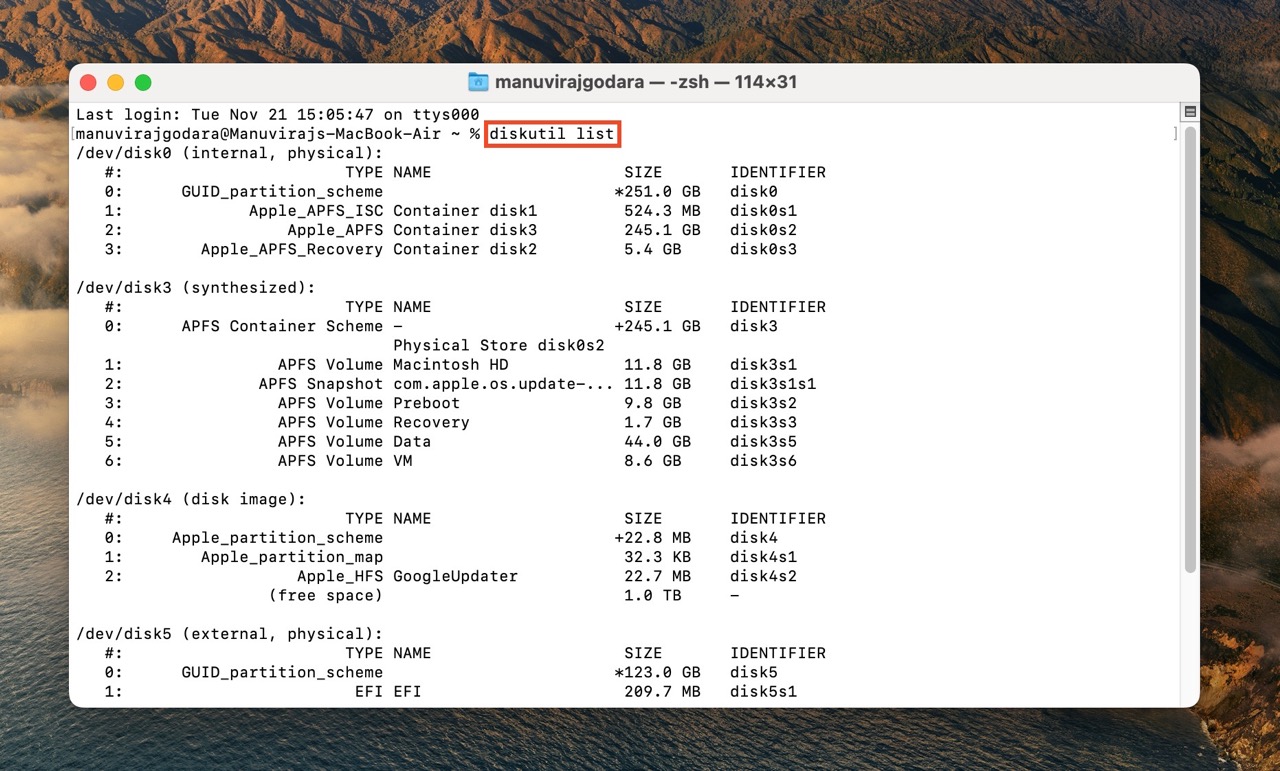
- Look for your SD card in the drive list. Note down its identifier. It will look something like /dev/disk2, or /dev/disk3, etc.
- Type diskutil verifyVolume <drive identifier>, without brackets, and press Enter.
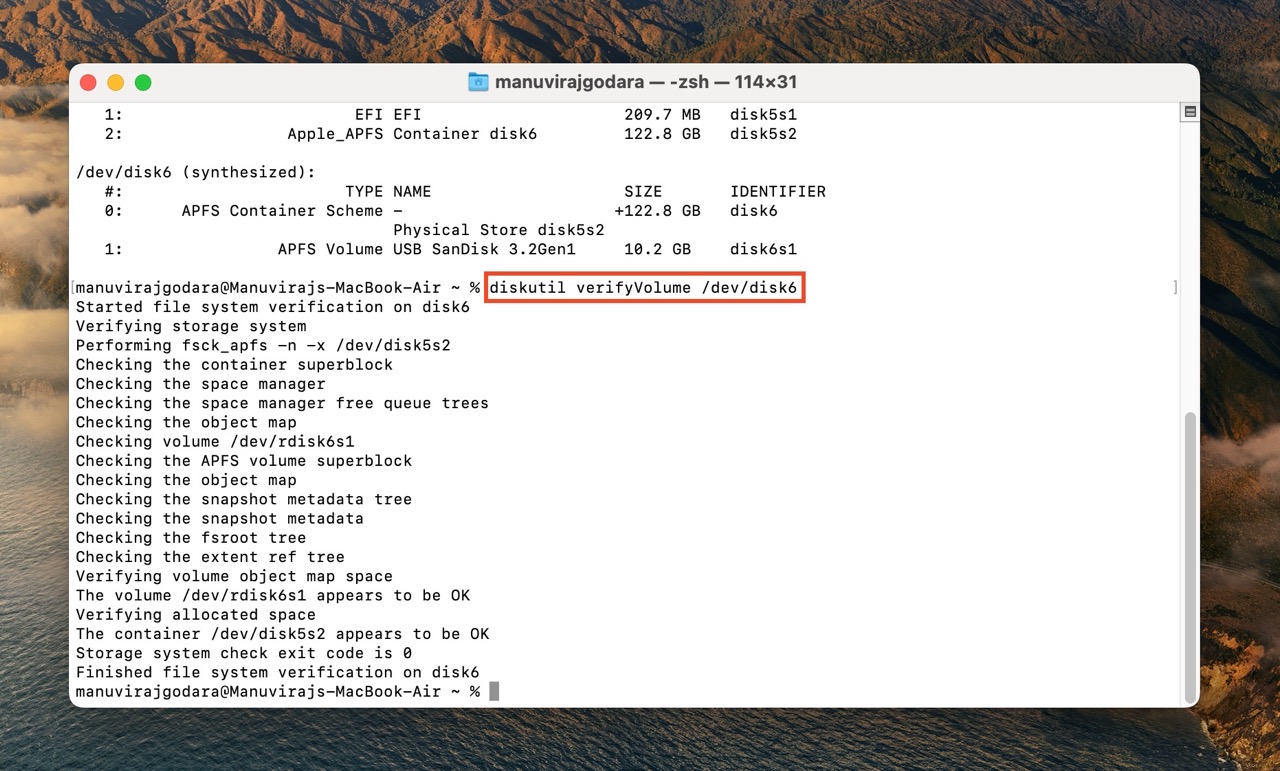
- MacOS will perform a read-only scan of the drive and display the results.
Advanced Check
- Connect the SD card to your Mac.
- Open Terminal. You can search for it in Spotlight Search (Command + Space).
- Type diskutil list and press Enter. Terminal will list all the drives connected to your Mac.
- Find your SD card’s drive identifier (/dev/disk2, or /dev/disk3, etc.), and note it down.
- Type diskutil verifyDisk <drive identifier>, without brackets, and press Enter. This command scans the entire SD card for bad blocks. This command won’t work if the SD card uses a Master Boot Record (MBR) partition table.

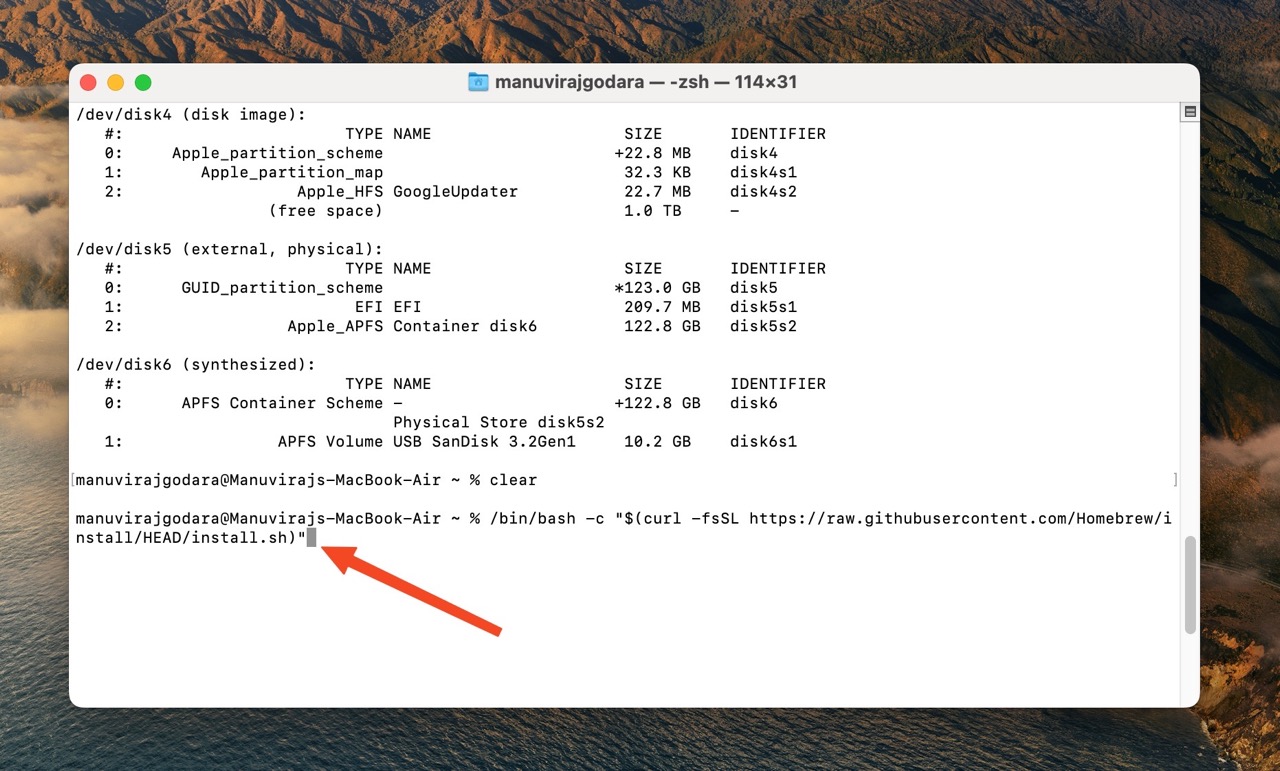
- Install Homebrew by executing the following command in Terminal: /bin/bash -c “$(curl -fsSL https://raw.githubusercontent.com/Homebrew/install/HEAD/install.sh)”. Remember to execute the commands listed under Next Steps, after Homebrew finishes installing. Skip to Step 7 if you’ve already installed Homebrew on your Mac.
- Type brew install smartmontools and press Enter.
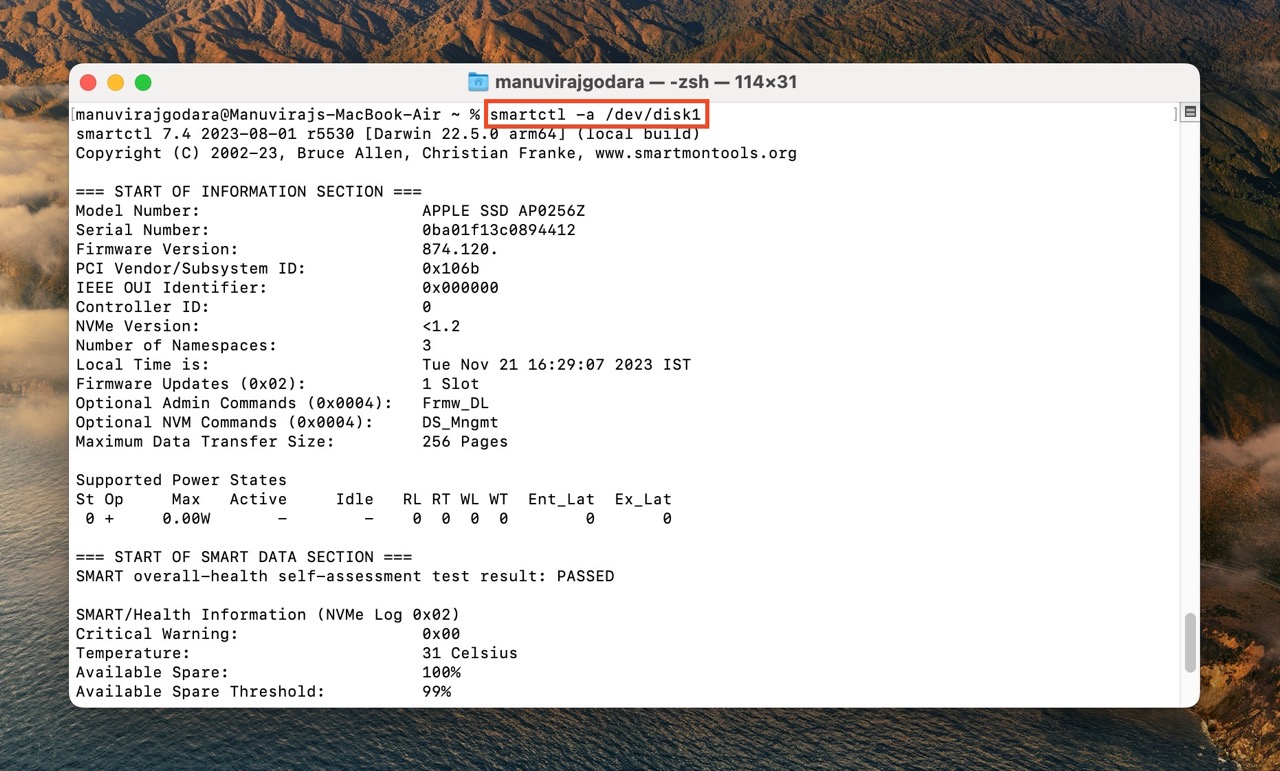
- Type smartctl -a <drive identifier> and press Enter. If supported by the SD card, this command will generate a detailed S.M.A.R.T. report. Here’s a list of the S.M.A.R.T. parameters and what they mean. If the S.M.A.R.T. values are off, it signals a failing SD card.
Method 2: Using Disk Utility
MacOS’ Disk Utility is an in-built tool to manage the drives connected to your device. In addition to formatting, partitioning, and creating disk images of your drive, you can also use Disk Utility’s First Aid feature to repair the connected drives, including your SD card.
Note: Rarely, you may observe some of your files go missing after a First Aid scan. This happens because First Aid detects bad blocks and marks them unfit for use. First Aid does attempt to move any data stored in bad sectors to healthy sectors, but is not always successful in doing so. Therefore, recover your data before scanning the SD card using First Aid.
Here’s how to use Disk Utility and check the SD card’s health on your Mac:
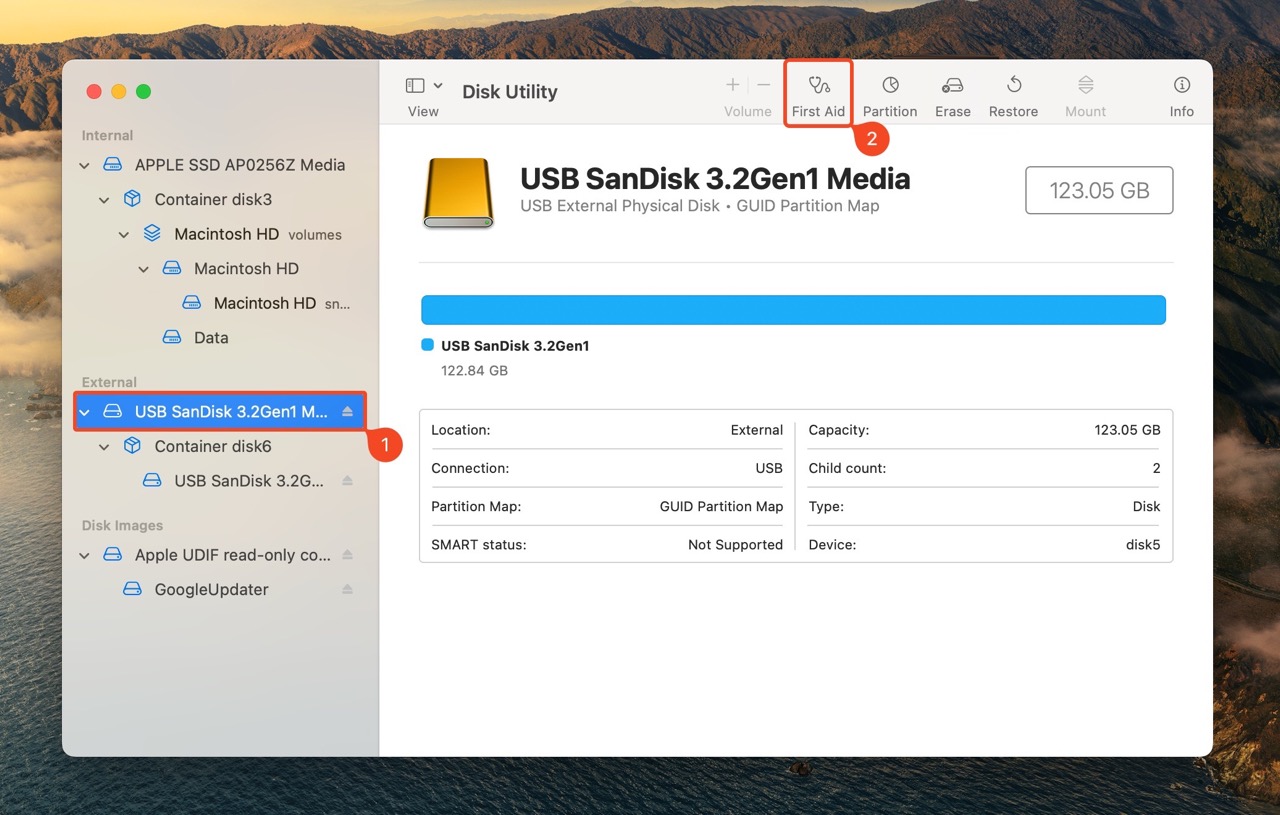
- Connect your SD card to the Mac.
- Open Spotlight Search (Command + Space) and search for “Disk Utility.”
- Launch the Disk Utility app.
- Select your SD card using the left navigation pane.
- Click on the First Aid button towards the top.
- Click on Run in the First Aid prompt.
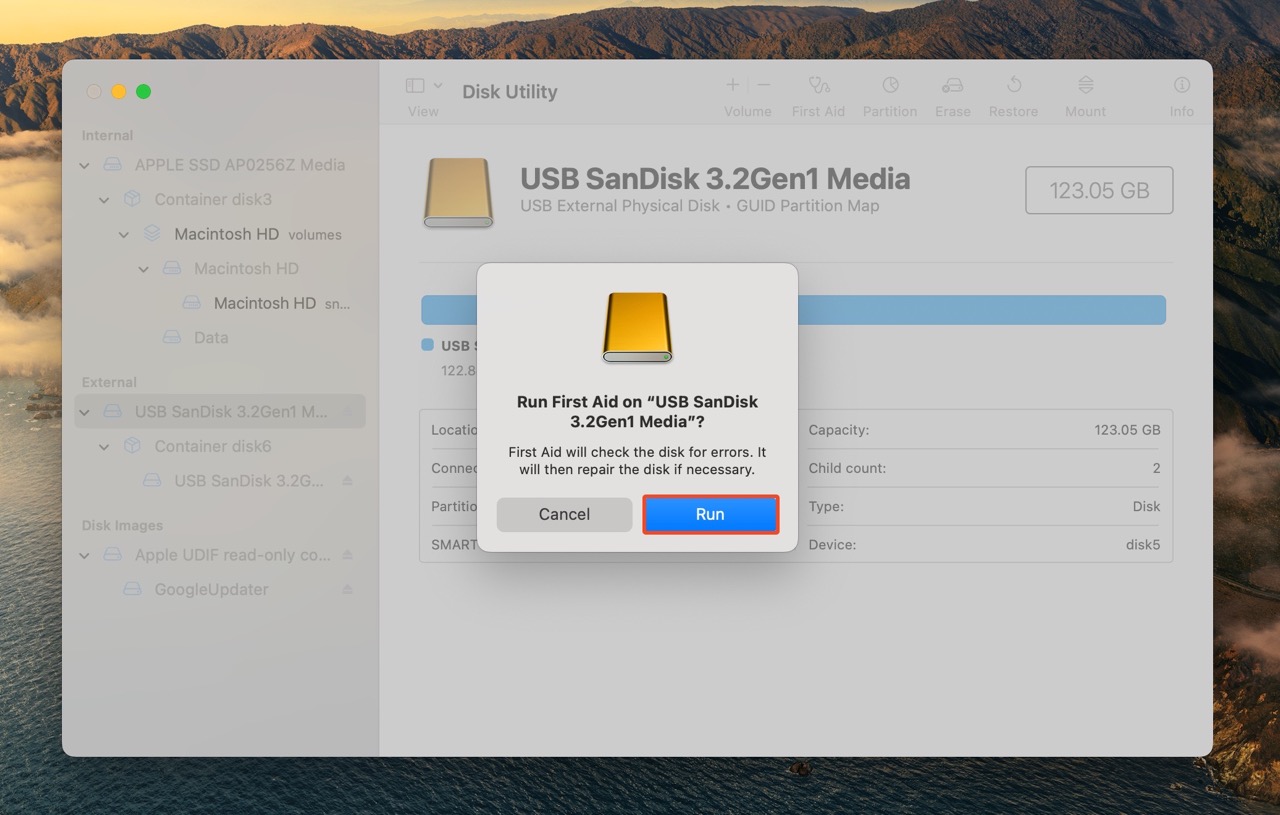
- Wait for Disk Utility to check and fix errors on your SD card.
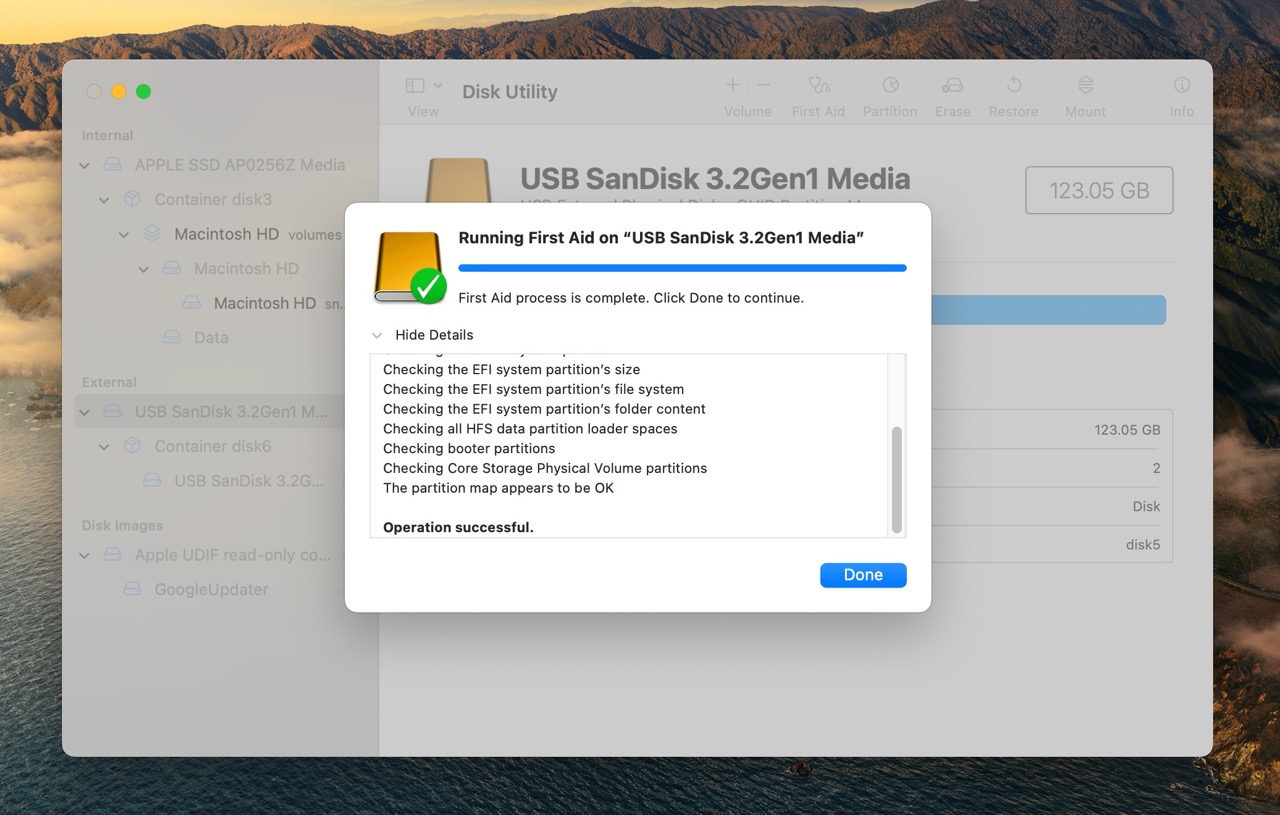
Once the First Aid scan completes, you’ll see a log containing the errors that the scan fixed, and the errors it couldn’t fix.
Note: Older macOS versions (OS X 10.10 and below) had a dedicated Verify Disk Permissions option in the First Aid window. On subsequent macOS releases, this feature was bundled in the First Aid scan itself. So, if your Mac is running macOS 10.10 or below, manually perform the Verify Disk Permissions scan.
Method 3: Creating and Transferring Large Files
Performance issues are one of the first symptoms of a failing SD card. To confirm whether your SD card is performing as advertised, you can use a somewhat unconventional technique—copy a large file to and fro from the SD card and see if its integrity is intact.
Here’s a great way to check the SD card’s health on a Mac, by creating and transferring a large file:
- Create a large video file (almost the size of the SD card’s total storage capacity) by looping a video in iMovie. Export the video.
- Copy the looped video to your SD card and then copy it back to your Mac.
- Open the video in VLC Media Player.
- Scroll through the video and see if there are any cuts, mistakes, and missing parts. If you encounter any discrepancy between the original video and the one you copied from the SD card, it likely happened because the SD card is failing.
Method 4: Using Third-Party Applications
Various third-party tools can help you accurately check the SD card’s health on macOS. In the sections that follow, we’ll take a look at three such programs.
If you’ve already lost some data from the SD card, we recommend using Program 1, as it’s an effective data recovery tool that also lets you check the SD card’s health. Program 2, and Program 3 are strictly for checking the SD card’s read/write speeds, inaccuracies in storage capacity, and sector defects.
Let’s see how to perform an SD card health check on a Mac, as well as recover your data, using third-party programs:
Program 1: Disk Drill for Mac
In addition to performance issues, data loss is the other most common symptom of a failing SD card. Luckily, it’s possible to get back these lost files using third-party SD card data recovery programs.
Our go-to choice for SD card data recovery is Disk Drill. I prefer Disk Drill and often recommend it in my data recovery articles primarily because of its easy-to-use, modern UI, and built-in tutorials. A complicated data recovery program is the last thing you need when dealing with a stressful data loss scenario.
The cutting-edge data recovery algorithm ensures you recover most, if not all, of your data. Disk Drill can recover data from logically corrupted SD cards, unless your SD card is also physically broken and undetectable. Numerous additional features like disk image creation and scanning, data protection, file preview, and S.M.A.R.T. monitoring give it an excellent value proposition.
Note: We highly recommend you create a disk image of your SD card, and scan this disk image instead of directly scanning the SD card. Here’s how to create a disk image of a drive, using Disk Drill’s Byte-to-byte Backup feature.
Here’s how to check your SD card’s health and recover data from it, using Disk Drill:
Check SD Card Health Using Disk Drill
- Download Disk Drill for Mac and install it.
- Connect your SD card to the Mac.
- Launch Disk Drill, and click on S.M.A.R.T. Monitoring under Extra Tools.
- Switch on S.M.A.R.T. Monitoring by clicking the Turn on option.
- Click on your SD card. You may need to manually Enable S.M.A.R.T. for external disks.
- If the SD card is working properly, Disk Drill will display an OK status next to each S.M.A.R.T. parameter. The screenshot below displays the S.M.A.R.T. parameters for an SSD. However, Disk Drill will display similar parameters for your SD card as well.
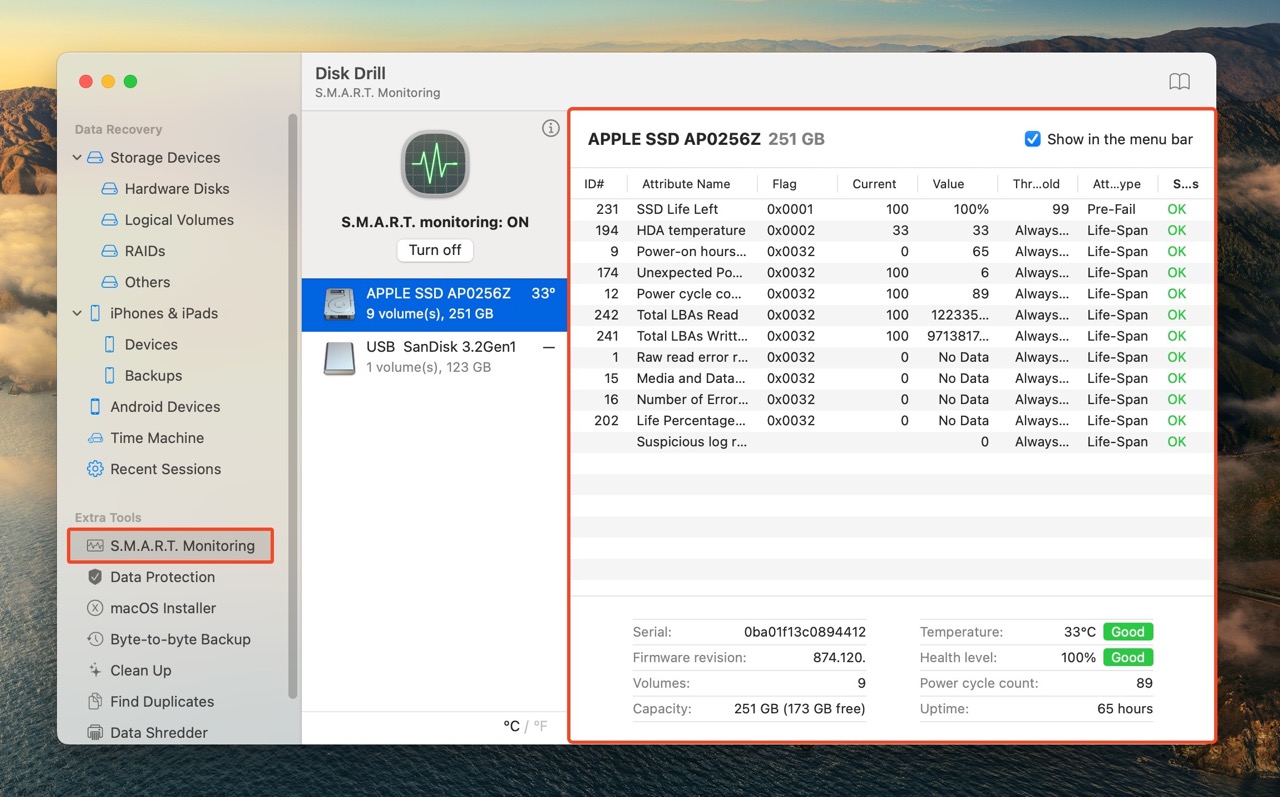
Important: This method only works if your SD card supports S.M.A.R.T. monitoring (most professional SD cards do).
Recover Data from Your SD Card Using Disk Drill
- Download and install Disk Drill for Mac if you haven’t already.
- Connect your SD card to the Mac.
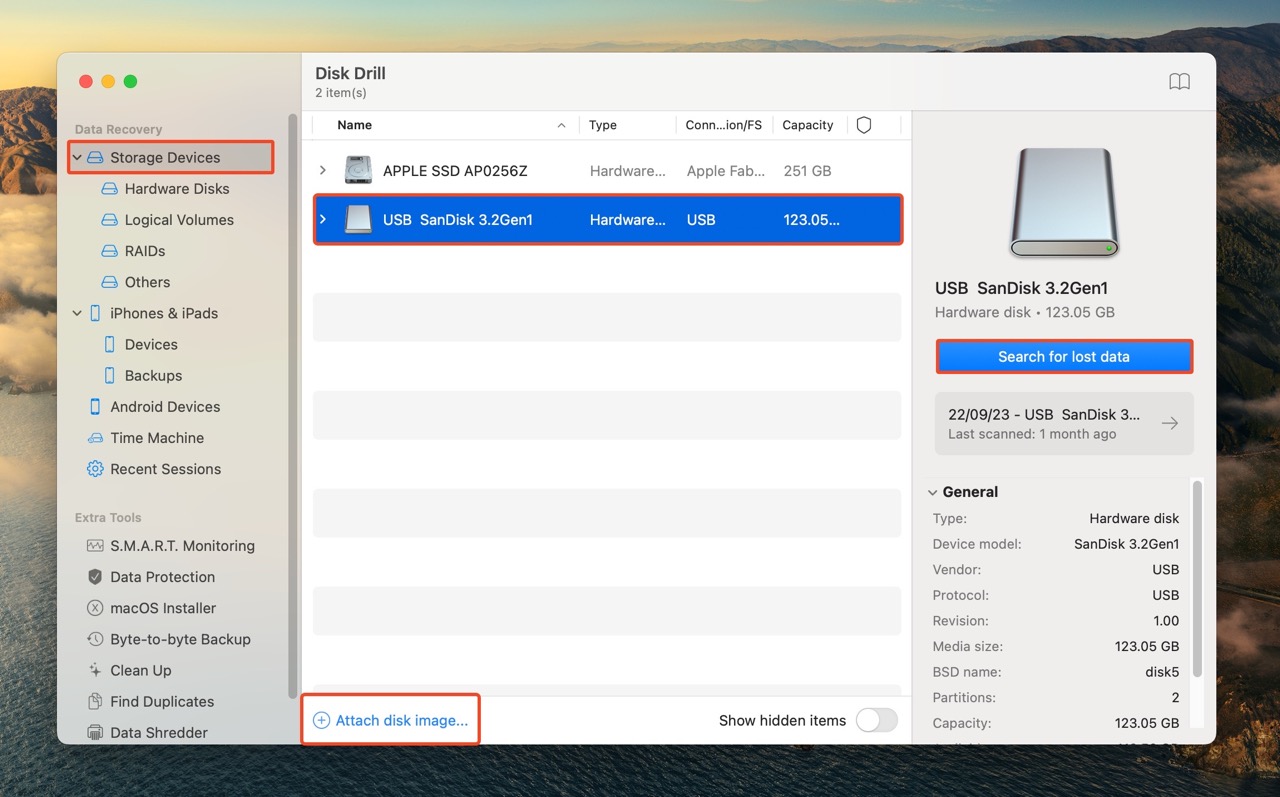
- Open Disk Drill and ensure you’re on the Storage Devices section under Data Recovery.
- As advised earlier, you should, ideally, create and scan the SD card’s disk image, instead of scanning it directly. If you did create a disk image—click on Attach disk image, browse for the SD card’s disk image, and double-click on it. Disk Drill will add it to the list of storage devices. Skip this step if you didn’t create a disk image.
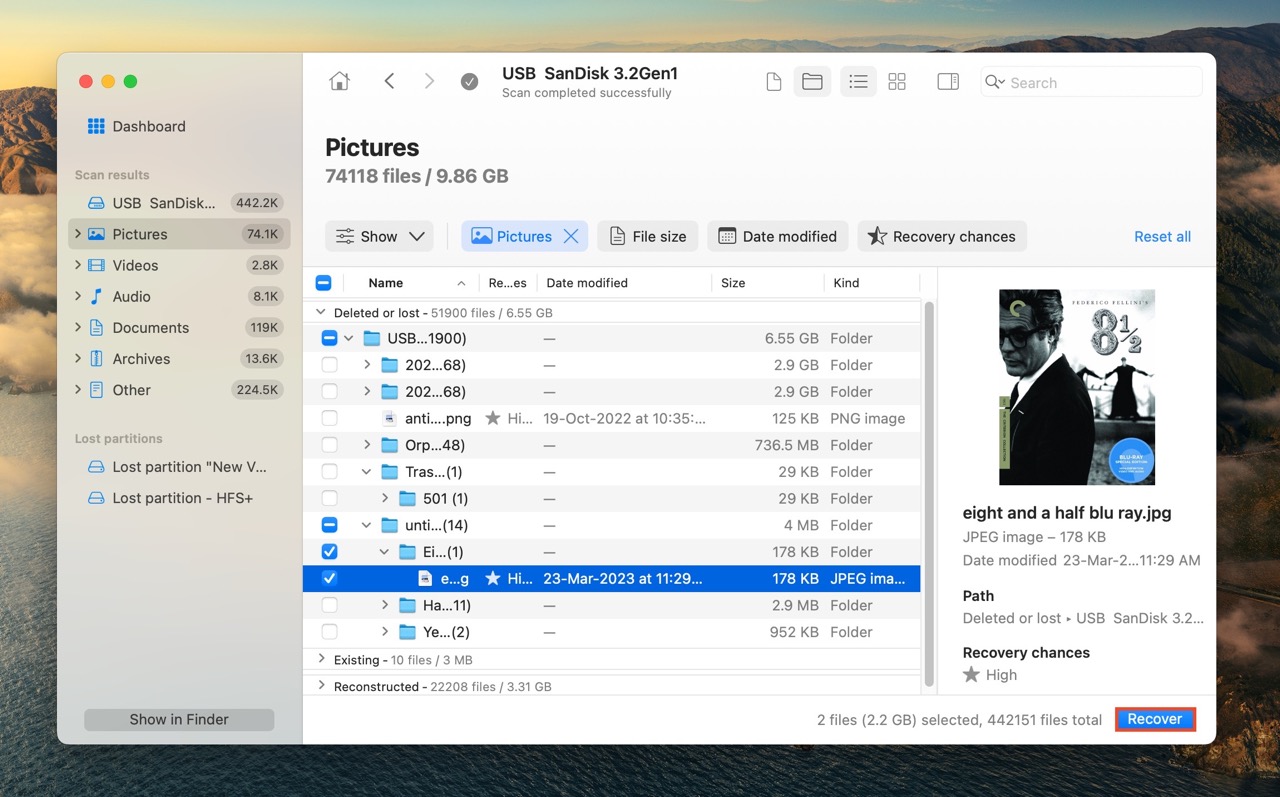
- Select the SD card, or its disk image (if you created one). Click on Search for lost data.
- Click Review found items to view all recoverable files Disk Drill discovered. To only view a certain file type, click on the relevant file type tiles (Pictures, Videos, Audio, Documents, Archives, and Other).
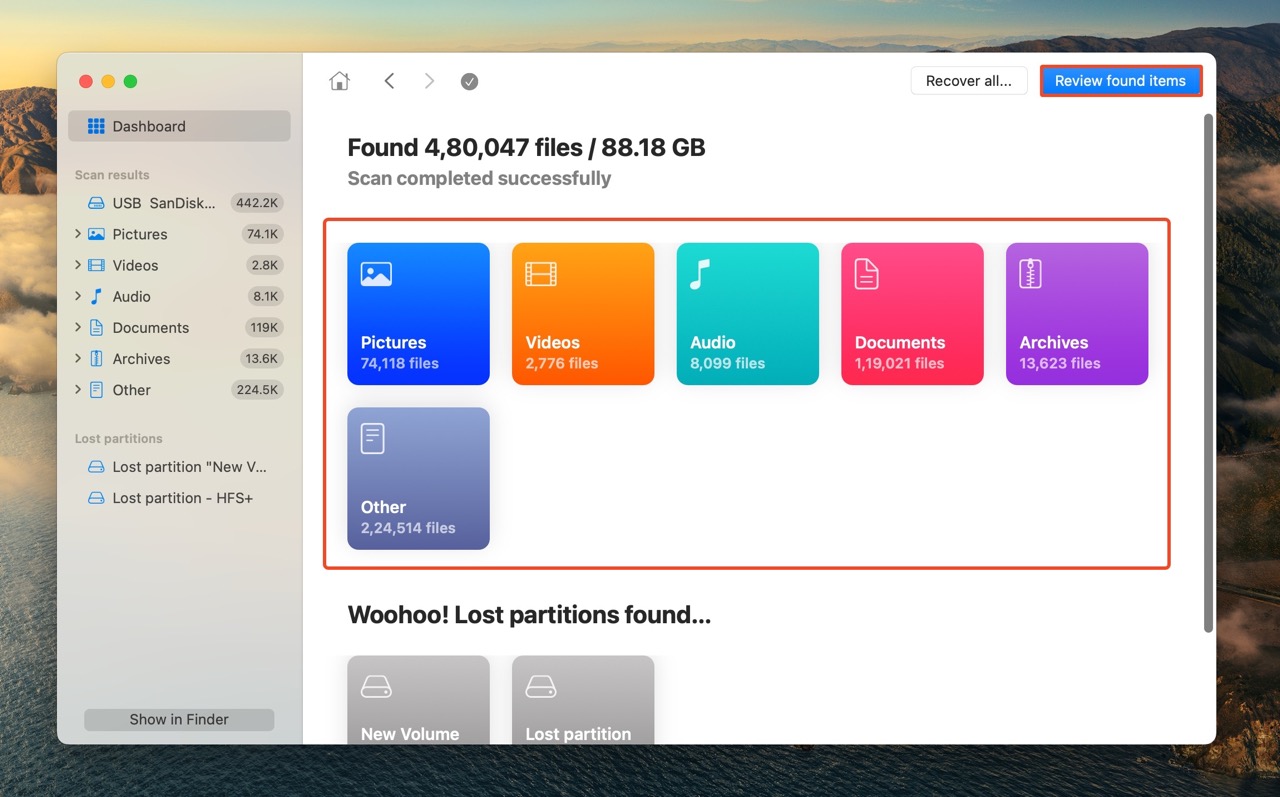
- Expand the Deleted or lost and Reconstructed sections.
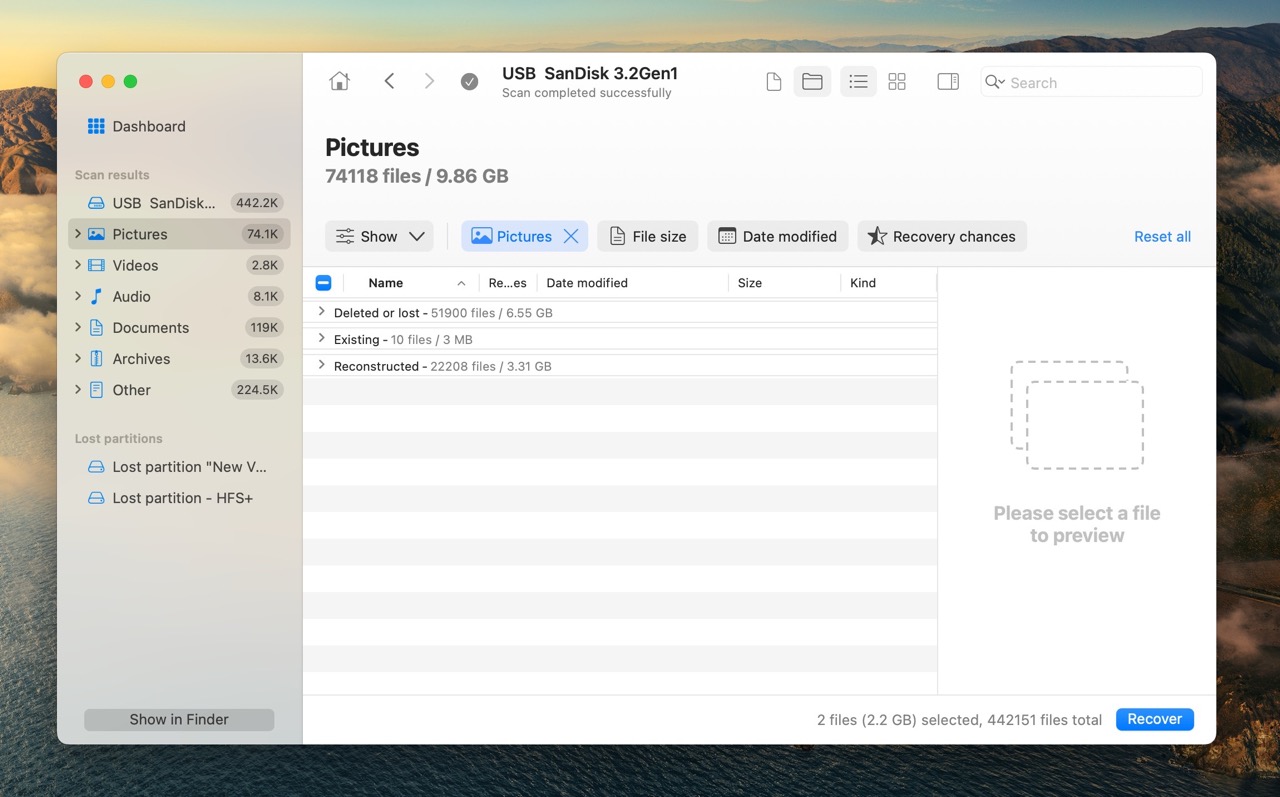
- Select the files you wish to retrieve, and click on Recover. Disk Drill displays a preview of the currently selected file, but you can manually preview a file by clicking the eye icon next to its filename.
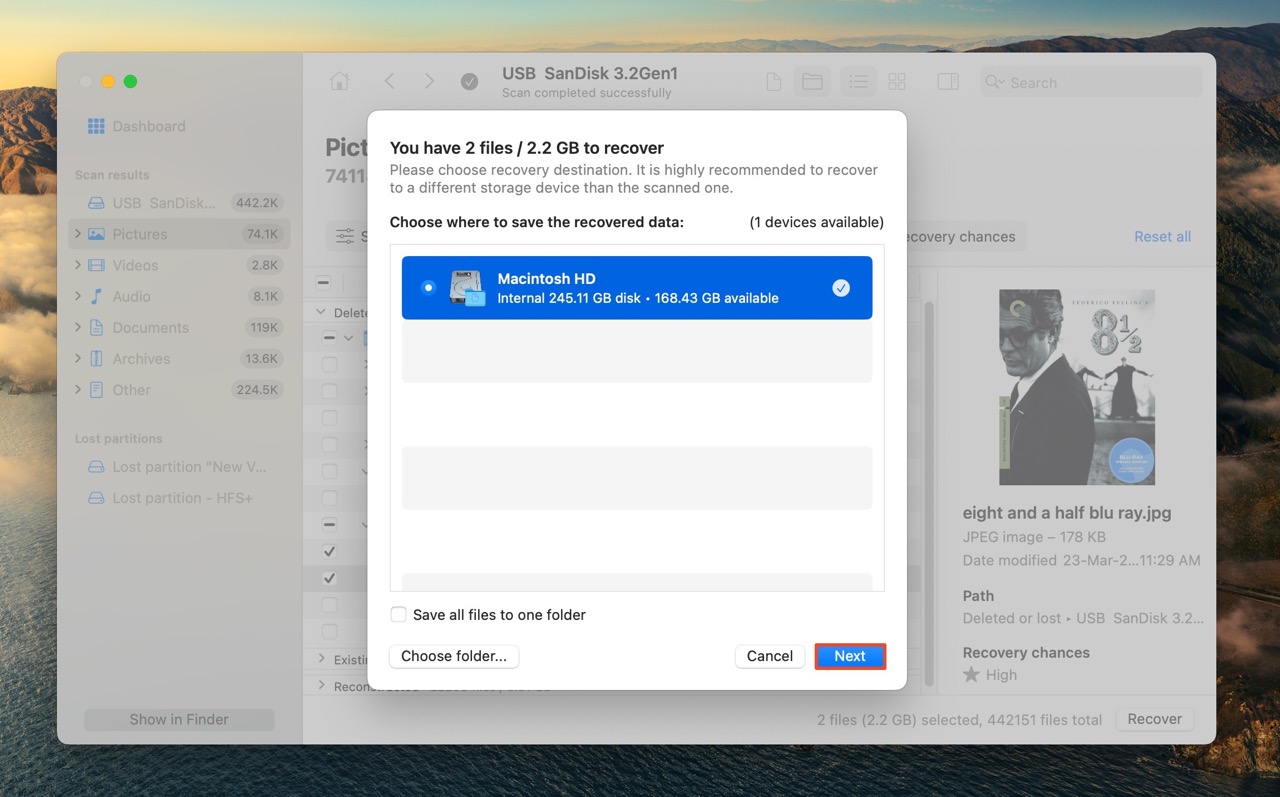
- Pick a recovery destination for the files and click Next. Do not save the files to the affected SD card.
- Disk Drill will recover the selected files.
Program 2: F3XSwift
F3XSwift is an app that tests your SD card for read/write errors, wrong storage capacity, and sector defects. It determines the SD card’s health by first writing large blocks of data to it, and then reading the written data. Once the read/write process completes, F3XSwift displays a simple success, or failed message.
Here’s how to use F3XSwift to perform an SD card health check on a Mac:
- Visit the F3XSwift GitHub Assets page.
- Download the “F3XSwift.app.zip” file from the latest release.
- Connect your SD card to the Mac.
- Open the downloaded app. You can find it in Finder > Downloads.
- Select the SD card from the F3XSwift GUI and click Test.
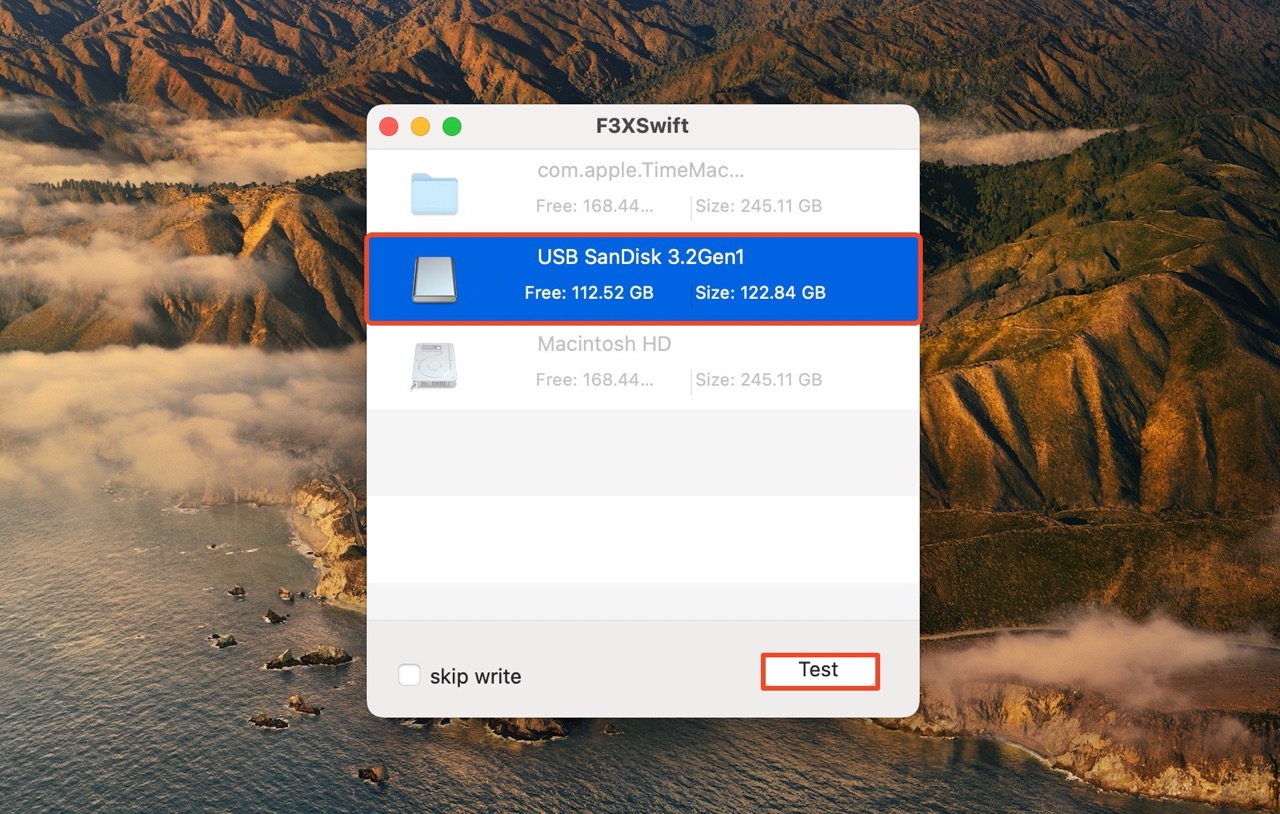
- F3XSwift will display a success or failed message once the test completes.
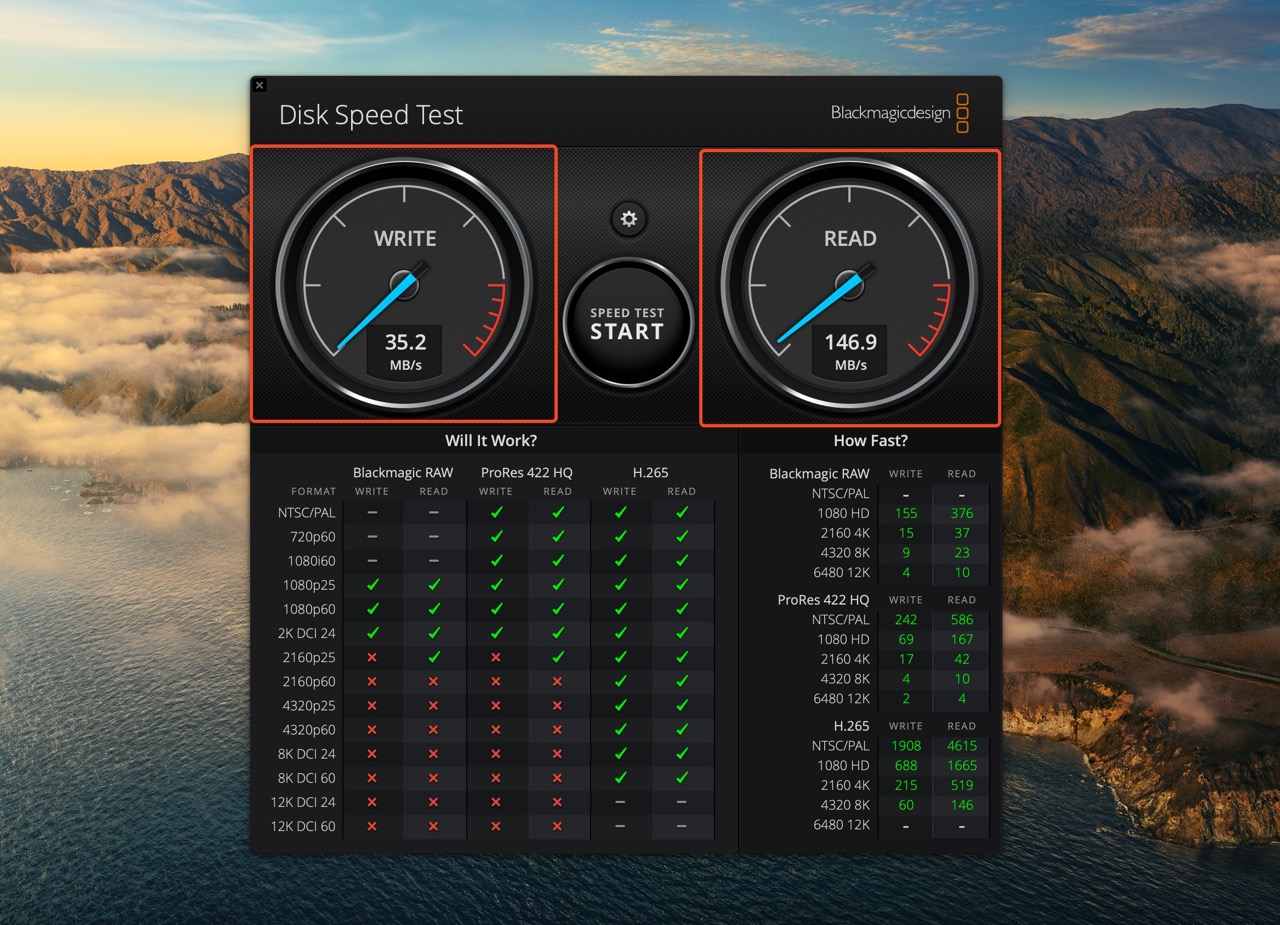
Program 3: Blackmagic Disk Speed Test
Blackmagic Disk Speed Test is a safe and convenient way to test your SD card’s performance. The program will write and read large files from your SD card to determine its read/write speeds. If the speed is substantially slower than advertised on your SD card, it’s a sign that the SD card is failing.
Note: Under ideal conditions, your SD card’s read/write speeds will only be as fast as the SD card slot supports. So, ensure you use the correct adapter for your particular SD card type.
Here’s how to check your SD card’s health using Blackmagic Disk Speed Test:
- Download Blackmagic Disk Speed Test from the Mac App Store.
- Connect your SD card to the Mac.
- Open Blackmagic Disk Speed Test.
- Click on the Settings cog above the Speed Test Start button. Choose the Select Target Drive option.

- Select your SD card in the Finder window that pops up and click Open.
- Click on the Speed Test Start button.
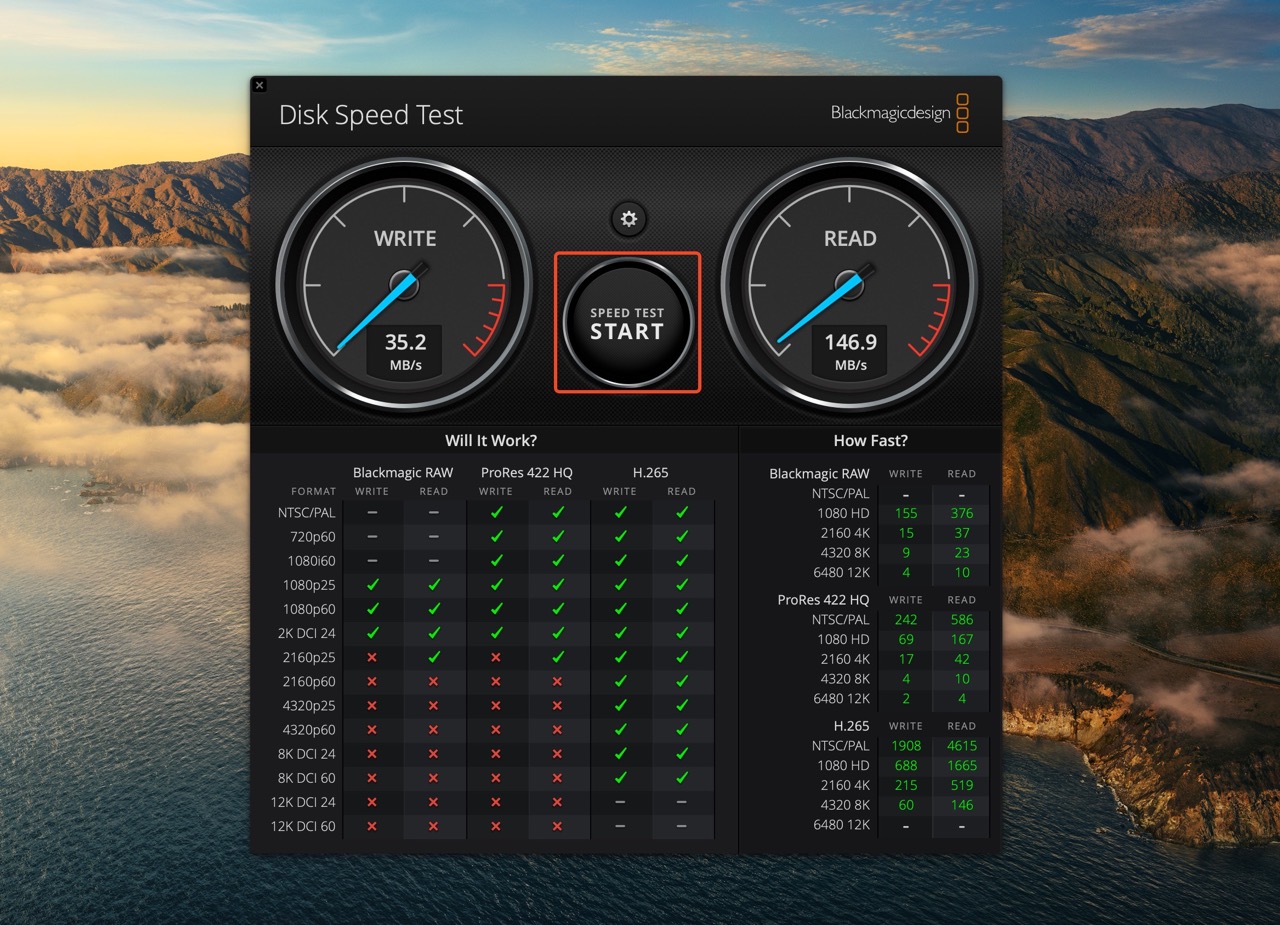
- Wait until the speed test completes. Compare the results to the advertised speeds of your SD card.
Conclusion
Performing frequent SD card health checks and preemptively fixing errors increases the longevity of your card, and gives you enough time to back up your data. Slow performance, missing files, incorrect storage capacity, the SD card refusing to mount, etc. are all common signs of an error-riddled SD card.
You can use in-built macOS utilities—like the diskutil command and the First Aid feature—to ensure your SD card is working properly. However, third-party tools like F3XSwift, and Blackmagic are often more convenient. If you wish to recover data from your SD card, and get a general overview of its health, Disk Drill is an ideal choice.
This article was written by Manuviraj Godara, a Staff Writer at Handy Recovery Advisor. It was also verified for technical accuracy by Andrey Vasilyev, our editorial advisor.
Curious about our content creation process? Take a look at our Editor Guidelines.