SDXC cards are commonly used in mobile devices and cameras (including professional camcorders), so it’s constantly reading and writing new data. And given its size, even the more durable models are prone to damage and breakage. These factors make it so a lot of users experience data loss on their SDXC cards.
This article is a guide on SDXC card recovery, important information on the possible causes of this data loss, as well as a set of instructions for the most effective methods of repairing damaged, corrupted, and unreadable SDXC cards.
Can You Recover Deleted Files From SDXC Cards?
For the most part, yes! But the success of SDXC card data recovery depends on what caused the data loss in the first place. Below are the most common issues that users face with their memory cards, as well as the data recovery scenario for each one.
- 😵 Accidental deletion – Even if you accidentally delete a file (and emptied the recycle bin), that data still lives deep within the file system of your SDXC card. With the right tools, you can recover files from SDXC card before it gets overwritten by new files.
- 🧹 Formatting – The process of formatting wipes all the data from an SDXC card. However, just like when you delete files, that data is still stored in the file system, waiting to be overwritten. You can use data recovery software to restore data from a formatted memory card.
- ⚠️ Corruption – When an SDXC card gets corrupted (due to virus attacks, interruption while reading and writing data, etc.), file data gets fragmented. The right tools can extract those fragments and rebuild your data.
- 🔨 Damage – If your SDXC card has “logical damage” (which includes all the issues above), data is recoverable with certain tools. We discuss more on logical damage below. But if your SDXC card suffered physical damage, such as breakage or heat damage, you will need the services of a professional data recovery center.
How to Recover Permanently Deleted (?) Data From an SDXC Card
As we talked about in the last section, deleted files still exist in your SDXC card’s file system. However, you can no longer access them through your operating system’s interface. So, we have to use data recovery software to recover deleted files from a memory card. These tools provide an interface that can interact with the file system – to extract and restore them. We’ll demonstrate this process for you with two different tools. Both tools are free memory card recovery software.
Option A: Disk Drill
Disk Drill is a trusted and well-reviewed data recovery software that we often recommend to our readers. That’s because it’s so easy to use and can restore large amounts of data from almost any device, including SDXC cards. You can recover up to 500 MB for free, but you can also preview as many files as you want (and use Disk Drill’s other data management tools) for free. Disk Drill’s recovery rate is the same for both the free and pro versions.
![]()
You can learn more about our experiences with Disk Drill in our full Disk Drill review.
To restore data with Disk Drill, follow the steps below:
- Using a USB-type or built-in card reader, connect your SDXC card to your computer.
- Download and install Disk Drill. Then, launch it by double-clicking its icon on your desktop.
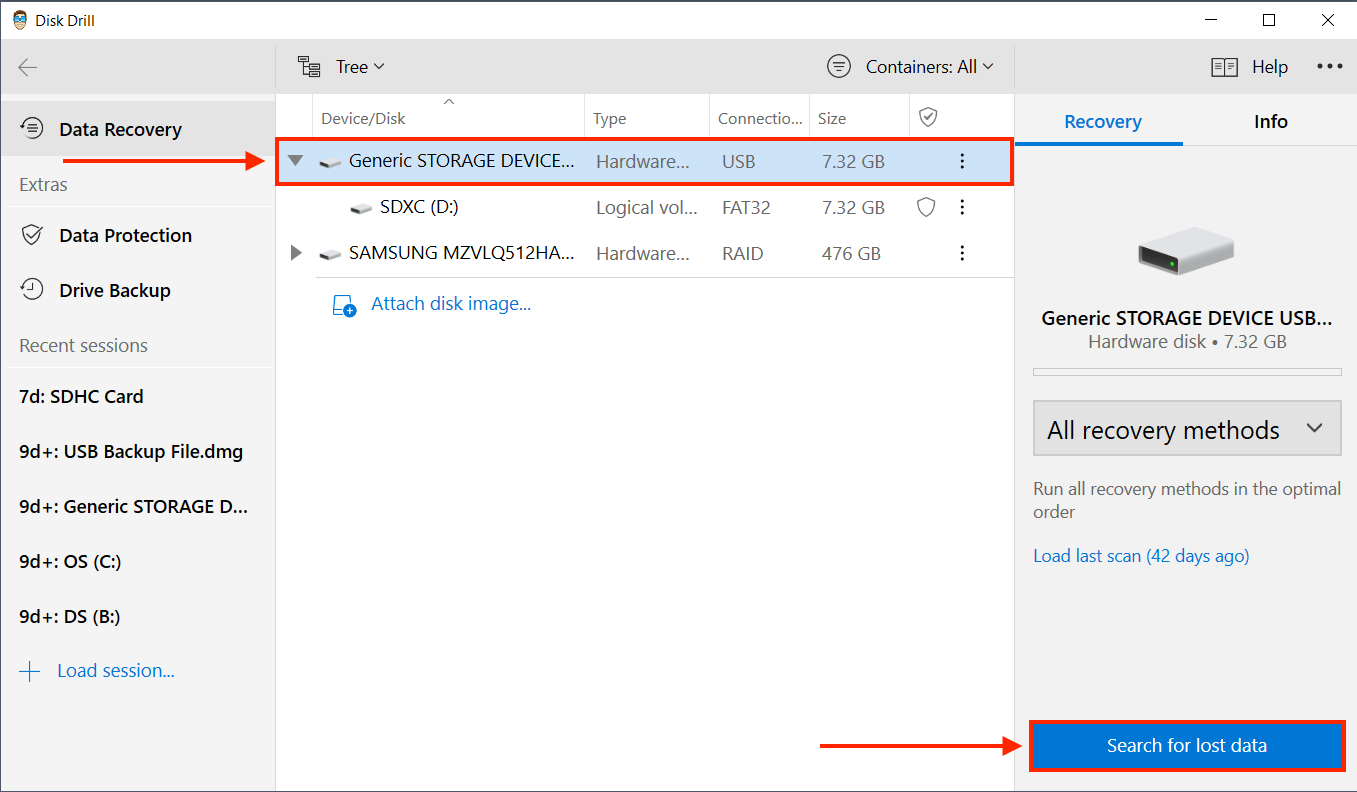
- Select your SDXC card from the drive list. If you’re using a USB-type card reader, it may appear as “Generic Storage Device”. Then, click for “Search for lost data”.
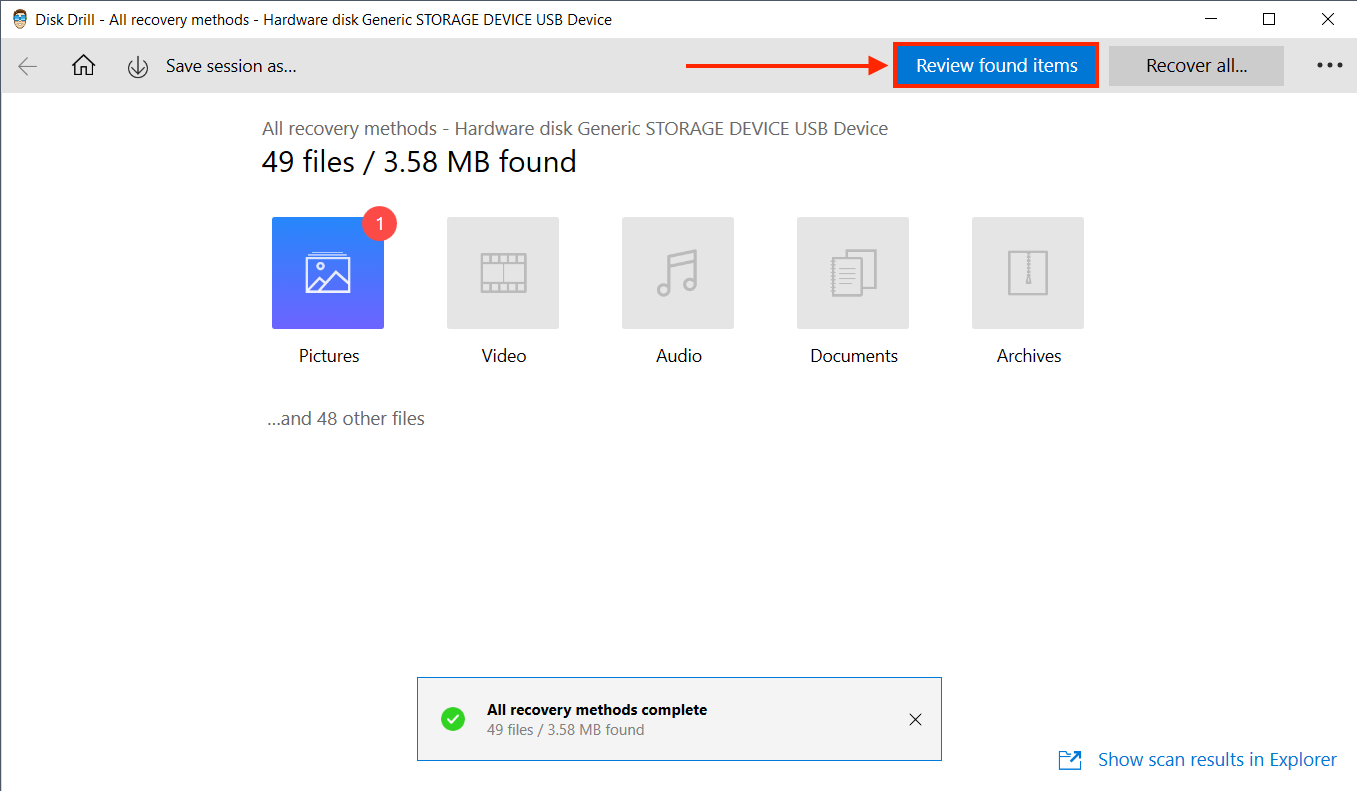
- Wait for Disk Drill to finish scanning your card. Once it tells you it’s done, click “Review found items”.
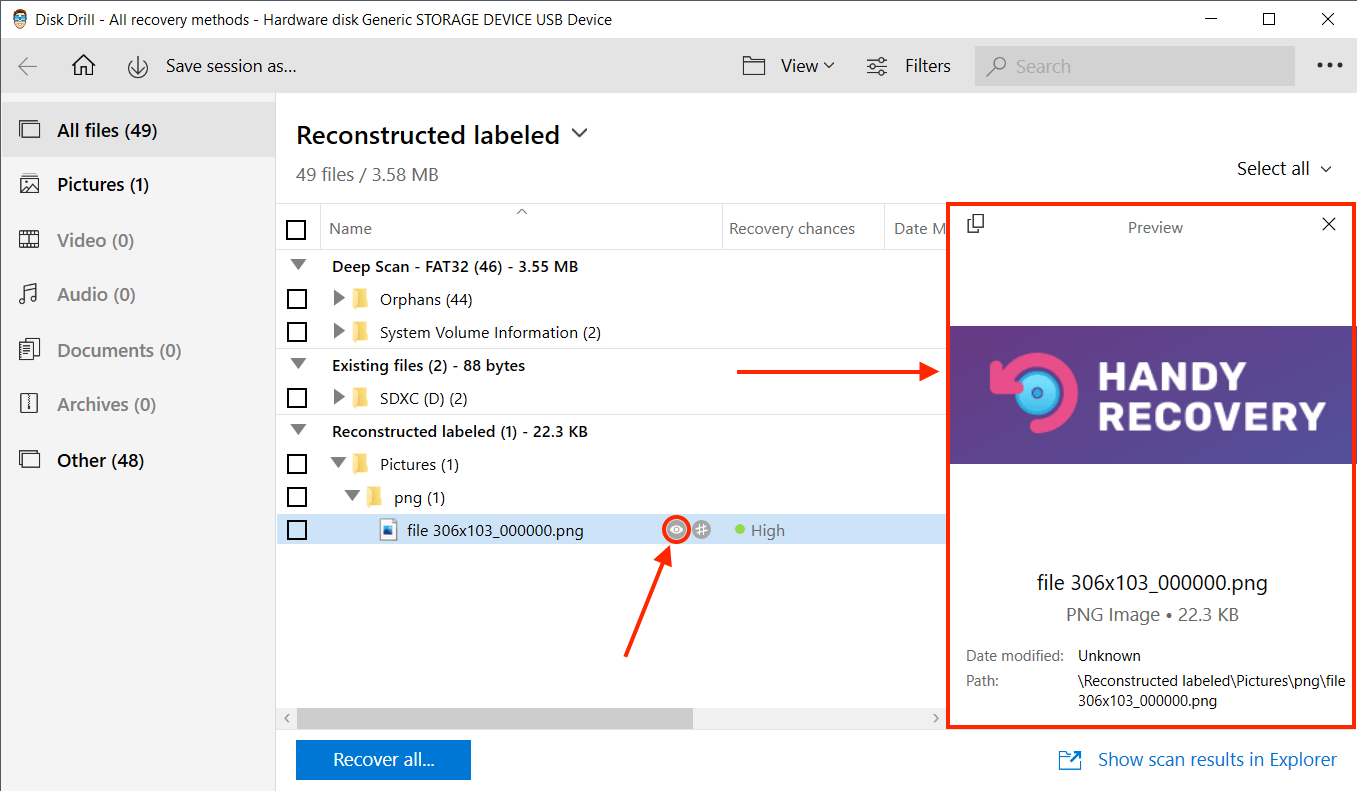
- On this window, you can start browsing the files Disk Drill found. Use the sidebar to filter found items by file type, or use the search bar if you’re looking for a specific file.
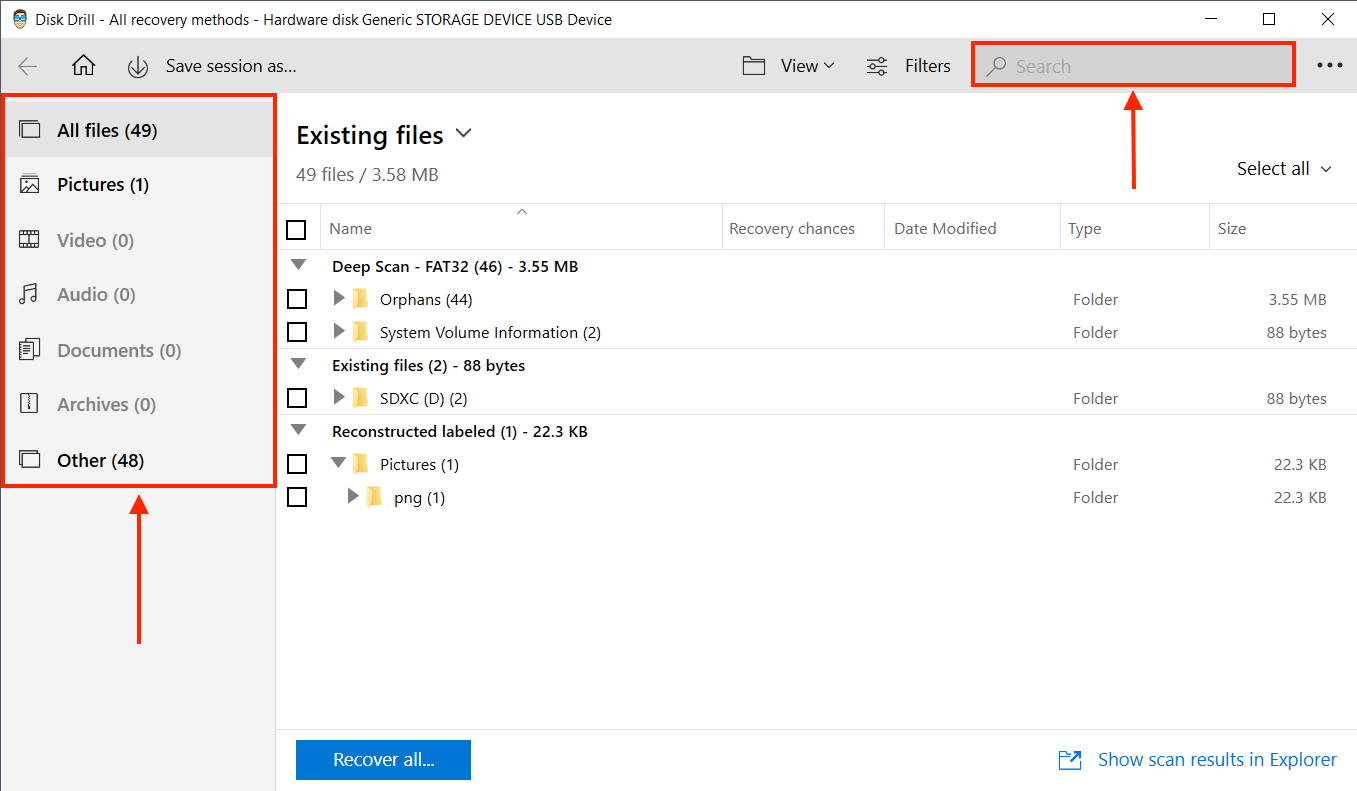
- You can also click the preview button (hover your mouse to the right of a file name until an “eye” button appears) to display a preview of your file in another window. This is particularly useful if you want to recover deleted photos from your memory card and the file names are all jumbled up.
- Use the checkbox column to select the files you wish to recover. Then, click “Recover”.
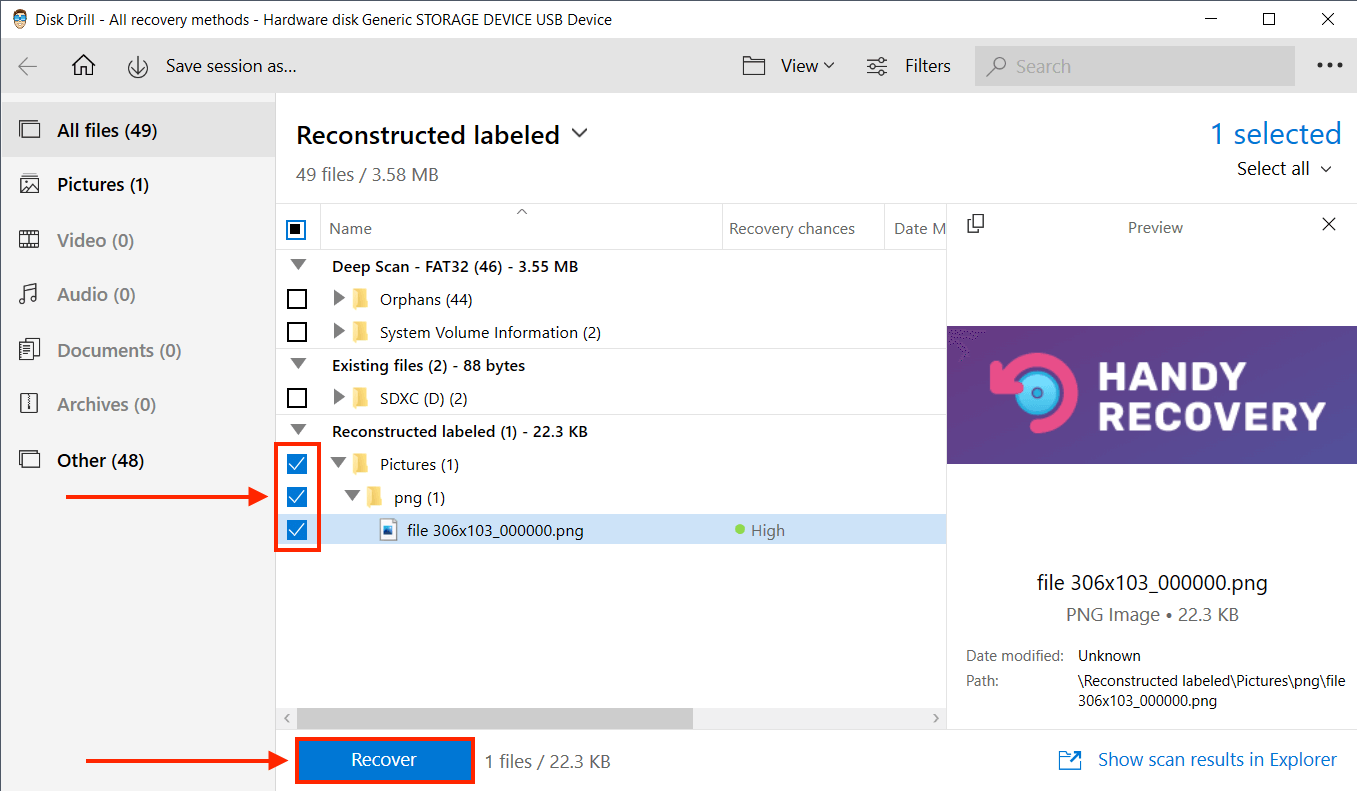
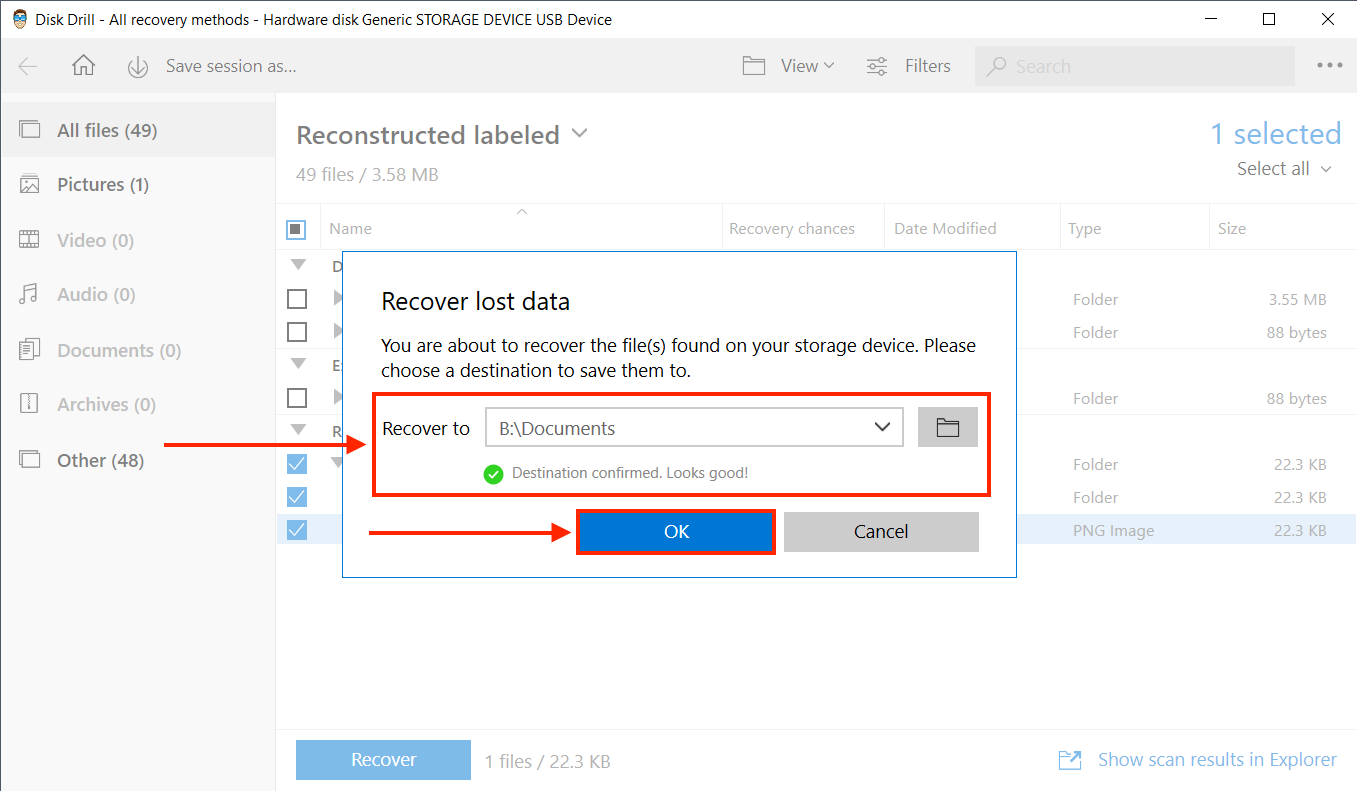
- Finally, choose a location on your computer as the destination for the recovered files. Make sure not to save it on your SDXC card, as you may overwrite the existing data.
Option B: Recuva
Recuva is another well-known data recovery software that we also recommend to our readers, because it’s a simple and lightweight app that users can easily grasp. With Recuva, you can recover as much data as you want for free, but the recovery rate is lower for the free version of the app compared to its pro version.

For a more in-depth coverage of Recuva, read our full Recuva review.
To recover data from SDXC card with Recuva, do the following:
- Connect your SDXC card to your computer using a USB-type or or built-in card reader.
- Download and install Recuva, and launch it by double-clicking its icon on your desktop.
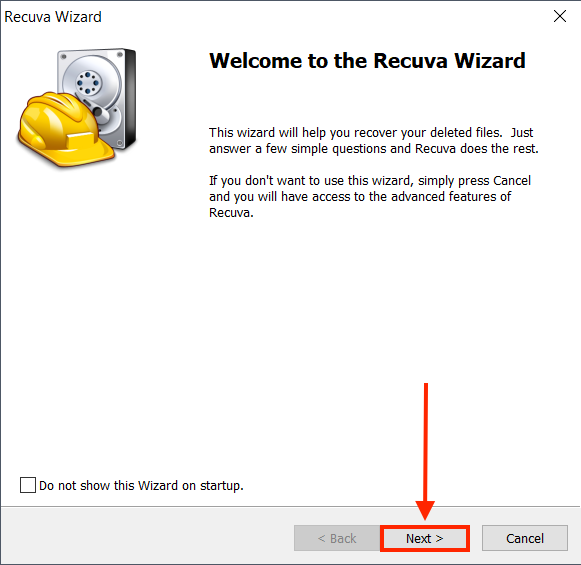
- In the initial window, click “Next”.
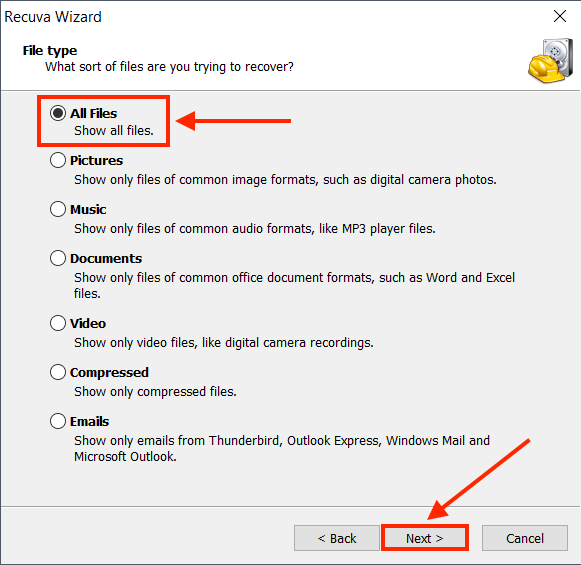
- In this window, you can select a specific file type Recuva will scan for – for example, select “Videos” if you want to recover deleted videos from your memory card. Or, you can select “All Files” if you want a wider sweep. Then, click “Next”.
- Similarly on the next window, select “On my media card or iPad”, then click “Next”.
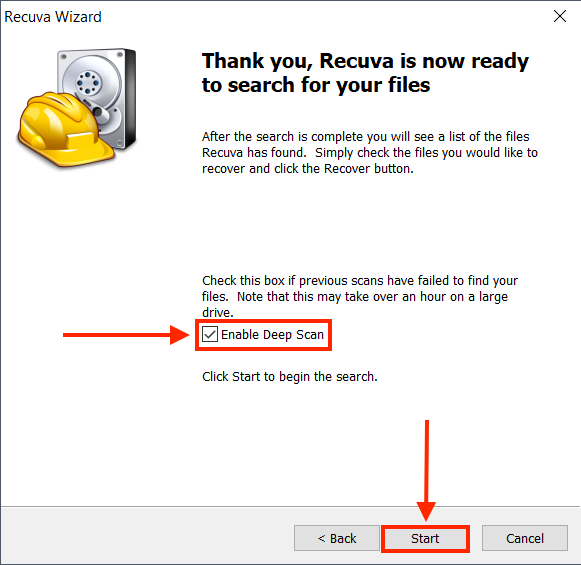
- Tick the box beside “Enable Deep Scan”, then click “Next”.
- Hit the “Switch to Advanced Mode” button.
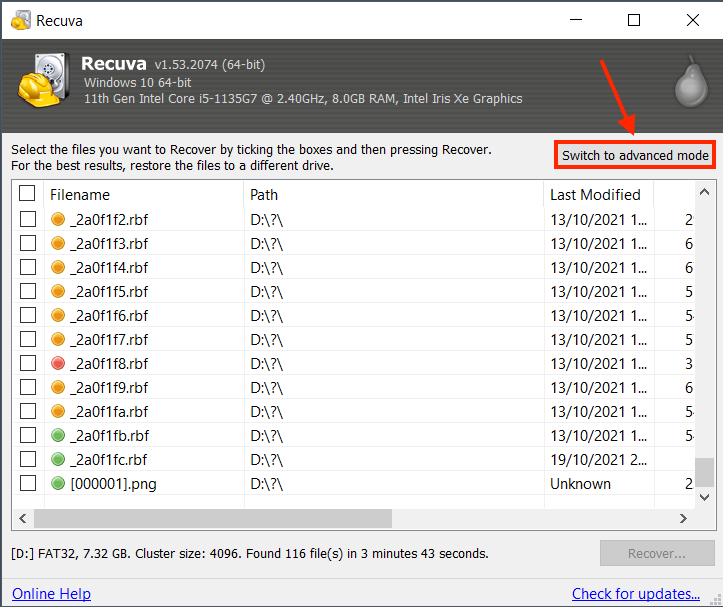
- On the left window, you can click on any file to display a preview of it in the right window. Click the checkboxes on the left to select the files you want to recover, then click “Recover”.

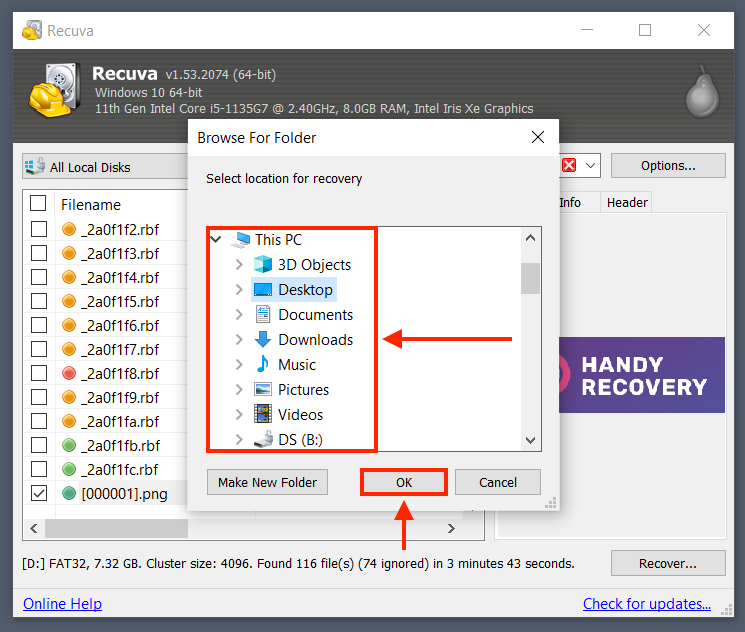
- On the dialogue box that appears, select a location where you want Recuva to save the recovered data. Then, click “OK”.
How to Fix Unmountable/Corrupted/Damaged SDXC Card(s)
As we just demonstrated, you can still recover files from a corrupted memory card by yourself, and you can even fix it without having to go to a shop. This is true for logically damaged SDXC cards, as well as memory cards that won’t show up on your computer. This section is a guide on all the methods you can use right now to repair your SDXC card.
However, if you know that your SDXC card is physically damaged, jump to the section: Recovering Physically Damaged SDXC Cards. Otherwise, proceed with the instructions below.
Making Your SDXC Card Accessible Again
In some cases, your computer won’t even be able to detect your SDXC card. We first have to make the card appear again on File Explorer before we can attempt to fix it. Here’s how to do it:
- Try another SD card reader or computer – Figure out if the problem is your SDXC card or your computer.
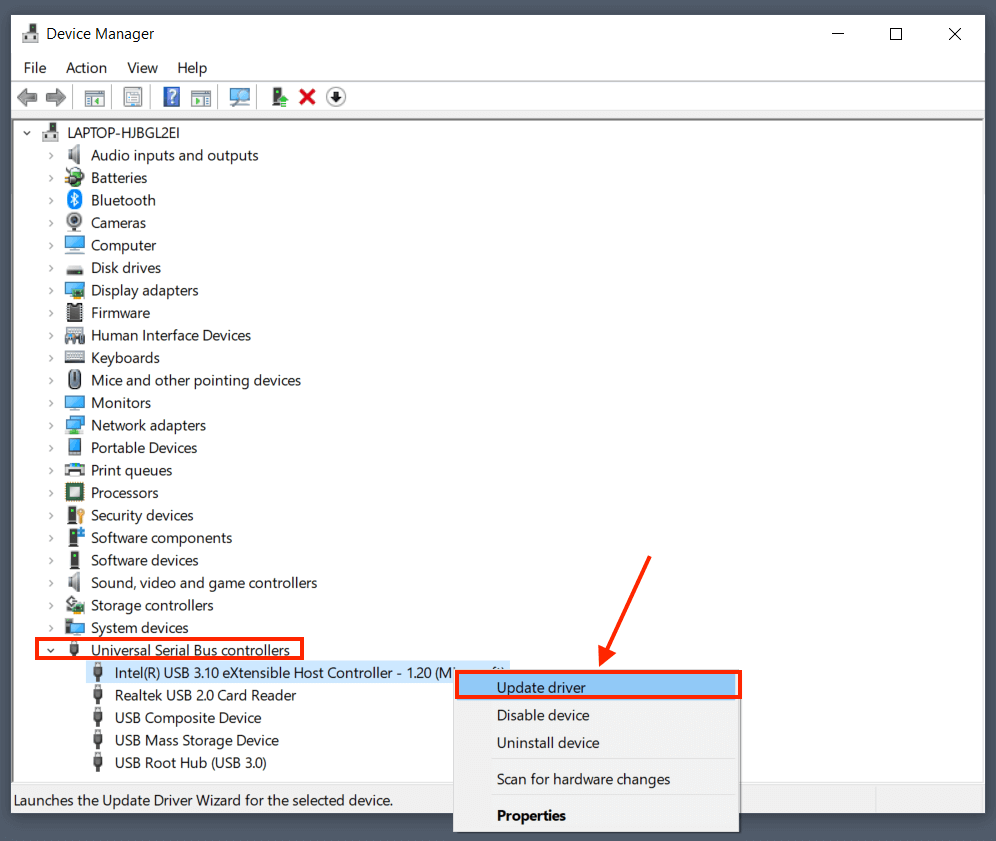
- Update drivers – Open Device Manager and expand the toggle for “Universal Serial Bus Control”. Update each item by hitting right-click > Update Driver.
- Clean ports and connectors – Use a dry lint-free cloth (like the one that comes with a new pair of glasses) and a toothpick to clear your devices of debris.
- Restart your computer – Your computer can sometimes get “stuck” in the middle of refreshing itself, interfering with SD card detection. Retart it to get it “unstuck”.
- Unlock your SD card – A locked SDXC card will not be accessible or even mounted. Unlock it by using the switch on the top of the right side of your memory card.
Fixing Logical Issues With Your SDXC Card
Corrupted or infected SDXC cards are logically damaged, which can manifest as interrupted read and write processes, missing files, and inaccessible memory cards. Before proceeding, make sure you’ve recovered and backed up the data from your SDXC card. The instructions in the data recovery section of this article can also help you recover files that disappeared from your memory card.
Then, make sure your memory card is securely connected to your computer, and you can see that it’s mounted (you can see it in Windows File Explorer).
Once these requirements are met, try the following methods to fix your SDXC card:
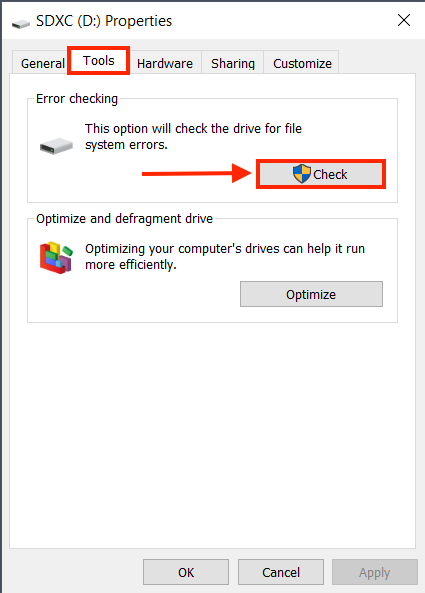
Windows Error-checking
Windows has a built-in tool for checking a drive’s file system integrity. This could fix errors with the file system, which might have caused missing files or errors while using your SDXC card.
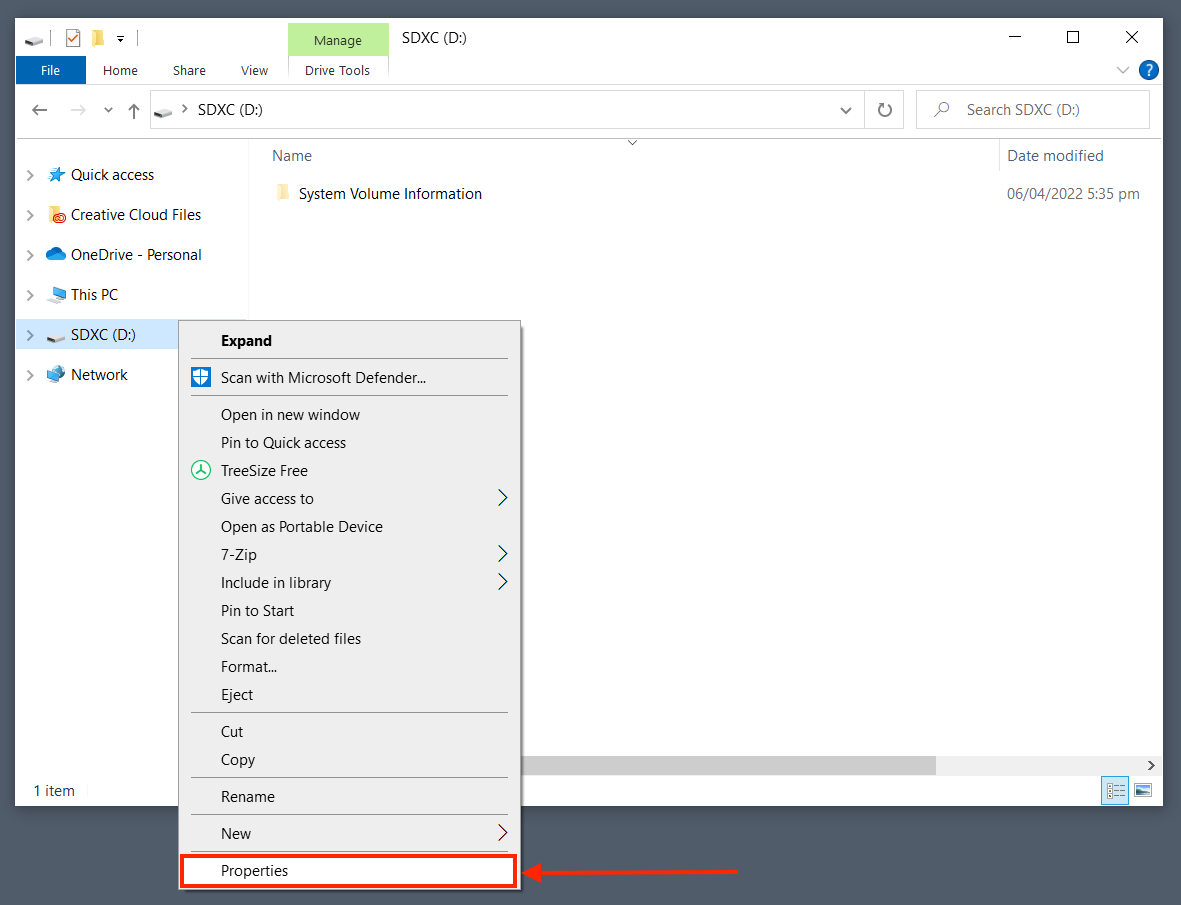
- Open File Explorer.
- On the left sidebar, right-click your SDXC card and hit Properties.
- Open the Tools tab, then click the “Check” button in the Error-checking section.
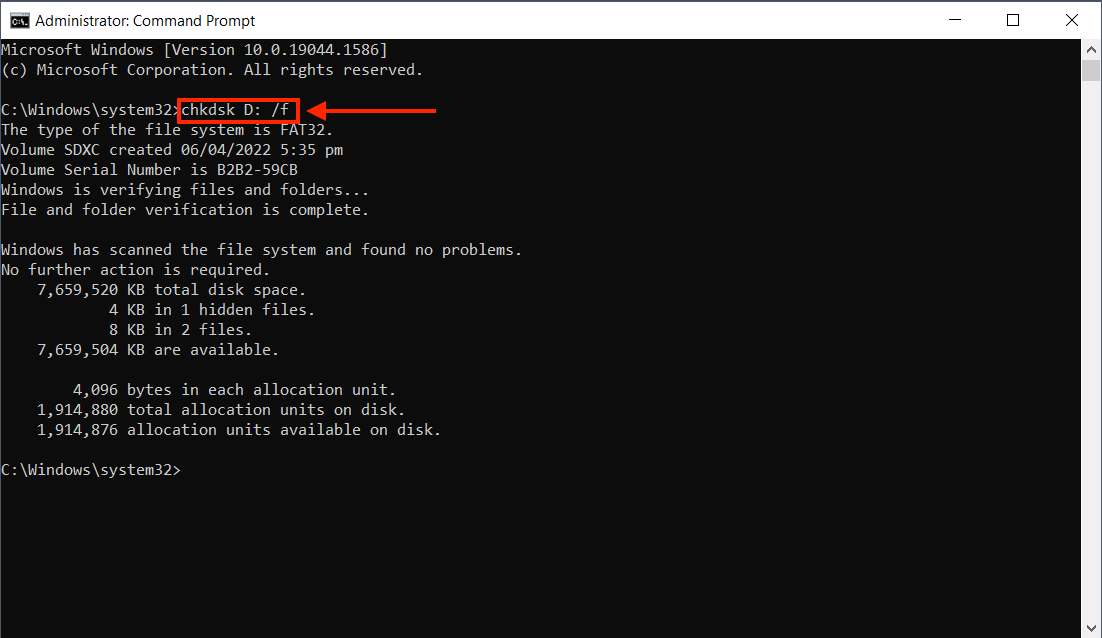
CHKDSK
Chkdsk is another Windows tool that scans and fixes file system errors, but also repairs (and marks) bad sectors that cause corruption and data loss. You run chkdsk using Command Prompt, but it’s super simple and requires no coding knowledge. Carefully follow the steps below:
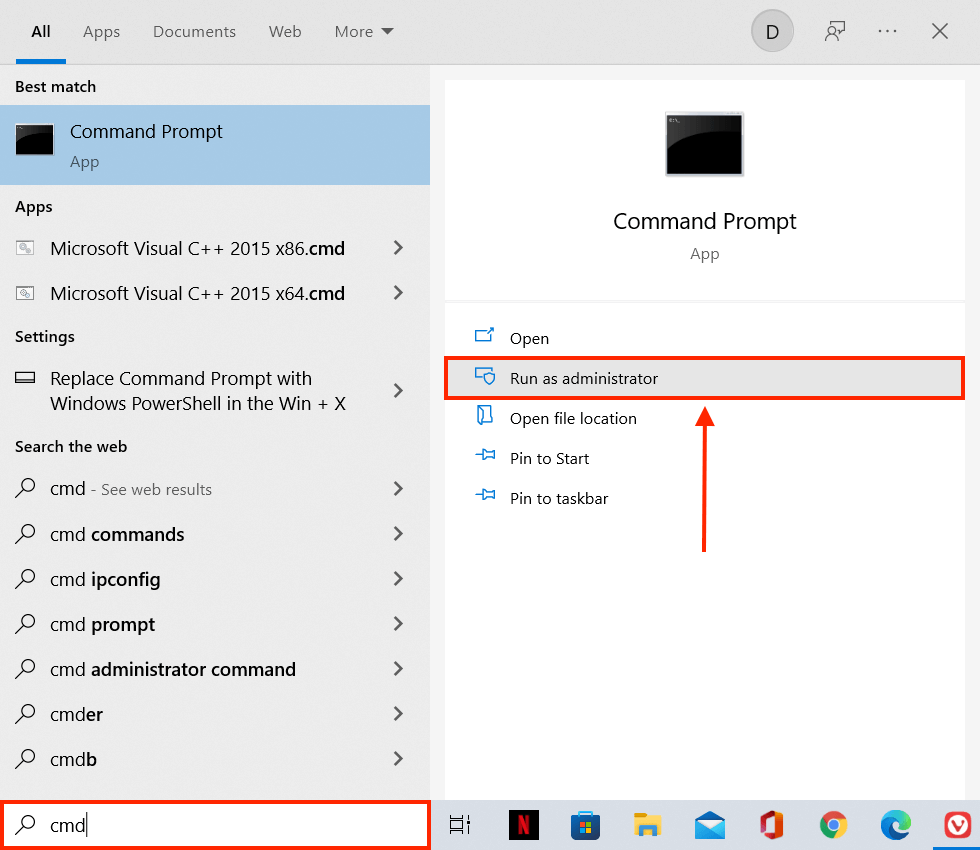
- Run Command Prompt as administrator by typing “cmd” in the Start menu search bar and clicking “Run as administrator”.
- Type the following command and press enter:
chkdsk D: /f
Replace “D” with your SDXC card’s drive letter.
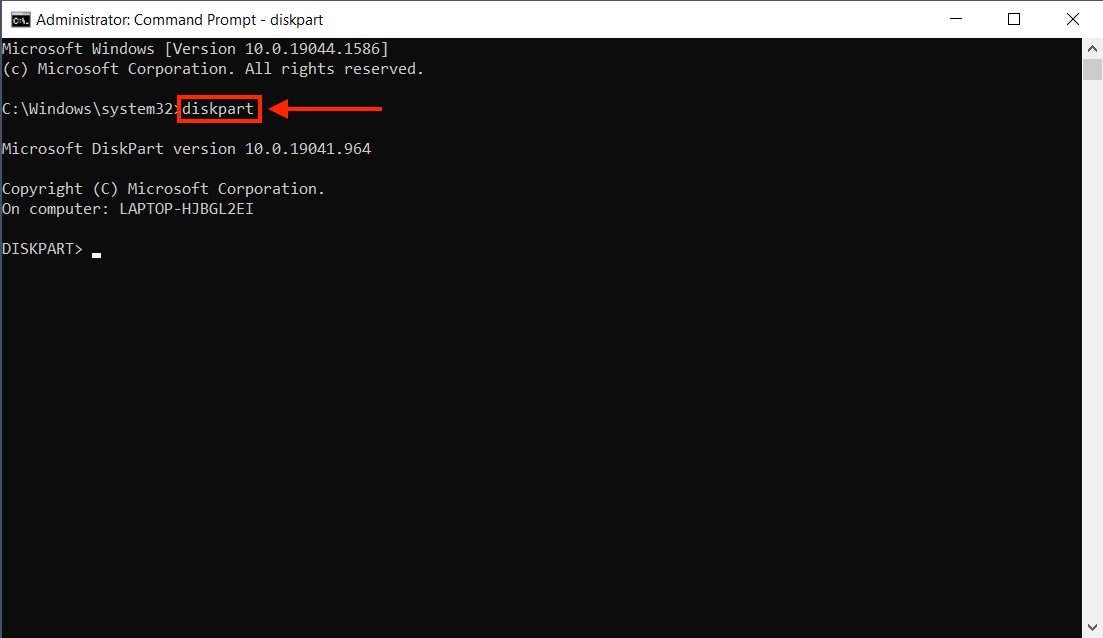
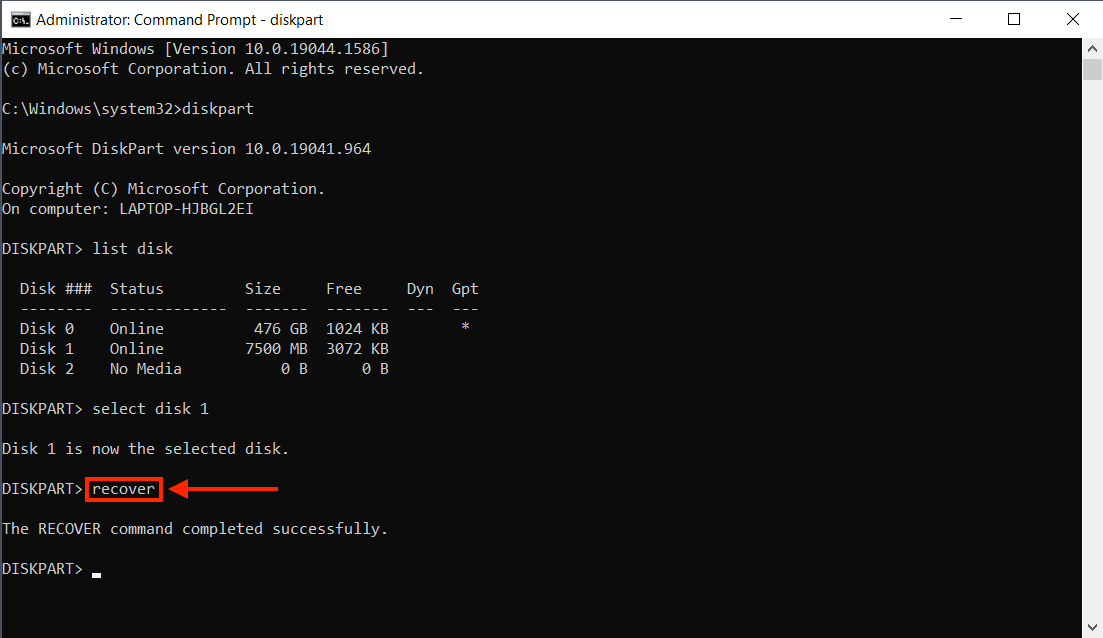
Diskpart Recover Command
Recover is a Diskpart command that you also run using Command Prompt. Diskpart is a partitioning tool that also has maintenance and first aid features. The “Recover” command refreshes and recovers disks. Follow the steps below:
- Run Command Prompt as administrator by typing “cmd” in the Start menu search bar and clicking “Run as administrator”.
- Type the following command and press enter:
Diskpart
- Type the following command and press enter:
list disk
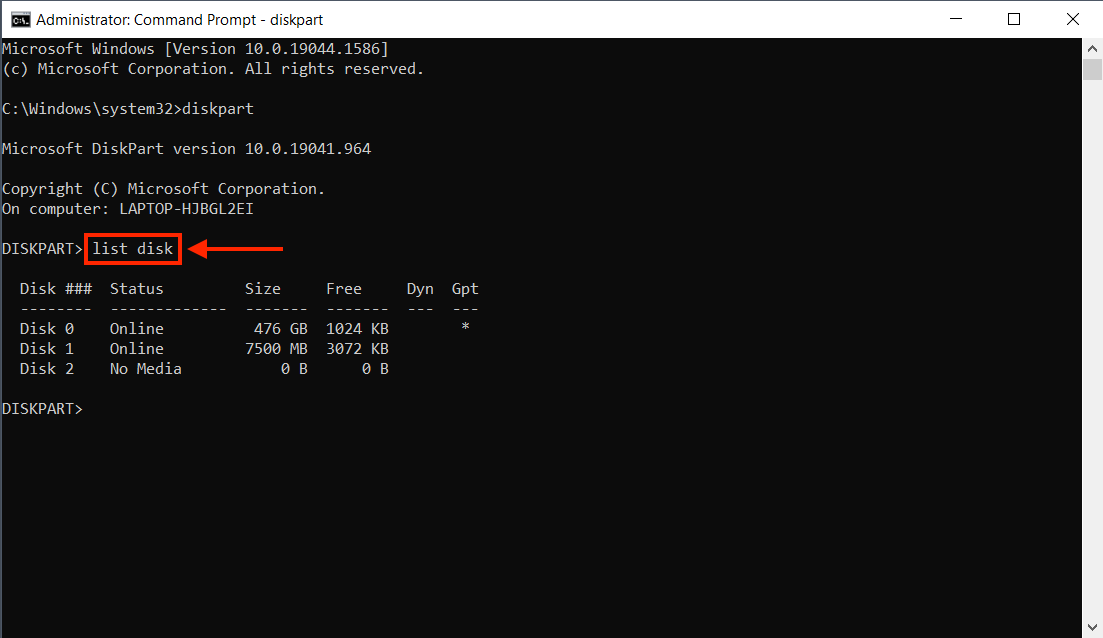
- Identify your SDXC card’s disk number (left-most column), then type the following command and hit enter:
select disk 1
Replace “Disk 1” with your SDXC’s disk number.
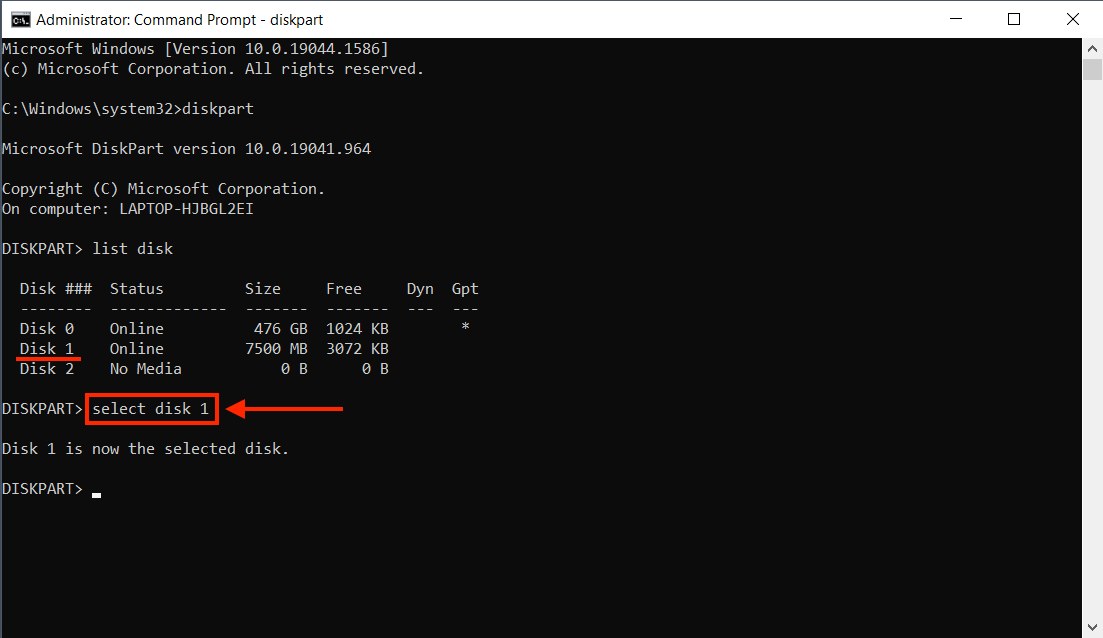
- Type the following command press enter:
recover
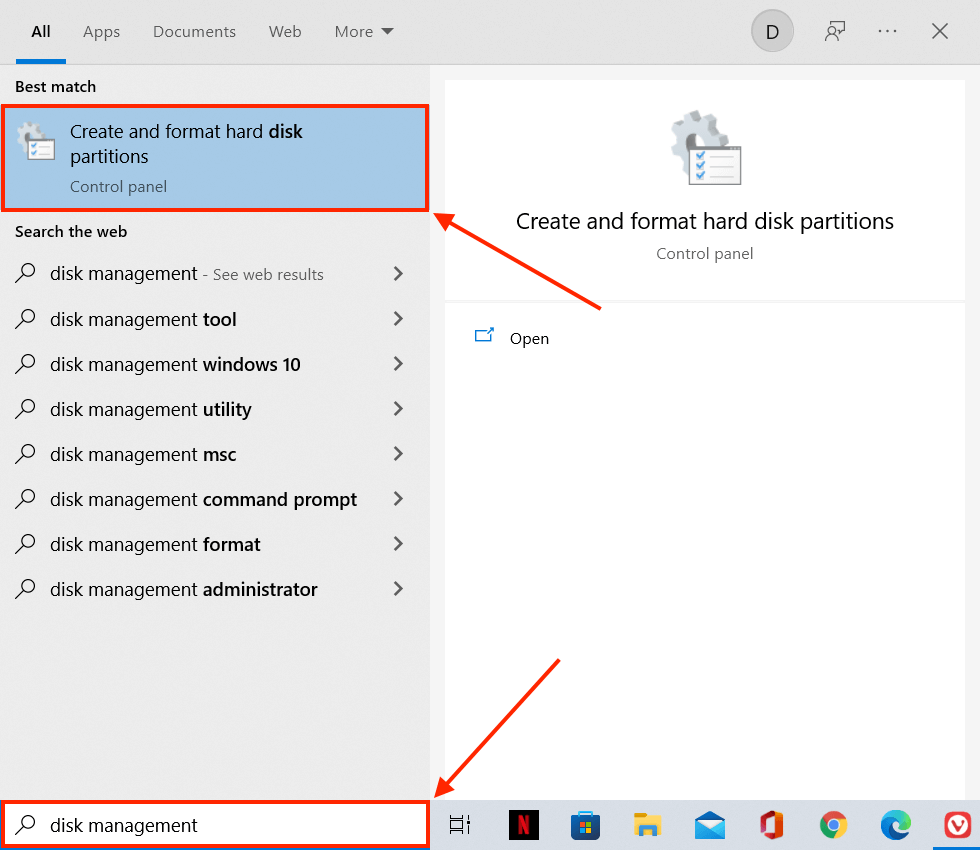
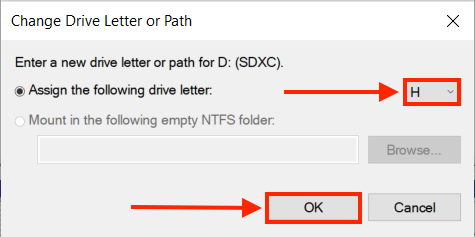
Assign a New Drive Letter
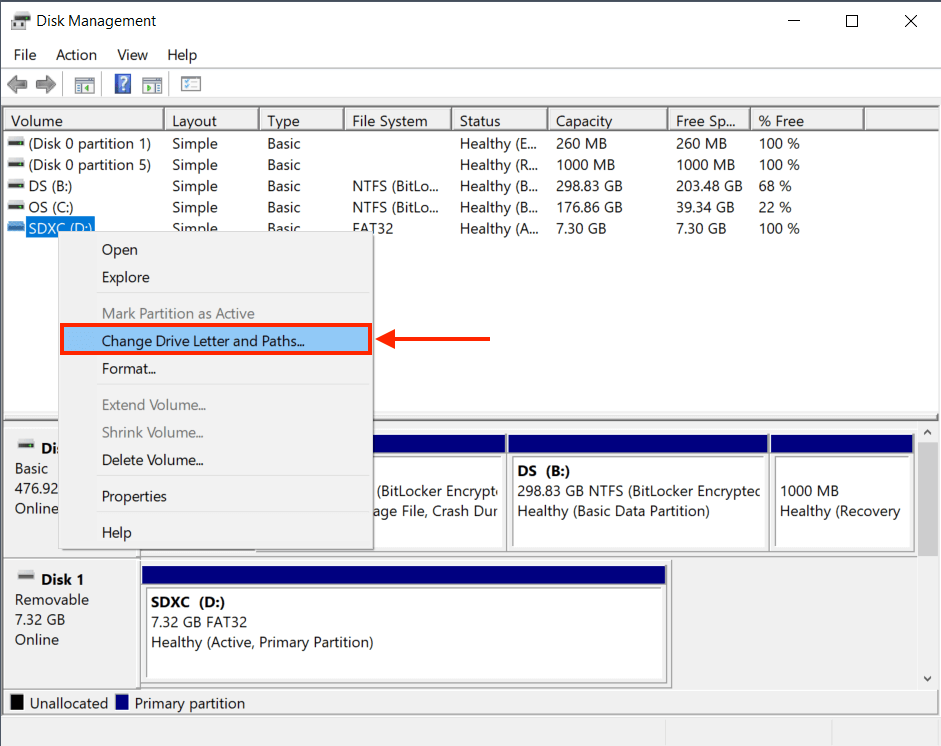
If your system doesn’t assign a letter to your SDXC card, you may encounter errors or your system may not read it. However, it will show up in Disk Management – which is where we’ll manually assign it a drive letter so your system will hopefully read it properly.
- Open Disk Management.
- Identify your SDXC card in the Volume column, then hit right-click > “Change Drive Letter and Paths…”.
- Click “Change…”.
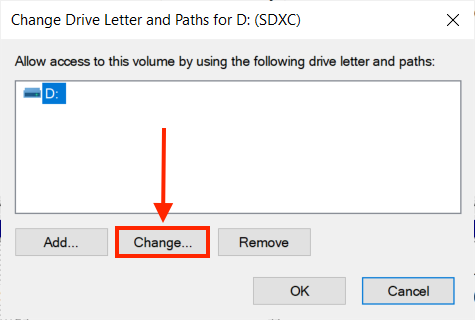
- Use the dropdown button to select a new drive letter (choose something that other drives aren’t already using), then click “OK”, then “OK”.
Windows Troubleshooter
Windows Troubleshooter is a built-in first aid utility that helps you repair errors on different components in your operating system. In recent Windows updates, you can only launch Windows Troubleshooter using Command Prompt. Here’s how:
- Launch Command Prompt.
- Type the following command and hit enter:
msdt.exe -id DeviceDiagnostic

- Continue with the instructions on-screen.
Format Your SDXC Card
If all the above methods fail, then it’s time to format your SDXC card and clean up its disk. This process will definitely wipe the data on your SDXC card, so make sure to recover and backup your files and folders first. Then, do the following steps:
- Open File Explorer.
- On the left sidebar, right-click your SDXC card and click “Format…”.
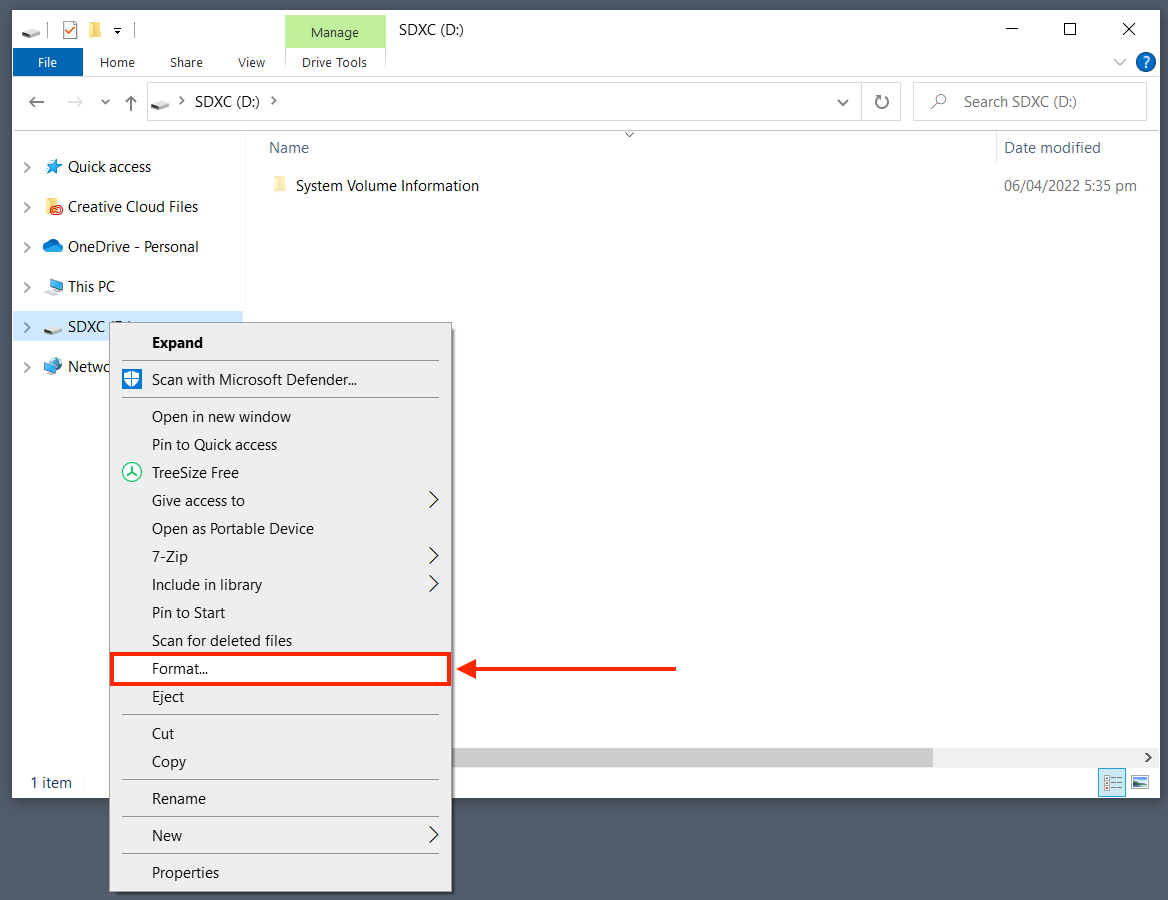
- Name your SDXC card, select FAT32 as its file system, then click “Start”. If it doesn’t work, redo step 2 and uncheck “Quick Format” and try running the process again.
Recovering Physically Damaged SDXC Cards
If your SDXC card was physically damaged (breakage, heat damage, etc.) DIY methods won’t work – in fact, you might just make it worse. Even recovering your data isn’t worth attempting by yourself. You need to send your SDXC card to a professional data recovery service. They have the equipment and the specialists to recover and fix your SDXC card without damaging it further.
If you’ve never done this before, here’s typically how the process goes:
- Locate data recovery services in your location. We collected some criteria on the best memory card recovery services to help you narrow your search (not all data recovery centers offer all of these, but find one that does offer as many as possible):
- Class 100 Clean Room – Storage disks are super sensitive to dust and debris. A Class 100 Clean Room is non-negotiable, as it’s critical to the safety of your SDXC card.
- Free estimate – Some data recovery centers offer a free estimate right after the initial call.
- User reviews – Real user reviews are the best representation of how good a data recovery service actually is. Read Google, TrustPilot, and Yelp reviews.
- High success rate – Data recovery centers usually advertise their success rate on their website (which SHOULD be backed up by customer data – just make sure they’ve had more than one customer).
- No data – no charge guarantee – Not all data recovery services offer this, but it’s a mark of a team that is confident in their ability to restore your data. This offer is a huge plus in my book.
- Give the data recovery service of your choice a call and describe your problem, as well as the data you want to recover. As we talked about in step 1, a good data recovery center will be able to provide a free estimate at this point.
- Ship your SDXC card to the data recovery center. Their specialists will now evaluate your memory card more closely and can accurately tell you how much data recovery costs. After you sign a couple of waivers, they’ll get to work.
- Pay the fee, then wait for your SDXC card to be sent back to you.
FAQ
How do I recover my SDXC card?
To recover your SDXC card, first stop using it. If you happen to save any new data on that card, it overwrites the existing data. Then, use a USB-type or built-in card reader to connect your SDXC card to a computer. Finally, use a data recovery tool to scan and restore it.
How to recover deleted SDXC card data on a Mac?
If you delete your data on your SDXC card, the first step is to stop using it. Then, try the following recovery methods:
- Check the hidden Trashes folder that Mac automatically creates when you delete files on an external storage device. To show the Trashes folder, connect your card reader to your Mac and hit (CMD + Shift + >).
- Use data recovery software. We recommend the following software, based on our recent article on the 15 best memory card card recovery tools:
- Disk Drill
- Recuva
- EaseUS Data Recovery
- Wondershare Recoverit
- R-Studio
What is the best SDXC card recovery software for PC?
We recently wrote an article on our top 15 picks for the best SD card recovery software for Windows. Here were our top results:
- Disk Drill
- Recuva
- EaseUS Data Recovery
- Wondershare Recoverit
- R-Studio
Can a damaged SDXC card be recovered?
The short answer is: it depends. If your SDXC card suffered physical damage (such as breakage, overheating, water damage, etc.), DIY methods will not work. You’ll have to send your SDXC card to a professional data recovery center, which has the right tools, facilities, and specialists that can extract data from physically damaged storage devices.
However, if you lost data due to corruption, virus attacks, formatting, and other internal issues, you can recover your data by yourself using data recovery software. But make sure you immediately stop using your SDXC card until you’ve recovered your data.
Conclusion
SDXC cards are super useful and capable (and popular even for professional equipment), but they’re prone to data loss and damage. The best you can do is constantly backup your data, but it’s still useful to have the knowledge to recover it – especially since the process is pretty similar for other storage devices. A quick tip: Disk Drill has both features (recovery and backup, the latter tool is called “byte-to-byte backup”), so you can start there. Thanks for reading!
This article was written by Alejandro Santos, a Staff Writer at Handy Recovery Advisor. It was also verified for technical accuracy by Andrey Vasilyev, our editorial advisor.
Curious about our content creation process? Take a look at our Editor Guidelines.