Nowadays, it’s rare to come across Small Computer Systems Interface (SCSI) hard dives, also referred to as “scuzzy drives.” Thus, it may be difficult to find a reliable SCSI hard drive data recovery guide. To fill this gap, we’ve formulated an easy to follow and execute data recovery tutorial that’ll help you retrieve files from your SCSI hard drive, at home.
Want to skip the background and jump straight to the recovery guide? Click here.
Can You Recover Data From SCSI Hard Drive?
Yes, you can restore data from a SCSI hard drive. Most modern data recovery programs support SCSI hard drives, provided you have the necessary adapters to connect the drives to your computer.
In addition to using the right adapters, the SCSI hard drive must be formatted to a Windows-recognized file system (such as NTFS, FAT32, exFAT, etc.).
However, like any other data recovery scenario, there are some pointers you need to keep in mind for a successful SCSI data recovery procedure:
- 🛑 Stop using the SCSI drive as soon as you discover that there’s data missing from it. Since SCSI drives are mostly used in servers and business environments, new data is constantly written to them. This can overwrite the previously deleted data, making it impossible to recover.
- 🕒 Begin data recovery as soon as possible. Again, this will ensure that no further data loss takes place and the deleted data on your SCSI hard drive is not overwritten.
- 🧑🔧 If you suspect the drive is physically damaged, i.e. there are unusual whirring or clicking noises, shut down the drive and have an expert take a look at it. Attempting DIY recovery on a physically damaged SCSI hard drive can further damage it and exacerbate data loss.
- 🔌 Since SCSI hard drives are typically connected to servers and devices that always remain powered on, it’s common for the drive to not power on after being switched off. If this occurs, seek the help of an expert because it could be a sign of damaged electronic circuitry.
How to Connect SCSI Hard Drive to PC
Due to their relative rarity, finding the correct SCSI reader can be quite an ordeal. If you use the incorrect reader, your Windows 11/10 PC may display errors such as drive not recognized, etc.
The first step in finding the correct SCSI adapter is to determine the type of SCSI connector your hard drive uses. Depending on the model of your hard drive, it could be using a 25-pin, a 50-pin, or a 68-pin connector. To purchase the actual adapter, online shopping sites like eBay, Newegg, and Amazon are your best bet.
There are two primary ways to connect a SCSI hard drive to your PC:
- Using a SCSI to USB Connector: As the name implies, an SCSI to USB adapter will let you connect your drive to your laptop or PC using a USB-A connector. There are many options available online. You may need a SCSI drive enclosure to power the SCSI hard drive.
- Using a SCSI to PCI Adapter Card: Using an SCI to PCI adapter card, you can connect your SCSI hard drive to your computer. This is only recommended if you have a bit of technical expertise and are comfortable working with computer hardware.
Albeit complicated, connecting your old SCSI drive to your PC is possible. But, if you are unable to procure the necessary adapters or unable to find one that suits your specific SCSI drive, it’s best to contact a professional data recovery service.
How to Recover Data From a SCSI Hard Drive
After connecting your SCSI drive to your PC, the next step in SCSI data recovery is to download a good data recovery program. Due to the overwhelming number of such programs available on the internet, it’s important that you only choose an option from the best data recovery apps in the market.
In our guide, we’ll be using Disk Drill Data Recovery, a leading data recovery solution. It’s perfect when attempting to restore data from a SCSI hard drive, as it has complete support for hard drives that use any kind of interface (including SCSI and SATA). Disk Drill can recover data from all major Windows and macOS file systems such as NTFS, FAT, exFAT, and more. While Disk Drill is compatible with Windows and macOS, Windows users can take advantage of its 500 MB free data recovery trial.
For an in-depth look at Disk Drill and all its features, take a look at our Disk Drill review.
Instructions on how to retrieve files from a SCSI hard drive using Disk Drill:
- Download Disk Drill and install it. Remember to download and install the software on a drive other than the SCSI hard disk. This is to prevent further overwriting of the lost data.
- Connect the SCSI drive to your computer.
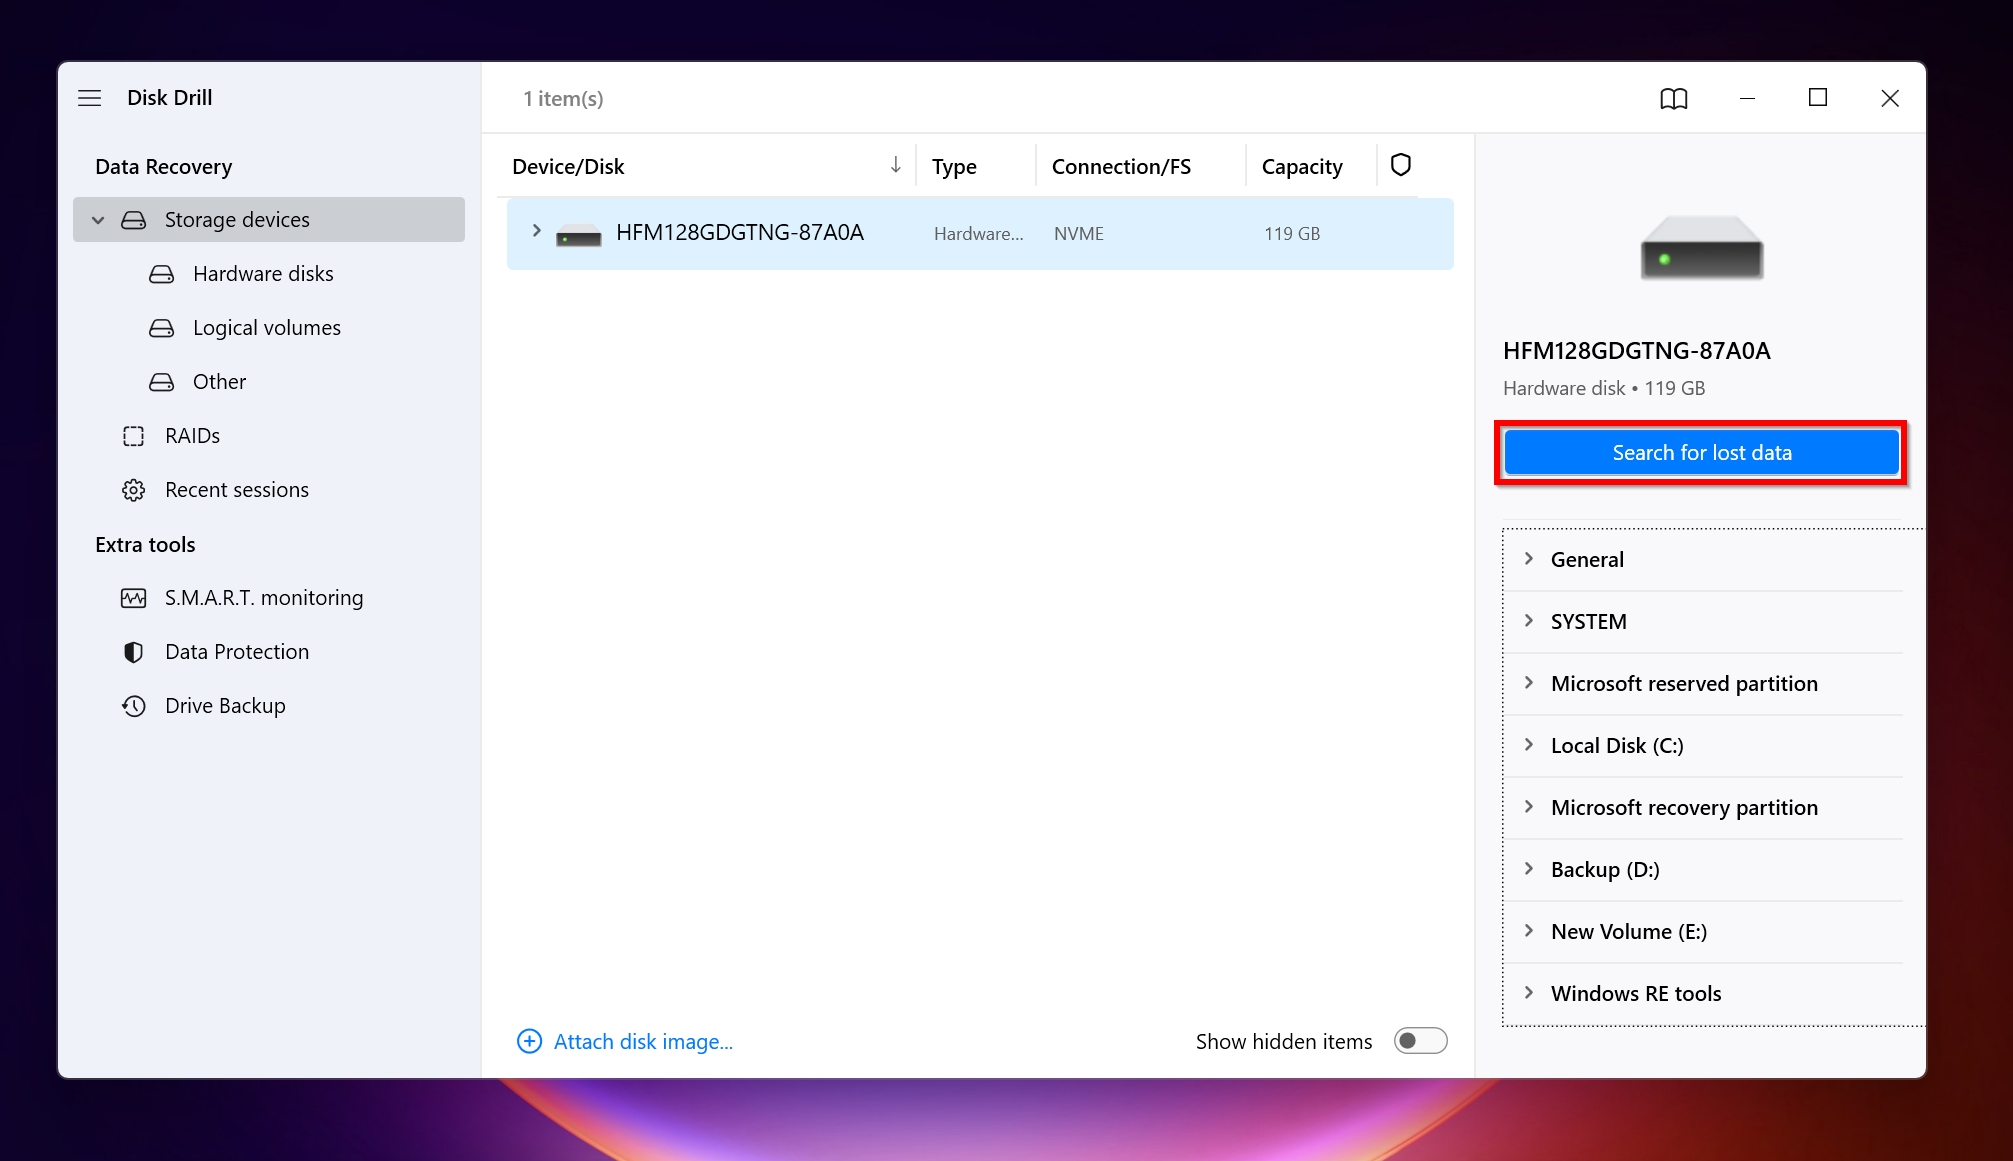
- Open Disk Drill, select the SCSI drive from the list of devices and click on Search for lost data.
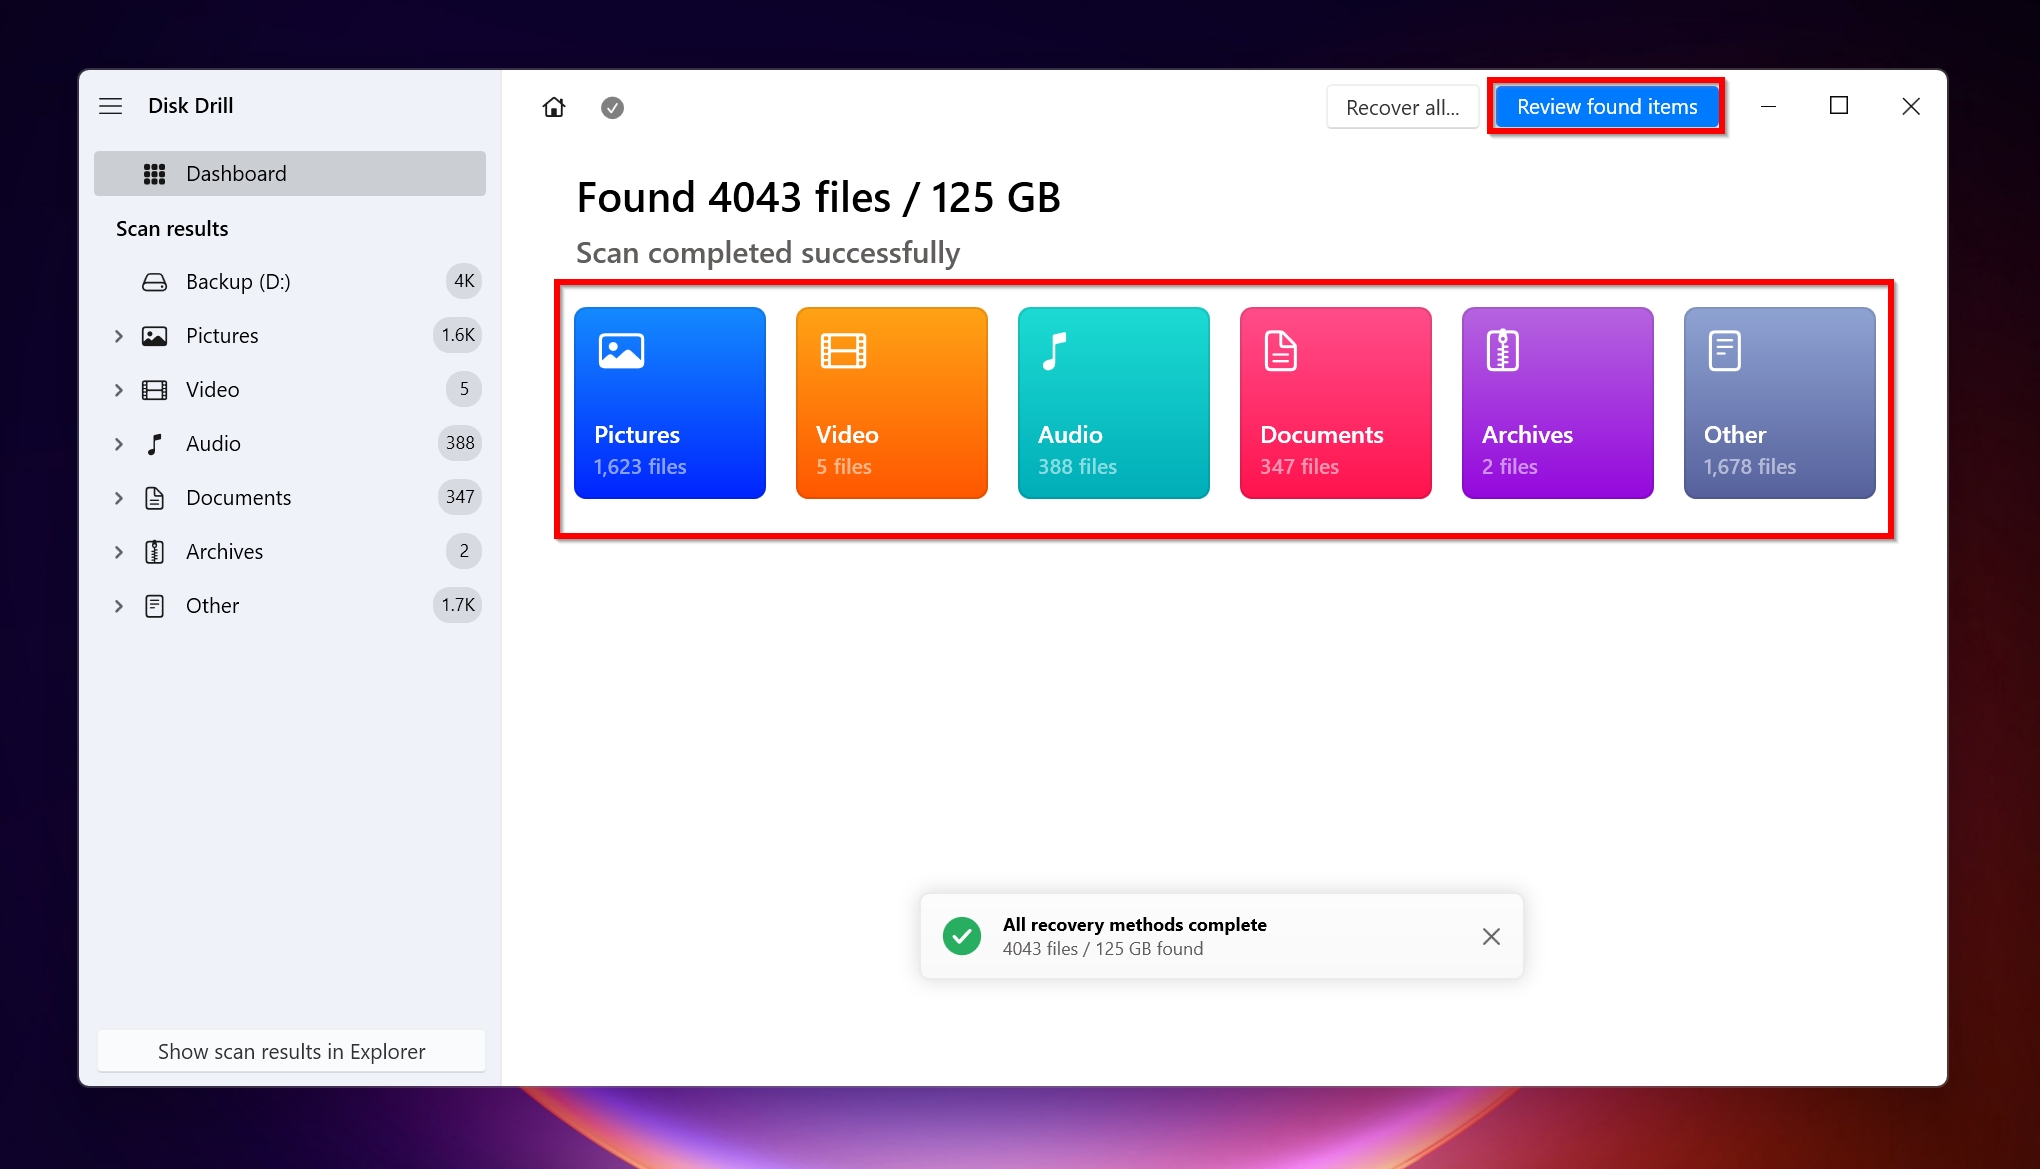
- Click Review found items to view the recoverable data. You can also directly click on the file type you are looking to recover.
- Expand the relevant section. For example, if you want to get off existing data from the drive as well, you can expand the Existing section.
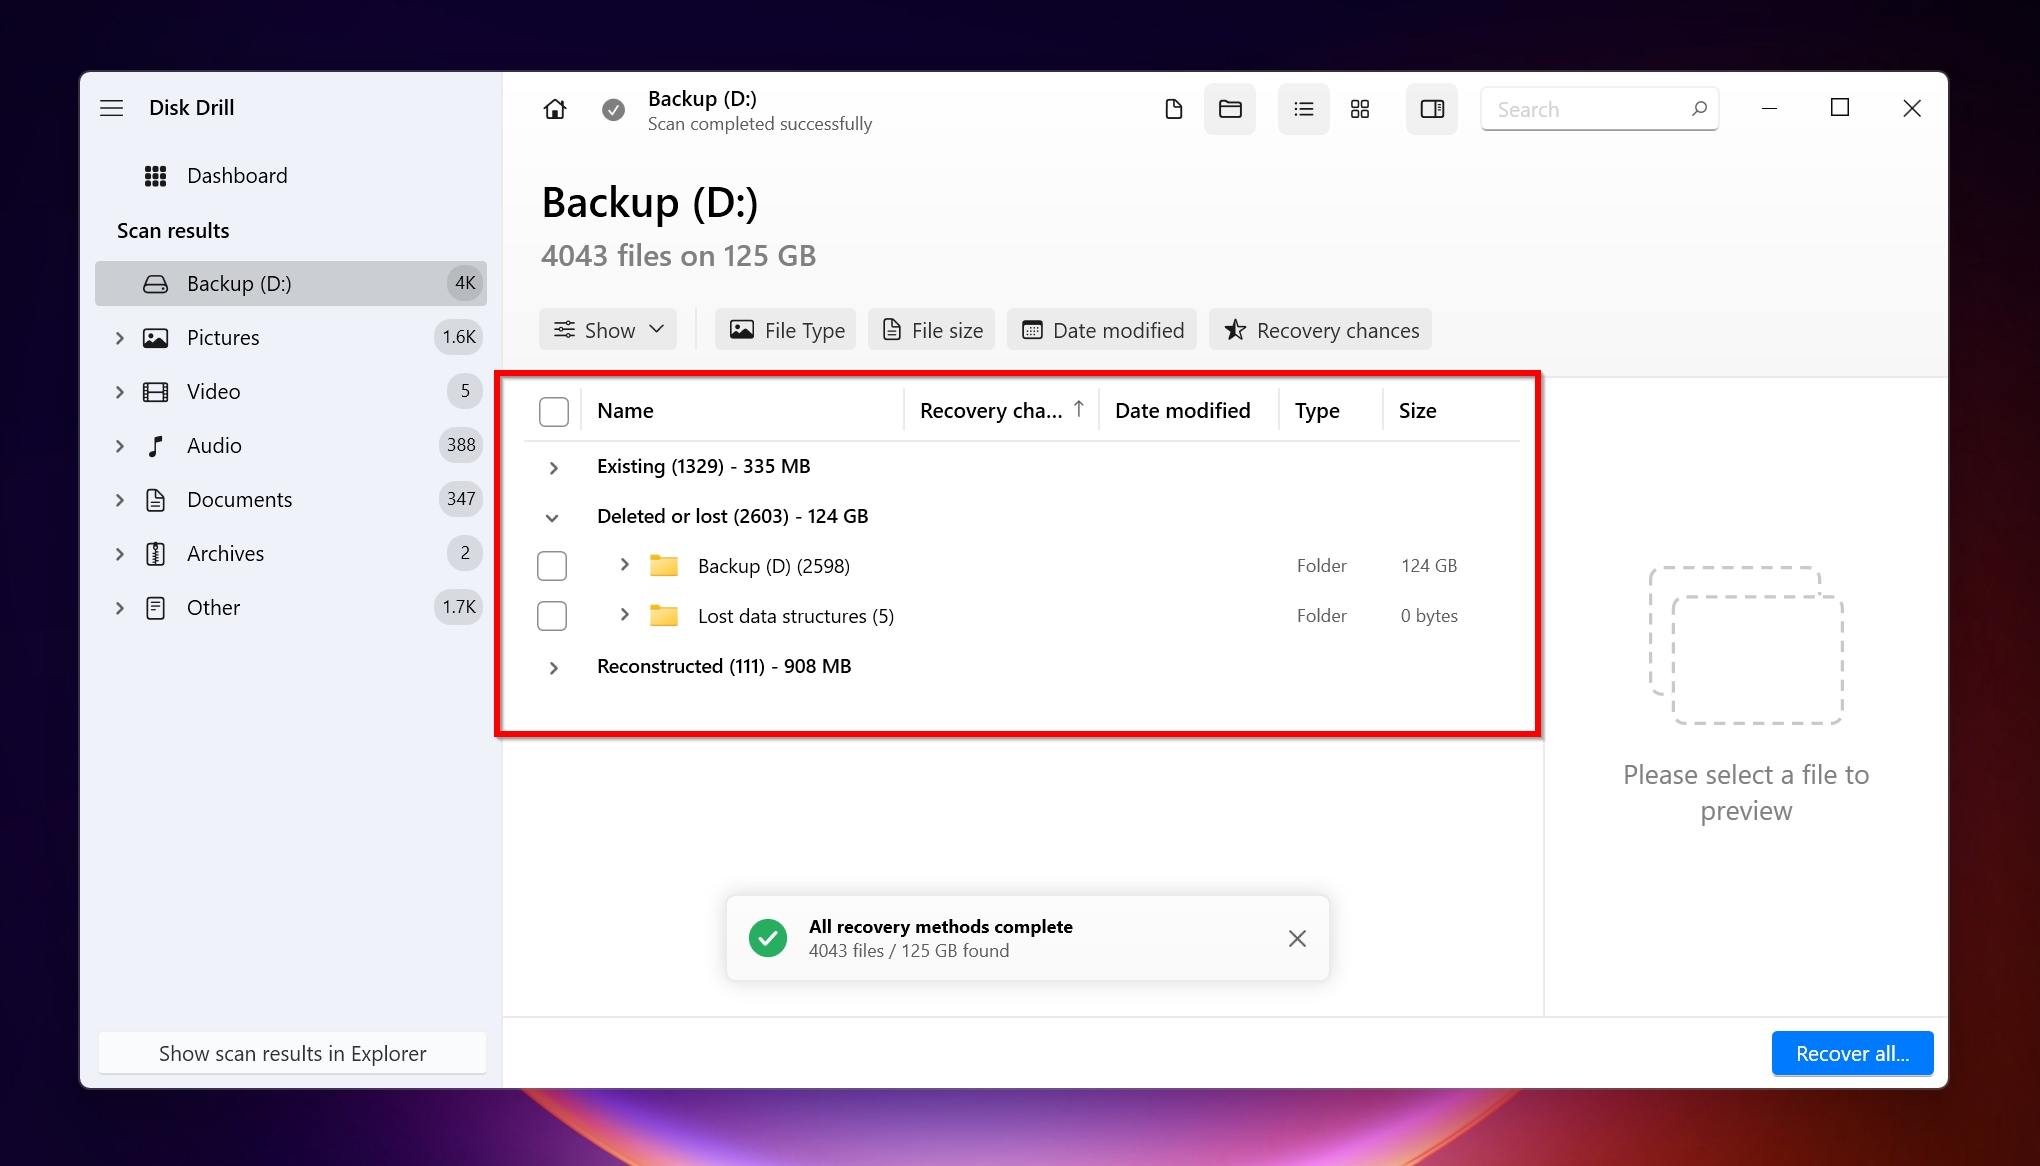
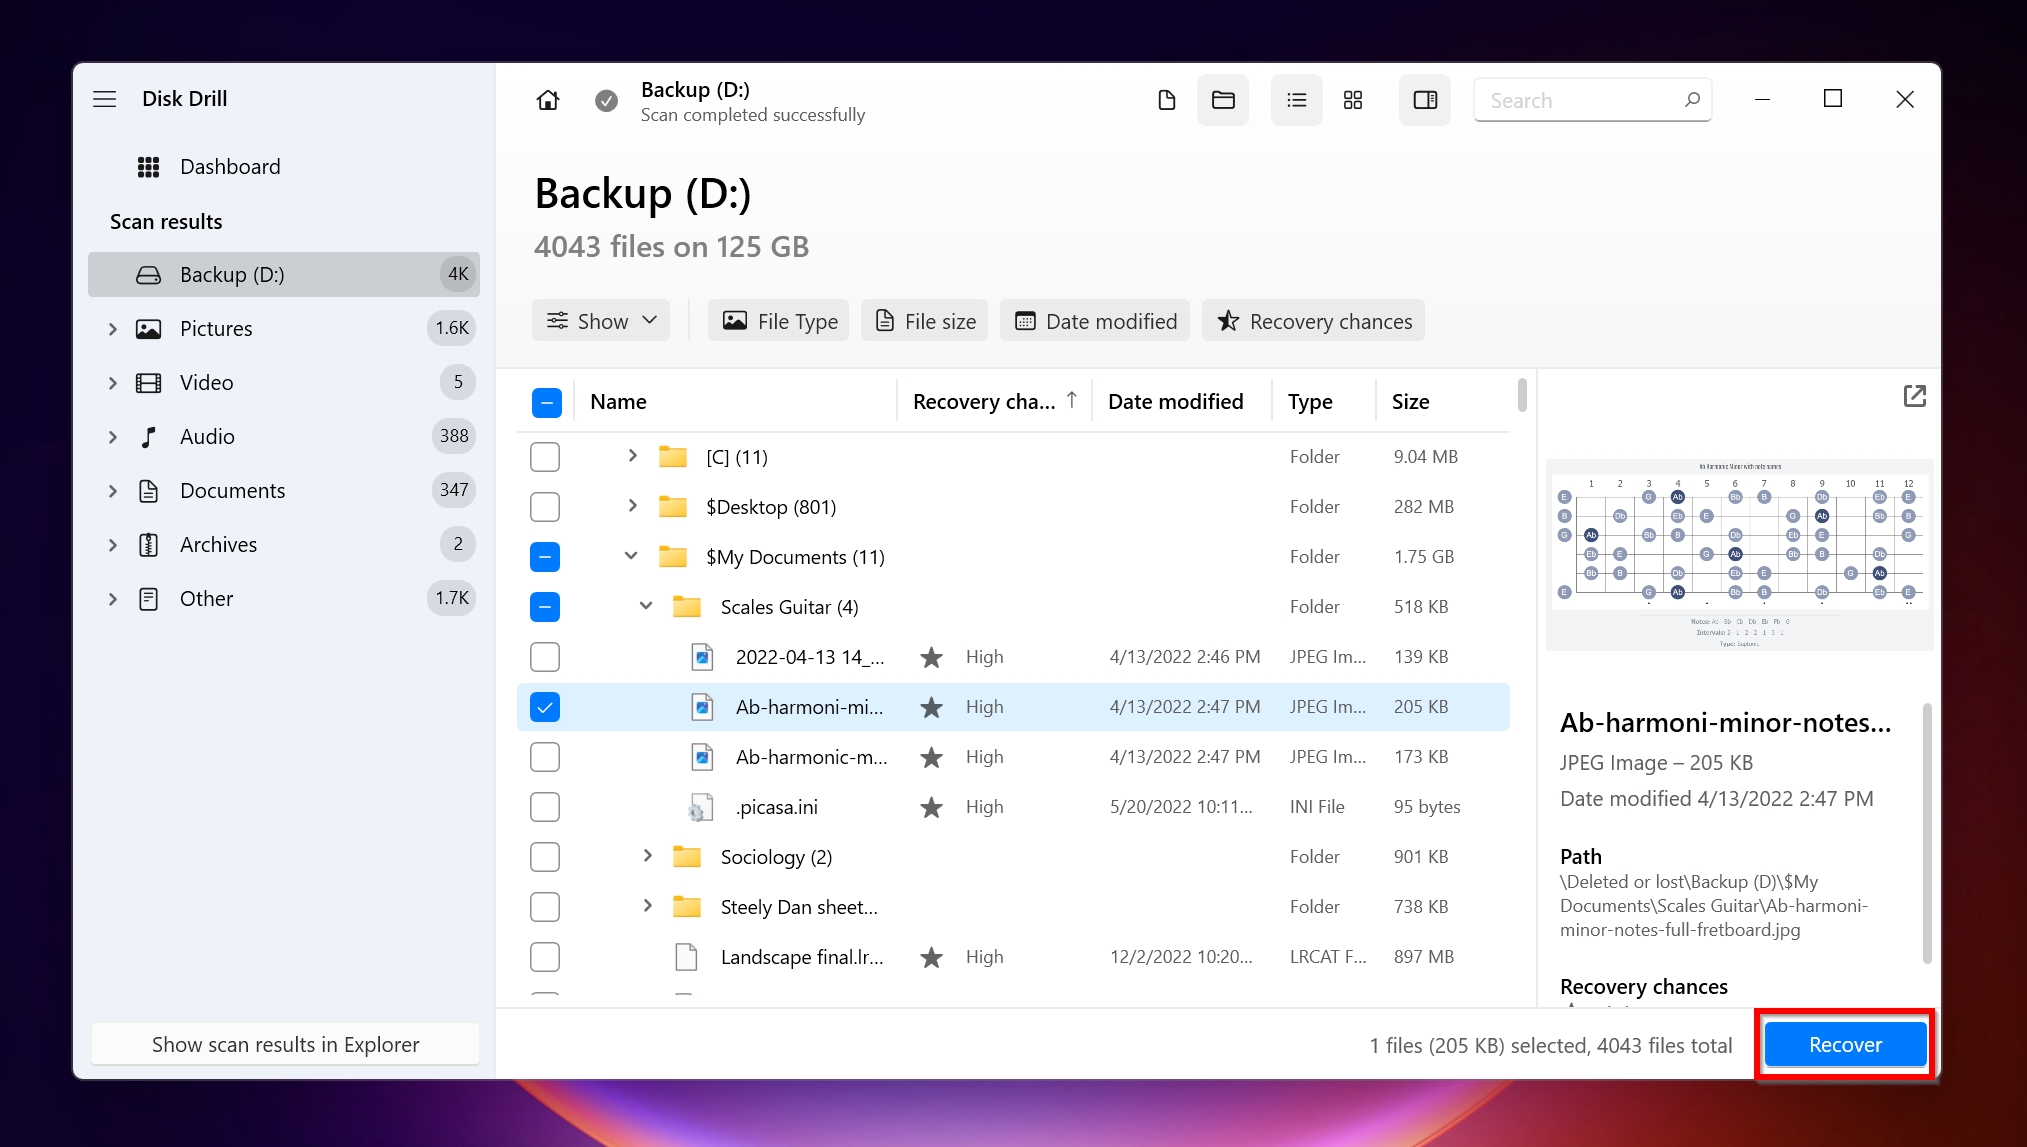
- Select the files you want to recover, by ticking the checkbox next to them. Disk Drill displays a preview of each file. Click on Recover.
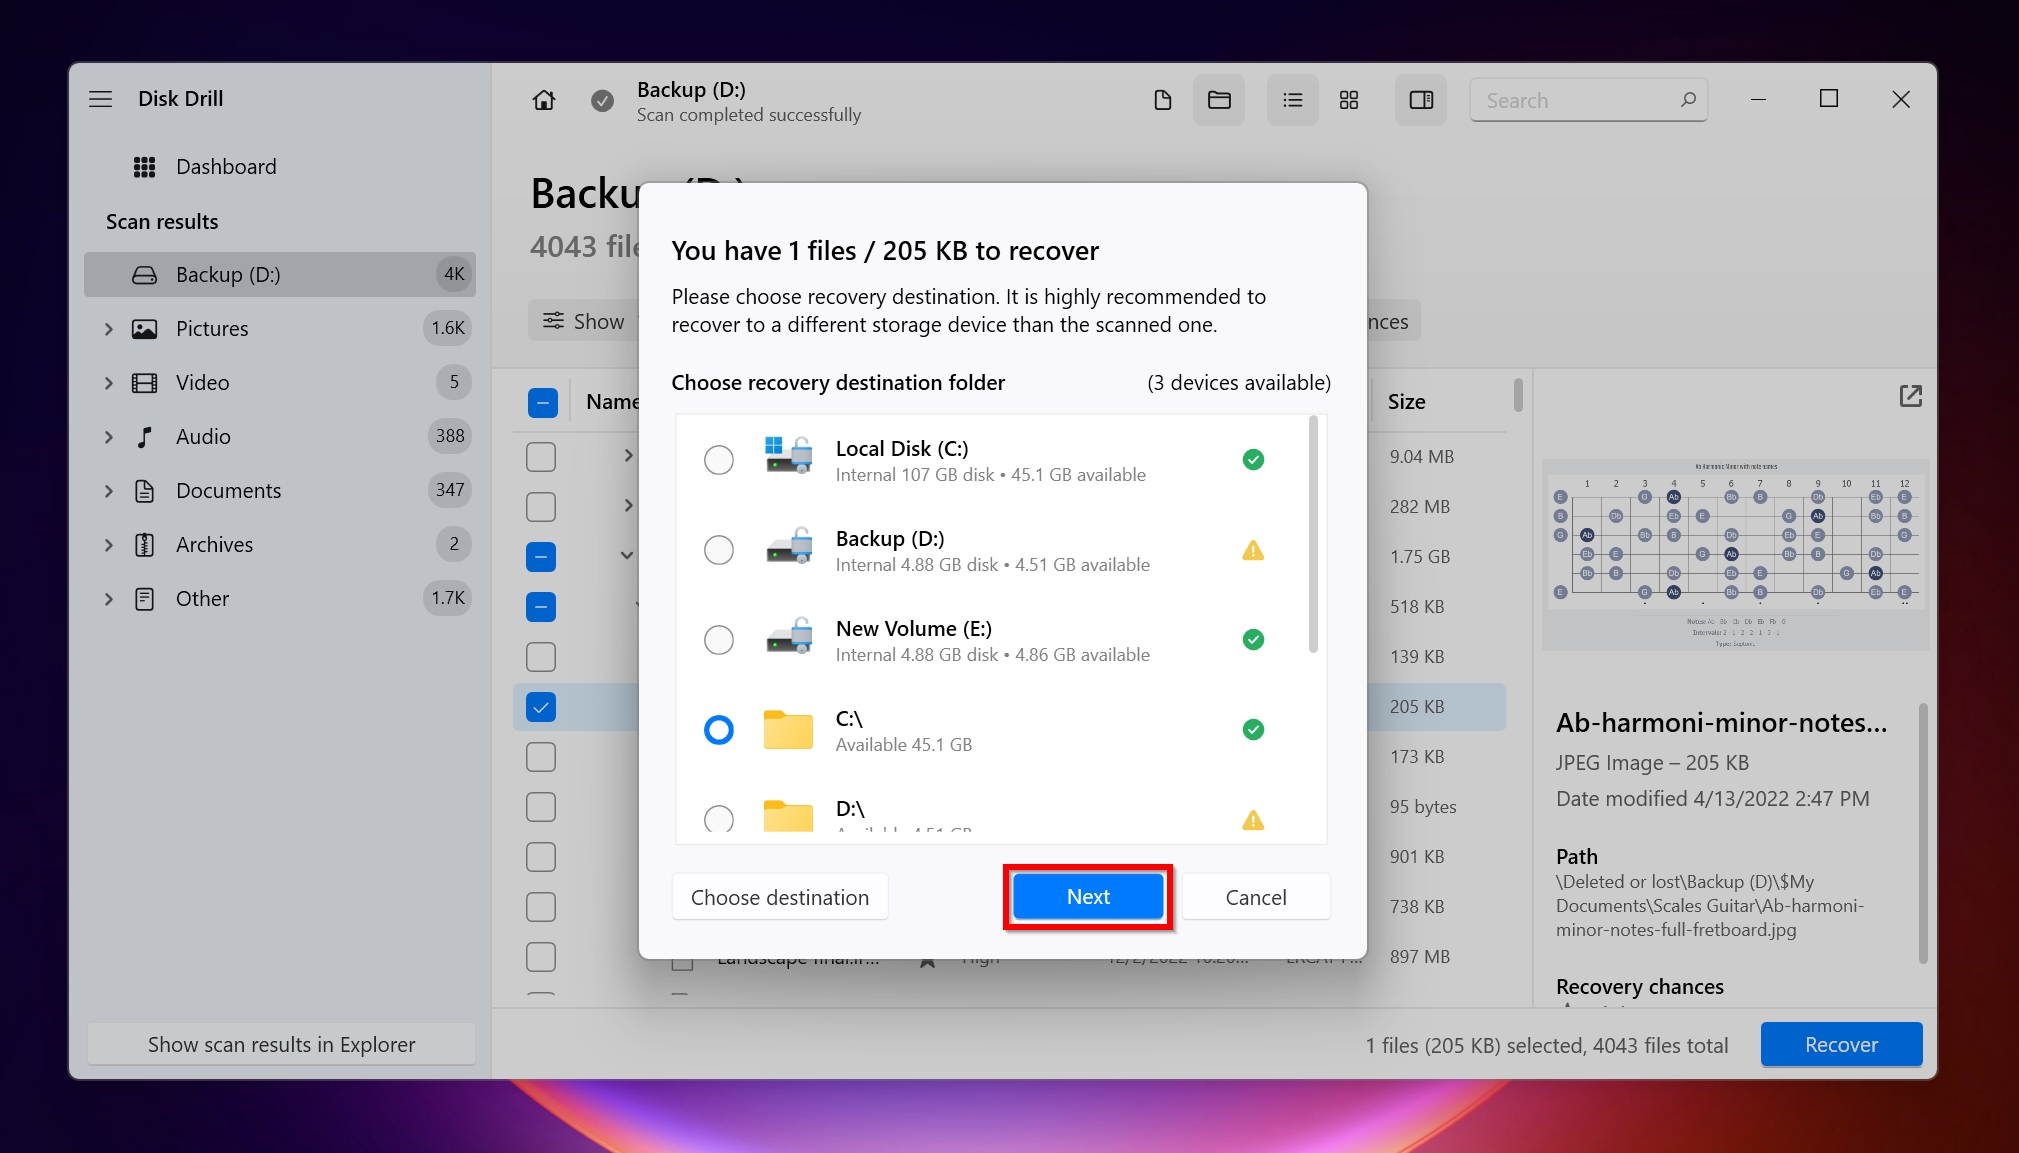
- Choose a recovery destination for the files and click Next to confirm. Don’t recover the data to the SCSI drive. Choose some other location for it. Additionally, Disk Drill will display a warning when you try to recover the files to the same location, so please pay heed to it.
- Disk Drill will recover the files for you.
FAQ
Are SCSI drives still used?
Yes. While not as common as they were earlier, many server farms and businesses still use SCSI hard drives. However, they are increasingly being replaced by newer formats and will soon be completely obsolete.
Will SCSI work on Windows 10?
Yes. SCSI drives will work on Windows 10, provided you have the correct drivers and use a good adapter card to connect the SCSI drive. Specific drivers are available on the internet and will have to be downloaded and installed manually.
How to connect SCSI hard drive to USB?
Simply purchase a good SCSI to USB converter, connect the SCSI drive to the SCSI slot, and plug in the USB cable in your PC. Remember, you may also need an external SCSI hard drive enclosure to power the hard drive in this case.
How to get files off an old SCSI hard drive?
Here is a quick guide to get your files off an old SCSI hard drive:
- Download Disk Drill and install it.
- Connect the SCSI drive.
- Open Disk Drill and click Search for lost data.
- Click Review found items, then expand Existing.
- Select the files and click Recover.
- Choose a recovery destination and click Next.
Conclusion
The main difficulty you will face when recovering data from a SCSI drive, is finding the right connectors and drivers. Thanks to data recovery software like Disk Drill, the actual data recovery process is quite simple and does not require any technical expertise whatsoever.
This article was written by Manuviraj Godara, a Staff Writer at Handy Recovery Advisor. It was also verified for technical accuracy by Andrey Vasilyev, our editorial advisor.
Curious about our content creation process? Take a look at our Editor Guidelines.