
If you accidentally deleted your LibreOffice document or closed your work without saving, this is the article for you. Depending on how your computer is set up, there are different methods you can use to recover a file. However, you’ll waste a lot of time if you don’t know the right conditions.
Below are all the methods to recover an unsaved or deleted LibreOffice document on Windows 10. To make it even easier, use the quick navigation table to identify your problem and jump to the solution.
Quick Navigation
Problem |
Solution |
I closed LibreOffice without saving and/or I need to recover files from a crashed computer. |
|
I deleted my LibreOffice document. |
Method 1: Restore Deleted LibreOffice Documents from the Recycle Bin |
I deleted my LibreOffice document and emptied the recycle bin. |
Method 2: Recover Deleted LibreOffice Documents Using Data Recovery Software |
I deteled my LibreOffice document and I have OneDrive enabled. |
Method 3: Restore Deleted LibreOffice Document From Cloud Backup |
I deleted my LibreOffice document and I have File History enabled. |
How to Recover Unsaved LibreOffice Documents
Depending on your settings, you may be able to recover unsaved LibreOffice documents using the app’s built-in recovery tools and backup files.
Method 1: Allow LibreOffice Document Recovery
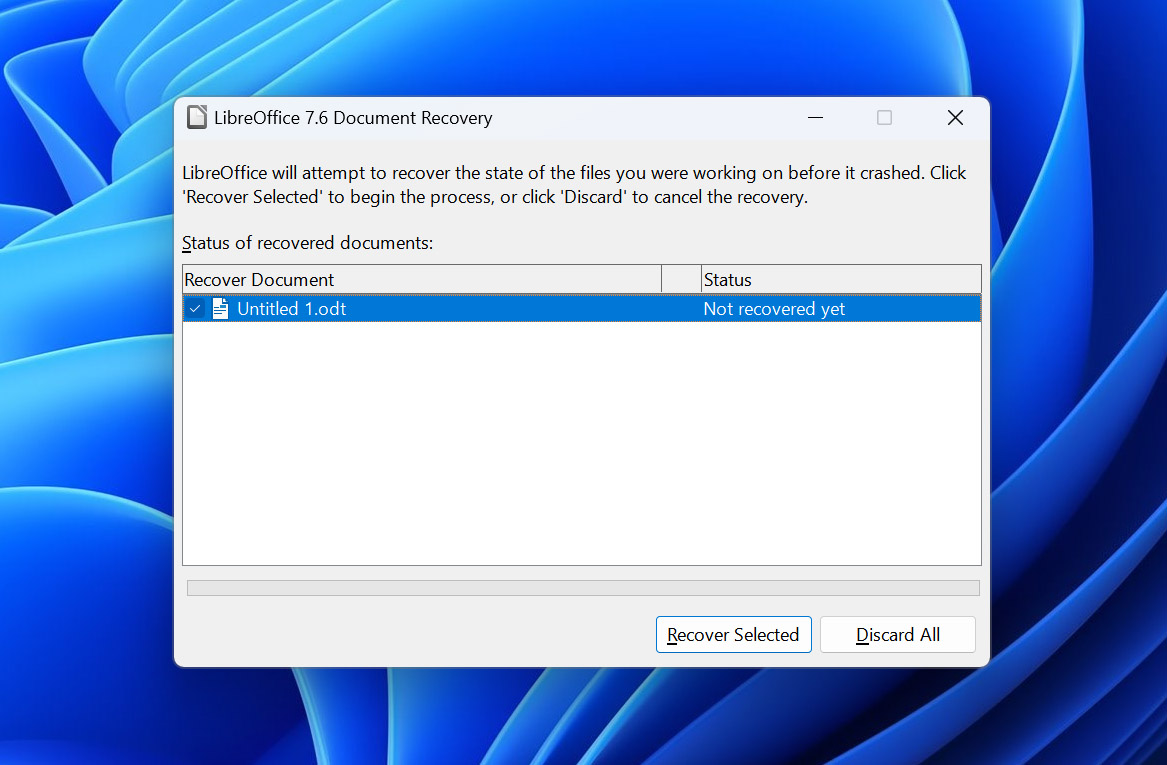
Upon launch, the app will automatically attempt to restore unsaved LibreOffice documents and any other unfinished work it can find. If the Document Recovery window pops up, select your document in the left column and click “Start.”
Method 2: Check LibreOffice Backup and Temporary Files
LibreOffice automatically creates backup files and temporary files in order to properly execute certain functions and to help users protect their work. This has worked for many users who closed a LibreOffice document without saving. You can find the LibreOffice “autosave” location by doing the following:
- In LibreOffice’s toolbar, click “Tools” > “Options…”
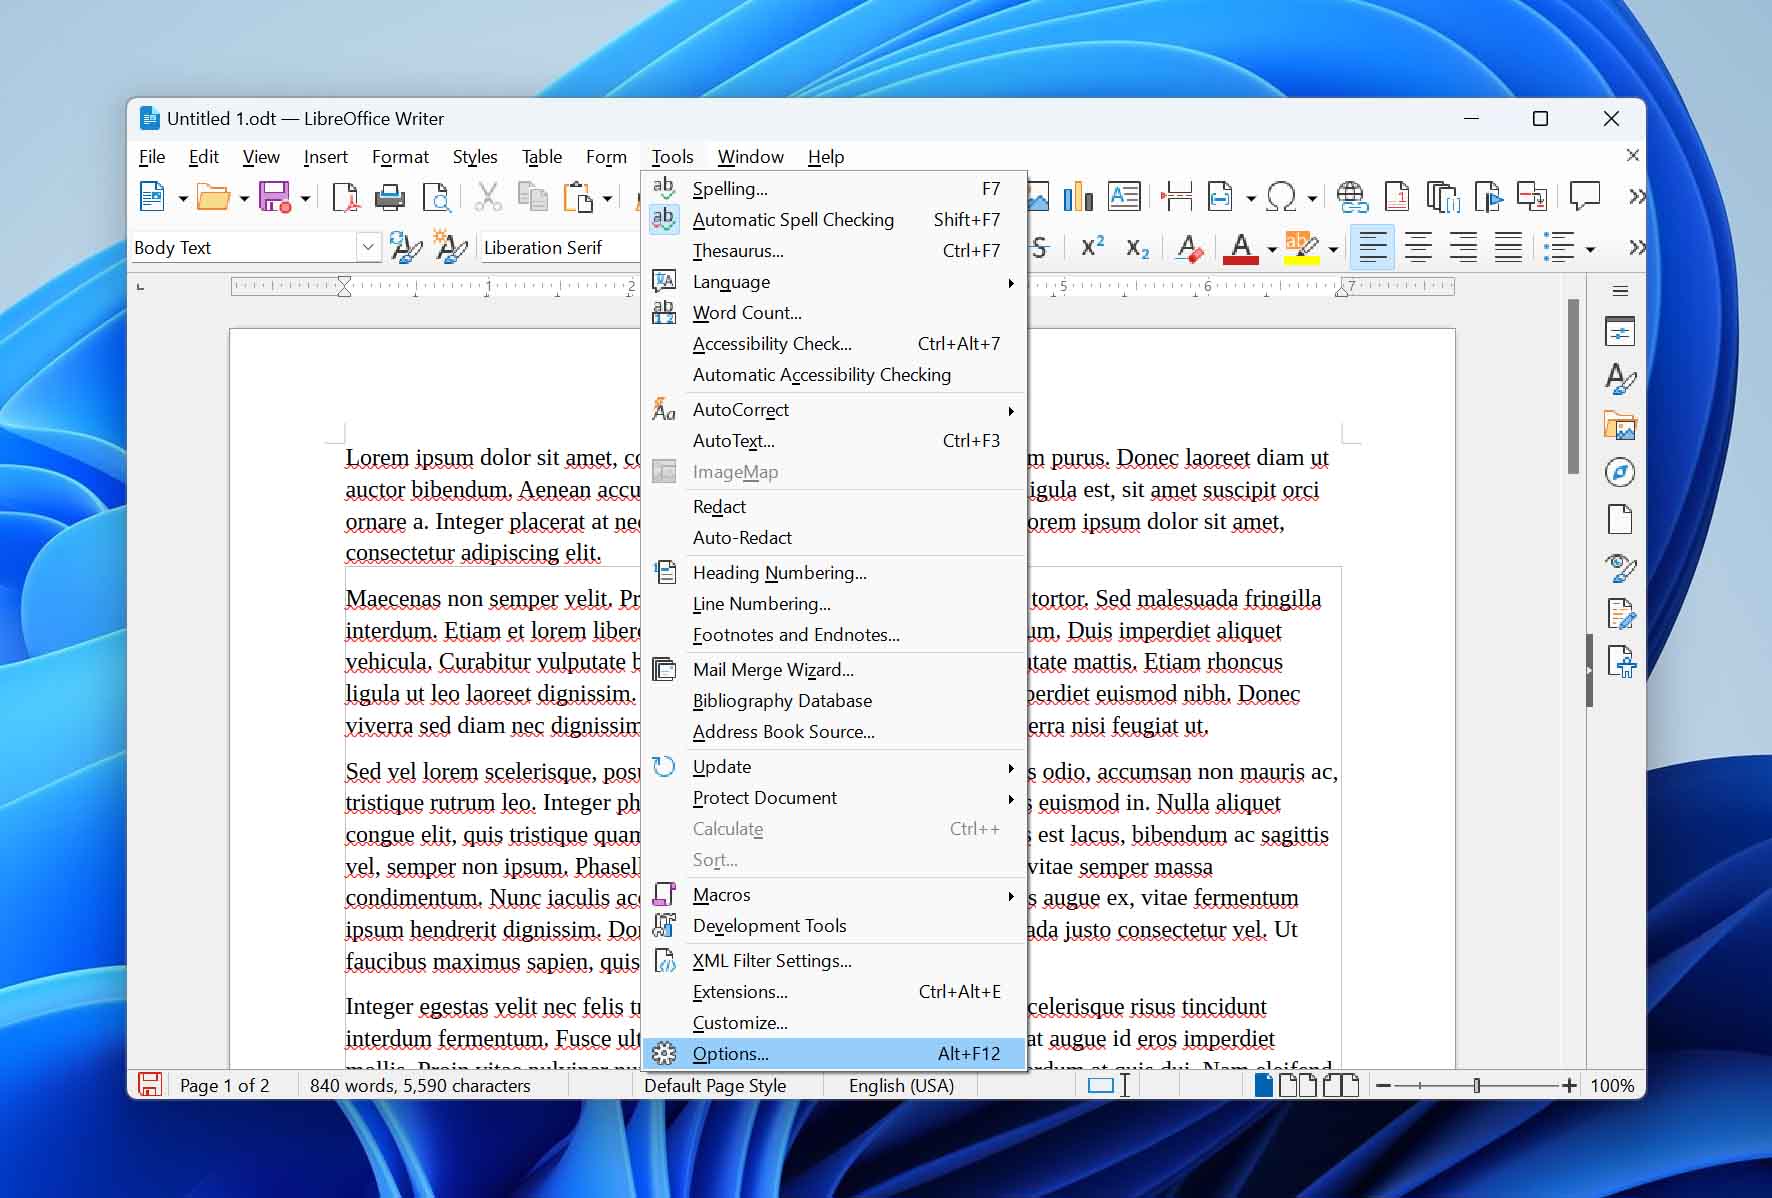
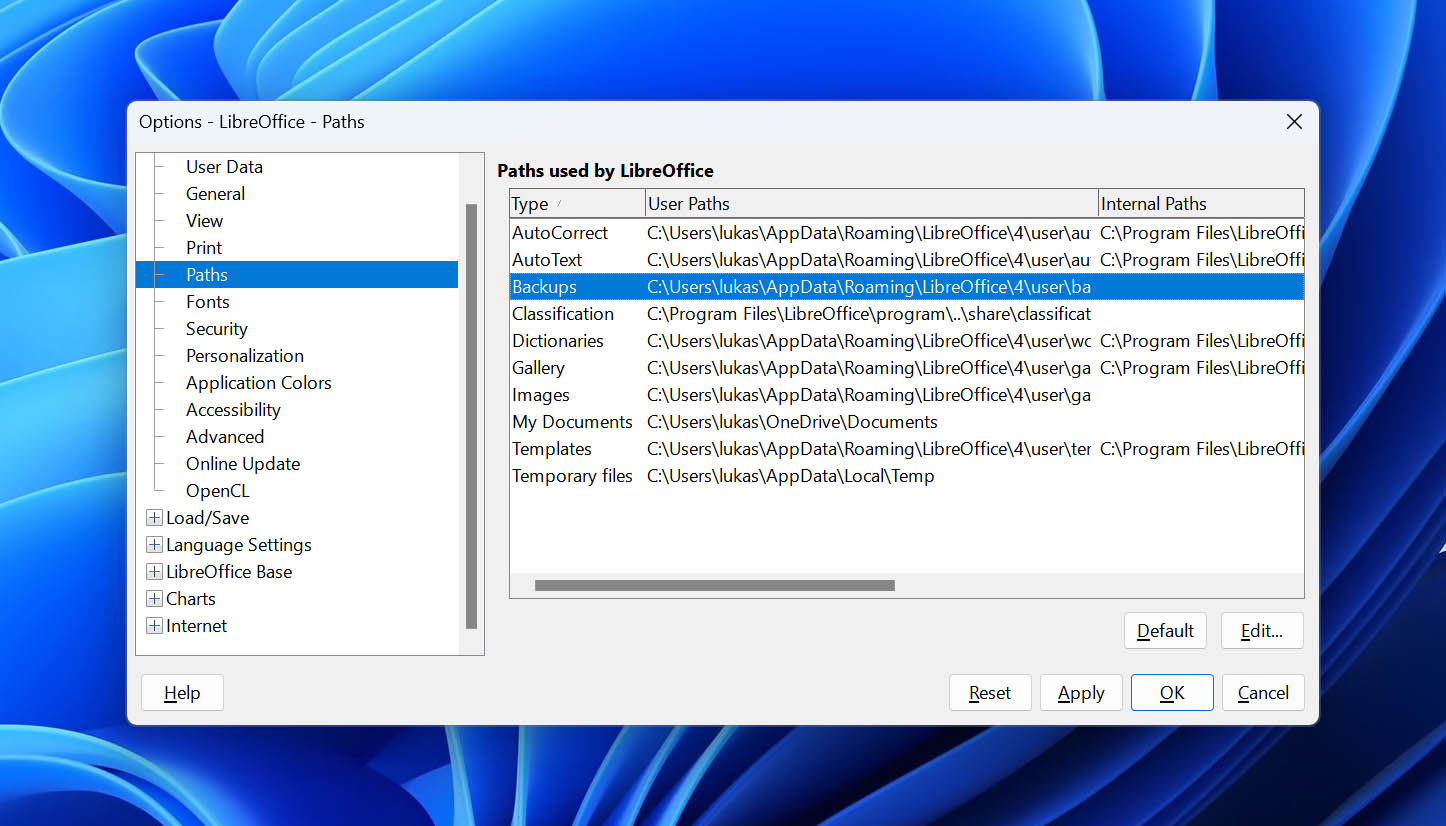
- In the new window’s left sidebar, expand “LibreOffice” and click “Paths.” In the main window, take note of the listed “Path” for “Backups.”
Pro tip: Some files may be hidden. To unhide them in File Explorer, click View on the menu bar > Show/Hide, and tick the box beside “Hidden items.”
How to Recover Deleted LibreOffice Documents
Depending on how you set up your computer (and what you did after deleting the file), there are 4 different methods to recover deleted files in LibreOffice:
Method 1: Restore Deleted LibreOffice Documents from the Recycle Bin
Deleted LibreOffice Documents get sent to the recycle bin, and they stay there until you manually empty it. Files sent to the recycle bin can easily be restored. Here’s how:
Tip: You can still recover your recycle bin even after emptying it using data recovery software.
- Open your recycle bin folder (it’s usually on your desktop).
- Right-click your LibreOffice Document and click “Restore.”

Method 2: Recover Deleted LibreOffice Documents Using Data Recovery Software
If you emptied your recycle bin (and if your LibreOffice recovery failed), there’s no way for you to retrieve your file without a special tool called data recovery software. Fortunately, the best data recovery software are available for download on the internet.
Many of them are easy enough to use that even beginners should be able to restore their files on the first try. We’ll use 2 of our favorites to demonstrate restoring a LibreOffice document:
Option A: Disk Drill
![]() Disk Drill is a popular and reliable data recovery software that we’ve featured many times on Handy Recovery. It’s very effective at restoring almost every file type that exists from almost any device. If your LibreOffice file disappeared, Disk Drill will find (and restore) it.
Disk Drill is a popular and reliable data recovery software that we’ve featured many times on Handy Recovery. It’s very effective at restoring almost every file type that exists from almost any device. If your LibreOffice file disappeared, Disk Drill will find (and restore) it.
It’s a powerful app that is super user-friendly, AND you can recover up to 500 MB worth of data for free. That should be more than enough for a LibreOffice document, so we can’t recommend enough that you give it a try for this task.
If you want to know more about Disk Drill’s performance and its many features (most of which are free!), read our full Disk Drill review.
- Download and install Disk Drill, then launch it.
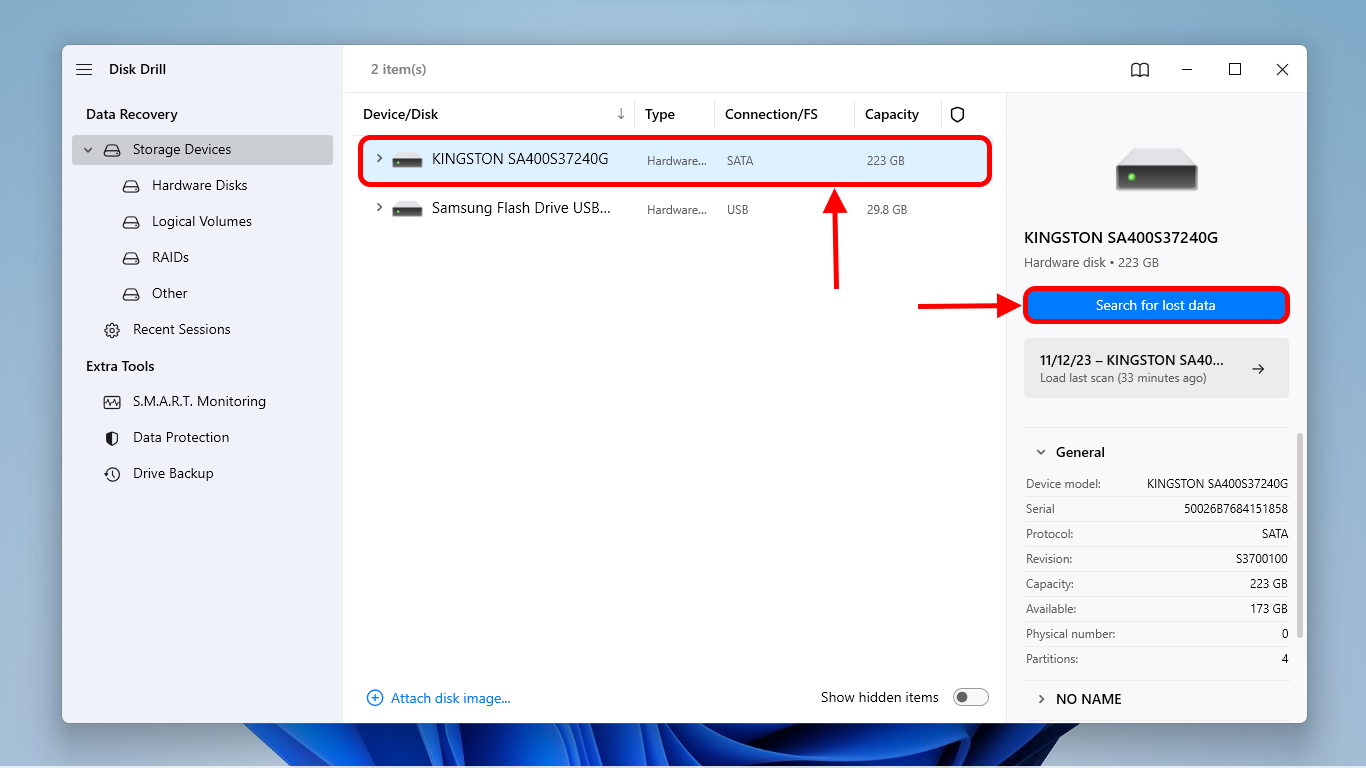
- Select the drive that contained your LibreOffice document (if you didn’t delete it from an external drive, it’s most likely in your system drive), then click “Search for lost data.”
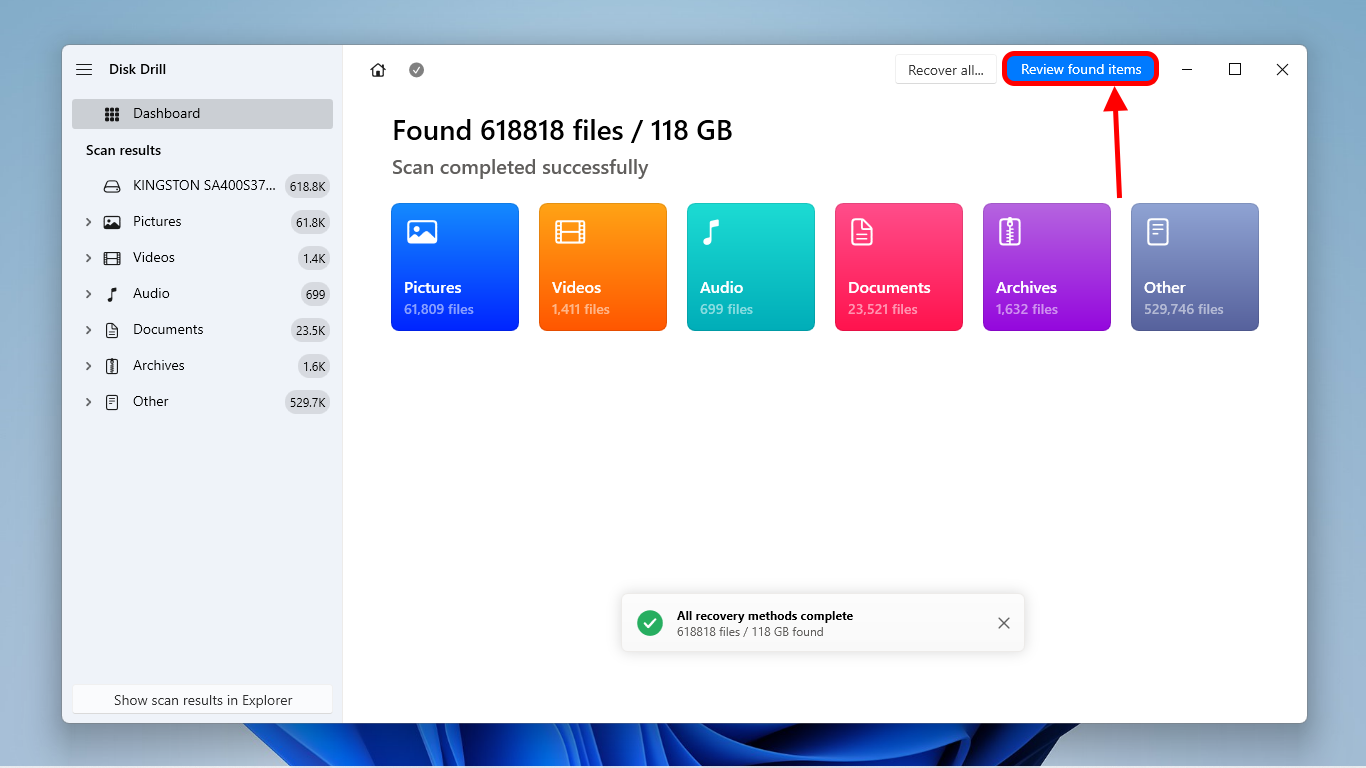
- You can wait for Disk Drill to complete its scan or you can immediately click “Review found items.” It will continue to populate scan results as it finds anything.
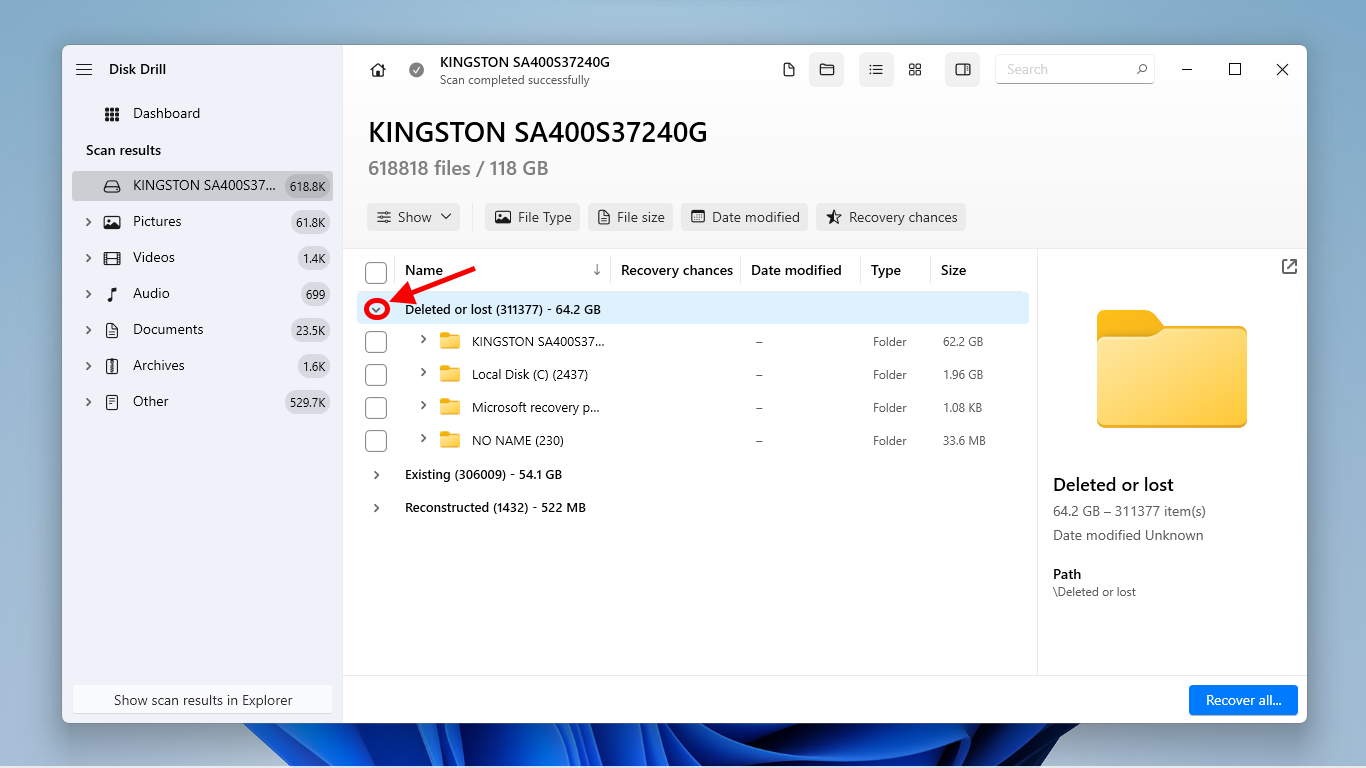
- To locate your missing LibreOffice Document, expand the Deleted or lost section first, which displays files found by the deep scan. If it’s not there, you can go back to this step and go through the Reconstructed section, which finds files by signature. In the next step, we’ll show you how to quickly narrow down the results so you don’t have to spend too much time browsing each section.
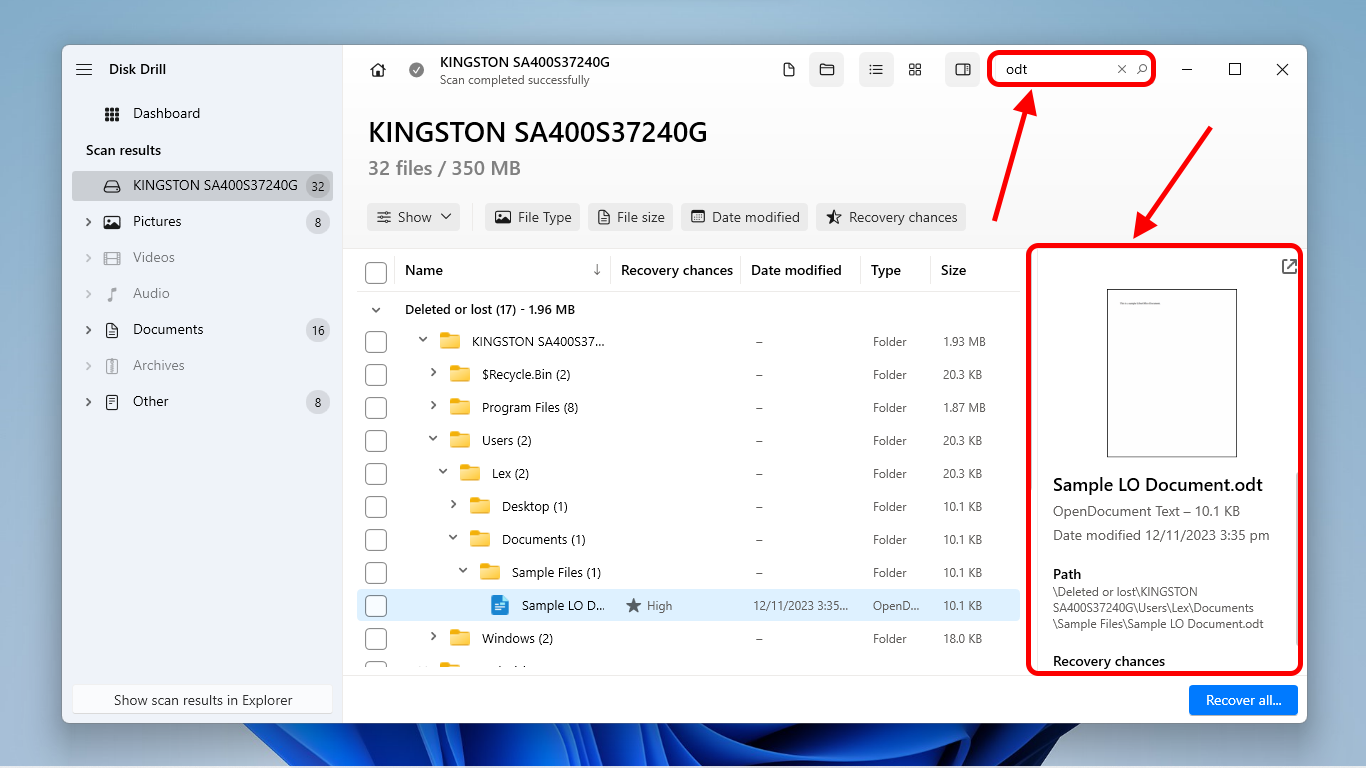
- Use the search tool to filter results even further. In the top-right corner of the window, click the Search button and type one of the following extensions depending on what you need to restore: .odt or .fodt (text documents), .ods or .fods (spreadsheets), .odp or .fodp (presentations), .odg or .fodg (graphics), or .odf for formulas and mathematical equations. Clicking on a file once will display a preview in the right panel.
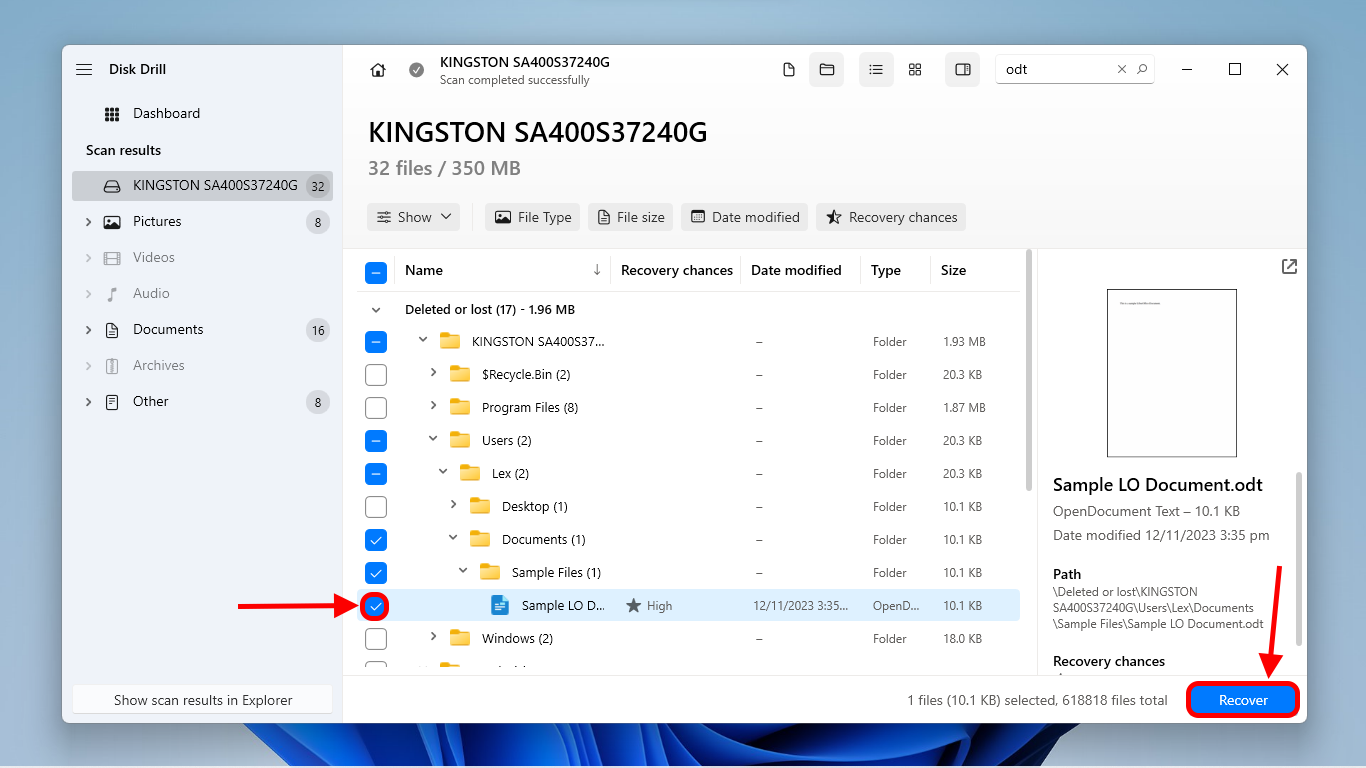
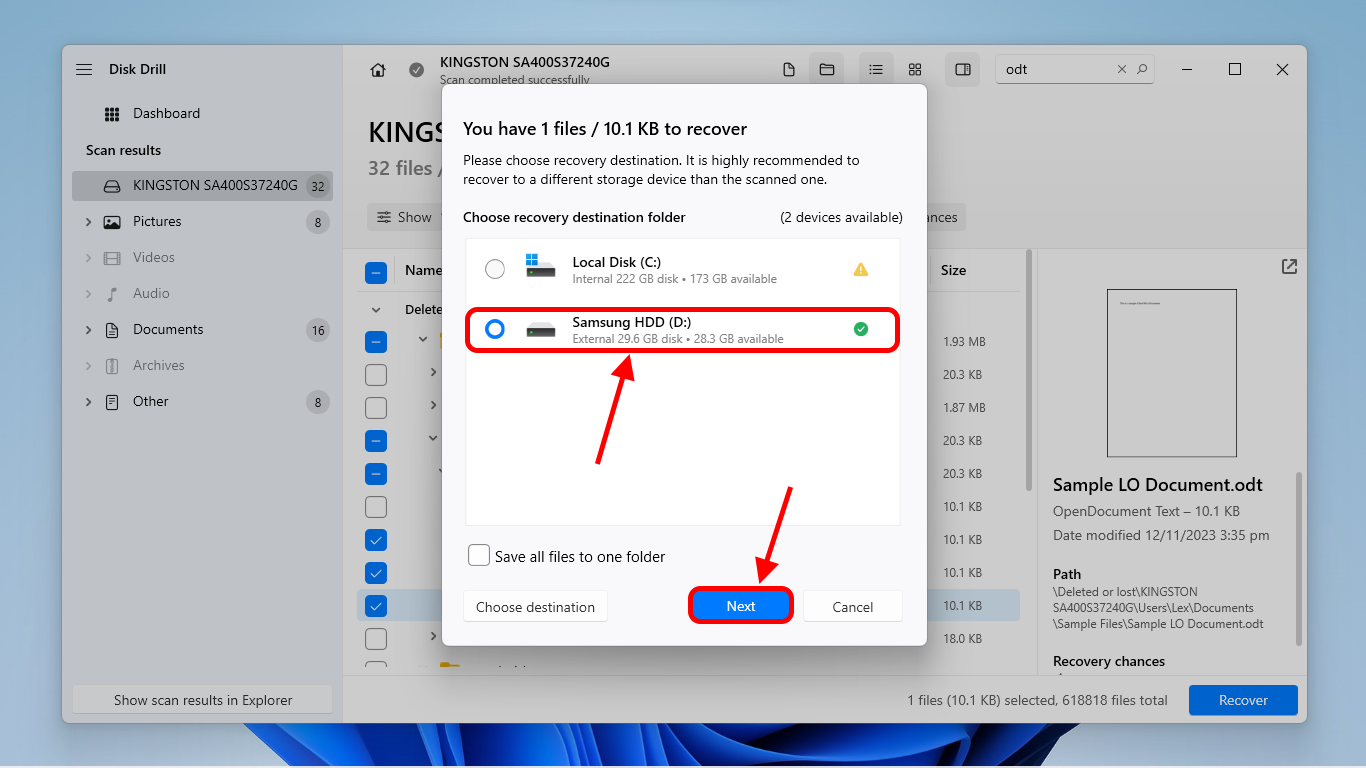
- Mark the box beside the file/s to select it/them and click Recover.
- Choose where you want to save the recovered file. We recommend you save it to a different drive (you can connect a USB or other storage device at this point) to avoid overwriting. Then, click Next to begin the recovery process.
Option B: Recuva
![]() Recuva is another well-known data recovery software that has a free version. Like Disk Drill, Recuva’s vast database catalogued the majority of common file types, including those used by LibreOffice. We’ll show you how to enable certain settings to maximize your chances to recover your deleted LibreOffice file.
Recuva is another well-known data recovery software that has a free version. Like Disk Drill, Recuva’s vast database catalogued the majority of common file types, including those used by LibreOffice. We’ll show you how to enable certain settings to maximize your chances to recover your deleted LibreOffice file.
To read about our experience recovering data with Recuva, read our full Recuva Data Recovery review.
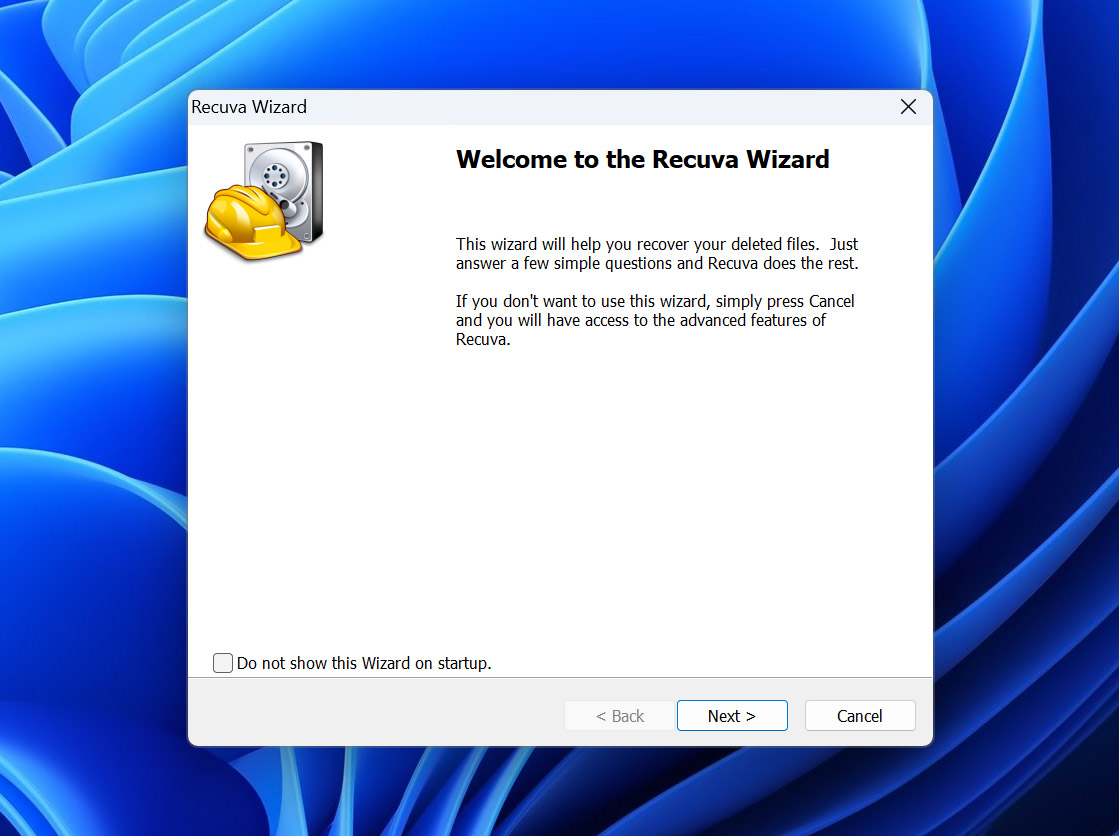
- Download and install Recuva, then launch it.
- Click “Next” to start the wizard.
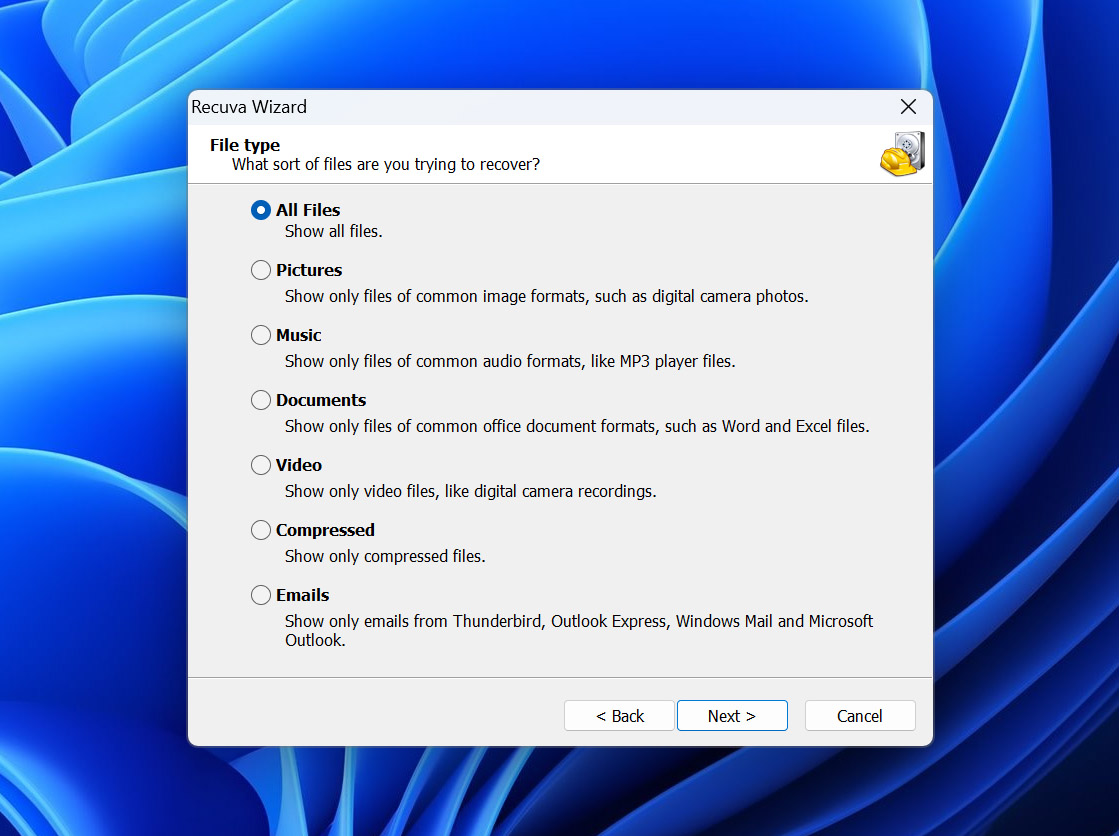
- Select “Documents”, then click “Next.”
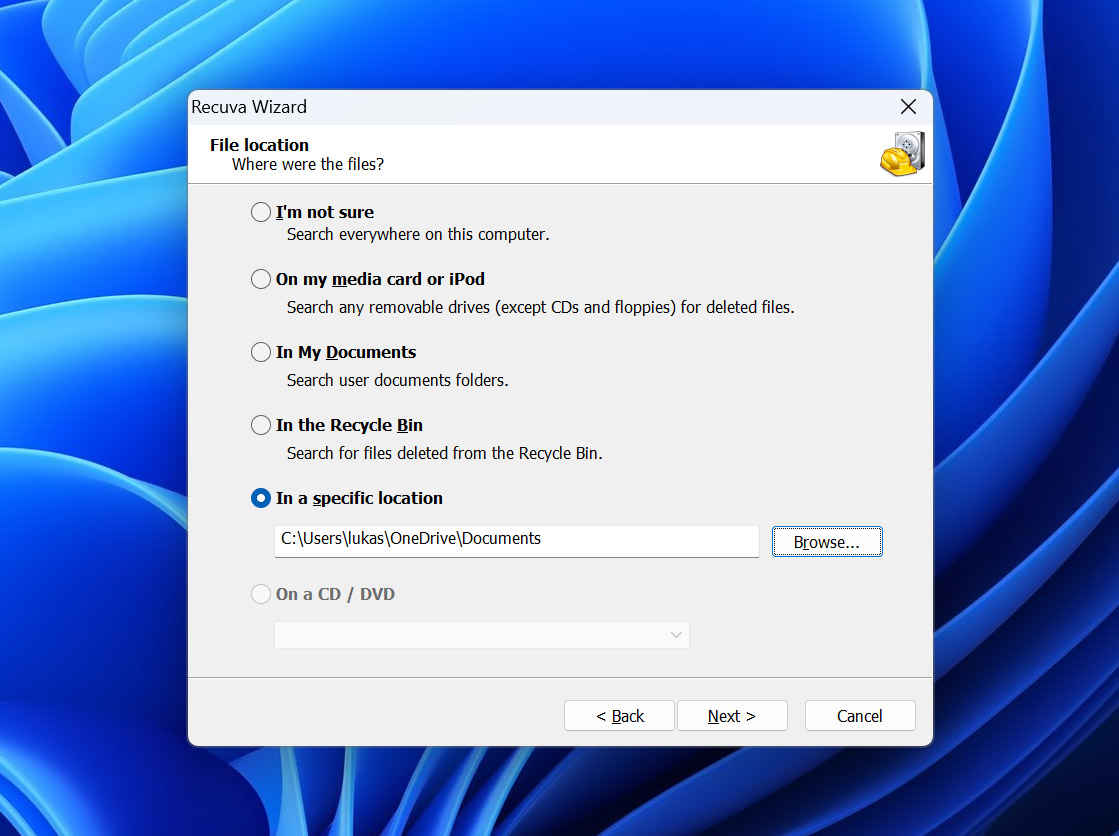
- Click “Browse” to select the location where you want to recover your LibreOffice document from, then click “Next.”
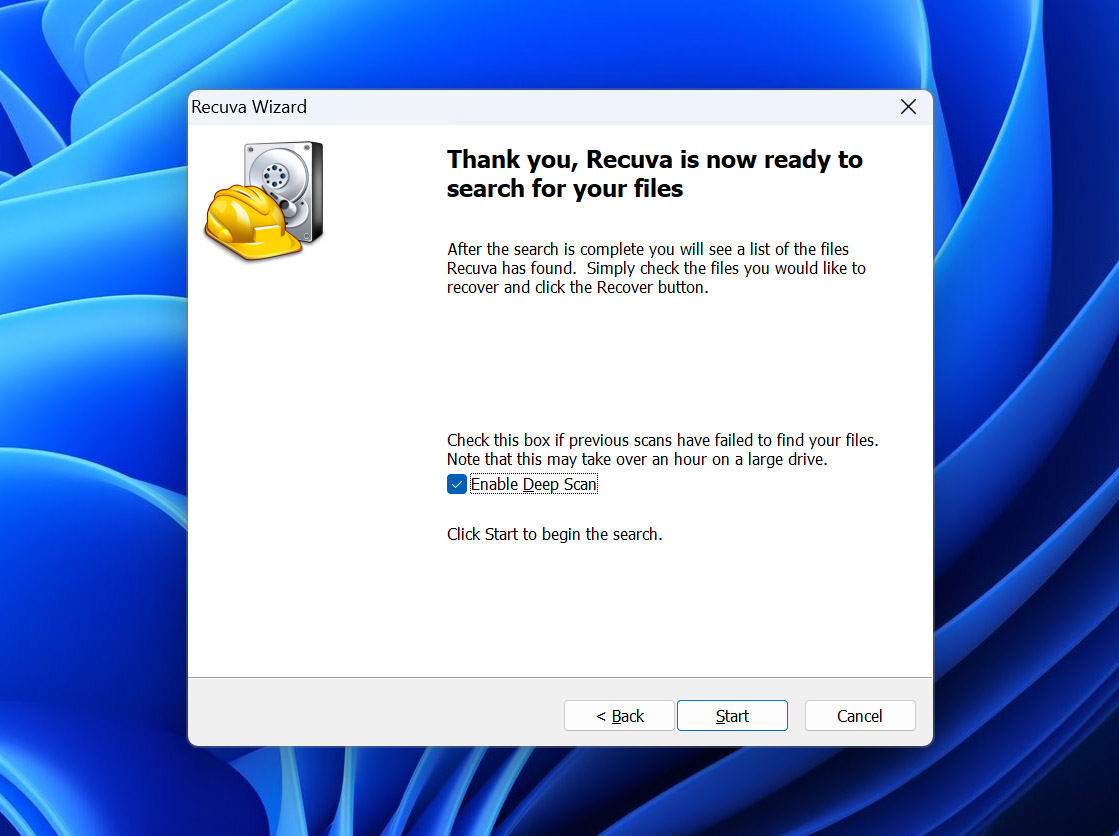
- Select “Enable Deep Scan”, then click “Start.”
- Wait for Recuva to complete its scan, then click “Switch to advanced mode.”
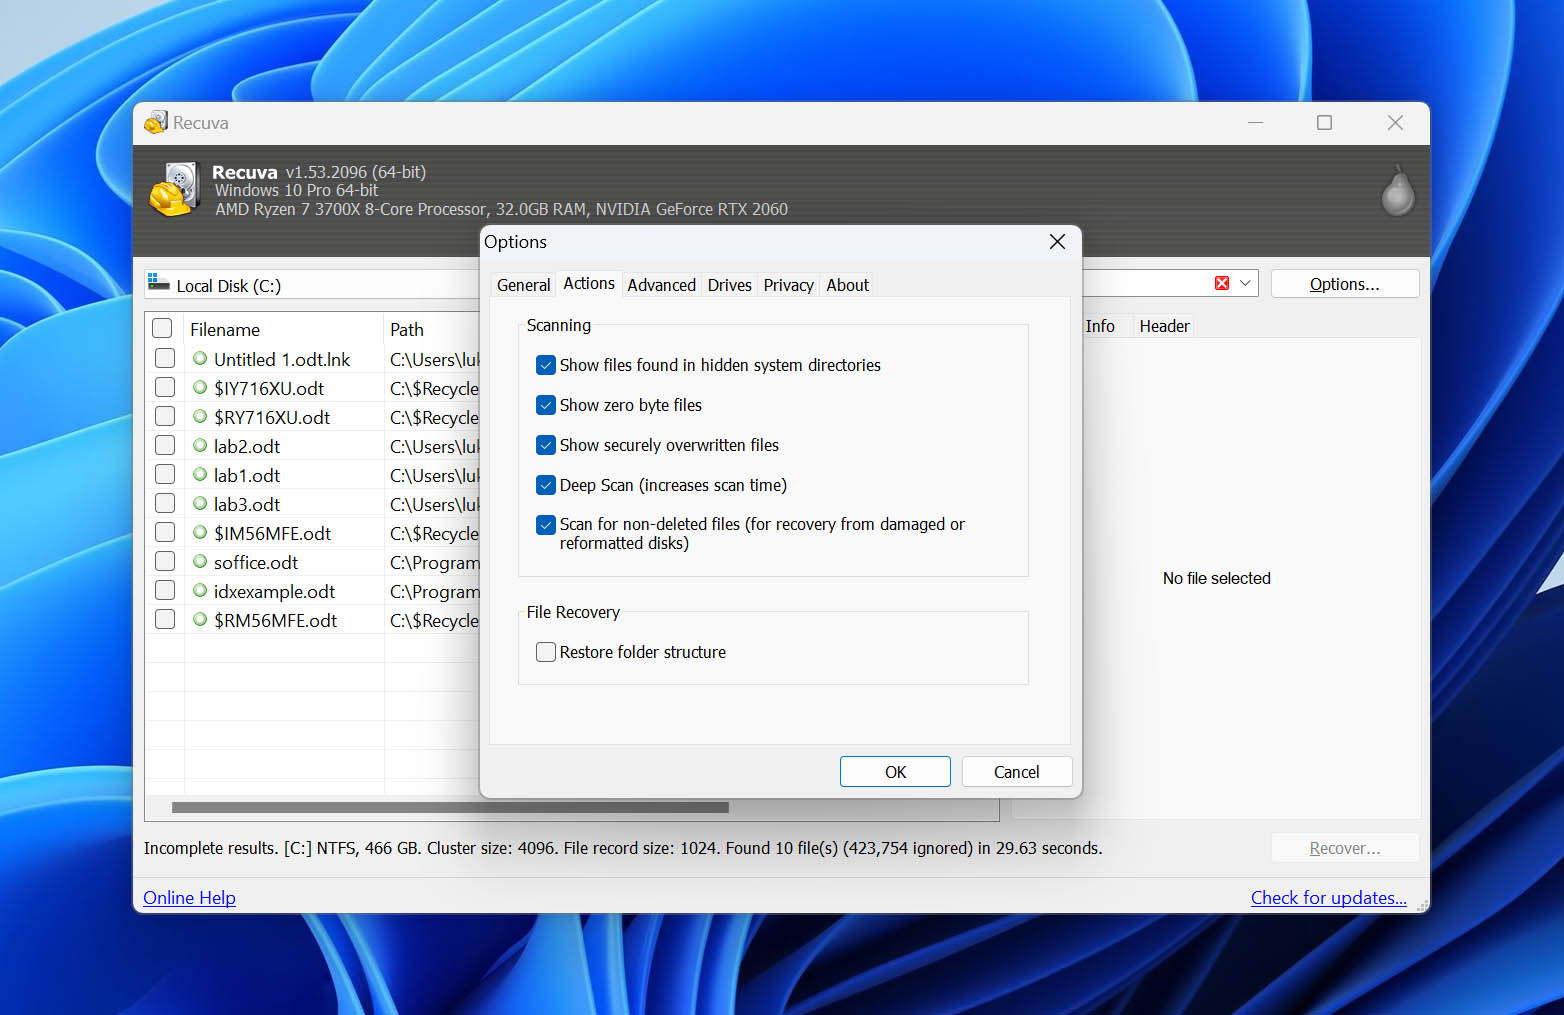
- Click “Options…”
- Navigate to the “Actions” tab and select “Scan for non-deleted files” if you accidentally formatted your drive or your document was deleted due to a virus infection or corruption. Then, click “OK.”
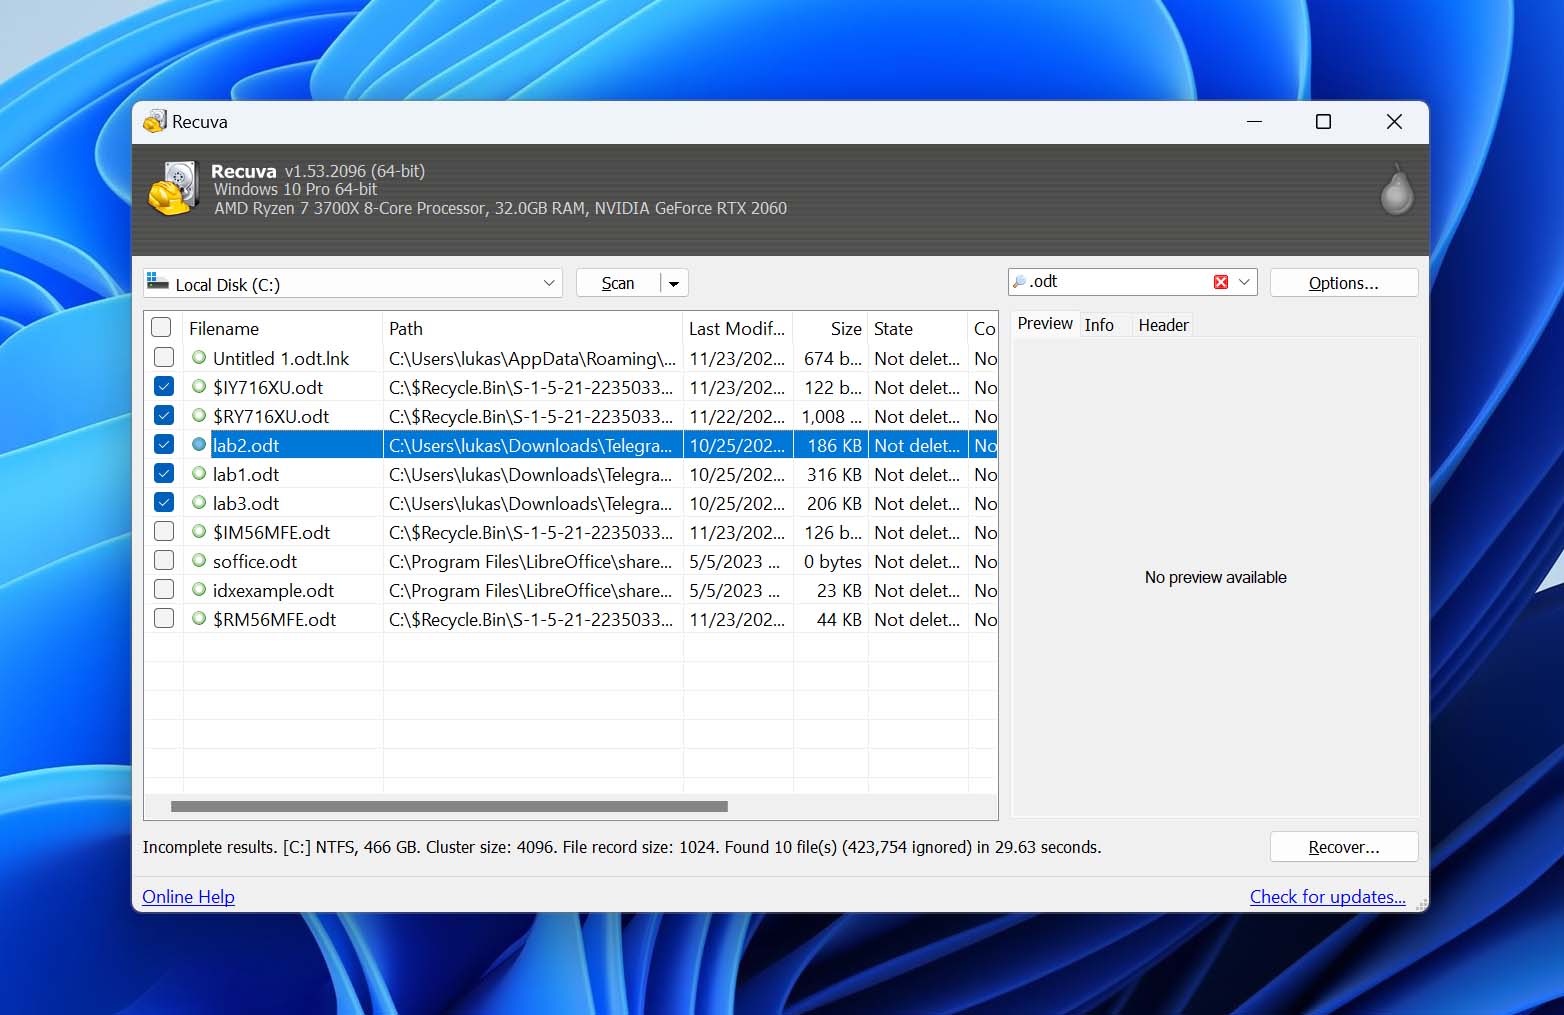
- Use the checkboxes in the left-most column to select the files you want to recover, then click “Recover…”
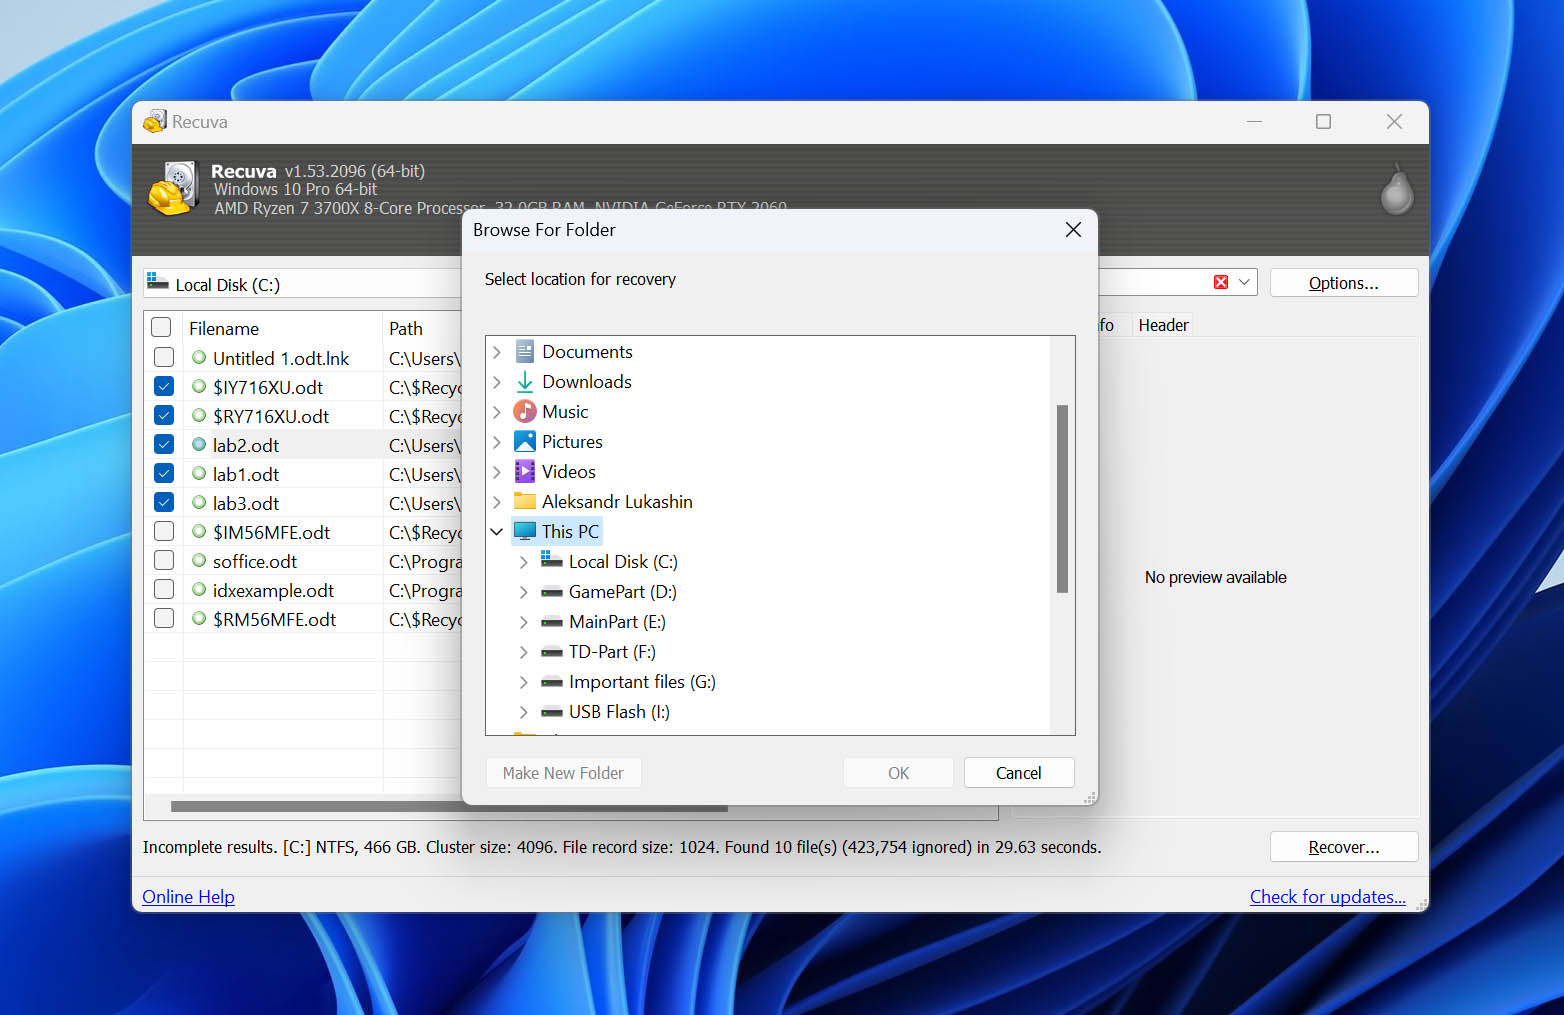
- Select a destination for the recovered files. Choose a location that is different from where you are restoring data from to avoid overwriting it. Then, click “OK.”
Method 3: Restore Deleted LibreOffice Document From Cloud Backup
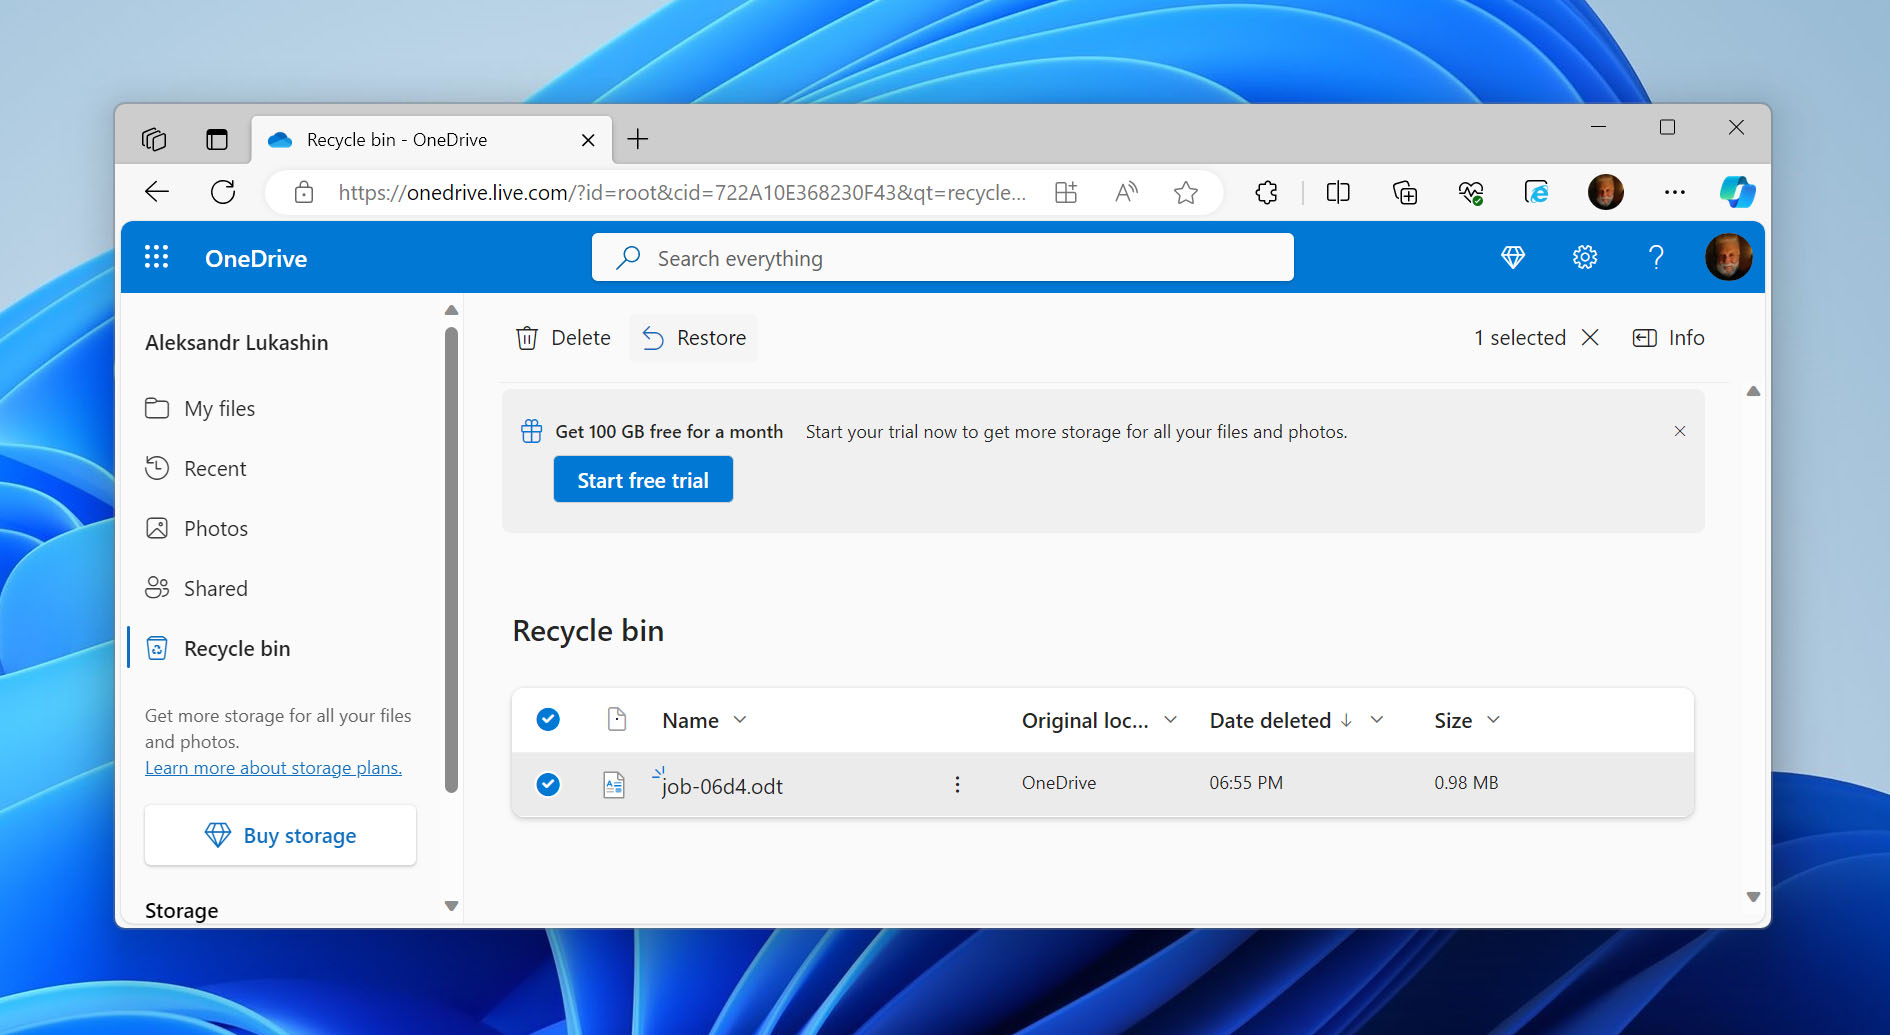
Microsoft OneDrive usually comes preinstalled with Windows 10. It helps users save space by saving files in the cloud while providing access to them from any device. If you have your local folders synced with OneDrive and accidentally deleted a file, you may find it in OneDrive’s Recycle bin folder.
To do this, log into https://onedrive.live.com/ and click “Recycle bin” in the left sidebar. Then, select the file you want to recover and click “Restore.”
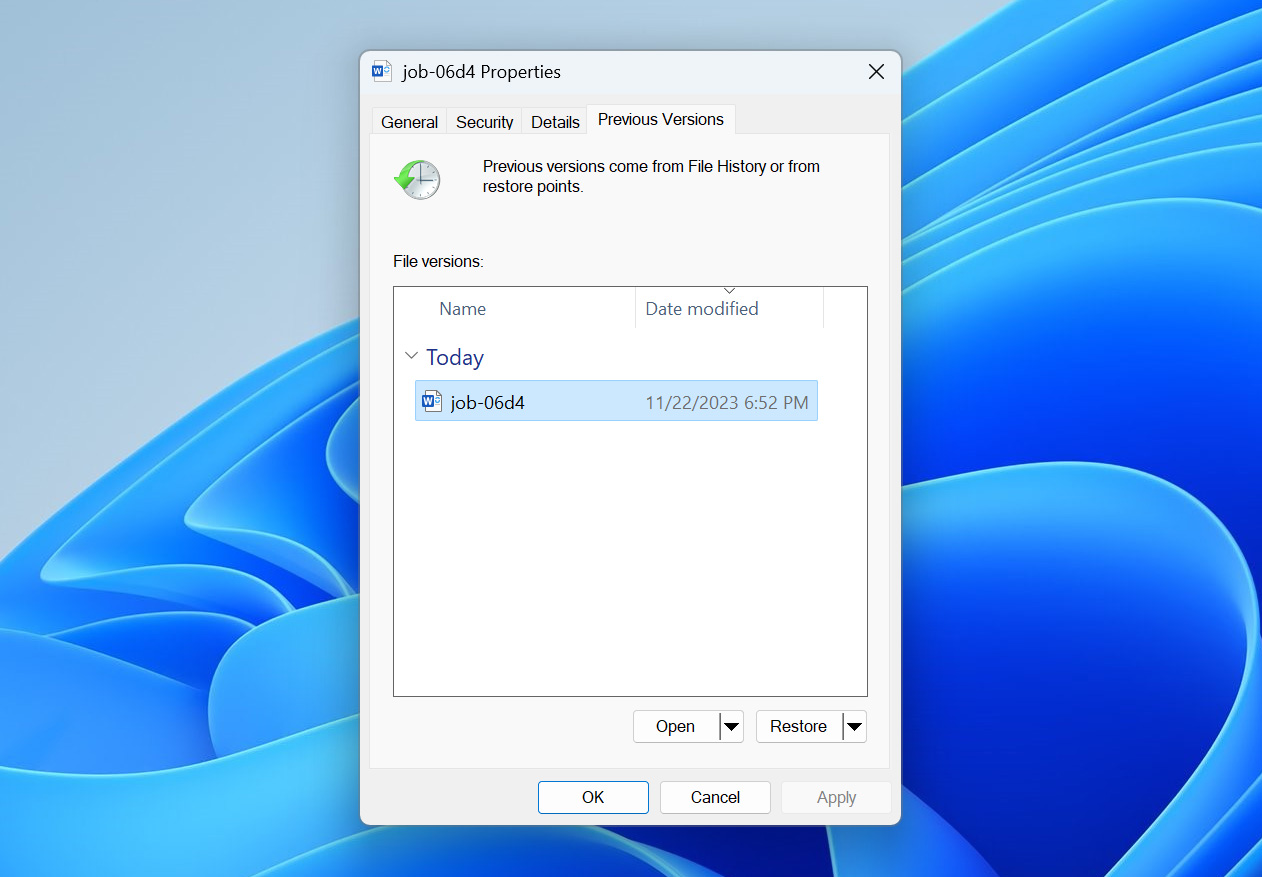
Method 4: Restore a Previous Version of Your Folder
“File History” is a Windows backup and restore feature that incrementally saves previous versions of both files and folders. It can also be used to recover deleted files in Windows 10. In our case, we’ll restore a previous version of the folder that contained the LibreOffice document (from before the file had been deleted).
To restore File History data, you will need to have enabled it before you deleted your file. If you did not have File History enabled before deleting it, try using data recovery software. Click here to jump to that section of the article.
Is it Possible to Recover an Overwritten LibreOffice Document?
Unfortunately, overwritten data can’t be restored by data recovery software anymore. In this case, the only option is to check if you have a copy of the document anywhere else – such as in the cloud or in your File History. Click the links below to quickly jump to these sections:
- Click to jump to Method 3: Cloud Backup
- Click here to jump to Method 4: Restore a Previous Version of Your Folder
Tips to Ensure Your LibreOffice Documents’ Safety
While the methods we demonstrate in this article can really help with recovering your LibreOffice documents, the best solution to data loss is prevention.
We recommend using the native backup features of both LibreOffice and Windows together and creating a bulletproof backup and recovery system. We’ll show you how to use both of these utilities in the sections below.
Enable Additional LibreOffice Backup
As previously mentioned, LibreOffice has an Auto-recovery feature. In Method 1, we demonstrated how it automatically prompts you to restore a backup when you launch LibreOffice.
But you can enable an additional LibreOffice Backup setting that allows you to create backups every time you save a document (new backups overwrite old ones) and manually restore them without relying on the auto-prompter.
This also allows you to work around the “LibreOffice recovery failed” error that sometimes shows up when LibreOffice attempts an automatic recovery.
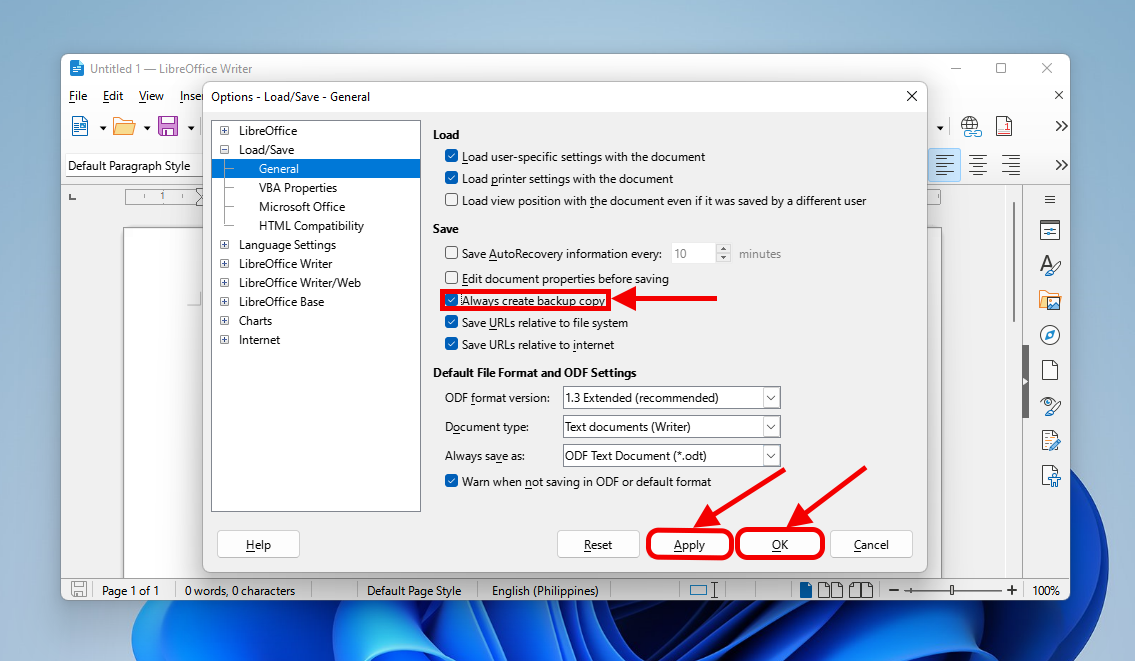
To enable additional LibreOffice backups:
- Open LibreOffice.
- On the menu bar, click Tools > Options > Load/Save > General. Then, mark the box beside Always create a backup copy. Click Apply then OK.
To restore the document, locate its .bak file (LibreOffice > Tools > Options > LibreOffice > Paths > Backups). Then, copy the file to another location and rename it with its original extension (e.g. .odt for text documents). You can then open the renamed file as normal, modify it, save it, etc.
Set Up File History
Windows File History tool is an intuitive backup utility that automatically saves past versions of all the files and folders in your library. Not only can you restore deleted files this way, but you can also restore a backup that was created prior to any changes you want to undo.
You can add specific folders to the library so they also get backed up automatically. You can also choose to exclude specific folders to avoid bloating your backups unnecessarily.
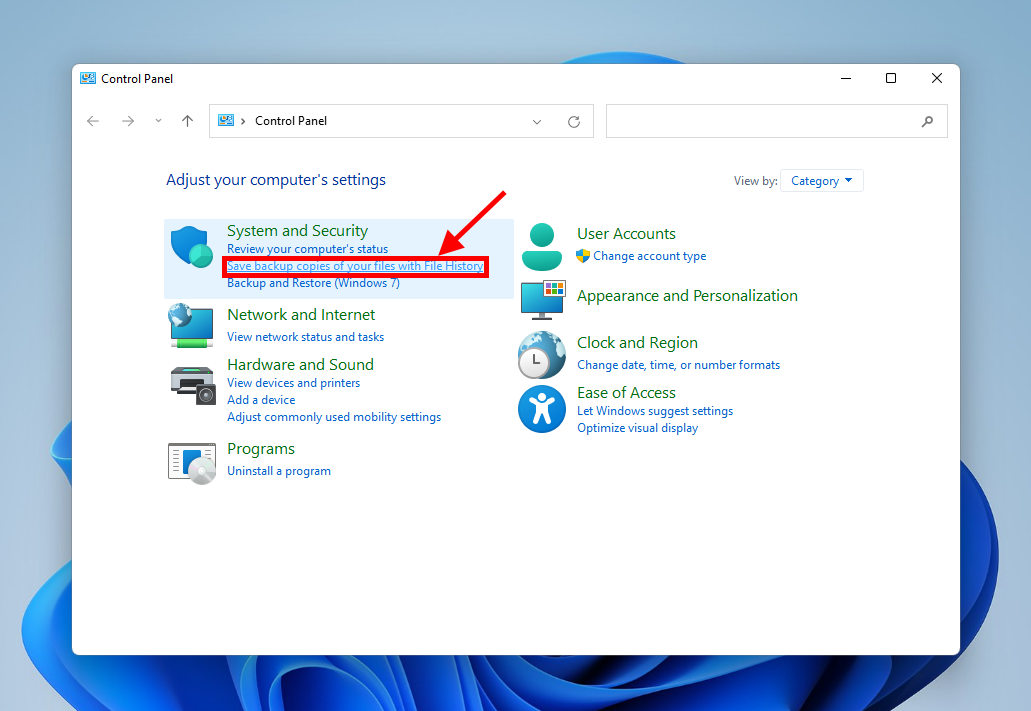
To enable File History on your PC:
- Connect an external storage device to your PC, ensuring it has enough space to back up the data you want (don’t worry, you can exclude specific folders or libraries later).
- Open Control Panel (you can find it in the Start menu). Under System and Security, click Save backup copies of your files with File History.
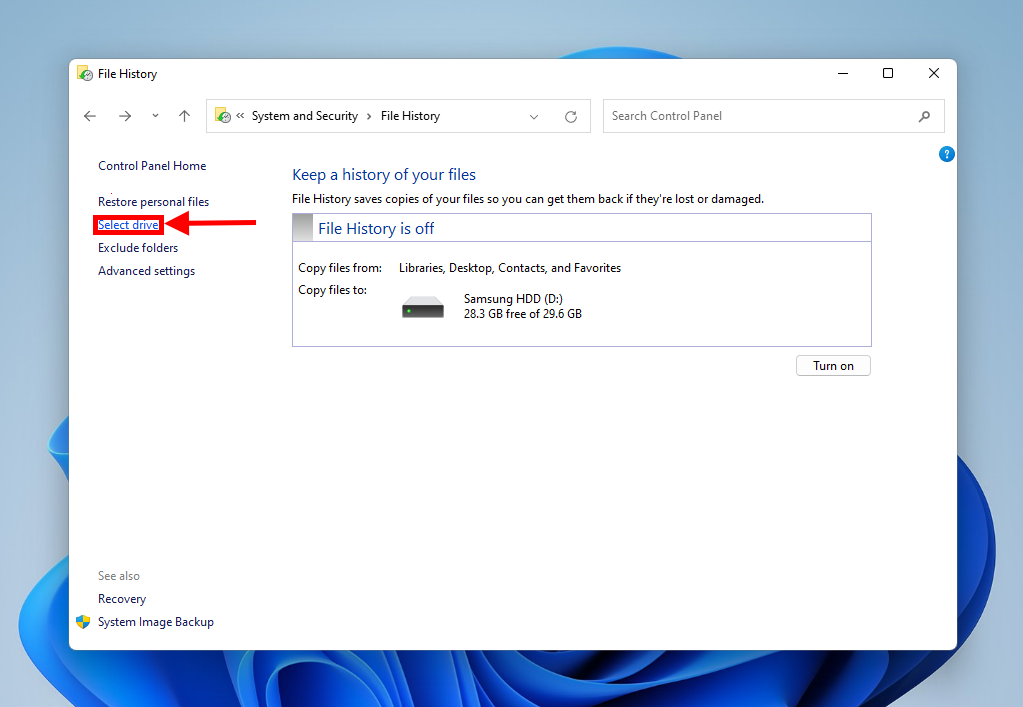
- On the left sidebar, click Select drive.
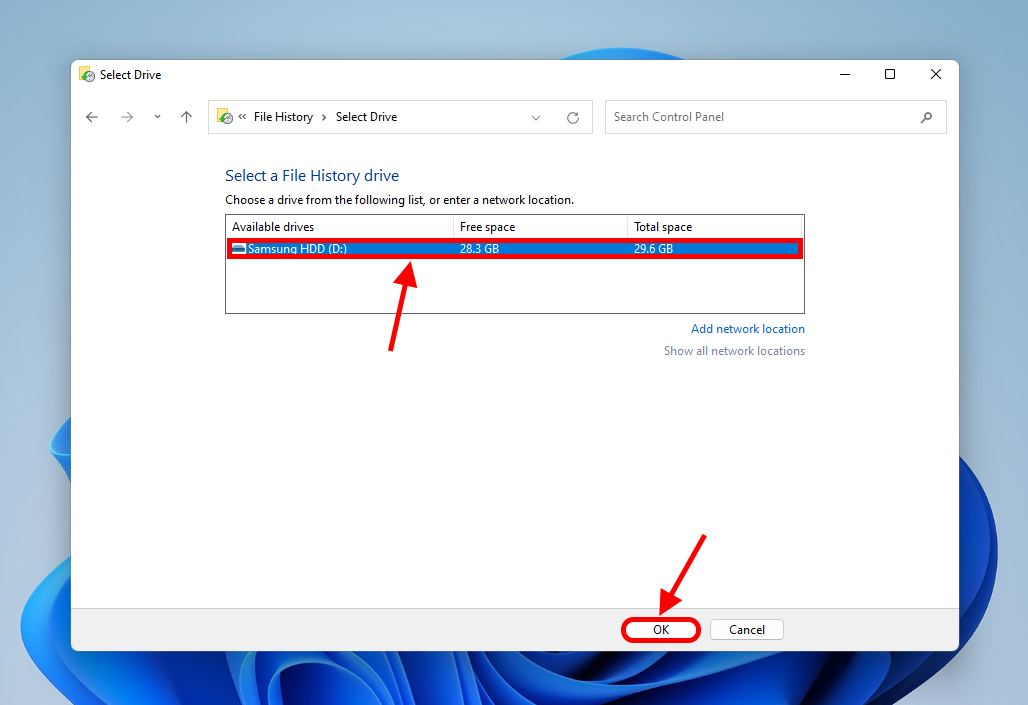
- Select the drive you connected in step 1 and click OK.
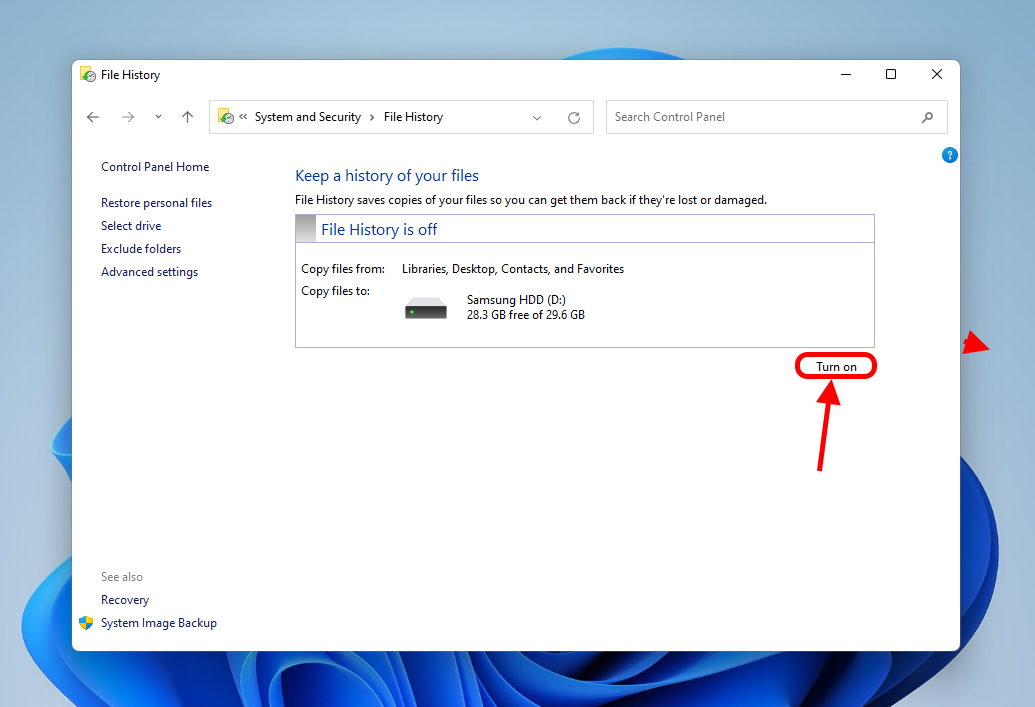
- Return to the main File History menu and click Turn on. At this point, File History is enabled and will start backing up the folders in your library (Documents, Music, Pictures, etc.).
If you want to exclude anything, click Exclude folders in the main window’s left sidebar and click Add to start the selection. Make sure to save any changes before closing the window!
To restore backups created by File History:
- Connect your backup drive to your PC.
- Open the File History menu (Windows Search > File History). Then, click Restore personal files in the left sidebar.
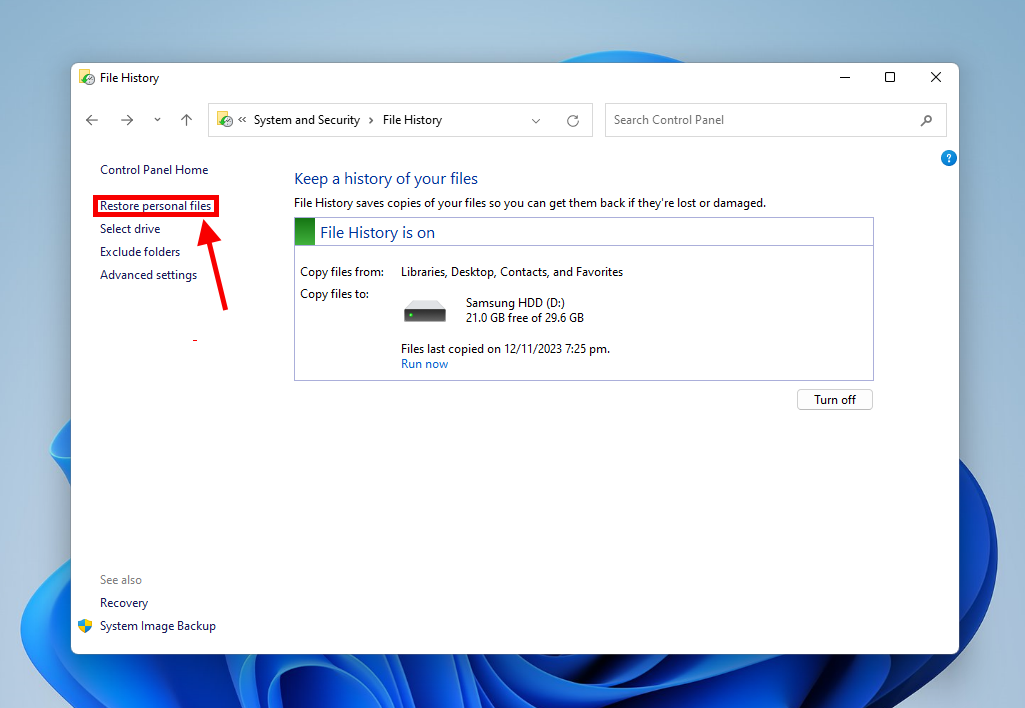
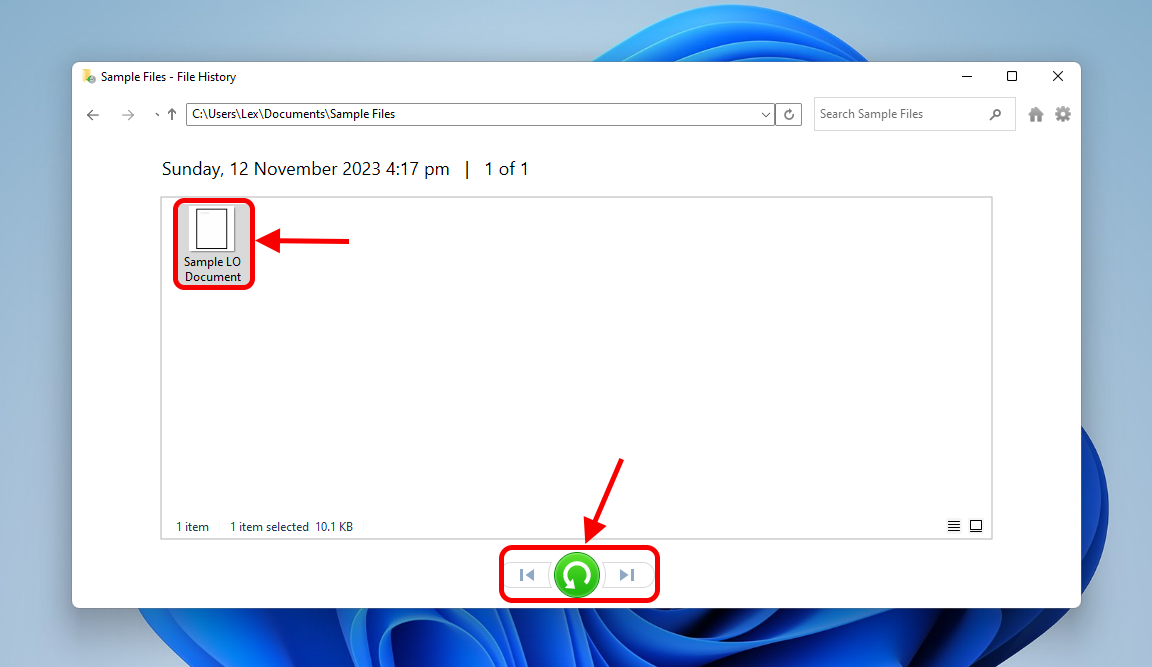
- In the File History recovery menu, navigate to the folder where your LibreOffice document was saved in. Click the left arrow at the bottom of the screen to browse previous versions of the Documents folder until you locate the file you want to restore. Then, click the green Restore button to recover the document.
FAQ
How to recover deleted LibreOffice document?
To recover a deleted LibreOffice document:
- Download, install, and launch Disk Drill.
- Select the drive that contained your file and click “Recover.”
- Click “Review found items.”
- Select your LibreOffice documents and click “Recover.”
- Save your files to a location on your computer.
Can you recover an unsaved LibreOffice document?
In some cases, yes. Here are 2 ways to do so:
- Often, LibreOffice automatically attempts to restore a document in case of any unsaved work. Upon launching LibreOffice, allow it to do so.
- Check your LibreOffice backup and temporary files. You can find the path to this folder by launching LibreOffice > Tools > Options > LibreOffice > Paths > Backups.
Does LibreOffice have autosave?
Yes and no. LibreOffice doesn’t have an “autosave” feature, but it has an “autorecovery” feature. When enabled, LibreOffice saves AutoRecovery information at a certain interval. This helps the program recover documents and other files in case it suddenly gets shut down without saving. This is different from incrementally saving progress like you see with Google Docs.
Where are LibreOffice recovery files stored?
Launch LibreOffice, then click Tools > Options > LibreOffice > Paths. Next to “Backups”, you’ll find the folder path where LibreOffice saves its recovery files.
How can I recover a corrupted LibreOffice document?
To recover a corrupted LibreOffice document, try the following methods:
- Confirm the document autorecovery when prompted by LibreOffice
- Restore a previous version of your LibreOffice document using Windows File History
- Use data recovery software that can reconstruct files
What should I do if LibreOffice recovery failed?
If LibreOffice recovery failed, try the following solutions:
- Locate the document’s backup file by opening LibreOffice > Tools > Options > LibreOffice > Paths. See the Backups entry and locate the file via Explorer. Then, copy the .bak file to another location and rename it with its original file extension (e.g. rename file.bak to file.odt).
- Use data recovery software to restore your file.
- If you have File History enabled, you can restore a previous version of the file.
To avoid this problem in the future, make sure to enable the Always create a backup copy setting found in LibreOffice > Tools > Options > Load/Save > General.
Is there a built-in backup feature in LibreOffice?
Yes, LibreOffice has a built-in backup feature and automatic recovery – both are enabled by default. If LibreOffice crashes or you close the program without saving, the app will automatically prompt you to recover the previous file. For better protection, we recommend that you enable Always create a backup copy via LibreOffice > Tools > options > Load/Save > General. In this menu, you can also set how often autorecovery data is saved.
Where to find a document after the LibreOffice crash?
You can find your document as a .bak (backup) file in LibreOffice’s backup folder (LibreOffice > Tools > Options > LibreOffice > Paths > Backups). To restore your document, copy its .bak file to another location and rename it with its original extension. If your file is named document.bak, rename it to document.odt.
This article was written by Alejandro Santos, a Staff Writer at Handy Recovery Advisor. It was also verified for technical accuracy by Andrey Vasilyev, our editorial advisor.
Curious about our content creation process? Take a look at our Editor Guidelines.