
PDF is the most common file type, especially in professional settings… Yet it’s prone to damage, corruption, unsaved exits and of course, accidental deletion. Because these issues are so common, we wanted to create an all-in-one, easy-to-follow guide for users of all skill levels to follow whenever your PDFs won’t cooperate.
This article covers how to recover unsaved/deleted/lost PDF files on Mac, and even how to repair broken/damaged/corrupted PDF files using simple and powerful tools. Read on.
Is it Possible to Recover Deleted or Unsaved PDF File?
In most cases, it’s possible to recover deleted or unsaved PDF files. You can even repair damaged PDF files with the right tools. Use the table below to figure out which scenario suits you and quickly jump to the right guide within the article.
Problem |
Solutions |
I closed my PDF document/my computer shut down before I could save it. |
Most macOS apps have an autosave feature. Jump to the Autosaves guide. If you couldn’t find any autosave files, jump to the Temp Folder guide. |
I accidentally deleted my PDF file. |
|
I lost/misplaced my PDF file. |
Jump to the Spotlight guide if you want to open your file and to the Terminal guide if you want to know its location path. |
I can’t open my PDF file. |
It’s probably damaged or corrupted. Try all the (free!) methods in the PDF Repair guide. |
How to Recover Unsaved PDF Files
If you close your PDF file (or your computer suddenly shuts off) before saving, you won’t find it in the usual places on your Mac. Instead, we’ll look at macOS folders that were specially created to save instances of your file while it was open.
Method #1: Check Your Apps’ Autosave Folders
MacOS apps usually have safety nets for unsaved documents that are suddenly closed. For example, you can recover an unsaved PDF on Foxit if you have autosaves enabled. In this article, we’ll focus on Preview and Adobe. Mac Preview has its own folder, while Adobe has its own – we’ll show you how to access both below.
Other PDF apps that have been optimized for Mac probably have this feature too. Try checking their websites or contacting support.
How to Locate Preview’s Autosaves
To recover unsaved pdf file on Mac from Preview’s autosave folder:
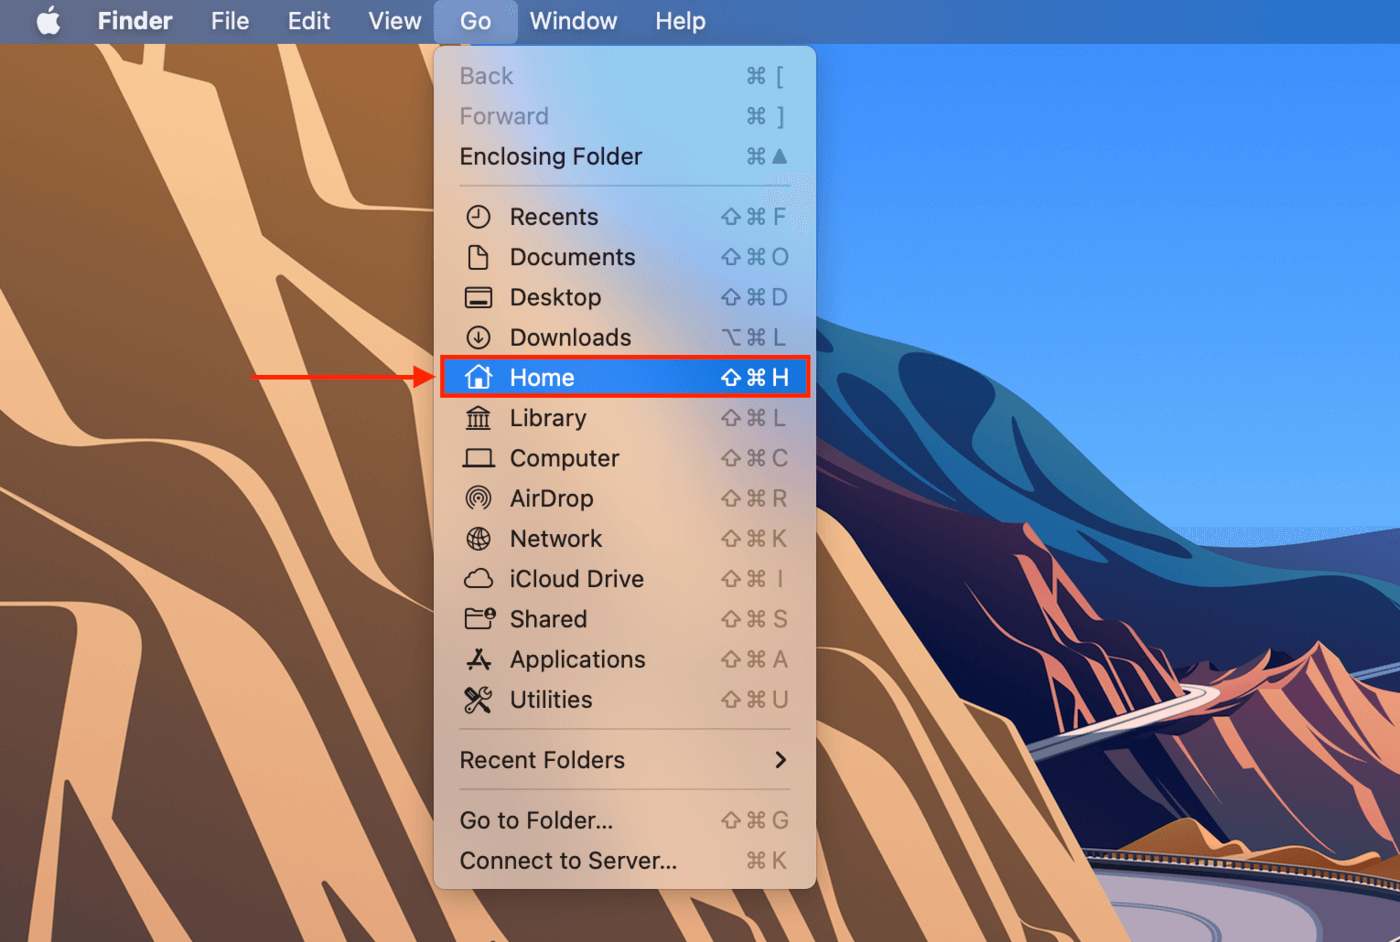
- Make sure Finder is open. On the Apple menu bar, click Go > Home.
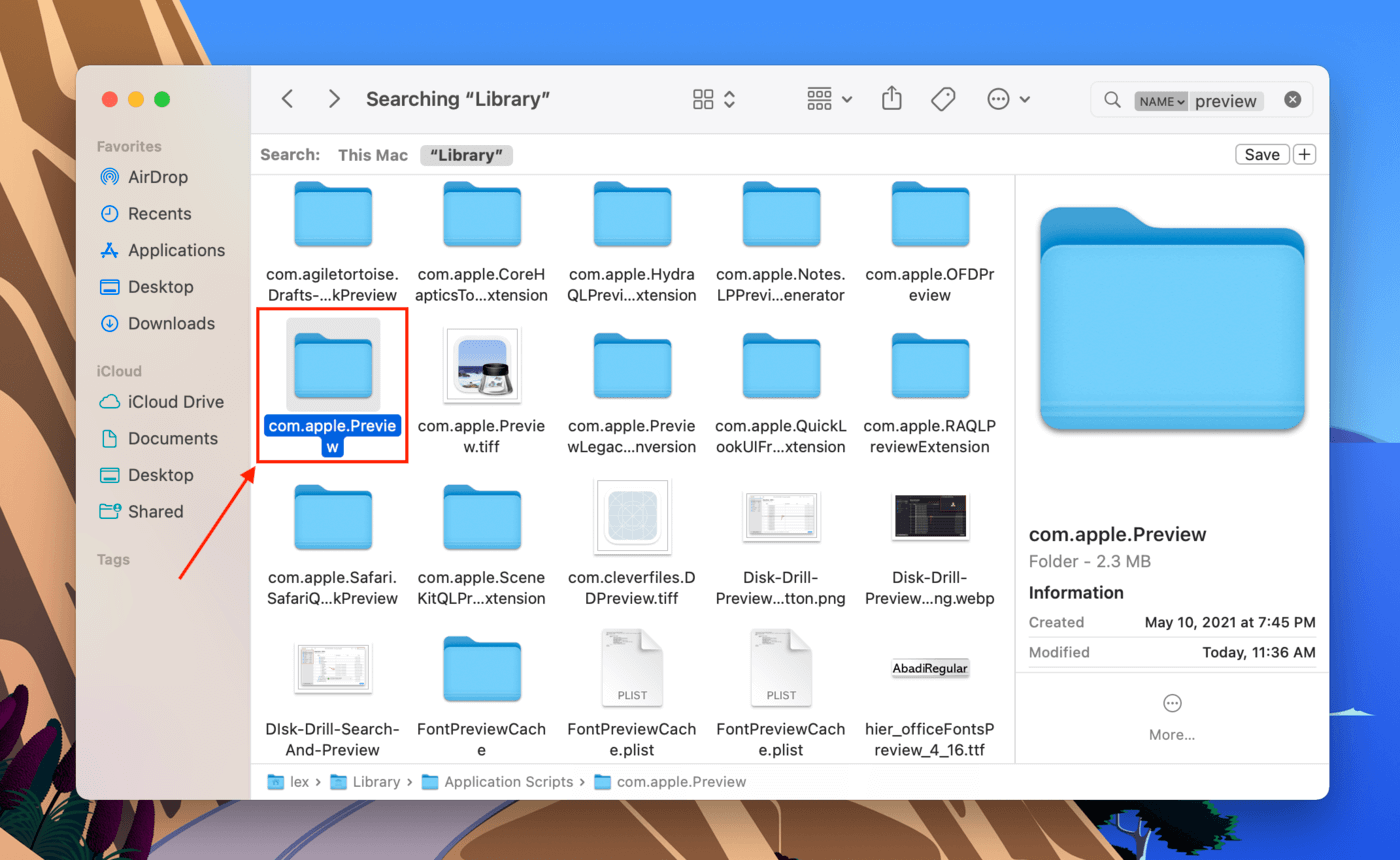
- Navigate to Library > com.apple.Preview folder. Use the search bar to quickly find it.
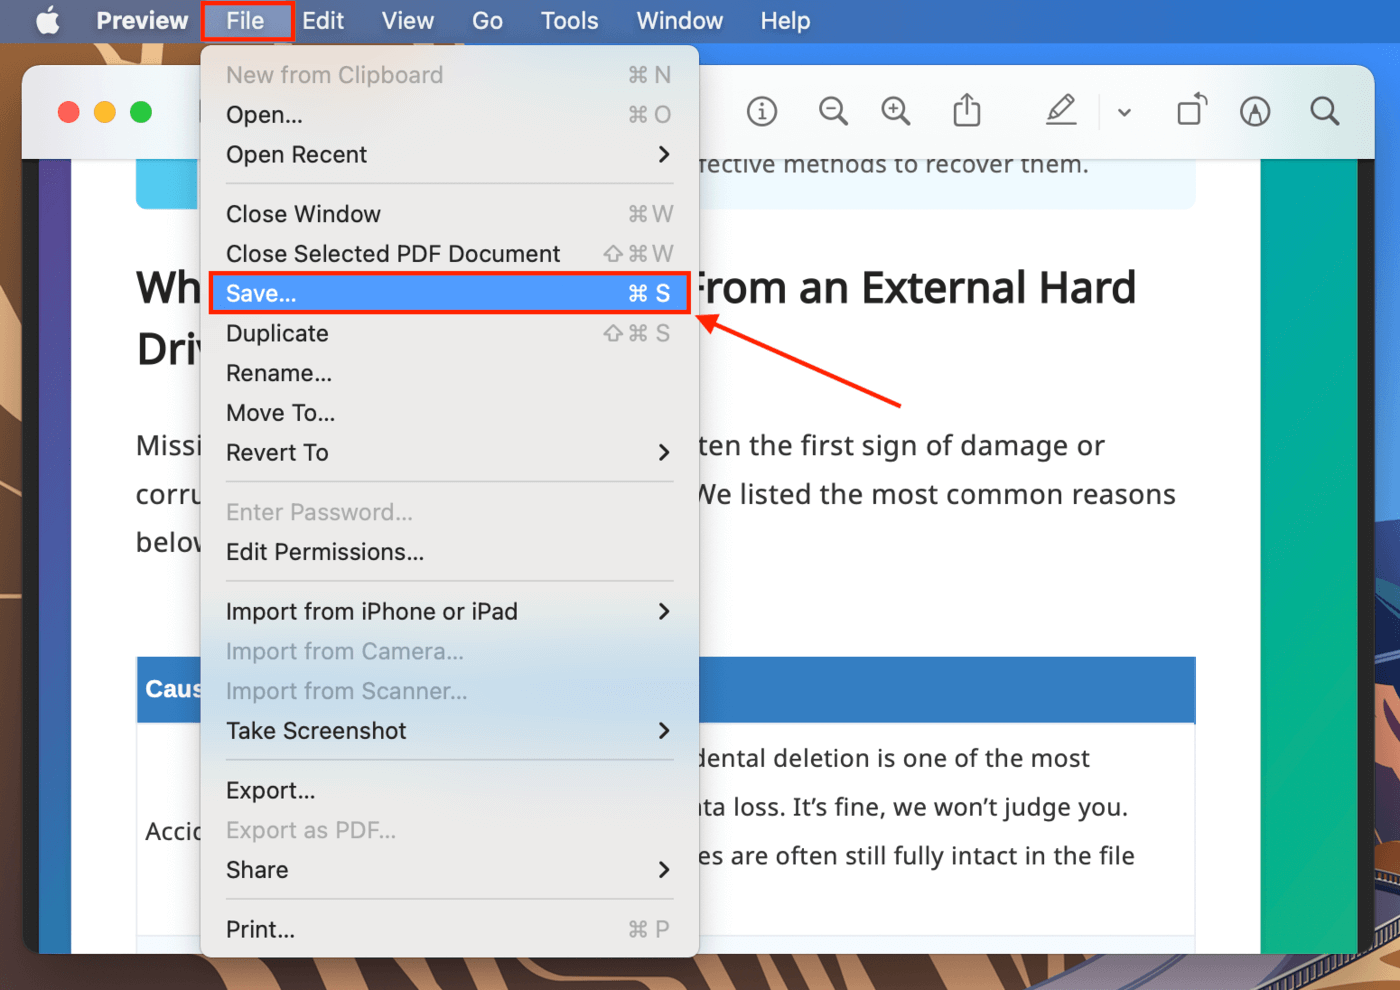
- Open your unsaved PDF file and hit File > Save to save it to a secure location.
How to Locate Adobe Acrobat’s Autosaves
To restore an unsaved Adobe Acrobat file:
- Make sure Finder is open. On the Apple menu bar, click Go > Go to Folder…”.

- Type the following path into the field, then click Go: /Library/Application Support/Adobe/Acrobat/AutoSave.
- Open your unsaved PDF file and hit File > Save and save it to a secure location.
Method #2: Check Mac Temporary Folder for Missing PDF Files
Mac’s temporary folder has a different purpose from autosave folders – it acts as a container for apps to store files while a process is being executed. If your Mac shut down in the middle of working on your PDF, you might find it here.
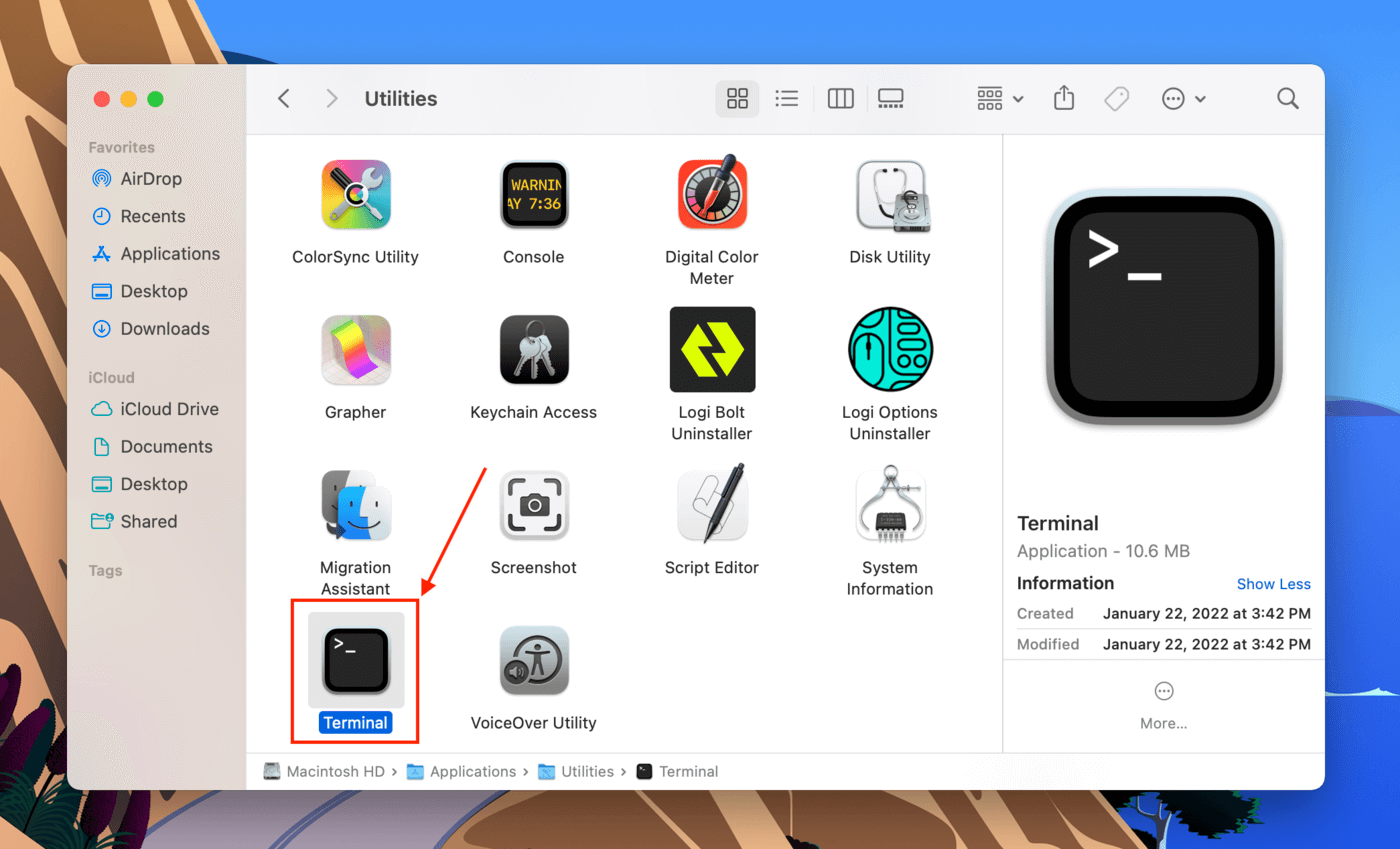
- Launch the Terminal app (Finder > Applications > Utilities).
- Type this command and hit return: open $TMPDIR
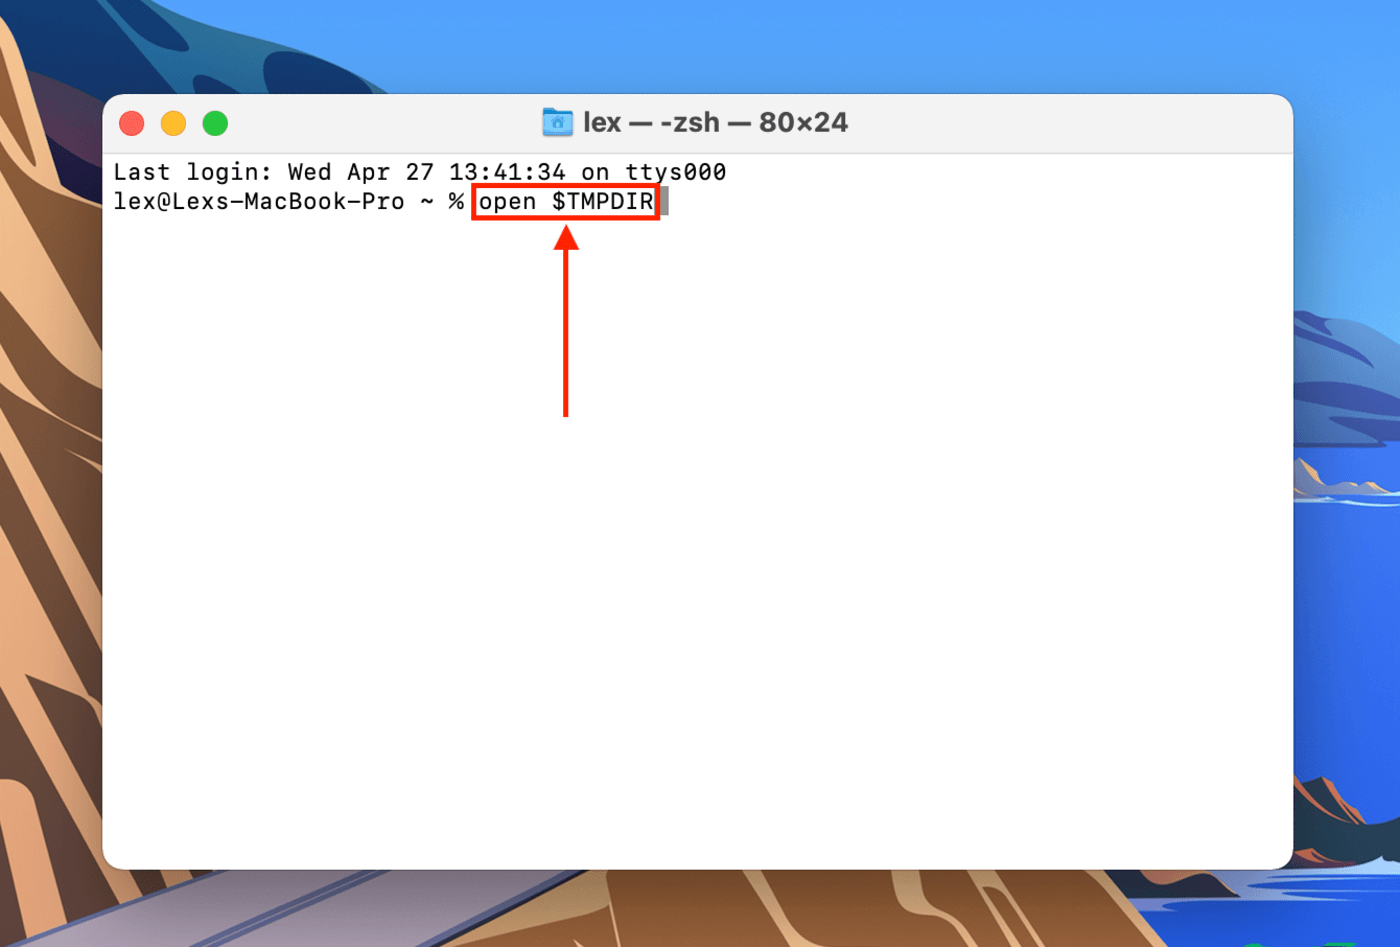
- In the folder that opens, navigate to the “TemporaryItems” folder. From here, you can copy your file to another folder or save it.

Pro Tip: Use the search bar to find your files faster!
How to Recover Deleted PDF Files
macOS really tries to give us as many second chances as possible. Below are 4 different methods to recover deleted files on Mac, using mostly native tools (and one powerful third-party app that we constantly hype on our blog). Read on.
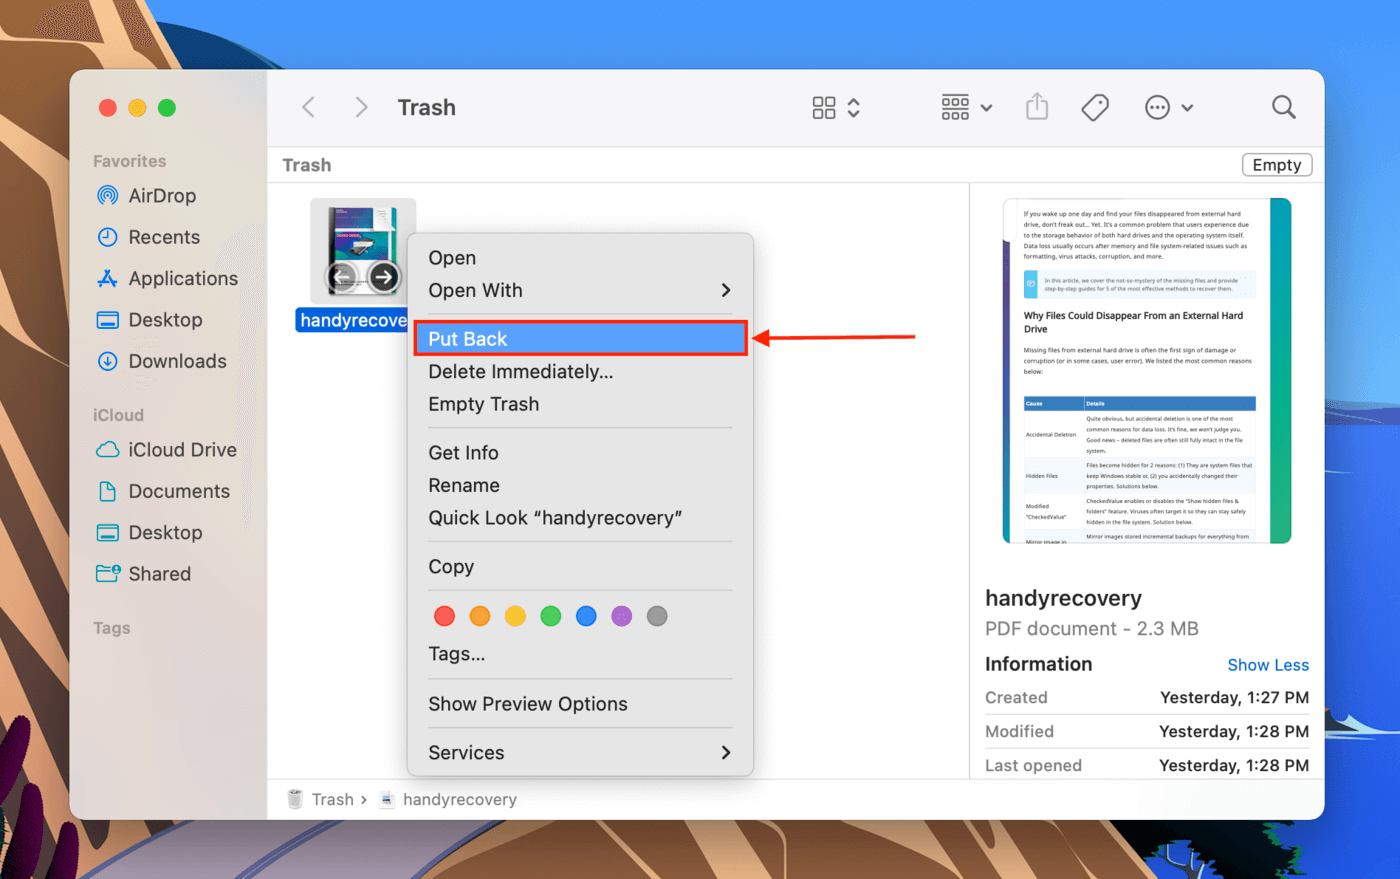
Method #1: Put Back PDF Files From Trash
If you deleted your PDF file but you haven’t emptied your Trash folder (or deleted it again from there), this is the first place you should look. Locate your Trash items and restore them by doing the following:
If you want to recover files from an emptied Trash folder, skip to Method #2.
- Open the Trash folder by clicking its icon on your dock or by typing ~./Trash in the search field of Finder > Go > Go to folder…

- Right-click your PDF file and click “Put Back”.
Pro Tip: External drives also have their own hidden Trash folder, as long as you deleted your files while connected to a Mac. Simply open your USB folder in Finder, then hit CMD + Shift + . to unhide it.
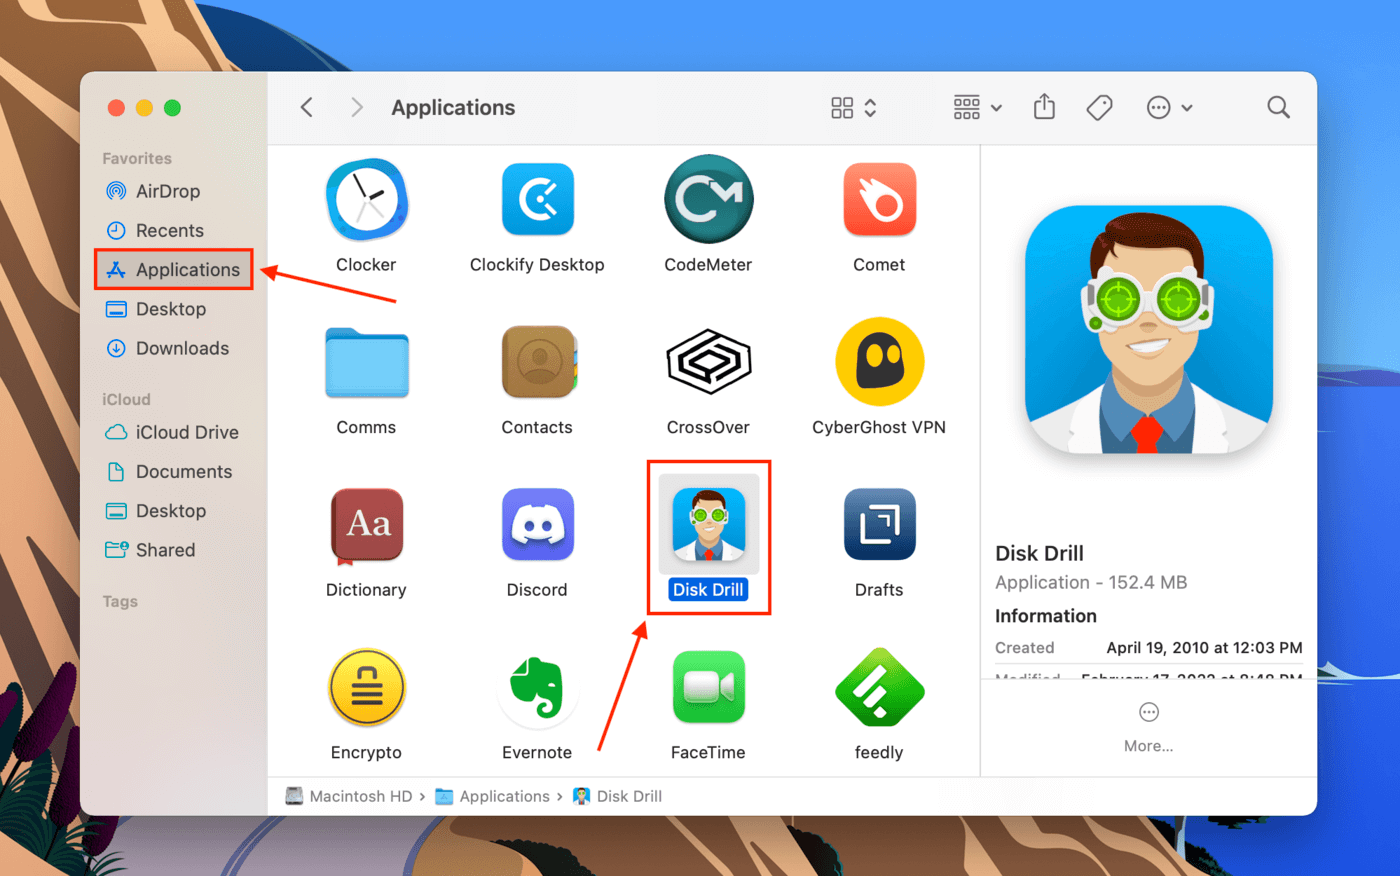
Method #2: Use Data Recovery Software
If you didn’t set up iCloud and Time Machine before deleting your PDF file, you’ll need a more powerful tool to extract that data and its metadata from the file system – specifically, data recovery software. For this article, we’ll be using Disk Drill.
In our opinion, it’s one of the best data recovery software for Mac because it’s been working consistently for every single file type and storage device we’ve thrown at it. It’s also an easy-to-use app, making it perfect for beginners.
The following guide demonstrates recovering a deleted PDF file from the system drive.
- Download and install Disk Drill.
- Launch Disk Drill (Finder > Applications > Disk Drill).
- Select Apple SSD or whatever your system drive is labeled as (or an external drive if you deleted your PDF from there), then click “Search for lost data”.
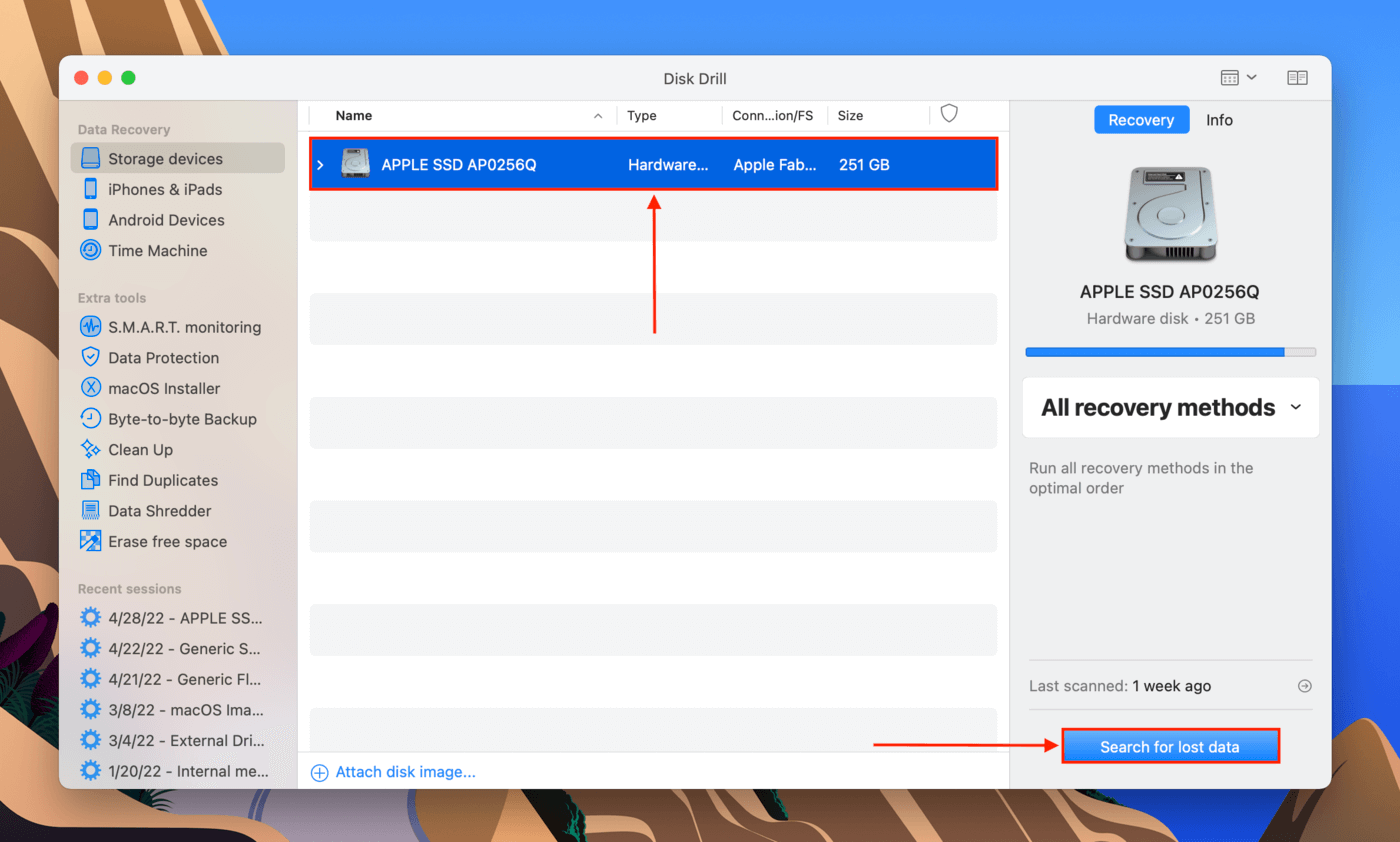
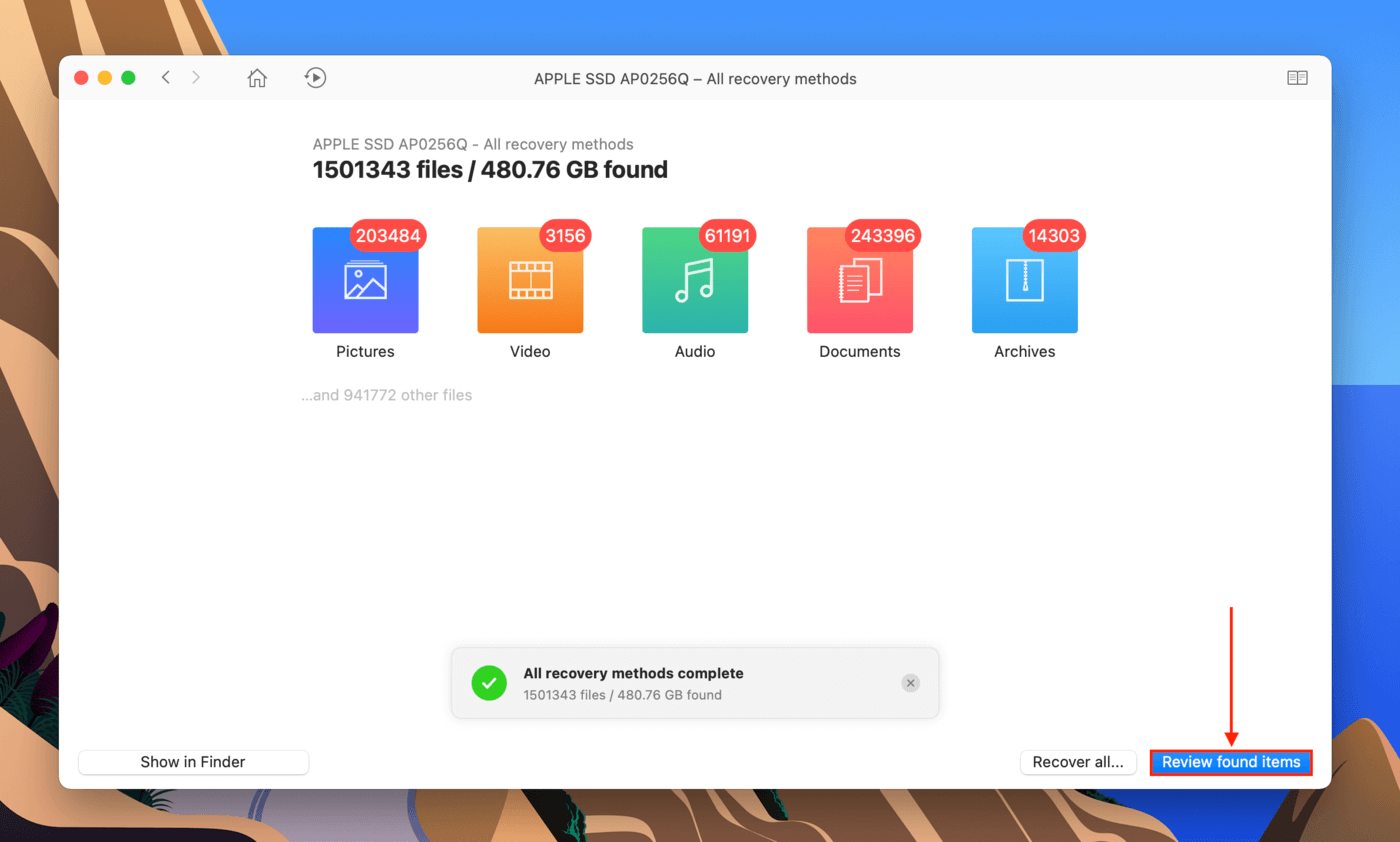
- Disk Drill will now scan your drive. Once it’s done, click “Review found items”.
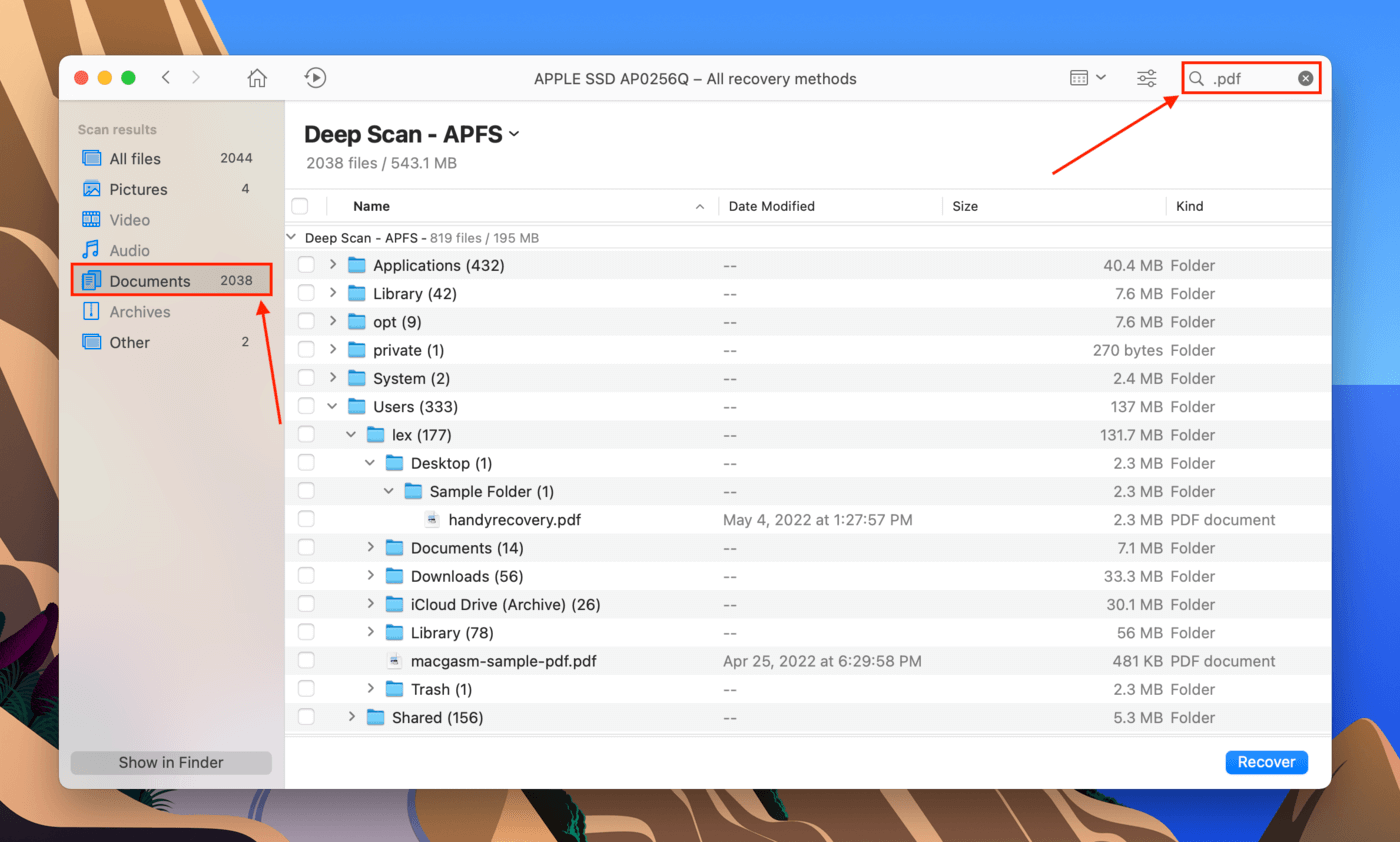
- Use the search bar on the top-right corner and the file type sidebar to narrow down the files Disk Drill found.
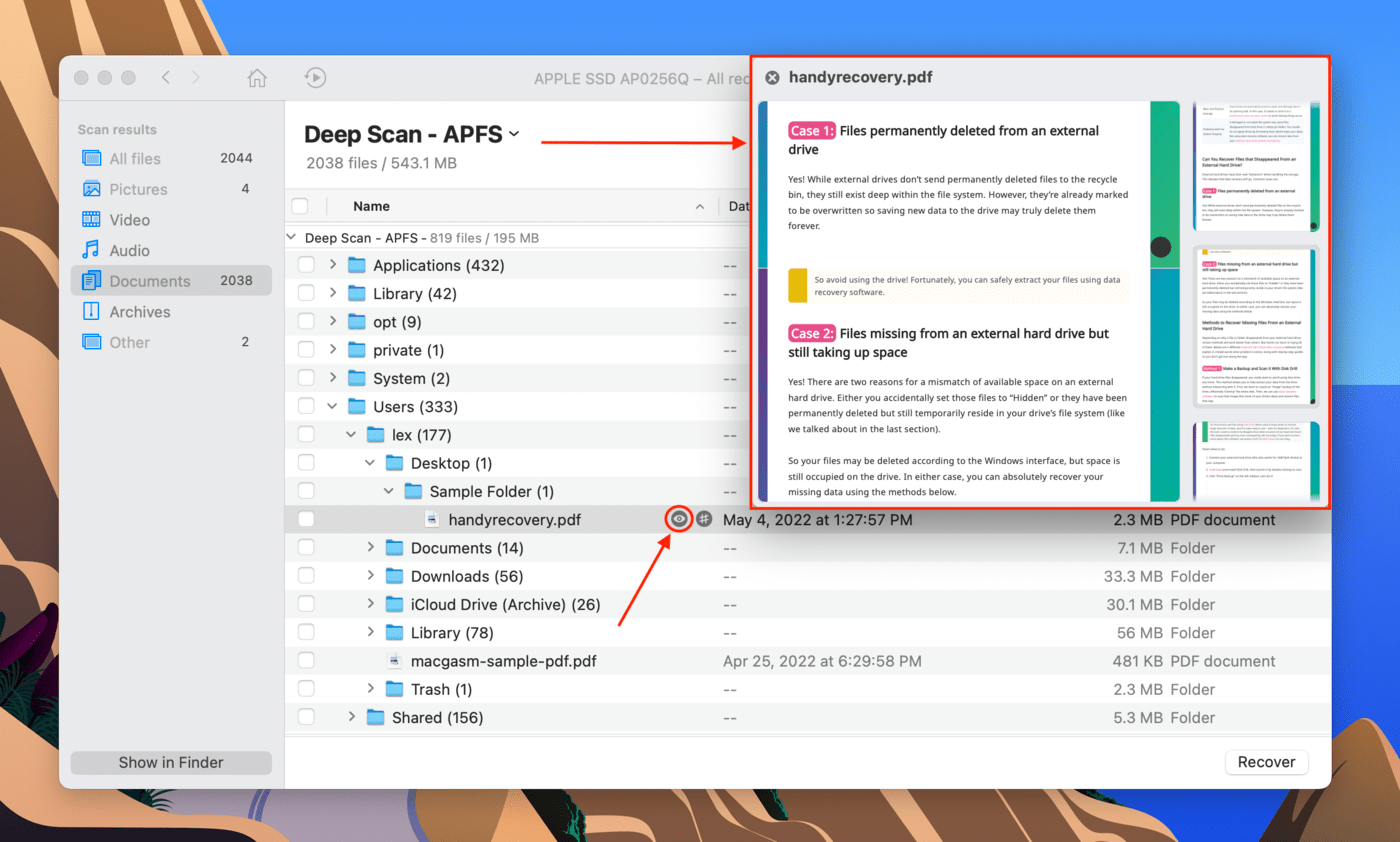
- Preview your PDF files by hovering your mouse pointer to the right of their file names and clicking the eye button. This has been a lifesaver whenever we needed to recover deleted photos on a Mac.
- Use the checkboxes in the left-most column to select the files you want to recover. Then, click “Recover”.
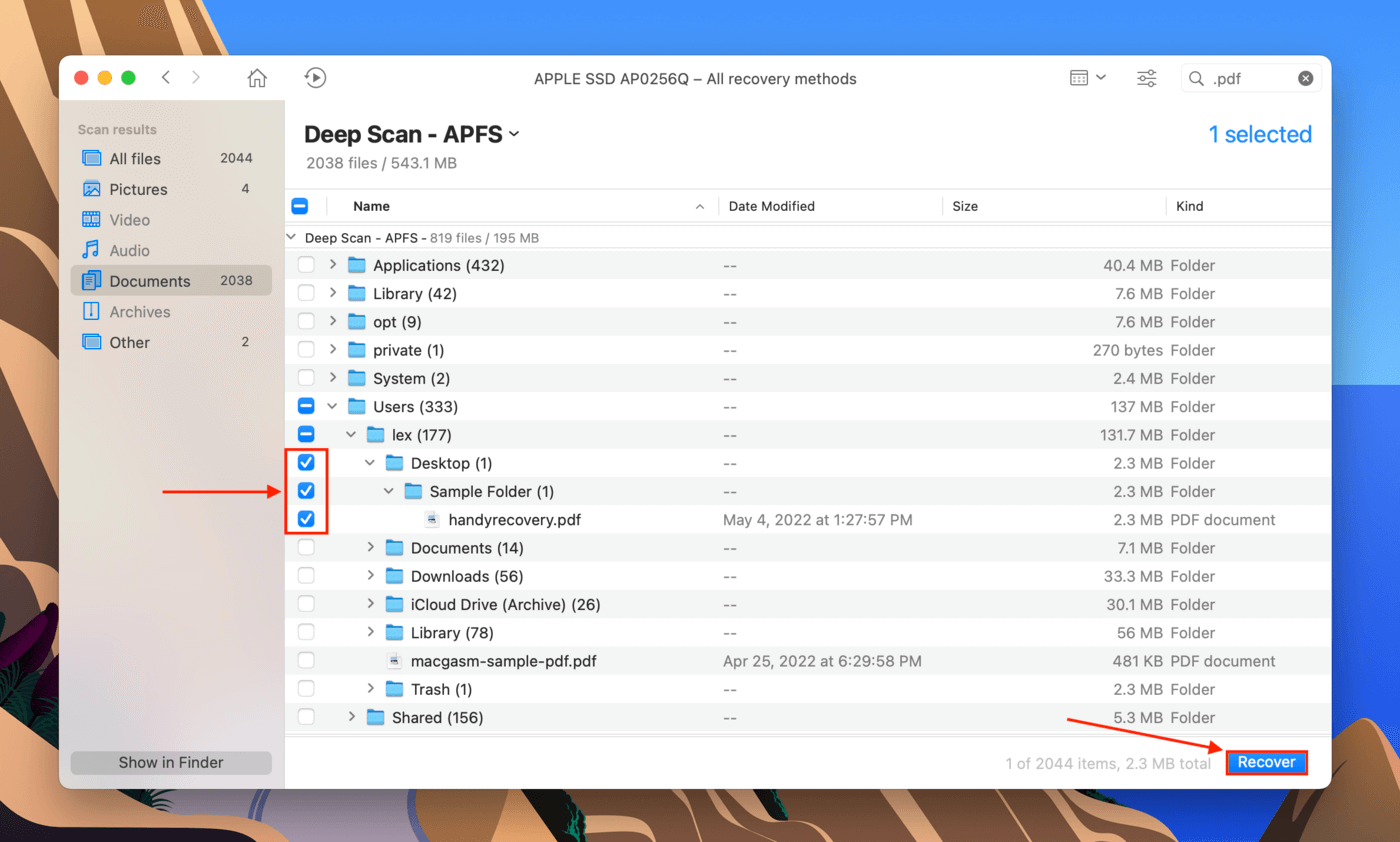
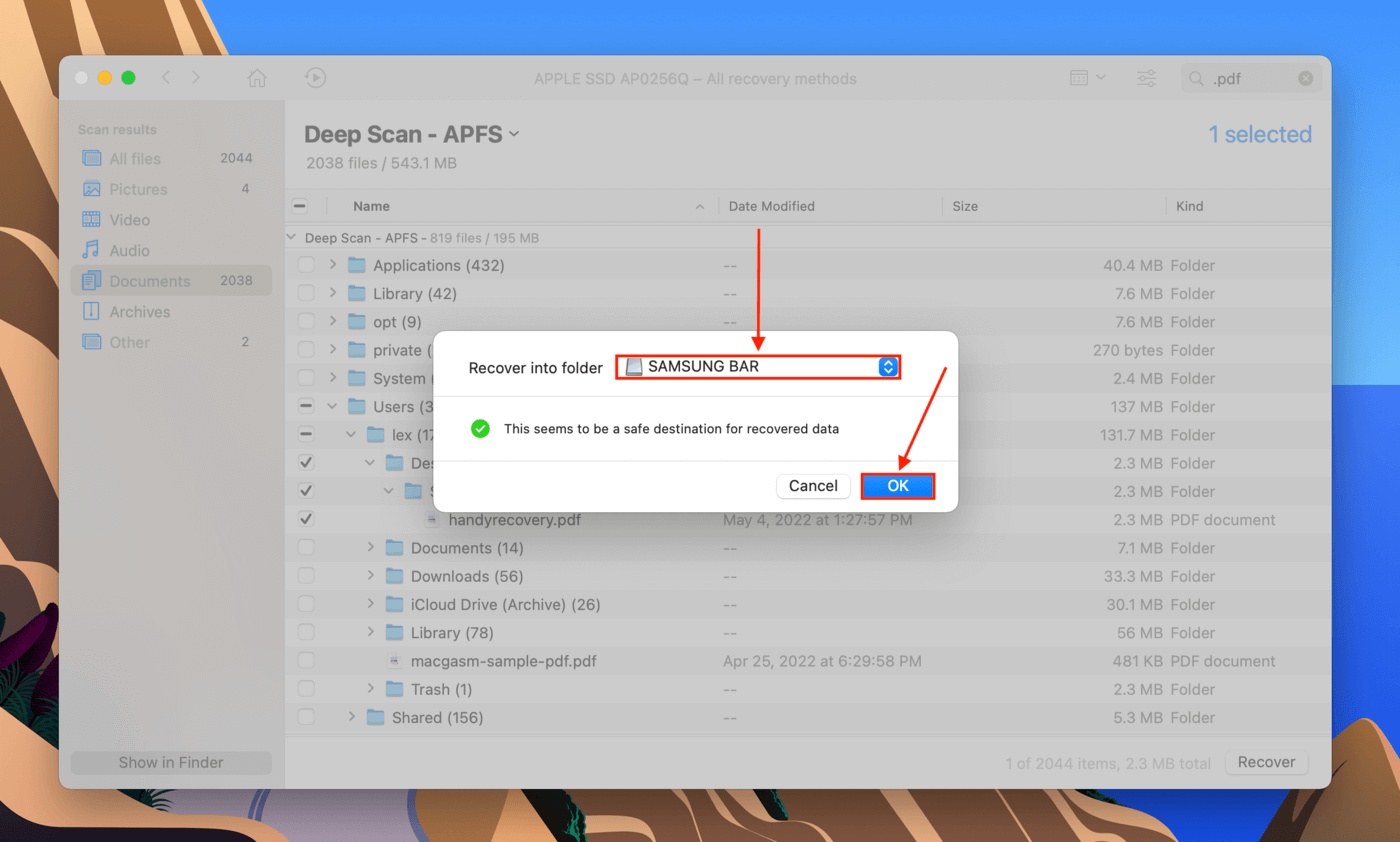
- Select a destination folder for your restored PDF file. If you’re recovering multiple files, save it to a folder on an external drive to avoid overwriting data. Then, click “OK”.
Disk Drill does not offer free data recovery. However, you can preview as many files as you want for free (so you know Disk Drill found the right files). If you want to learn more about this app before making a decision, read our full Disk Drill review.
Method #3: Restore PDF Using Time Machine
Time Machine is a native macOS backup tool that saves instances of your files and folders along with different points in their timeline. These instances are called “snapshots”. Using Time Machine, we can restore a snapshot of the folder that contained your PDF before it was deleted. To restore data from a Time Machine backup, do the following:
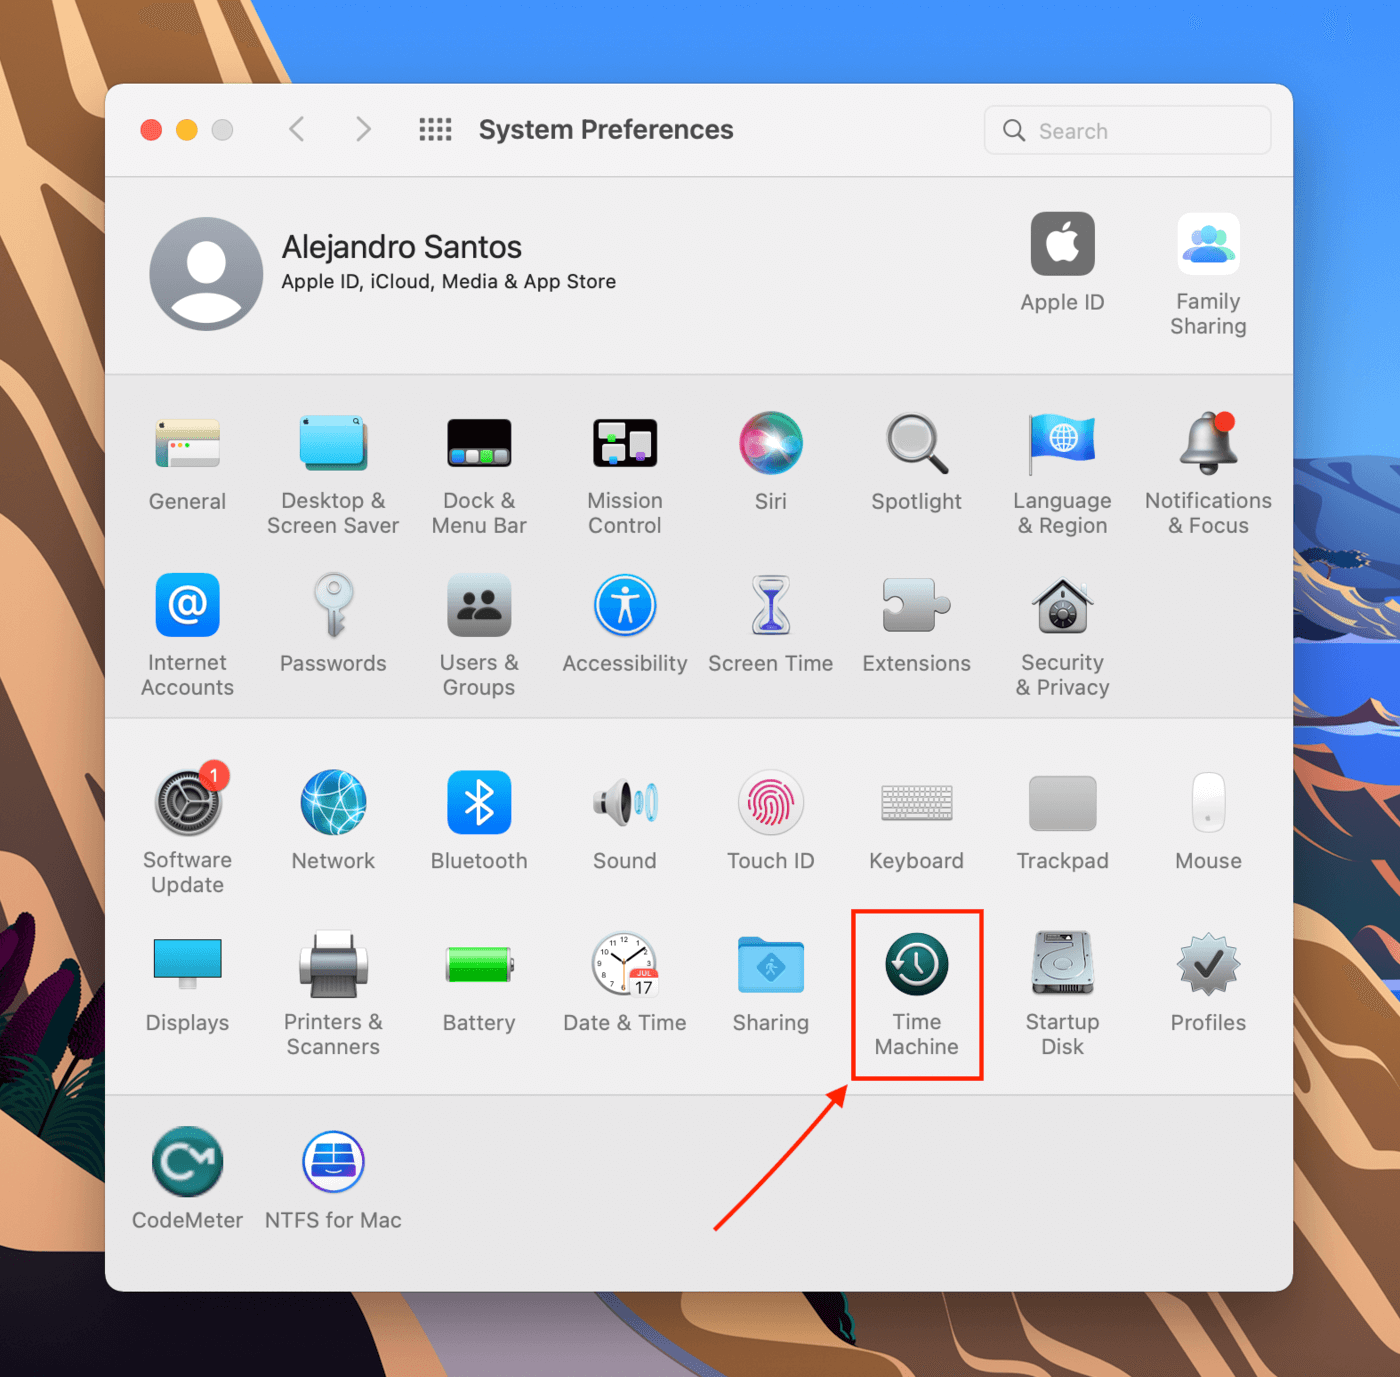
- Launch System Preferences > Time Machine.
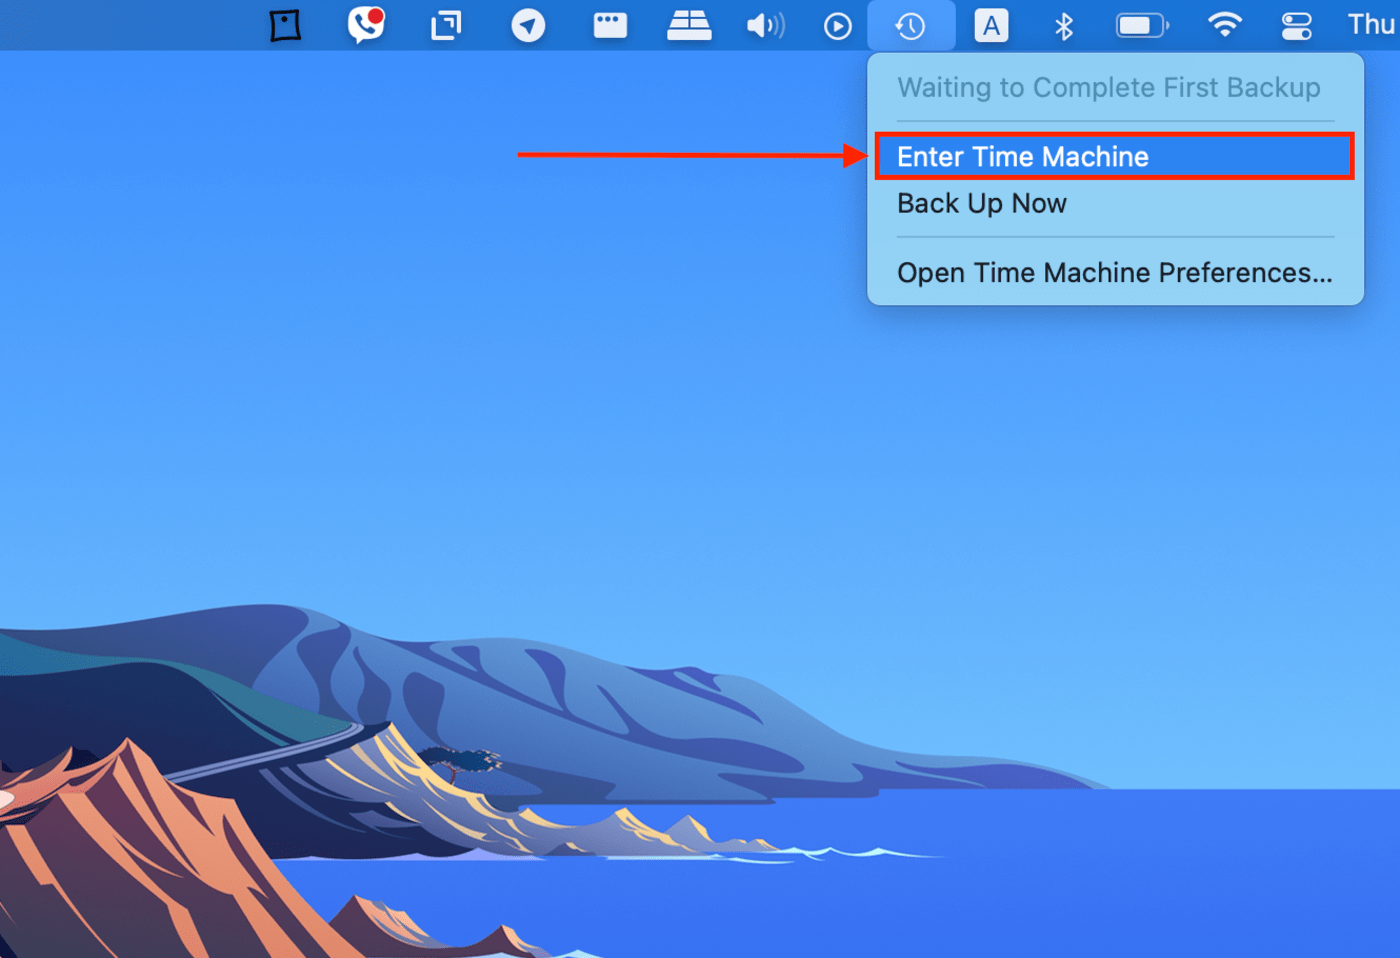
- Tick the box next to the “Enable Time Machine in menu bar” setting, then close the window.

- Launch Finder and navigate to the folder that contained your missing PDF file. The usual locations are Documents, Downloads, and even Recents. Then, click the Time Machine button on the menu bar > Enter Time Machine.
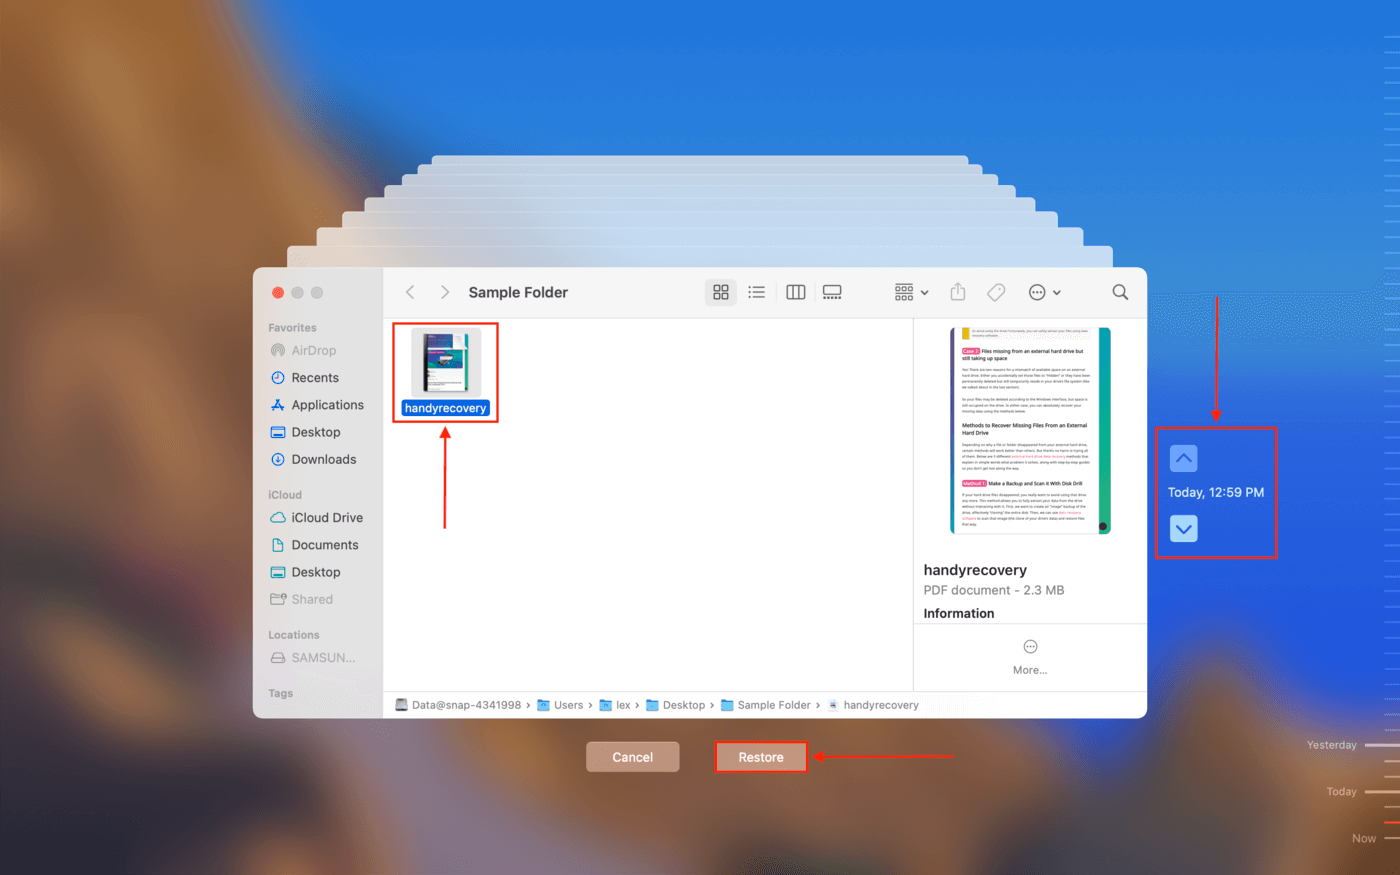
- Use the arrows to the right of the snapshots window to browse through past instances of your folder. Find one where it still contained your PDF file. Then, select your PDF and click “Restore”.
Method #4: Download Deleted PDF From iCloud
If you have iCloud enabled, then it’s possible that it deleted the local copy of your PDF file in order to preserve space on your Mac. Instead, it stores the file in iCloud Drive. Here’s how to download that file:
Pro Tip: You can enable/disable this behavior by launching System Preferences > Internet Accounts and managing your iCloud settings.
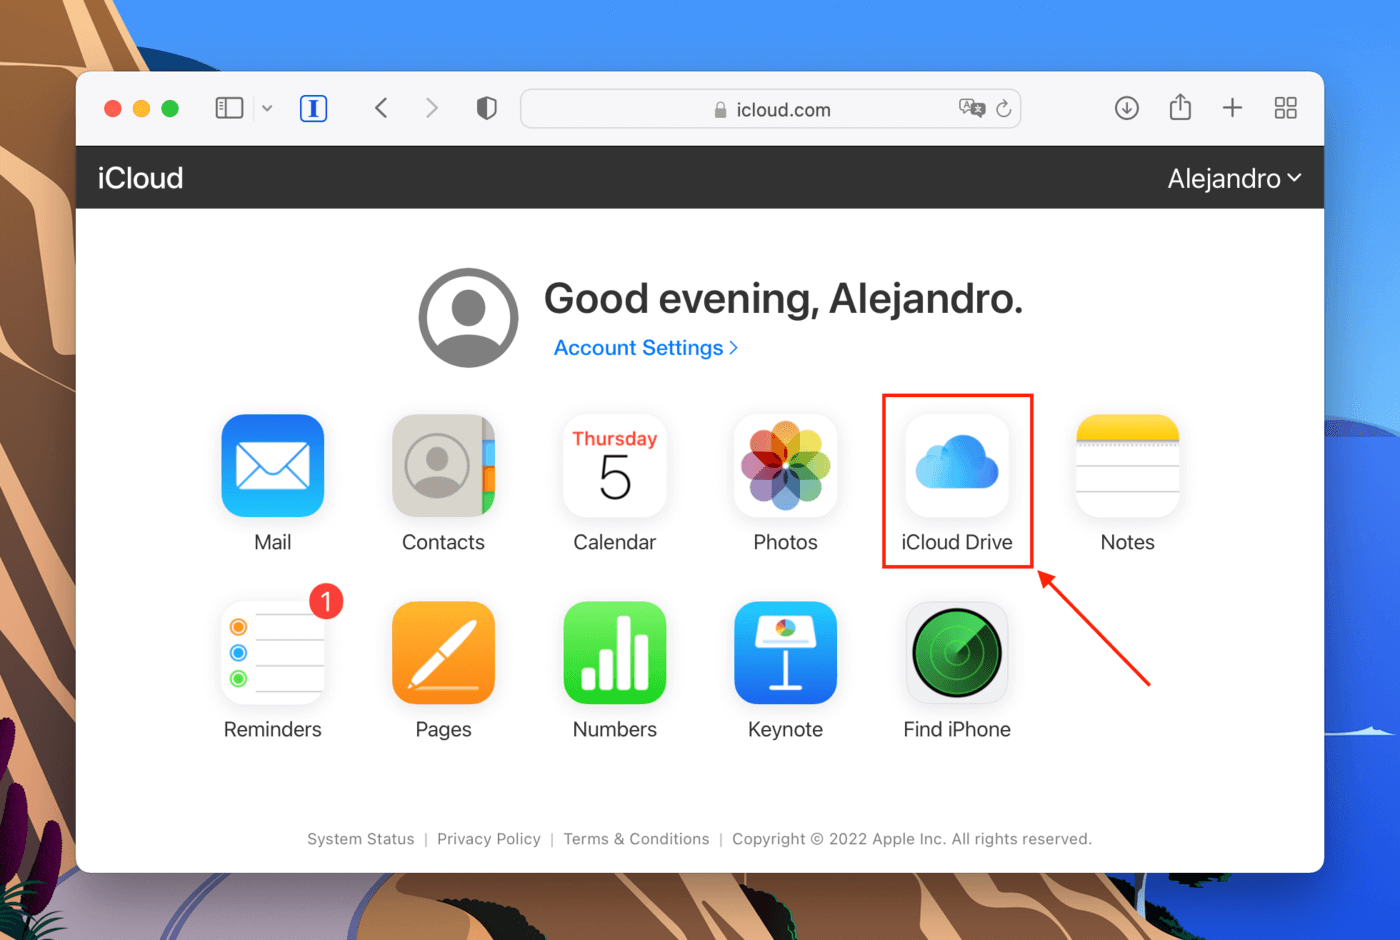
- Open your browser and log into iCloud.com. Then, click “iCloud Drive”.
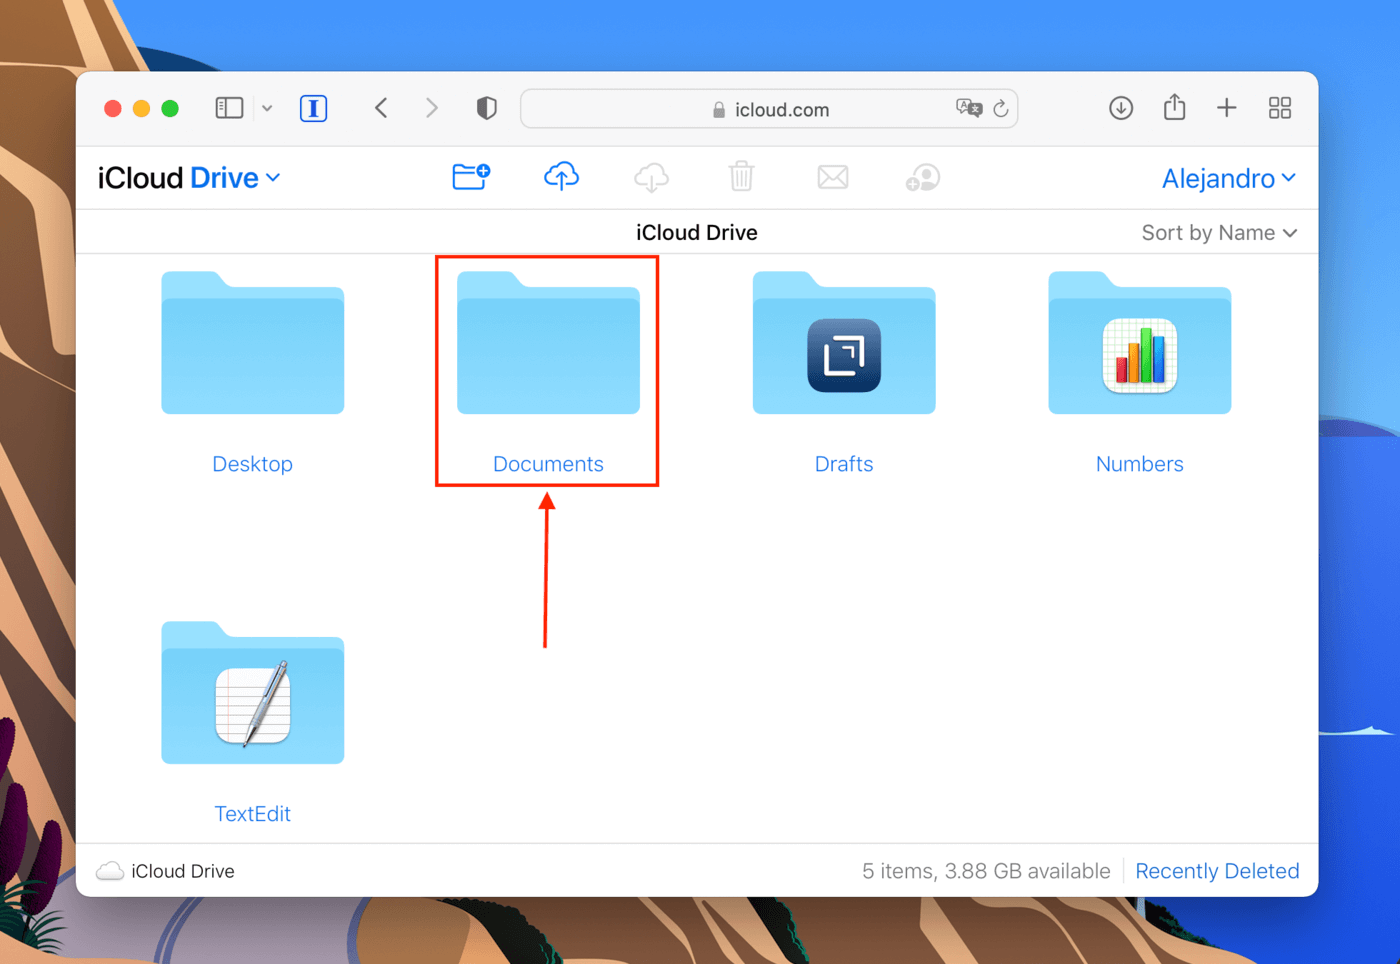
- Open Documents (or Desktop if you saved it there).
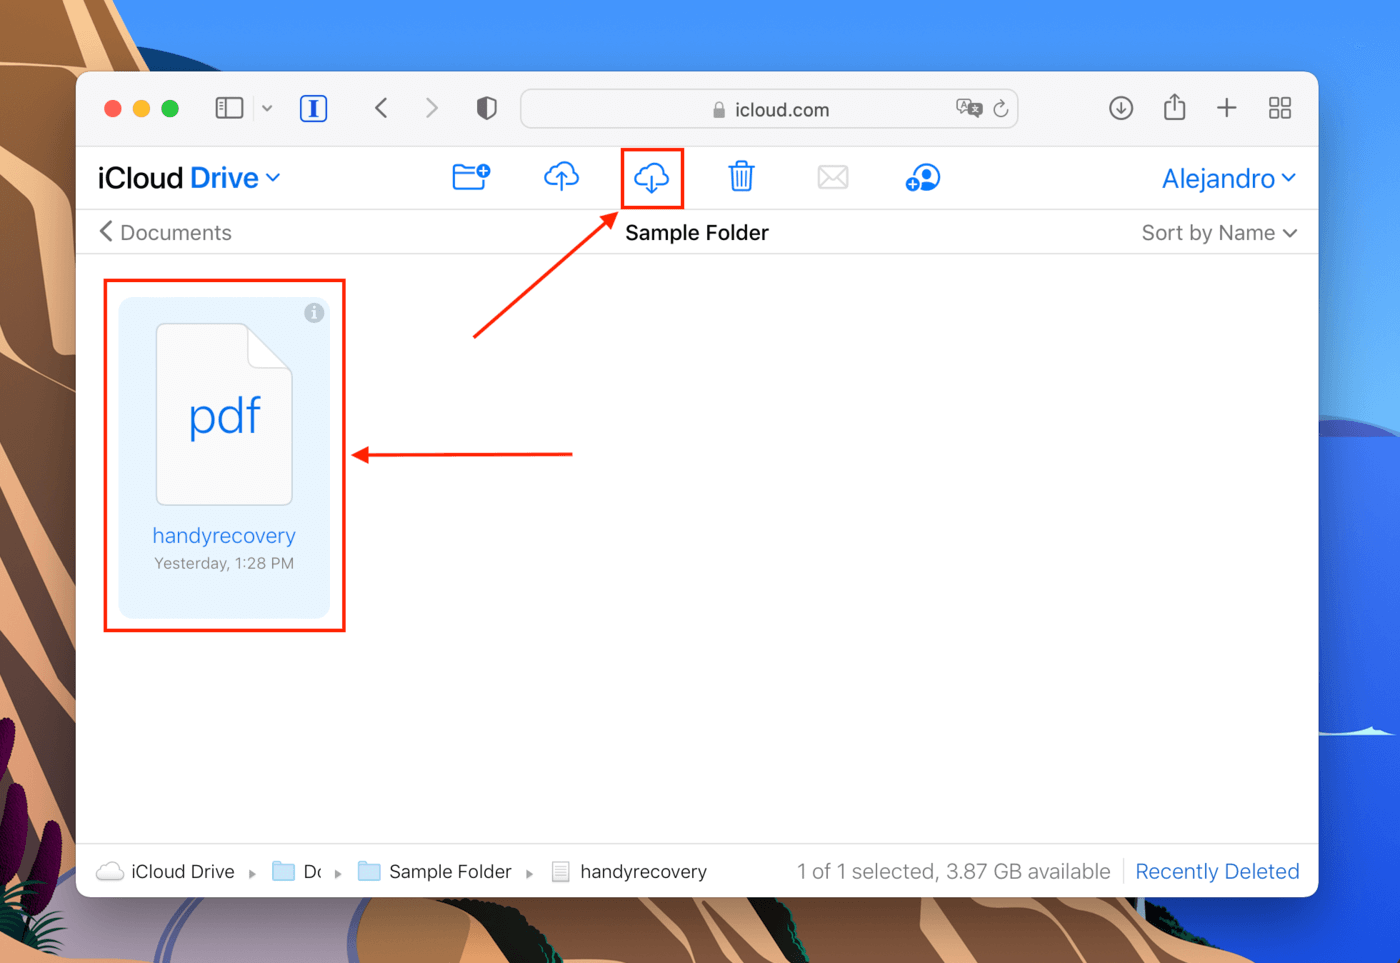
- Select your PDF file, then click the download button. You can use the sort button to display only PDF files to hasten your search.
You should then find your file in your Downloads folder (unless you changed your download location folder).
How to Find a PDF That Disappeared on Mac
It’s quite possible that you simply misplaced your files. Here are 2 of the fastest (and most reliable) methods to find a PDF that disappeared on your Mac:
Method #1: Use Spotlight Search
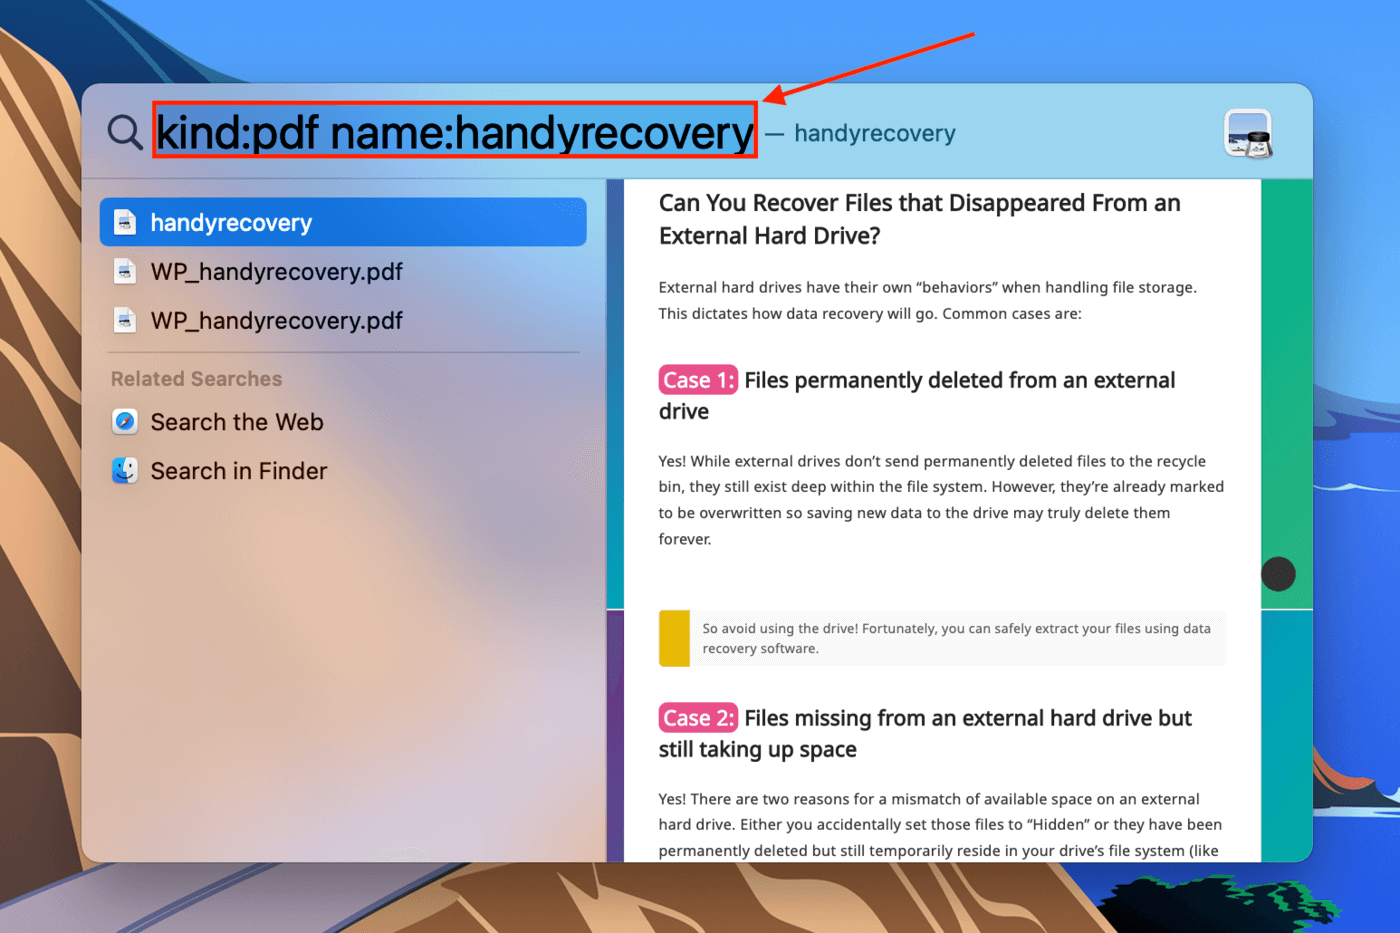
Spotlight is a powerful search feature for Mac, where you can use queries like name, date, kind, and author to filter results. To use Spotlight and its queries to locate a missing PDF, just hit (CMD + Space) and type kind:pdf (plus another query if you want).
Pro Tip: Use the arrow keys to highlight a search result to display a preview of the file.
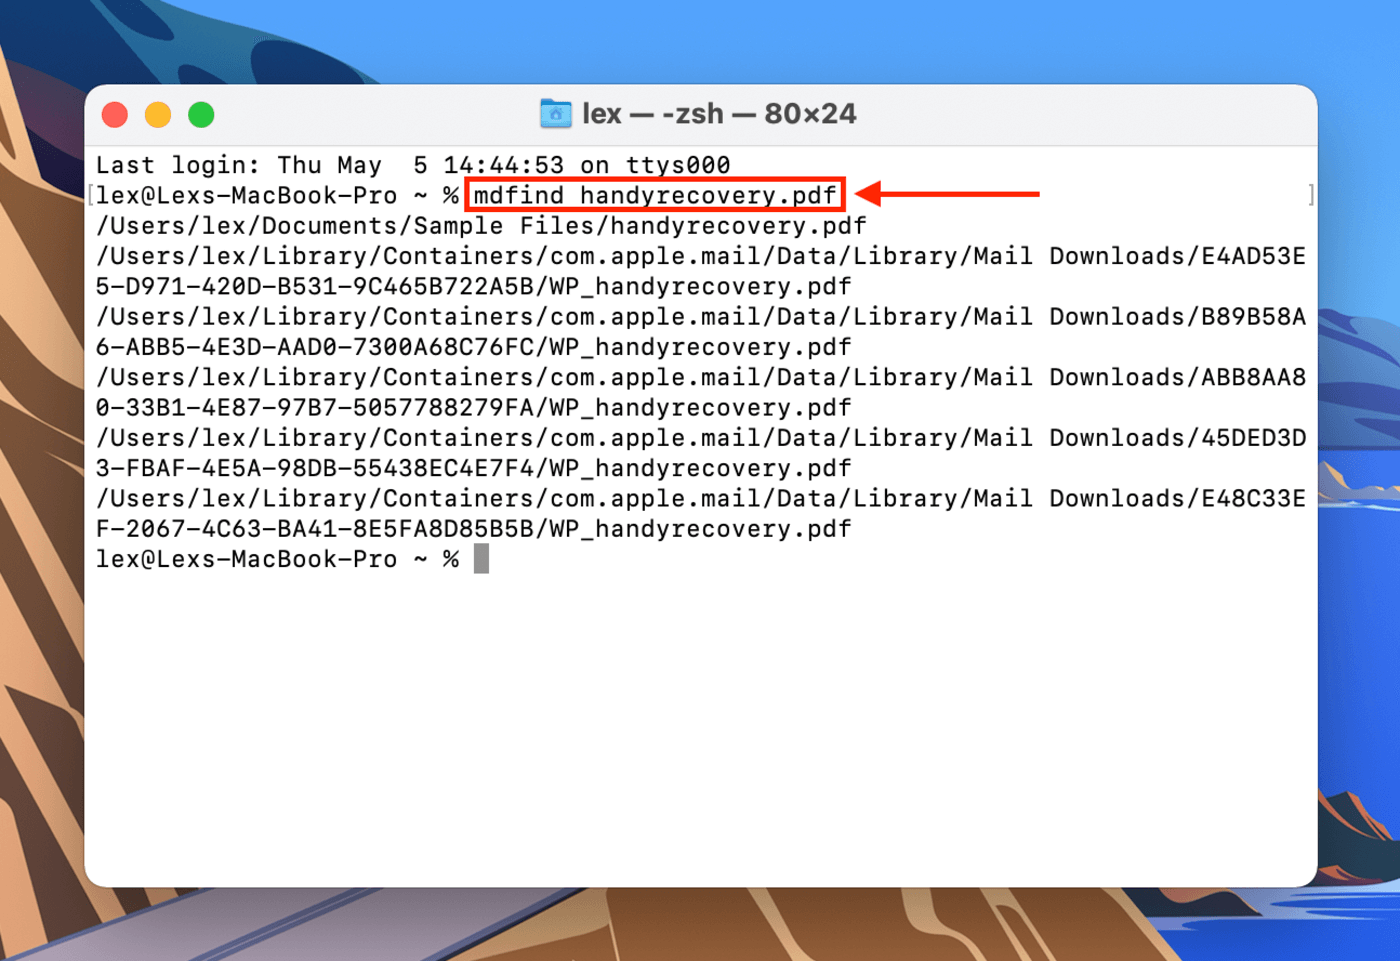
Method #2: Use MDFIND Command With Terminal
We can also use the “mdfind” command with Terminal to figure out which folder your PDF is stored in. Type the following command and hit (Return):
mdfind yourfilename.pdf
Replace “yourfilename.pdf” with the name and extension of your PDF file. This should display the exact path leading to your PDF.
How to Repair a PDF File for Free
If you can’t open your PDF file or you keep getting errors when you try to, it’s probably corrupted or damaged in some other way. Try the following 100% free fixes:
Method #1: Convert PDF to a Different File
You can recover the information on your PDF by converting it to a different file type. Adobe Acrobat allows users to export (File > Export) PDFs to DOCX and other document types, while Preview can export PDFs as image files. You can also use Adobe’s online PDF converter to convert your file via browser.
Method #2: Restore PDF to Previous Version
Many macOS apps store previous versions of the files you’re working on. You can access them by opening the PDF with the app, and clicking File > Revert To > Previous Save or Browse All Versions…. on the Apple menu bar.
Method #3: Use PDF Toolkit (PDFtk)
PDFtk is a free PDF manipulation tool that has a powerful repair utility you can run via the Terminal’s command line. Once you’ve downloaded and installed PDFtk, launch Finder and navigate to the folder that contains your PDF file. Then, right-click the folder and select Services > New Terminal at Folder. Then, type the following command and hit (Return):
pdftk handyrecovery.pdf output handyrecovery2.pdf
Replace handyrecovery.pdf with your PDF’s filename and replace handryrecovery2.pdf with whatever you want to name the repaired PDF file. You’ll find this new file in the same folder.
FAQ
How do I recover a permanently deleted PDF on Mac?
To recover a permanently deleted PDF on Mac:
- Download, install, and launch Disk Drill.
- Select your system drive and click Search for lost data.
- Once the scan is done, click Review found items.
- Click the checkboxes beside the files you want to restore.
- Click recover and choose a destination.
What to do if a damaged PDF file won’t open?
If your damaged PDF won’t open, try the following solutions:
- Convert your PDF to a different document type.
- Restore your PDF to an earlier version.
- Use PDFtk’s repair tool.
For step-by-step instructions for each of these fixes, read the full article.
What is the Adobe Acrobat autosave location on Mac?
Adobe Acrobat’s autosave location on Mac is /Library/Application Support/Adobe/Acrobat/AutoSave. You can type this path in Finder > Go > Go to Folder… to quickly open it.
Conclusion
This guide has absolutely every fix possible for unsaved/deleted/lost/damaged PDF files, so we suggest bookmarking this article in case it inevitably happens again (you’ll be someone’s hero). Better yet, make sure to set up iCloud and Time Machine if you haven’t already!
This article was written by Alejandro Santos, a Staff Writer at Handy Recovery Advisor. It was also verified for technical accuracy by Andrey Vasilyev, our editorial advisor.
Curious about our content creation process? Take a look at our Editor Guidelines.