
If your desktop files disappeared on your Mac, don’t worry – it’s fixable. It’s also pretty common, thanks to macOS’ many customization settings. In fact, there are a lot of reasons why files disappeared from the desktop on a Mac… and this article explores them all.
In this blog post, we cover every single possible data loss scenario, and we provide instructions on corresponding solutions so you don’t have to run around the internet searching for the right answer. Read on.
Want to skip the background and jump straight to the recovery guide? Click here.
Where Did All My Desktop Files and Folders Go?
To better put the problem into perspective, files and folders that disappear from the desktop on Mac usually fall under 2 scenarios: (1) only certain files/folders are missing, or (2) all files/folders are missing from the desktop. The first step of restoring these files is to figure out which scenario applies to you. Let’s quickly explore both of them:
Case 1: Certain Desktop Files/Folders Are Missing
If only certain desktop files and folders are missing, there are 4 possible causes. Expand the tabs below for a quick explanation and jump links to the corresponding solutions:
✂️ Accidental deletion
You may have accidentally deleted your files. Deleted files are still intact in your file system if they haven’t been overwritten by new data. If you haven’t cleared your Trash folder, jump to Method #2. If you need to recover your emptied Trash, the solution then requires third-party software.
Fortunately, the process is super easy – even for beginners. Jump here to learn the details. If you have Time Machine activated, you may be able to restore a previous instance before the file was deleted from your desktop. Jump to Method #3.
🗂 Stacks is enabled
Stacks is Mac’s way of helping you organize your desktop by grouping similar files into “stacks”. These are pseudo folders on your desktop that expand and retract when you click on them, preserving your screen real estate. Jump to Method #6. This doesn’t work for desktop folders that disappeared on Mac, because they are already considered their own “stacks”.
❌ Disconnected/unmounted drive
Mounted drives are displayed on the desktop by default. If your drive is connected to your Mac but you still can’t find it on your desktop, check Disk Utility to make sure it’s mounted (Finder > Applications > Disk Utility).
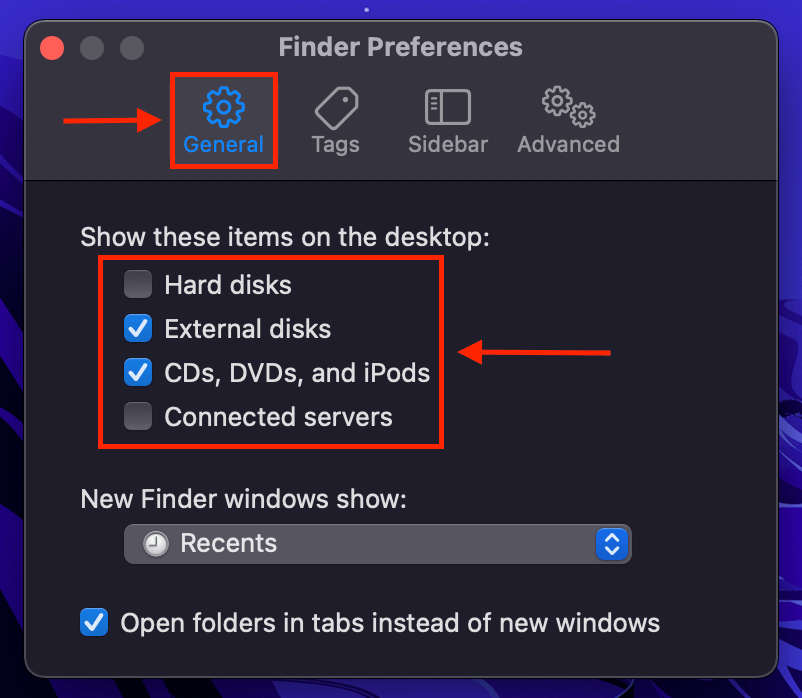
If your drive is mounted according to Disk Utility but is still missing from your desktop, make sure “External Disks” is checked in the General tab of Finder Preferences (Finder > “Finder” on the Apple menu bar > Preferences…)
❓ Misplaced files
It’s entirely possible that your files haven’t actually disappeared – they’re just misplaced. Jump to Method #1.
Case 2: All the Files/Folders on My Desktop Disappeared
Scenario 2 is “everything on my desktop disappeared on my Mac”. If all of your files and folders on your desktop are missing, there are likely 2 possible causes. Just like the last section, expand each tab for a short summary of the problem and jump links to the corresponding solution:
⚙️ Desktop files are set to hidden in Finder/Terminal
☁️ iCloud drive deleted local desktop files
Depending on your settings, iCloud will delete local copies of your files and keep them in the cloud. While it can be annoying if you aren’t aware of it, iCloud is just trying to help you manage your storage space. Jump to Method #5.
How to Recover Desktop Files & Folders On a Mac?
Before anything else, if you suspect that your desktop files have been deleted, you need to act quickly. As long as your files haven’t been overwritten yet, it’s still possible to recover your data. However, you’ll need to use data recovery software – this is a tool that can extract data directly from your Mac’s file system (without needing Finder).
Even if you’re unsure that your files are actually deleted, this is the fastest way to locate them on your Mac even if they’re corrupted or hidden.
For this article, we’ll be using a freemium tool called Disk Drill. We often recommend Disk Drill to our readers because we’ve had great success recovering data with it, and its GUI (graphical user interface) is very friendly to beginners – this also makes it great for demonstrating data recovery on our blog. To learn more about its features and our experiences using the tool, read our full Disk Drill review.
- Download and install Disk Drill.
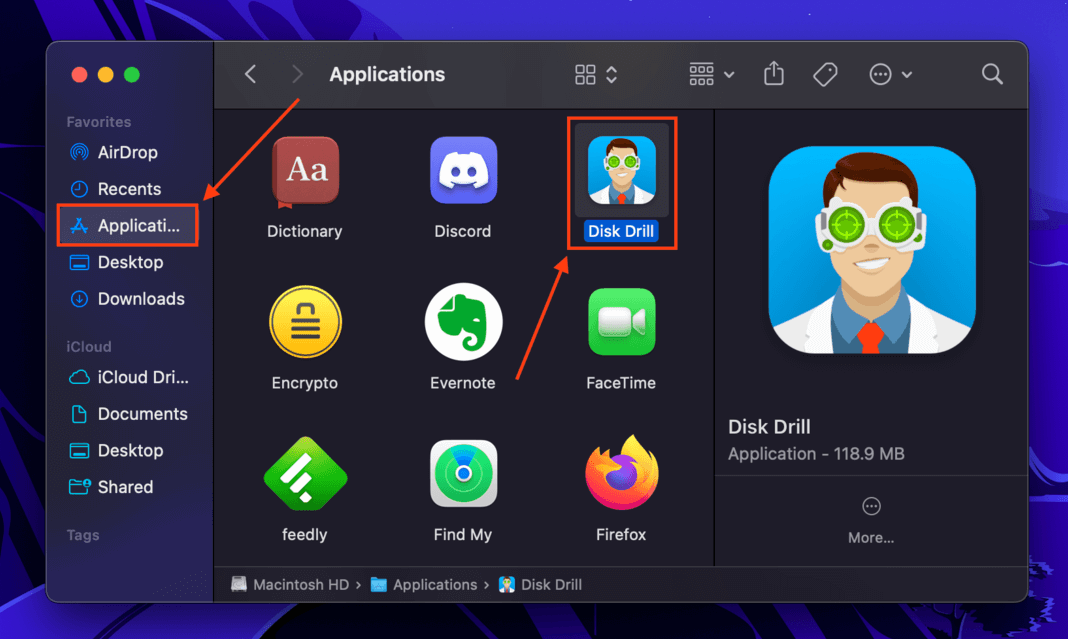
- Launch Disk Drill by opening Finder > Applications and double-clicking Disk Drill’s icon.
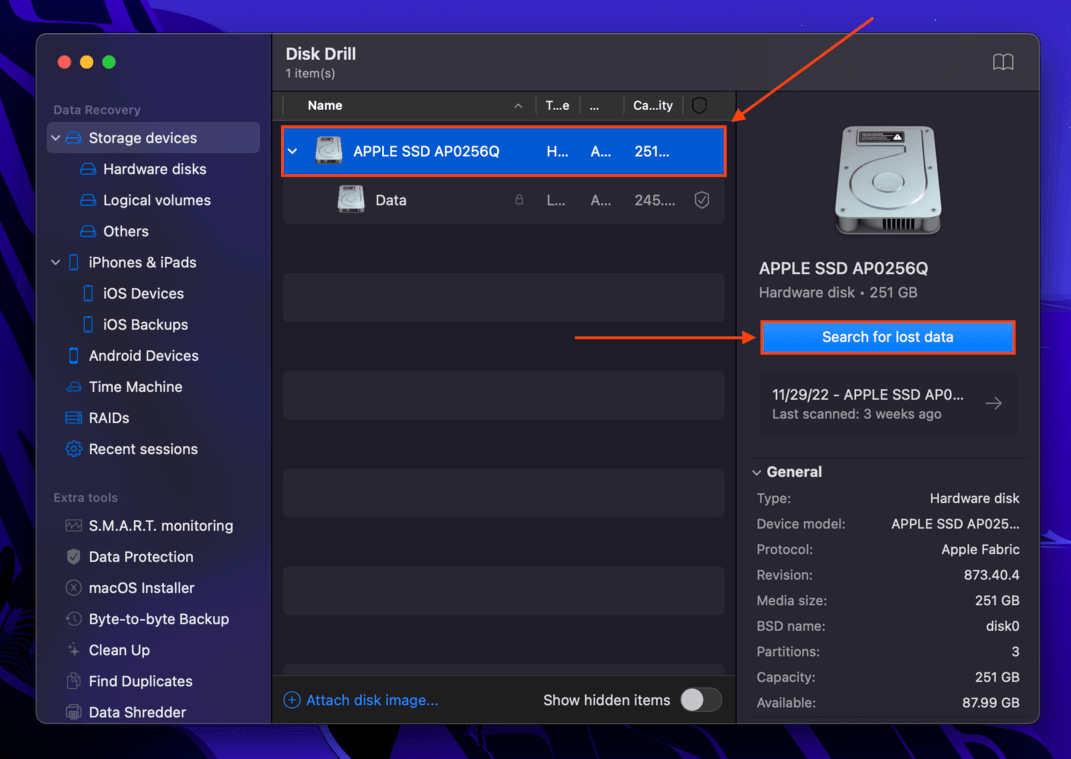
- Select the drive that contained your missing desktop files – this is usually your system drive, called “Apple SSD”. Then, click Search for lost data.
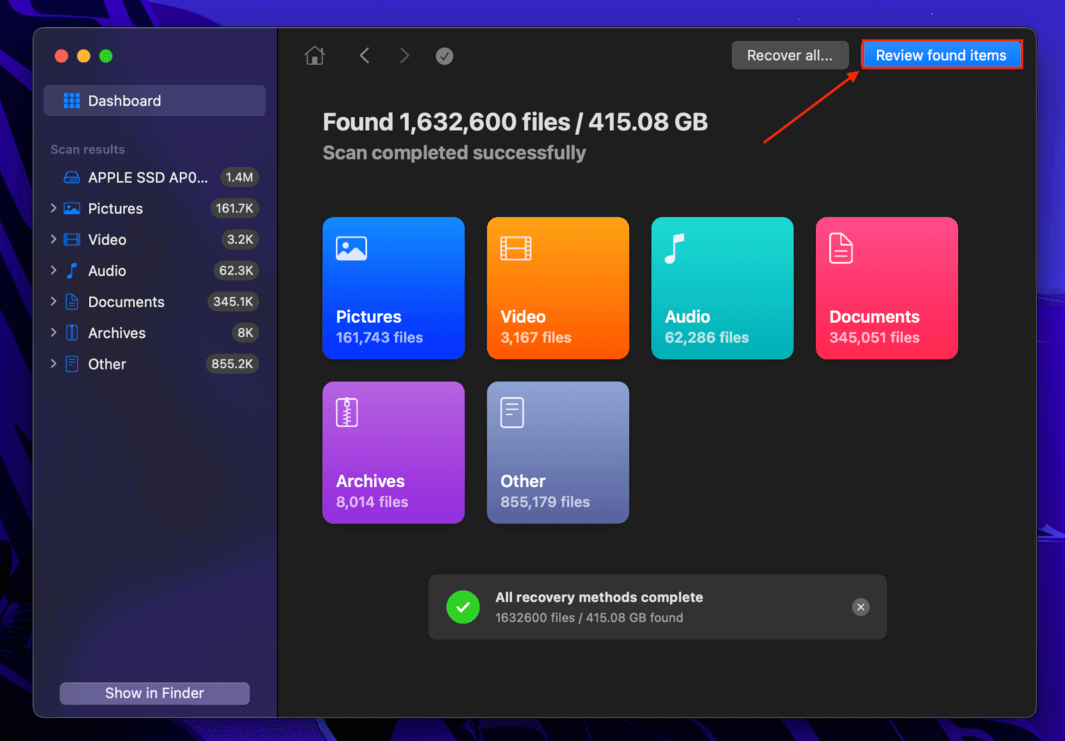
- Let Disk Drill run its scan. Once it’s complete, click Review found items.
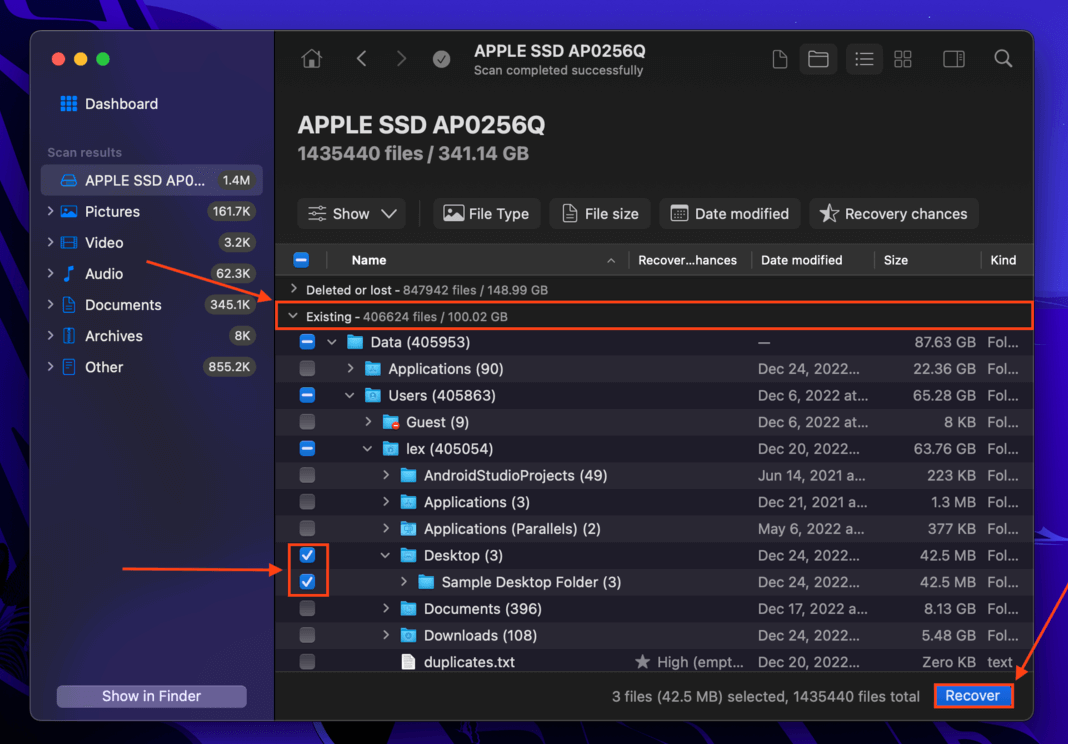
- You’ll be greeted by a list of files Disk Drill found. Expand the Existing tab to view files that are only missing and not deleted (use the correct tab for your situation). You should be able to follow the folder tree to find your Desktop folder (Data > Users > username > Desktop). Select your files and folders using the checkboxes in the leftmost column and click Recover.
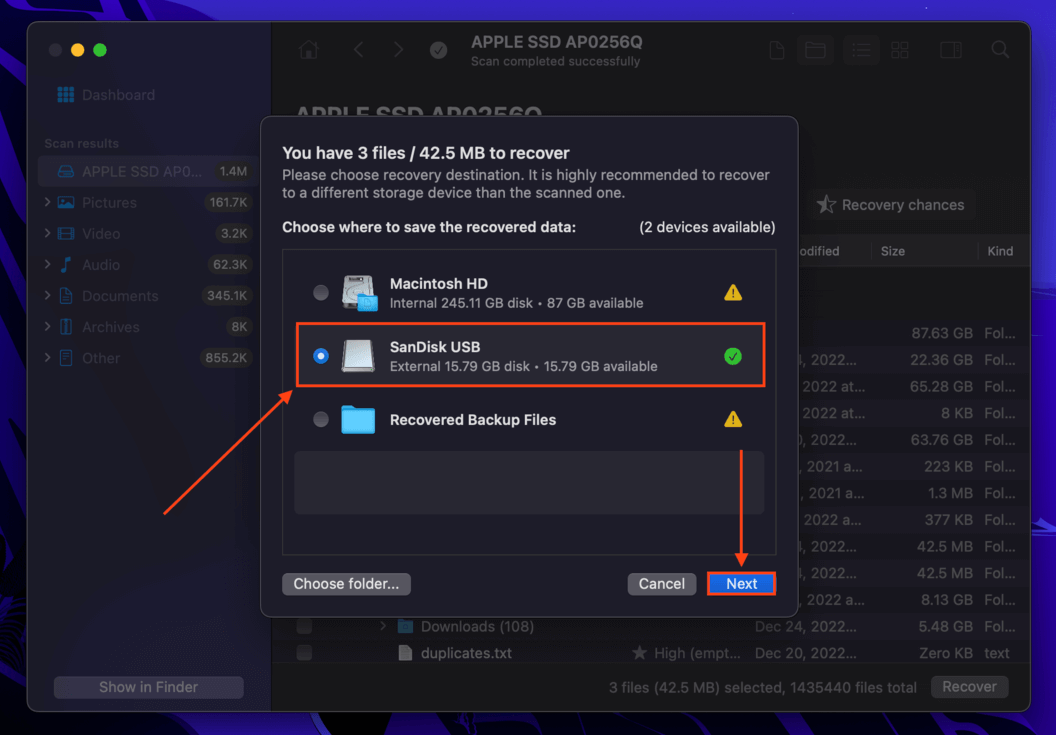
- On the dialogue box that appears, use the dropdown menu to select a location where Disk Drill will save your recovered files. As you’ll see from the warning below, it’s advised that you save recovered files in a different drive (like a USB) – but if you only want to recover this one file, you should be fine. Finally, click Next to proceed with the recovery.
Disk Drill Basic for Mac doesn’t offer free data recovery. You can scan your Mac and preview your files to ensure they’re recoverable before purchasing a license. Free data recovery software exists, but each has its own limitations.
How to Find Disappeared Desktop Files & Folders on a Mac
The methods listed below will work if you deleted your desktop files and folders but have a backup or if you haven’t deleted them, but they have suddenly gone missing from your Mac. You can go back to the navigation section if you want to jump to specific methods that you think suit your situation – but you can also go through every method on the list if you want to cover all your bases.
Method 1: Use Spotlight Search to Find the File
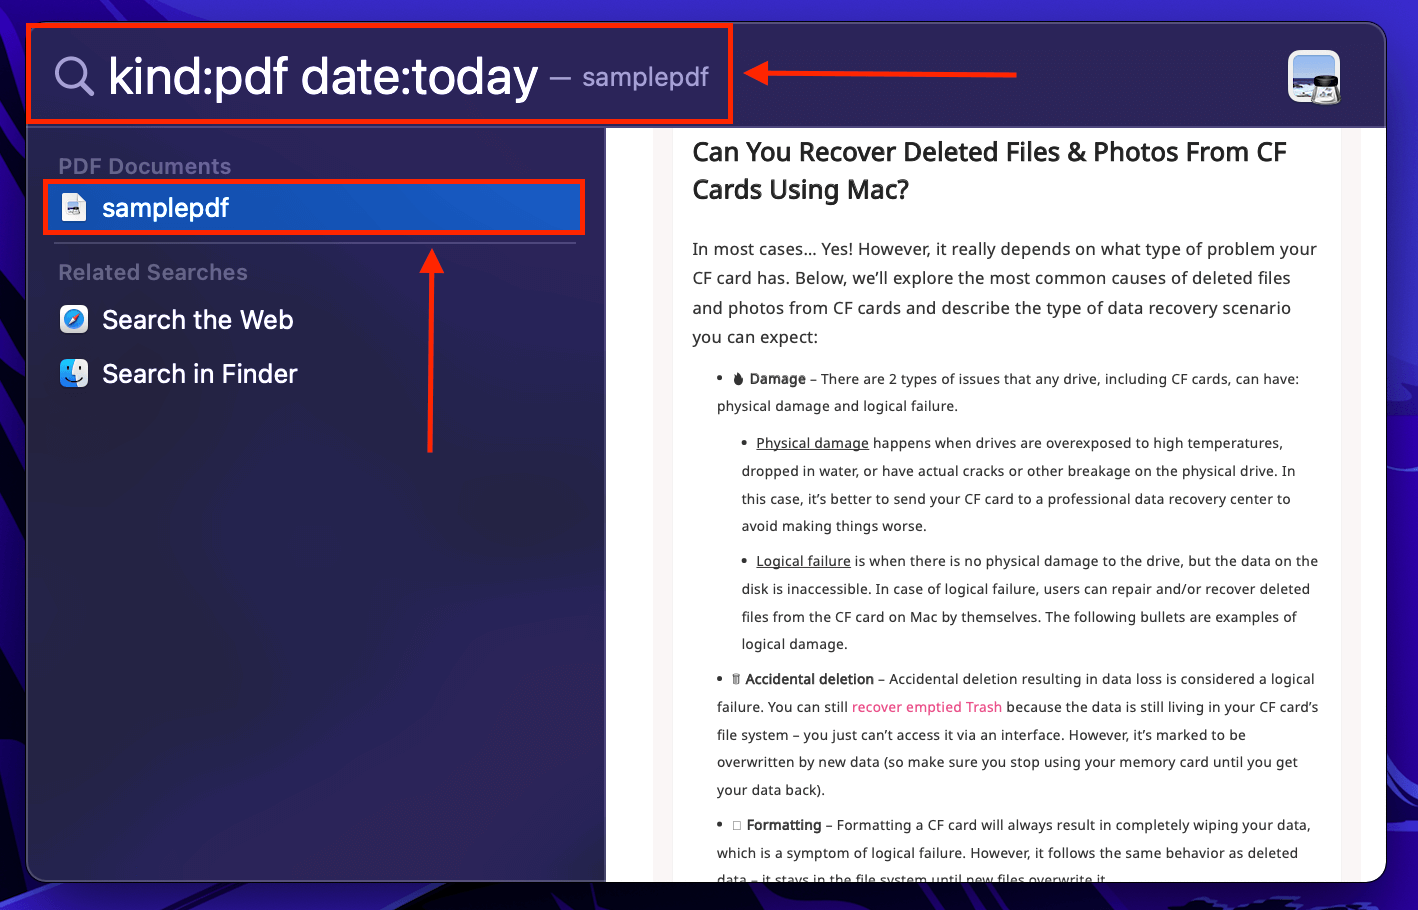
Spotlight is Mac’s super intuitive search tool that uses parameters called “queries” to help users find their files quickly. You can even display previews of your files inside Spotlight itself by clicking on it (see example below). To launch Spotlight Search, hit (CMD + Space). You can then use the following queries to set parameters that will narrow down your search:
Query |
What does it do? |
How to use it |
name: |
Filter search by name. |
name:samplepdf.pdf |
date: |
Filter search by last known interaction. |
date:yesterday |
kind: |
Filter search by file type. |
kind:pdf |
author: |
Filter search by author. |
author:lex |
💡 Pro Tip: You can “stack” queries to keep narrowing down your search. For example, try a combination like “kind:pdf date:today”
Method 2: Restore Desktop Files Using the Trash Folder
Deleted files always go to your Trash folder, which you can find in your dock (if it’s not there, go to Finder > “Finder” on the Apple menu bar > Go > Go to folder… and enter “.~/Trash” without the quotes). Unless you emptied your Trash folder, there’s a good chance you’ll find your missing files there. To recover deleted files from your Trash folder, simply right-click your file and select “Put Back”.

Method 3: Recover Lost and Deleted Desktop Files and Folders Using Time Machine
Time Machine is a powerful backup tool that comes installed on your Mac by default. This section assumes that you enabled Time Machine in the past. To restore your data from a Time Machine backup, do the following:
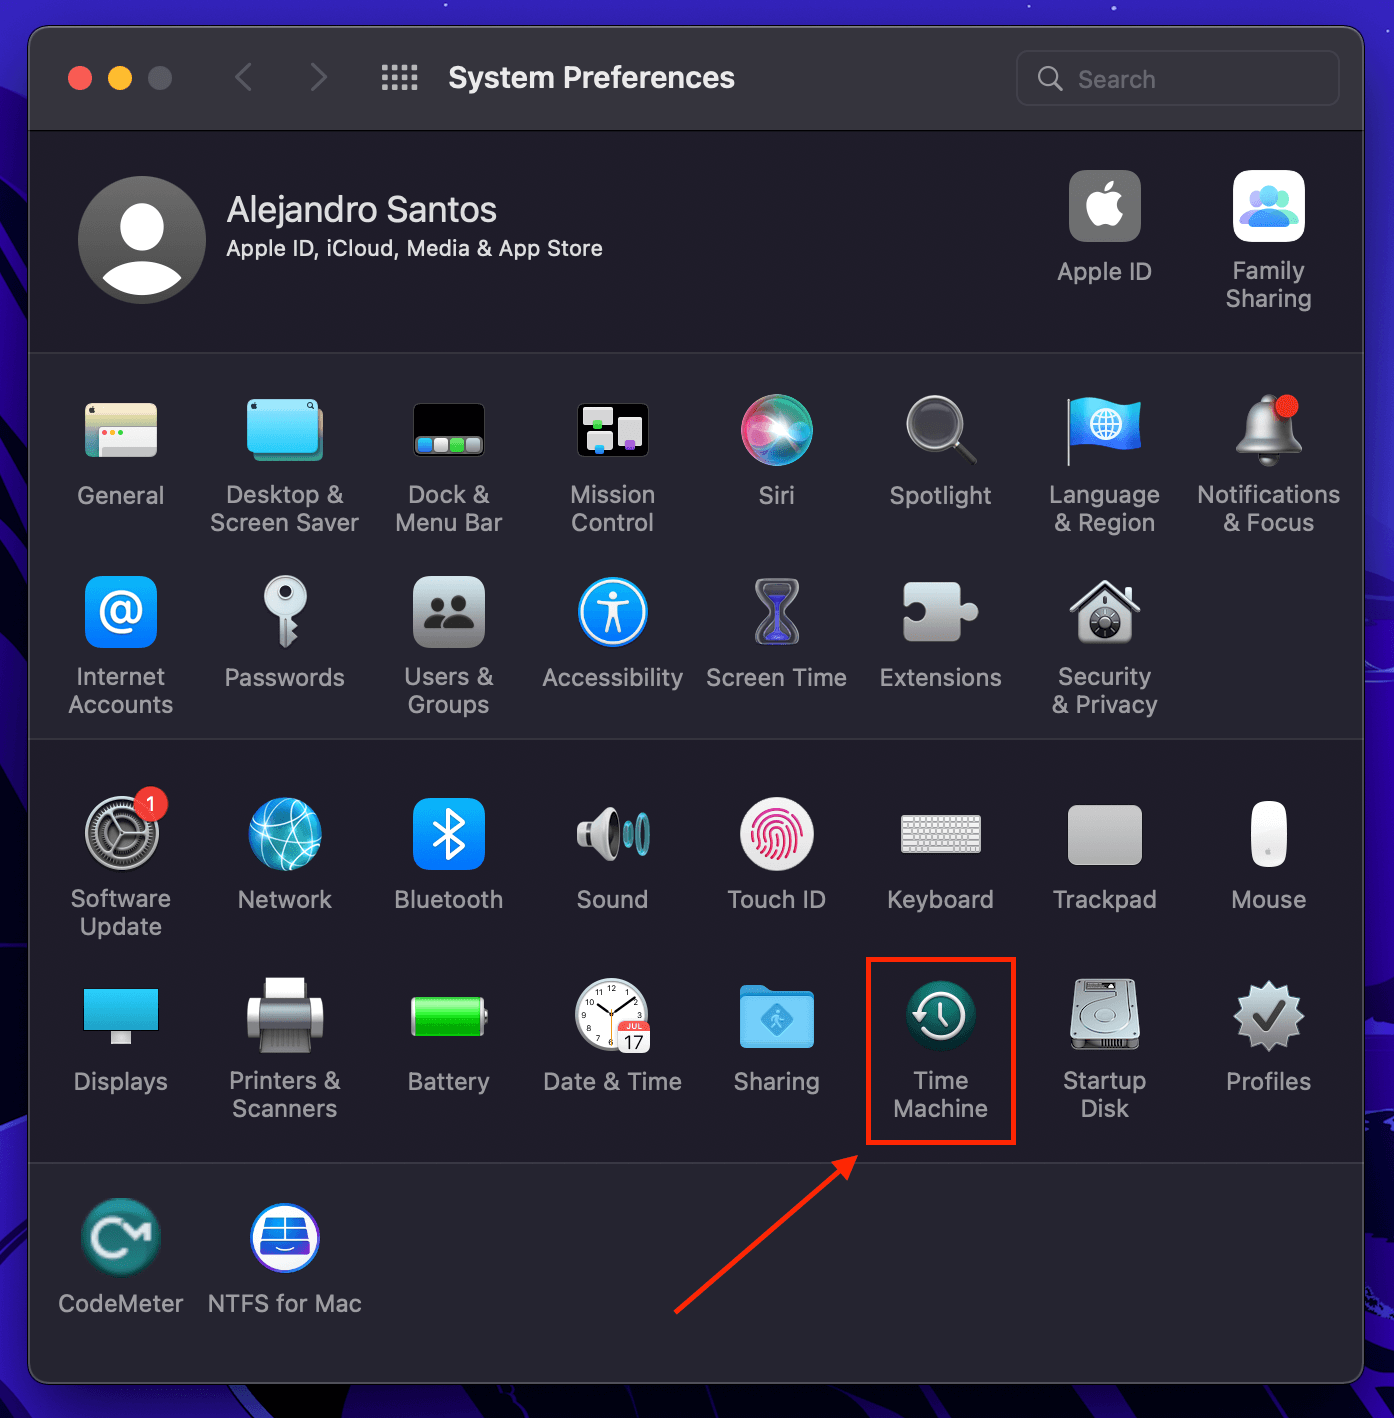
- Open System Preferences > Time Machine.
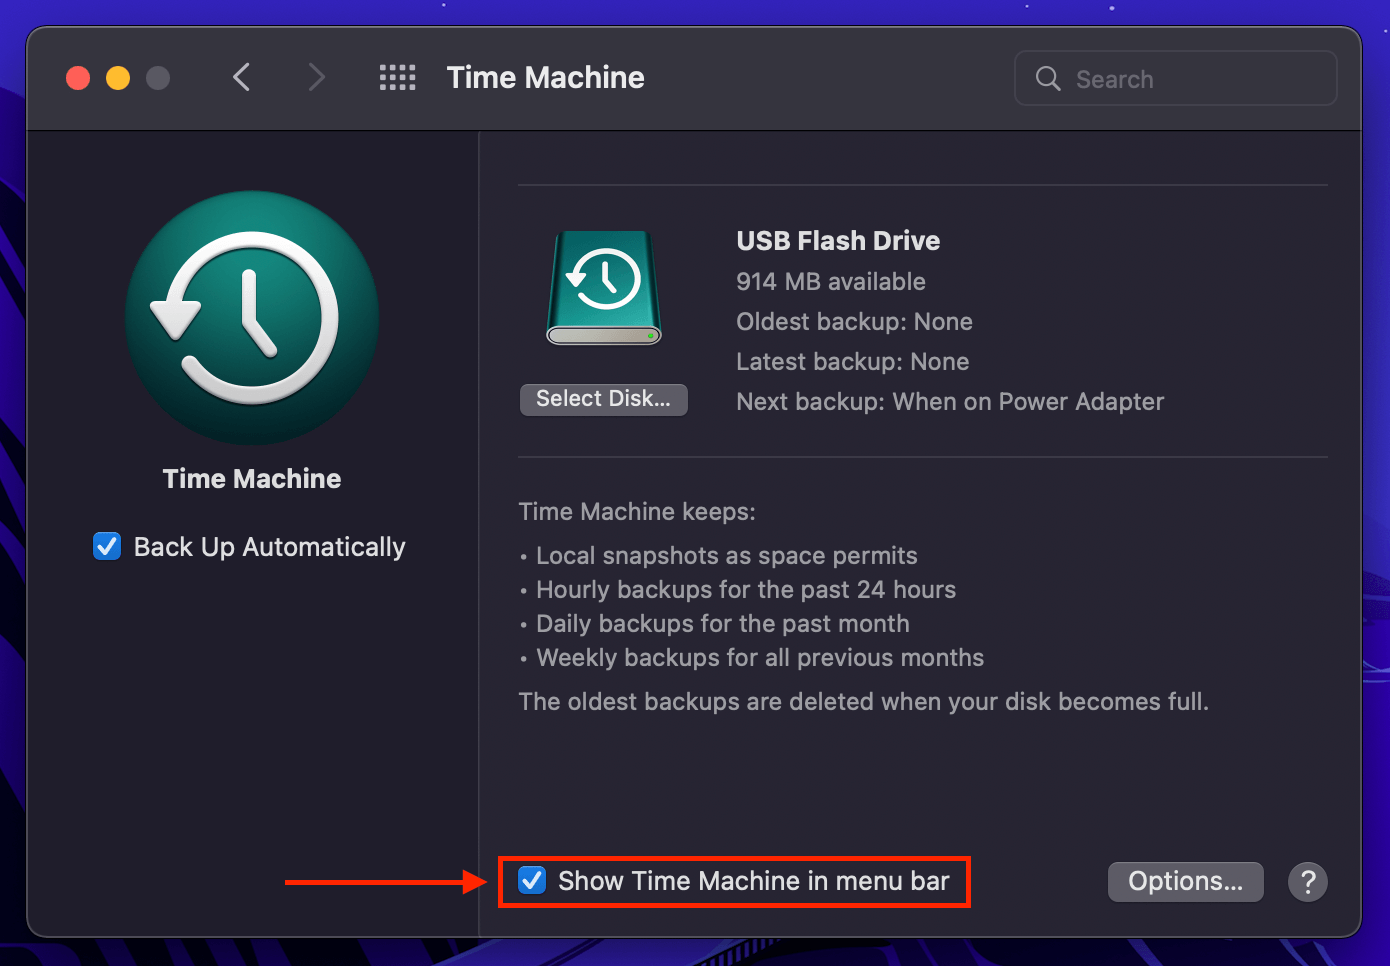
- Enable “Show Time Machine in menu bar” by ticking the box beside it, then close the window.
- Open Finder and navigate to your desktop folder. Then on your Apple menu bar, click the Time Machine button > Enter Time Machine.

- Use the arrows on the right side of the window to browse through the timeline of your desktop folder. Select the files you want to recover, then click “Recover”.

Method 4: Show Hidden Desktop Files Using Finder
Finder lets you toggle the display of components connected to your Mac (such as external drives, etc.). These are usually displayed on your desktop, but may be hidden thanks to these settings. To unhide them, do the following:
- Open Finder.
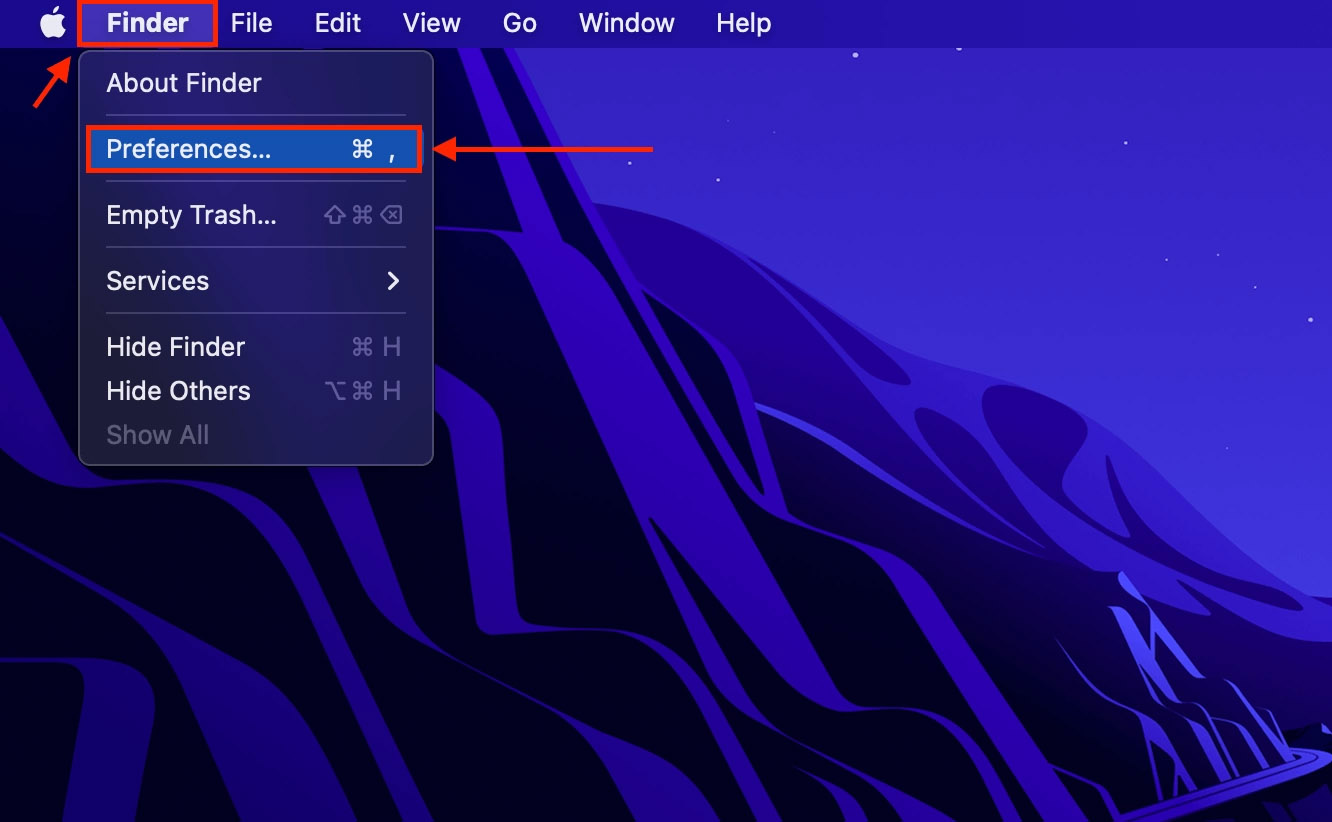
- On the Apple menu bar, click Finder > Preferences…
- In the General tab, tick the boxes beside the items you want displayed on your desktop.
Method 5: Disable iCloud Drive Sync to Restore Desktop Folders on Mac
Once you’ve used up a certain amount of storage, iCloud deletes local copies of files and folders in pre-specified locations on your Mac – including your Desktop folder. This behavior is Mac’s way to help you save space on your drive. To disable this behavior and restore the files and folders on your desktop, do the following:
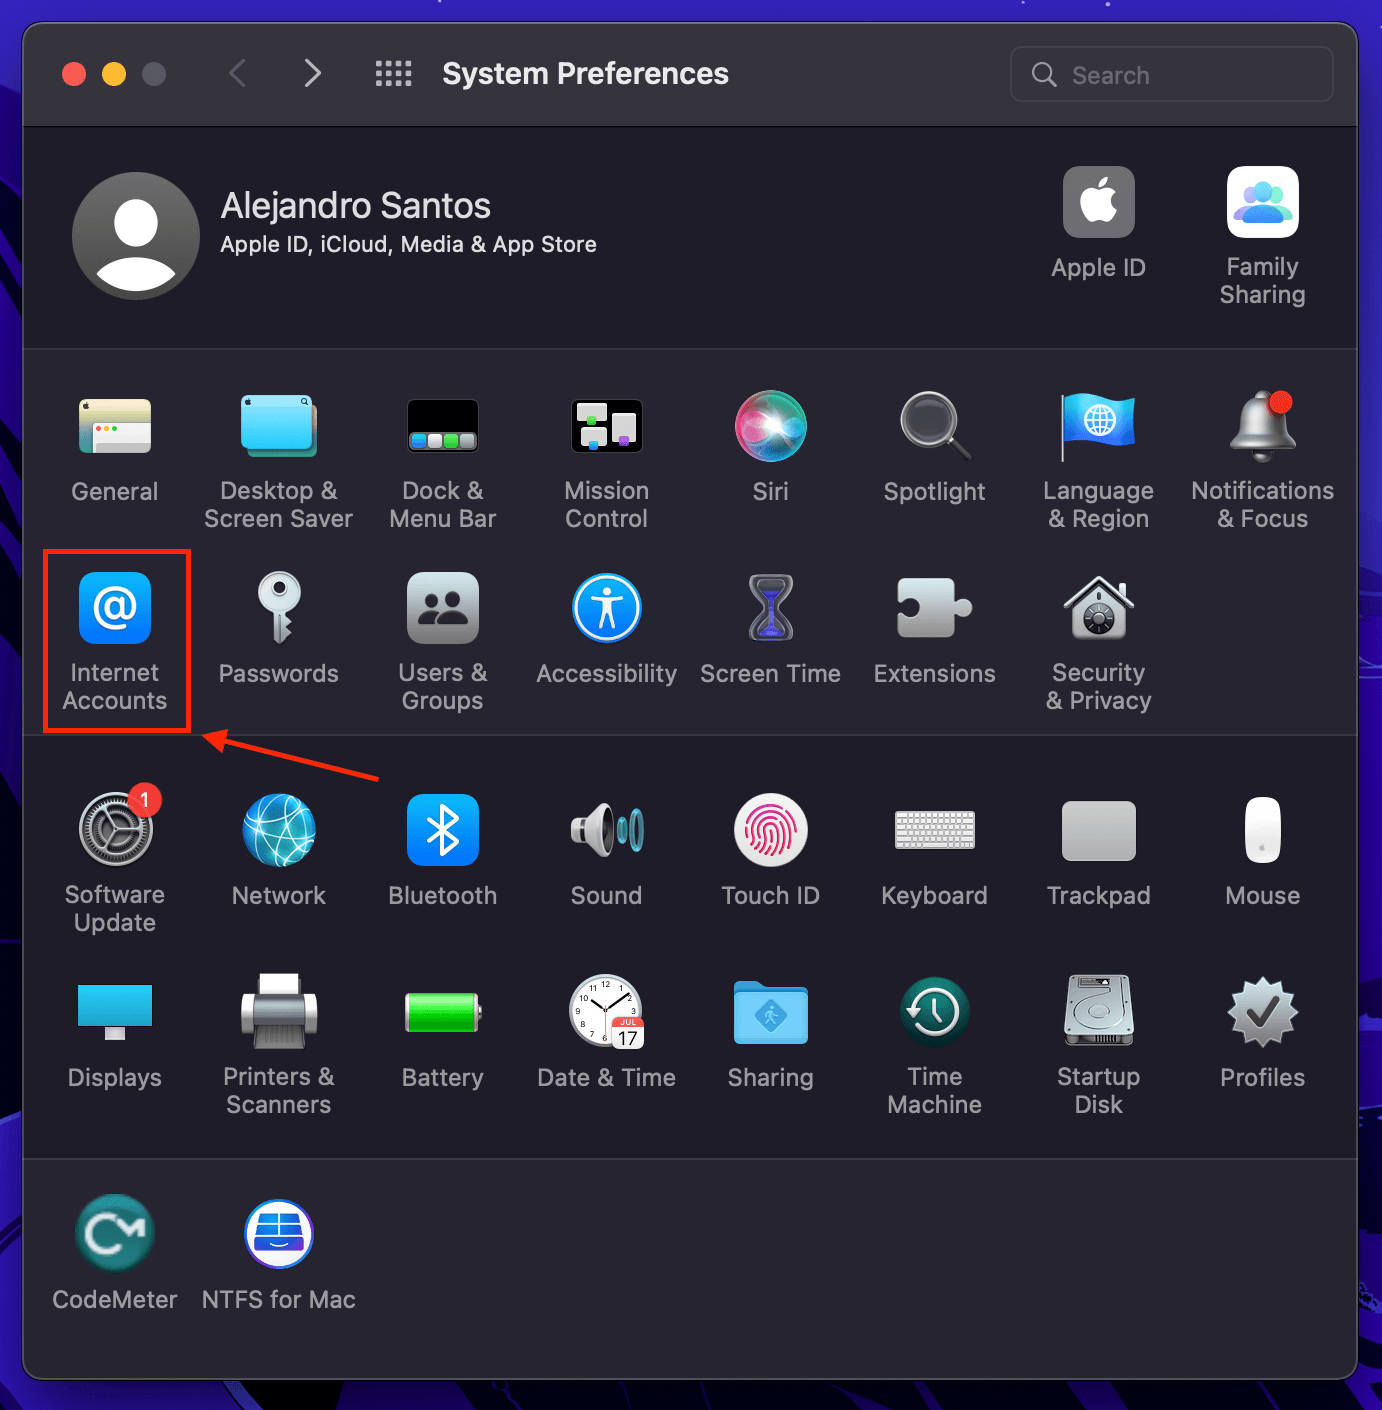
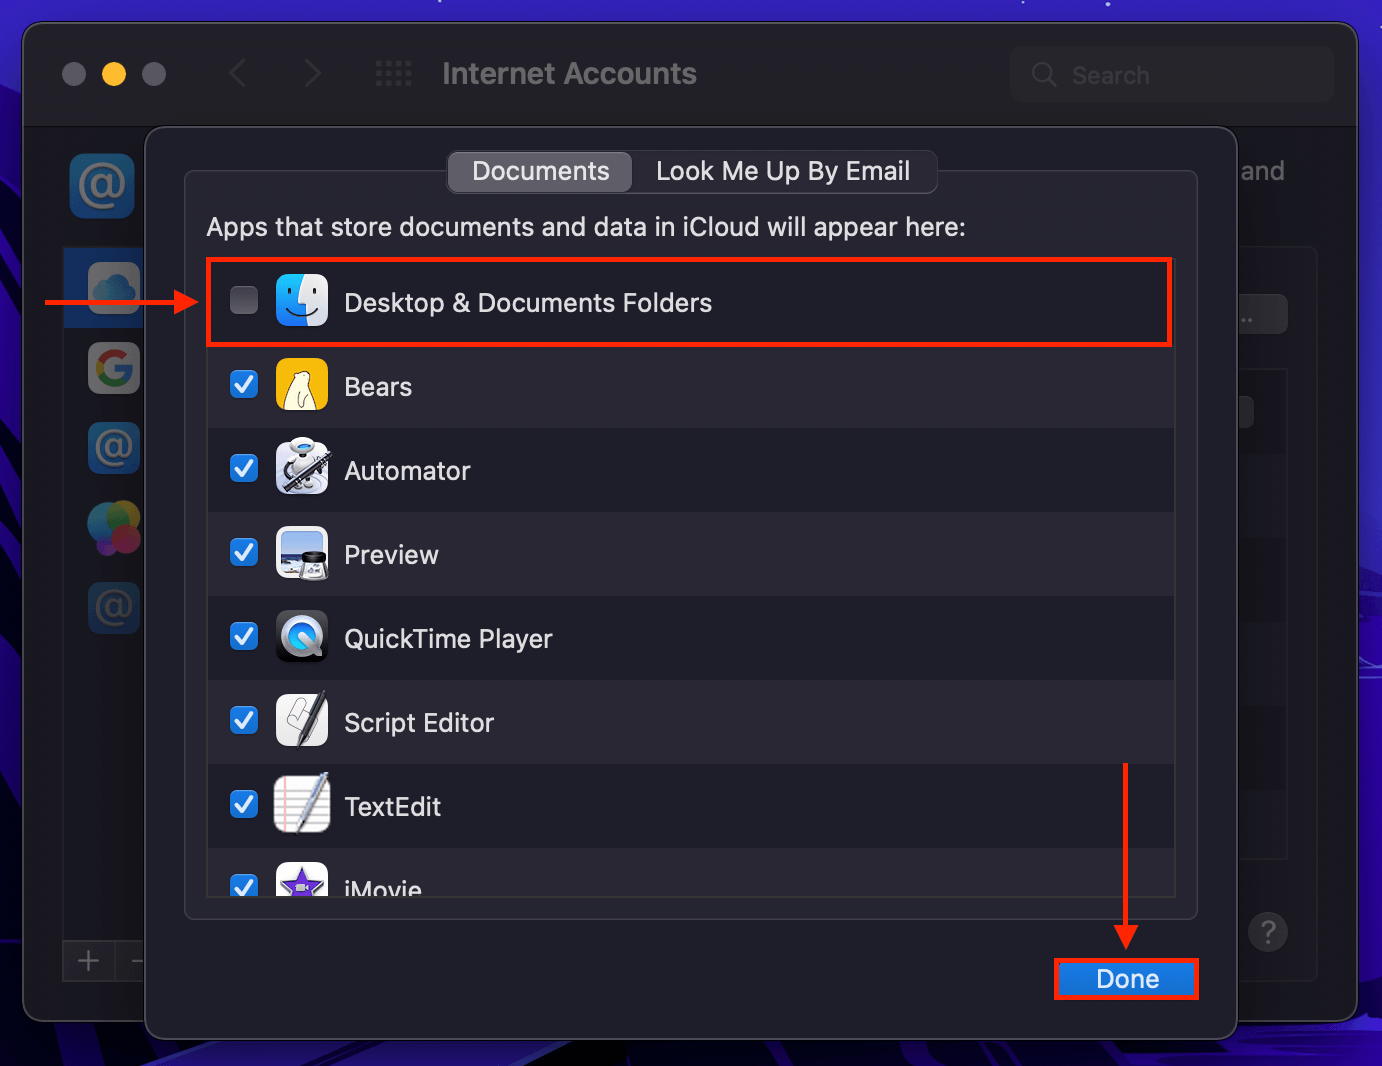
- Open System Preferences > Internet Accounts.
- On the left sidebar, click iCloud. Then, click the “Options…” button beside “iCloud Drive” in the right pane.
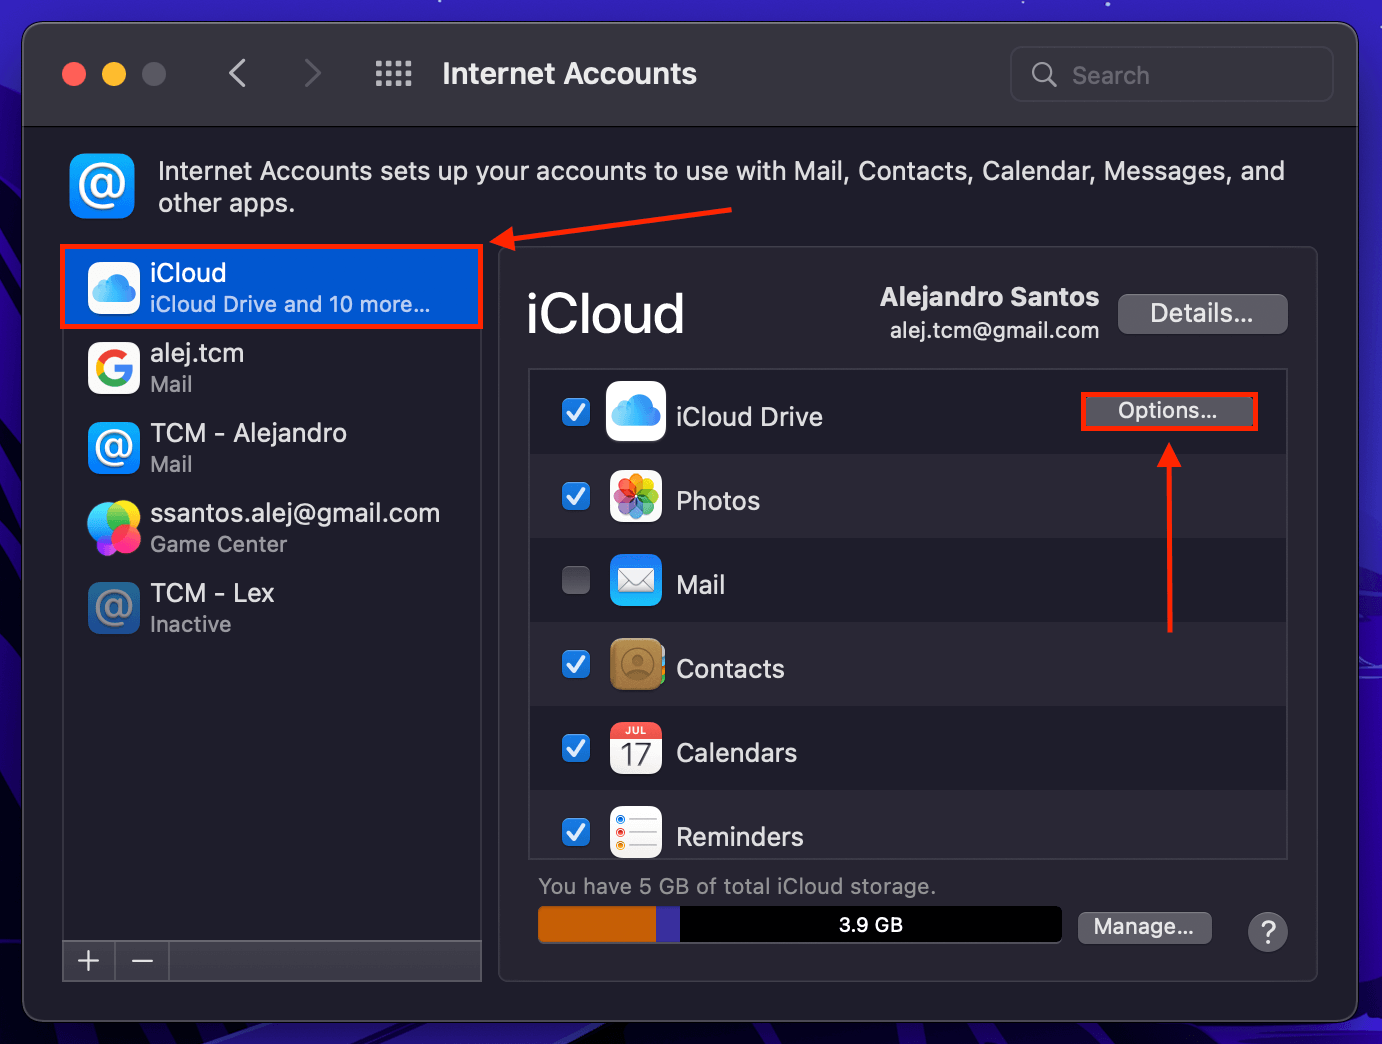
- Untick the box beside “Desktop & Documents Folders”.
Method 6: Find Disappeared Mac Folder Through Stack
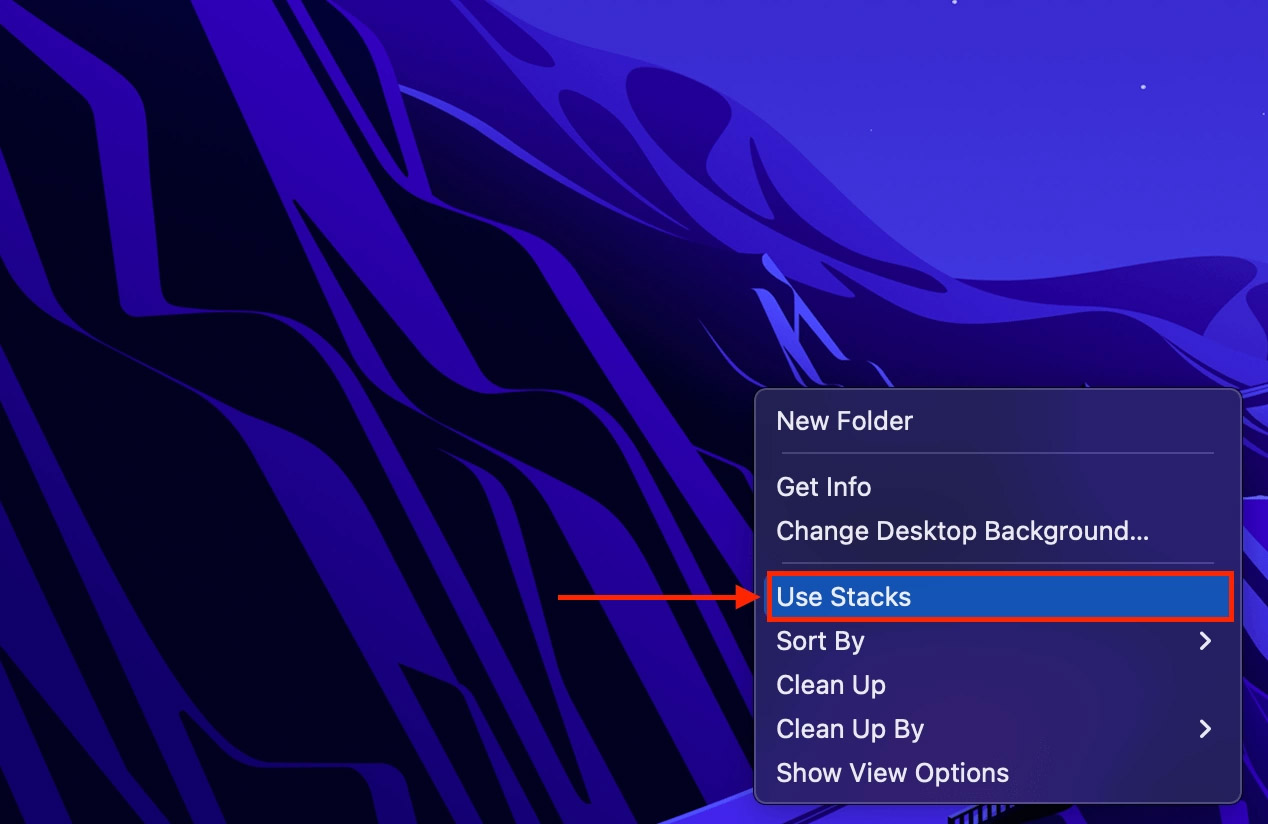
If you can’t find your files and folders on your desktop but you see a pile of icons grouped together, you’re probably using Stacks. Think of Stacks as invisible folders that only exist on your desktop to group similar files together. To disable this feature, right-click on your desktop and make sure “Use Stacks” is unticked.
Method 7: Unhide Desktop Files Through Terminal
The following command causes all desktop items to completely disappear:
defaults write com.apple.finder CreateDesktop false; killall Finder
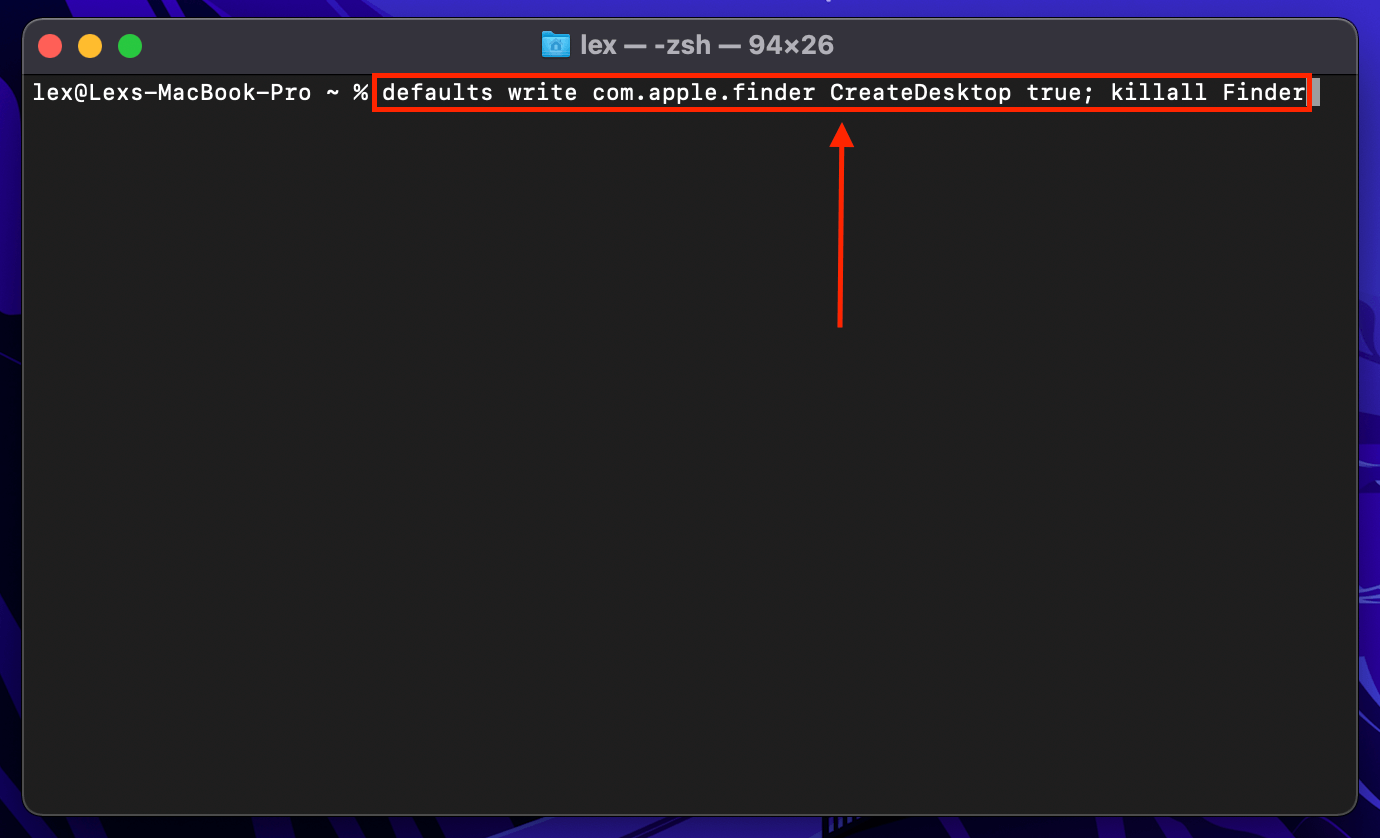
It’s unlikely that you did this “accidentally”, but it’s worth a shot to disable this setting. Launch Terminal (Finder > Applications > Utilities > Terminal), then type the following command and hit return:
defaults write com.apple.finder CreateDesktop true; killall Finder
FAQ
How to recover desktop files on Mac?
Here is a super-quick guide on recovering deleted desktop files on your Mac:
- Download & install Disk Drill.
- Launch the app & scan your system drive.
- Browse the results for your desktop files.
- Use the checkbox column to select the files you want to recover.
- Select a destination for the recovered files.
However, there are many reasons that can cause your desktop files to disappear and corresponding solutions for each one. Read again the full article to learn more.
Why did my desktop files disappear on my Mac?
Depending on the scenario, there are different reasons why desktop files disappear on Mac. If only specific files are missing:
- You accidentally deleted your files.
- Stacks is enabled (right-click desktop > Use Stacks).
- You misplaced your files.
If all items on your desktop are missing:
- Your desktop is set to hidden.
- iCloud drive deleted local copies of your desktop folder.
Why did everything on my MacBook desktop disappear?
If all of the items on your MacBook’s desktop disappeared, you either set your desktop to hidden or iCloud deleted the local copies of your desktop files (don’t worry, they’re still in the cloud).
What should I do if my Mac desktop files disappeared after update?
Depending on your Mac settings, there are different ways to restore Mac desktop files that disappeared after update:
- If you have iCloud enabled, you will likely find all your files safely in iCloud Drive after you update macOS.
- If you enabled Time Machine for a time before you updated macOS, you can restore your desktop files via Time Machine snapshots.
- If your files are totally gone from your Mac, you’ll need to use data recovery software like Disk Drill or PhotoRec to restore them by scanning your system drive.
Conclusion
macOS has some quirky behaviors that could make you question spending multiple paychecks on a Mac machine. However, once you get used to moving around the environment using the tools in this article, you’ll never lose another file again. You’ll also find that Mac is really good at making sure users can quickly find their data, no matter where it is in the file system. Just make sure to back up your files with iCloud and Time Machine in case something really goes wrong.
This article was written by Alejandro Santos, a Staff Writer at Handy Recovery Advisor. It was also verified for technical accuracy by Andrey Vasilyev, our editorial advisor.
Curious about our content creation process? Take a look at our Editor Guidelines.