CF (Compact Flash) cards have recently become the memory card of choice for professional photographers and serious enthusiasts… Or maybe your model just happened to use one. Either way, losing all those photos and footage sucks.
We consider ourselves experts on restoring data, so we wrote a guide for Compact Flash card data recovery on Mac. We not only cover the process step-by-step using 2 powerful tools (one of them is free!) – we also explore the possible reasons why you experienced this data loss. Read on.
How to Recover Deleted Files From CF Card on macOS
If you’ve deleted data from your CF card, formatted it, or if your CF card has experienced a logical failure, you’ll find that accessing your data through conventional methods becomes challenging. Thankfully, data recovery software can retrieve and reconstruct both data and metadata, enabling you to regain access. We believe this approach is the most secure and straightforward method for recovering data from a Compact Flash card on a Mac, and it’s our top recommendation for our readers.
In the next sections, we demonstrate this process with 2 popular data recovery software. Read on.
Option A: Disk Drill
If you’re a regular here at Handy Recovery, you’ll often spot Disk Drill in our data recovery software recommendations – for good reason. Disk Drill is one of the best data recovery software for Mac, thanks to its high recovery rate and beginner-friendly GUI (graphical user interface). This also makes it a great reco and a great app for demonstrating data recovery to our readers.
![]()
It’s also ideal for CF card recovery on Mac, as well as for other memory cards typically used with cameras, such as SD cards. The app allows you to preview RAW photos and videos, provided your system has an application to preview that specific file type. For a deeper dive into Disk Drill’s features, read our full Disk Drill review. If you would like a review specifically on the macOS version, you should check out these guys.
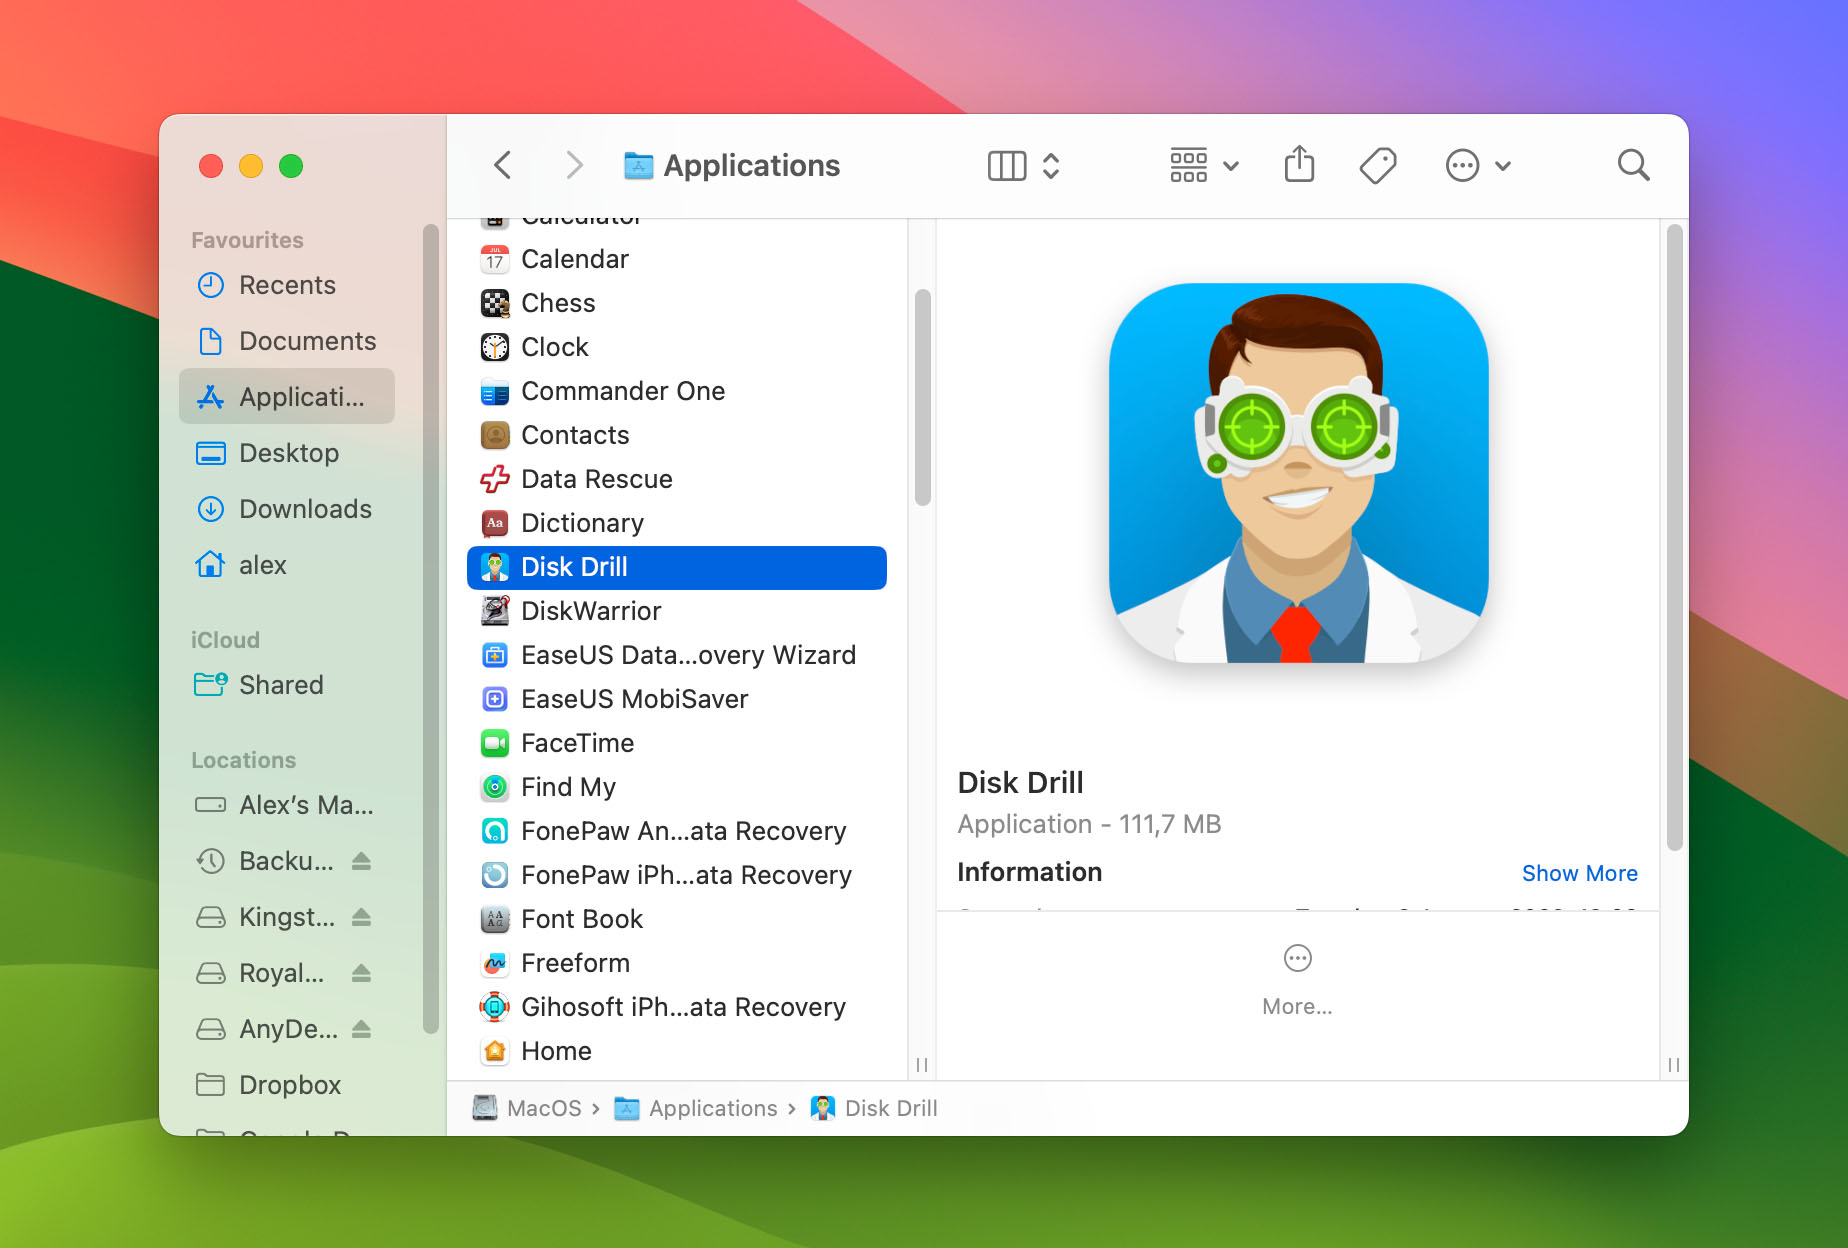
- Download and install Disk Drill.
- Open Finder > Applications, then double-click the Disk Drill icon to launch the app.
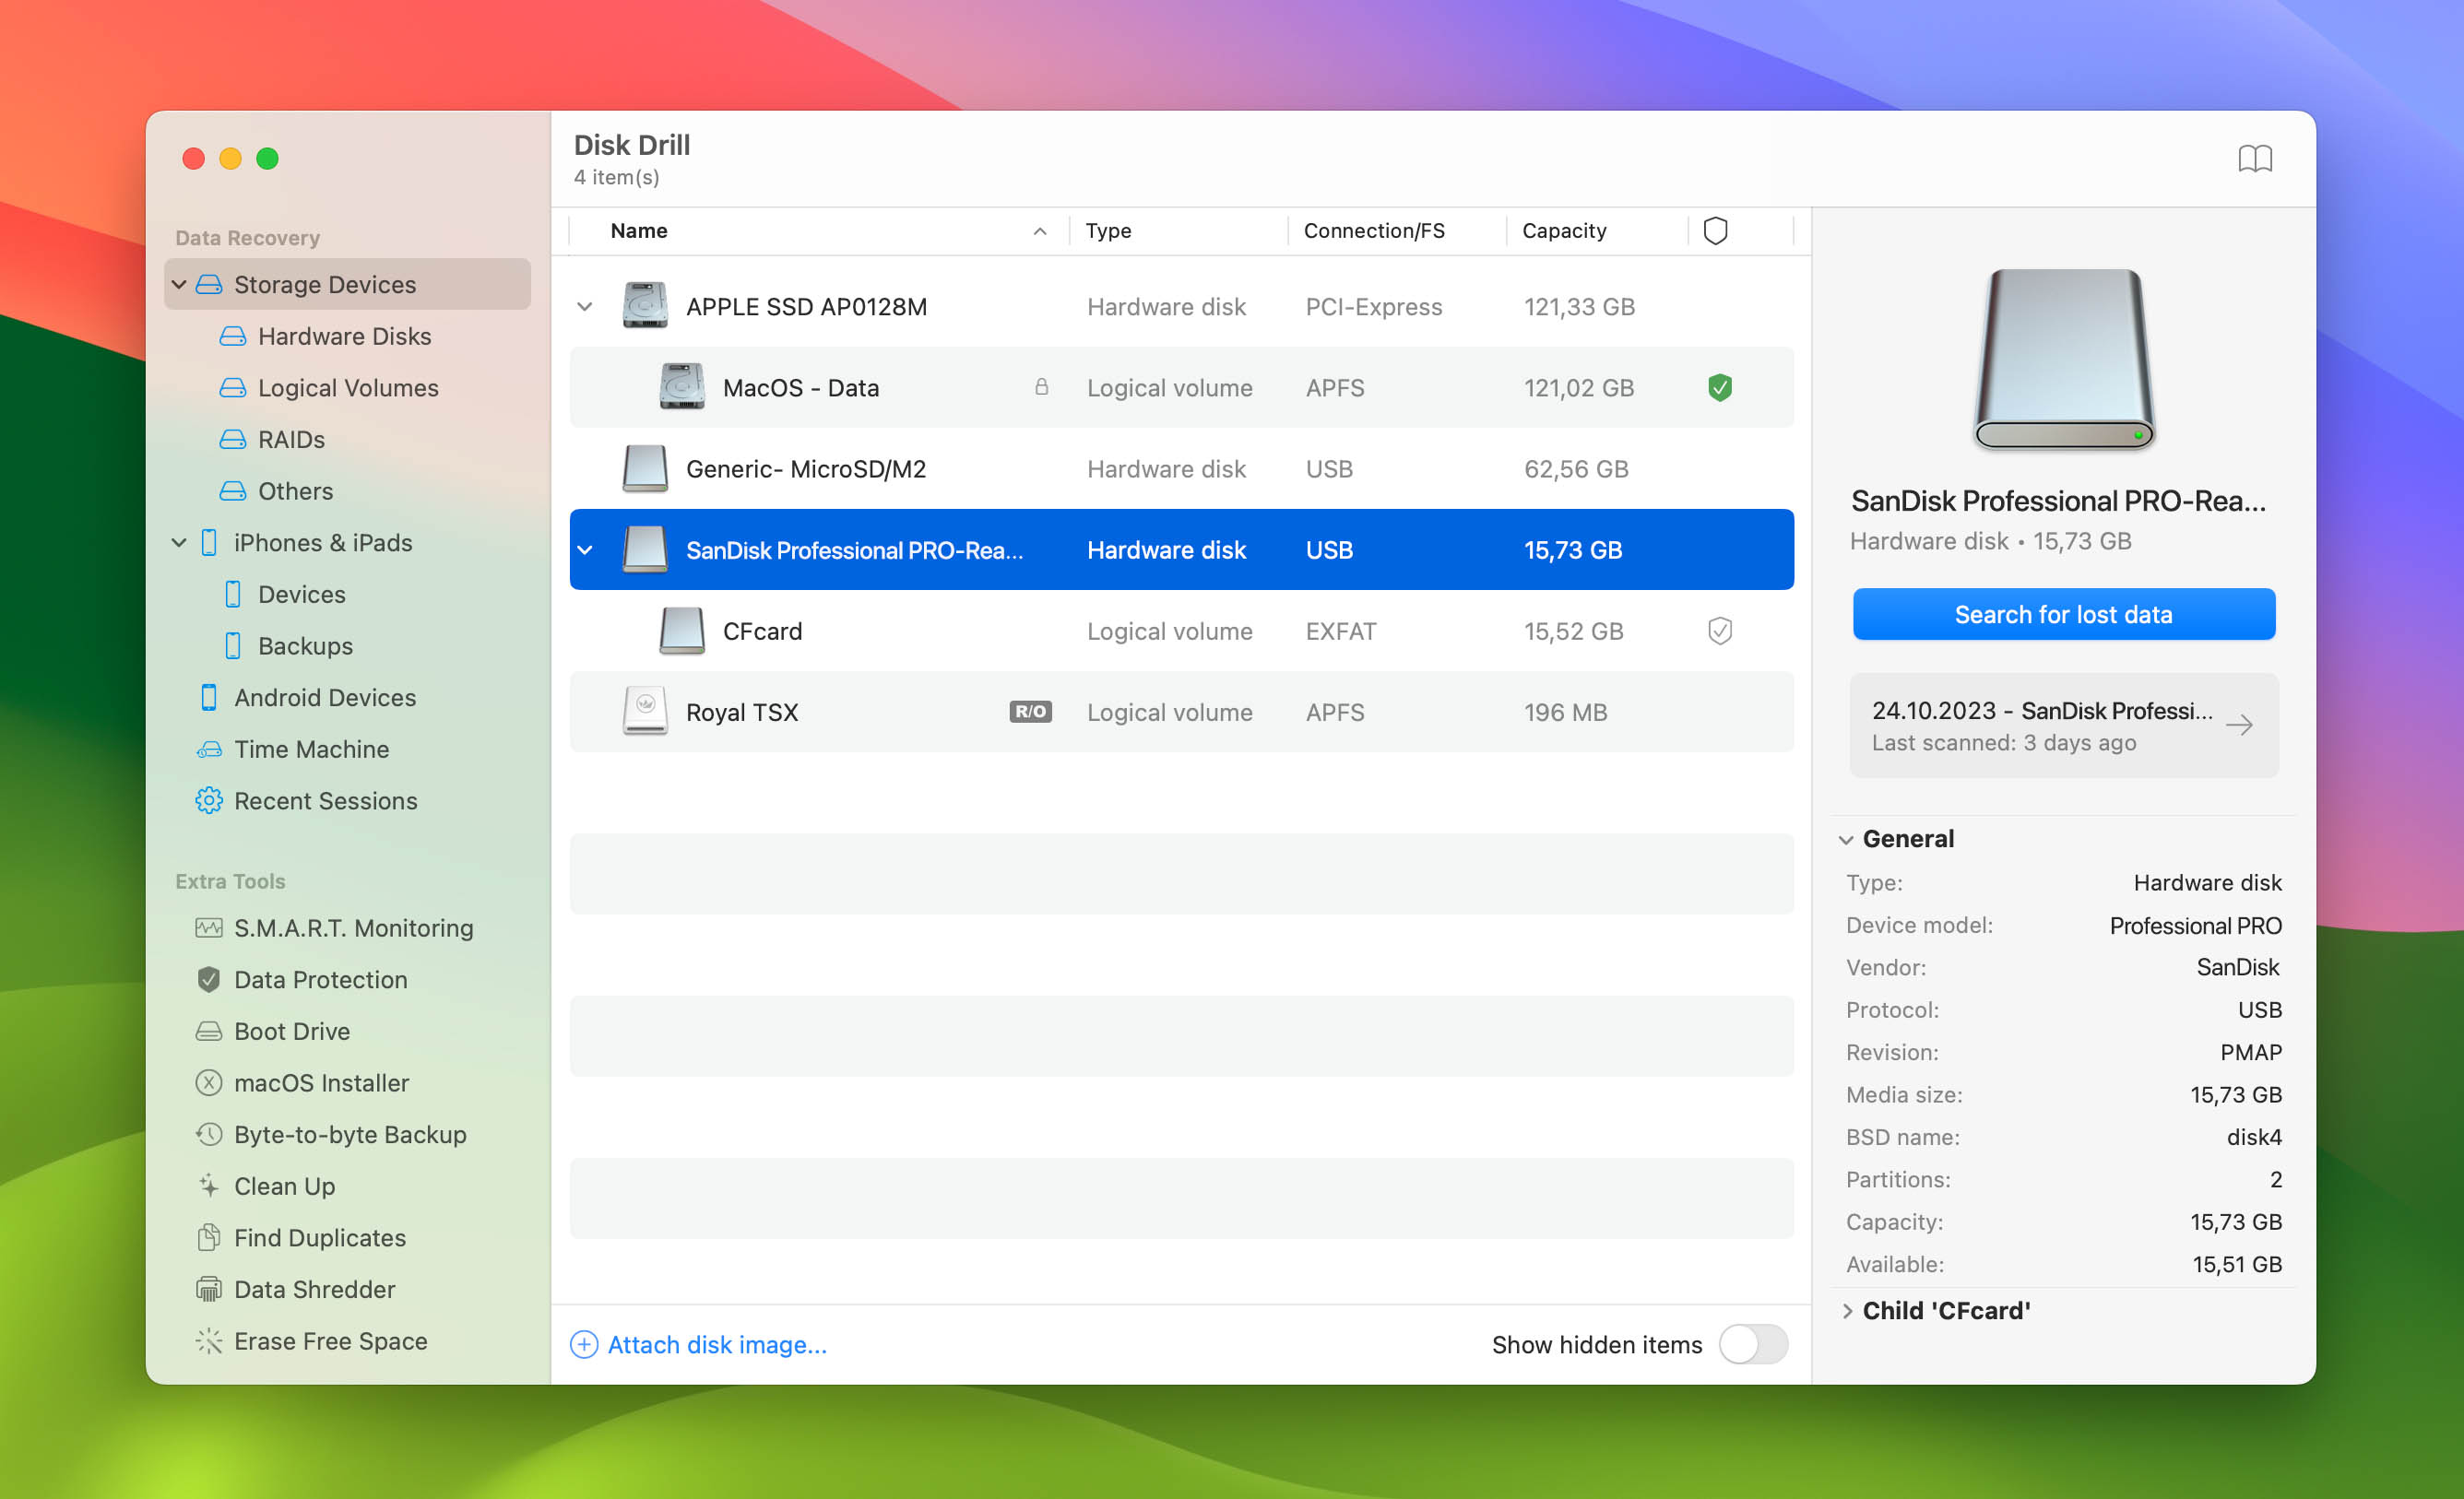
- Select your CF card from the list (if you’re using a USB-type card reader, it might appear as “Generic Storage Device”), then click “Search for lost data”.
- Disk Drill will start scanning your memory card for the missing data. Wait for the process to complete, then click “Review found items”.
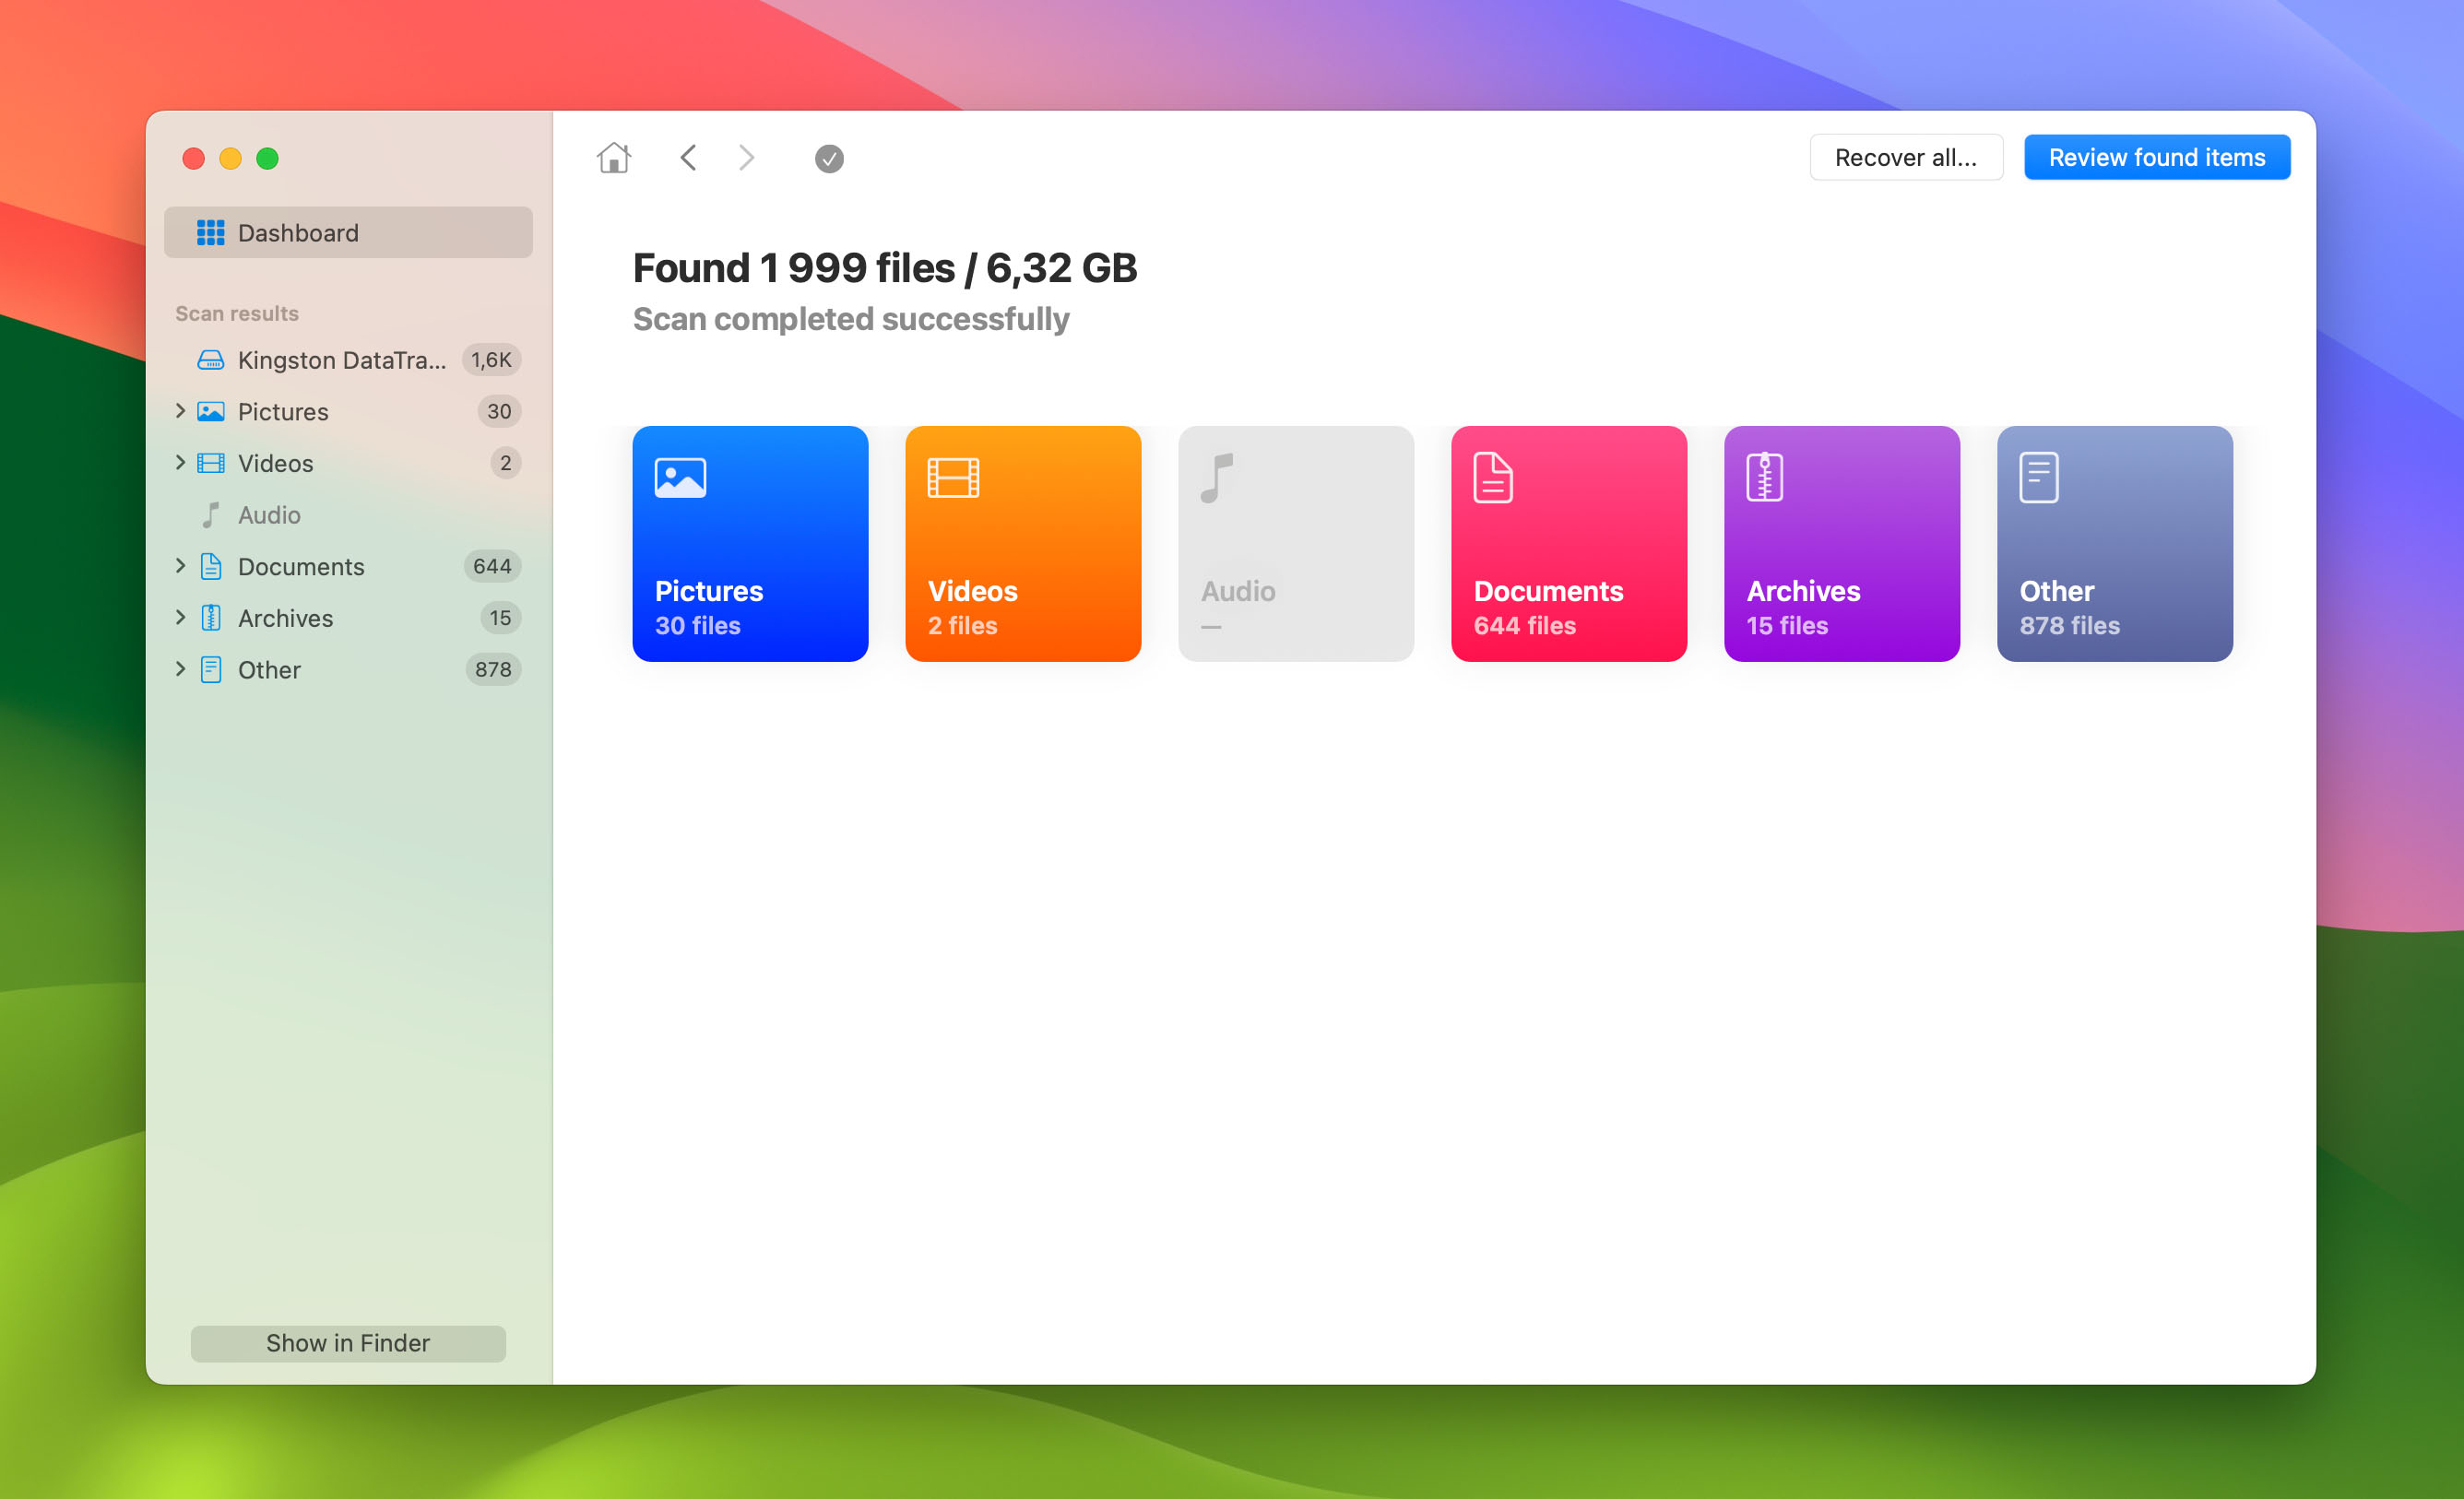
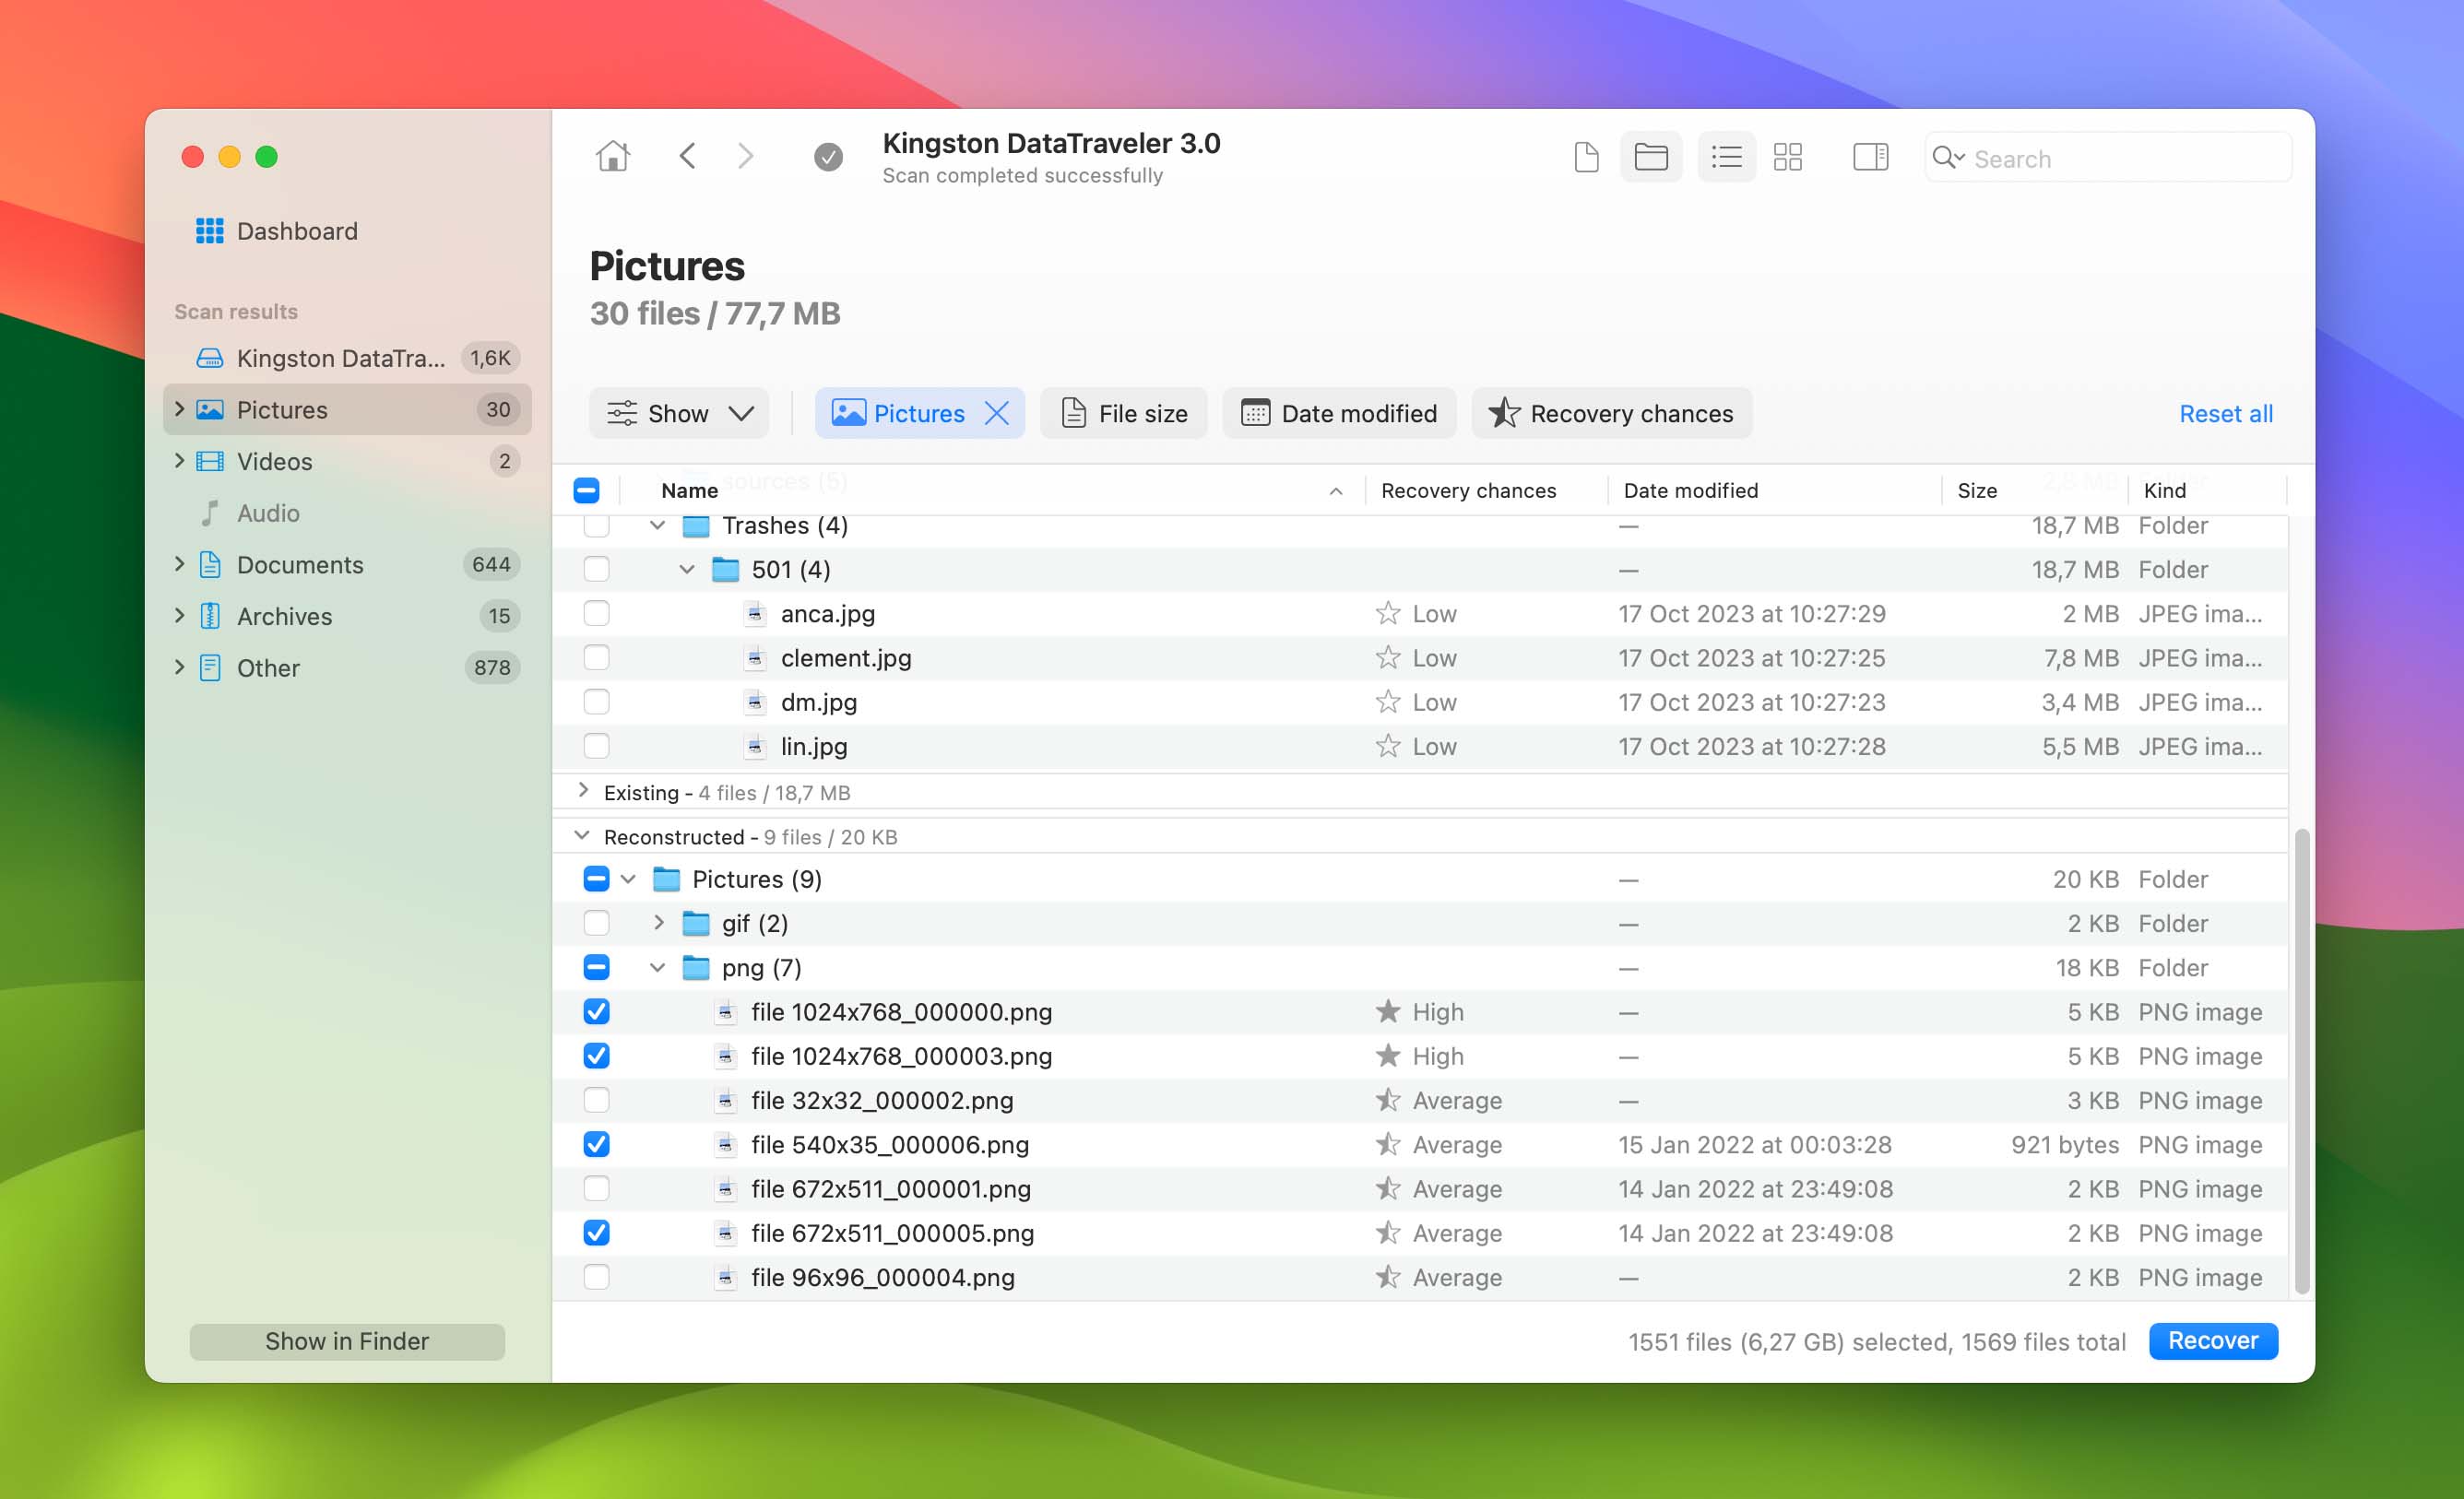
- The next window will display all the files Disk Drill found. You can preview any file by hovering your mouse pointer to the right of their filename and clicking the eye button that appears.
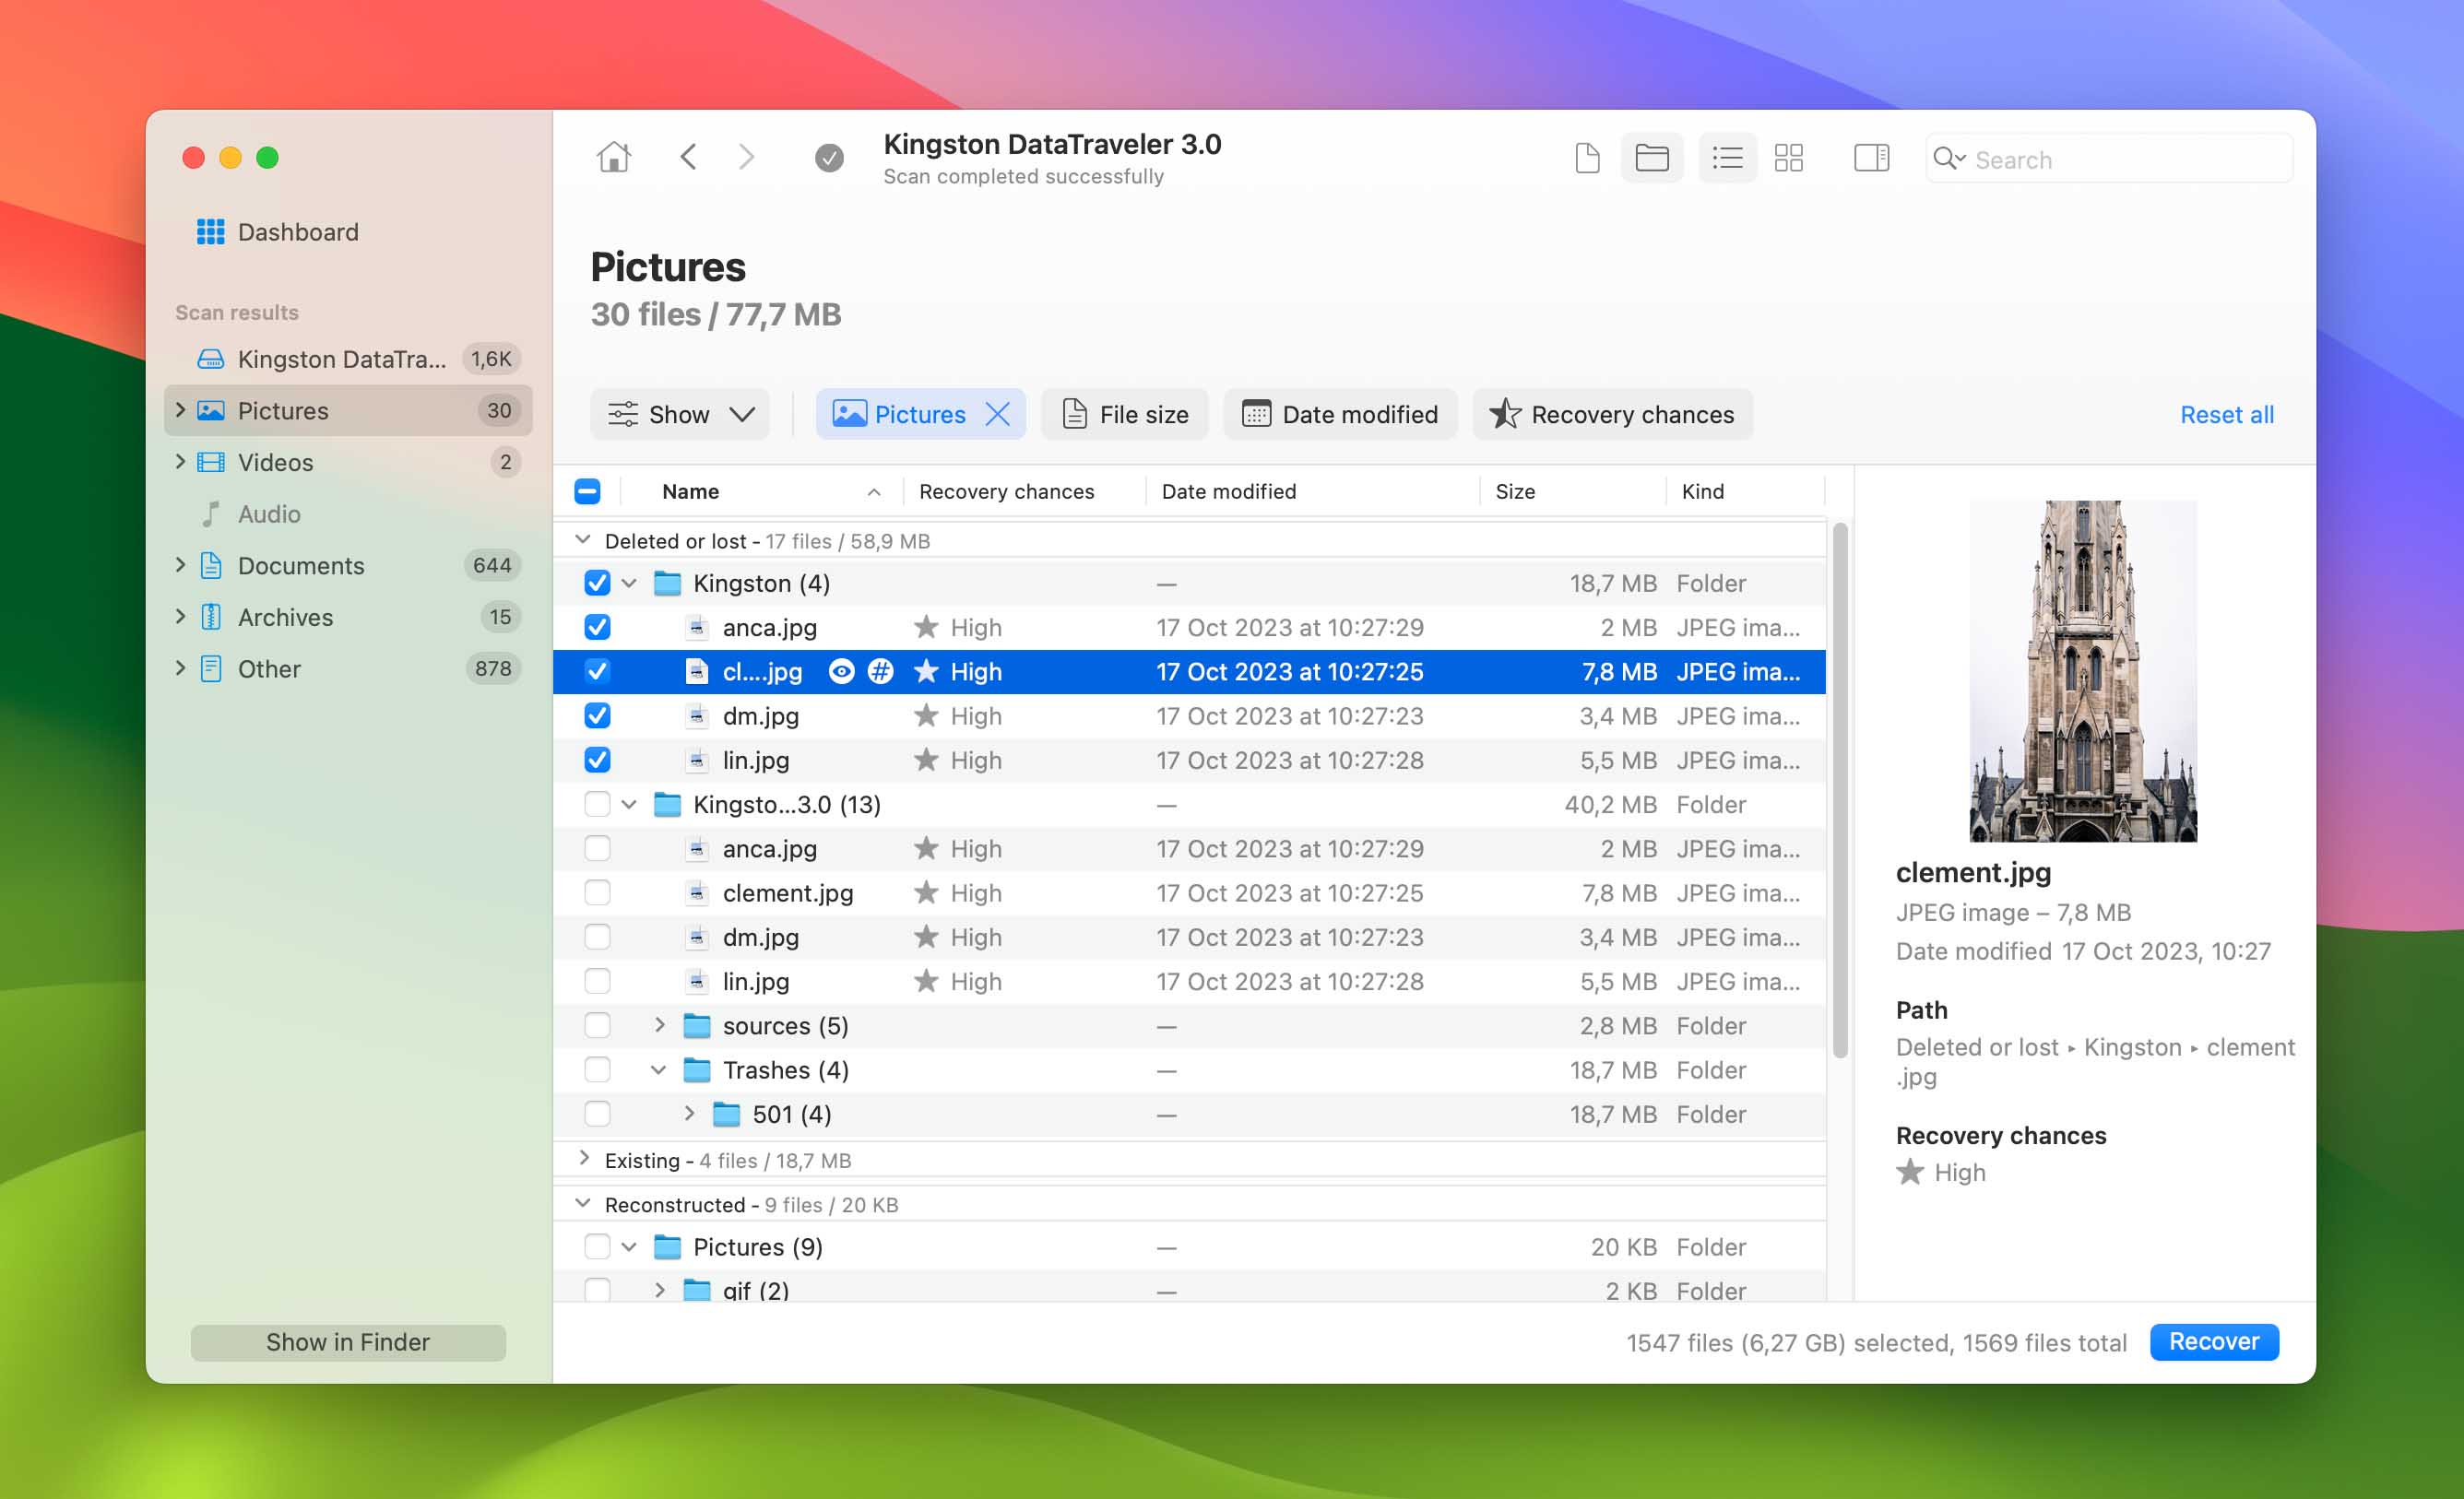
- To select the files you want to recover, click on the boxes in the left-most column. Or leave all the boxes blank to recover found files. Then, click “Recover”.
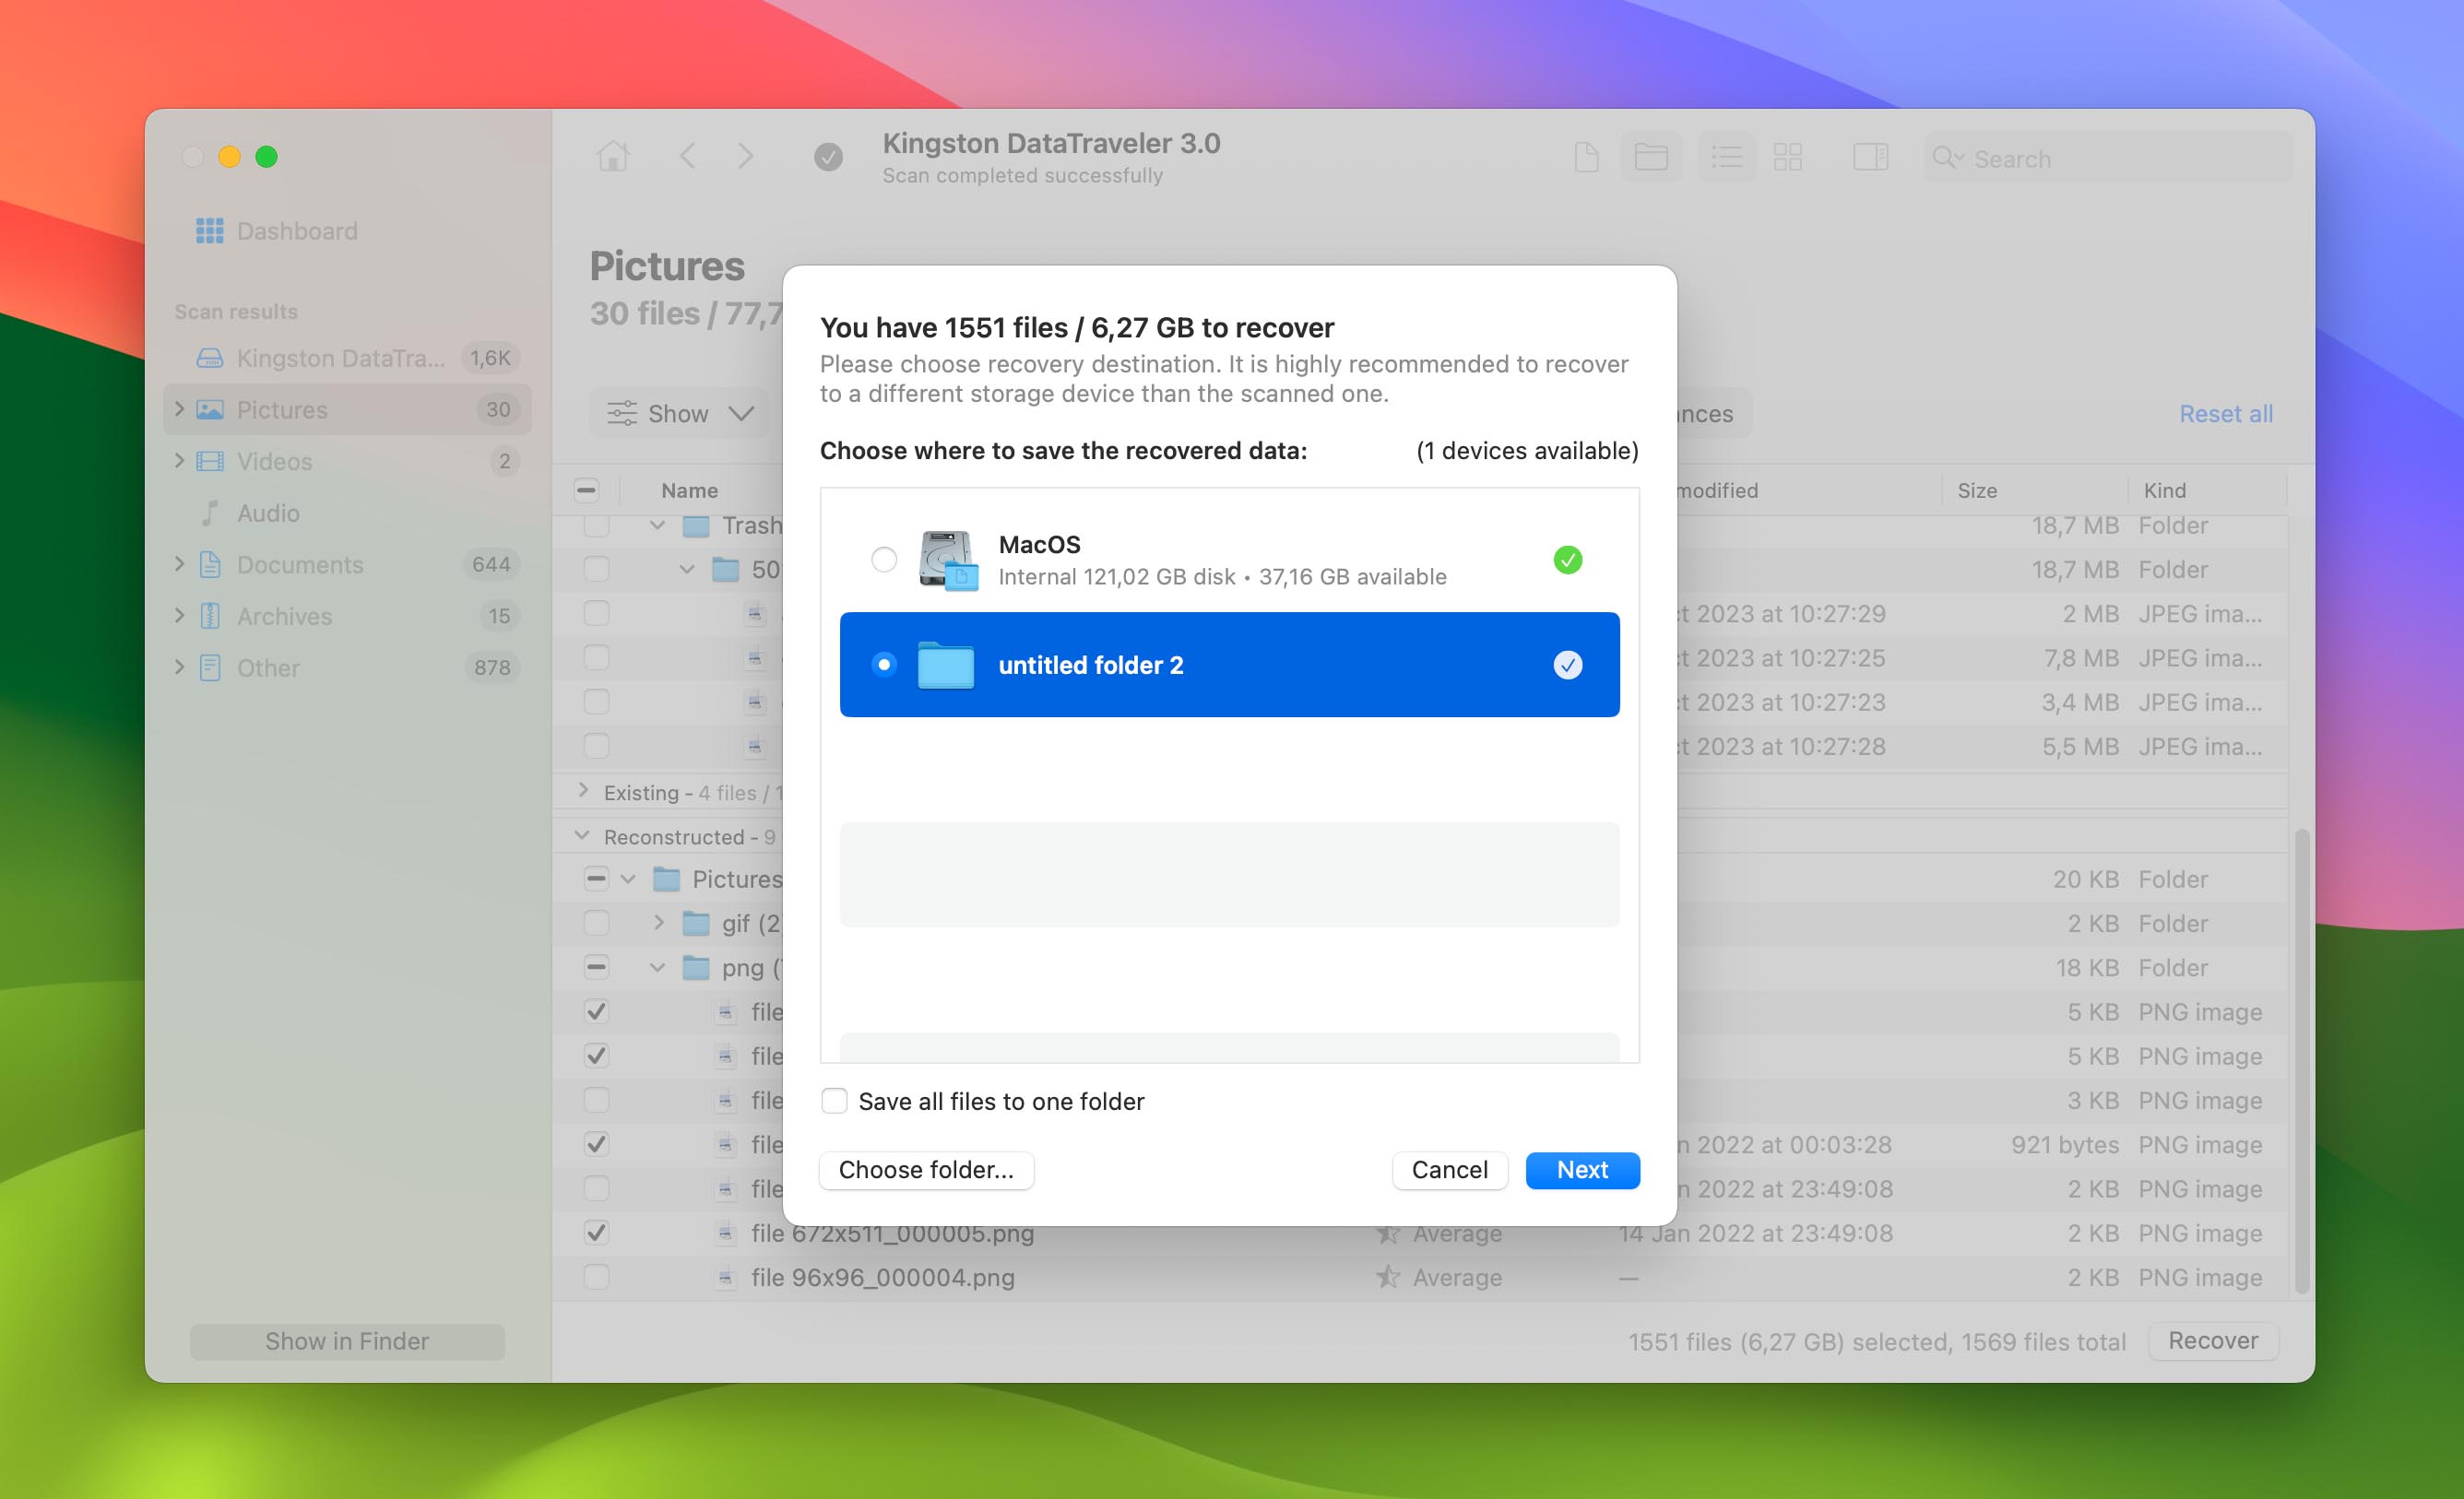
- On the dialogue box that appears, you have the option to either select from the suggested disks or use the “Choose folder…” button to pick a folder through the standard macOS dialog. Once you’ve selected a folder on your computer where Disk Drill will save the recovered files, hit “Next”.
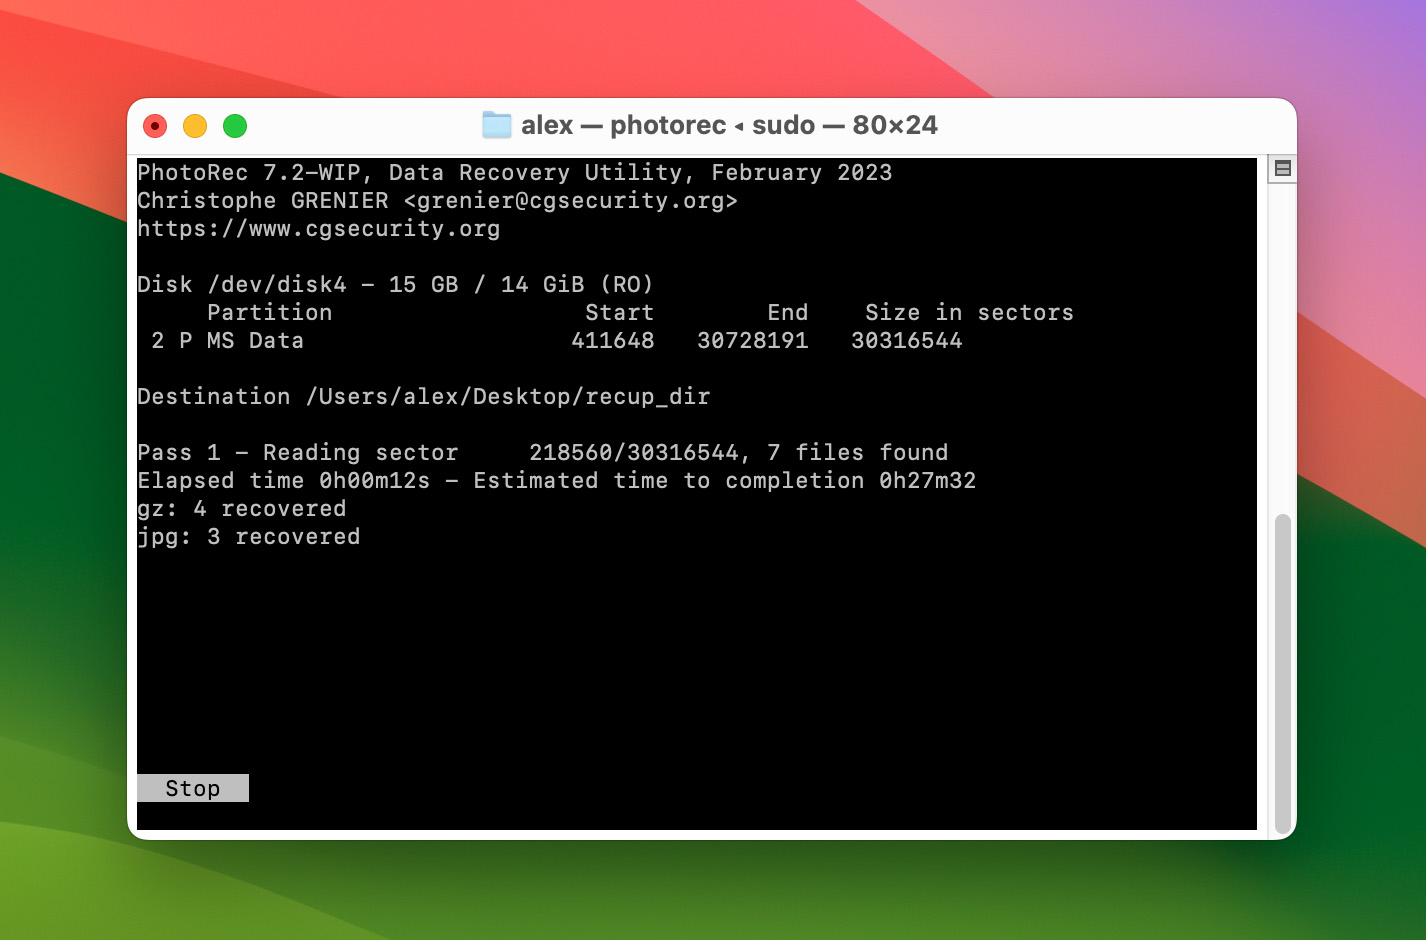
Option B: PhotoRec
Developed by the same company that created TestDisk, CGSecurity’s PhotoRec is a powerful but not-so-beginner-friendly data recovery app that can restore photos and videos from CF cards and most other storage devices.
![]()
As you’ll see below, PhotoRec is pretty much macOS Terminal – but even if you’ve never written a line of code before, you should be fine as long as you follow the steps we prepared for you. If you want to learn more about PhotoRec (and need some help with installing it), read our in-depth PhotoRec review.
- Download and install PhotoRec.
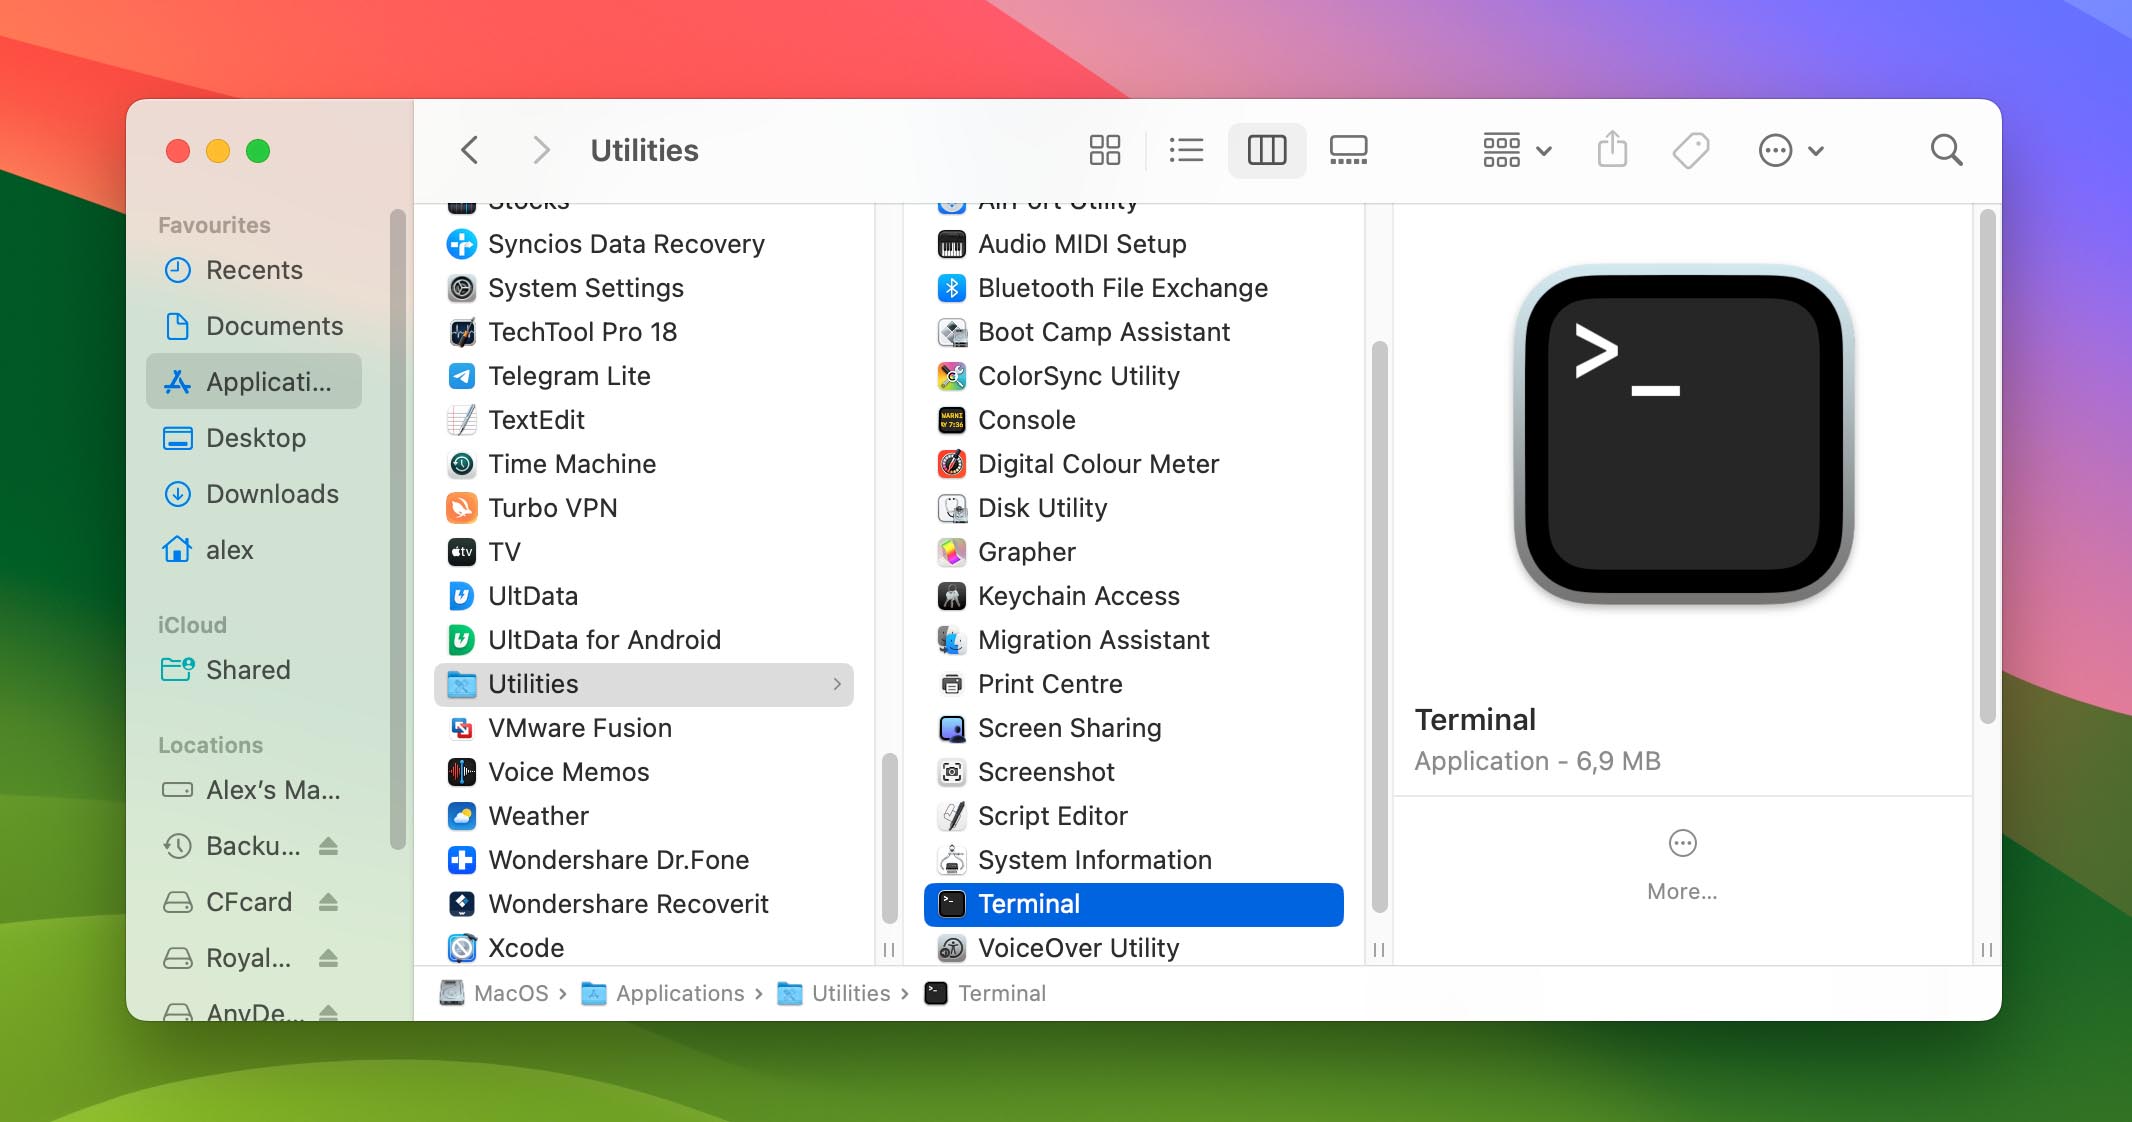
- Launch the Terminal app by opening Finder > Applications > Utilities > Terminal.
- Launch PhotoRec by typing the following command and hitting (return):
sudo photorec
Enter your password if prompted.
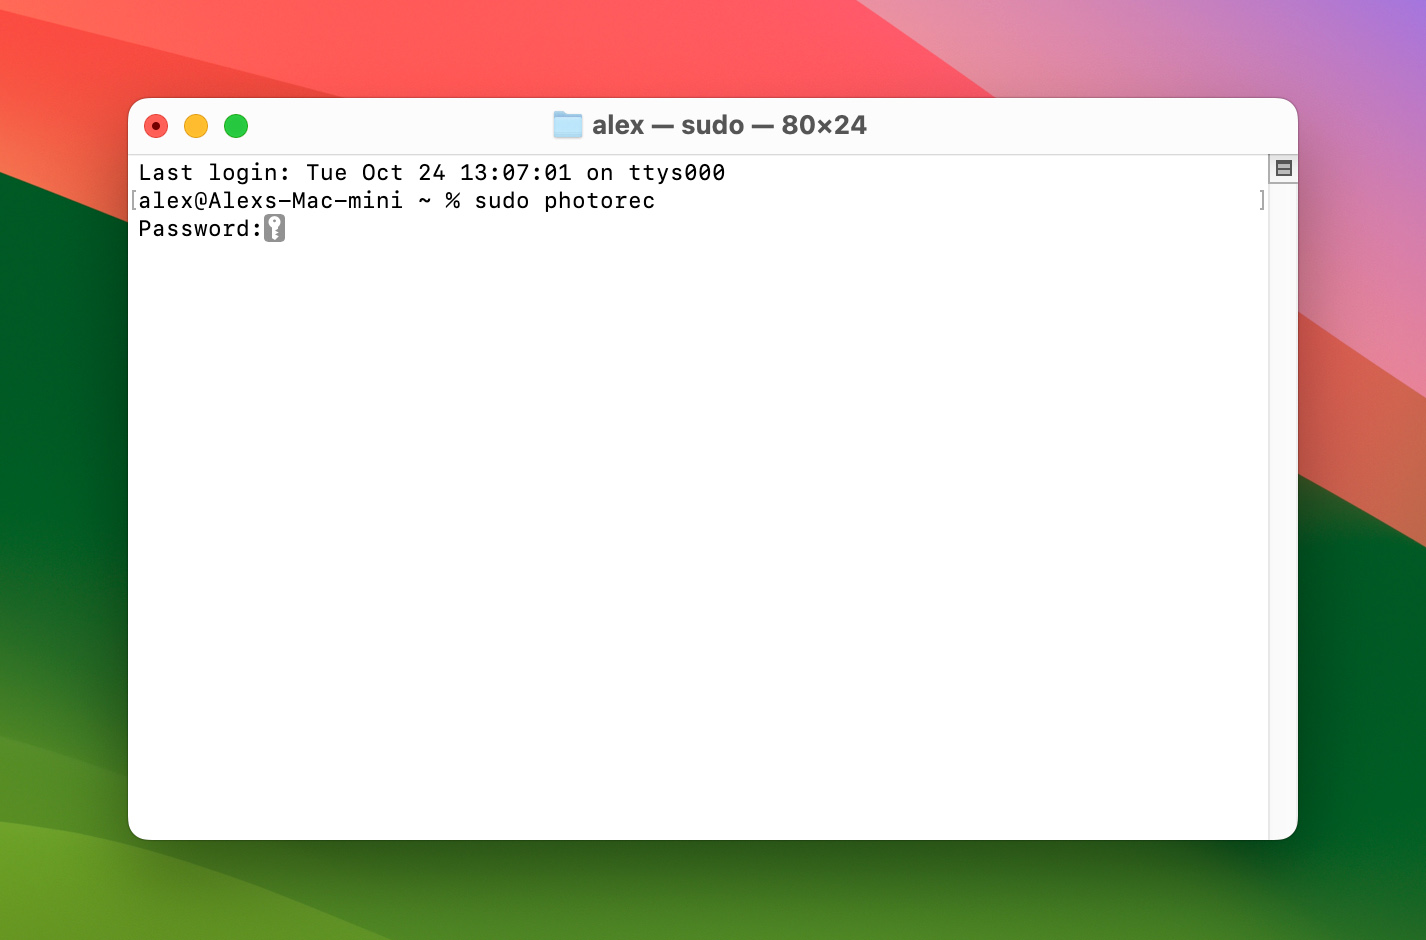 ⚠️
⚠️This only works when installed via Homebrew.
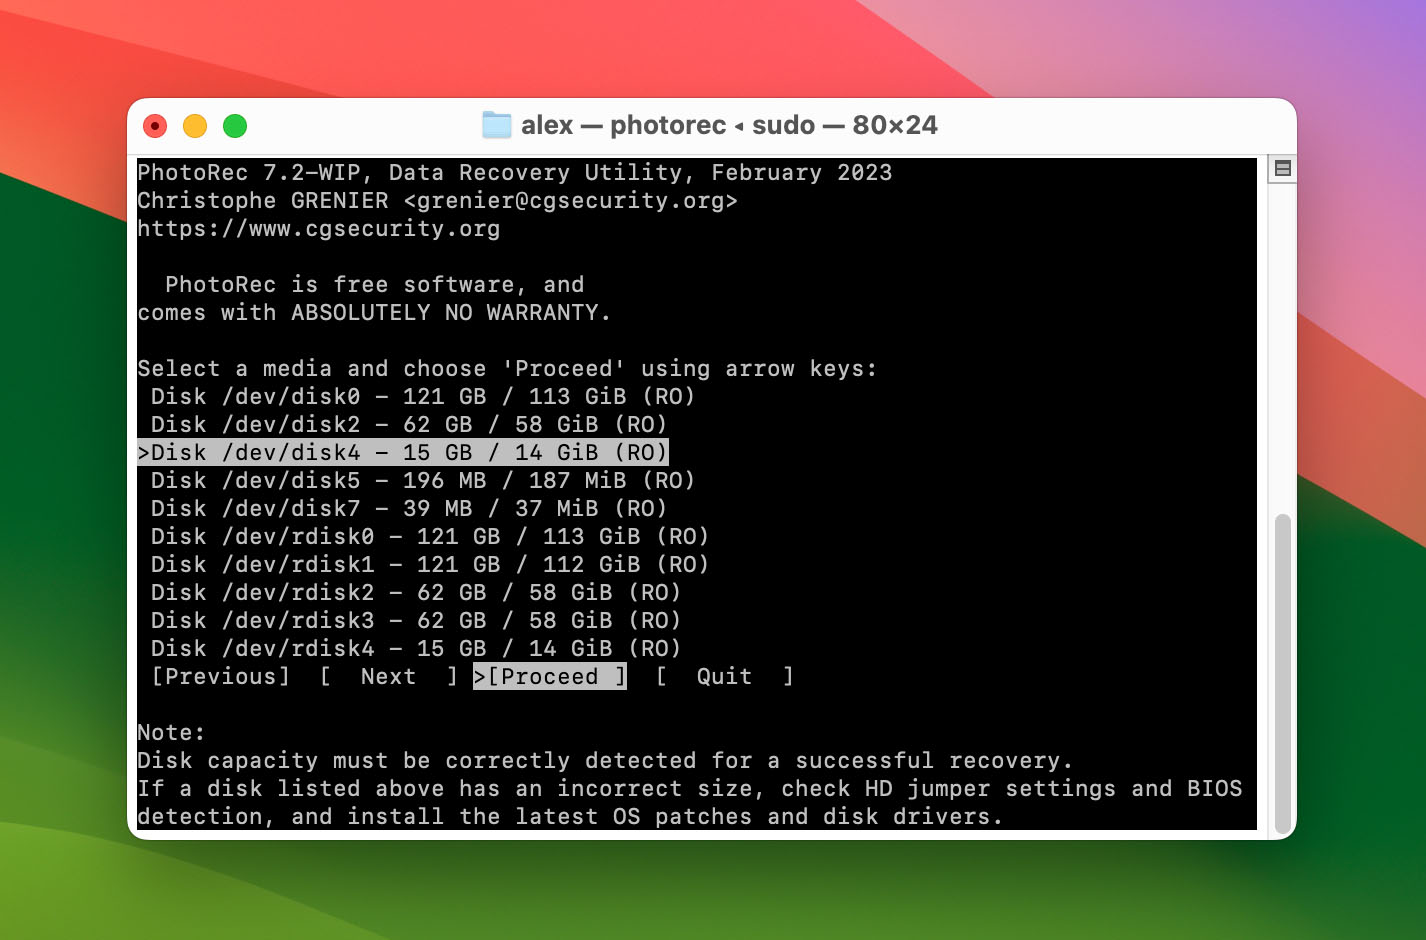
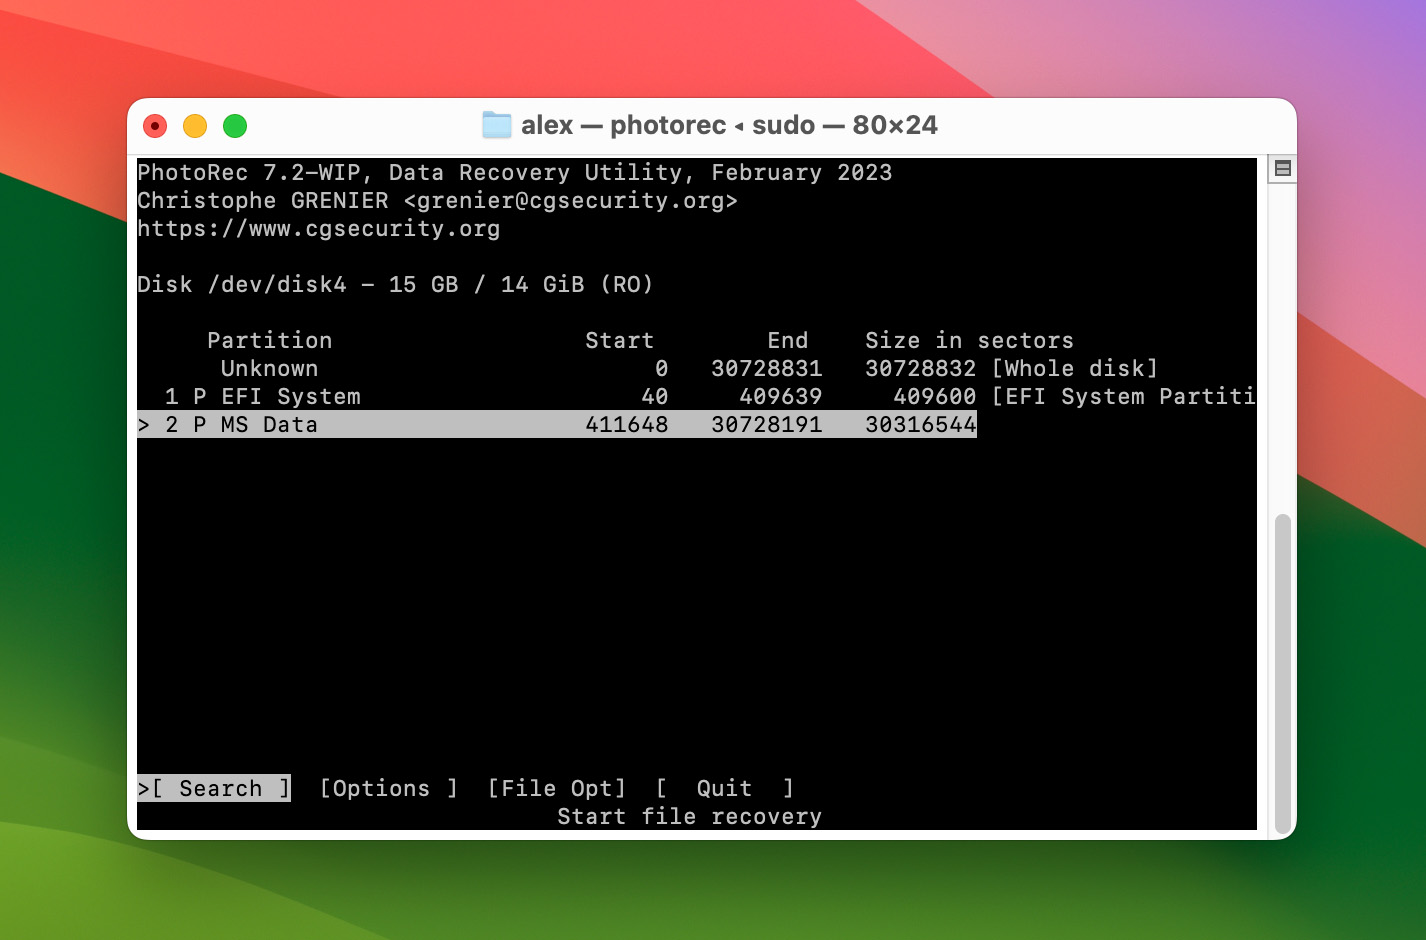
- Use the arrow keys to select your CF card from the list, then hit “Proceed”.
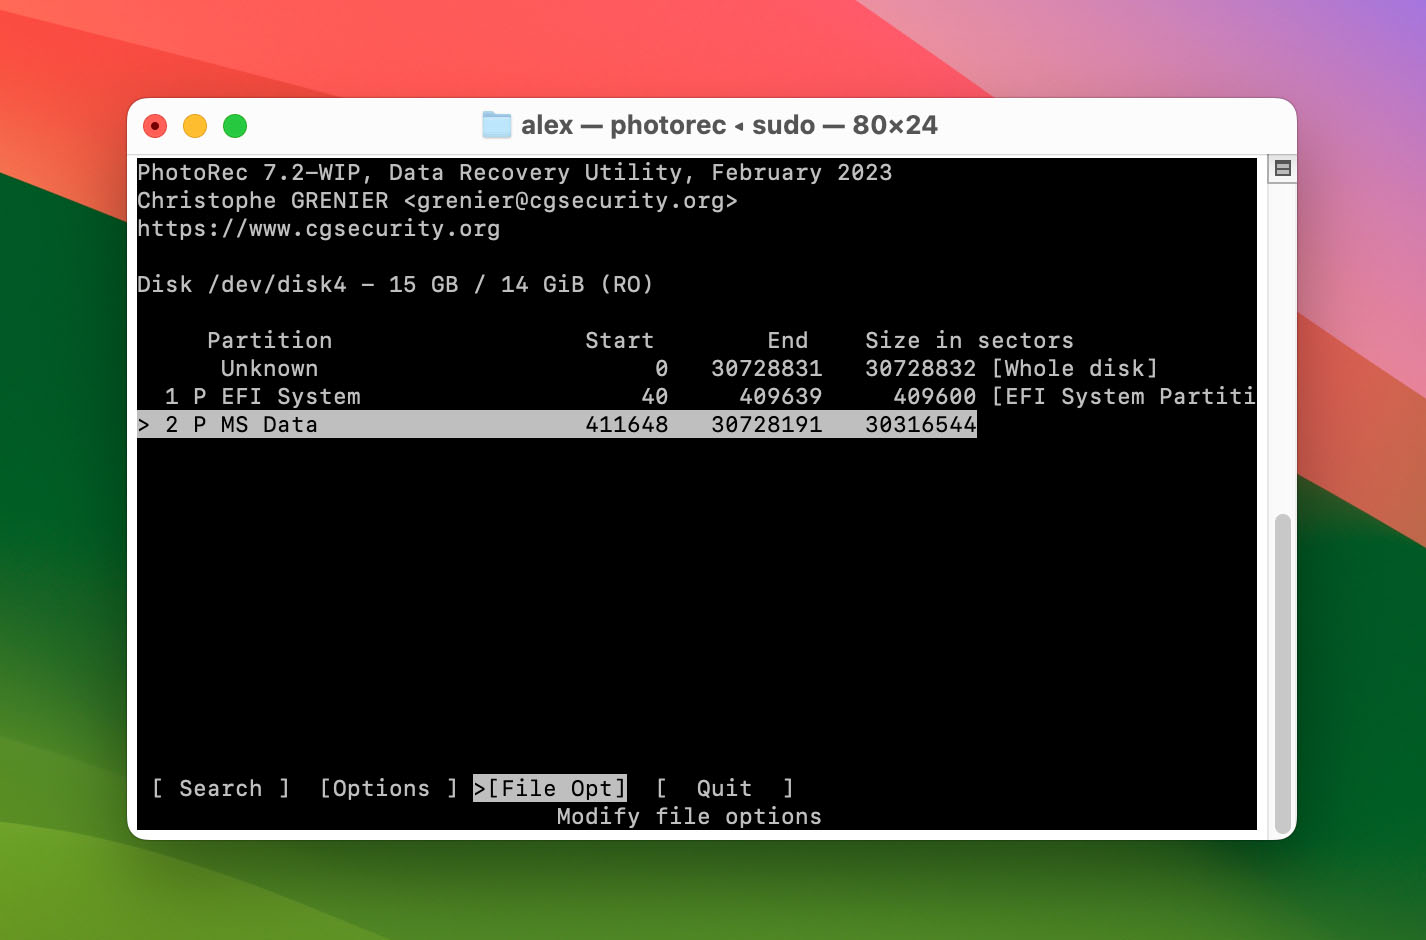
- Use the arrow key to highlight the partition you want PhotoRec to scan, then navigate to “File Opt”.
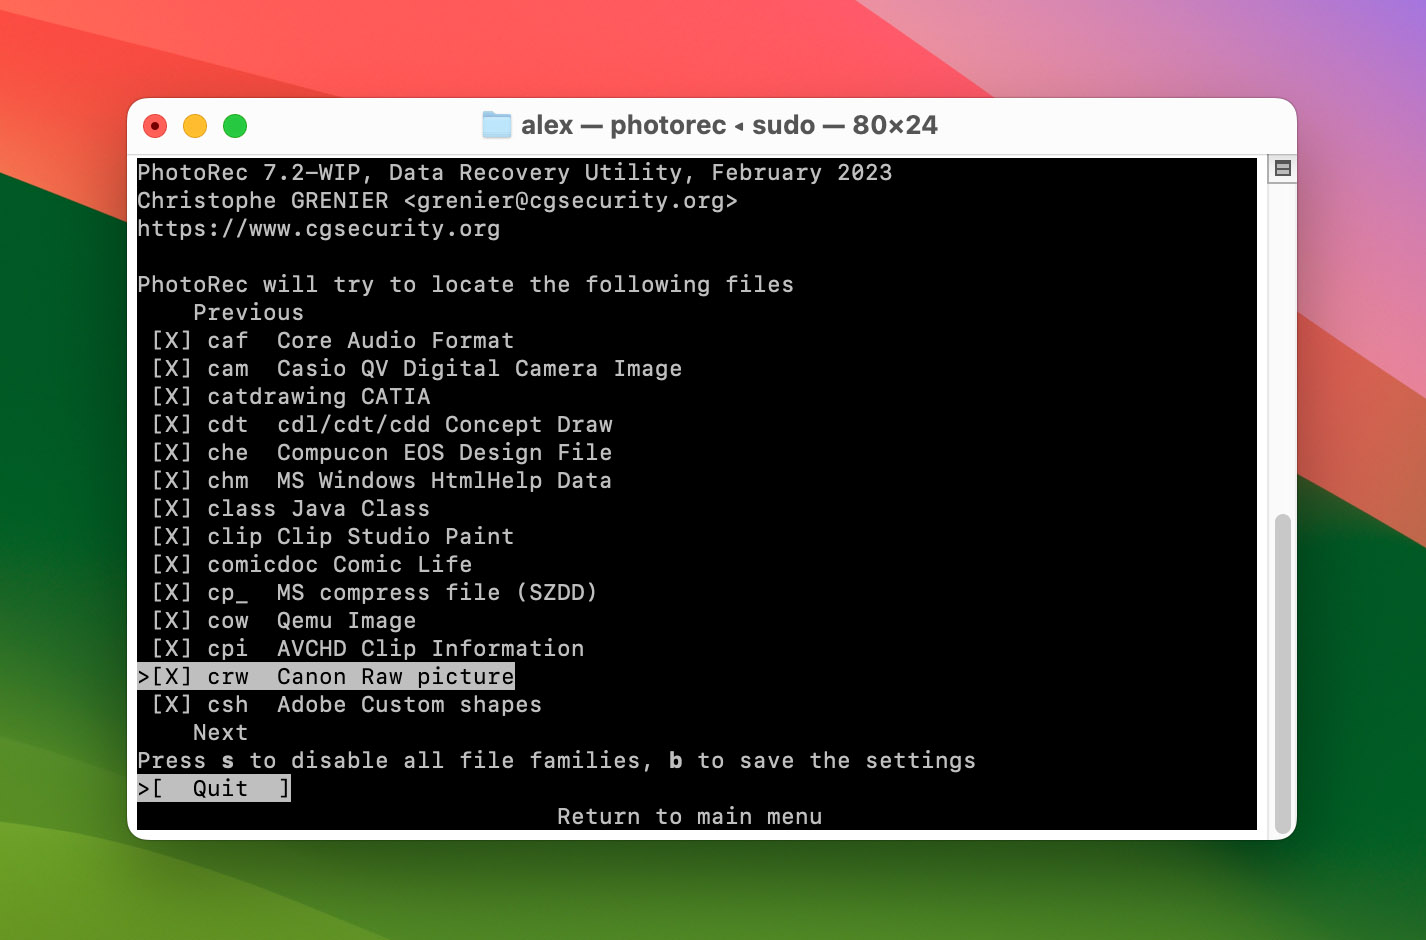
- Make sure that the file types you want to recover are selected. Then, hit return to go back to the partition screen.
- This time, hit “Search”.
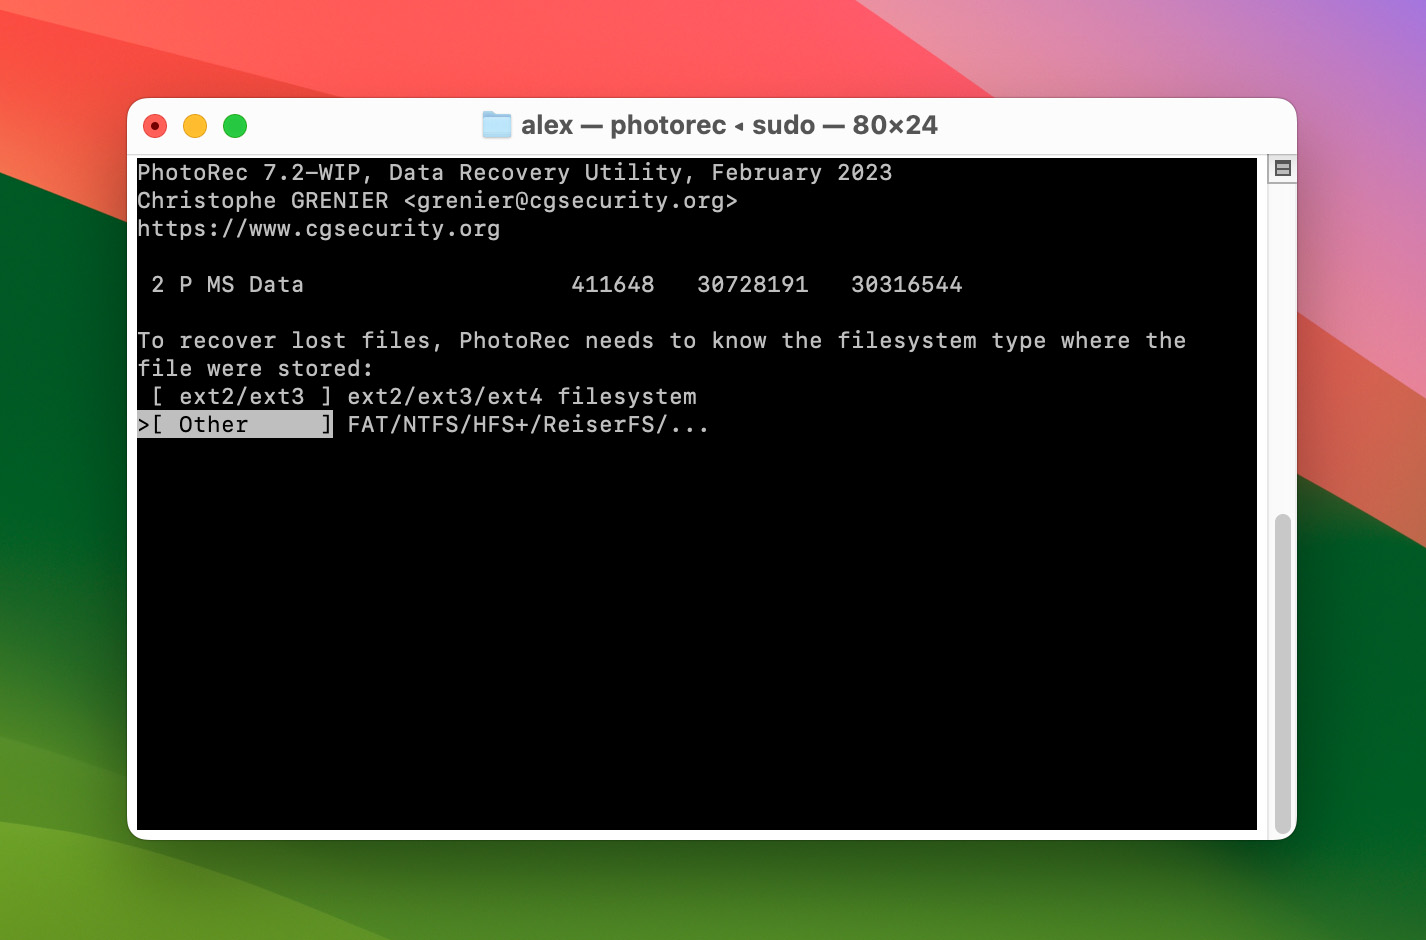
- Assuming your CF card is formatted to FAT32, select “Other” and hit (return).
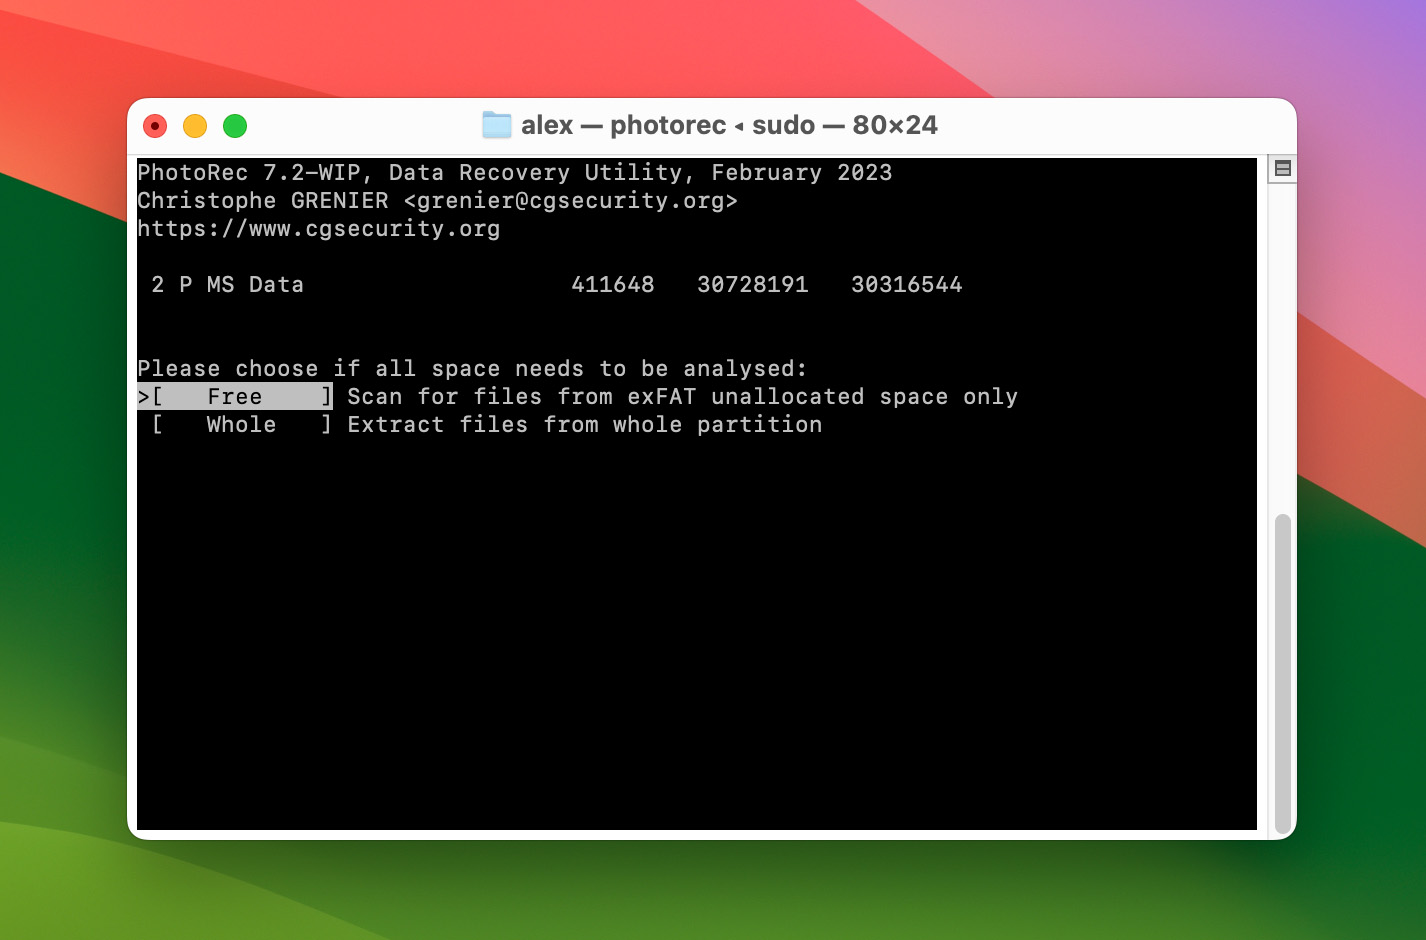
- Choose “Free” if you’re only trying to recover deleted files, and “Whole” if you’re also recovering corrupted data. Then, hit (return).
- Use the arrow keys to select a folder on your Mac where you want PhotoRec to save the recovered files. Use the right and left arrow keys to expand folders. Then, hit (C) to confirm your selection.
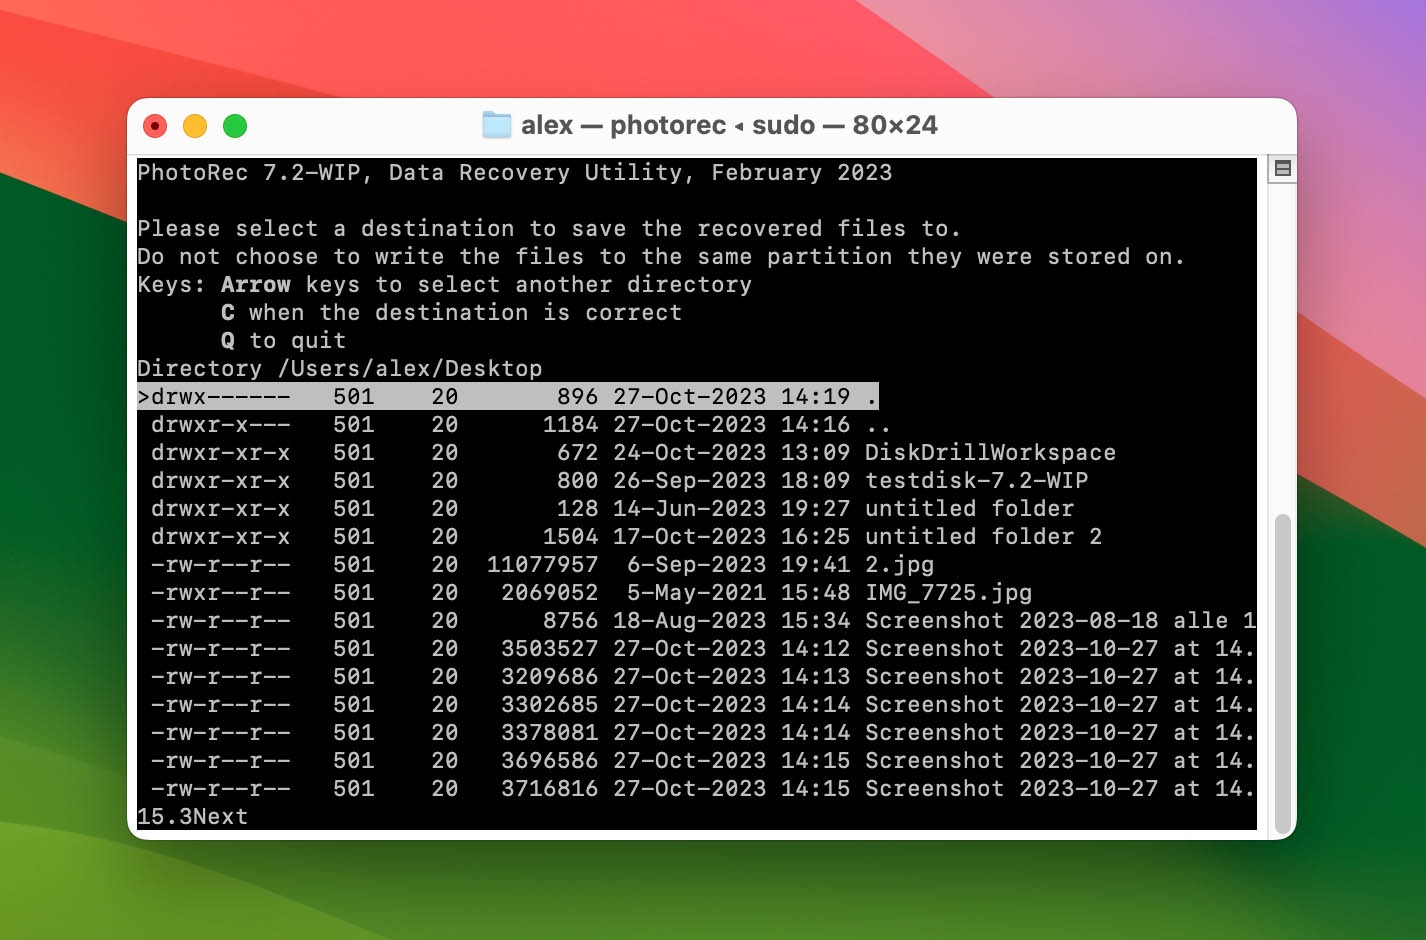
- Wait for PhotoRec to complete the recovery process. Your files will appear in a folder called “recup_dir” in the location you selected.
How to Fix Unmountable, Corrupted, or Damaged CF Cards on Mac
Before you can fix your CF card, we first have to make sure that your Mac can actually access the drive. Even if your data is still missing, what matters is that your memory card at least appears in Disk Utility (Finder > Applications > Utilities). If this is not the case, there are a few things you can do:
- Mount your card. Your memory card might not be mounted – you can use Disk Utility’s “Mount” button to fix it.
- Enable external drives on your desktop and in Finder. Finder > Preferences allows users to enable the display of external drives in Finder and on the desktop.
- Clean your ports. Use a (dry) lint-free cloth to clear your devices of any debris, which may be physically preventing a secure connection.
- Restart your Mac in case it got stuck while refreshing itself, preventing it from recognizing your CF card.
- Update your drivers, as they might be outdated and prevent your Mac from reading your CF card. You’ll need to update macOS entirely (System Preferences > Software Update).
- Try another CF card or Mac and make sure your CF card is really the problem.
Fixing Logical Issues With Your CF Card
Once your CF card is showing up on your Mac, you can proceed with repairing it. As we talked about earlier in the article, logical failure is generally “fixable” by users. Logical failure includes deleted and formatted data, as well as data corruption due to virus infections and read/write interruptions. Depending on how your CF card failed, there are different solutions you can try.
We wrote easy-to-follow step-by-step guides for every single method available (all of them are free) in our article on recovering data from a corrupted SD card on Mac. Click the link to read the article, and don’t worry – the process is similar for SD cards and CF cards.
Recovering a Physically Damaged CF Card
If your CF card is physically damaged, DIY solutions aren’t going to cut it. In fact, tampering with a physically damaged drive without the right tools will probably just make things worse. Professional data recovery services have the tools, specialists, and facilities required to properly handle storage disks. Find one near your area that satisfies as many of these criteria as possible:
- ✅ Class 100 Clean Room – Class 100 Clean Rooms have controlled temperature, pressure, and size of particles per volume of air – these conditions keep your CF card safe from damage.
- ✅ Free Estimate – Some data recovery centers are capable of providing a free estimate over the phone after you describe your situation.
- ✅ No data – no charge – The best memory card recovery services provide a “no date – no charge” guarantee, which ensures that you only pay for successful recovery.
- ✅ Does not charge “per GB recovered” – The process of data recovery is too complex to be boiled down to “$X per GB”, and this is a sure sign of a flawed data recovery center.
Taking a Deeper Dive: CF Card Recovery Possibilities on Mac
In some cases, the CF card recovery process is fairly simple. However, the outcome largely depends on the specific problem your CF card is facing. Below, we’ll delve into the most common causes of deleted files and photos from CF cards and outline the data recovery scenarios you can anticipate.
- 🔥 Damage – There are 2 types of issues that any drive, including CF cards, can have: physical damage and logical failure.
- Physical damage happens when drives are overexposed to high temperatures, dropped in water, or have actual cracks or other breakage on the physical drive. In this case, it’s better to send your CF card to a professional data recovery center to avoid making things worse.
- Logical failure is when there is no physical damage to the drive, but the data on the disk is inaccessible. In case of logical failure, users can repair and/or recover deleted files from the CF card on Mac by themselves. The following bullets are examples of logical damage.
- 🗑 Accidental deletion – Accidental deletion resulting in data loss is considered a logical failure. You can still recover emptied Trash because the data is still living in your CF card’s file system – you just can’t access it via an interface. However, it’s marked to be overwritten by new data (so make sure you stop using your memory card until you get your data back).
- 🧹 Formatting – Formatting a CF card will always result in completely wiping your data, which is a symptom of logical failure. However, it follows the same behavior as deleted data – it stays in the file system until new files overwrite it.
- ❌ Corruption – Corruption is another example of logical failure. It happens due to virus attacks, interruptions during the read/write process – such as power outages and improperly ejecting your card reader – and more. Even if the data itself is corrupted, data recovery software can extract its metadata from the file system and rebuild the file.
FAQ
How to recover data from a CF card on Mac?
The fastest and easiest way to recover data from a CF card on your Mac is by using data recovery software:
- Connect your CF card to your Mac.
- Download and install the recovery software.
- Launch the software and scan your CF card.
- Wait for the scan to complete and select the files you want to restore.
- Choose a recovery destination on your Mac.
Can you recover a formatted CF card on Mac?
Yes! But only as long as you haven’t saved any new data to it. You can use data recovery software like Disk Drill or PhotoRec to restore it.
How to recover deleted photos from Compact Flash card on Mac?
Use data recovery software like PhotoRec (it’s free!) to recover deleted photos from a Compact Flash card on your Mac:
- Download and install PhotoRec.
- Launch PhotoRec and select your CF card, then hit “Proceed”.
- For partition selection, choose “Others” and hit return.
- Hit Search to start the process, and select a destination for the recovered files.
What is the best CF card recovery software for Mac?
We tested dozens of paid and free CF card recovery software (as well as SD card recovery software) for Mac on our own memory cards, and we came up with 5 of our favorite tools:
- Disk Drill
- PhotoRec
- R-Studio
- Remo Recover
- Wondershare Recoverit
Is it possible to recover data from a SanDisk CF card on macOS?
You can recover data from a SanDisk CF card on macOS using data recovery software, but only if it suffered “logical damage” (corruption, inaccessible data, virus attacks, etc.) If your memory card is physically damaged, send it to a professional data recovery service.
This article was written by Alejandro Santos, a Staff Writer at Handy Recovery Advisor. It was also verified for technical accuracy by Andrey Vasilyev, our editorial advisor.
Curious about our content creation process? Take a look at our Editor Guidelines.