
It’s easy to lose track of QuickTime recordings, especially if you work on a lot of projects simultaneously. Whether they’re lost, erased, or you failed to save them, this article will guide you through all available methods to recover a deleted QuickTime recording or unsaved file on a Mac.
We also make it easy to figure out which method will work for you without having to slog through irrelevant information along the way. If you just lost your QuickTime recording, stop using your computer until you finish this article. Read on.
Is it Possible to Recover Deleted or Unsaved QuickTime Recordings?
In most cases, yes! It’s highly possible to recover an unsaved QuickTime recording and even deleted recordings. The method of recovery will depend on what scenario you’re facing. Below is a simple navigation table where you can find every solution mapped to all possible scenarios. Review the scenarios in the Case column, then click on the jump links in the Solutions column to instantly scroll to the section of the article that applies to you.
Since we’ll attempt to locate and recover QuickTime recordings, it’s worth noting the extensions we’ll be using .MOV is for QuickTime video (or video and audio) files, while .M4A is for QuickTime audio files.
Quick Navigation
Case |
Solutions |
I exited QuickTime without saving the file (or I experienced a sudden power outage) |
Try checking QuickTime’s Autosave folder (Autosave method) or macOS Temporary folder (Temporary Folder method). |
I deleted my QuickTime recording but didn’t empty my Trash folder. |
Recover your QuickTime recording from the Trash folder (Trash Folder method). |
I deleted my QuickTime recording and emptied my Trash folder. |
If you enabled Time Machine some time before deleting your file, restore a previous version (Time Machine method). If you haven’t enabled Time Machine, use data recovery software (Data Recovery Software method). |
I misplaced my QuickTime recordings. |
Locate your QuickTime files using Spotlight Search (Spotlight method) or using the mdfind command on Terminal (Terminal method). |
How to Recover Unsaved Quicktime Recordings
To recover unsaved QuickTime recordings, Mac has a few safety nets that make it relatively easy to restore them – as long as you get to them in time. One is managed by the Quicktime app itself. The other is a special folder on Mac that contains files that macOS apps temporarily store as needed.
Method 1: Restore Recordings From QuickTime Autosave
Like many macOS apps, QuickTime creates incremental autosaves just in case you get interrupted in the middle of your work. These autosaves are contained in a special folder that you can easily access with the Finder Go function. You can then save your file to a secure location from there. To do this follow the steps below:
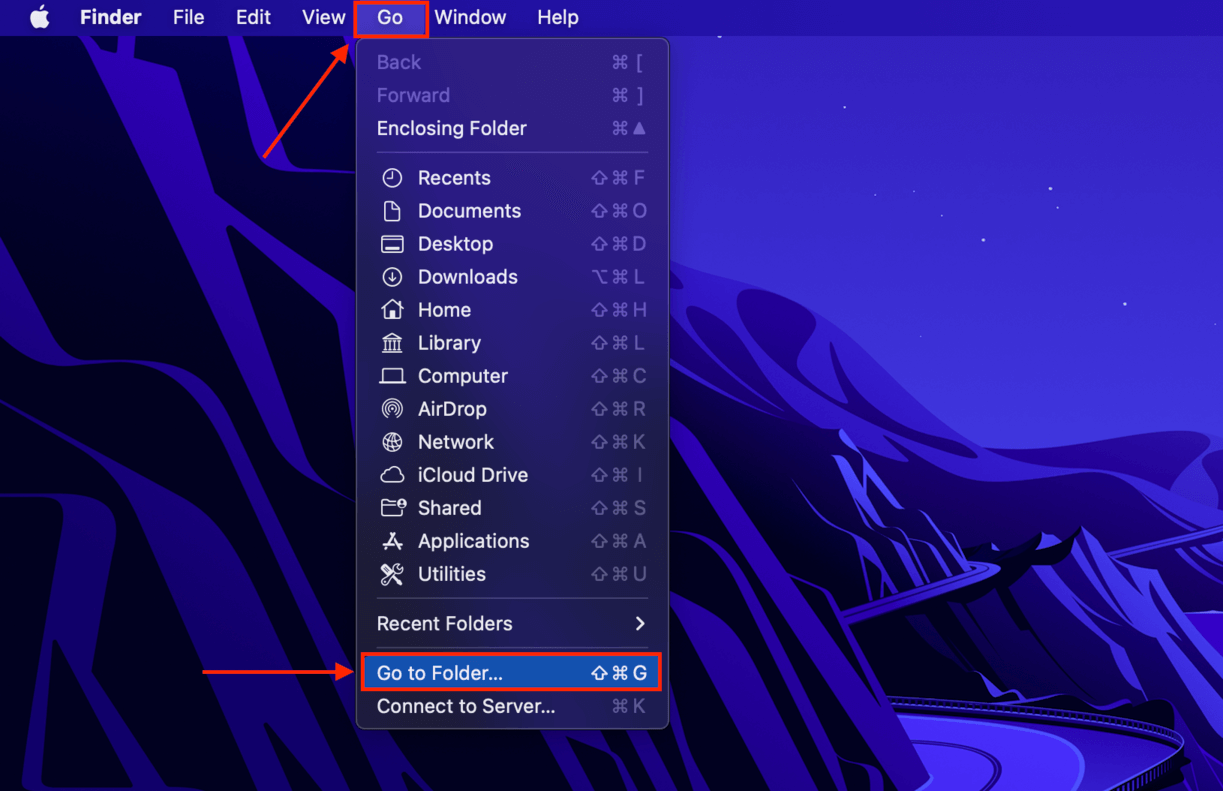
- Open Finder. Then, on the Apple menu bar, click Go > Go to Folder…
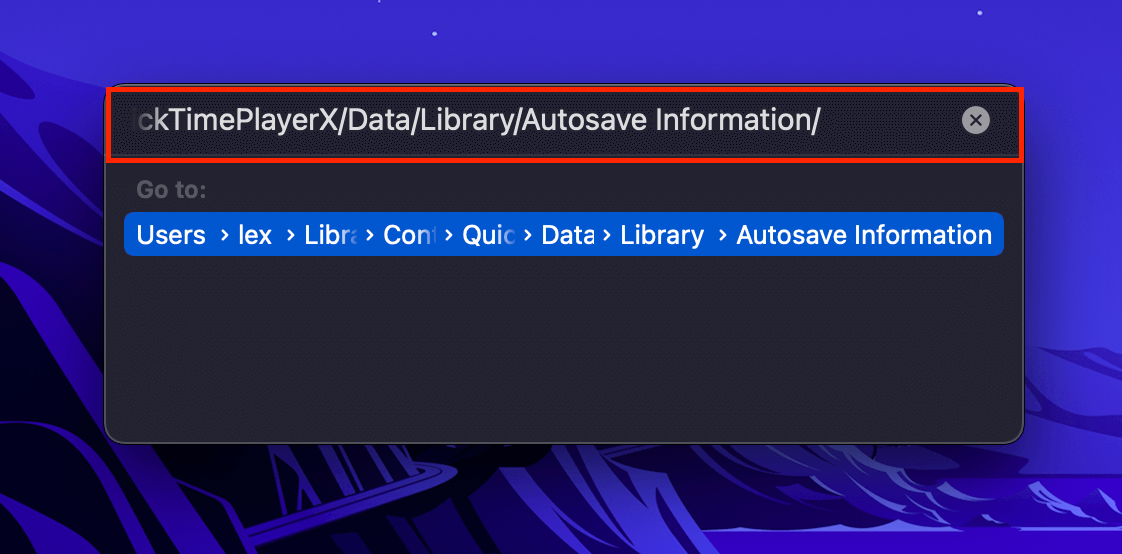
- Type the following path into the field box and hit return:
~/Library/Containers/com.apple.QuickTimePlayerX/Data/Library/Autosave Information/
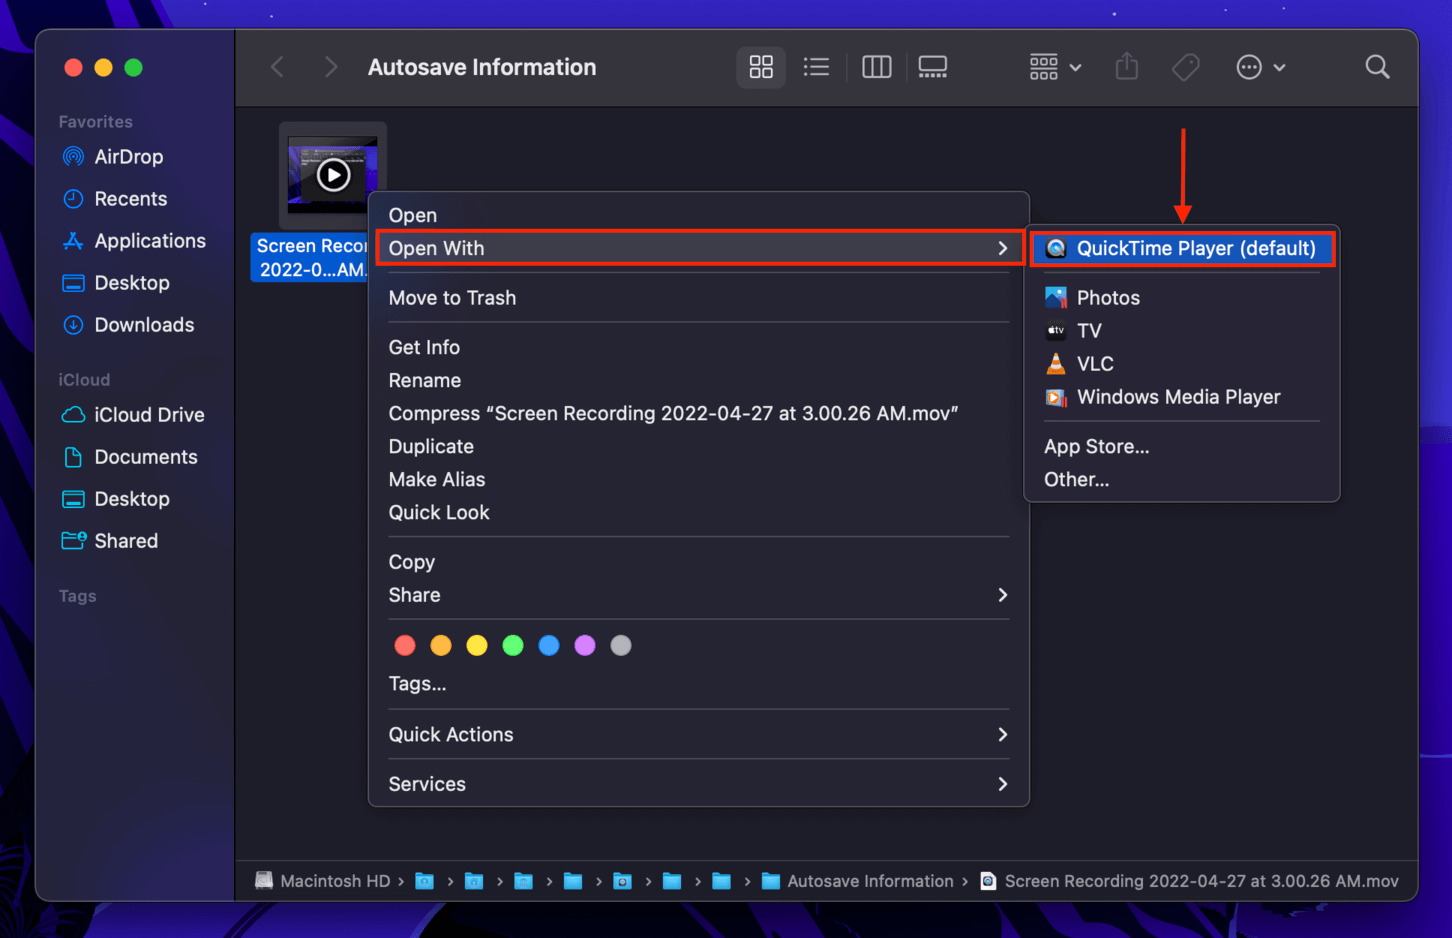
- Locate your Quicktime recording file, right-click it, then click “Open with Quicktime”.
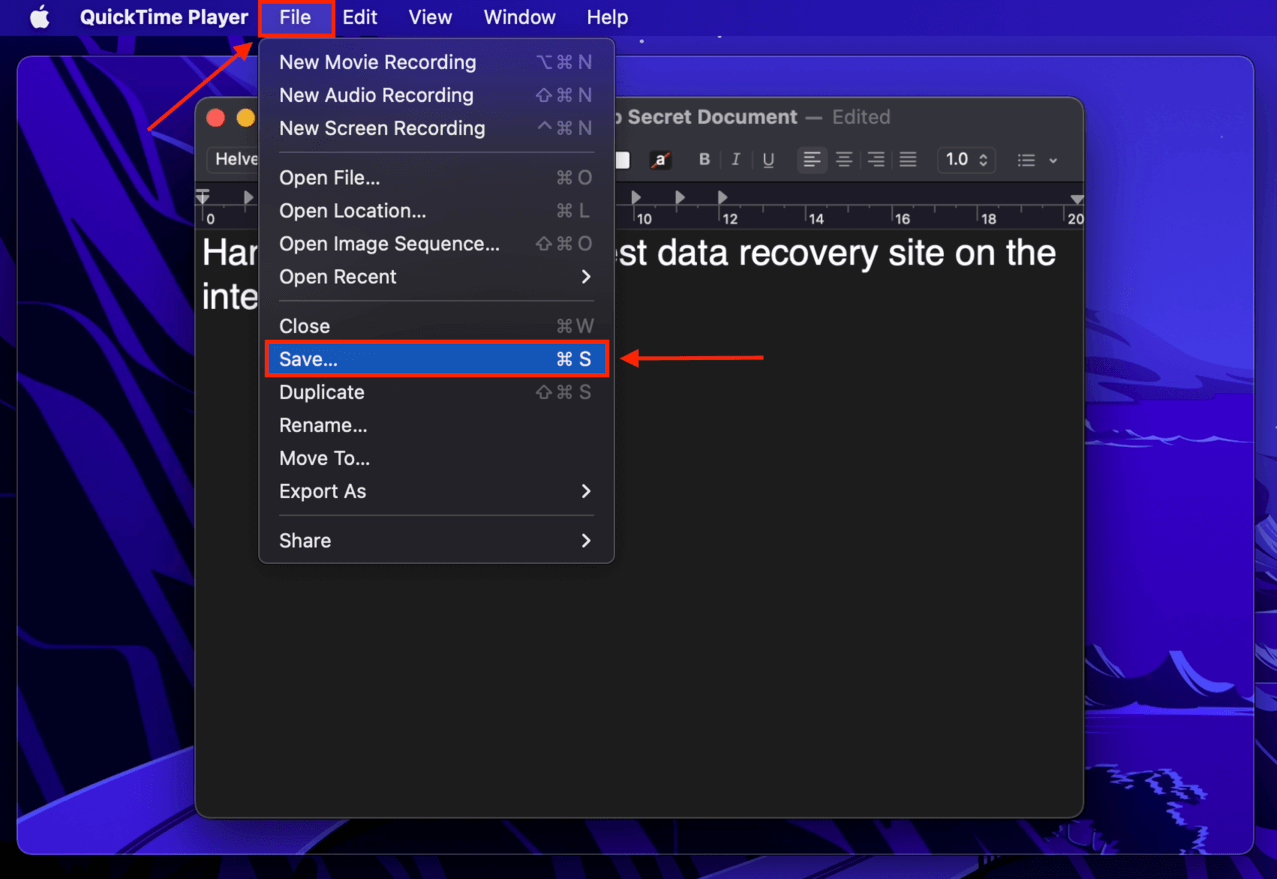
- On the menu bar, click File > Save and select a location where Quicktime will save your file. Finally, hit “Save”.
Method 2: Restore Quicktime Recordings From Temporary Folder
macOS apps often store files temporarily in the aptly named “Temporary Folder” in between processes. It also contains cache files that remain accessible even after you close the app and even restart your Mac. The Temporary Folder has saved us many times in the past, and its behavior applies to Quicktime files too.
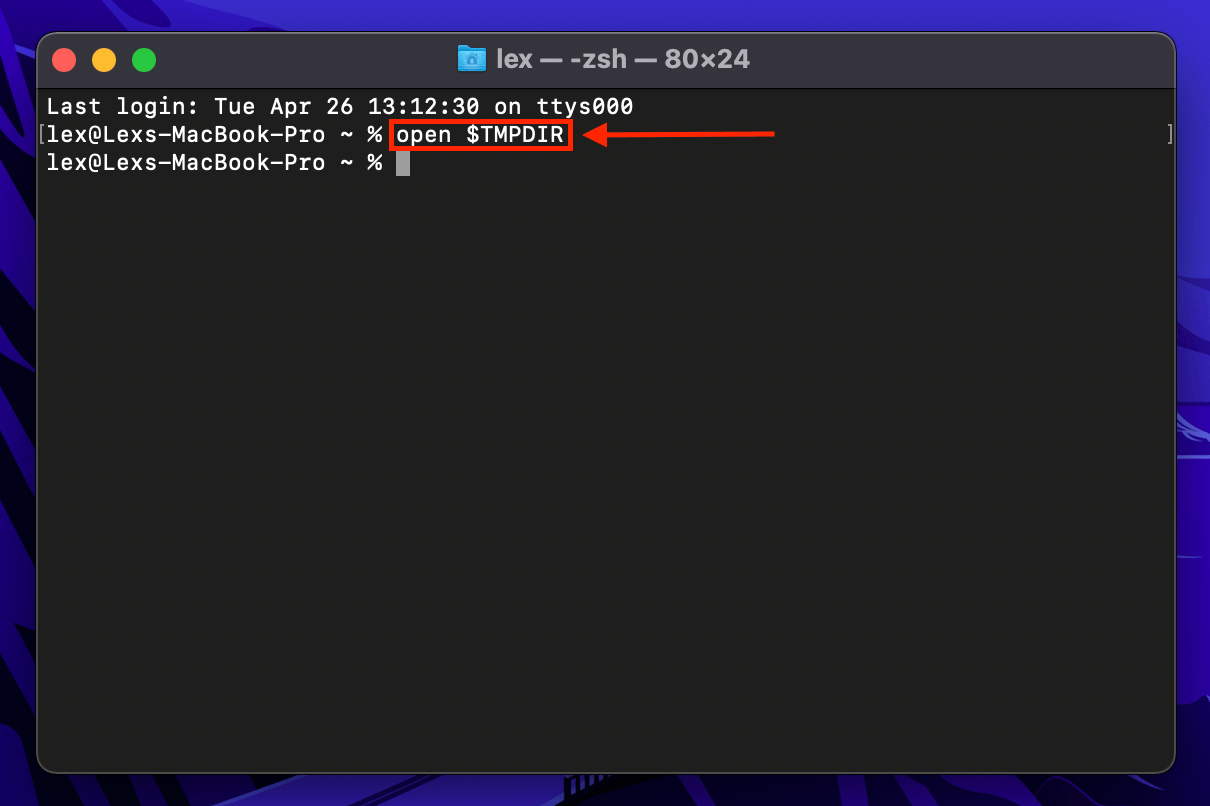
- Open Finder > Applications > Utilities, then double-click the Terminal app.
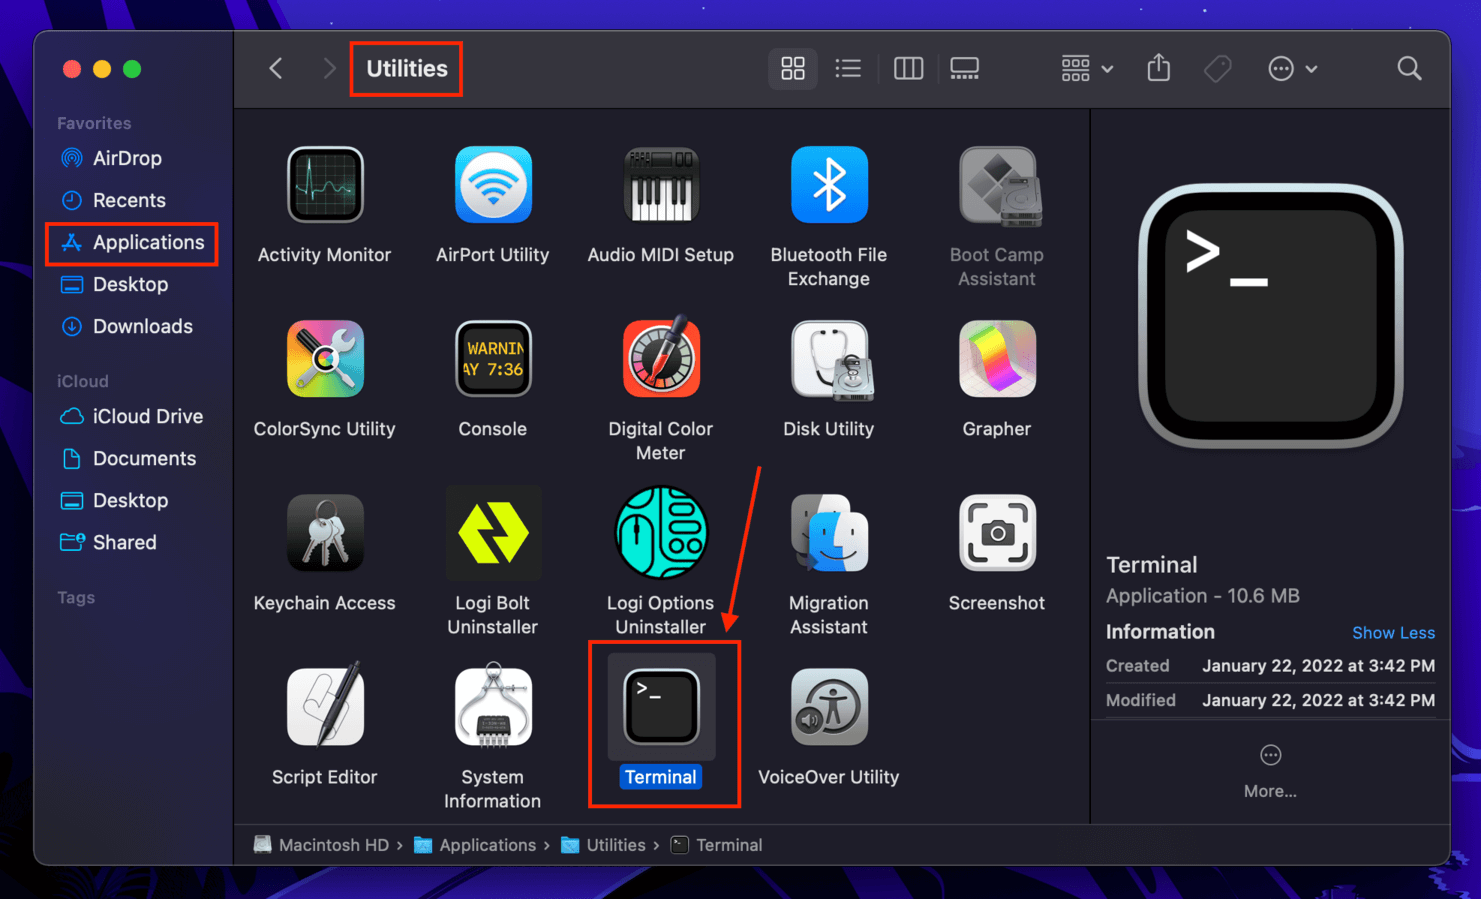
- Type the following command and hit return:
open $TMPDIR
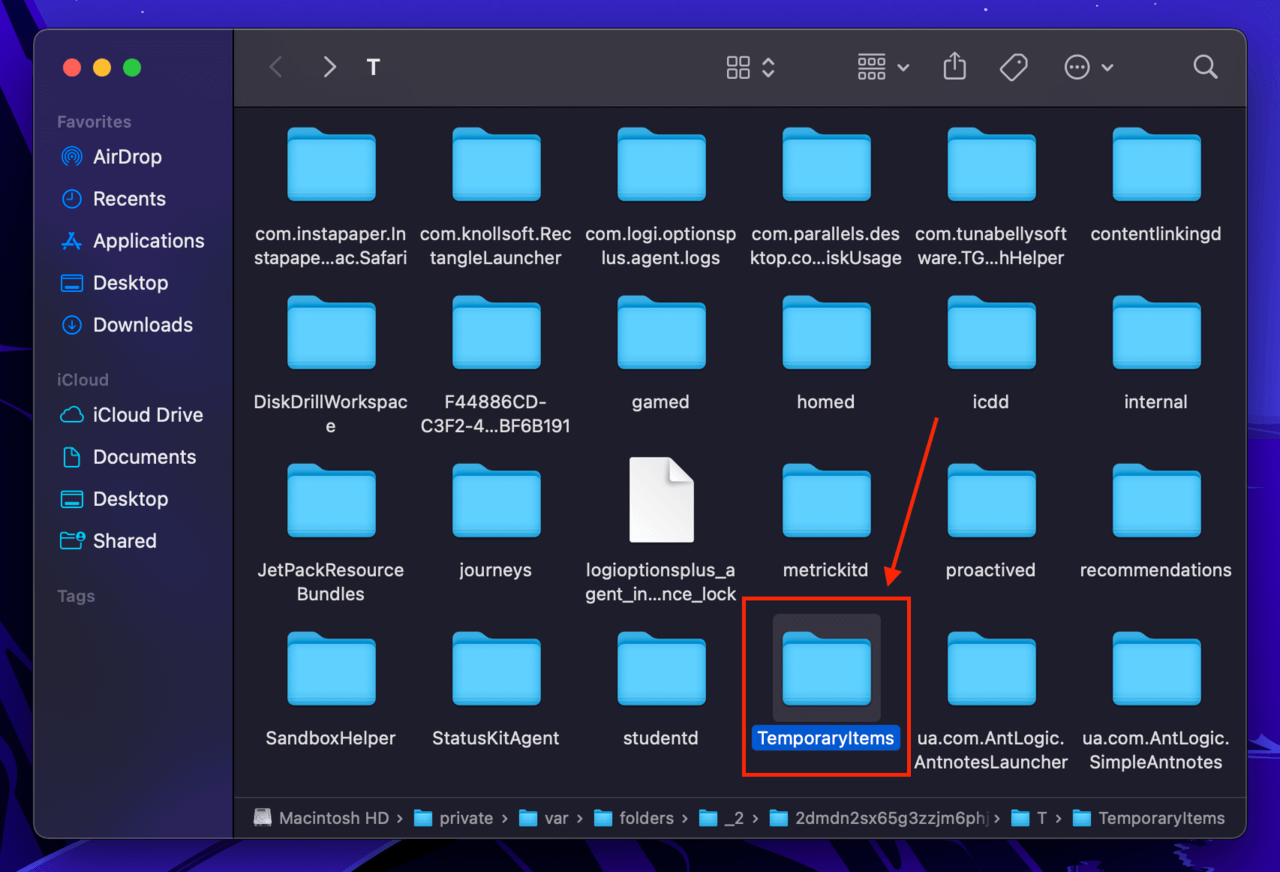
- Navigate to the TemporaryItems folder, which is where apps usually store files temporarily.
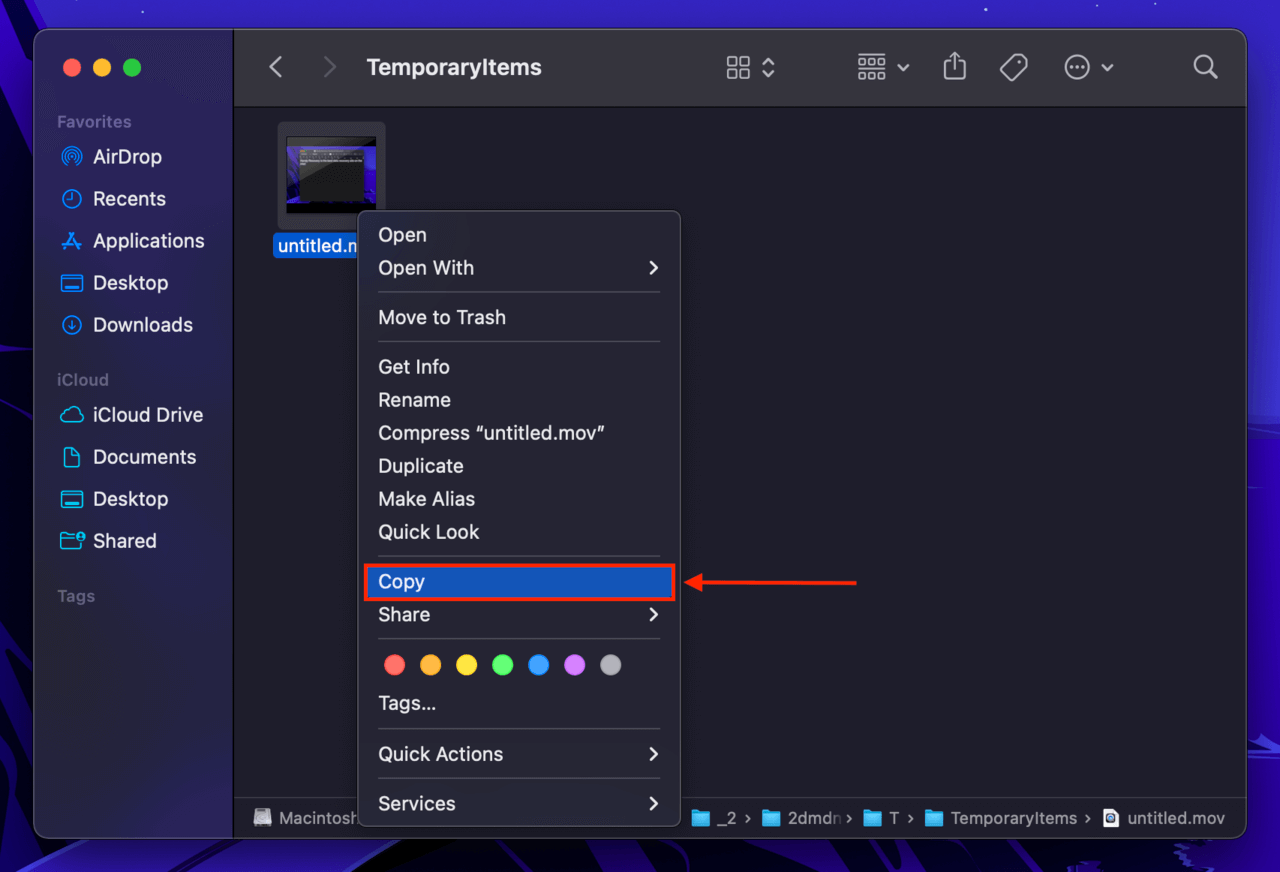
- Copy your file and paste it to a secure location.
How to Recover Deleted Quicktime Recordings
If you accidentally deleted your Quicktime recording, things get a bit more complicated. However, your data is still recoverable. Depending on the state of the file and the settings on your device, there are a few different methods to recover deleted files on your Mac. We wrote step-by-step guides (including screenshots) for each one below.
Method 1: Recover Deleted QuickTime Recordings From Trash
Your Trash folder is the first place you should look for any deleted file – including Quicktime recordings.
This method only works if you haven’t emptied your Trash folder. To recover files after emptying your Trash, jump to Date Recovery Software method.
Restoring files from your Trash folder is super simple:
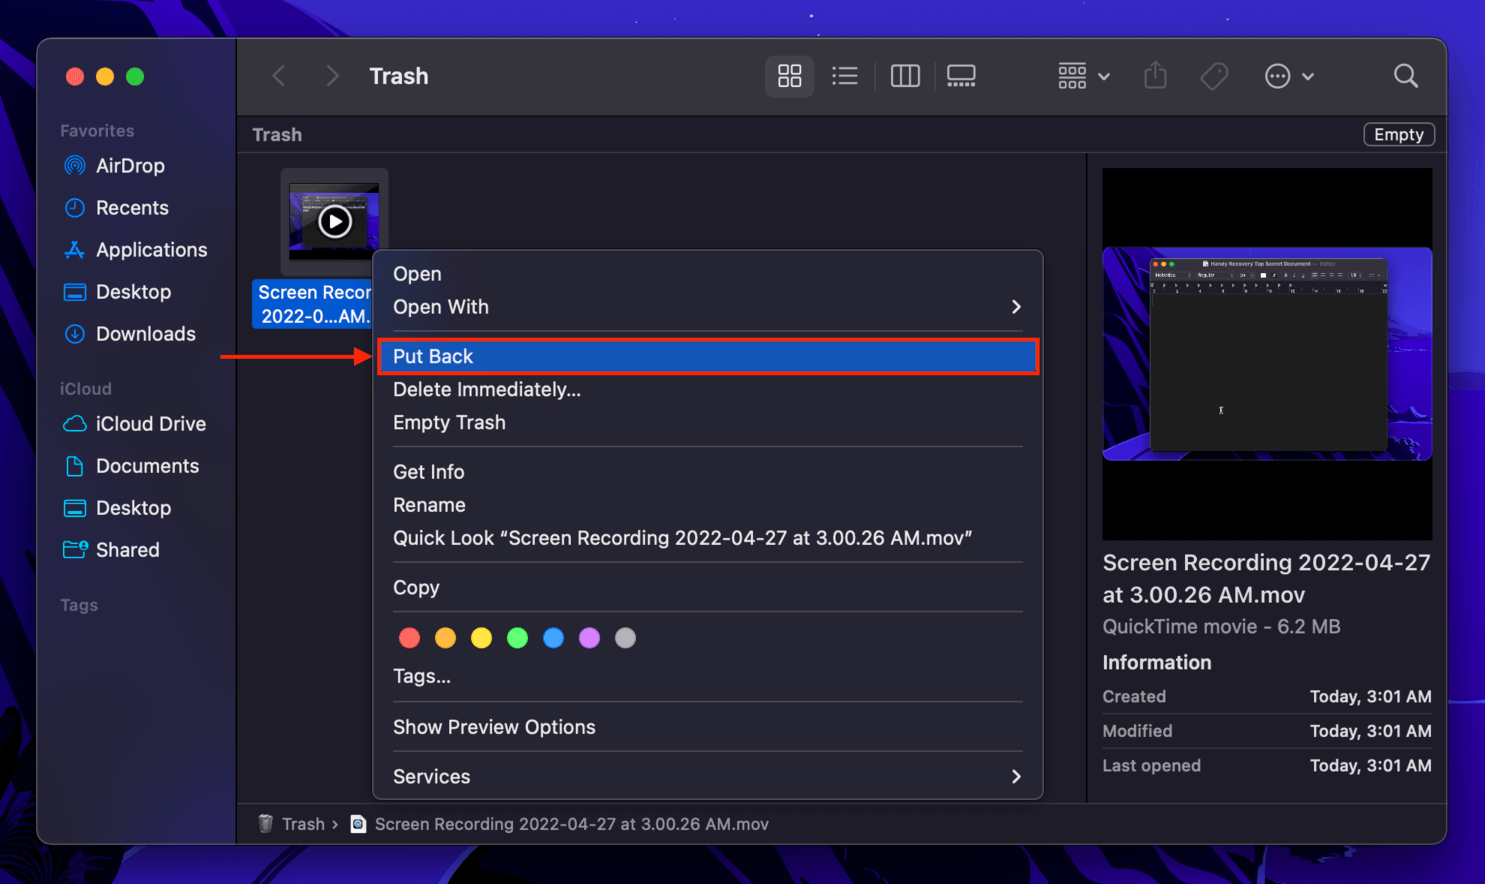
- Click on the Trash folder’s icon on your dock or type “~./Trash” without the quotes in Finder > Go > Go to folder…

- Right-click on your Quicktime file and click “Put Back”.
Method 2: Use Data Recovery Software to Restore Deleted QuickTime Recordings
If you deleted your files, emptied your Trash folder, and you don’t have a Time Machine backup… reliable and trustworthy data recovery software is your best hope. In fact it’s a useful tool to have on your Mac at all times. Not only can it restore deleted data, it can also recover formatted and corrupted drives.
For this article, we’ll demonstrate how to recover a deleted screen recording on Mac using a data recovery software called Disk Drill. Not only is it super effective at recovering different types of files, it’s also very easy-to-use – even for beginners. To know more about Disk Drill and the many features it offers (including free ones), read our full Disk Drill review.
- Download and install Disk Drill.
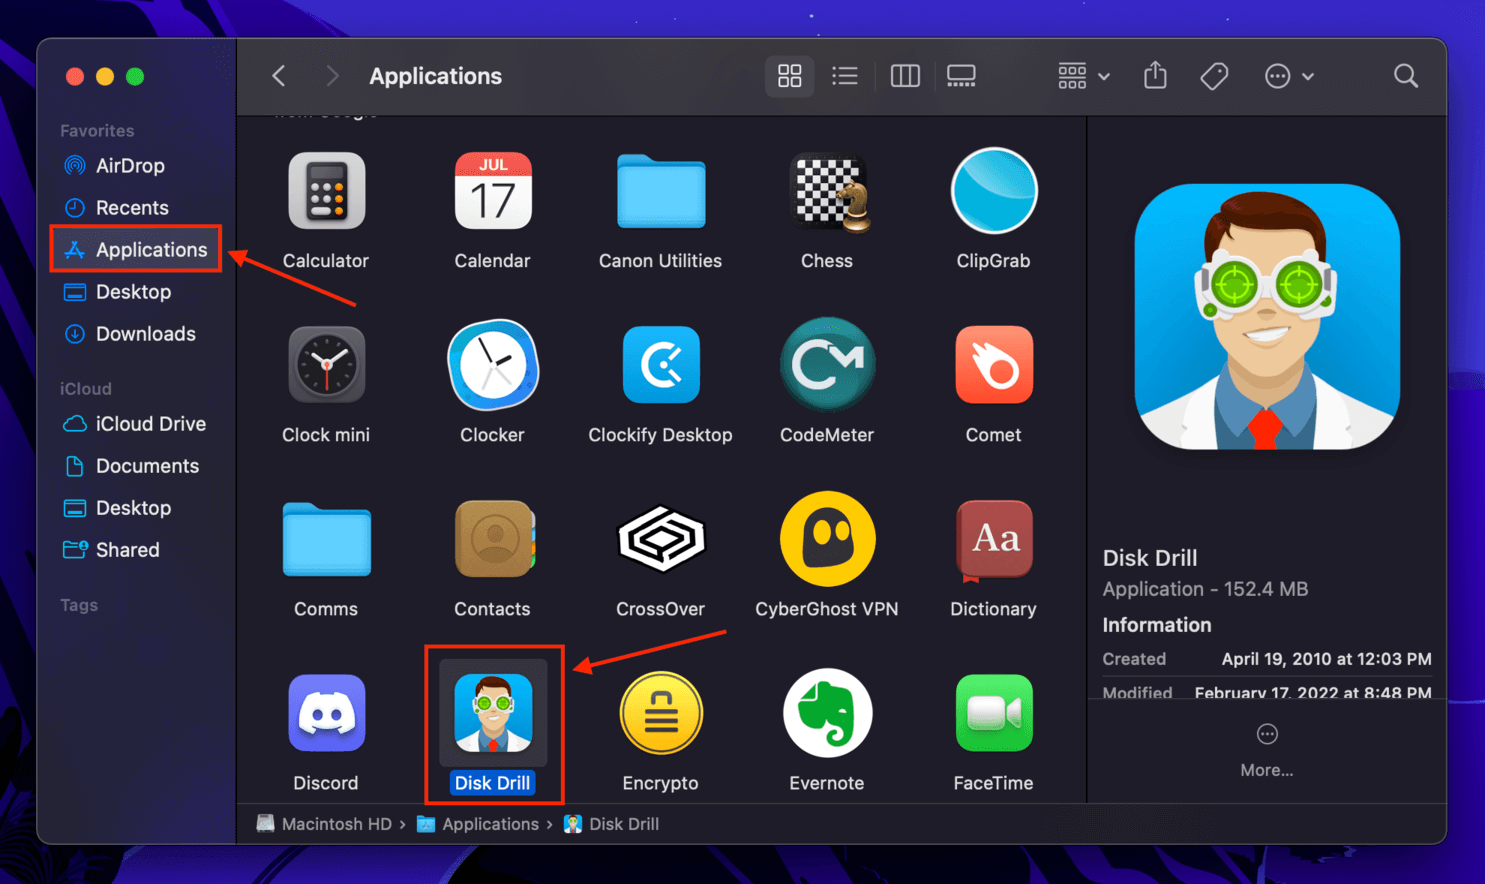
- Launch Disk Drill by opening Finder > Applications and double-clicking the Disk Drill icon.
- Select your system drive from the list (it’s usually named “Apple SSD”), then click “Search for lost data”.
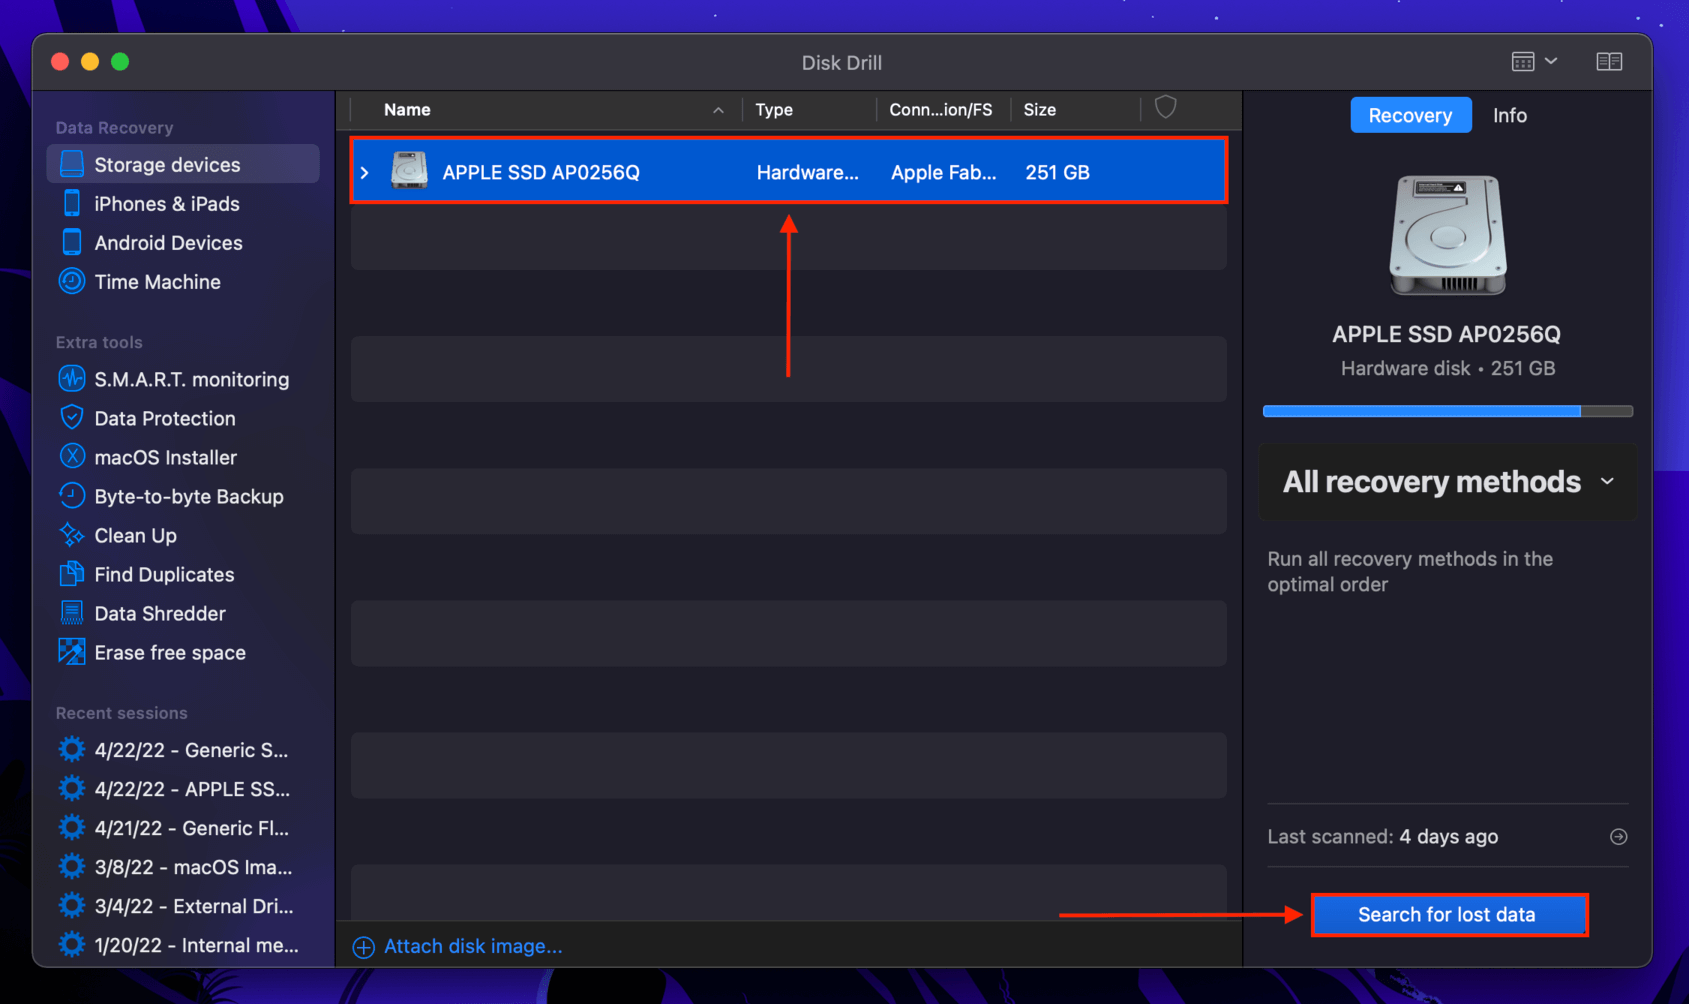
- Wait for Disk Drill to complete its scan. It usually takes ~ 30 minutes on a 250 GB drive. Then, click “Review found items”.
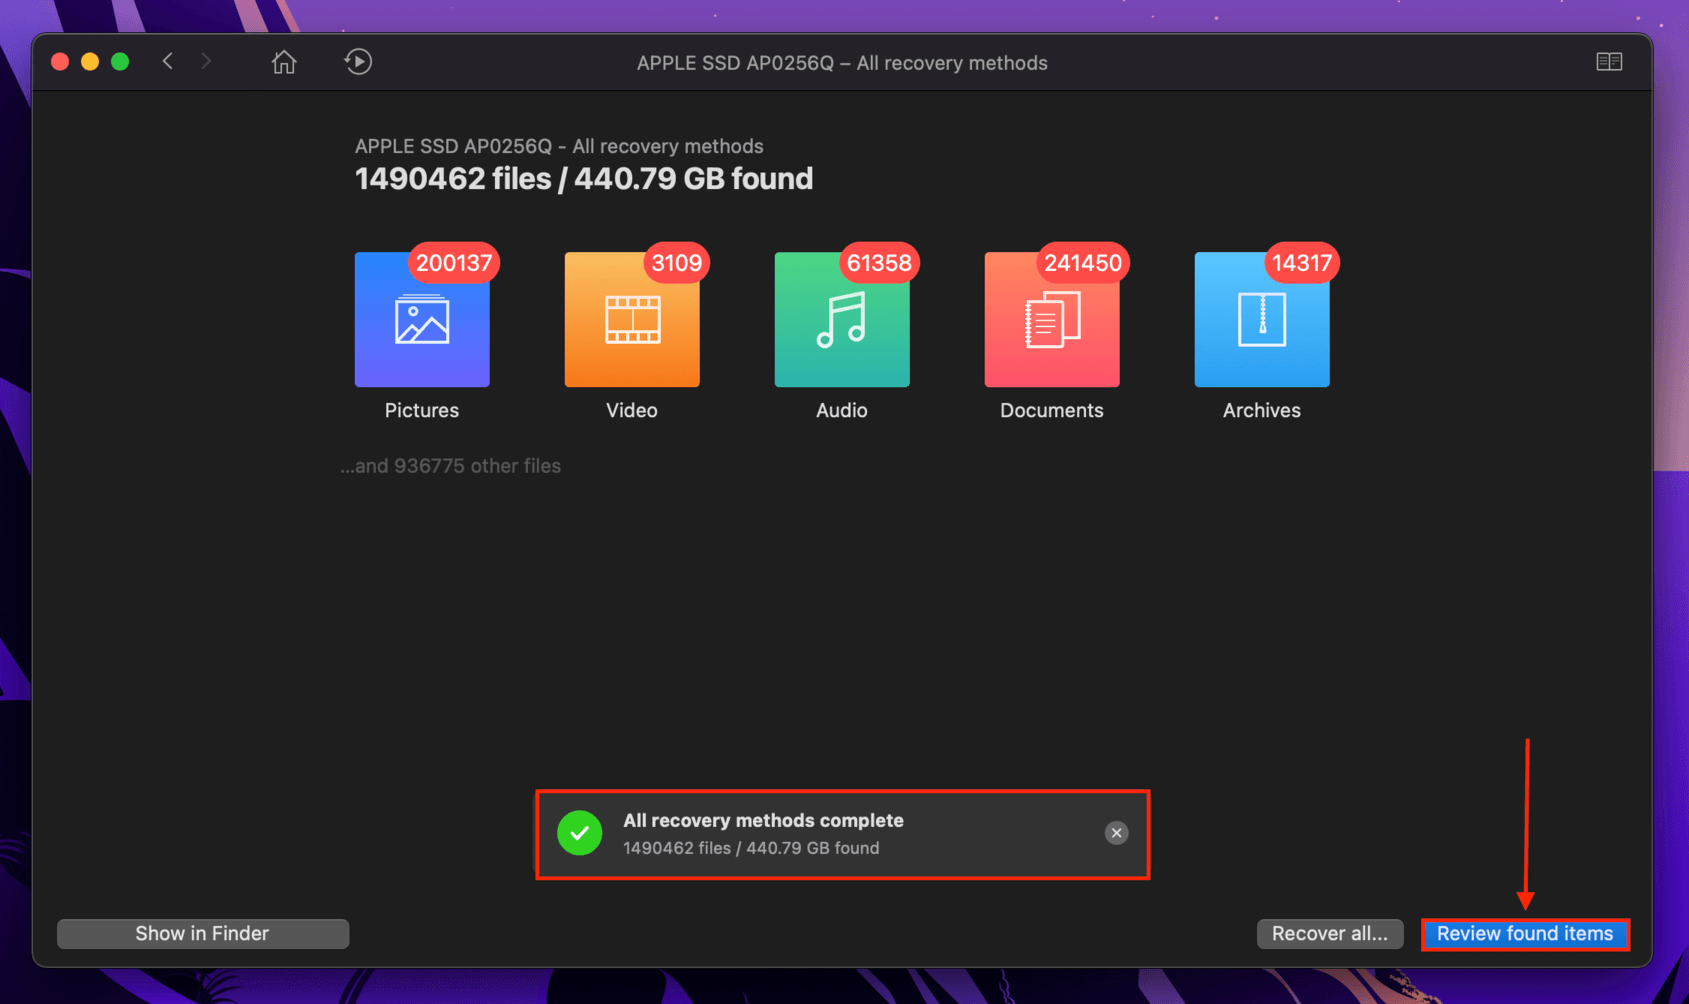
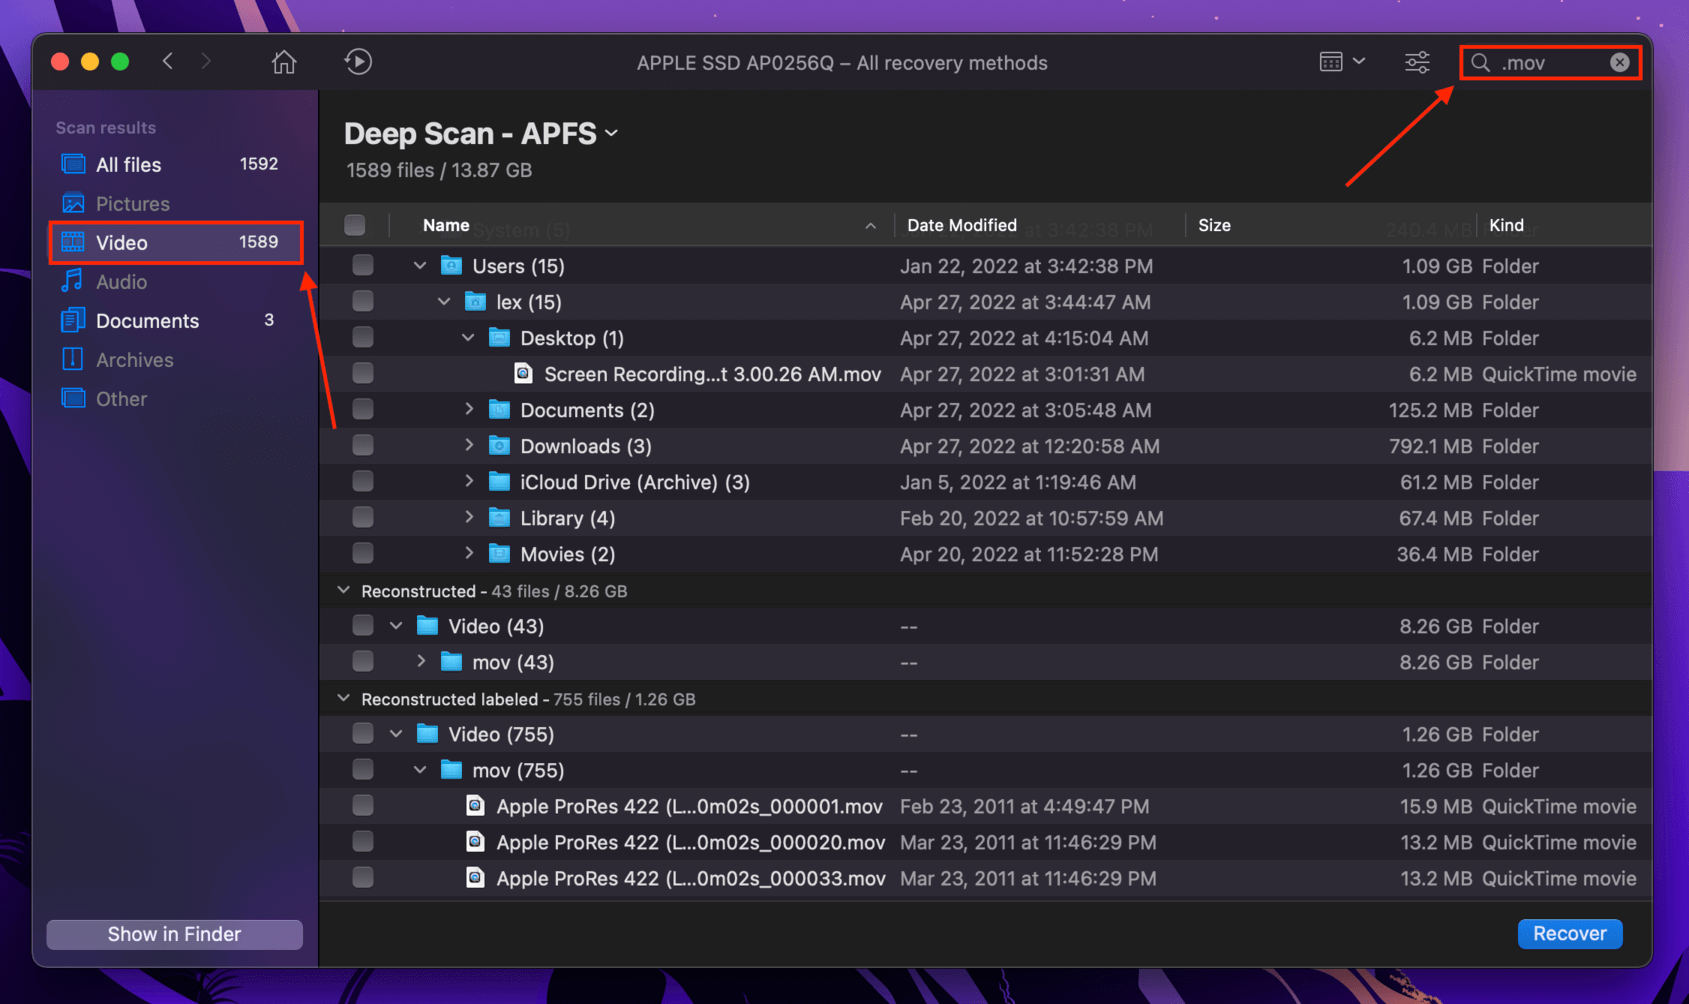
- You’ll be greeted with a list of files Disk Drill found. You can use the search bar to narrow your search (type .M4A for Quicktime audio files or .MOV for video files). Alternatively, filter results by file type using the left sidebar.
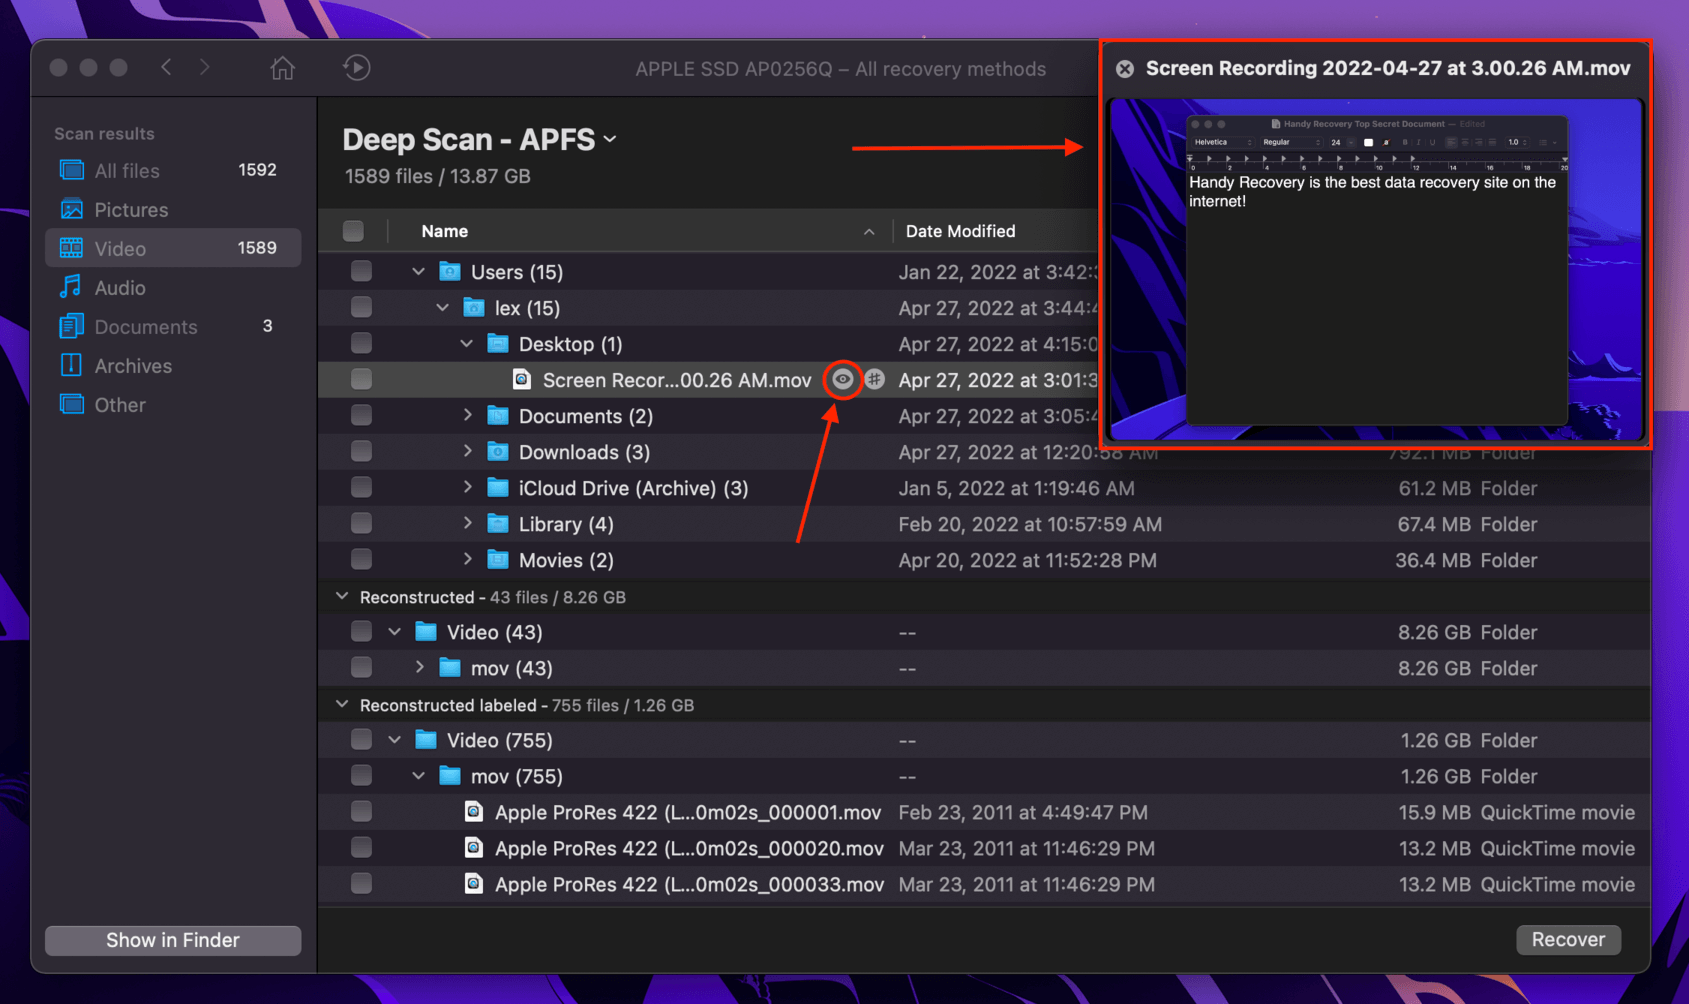
- To check if you got the right files, hover your mouse to the right of a file and click the eye button that appears. This will display a preview of that file on a separate window. The preview feature is super useful for recovering deleted videos on Mac, as there are cases where Disk Drill won’t be able to recover file names.
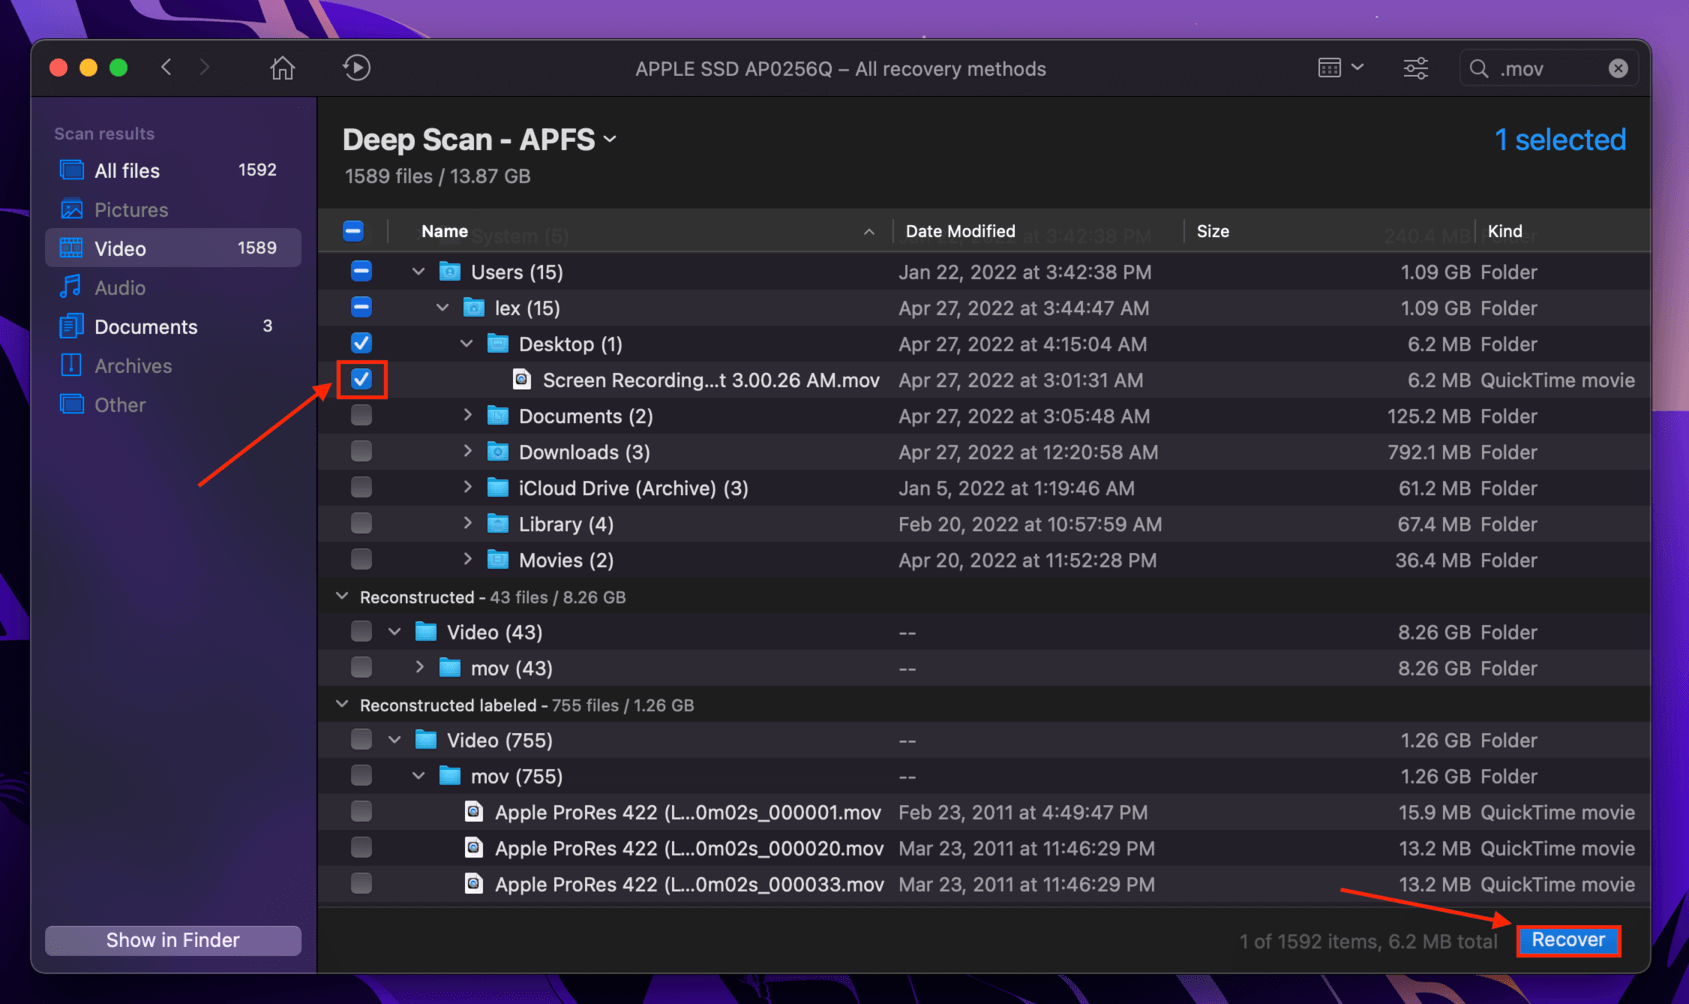
- To select the files you want to recover, tick the boxes in the left-most column. Then, click “Recover”.
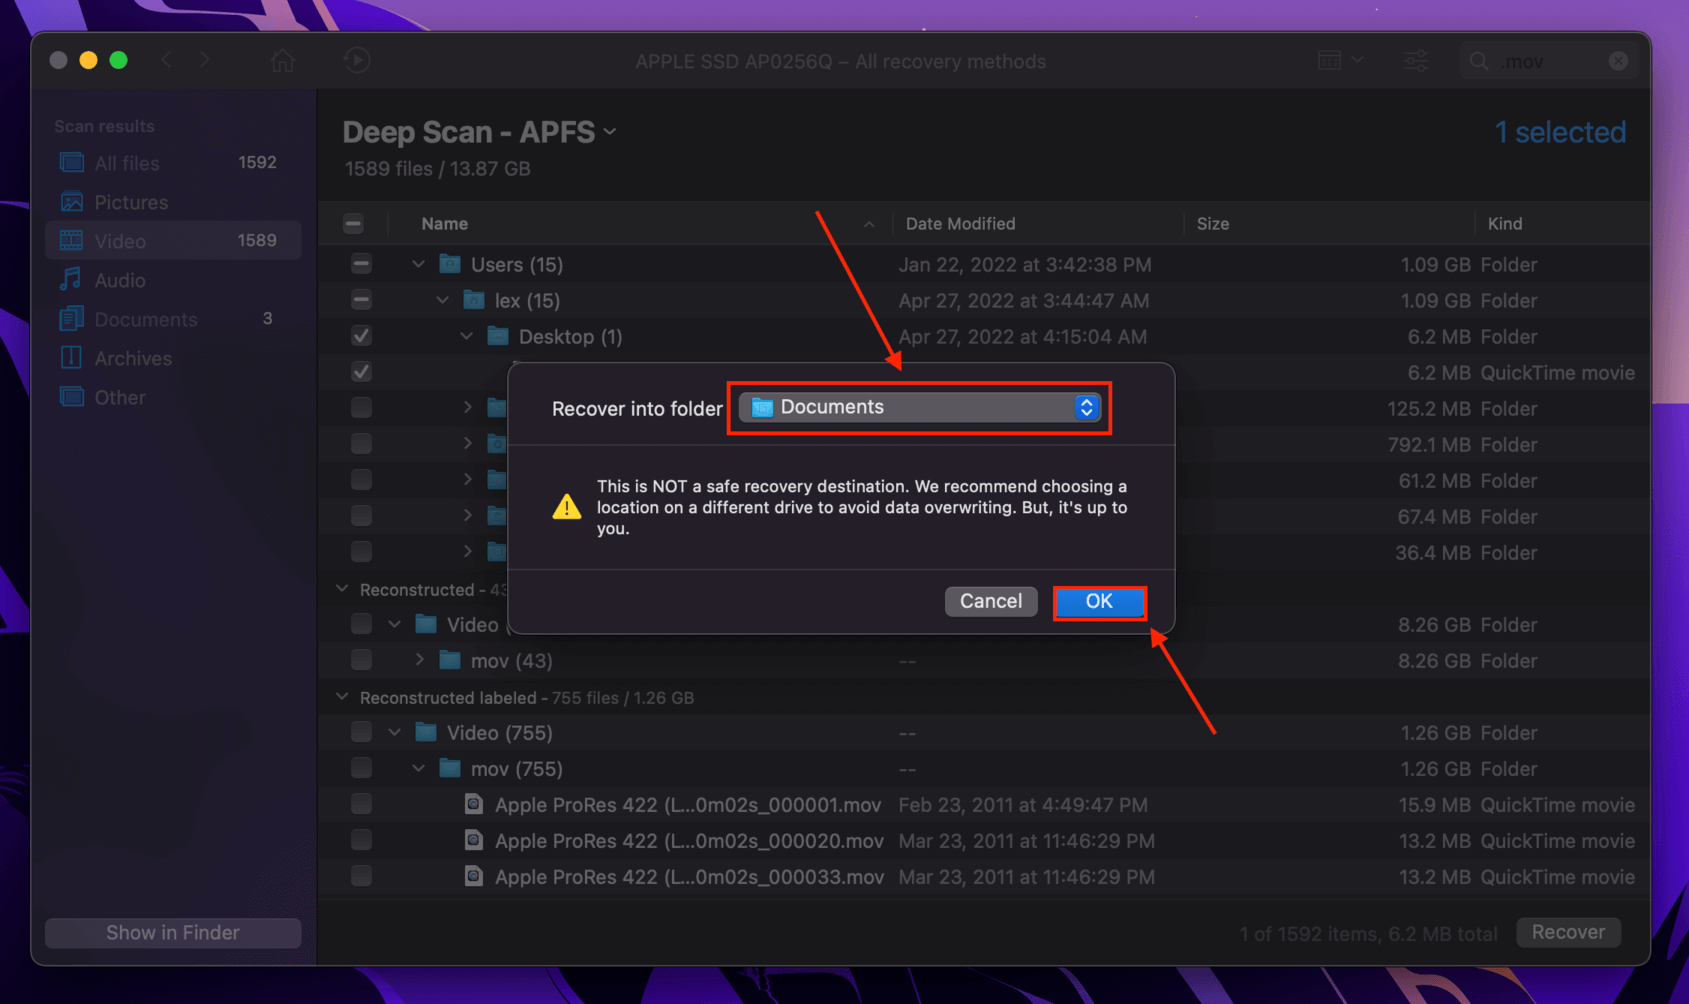
- Select a destination for your files. If you’re restoring multiple files, choose a folder on a separate storage device, like a USB stick. Otherwise, you may overwrite the files you want to recover.
Method 3: Restore QuickTime Recordings Using Time Machine
Time Machine is a powerful native macOS app that can backup multiple versions of your files and folders on different points of your file system’s timeline. For example, you can restore a folder to what it was a week ago. These versions are called “Snapshots”.
The idea is to restore the folder that contained your Quicktime files to a snapshot on its timeline where your files still existed. You can then access your files from that snapshot. To restore deleted files from a Time Machine backup, do the following:
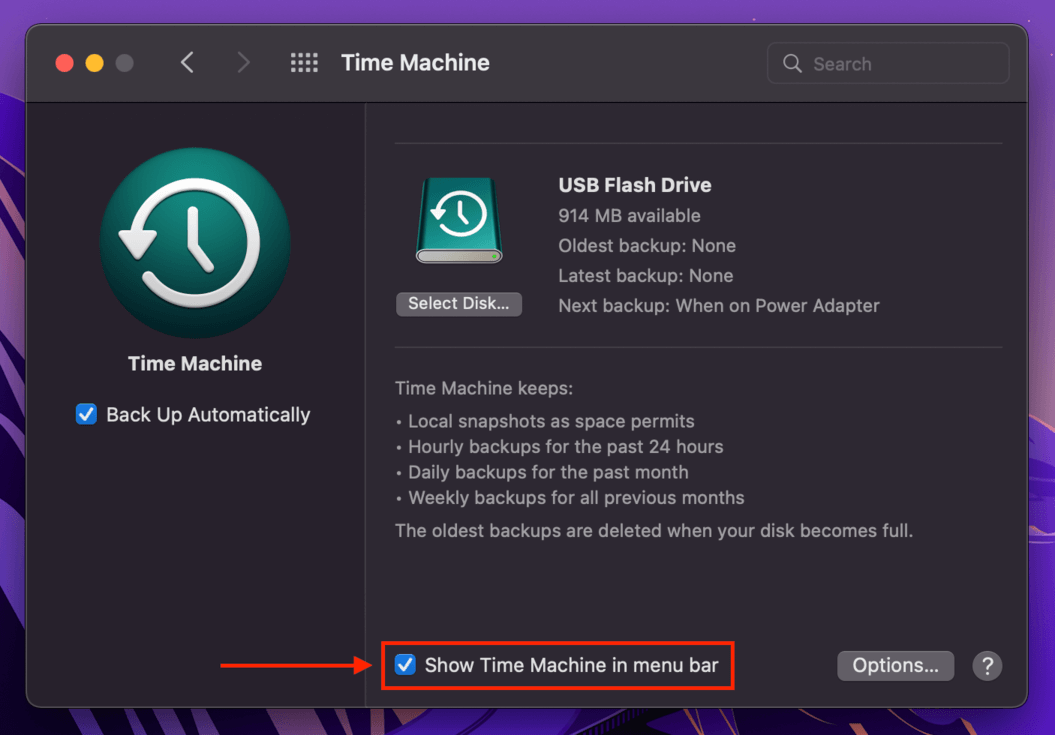
- First, we need to enable the Time Machine button on the menu bar. Open System Preferences > Time Machine.
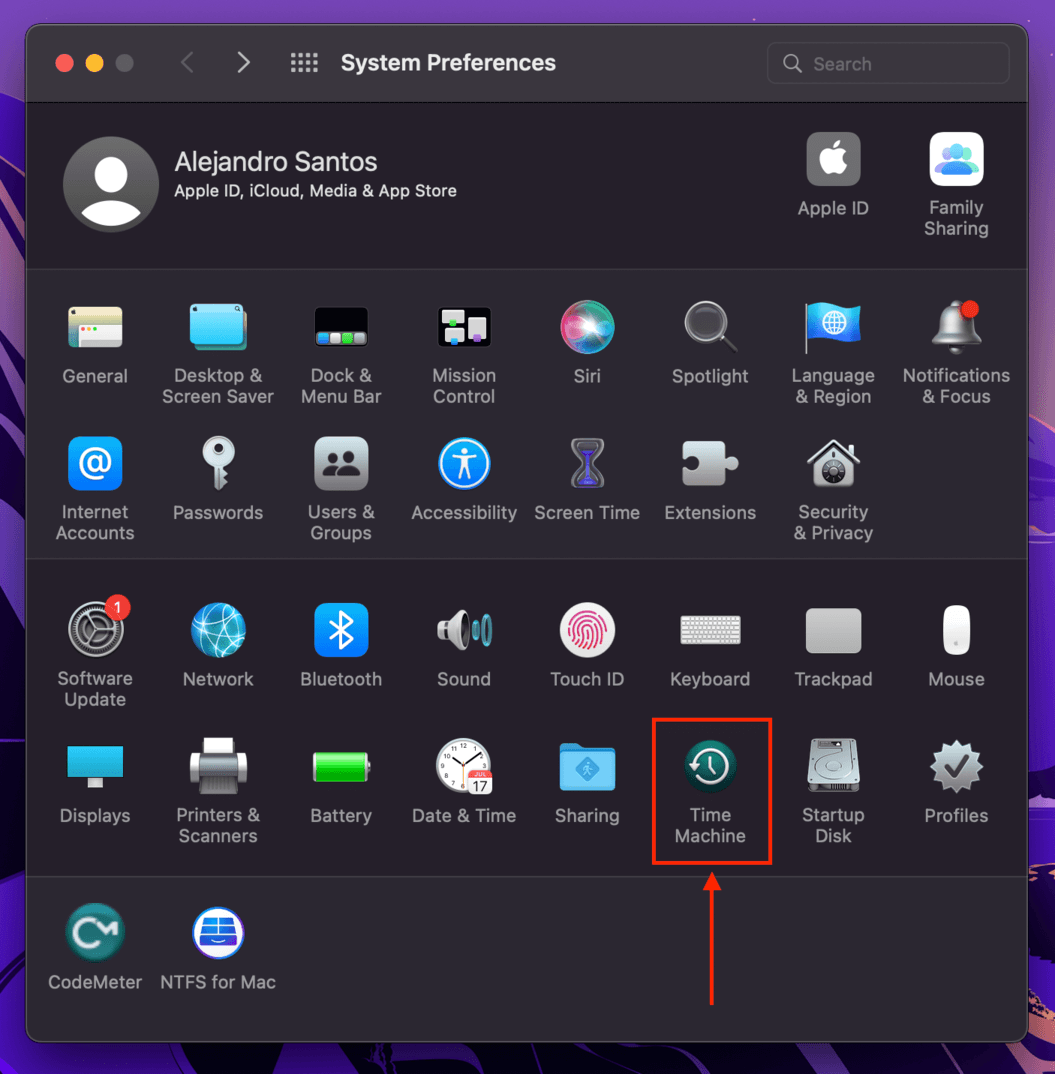
- Enable “Show Time Machine in menu bar” by ticking the checkbox beside it. Then, exit the System Preferences window.
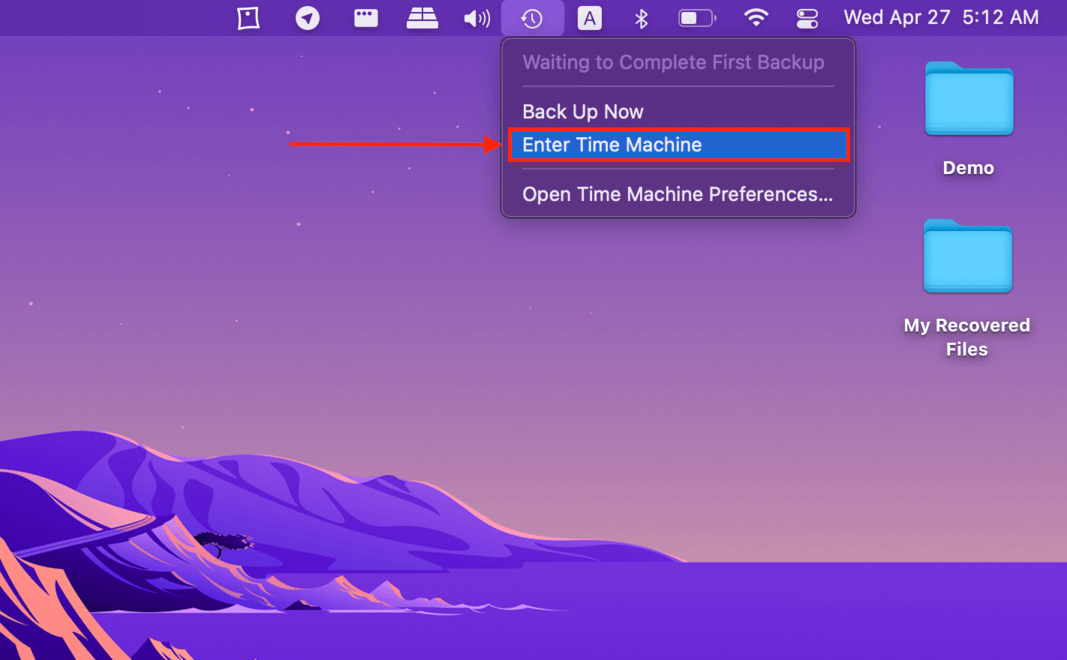
- Open the folder that contained your Quicktime files. Then on the Apple menu bar, click the Time Machine button > “Enter Time Machine”.
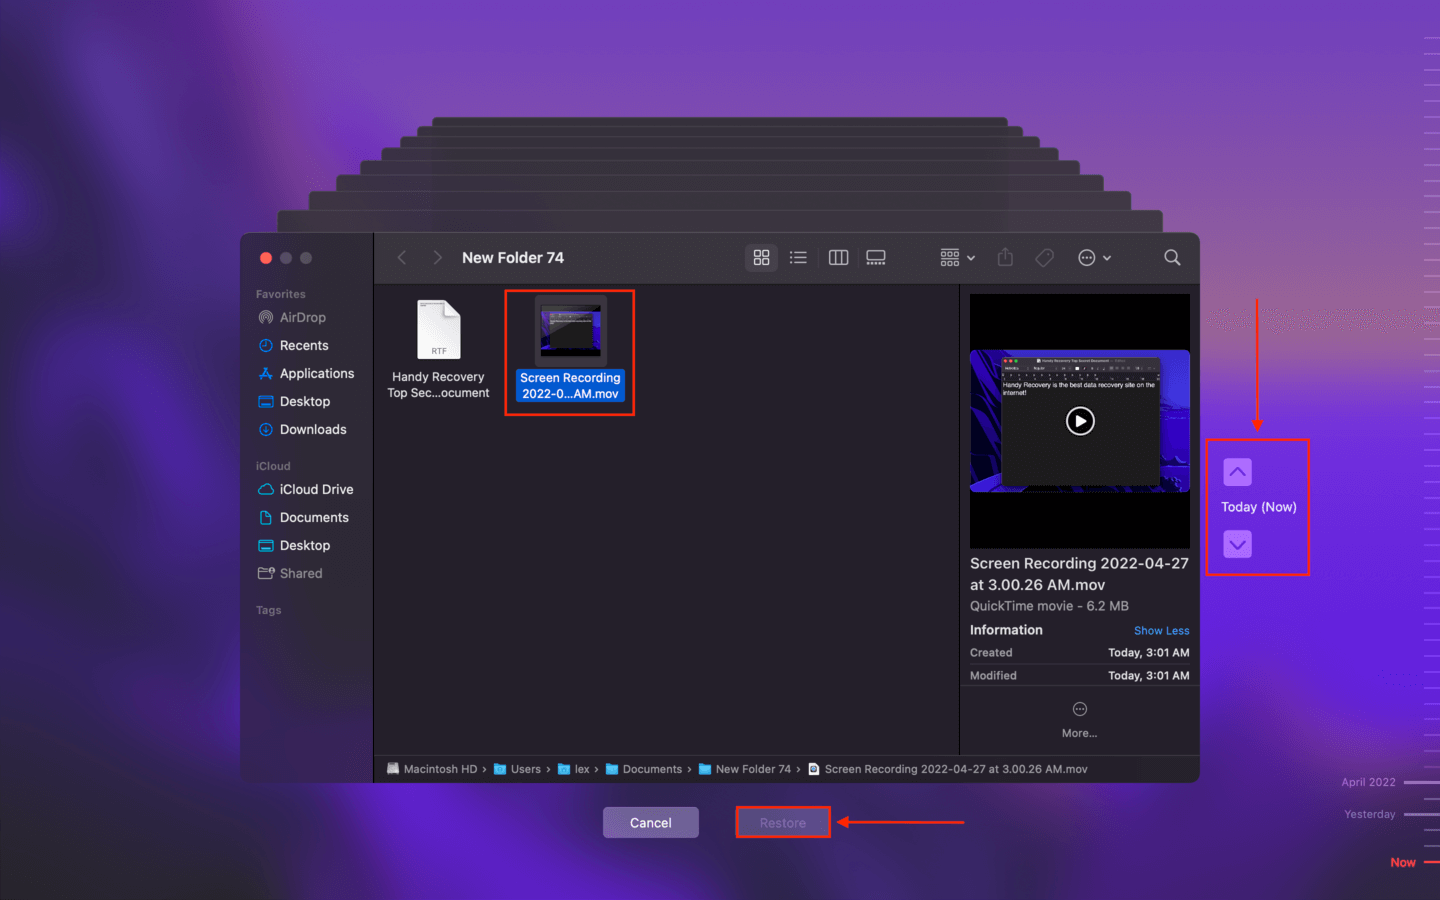
- Use the arrows on the right to navigate through versions of that folder in the timeline. When you find the version where your files are still intact, select them, then click “Restore”.
How to Find Missing Quicktime Recordings
If you recently did some spring cleaning on your Mac, you might have accidentally misplaced your QuickTime recordings. Heck, maybe you just forgot where you saved them in the first place (we’ve all been there). This section of the article guides you on how to recover a lost QuickTime recording on Mac.
Remember that .MOV applies to QuickTime video and audio files like screen recordings, and .M4A applies to QuickTime audio files.
Method 1: Use Spotlight Queries
Spotlight is a powerful search function for macOS devices. Not only can it locate files extremely fast, it can also apply multiple queries to fine tune your search on the spot. Try this:
Hit (CMD + Space) to open Spotlight search. Then, type the following: kind:MOV date:yesterday
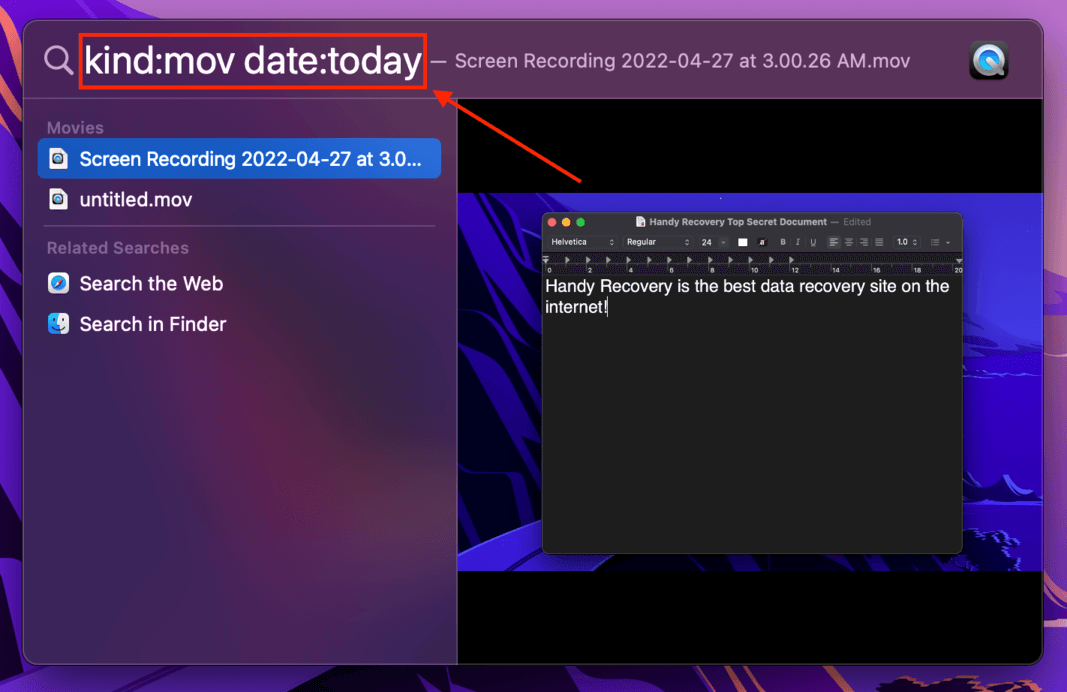
This will run a search for all the MOV files you interacted with the day before. Use M4A if you’re looking for an audio recording, and change the date parameter to whenever you last worked with the file.
You can preview the files Spotlight found by clicking on them once.
Method 2: Use the MDFIND Command in Terminal
Another efficient and reliable way to locate your QuickTime files is by using the mdfind command in the Terminal app. The MDFIND command requires you to know the file name, and once executed will display the path to the folder that contains it. Try this:
- Launch Terminal by opening Finder > Applications > Utilities, and double-clicking the Terminal app.
- Type the following command and hit return:
mdfind “filename.extension”
Replace “filename.extension” with yours and remove the quote.
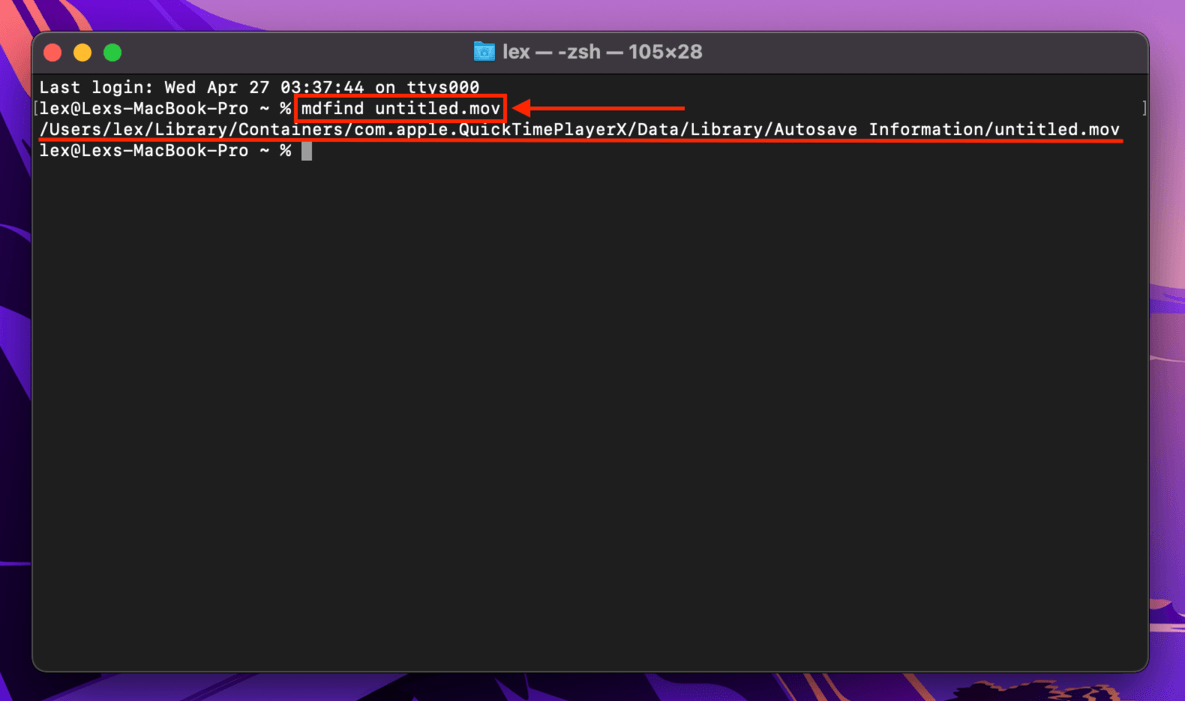
💡 Tip: Try using “untitled” as your if you weren’t able to name your file before the problem happened. The command should look like this:
mdfind untitled.mov
FAQ
How do I restore QuickTime files on Mac?
The best way to restore deleted QuickTime files is by using data recovery software like Disk Drill.
- Download and install Disk Drill.
- Use Disk Drill to scan your system drive.
- Use the search bar to filter results to show only .MOV or .M4A files.
- Select the files you want to recover and click the Recover button.
- Select a destination for your recovered files.
However, this is not the only way to restore deleted QuickTime files… For more methods (along with their step-by-step instructions), read the full article.
Where did my screen recording go on my Mac?
The default folder for screen recordings on Mac is the Desktop folder. If it’s not there, you can also use Finder > Go to navigate to this path: ~/Library/ScreenRecordings.
However, it’s easy to change save file locations and it’s also possible you moved the file inadvertently from its default folders. Try using the kind: and date: queries on Spotlight (for ex. kind:MOV date:today) or the mdfind command in Terminal to quickly find it.
Where are QuickTime audio recordings saved?
QuickTime audio recordings are usually saved on the desktop by default. However, it’s easy to change the save file location or you might have moved the file by accident. Use Spotlight search or the mdfind command in Terminal to locate it.
How do I restore a screen recording video?
To restore a screen recording video, first check your Trash folder. If it’s not there, try restoring a snapshot from a Time Machine backup. If you emptied your Tras folder and haven’t enabled Time Machine, use data recovery software like Disk Drill or PhotoRec. Here’s how:
- Download Disk Drill.
- Scan your system drive.
- Filter results to show only MOV and M4A file extensions.
- Select the files you want to recover, then click the Recover button.
- Choose the destination for your restored QuickTime files.
Why my QuickTime screen recording didn't save?
There are a few possible reasons why your QuickTime screen recording didn’t save (and what you can do to fix it):
- Interruption by a sudden shutdown – Check the QuickTime Autosave folder and macOS Temporary Folder. For detailed instructions on how to locate both, read the full article.
- Invalid save location – Try changing the save file destination for your screen recordings.
- Interruption by background apps – Force quit unnecessary apps. On the menu bar, click the Apple icon > Force Quit…
Conclusion
That was a lot of information to take in… But if you work with QuickTime recordings often, it’s worth knowing your way around securing your files. This is especially because we can’t always predict what will happen while we’re working. A sudden power outage could undo hours of work if you didn’t have these methods at your disposal. For even more security, we highly suggest enabling Time Machine snapshots ASAP if you haven’t already.
This article was written by Alejandro Santos, a Staff Writer at Handy Recovery Advisor. It was also verified for technical accuracy by Andrey Vasilyev, our editorial advisor.
Curious about our content creation process? Take a look at our Editor Guidelines.