If you lost your valuable OBS recordings for any reason, including accidental deletion, sudden crash, data corruption, or any similar data loss scenario, don’t worry—there’s a way to get around that.
In this article, we will explain how to recover OBS recording using data recovery software with easy-to-follow steps. We’ll also give you helpful solutions to troubleshoot some common OBS issues.
Before we get into more details on how exactly you can recover deleted OBS recordings, we want you to know that we’ll start by assuming you have already tried the primary methods of data recovery available on Windows 10 (or data recovery methods for Windows 11 if you’re a Win 11 user), such as checking your recycle bin and checking for possible backups. The next part of the article will talk about permanently deleted OBS recordings.
Where Does OBS Studio Save Recordings
By default, OBS Studio will save your recordings to your video folder in your main documents section. The fastest way to access this location is by clicking File – Show Recordings.

You can easily set a custom Recording Path (the location where your recordings are saved).
Here are the steps you will need to take:
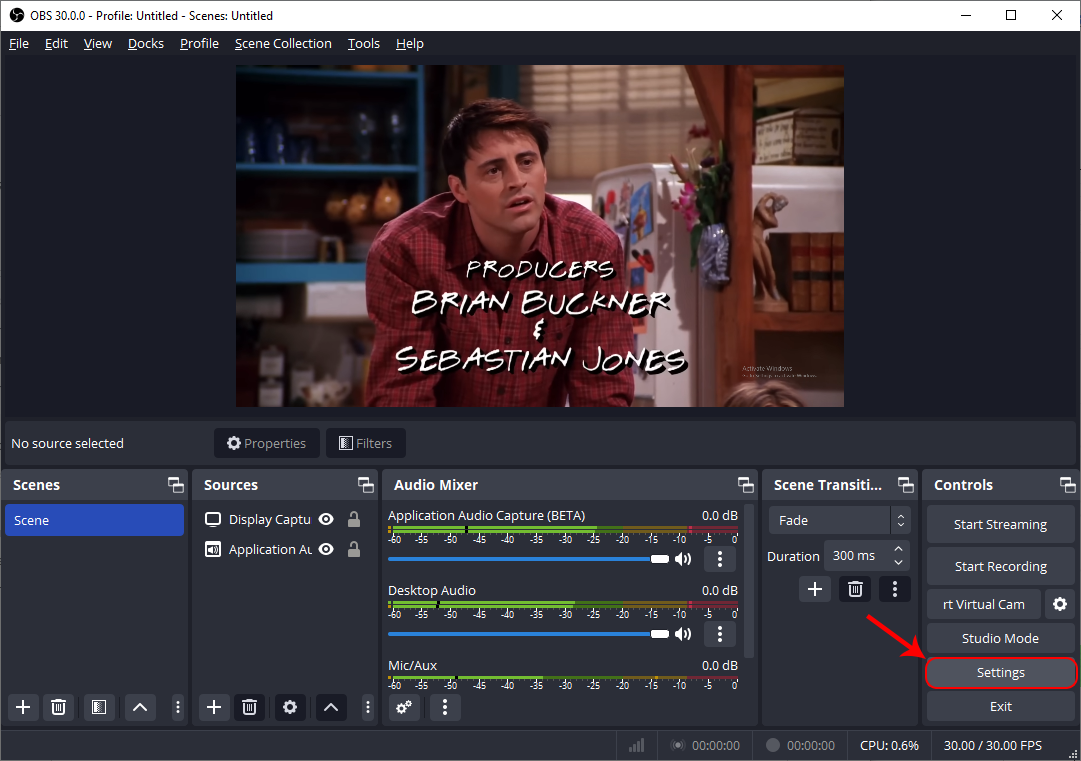
- Click on the Settings button at the bottom right.
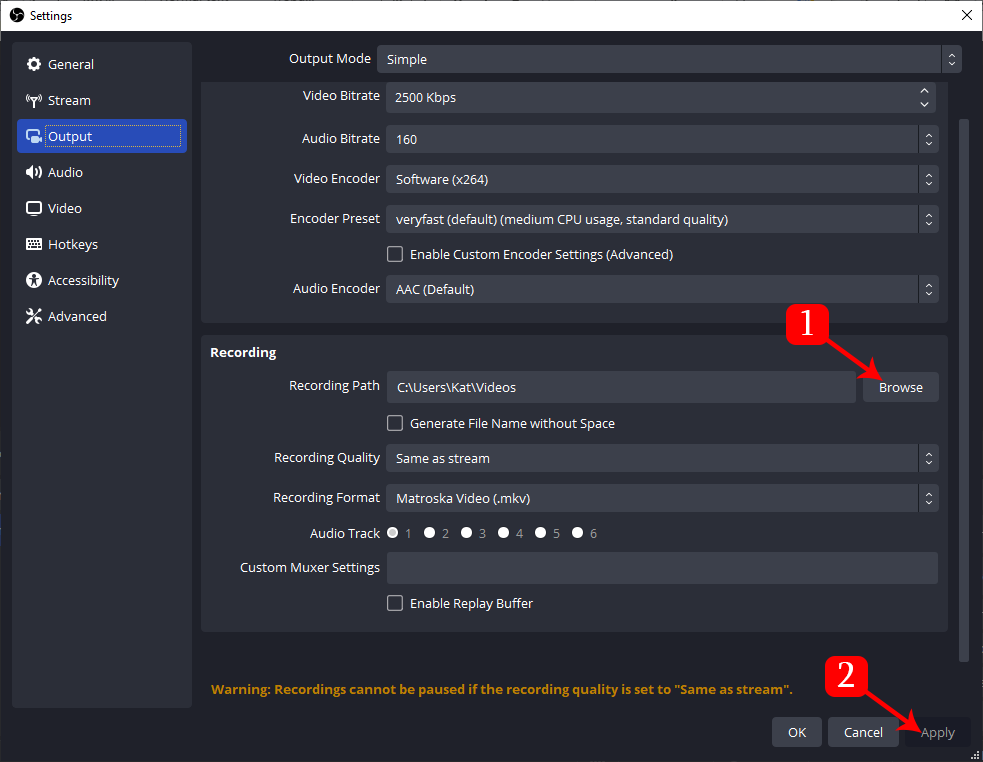
- Go to the “Output” tab, then the “Recording” section.
- From there, type or paste the folder location in the “Recording Path” box, or click “Browse” to choose a folder/storage location on your computer’s hard drive.
Now, when you stop the recording, the files will be stored in that folder. As we have previously mentioned, You’ll have to go to File> Show Recordings to open the location.
Recover Permanently Deleted OBS Recordings
OBS does not keep ‘backup’ recordings or buffers; it only saves the file that’s being recorded. In case your saved OBS recordings have been accidentally deleted or the storage device formatted, there is only one reliable method to recover the deleted OBS recordings – using a data recovery software solution.
Recover Permanently Deleted OBS Recordings Using Data Recovery Software
There are numerous tools that can recover deleted video files. This software ranges from overly simple to complex. One such app is Disk Drill Data Recovery, a tool that we have used for quite a while and has an incredibly high success rate with video recovery.
Let’s take a look at how you can recover deleted OBS files in Windows:
- Download Disk Drill and install it. Choose a different partition or disk for installing Disk Drill than the one that faced data loss to avoid overwriting.
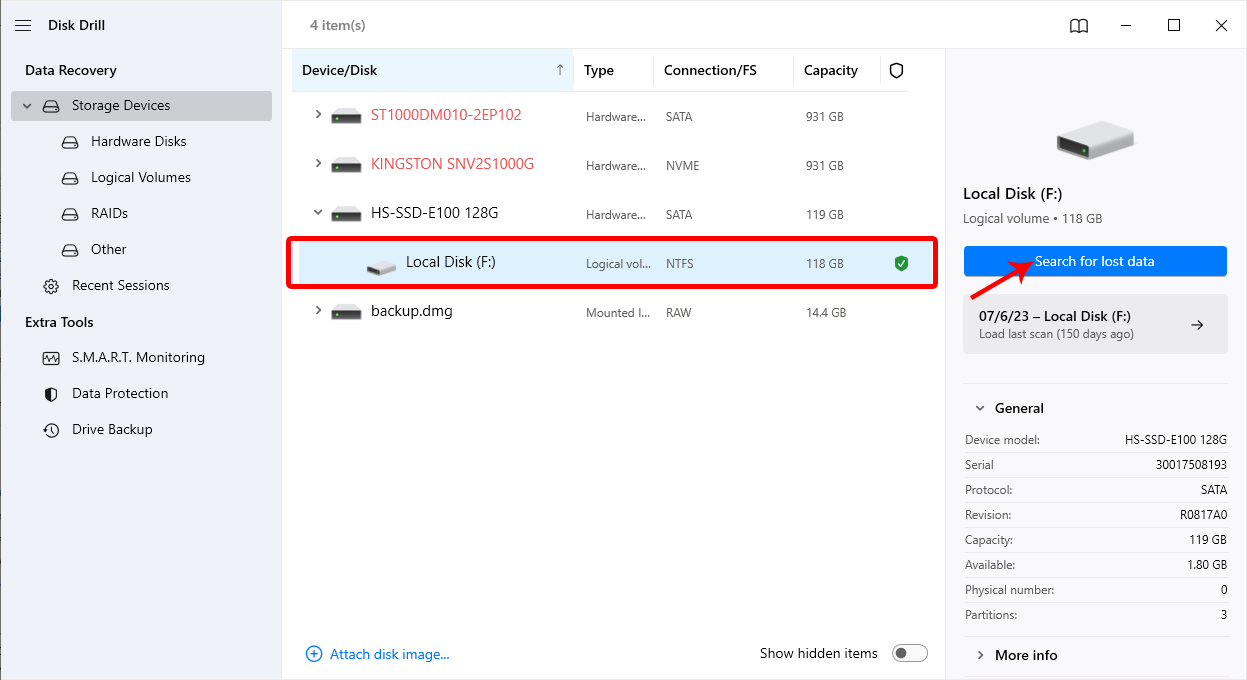
- Launch Disk Drill and click on the “Search for lost data” button. It can be found next to the hard drive from which you want to recover permanently deleted OBS recordings.
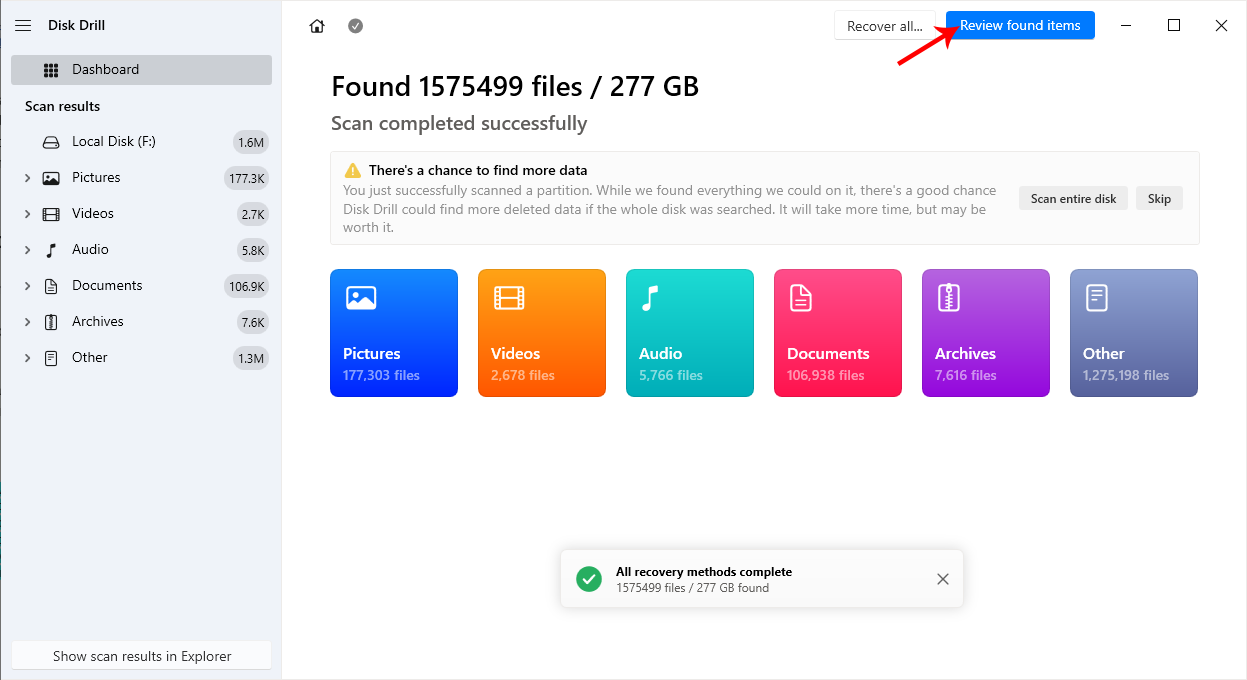
- You can check for files that Disk Drill found by clicking Review found items during the scan. Alternatively, you can wait for the process to finish first before clicking the same button.
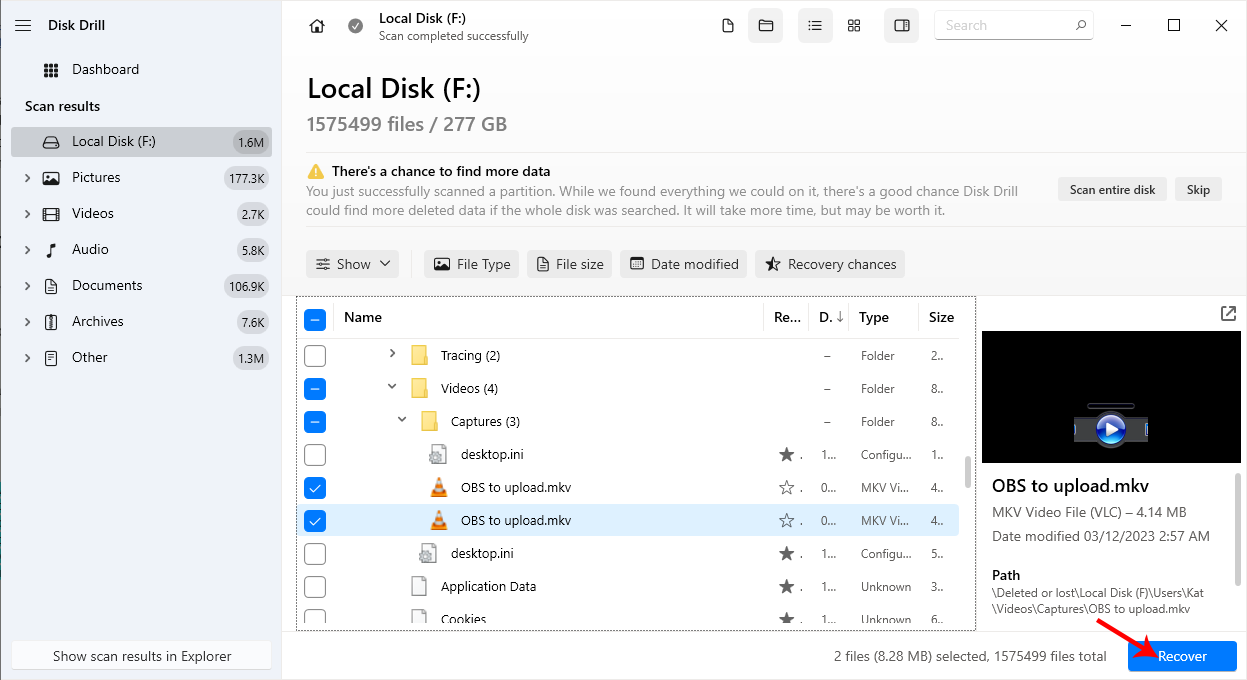
- Select the video files you would like to recover from the list of results. You will have the option to filter the scan using several filters.
Press the “Recover” button to get started with the recovery process.
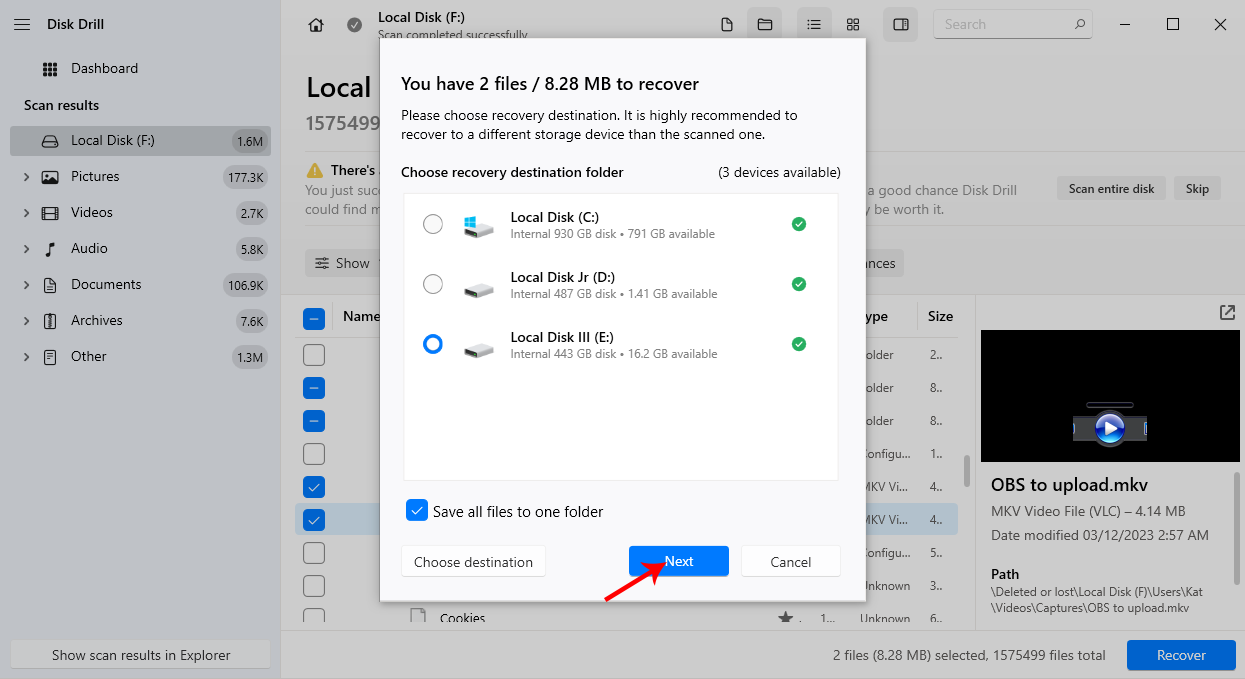
- After that, choose the folder where you want to store your recovered files. Now, click Next to start recovering them.
- If you want to check your recovered files in File Explorer after the data recovery process is complete, just click the Show recovered data in Explorer button on the recovery page.
Important: Do not attempt to recover video files to the same drive you are recovering from to avoid overwriting.
You can also study our Disk Drill’s review yourself and determine whether you want to use it to recover your permanently deleted files.
Resolving Some Common OBS Issues
➡️ Why does OBS record in MKV?
MKV is the default option of recording format as it is more resistant to crashes. MP4 files need to be closed out to work correctly. If something goes wrong and the MP4 file is not properly closed out, you lose every frame of that file, and there’s an excellent chance it will become completely unrecoverable. While the MP4 file may be corrupted and unrecoverable in case of a crash, the MKV does not need to be closed out to be usable.
➡️ How to make OBS record in mp4
There are several recording options you can choose from with OBS, two of the most common are the .mkv file type or the .mp4 file type.
Changing the file extension to MP4 can be easily accomplished by following the steps below:
- Go to the Settings and select the Output tab.
- Find Recording Path under the Recording tab.
- Select Fragmented MP4 (.mp4) from the Recording Format dropdown list you can find there.

➡️ OBS won’t stop recording/OBS stuck on stopping recording
When facing the OBS stuck on stopping recording issue, you will notice that the OBS software won’t be able to stop the recording process and will get stuck on the Encoding overloaded error.
If the encoding gets overloaded, it means your computer hardware cannot handle the video production maybe because your CPU and GPU are overloaded and can’t encode as fast as you need. Trying to record a video with high standards like 4K resolution and over-60 fps could also be the cause for this error.
In case the encoding is overloaded, your computer will stop the video creation. Even though the OBS recording is still running, the GPU and CPU will completely stop the outputting.
As a result, if you press the Stop Recording button, OBS will prompt you to the sign of an Encoding overloaded error. It will not be able to stop the recording as technically; it is not yet complete; the video is only halfway done.
If this is the case, you will not be able to retrieve that video. The only option you have is to shut down the OBS process. If you attempt to restart a screen recording directly with any optimization, the OBS Encoding Overloaded error will pop up again.
How to Troubleshoot the OBS “Encoding Overloaded” issue:
- 🎥 Turn down video settings.
- 🧪 Apply to Hardware Encoder.
- 📈 Change CPU Usage Preset.
- 💽 Free up more HDD space.
- 💡 Try using an OBS alternative.
➡️ My OBS recording is corrupted
An OBS recording can get corrupted if a problem occurs during saving. In case your computer loses power or crashes while you save your video, there’s a good chance that the recording will be corrupted. OBS recording can also be corrupted by viruses and other malware.
There are some repairs you can run to try to fix your recording. However, the chances of successfully repairing corrupted recordings are not guaranteed. For MP4 recordings, you can attempt recovery using MP4 Repair/Untrunc for Windows. This app is designed to recover corrupted, broken, deleted, or unfinished files with H.264 coding format saved in .mp4, .mov, .m4v, and .3gp.
You will not be able to open or repair the corrupted OBS file using data recovery software. Instead, you will have to use specialized video repair software.
➡️ I can’t play my OBS recordings
Have you tried to record videos with OBS and save them as MP4 just to realize when you finished the whole recording process that your file won’t play? If this is the case, OBS had probably crashed before the MP4 had finished saving, thus corrupting the file.
Changing the container format to FLV should not change the file size; however, the remux process will just take the raw encoded video and audio data and put it into a different container format. By choosing FLV, in case of a crash, the recording will just stop, and you will be able to play the recording up to the point where the crash happened.
Another reason why you might not be able to play your OBS recording is that your media player does not support those file formats or you don’t have the right pack of codecs.
Codecs are computer programs that can encode or decode audio and video files. While most video players have their own self contained codec packs others might require an additional codec set. If you are wondering which codec pack to use, K-Lite Basic or Combined Community Codec Pack (CCCP) are two of the most popular.
Prevent OBS Recording Loss and Enhance Recovery Odds
To avoid losing hours of recording in the future, you can apply settings and establish preventive measures and habits when using OBS. Here are some of our recommendations:
- 📄 Choose stable file formats – Some video formats are less likely to get corrupted, even if your stream abruptly stops due to unanticipated errors. For example, the MKV video format is less likely to suffer damage from crashes. It would be easier to recover stable file formats if you lose them.
- 💽 Backup regularly – We recommend you have a more consistent backup process to save copies of your recordings to another drive or cloud storage. Having an extra copy of your videos will save you the headache if you lose the videos saved on your recording path.
- 💾 Use reliable storage – Make sure to understand which storage type would work better for your needs. HDDs are slower and are more prone to data loss due to their physical spinning parts. Meanwhile, SSD data recovery may be more complicated, especially if the TRIM process has already permanently deleted data from the flash cells of your SSD. Still, SSDs are more commonly used because of their lightweight body and more robust storage capacities.
- 🗜️ Maintain sufficient disk space – Always making sure that you have enough space before recording/streaming would put your recordings at less risk of getting corrupted. It can also prevent OBS from encountering issues because of insufficient storage.
- ⚙️ Optimize recording settings – Unoptimized recording settings can lead to unnecessarily large file sizes, consuming significant disk space. Find the best settings to match your needs while maintaining video quality. You can find suggestions online for OBS settings depending on your preferences.
- 🔄️ Update OBS to the latest version – Keep OBS updated to receive error fixes and performance enhancements applied to the newest version of the app. FAQ
FAQ
I did not save my OBS recording, any chance to recover it?
The answer to this question depends on the file output type you have been using. Recordings done in an mp4 file format are unable to be recovered if something happens due to the particular container structure.
.flv and .mkv do not have this problem, as these are designed as streaming media containers. If you want to be on the safe side, you should probably set the output format to .flv and convert it to .mp4 once the recording has finished. The .flv file will work even if the OBS software has crashed, as their container structure enables the video to end at any point.
My OBS recording disappeared. How can I find it?
You can find OBS Studio recordings by selecting File> Show Recordings; however, the output path can be changed under Settings > Output.
OBS won’t move or delete any of your existing recordings unless you change some of its default settings.
If the video recording is not available in the specified folder, you can try recovering it. If you have a backup of your OBS recording, you should be able to restore it quickly. The process is quite straightforward; you can follow these steps:
- Open File Explorer.
- Right-click on the folder where your OBS recording was located.
- Select Properties, then click on the Previous Versions tab.
- Pick a previous version of the folder and just click the Restore button.
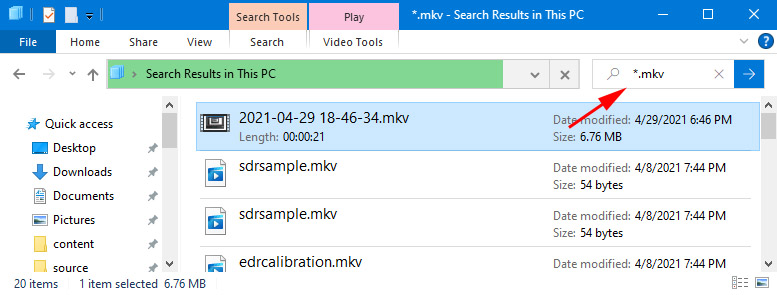
In addition to this method, you can use the global search by file format to look for the missing OBS recording.
OBS crashed while recording, are there any chances to recover the recording?
Crashed OBS recordings can be recovered using some specialized video repair programs. For example, you can try Stellar video repair software and Youdot video repair.
Conclusion
As you can see, even permanently deleted OBS recordings can be recovered. We have explained a couple of ways that you can employ to restore deleted OBS recordings on Windows 10 or 11, including Disk Drill, an easy-to-use file recovery software.
This article was written by Roxana Raducanu, a Author at Handy Recovery Advisor. It was recently updated by Princess Lescan. It was also verified for technical accuracy by Andrey Vasilyev, our editorial advisor.
Curious about our content creation process? Take a look at our Editor Guidelines.